Boost your store’s revenue with AI Dynamic Pricing and BOGO Discount plugin for WooCommerce, a smart solution designed to automate pricing strategies and maximize conversions. Leverage AI-driven insights to offer personalized discounts, dynamic price adjustments, and powerful BOGO deals.
Installation
↑ Back to topTo start using a product from WooCommerce.com, you can use the “Add to store” functionality on the order confirmation page or the My subscriptions section in your account.
- Navigate to My subscriptions.
- Find the Add to store button next to the product you’re planning to install.
- Follow the instructions on the screen, and the product will be automatically added to your store.
Alternative options and more information at: Managing WooCommerce.com subscriptions.
Configuration
↑ Back to topTo set up AI-based dynamic pricing and BOGO discounts on your store, go to WooCommerce > Settings > Quantity Breaks and BOGO Offers > Manage Rules and configure the following.
Manage Rules
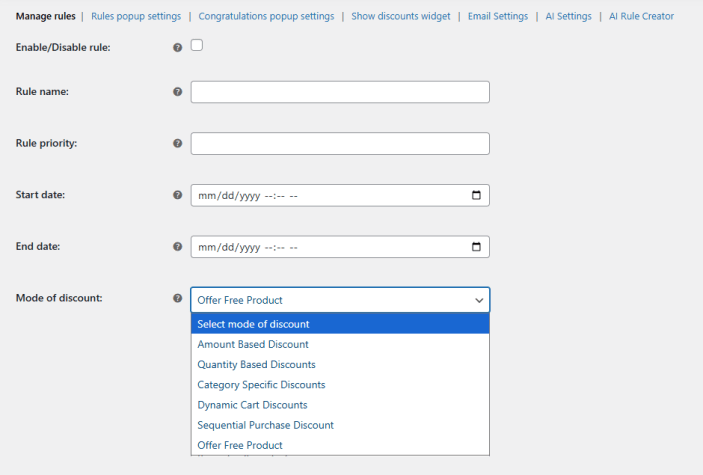
↑ Back to topIn this section, you can add new rules or manage the existing rules. To create a new rule, click on the “Add New Rule” button and configure the following settings:
- Enable/Disable Rule: Click the checkbox to enable or disable the rule.
- Rule Name: Set the name for the rule.
- Rule Priority: Set the priority for the rule.
- Start Date: Select the start date for the rule.
- End Date: Select the end date for the rule.
- Mode of Discount: Select your preferred discount mode for the rule. You can select from the following options:
- Amount Based Discount
- Quantity-Based Discount
- Category Specific Discount
- Dynamic Cart Discount
- Sequential Purchase Discount
- Offer Free Product

Creating Discount Rules based on Different Modes
↑ Back to topAmount Based Discount
If the mode of discount is selected as “Amount Based Discount” you will see the following settings. Here you configure the discount rules based on order amount.
- Product/Category: Select if you want to apply the discount rule on product or category.
- Select Products/Categories: Select the specific product or category on which you want to apply the discount rule. You can choose to include or exclude the selected product/category from the rule.
- Add Sub Rules: Add multiple sub rules to control the discount offer. You can create the discount rule by configuring the following:
- User Role: Select the user role for which you want to apply the rule.
- Min Spend Amount($): Enter the minimum spend amount to avail the discount.
- Max Spend Amount($): Enter the maximum amount to avail the discount.
- Discount Type: Choose the discount type as fixed or percentage.
- Discount Amount($): Add the discount amount that the customer will receive.
- Popup Message: Add the popup message for discount offer.
Click on “Add” button to add multiple sub rules.
Important Note: Use {discount} for Discount price {min} and {max} for minimum and max ranges of any rule and {products} or {categories} for Products or Categories or {freeQuantites} for free product quantities or {freeProduct} for free product name or {availMonth} for coupon avail month or {spendMonth} for spending month


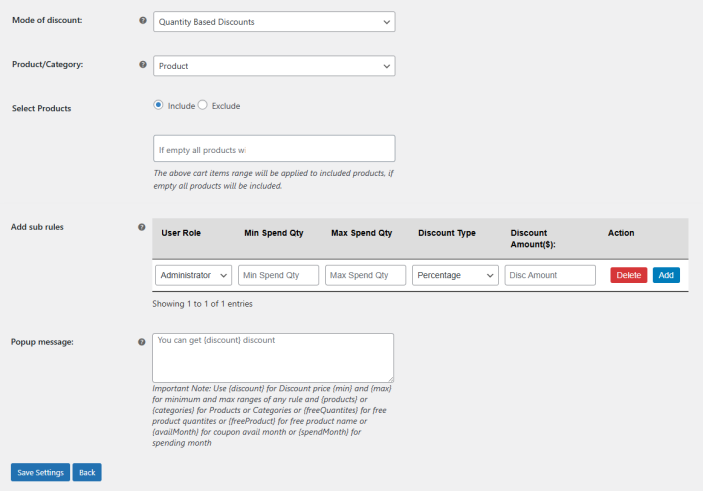
Quantity Based Discount
If the mode of discount is selected as “Quantity Based Discount” you will see the following settings. Here you configure the discount rules based on order quantity.
- Product/Category: Select if you want to apply the discount rule on product or category.
- Select Products/Categories: Select the specific product or category on which you want to apply the discount rule. You can choose to include or exclude the selected product/category from the rule.
- Add Sub Rules: Add multiple sub rules to control the discount offer. You can create the discount rule by configuring the following:
- User Role: Select the user role for which you want to apply the rule.
- Min Spend Quantity: Enter the minimum spend quantity to avail the discount.
- Max Spend Quantity: Enter the maximum qunatity to avail the discount.
- Discount Type: Choose the discount type as fixed or percentage.
- Discount Amount($): Add the discount amount that the customer will receive.
- Popup Message: Add the popup message for discount offer.

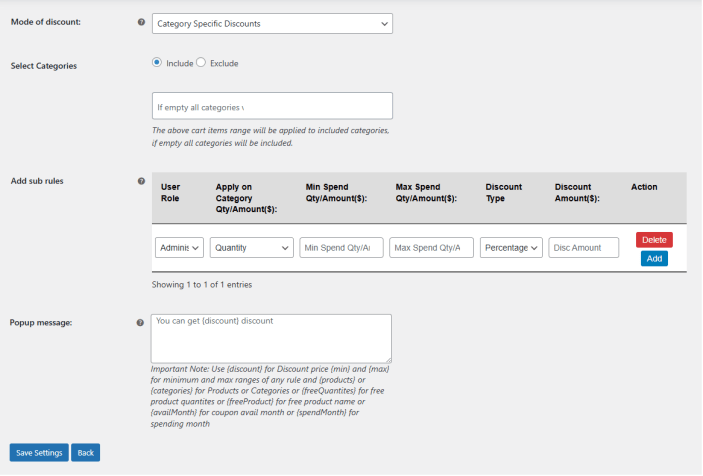
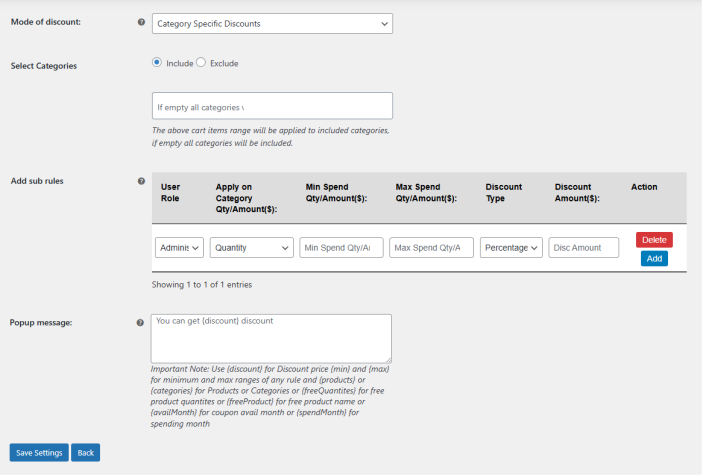
Category Specific Discount
If the mode of discount is selected as “Category Specific Discount” you will see the following settings. Here you configure the discount rules based on category.
- Select Categories: Select the specific category on which you want to apply the discount rule. You can choose to include or exclude the selected category from the rule.
- Add Sub Rules: Add multiple sub rules to control the discount offer. You can create the discount rule by configuring the following:
- User Role: Select the user role for which you want to apply the rule.
- Apply on Category Qty/Amount($): Select if you want to apply the discount rule based on category quantity or amount.
- Min Spend Qty/Amount($):: Enter the minimum spend on quantity or amount to avail the discount.
- Max Spend Qty/Amount($): Enter the maximum spend on quantity or amount required to avail the discount.
- Discount Type: Choose the discount type as fixed or percentage.
- Discount Amount($): Add the discount amount that the customer will receive.
- Popup Message: Add the popup message for discount offer.
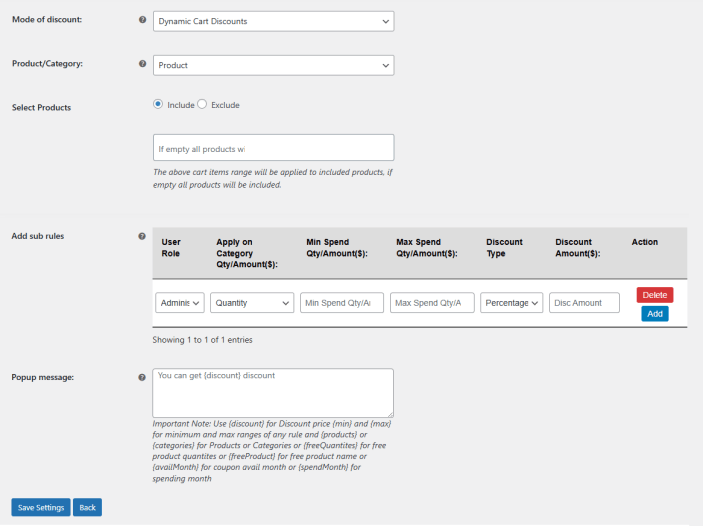
Dynamic Cart Discount
If the mode of discount is selected as “Dynamic Cart Discount” you will see the following settings. Here you configure the discount rules based on dynamic cart value.
- Product/Category: Select if you want to apply the discount rule on product or category.
- Select Products/Categories: Select the specific product or category on which you want to apply the discount rule. You can choose to include or exclude the selected product/category from the rule.
- Add Sub Rules: Add multiple sub rules to control the discount offer. You can create the discount rule by configuring the following:
- User Role: Choose the user role to which this rule will apply.
- Apply on Category Qty/Amount($): Select whether the discount is based on category quantity or total amount.
- Min Spend Qty/Amount($): Set the minimum quantity or amount required to qualify for the discount.
- Max Spend Qty/Amount($): Define the maximum quantity or amount allowed to apply the discount.
- Discount Type: Select the discount type, either fixed or percentage.
- Discount Amount($): Enter the discount value the customer will receive.
- Popup Message: Add the popup message for discount offer.

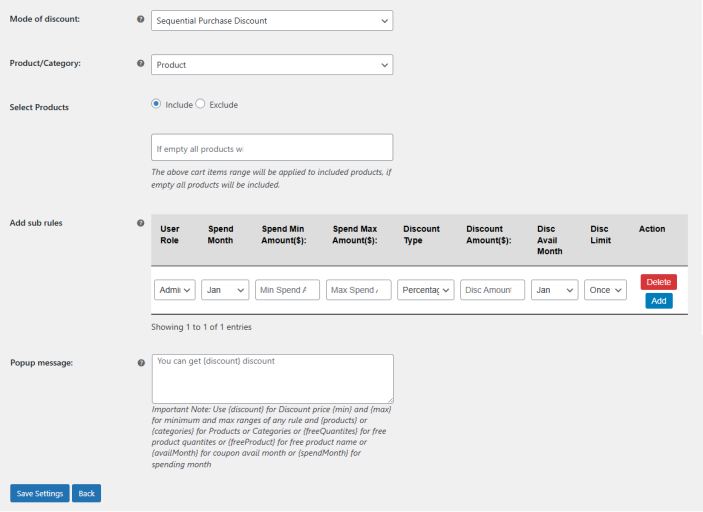
Sequential Purchase Discount
If the mode of discount is selected as “Sequential Purchase Discount” you will see the following settings. Here you configure the discount rules based on sequential purchase data.
- Product/Category: Select if you want to apply the discount rule on product or category.
- Select Products/Categories: Select the specific product or category on which you want to apply the discount rule. You can choose to include or exclude the selected product/category from the rule.
- Add Sub Rules: Add multiple sub rules to control the discount offer. You can create the discount rule by configuring the following:
- User Role: Choose the user role for which you want to apply the discount rule.
- Spend Month: Select the spend month from the dropdown for which customer the rule will offer discount.
- Spend Min Amount($): Enter the minimum amount spend required to get the discount offer.
- Spend Max Amount($): Add the maximum amount required to spend in order to get the discount offer.
- Discount Type: Choose the discount type as fixed or percentage.
- Discount Amount($): Enter the discount amount.
- Discount Avail Month: Choose the month to avail discount by the customer.
- Disc Limit: Set a limit for the discount usage. You can set the limit to once or eash order.
- Popup Message: Add the popup message for discount offer.

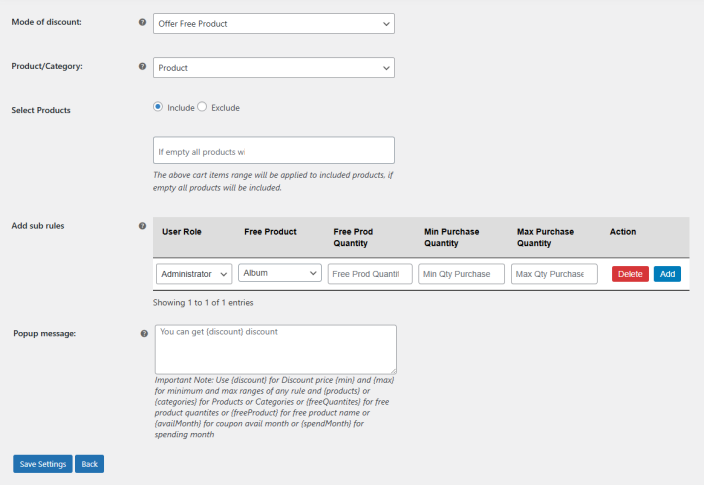
Offer Free Product as Discount
If the mode of discount is selected as “Offer Free Product” you will see the following settings. Here you configure the discount rules as:
- Product/Category: Select if you want to apply the discount rule on product or category.
- Select Products/Categories: Select the specific product or category on which you want to apply the discount rule. You can choose to include or exclude the selected product/category from the rule.
- Add Sub Rules: Add multiple sub rules to control the discount offer. You can create the discount rule by configuring the following:
- User Role: Choose the user role to which this rule will apply.
- Free Product: Select the product that you want to offer as a free gift.
- Free Product Quantity: Enter the quantity that the customer will receive as free product gift.
- Minimum Purchase Quantity: Add the minimum purchase quantity required to get the discount offer.
- Maximum Purchase Quantity: Enter the maximum purchase quantity to get the discount offer.
- Popup Message: Add the popup message for discount offer.

Click on the “Save Settings” button to save the rule.
Rule Pop-Up Settings
↑ Back to topIn this tab, you can configure the rule pop-up’s settings. Go to WooCommerce > Settings > Quantity Breaks and BOGO Offers > Rule Pop-Up Settings and configure the following.
- Enable/Disable Popup: Enable or disable the rule popup.


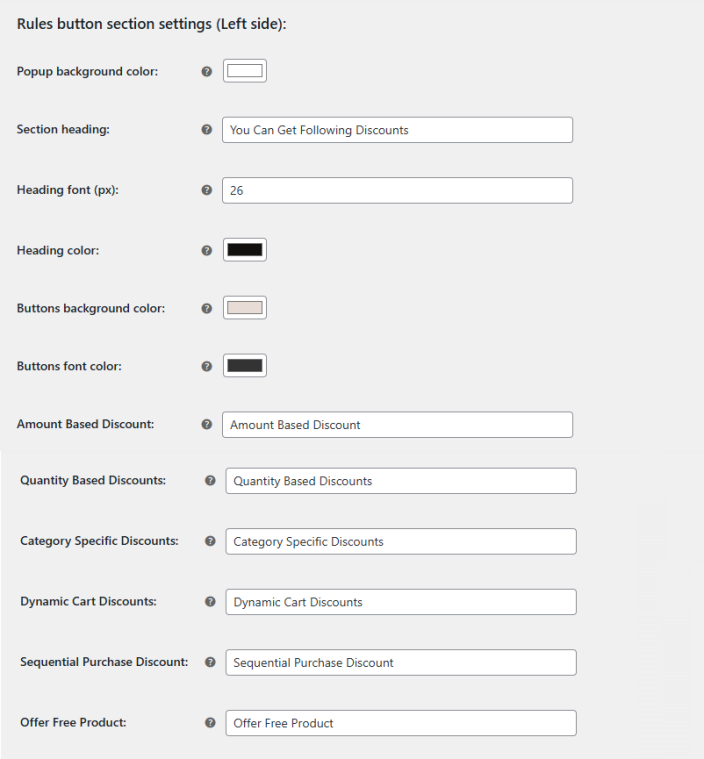
Rules button section settings (Left side): Here, you will configure the settings for the left side of the rule button section.
- Popup Background Color: Choose the background color for the pop-up button section.
- Section Heading: Add a heading for the pop-up section.
- Heading Font (Px): Enter the font size in pixels for the heading.
- Heading Color: Choose the color for the pop-up heading.
- Buttons Background Color: Select the background color for the buttons.
- Buttons Font Color: Select the font color for the buttons.
- Amount Based Discount: Enter the heading for the amount-based discount.
- Quantity Based Discounts: Enter the heading for the quantity-based discount.
- Category Specific Discounts: Enter the heading for the category specific discount.
- Dynamic Cart Discounts: Enter the heading for the dynamic cart discount.
- Sequential Purchase Discount: Enter the heading for the sequential purchase discount.
- Offer Free Product: Enter the heading for the free product discount.

Rules display section settings (Right side): Here, you will configure the settings for the Right side of the rule button section.
- Popup Background Color: Choose the background color for the right side of the pop-up.
- Heading Text: Enter the heading text for the right side of the pop-up.
- Heading Color: Choose the color of the heading.
- No Discount Default Message: Enter the default message for no discount.
- Rules Heading Color: Choose the color for the heading of the rule.
- Rules Font Color: Select the color for the font of the pop-up rules.
- Rules Border Color: Select the color for the border of rules.
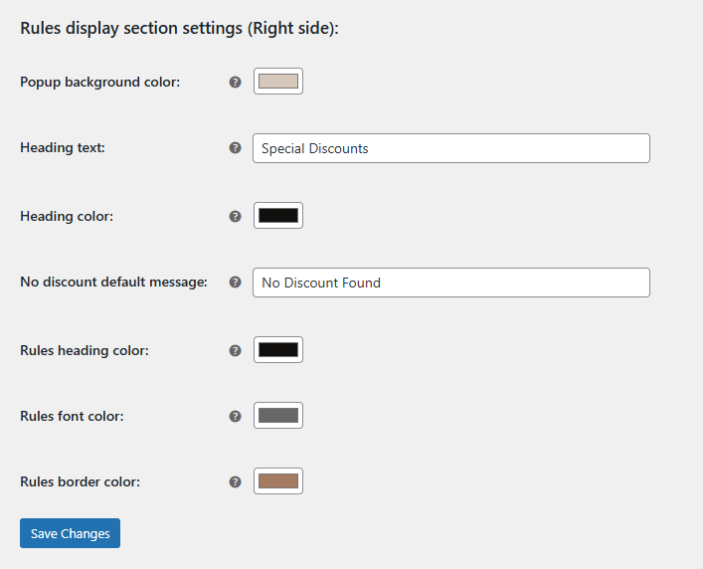

Click on “Save Changes” to save and implement the settings.
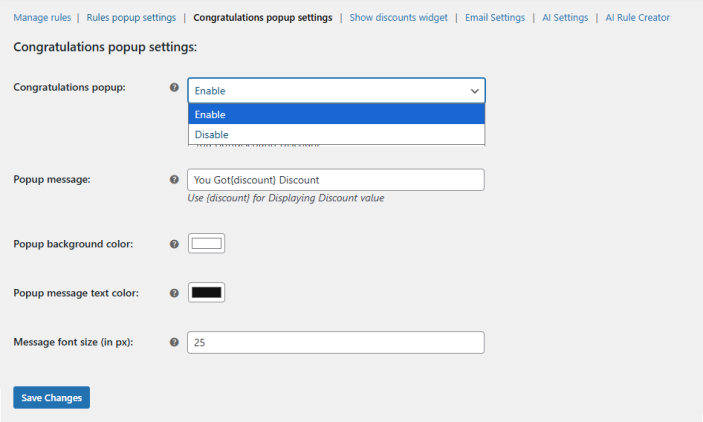
Congratulations Popup Settings
↑ Back to topIn this section, you can configure the settings for the congratulations pop-up. Go to WooCommerce > Settings > Quantity Breaks and BOGO Offers > Congratulations Popup Settings and configure the following.
- Congratulations Popup: Enable or disable the congratulations pop-up.
- Popup Message: Configure the message for the pop-up. Use {discount} for displaying the discount value. For Example: You Got {discount} Discount.
- Popup Background Color: Choose the background color for the congratulations pop-up.
- Popup Message Text Color: Select the text color for the message on the pop-up.
- Message Font Size (in px): Set the font size in pixels.
Click on “Save Changes” to save the settings.

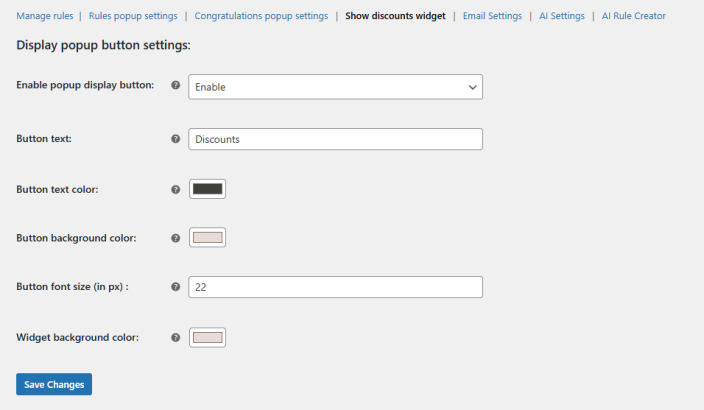
Show Discounts Widget
↑ Back to topIn this tab, you can configure the discount widget button. Go to WooCommerce > Settings > Quantity Breaks and BOGO Offers > Show Discounts Widget and configure the following.
- Enable Pop-up Display Button: Enable or disable the pop-up widget.
- Button Text: Enter the text for the pop-up widget.
- Button Text Color: Choose the color for the widget button text.
- Button Background Color: Select the background color for the widget button.
- Button Font Size (in px): Set the font size in pixels for the pop-up widget button.
- Widget Background Color: Choose the background color for the widget.

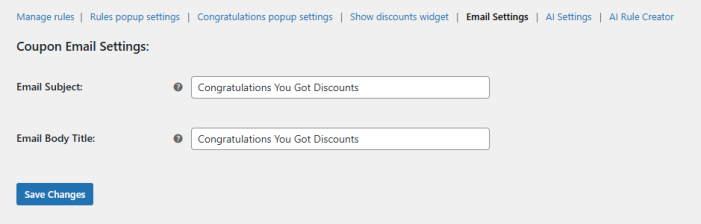
Email Settings
↑ Back to topIn this section, you can configure the settings for the coupon email sent to customers. Go to WooCommerce > Settings > Quantity Breaks and BOGO Offers > Email Settings and configure the following.
- Email Subject: Enter the subject line for the email.
- Email Body Title: Add the body title for the email.

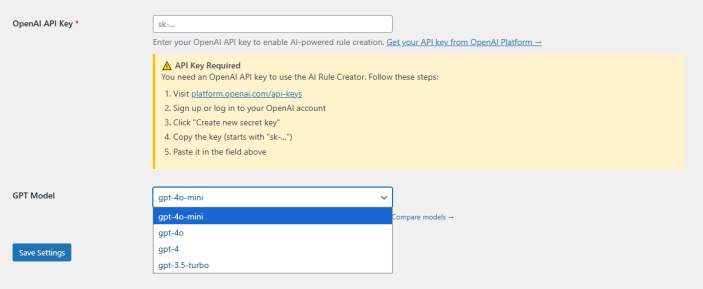
AI Settings
↑ Back to topThe AI Dynamic Pricing and Discount Plugin allows you to create rules using AI. You can create multiple rules based on your goals. AI will analyze the previous data of your store to create or suggest rules to achieve specific goals, such as revenue generation or stock clearance. Go to WooCommerce > Settings > Quantity Breaks and BOGO Offers > AI Settings and configure the following.
- OpenAI API Key: Enter your OpenAI API key to enable AI-powered rule creation. To get your OpenAI API key, follow the steps below:
- Visit platform.openai.com/api-keys
- Sign up or log in to your OpenAI account
- Click “Create new secret key.”
- Copy the key (starts with “sk-…”)
- Paste it in the field above
- GPT Model: Choose the OpenAI model to use for generating discount rules. If you need help in deciding which model to use, you can click on “compare models” to see a comparative analysis in the form of a table. You can choose between the following GPT models:
- GPT-4o-mini
- GPT-4o
- GPT-4
- GPT-3.5-turbo
Click on the “Save Settings” button to save and implement the configured settings.

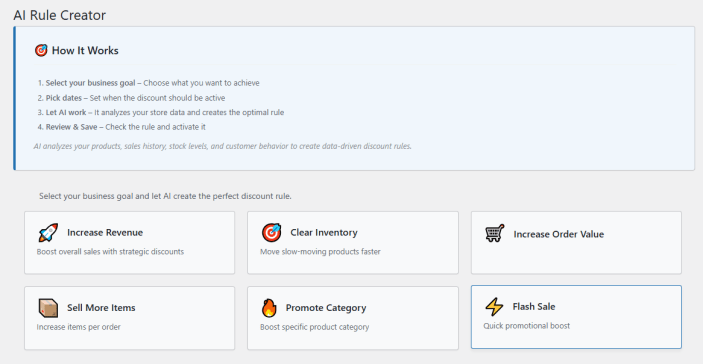
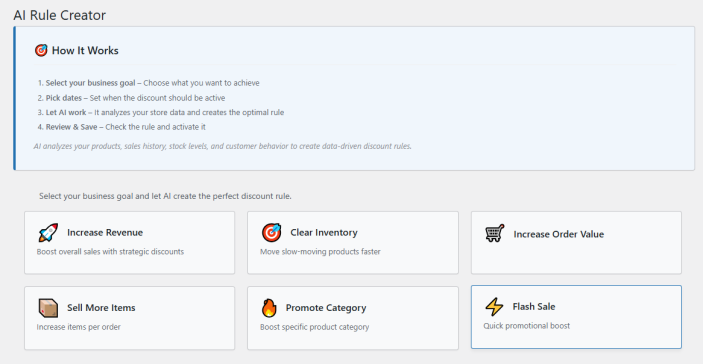
AI Rule Creator
↑ Back to topHere you can create discount rules by using AI. You can create rules to meet your goals and create them for specific dates as well. Go to WooCommerce > Settings > Quantity Breaks and BOGO Offers > AI Rule Creator and follow the steps to create discount rules and dynamic pricing using AI.
- Select your Business Goal: Choose what you want to achieve with the discount offers. You can choose between the following business goals:
- Increase Revenue: Boost overall sales by creating rules focused on increasing store revenue.
- Clear Inventory: Create rules to clear slow-moving products.
- Increase Order Value: Let AI create rules focused on increasing Average Order Value (AOV).
- Sell More Items: Rules to increase items per order.
- Promote Category: Create rules to boost specific product categories.
- Flash Sale: Quick promotional flash sales.
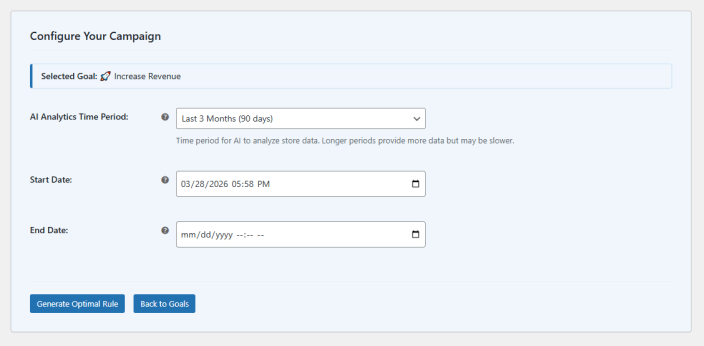
- AI Analytics Time Period: Choose the time period for AI to analyze store data. Longer periods provide more data but may be slower.
- Pick Dates: Set when the discount should be active. You can select the start and end date for the discount.
- Let AI Work: AI analyzes your products, sales history, stock levels, and customer behavior to create data-driven discount rules.
Click on “Create Optional Rule” to create AI-based discount rules.