
Installation
↑ Back to topTo start using a product from WooCommerce.com, you can use the “Add to store” functionality on the order confirmation page or the My subscriptions section in your account.
- Navigate to My subscriptions.
- Find the Add to store button next to the product you’re planning to install.
- Follow the instructions on the screen, and the product will be automatically added to your store.
Alternative options and more information at:
Managing WooCommerce.com subscriptions.

II. Updates
↑ Back to topPlease read this documentation
III. Create a Shared Space Product
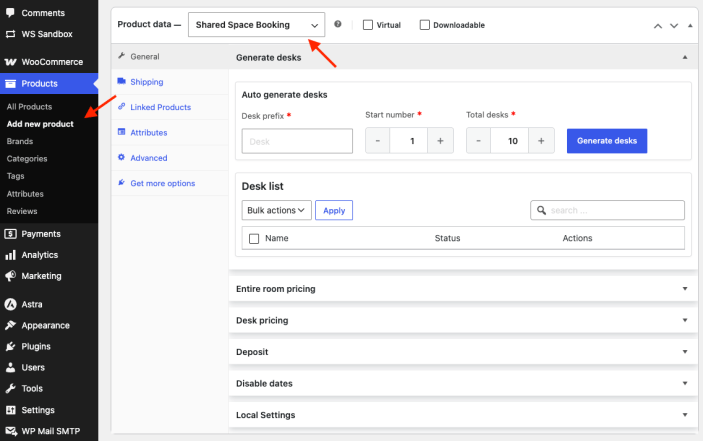
↑ Back to topGo to WordPress Admin > Products > Add New. Enter a title (this is your “room” or space), then in the Product data panel select the Shared Space Booking product type.
1. Choose the Booking Type
↑ Back to topIn the product settings, choose which Allowed Booking Type customers can use:
- Only room — the whole space is booked as one unit.
- Only Desk — the space is booked seat by seat.
- Both — customers choose room or desk on the booking form.

2. Choose a Duration Mode and Set Prices
↑ Back to topEach space uses one of two duration modes, available for both room and desk booking:
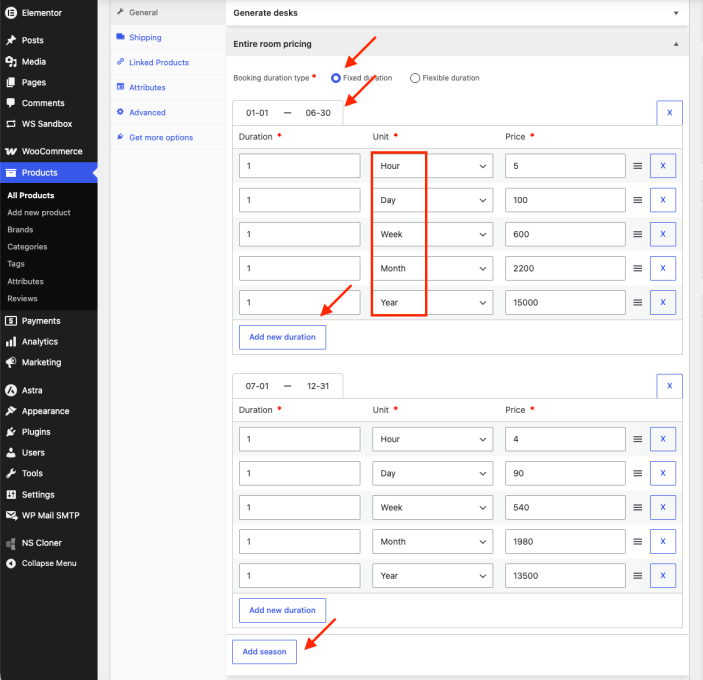
- Fixed duration — you sell predefined lengths (for example, a 1-day or 1-month package) at set prices.
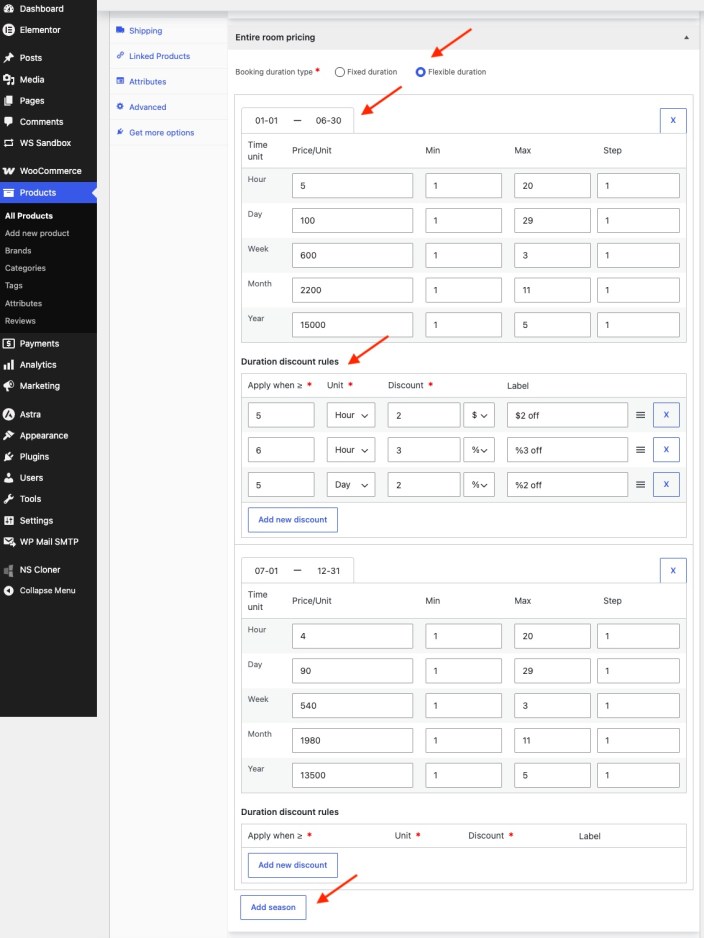
- Flexible duration — customers choose their own length, priced per unit.
Set the billing unit and rate: hour, day, week, month, or year.
Add Seasonal Prices and Discounts
For flexible durations, you can add:
- Seasons — different rates for specific date ranges (for example, a higher weekend or peak-month rate).
- Discounts — reduced rates for longer bookings (for example, a lower monthly rate than the daily rate multiplied out).
3. Set the Deposit
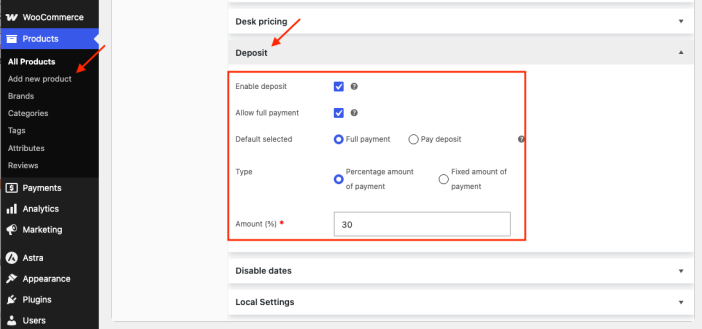
↑ Back to topEnable a deposit so customers pay part of the total now and the rest later. Choose a percentage or a fixed amount.
Example: Set a 30% deposit. On a 100.00 booking, the customer pays 30.00 at checkout; the remaining 70.00 is invoiced before check-in (see Global Settings > Deposit).
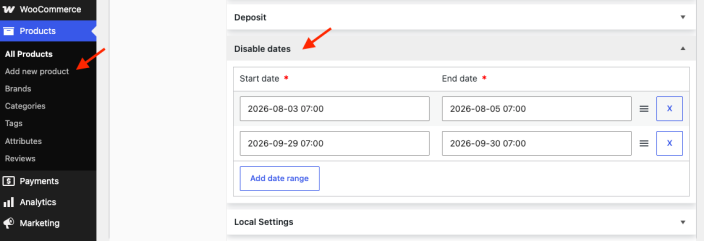
4. Set Disable Dates
↑ Back to topBlock specific dates or date ranges when a space cannot be booked (holidays, maintenance). Blocked dates appear as unavailable on the calendar.
5. Generate and Manage Desks
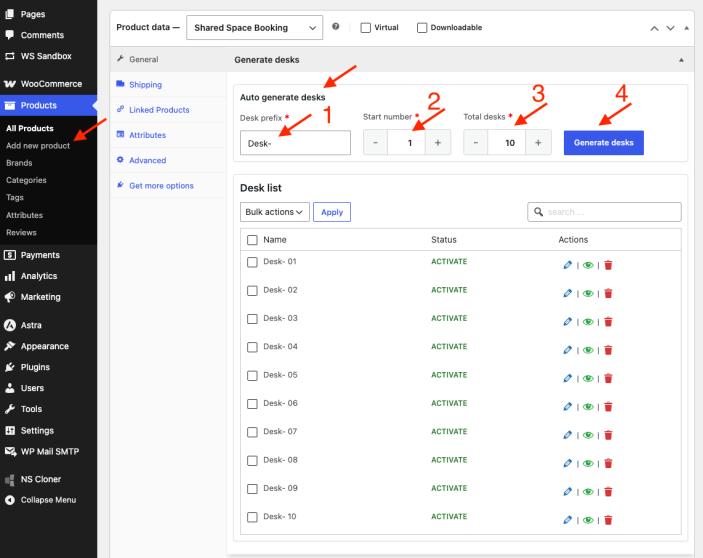
↑ Back to topIf the space is bookable by desk, create its desks:
- Use the Generate desks tool on the product to create multiple desks at once.
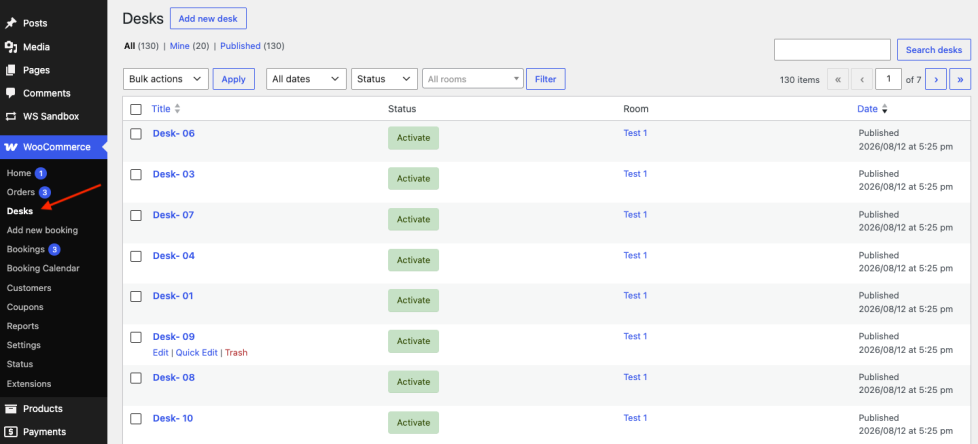
- Each desk is stored under WooCommerce > Desks and assigned to this room.
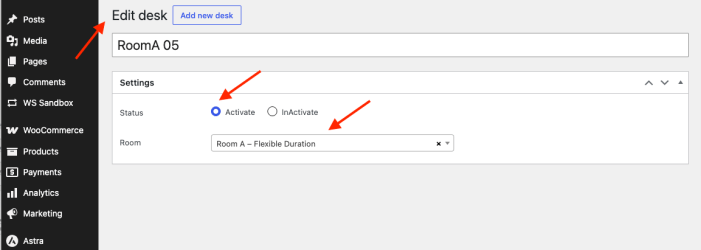
- Set each desk’s Status to Activate or InActivate to control availability.
Desks stay in sync with their room automatically: trashing, restoring, or deleting a room applies the same action to its desks.
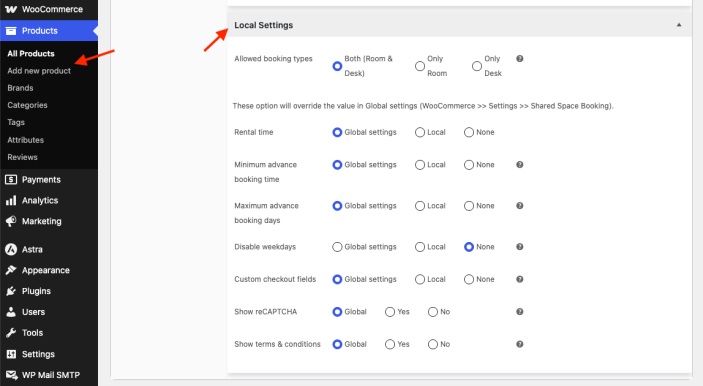
6. Local Settings (Optional Overrides)
↑ Back to topSome global options can be overridden per product, so individual spaces can behave differently from your store defaults where supported.
IV. Booking Management
↑ Back to top1. View Bookings on the Calendar
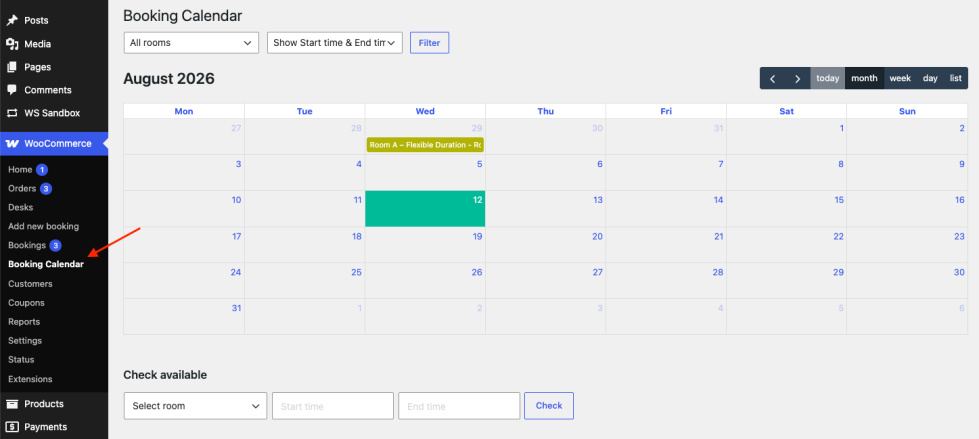
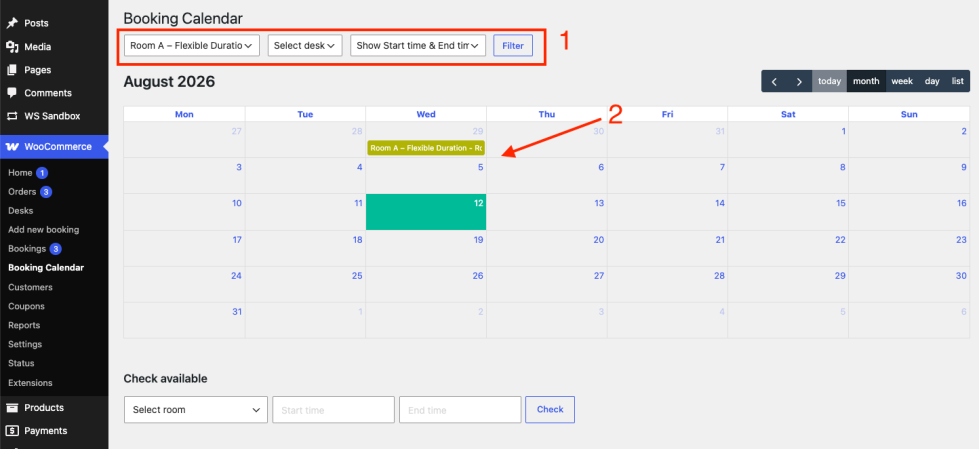
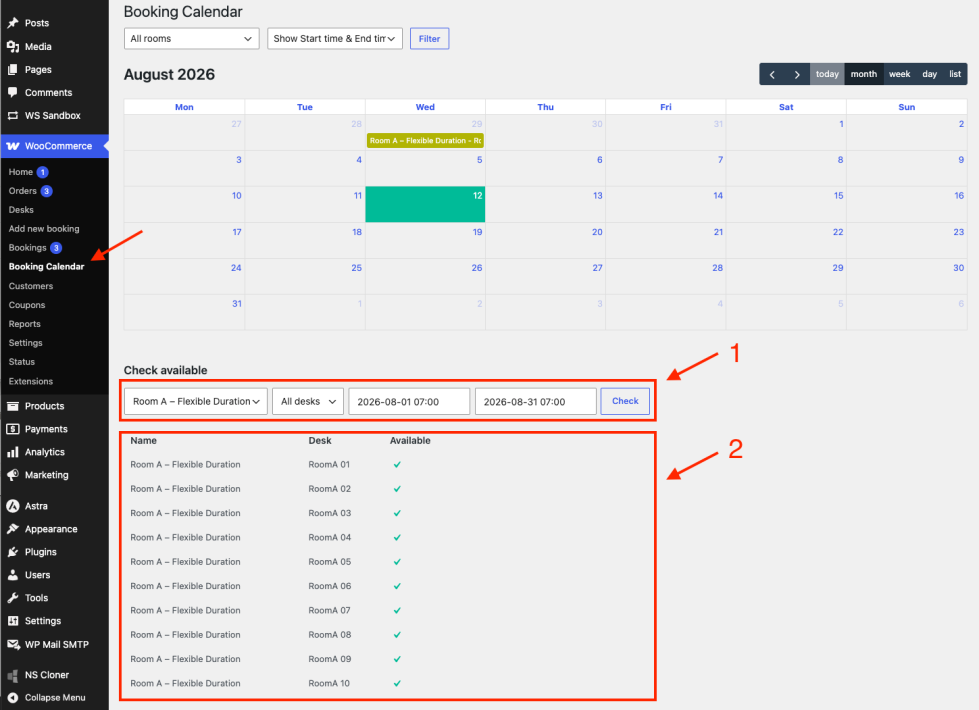
↑ Back to topGo to WooCommerce > Bookings (Booking Calendar) to see all reservations in a calendar view. You can filter by desk to focus on a specific seat, and availability reflects live order status.
2. Manually Add a New Booking
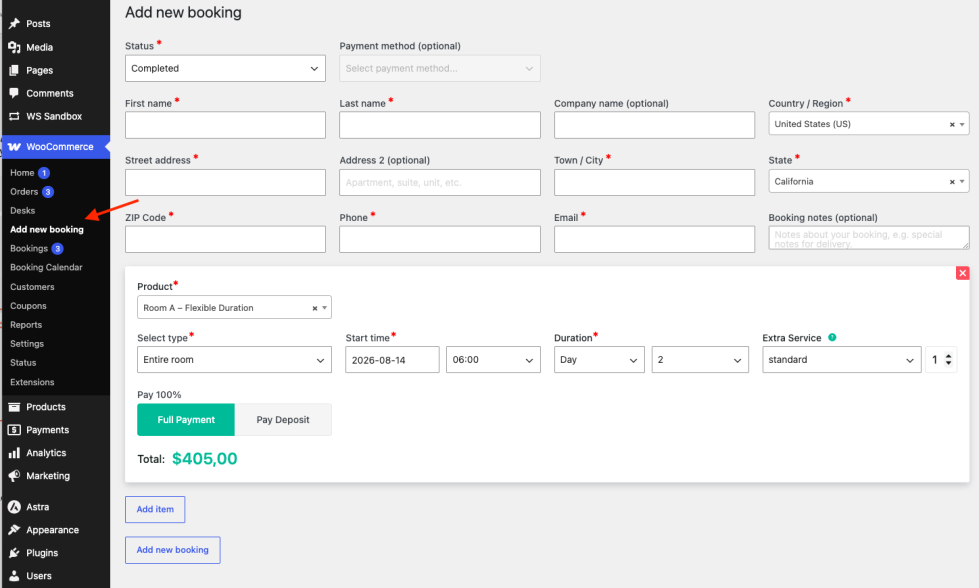
↑ Back to topFrom the booking manager you can create a booking by hand — useful for phone or walk-in customers:
- Select or enter the customer’s billing details.
- Choose the room or desk, start time, and duration.
- Review the total, deposit, and payment method.
- Save the booking.
V. Manage Desks
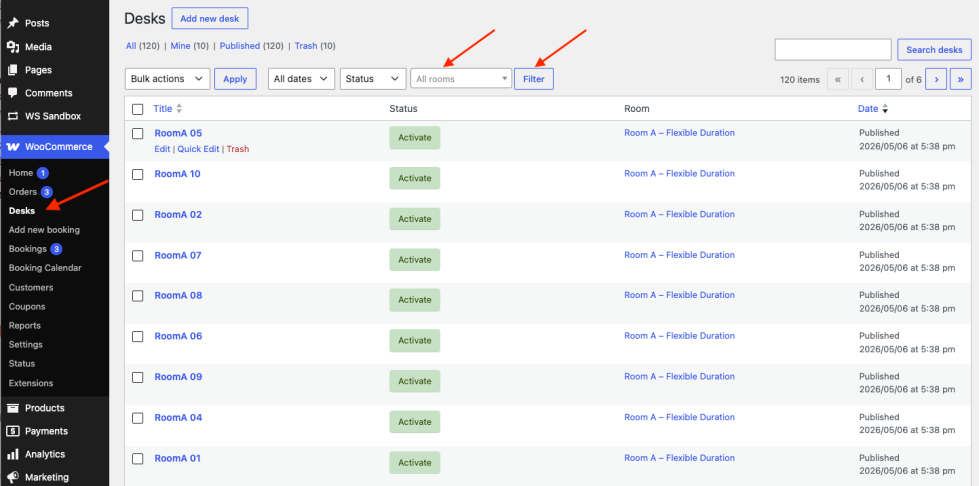
↑ Back to topGo to WooCommerce > Desks to manage all seats:
- View desks — each row shows the desk Status and the Room it belongs to.
- Add / edit a desk — set the desk title, Status (Activate / InActivate), and the Room it belongs to.
- Filter — by Status and by Room.
- Bulk actions — activate or inactivate many desks at once.
VI. Manage Custom Checkout Fields
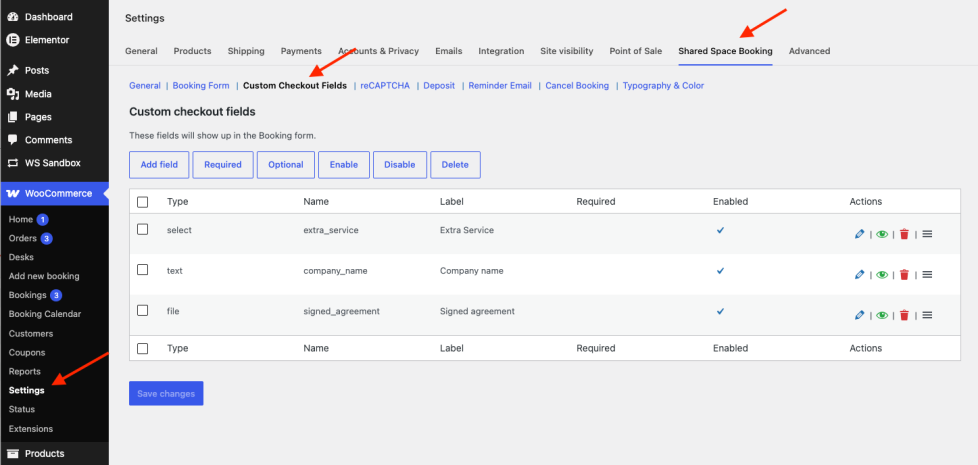
↑ Back to topAdd extra fields to the booking form under WooCommerce > Settings > Shared Space Booking > Custom Checkout Fields.
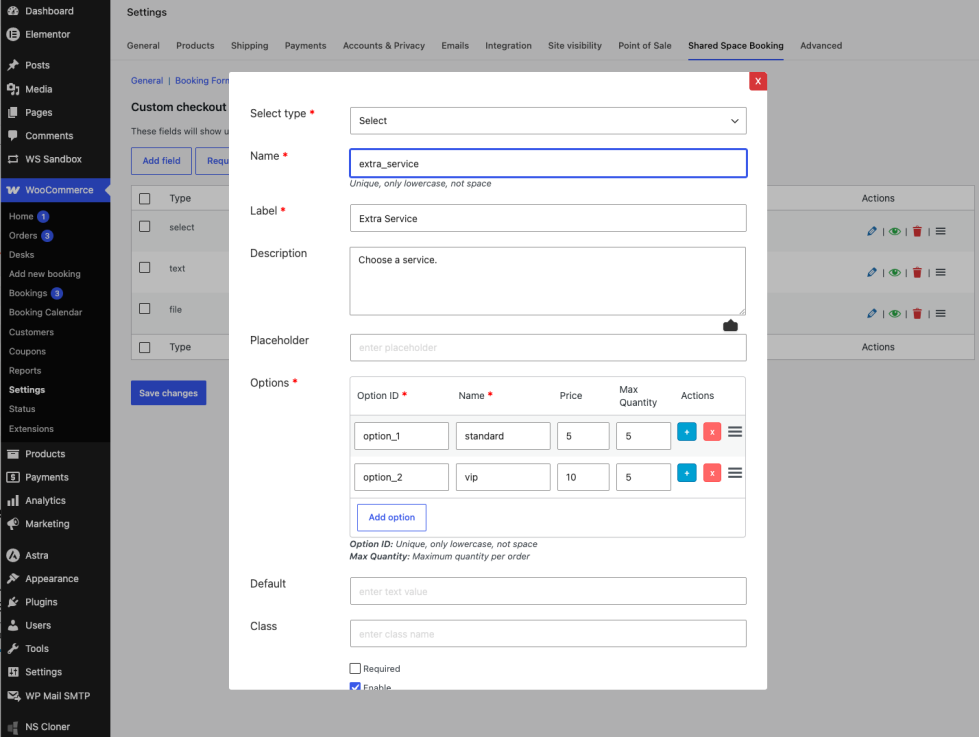
Supported field types include text, textarea, select, radio, checkbox, and file upload. For each field you can set: Type, Name, Label, Description, Placeholder, Default, Class, Required, and Enable.
Example: Add a required “Company name” text field and an optional “Signed agreement” file upload.
VII. Global Settings
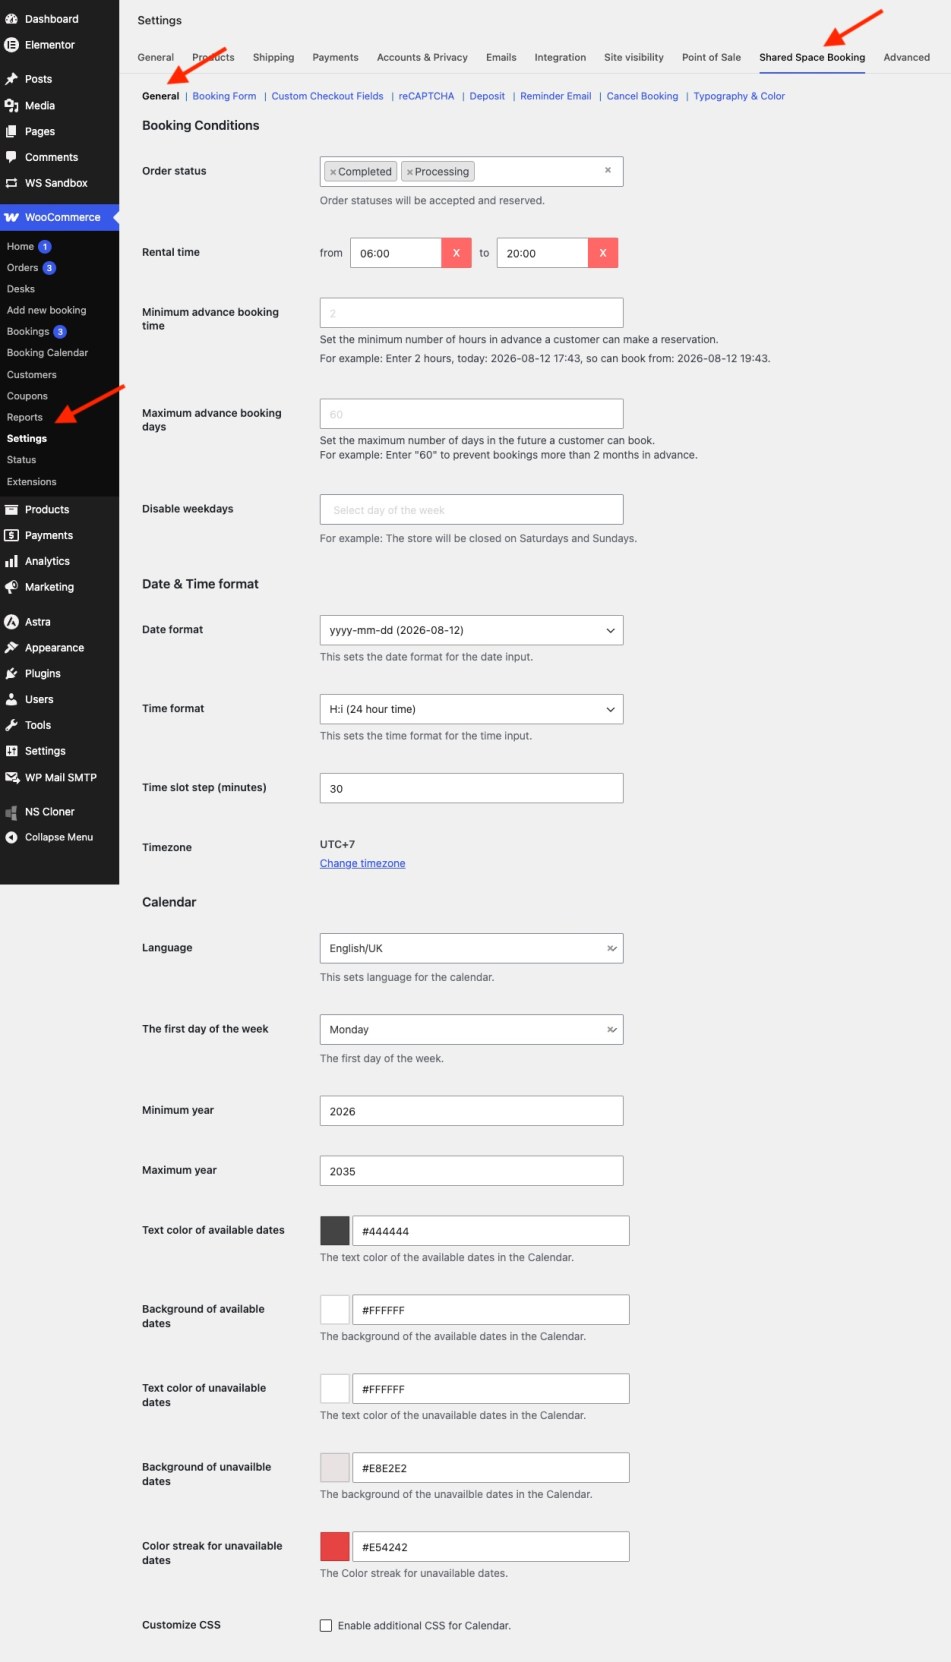
↑ Back to topGo to WooCommerce > Settings > Shared Space Booking. Settings are grouped into tabs.
1. General
↑ Back to top1.1 Booking Conditions
- Order status — which order statuses count as a confirmed reservation (default: Completed, Processing; On-hold also available).
- Rental time — the daily opening hours (from / to) available for booking.
- Minimum advance booking time — how many hours ahead a customer must book (example: 2 hours).
- Maximum advance booking days — how far in the future customers can book (default: 60).
- Disable weekdays — close specific days of the week (example: Saturday and Sunday).
1.2 Date & Time Format
- Date format and Time format for the inputs (defaults:
Y-m-d,H:i; date formatd.m.Yis supported). - Time slot step (minutes) — interval for time selection (default: 30).
- Timezone — read from your WordPress timezone setting.
1.3 Calendar
- Language, first day of the week, and minimum / maximum year shown.
- Colors for available and unavailable dates (text and background) and the streak color for unavailable dates.
- Customize CSS — add your own CSS for the calendar.
2. Booking Form
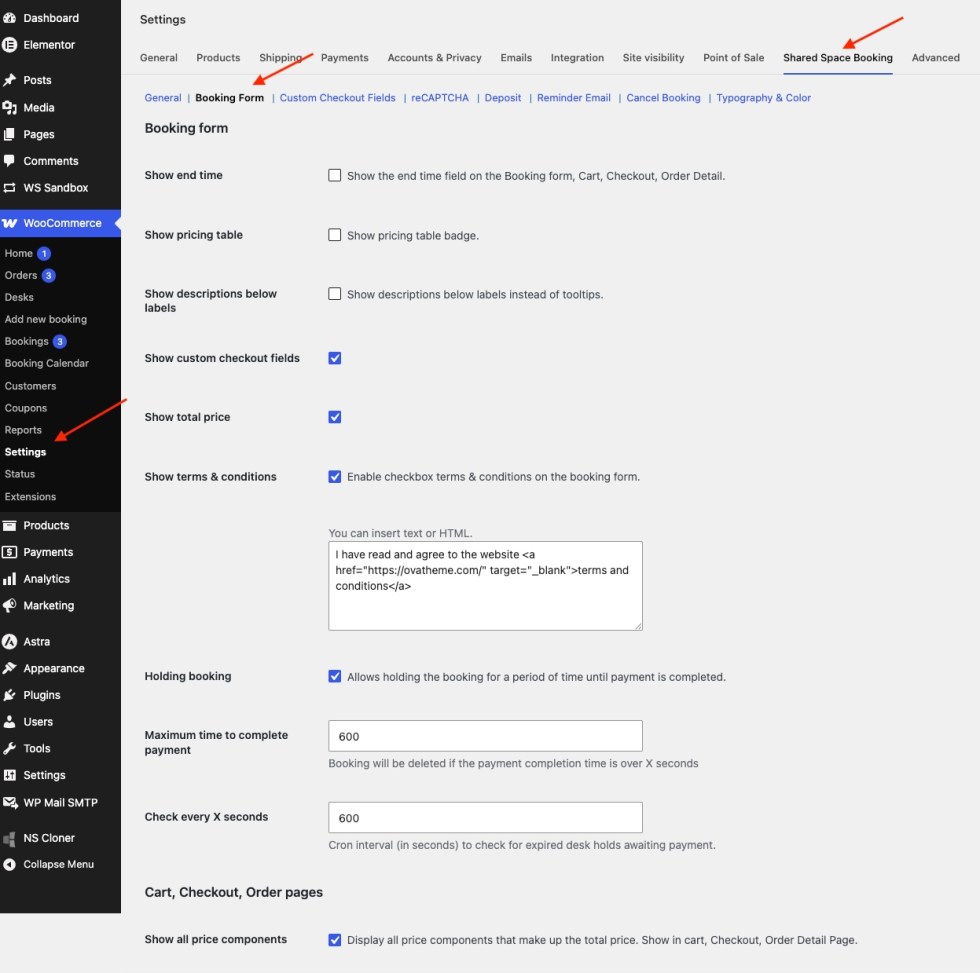
↑ Back to topBooking form display:
- Show end time field
- Show pricing table badge
- Show descriptions below labels (instead of tooltips)
- Show custom checkout fields
- Show total price
- Show terms & conditions + editable terms text
- Holding booking — hold a space until payment is complete, with:
- Maximum time to complete payment (seconds, default 600) — the hold is deleted if payment isn’t finished in time.
- Check every X seconds — how often the system checks for expired holds.
Cart, Checkout, Order pages:
- Show all price components — display every part that makes up the total.
3. reCAPTCHA
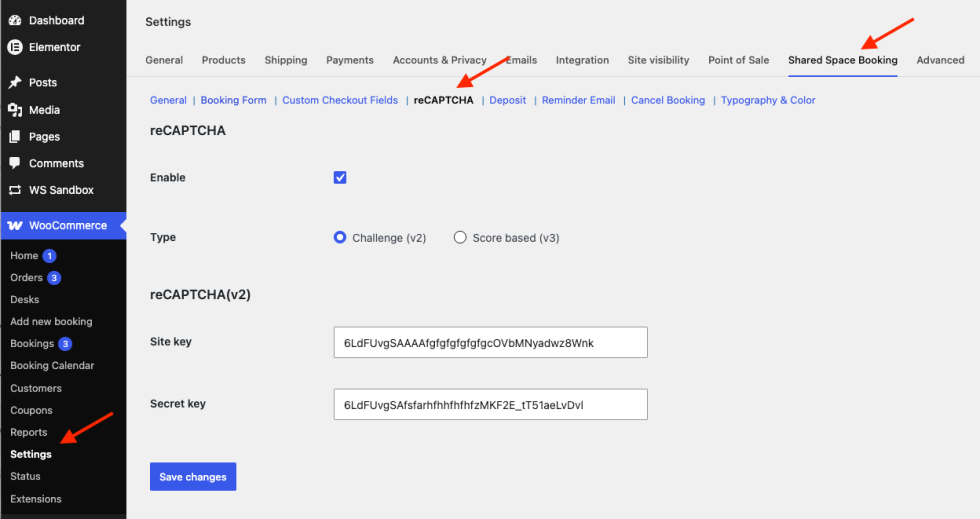
↑ Back to topProtect the booking form from spam:
- Enable reCAPTCHA.
- Type — Challenge (v2) or Score based (v3).
- Enter the Site key and Secret key for the chosen version.
4. Deposit
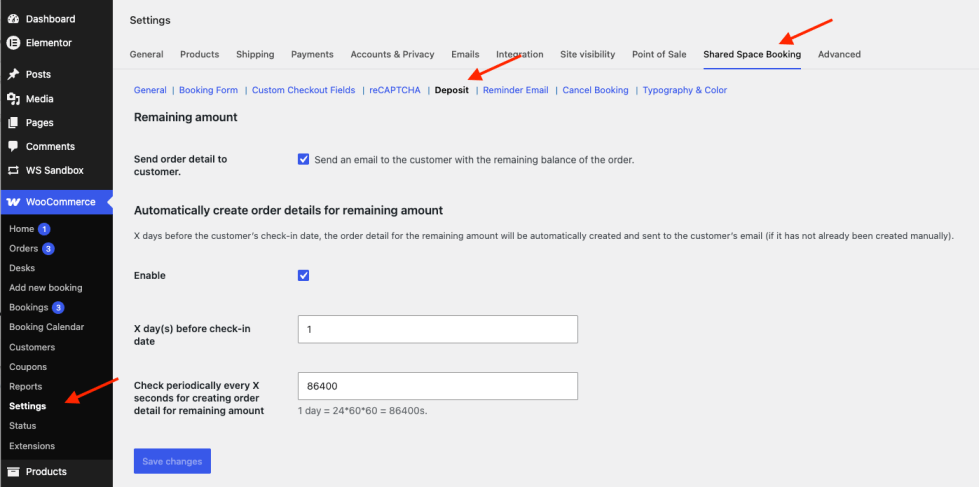
↑ Back to topControls the remaining balance after a deposit:
- Send order detail to customer — email the customer the remaining balance.
- Automatically create order details for remaining amount — enable, then set X days before check-in to auto-generate the balance invoice, and the check interval (seconds) for the background task (1 day = 86400s).
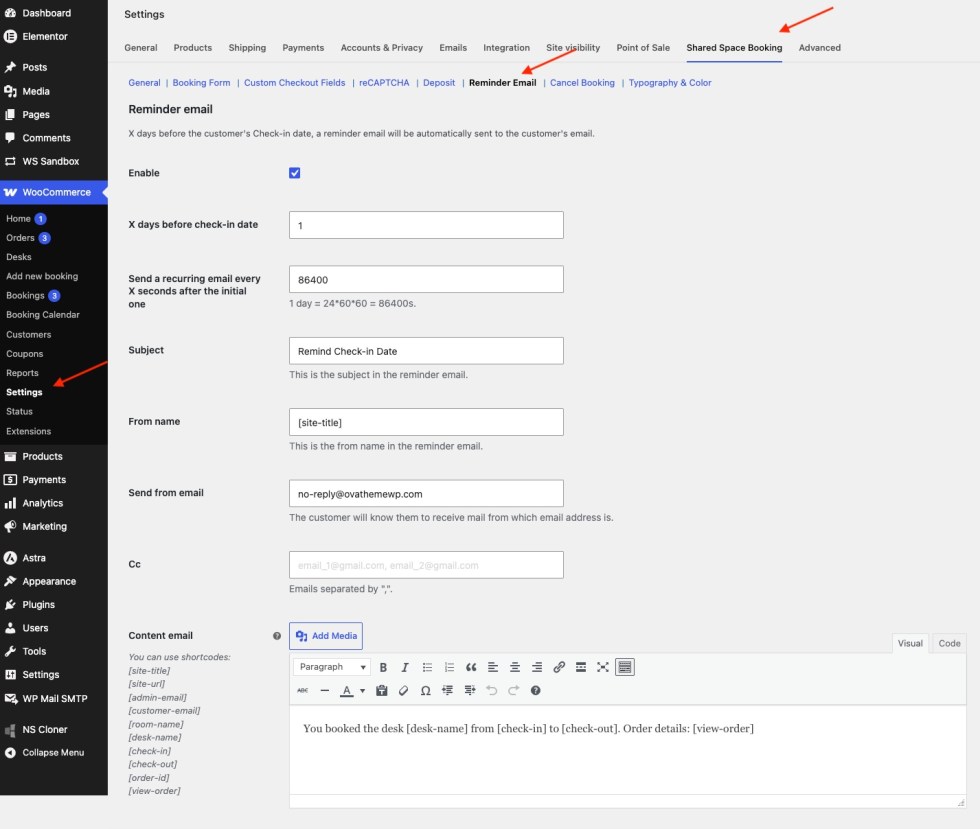
5. Reminder Email
↑ Back to topSend an automatic reminder before check-in:
- Enable, then set X days before check-in and an optional recurring interval.
- Configure Subject, From name, From email, Cc, and Content.
- Content supports shortcodes:
[site-title],[site-url],[admin-email],[customer-email],[room-name],[desk-name],[check-in],[check-out],[order-id],[view-order].
6. Cancel Booking
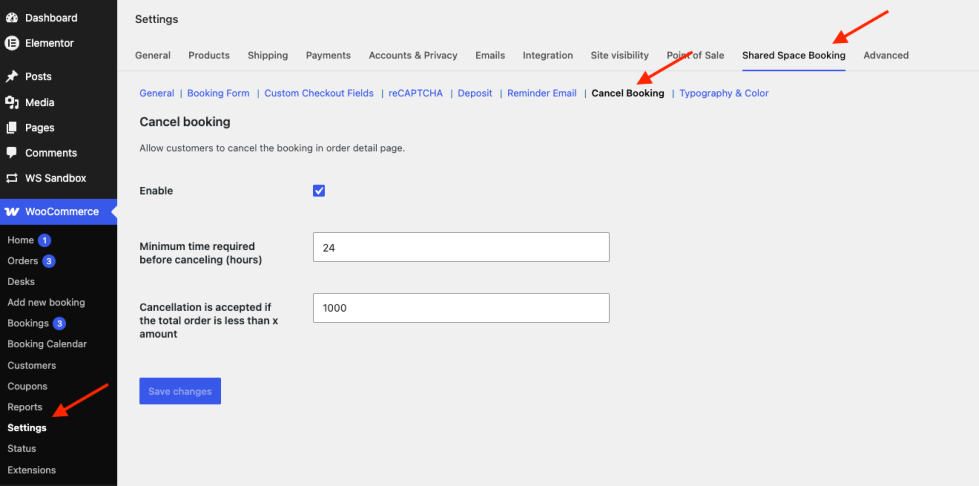
↑ Back to topLet customers cancel from the order detail page:
- Enable, then set the minimum hours required before canceling and the order-total threshold under which cancellation is accepted.
- Optionally email the admin when a customer cancels, with a customizable subject and content (supports
[site-title],[customer-email],[order-id],[view-order], and more).
7. Typography & Color
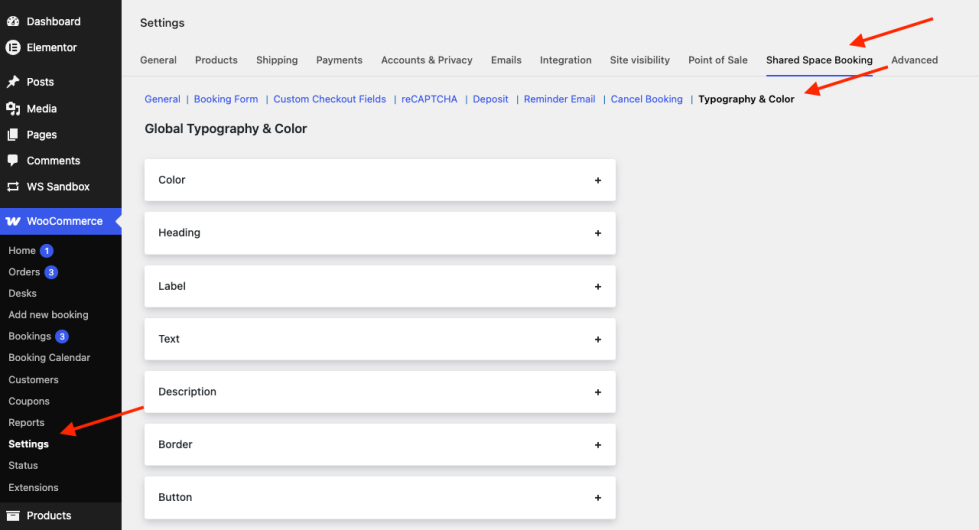
↑ Back to topStyle the booking form without code. Configure Color (primary, secondary, light, background), and typography for Heading, Label, Text, Description, Border, and Button (font size, style, weight, line height, colors, and hover states).
VIII. Shortcodes
↑ Back to topPlace the booking experience anywhere with a shortcode:
[ovass_booking_form]— renders the full booking form. Optional attributes:product_id,class.- Example [ovass_booking_form product_id=”492″]
[ovass_booking_button]— renders a “Book Now” button that opens the booking form in a popup. Optional attributes:product_id,class.- Example [ovass_booking_button product_id=”492″]

