Installation
↑ Back to topTo start using a product from WooCommerce.com, you can use the “Add to store” functionality on the order confirmation page or the My subscriptions section in your account.
- Navigate to My subscriptions.
- Find the Add to store button next to the product you’re planning to install.
- Follow the instructions on the screen, and the product will be automatically added to your store.
Alternative options and more information at:
Managing WooCommerce.com subscriptions.

Configuration
↑ Back to topAfter you have installed and activated the SMS Alert Notifications for WooCommerce extension, You have three tabs in WooCommerce > SMS Alerts. which are General, SMS Gateways, Message and Button Style.
General Settings
↑ Back to top- Admin Phone Number: Enter the phone number with the country code on which admin receive SMS Alerts.
Admin Alerts
- Enable customer registration alerts: When checked, admin will receive a sms alert whenever a new user registers.
- Enable new order alerts: When checked, admin will receive a sms alert whenever an order is placed.
- Enable out of stock alerts: When checked, admin will receive a sms alert whenever a product gets out of stock.
Customer Alerts
- Enable order status update alerts: When checked, customers will receive a sms alert whenever their order status gets updated.
- Select order statuses for alerts: Select the order statuses for which customers should be notified when the order status is updated.
- Enable back-in-stock reminder button and alerts: When checked, customers will be displayed a button on product pages of products that are out of stock and will receive an sms alert whenever the product is back in stock if they click to sign up for a reminder.

SMS Gateways
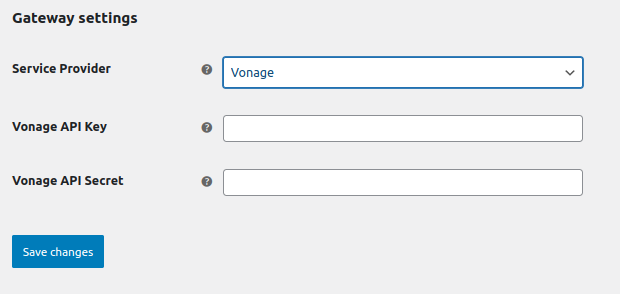
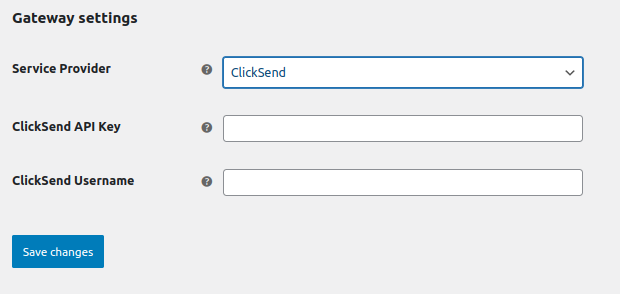
↑ Back to topGateway settings:
- Service Provider: Choose the Service Provide that you would like to use.
For Twilio Service you need to configure followings:
- Twilio Account SID:
- Twilio Auth token:
- Twilio From:

For Vonage Service, you need to configure the following:
- Vonage API key:
- Vonage API Secret:
For ClickSend Service you need to configure the followings:
- ClickSend API key:
- ClickSend Username:
For BulkGate Service, you need to configure the following:
- BulkGate Application ID:
- BulkGate Application Token:

Messages and Button Style
↑ Back to top- New user registration alert text: Enter custom text for new user registration alerts.
- New order alert text: Enter text for new order received alerts.
- Out of stock alert text: Enter text for new alerts for out of stock products.
- Order status update alert text: Enter text for order status update alerts.
- Product back in stock alert text: Add text for back in stock alerts for customers
- Back in stock reminder button text: Write text for Back in stock reminder button.

SMS Gateways Guide
Twilio
- Create an account on Twilio if you don’t already have one from here: https://www.twilio.com/try-twilio.
- After successfully signing up, you will be redirected to the console, where you should see your “Account SID” and “Auth Token”, copy both to the plugin setting fields.
- Now, go back to the Twilio’s console and from the left menu bar click and expand messaging, and then click services submenu item.
- If you already have a service created, copy its sender ( shortcode / longcode ) over to the plugin’s setting field and that’s it, see if everything is working.
- If no service has been created, click the create messaging service button to the right.
- Create a new service using senders from either shortcode, phone number or Alpha sender.
- Once successfully created, copy the service’s sender to the plugin’s setting field.
- This should conclude the configuration for the Twilio SMS Gateway.
Vonage
- Create an account on Vonage if you don’t already have one from here: https://ui.idp.vonage.com/ui/auth/registration
- After creating an account drop a quick email to the Vonage Support stating that you are going to use the service for the FMEAddons SMS alerts wordpress Plugin.
- Once signed up, you should be redirected to your account dashboard, where you will see your master API key and API secret. You can use these to configure the plugin. Or if you would like to create a separate API key for the plugin, you can do so from the left menu bar by clicking on API settings.
- Copy the API Key and API Secret to the plugin setting fields.
- That’s it, see if everything is working.
- This should conclude the configuration for Vonage SMS Gateway.
ClickSend
- Create an account on ClickSend if you don’t already have one from here: https://dashboard.clicksend.com/signup/step1
- Once successfully created, you will be redirected to the dashboard, where in the left bar, you should see the developers menu item at the very bottom.
- Click the Developers menu item to expand the submenu and click the API Credentials sub menu item.
- Now you should see the username and API Key for your account. Copy these over to the plugin’s settings fields.
- That’s it, see if everything is working.
- This should conclude the configuration for the ClickSend SMS Gateway.
BulkGate
- Create an account on BulkGate if you don’t already have one from here: https://portal.bulkgate.com/sign/up
- Once successfully created, you will be redirected to the dashboard, where in the left bar, you should see the Modules and APIs menu item. Click on Modules and APIs.
- You will be displayed multiple API options find and click HTTP Advanced API
- Then, from the popup window, click create API.
- Now you should see your API widget under My APIs and Modules on top of the page. Click the widget to display its credentials and settings.
- Now you should see Application ID and Application Token, Copy both to the Plugin’s setting fields.
- That’s it, see if everything is working.
This should conclude the configuration for BulkGate SMS Gateway.