What is StoreGuard?
↑ Back to topOverview
↑ Back to topStoreGuard – IP Rate Limiter is a security plugin that protects your WooCommerce store by limiting the number of actions any single IP address can perform within a specific time period.
What It Does
↑ Back to top- Blocks brute-force login attacks – Stops password guessing
- Prevents registration spam – Eliminates bot accounts
- Reduces payment fraud – Prevents card testing
- Stops comment/review spam – Keeps products clean
- Blocks malicious traffic – Improves store performance
How It Works
Key Features at a Glance
↑ Back to top- 7 independent rate limiters
- Dashboard widget showing recent blocks
- Activity logs with detailed information
- Activity logs with detailed information
- IP whitelist (trusted IPs bypass all limits)
- Manual IP blocking & unblocking
- Email notifications when IPs are blocked
- Customizable error messages
- Professional admin interface
Installation
↑ Back to topTo start using a product from WooCommerce.com, you can use the “Add to store” functionality on the order confirmation page or the My subscriptions section in your account.
- Navigate to My subscriptions.
- Find the Add to store button next to the product you’re planning to install.
- Follow the instructions on the screen, and the product will be automatically added to your store.
Alternative options and more information at:
Managing WooCommerce.com subscriptions.

Setup and Configuration
↑ Back to topStep 1: Access StoreGuard Settings
↑ Back to top- In WordPress admin left menu
- Find WooCommerce
- Click WooCommerce
- You’ll see submenu
- Click StoreGuard (at bottom of submenu)
- You’re now in StoreGuard settings page
Dashboard → WooCommerce → StoreGuardStep 2: See the 8 Configuration Tabs
↑ Back to topYou’ll see 8 tabs at the top:
- General – General settings
- Registration – Sign-up protection
- Checkout – Payment protection
- Login – Login protection
- Password Reset – Password reset protection
- Comments & Reviews – Spam protection
- Payment Method – Payment fraud protection
- Blocked IPs & Logs – Blocking management
Step 3: Start with General Tab
↑ Back to topClick on “General” tab
You’ll see these options:
A. Whitelisted IPs
Text area where you can add trusted IPs
(Your office IP, developers, partners, etc.)

What to add:
- Your office IP: 203.0.113.50
- Your home IP: 203.0.113.51
- Developer IP: 203.0.113.52

How to find your IP:
Go to whatismyipaddress.com in browser
Copy the IP shown
Paste into this field
B. Alert Email
Email address where you get alerts
Usually: your@email.com or admin@yourstore.com

When you get alerts:
- When an IP is blocked
- How many times per day
- Which types of blocks
C. Enable Email Alerts
Checkbox: "Enable Email Alerts"
Check this box = Yes, send me emails
Leave unchecked = No emails
D. Generic Error Message
Checkbox: "Hide IP in Error Messages"
Check this = Don't show IP to users (more private)
Leave unchecked = Show IP (more technical info)

Example:
With checked: "Access blocked. Please try again in 60 minutes."
Without: "IP 203.0.113.50 blocked for 60 minutes."
Step 4: Fill in General Settings
↑ Back to topBasic Setup (5 minutes):
- Add Your IP to Whitelist
- Find your IP: whatismyipaddress.com
- Paste it in “Whitelisted IPs” field
- Add one IP per line
- This makes sure YOU can always access store
- Add Alert Email
- Enter your email: admin@yourstore.com
- This is where alerts get sent
- Enable Email Alerts
- Check the box “Enable Email Alerts”
- You’ll get emails when IPs are blocked
- Hide IPs (Optional)
- Check “Hide IP in Error Messages” if you want
- More privacy-friendly
- Recommended ✓
- Click “Save Changes”
- Button at bottom of page
- You see message “Settings saved”
Step 5: Enable Features You Need
↑ Back to topNow click on each tab below and enable what you want:
Quick Setup (use recommended values):
Click each tab:
- Registration → Check “Enable” → Use recommended values → Save
- Login → Check “Enable” → Use recommended values → Save
- Checkout → Check “Enable” → Use recommended values → Save
- Password Reset → Check “Enable” → Use recommended values → Save
- Comments & Reviews → Check “Enable” → Use recommended values → Save
- Payment Method → Check “Enable” → Use recommended values → Save
That’s it! You’re now protected.
Advanced configuration
↑ Back to topFeature #1: Registration Protection
↑ Back to topProtects against bot sign-ups
Location: WooCommerce → StoreGuard → Registration tab
Settings You’ll See:
☐ Enable Registration Rate Limiting
Max Attempts: [3] (how many registrations allowed)
Window (minutes): [60] (time period)
Block Duration (minutes): [1440] (how long to block)
What Each Setting Does:
- Enable checkbox: Turn protection on/off
- Max Attempts: Number of registrations allowed (default: 3)
- Means: 3 registrations allowed per IP
- Normal: Real customer registers ONCE
- Bot: Tries to register 100+ times
- Window (minutes): Time period to count (default: 60)
- Means: Count attempts over 60 minutes
- After 60 minutes, counter resets
- Block Duration: How long to block (default: 1440 = 24 hours)
- Means: After limit exceeded, blocked for 24 hours
- After 24 hours, automatically unblocked
Recommended Values:
Enable: ☑ Yes
Max Attempts: 3
Window: 60 minutes
Block Duration: 1440 minutes (24 hours)
When to Change:
- If you have many legitimate bulk registrations → Increase “Max Attempts”
- If you want faster unblock → Decrease “Block Duration”
- If you want faster counting → Decrease “Window”
To Configure:
- Click Registration tab
- Check “Enable Registration Rate Limiting”
- Change numbers if you want (or keep defaults)
- Click “Save Changes”
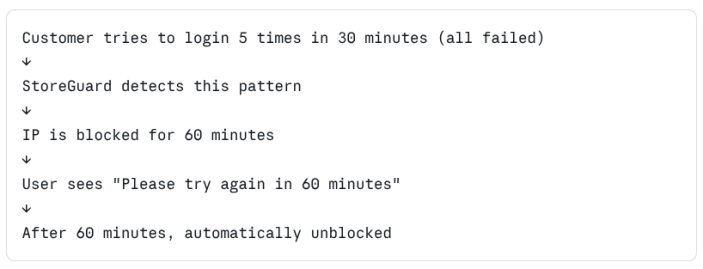
Feature #2: Login Protection
↑ Back to topProtects against brute-force password attacks
Location: WooCommerce → StoreGuard → Login tab
Settings You’ll See:
☐ Enable Login Rate Limiting
Max Failed Attempts: [5]
Window (minutes): [30]
Block Duration (minutes): [60]
☐ Enable Generic Error Message
What Each Setting Does:
- Enable checkbox: Turn protection on/off
- Max Failed Attempts: Failed attempts allowed (default: 5)
- Means: 5 wrong passwords allowed
- Normal: Real customer enters password correctly (0 failures)
- Attacker: Tries 100+ wrong passwords
- Window (minutes): Time period (default: 30)
- Means: Count failures over 30 minutes
- Block Duration: How long to block (default: 60 minutes)
- After blocked, try again in 60 minutes
- Generic Error Message: Hide which field is wrong
- ☑ Checked: “Invalid credentials” (doesn’t say which field)
- ☐ Unchecked: “User not found” or “Password incorrect”
Recommended Values:
Enable: ☑ Yes
Max Failed Attempts: 5
Window: 30 minutes
Block Duration: 60 minutes
Generic Error Message: ☑ Yes
To Configure:
- Click Login tab
- Check “Enable Login Rate Limiting”
- Optionally check “Enable Generic Error Message”
- Click “Save Changes”
Feature #3: Checkout Protection
↑ Back to topProtects against payment fraud and repeated failed checkouts
Location: WooCommerce → StoreGuard → Checkout tab
Settings You’ll See:
☐ Enable Checkout Rate Limiting
Max Attempts: [10]
Window (minutes): [60]
Block Duration (minutes): [720]
What Each Setting Does:
- Enable checkbox: Turn protection on/off
- Max Attempts: Checkout attempts allowed (default: 10)
- Real customer: Completes checkout in 1-2 attempts
- Attacker: Tries 50+ different card numbers
- Window (minutes): Time period (default: 60)
- Count attempts over 60 minutes
- Block Duration: How long to block (default: 720 = 12 hours)
- After blocked, try again in 12 hours
Recommended Values:
Enable: ☑ Yes
Max Attempts: 10
Window: 60 minutes
Block Duration: 720 minutes (12 hours)
When to Change:
- If customers often retry failed payments → Increase “Max Attempts”
- If you want quicker unblock → Decrease “Block Duration”
To Configure:
- Click Checkout tab
- Check “Enable Checkout Rate Limiting”
- Click “Save Changes”
Feature #4: Password Reset Protection
↑ Back to topPrevents email enumeration attacks
Location: WooCommerce → StoreGuard → Password Reset tab
Settings You’ll See:
☐ Enable Password Reset Rate Limiting
Max Attempts: [3]
Window (minutes): [60]
Block Duration (minutes): [120]
What This Prevents: Attackers trying to guess customer emails by requesting password resets
Recommended Values:
Enable: ☑ Yes
Max Attempts: 3
Window: 60 minutes
Block Duration: 120 minutes (2 hours)
To Configure:
- Click “Password Reset” tab
- Check “Enable Password Reset Rate Limiting”
- Click “Save Changes”
Feature #5: Comments & Review Protection
↑ Back to topPrevents spam in comments and product reviews
Location: WooCommerce → StoreGuard → Comments & Reviews tab
Settings You’ll See:
COMMENTS:
☐ Enable Comment Rate Limiting
Max Comments: [5]
Window (minutes): [60]
Block Duration (minutes): [240]

REVIEWS:
☐ Enable Review Rate Limiting
Max Reviews: [5]
Window (minutes): [60]
Block Duration (minutes): [480]
What This Does:
- Limits comments per IP
- Limits product reviews per IP
- Can be configured differently for each
Recommended Values:
Comments:
Enable: ☑ Yes
Max: 5
Window: 60 minutes
Block: 240 minutes (4 hours)

Reviews:
Enable: ☑ Yes
Max: 5
Window: 60 minutes
Block: 480 minutes (8 hours)
To Configure:
- Click “Comments & Reviews” tab
- Check both “Enable” boxes
- Click “Save Changes”
Feature #6: Payment Method Protection
↑ Back to topPrevents card testing fraud
Location: WooCommerce → StoreGuard → Payment Method tab
Settings You’ll See:
☐ Enable Payment Method Rate Limiting
Max Attempts: [5]
Window (minutes): [60]
Block Duration (minutes): [720]
What This Does: Limits how many payment methods can be added per IP Prevents attackers from testing stolen credit cards
Recommended Values:
Enable: ☑ Yes
Max Attempts: 5
Window: 60 minutes
Block Duration: 720 minutes (12 hours)
To Configure:
- Click “Payment Method” tab
- Check “Enable Payment Method Rate Limiting”
- Click “Save Changes”
🎯 Messages
↑ Back to topCustom Error Messages
↑ Back to topLocation: WooCommerce → StoreGuard → General tab
Why Customize? Default messages are good, but you can make them match your brand
Available Placeholders:
{hours}– How many hours until unblock{ip}– The blocked IP address
Example Custom Messages:
For Login Blocks: Default: “Too many login attempts. Please try again in 60 minutes.”
Custom: “We detected multiple failed login attempts from your location. For your security, you’re temporarily locked out. Please try again in {hours} hours or reset your password.”
For Registration Blocks: Default: “Too many registration attempts. Please try again in 24 hours.”
Custom: “We allow 3 registrations per person to prevent abuse. You’ve reached the limit. Please contact us if you believe this is a mistake.”
For Checkout Blocks: Default: “Too many checkout attempts. Please try again later.”
Custom: “We detected unusual checkout activity from your location. Please try again in {hours} hours or contact support.”
How to Add Custom Messages:
- Go to General tab
- Scroll down to “Custom Error Messages”
- Find the field for the message you want to customize
- Clear the default text
- Type your custom message
- Use
{hours}and{ip}if you want dynamic content - Click “Save Changes”
Monitoring and Management
↑ Back to topViewing Dashboard Widget
↑ Back to topLocation: WordPress Dashboard (home page after login)
What You’ll See:
StoreGuard: Recent Blocks
━━━━━━━━━━━━━━━━━━━━━━━━━━━
Total Blocked Today: 47
Currently Blocked: 12
Blocks by Type:
  Login: 23
  Registration: 15
  Checkout: 9
  Comments: 0
  Reviews: 0
  Payment: 0
What It Shows:
- How many IPs blocked today
- How many are currently blocked
- Breakdown by type
- Quick status check
Viewing Activity Logs
↑ Back to topLocation: WooCommerce → StoreGuard → Blocked IPs & Logs tab
You’ll See Two Sections:
Section 1: Blocked IPs (Current)
Table showing:
IP Address | Action | Blocked Since | Unblock At | Unblock Now
203.0.113.50 | Login | 2024-04-20 14:32 | 15:32 | [Unblock] [Whitelist]
Section 2: Activity Logs (History)
Table showing:
IP | Action Type | Timestamp | Reason
203.0.113.50 | Login | 2024-04-20 14:32 | 5 failed attempts in 30 min
203.0.113.51 | Registration | 2024-04-20 14:15 | 3 registrations in 60 min
How to Use:
- Scroll through to see what’s being blocked
- Click “Unblock” to remove a block
- Click “Whitelist” to never block again
- Look for patterns (same IP multiple times)
Email Alerts
↑ Back to topWhat You’ll Receive:
From: StoreGuard Security
Subject: StoreGuard Alert - IP Blocked

An IP address has been blocked due to suspicious activity.

IP Address: 203.0.113.50
Action: Login Attempt
Attempts: 5 failed attempts
Time: 2024-04-20 14:32:15 UTC
Block Duration: 60 minutes
Blocked Until: 15:32 UTC

To manage this block, visit:
WooCommerce → StoreGuard → Blocked IPs & Logs
Troubleshooting
↑ Back to topIssue #1: “A Real Customer Got Blocked”
↑ Back to topProblem: A legitimate customer can’t access the store
Solution:
- Go to WooCommerce → StoreGuard → Blocked IPs & Logs
- Look for their IP in the “Blocked IPs” section
- Click “Unblock”
- Tell customer to try again
To Prevent:
- Ask them for their IP
- Click “Whitelist” instead of “Unblock”
- They’re now never blocked again
Why It Happened:
- They’re on shared office IP (see earlier section)
- They exceeded attempt limits (rare for real customers)
- Time-based block hasn’t expired yet
Issue #2: “I Can’t Access My Admin Panel”
↑ Back to topProblem: You’re locked out of WordPress admin
Solution – Option A: Use Different IP
- Connect to different network (phone hotspot, library)
- Try accessing admin again
- Should work from different IP
Solution – Option B: Unblock Via Database
- Contact your hosting provider
- Ask them to access your database
- Tell them to delete the block for your IP
- You’ll have access again
To Prevent: Add your IP to whitelist in General tab (You’re then immune to all blocks)
Issue #3: “Too Many Blocks, Plugin Is Too Strict”
↑ Back to topProblem: Lots of legitimate users getting blocked
Solution: Increase the attempt limits
- Go to the tab causing issues (e.g., Login)
- Increase “Max Attempts” number
- Increase “Window” (minutes)
- Click “Save Changes”
Example: Changed Login from 5 attempts to 10 attempts Now only blocks after 10 failures instead of 5
Issue #4: “I Don’t See the Dashboard Widget”
↑ Back to topProblem: The StoreGuard widget isn’t showing on Dashboard
Solution:
- Go to WordPress Dashboard
- Look at top right: “Screen Options”
- Click “Screen Options”
- Look for “StoreGuard: Recent Blocks”
- Check the box next to it
- Widget appears on dashboard
Issue #5: “Email Alerts Not Working”
↑ Back to topProblem: You’re not receiving email notifications
Checklist:
- Is “Enable Email Alerts” checkbox checked?
- Go to General tab
- Check if it’s enabled
- Is the alert email correct?
- Go to General tab
- Verify email address is correct
- Is email getting to spam?
- Check your spam/junk folder
- Add StoreGuard email to contacts
- Test it:
- Make a test block by exceeding login limit
- Should get email
If Still Not Working:
- Contact your hosting provider
- Ask them to check email logs
- They can help diagnose mail issues