
I. Installation
↑ Back to topPlease see this documentation.
II. Updates
↑ Back to topPlease see this documentation.
III. Create a tour
↑ Back to topTo create a bookable tour, you need to:
- Firstly, go to: WordPress Admin panel > Products > Add new product
- Then, you add the name and description for a tour
- Next, you move on to product data tab, select tour product in product data drop-down.
- After that, you can set the following settings:
1: Configure Tax Settings
↑ Back to topThe Tax Settings feature allows you to configure how taxes are applied to your tour
Step 1: Enable Tax
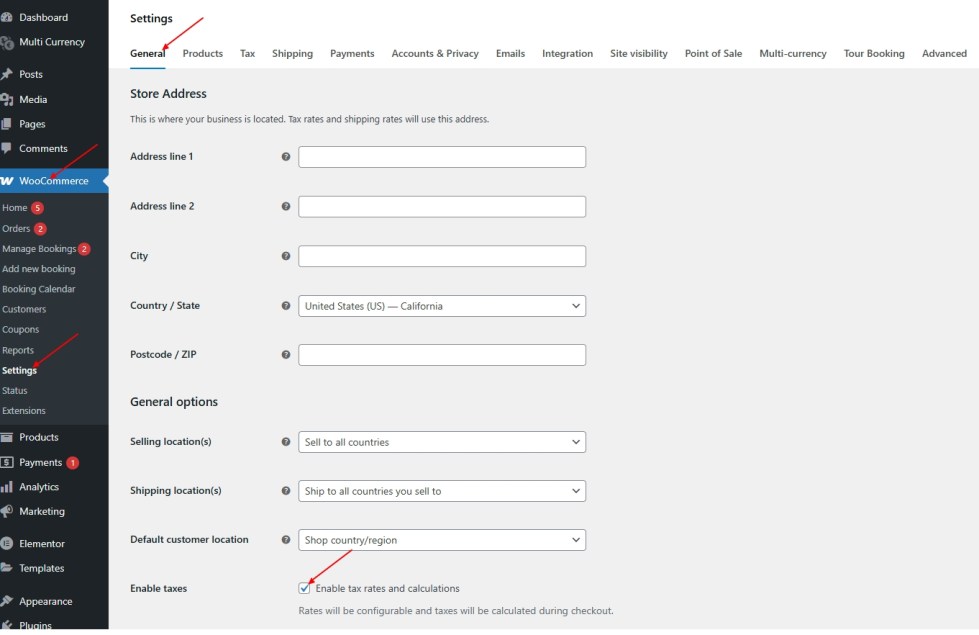
Go to WooCommerce >> Settings >> General >> Store Address >> Enable taxes: Tick the checkbox “Enable tax rates and calculations”
Step 2: Setup Tax Settings
After enabling taxes, you can set the tax options for each tour:
- Select Tax Status
- Taxable – Apply tax rules based on the selected tax class.
- Shipping only – Apply tax only to shipping costs.
- None – No tax will be applied.
- Select Tax Class
- Standard – Default tax class (applied to most products).
- Reduced Rate – Special reduced tax rate (e.g., for certain services or products).
- Zero Rate – No tax applied, even if the product is marked as Taxable.
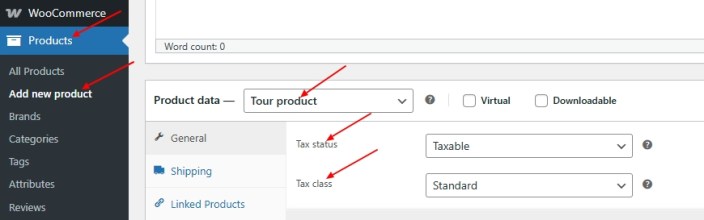
Note: To set tax class, go to WooCommerce >> Settings >> Tax >> Standard rates, Reduce rate rates or Zero rate rates tab
2. Choose a type of tour and set price
↑ Back to topOur plugin support 3 types of tour: Multiple-day tour, one-day tour, and specific date range
2.1 Multiple-day tour
A multiple-day tour is a travel package or itinerary that spans several days.
Steps to follow:
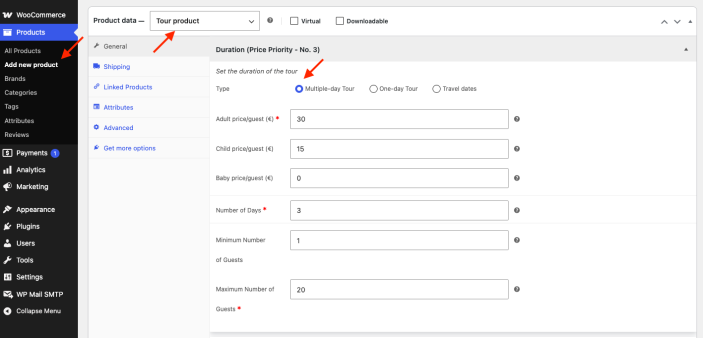
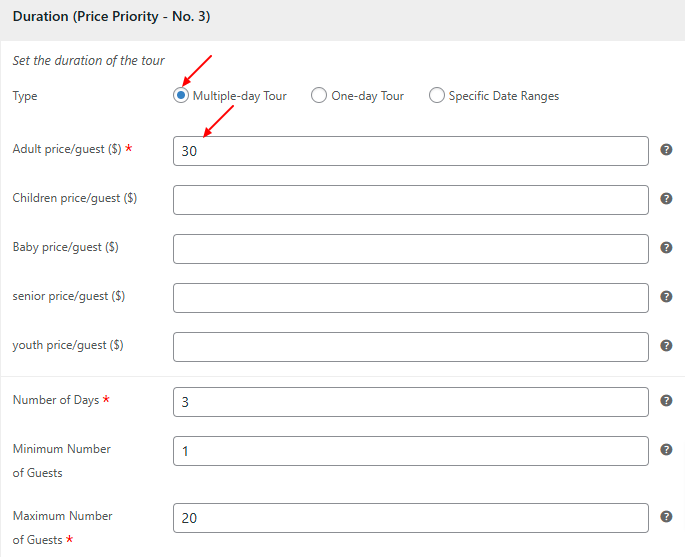
- Go to Duration > Type > Choose: multiple-day tour
- Set price for customer groups. Please, note: you can add and delete guests.
- Set number of days: set the length for a tour
- Set maximum number of guests and minimum number of guests. Please, note: For instance, you created the London tour with a maximum number of 20 guests. A customer booked this tour for 2 guests. After that, the Admin changed the order status to completed. A other customer will be only allowed to make a booking with a maximum number of 18 guests.
2.2 One-day tour
A one-day tour is a short travel package or itinerary that takes place within a single day
Steps to follow:
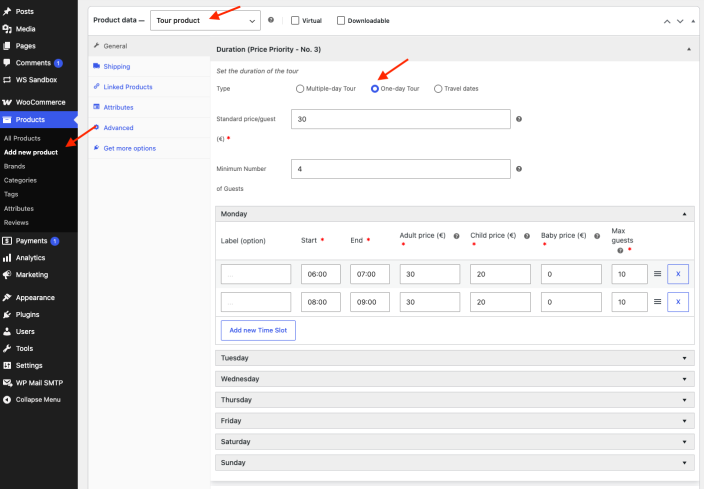
- Go to Duration > Type > Choose: one-day tour
- Add standard price for each guest: The price is displayed on the listing page and the detail pages.
- Add minimum number of guests
- Set tour packages in a day: In this step, you will add label ( name of tour packages), start time and end time ( time slots ), prices for different customer groups ( Please, note: you can add and delete guests ), maximum number of guests
- Set tour packages in a day for special time periods: This feature allows you set tour packages in a day for holidays, seasons in a year, special date ranges. You choose date ranges ( start dates and end dates of a special time period ), add label ( name of tour packages), start time and end time ( time slots ), prices for different customer groups ( Please, note: you can add and delete guests ), maximum number of guests
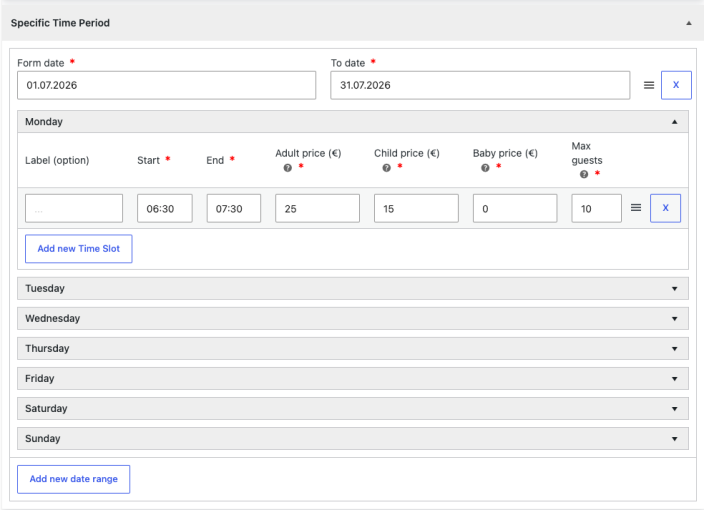
2.3 Specific date ranges
This is the feature that allows you to set tour prices for special time periods
Steps to follow:
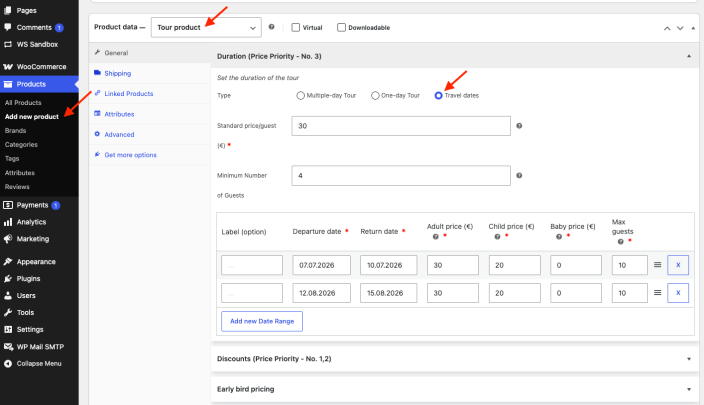
- Go to Duration > Type > Choose: Travel dates
- Add standard price for each guest. The price is displayed on the listing page and the detail pages.
- Set minimum number of guests
- Add price option for each special time period. You set: label, start date and end date, price for customer groups ( Please, note: you can add and delete guests ), and maximum number of guests of each time period.
3. Add Discount Rates
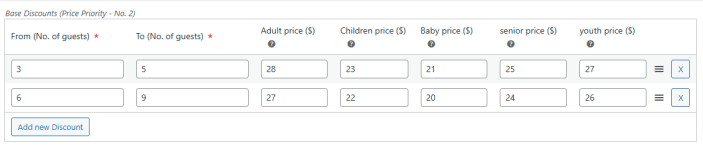
↑ Back to topBase Discount: Discounts are applied based on predefined group size. Configure unlimited group sizes and set prices of different customer groups ( Please, note: you can add and delete guests ) for each group size.
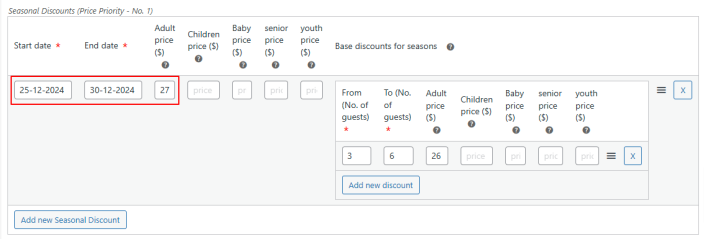
Seasonal Discount: Offer discount rates tailored to specific times of the year, often aligned with seasonal demand, holidays, or events. Create pricing plans of different customer groups ( Please, note: you can add and delete guests ) for each specific time period. Besides, also configure price options based on predefined group size for each time period
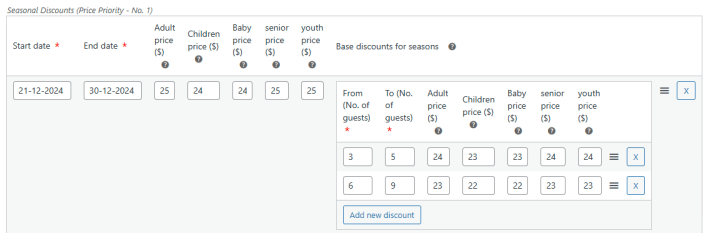
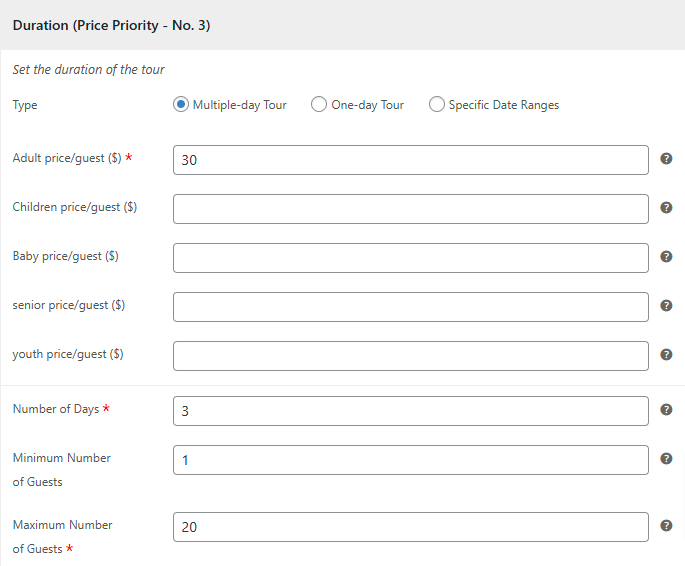
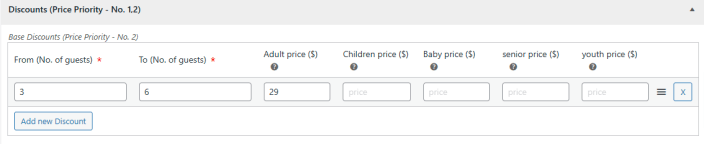
Please, note: In the case, you set price according to the tour type, base discount, and seasonal discount. Firstly, tour price will be applied based on seasonal discount rate. If the customer’s booking does not satisfied the conditions for applying the seasonal discount, the base discount will be applied. In case, the customer’s booking does not meet the conditions for applying the base discount, the tour type price will be applied.
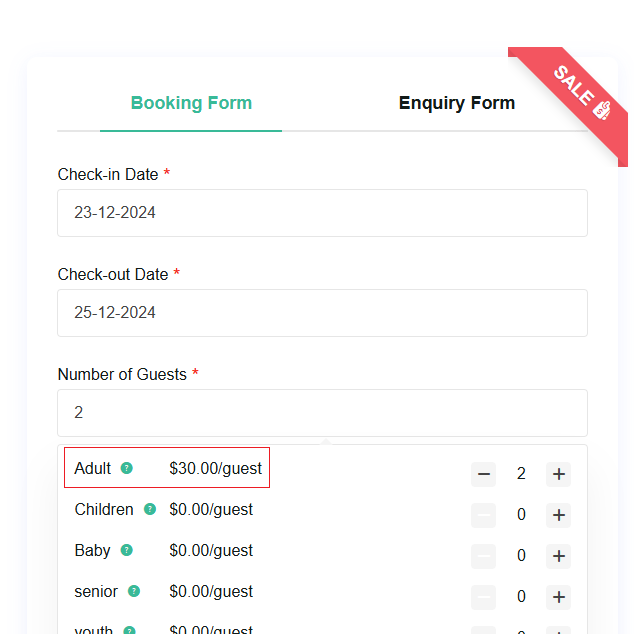
For instance, you have a 3-day tour and the price per adult is $30
After that, you set base discount rate and seasonal discount rate for each adult
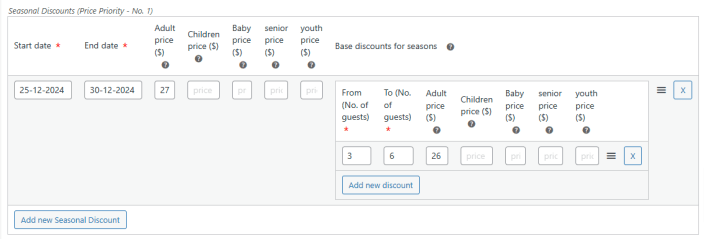
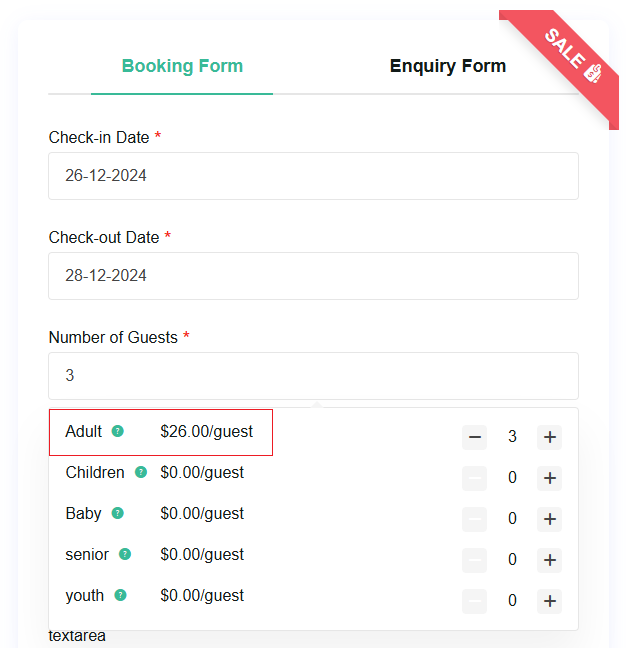
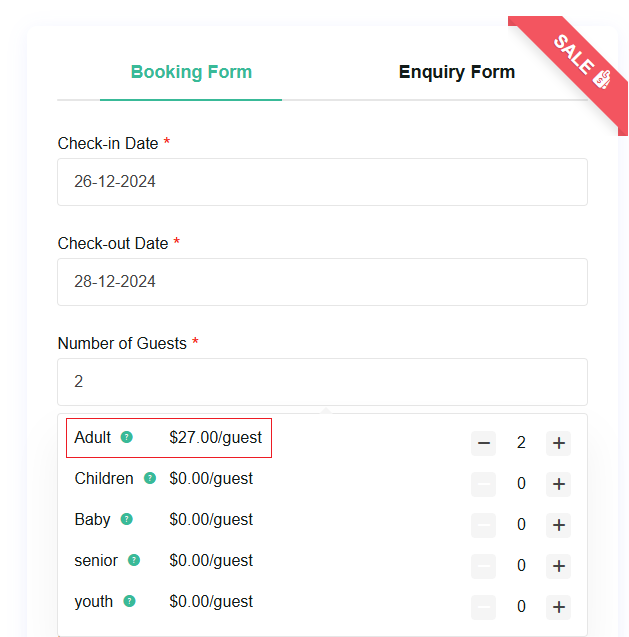
+ If a customer placed an order from December 26 2024 to December 28 2024
With 3 adults, his booking will be applied the base discount rate for season. The price will be $26 for each adult
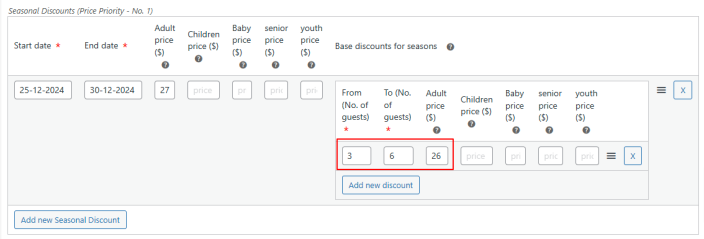
With 2 adults, his booking will be applied the seasonal discount rate. The price will be $27 for each adult
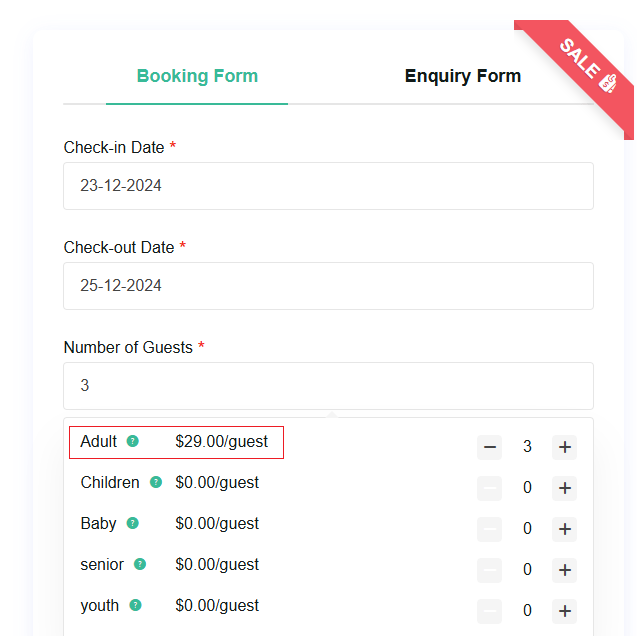
+ If a customer placed an order from December 23 2024 to December 25 2024
With 3 adults, the booking will be applied the base discount rate. The price will be $29 for each adult

With 2 adults, the booking will be applied the the price of tour. The price will be $30 per adult
4. Early bird pricing
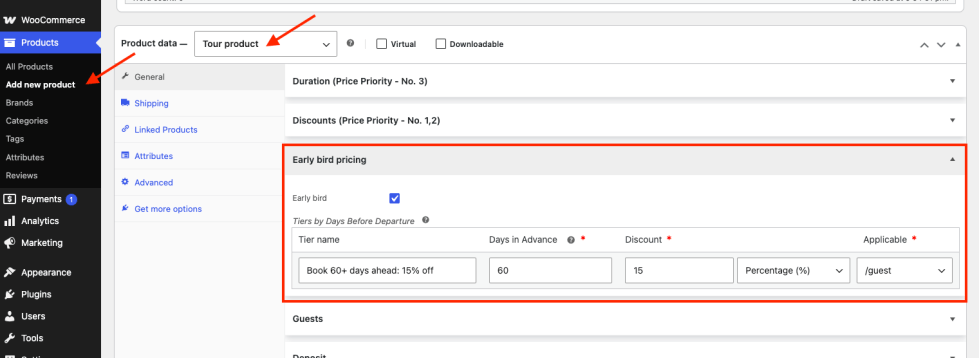
↑ Back to topTiered discounts for advance bookings. For each tier set a name, the number of days in advance, the discount value, the type (percentage or fixed amount), and what it applies to. The tier name can be displayed in the cart, checkout, and order details.
For example: “Book 60+ days ahead: 15% off. The discount is applied and labeled in the price breakdown without any coupon codes.
5. Set Guests
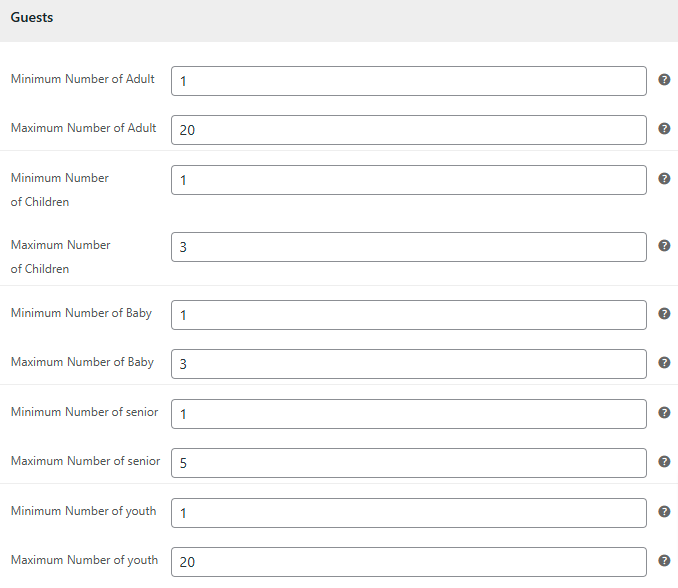
↑ Back to topThe feature allows you to set minimum number / maximum number of participants required within specific age groups for a tour.
Please, note: you can add and delete guests
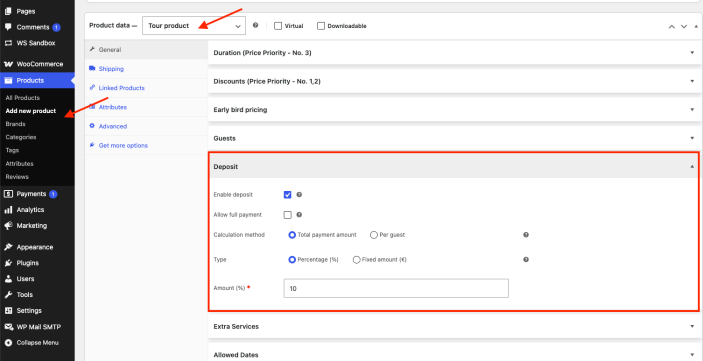
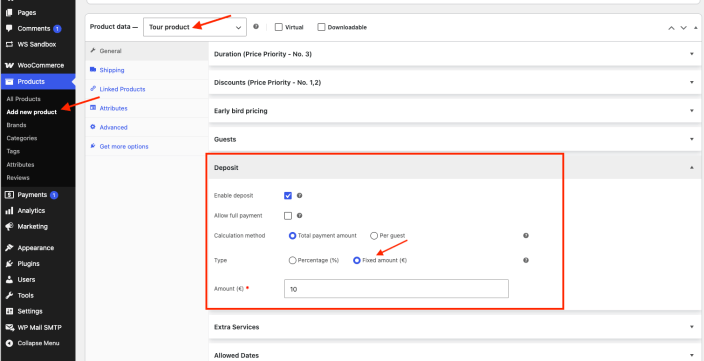
6. Set deposit payment for a tour
↑ Back to topDeposit payments is an amount that your customers will have to pay a certain amount upfront when they experience services.
Steps to follow:
- Firstly, If you want to configure a deposit payment for a tour, you tick the check box: Enable
- Next, you tick the check box: Allow full payment if you want to display full payment option in the product details.
- Choose one of 2 types of deposit: Percentage amount of payment or Fixed amount of payment
- Enter amount
7. Add Extra Service for a Tour
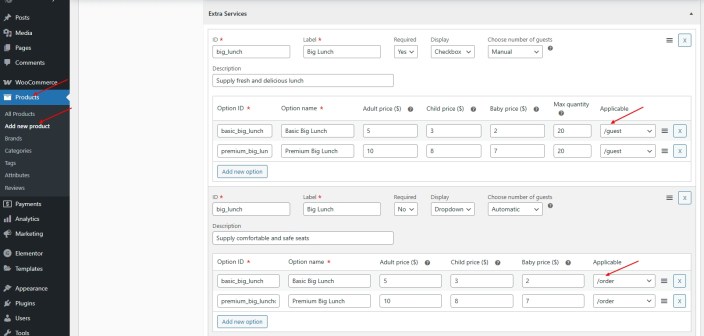
↑ Back to topYou can add unlimited payable services to a tour. Each service can also include unlimited payable options, giving you flexibility in how you offer add-ons to customers.
Steps to Add an Extra Service
- Add Service Information – Enter a unique Service ID and a Label.
- Set Requirement – Choose whether the service is Required or Optional.
- Select Display Style – Choose how the service will appear to customers: Dropdown or Checkbox
- Define Guest Selection Method – Decide how customers specify the number of guests using the service:
- Manual – Customers manually select the number of guests.
- Automatic – Automatically apply the number of guests chosen previously.
- Add a Description – Provide a short description for the service.
- Add Options for Each Service – Configure details for each option:
- Option ID, Name, Price (can be set per customer group)
- Choose whether the option applies per guest or per order
(Note: You can add or delete guest groups as needed.)
Please, note: Example for Guest vs. Order Applicability
- Applicable for Guest
For instance, if you have a Basic Big Lunch option priced at $5/meal per adult and you set this option to be applicable for guest:- A booking with 2 adults will be calculated as: $5 × 2 = $10
- Applicable for Order:
If you set the same Basic Big Lunch option to be applicable for order:- A booking with 2 adults will still cost $5 total, regardless of the number of guest
8. Sync booking
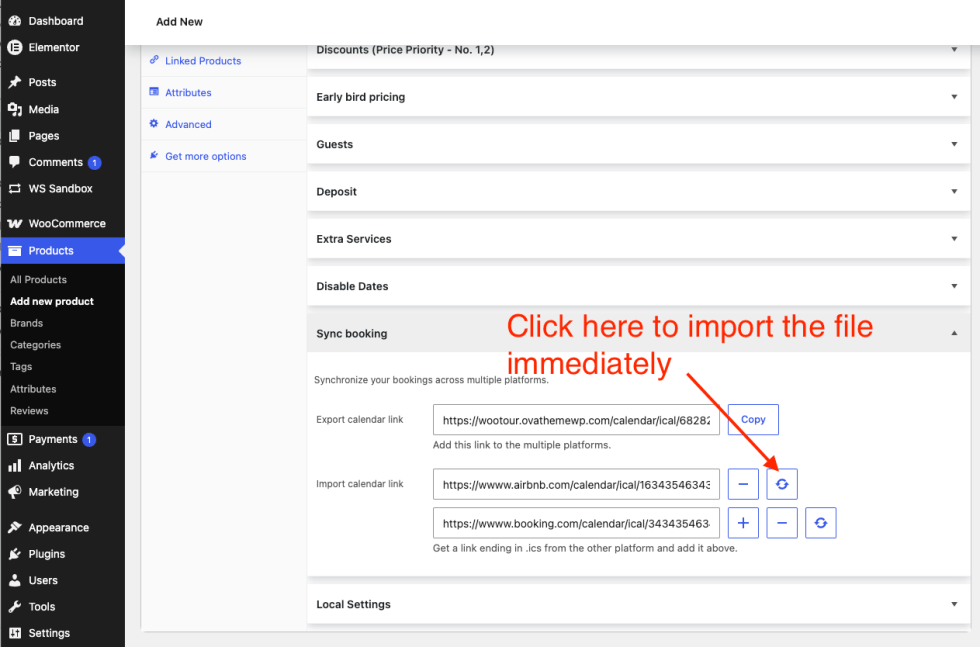
↑ Back to topSynchronise booked dates with external platforms (Airbnb, Booking.com, VRBO, Google Calendar, etc.) using the standard iCalendar format. Synchronization between your site and other platforms is real-time.
Export calendar link: Auto-generated read-only .ics URL for this product. Copy it and paste into any platform’s “import calendar” field. Updates automatically whenever an order is placed or cancelled.
Import calendar link: Paste one or more .ics URLs from other platforms. Use + / − to add or remove rows, and ↺ to trigger an immediate sync. Requires Enable Import calendar link setting in WooCommerce → Settings → Tour Booking >> Sync Booking
The plugin syncs import links on a WordPress cron schedule. Use the ↺ Update button to force an instant sync after adding a new link.81.) Export
Sync orders from your site to other platforms such as Airbnb, Booking.com, and more.
Step 1: Click the “Copy” button for a product on your site.
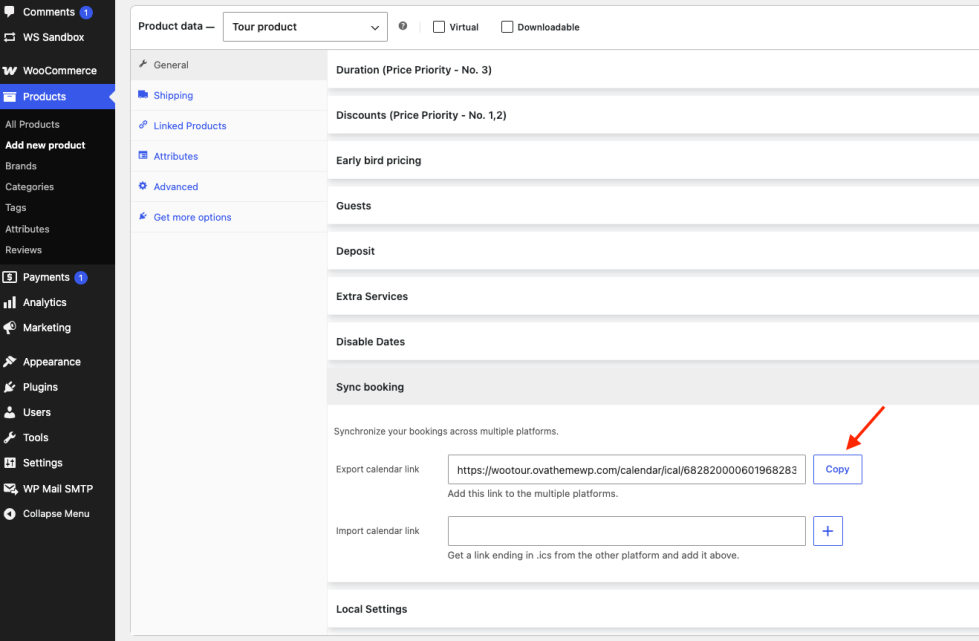
Step 2: Paste the link copied in Step 1 into another platform.
Example: paste to Airbnb
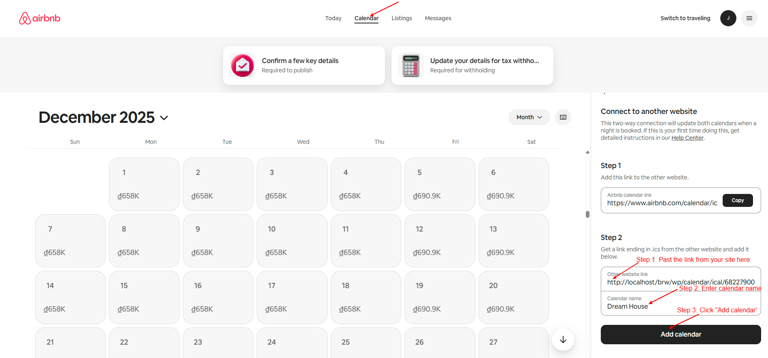
- Log in to Airbnb and go to Calendar
- Select your listing
- Click Availability → Connect calendars
- Click Connect to another website → Step 2 section
- Paste the link
- Enter a name for the calendar
- Click Add calendar
- Note: Airbnb will import this calendar and automatically block the corresponding dates.
Example)
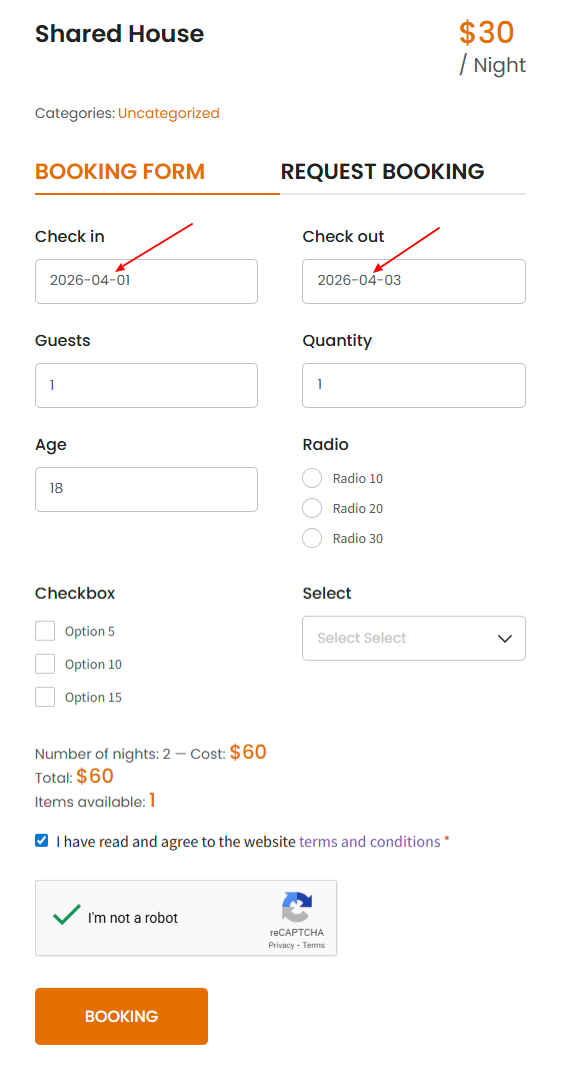
Suppose a customer books a product on your site from April 1, 2026 to April 3, 2026. Then April 1 and April 2 will be blocked on the calendar of that product
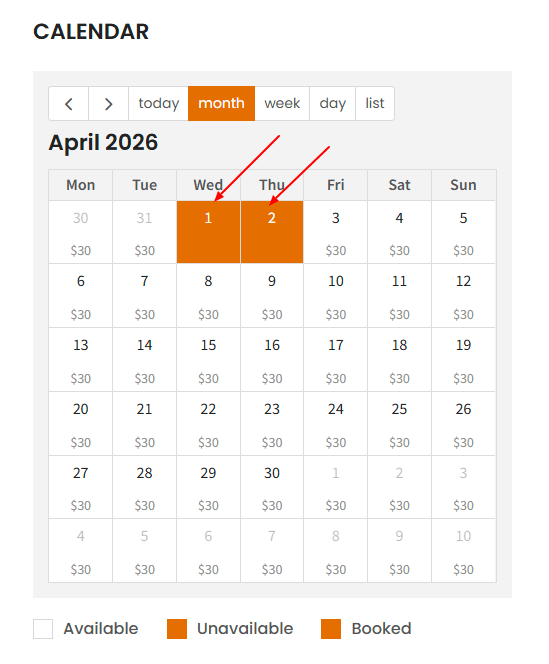
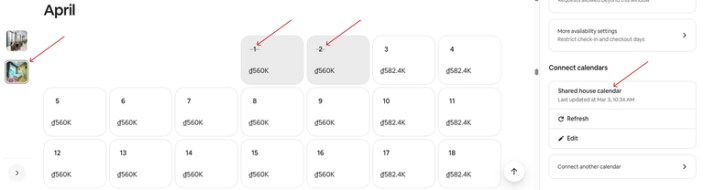
When you open the calendar for that product on Airbnb.com, April 1 and April 2 will also appear as blocked.
2.2) Import
Import and sync the product calendar from other platforms to your site.
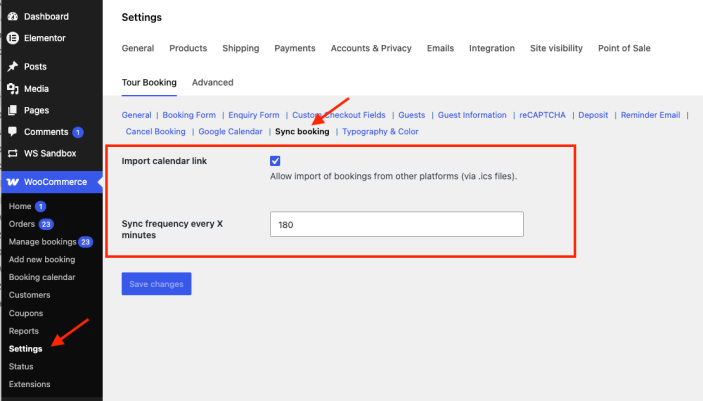
Step 1: Enable “Import Calendar Link”
Go to: WooCommerce → Settings → Tour Booking >> Sync Booking
Step 2: Copy link from other platforms
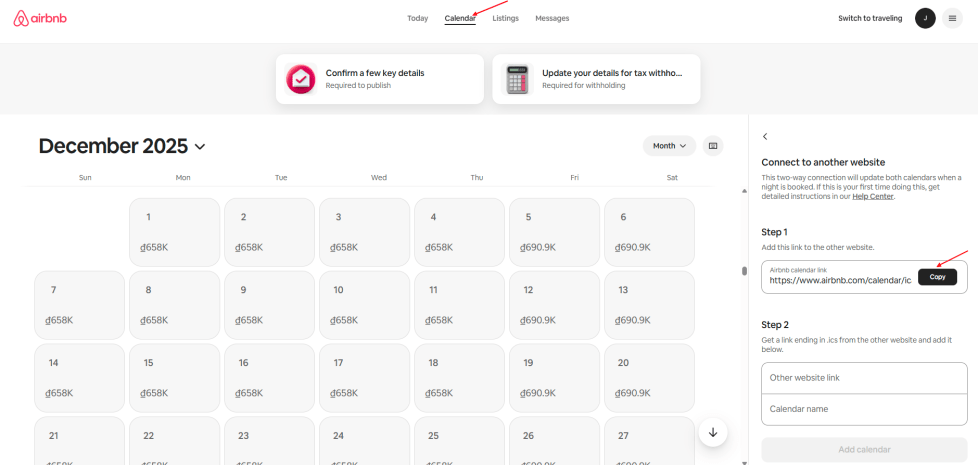
Example: copy link form Airbnb
- Log in to Airbnb and go to Calendar
- Select your listing
- Click Availability → Connect calendars
- Go to step 1 section
- Copy the Airbnb calendar link (.ics)
Step 3: Paste the link copied in Step 1 into your site
- Save to start syncing without click “update” button.
- After importing the .ics file, the system will create orders for the product based on the corresponding dates in the .ics file. Therefore, those dates will be blocked on your site.
9. Set Allowed Dates
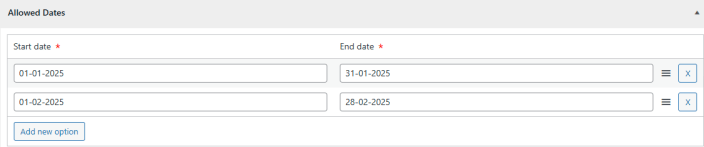
↑ Back to topThese are the dates that users are permitted to select for a booking. Any dates outside of this range are not available for selection.
With the feature, you add start dates and end dates for each allowed time period.
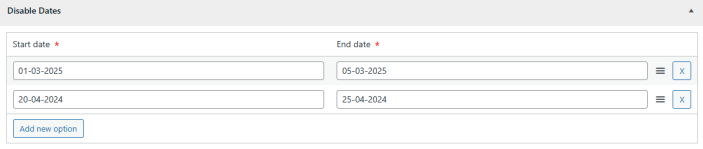
10. Set Disabled Dates
↑ Back to topThese are the dates that users are not permitted to select
With the feature, you set start dates and end dates for each disable time period.
11. Configure Local Settings for a Tour
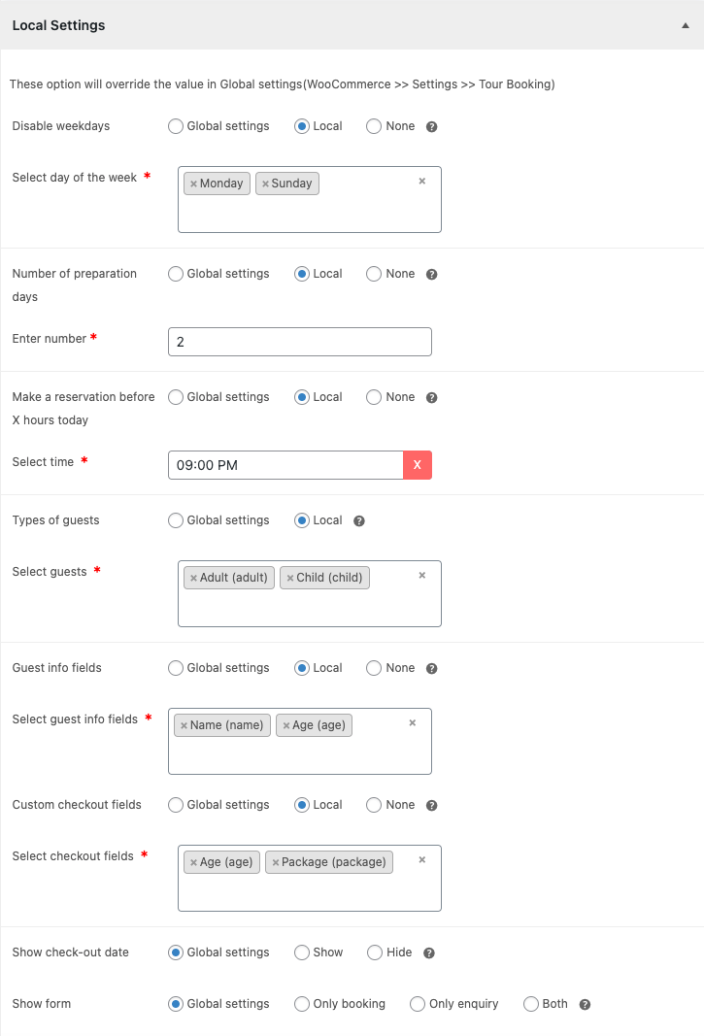
↑ Back to topPlease, note: These options will override the value in Global settings (WooCommerce > Settings > Tour Booking)
With the feature, you can set:
Explain some value in per setting:
- Global Settings: Get value in WooCommerce Setting.
- Local: The values only apply for this product.
- None: This setting doesn’t use for this product.
- Disable weekdays: You can choose days in the week in which are not permitted to select
- Number of preparation days: Set the buffer time required before a booking can be made. For example, if you set: number of preparation days is 2 days. Suppose that today is Thursday, December 19 2024. As a result, you can only make a booking from Saturday, December, 21 2024.
- Make a reservation before X hours today: Same-day reservations are allowed only if they are made before a specific time today
- Types of guests: That defined in WooCommerce settings
- Guest info fields: That defined in WooCommerce settings
- Custom checkout fields: The field display in Booking Form and enquiry Form.
- Show checkout date: in booking form and enquiry form.
- Show form ( show booking form and enquire form ). Choose one of 4 options:
- Global settings: Get value in WooCommerce Setting.
- Only booking: Only show booking form
- Only enquire: Only show enquiry form
- Both: Show both booking form and enquiry form
IV. Manage Bookings
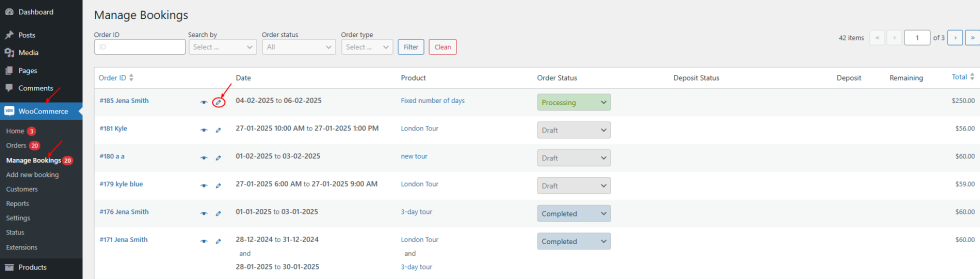
↑ Back to topWith this feature. you can use booking search functionality to filter bookings, change booking statuses, and edit bookings.
Go to WordPress Admin panel > WooCommerce > Manage Bookings
1. Booking Search Functionality
↑ Back to topThe feature allows users to quickly find specific bookings from a list using various search criteria:
- Order ID
- Customer email/ customer name/ product name/ check-in date/ check-out date
- Order Statuses: Pending payment, process, on hold, completed, cancelled, refunded, failed, draft.
- Deposit Status: Normal, deposit, remaining

2. Change Booking Statuses
↑ Back to topAllow to change booking statuses: Pending payment, process, on hold, completed, cancelled, refunded, failed, draft

3. Edit Booking Details
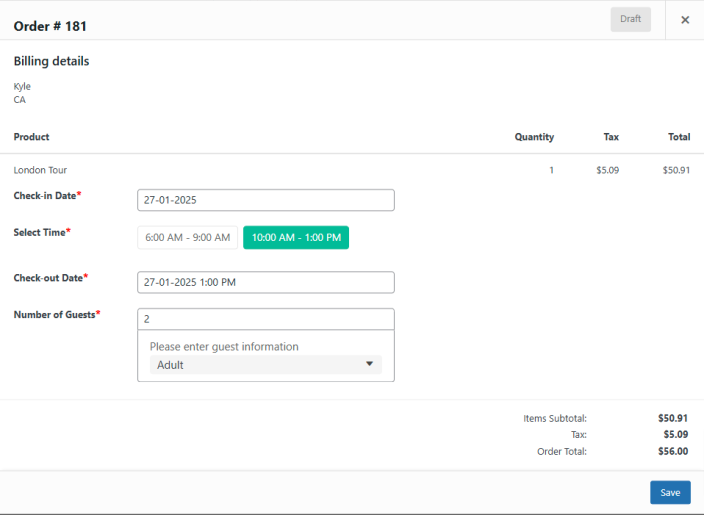
↑ Back to topYou click edit icon to edit bookings
Then you will see popup and you can change check-in date & check-out date as well as number of guests for each booking
V. Add New Bookings
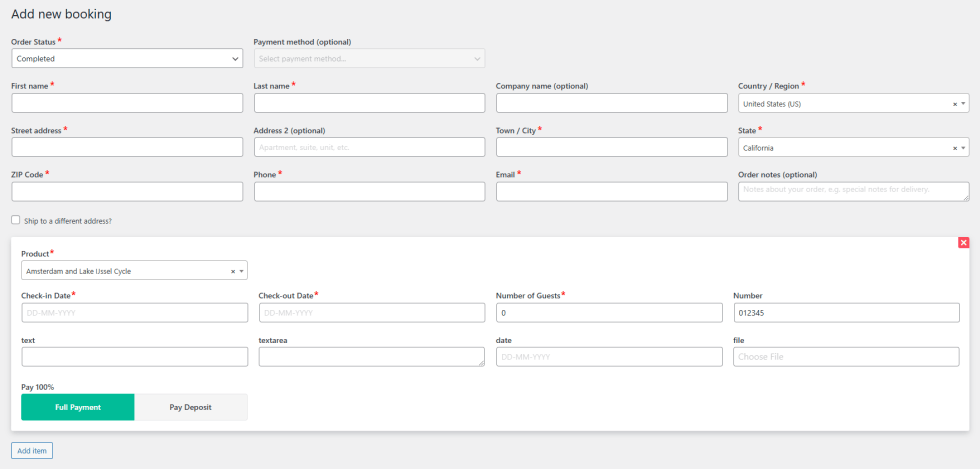
↑ Back to topCreate booking manually from the backend for customers who book via phone, email, or messages.
Go to WordPress Admin panel > WooCommerce > Add new booking
- Select order status: Pending payment, process, on hold, completed, cancelled, refunded, failed, draft
- Select payment method: Direct bank transfer, check payments, cash on delivery
- Fill in Customer information: First Name, Last Name, Company name, Country / Region, Street address, Address, Town / City, State, ZIP Code, Phone, Email, Order notes
- Add unlimited tours for an order: Choose tours in tour list and fill in the booking form
- Choose that customers made a full payment or paid a deposit
VI. Booking Calendar
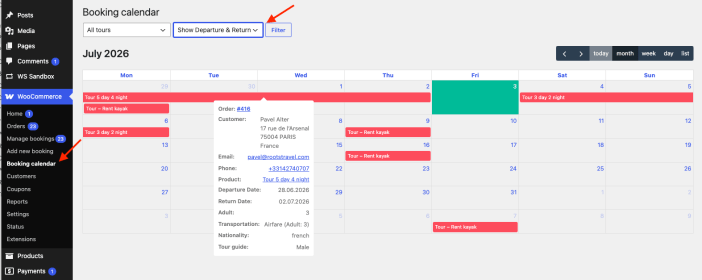
↑ Back to topGo to WordPress Admin panel > WooCommerce > Booking Calendar
The Booking Calendar in the backend allows you to efficiently manage and review all reservations with a clear, visual interface.
Key Features:
- Multiple Views: Manage bookings in daily, weekly, monthly, or list view directly from the backend.
- Quick Filtering: Easily filter bookings for a specific product.
- Clear Overview: Gain a comprehensive snapshot of all reservations to simplify scheduling.
- Custom Display Options: Choose to display bookings with check-in dates only, check-out dates only, or both for more flexible management.
VII. Global Settings
↑ Back to topYou only need to set all those settings once and they will be applied for all products
Go to: WordPress Admin panel > WooCommerce > Settings > Tour Booking
1. Configure General Settings
↑ Back to topWith the function, you can set booking conditions, date and time format, and calendar
To set general settings, go to WordPress Admin panel > WooCommerce > Settings > Tour Booking > General
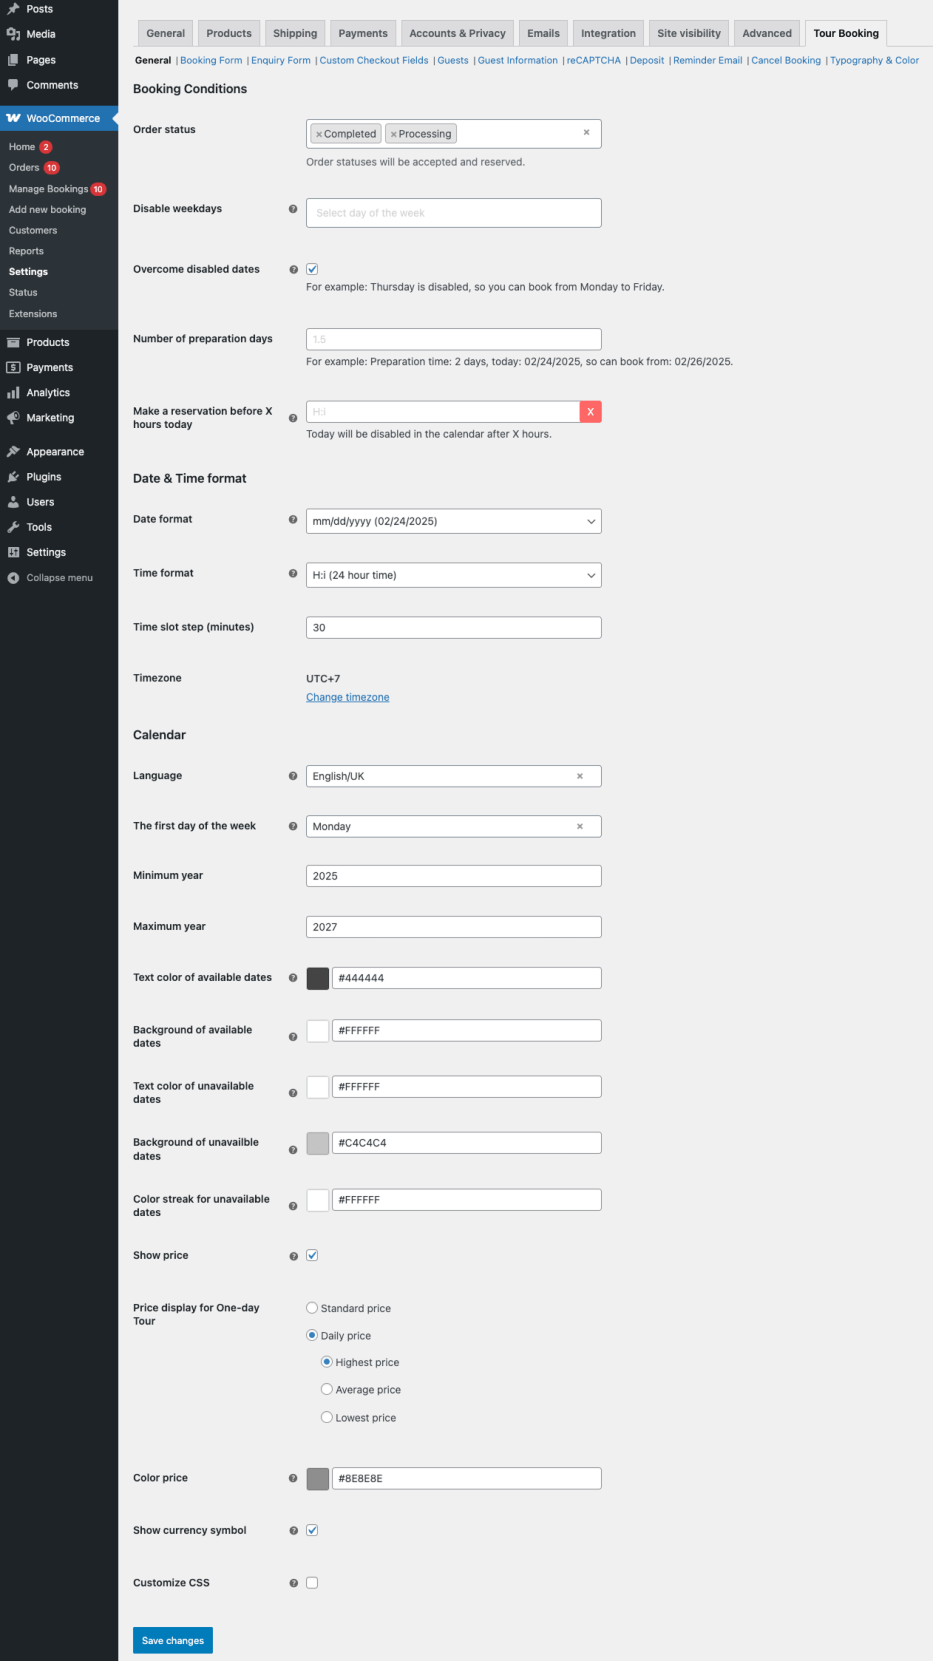
In this feature, you can set:
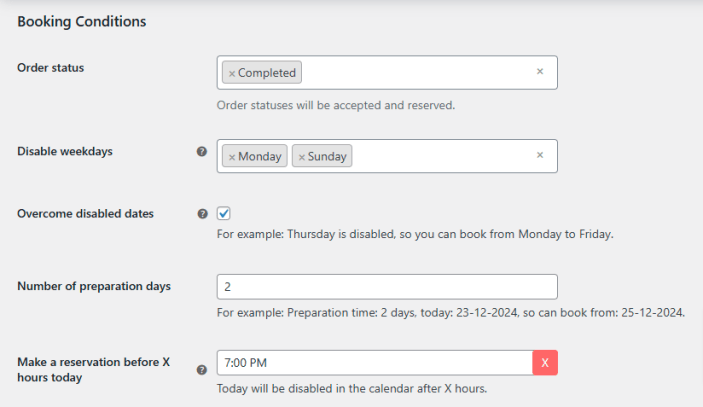
1.1 Booking Conditions
- Order Status: You will choose order statuses that will be accepted and reserved.
- Disable weekdays: Choose specific weekdays in which users will be prevented from booking
- Overcome disabled dates: Allow to choose a date range including disabled dates. For instance, if you activate this feature and you choose that Thursday is disabled. A guest can still make a booking from Monday to Friday including Thursday that is disabled.
- Number of preparation days: Set the buffer time required before a booking can be made. For example, if you set number of preparation days is 2 days. Suppose that today is Thursday, December 19 2024. As a result, you can only make a booking from Saturday, December, 21 2024.
- Make a reservation before X hours today: Same-day reservations are allowed only if made before a specific time today
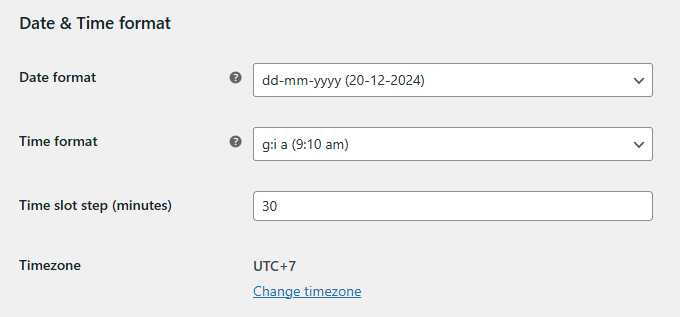
1.2 Date and time format
- Date format: Support 4 date formats including dd-mm-yyyy, yyyy-mm-dd, dd/mm/yyyy, and yyyy/mm/dd
- Time formats: Support 7 time formats including H:i (24 hours), h:i (12 hours), h:i a (09:10 am), h:i A (09:10 AM), g:i (9:10), g:i a (9:10 am), g:i A (9:10 AM)
- Time slot steps: Allows to choose a default length for the time slot step. This setting is only used when the group time of pick-up and drop-off date is empty. For example: Set 15 minutes as the default time slot step, the booking hour will be divided by a grid of 15 minutes: 07:15, 07:30, 07:45.
- Time Zone: Change time zone that fits your region
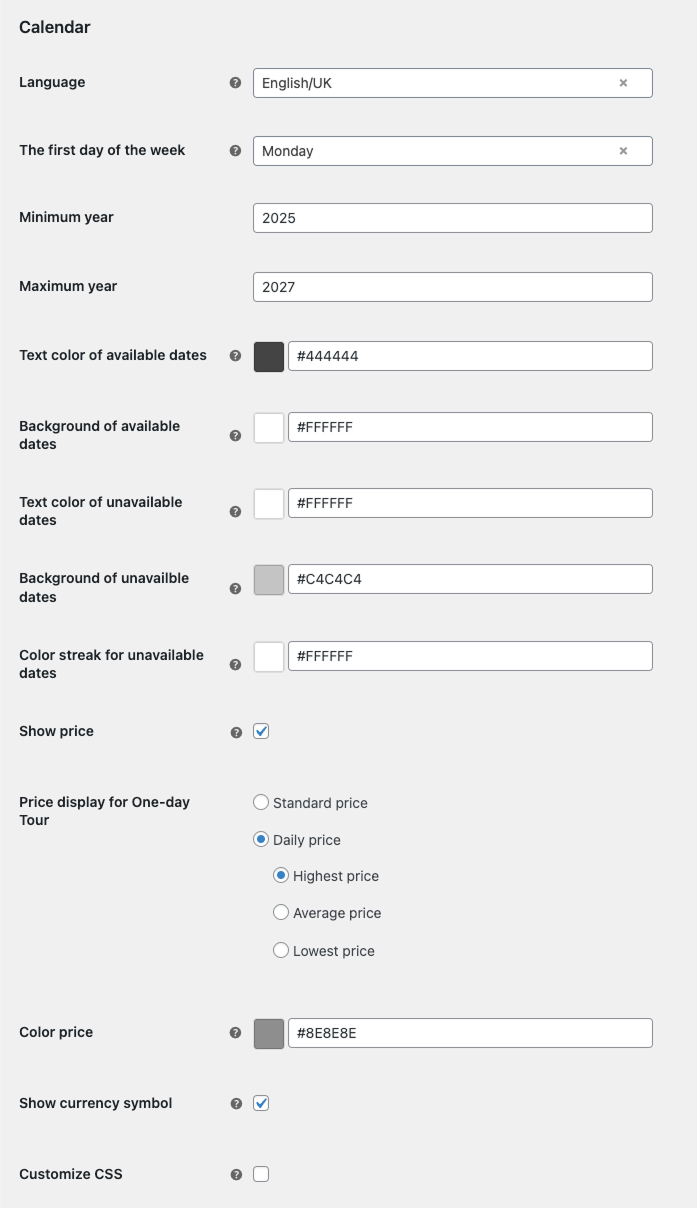
1.3 Calendar
- Language: Choose a language for the calendar
- The first day of the week: For example, if you want Sunday is the first day of the week, you insert: Sunday in this field.
- Minimum year: Set the earliest year that users can select a date from
- Maximum year: Set the latest year users are allowed to select
- Text color of available dates: Allow to set text color for dates that users can book
- Background of available dates: Allow to set color of background for dates that users can book
- Text color of unavailable dates: Allow to set text color for dates that users aren’t permitted to select
- Background of unavailable dates: Allow to set color of background for dates that users aren’t permitted to select
- Color streak for unavailable dates: A color streak to indicate dates that are blocked, disabled, or unavailable for selection
- Show Price: Display price in calendar
- Price display for One-day Tour: This option only apply for “One-day Tour” type.
- Color price: Allow to customize color of price.
- Show currency symbol: show/hide symbol in price.
- Customize CSS: Add CSS to customize settings for the calendar
2. Set a Booking Form
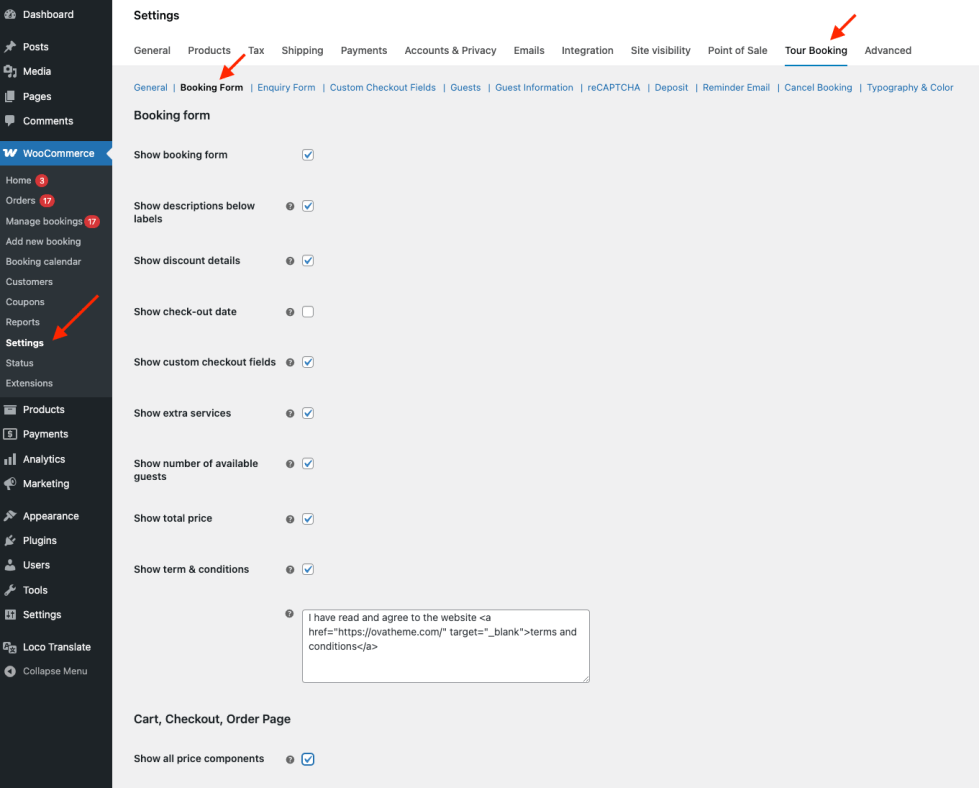
↑ Back to topA booking form will help you to collect all necessary details required to confirm a booking.
Go to WordPress Admin panel > WooCommerce > Settings > Tour Booking > Booking Form
This feature allows to:
- Show/hide booking form, discount details, check-out date, custom checkout fields, extra services, number of available guests, and total price
- Show/hide term and conditions. Besides, you can add text for term and conditions
- Show/hide all price components in cart, checkout, and order page: Displaying all price components will help to explain how the total price is calculated
3. Set an Enquiry Form
↑ Back to topEnquiry forms serve as a convenient communication tool between businesses and customers that allows customers to expresses interest in a tour.
Go to WordPress Admin panel > WooCommerce > Settings > Tour Booking > Enquiry Form
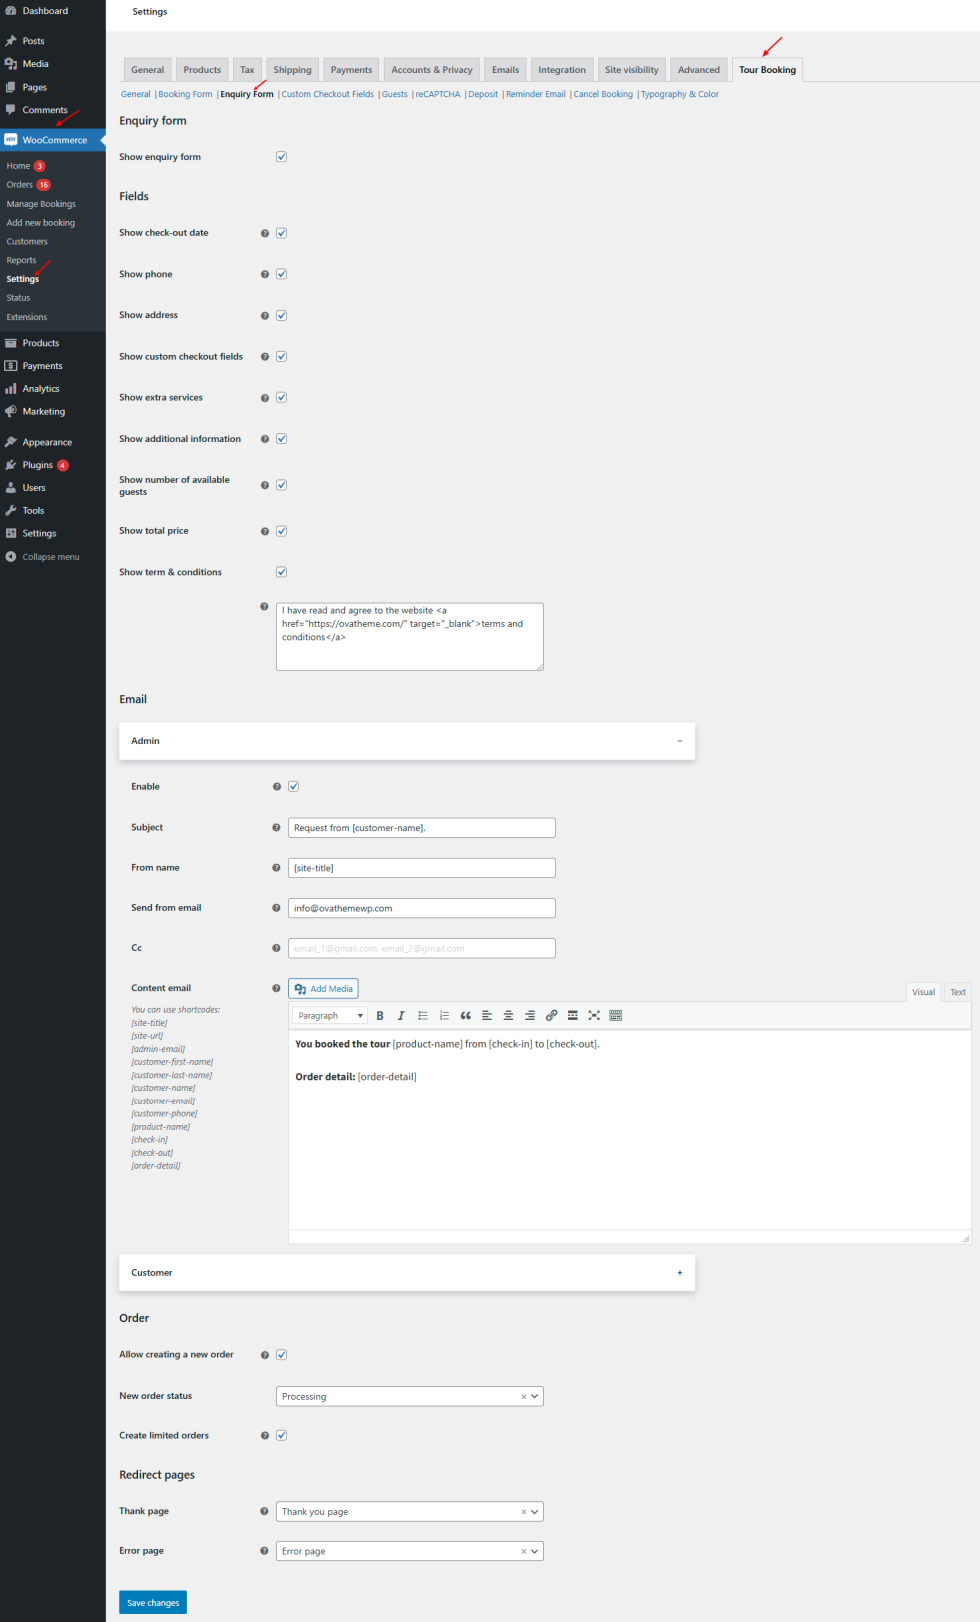
This feature allows to:
3.1 Show/hide enquiry form
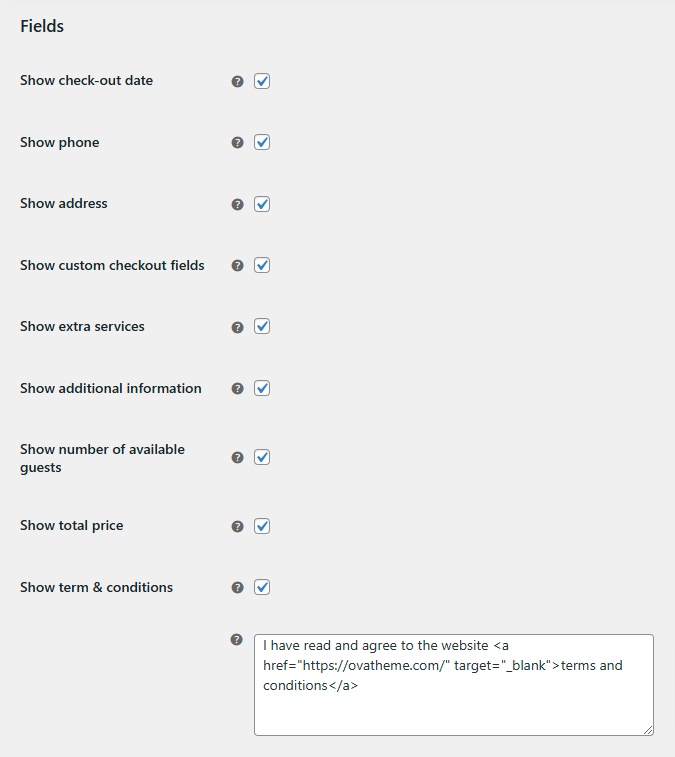
3.2 Show/hide fields
- Show/hide check-out date, phone, address, custom checkout fields, extra services, additional information. number of available guests, and total price
- Show/hide term and conditions. Besides, you can still add text for term and conditions
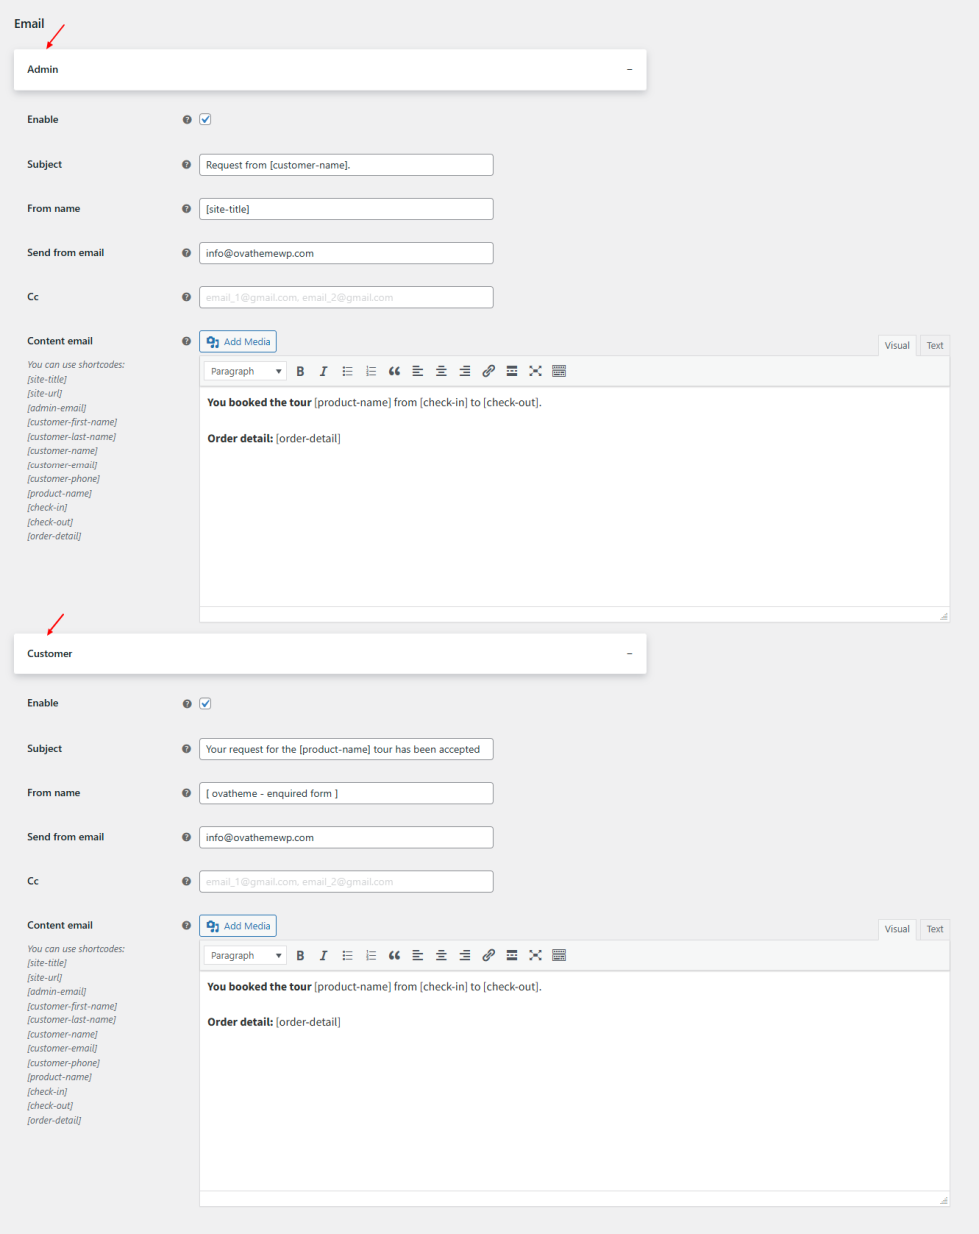
3.3 Set Email
+ Set email for Admin
- Enable: Allow to send email to email address of Admin or not
- Subject: Set subject for email
- From name: Set from name for email
- Send from email: Customers will know that they received email from which email address is
- CC: Add other email addresses
- Email Content: Use these short codes: [site-title] [site-url] [admin-email] [customer-first-name] [customer-last-name] [customer-name] [customer-email] [customer-phone] [product-name] [check-in] [check-out] [order-detail] if you want to add these details in email content
+ Set email for Customer
- Enable: Allow to send email to email address of Admin or not
- Subject: Set subject for email
- From name: Set from name for email
- Send from email: Customers will know that they received email from which email address is
- CC: Add other email addresses
- Email Content: Use these short codes: [site-title] [site-url] [admin-email] [customer-first-name] [customer-last-name] [customer-name] [customer-email] [customer-phone] [product-name] [check-in] [check-out] [order-detail] if you want to add these details in email content
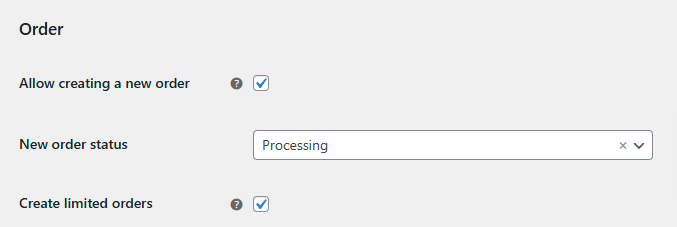
3.4 Set orders
- Allow creating a new order: You want to allow to WooCommerce to make a new order after a customer submits an enquiry form or not.
- New order status: Choose the status for a new order.
- Create limited orders: Prevent customers from booking when they select more than the maximum number of guests per tour
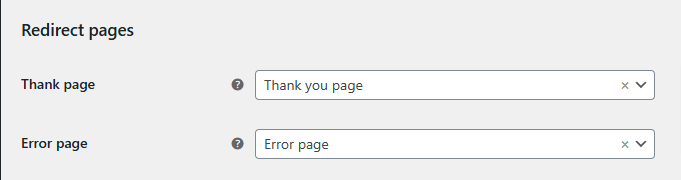
3.5 Set redirect pages
- Thank page: Choose a page that redirect users when they successfully placed an order.
- Error page: Choose a page that redirect users when their order fails.
4. Set Custom Checkout Fields
↑ Back to topThe feature allows to add and mange checkout fields displayed in the Booking form and Enquiry form.
Go to: WordPress Admin panel > WooCommerce > Settings > Tour Booking > Custom Checkout Fields
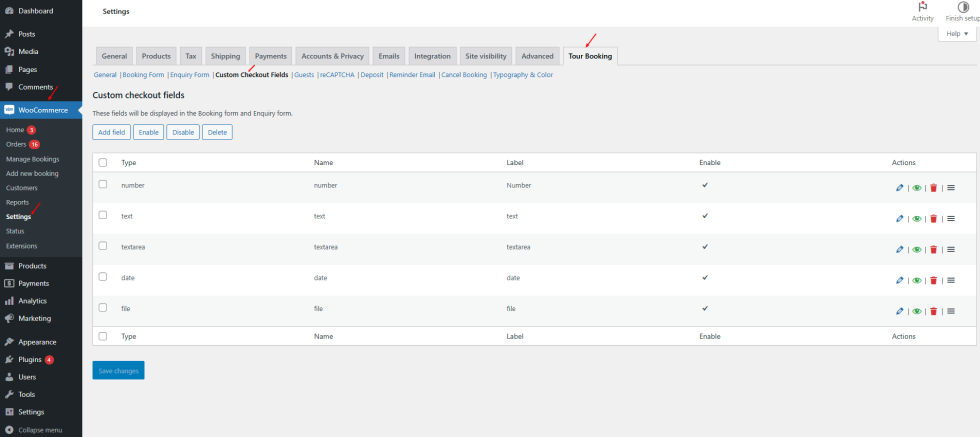
+ Add fields
- Select type: supports 11 different types of Custom Checkout fields including text, number, tel, email, password, textarea, radio, checkbox, select, date, and file
- Name: Add name for fields that is shown in the back end
- Label: Add name for fields that is shown in the front end
- Description: Add description for fields
- Placeholder: Enter a hint or example text displayed inside an input field to indicate what the user should enter
- Default: Enter a pre-filled value in the field that will be submitted unless the user changes it
- Class: choose class for the field
- Required: Mark Custom Checkout fields as required or non-required
- Enable: Enable or Disable a Custom Checkout field in the form
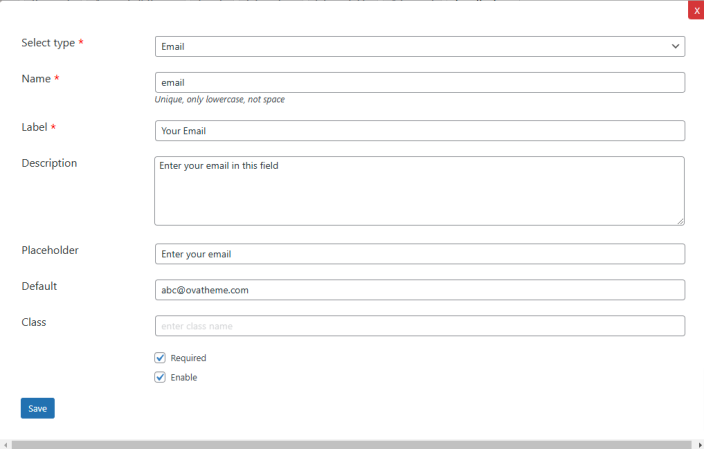
+ Edit fields
+ Delete fields
5. Add and Manage Guests
↑ Back to topThe feature enable you add unlimited different customer groups. Besides, you can edit or delete the premade customer groups
Go to: WordPress Admin panel > WooCommerce > Settings > Tour Booking > Guests
How to add a customer group:
- Label: Add label that is shown in the front end
- Name: Add name that is shown in the back end
- Description: Add description
- Show/hide price beside: Allow to show/hide price beside label of guests
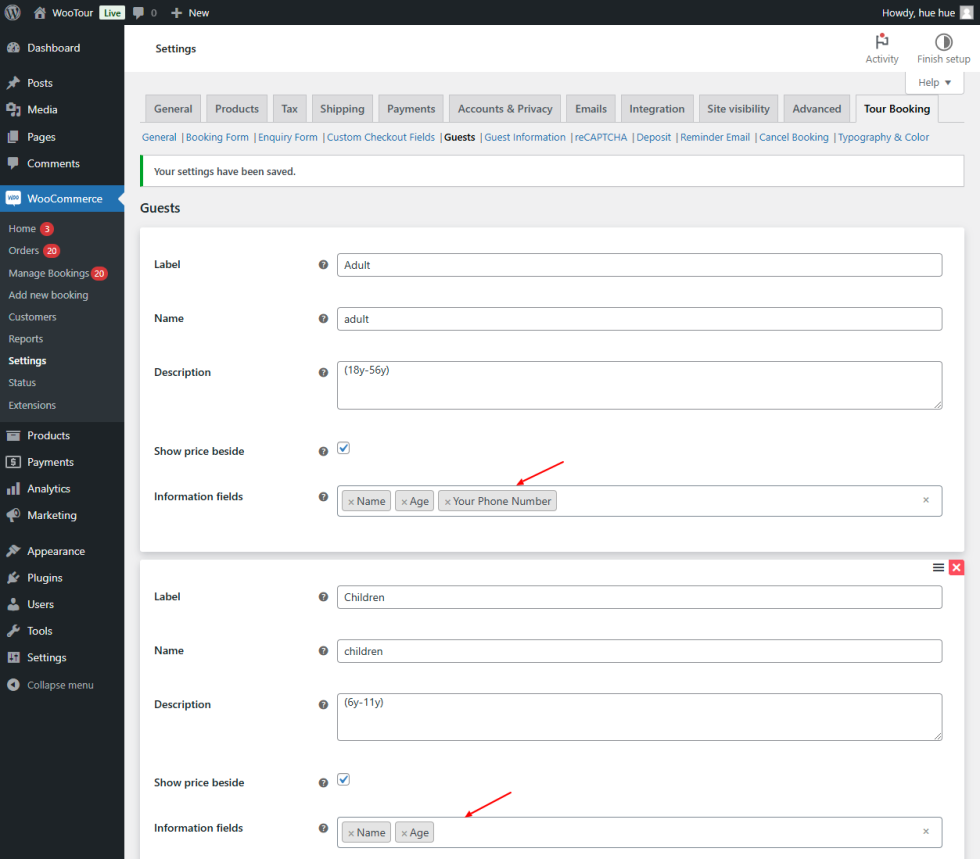
- Information Fields: Select information fields in the list for each customer group
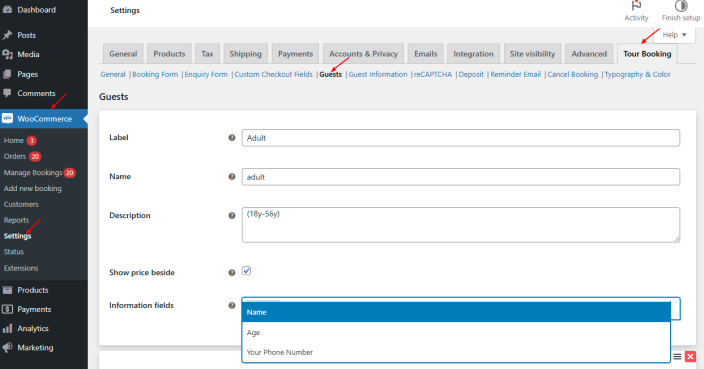
6. Add and Manage Guest Information
↑ Back to topThe feature helps you to collect information for each individual customer when customers make a booking.
This feature allows you to add unlimited information fields for each guest ( name, phone, age … ), edit and delete information fields of guests.
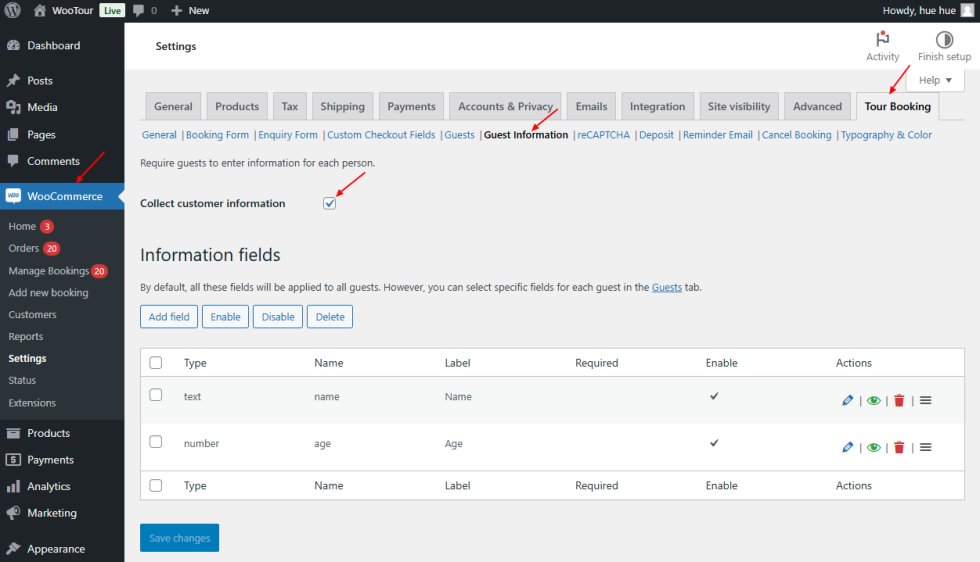
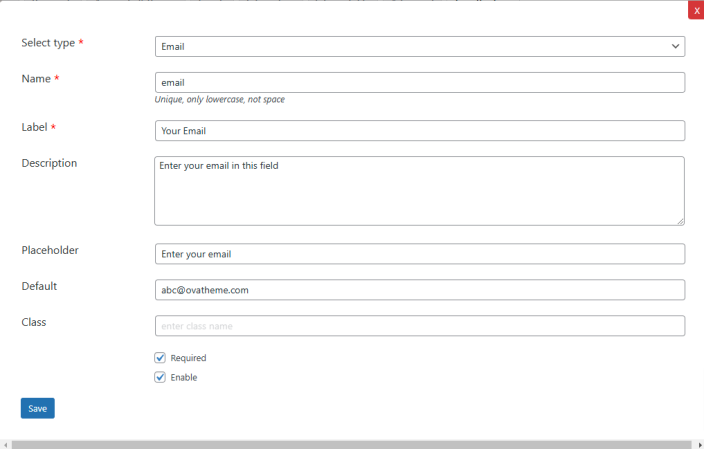
6.1 Add information fields of guests in backend
Select type: supports 11 different types of Custom Checkout fields including text, number, tel, email, password, textarea, radio, checkbox, select, date, and file- Name: Add name for fields that is shown in the back end
- Label: Add name for fields that is shown in the front end
- Description: Add description for fields
- Placeholder: Enter a hint or example text displayed inside an input field to indicate what the user should enter
- Default: Enter a pre-filled value in the field that will be submitted unless the user changes it
- Class: choose class for the field
- Required: Mark Custom Checkout fields as required or non-required
- Enable: Enable or Disable a Custom Checkout field in the form
6.2 Display information guests in the frontend
Suppose that I configure guest information fields for adults and children as follows:
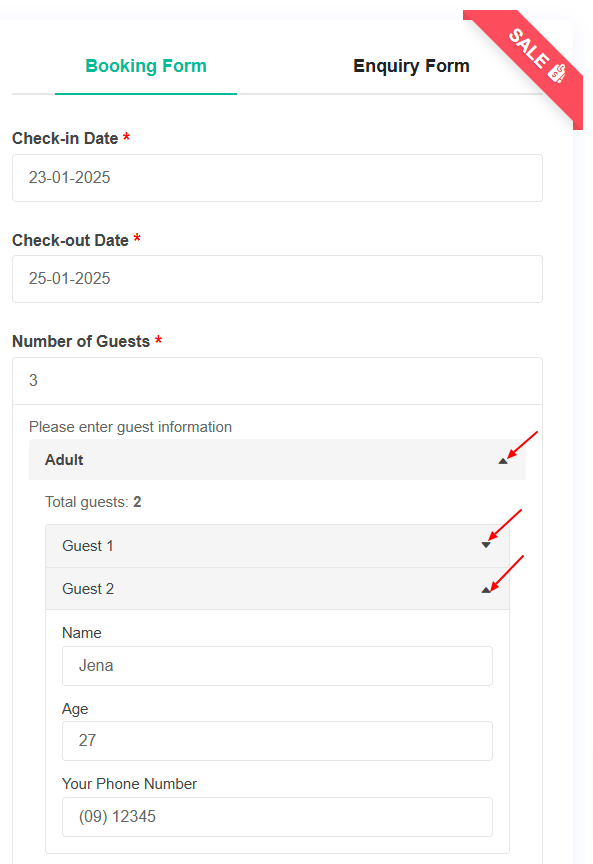
Display in booking form and enquire form

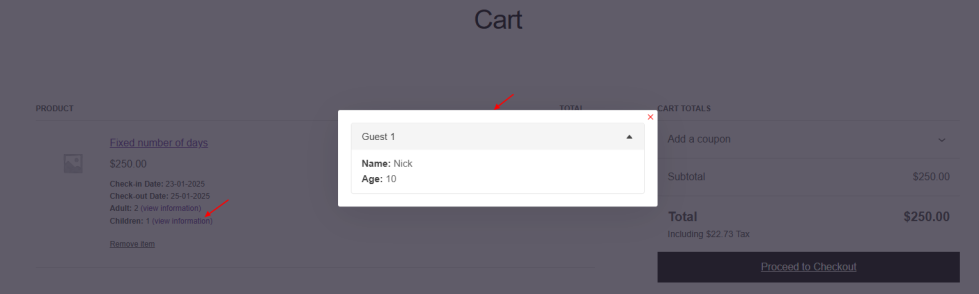
Display in Cart, Checkout and order details
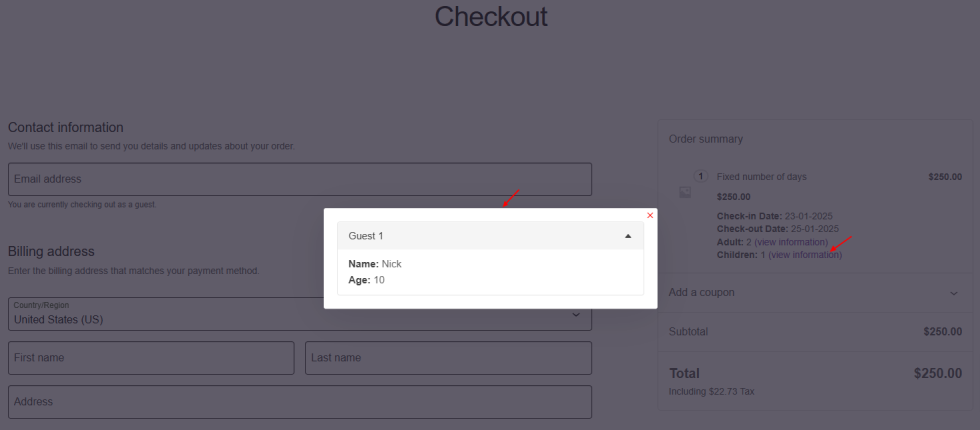
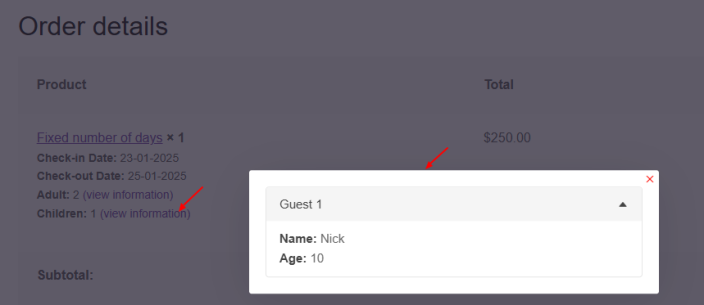
7. Create reCAPTCHA
↑ Back to topreCAPTCHA is a free security service provided by Google that protects websites from spam and abuse by verifying whether a user is human or a bot
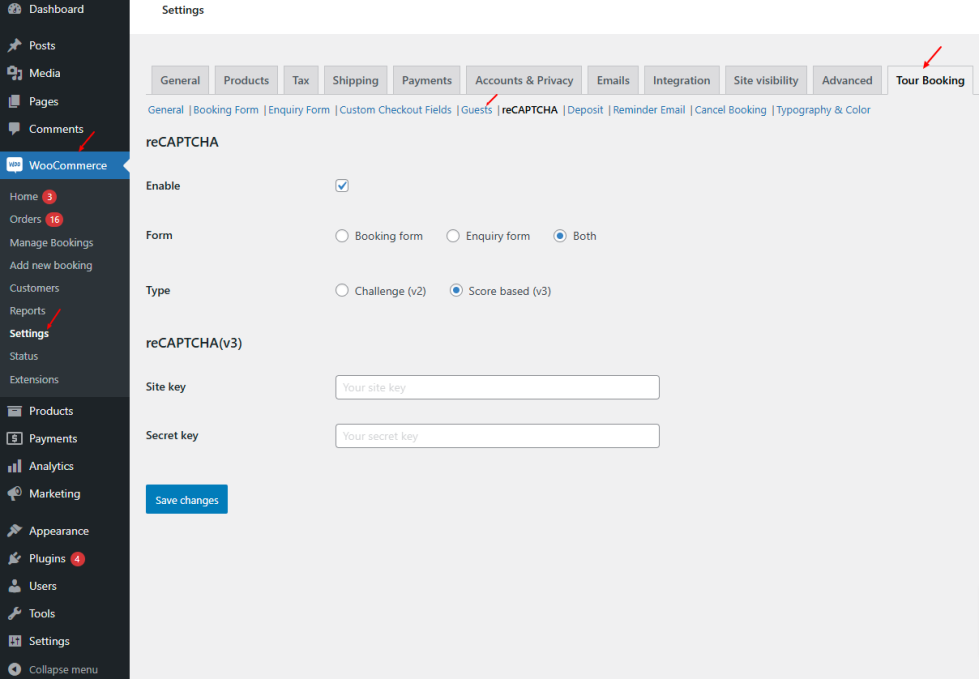
To create reCAPTCHA, go to: WordPress Admin panel > WooCommerce > Settings > Tour Booking > Guests
- Enable: Show/hide reCAPTCHA
- Form: Use reCAPTCHA for booking form, enquiry form or both of these forms
- Type: Choose one of 2 reCAPTCHA types including Challenge (v2) and score based (v3). After that, you enter site key and secret key for the reCAPTCHA type you choose.
8. Set Deposit Payment
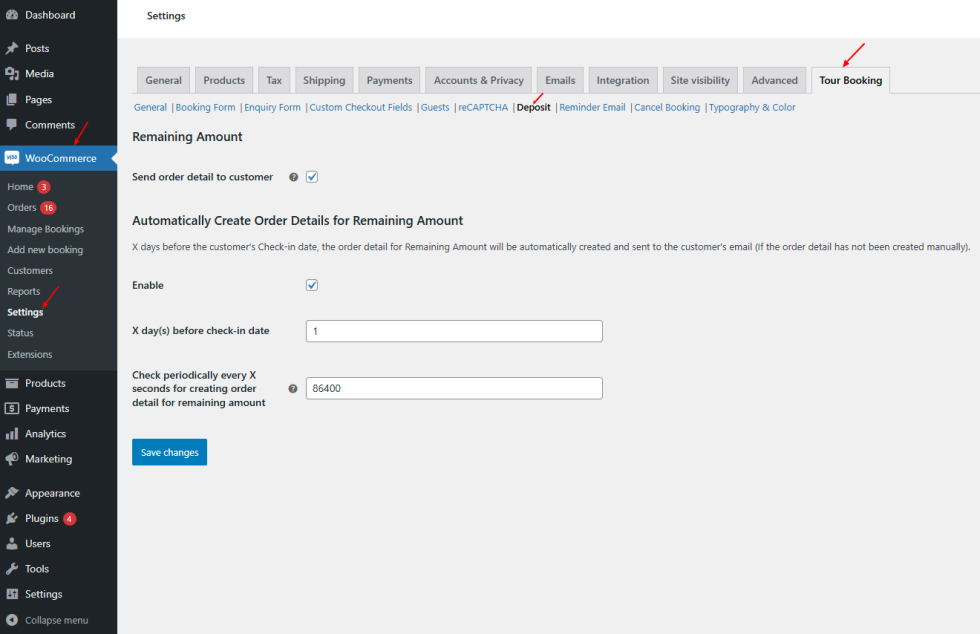
↑ Back to topGo to: WordPress Admin panel > WooCommerce > Settings > Tour Booking > Deposit
8.1 Remaining amount
Send order detail to customer: Allow to send an email including remaining amount of an order to customers’ email address or not.
8.2 Automatically create order details for remaining amount
- Enable: Allow to automatically create order details for remaining amount of an order or not
- X day before check-in date: Set number of days before the customer’s Check-in date when the order details including Remaining Amount of the order will be automatically created and sent to the customer’s email (If the order detail has not been created manually).
- Check periodically every X seconds for creating order details for remaining amount of an order: Determines how often the system checks for creating order details for remaining amount of an order.
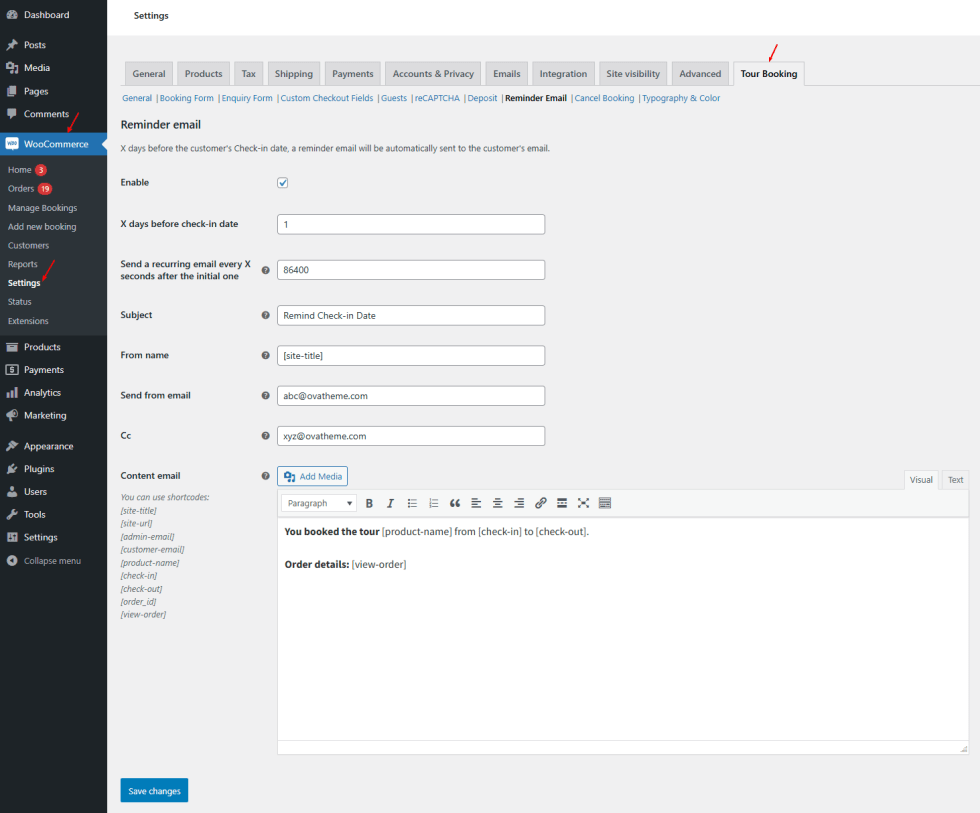
9. Set Reminder Email
↑ Back to topReminder email is a notification automatically sent to customers’ email addresses to remind him of an upcoming check-in for a reservation or booking
Go to: WordPress Admin panel > WooCommerce > Settings > Tour Booking > Reminder Email
- Enable: Allow to automatically sent an reminder email to customer or not
- X day before check-in date: Suppose that you set 2 days before check-in date. If the check-in date is December 25, 2024, the email will be sent on December 23, 2024.
- Send a recurring email every X seconds after the initial one: Create an automated process where an email is sent repeatedly every X seconds after the first email.
- Subject: Set subject for email
- From name: Set from name for email
- Send from email: Customers will know that they received email from which email address is
- CC: Add other email addresses to send
- Email Content: Use these short codes: [site-title] [site-url] [admin-email] [customer-email] [product-name] [check-in] [check-out] [order_id] [view-order] to add details for email content
10. Set Cancellation Policy
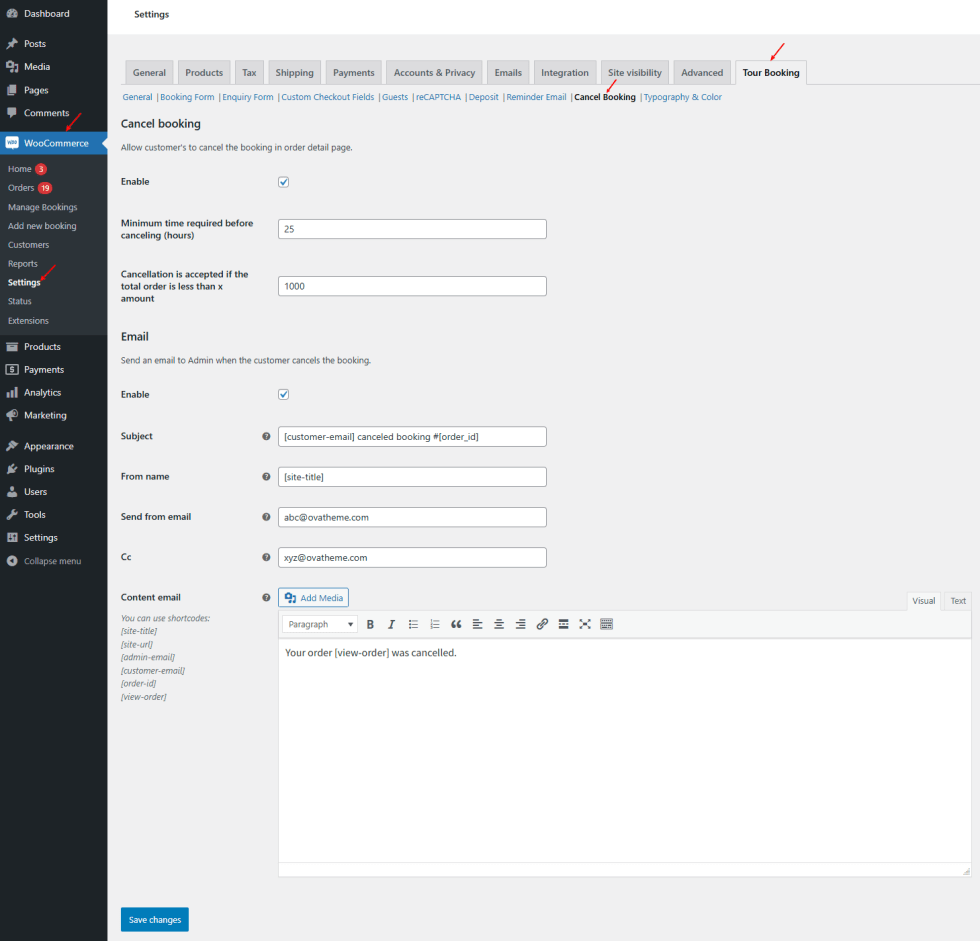
↑ Back to topThe feature enables to set the rules and procedures for canceling a booking
Go to: WordPress Admin panel > WooCommerce > Settings > Tour Booking > Cancel Booking
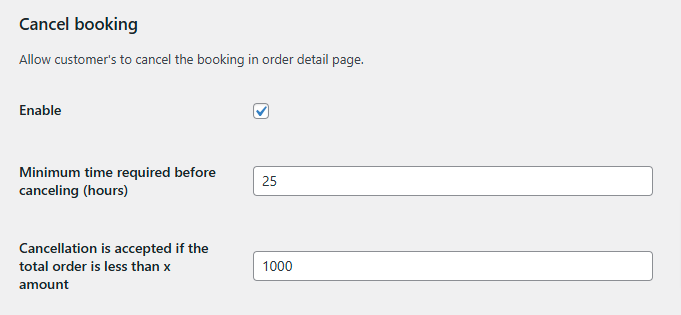
10.1 Set cancellation policy
- Enable: Allow customers to cancel booking or not
- Minimum time required before canceling (hours): Enable customers to cancel your appointment at least x minutes before the appointment time
- Cancellation is accepted if the total order is less than x amount: Allows order cancellations only when the total value of the order does not exceed X amount
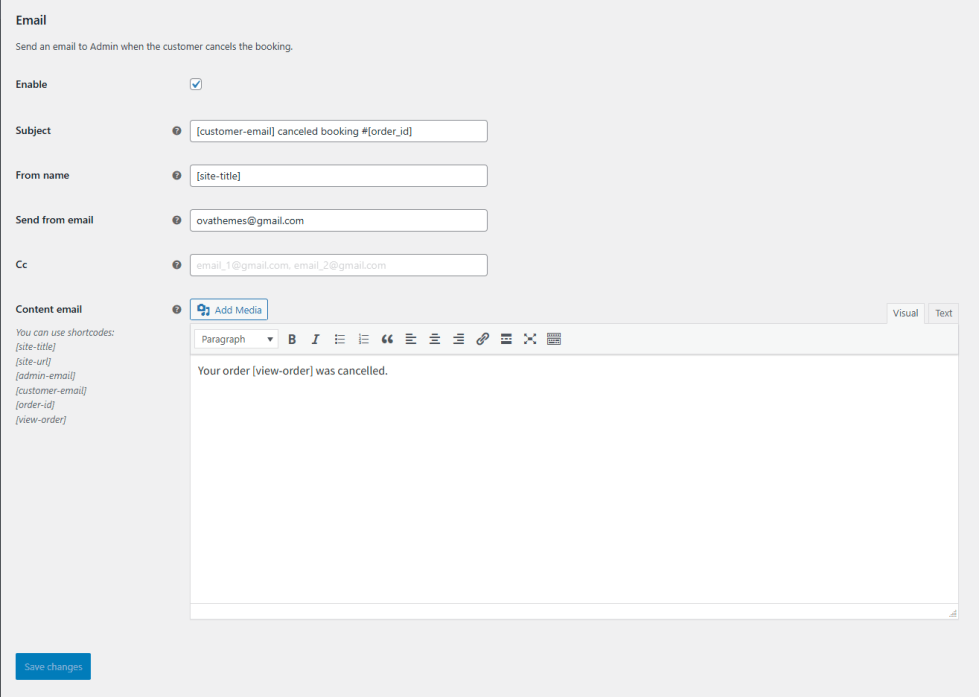
10.2 Set email
This feature is able to configure an email to send to email address of Admin when customers cancel their booking
- Enable: Allow to sent to the email address of Admin when customers cancel their booking or not
- Subject: Set subject for email
- From name: Set from name for email
- Send from email: Customers will know that they received email from which email address is
- CC: Add other email addresses to send
- Email Content: Use these short codes: [site-title] [site-url] [admin-email] [customer-email] [order-id] [view-order] to add details for email content.
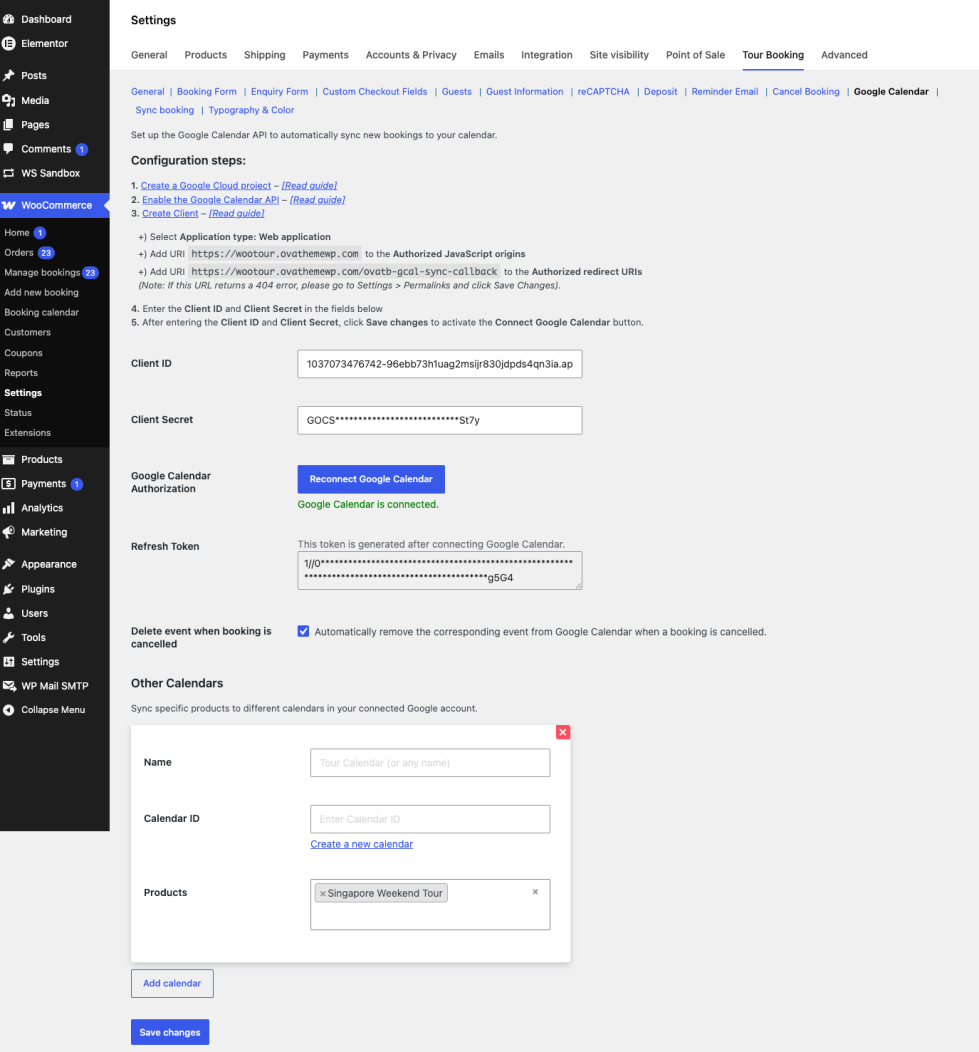
11: Google Calendar
↑ Back to topSynchronize orders in both directions between Google Calendar and your site. You can synchronize your tour order to a specific Google Calendar for that tour, ensuring it doesn’t mix up with other tours.
12: Sync Booking
↑ Back to topSynchronize orders in both directions between platforms (booking.com, airbnb …..) and your website.
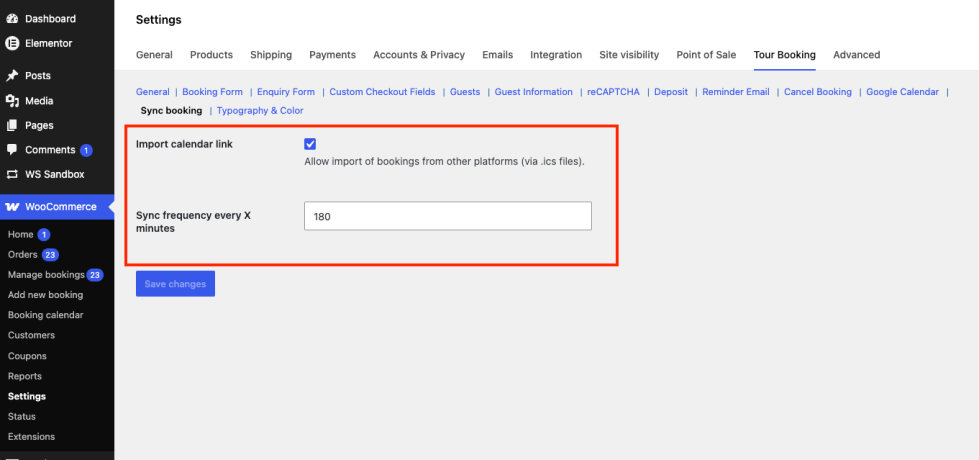
Enable “Import Calendar Link”
Enables the iCal import feature. When active, the system periodically fetches .ics calendar URLs configured per product and blocks dates found in those feeds.
Sync frequency every X minutes
How often (in minutes) the system fetches the external calendar feeds and updates blocked dates. Lower values keep availability more up-to-date but increase server load.
Default: 180 minutes
13. Set Typography and Color
↑ Back to topGo to: WordPress Admin panel > WooCommerce > Settings > Tour Booking > Typography & Color

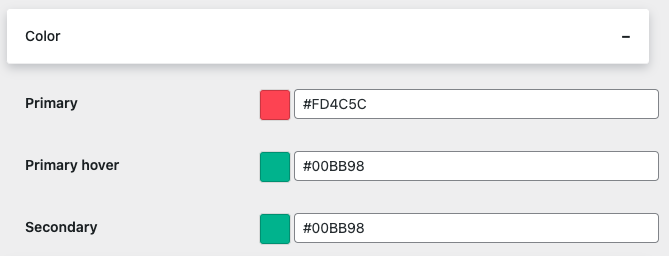
13.1 Color
You can set: primary color, primary color when you hover, and secondary color
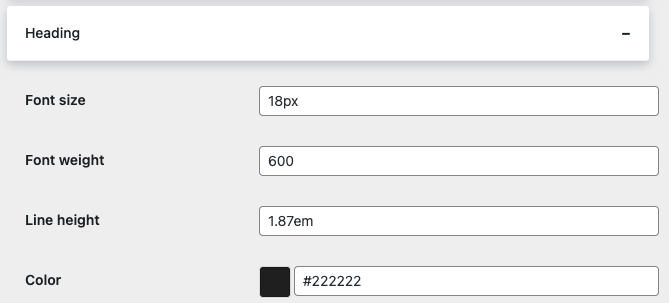
13.2 Heading
Allow to configure font size, font weight, line height for heading, and color of heading
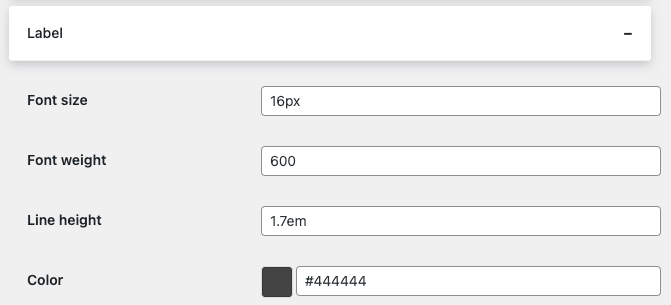
13.3 Label
You can set font size, font weight, line height for label, and color of label
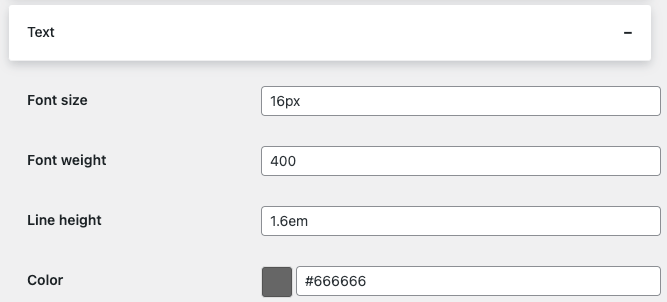
13.4 Text
Set font size, font weight, line height for text, and color of text
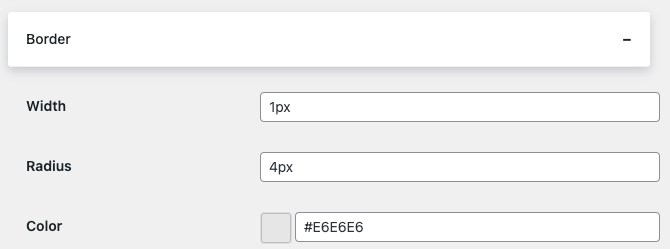
13.5 Border
Set Width, radius and color for borders
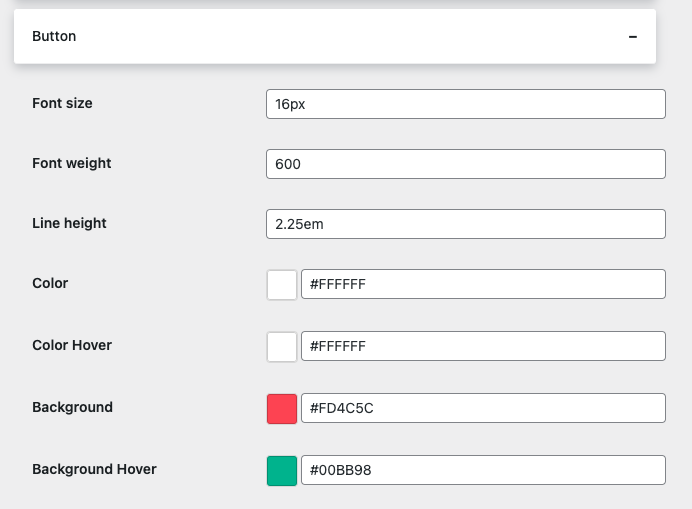
13.6 Button
Set font size, font weight, line height, color, color when you hover, background color, background color when you hover for buttons
VIII. Shortcodes
↑ Back to top1: Display Booking Form for a Product
↑ Back to top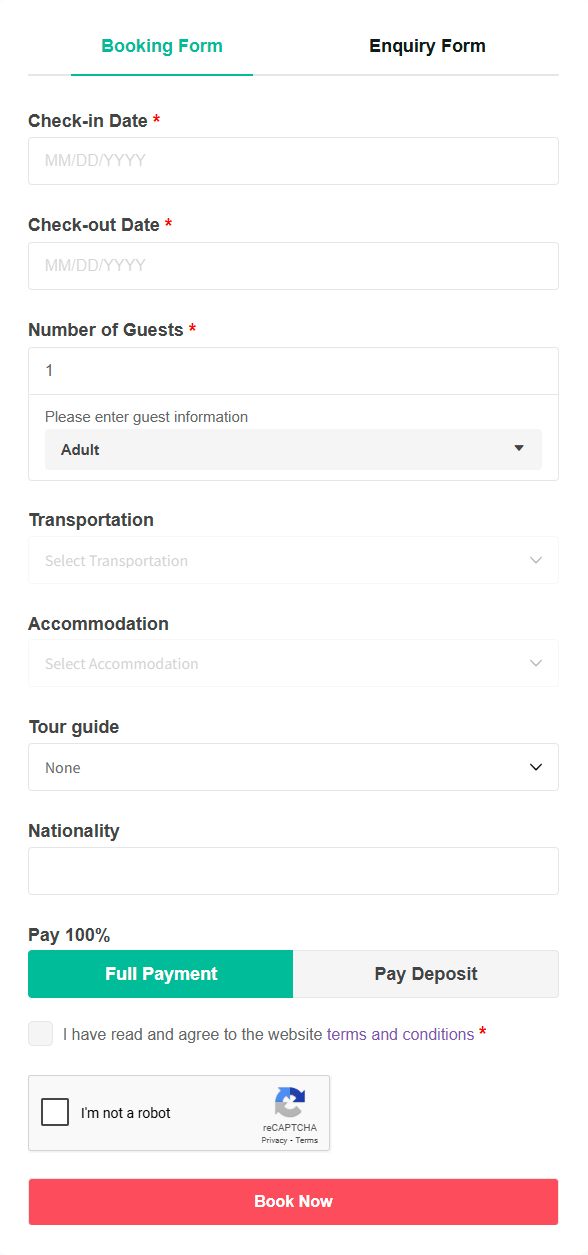
[ovatb_booking_form class="" product_id="57" show_form="both"]Params of shortcode:
- product_id: Id of a product
- show_form: You can insert value: booking or enquiry or both.
- booking: Display Booking Form
- enquiry: Display Enquiry Form
- both: Display Booking Form and Enquiry Form
- class: Add a class to style for the form
If you insert this shortcode in Product Detail, you don’t need to insert product_id, so the shortcode bellow:
[ovatb_booking_form class="" show_form="both"]2: Search Tour Shortcode
↑ Back to top
class: Add a custom class
fields: product-name|category|checkin-date|guests|attribute|product-tag|price-filter => Fields to display
columns: 1 or 2 or 3 or 4 => Number of columns used to display the fields

product_name_label: Label of the "product-name" field
product_name_placeholder: Placeholder of the "product-name" field
product_name_required: "yes" or "no" => Make the "product-name" field required

category_label: Label of the "category" field
category_placeholder: Placeholder of the "category" field
default_category: Default category value on page load (enter the category slug)
category_required: "yes" or "no" => Make selecting a category required
incl_cat: 123|456|789 => Include categories (enter category IDs separated by a vertical bar)
excl_cat: 123|456|789 => Exclude categories (enter category IDs separated by a vertical bar)

checkin_date_label: Label of the "checkin-date" field
checkin_date_placeholder: Placeholder of the "checkin-date" field
checkin_date_required: "yes" or "no" => Make selecting a check-in date required

guest_label: Label of the "guests" field
min_guests: Minimum number of total guests
max_guests: Maximum number of total guests
guest_required: "yes" or "no" => Make selecting guests required

(Make sure you have added a guest with the guest name "adult" in Woo >> Settings >> Tour Booking >> Guests)
default_adult: Default number of Adults
min_adult: Minimum number of Adults
max_adult: Maximum number of Adults
(Do the same for child or baby if they have been created in Woo >> Settings >> Tour Booking >> Guests)

(Make sure you have added attributes in Products >> Attributes)
attribute_label: Label of the "attribute" field
attribute_placeholder: Placeholder of the "attribute" field
attribute_required: "yes" or "no" => Make selecting an attribute required

product_tag_label: Label of the "product-tag" field
product_tag_placeholder: Placeholder of the "product-tag" field
product_tag_required: "yes" or "no" => Make entering a product tag required

price_filter_label: Label of the "price-filter" field
min_price: Enter an integer => Minimum price on the price slider
max_price: Enter an integer => Maximum price on the price slider
(If min_price and max_price are not set, the default min_price and max_price from the "wc_product_meta_lookup" table will be used)

button_text: Text for the submit button
result_url: Link to the Result page (this page must contain the Search Ajax element or shortcode)
3: Search Tour Ajax Shortcode
↑ Back to top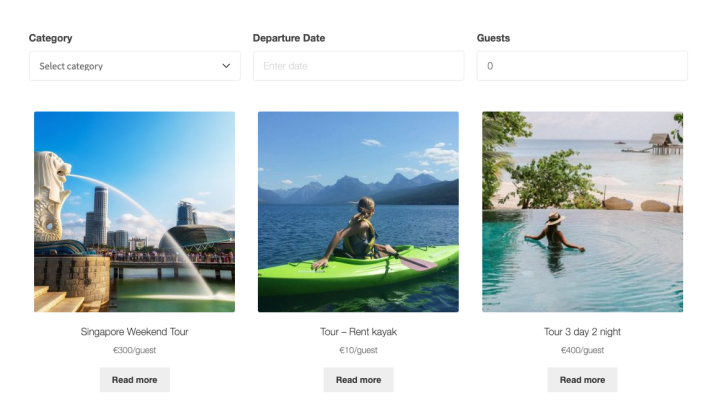
class: Add a custom class
fields: product-name|category|checkin-date|guests|attribute|product-tag|price-filter => Fields to display
columns: 1 or 2 or 3 or 4 => Number of columns used to display the fields

product_name_label: Label of the "product-name" field
product_name_placeholder: Placeholder of the "product-name" field
product_name_required: "yes" or "no" => Make the "product-name" field required

category_label: Label of the "category" field
category_placeholder: Placeholder of the "category" field
default_category: Default category value on page load (enter the category slug)
category_required: "yes" or "no" => Make selecting a category required
incl_cat: 123|456|789 => Include categories (enter category IDs separated by a vertical bar)
excl_cat: 123|456|789 => Exclude categories (enter category IDs separated by a vertical bar)

checkin_date_label: Label of the "checkin-date" field
checkin_date_placeholder: Placeholder of the "checkin-date" field
checkin_date_required: "yes" or "no" => Make selecting a check-in date required

guest_label: Label of the "guests" field
min_guests: Minimum number of total guests
max_guests: Maximum number of total guests
guest_required: "yes" or "no" => Make selecting guests required

(Make sure you have added a guest with the guest name "adult" in Woo >> Settings >> Tour Booking >> Guests)
default_adult: Default number of Adults
min_adult: Minimum number of Adults
max_adult: Maximum number of Adults
(Do the same for child or baby if they have been created in Woo >> Settings >> Tour Booking >> Guests)

(Make sure you have added attributes in Products >> Attributes)
attribute_label: Label of the "attribute" field
attribute_placeholder: Placeholder of the "attribute" field
attribute_required: "yes" or "no" => Make selecting an attribute required

product_tag_label: Label of the "product-tag" field
product_tag_placeholder: Placeholder of the "product-tag" field
product_tag_required: "yes" or "no" => Make entering a product tag required

price_filter_label: Label of the "price-filter" field
min_price: Enter an integer => Minimum price on the price slider
max_price: Enter an integer => Maximum price on the price slider
(If min_price and max_price are not set, the default min_price and max_price from the "wc_product_meta_lookup" table will be used)

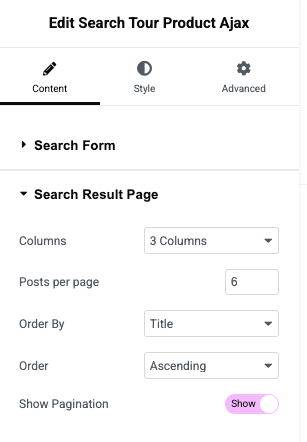
layout_columns: 1 or 2 or 3 or 4 => Number of columns used to display products => Default: 3
posts_per_page: Number of products displayed per page => Default: 6
orderby: title or ID or date or modified or rand or menu_order or rating (default: title; if you enter "rating", product reviews must be enabled in Woo settings).
order: ASC or DESC => Default: ASC
show_pagination: "yes" or "no" => Display pagination when applicable (e.g. with 10 products in total and posts_per_page: 6, there will be 2 pages)
IX. Elements of Elementor
↑ Back to top1: Search Tour
↑ Back to top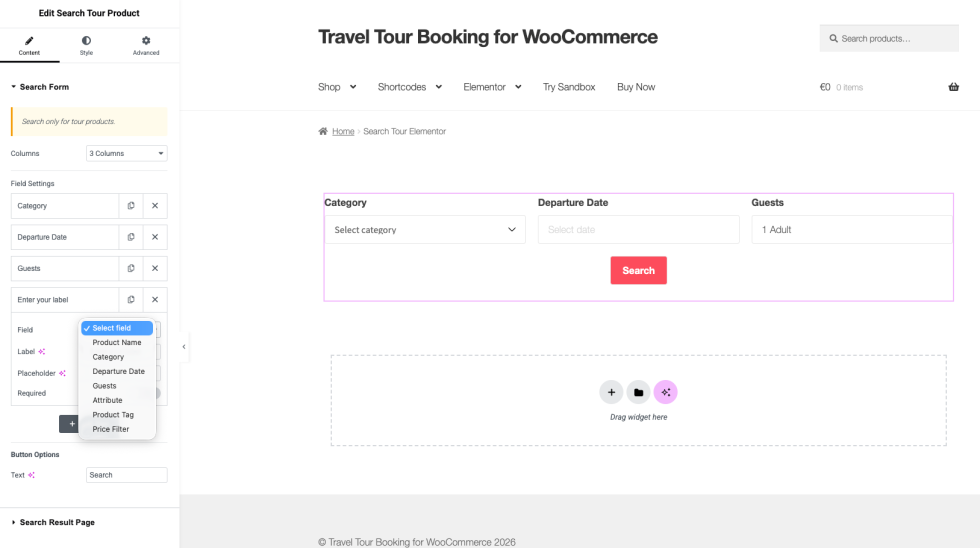
2: Search Tour Ajax
↑ Back to top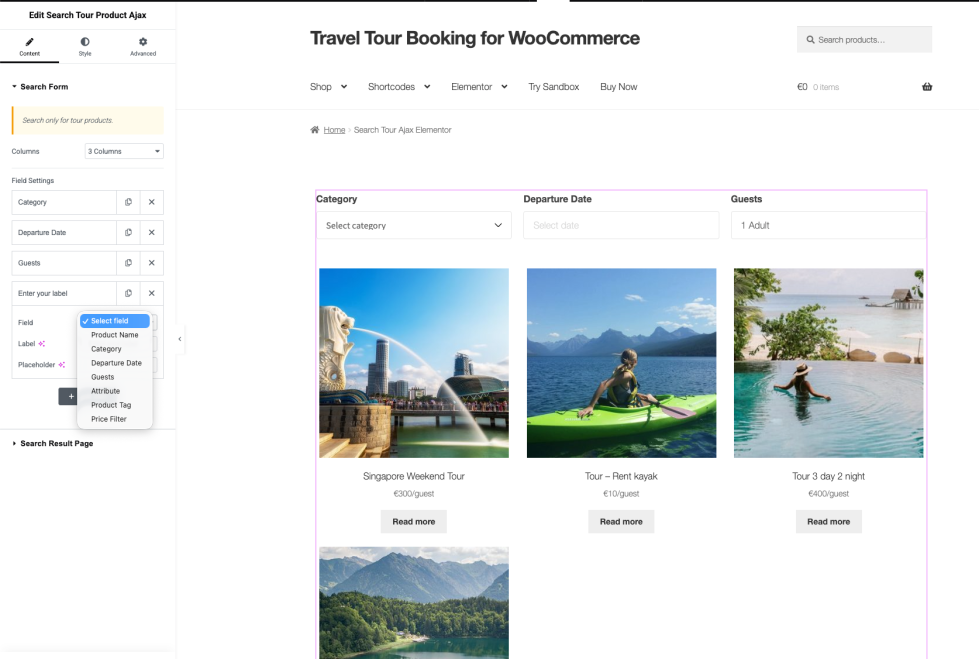
X: Translation
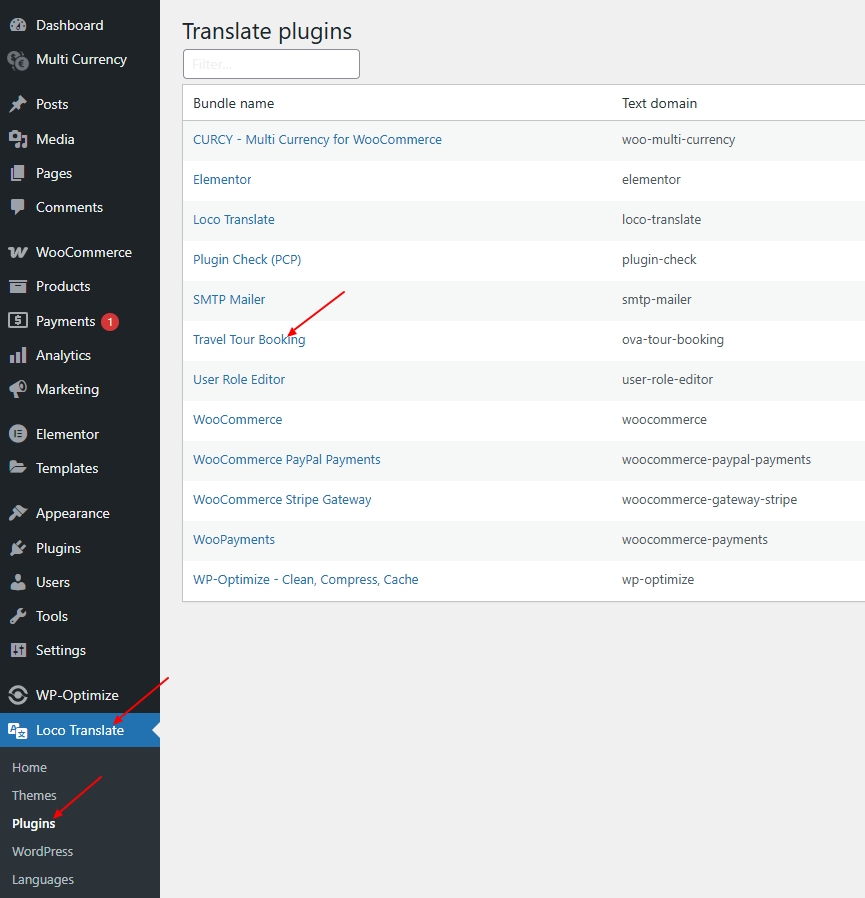
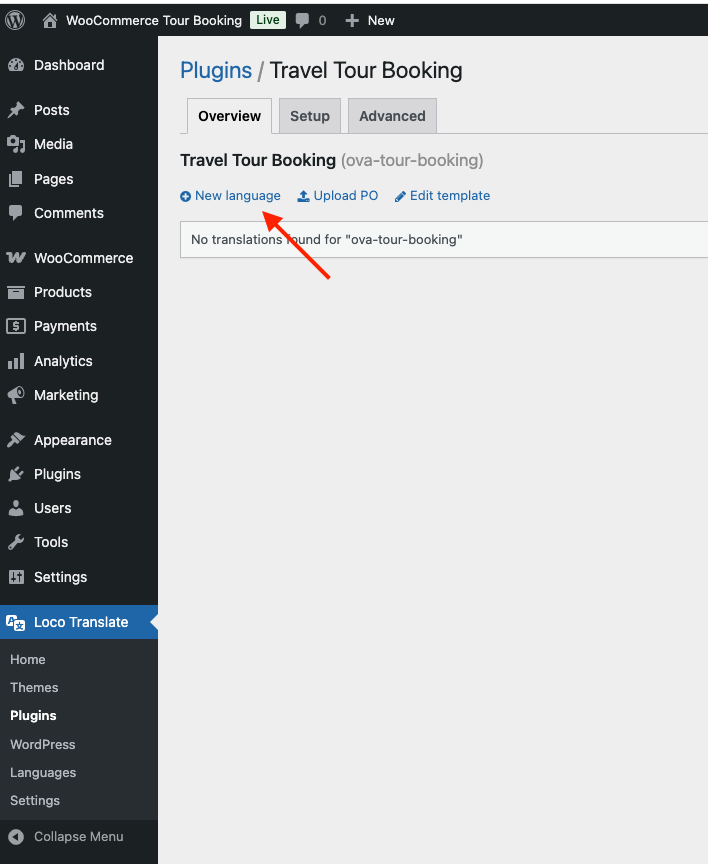
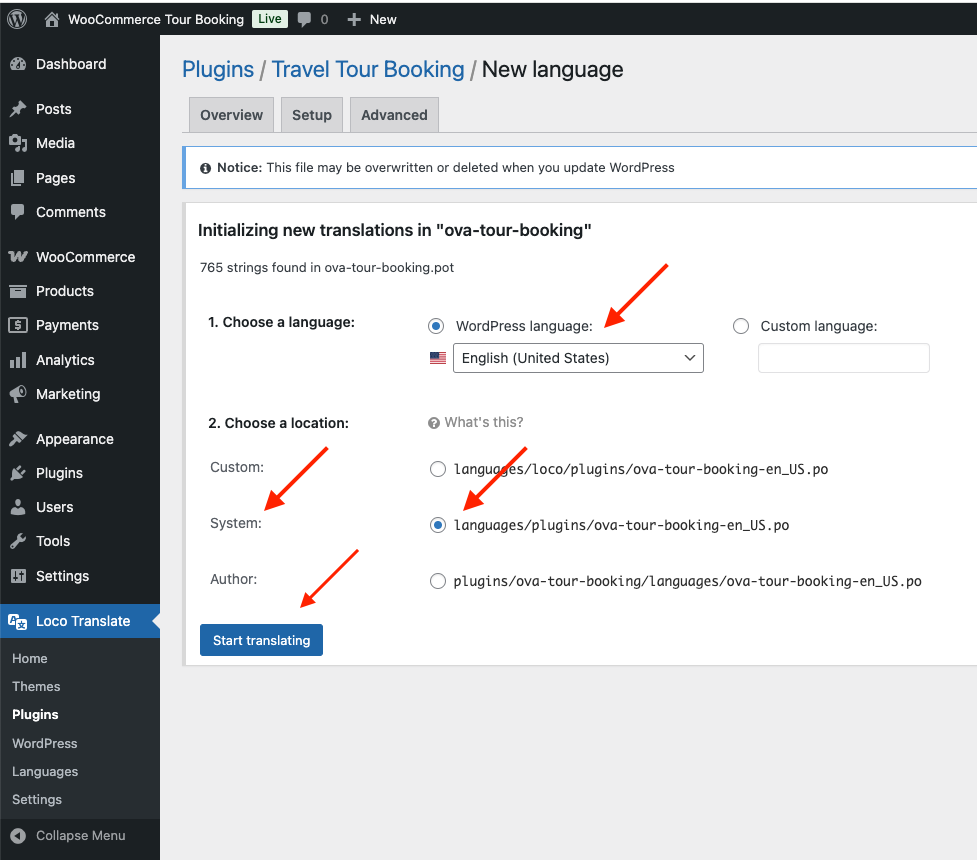
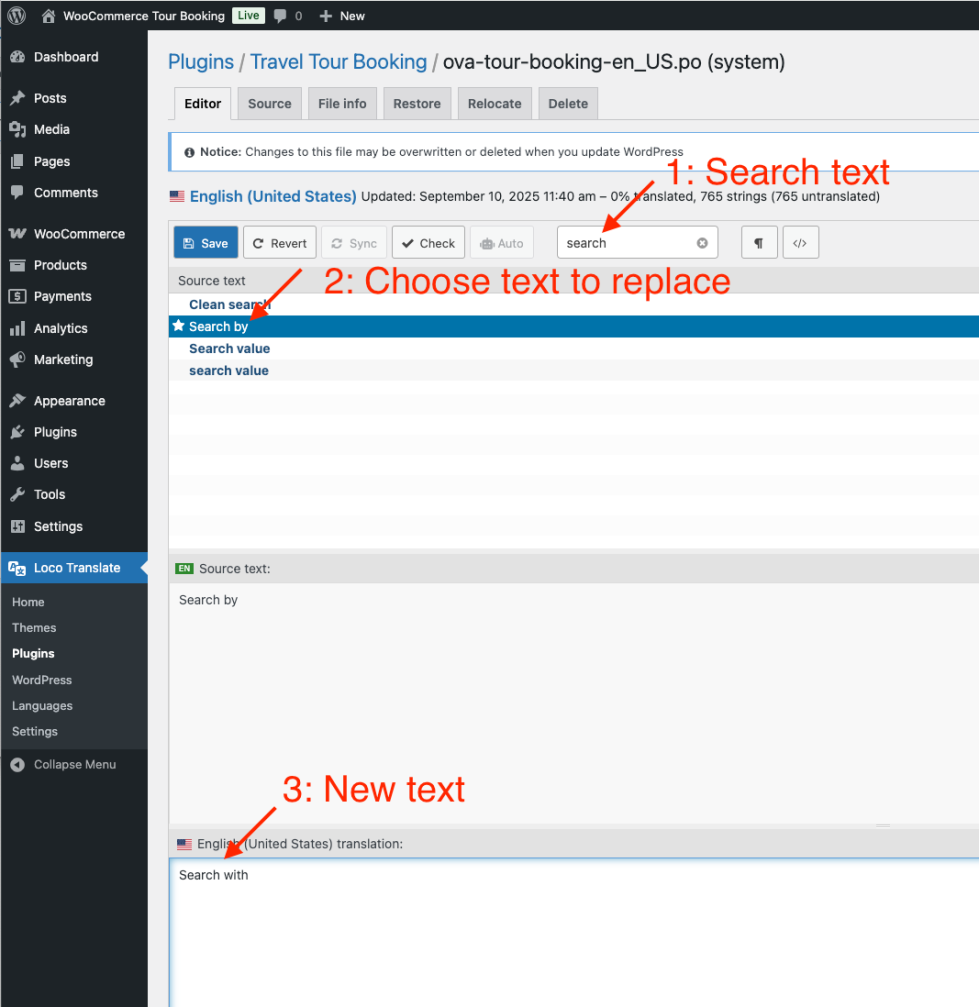
↑ Back to topYou can use Loco Translate Plugin to replace text in plugin.
Go to Loco Translate >> Plugins >> Travel Tour Booking
XI: Customize Template in Theme or Child Theme
↑ Back to topStep 1:
You have to create “ova-tour-booking” in your theme or child theme
Step 2:
Copy files in
plugins/ova-tour-booking/templates/*.php
to
themes/your-theme/ova-tour-booking/ folder.
XII: Compatibility
↑ Back to top- We tested the plugin with WooCommerce Multiple Currency plugin.

