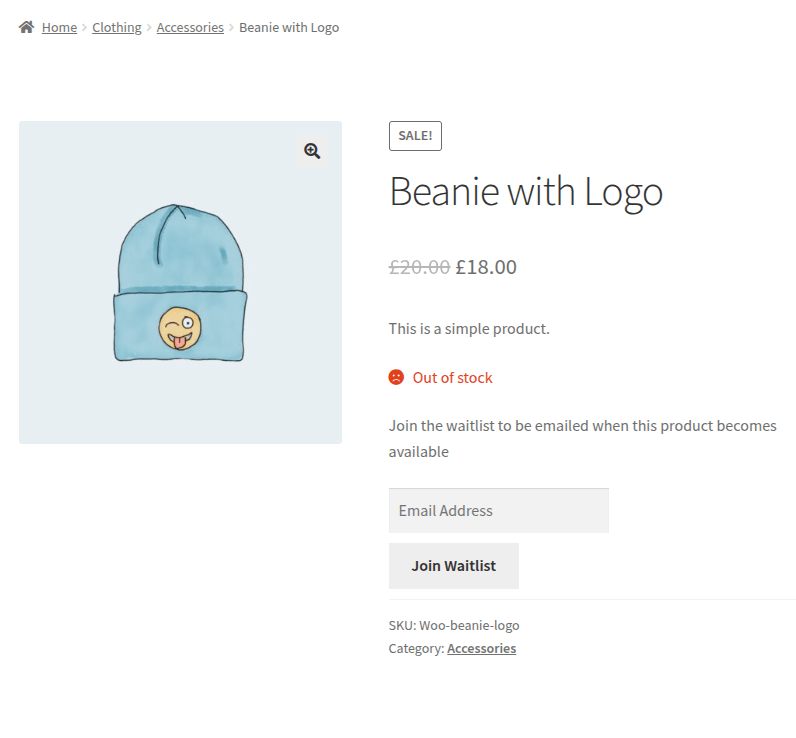
Waitlist for WooCommerce allows customers to sign up to be notified by email when an out-of-stock product becomes available.
As a store owner you can also review who is on the waiting list for which products and sort products by the number of people registered on the waiting list.
Installation
↑ Back to top- Download the .zip file from your WooCommerce account.
- Go to: WordPress Admin > Plugins > Add New to upload the file you downloaded with Choose File.
- Activate the extension.
More information at: Installing and Managing Plugins.
Upgrading to Version 2?
↑ Back to topImprovements have been made to the plugin with the release of version 2, the most significant being:
- You can add waitlist elements anywhere on your site with the use of a shortcode [woocommerce_waitlist product_id=123] where “product_id” equals the ID of the product for which you want the user to join the waitlist. More information about shortcodes at: WordPress Codex – Shortcode
- No more page reloads when a user is added to a waitlist. Waitlist updates are handled in the background, and customers need not wait for a page reload when adding themselves. Customers click a button and are greeted with a notification that they have successfully signed up.
There have been minor adjustments to the layout of waitlist elements displayed on the frontend. Waitlist elements are always grouped together on the page and can be styled by targeting their wrapper classes. If you notice issues with styling, review the following guidelines and adjust CSS accordingly:
- Different WooCommerce pages can be targeted using the supplied body classes. For example: .single-product for single products and .post-type-archive-product for the shop page and other product archive pages (e.g., product category pages).
- Default WooCommerce wrapper classes can be used to specify styles for different product types. For example, .product-type-variable and .product-type-simple for variable and simple products, respectively.
- Waitlist elements are wrapped using the .wcwl_frontend_wrap class on product archive pages and .wcwl_elements on single product pages. This difference is due to the additional toggle button added on archive pages to avoid cluttering the page.
If extensive customizations are in place on your site, we recommend editing these to reflect the new template changes. A waitlist can be included with the new shortcode and should make everything simpler for complicated setups or custom product types. Any legacy code should still work if the appropriate filters were utilized, but this is no longer the recommended approach.
If you have queries on the changes or need help with your customizations, please submit a support ticket and we will be happy to assist you.
Setup and Configuration
↑ Back to topSettings Screen
↑ Back to topThere are options to customize the plugin to suit your needs on the settings screen. Go to WooCommerce > Settings > Products, and select the Waitlist link.
Display options enable you to control what your customer see in your shop:
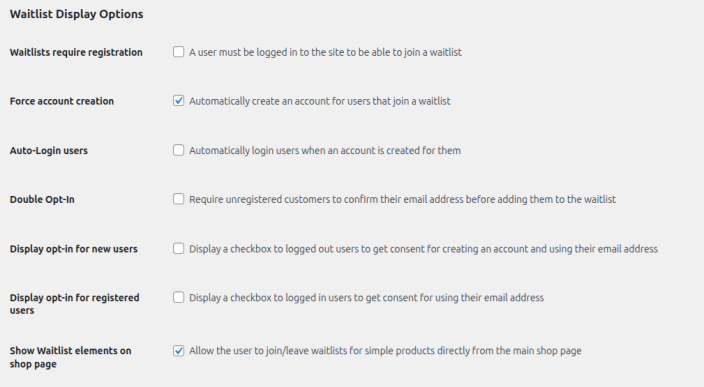
- Waitlist require registration – logged out customers will be met with a notice informing them that they need to register where you would usually see the waitlist.
- Force account creation – when a customer adds themselves to the waitlist an account will be silently created in the background and a new account email will be sent to the customer.
- Auto-Login users – when a new user joins a waitlist and an account is automatically created, checking this option will automatically log them in
- Double Opt-in – checking this will send a confirmation email to a customer when they try to add themselves to a waitlist. They will not be added until they confirm their email address by clicking a link in the email (can help to reduce spam submissions).
- Opt-in options – show a consent message and checkbox which the customer will need agree to and check before being able to submit the waitlist form (separate options for logged out/logged in users).
- Show waitlist elements on shop page – whether or not you want to show the waitlist elements on product archive pages (shop, category archives etc). This will only apply to simple products.
Administration options allow the shop manager to specify options to make the plugin work for them:

- Archive waitlist – Keep a list of email addresses after they have been removed from the waitlist (along with a date of when they were removed).
- Minimum Stock – The minimum stock amount required for waitlists to activate and send in stock notifications. This can also be set per product on the product edit screen.
- Remove data on uninstall – By default the waitlist data will not be removed when uninstalling the plugin. If you would like to delete all waitlist data (this includes removing all waitlists and archives) you can check this option.
- Export waitlist data – This button will collate all of your waitlist data into a downloadable CSV file.
Update options are for the sole purpose of updating the stored metadata pertaining to the plugin (this may be required when updating from an older version):

- Update waitlist counts – If you notice your waitlist counts are wrong for any reason they can be recalculated here. This was implemented for older versions of the plugin when metadata structure was updated.
- Update waitlist metadata – Older versions of the plugin used a different metadata structure and this manually updates your current data to this structure. Should not be required unless you are updating from a very old version of the plugin.
Products Listing Screen
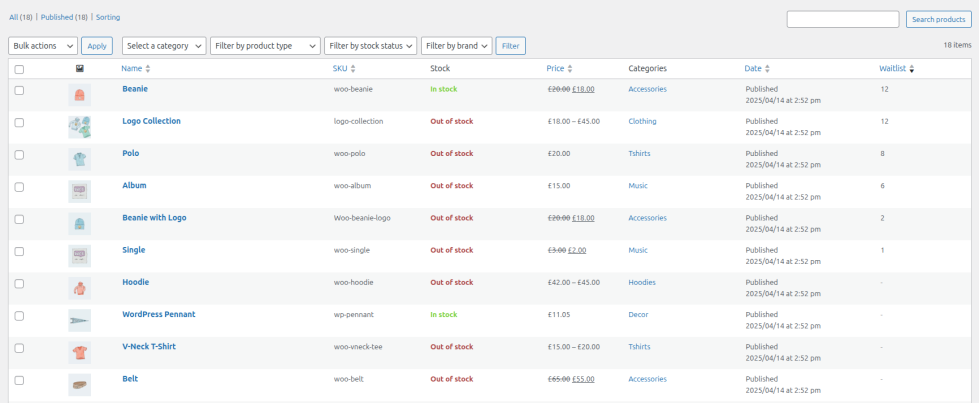
↑ Back to topWaitlist for WooCommerce adds a new column to the Products listing in the WordPress administration area, displaying the number of users on the waiting list for a product. This column is sortable to enable Shop Managers to quickly find the most ‘sought after’ products in the catalog.
Edit Product Screen
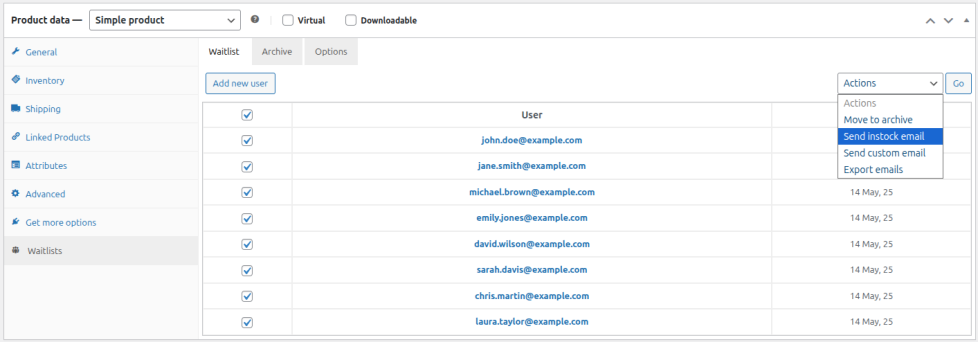
↑ Back to topWaitlist for WooCommerce adds a new product tab to the Edit Product screen. This new tab displays any customers that are currently on the waiting list for the product, any customers that were sent an in-stock notification email and subsequently removed from the waiting list (if archiving is enabled) and available options for this product.
On the waitlist tab the shop manager can add single or multiple email addresses (separated by a comma), remove customers from the waiting list, manually send out in-stock notification emails or send custom emails:
On the archive tab the shop manager has options to add customers back to the waiting list (these customers will remain in the archive until deleted), permanently delete customers from the archive or send the customers a custom email (if, for example, it is suspected a notification email has not reached them). If a customer removes themselves from the archive (via the “My Waitlists” tab on the “My Account” page), this tab will also reflect this:

The options tab provides the shop manager with the ability to enforce specific options for certain products. If set here, these options will override the global options (for this product only):

Waiting lists are updated instantly when working on the product edit screen. This avoids having to update/save the product post each time an edit is required.
For variable products it is advised that the product is updated when changes are made to variations (for example, altering the stock level/status) as changes will not be instantly reflected on the Waitlist tab.
When sending out custom emails from these tabs the default mail client on your computer will be activated.
Automated Emails
↑ Back to topWhen a product is switched from ‘Out-of’stock’ status to ‘In-stock’, or when quantity increases past a set limit, Waitlist for WooCommerce sends all users on the waiting list an email informing them that the product is back in stock, with a link to the product listing for making purchases.
The emails follow the same design as all other WooCommerce emails, but the subject and the heading can be altered at WooCommerce > Settings > Emails > Waitlist Mailout.
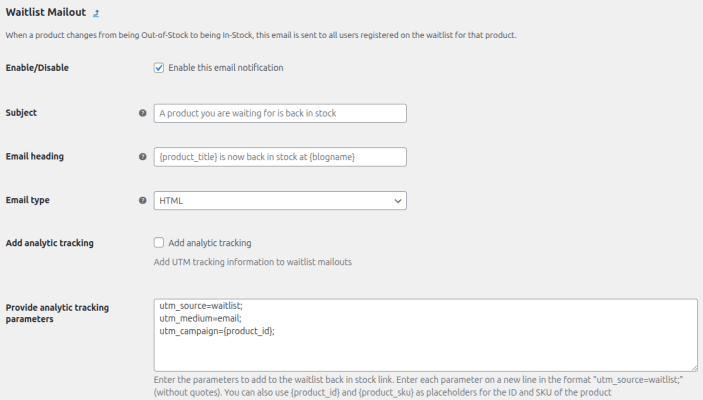
Here, it is also possible to add google analytics tracking codes to the product link sent out in the email.
Once this email is sent, Waitlist for WooCommerce removes all users from the waiting list for this product. If the product is subsequently switched back to ‘Out-of-stock’, the waiting list will be empty.
The settings for emails sent to an administrator when a user signs up to a waitlist can be found at WooCommerce > Settings > Emails > Waitlist Admin Sign-up Email:
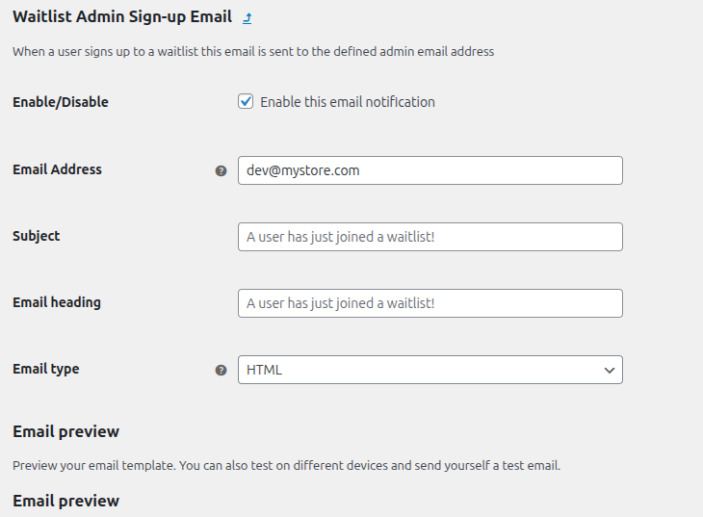
There is also a “Waitlist joined notification”, “Waitlist left notification” and “Waitlist double opt-in” email that can be enabled, disabled and edited in a similar manner.
Waitlist Archiving
↑ Back to topWhen a product comes back into stock and automated emails are turned on, a record of the waiting list is saved. The archive tab lists all of the customers that were sent a back in stock notification, the date that the emails were sent and provides controls to manually add the customers back to the waiting list, remove them permanently or send custom emails:

Opt-In Options
↑ Back to topOptions have been added to display an opt-in checkbox and a notice to users signing up to a waiting list. With these options enabled new users will need to consent to an account being created and receiving further communications before being allowed to join the waiting list. This can be enabled for both new users and existing users (a different notice is shown to for each):
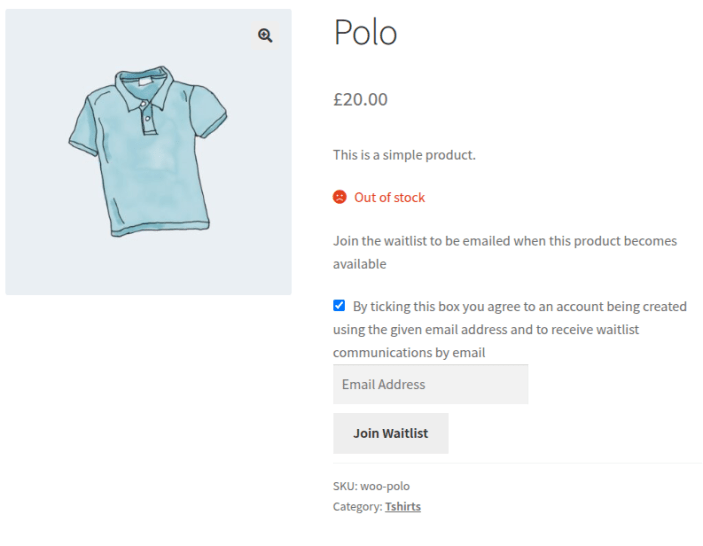
There is now an option to use double opt-in for any non-registered visitors on your site that join the waitlist. This will not add the visitor to the waitlist until they have confirmed their email address (via a link sent to the email added to the waitlist form).
Displaying Waitlist Elements on Product Archive Pages
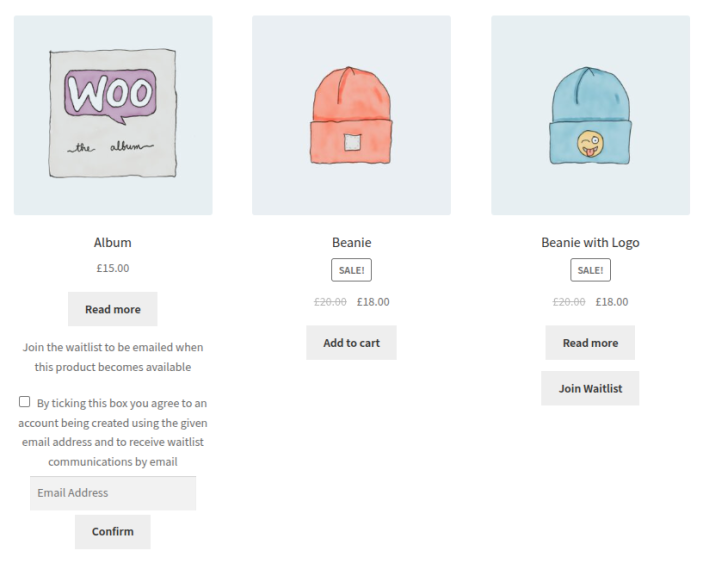
↑ Back to topAn option has now been added to display the waitlist elements on product archive pages. With this enabled, users will be able to join waiting lists for products from the shop page, product category pages or any other product archive pages:
Personal Data
↑ Back to topIf “Force account creation” is selected in the options Waitlist for WooCommerce will create a user for each email that signs up to a waitlist, allowing the user to take control of their data. This means we do not actually store user email addresses anywhere else other than the default user table in the database. With this option disabled, email addresses are stored on the waitlist in the postmeta table. Users will receive an unsubscribe link via the “waitlist joined notification” email if enabled.
When processing data erasure requests (added in WordPress 4.9.6) there is an option to retain waitlist information if required, this can be found at WooCommerce > Settings > Accounts & Privacy. When this option is selected, all waitlist data is removed when deleting personal data for a user.
Customization
↑ Back to topWaitlist for WooCommerce comes with action and filter hooks for your customization needs. For more information on using hooks in WordPress, see Plugin API.
Action Hooks
↑ Back to topwcwl_before_add_user_to_waitlistwcwl_after_add_user_to_waitlistwcwl_before_remove_user_from_waitlistwcwl_after_remove_user_from_waitlistwcwl_mailout_send_emailwcwl_new_signup_send_email
Filter Hooks
↑ Back to topOptions
wcwl_persistent_waitlists_are_disabledwcwl_automatic_mailouts_are_disabledwcwl_enable_waitlist_for_backorder_products
Admin
Text
wcwl_empty_waitlist_introductionwcwl_variation_tab_titlewcwl_updated_nag_textwcwl_dismiss_nag_text
Template paths
wcwl_include_path_admin_panel_tabswcwl_include_path_admin_panel_waitlist_tabwcwl_include_path_admin_panel_archive_tabwcwl_include_path_admin_panel_options_tabwcwl_include_path_admin_panel_side_tabwcwl_include_path_admin_panel_variablewcwl_include_path_admin_panel_simplewcwl_include_path_admin_panel_waitlist_add_newwcwl_include_path_admin_panel_waitlist_actionswcwl_include_path_admin_panel_archive_actionswcwl_include_path_admin_panel_table_row
User Waitlist Shortcode
wcwl_shortcode_titlewcwl_shortcode_intro_textwcwl_shortcode_product_titlewcwl_shortcode_thumbnailwcwl_shortcode_remove_textwcwl_shortcode_no_waitlists_textwcwl_shortcode_archive_intro_textwcwl_shortcode_archive_product_titlewcwl_shortcode_archive_remove_textwcwl_shortcode_visit_shop_text
Frontend
Join Waitlist Elements
wcwl_join_waitlist_message_textwcwl_join_waitlist_success_message_textwcwl_join_waitlist_already_joined_message_textwcwl_join_waitlist_button_textwcwl_new_user_opt-in_textwcwl_registered_user_opt-in_text
Leave Waitlist Elements
wcwl_leave_waitlist_message_textwcwl_leave_waitlist_success_message_textwcwl_leave_waitlist_button_text
Update Waitlist Elements (grouped products)
wcwl_waitlist_checkbox_textwcwl_grouped_waitlist_message_textwcwl_grouped_product_joined_message_textwcwl_event_waitlist_message_textwcwl_update_waitlist_button_text
Archive
wcwl_confirm_waitlist_button_text
Account
wcwl_account_tab_titlewcwl_account_removed_archives_messagewcwl_enable_waitlist_account_tab
Errors/Notices
wcwl_join_waitlist_user_requires_registration_message_textwcwl_join_waitlist_invalid_email_message_textwcwl_toggle_waitlist_no_product_message_textwcwl_error_message_invalid_noncewcwl_error_message_invalid_userwcwl_error_message_invalid_productwcwl_email_error_messagewcwl_optin_error_messagewcwl_generic_error_messagewcwl_loading_messagewcwl_dismiss_notification_textwcwl_notice_message_double_optin
Emails
woocommerce_email_subject_woocommerce_waitlist_mailoutwoocommerce_email_heading_woocommerce_waitlist_mailoutwoocommerce_email_subject_woocommerce_waitlist_signup_emailwoocommerce_email_subject_woocommerce_waitlist_signup_emailwcwl_tracking_urlwcwl_tracking_codes
Miscellaneous
wcwl_show_waitlist_elements_for_pagewcwl_show_waitlistwcwl_enable_waitlist_account_tabwcwl_new_user_opt-in_textwcwl_registered_user_opt-in_textwcwl_email_field_labelwcwl_email_field_placeholderwcwl_add_waitlist_for_elementor
Advanced
wcwl_supported_productswcwl_waitlist_endpointwcwl_locate_templatewcwl_notification_time_limit
FAQ
↑ Back to topCan I add the waitlist to a non-product/custom product page?
The plugin now includes a shortcode for adding the waitlist elements to any page on your site, all you need is the product ID. This is done by adding the following to your pages content: [woocommerce_waitlist product_id=123] where “product_id” equals the ID of the product you want the user to join the waitlist for.
Can a customer view all the products they are on a waiting list for?
↑ Back to topSince version 1.7.0 customers will be able to view the products they are waiting for on the newly added “Your Waitlists” tab found on the default “My Account” page. There is also a shortcode [woocommerce_my_waitlist] which will display a list of all the products that the currently logged in user is waiting for. This will only work if for customers that have an account (select the option “Force account creation” to automatically create an account for all users signing up to a waitlist).
Are customers put on a waitlist in a particular order?
↑ Back to topYes. Customers are added to the waitlist in the order they join. A date has also been added to make it clear when each customer joined.
Does Waitlist for WooCommerce work with WPML?
↑ Back to topYes. Support has now been added for for WPML with the release of version 1.6.1.
Does this work for affiliate products?
↑ Back to topNo. At the moment, stock status has no bearing on the output of an affiliate product listing so these have been left well alone.
Does this work for variable products?
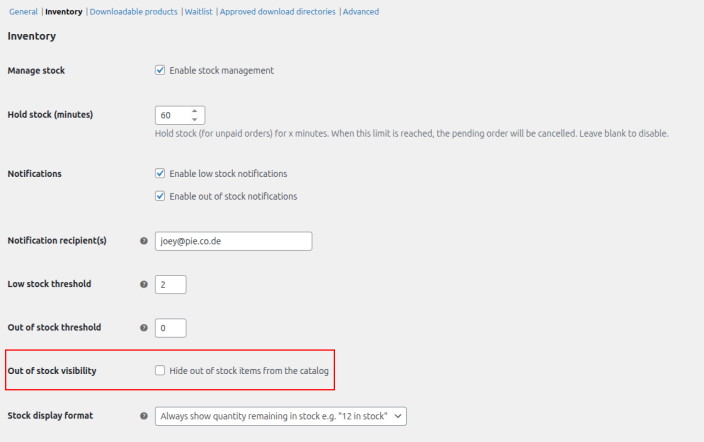
↑ Back to topThere is a known issue when using Waitlist for WooCommerce in conjunction with variable products that prevents the Waitlist UI from being displayed in the Edit Product screen when the ‘Out of Stock Visibility’ option is set to ON.
You would only need to do this if you were managing waitlists internally, but did not want customers to be able to join a waitlist via the front-end of your site.
The only current solution to this problem is to turn this option off:
How do I change the subject/content of Waitlist Mailout emails?
↑ Back to topThe content of the email and the subject line are both editable via the WooCommerce email system. Waitlist for WooCommerce adds a new section to the ‘Emails’ tab of WooCommerce Settings where this can be managed. More information at: Configuring WooCommerce Settings > Emails.
The “Back in stock” notification email can also be completely customized by overwriting the file in your theme. This is done by copying the relevant file over from woocommerce-waitlist/templates/emails/ into your theme’s WooCommerce template override directory (theme/woocommerce/emails/). For more information check out this article.
What if I don’t want users to be automatically emailed when a product is back in stock?
↑ Back to topWe have you covered. Add the following snippet to the functions.php file in your theme, and no email will be sent and users remain on the waitlist.
add_filter( 'wcwl_automatic_mailouts_are_disabled', '__return_true' );
What if I want to email users automatically, but don’t want them to be removed from the waitlist?
↑ Back to topThat’s possible also. Add the following snippet to the functions.php file in your theme, and users remain on the waitlist until they purchase that product.
add_filter( 'wcwl_persistent_waitlists_are_disabled', '__return_false' );
Why does Waitlist only show up for some products?
↑ Back to top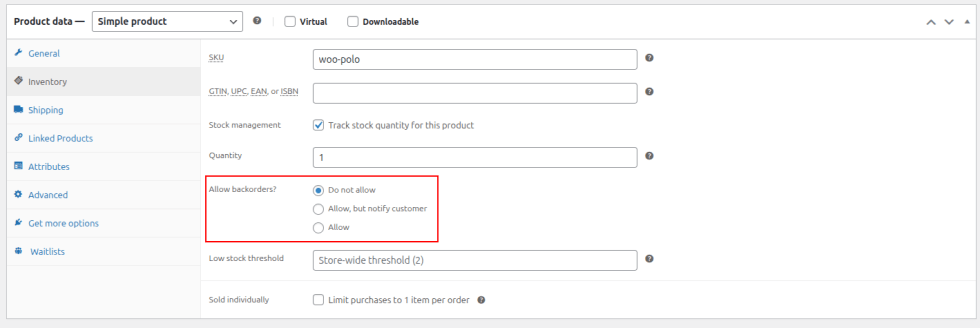
If you’re using the Advanced Notifications extension, be sure to disable the backorder setting.
Do I have to show the “My Waitlists” tab on the my account page?
↑ Back to topNot at all! Simply add the following snippet to your functions.php file in your theme and the Waitlist tab will not be loaded.
add_filter( 'wcwl_enable_waitlist_account_tab', '__return_false' );If you would like to display customer waitlists on another page simply use the shortcode [woocommerce_my_waitlist]
The “My Waitlists” tab doesn’t work, how can I get rid of the 404 “Page not found” error?
↑ Back to topNavigate to Settings > Permalinks in the WordPress administration area and click the “Save Changes” button. You do not need to update any options on this page before pressing the button.
When activating the plugin a new endpoint for the account pages is added to show the customer’s waitlist information. When the websites URL structure is changed in this manner it can sometimes require a manual update (known as “flushing permalinks”) to avoid seeing 404 errors due to the older version being cached.
Can I change the text on the Waitlist buttons?
↑ Back to topOf course, just customize the following snippet by replacing the text ‘Custom Text’ for the join/leave buttons respectively. Add it to your functions.php file in your theme to see the changes.
add_filter( 'wcwl_join_waitlist_button_text', 'change_waitlist_join_button_text' );
function change_waitlist_join_button_text( $text ) {
return __( 'Custom Text' );
}
add_filter( 'wcwl_leave_waitlist_button_text', 'change_waitlist_leave_button_text' );
function change_waitlist_leave_button_text( $text ) {
return __( 'Custom Text' );
}
How can I hide the “add to cart” button for out of stock variations?
↑ Back to topBy default, when an out of stock variation is selected, WooCommerce disables the “add to cart” button but it remains visible. When displaying the waitlist button as well this can become confusing for customers. The following CSS snippet can be added to your theme’s custom CSS option (if provided) in the WordPress Admin or your child theme’s style.css:
.woocommerce-variation-add-to-cart-disabled {
display: none;
}
How can I change the language of the plugin?
↑ Back to topThe plugin is fully translatable using the provided .pot file (found in the assets/language directory in the plugin). We suggest the following steps to translate manually (the plugin also supports WPML and can be used with other translation plugins such as Loco Translate):
- Download and install a free program called Poedit
- Within Poedit, Click File > New from POT/PO file… and choose the plugins .pot file
- Choose your translation language
- Translate each required string using either the bottom boxes to enter your own translations or the recommendations in the sidebar provided by Poedit
- Once you’ve finished click File > Save, change the filename to reflect the plugin and add the country code at the end of the filename, this is important! (e.g. woocommerce-waitlist-fr_FR.po for French)
- If a .mo file is not automatically generated when the .po file is saved you can generate one by clicking File > Compile to MO. This should be named the same as your .po file (woocommerce-waitlist-fr_FR.mo)
- Save both of these files into the site directory wp-content/languages/plugins/ (if this directory does not exist you can create it (You will need to do this in your servers file manager or over FTP)
- Change the site language in the WordPress admin by going to Settings and your translations should appear
- If they don’t appear immediately try clearing your cache and hard refreshing the page (ctrl+shift+r)
Can I show waitlists for products available on backorder?
↑ Back to topBy default, the waitlist will not be shown on any products set as available on backorder. You can use the following snippet in your child theme’s functions.php file to override this behaviour:
add_filter( 'wcwl_enable_waitlist_for_backorder_products', 'wcwl_force_backorder_waitlist_true' );
function wcwl_force_backorder_waitlist_true( $product_id ) {
return true;
}
The product ID is passed in here to allow further customizations if required.
Does this work for Product Bundles for WooCommerce?
↑ Back to topSupport for Product Bundles has been added since version 2.1.0. By default, product bundles will now have a waitlist just like other products. A bundle is considered out of stock if any mandatory products within the bundle are not available (optional products are ignored) and notifications will be sent to a user when the bundle is available again (e.g. all mandatory products within that bundle become available). If you have complex product bundles (e.g. involving variable products that handle stock at the variation level) please get in touch using the link below to ensure our plugin will work as you require.
Does this work for Composite Products for WooCommerce?
↑ Back to topUnfortunately, we do not currently offer waitlist support for composite products but the plugin will work alongside this extension. This is another feature we would like to implement in a future version.
Does this work with Elementor?
↑ Back to topOut of the box the waitlist plugin should work with Elementor. The plugin adds the waitlist elements to the single product page template (available if you are using Elementor Pro) by default but this can be disabled by using the following snippet if you wish to add the waitlist elements yourself using the shortcode.
add_filter( 'wcwl_add_waitlist_for_elementor', '__return_false' );Due to the variability with the setup of Elementor; if something is amiss with the plugin please get in touch with us via a support request and we can assist with your setup.
Can I disable the waitlist feature for products by default?
↑ Back to topYes, by adding a code snippet to filter the default behaviour you can disable the waitlist for whatever products you like. This will apply to any products that have not had the waitlist options saved (new products and products that have not been edited since you activated the plugin). For any products that have waitlist options already, the saved option will always be respected, allowing you to override the filter by setting the option to enable the waitlist when you edit the product.
This snippet will disable waitlists for all products by default and can be edited in any way you require (the product ID is passed in to allow for advanced filtering) and added to your active theme’s (we strongly recommend a child theme to avoid your change being overwritten when you update your theme) functions.php file:
/*** Filter the default option for enabling waitlist * * @param string $enabled whether the waitlist is enabled ('true' or 'false') * @param int $product_id product ID */function my_custom_disable_waitlist_by_default( $enabled, $product_id ) {return 'false';}; add_filter( 'wcwl_default_option_enable_waitlist', 'my_custom_disable_waitlist_by_default', 10, 2 );
Questions & Support
↑ Back to topHave a question before you buy? Please fill out this pre-sales form.
Already purchased and need some assistance? Get in touch the developer via the Help Desk.
