The Real-Time Fraud Detection and Blocking extension for WooCommerce stops credit card fraud and card testing bots before payment processing thereby protecting you from charge-backs, gateway fees, and reputational damage. It’s easy-to-use and has provided robust enterprise level anti-fraud protection since 2009.
The following document provides all the information you need to get setup and effectively use this extension.
Want to get started fast? Then scroll down to our Quick Start Guide.
Requirements
↑ Back to top- WordPress: 5.0 or higher (tested up to 7.0)
- WooCommerce: 7.0 or higher (tested up to 10.8.1)
- PHP: 7.4 or higher
- MaxMind Account: Requires a MaxMind minFraud account — Get a free trial with 1,000 free risk score queries here.
- cURL: PHP cURL extension must be enabled (standard on most hosts). Used by WordPress to communicate with the MaxMind minFraud API over HTTPS.
- Outbound HTTPS: Server must be able to reach minfraud.maxmind.com on port 443
Installation
↑ Back to topTo start using a product from WooCommerce.com, you can use the “Add to store” functionality on the order confirmation page or the My subscriptions section in your account.
- Navigate to My subscriptions.
- Find the Add to store button next to the product you’re planning to install.
- Follow the instructions on the screen, and the product will be automatically added to your store.
Alternative options and more information at:
Managing WooCommerce.com subscriptions.

Quick Start Guide
↑ Back to topGetting up and running takes just a few minutes:
- Open a minFraud account at MaxMind. A free trial with 1,000 queries is available.
- Follow the links in your MaxMind account to generate a license key.
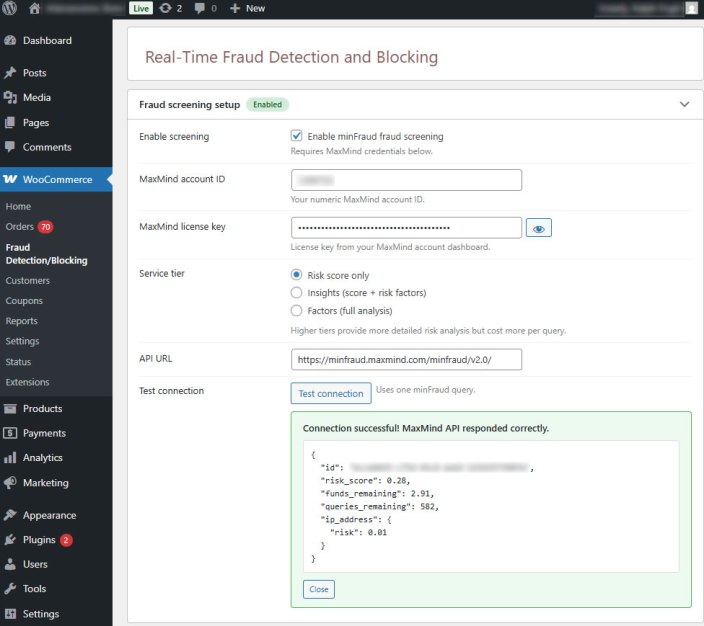
- Open the extension’s settings page — WooCommerce > Fraud Detection/Blocking and open the Fraud screening setup accordion section. Enter your MaxMind Account ID and license key.
- Click the Test Connection button to verify your credentials are working.
- Check Enable screening at the top of the settings page.
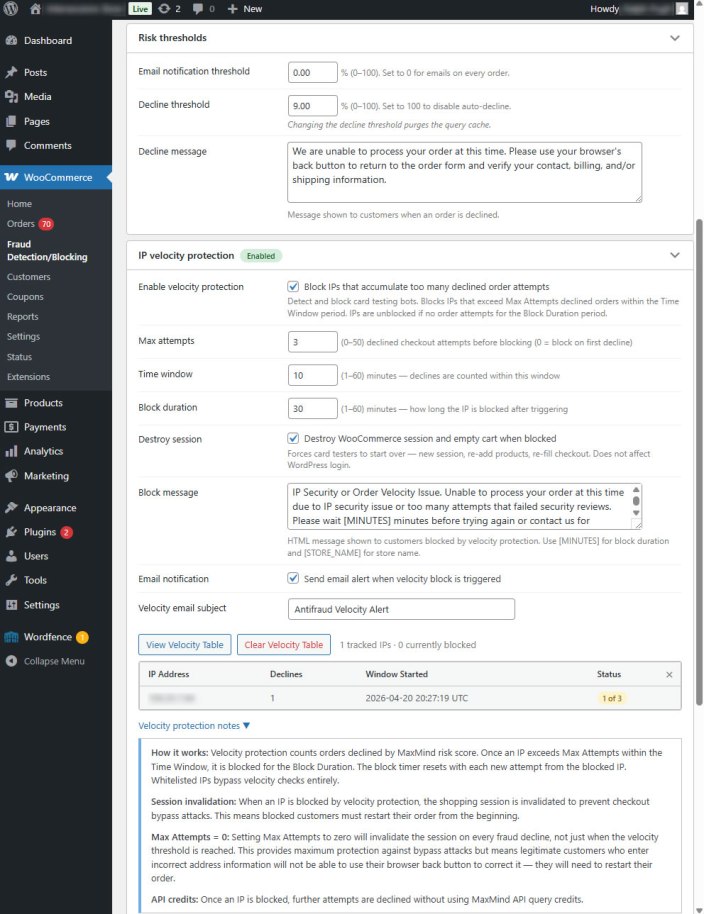
- Open the Risk thresholds accordion. The defaults should be fine. Email notification threshold is set to 0% so you’ll receive an email on every order screened. Decline threshold is set to 100% so no orders will be declined. As you gain experience and observe how MaxMind scores your customer base, you can gradually lower the Decline threshold to 50%, then 40%, and eventually under 10%. In our experience most legitimate orders will have risk scores of under 3% — but as they say ‘your mileage may vary’.
Note: MaxMind defines the risk score as the probability the order is fraudulent. - IP velocity protection — leave it disabled for now. You can enable it later for automatic card testing bot blocking.
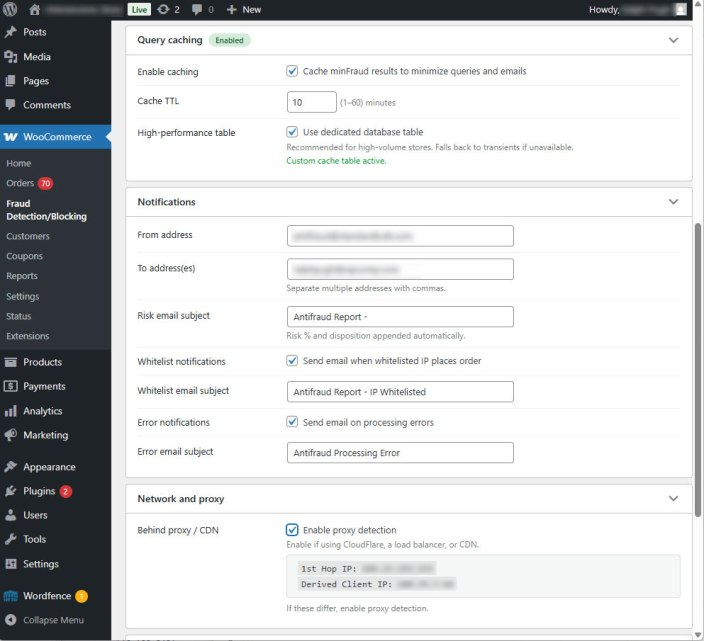
- Query caching — enable it to minimize your MaxMind query consumption. The default settings – cache TTL of 10 minutes and use dedicated database table are fine.
- Notifications — Check the email addresses. The defaults are usually OK, but make sure the “To” address is a valid email where you can receive the extension’s merchant notification emails.
- Network and proxy – if the two IP addresses shown are different check the Enable proxy detection box.
- Whitelisting — enter your office IP address. No point in wasting queries on orders you enter manually. Don’t know your IP? Open the Network and proxy section again. It shows as Derived Client IP.
- Logging — defaults are OK.
- On processing error — defaults are OK here, as well.
- Click Save Changes at the bottom left to save your settings.
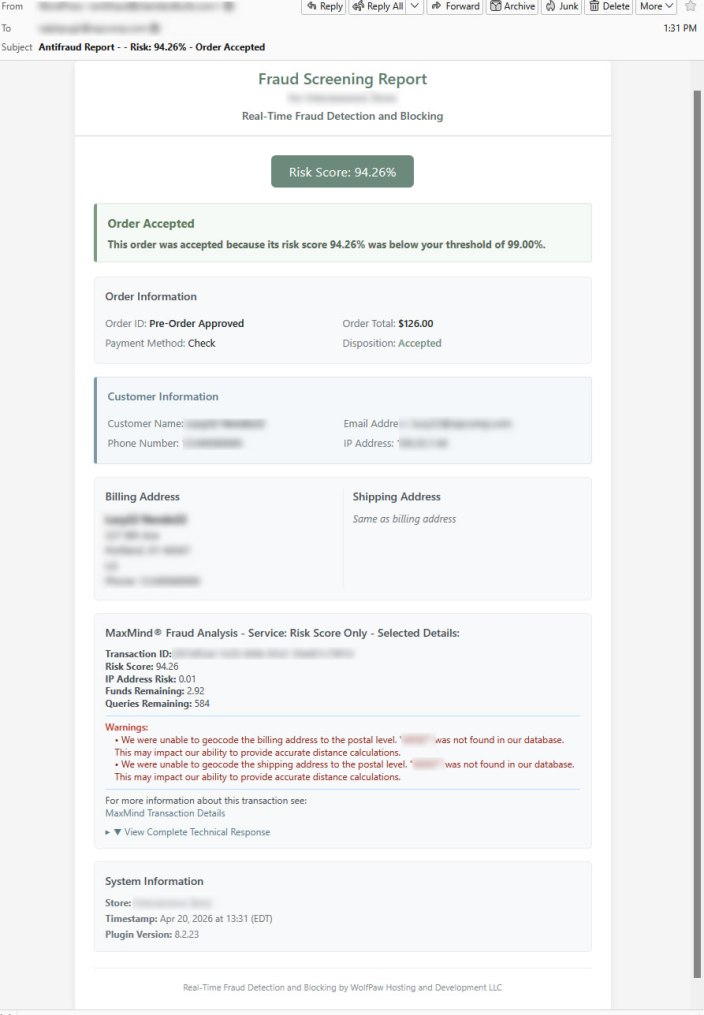
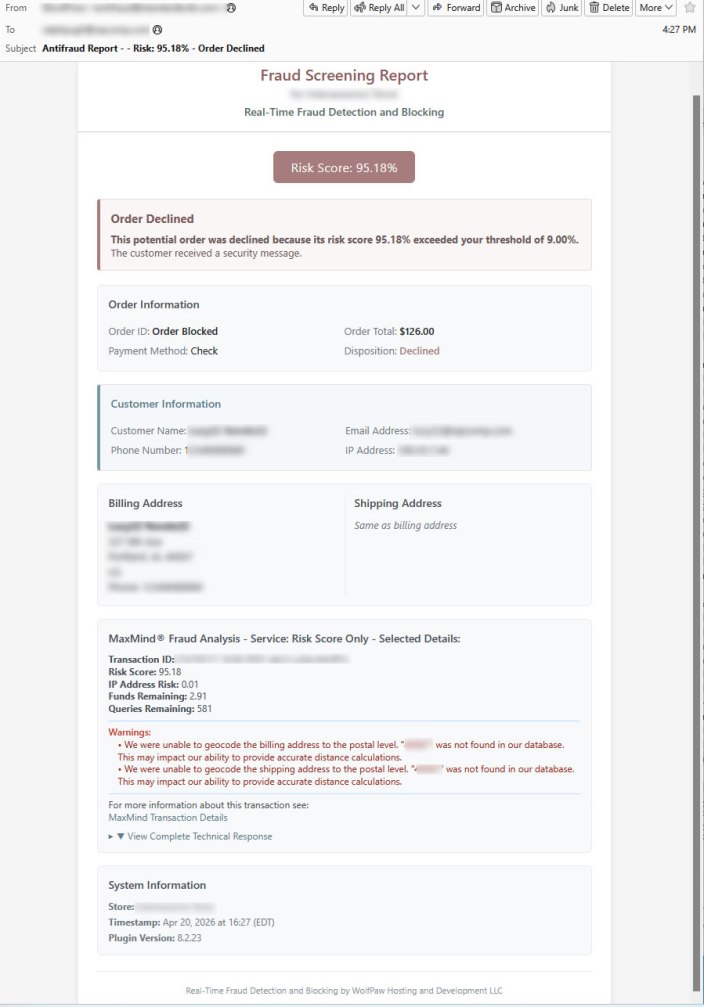
What to expect — you should receive a merchant notification email entitled Order Accepted for every order. This email will show the risk score, order details and MaxMind’s complete analysis response in a drop-down section. A sample of this email is shown below.
Note: You will not receive an email on a order with contact and addresses details that match a previous order cached within the caching time period.
Next Steps
↑ Back to topAfter you’ve got the Real-Time Fraud Detection and Blocking for WooCommerce extension setup and working here are some of the next step you’ll want to take in order to get the full benefit.
- IP velocity protection — open this accordion and enable the feature. The default settings (5 Max attempts, 10 minute Time window, 30 minutes Block duration, destroy session and send email) are fine. This feature will protect you from credit card number testing bots by monitoring the number of order declines per IP address. Once they hit your limit any further order attempts from that IP address are automatically blocked. See below for more details on this feature.
- Lower the order decline risk score threshold. If you sell high margin inexpensive products you might use a higher decline threshold than a merchant selling low margin expensive products. See Tips and Best Practices below for some thoughts on the math for optimizing the risk score.
- Raise the email notification risk score threshold. No point in choking on excessive emails for known good orders. Raising this from 0% to 1 or 2% will eliminate most of the unnecessary notifications.
Configuration Guide
↑ Back to topNavigate to WooCommerce > Fraud Detection/Blocking. The settings page uses collapsible accordion sections. The first section — Fraud Screening Setup — is open by default.
Fraud Screening Setup
↑ Back to top| Setting | Description | Default |
|---|---|---|
| Enable screening | Master switch for fraud screening. Requires MaxMind credentials configured below. | Off |
| MaxMind Account ID | Your numeric MaxMind account ID, found on the MaxMind dashboard under Account > Account Information. | — |
| MaxMind License key | A license key generated in your MaxMind account under Account > Manage License Keys. | — |
| minFraud Service tier | Score = basic risk score. Insights = score plus risk factors and IP data. Factors = full analysis with human-readable explanations. Higher tiers provide more information on the nature of the risk but cost more per query. | Score |
| MaxMind API URL | The MaxMind minFraud API URL. Change only if directed by MaxMind support. | https://minfraud.maxmind.com/minfraud/v2.0/ |
| Test MaxMind connection | Sends a test request to verify your credentials. Uses one minFraud query from your account. |
Risk Thresholds
↑ Back to top| Setting | Description | Default |
|---|---|---|
| Email notification threshold | Send a fraud report email when the risk score is at or above this percentage. Set to 0 to receive emails for every screened order. | 0 |
| Decline threshold | Automatically decline orders at or above this risk score. Set to 100 to disable auto-decline while you calibrate. | 100 |
| Decline message | Message shown to customers when their order is declined. | (see below) |
Getting started: We recommend setting the decline threshold to 100 (no auto-decline) during your first week. Monitor the fraud report emails to understand the risk score distribution for your store’s orders. A starting point of 30–40% is common, then gradually lower as you gain confidence.
IP Velocity Protection
↑ Back to topDetects and blocks credit card testing bots by tracking declined checkout attempts per IP address. When card testers hit your checkout page, they typically try many card numbers in rapid succession. Velocity protection counts only declined orders (not all attempts) and blocks the IP when it exceeds your threshold.
| Setting | Description | Default |
|---|---|---|
| Enable velocity protection | Master switch for IP velocity tracking and blocking. | Off |
| Max attempts | Number of declined checkout attempts before blocking the IP. Range: 0–50. Set to 0 to block on the very first decline. | 5 |
| Time window | Declines are counted within this rolling window. Range: 1–60 minutes. | 10 min |
| Block duration | How long a blocked IP stays blocked. Range: 1–60 minutes. The block timer resets on every subsequent attempt from the blocked IP (rolling block). | 30 min |
| Destroy session | Empty the shopping cart and destroy the WooCommerce session when an IP is blocked. This forces card testers to start over — new session, re-add products, re-fill the checkout form. Does not affect the customer’s WordPress login. | On |
| Block message | Message shown to customers blocked by velocity protection. Supports [MINUTES] (block duration) and [STORE_NAME] (your store name) tokens. | (see below) |
| Email notification | Send an email alert when a velocity block is triggered. | On |
| Velocity email subject | Subject line for velocity alert emails. The blocked IP is appended automatically. | Antifraud Velocity Alert |
How counting works: Only orders that are declined by MaxMind risk scoring (or by cache hit) count toward the velocity limit. Orders that pass screening, whitelisted orders, and orders blocked by error disposition do not count. This prevents false velocity blocks from legitimate customers who happen to retry checkout.
The admin page includes a View Velocity Table button showing all tracked IPs with their decline counts and block status, and a Clear Velocity Table button (two-click confirm) to reset all tracking data. A collapsible Velocity Protection Notes panel provides quick reference documentation.
Query Caching
↑ Back to top| Setting | Description | Default |
|---|---|---|
| Enable caching | Cache minFraud results for identical checkout data to reduce query charges and merchant emails. | On |
| Cache TTL | How long cached results remain valid, in minutes. Range: 1–60. | 10 min |
| High-performance table | Create a dedicated database table for caching instead of using WordPress transients. Recommended for stores processing more than 50 orders per hour. Falls back to transients if the table can’t be created. | On |
Notifications
↑ Back to top| Setting | Description | Default |
|---|---|---|
| From address | The sender address for all fraud notification emails. | Store owner’s email |
| To address(es) | Recipient address(es). Separate multiple addresses with commas. | Admin email |
| Risk email subject | Subject prefix for fraud report emails. Risk % and disposition are appended automatically. | Antifraud Report – |
| Whitelist notifications | Send email when a whitelisted IP places an order. | On |
| Whitelist email subject | Subject line for whitelist notification emails. | Antifraud Report – IP Whitelisted |
| Error notifications | Send email when a processing error occurs during screening. | On |
| Error email subject | Subject line for error notification emails. | Antifraud Processing Error |
Network and Proxy
↑ Back to top| Setting | Description | Default |
|---|---|---|
| Behind proxy / CDN | Enable if your store is behind CloudFlare, a load balancer, CDN, or reverse proxy. When enabled, the extension reads the real client IP from X-Forwarded-For, CF-Connecting-IP, X-Real-IP, and True-Client-IP headers. | Off |
Whitelisting
↑ Back to top| Setting | Description | Default |
|---|---|---|
| IP whitelist | Comma-separated list of IPv4/IPv6 addresses and CIDR ranges. Whitelisted IPs bypass fraud screening entirely without consuming a minFraud query. This is especially useful for whitelisting your office IP so that staff can place manual or test orders without triggering fraud screening. Examples: 192.168.1.100, 10.0.0.0/8, 2001:db8::/32 | — |
Note: Changing the whitelist purges cached whitelist entries from the query cache.
Logging
↑ Back to top| Setting | Description | Default |
|---|---|---|
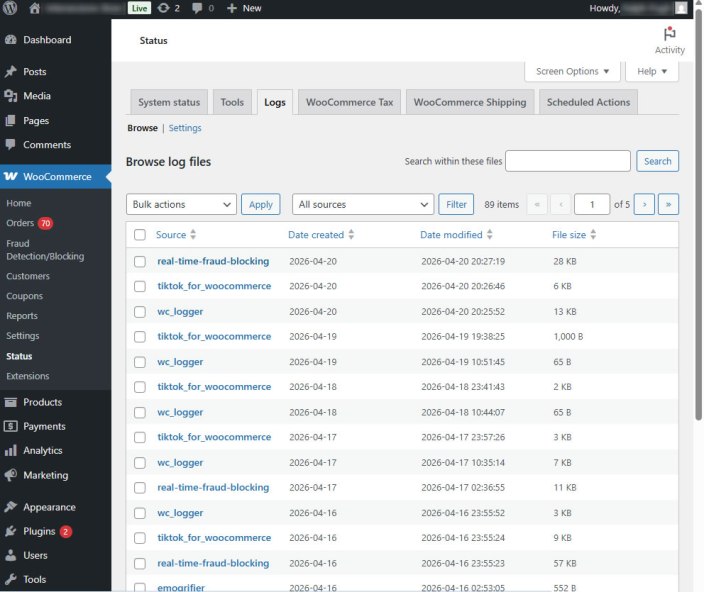
| Enable logging | Log fraud analysis activity through WooCommerce’s built-in logging system. | On |
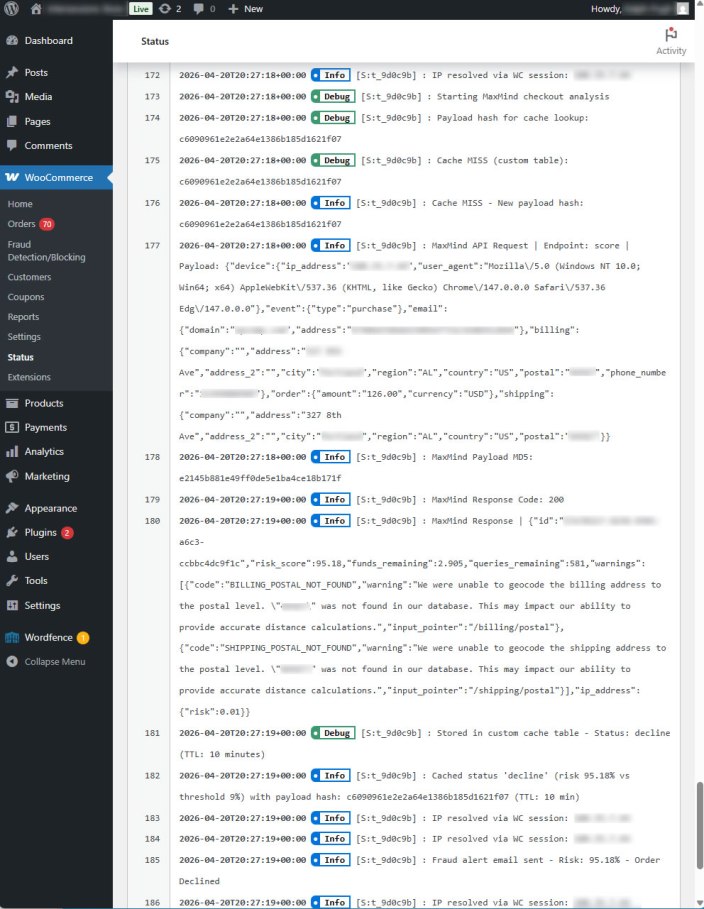
| View logs | Click the button to open WooCommerce > Status > Logs. Look for entries starting with real-time-fraud-blocking. | — |
Log retention is managed through WooCommerce’s log settings at WooCommerce > Status > Logs > Settings.
On Processing Error
↑ Back to topControls what happens when MaxMind is unreachable, returns an error, or the extension encounters an unexpected exception during screening.
| Setting | Description | Default |
|---|---|---|
| Disposition | Accept order (recommended): allow the order so you don’t lose sales. A note is added to the order flagging it for manual review. Decline order: block checkout if screening fails. The customer sees the error decline message. | Accept |
| Error decline message | Message shown to customers when an order is declined due to a processing error. Only used when disposition is set to Decline. | (see below) |
Order notes: When disposition is set to Accept, orders that pass through without screening receive an order note: “Fraud Detection — Processing Error (Order Accepted)” with the error details and a recommendation to review the order manually. These orders also have their disposition meta set to “Error — Accepted” for easy filtering.
How Screening Works
↑ Back to topThe extension intercepts checkout submissions across all three WooCommerce checkout paths:
- Block Checkout — via WooCommerce Store API hooks
- Classic Checkout — via
woocommerce_checkout_processandwoocommerce_after_checkout_validation - WooPay — via Store API (same as Block Checkout)
Every checkout path follows the same screening flow:
- Customer clicks Place Order (or completes WooPay flow).
- Fraud Detection/Blocking intercepts the checkout submission before payment is captured.
- If screening is disabled, the order proceeds normally.
- IP whitelist check — if the customer’s IP matches a whitelisted address or CIDR range, the order is allowed through without consuming a minFraud query. An optional notification email is sent.
- Velocity pre-check — if IP velocity protection is enabled, the extension checks whether this IP is currently blocked. If blocked, the checkout is stopped immediately with the velocity block message. The block timer resets on every attempt (rolling block). No minFraud query is consumed.
- Cache check — if caching is enabled and a cached result exists for this exact contact and address data, the cached decision (accept/decline) is used without consuming a minFraud query.
- minFraud query — the extension sends order data (IP, email, billing/shipping address, order amount, currency, user agent) to MaxMind’s minFraud API.
- Error handling — if the minFraud query fails (network error, invalid credentials, etc.), the error disposition setting determines whether the order is accepted or declined. Accepted orders receive an order note flagging them for manual review.
- Risk evaluation — the returned risk score is compared against your thresholds. If it meets or exceeds the decline threshold, the order is declined. If it meets the email threshold, a notification is sent.
- Velocity recording — if the order was declined by risk scoring, the decline is recorded against the customer’s IP for velocity tracking. If this decline pushes the IP past the max attempts threshold, the IP is blocked immediately, the session is destroyed (if enabled), and a velocity alert email is sent.
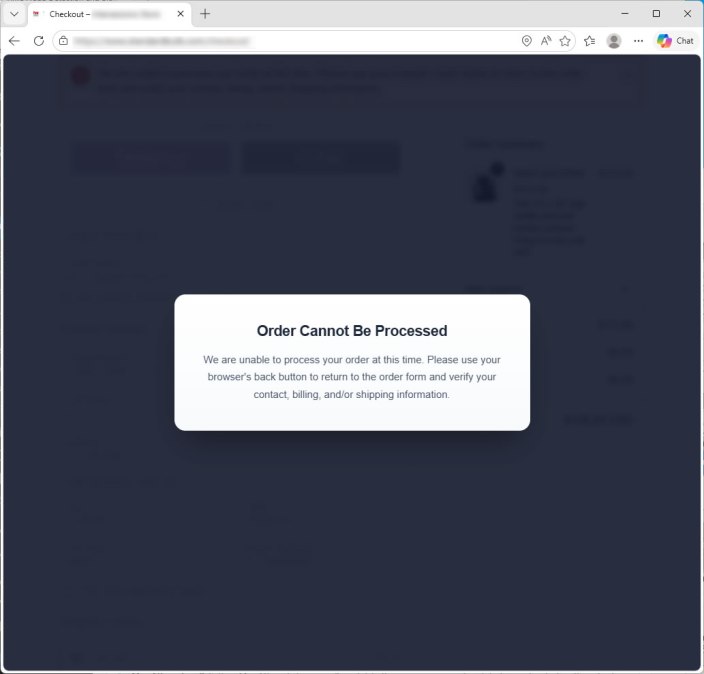
- Checkout proceeds (accepted) or the customer sees the appropriate decline message.
Note: Because screening happens before payment, no credit card charge is made on declined orders. The customer sees your decline message and can modify their information or contact you.
Email Notifications
↑ Back to topThe extension sends detailed HTML email reports for different screening outcomes. Each email includes customer details, IP address, risk score, order total, and the full MaxMind response data (varies by service tier).
| Email Type | When Sent | Default Subject |
|---|---|---|
| Fraud Report | Risk score meets or exceeds the email notification threshold. The report indicates whether the order was accepted or declined, depending on whether the score was above or below the decline threshold. | Antifraud Report – |
| Velocity Alert | An IP address has been blocked after exceeding the maximum declined attempts within the time window. Includes the IP, email, decline count, block duration, and checkout source. | Antifraud Velocity Alert |
| Processing Error | MaxMind API returned an error or was unreachable. Sent regardless of the error disposition setting. | Antifraud Processing Error |
| Whitelist Notification | A whitelisted IP placed an order (if enabled). | Antifraud Report – IP Whitelisted |
Order Notes
↑ Back to topFraud Detection/Blocking adds notes to WooCommerce orders documenting the screening outcome. These appear in the Order Notes panel on the order detail page.
| Note Type | When Added | Contents |
|---|---|---|
| Screening Result | Every screened order that completes checkout. | Risk score, decline threshold, disposition (accepted/declined), MaxMind transaction ID, customer IP, and timestamp. |
| Whitelisted | Order from a whitelisted IP. | Customer IP and the whitelist entry it matched. |
| Processing Error — Accepted | Order accepted despite a screening failure (error disposition = Accept). | Error details, customer IP, and a recommendation to review the order manually for fraud risk. |
Tip: Orders accepted during a processing error have their disposition meta set to “Error — Accepted”. You can filter or search for these in your order management workflow to ensure they receive manual review.
Troubleshooting
↑ Back to topTest Connection fails with authentication error
Verify that your Account ID is the numeric ID (not your email address) and that the License Key has not been revoked. Generate a new license key in your MaxMind dashboard if needed.
Orders are not being screened
Confirm that “Enable screening” is checked and your MaxMind credentials are entered. Check WooCommerce > Status > Logs for entries starting with real-time-fraud-blocking. Also verify the plugin is active under Plugins > Installed Plugins.
All orders are being declined
Check your Decline Threshold. If set too low, even low-risk orders will be blocked. Set to 100 to disable auto-decline while you review the risk scores coming back in your email reports, then lower the threshold gradually.
Emails are not being received
Verify the From and To addresses in the Notifications section. Check that the From address is authorized to send mail on your domain (SPF/DKIM). Many hosting providers block outbound mail on port 25 or have server IPs that are flagged by major email providers. Installing an SMTP plugin (WP Mail SMTP, Post SMTP, or FluentSMTP) to authenticate through your mail server or a transactional email service (Gmail, SendGrid, Mailgun, Amazon SES) is strongly recommended. The plugin uses wp_mail(), so any SMTP plugin will automatically route all notifications through the configured mail server.
Wrong IP address detected (always 127.0.0.1 or server IP)
Enable “Behind proxy / CDN” in the Network and Proxy section. This tells the extension to read the real client IP from forwarded headers (X-Forwarded-For, CF-Connecting-IP, etc.) instead of the direct connection.
Cache is not reducing minFraud queries
The cache only reuses results when the checkout identity data (IP, email, billing and shipping addresses) is identical. Changes to the cart contents or order amount do not affect the cache key — so a customer adjusting their cart will still get a cached result. However, any change to the customer’s email or addresses generates a new cache key and requires a new query . Set a TTL of 10–15 minutes for best results.
Extension conflicts with another checkout extension
Fraud Detection/Blocking hooks into WooCommerce’s standard checkout pipeline. If another extension modifies the checkout flow (e.g., multi-step checkout, custom checkout pages), there may be conflicts. Check the logs for errors and contact support with details about the other extension.
Velocity protection is blocking legitimate customers
Increase the Max Attempts threshold or widen the Time Window. Velocity only counts orders declined by MaxMind risk scoring, not payment gateway failures — so a customer mistyping their card number won’t trigger a velocity block. However, a customer who enters an incorrect shipping zip code several times could trigger repeated MaxMind declines if the address mismatch pushes their risk score above your threshold. Start with 5 attempts in 10 minutes and adjust based on your store’s checkout patterns. You can also use the View Velocity Table button to see which IPs are being tracked or blocked.
Velocity counters not incrementing
Velocity only counts declined orders. If the order is accepted, whitelisted, or blocked by error disposition, it does not count toward velocity limits. Check that your decline threshold is set low enough to produce declines, and verify that velocity protection is enabled.
Tips & Best Practices
↑ Back to topGetting Started
Start with the decline threshold at 100 (no auto-decline) and the email threshold at 0 (email on every order). Run this way for a week to understand the risk score distribution for your store’s orders. An interim setting of 30–40% is common, then gradually lower the threshold as you gain confidence in the scoring for your particular customer base.
Understanding Risk Scores
MaxMind’s risk score is a percentage (0–100) representing the probability that the transaction is fraudulent. A score of 25 means roughly a 25% chance of fraud based on the data sent. The score is not an absolute guarantee — it is a probability based on patterns across MaxMind’s global network of merchants.
Calculating an Optimal Decline Threshold
Consider your profit margin and chargeback costs. The basic formula: if (profit × (100 - riskScore)) > (fraudLoss × riskScore), it may still be profitable to accept the order. For a product with a 30% margin and a $100 price, the breakeven risk score is roughly 23%. Many merchants start with a decline threshold of 30–40% and adjust based on their chargeback rate.
Query Caching Tips
Caching saves money on retries. If a customer’s checkout fails (wrong CVV, expired card), they’ll retry with the same data. Without caching, each retry costs another half-cent query. With a 10-minute TTL, retries within that window are free. The high-performance database table is recommended for stores with more than 50 orders per hour to avoid bloating the WordPress options table.
Proxy / CDN Detection
If you use CloudFlare, AWS CloudFront, or any reverse proxy, you must enable proxy detection. Without it, MaxMind sees your server’s IP instead of the customer’s, and every order will appear to come from the same location — making the risk score meaningless.
IP Velocity Protection
Card testing bots typically fire dozens of checkout attempts in rapid succession from the same IP, each with a different stolen card number. Velocity protection catches this pattern by counting only declined orders. Start with 5 max attempts in a 10-minute window and a 30-minute block duration. The “destroy session” option is critical — without it, bots retain their cart and session, making it trivial to retry. With session destruction, they must re-add products, re-fill the checkout form, and get a new session cookie on every block.
The rolling block means every attempt from a blocked IP resets the block timer. A bot that keeps trying never gets unblocked. Legitimate customers who were caught by mistake simply wait for the block to expire.
How to Uninstall
↑ Back to top- Go to Plugins > Installed Plugins.
- Deactivate Real-Time Fraud Detection and Blocking.
- Click Delete to remove the extension files.
When deleted, the extension automatically cleans up its database entries: settings, transients, the custom cache table, and the velocity tracking table are all removed. No manual database cleanup is needed.
Screen Shots
↑ Back to topFraud Screening Setup – MaxMind Configuration
Risk Thresholds and IP Velocity Protection Configuration
Query Caching, Notifications and Network and Proxy Configuration
Whitelisting, Logging and On Processing Error Configuration

Logging – WooCommerce Logs
Logging – Fraud Detect/Block Log Detail
Order Decline Modal Message
Email Notification – Order Accept
Email Notification – Order Declined
FAQs
↑ Back to topHelp customers by answering commonly asked questions.
Question 1 – Does this work with my payment gateway?
Yes. The extension screens orders before payment processing, so it works with all payment gateways — Stripe, PayPal, Authorize.net, and any other gateway that uses WooCommerce’s standard checkout flow.
Question 2 – Will legitimate customers be affected?
Screening happens in tenths of a second and is invisible to customers whose orders fall below your risk threshold. Only high-risk orders see a decline message, which you can customize.
Question 3 – How much does MaxMind cost?
MaxMind offers a free trial with 1,000 queries. After that, queries cost approximately $0.005 each — about half a cent per order. Smart query caching and IP velocity protection reduces costs further by reusing results when customers retry with identical data.