
QR Code Tickets & Check-in allows your WooCommerce store to:
Ticket Generation & Customization
- Automatically generate QR code tickets when a customer purchases a product
- Customize ticket codes with prefix, suffix (with dynamic placeholders), length, format, and separator
- Choose from 12 professionally designed ticket templates or create custom HTML templates
- Send tickets via email with PDF download option
- Mini Print (58mm and 80mm paper width)
Check-in & Validation
- Quick check-ins and bulk check-ins for faster operations
- Scan and validate tickets using your mobile camera (no app required)
- Front-end check-in page using shortcode (no admin access needed)
- Multiple check-in types: Single Entry, Single Entry with Exit, Multiple Entry, Multiple Entry with Exit
- Role-based access control to restrict check-in by user role
- Public check-in mode (no login required with security options)
Ticket Management
- Edit ticket details (customer name, email, expiry, check-in type)
- Delete tickets permanently
- Transfer tickets to another person with email notifications
- Ticket lookup shortcode to check ticket status
- Audit trail & logs for all ticket actions
Customer Features
- My Tickets page in customer account (view, print, email, transfer)
- Enhanced email notifications with embedded QR codes
Reports & Analytics
- Track usage, reports, and entry statistics
- CSV export with advanced filtering
Developer Features
- REST API endpoints for custom integrations
- Webhooks for ticket created, checked-in, and invalid events
Compatibility
- WooCommerce Bookings by WooCommerce
- Booking & Appointment Plugin for WooCommerce by Tyche Softwares
It is perfect for:
- Events
- Concerts
- Workshops
- Exhibitions
- Amusement parks
- Entry-based services
- Corporate events & conferences
- Sporting events & tournaments
- Classes & training sessions
- Festivals & multi-day events
Let’s set up your ticketing system step by step.
Installation
↑ Back to topTo start using a product from WooCommerce.com, you can use the “Add to store” functionality on the order confirmation page or the My subscriptions section in your account.
- Navigate to My subscriptions.
- Find the Add to store button next to the product you’re planning to install.
- Follow the instructions on the screen, and the product will be automatically added to your store.
Alternative options and more information at:
Managing WooCommerce.com subscriptions.

Configure Global Ticket Settings
↑ Back to topBefore selling tickets, you should configure how tickets behave.
Go to: WooCommerce → Settings → Tickets
This is the central control panel for your ticket system.
Understanding How Ticket Generation Works
↑ Back to topTickets are generated automatically when:
- A product with a ticket enabled is purchased
- The order reaches a specific order status (you define this)
So first, we define how tickets should be created.
Ticket Code Configuration
↑ Back to topInside the Settings tab, you will see options to configure ticket codes.
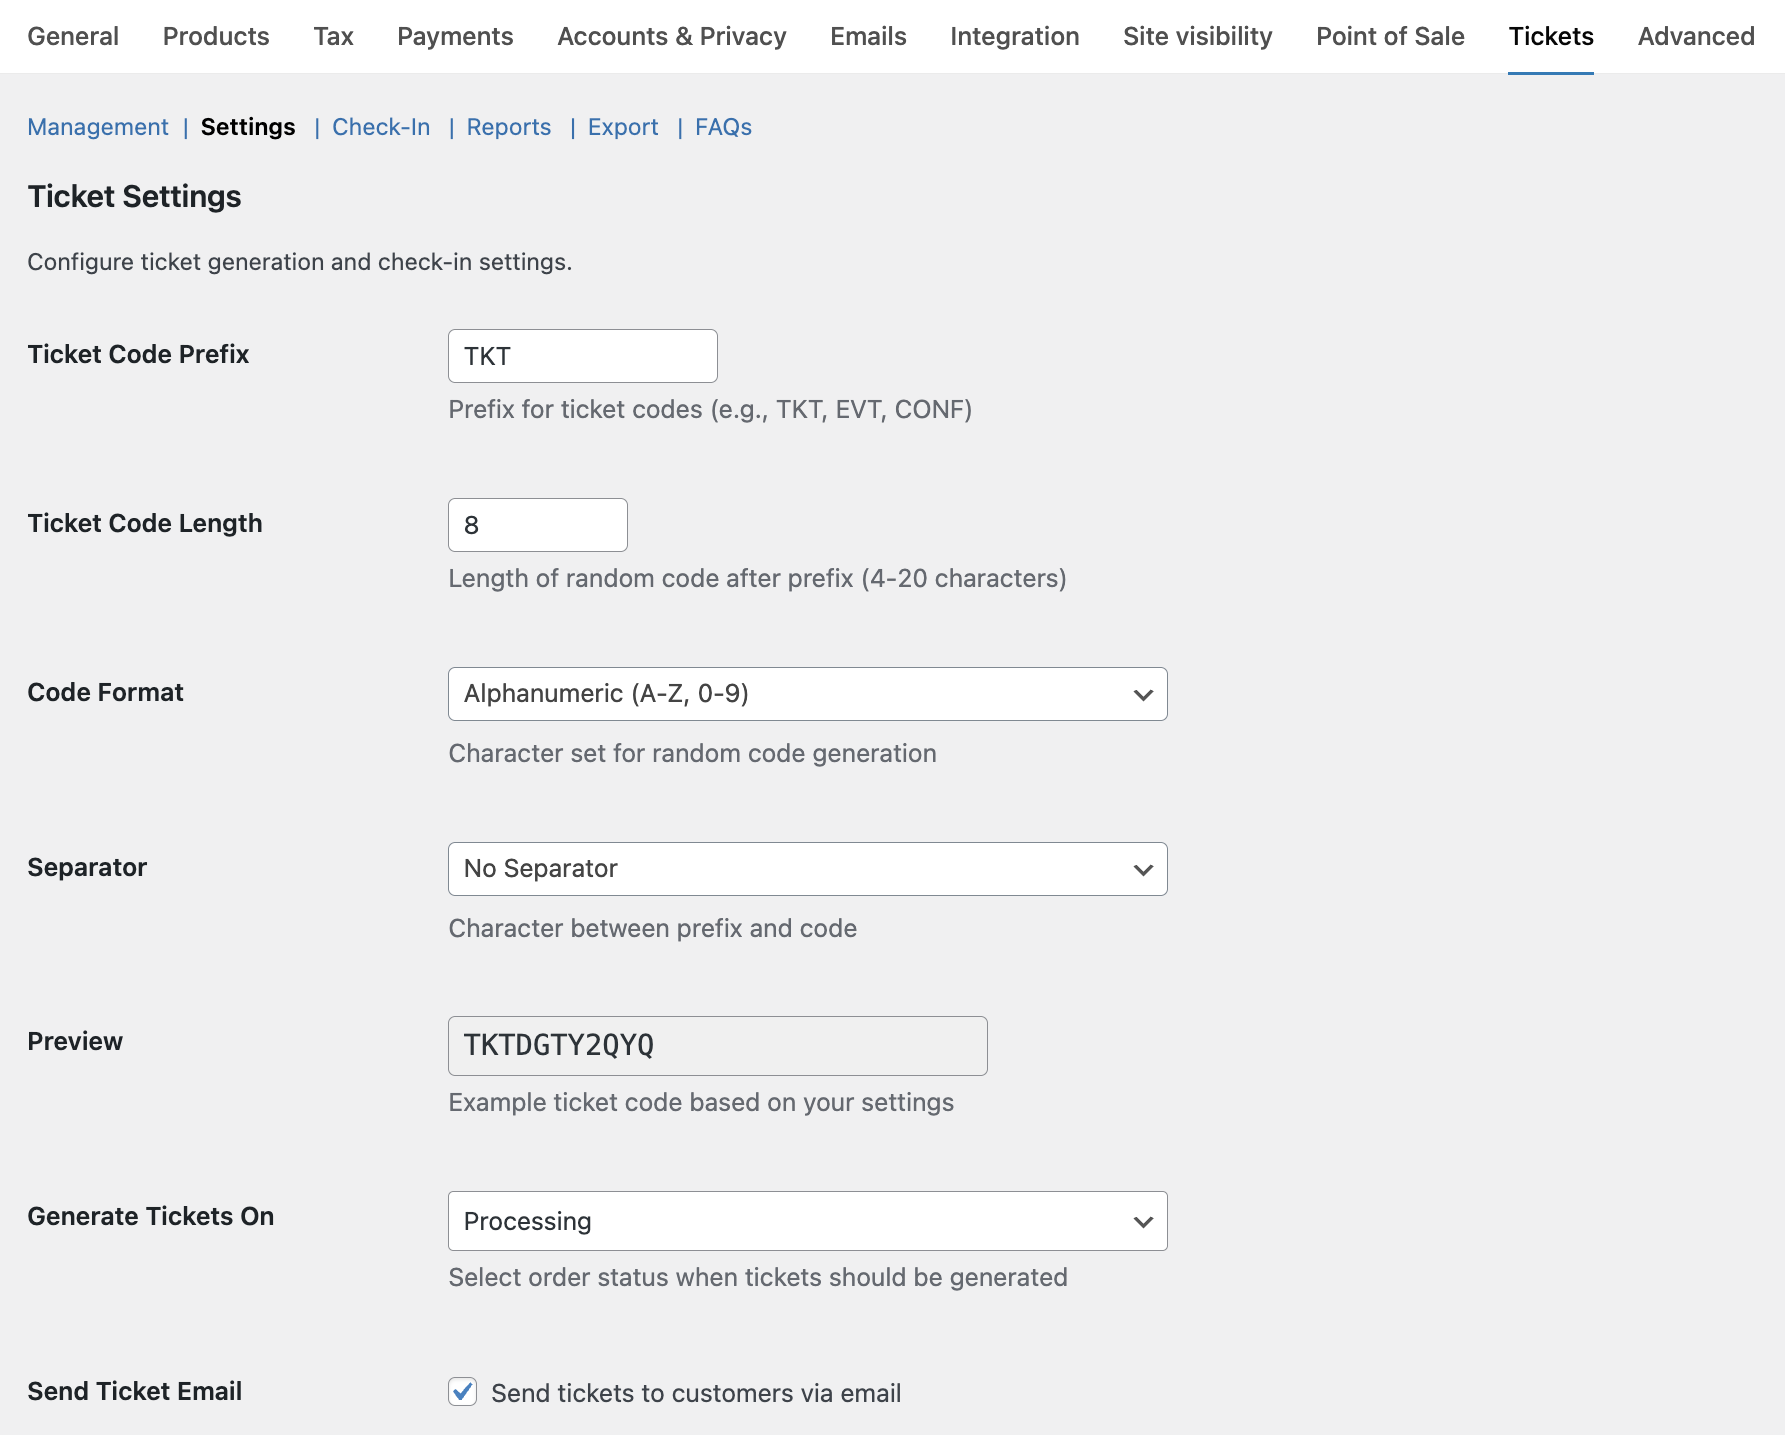
Ticket Code Prefix
This appears at the beginning of every ticket.
Example:
- EVT
- PARK
- SHOW2025
If prefix = EVT
Final code may look like:EVT-84G7K2
Ticket Code Suffix
You can also add a suffix to your ticket codes. This appears at the end of every ticket code and can be used to indicate the year, event type, or any other identifier.
Example
2025FESTEVENT
If prefix = TKT, separator = -, and suffix = 2025, the final code will look like: TKT-84G7K2-2025
Ticket Code Length
Defines how many random characters are generated.
Example:
- 6
- 8
Longer codes = more uniqueness.
Code Format & Separator
Choose how your ticket code is structured and separated.
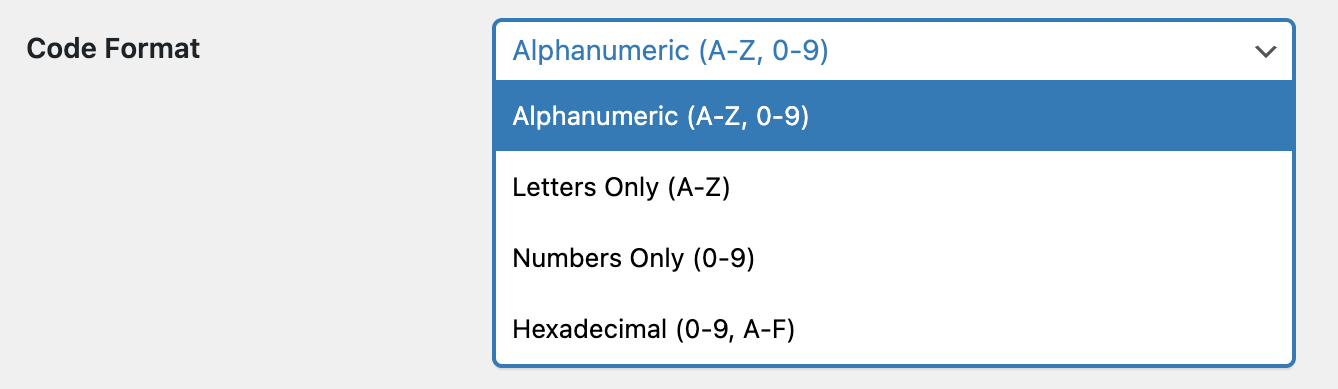
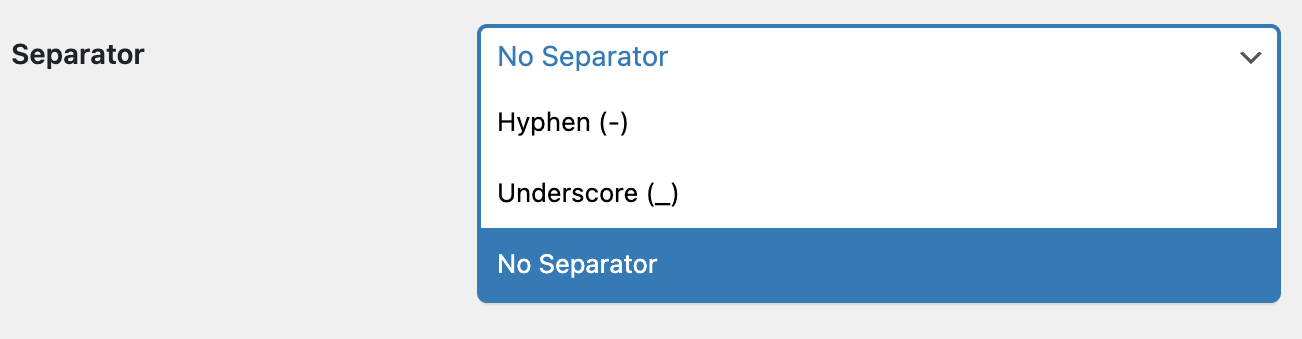
Preview is shown instantly so you know how your final ticket will look.

When Should Tickets Be Generated?
Choose the order status that triggers ticket creation. Most common choices are:
- Processing
- Completed (Default)
Example:
If you want tickets to generate only after full payment confirmation, choose Completed.

Sending Tickets to Customers
Send Ticket Email: Enable this option to automatically send ticket email.
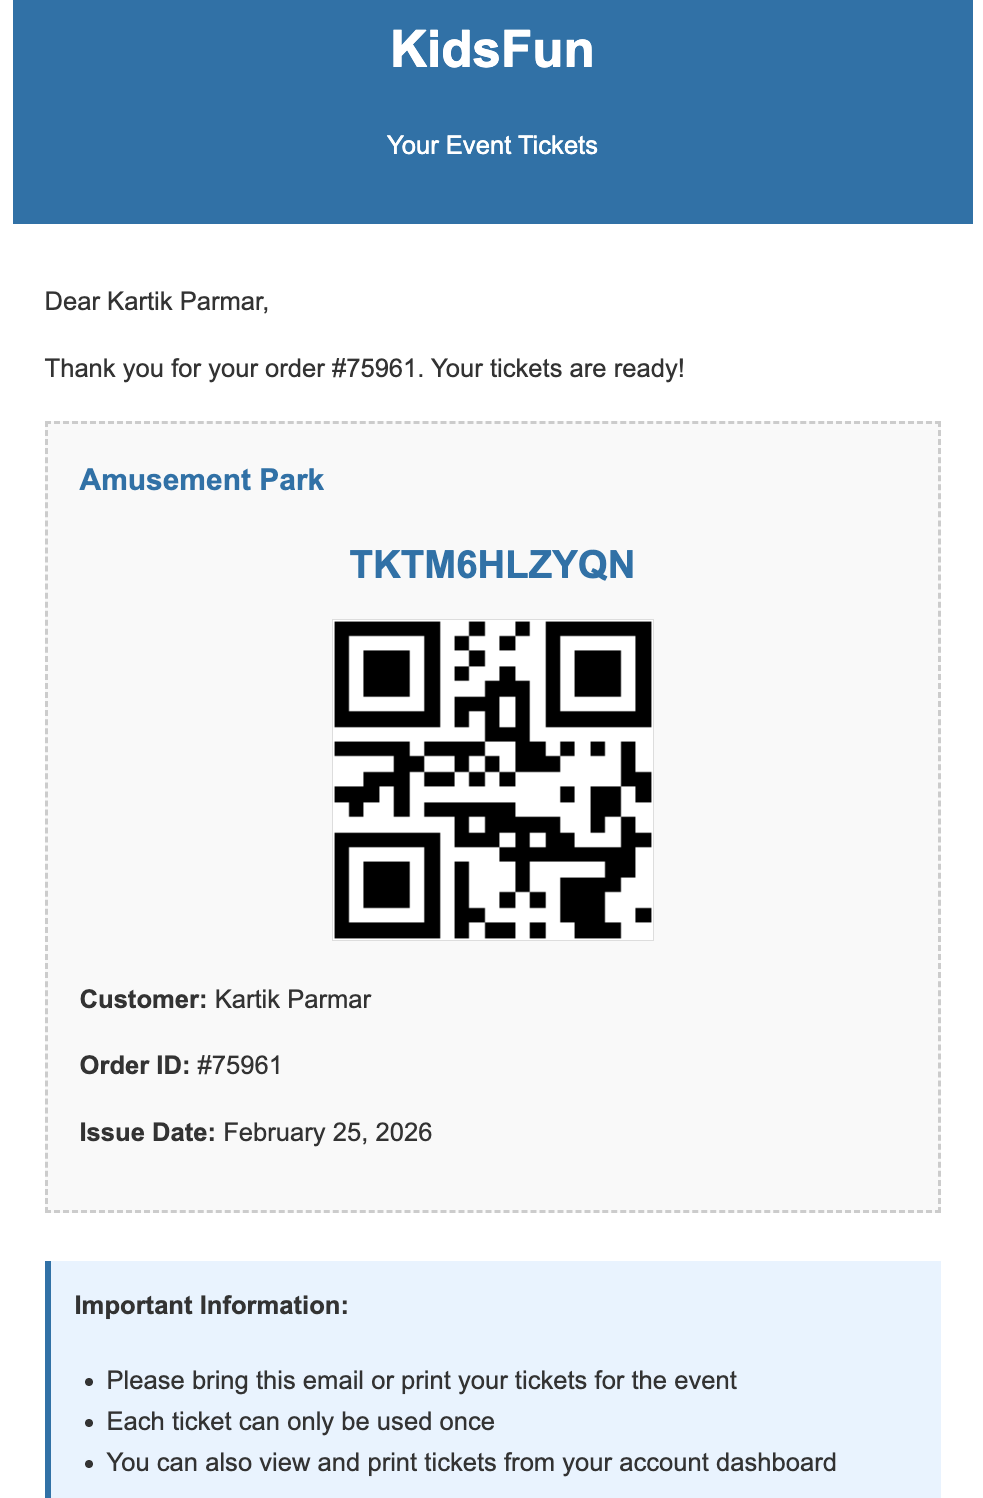
Ticket Per Quantity
This setting defines how many tickets are created. If enabled, then the customer buys 3 quantities, and 3 separate tickets will be generated. If disabled, then only 1 ticket per product line will be generated.
Ticket Validity
You can set how many days the ticket remains valid. The Ticket expiry is calculated from the purchase date.
Example:
- Set 1 day → valid only for event day
- Set 7 days → valid for a week after purchase
Ticket Design Template
Choose from 12 professionally designed ticket templates to match your brand and event type.
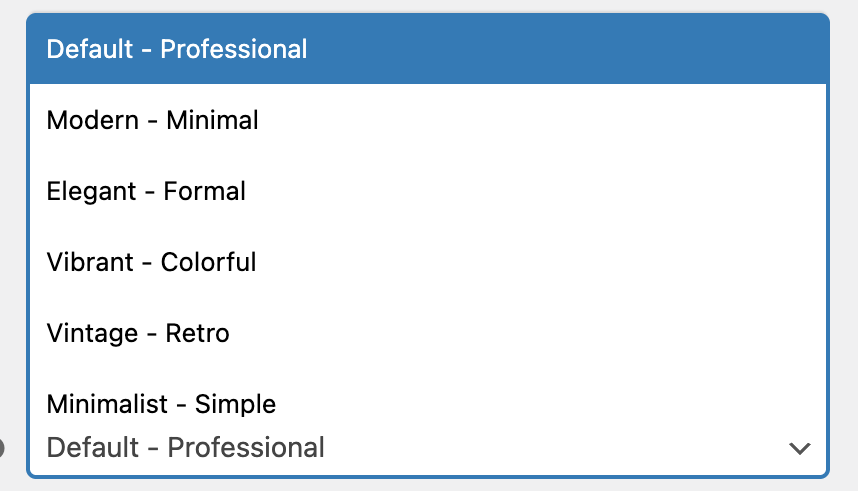
Templates are professionally designed and ready to use. Advanced users can customize via custom code if needed.
| Template | Description |
|---|---|
| Default — Professional | Classic design with clean borders and structured layout |
| Modern — Minimal | Clean, contemporary minimalist design with gradient header |
| Elegant — Formal | Refined design for upscale events (galas, weddings, theatre) |
| Vibrant — Colorful | Bold, energetic design for music festivals and carnivals |
| Vintage — Retro | Classic retro-inspired ticket stub design |
| Minimalist — Black & White | Ultra-clean black and white design |
| Professional — Dark Edition | Dark-themed ticket with two-panel layout |
| Classic Stub — Gold Accent | Traditional ticket with gold accent strip |
| Jungle Safari — Nature Edition | Forest green design for wildlife parks and nature reserves |
| Adventure Park — Thrill Edition | Electric purple-to-orange gradient for amusement parks |
| Concert Night — Neon Edition | Dark, electric design for music concerts |
| Theatre — Grand Playbill | Elegant portrait-style ticket for theatre and opera |
Custom Ticket Template – Upload your own HTML template using merge code
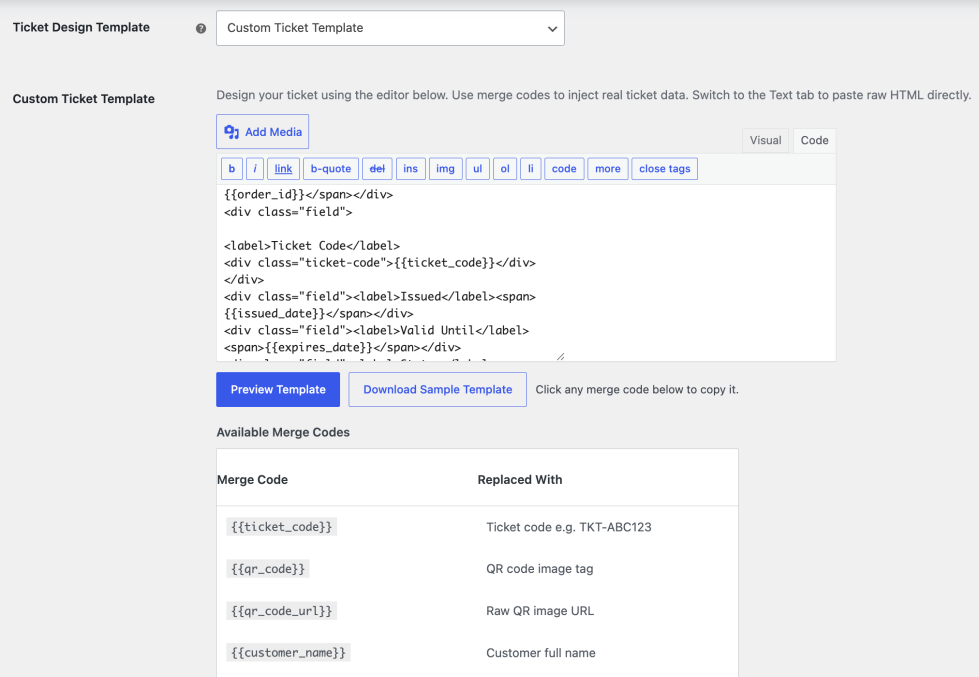
Custom Template Merge Codes:
{{ticket_code}}– Ticket code{{qr_code}}– QR code image{{customer_name}}– Customer full name{{customer_email}}– Customer email{{order_id}}– Order ID{{product_name}}– Product name{{variation_name}}– Variation details (if applicable){{booking_details}}– Booking details (if applicable){{issued_date}}– Ticket issue date{{expires_date}}– Expiry date{{site_name}}– Store name{{site_url}}– Store URL{{site_logo}}– Site logo{{ticket_status}}– Valid / Used / Expired
Enable Bulk Check-In & Export
- Enable Bulk Check-In for faster entry management
- Enable Export if you want CSV reports
Click Save Changes when finished.
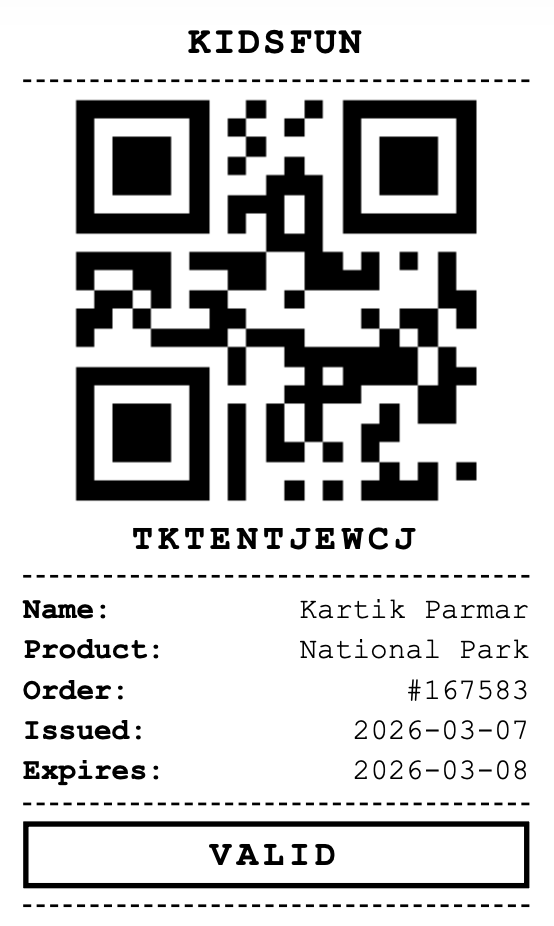
Mini Print
This section can be used when issuing the ticket from the desk where print can be as small as possible with sufficient information and quick process with minimum use of paper.
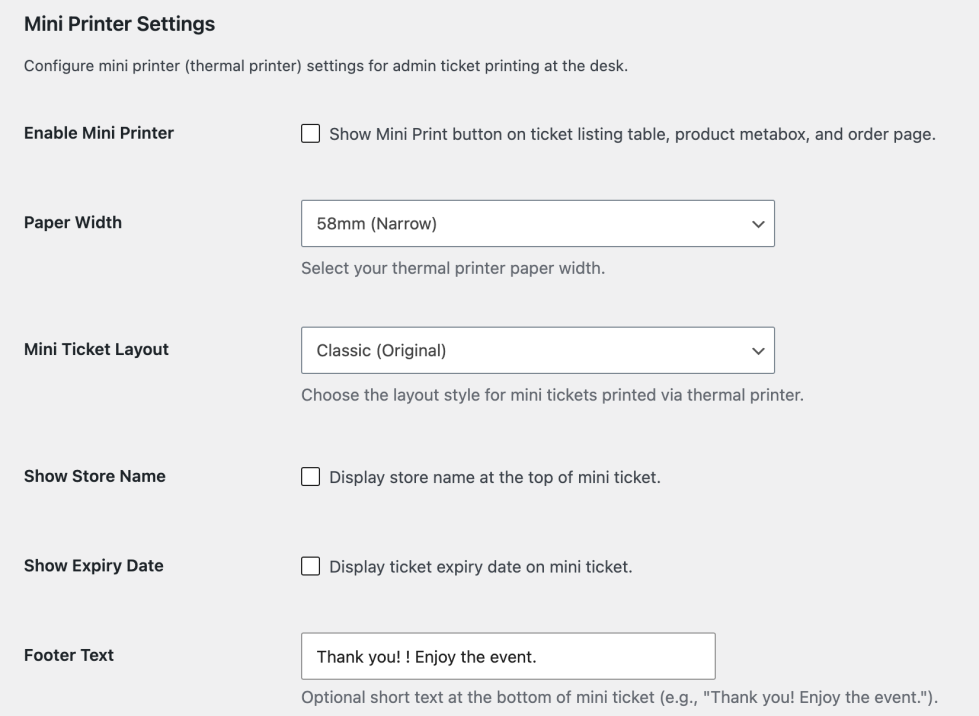
Example ticket as shown in the following image.
Supported Paper Widths:
- 58mm (Narrow)
- 80mm (Standard)
Available Mini Ticket Layouts:
Choose from 6 professionally designed layouts to match your brand and event type:
| Layout | Best For |
|---|---|
| Classic | All-round use with balanced information display |
| Minimalist | High-speed events where only essential information is needed |
| Brand-Focused | Corporate events where branding is important (includes logo space) |
| Event-Focused | Theatres and multi-day events with seat/gate information |
| GST Invoice Style | Retail and invoice-style receipts with itemized table |
| Sales Invoice with QR | Clean sales invoice with order items and totals |
Customization Options:
- Show/Hide store name
- Show/Hide expiry date
- Custom footer text
- Paper width selection (58mm / 80mm)
You can also override mini ticket templates in your theme for complete design control.
Your global setup is now complete.
Enable Tickets on a Product
↑ Back to topNow we choose which product should generate tickets.
- Go to Products → Edit Product
- Scroll to Product data Meta box
- Click on Ticket Settings Tab
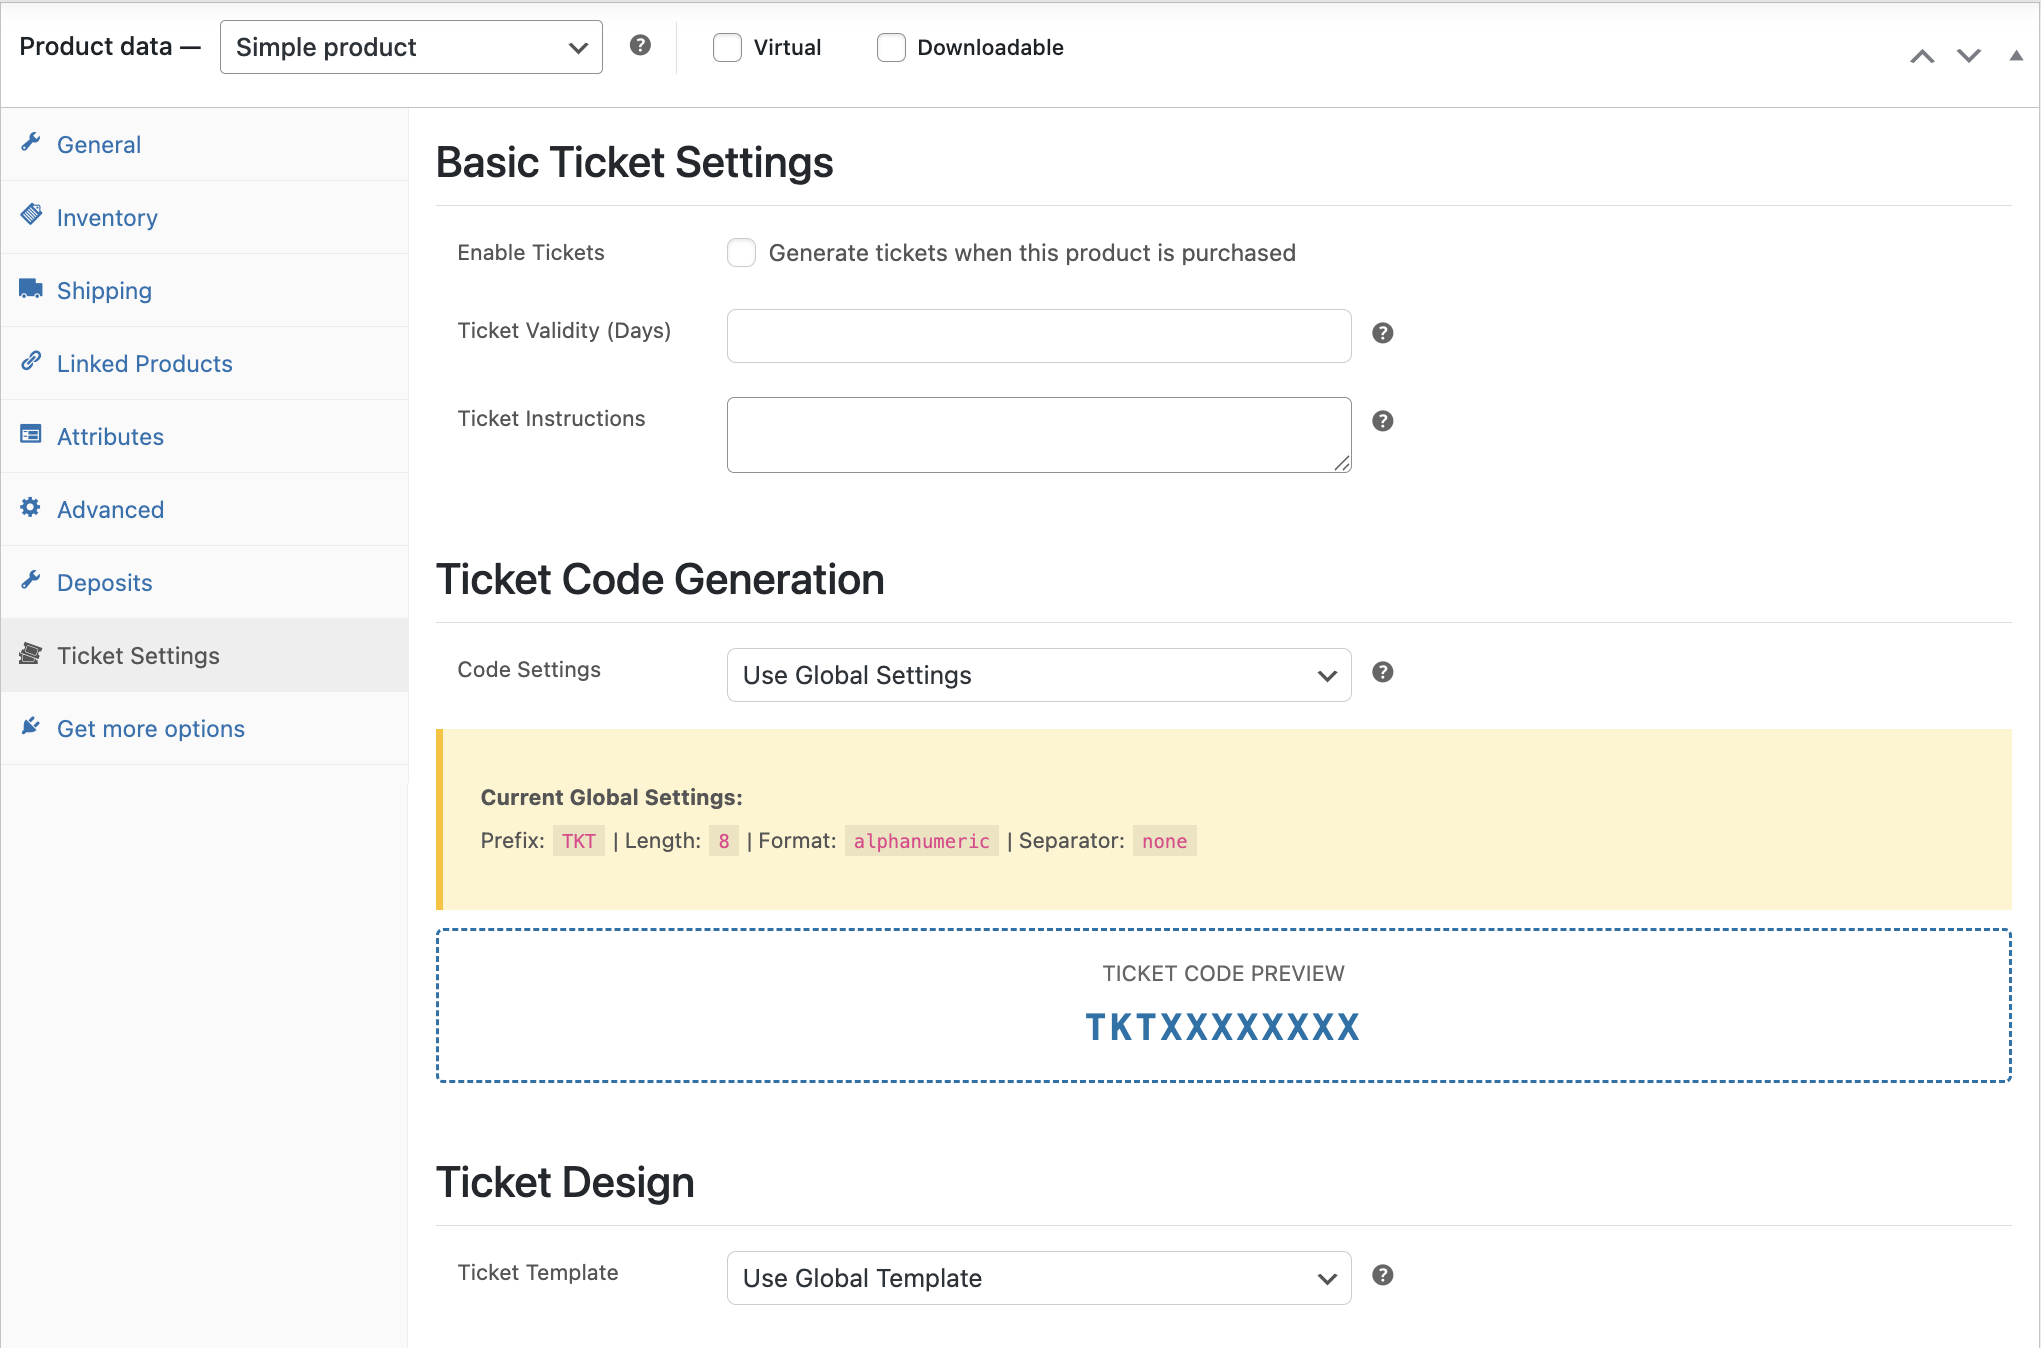
Here you can enable tickets for this product and Override global settings (if needed).
Use this when:
- Different events require different prefixes
- Different validity periods are needed
- Different templates are required
Configure the Ticket Setting according to your business requirements and Update the product.
Test Purchase
↑ Back to topNow lets perform a test by purchasing the product where ticket settings are configured. Complete the payment of it and change the order status to your configured trigger (e.g Completed).
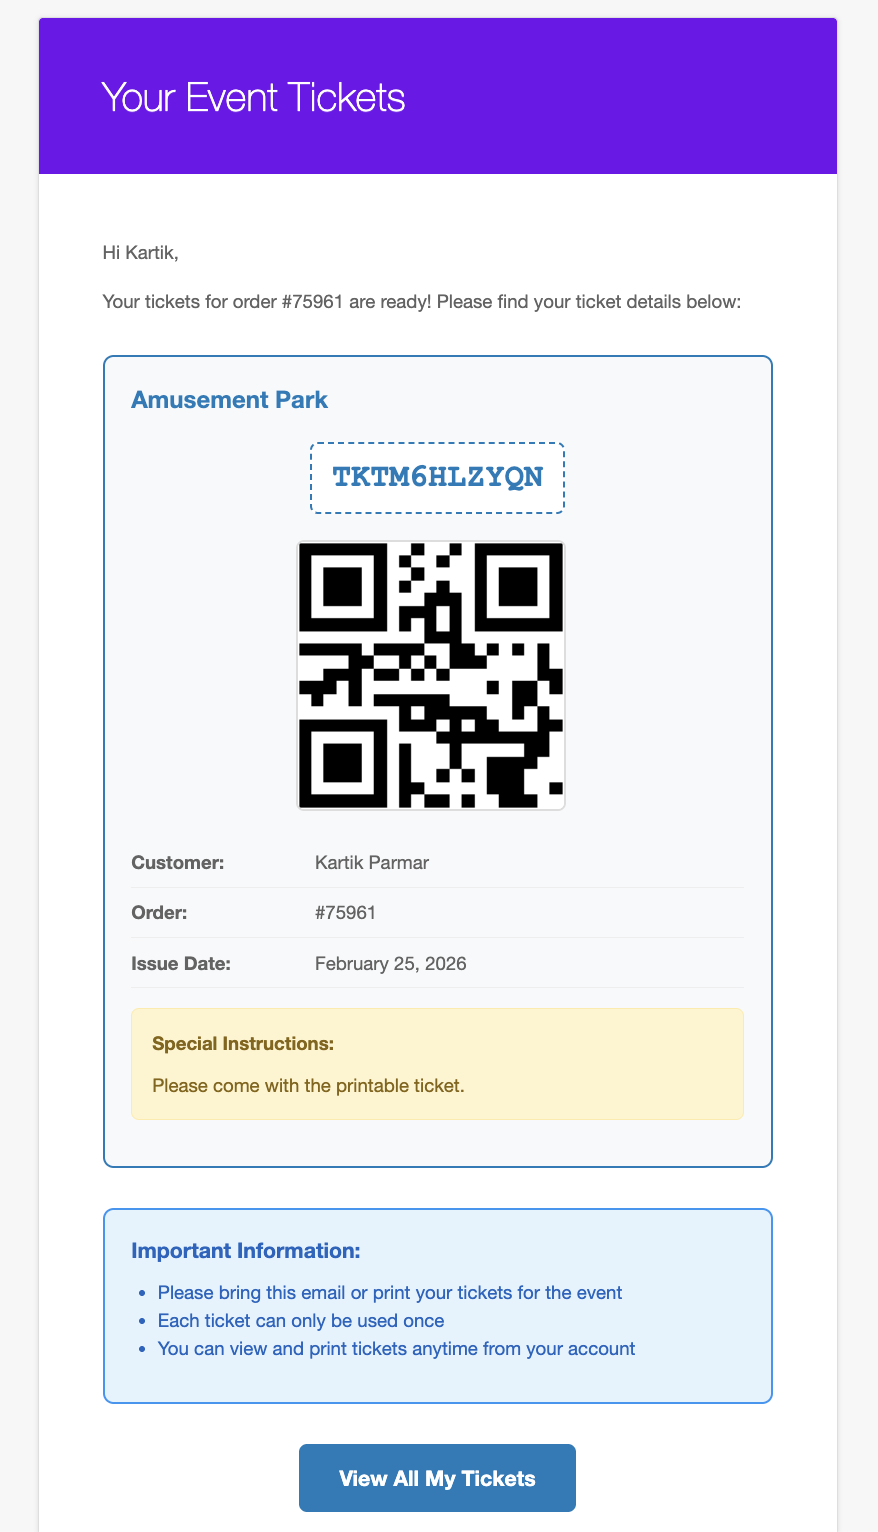
Tickets will now be generated automatically. The customer will receive the ticket email and QR Code inside it.
Checking In Tickets at Entry
↑ Back to topBack-end Check-in
This is where your system becomes powerful.
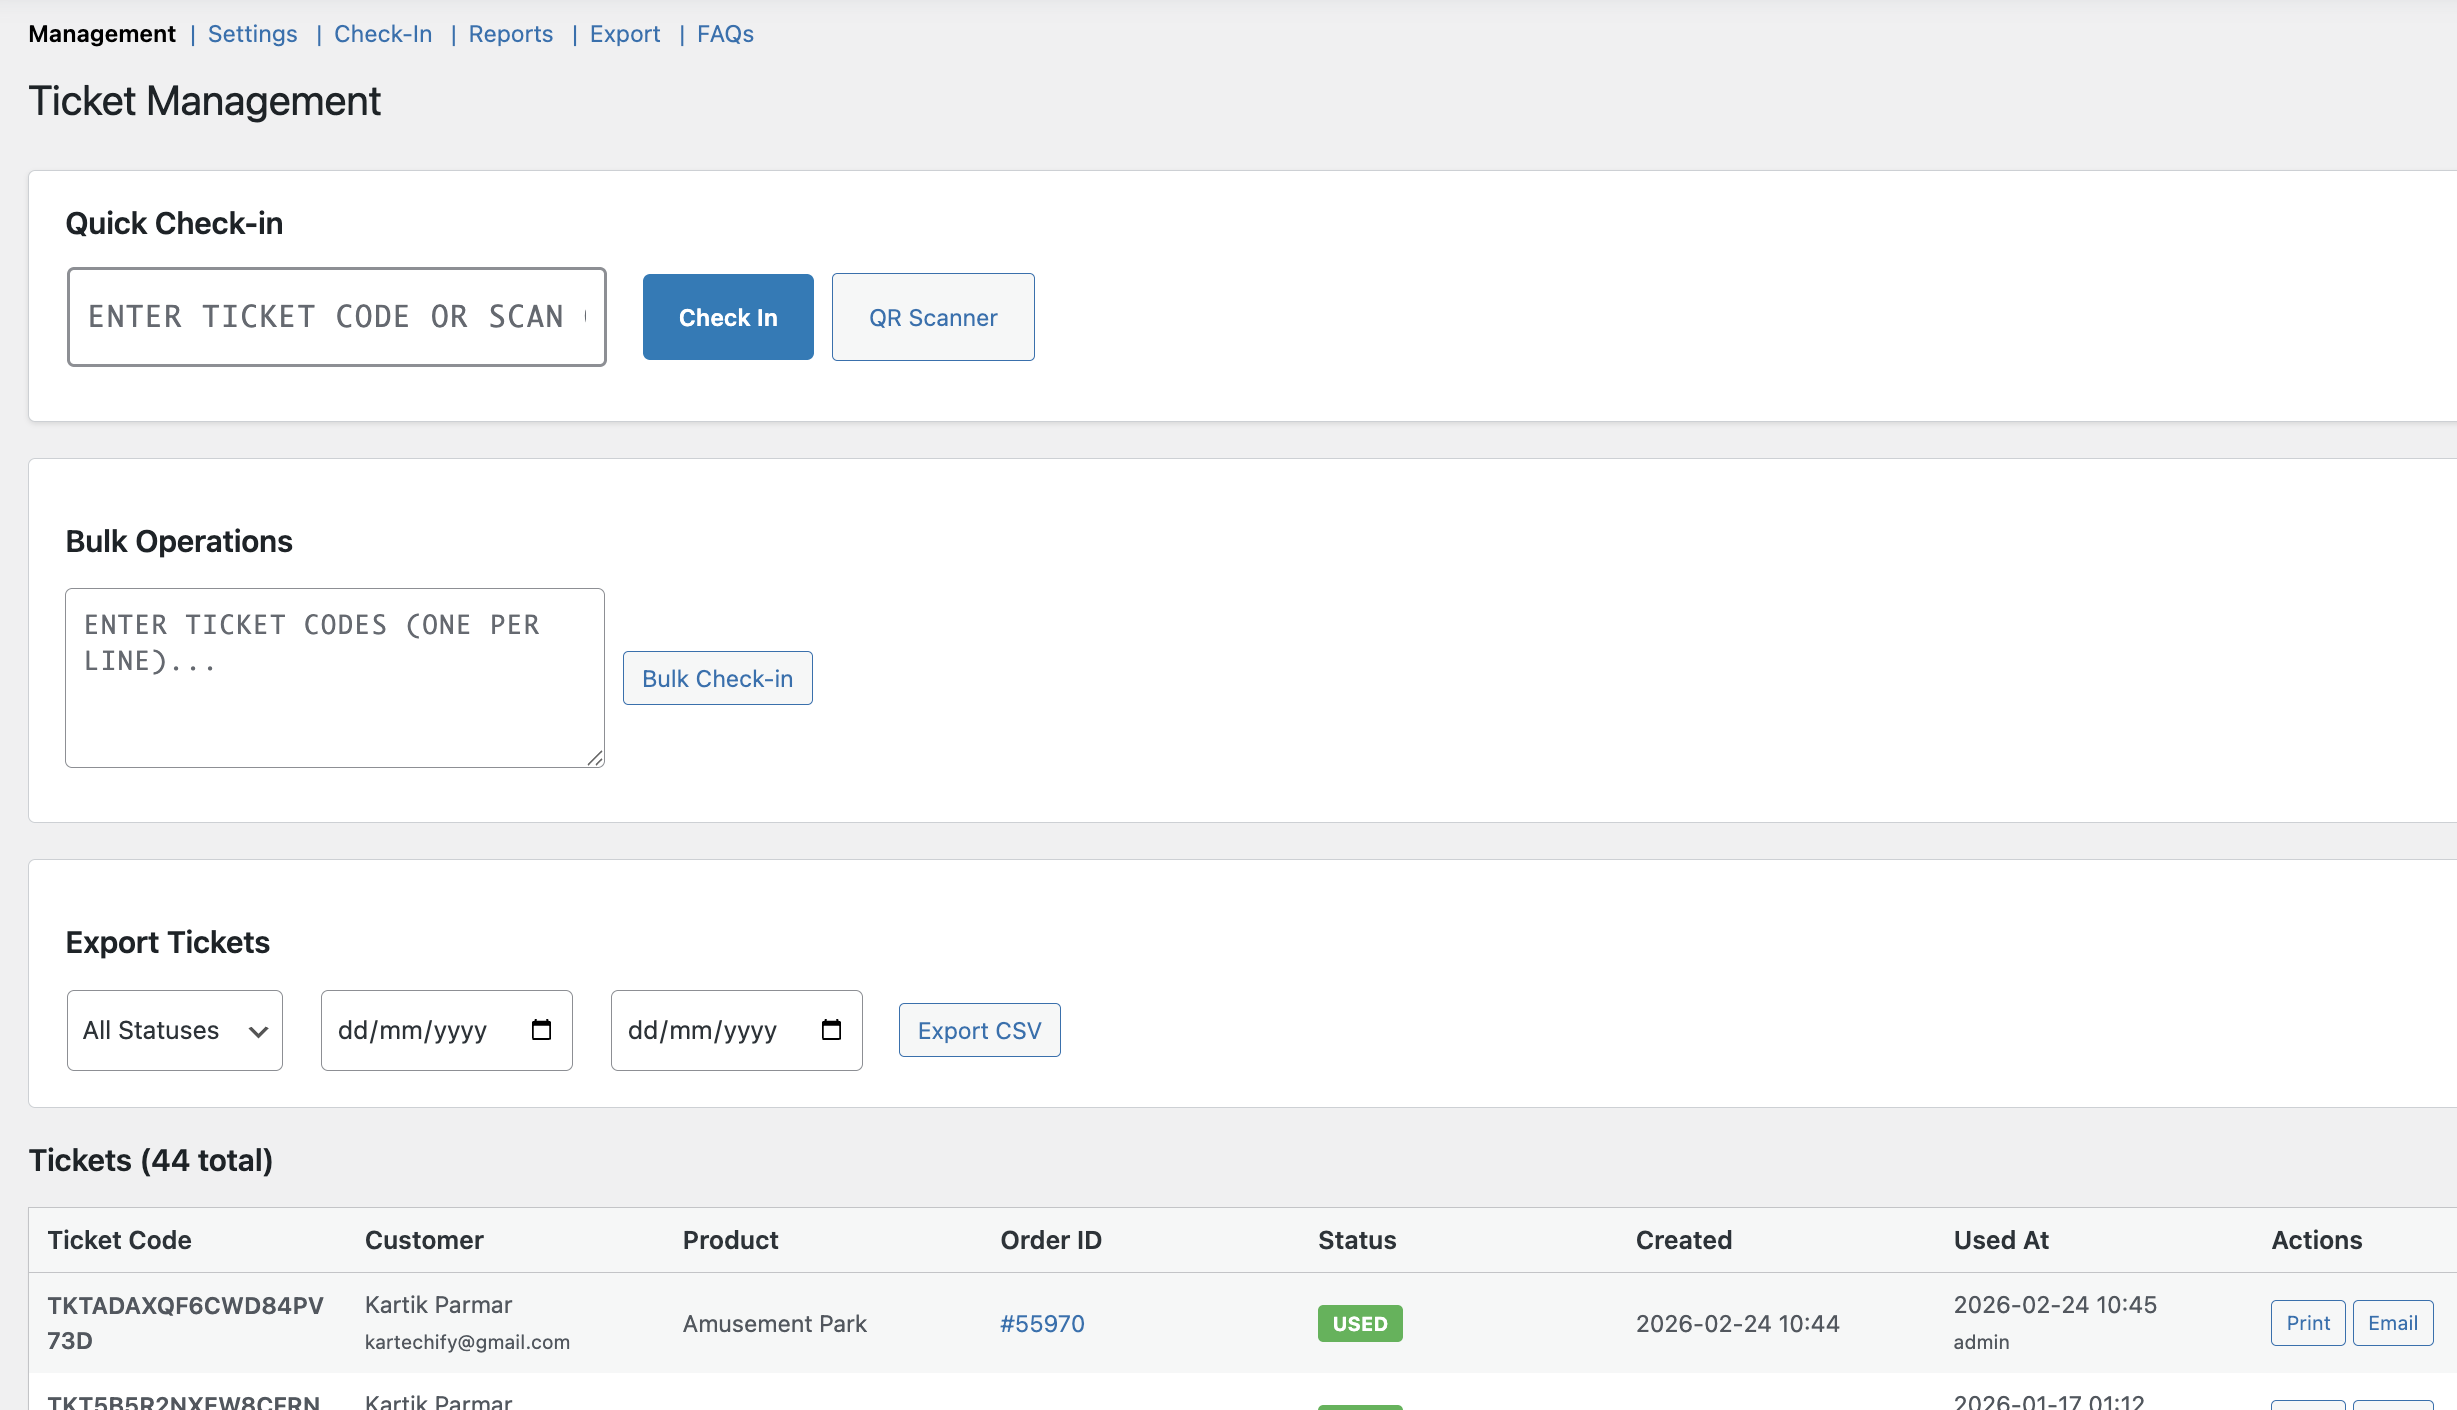
Go to: WooCommerce → Settings → Tickets → Management
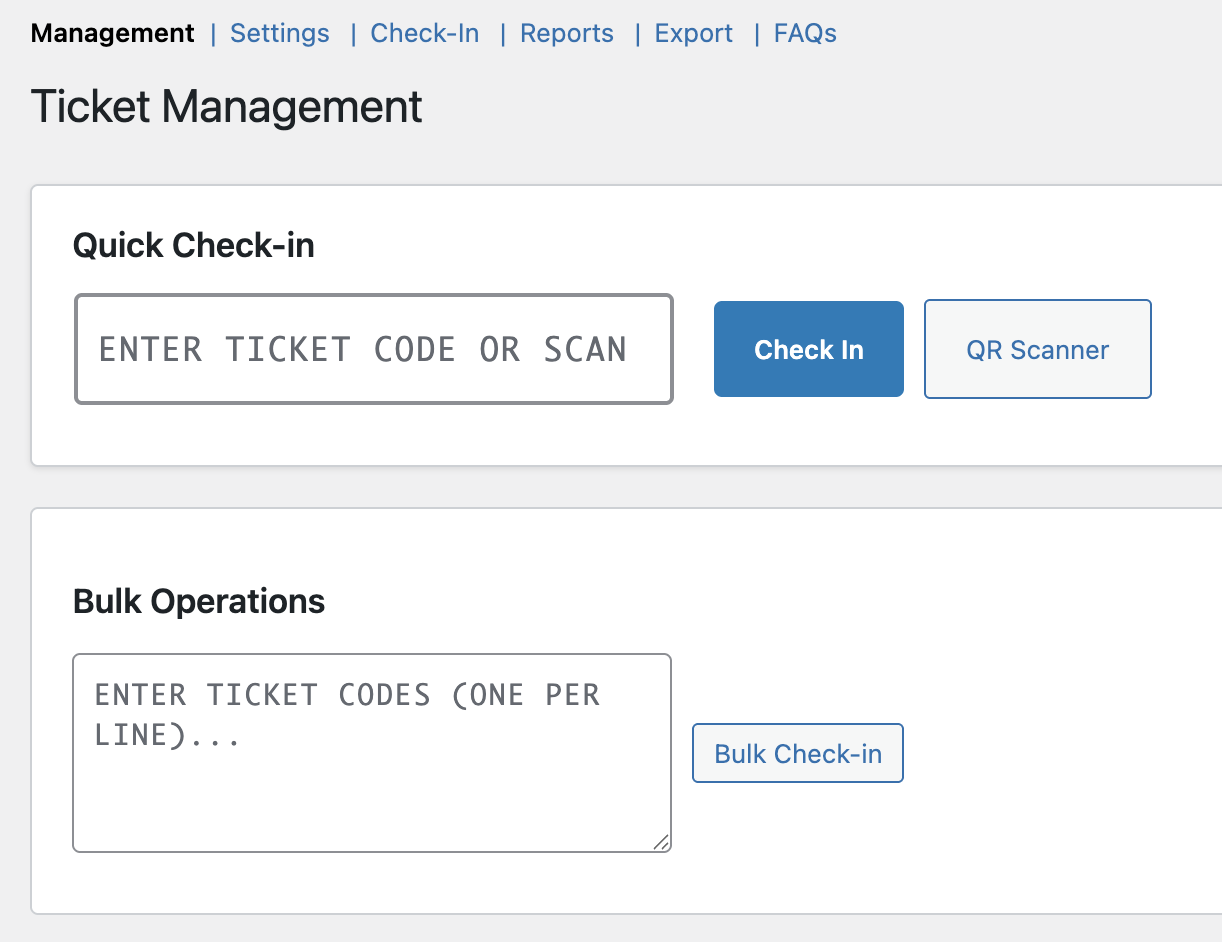
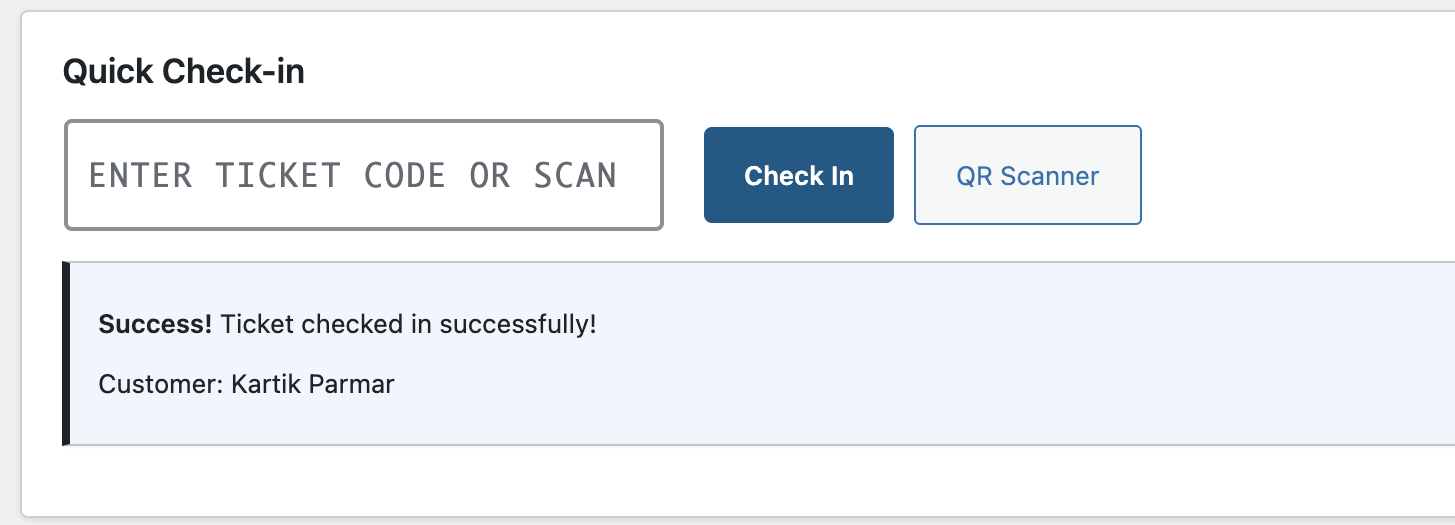
You can manually enter the ticket code or scan it using the QR Scanner, and accordingly, the result will be shown. If the ticket is valid, then it will show a success message for the check-in.
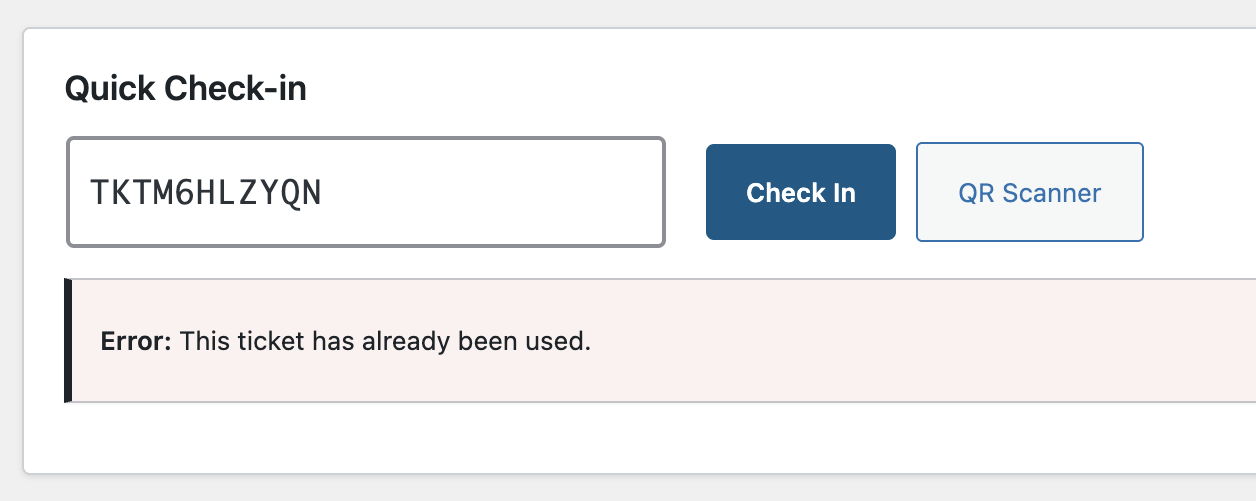
If the ticket is already used, then it will show the error message as shown in the screenshot below.
Front-end Check-in
Granting admin access to check-in staff solely for the purpose of validating tickets is not ideal, as it exposes sensitive store and customer data unnecessarily. To address this, the plugin provides two shortcodes that can be placed on any front-end page of your site. This allows check-in staff to validate tickets directly from a dedicated page without requiring any WordPress admin or WooCommerce backend access.
[ticket_checkin_form title="Event Check-in"]

[ticket_scanner show_manual="yes"]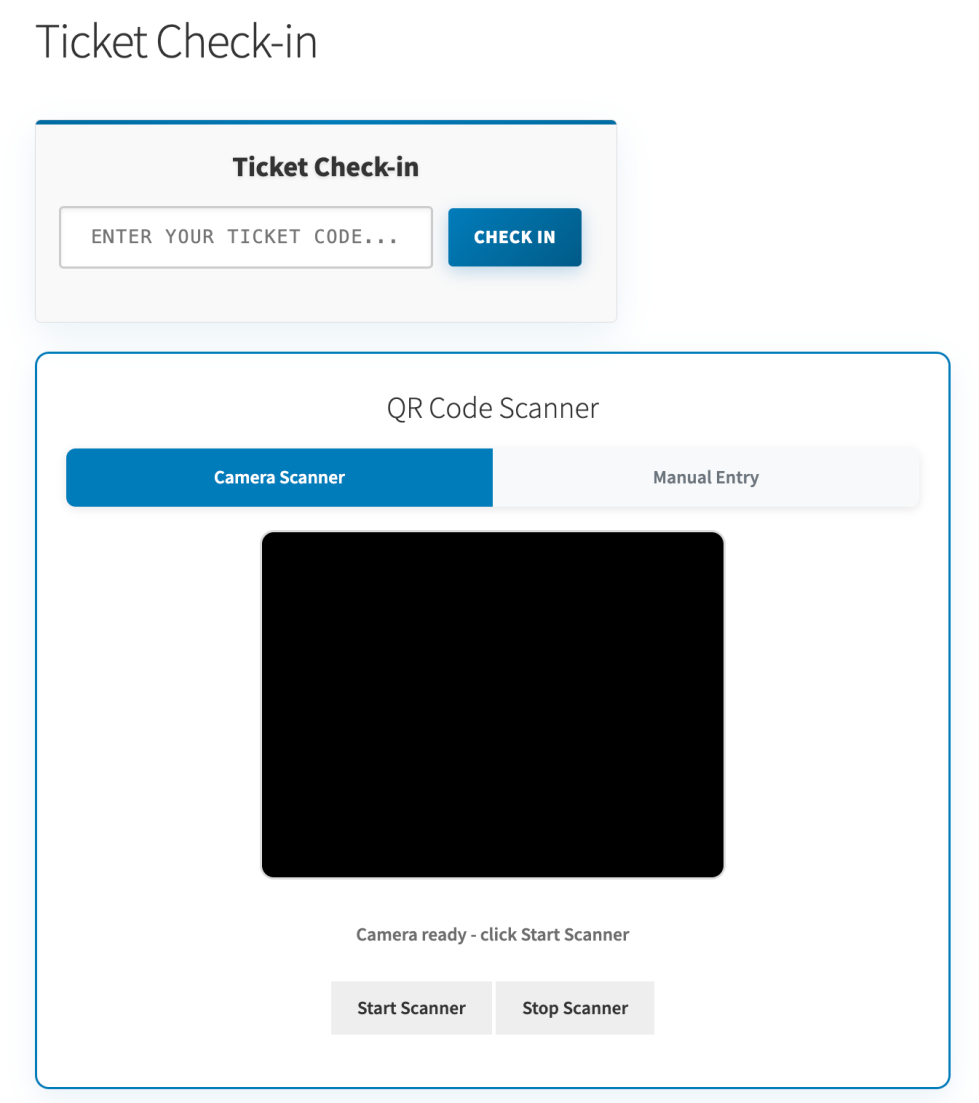
Ticket Lookup Shortcode
The [ticket_lookup] shortcode allows staff or customers to quickly check ticket details without performing a check-in.
Usage
[ticket_lookup]
Attributes:
| Attribute | Default | Description |
| title | “Check Your Ticket” | Heading above the lookup form |
| button_text | “Look Up Ticket” | Text on the lookup button |
| placeholder | “Enter ticket code…” | Placeholder text for the input field |
| show_scanner | “yes” | Show/hide QR scanner mode |
Features:
- Manual entry of ticket codes
- QR code scanner (works directly from mobile browser)
- Displays ticket details including:
– Ticket code and status
– Check-in type
– Entry progress (for multiple-entry tickets)
– Ticket mode (Per Product / Per Order)
– Customer and order information - “Check In” and “Clear” buttons for quick actions
Example:
[ticket_lookup title="Event Check-in" button_text="Find Ticket" show_scanner="yes"]
To further tighten security, the plugin includes a Check-in Allowed Roles setting available at both the global and per-product level. This setting lets you define which WordPress user roles are permitted to perform check-ins. Simply create a dedicated WordPress user role for your check-in staff, assign it as an allowed role in the plugin settings, and staff members with that role will only be able to perform check-ins — nothing more. The Administrator role is always included by default and cannot be removed.

Apart from the check-in option on the Management tab and the front end page, There are other options like downloading the Reports in the CSV format as well viewing the list of tickets currently there in the system.
Public Check-in Mode (No Login Required)
By default, the front-end check-in shortcodes require users to be logged in with an allowed role (Administrator or Ticket Checker).
If you need to allow check-in staff to scan tickets without logging in (e.g., for temporary staff, volunteers, or multiple tour operators), you can use the wc_ticket_current_user_can_checkin filter.
Example code snippet (add to your theme’s functions.php):
add_filter( 'wc_ticket_current_user_can_checkin', function( $can_checkin, $product_id ) {
    if ( defined( 'DOING_AJAX' ) && DOING_AJAX ) {
        $action = isset( $_POST['action'] ) ? $_POST['action'] : '';
        if ( in_array( $action, array( 'checkin_ticket', 'validate_ticket_qr' ) ) ) {
            return true; // Allow anyone to check in via these actions.
        }
    }
    return $can_checkin;
}, 10, 2 );
Security Note: Once enabled, anyone with the check-in page link can scan tickets. Consider password-protecting the page or sharing the link only with trusted staff.
Order Page Ticket Management
↑ Back to topWhen viewing an order that contains ticket products a Tickets Metabox appears.
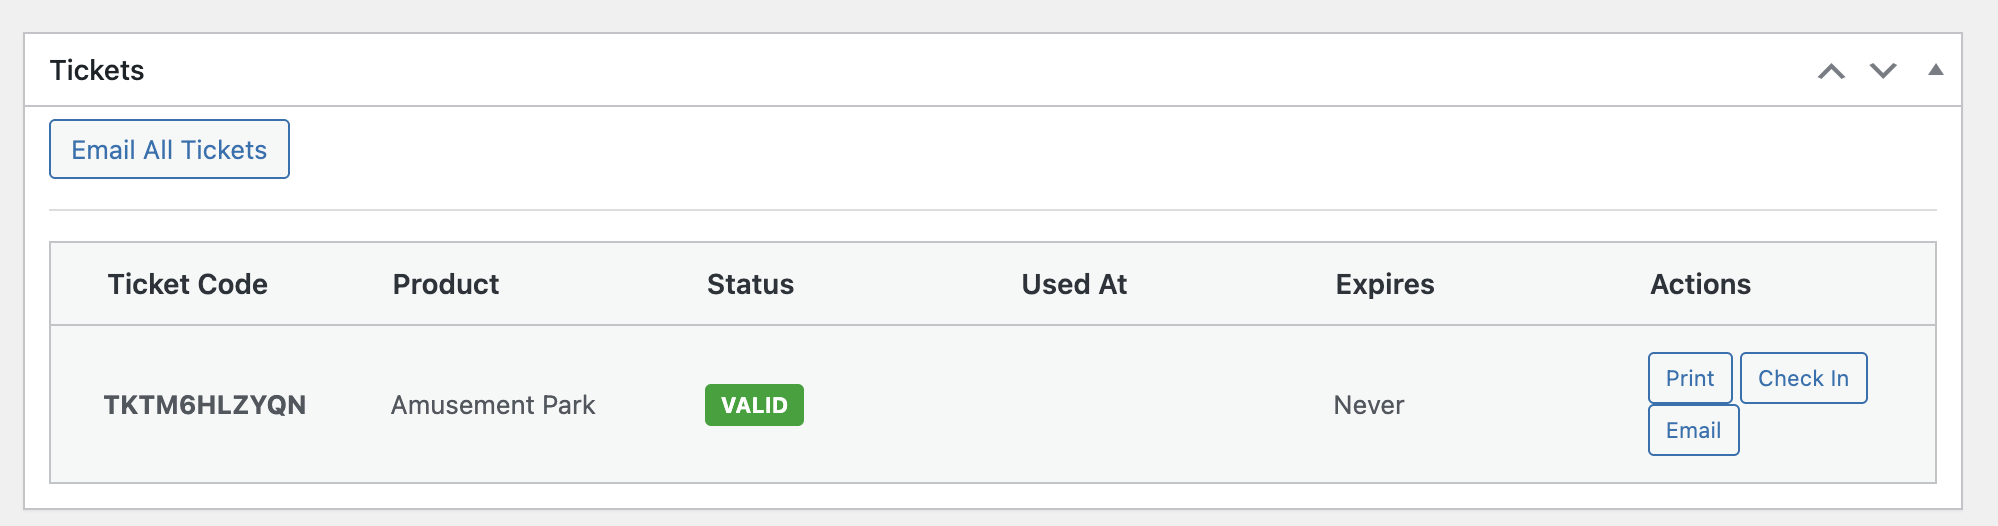
Here you can:
- View ticket codes and product
- See expiry
- Check usage status
- Check-in | Invalid | Print | Print Mini | Email Ticket
- Email all tickets again
Ticket Transfer
↑ Back to topThe plugin allows customers to transfer their tickets to another person directly from their My Account page. This is useful when the original ticket holder cannot attend and wants to give the ticket to someone else.
Enabling Ticket Transfer
Go to WooCommerce → Settings → Tickets → Ticket Transfer Settings and configure:
| Setting | Description |
|---|---|
| Enable Ticket Transfer | Turn on/off the transfer feature globally |
| Transfer Link Expiry (Hours) | How many hours the transfer link remains valid (default: 24) |
| Transfer Deadline (Hours Before Expiry) | Block transfers when ticket expires within this many hours (0 = disable) |
| Max Transfers Per Ticket | Maximum number of times a ticket can be transferred (0 = unlimited) |
| Regenerate Ticket on Transfer | Generate a new ticket code and QR code when a transfer is accepted (old code becomes invalid) |
How Transfer Works (Customer View)
- Initiate Transfer:
- Customer logs into their account and goes to My Account → My Tickets
- Click Transfer Ticket button next to the ticket
- Enter the recipient’s name and email address
- Click Send Transfer Request
- Pending State:
- The original ticket is locked (cannot be used or transferred again)
- The recipient receives an email with accept/decline links
- A “Transfer Pending” badge appears on the ticket
- Accept Transfer:
- Recipient clicks the Accept link in the email
- The ticket ownership transfers to the recipient
- If “Regenerate Ticket on Transfer” is enabled, a new ticket code and QR code are generated
- The recipient receives the ticket via email
- The original ticket code becomes permanently invalid
- Decline Transfer:
- Recipient clicks the Decline link
- The ticket is unlocked and returned to the original owner
- Original owner is notified
- Cancel Transfer:
- Original owner can cancel a pending transfer from My Account
- The ticket is unlocked and becomes available again
Transfer Email Notifications
| Email Type | Sent To | Purpose |
|---|---|---|
| Transfer Request | Recipient | Accept/decline the transfer |
| Transfer Accepted | Original Owner | Confirmation that transfer was accepted |
| Transfer Declined | Original Owner | Notification that transfer was declined |
Security Features
- Transfer Link Expiry: Links automatically expire after the configured hours
- Locked During Transfer: Tickets cannot be used while a transfer is pending
- QR Regeneration: New QR code on transfer prevents original owner from reusing the ticket
- Audit Trail: All transfer actions are logged
Tickets & Booking Solutions
↑ Back to topThe QR Code Tickets & Check-in plugin is compatible with following Booking plugins
- Booking & Appointment Plugin for WooCommerce by Tyche Softwares
- WooCommerce Bookings by WooCommerce
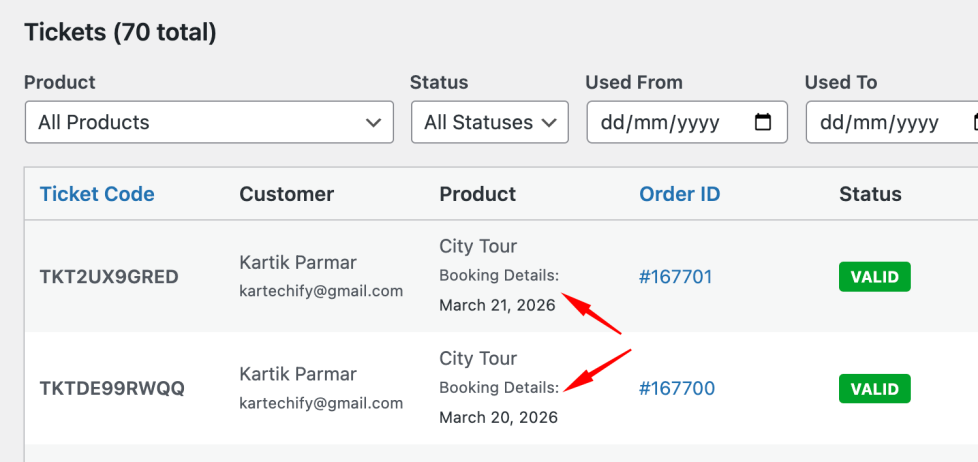
When the product is setup with the Bookable product and ticket is configured on that product then once it is booked by customer and ticket generated, the ticket listing will also show the booking details in the Ticket listing table as well in the Email Notification and PDF.
Final Setup Checklist
↑ Back to topBefore going live, confirm:
- Global settings configured
- Product has a ticket enabled
- Generate Tickets On status selected
- Email sending enabled
- Scanner tested on mobile
- Test purchase completed
Your ticketing system is now fully operational.
REST API Endpoints
↑ Back to topThis plugin also has the endpoints that you can use to implement any custom application. Visit this QR Code Tickets & Check-in REST API Documentation to get full details of it.
Ticket Logs / Audit Trail
↑ Back to topThe plugin maintains a complete audit trail of all ticket actions. This is useful for security, troubleshooting, and compliance.
What Is Logged
| Action | Description |
|---|---|
| Created | Ticket generated for an order |
| Checked In | Ticket scanned at entry |
| Checked Out | Ticket scanned at exit |
| Bulk Checked In | Ticket checked in via bulk action |
| Email Sent | Ticket email sent to customer |
| Edited | Ticket details edited by admin |
| Invalid | Ticket marked as invalid |
| Deleted | Ticket deleted (v3.7.0+) |
| Transfer Initiated | Transfer request started |
| Transfer Accepted | Transfer accepted by recipient |
| Transfer Declined | Transfer declined by recipient |
| Transfer Cancelled | Transfer cancelled by owner |
| Transfer Expired | Transfer link expired |
Accessing Logs
Go to WooCommerce → Settings → Tickets → Logs
Log Table Columns
| Column | Description |
|---|---|
| ID | Unique log entry ID |
| Ticket | Ticket code (clickable to view details) |
| Action | Type of action performed |
| User | WordPress user who performed the action |
| IP Address | IP address of the user |
| Details | Additional information about the action |
| Date | Timestamp of the action |
Filtering & Search
| Filter | Purpose |
|---|---|
| Action | Filter by specific action type |
| User | Filter by WordPress user |
| Date From / To | Filter by date range |
| Search | Search by ticket code, details, or IP address |
Clearing Logs
⚠️ Warning: Clearing logs is permanent and cannot be undone. It is recommended to export logs before clearing them.
To clear all logs, click the Clear All Logs button at the top of the Logs table. You will be prompted to confirm the action.
FAQs
↑ Back to topHelp customers by answering commonly asked questions.
How do tickets get generated?
Tickets are automatically generated when an order reaches the status you configure (default: Completed). Each product quantity creates a unique ticket.
Can I customize ticket designs?
Yes! Choose from 6 professional templates or create your own custom template using our template system.
Do customers receive tickets via email?
Yes, customers automatically receive beautiful HTML emails with embedded QR codes and ticket details.
How does check-in work?
Multiple options: manual code entry, QR code scanning via camera, or bulk check-in. All methods validate tickets in real-time.
What happens if someone orders 3 tickets?
If Ticket per Quantity option is enabled then they receive 3 unique tickets, each with its own code and QR code. Each can be checked in separately.
Can customers print their tickets?
Yes! Customers can print tickets from their My Account page anytime. Tickets are also printable from emails.
Can I export ticket data?
Yes, export to CSV with advanced filtering by status, date range, product, and more.
Where can I find my tickets?
Customers: My Account → My Tickets
Admins: WooCommerce → Settings → Tickets → Management
Can I set ticket expiration dates?
Yes, set global validity period or per-product custom expiration dates.

