
TIV Globus turns your single-language WordPress and WooCommerce store into a multilingual one.
Products, categories, pages, posts, URLs, checkout, and order emails all appear in the language each visitor chooses, while you keep managing one catalog and one set of orders.
This guide shows how to set it up and run it.
Installation
↑ Back to topTo start using a product from WooCommerce.com, you can use the “Add to store” functionality on the order confirmation page or the My subscriptions section in your account.
- Navigate to My subscriptions.
- Find the Add to store button next to the product you’re planning to install.
- Follow the instructions on the screen, and the product will be automatically added to your store.
Alternative options and more information at:
Managing WooCommerce.com subscriptions.

Setup and Configuration
↑ Back to topAfter activation, a new TIV Globus menu appears in the WordPress admin. This is where you turn your store into a multilingual WooCommerce store by choosing the languages you want to sell in.
Enable your languages
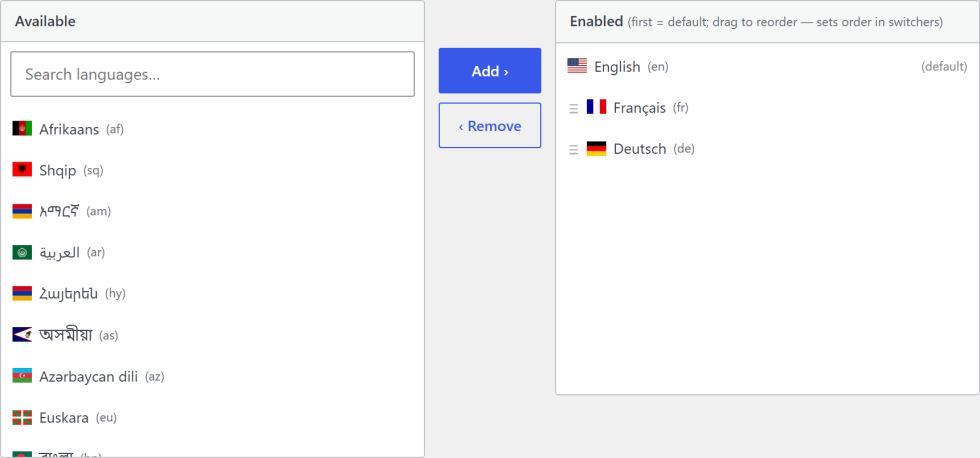
↑ Back to top- Go to TIV Globus > Languages.
- In the Available list, find each language you want to offer (use the search box) and click Add to move it to the Enabled list.
- Drag the languages in the Enabled list to set their order. The first language is your default content language: it is what your store falls back to when a translation is missing, and the language whose URLs have no prefix.
- Save the page.
Keep your store’s current language as the default.
Put the language your store already runs in first, and leave it there. The default language has no URL prefix, so every product, page, and post stays at the exact address search engines already indexed – you are adding languages on top, not moving anything.
You can change the default later – drag another enabled language to the top of the list and it becomes the new default – but on a live, established store we do not recommend it. Doing so moves your original content under a language prefix and gives the no-prefix URLs to the new default, which changes addresses search engines have already indexed and forces a re-crawl. Choose your default once, at the start.
Changing a language flag
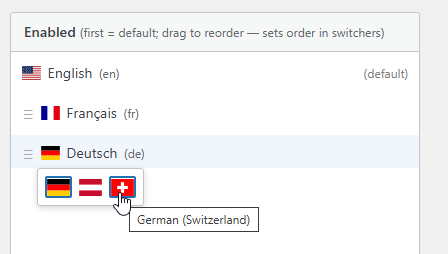
↑ Back to topBy default, each language uses a flag based on its locale. If your store targets a specific country, you can change the flag:
- Go to the TIV Globus settings page.
- In the Enabled list, click the flag icon next to a language.
- Pick a flag from the country picker.
- Click Save Changes.
This is purely visual. It changes the flag shown in the language switcher across your site, and does not affect URLs, content, or locale settings.
How visitors get their language
↑ Back to topEach language you enable is served from its own clean URL prefix; only the default language has no prefix at all. For example:
- Default language:
https://yoursite.com/shop/ - French:
https://yoursite.com/fr/boutique/ - German:
https://yoursite.com/de/laden/ - Spanish:
https://yoursite.com/es/tienda/ - …and so on for every language you add.
As noted above, the prefix-free default means your existing URLs do not change when you install TIV Globus – so there is no redirection to set up, nothing to migrate, and no broken-link or crawl errors reported in Google Search Console. You simply add languages on top of the site you already have.
Visitors switch language using the language switcher, which you can add to a menu, a widget area, or a block (see The Language Switcher below).
How translation works, in short
↑ Back to topEvery translatable field holds all languages at once. You never manage separate copies. To translate anything:
- Switch the editing language with the Edit in: control in the admin bar.
- Edit the field – you see only the current language’s text.
- Save – the plugin merges your edit back and keeps the other languages intact.
A few habits make a multilingual WooCommerce store easier to maintain:
– Always create content in the default language first, save, then switch languages.
– You do not have to translate everything. Any field you skip stays in the default language for that audience. Translate what matters most to your customers.
The two language controls
↑ Back to topTIV Globus adds two dropdowns to the admin bar, and they work independently:
- Edit in: sets the language of the content you are editing right now. Pick a language and the screen reloads showing that language’s version; you edit it and save. It appears wherever there is translatable content – post, page, product, and term screens, WooCommerce settings, and Settings > General – and is hidden where there is nothing to translate, such as the Dashboard.
- Admin Language sets the language of the WordPress dashboard itself (menus, buttons, labels), for your user account only. It sits next to your account menu because it is a personal preference. It never changes your content or your store’s default language. It can be any language WordPress has installed – it does not have to be one of your store’s content languages. For example, you can work in a Spanish dashboard while your storefront sells in English, French, and German.
Because the two are independent, you can use them in any combination:
Keep the dashboard in English while editing French content, or switch the dashboard to French while editing English. Your choice of dashboard language never affects the content you store.
On small screens such as phones, WordPress collapses the admin bar to a few core icons and hides plugin-added controls, so both of these dropdowns are unavailable there. Switch languages from a tablet or desktop width.
Editing Content in Multiple Languages
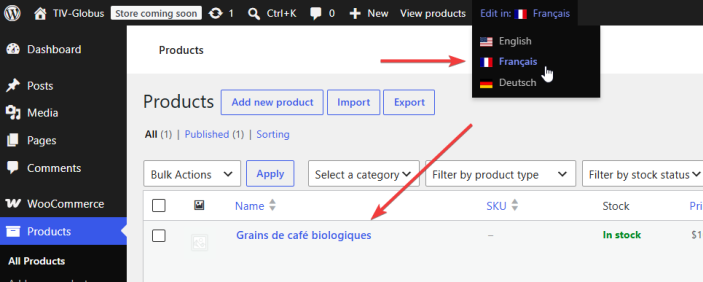
↑ Back to topThe Edit in: control selects which language version you are editing right now. Pick a language, the screen reloads in that language, you edit, and you save. The behavior is identical in the block editor (Gutenberg) and the classic editor.
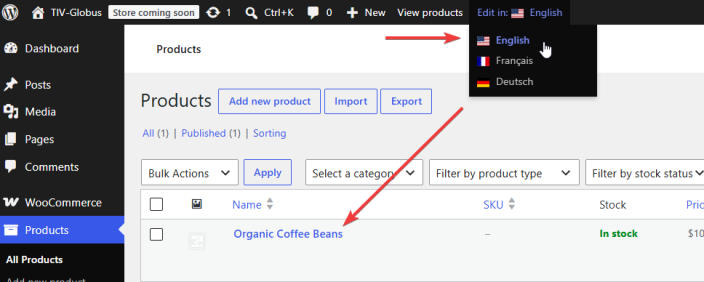
For example, on the product list, switching Edit in: from English to French changes the displayed content from the English name to the French one – same product, same screen:
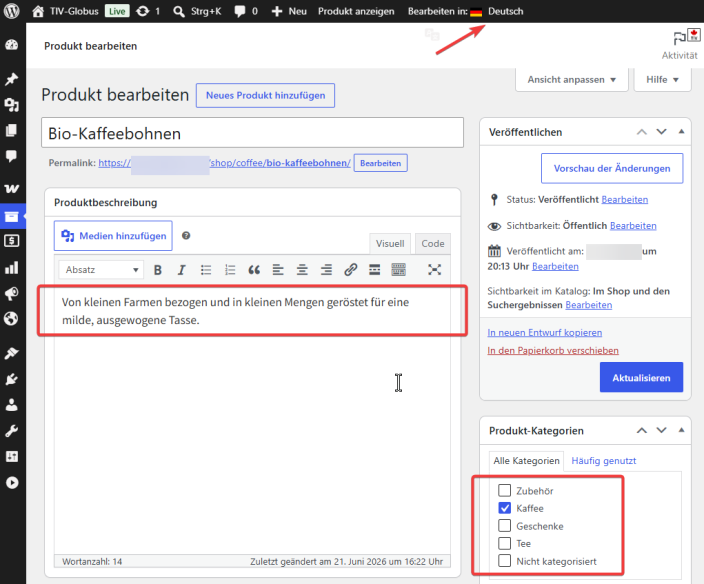
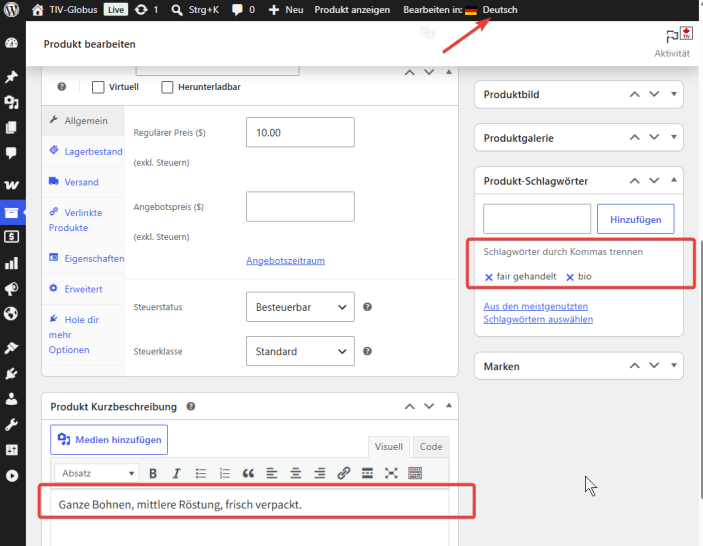
Translating a product
↑ Back to top- Open the product for editing.
- In the admin bar, set Edit in: to the target language.
- Translate the product name, description, and short description. You can also assign categories and tags – their translated names appear in the selectors.
- Update the product. Price, stock, SKU, and other product settings are shared across all languages, so you enter them only once.
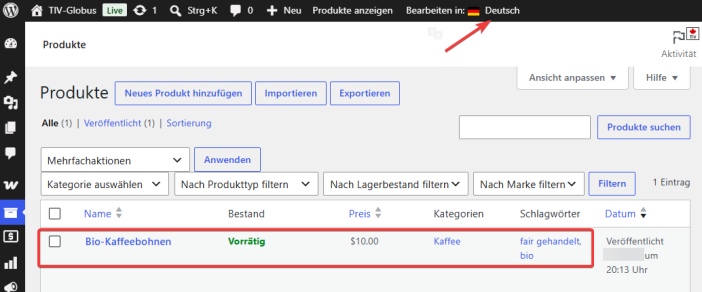
The product list shows each product’s name, categories, and tags in the current Edit in: language:
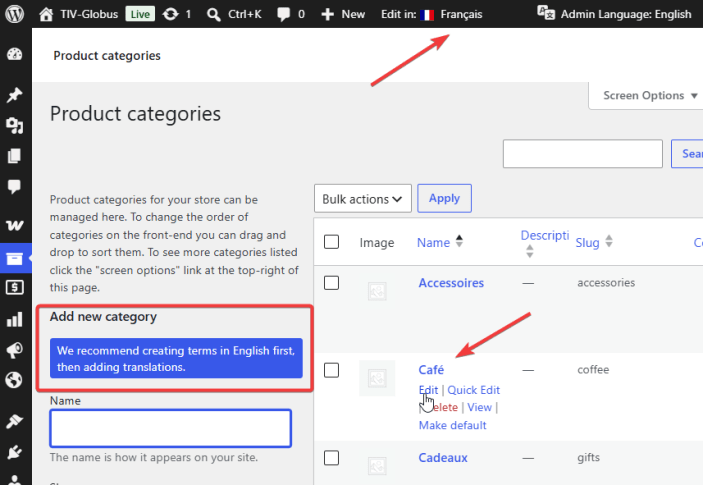
Translating a category, tag, or attribute
↑ Back to top- Go to Products > Categories (or Tags, or an Attribute’s terms). The list shows each term in the current Edit in: language. Create new terms in your default language first, then add translations.
- Open a term for editing.
- Set Edit in: to the target language.
- Translate the name and description, then Update.
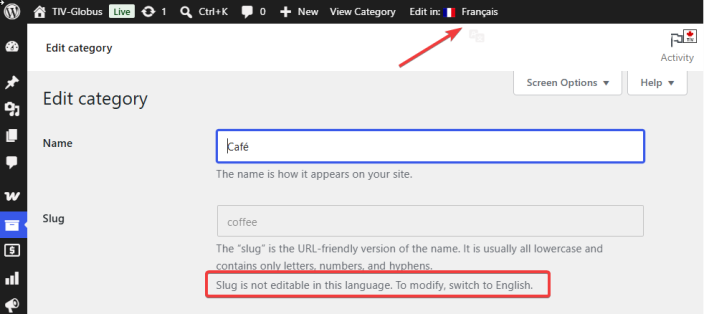
A term keeps a single slug, defined in your default language, so the slug field is read-only while you edit in another language. To change it, switch Edit in: back to the default language.
Translating a post or page in the Block Editor
↑ Back to top- Open the post or page in the block editor.
- Open the Languages panel from the flag icon in the editor’s top toolbar and set the editing language (for example Editing: Français). The block editor runs full screen and hides the admin bar, so this in-editor panel is where you switch language – it does the same job as Edit in: elsewhere.
- Translate the title and the content blocks. Each language keeps its own content.
- Update. The selected language is applied when the editor saves, including saves made over the REST API.

The classic editor works the same way: switch the language, edit the title and content, and save.
Quick Edit
↑ Back to topThe Edit in: control also appears on the post, page, product, and term list screens, so you can translate names and titles through Quick Edit without opening the full editor. Post, page, and product slugs can be translated here too; term slugs stay read-only.

Multilingual URLs and Slugs
↑ Back to topIn a multilingual WooCommerce store, URLs should be translated too. TIV Globus gives each language its own slug for products, posts, and pages:
- English:
/shop/ - French:
/fr/boutique/ - German:
/de/laden/
To set a translated slug, switch the Edit in: language on the edit screen, change the slug field, and save. A request for a default-language slug under a non-default language is sent to the correct translated slug with a 301 redirect, which keeps your SEO clean. All WordPress permalink structures are supported.
Terms (categories, tags, and attributes) use a single slug, defined in your default language. The slug field is read-only while you edit a term in another language.
WooCommerce Emails
↑ Back to topOrder emails are sent in the language the customer used at checkout. TIV Globus saves that language with the order and switches the email locale before rendering, so the subject, heading, and template labels all appear in the customer’s language. Admin notification emails stay in your store’s admin language.
You may not need to translate emails at all
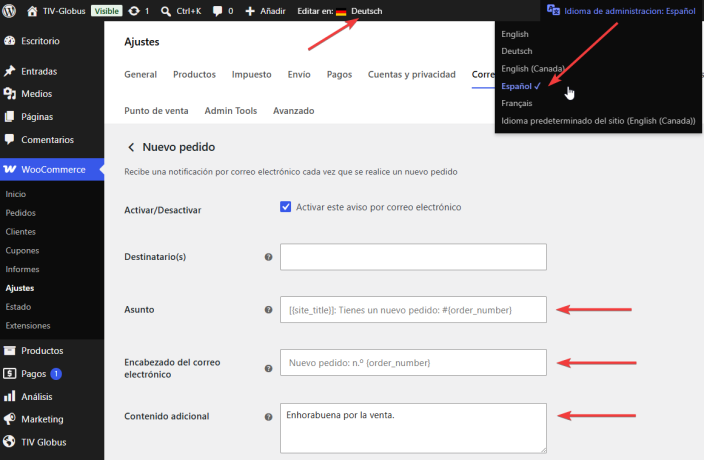
↑ Back to topIf you leave the email Subject, Email heading, and Additional content fields empty, WooCommerce supplies its own professionally translated text – so customer emails arrive in the customer’s language and admin notifications in your admin language, with no setup.
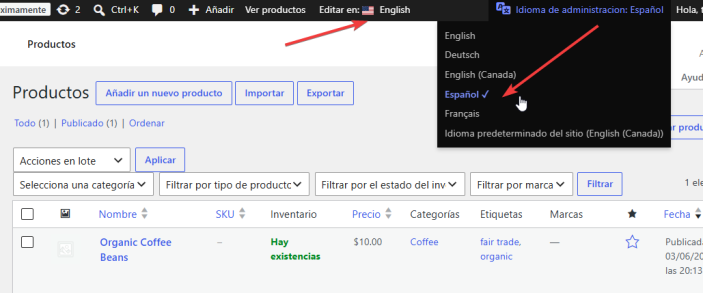
One detail worth knowing on the settings screen: the default text shown there follows your Admin Language, not the Edit in: control. In the example below the admin interface is Spanish and Edit in: is German, yet WooCommerce’s defaults (Subject, Email heading, Additional content) appear in Spanish – because they come from WooCommerce and are displayed in the dashboard language. The Edit in: control only affects text you enter yourself; it never changes WooCommerce’s built-in defaults.
Customizing email text
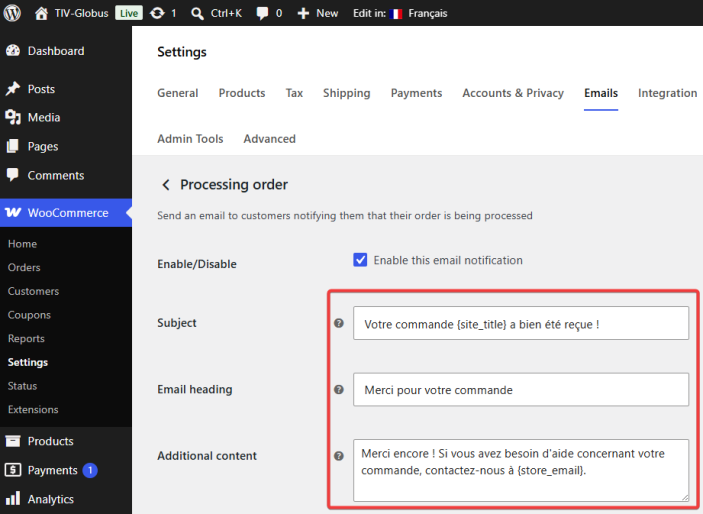
↑ Back to topTo replace a default with your own wording:
- Go to WooCommerce > Settings > Emails and open an email type.
- In the default language, enter your custom text and save.
- Switch language with Edit in: in the admin bar, enter the translated text, and save.
- Repeat for each language.
Once you customize a field for any language, WooCommerce’s built-in translation is no longer used for that field. Languages you do not customize fall back to your default-language text, so if you customize an email, translate it for all enabled languages.
The Language Switcher
↑ Back to topThe language switcher lets visitors change languages anywhere on your site. It is available in three forms that share the same display options (flags, language names, codes, or dropdown).
As a menu item
↑ Back to top- Go to Appearance > Menus (or use the Customizer).
- Find the Language Switcher panel on the left.
- Click Add to Menu. A single menu item appears and automatically expands into all enabled languages on the front end.
- Open the menu item’s settings to choose how it displays:
- Style – Flat (inline) lists the languages side by side, or Dropdown shows one menu that expands.
- Show flags – show or hide the country flags.
- Label – the text shown for each language: Native name (for example Français), English name (French), Code (EN), Code + Name, or None (flags only).

As a block
↑ Back to topIn the block editor, the Site Editor (Appearance > Editor), or a widget area (Appearance > Widgets), open the + inserter, search for Language Switcher, and insert the TIV Globus Language Switcher block. It previews the enabled languages with their flags and labels; choose the display style in the block’s settings sidebar.
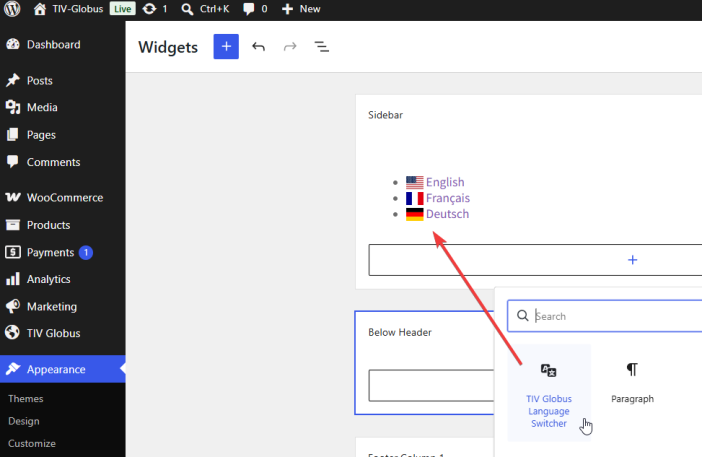
As a widget
↑ Back to topModern WordPress manages widget areas with blocks (Appearance > Widgets), so you add the switcher there with the TIV Globus Language Switcher block, as shown above. On sites still using the classic widgets screen, the Language Switcher widget can be placed in any widget area, such as a sidebar or footer.
Navigation Menus
↑ Back to topPage-type menu items (Shop, Cart, My Account, and so on) inherit their label and URL from the page, so they are translated automatically when the page is multilingual. No extra work is needed.
Custom links (such as a Home link) need manual translation:
- Add the custom link in the default language.
- Switch language in the admin bar.
- Edit the Navigation Label and the URL (for example
https://yoursite.com/fr/for the French home page). - Save Menu. The plugin merges your edit and preserves the other languages.
Always add pages to the menu while editing in the default language, so the default-language title becomes the shared label.
Page Builders
↑ Back to topWe have tested TIV Globus with two popular page builders, Elementor and Avada. Page builders are large and frequently updated, so it is worth testing your own layout after translating – some advanced widgets or third-party add-ons may behave differently.
Page builders usually run in a full-screen editor that hides the WordPress admin bar, so the Edit in: control is not available while you are editing. You therefore set the language before you open the builder. The procedure is:
- Build the page in your default language first and publish it.
- Switch the editing language in the admin bar – from the post list or the post edit screen – before opening the builder.
- Open the builder. It starts from your default-language design.
- Translate the text and save. Your default-language version is not affected.
Multilingual SEO
↑ Back to topTIV Globus covers the SEO essentials a multilingual store needs. Each page is reachable at its own per-language URL with a matching canonical, hreflang tags point search engines to the other language versions, and every language gets its own XML sitemap, listed in robots.txt for discovery.
Yoast SEO
↑ Back to topWe have tested TIV Globus with Yoast SEO (free version). Common Yoast fields – the SEO title, meta description, social (OpenGraph) tags, canonical URL, and schema – are filtered per language. As with any integration, it is worth checking the result for your own setup.
- Run Yoast’s first-time configuration while the admin language is set to the default language, so Yoast stores its baseline data in the default language.
- To customize an SEO title or meta description for a specific language: edit it in the default language first and save, then switch language, edit the Yoast fields, and save.
Each language has its own sitemap index, for example https://yoursite.com/sitemap_index.xml for the default language and https://yoursite.com/fr/sitemap_index.xml for French.
Site Language vs. Default Content Language
↑ Back to topWordPress Settings > General has a Site Language dropdown. This controls the language of the WordPress admin interface only. It does not change your default content language, which is the first language in the TIV Globus enabled languages list. Changing Site Language will not move, rewrite, or affect your multilingual content.
The Site Title and Tagline on Settings > General are themselves translatable: switch the Edit in: language, edit the field, and save.
Troubleshooting
↑ Back to topA menu item shows the wrong language for everyone. You likely added the page or edited the label while in a non-default language. Switch to the default language, open the menu item, clear the Navigation Label so WordPress uses the page title, and save.
A visitor sees the default language instead of a translation. That field has no translation for the requested language yet. The plugin always falls back to the default language rather than showing an empty value. Add the missing translation on the relevant edit screen.
A page-builder page shows the default language for another language. Set the editing language in the admin bar before opening the builder, then translate the content; the first time, your default-language design is shown as the starting point.
TIV.NET INC., based in Toronto, Canada, develops and supports the following WooCommerce extensions:
↑ Back to top| TIV Admin Tools | A set of utilities for WooCommerce shop owners, administrators, and developers to secure, tune, and debug their store. |
| TIV Globus | Makes WooCommerce multilingual – translate product descriptions, categories, attributes, and tags. |
| TIV Multi-currency | Lets customers pay in the currency of their choice. |
| TIV Paywall | Enables the monetization of various types of content, including videos, documents, etc., by allowing the sale of access to it. |
| TIV Sales Assistant | Manage store-wide sales from one place – schedule discounts by category, tag, and country instead of editing products one by one. |
FAQs
↑ Back to topHelp customers by answering commonly asked questions.
Do I create a separate product for each language?
No. A single product holds all languages. You translate the name and descriptions per language, while price, stock, and SKU are shared.
How do customers choose their language?
Through the language switcher, which you can place in a menu, a widget area, or as a block. Visitors are then served from a clean, language-specific URL.
Will my store URLs be translated?
Yes. Each language can have its own slug for products, posts, pages, and terms, with an automatic 301 redirect from the default slug.
Does it support page builders?
Yes. Elementor is supported with independent content per language, and Avada and Fusion Builder are supported natively.
What language are order emails in?
The language the customer used at checkout. TIV Globus stores it with the order and reuses it for later emails about that order.