
This walkthrough is for store owners and shop managers who have just installed Elite Balance. In about 10 minutes you check the payment method, find your way around the dashboard, give a test customer some store credit, pay an order with it, refund that order to the wallet and read the result in the ledger. It ends with a short explanation of how the ledger works, which makes the rest of the documentation easier to follow.
Before you start
↑ Back to top- Elite Balance is installed and active. If not, see Installing Elite Balance.
- You are logged in as an Administrator or Shop manager.
- You have a test customer account. Wallets belong to registered customers; guest checkouts have no wallet.
- You have a cheap test product, and ideally one other payment method enabled (for example Direct bank transfer or Cash on delivery) so you can try a partial payment.
Tip: Run this tour on a staging copy of your store if you can. Everything you do here is recorded in the ledger permanently, as it would be for a real customer.
Step 1: Check the payment method
↑ Back to topWallet payments and partial payments are both on as soon as you activate Elite Balance. To confirm:
- Go to WooCommerce > Settings > Elite Balance. The Checkout section at the top shows a Wallet payments on label and the line “Partial payments are allowed.”
- Click Manage the payment method. This opens WooCommerce > Settings > Payments > Elite Balance Wallet.
- Check that Enable wallet payments and Let customers combine their wallet balance with another payment method are both ticked. Leave Title (Wallet balance) and Description as they are for now.
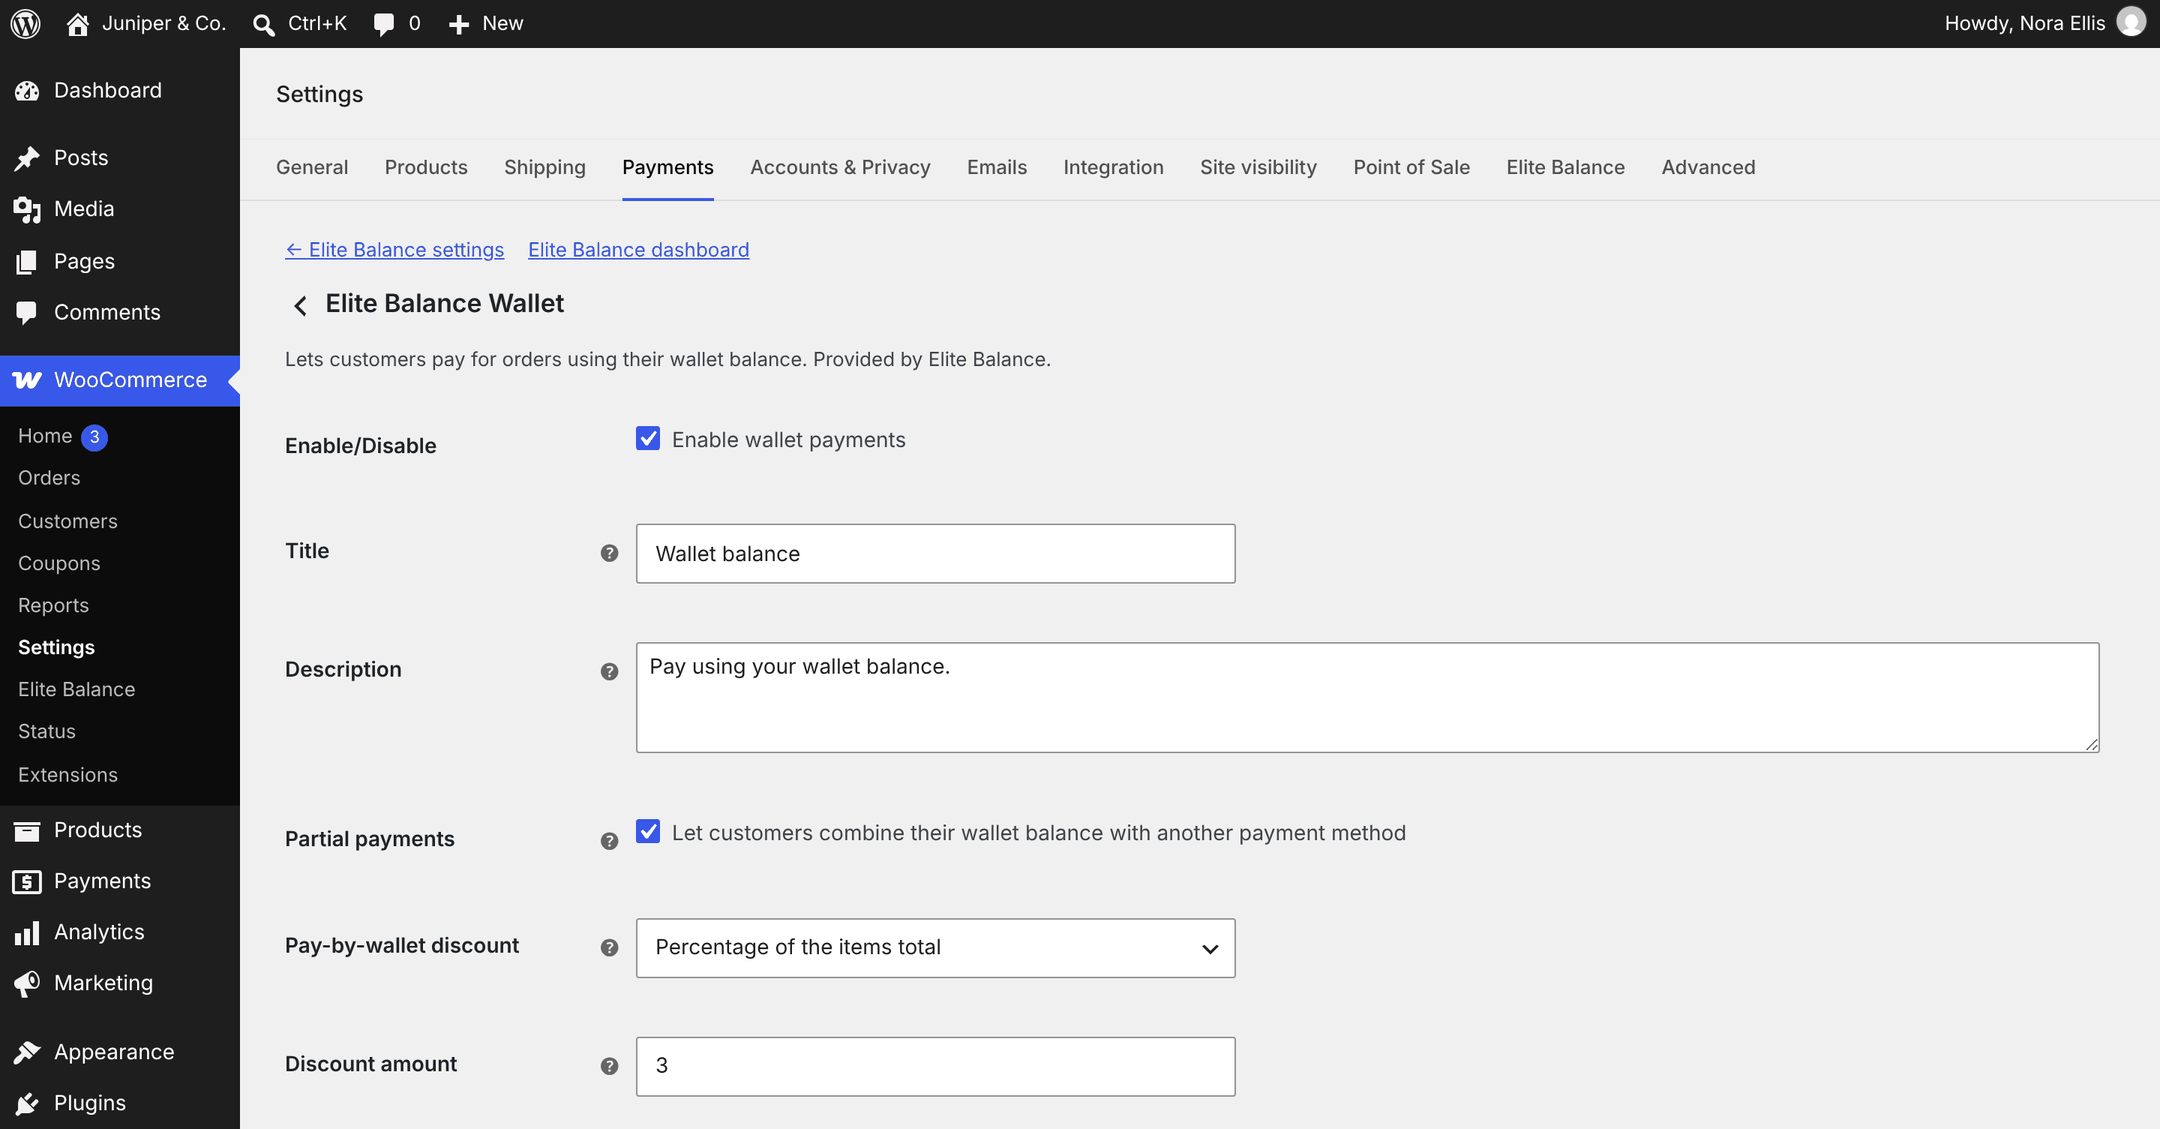
Every field on this screen is explained in the Settings Reference.
Step 2: Find the dashboard
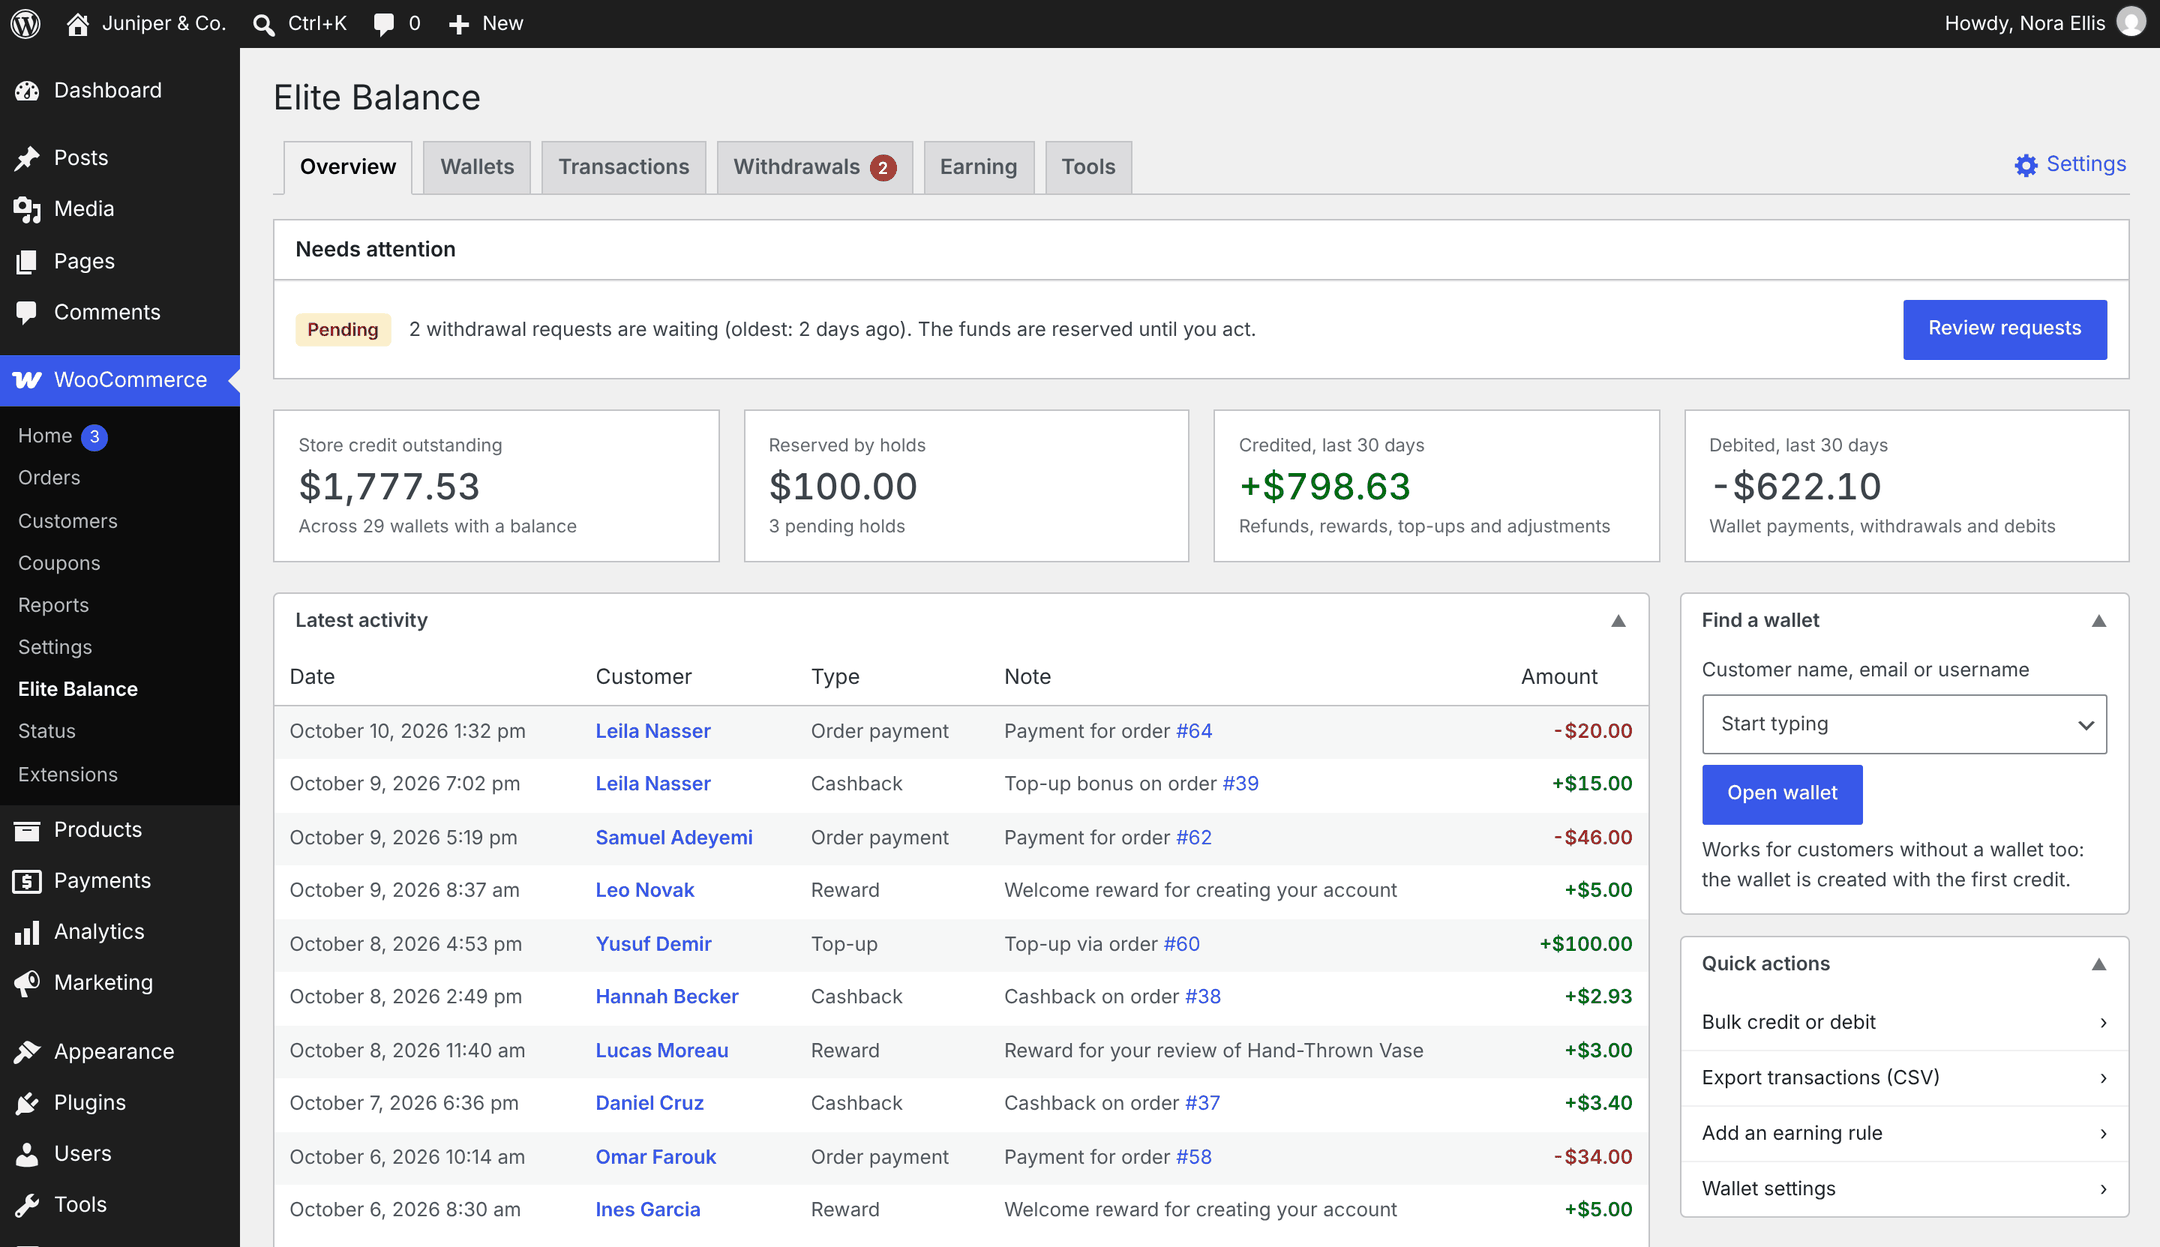
↑ Back to topGo to WooCommerce > Elite Balance. The dashboard has up to six tabs:
| Tab | What you do there |
|---|---|
| Overview | See what needs your attention, the store’s totals, the latest activity, and open any customer’s wallet. |
| Wallets | Browse, search, lock and export wallets. The Bulk operations button at the top credits or debits many wallets at once. |
| Transactions | The whole ledger, with filters and CSV export. |
| Withdrawals | The queue of customer withdrawal requests. Shown only while withdrawals are enabled or any request exists, with a count of pending requests. |
| Earning | Reward rules (cashback, top-up bonus, signup, review, birthday). Shown while earning is enabled (the default) or any rule exists. |
| Tools | Migration from another wallet plugin, and the Support section at the end with the site details to include in a support request. |
On a fresh store you see five tabs, because withdrawals are off by default. Settings, with a gear icon on the right of the tab bar, takes you to WooCommerce > Settings > Elite Balance.
The Overview starts with Needs attention (for example pending withdrawals or wallet data from another plugin waiting to be migrated), followed by four figures: Store credit outstanding, Reserved by holds, Credited, last 30 days and Debited, last 30 days. Below them are Latest activity, the Find a wallet search and Quick actions.
Step 3: Credit a test customer
↑ Back to top- On the Overview, in Find a wallet, start typing the test customer’s name, email or username and pick them from the list.
- Click Open wallet. This works even if the customer has no wallet yet: the wallet is created with the first credit.
- In the Adjust balance box on the right, keep Credit selected.
- Enter an Amount larger than your test product’s price, for example 50.
- Pick a Reason (required), for example Promotion. Choose Other (type your own) to type a reason that is not in the list.
- Optionally add a Note (optional detail, kept in the ledger).
- Leave Email the customer (when the wallet emails are enabled) ticked if you want to see the Wallet credited email.
- Click Apply adjustment.
The wallet screen now shows the new Balance and Available to spend, and the Transactions box lists an Admin adjustment with the amount, the Balance after it, your name as the reference and your reason as the note.

Note: A debit works the same way, but before it is applied you are asked to type the exact amount again, to prevent mistakes. The same form also appears in the Wallet card on the customer’s Edit user screen; it saves on its own, so you do not need to click Update User. You can change the list of reasons under WooCommerce > Settings > Elite Balance (Adjustment reasons).
Step 4: See what the customer sees
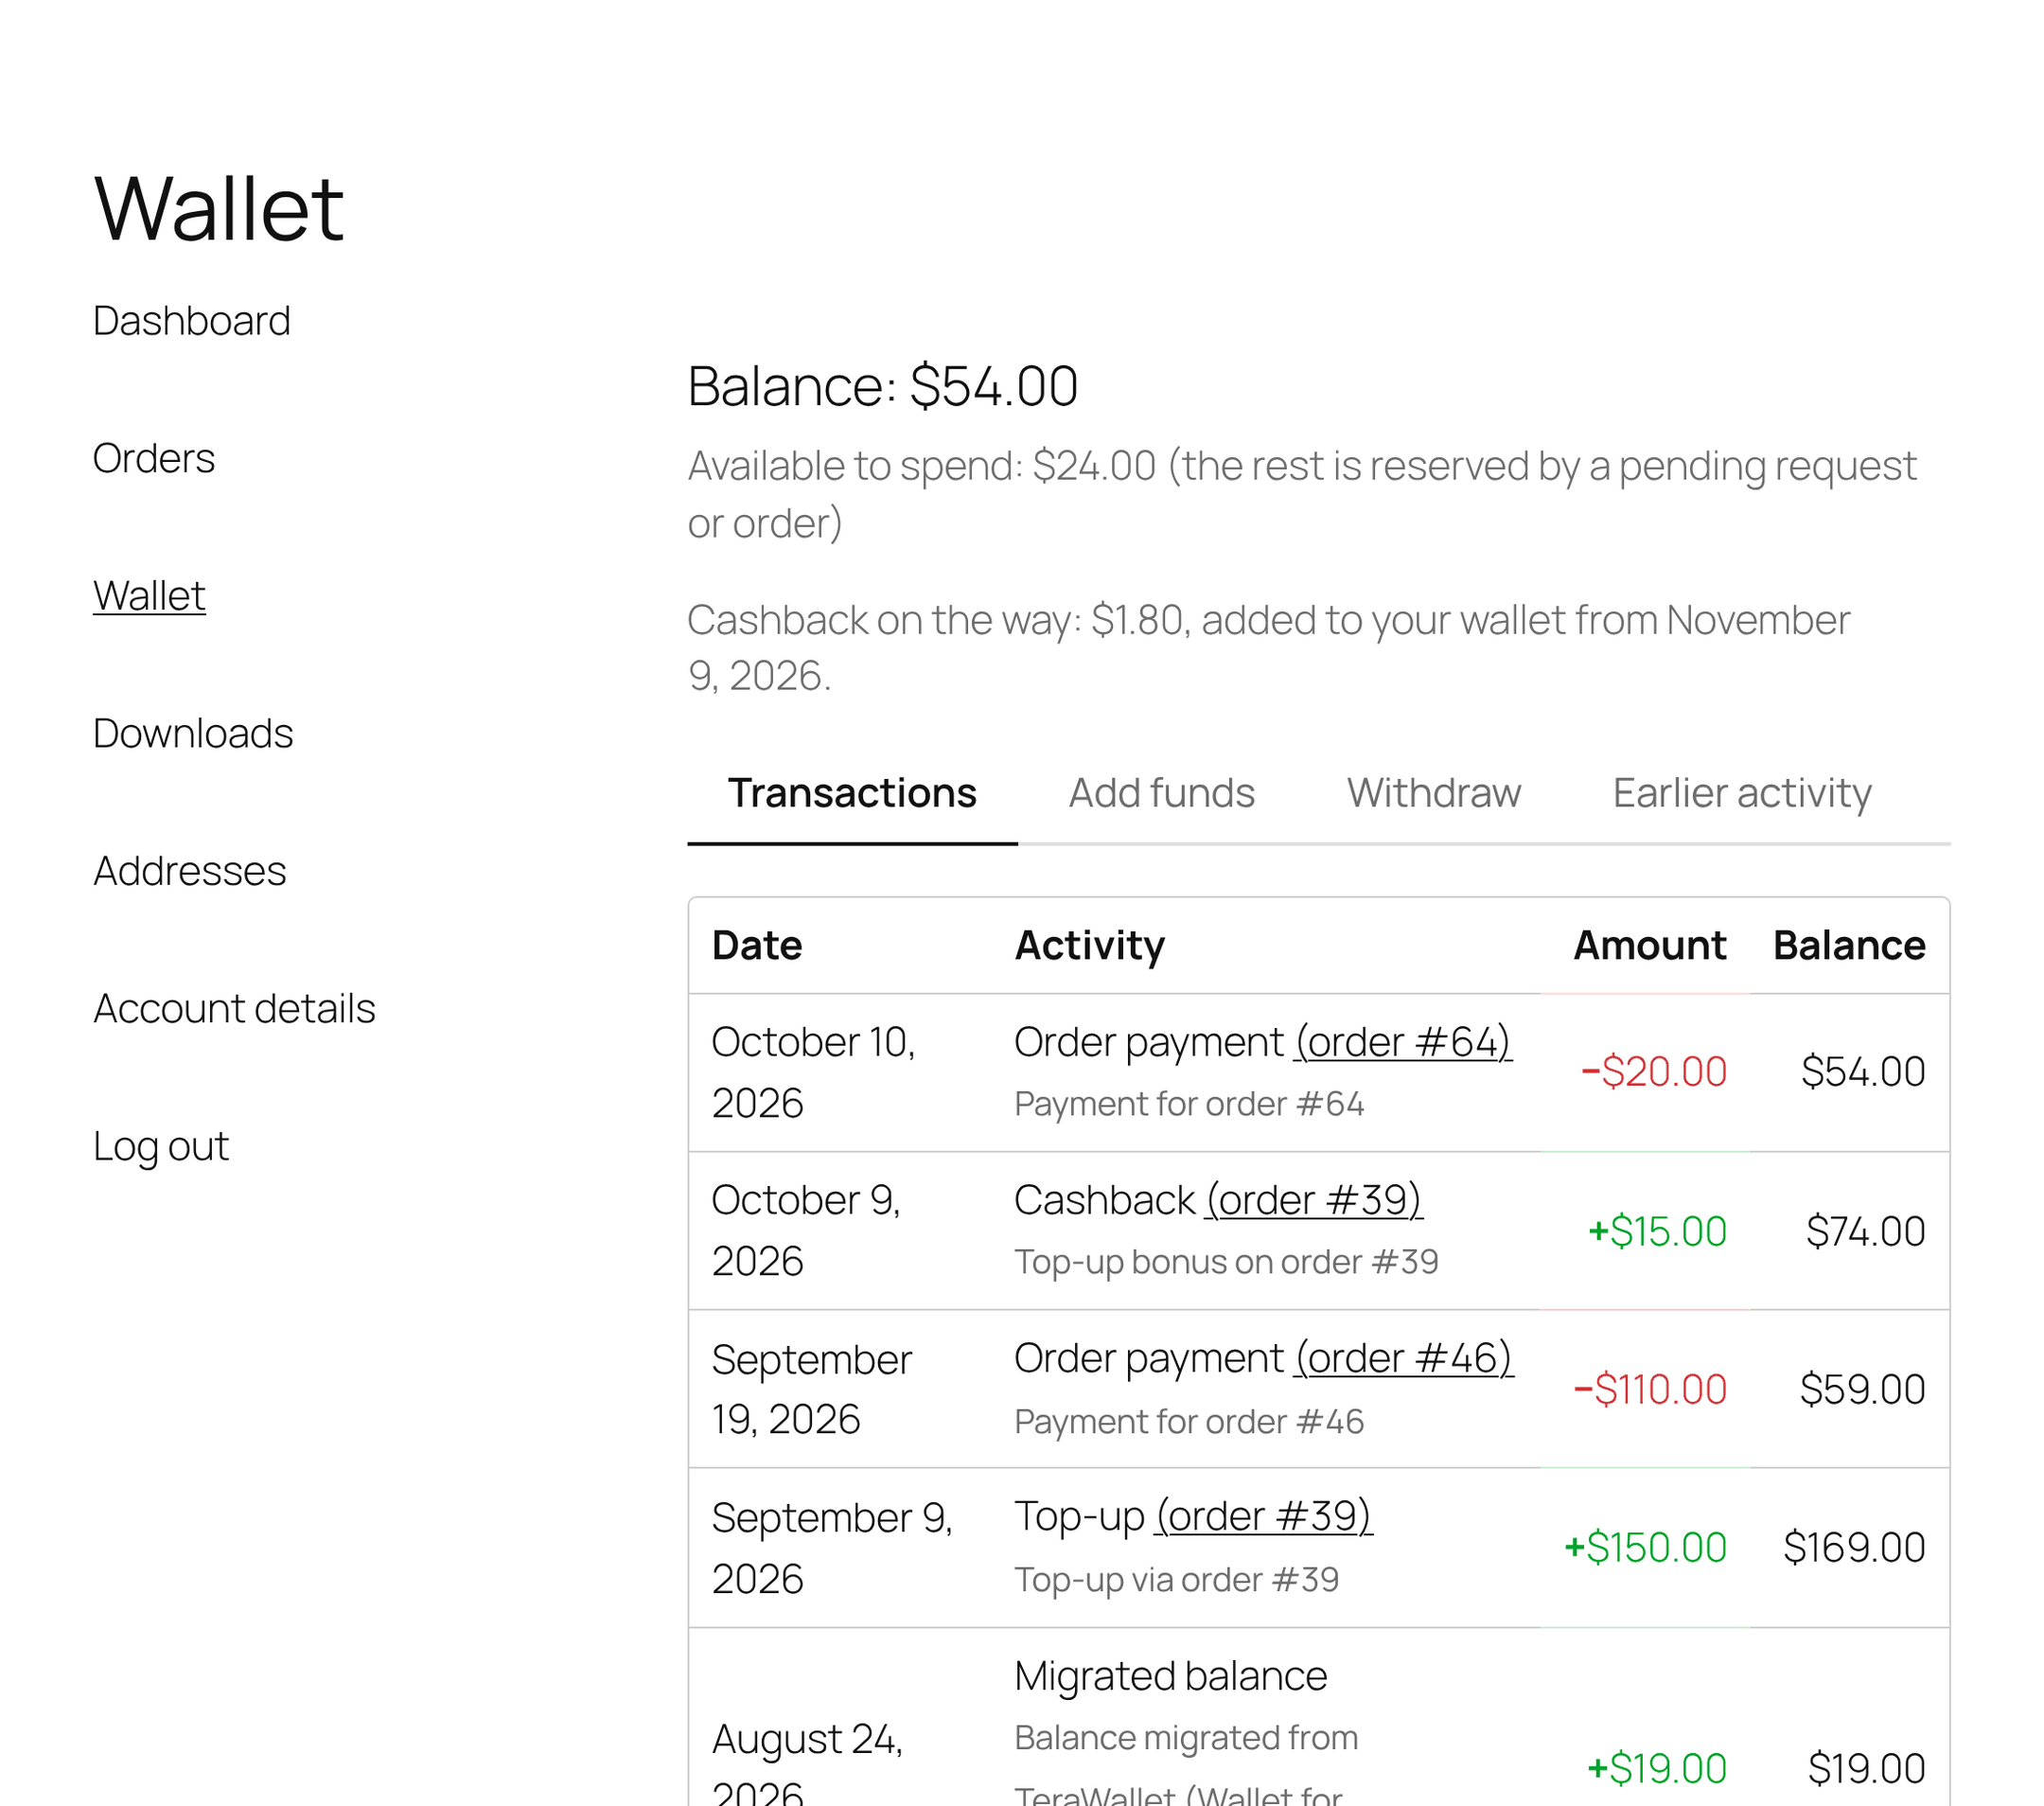
↑ Back to topOpen a private browser window, log in as the test customer and go to My Account > Wallet. The page shows:
- the Balance, and Available to spend when part of it is reserved;
- a Transactions tab with the same history you saw in the admin, in customer wording. Your credit appears as Balance adjustment. Staff reasons and notes on manual adjustments are never shown to customers;
- an Add funds tab, because top-ups are on by default;
- a Withdraw tab only if you enabled withdrawals, and an Earlier activity tab only after a migration from another wallet plugin.
Step 5: Pay an order from the wallet
↑ Back to topStill logged in as the customer:
- Add the test product to the cart and go to checkout.
- Choose Wallet balance. Its description shows the available balance, for example “Pay using your wallet balance. Available balance: $50.00.”
- Place the order.
The wallet is debited immediately, as one Order payment transaction, and WooCommerce marks the order as paid. The order gets a note such as “Elite Balance: $20.00 paid from wallet (transaction #12). Wallet balance is now $30.00.”
Wallet balance is offered only when the customer is logged in, the wallet is not locked, the order is in your store currency and the available balance covers the whole order total.
Try a partial payment
↑ Back to topPut more in the cart than the remaining balance covers. Wallet balance is no longer offered; instead the customer ticks Use my wallet balance ($X available), optionally types how much to use (empty means as much as possible), and picks another payment method for the rest. The wallet amount shows as a Wallet payment line in the totals.
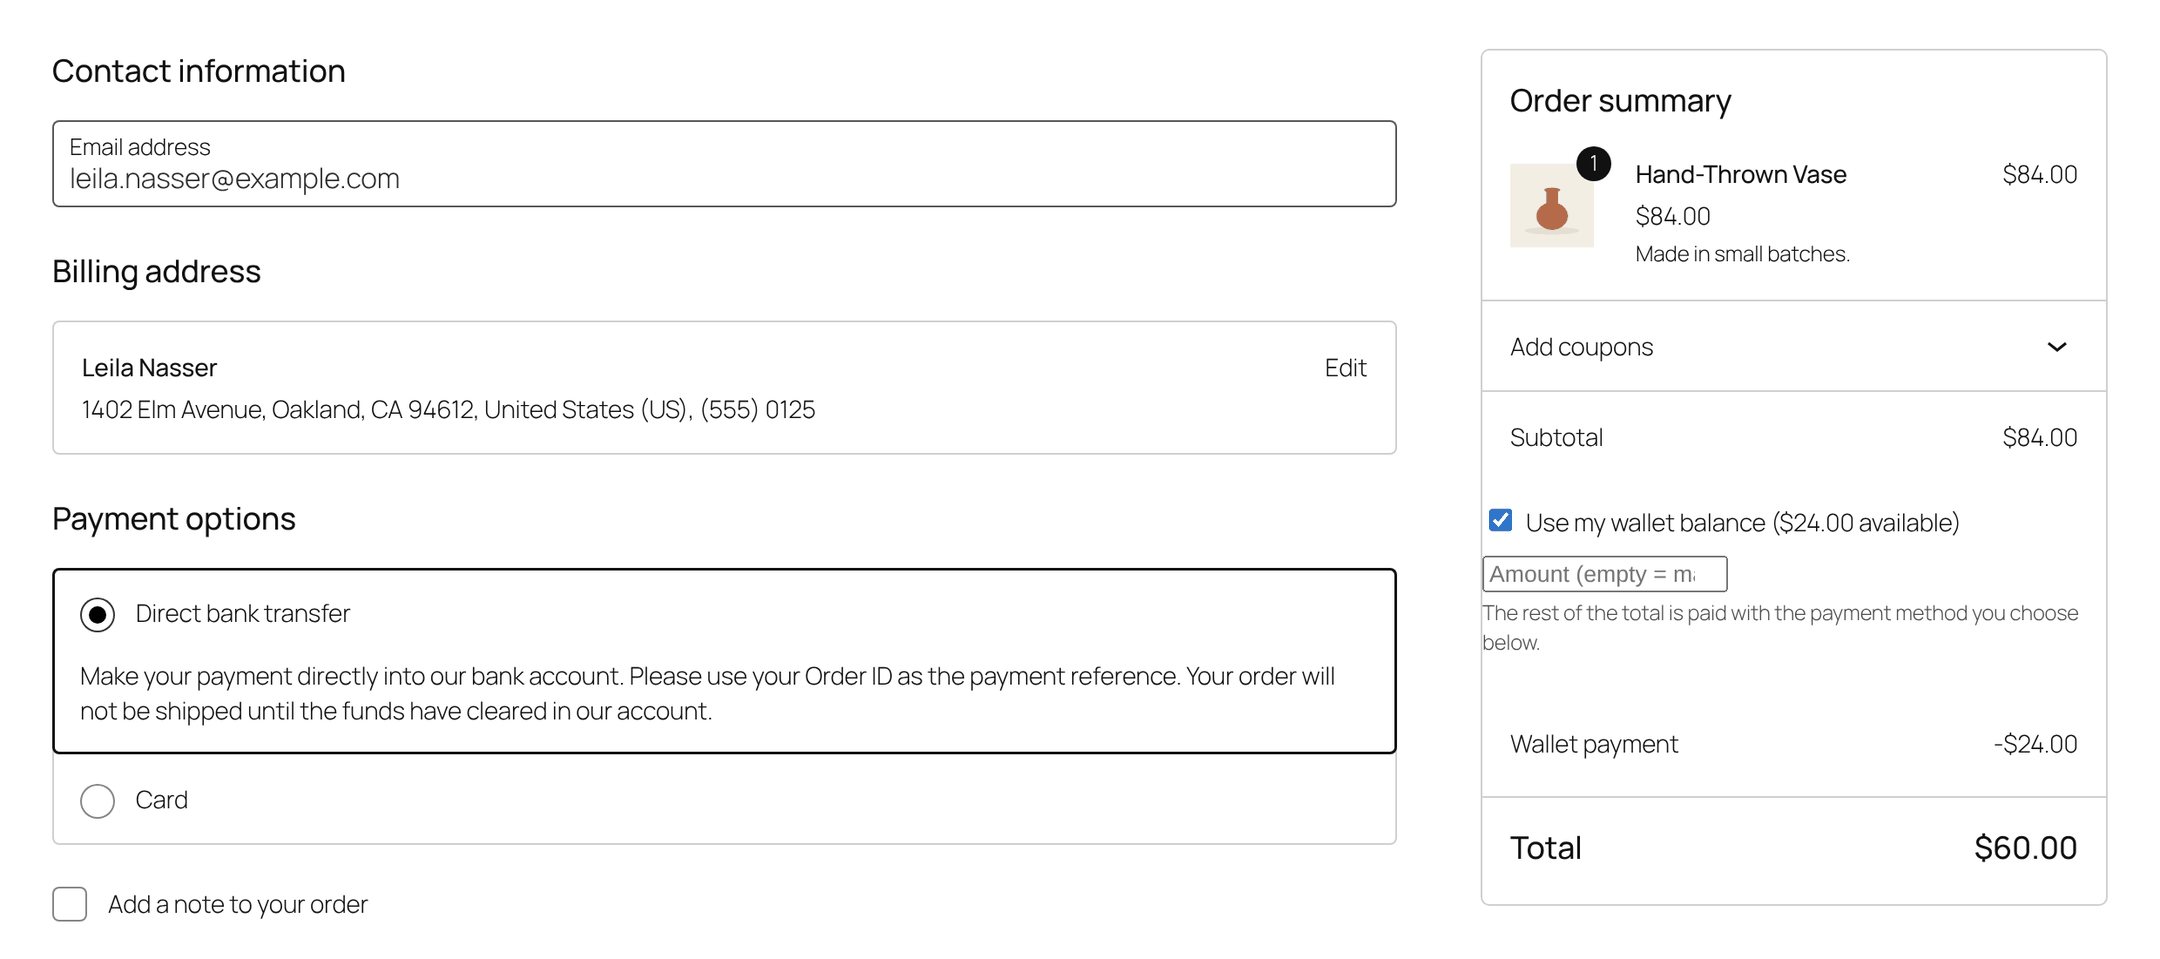
When the order is placed, the wallet amount is reserved (a hold), not taken. It is collected when the other payment method confirms payment, and released back to the customer automatically if the order is cancelled or fails. Details are on Checkout and Wallet Payments.
Step 6: Refund to the wallet
↑ Back to topBack in the admin, open the order you paid fully from the wallet under WooCommerce > Orders. The Elite Balance box on the order screen shows the customer’s wallet balance (and what is available) and the ledger rows linked to this order. For an order paid partly from the wallet, it also shows the wallet amount applied and any pending hold.
- Click Refund below the order items.
- Enter the quantities or the refund amount, and a reason if you like.
- Click Refund $X via Elite Balance Wallet and confirm.
WooCommerce creates the refund record and Elite Balance credits the wallet with a Refund to wallet transaction linked to the order.
For an order paid with another method (a card, for example), the same refund panel has an extra Refund to wallet button. It creates the WooCommerce refund record and gives the amount to the customer as store credit, without sending money back through the original payment method. Orders paid partly from the wallet are covered on Refunds to Wallet.
Important: Changing an order’s status never moves wallet money. Marking an order Refunded or Cancelled does not return money that was already taken from the wallet; use the refund panel. Cancelling only releases a reservation that was never collected.
Step 7: Look at the ledger
↑ Back to topOpen the Transactions tab. You should see your three movements: the Admin adjustment, the Order payment and the Refund to wallet, each with the Balance after it and a Reference to the staff member or the order.
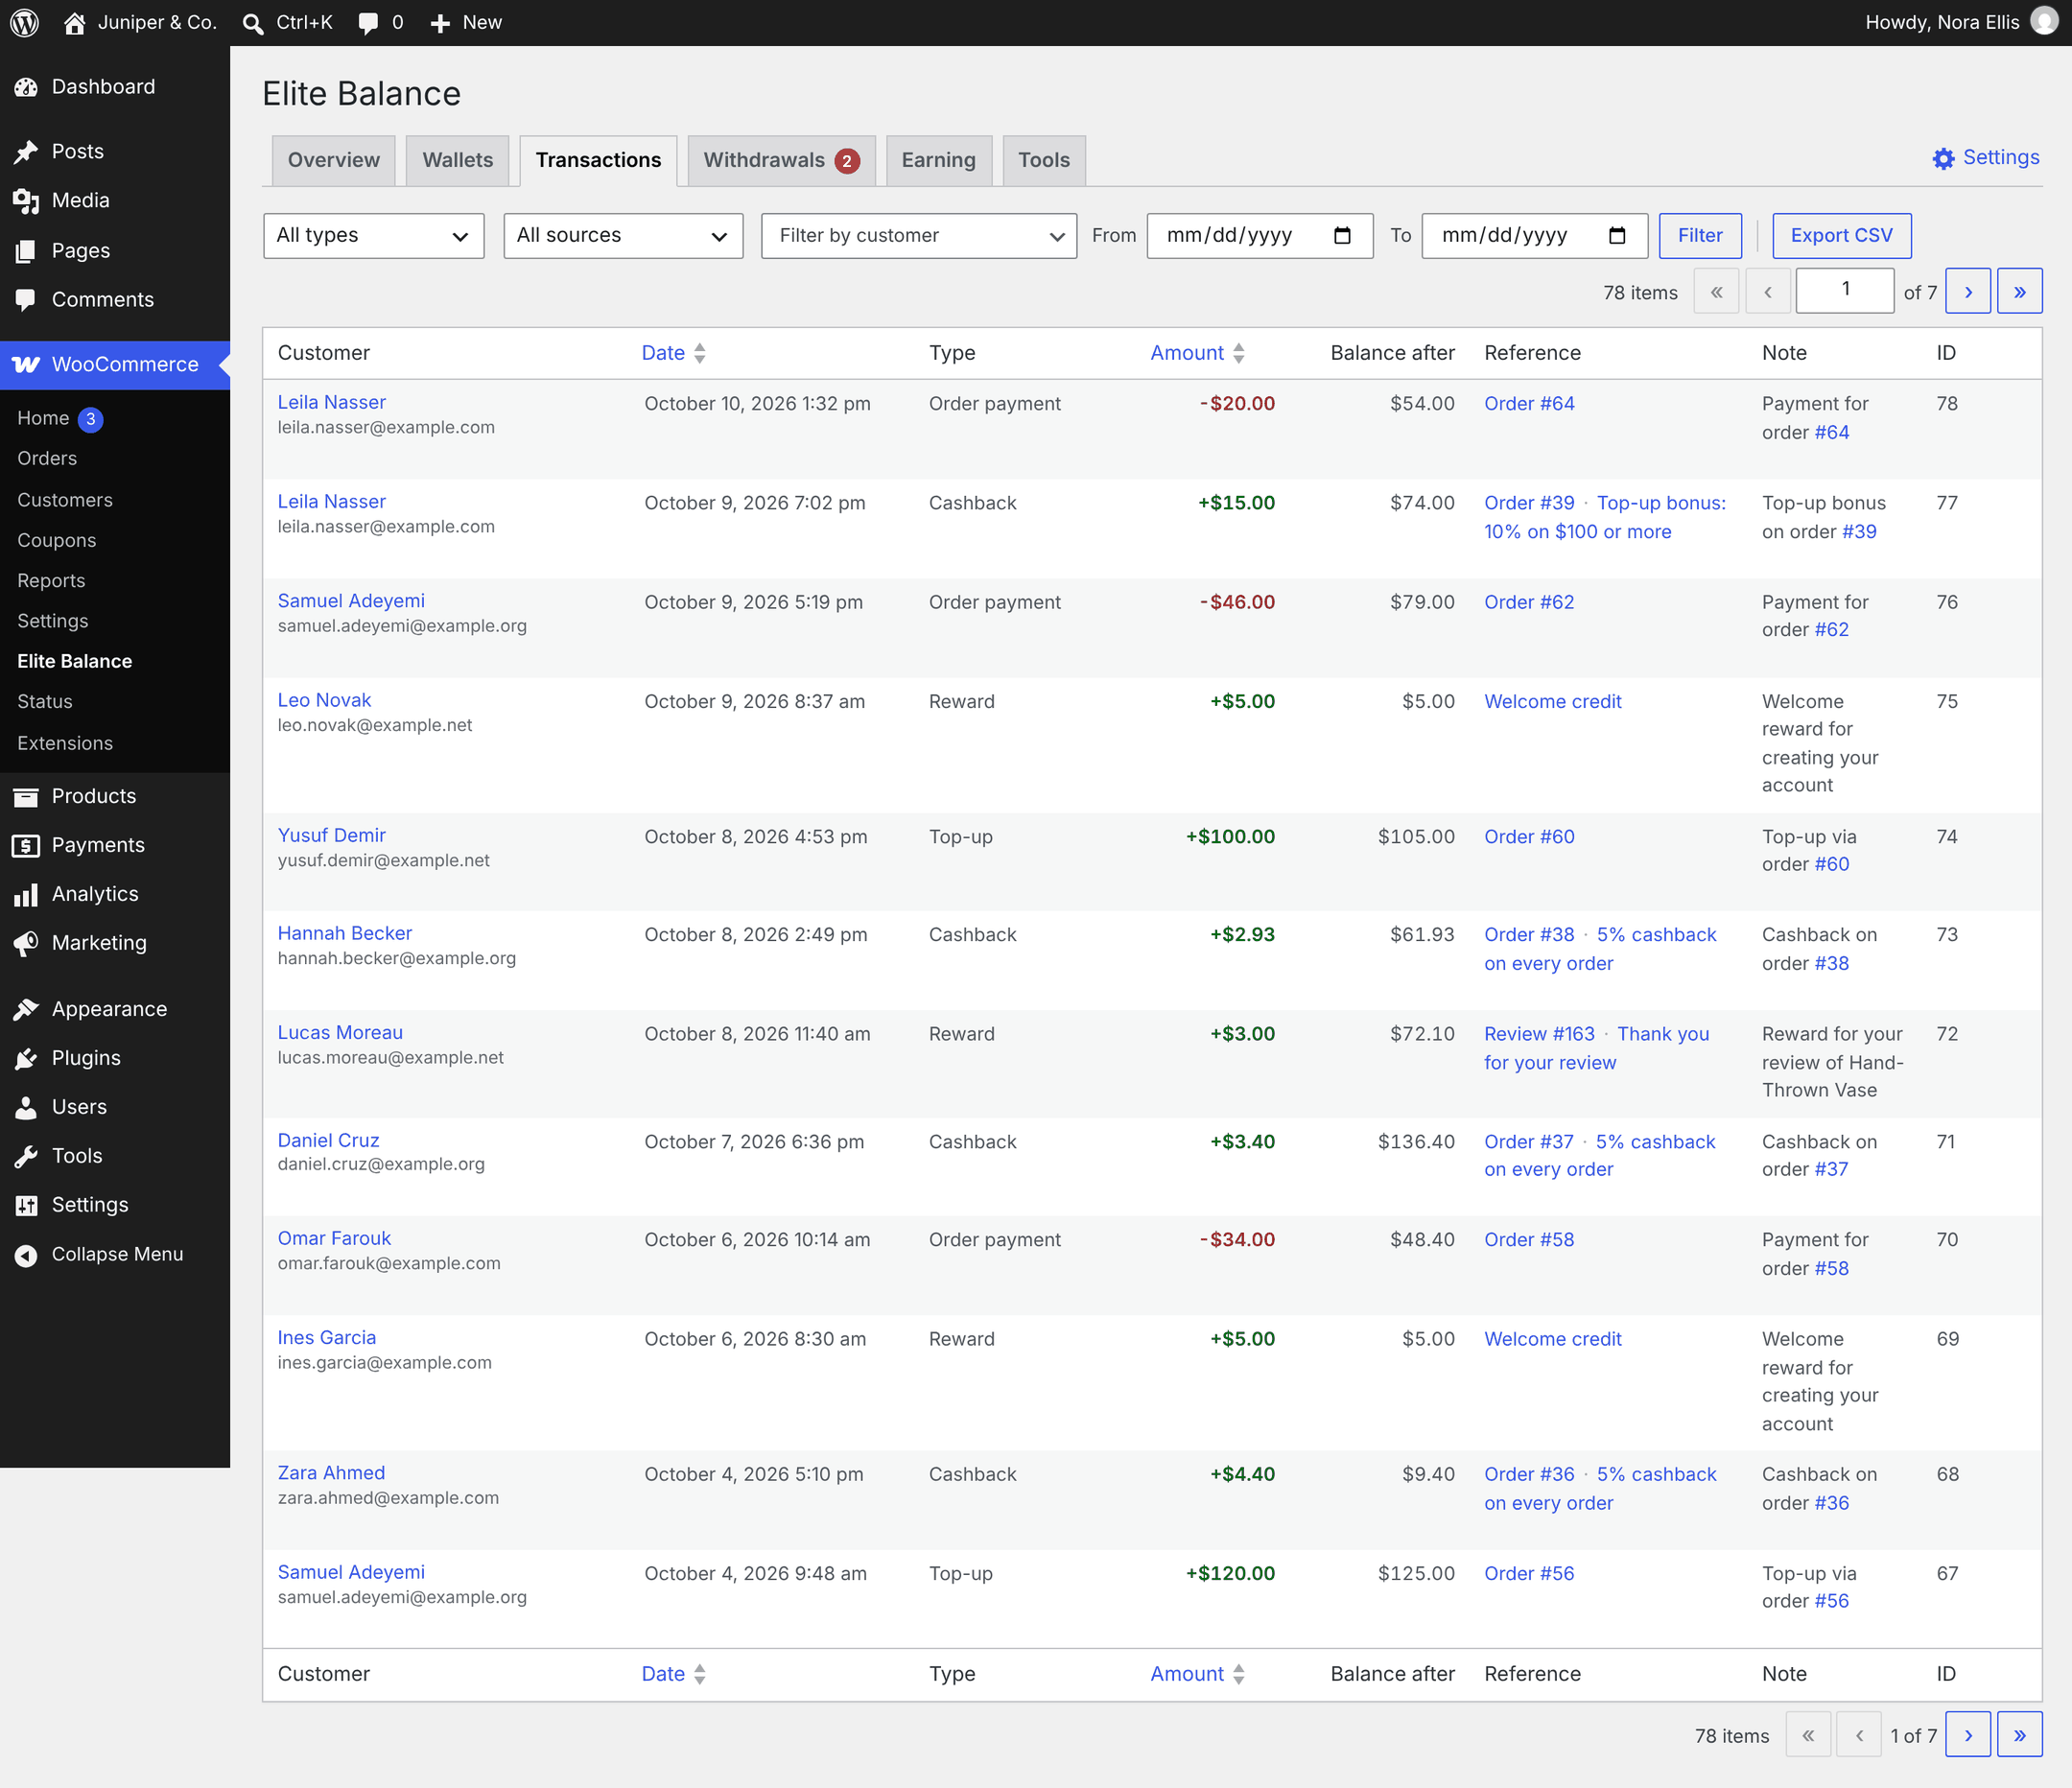
Use the filters (type, source, customer, and From and To dates in your store’s time zone) to narrow the list, and Export CSV to download what you filtered. Managing Wallets covers every column and option.
How the ledger works
↑ Back to topElite Balance does not keep a balance as one number that features overwrite. It keeps a ledger: a list of every movement. Five ideas explain everything you see in the plugin.
Rows are never edited or deleted
↑ Back to topEvery credit and debit is a permanent row: when it happened, the type, the amount, who or what caused it, a note, and the balance after it. Nothing in Elite Balance edits or deletes a row. A mistake is corrected with a new row (for example a debit with the reason Correction), so the history always shows what really happened.
Every row carries the balance after it
↑ Back to topBecause each row records the resulting balance, any balance can be explained step by step, and a wrong balance is a detectable error, not a mystery. The wp rb-elbal reconcile command checks every wallet against its own history (see WP-CLI Commands). Amounts are stored with four decimal places, so there are no rounding surprises.
Nothing happens twice
↑ Back to topEvery movement carries a unique key (an idempotency key). If the same operation arrives again, the ledger recognizes the key and returns the original result without writing a second row. This protects against a payment gateway sending the same notification twice, a double-clicked button, a page refresh that resubmits a form, or a migration that runs again. If you double-submit the Adjust balance form, you see “This form was already submitted; the balance was not changed again.”
Holds reserve money without moving it
↑ Back to topA hold sets part of a balance aside without changing it. That is why a wallet has two figures: the Balance (what the ledger says) and Available to spend (the balance minus pending holds). Holds are used in two places:
- Partial payments. The wallet part is held when the order is placed, captured (turned into an Order payment row) when the order is paid, and released if the order is cancelled or fails.
- Withdrawal requests. The requested amount is held until staff mark the request transferred (a Withdrawal row) or reject it (the hold is released).
A full payment with Wallet balance uses no hold: the order is paid at the moment it is placed, so the wallet is debited right away. Current holds are listed in the Holds box on each wallet screen.
Money only moves when someone decides
↑ Back to topStatus changes never move wallet money on their own. Refunds to the wallet are always an explicit action on the order. Wallets never go negative: a debit larger than the available balance is refused, and a locked wallet refuses new spending (credits still work).
Transaction types you will see
↑ Back to top| Type | Direction | When it is written |
|---|---|---|
| Order payment | Debit | Wallet money collected for an order, fully or partly paid from the wallet. |
| Refund to wallet | Credit | An order refunded as store credit. |
| Top-up | Credit | The customer added funds with Add funds and the payment was confirmed. |
| Withdrawal | Debit | A withdrawal request was marked transferred. |
| Cashback | Credit | An order cashback or top-up bonus rule paid out. |
| Reward | Credit | A signup, product review or birthday rule paid out. |
| Reward reversal | Debit | Credited cashback taken back after the earning order was refunded or cancelled. |
| Admin adjustment | Credit or debit | Staff credited or debited the wallet with a reason, one wallet at a time, in bulk or by CSV import. Customers see it as Balance adjustment. |
| Migrated balance | Credit | The opening balance imported from another wallet plugin. |
| Credit and Debit | Credit, debit | Generic types, used when custom code writes to the ledger without naming a type. |
Developers can register their own types; see the Developer Reference.
Where to go next
↑ Back to top- Switching from another wallet plugin? Read Migrating from Another Wallet Plugin before you invite customers to use their wallets.
- Decide on top-ups, earning and withdrawals in the Settings Reference.
- Reward customers with Earning Rules and Cashback.
- Adjust the customer emails in Wallet Emails.
- Learn the daily screens in Managing Wallets.