
MCP for WooCommerce by w7s connects Claude, ChatGPT, and other AI assistants to your WooCommerce store so they can work with your orders, products, customers, and more in plain language. It turns on the built-in WooCommerce Model Context Protocol (MCP) features, gives you a settings screen to manage the connection and your API keys, and lets you choose exactly which groups of tools the AI client is allowed to use. This guide covers what you need, how to set it up, what every setting does, and how developers can extend it.
Overview
↑ Back to topMCP for WooCommerce configures and extends the WooCommerce MCP integration. MCP is the standard that lets an AI assistant call tools on your site, and WooCommerce ships an MCP endpoint at /wp-json/woocommerce/mcp. This plugin enables that endpoint on activation and adds the pieces a store needs to use it in practice.
It does three main things:
- It provides a new settings area under WooCommerce > Settings > MCP for connecting an assistant, creating API keys, and reviewing activity;
- It registers a large set of MCP abilities so an assistant can list and manage orders, products, customers, coupons, refunds, tax, shipping, webhooks, reports, and more; and
- It lets you switch whole groups of tools (called tool packs) on or off, so an assistant only ever sees the capabilities you have chosen to expose.
The plugin does not replace the WooCommerce MCP endpoint. It enables it, then layers on the connection and key management screens, a large library of abilities, tool pack gating that is enforced when a tool runs, optional activity logging, and API key permission enforcement on every call.
Requirements
↑ Back to topMCP for WooCommerce needs the following to run:
- WordPress 5.8 or higher.
- WooCommerce 9.0 or higher. WooCommerce is a hard dependency. The plugin declares
Requires Plugins: woocommerceand will prompt you if WooCommerce is missing. - PHP 7.4 or higher.
- MySQL 5.6 or higher, or the MariaDB equivalent.
- An AI assistant that understands MCP, such as Claude Desktop or ChatGPT, or any other MCP or OpenAPI 3.1 client (Cursor, Cline, n8n, Ollama, and more).
- A paid ChatGPT plan that allows custom GPTs, or a paid Claude plan (Pro, Max, Team, or Enterprise) that supports custom connectors.
- For the one-click Claude Desktop setup: Claude Desktop 0.13.37 or newer.
The Claude connection holds an open link to your site for the length of a session, up to about an hour, which uses a PHP worker for that time. On constrained shared hosting, keep that in mind when sizing PHP workers.
Developer note: MCP for WooCommerce enables WooCommerce MCP automatically when you activate it. If WooCommerce MCP is ever turned off, the plugin shows a notice with a link to switch it back on.
Installation
↑ Back to topTo start using a product from WooCommerce.com, you can use the “Add to store” functionality on the order confirmation page or the My subscriptions section in your account.
- Navigate to My subscriptions.
- Find the Add to store button next to the product you’re planning to install.
- Follow the instructions on the screen, and the product will be automatically added to your store.
Alternative options and more information at: Managing WooCommerce.com subscriptions.
Setup and configuration
↑ Back to topAll settings live under WooCommerce > Settings > MCP, on a page headed MCP Settings, organized into five tabs: Connection, Tool Packs, Add tools, Store Control, and Logs. The plugin uses its own Save controls inside each tab, so the standard WooCommerce Save changes button is hidden here. When the MCP connector is disabled, only the Connection tab is shown, and the Logs tab appears only while action logging is on. The sections below follow the tabs in the order you will use them.
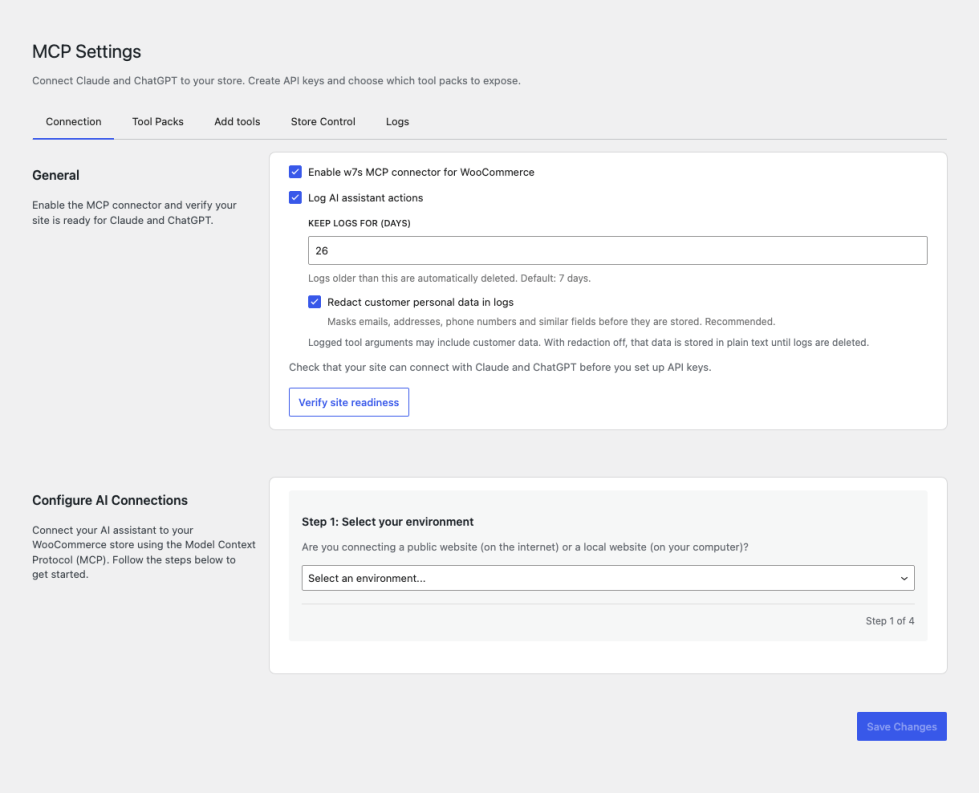
Connection settings
↑ Back to topThe Connection tab is where you link an assistant to your store and manage the credentials it uses. It walks you through the setup as numbered steps:
- Select your environment (local sites only) — choose between a public website (accessible on the internet) and a local website (on your computer). On a public site this step is skipped.
- Select your AI assistant — choose Claude (Recommended), ChatGPT, or Other AI service.
- Create an API key — give the key a name, pick its permission (Read, Write, or Read/Write), and create it. The consumer key and secret are shown once, so save them straight away.
- Connect — follow the instructions for the assistant you chose. The exact steps for each assistant are covered in Connecting an assistant below.
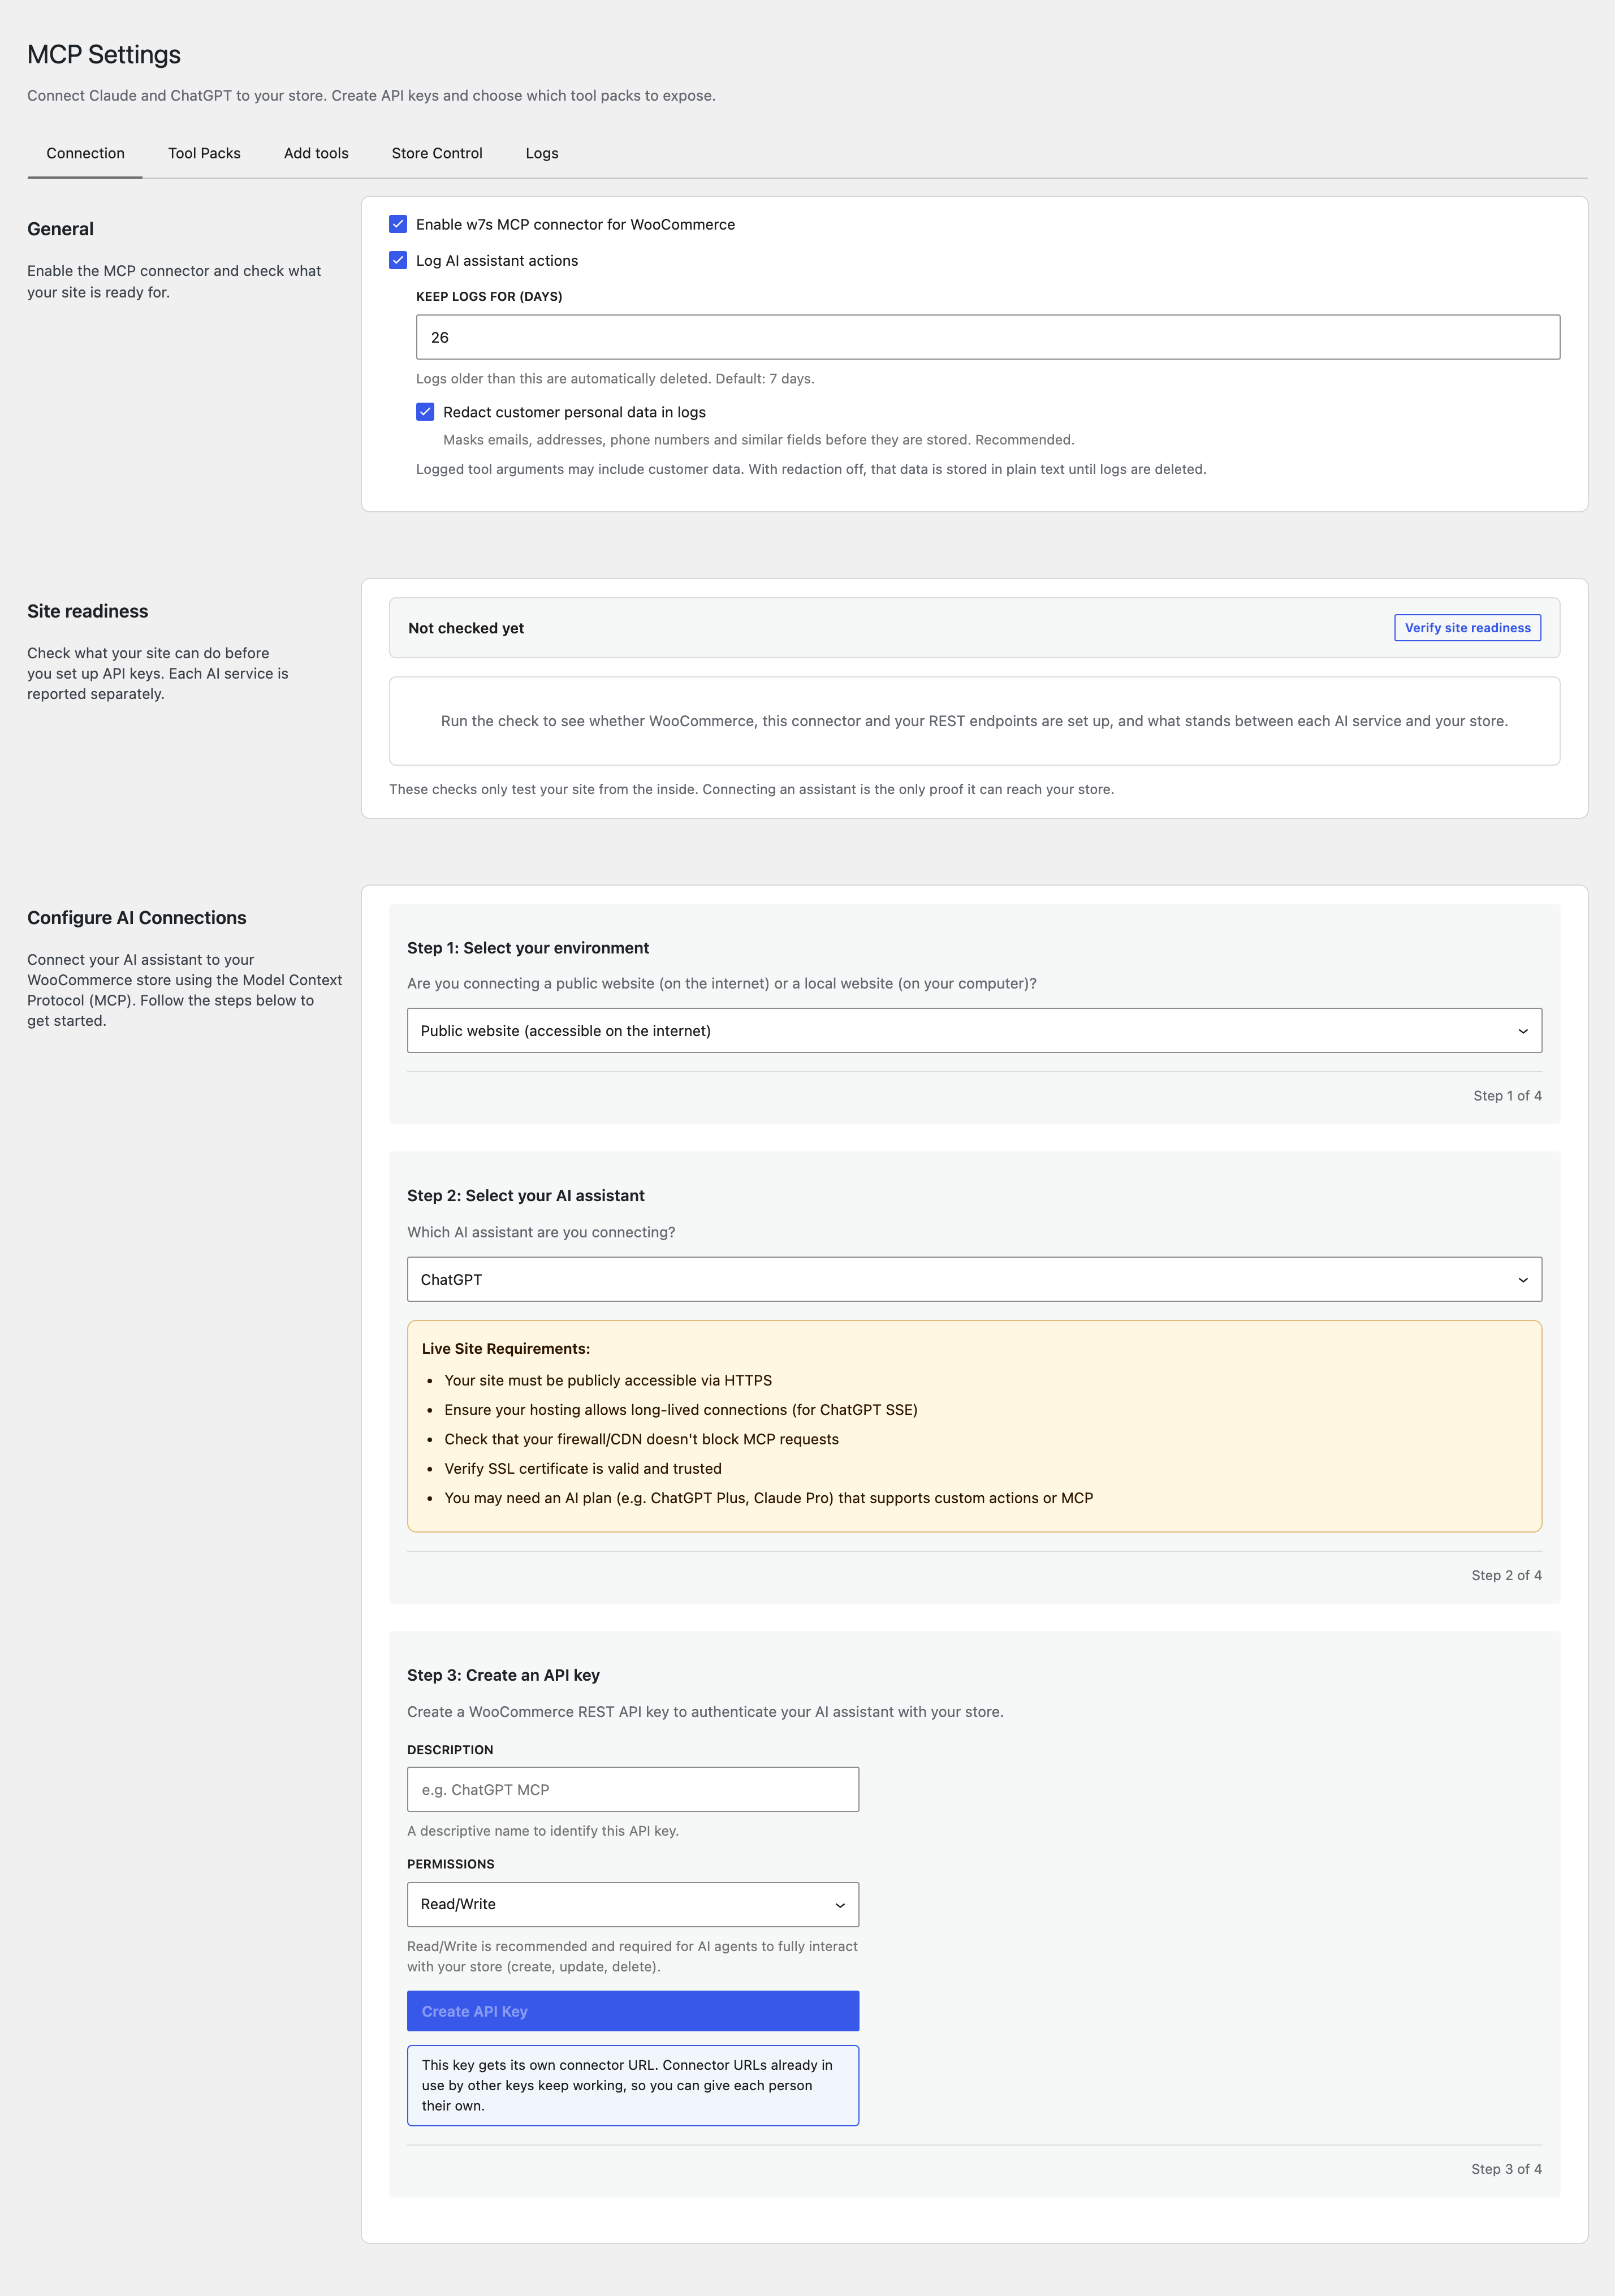
Beyond the setup steps, the tab contains:
Enable connector. The master switch for the whole integration. When it is off, no tools and no keys are exposed to any assistant, and the other settings tabs are hidden.
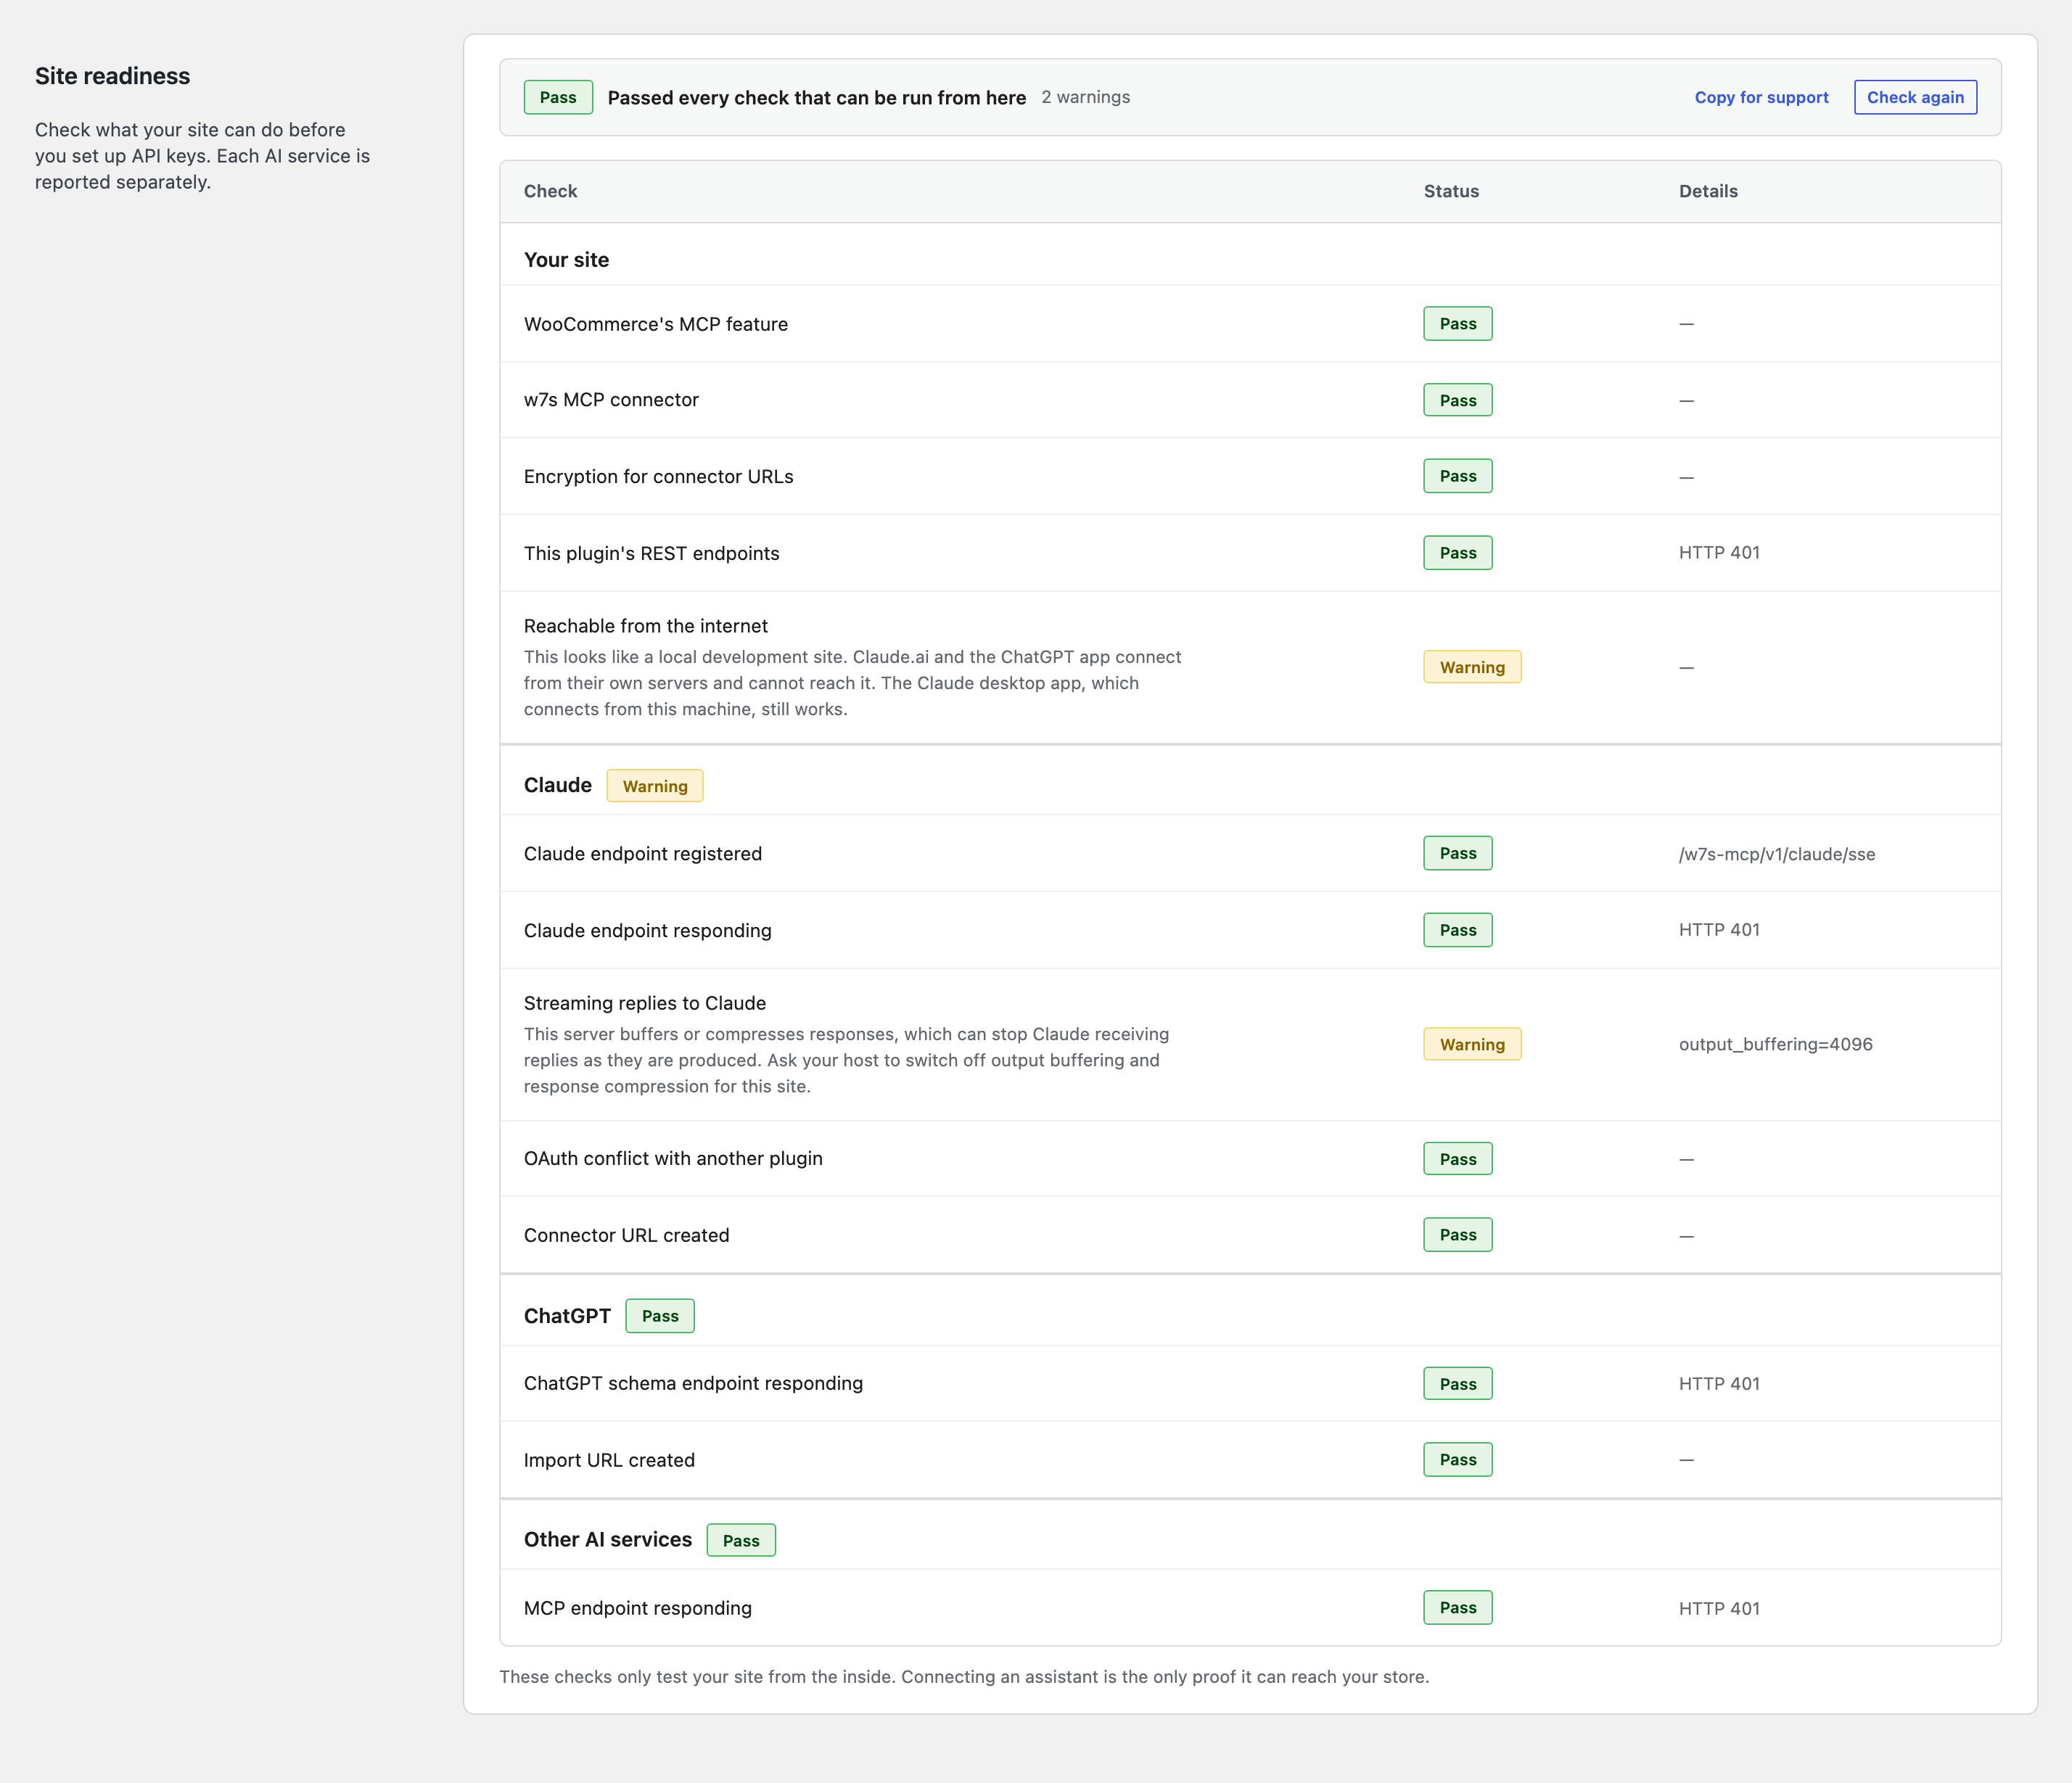
Verify site readiness. Site readiness has its own section on the tab. It runs a set of checks against your store and reports what it finds for each AI service separately, so a store that is fine for ChatGPT and blocked for Claude reads as exactly that.
The report opens with the overall result and groups the checks beneath it. Your site holds the prerequisites every service shares: WooCommerce’s own MCP feature, this plugin’s connector switch, whether this server can encrypt the credential behind a connector URL, whether the plugin’s REST endpoints answer, and whether the store looks reachable from the internet at all. Below that, one group per service holds the checks only that service can fail — for Claude, whether its endpoint is registered and answering, whether your server buffers or compresses responses in a way that stalls a live stream, and whether another plugin publishes an OAuth server that Claude would find first; for ChatGPT, its schema endpoint and import URL. Each row carries a Pass, Warning, Fail, or Not checked result, and anything that is not a pass explains itself in place.
Copy for support puts the whole result on your clipboard as plain text, including the identifier of each check, which is what a support ticket needs.
One caveat matters when you read a passing report. Every check runs from your site to itself, so none of them can see a firewall, a staging password, or an AI bot rule sitting between an assistant’s servers and your store. A pass means nothing on your side is in the way. Only a real connection proves an assistant can reach you.
API keys. Create and manage the WooCommerce REST API keys an assistant uses, in the Manage API Keys list. The key is sent as the X-MCP-API-Key header on MCP requests. The key’s own permission controls what the assistant can do: a read key can only run read operations like search, list, and get, while write or read/write keys can also create, update, and delete. The user attached to the key must also have the manage_woocommerce capability. Create the most limited key that still does the job. Revoking a key from this list immediately cuts off any assistant that was using it — this is also how you disconnect an assistant.
Actions menu. Every key in the list has an Actions menu, opened from the button at the end of its row. It holds everything that key can do:
- Copy MCP connector URL (Claude, ChatGPT app) and Copy schema URL (Custom GPT) — the key’s connector URL, in the form the client expects. One key works with every assistant, so both are always offered: the same token authenticates both addresses, and only the endpoint they point at differs. Claude and the ChatGPT app both take the MCP connector URL; only a Custom GPT wants the schema URL. The URL is available whenever you come back, so losing it is not a reason to create anything new.
- Regenerate URL — issue a fresh URL for that key. The previous one stops working immediately, so anyone using it is disconnected until you give them the new one. Every other key, and anyone using it, is unaffected. The confirmation that follows includes copy buttons so you can hand the new URL straight to the assistant.
- Disconnect URL — switch off that key’s URL while the key itself keeps working for clients that send it as a header, such as the Claude Desktop app.
- Revoke key — delete the API key outright. This cannot be undone, and it removes the connector URL with it.
A key that has no connector URL simply shows fewer entries: only Revoke key. A URL can only be created at the same time as the key, because WooCommerce shows the full key only once and it cannot be recovered afterwards. To give someone their own URL, create a new API key for them in the connection steps above.
Recent AI activity. A short list of the last few actions AI assistants have taken on your store, with the tool, result, client, and user behind each one. It appears once there is activity to show and links through to the full log.
Action logging. Optionally record MCP tool calls, with a retention period you choose. Logging is on by default with a 7-day retention, after which entries are deleted automatically. See the Logs tab to read what gets recorded.
Developer note: The remote connector for Claude and ChatGPT has to replay an API key to the site on every request, so that credential is stored in your database — one entry per key that has a connector URL. Each entry is encrypted at rest using a key derived from your site’s WordPress salts, which live in wp-config.php rather than the database, so a database backup alone does not expose a usable key. Treat each one as a live credential. To revoke a connector, either use Disconnect URL in that key’s Actions menu, which removes only that URL, or Revoke key in the same menu, which removes both. Deactivating the plugin clears every stored connector credential.
Stores that connected before connector URLs became per-key have one older, shared URL that is not tied to a single API key. It keeps working exactly as before, and nothing needs to be changed or re-pasted. It is shown under the API keys list as Shared connector URL, where you can copy it or turn it off once everyone using it has their own URL.
Connecting an assistant
↑ Back to topThis section walks you from a fresh install to a working connection. Which steps you follow depends on two things: the assistant you are connecting (Claude, ChatGPT, or another AI service), and where your store runs (a public website on the internet, or a local site on your own computer). Read the prerequisites first, then jump to the section that matches your setup:
- Connect the Claude Desktop app to a public site
- Connect the Claude Desktop app to a local site
- Connect Claude.ai in the browser to a public site
- Giving each person their own connection
- Connect the ChatGPT app to a public site
- Connect a Custom GPT to a public site
- Connect a Custom GPT to a local site
- Connect another AI service
All of these start the same way. Go to WooCommerce > Settings > MCP > Connection, pick your environment (on a local site) and assistant, and create an API key. The key is shown once and is the credential the assistant uses. Create the most limited key that does the job: a read key for reporting, a write or read/write key only when the assistant needs to make changes.
Before you start
↑ Back to topA few things need to be true before a connection will work. Most failed setups trace back to one of these.
For a public website (your live store on the internet):
- The site must be reachable over HTTPS with a valid, trusted SSL certificate. A self-signed or expired certificate will fail.
- Your host, firewall, or CDN must allow long-lived connections. The Claude and ChatGPT stream connections (Server-Sent Events, or SSE) hold an open link to your site for the length of a session, up to about an hour, and some CDNs cut these off early.
- Your host, firewall, or CDN must also let the assistant’s own requests through. Cloudflare and several hosting panels now ship a one-click setting that blocks AI bots, and it blocks the assistant you connected on purpose along with the crawlers you wanted to keep out. See Requests blocked by Cloudflare or your host.
- You may need a paid plan on the assistant’s side, such as ChatGPT with custom GPTs or developer-mode connectors, or a Claude plan that supports custom connectors (Pro, Max, Team, or Enterprise).
For a local website (running on your own computer, for example in a tool like Local, MAMP, or Docker):
- Connecting locally is more involved and is aimed at developers comfortable with a terminal, with editing configuration files, and with a tunneling tool such as ngrok.
- On a local site, the Connection tab starts with an environment picker. Choose Local website (on your computer) in Step 1 and the instructions adapt to the local setup, including the extra certificate settings.
- Claude Desktop can talk to a local site directly through a bridge, with one extra setting for the local SSL certificates. See Connect the Claude Desktop app to a local site below.
- Anything hosted by the assistant’s own servers, which includes the Claude.ai browser connector and both ChatGPT routes, cannot reach
localhost. You have to expose the local site through a tunnel first. See the local Custom GPT steps below.
Developer note: When setting up Claude Desktop manually (rather than with the one-click bundle), the bridge needs Node.js 22 or newer. If the assistant shows the server as failed or no tools appear, this is almost always the cause. The fix is discussed in the manual setup steps below.
How the connection works
↑ Back to topIt helps to know what the pieces are before you wire them together.
The MCP endpoint is the address an assistant connects to. WooCommerce exposes it at /wp-json/woocommerce/mcp. This is the value a bridge needs as its WP_API_URL. Pass the full endpoint, not just your site root. Passing only the root returns a 404 rest_no_route error.
The API key authenticates each request. It is a WooCommerce REST API key in the form consumer_key:consumer_secret, sent in the X-MCP-API-Key header. The key’s permission scope is enforced on every call, so a read key cannot write no matter how a request is phrased. The user attached to the key also needs the manage_woocommerce capability.
From there, clients connect in one of three shapes:
- A local bridge. Claude Desktop runs a small helper on your machine that speaks to your store and presents the tools to the app. With the one-click bundle, the bridge ships inside the bundle; with the manual setup, it is the
@automattic/mcp-wordpress-remotepackage. Either way, the key stays on your machine and is never stored on the site. - A remote stream. The Claude.ai browser connector and other hosted clients connect to your site over SSE. Because some of these clients cannot send a custom header, the plugin gives them a connector URL with a revocable token in it instead of the raw key. Each URL belongs to one API key, and that key’s credential is stored on the site, encrypted at rest, so it can be replayed on every request. Because the URL carries the key’s own permissions, a read-only key stays read-only through the browser connector.
- A direct MCP or OpenAPI client. Tools such as Cursor, Cline, n8n, or your own integration talk to the MCP endpoint directly with the
X-MCP-API-Keyheader, or import the OpenAPI 3.1 schema. See Connect another AI service.
Connect the Claude Desktop app to a public site
↑ Back to topThis is the most common setup, and in most cases it is now one click. The Connection tab’s Claude instructions are split into two tabs — Claude Desktop app and Claude.ai (web browser) — so pick the Claude Desktop app tab for these steps.
One-click setup (recommended):
- In WooCommerce > Settings > MCP > Connection, choose Claude and create an API key.
- On the Claude Desktop app tab, select Download Claude Desktop bundle (.mcpb). The bundle is built with this store’s endpoint and your new key already filled in.
- Double-click the downloaded
.mcpbfile. Claude Desktop opens and registers the store automatically — there is no configuration file to edit. This needs Claude Desktop 0.13.37 or newer. - Back on the Connection tab, use the verify control to confirm the connection is live.
The bundle contains your API key, so treat the file like a credential. If the file is ever shared, revoke that key from the Manage API Keys list and download a fresh bundle with a new key.
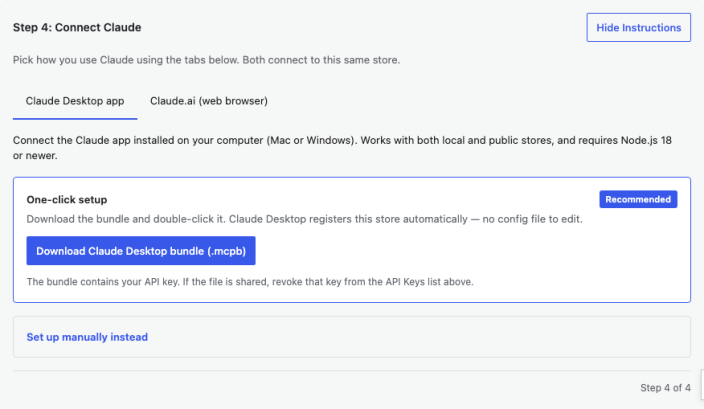
Manual setup:
If you prefer to configure Claude Desktop by hand, or the one-click bundle is not available on your server, select Set up manually instead on the same tab. The manual setup runs a bridge on your computer using the @automattic/mcp-wordpress-remote package.
- Select Copy Claude Desktop Config. This builds a ready-to-paste block with your endpoint and key already filled in.
- Open the Claude Desktop configuration file,
claude_desktop_config.json, and merge the block into itsmcpServerssection. See Find the Claude Desktop configuration file below if you are not sure where it is. The block looks similar to this:
{
  "mcpServers": {
    "woocommerce-mcp": {
      "command": "/path/to/node22/bin/npx",
      "args": ["-y", "@automattic/mcp-wordpress-remote"],
      "env": {
        "WP_API_URL": "https://yourstore.com/wp-json/woocommerce/mcp",
        "CUSTOM_HEADERS": "{\"X-MCP-API-Key\": \"ck_yourkey:cs_yoursecret\"}"
      }
    }
  }
}- Replace
/path/to/node22/bin/npxwith the real path on your computer. The bridge needs Node.js 22 or newer, and Claude Desktop does not use your terminal’s Node version, so the full path is the reliable way to point it at the right one. In a terminal, runnvm use 22, thenwhich npx, and paste what it prints — for example/Users/you/.nvm/versions/node/v22.22.0/bin/npx. - Save the file, then fully quit and reopen Claude Desktop. A restart is required for it to pick up the change.
- Back on the Connection tab, use the verify control to confirm the connection is live.
If the server shows as failed or no tools appear, Claude is still using a Node.js version older than 22. Recheck that the command value is the full Node 22 path rather than a bare npx, then restart Claude Desktop.
Find the Claude Desktop configuration file
↑ Back to topThe manual setup above asks you to edit claude_desktop_config.json. The easiest way to open it is from inside Claude Desktop, which also creates the file the first time if it does not exist yet.
- Open Claude Desktop.
- Go to Settings, then the Developer section.
- Select Edit Config. This opens
claude_desktop_config.jsonin your default text editor.
If the file is new, it may be empty or contain only {}. Add the mcpServers block inside the top-level braces. If mcpServers already exists with other servers in it, add woocommerce-mcp alongside them rather than replacing the whole section.
If you would rather open the file directly, it lives here:
- macOS:
~/Library/Application Support/Claude/claude_desktop_config.json. TheLibraryfolder is hidden in Finder. Use Go, then Go to Folder (Shift+Cmd+G), and paste the path. - Windows:
%APPDATA%\Claude\claude_desktop_config.json. Paste that into the File Explorer address bar or the Run dialog (Win+R). - Linux:
~/.config/Claude/claude_desktop_config.json.
After saving, fully quit and reopen Claude Desktop. It only reads the configuration at startup, so a running app will not pick up your changes. A missing comma or bracket will silently disable every server in the file, so check the JSON is valid if nothing loads.
Connect the Claude Desktop app to a local site
↑ Back to topPick Local website (on your computer) in Step 1 of the Connection tab, and the Claude Desktop instructions adapt to the local environment. A local site usually serves over a self-signed certificate that will be rejected by default, so there is one extra step on the WordPress side. Add this to your site using the Code Snippets plugin:
add_filter( 'woocommerce_mcp_allow_insecure_transport', '__return_true' );From there, the one-click setup works as it does on a public site: download the bundle from the Claude Desktop app tab and double-click it. When the local environment is selected, the bundle is built to accept the local certificate for you.
If you set up manually instead, follow the manual steps from the public-site section above and add NODE_TLS_REJECT_UNAUTHORIZED to the env block so the bridge accepts the local certificate. The claude_desktop_config.json file should contain the following:
{
  "mcpServers": {
    "woocommerce-mcp": {
      "command": "/path/to/node22/bin/npx",
      "args": ["-y", "@automattic/mcp-wordpress-remote"],
      "env": {
        "WP_API_URL": "https://yourstore.local/wp-json/woocommerce/mcp",
        "CUSTOM_HEADERS": "{\"X-MCP-API-Key\": \"ck_yourkey:cs_yoursecret\"}",
        "NODE_TLS_REJECT_UNAUTHORIZED": "0"
      }
    }
  }
}
Save, restart Claude Desktop, and verify. The Connection tab generates this local variant for you when you pick the local environment, including the Node 22 reminder.
Developer note: Only use the insecure transport filter and NODE_TLS_REJECT_UNAUTHORIZED on a local development site. Never set them on a public store. They tell the connection to skip certificate checks, which is unsafe over the open internet.
Connect Claude.ai in the browser to a public site
↑ Back to topIf you use Claude in your web browser at claude.ai rather than the desktop app, Claude connects to your store as a custom connector over SSE. There is nothing to install, but it needs a paid Claude plan (Pro, Max, Team, or Enterprise) that supports custom connectors, and it works for public sites only, because Claude’s servers cannot reach a local address.
Claude’s remote connectors cannot send a custom header, so this method uses a connector URL with a revocable token rather than the X-MCP-API-Key header.
- In WooCommerce > Settings > MCP > Connection, choose Claude, create an API key, and open the Claude.ai (web browser) tab. The tab shows the connector name and a generated connector URL, each with a copy button. The URL ends in
/wp-json/w7s-mcp/v1/claude/ssewith a token attached.
If you navigate away before saving the URL, you do not have to create a new key to get it back. Return to the Connection tab and choose Claude again, and the URL is shown ready to copy, or find the key in the Manage API Keys list and use Copy URL for Claude in its Actions menu.
2. In Claude, go to Settings > Connectors and add a custom connector.
3. Paste the connector name (woocommerce-mcp) into the name field and the connector URL into the URL field. Leave the OAuth fields blank.
4. Save the connector and enable it in a chat.
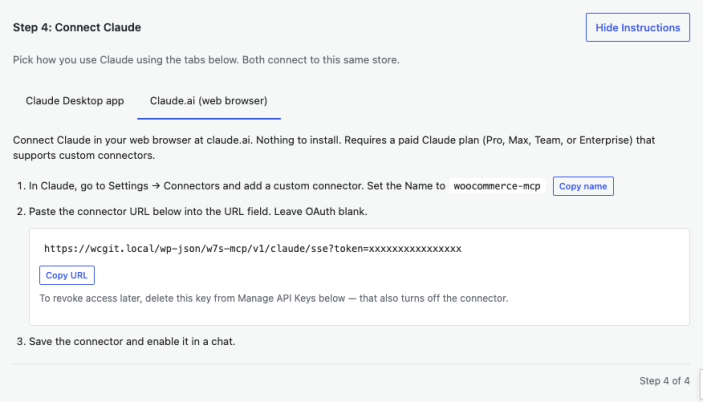
The token in the URL is revocable and separate from your raw API key. To revoke access later — or if the token is ever exposed — open the Manage API Keys list on the Connection tab and use that key’s Actions menu: Disconnect URL switches it off, Regenerate URL replaces it with a new one, and Revoke key removes the key entirely. All three affect only that one key, so other people’s connectors keep working.
Because each URL belongs to a single API key, several people can each connect their own Claude.ai account to the same store. See Giving each person their own connection.
Giving each person their own connection
↑ Back to topIf more than one person uses an AI assistant with your store, give each of them their own API key rather than sharing one connection. Every key carries its own connector URL, so the people on your team connect independently.
To set someone up, create an API key for them in the connection steps, choose the permission their job needs, and hand them the connector URL that appears with it. Repeat for the next person. Every key keeps its URL in the Manage API Keys list, in that key’s Actions menu, where you can copy, regenerate, or disconnect it later.
Doing it this way rather than sharing one URL gives you three things:
- Separate permissions. A support agent can have a read/write key while a bookkeeper has a read-only one. The permission travels with the URL, so a read-only key cannot make changes no matter how a request is phrased.
- A usable audit trail. Action log entries record the user behind the key, so you can see who asked for what. With a shared URL, every action looks the same.
- Individual revocation. When someone leaves, revoke their key. Their connection stops and nobody else is interrupted. Regenerating one person’s URL is equally contained.
Anyone can paste the same URL into more than one place if they want to, and a URL is not tied to a particular Claude.ai account — treat it as a credential belonging to the key it came from.
Connect the ChatGPT app to a public site
↑ Back to topThis is the route to use if you want ChatGPT to create and update things in your store. ChatGPT speaks MCP to your site directly, so it receives every tool you have switched on. There is no schema to import and no 30-tool cap.
- On the Connection tab, select the public environment, choose ChatGPT, and create a Read/Write API key. A read key cannot create or update anything.
- Open the ChatGPT app tab in the connect step. It shows the endpoint and copy buttons for everything below.
- In ChatGPT, open Settings > Plugins > MCPs > Add > Add MCP Server.
- Set the server type to Streamable HTTP.
- Paste the endpoint into URL. It ends in
/wp-json/w7s-mcp/v1/claude/sse. The wordclaudein the path is historical: the endpoint is not Claude specific and ChatGPT uses it as it is. - Under Headers, add a header named
X-MCP-API-Keyand set its value to yourconsumer_key:consumer_secret. Leave Bearer token env var and Headers from environment variables empty. - Click Save, then check the server is switched on in the MCPs list.
The API key is shown once, when it is created. If you no longer have it, create a new one on the Connection tab.
To revoke access, delete the key from Manage API Keys. That turns off its connector URL at the same time.
One thing this route cannot do is take a photo you attached in a ChatGPT conversation and put it in your Media Library — ChatGPT would have to transcribe the whole file as text and gives up early. Host the images somewhere with a web address and use Upload image from URL instead.
Connect a Custom GPT to a public site
↑ Back to topA Custom GPT connects through an OpenAPI schema that it imports from a URL. Unlike the app connector above, a Custom GPT can use at most 30 tools, and refuses to import a schema listing more than that. The schema is therefore always capped at 30, so the import works whatever your store has enabled — but the 30 it keeps are simply the first 30 in tool order. Open the Tool Packs tab after switching to ChatGPT, pick the 30 you want, and press Save Changes.
ChatGPT also allows only one action per domain in a single GPT. If the import fails with “Cannot have multiple custom actions for the same domain”, delete the existing action for your site from that GPT before adding the new one.
- On the Connection tab, select the public environment, choose ChatGPT, and open the Custom GPT tab in the connect step. It shows the setup steps and an import URL.
- The import URL ends in
/wp-json/w7s-mcp/v1/chatgpt/openapi.jsonand carries a short-lived, revocable token in the query string. ChatGPT does not send the custom header when it fetches the schema, which is why the token is in the URL. In ChatGPT, create a GPT, add an action, use Import from URL, and paste it in. - For the authentication header, set the custom header name to
X-MCP-API-Keyand the key value to yourconsumer_key:consumer_secret. The Connection tab has copy buttons for both.
Because the import URL carries a token rather than your key, the key itself never appears in a URL. To see it again later, return to the Connection tab, choose ChatGPT, and open the Custom GPT tab: the setup steps and the import URL reappear. You can also copy it from any key’s Actions menu in Manage API Keys. Either way, you never need a new key to retrieve it.
Each API key has its own token, which covers both that key’s Custom GPT import URL and its MCP connector URL, so those two change together if you regenerate. Both are offered in the key’s Actions menu in Manage API Keys, whichever assistant you created it for. Other keys are never affected: creating a key, or regenerating one key’s URL, leaves everyone else’s connection working.
If the actions import fine but a test call shows the Allow prompt and then nothing happens, the schema and the key are not the problem. Something in front of WordPress is turning ChatGPT away. See Requests blocked by Cloudflare or your host.
Connect a Custom GPT to a local site
↑ Back to topChatGPT cannot reach localhost, which rules out the app connector on a local site, so you run the plugin’s bridge locally and expose it through a tunnel. This bridge is a small Node server bundled with the plugin, separate from the Claude Desktop bridge.
- Open a terminal and change into the plugin folder, for example
wp-content/plugins/w7s-mcp/. - The first time only, install dependencies with
npm install. This needs Node.js installed on your computer already. - Set your endpoint and key, then start the bridge. It listens on port 3333. Leave this window open.
On macOS or Linux:
export W7S_MCP_URL="https://yourstore.local/wp-json/woocommerce/mcp"
export W7S_MCP_API_KEY="ck_yourkey:cs_yoursecret"
npm run chatgpt
On Windows (PowerShell):
$env:W7S_MCP_URL="https://yourstore.local/wp-json/woocommerce/mcp"; $env:W7S_MCP_API_KEY="ck_yourkey:cs_yoursecret"; npm run chatgpt- In a second terminal, expose port 3333 with a tunnel. With ngrok installed and authenticated, run
ngrok http 3333and copy the HTTPS URL it shows, for examplehttps://abc123.ngrok-free.app. - Stop the bridge in the first terminal with Ctrl+C, then start it again with
BASE_URLset to your tunnel URL so the schema points at the public address:
export W7S_MCP_URL="https://yourstore.local/wp-json/woocommerce/mcp"
export W7S_MCP_API_KEY="ck_yourkey:cs_yoursecret"
export BASE_URL="https://abc123.ngrok-free.app"
npm run chatgpt- In ChatGPT, import the schema from your tunnel URL and set the header name to
X-MCP-API-Keyas in the public-site steps.
The tunnel URL changes each time you restart ngrok on the free plan, so you will re-import the schema when it changes.
Connect another AI service
↑ Back to topYou are not limited to Claude and ChatGPT. Choose Other AI service in the assistant step and the Connection tab shows three ready-to-copy endpoints that work with any MCP or OpenAPI 3.1 client — Gemini, Grok, Ollama, Cursor, Cline, Continue, Zed, n8n, Zapier, Make, or your own custom integration:
- MCP endpoint (Streamable HTTP / JSON-RPC). The WooCommerce MCP endpoint at
/wp-json/woocommerce/mcp, for MCP-aware clients such as Cursor, Cline, Continue, Zed, and agent frameworks that support remote MCP servers. - MCP over SSE (Claude-compatible). The SSE endpoint at
/wp-json/w7s-mcp/v1/claude/sse. Once you create an API key, the tab shows a connector URL with a revocable token, ready to paste into any SSE-compatible client that cannot send custom headers. The token belongs to that key, so you can issue a separate URL per client or per person and revoke one without disturbing the rest. - OpenAPI 3.1 schema. The schema at
/wp-json/w7s-mcp/v1/chatgpt/openapi.json, with a revocable token in the URL for the import step — ready to import into Grok, ChatGPT GPTs, n8n, Zapier, Make, Postman, or Open WebUI. The same per-key token works here.
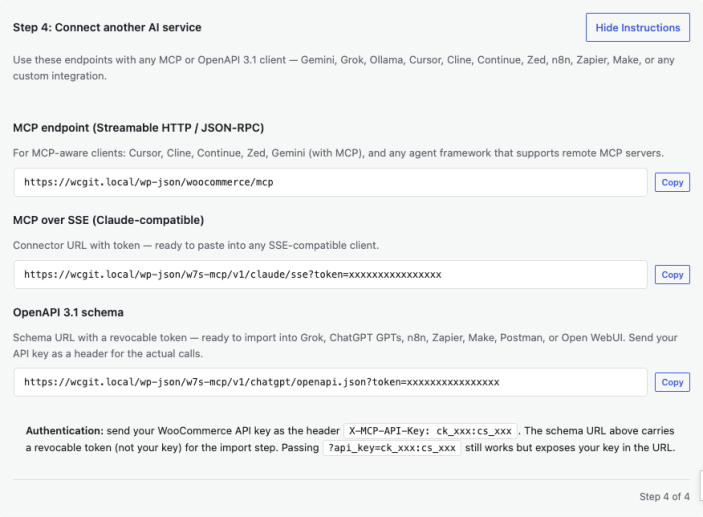
For authentication, send your WooCommerce API key as the header X-MCP-API-Key: ck_xxx:cs_xxx. The schema and connector URLs carry a revocable token (not your key) so you can share them with an import step safely. Passing ?api_key=ck_xxx:cs_xxx as a query parameter still works but exposes your key in the URL, so prefer the header.
The same rules apply as everywhere else. Only enabled tool packs are exposed, and the key’s read or write scope is enforced on every call.
Verify and troubleshoot
↑ Back to topThe Connection tab has a verify control for the active assistant, and the Site readiness section reports what your store can do, per AI service. Start there if something is not working: the group for the assistant you are connecting names what it found, and Copy for support hands the whole report to a ticket.
Common issues:
- No tools appear, or the server shows as failed in Claude Desktop after a manual setup. The bridge is running on Node.js older than 22. Set
commandto the full path of Node 22’snpx, as described in the manual setup steps. The one-click bundle does not have this problem, so consider switching to it. - A
404 rest_no_routeerror. TheWP_API_URLis set to your site root instead of the full endpoint. It must end in/wp-json/woocommerce/mcp. - A local connection is refused over HTTPS. The certificate is being rejected. On a local site, add the insecure transport filter and, for a manual setup,
NODE_TLS_REJECT_UNAUTHORIZED, as in the local Claude steps. Never do this on a public store. - Claude connects, but replies arrive all at once at the end, or the conversation appears to hang. Run Verify site readiness and read the Event streaming check in the Claude group. A warning there means this server buffers or compresses responses, which holds back the events Claude is waiting on. Ask your host to switch off PHP output buffering (
output_buffering),zlib.output_compression, and response compression for this site. - The connection seems to hold resources for a while. That is expected. The SSE stream keeps an open connection and a PHP worker for the length of a session, up to about an hour. On constrained shared hosting, account for this when sizing PHP workers.
- A token or bundle was exposed. Open the Manage API Keys list on the Connection tab and act on that key alone from its Actions menu: Regenerate URL replaces it, Disconnect URL switches the URL off while the key still works as a header, and Revoke key removes both. Everyone else’s connection keeps working. Deactivating the plugin clears every stored connector credential.
- Opening a connector URL in a browser shows a message instead of connecting. That is expected, and it is the URL working correctly. The SSE endpoint is a stream for an AI client to hold open, not a page to visit, so a browser GET is answered with a short explanation telling you to paste the URL into your assistant’s connector settings. The reply is deliberately identical whether the token in the URL is valid, expired, or missing, so it says nothing about whether the connector still works — check that from the Connection tab instead.
- The connector URL was lost. You do not need a new key. Either return to WooCommerce > Settings > MCP > Connection and pick the assistant you set up, or find the key in the Manage API Keys list and copy its URL from the Actions menu.
- The assistant asks for approval, you approve, and then nothing happens. No answer, no error you can act on, and nothing in the Logs tab. That combination usually means the request never reached WordPress, and the most common reason is an AI bot blocking rule at your CDN or host. See Requests blocked by Cloudflare or your host.
- Claude.ai refuses to add the connector with an authorization or token error, while ChatGPT and the Claude Desktop app work. Another plugin on the site is publishing an OAuth server that Claude finds first. See Another plugin publishes an OAuth server for your site.
Requests blocked by Cloudflare or your host
↑ Back to topCloudflare and several hosting panels now offer a one-click setting that blocks AI bots. It is a reasonable way to keep training crawlers out of your content, but it cannot tell the difference between a crawler scraping your site and an assistant you connected on purpose. ChatGPT sends its action requests with the user agent ChatGPT-User, and a blanket block turns those away along with crawlers like GPTBot. Anthropic uses a similar Claude-User agent for requests made on your behalf, so a Claude connector can be caught the same way. Security plugins and hosting firewalls have started shipping the same kind of rule.
Because the block happens before the request reaches WordPress, the plugin never sees the call. The assistant shows its usual approval prompt, the call quietly fails, and the Logs tab stays empty. An approval prompt with no log entry is the signature of a block in front of your site rather than a problem with the plugin, your API key, or your schema.
To check, run this from any terminal, using your own domain and key:
curl -i -X POST \
  -H "Content-Type: application/json" \
  -H "X-MCP-API-Key: ck_yourkey:cs_yoursecret" \
  -H "User-Agent: ChatGPT-User/1.0; +https://openai.com/bot" \
  -d '{}' \
  https://yourstore.com/wp-json/w7s-mcp/v1/chatgpt/tools/woocommerce-orders-list
A JSON response means the request reached WordPress and the plugin answered, so the block is not your problem. A 403 with a short block message, or an HTML challenge page, means something in front of your site refused it. Run the same command again with the User-Agent line removed: if that one gets through, the rule is matching on the agent name and you have your answer.
To fix it in Cloudflare, open Security > Bots and turn off Block AI Scrapers and Crawlers. If you would rather keep the protection on, leave it enabled and add a WAF custom rule that skips it for your MCP paths only:
(http.user_agent contains "ChatGPT-User" and starts_with(http.request.uri.path, "/wp-json/w7s-mcp/"))Set the action to Skip, and skip the remaining custom rules along with bot protection. Training crawlers stay blocked everywhere else, so your content is still protected while your own assistant keeps working. Use Claude-User in place of ChatGPT-User for a Claude connector, or match on both.
If someone else manages your firewall, ask them to allow the ChatGPT-User agent on the /wp-json/w7s-mcp/ paths. OpenAI publishes the address ranges that agent calls from in its bot documentation, if your host prefers to allow by IP address instead. If you run a security plugin with its own bot blocking, check there too.
Another plugin publishes an OAuth server for your site
↑ Back to topThis one shows up as Claude.ai refusing to add the connector, with an authorization failure or a token exchange error, while ChatGPT and the Claude Desktop app keep working. The Logs tab stays empty, because the connection fails before any request reaches this plugin.
MCP for WooCommerce does not use OAuth. That is deliberate: the connector URL carries a revocable token so Claude can connect with no authorization step at all. But before Claude.ai connects, it checks your site address for an OAuth server, at /.well-known/oauth-authorization-server. If another plugin publishes one there, Claude authorizes against that instead, and the attempt fails, because that server belongs to a different endpoint and does not know Claude. This happens most often when a second MCP plugin is installed alongside this one.
Verify site readiness on the Connection tab checks for this. The OAuth discovery row in the Claude group warns when it finds one, and names the endpoint it belongs to. You can also check by hand: open https://yoursite.com/.well-known/oauth-authorization-server in a browser. Your 404 page means nothing is published and this is not your problem. A block of JSON with issuer and token_endpoint in it means something is, and https://yoursite.com/.well-known/oauth-protected-resource will usually name the endpoint it belongs to.
You have three ways out:
- Use the Claude Desktop app instead. The one-click bundle from the Connection tab avoids the whole issue. The desktop app runs a small bridge on your own computer that sends your API key as a header, so there is no connector URL, no token, and no OAuth discovery for another plugin to capture. This is the quickest fix if the desktop app suits you.
- Deactivate the other MCP plugin, if you are not using it. Claude.ai then finds no OAuth server, and the connector URL works as an authless connector the way it is meant to.
- Keep both and accept the limit. Discovery happens at the site address, not per endpoint, so two MCP plugins cannot both offer connectors on one domain when one of them publishes an OAuth server. Use Claude Desktop for this plugin, or run the other plugin on a different site.
ChatGPT is unaffected either way, since it authenticates with a header and never performs OAuth discovery.
Tool Packs settings
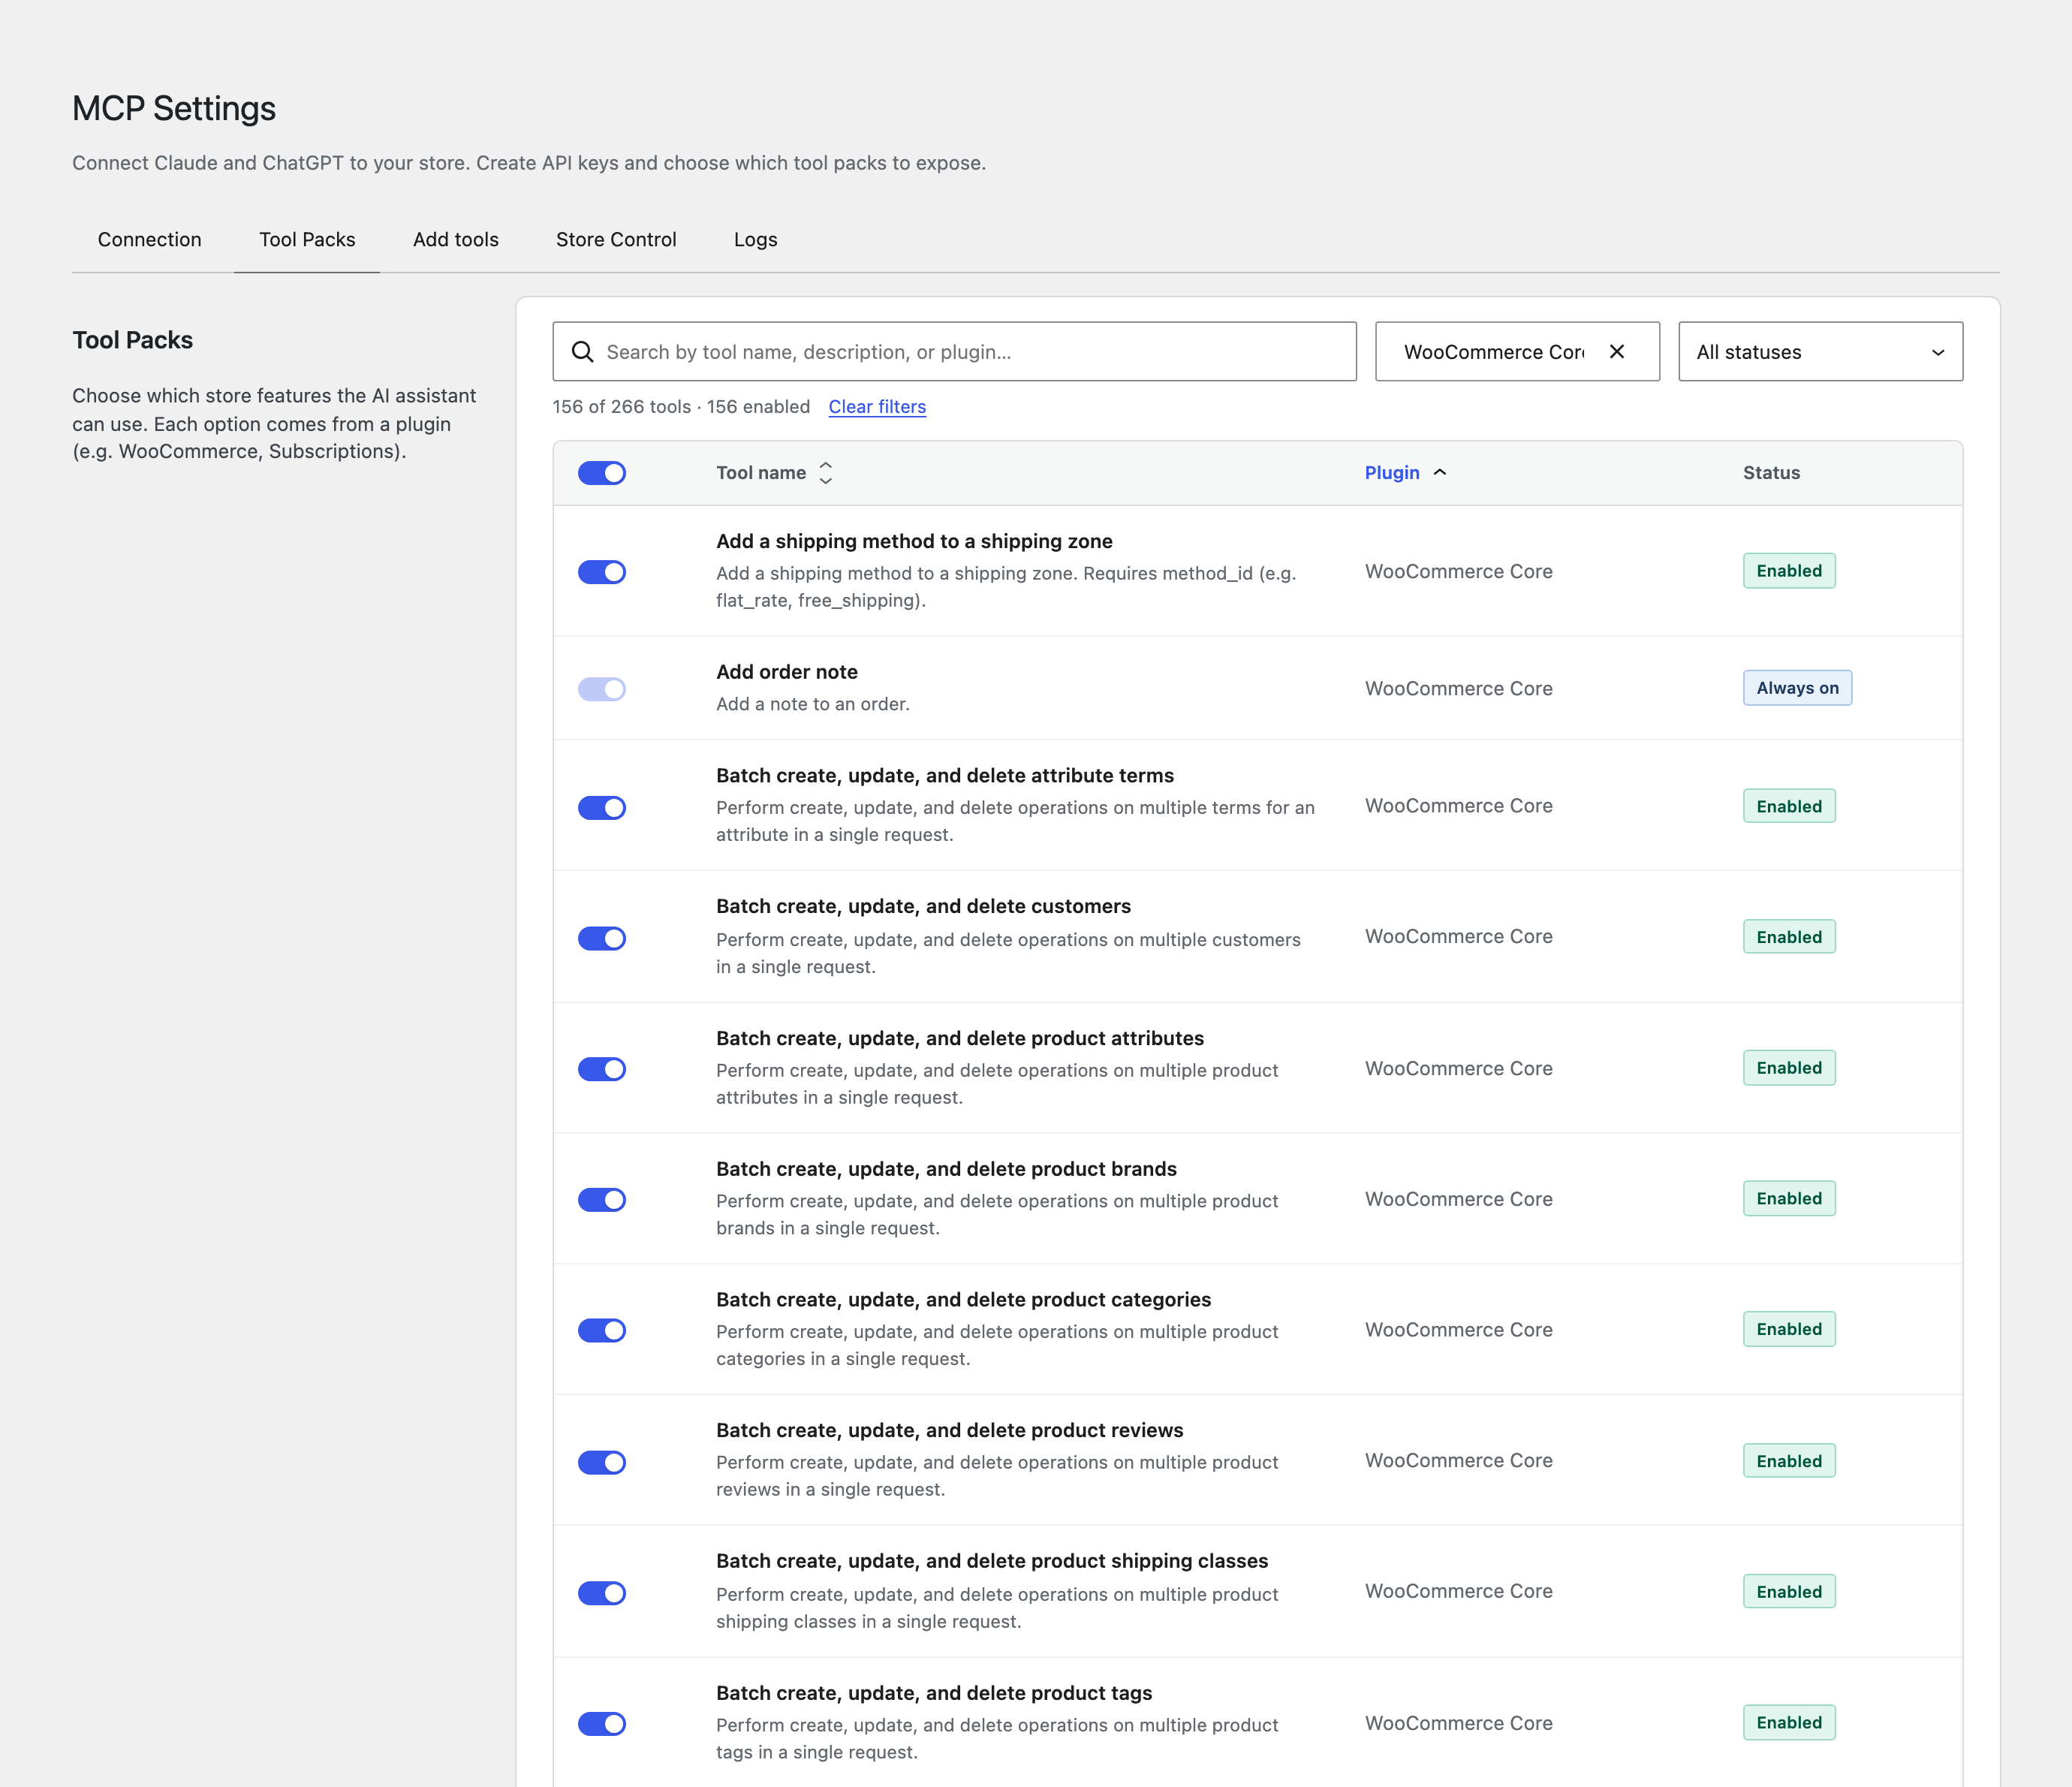
↑ Back to topA tool pack is a group of related abilities, such as everything to do with orders or everything to do with products. The Tool Packs tab lists the available packs and abilities, each with a toggle, plus a select all/deselect all control in the header for bulk changes.
Only enabled packs are exposed to AI clients. This is the main control for deciding what an assistant can and cannot touch. A disabled pack is invisible to the assistant, and the restriction is enforced when a tool runs, not just hidden from the tool list, so a disabled pack cannot be called even if an assistant knows its name.
One group is not gated this way. WooCommerce’s own product and order tools — list, search, get, create, update, and delete a product; list, search, get, create, and update an order; change an order’s status; add an order note — belong to the WooCommerce MCP endpoint itself. They are listed on the tab under WooCommerce Core so you can see them, but they have no toggle and are available whenever the connector is on. The API key’s permission is what limits them, so use a read key when an assistant should not be able to change a product or an order.
Tools you have added from other plugins through the Add tools tab also appear here, listed with the plugin they come from, so everything an assistant can reach is visible in one place. Their toggles are managed on the Add tools tab.
If you are building a Custom GPT, keep an eye on the exposed count in the notice at the top of the tab: a Custom GPT can use at most 30 tools. That count includes the always-on WooCommerce Core tools and any tools added on the Add tools tab, because those take up the 30 slots too. When more than 30 are enabled, the tab trims the selection back to the limit — the tools already enabled come first, then the rest in category and name order — so check the survivors are the ones you want and press Save Changes. Until you save, the trim exists only on screen and the schema the GPT imports is unchanged. The cap and the trimming apply only to the Custom GPT route; the ChatGPT app connector and Claude get every tool you enable.
Add tools
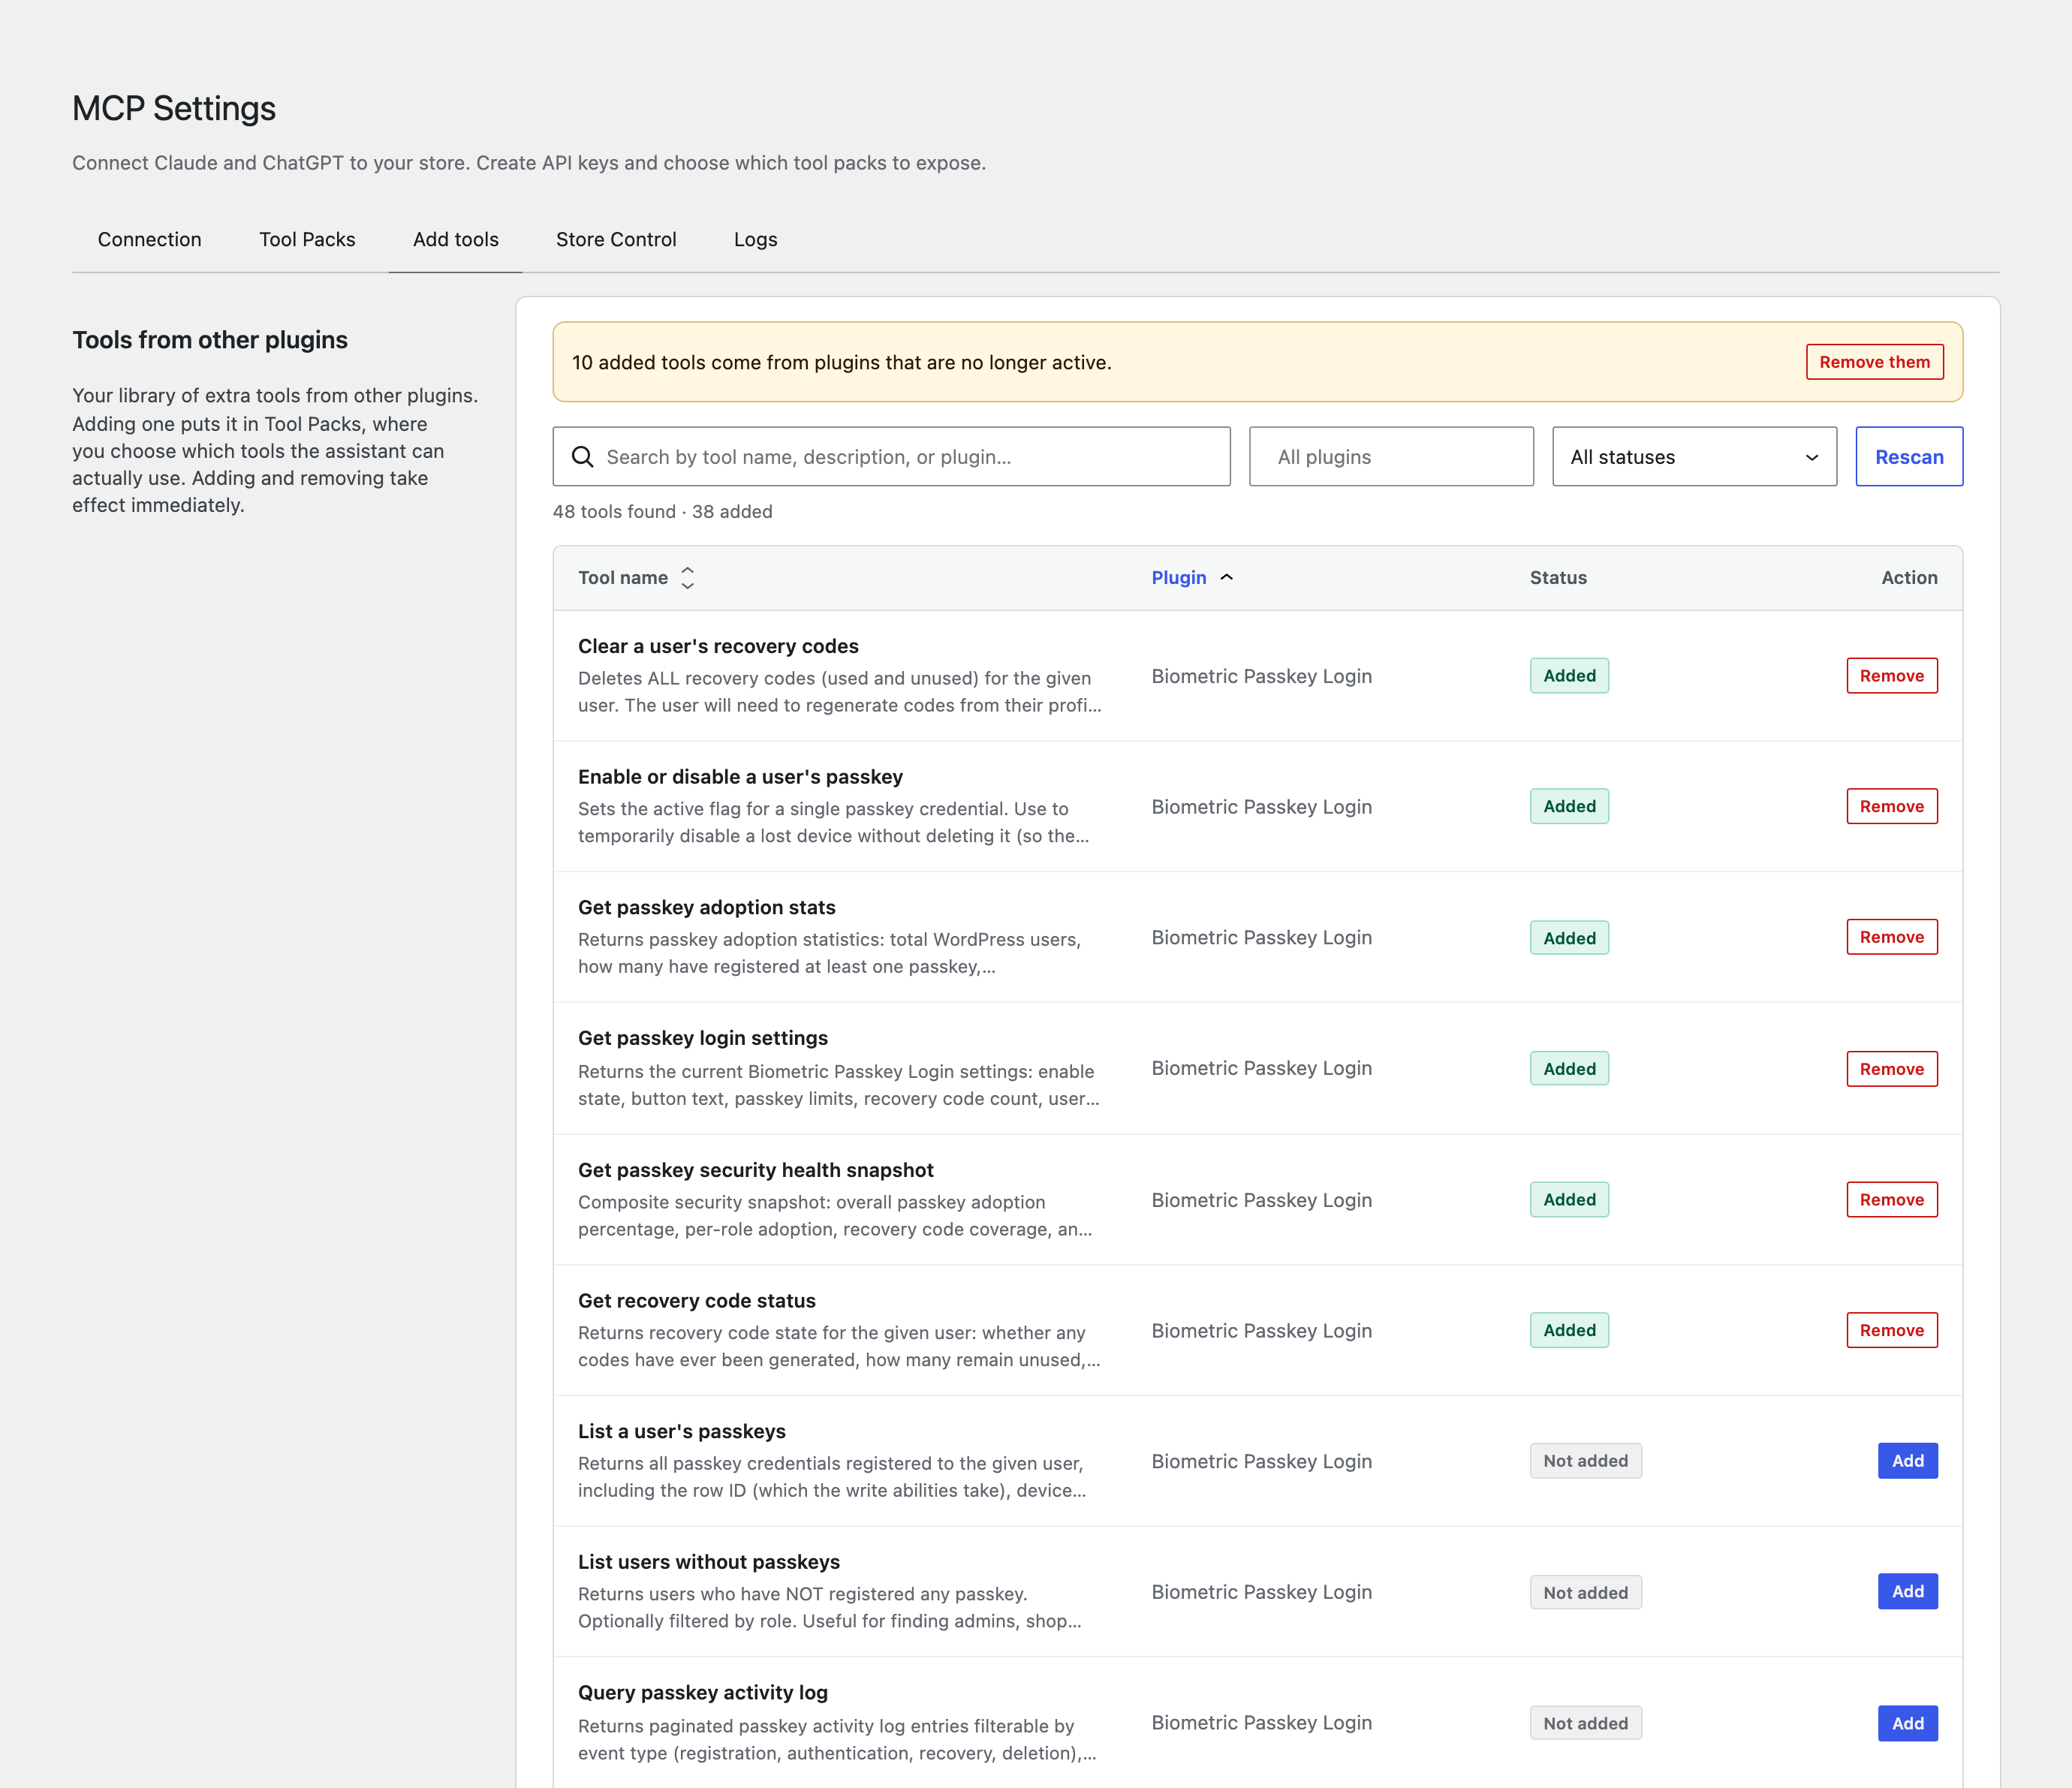
↑ Back to topOther plugins can offer extra tools for your assistant — for example, a subscriptions plugin offering subscription tools. The Add tools tab is where you find and manage them. Anything you add appears in Tool Packs and becomes available to the assistant. The tab is shown only while the MCP connector is enabled.
Find tools from other plugins. Select Find tools and the plugin scans your active plugins for extra tools the assistant can use. Discovered tools are listed under Available to add, grouped by the plugin they come from, each with an Add button.
Your added tools. Tools you have added are listed with an enable toggle and a remove control, grouped by their source plugin.
Unavailable tools. If a plugin that provided tools is deactivated or removed, its tools are flagged with an Unavailable badge and are no longer sent to the assistant. Reactivate the plugin to use them again, or clear them all at once with the Remove unavailable tools button.
Store Control
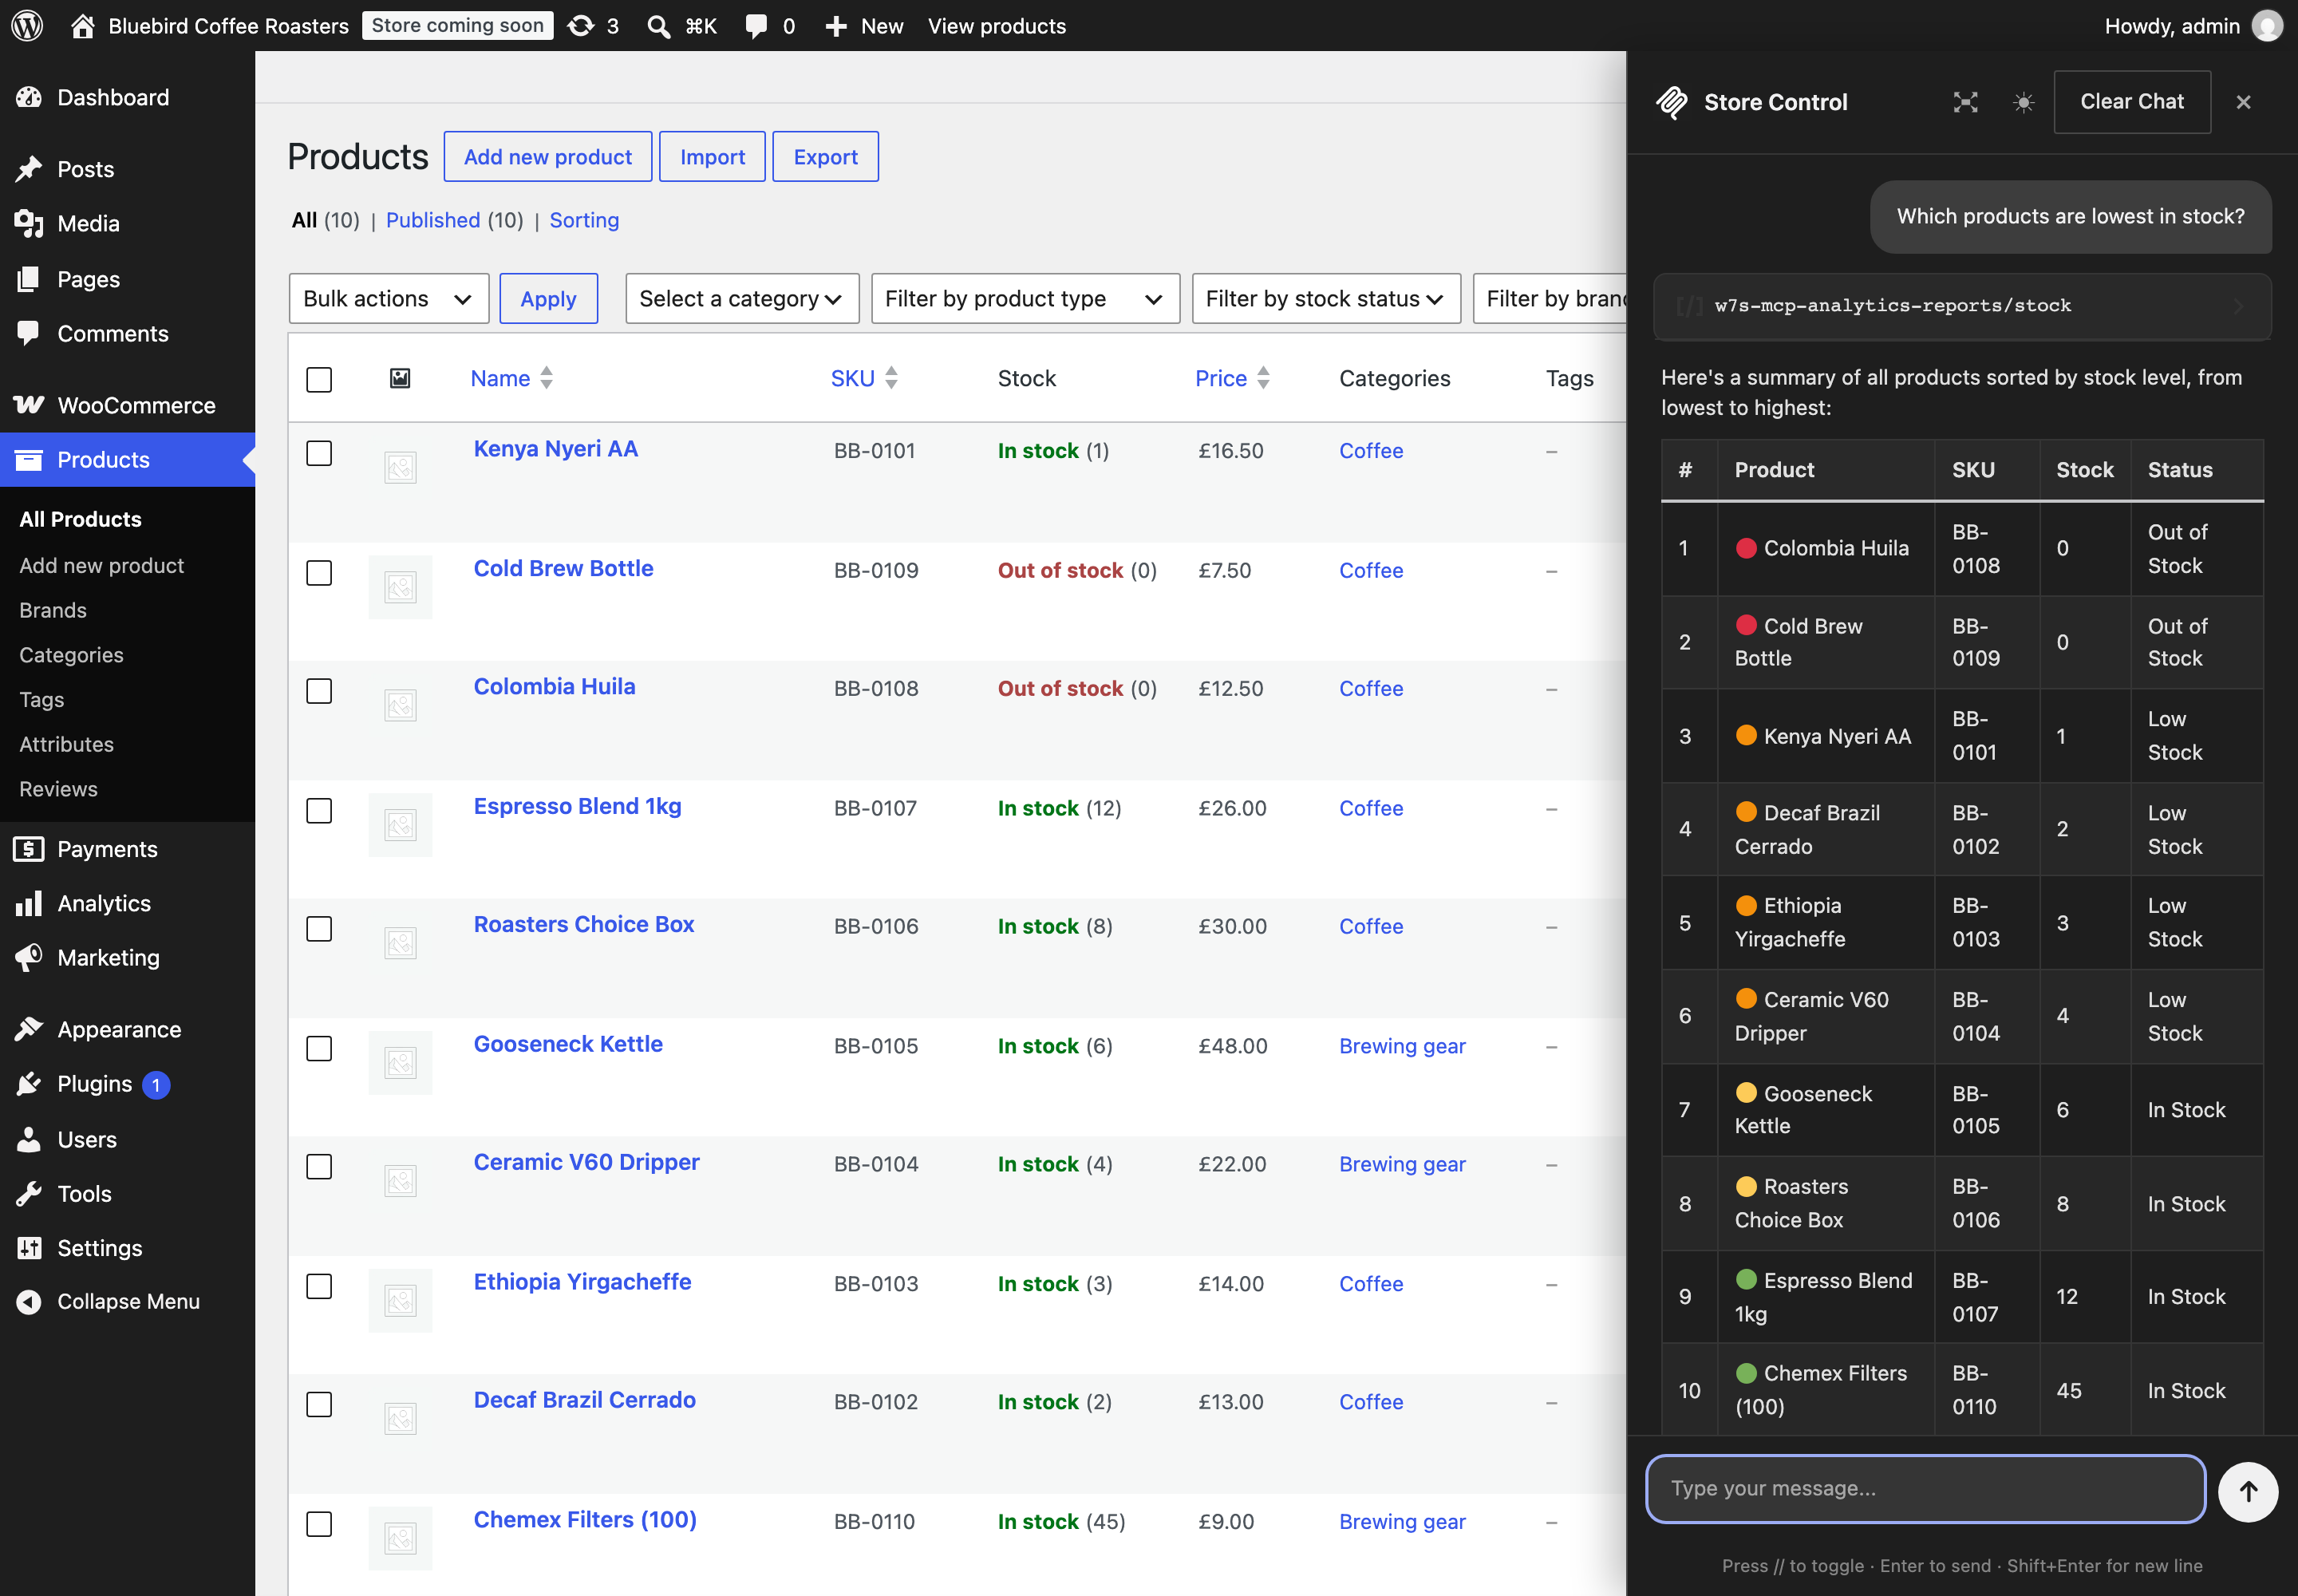
↑ Back to topStore Control is a chat window built into the WordPress Admin dashboard (WP Admin), so you can run MCP tools without leaving your store. Open it with the floating button in the corner of any admin page, or by typing // in an admin input field. It is handy for testing that your tools work and for quick day-to-day tasks.
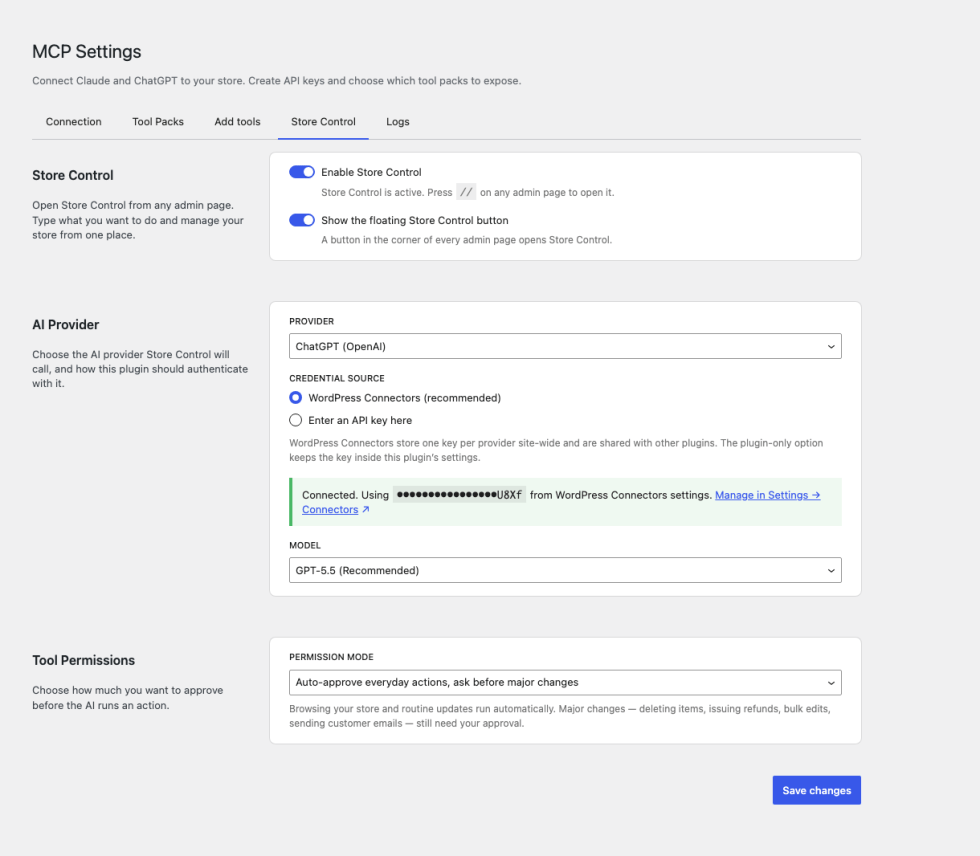
The Store Control tab holds its settings:
Enable Store Control. Turns the in-admin chat on or off.
Show the floating Store Control button. Choose whether the corner button appears on admin pages. When the button is hidden, the // shortcut still opens Store Control.
AI provider. Store Control calls out to an AI provider on your behalf, so it needs its own provider key — separate from the API keys that connect Claude Desktop or ChatGPT to your store. Choose Claude (Anthropic) or ChatGPT (OpenAI), then supply a key directly or, on WordPress 7.0 or higher, use a key stored site-wide in WordPress Connectors.
Model. Pick the model Store Control uses. For Claude: Claude Sonnet 5 (recommended), Claude Opus 5 (most capable), or Claude Haiku 4.5 (fastest). For ChatGPT: GPT-5.6 Sol (recommended), GPT-6 Astra (most capable), or GPT-5.6 Luna (fastest).
Tool permissions. Choose how much you want to approve before the AI runs an action: ask before every action; auto-approve everyday actions but ask before major changes such as deletes, refunds, and bulk edits; or auto-approve everything. Full auto-approve asks you to type a confirmation before it can be enabled.
Save your choices with the Save changes button. The Tool Packs and key scope rules still apply, so Store Control sees exactly the same abilities you have enabled everywhere else.
Logs
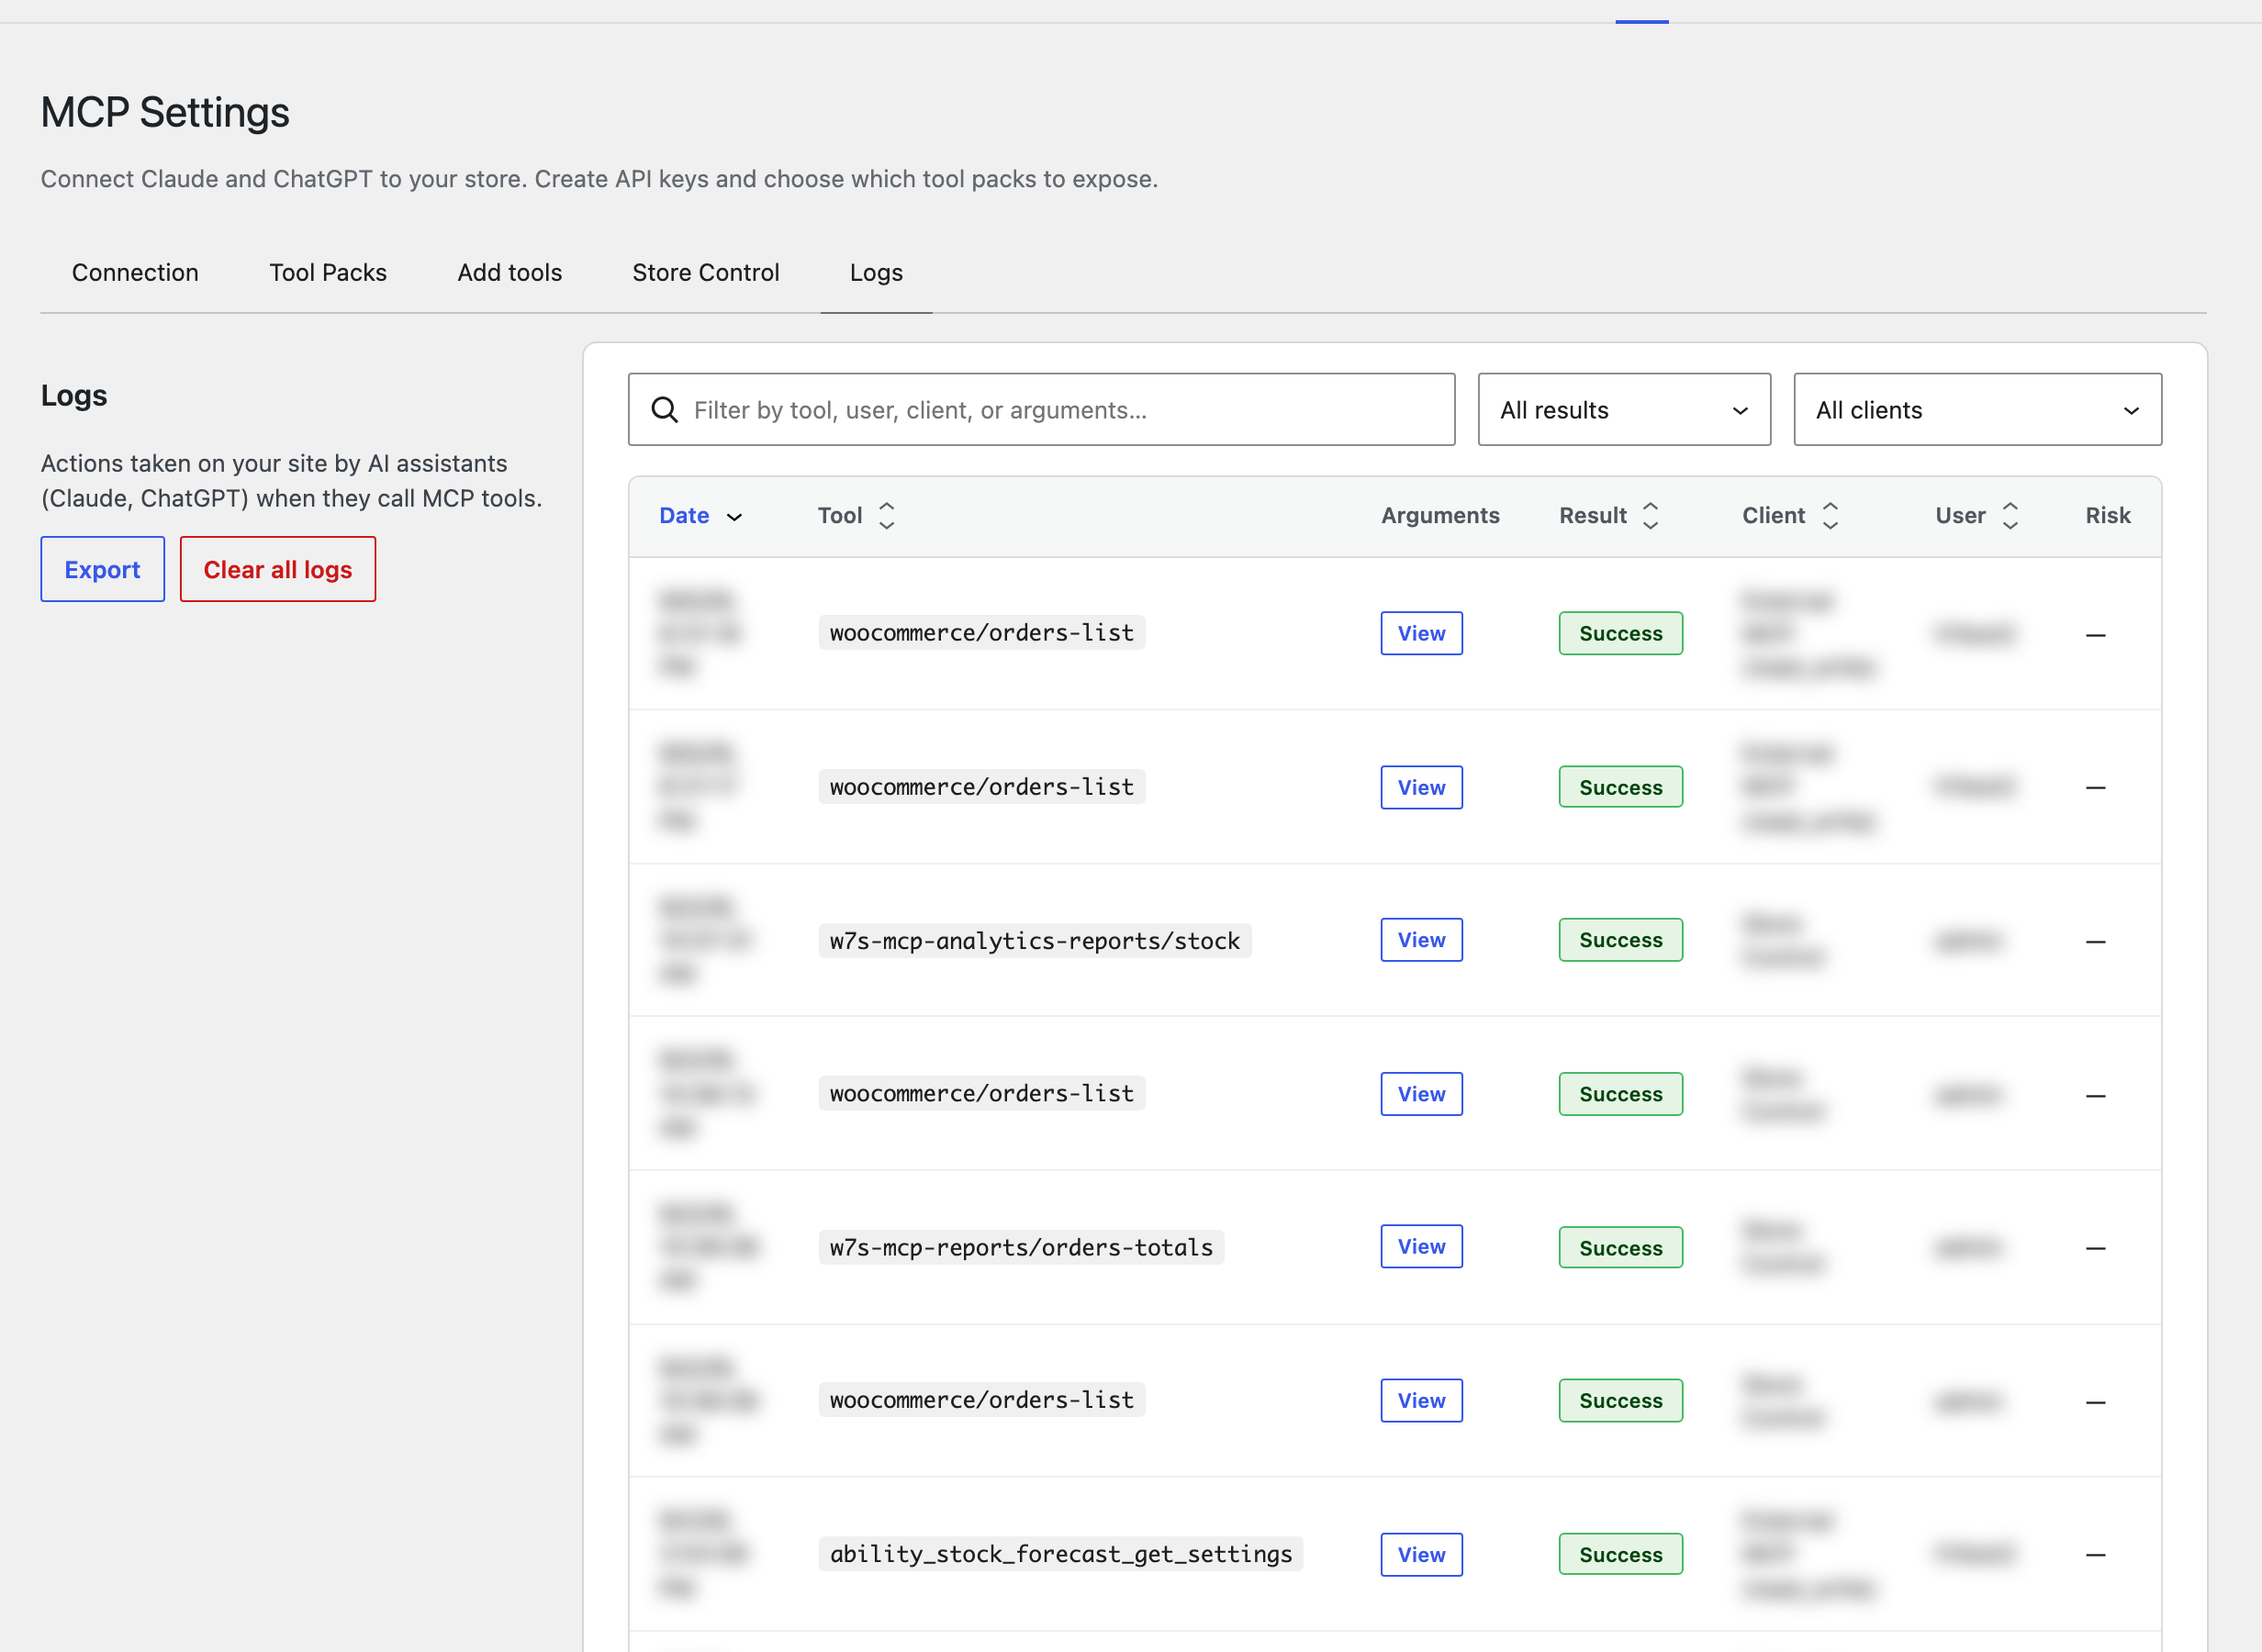
↑ Back to topWhen action logging is enabled on the Connection tab, the Logs tab shows a record of MCP tool calls: the date, the tool, the result, and the client and user behind each one. Search across tools, users, clients, and arguments, filter by result and by client, and sort by date, tool, result, client, or user. Export saves the log to a file and Clear all logs empties it. On small screens, the log rows collapse into stacked cards so they stay readable.
Every call is recorded, not only the ones that worked. An entry is marked success when the tool returned a result, error when the call ran and failed (including a tool that reported its own failure, such as an order that does not exist), and denied when the credentials were rejected before the tool ran. Rejected requests are recorded at most once a minute per assistant, since those endpoints can be reached without a valid key and an entry per attempt would fill the log.
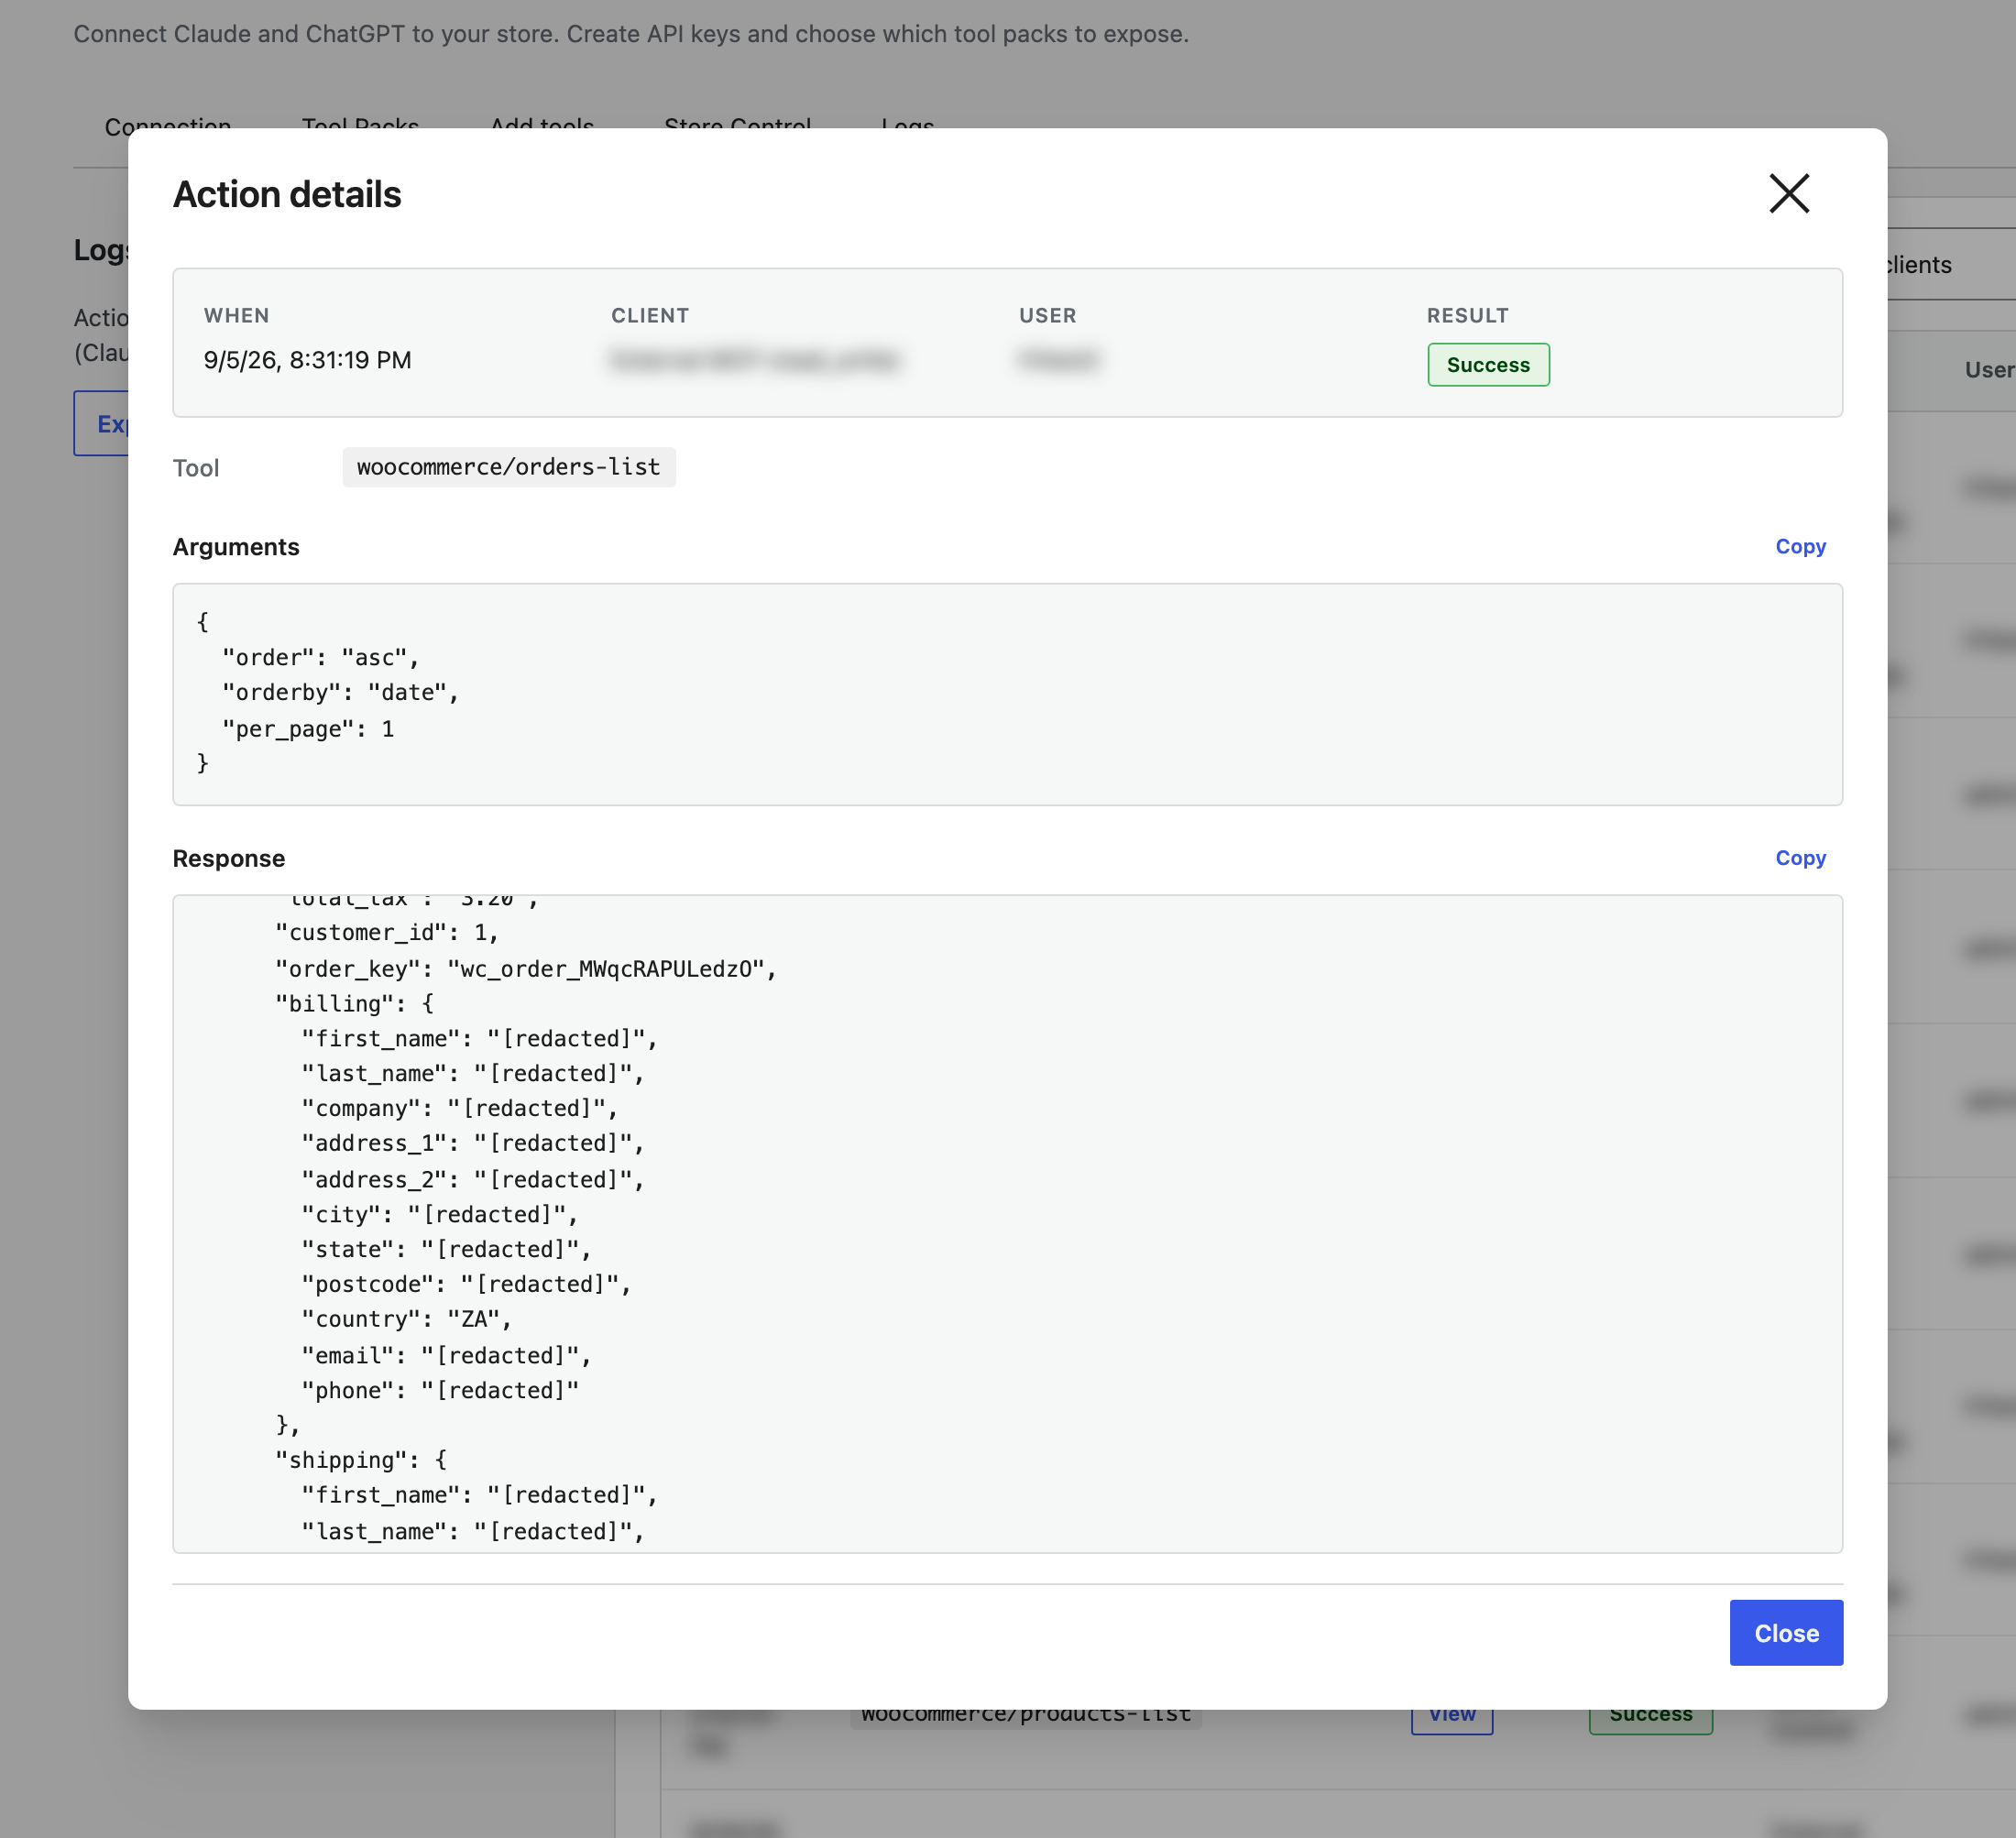
Action details
↑ Back to topView in the Arguments column opens the full record of one call: when it ran, the client and user behind it, the result, the tool that was called, how long it took, and whether that tool counts as a major change. Below the summary sit the two payloads — the arguments the assistant sent, and the response your store sent back — each with its own Copy button.
The response is what tells you whether a call did what the assistant said it did. A tool that fails on its own terms still answers, so “the assistant reported success” and “the tool succeeded” are two different claims, and only the response settles which one you have.
A long response is cut so a single call cannot bloat the log table. When that happens the entry says so and gives the real length, so a trimmed response is never mistaken for the whole answer. Entries recorded before your store updated have no response stored and show nothing in that section; run the call again to get one.
Exporting the log
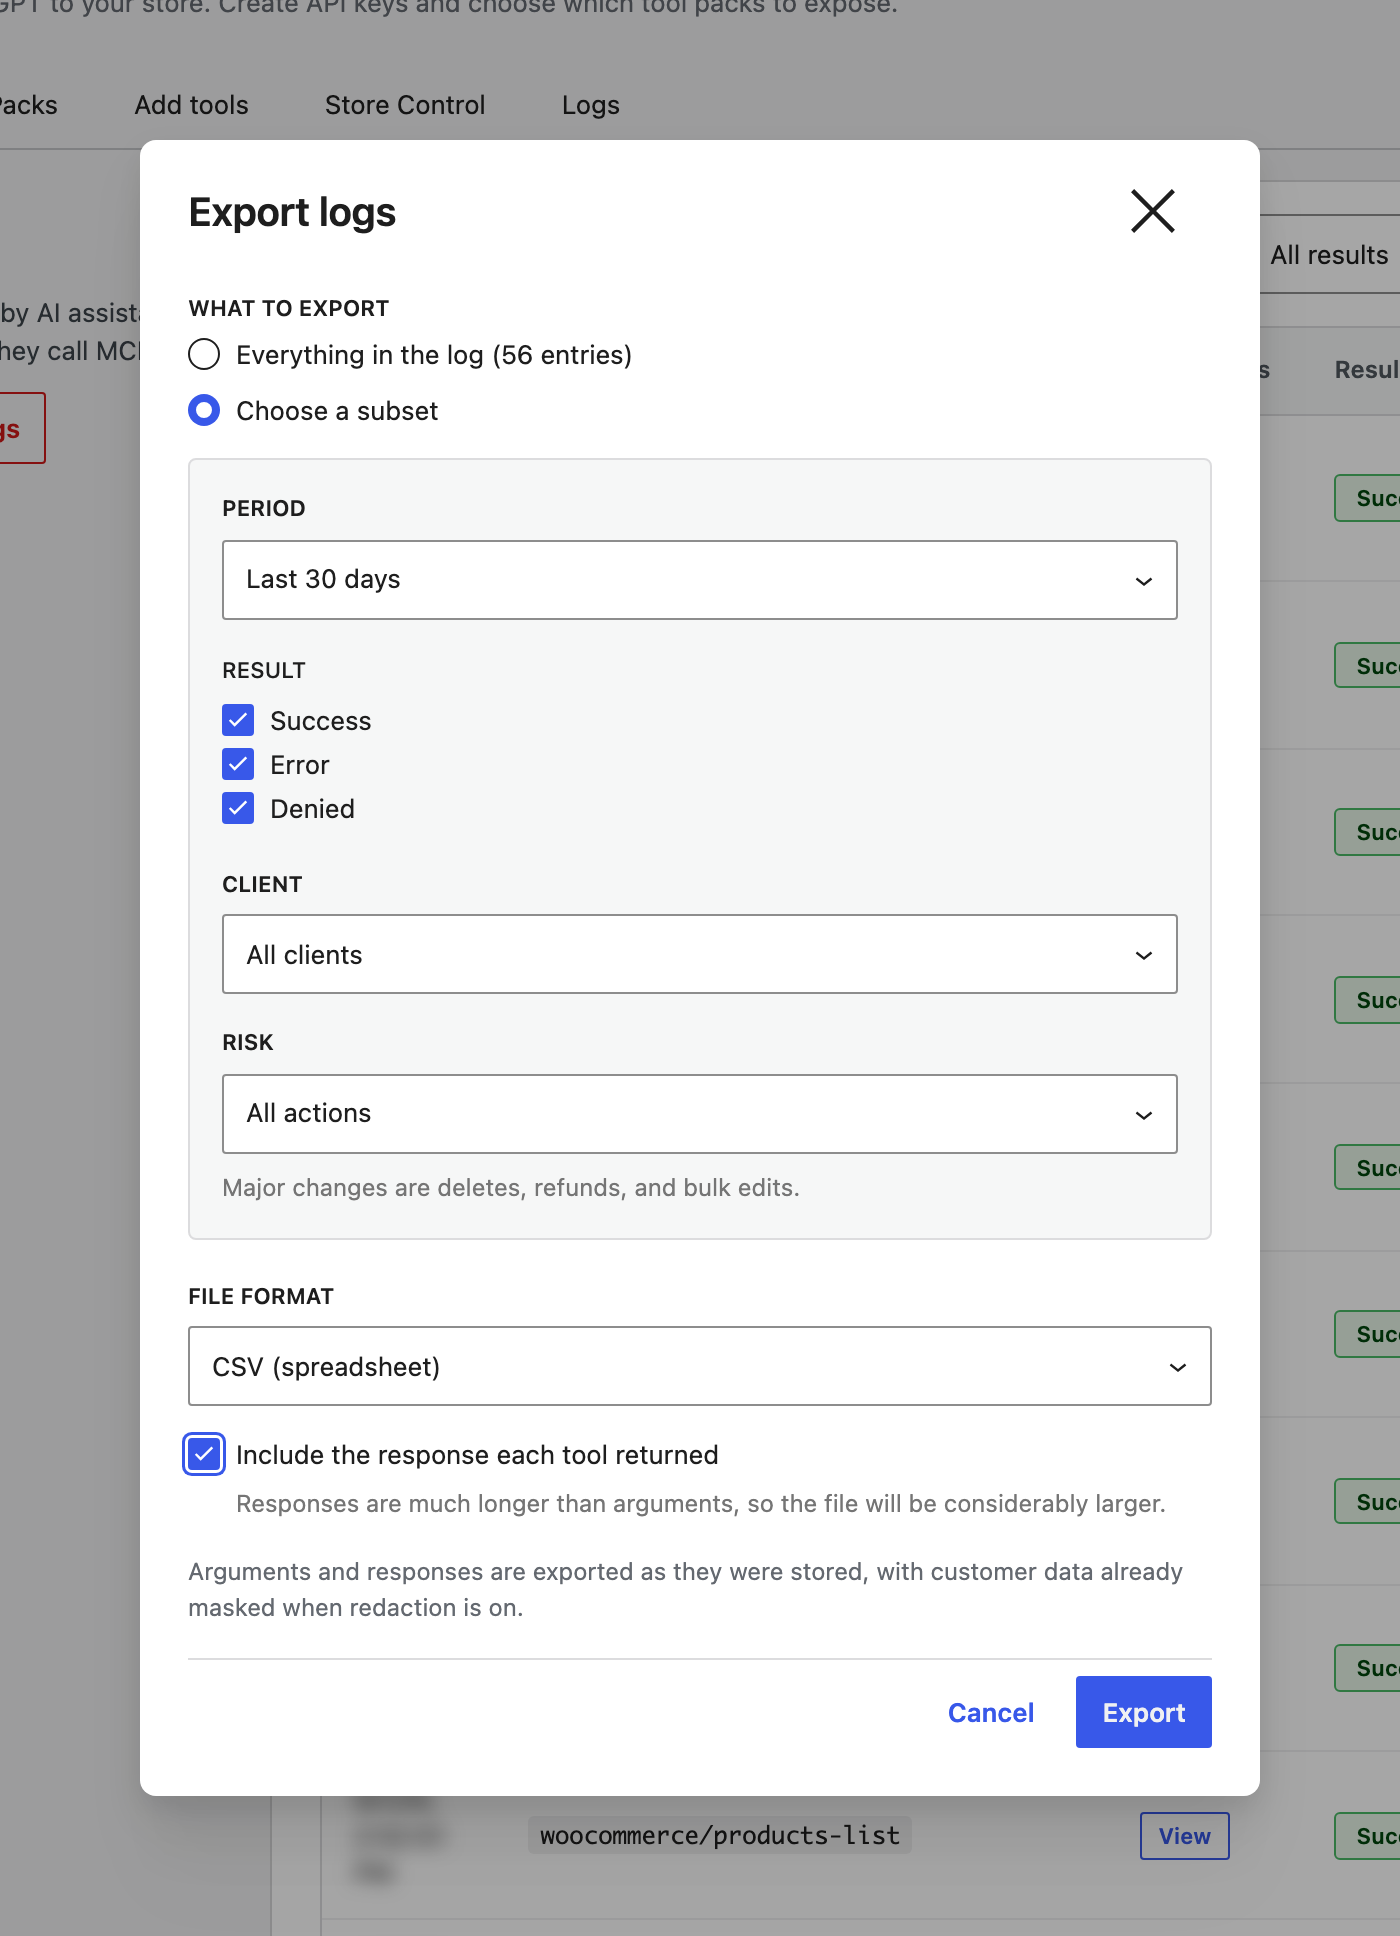
↑ Back to topExport opens a dialog for saving the log as a file — for handing a period to an accountant or an auditor, or for opening a busy stretch in a spreadsheet. Start by choosing what to export:
- Everything in the log, however the table is filtered on screen.
- What the Logs tab is showing now, offered when a search or a filter is active, so you can narrow the table first and export exactly what you are looking at.
- Choose a subset, which opens filters of its own: a period (any time, today, the last 7, 30, or 90 days, or a custom date range), which results to include, a single client, and a risk level — all actions, major changes only, or everyday actions only.
Then pick the format. CSV opens in any spreadsheet. JSON suits scripts and further processing. Include the response each tool returned is off by default, because responses run far longer than arguments and turn a small file into a large one.
Arguments and responses are written to the file exactly as they were stored, so customer data is already masked when redaction is on. One export stops at 50,000 rows and says so in the file itself, so narrow the period if your log is larger than that.
What is stored, and for how long
↑ Back to topLogged arguments and responses can both contain customer data, so the plugin redacts personally identifiable information (PII) by default. Fields such as emails, addresses, and phone numbers are masked before anything is written, in the response as well as in the arguments.
Old entries are deleted for you. A daily job removes anything older than Keep logs for (days) on the Connection tab, which defaults to 7 days and accepts anything from 1 to 365, so nothing has to be pruned by hand. That job runs on WordPress’s scheduled tasks, which fire on a visit to your site rather than at a fixed hour, so on a very quiet store the clear-out can lag behind the retention period until someone loads a page.
You can adjust redaction and retention, or turn logging off entirely, from the Connection tab. The Logs tab only appears when logging is enabled.
What the assistant can do
↑ Back to topOnce connected, and depending on which packs you enable and which WooCommerce extensions you run, an assistant can work with:
- Orders – list, search, create, and update orders, change an order’s status, run order actions, and manage order notes. There is no delete-order tool.
- Products – list, search, create, update, and delete products, plus variations, attributes, categories, tags, shipping classes, custom fields, and reviews.
- Customers – list, create, update, and delete customers, and retrieve customer downloads.
- Coupons – list, create, update, and delete, when WooCommerce coupons are enabled.
- Refunds – create, list, get, and delete order refunds.
- Tax – manage tax rates and tax classes.
- Shipping – manage shipping zones, their locations, and their methods.
- Payments – view and adjust payment gateway settings.
- Webhooks – list, create, update, and delete webhooks.
- Reports and Analytics – read WooCommerce reports and Analytics report types.
- Emails – list WooCommerce emails and enable or disable individual ones.
- System status – read store environment and system status, and run system status tools.
- WordPress site and content – posts, pages, comments, media, categories, tags, taxonomies and terms, menus, users, post meta, user meta, revisions, post types, options, settings, site health, and installed plugins and themes. These packs reach beyond the store, so they are off until you enable them, and writes through them are held to allowlists — see Write allowlists and upload guardrails.
Some abilities need the matching WooCommerce extension installed and active, including WooCommerce Subscriptions, WooCommerce Bookings, WooCommerce Memberships, Product Brands, and Cost of Goods Sold. Other plugins can also offer tools of their own, which you add from the Add tools tab.
Use cases
↑ Back to topThese are real situations a store runs into, and the setup in MCP for WooCommerce that handles each one. Every scenario uses abilities the plugin actually ships. Read them as practical recipes. Pick the few that match how you work and start there.
A note on safety before the scenarios. Two controls do the heavy lifting in almost every setup below. The first is the permission scope on your API key. A read key cannot write, and that is enforced when a tool runs, not just hidden from the assistant’s tool list. The second is Tool Packs. Only the packs you enable are exposed, and a disabled pack will not run even if the assistant tries to call it. You can expand any pack to see its individual abilities and switch off the ones you do not want, so you can keep list, get, and update on while turning delete off. WooCommerce’s own product and order tools are the exception: they have no toggle and are always available, so the key’s permission is the only thing limiting them. Most of the safety in these scenarios comes from those two settings.
Answer the daily questions without touching anything
↑ Back to topYou start the morning wanting numbers. How many orders shipped yesterday. What sold best this week. Which products are about to run out of stock. You do not want to click through five admin screens, and you definitely do not want a tired 7am mistake changing live data.
Set up a read-only assistant. Create an API key with read permission, then enable the Reports and Analytics Reports packs and leave everything else off — WooCommerce’s own order and product tools are always available, and the read key keeps them read-only. Now you can ask in plain English and get an answer pulled straight from the store. The Analytics Reports pack returns summaries, not just rows, so “what was net revenue last month” or “show me my top ten products by sales” comes back as a total, not a spreadsheet you have to add up yourself.
The read key is the point. Even if you phrase something as a command, the assistant cannot change an order, edit a product, or refund a payment. The key is blocked from every write operation the moment a tool runs. You get the answers and none of the risk.
Close the month without exporting a single CSV
↑ Back to topMonth-end means revenue, tax collected, refunds, and margin. The usual routine is exporting reports, opening them in a spreadsheet, and reconciling by hand. It takes an afternoon and it is easy to fumble a number.
A read key with the Reports and Analytics Reports packs covers most of this. Ask for the revenue summary for the period, the tax summary, and the refund totals, and you get the aggregates back directly. If you run WooCommerce Cost of Goods Sold, the COGS abilities let you ask for margin on a product or an order, so “what was my gross margin on orders last month” is a question you can answer in chat instead of a formula you have to build.
Keep this assistant read-only. Nothing here needs to write, and a read key means your accountant or bookkeeper can use it without any chance of changing the books while they look at them.
Make a hundred catalog changes for a client and keep the receipts
↑ Back to topYou run an agency. A client wants a seasonal price change across a category, new tags on a product line, and a batch of variations updated before a launch. Doing it by hand in WP Admin is slow and error-prone, and when the client asks what changed, you want a clear answer.
Create a read/write key and enable the catalog packs: Product Variations, Product Attributes, Product Categories, Product Tags, Product Shipping Classes, and Product Reviews. WooCommerce’s own product tools are already there. The plugin ships batch abilities for variations, attribute terms, categories, tags, and more, so bulk work that would take an hour of clicking becomes a few instructions. Add Tax Rates or Shipping Zones only if the job touches them, and leave the Customers pack off so the assistant stays inside the catalog. Bear in mind the always-on order tools mean it can still read orders, and the customer details on them.
Keep action logging on for this one. Every change the assistant makes is recorded, with the time and the key that made it. When the client asks what you did, you have the record. Customer fields in the log are masked by default, so the audit trail does not become a second copy of their data.
Give support the tools to fix things, but not to break them
↑ Back to topYour support lead wants the assistant to pull up an order, read its history, add a note, and handle a refund when one is due. What they do not want is a junior agent, or the assistant itself, deleting an order during a busy shift.
This is where per-ability control earns its place. Use a write key and enable the Order Notes pack, plus Refunds if your team handles refunds. Then expand each one and switch off the abilities you do not want: Delete an order note and Delete a refund can come off while the refund, list, and get abilities stay on. Deleting an order is not a worry here — WooCommerce ships no delete-order tool, so there is nothing to disable. The result is an assistant that can look up “find the order for this customer’s last purchase,” add an internal note, and process a refund, but cannot remove anything. This is the case where whole packs are too blunt and switching off individual abilities is exactly what you need.
Action logging gives you the rest of the comfort. You can see which tools ran and when, so a refund issued at the wrong time is a question you can answer rather than a mystery.
Set up a sale, or a whole new store section, by talking it through
↑ Back to topYou are launching a promotion next week. That means a coupon, maybe a new shipping zone for a region you are expanding into, the right tax rate for it, and a couple of order emails turned on or off for the campaign. Each of those lives on a different settings screen.
MCP for WooCommerce exposes the configuration side of WooCommerce, not just the data. With a read/write key and the relevant tool packs enabled, you can create a coupon with its restrictions and expiry, add a shipping zone and a method, create a tax rate for a new region, and enable or disable specific transactional emails by ID. You describe what the sale needs and the assistant sets it up across those screens in one go.
Because Tool Packs gate these, you decide how far this reaches. Enable Coupons, Shipping Zones, Tax Rates, and Emails for the launch and leave the rest off, and the assistant can build the promotion without being able to touch customers. WooCommerce’s own product and order tools stay available regardless, so use a key whose permission matches how much change you want to allow.
Stay on top of a subscriptions business
↑ Back to topYou run recurring billing with WooCommerce Subscriptions. The questions that matter are different from a one-off store. Which subscriptions are on hold. Whose renewal just failed. What a particular customer is paying and when their next payment lands.
When WooCommerce Subscriptions is active, its pack appears automatically and the assistant can list and filter subscriptions, read a single one, add a subscription note, and look up the orders tied to a renewal. So “show me subscriptions that failed to renew this week” or “add a note to this subscription that the customer asked to pause” become plain questions. The same extension-aware behavior applies to Bookings and Memberships. The packs only show up when the extension is installed, so you never see tools for features your store does not run.
Match the key to the work. A read key is enough for monitoring renewals. Use a write key only if you want the assistant to add notes or make changes.
Run the assistant inside WP Admin with no desktop app
↑ Back to topNot everyone wants to install and configure a desktop client. Sometimes you just want to ask a question while you are already in the dashboard.
The plugin includes Store Control, an in-admin chat. Type // on any admin page, or use the floating button, and a chat opens right inside WP Admin. It runs the same MCP tools locally using your own Claude or OpenAI key, so the person at the keyboard can ask about orders or update a product without leaving the page they are on and without a separate app to set up. It is the fastest way to get a non-technical team member using the assistant, because there is nothing to connect. If the floating button gets in the way, hide it from the Store Control tab — the // shortcut keeps working.
The Tool Packs and key scope rules still apply, so Store Control sees exactly the same abilities you have enabled everywhere else, and its permission modes let you decide whether it asks before running actions or only before major changes.
Troubleshooting
↑ Back to topThis section covers problems that show up once the plugin is installed and an assistant is connected. If you are still trying to connect, or the assistant cannot reach your store at all, see Verify and troubleshoot in the Connection section first, since those are connection-specific.
A tool or a whole pack is missing from the assistant
↑ Back to topThe most common reason is that the pack is switched off. Only enabled packs are exposed, so open Tool Packs and confirm the pack you expect is on. If it is on and you only want some of its abilities, check that the specific ability’s toggle is still on.
If you are set up as a Custom GPT, the tab may have switched something off for you. It keeps the enabled count at or below the 30-tool limit a Custom GPT imposes, so enabling a new pack can quietly drop another one out of the selection. Check the count notice at the top of the tab. This does not happen on the ChatGPT app route, which has no cap — if you are on it, make sure the ChatGPT app tab is the one selected in the connect step.
If a whole feature never appears in the list, the plugin is hiding it on purpose because the feature it depends on is not active. Packs only register when their requirement is met:
- Coupons appear only when Enable coupons is turned on in WooCommerce > Settings > General.
- Product Brands appear only when a brand taxonomy exists, which usually means the Brands feature or a brands plugin is active.
- Cost of Goods Sold abilities appear only when the Cost of Goods Sold feature is enabled.
- Analytics reports appear only when the Analytics feature is enabled.
- Product custom field tools require WooCommerce 9.2 or higher.
- Subscriptions, Bookings, and Memberships tools require the matching WooCommerce extension installed and active.
Turn on the underlying feature or extension, then reload the Tool Packs tab and the pack will be there.
Note that WooCommerce’s own product and order tools never disappear this way — they have no toggle and are always present while the connector is on.
An added tool shows as Unavailable
↑ Back to topTools you added from another plugin stop working when that plugin is deactivated or removed. On the Add tools tab they are flagged with an Unavailable badge, their toggles are disabled, and they are no longer sent to the assistant. Reactivate the source plugin to bring them back, or select Remove unavailable tools to clear them all at once.
The assistant changed nothing, or reports a read-only key
↑ Back to topIf a request to create, update, or delete comes back refused, the API key is almost certainly a read key. A read key can run searches, lists, and lookups, but it is blocked from every write the moment a tool runs. Create a new key with write or read/write permission on the Connection tab and connect the assistant with that one.
If a write still fails with a write-capable API key, check the user the key belongs to. That user must have the manage_woocommerce capability. A key tied to a user without it cannot use the tools at all.
Nothing works, and no tools show up anywhere
↑ Back to topTwo switches turn the whole integration off.
First, the connector itself. On the Connection tab, confirm Enable connector is on. When it is off, no tools and no keys are exposed to any assistant, and the Tool Packs, Add tools, Store Control, and Logs tabs are hidden until it is switched back on.
Second, WooCommerce MCP. The plugin turns this on when you activate it, but if it has since been switched off, MCP for WooCommerce shows a notice with a link to switch it back on. Follow that link, then reconnect.
How do I disconnect an assistant?
↑ Back to topUse Revoke key in that key’s Actions menu, in the Manage API Keys list on the Connection tab. The key stops working immediately: a Claude.ai connector or ChatGPT import that relied on it loses access, and its stored connector credential and token are cleared. Only that key is affected, so anyone connected with a different key carries on.
If you want to stop the browser connector but keep the key working for a client that sends it as a header, use Disconnect URL in that key’s Actions menu instead of revoking the key.
For Claude Desktop, also remove the connector from Claude’s settings, since the app-side entry does not remove itself.
The Logs tab is missing
↑ Back to topThe Logs tab only appears when action logging is enabled. Turn logging on under the Connection tab and the Logs tab returns.
Store Control will not open or answer
↑ Back to topStore Control needs its own AI provider key, separate from the API keys that connect Claude Desktop or ChatGPT. Those keys let an outside assistant reach your store. Store Control is the reverse: it calls out to Claude or OpenAI on your behalf, so it needs a provider key to do that.
Open the Store Control tab, choose a provider, and supply a key, either from WordPress Connectors or entered directly. Until a provider key is in place, the chat window can open but cannot reply.
Also check that Store Control is enabled on its tab. And if the floating button is missing, it may simply be hidden — the Show the floating Store Control button setting controls it, and the // shortcut opens Store Control either way.
The standard WooCommerce Save button is gone on these screens
↑ Back to topAlso expected. Each MCP tab has its own Save control, so the shared WooCommerce Save changes button is hidden under WooCommerce > Settings > MCP. Use the Save button inside the tab you are editing. If a change did not stick, check that you saved within that specific tab.
On a large store, tools are slow or time out
↑ Back to topRemote clients receive every enabled tool and the full result of each call, so a broad question against a large catalog is genuinely doing a lot of work. Ask for a narrower result — a date range, a status filter, or a smaller page size — rather than everything at once, and trim the enabled set on the Tool Packs tab so the tool list a client loads at startup is smaller.
Store Control is the exception: it caps each tool result at about 12,000 characters, cuts at item boundaries rather than mid-record, and notes the real total when it does, so a partial list is never mistaken for a complete one. Developers can change that cap with the w7s_mcp_chat_tool_result_char_budget filter.
Keep in mind that a Claude or ChatGPT session holds an open connection and a PHP worker for up to about an hour. On constrained shared hosting, a few simultaneous sessions can use up your available workers, which looks like slowness or dropped connections. Account for this when sizing PHP workers.
Send your setup to support
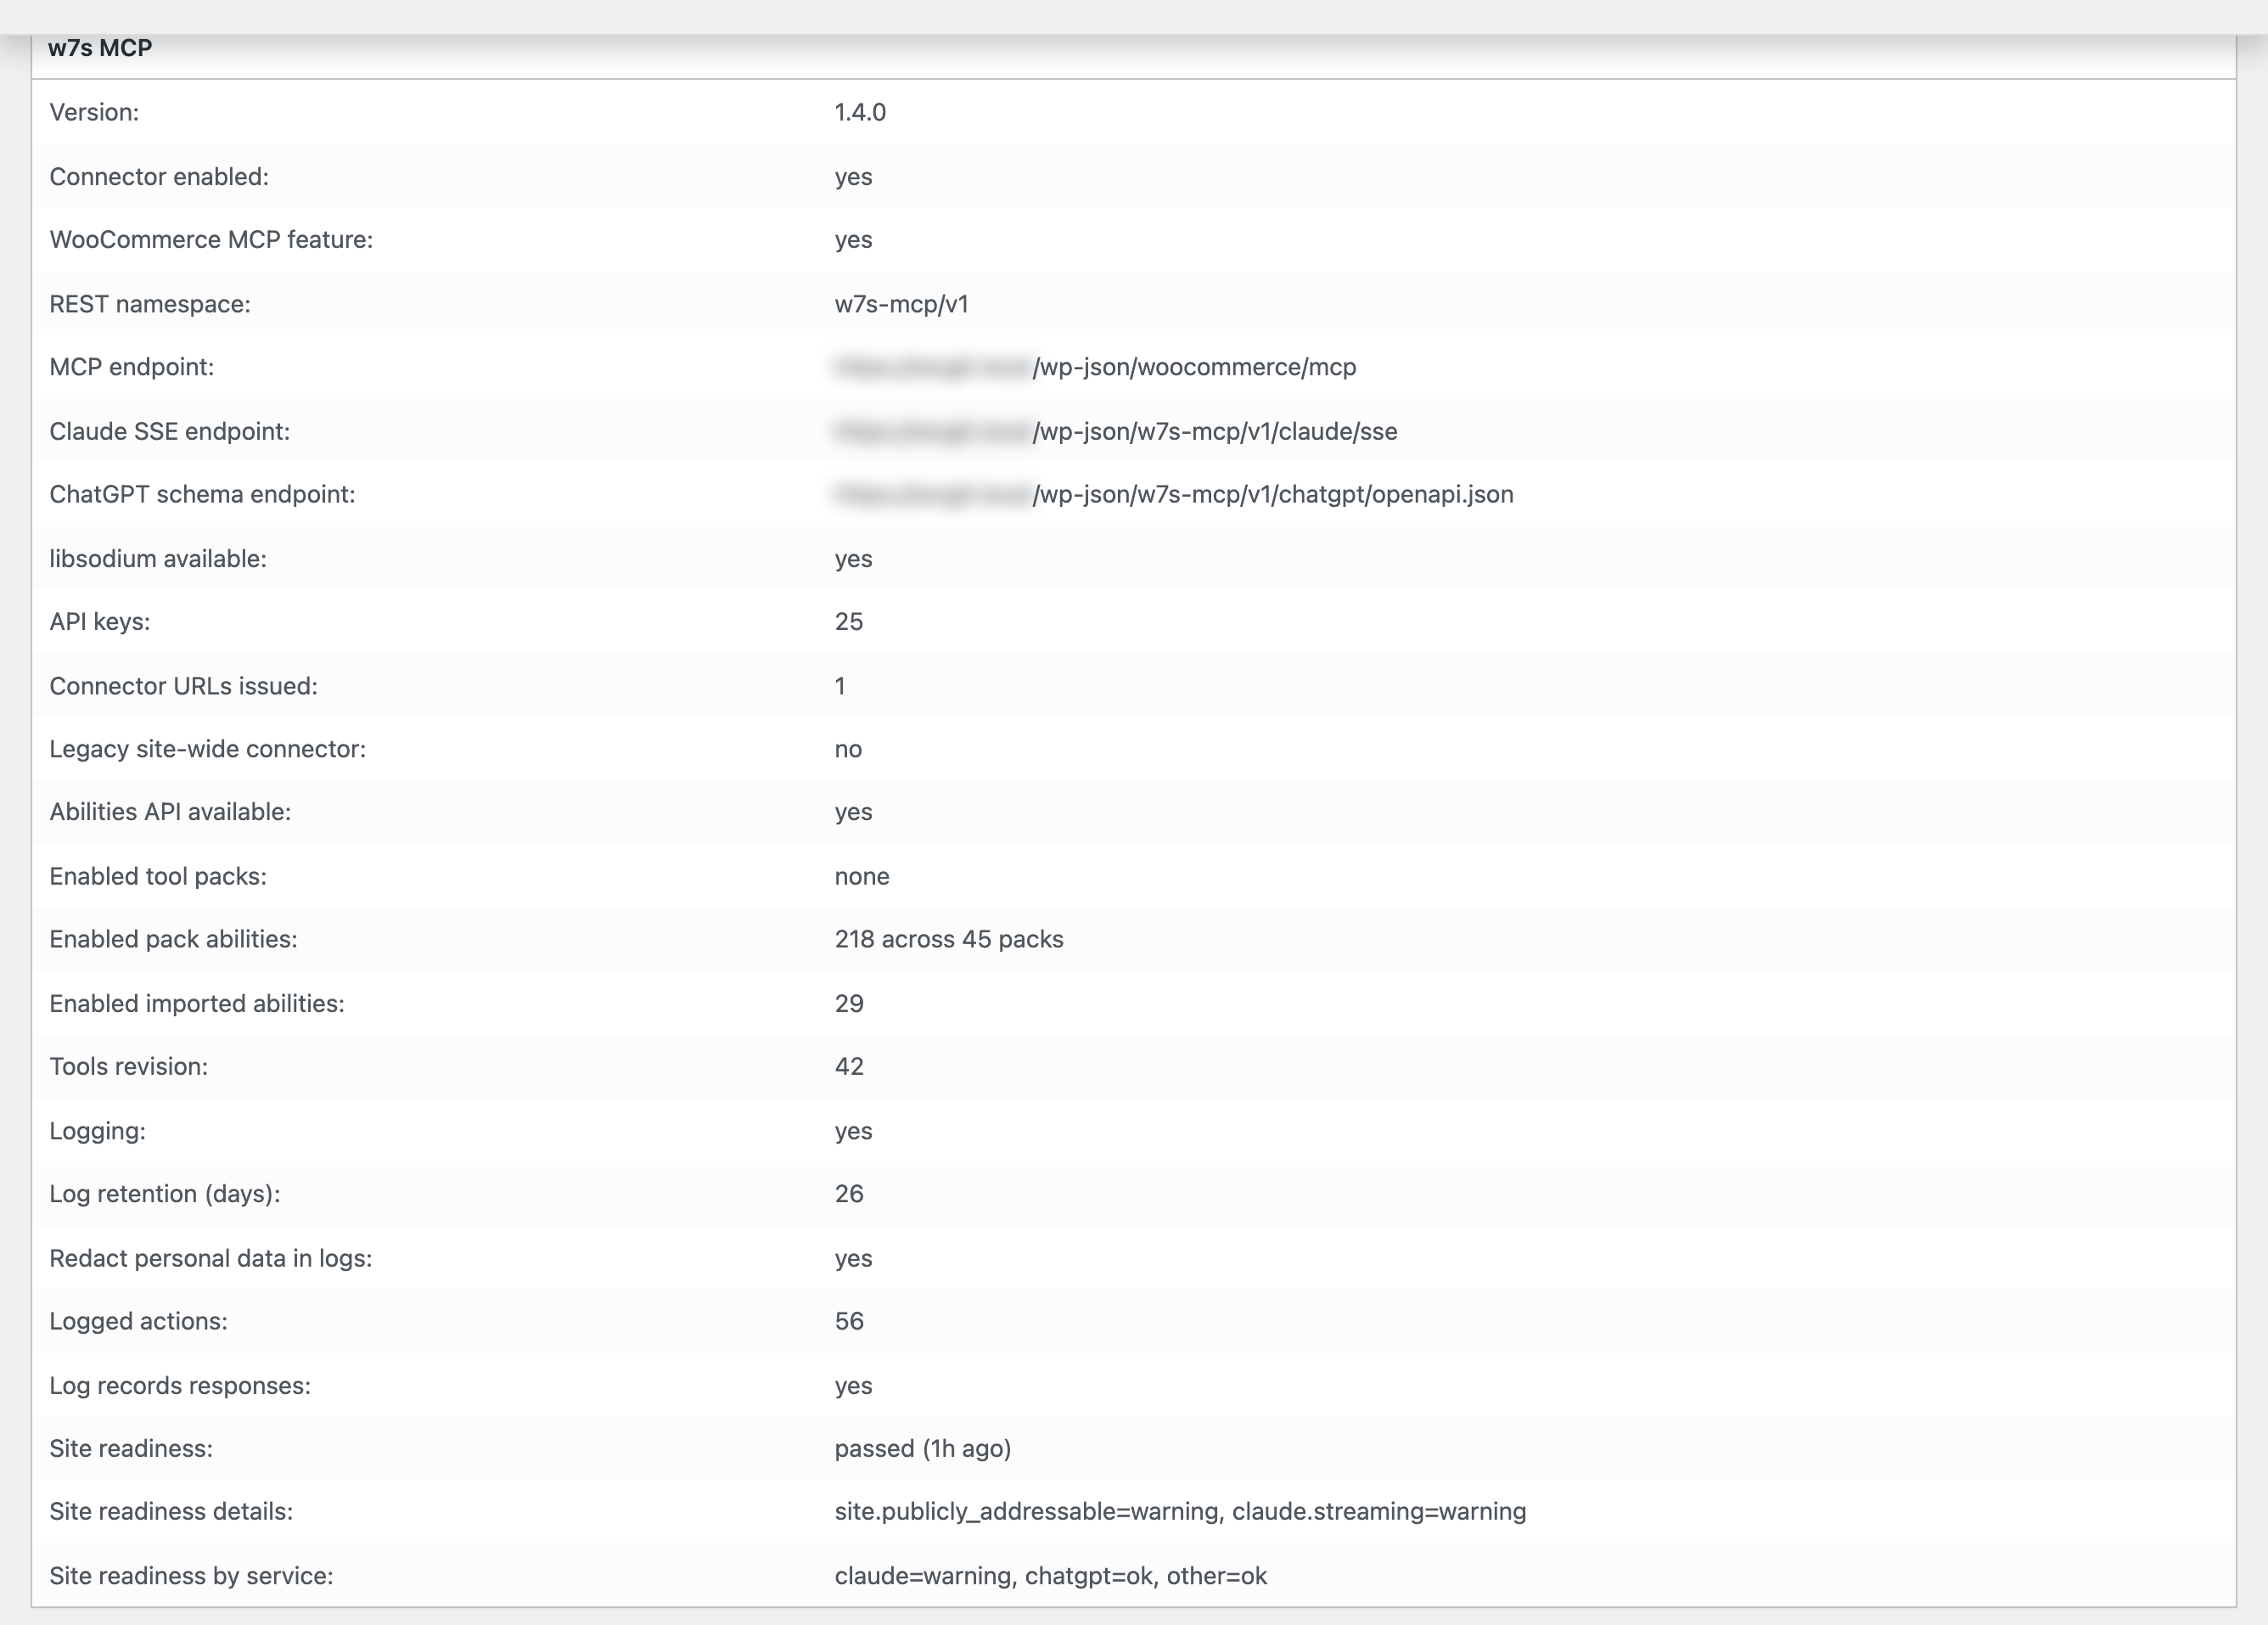
↑ Back to topWooCommerce > Status carries a w7s MCP section, so a support ticket can arrive with your setup already in it instead of a round trip asking for it. Select Get system report at the top of that page and copy the result: the MCP section travels with it.
It reports the plugin version, whether the connector and the WooCommerce MCP feature are on, your three endpoint addresses, whether this server can encrypt a connector credential, how many API keys and connector URLs exist, which tool packs and how many abilities are enabled, your logging settings, whether the log is recording tool responses, and what the last site readiness run found, including which checks were not a pass and the result per service. The readiness rows are the stored result of the last run rather than a fresh one, because a status page must not make outbound requests, so run Verify site readiness first if the last run was a while ago.
Nothing in the section is a secret. It carries counts and settings, never an API key, a token, or a connector URL.
When you are stuck, turn on logging and reproduce
↑ Back to topThe fastest way to see what an assistant actually did is the action log. Enable action logging on the Connection tab, repeat the action that failed, then open the Logs tab. Each entry shows the tool that ran, the key or user behind it, the time, and whether it succeeded, and View opens the arguments it was called with alongside the response it returned — which is usually where the reason lives when a call ran but did not do what was asked. Customer fields in the log are masked by default, so turning logging on to debug does not expose personal data.
Failures are recorded too, which is what makes the log worth reading when nothing appears to happen. A call that ran and failed is logged as error, and a call whose credentials were rejected is logged as denied. So if you reproduce the problem and the log stays empty, the request never reached your store at all, and the cause is in front of WordPress rather than inside it. That is usually a CDN or firewall rule: see Requests blocked by Cloudflare or your host.
FAQ
↑ Back to topDoes this work with WooCommerce High Performance Order Storage (HPOS)?
↑ Back to topYes.
Do I have to keep WooCommerce MCP turned on?
↑ Back to topYes. MCP for WooCommerce enables it on activation. If it gets switched off, the plugin shows a notice with a link to enable it again, because the integration depends on it.
Where do API keys come from?
↑ Back to topThey are standard WooCommerce REST API keys (a consumer key and secret). The plugin uses the key’s existing permission, so a read key cannot make changes. Create keys from the Connection tab.
How do I disconnect an assistant or revoke access?
↑ Back to topUse Revoke key in that key’s Actions menu, in the Manage API Keys list on the Connection tab. The key stops working immediately, and its connector URL, token, and stored credential are cleared with it. Other keys and their connections are unaffected.
To switch off only the browser or ChatGPT connection while leaving the key usable by a client that sends it as a header, use Disconnect URL in that key’s Actions menu.
Can several people each connect their own Claude.ai account?
↑ Back to topYes. Give each person their own API key, and each key gets its own connector URL. See Giving each person their own connection.
Can I connect something other than Claude or ChatGPT?
↑ Back to topYes. Choose Other AI service on the Connection tab to get the MCP endpoint, an SSE connector URL, and an OpenAPI 3.1 schema URL that work with clients such as Cursor, Cline, Continue, Zed, n8n, Zapier, Make, Ollama, Gemini, and Grok.
An assistant is trying to use a tool I did not enable. What happens?
↑ Back to topNothing runs. Disabled tool packs are enforced when a tool is called, not merely hidden, so a tool from a disabled pack cannot execute even if the assistant requests it by name. The exception is WooCommerce’s own product and order tools, which have no toggle and are always available — the API key’s read or write permission is what limits those.
What happens to added tools if I deactivate the plugin that provides them?
↑ Back to topThey are flagged as Unavailable on the Add tools tab and are no longer sent to the assistant. Reactivate the plugin to restore them, or remove them all with one click.
Will logging store my customers’ personal details?
↑ Back to topNot by default. PII redaction is on out of the box, so emails, addresses, phone numbers, and similar fields are masked before the log is written — in the response a tool returned as well as in the arguments it was called with. You can change this on the Connection tab.
My Claude connection seems to hold resources for a while. Is that expected?
↑ Back to topYes. A Claude session keeps an open connection, and a PHP worker, for up to about an hour. On limited shared hosting, factor that into your PHP worker count.
Developer documentation
↑ Back to topThis section is for developers extending or customizing MCP for WooCommerce. Hooks are listed by their exact name; read the referenced source for arguments and timing.
Master switch
↑ Back to topw7s_mcp_connector_enabled (filter) is the master switch returned by W7S_MCP::is_connector_enabled(). When it resolves to false, no MCP tools and no ChatGPT or keys APIs are exposed. It defaults to the stored connector option. Source: includes/class-w7s-mcp.php.
Registering tool packs
↑ Back to topw7s_mcp_register_tool_packs (action) fires when tool packs are collected. It passes a $register callable, so another plugin can add a pack that admins then switch on or off in Tool Packs:
add_action( 'w7s_mcp_register_tool_packs', function ( $register ) {
    $register(
        'my_plugin_slug',
        __( 'My Plugin', 'my-plugin' ),
        __( 'Description.', 'my-plugin' ),
        'my_plugin/ability_prefix'
    );
} );
Abilities whose ID starts with that prefix are included in WooCommerce MCP only while the pack is enabled. The callable also accepts optional per-ability descriptors (for per-ability toggles), a plugin label, and a category label. Source: includes/class-w7s-mcp-tool-packs.php.
Individual abilities are registered with the WordPress Abilities API, not with a plugin-specific hook. Register them as normal and have WooCommerce include them (wp_register_ability plus woocommerce_mcp_include_ability); registering a pack for their prefix is what gives store owners a switch. Alternatively, expose them and let the store owner import them from the Add tools tab.
API key permission scope
↑ Back to topRead-only key enforcement relies on two classifiers, both filterable, in includes/class-w7s-mcp-ability-helper.php:
w7s_mcp_is_write_operationdecides whether a given ability or tool name counts as a write. The plugin classifies by name (write verbs such ascreate,update,delete,batch; read verbs such asget,list,search). Anything unrecognized defaults to write, so an unknown tool cannot be run by a read-only key. Use this filter to correct the classification for a custom tool.w7s_mcp_is_destructive_abilityoverrides whether an ability is treated as destructive. The plugin first trusts an explicit destructive declaration from the Abilities API, then falls back to name heuristics.
Registering a readiness service
↑ Back to topw7s_mcp_readiness_services (filter) receives the list of services site readiness reports on, so another plugin can add its own assistant beside Claude and ChatGPT. Each entry implements W7S_MCP_Readiness_Service (includes/readiness/interface-w7s-mcp-readiness-service.php), which is three methods: get_id() returns a stable slug used as the key in the REST response and as the prefix for the service’s check ids, get_label() its merchant-facing name, and run( $context ) returns its check results.
The runner establishes the shared prerequisites once and passes them in as $context, so a service never re-probes what the runner has already settled. Anything a service cannot test because a prerequisite failed should come back as a skipped check rather than a passing one. Build results with the W7S_MCP_Readiness_Check factories (ok(), warning(), fail(), skipped()), each taking a stable untranslated id, a translated label, an explanation, and an optional untranslated support detail such as HTTP 401. A service that throws is reported as failed rather than taking the readiness response down with it. Source: includes/readiness/class-w7s-mcp-readiness.php.
Write allowlists and upload guardrails
↑ Back to topWrites through the WordPress tools are restricted to allowlists, all filterable, in includes/class-w7s-mcp-wordpress-tools.php:
w7s_mcp_writable_option_keyscontrols which options may be written.w7s_mcp_writable_post_fieldscontrols which post fields may be written.w7s_mcp_allowed_protected_post_metaallows specific protected meta keys (defaults to_thumbnail_id).w7s_mcp_max_upload_bytescaps the maximum upload size in bytes.
Action log and PII redaction
↑ Back to topThe action log records MCP tool calls, along with the response each one returned, and masks PII before storage. w7s_mcp_log_pii_arg_keys (filter) adjusts which keys are redacted, so you can add custom checkout meta or remove a default. The same key list governs the response: MCP returns its payload as a JSON string inside a text part, so the log decodes that string before redacting, and a customer field buried in a tool’s output is masked the same way as one in its arguments. Source: includes/class-w7s-mcp-action-log.php. The log is viewable under the Logs tab. Logging is on by default and retention defaults to 7 days, clamped to between 1 and 365; both are configurable on the Connection tab, and a daily cron (w7s_mcp_clean_old_logs) applies the retention.
Store Control
↑ Back to topThree filters shape what the in-admin chat sends to the AI provider, all in includes/client/class-w7s-mcp-chat-client.php:
w7s_mcp_chat_tool_result_char_budgetsets the character budget for a single tool result before it is cut at item boundaries (default 12,000, floored at 500). Larger results carry atruncatednote stating the real total.w7s_mcp_chat_scrub_tool_argsfilters the arguments the model supplied before a tool runs. It receives the scrubbed arguments, the tool name, and the original arguments.w7s_mcp_chat_tool_descriptionfilters the description a tool is advertised with, so you can steer how the model chooses between them.
Logging for troubleshooting
↑ Back to topThe plugin writes to its action log at numerous points during tool execution. When diagnosing an issue, enable action logging on the Connection tab and reproduce the call, then review the Logs tab for the action, the key or user, and the timestamp.

