
Approving and managing affiliates is how you decide who promotes your store. Affiliate and Referral Program for WooCommerce gives you one screen to vet applicants, sort affiliates into groups, set their level, review each affiliate’s sales and traffic, edit their details, and send announcements to everyone at once. Part of the Affiliate and Referral for WooCommerce documentation.
The Affiliates screen
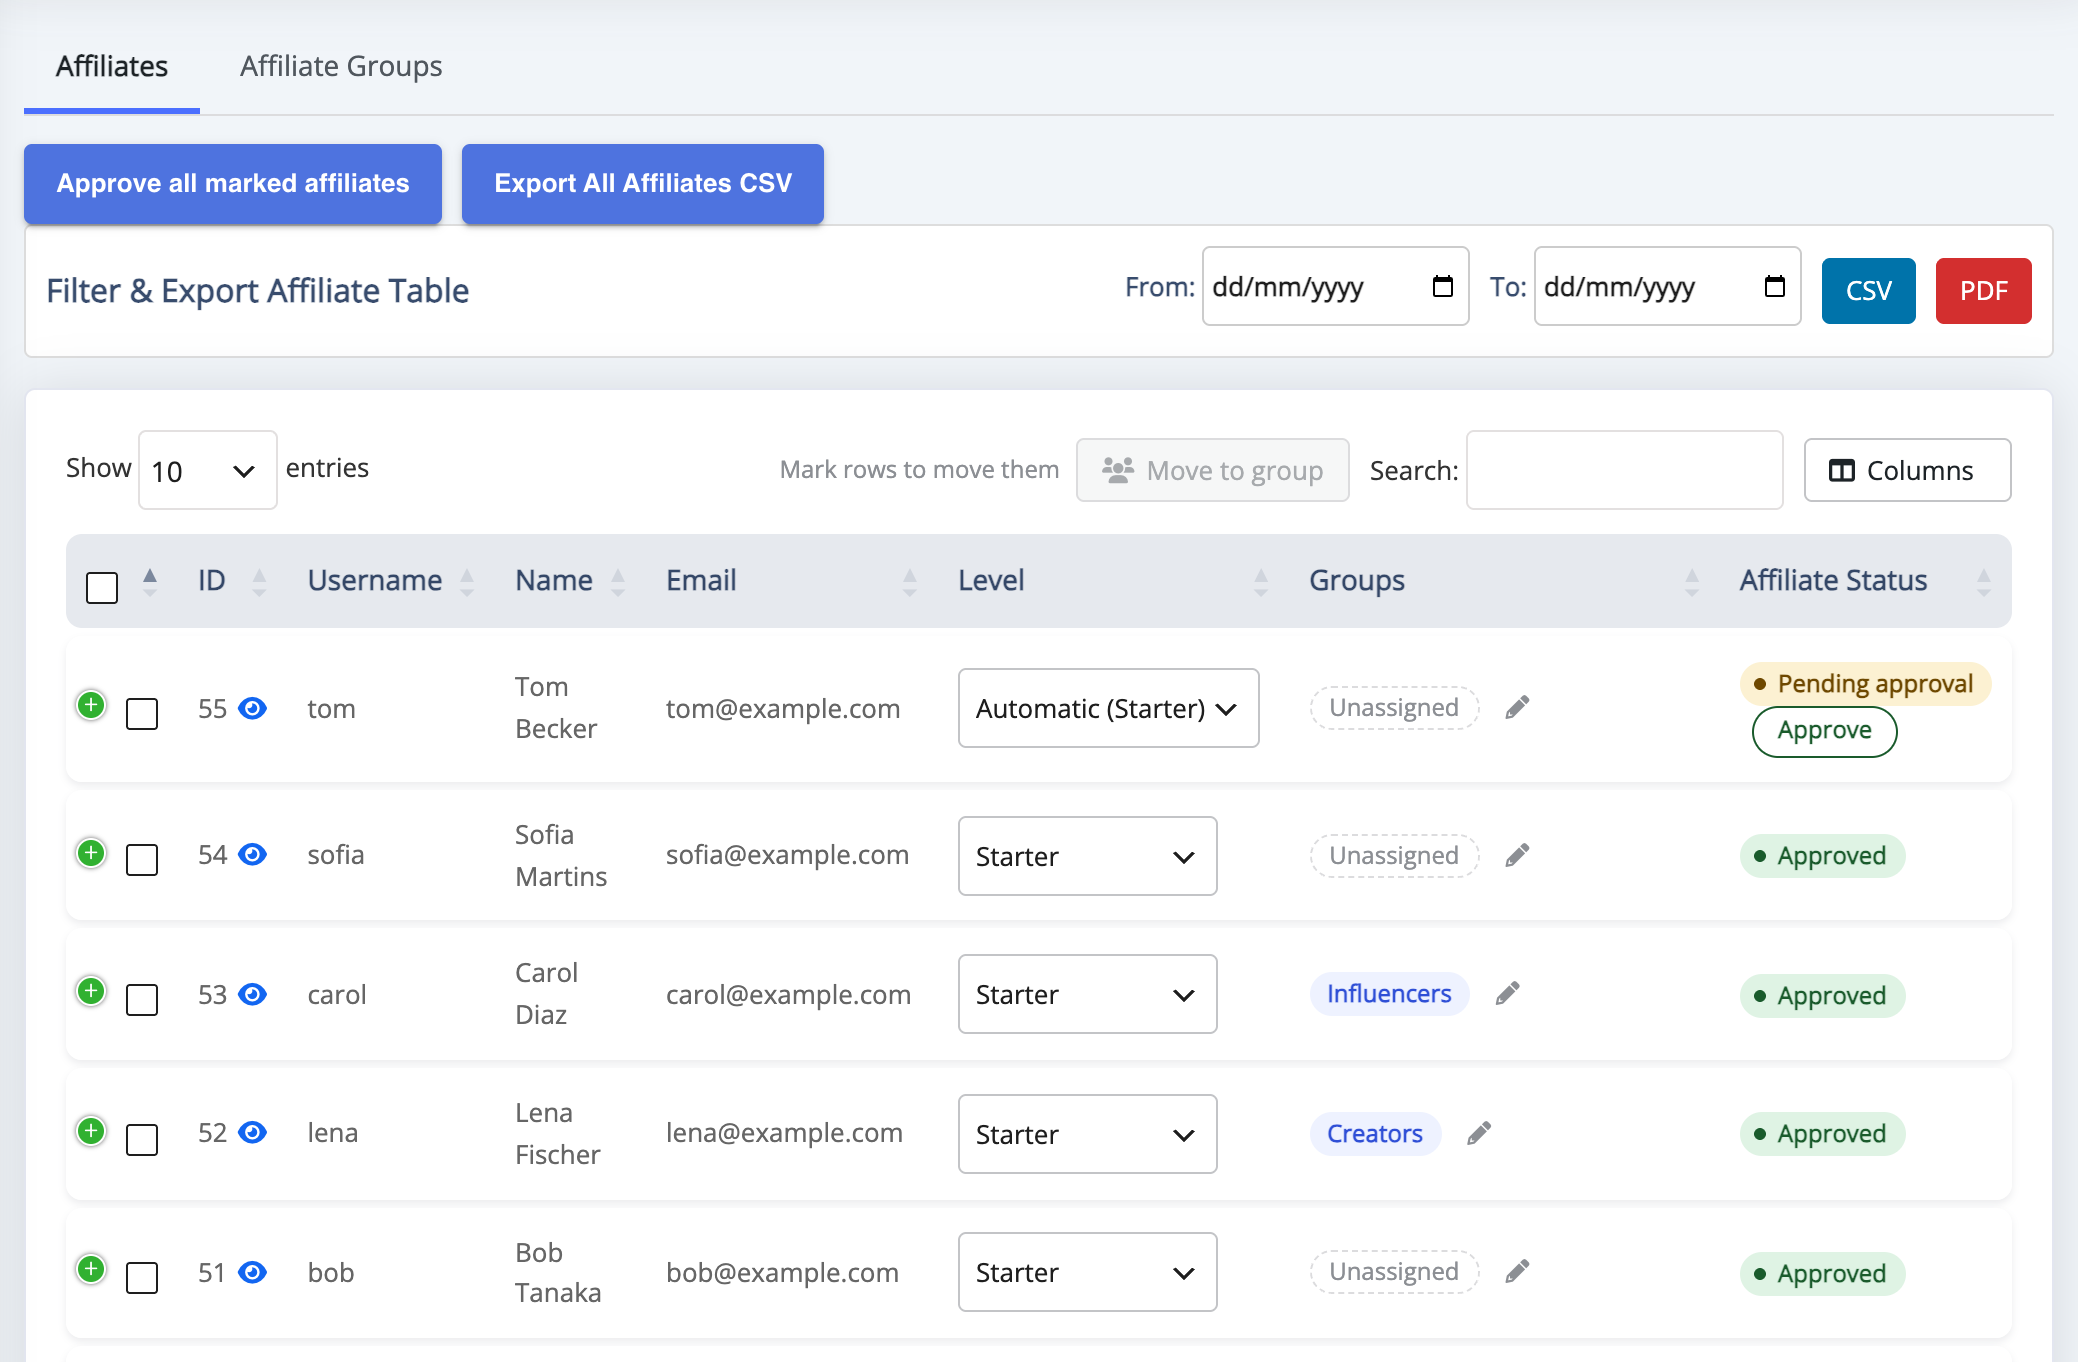
↑ Back to topGo to: WooCommerce > Affiliate & Referral > Affiliates. The screen has two tabs: Affiliates, the table of every affiliate, and Affiliate Groups. Each row shows the affiliate’s ID, name, contact details, role, who recruited them (Parent Id and Parent Name), earnings, Level, Groups, Registration Date and Affiliate Status.
Above the table, Move to group works on the rows you mark, the search box filters the table as you type, and Columns chooses which columns are shown.
Vet applicants before they join
↑ Back to topBy default, anyone who registers becomes an active affiliate immediately. To review applications first:
- Go to: WooCommerce > Affiliate & Referral > Advanced Features > General.
- Turn on Affiliate Verification.
- Click Save Changes.
New signups now wait for you. Their Affiliate Status shows a Pending approval badge with an Approve button; approved affiliates show Approved. To approve several at once, mark their rows and click Approve all marked affiliates. Approval can send the affiliate a confirmation email — the wording lives in Customize Affiliate and Referral Emails.
There is no separate “rejected” state. An applicant you do not approve simply stays inactive, and no rejection message is sent — if you want to tell them why, email them yourself.
Affiliate groups
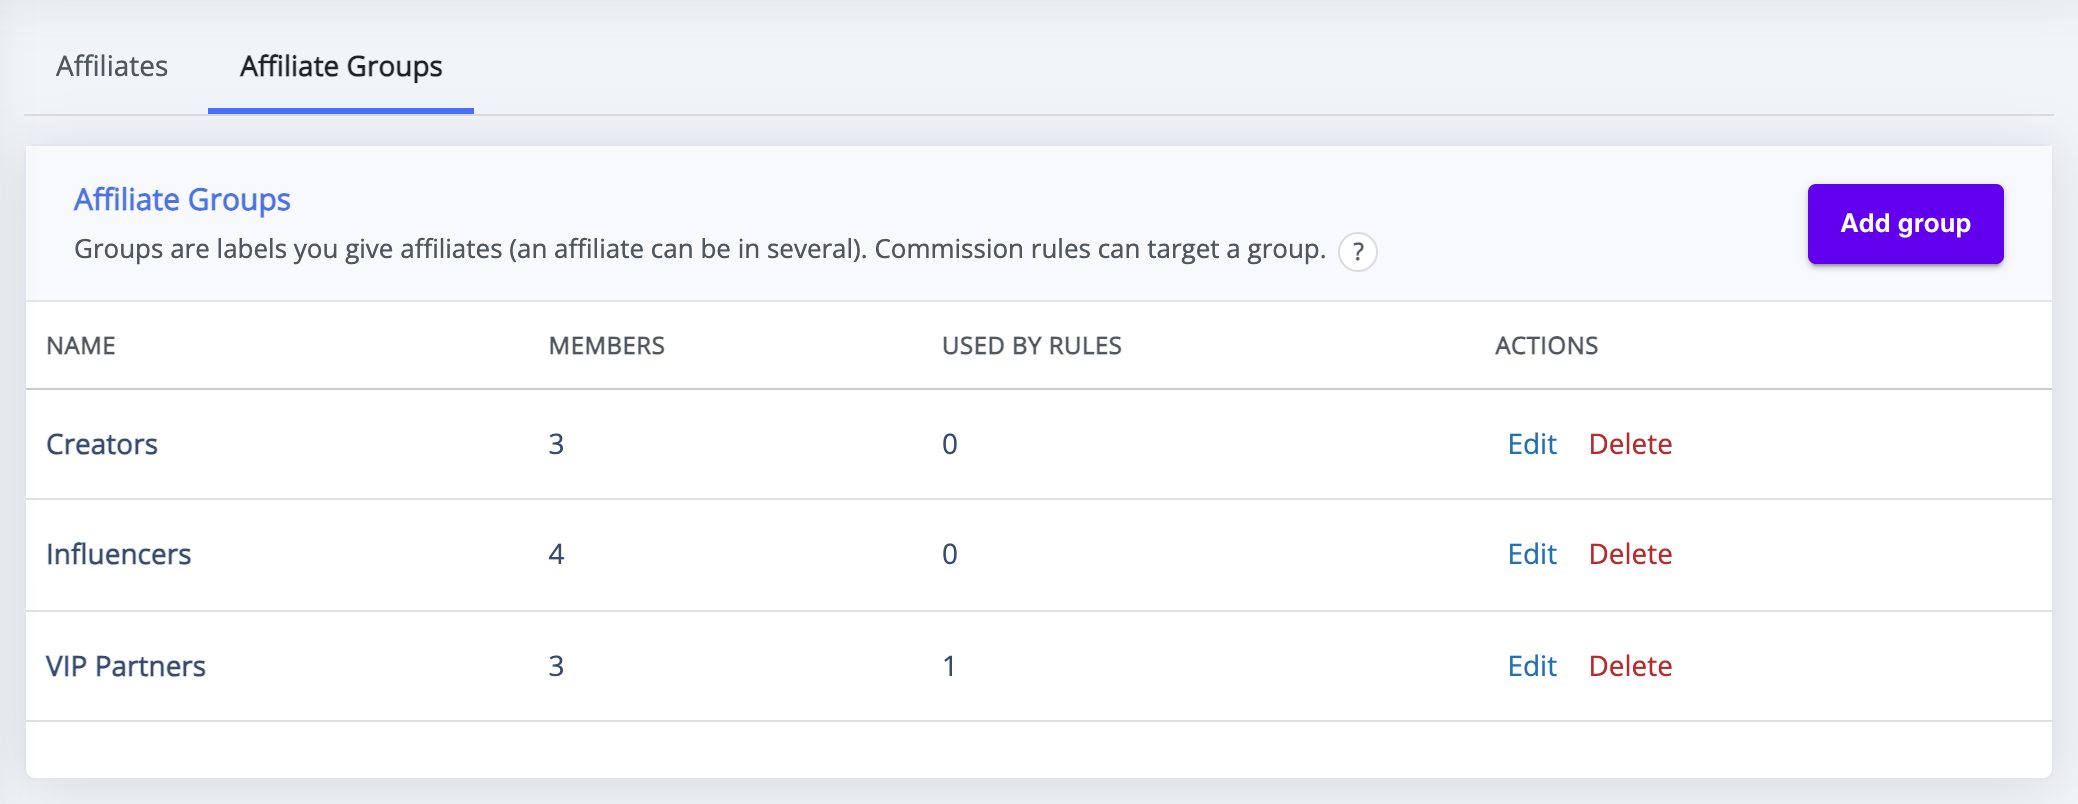
↑ Back to topGroups are labels you give affiliates — “Influencers”, “VIP Partners”, “Creators” — so a commission rule can pay a whole group its own rate. An affiliate can be in several groups. Groups belong to commission rules, so a store updated from an earlier version gets them after converting to commission rules.
Create a group
↑ Back to top- On the Affiliate Groups tab, click Add group.
- Enter a Name and, if you like, a Description.
- Under Affiliates in this group, search by name or username and click Add for each member.
- Click Save group.
The tab lists each group with its Members and the commission rules that use it (Used by rules). After a group is deleted, rules that targeted it no longer match anyone through it.
Add affiliates to a group
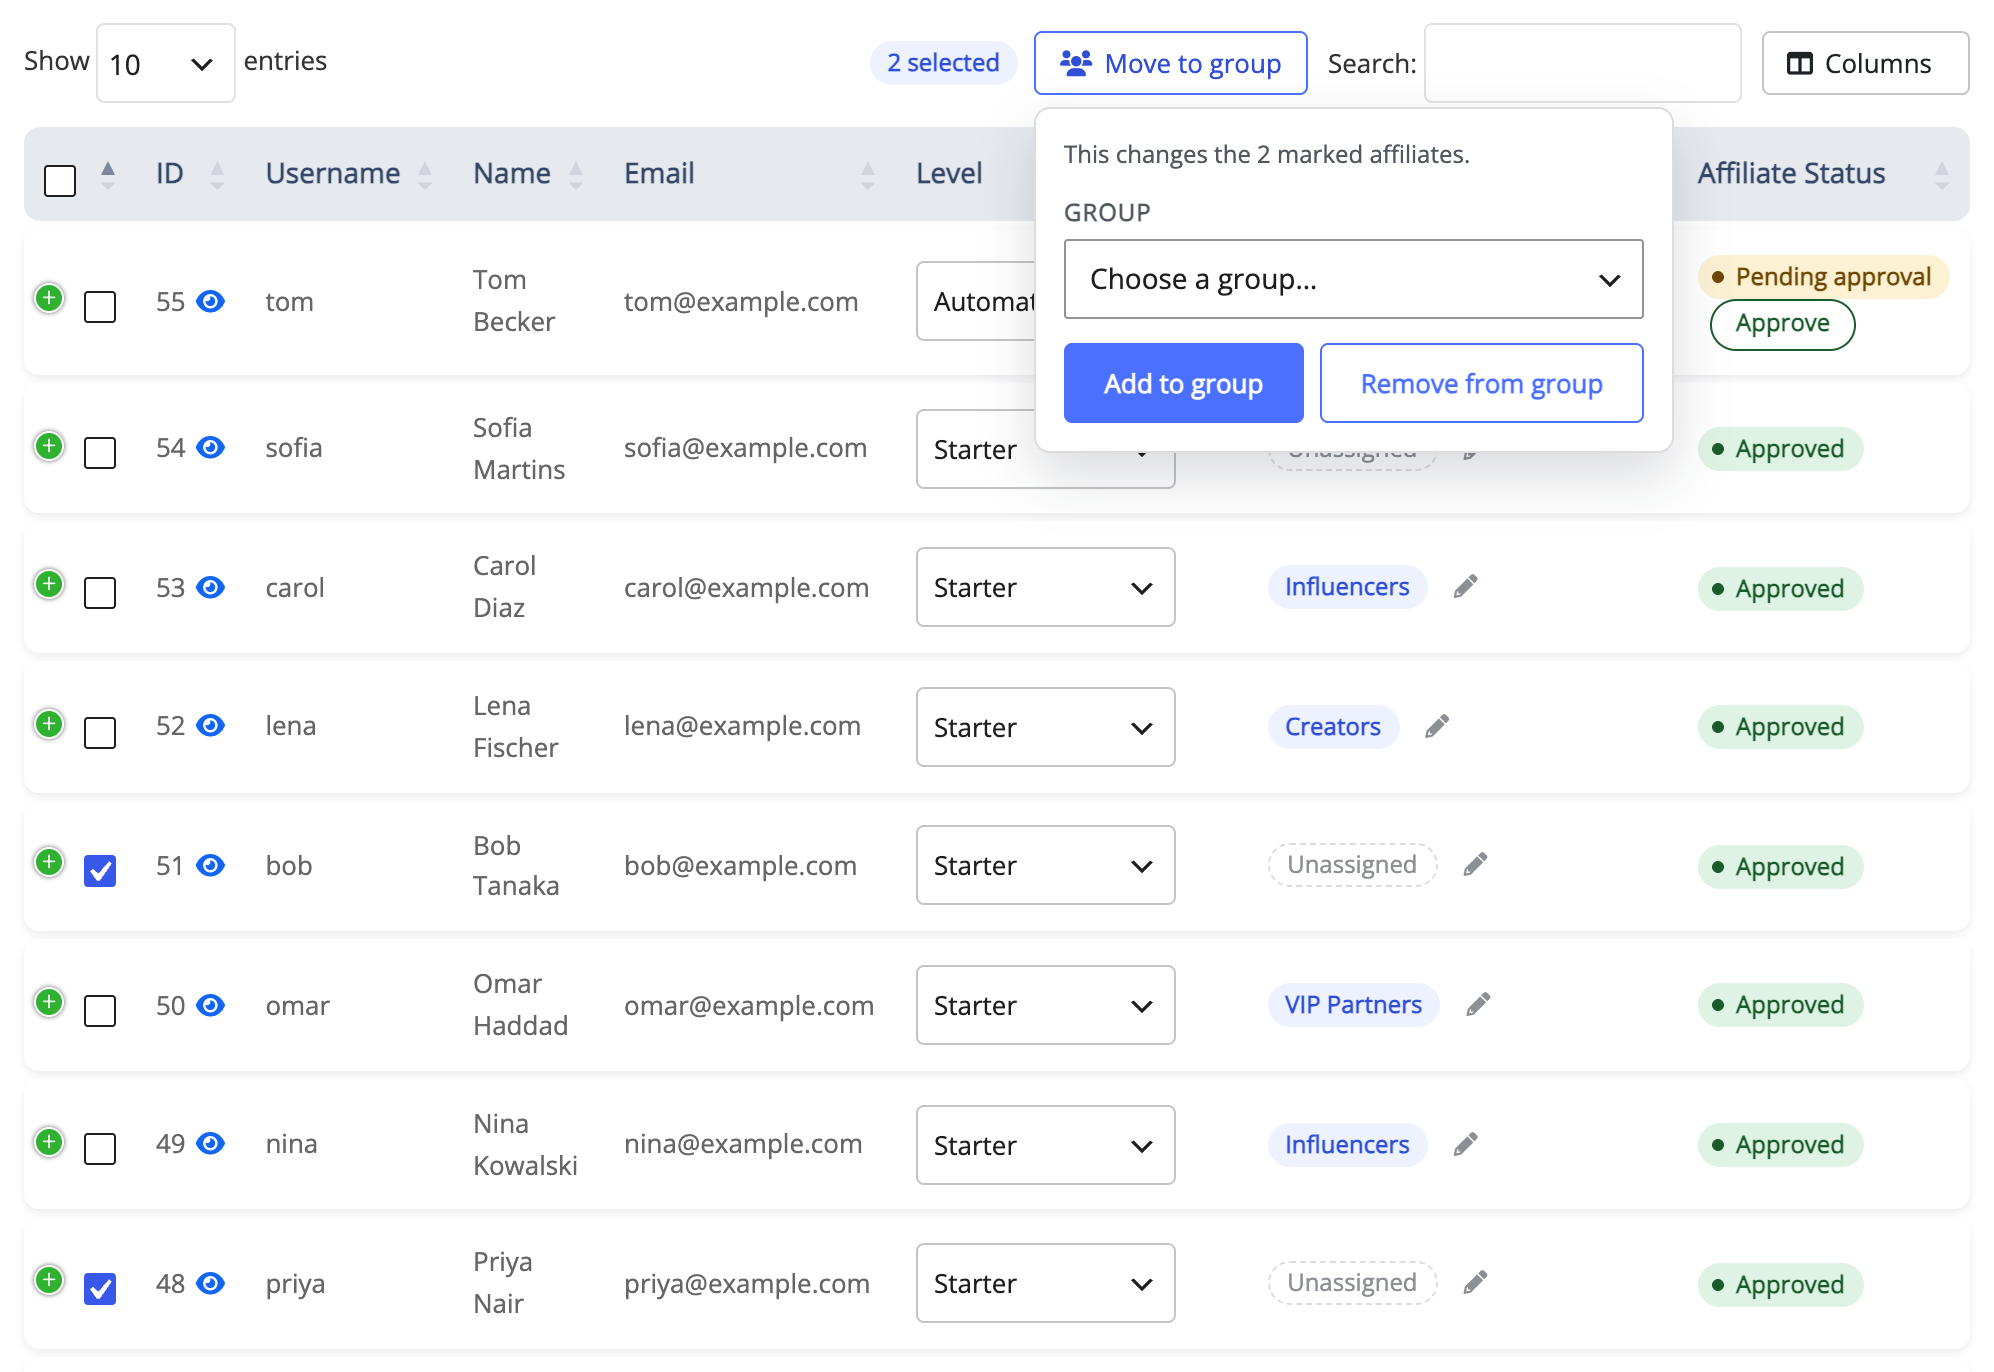
↑ Back to top- Several at once – on the Affiliates tab, mark the rows, open Move to group, choose the Group, and click Add to group or Remove from group.
- One affiliate – click the pencil in the row’s Groups cell, tick every group the affiliate belongs to, and click Save. Cancel changes nothing.
- From the profile – under Users, open the affiliate and tick their Affiliate groups in the Affiliate commission section.
To pay a group its own rate, choose Affiliate groups under Who earns this rate in a commission rule — see How to Set Up Referral Commission Rules.
Set an affiliate’s level and lock it
↑ Back to topAffiliates reach levels automatically as their referrals are approved. To change one by hand, choose a level in the row’s Level column, or Automatic to hand the decision back to the plugin. A level chosen there is re-checked after the affiliate’s next approved referral. To keep it, open the affiliate under Users, choose the Affiliate level in the Affiliate commission section and tick Level lock. See Performance-Based Affiliate Commission with Affiliate Levels.
Review one affiliate in detail
↑ Back to topClick an affiliate’s row to open their detail view. The header shows their Referral Code, Referral Link and Coupon, with summary cards for Total Referrals, Total Commission, Approved Commission, Pending Commission, Wallet Amount and Total Visitors. Below them, tabs cover everything the affiliate has done:
- Referrals – this affiliate’s commission records, with Approve All Marked Referrals and Reject All Marked Referrals.
- Payouts – their withdrawal requests and payment history.
- Traffic – every recorded visit from their links: IP, URL, visit count, browser, device, platform and date.
- Profile – their contact details, editable in place.
- Show MLM Chain – opens the affiliate’s WordPress profile, where their network tree is shown. See How to Set Up MLM in Your Affiliate Program.
Edit an affiliate’s details
↑ Back to topSmall corrections are quickest on the Profile tab of the detail view — User Name, Email, First Name, Last Name and Phone, then Update. For everything else, the affiliate is an ordinary WordPress user: open them under Users to change their password or role, and use the Affiliate commission section for their groups, level and affiliate coupon.
Send an announcement to all affiliates
↑ Back to top- Go to: WooCommerce > Affiliate & Referral > Advanced Features > Notification.
- Click Add Notification and fill in Enter Notification Title and Enter Notification Message.
- Save the notification — it is visible to every affiliate immediately.
Affiliates see announcements under the bell icon in their dashboard header, with a badge counting the ones they have not opened. Announcements are plain text — no links or formatting — and you can edit or delete them here later.
The announcement bell appears on dashboard Template 1 only — Template 2 has no notification area. If you rely on announcements, keep Template 1 selected; see the Affiliate Dashboard and Affiliate Area Guide.
Export your affiliate list
↑ Back to top- Export All Affiliates CSV – the complete list as one file: every affiliate with their status, level, whether the level is locked, groups, recruiter, earnings, wallet balance, currency, referral code, payment method and registration date.
- Filter & Export Affiliate Table – narrows the table by registration date and exports what you see, with the columns currently shown, as CSV or PDF.
More on exports in Affiliate Reports and CSV Exports.
FAQ
↑ Back to topDo affiliates get a special WordPress role?
↑ Back to topNo. Affiliates keep whatever role they already have — usually Customer — and their affiliate standing is tracked separately. Nothing about their store account changes when you approve them.
Can an affiliate be in more than one group?
↑ Back to topYes. Each group a commission rule targets is checked separately, and the first matching rule in the list pays.
What is the difference between a group and a level?
↑ Back to topYou put affiliates into groups yourself, and they stay there until you move them. Levels are earned: affiliates reach them automatically as they perform, unless you lock a level by hand. Commission rules can target either.
Where do I see who recruited an affiliate?
↑ Back to topThe Parent Id and Parent Name columns show the recruiter, and Show MLM Chain in the detail view shows the whole branch. More questions are answered in the Affiliate and Referral Program: FAQ.

