One of the most important aspects of a well-designed ecommerce site is the checkout page. After all, it’s the final destination of the customer journey before a purchase is made. If your WooCommerce checkout page is difficult or time-consuming to use, shoppers can get frustrated and abandon their carts and be less likely to return to your store.
But an effective and high-converting checkout page looks different for every business. Your checkout page’s style, structure, number of fields, and other features will vary depending on your industry and the types of products you sell.
For instance, if you sell a single physical product, a quick and easy one page checkout without the need for account creation may work best. But if you sell vacation rental bookings, you may need a multi-step checkout with a variety of extra fields to gather all the necessary customer details needed for a reservation.
And if you sell software on a subscription basis, you might require customers to create an account so they can access their license keys and manage subscription renewals.
So what customizations should you make to the WooCommerce checkout page in your store? How do you go about making those changes?

To best answer these questions, we’ll first examine some of the reasons why you should customize the WooCommerce checkout page. Then we’ll discuss the types of customizations you can make and demonstrate some of the tools and techniques you can use to make those changes.
Note: If you plan to manually customize the checkout page using code, always install a child theme first and add your code to your child theme files. Using a child theme will protect your code changes during theme updates, as changes to your main theme files will be overwritten each time your theme is updated. If you don’t know how to do this, Jetpack has a great article on how to create a child theme that walks you through the process step by step.
Why you should customize the WooCommerce checkout page
↑ Back to topThe ultimate goal of customizing your WooCommerce checkout page is, of course, to convert more shoppers and increase average order value (AOV). But an optimized checkout is not necessarily guaranteed between the default WooCommerce checkout page and whatever theme you’ve chosen for your store. Every store owner’s needs are different and what their customers expect can vary, which is why customization is often necessary.
One universal rule, though, is that you want to design your checkout page so that the purchase process is quick and smooth. Your checkout page should also be easy to read and match the style of the rest of your website so visitors have a consistent experience.
Considering the needs of shoppers is important as well. By offering options during checkout that might benefit your particular customer — like multiple payment methods, shipping options, and the ability to sign up for loyalty programs — customers can make choices that meet their needs.
The WooCommerce checkout page is also a great opportunity to funnel your customer into marketing channels, like email and text messaging, without disrupting their checkout experience.
Lastly, if your business has any specific information you need to gather from customers to provide a service, like accommodation bookings or wholesale distribution, you may need to add custom fields to your checkout page.
Types of WooCommerce checkout page customizations
↑ Back to topSo what kinds of customizations can you make to WooCommerce checkout page templates to address each of these concerns? Let’s break the process down into five types of customization goals and discuss how to achieve each one.

1. Improvements to user flow and checkout efficiency
Your customers don’t want to spend longer checking out of your store than they did searching for products and adding them to their cart. In fact, 18% of customers will abandon their cart if a checkout page is too long or confusing, and 25% percent will bounce if they’re required to create an account.
There are a number of ways that you can customize checkout to help speed things up for shoppers. Let’s dive into a few different options.
Minimize the number of checkout fields
The more information your customers have to input into your checkout form, the more annoyed they could become. Thankfully, many browsers save data like username, address, and even credit card details from previous purchases. But that’s only if a user opts into such a feature. It’s still best to try to limit the number of fields that are displayed, as well as which ones a customer is required to fill out.
A Baymard Institute study found that most checkout pages only need eight form fields. Now, that may be too few for your store but their data also shows that the average number of Checkout page conversions is directly related to the number of checkout fields — so the more you can minimize the number of fields, the better.
There are a few different ways you can reduce the number of fields to improve checkout flow. You can use the block editor when editing your WooCommerce checkout page, or the Customizer if your theme does not support block editing. You can also use a plugin or add custom functions to your child theme’s functions.php file.
How to edit or remove WooCommerce checkout fields with the block editor:
If you’re using a block theme, you can edit fields with the Site Editor by going to Appearance → Editor → Pages → Checkout. Otherwise, you can navigate to your WordPress dashboard and go to Pages → Checkout.
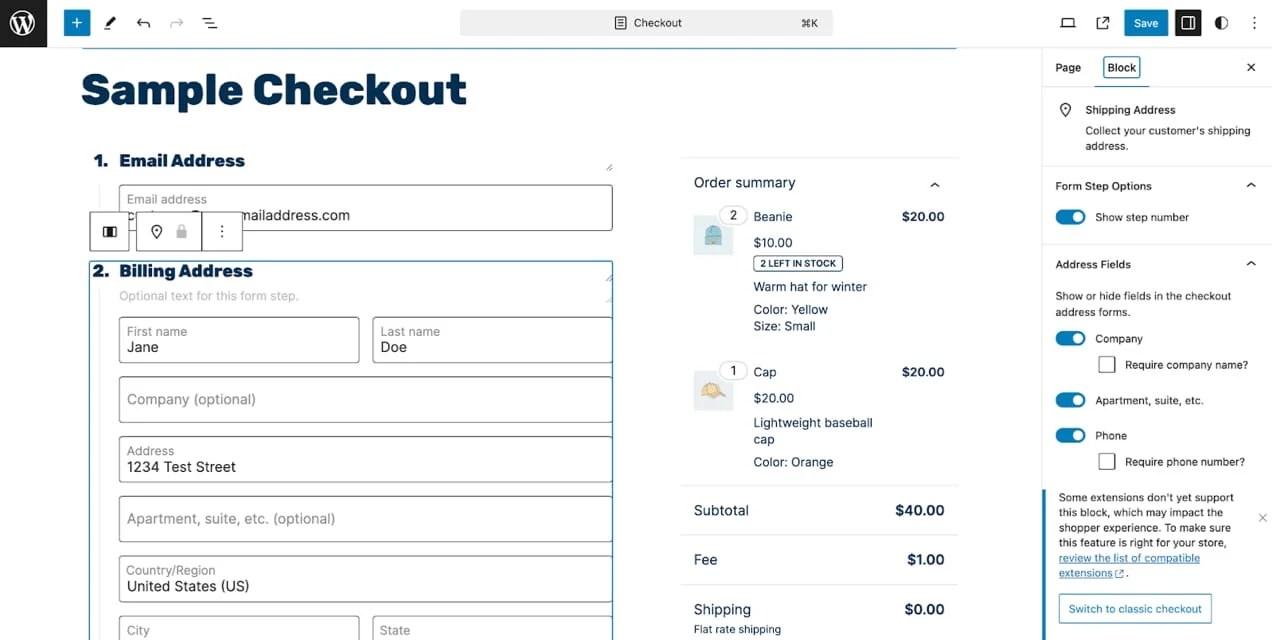
With the block editor, you’ll only be able to edit or remove a few elements. These include:
- Order notes
- Terms and conditions
- Coupon code
- Phone number
- Company name
- Address 2 (apartment number, suite, etc.)
- Section headings and step numbers
- Section descriptions
- Return to cart link
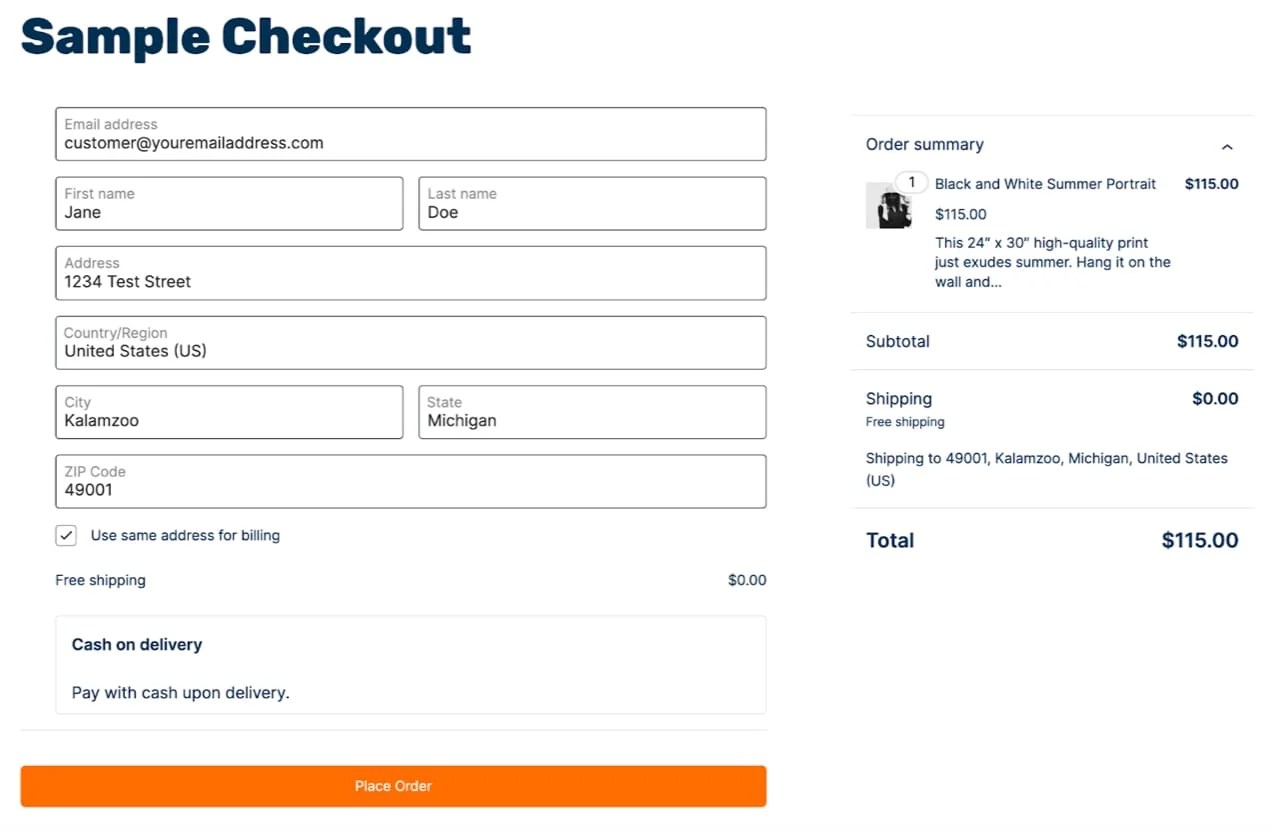
Here’s what your custom WooCommerce checkout page would look like if you removed all of the above options in the block editor.
How to use the Customizer to remove or edit WooCommerce checkout fields:
Depending on your theme, you may need to use the Customizer to hide a few fields. In the Customizer, there are fewer customization options than with the block editor.
Under Appearance → Customizer in your WordPress dashboard, you’ll find a variety of options to customize your WordPress site. In the left-hand menu, navigate to WooCommerce → Checkout.
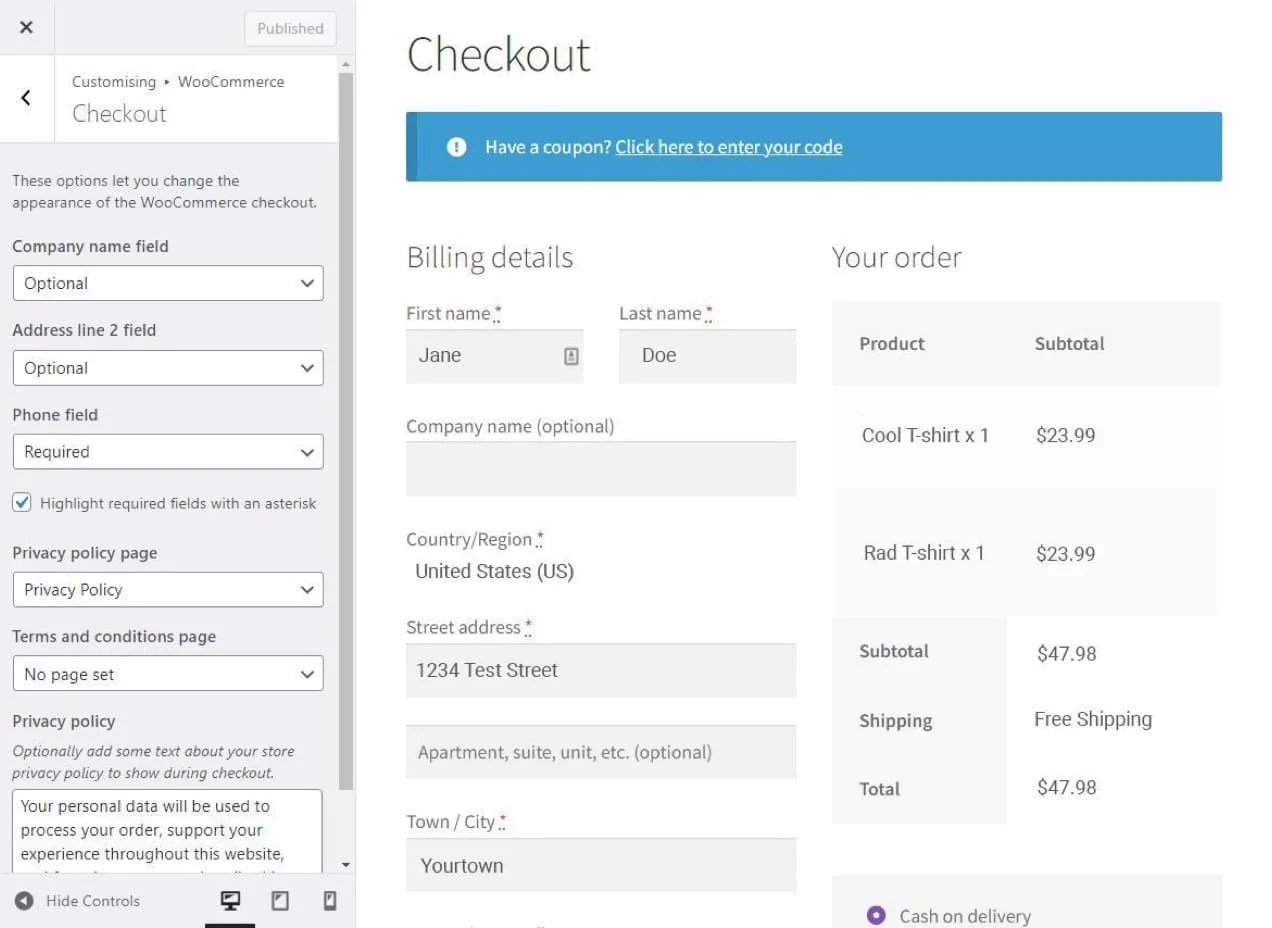
Here, you can hide the Company name, Address line 2, and Phone fields. You can also leave the Privacy policy field blank to remove that from the checkout page.
How to remove or edit fields using a WooCommerce checkout field editor plugin
If you need more advanced options, you may want to try an extension specifically designed to allow you to remove, add, and edit the WooCommerce checkout fields. For this example, we’ll use the Checkout Field Editor extension.

The Checkout Field Editor extension gives you the option to edit, remove, and add fields in three different areas: Billing Fields, Shipping Fields, and Additional Fields. When you add, edit, or remove fields in each area, they will show up in (or disappear from) those specific areas of the checkout page.
You can disable fields by ticking the checkboxes on the left-hand side of each row and selecting the Disable/Remove button.
Be aware that disabling core fields (highlighted in purple) may cause issues with your checkout or conflicts with other plugins that may rely on those fields.
How to remove or edit WooCommerce checkout fields using PHP functions:
Note: This will only work if your checkout page uses the [woocommerce-checkout] shortcode. It will not work with a checkout page built with the block editor.
If you’re not using the block editor for your custom WooCommerce checkout page, you can use code to remove or edit checkout fields. You should place PHP actions and functions in your child theme’s functions.php file.
Download the child theme’s functions.php file from your server using an SFTP service like FileZilla or Cyberduck. You can edit functions.php in a text editor like Notepad++.
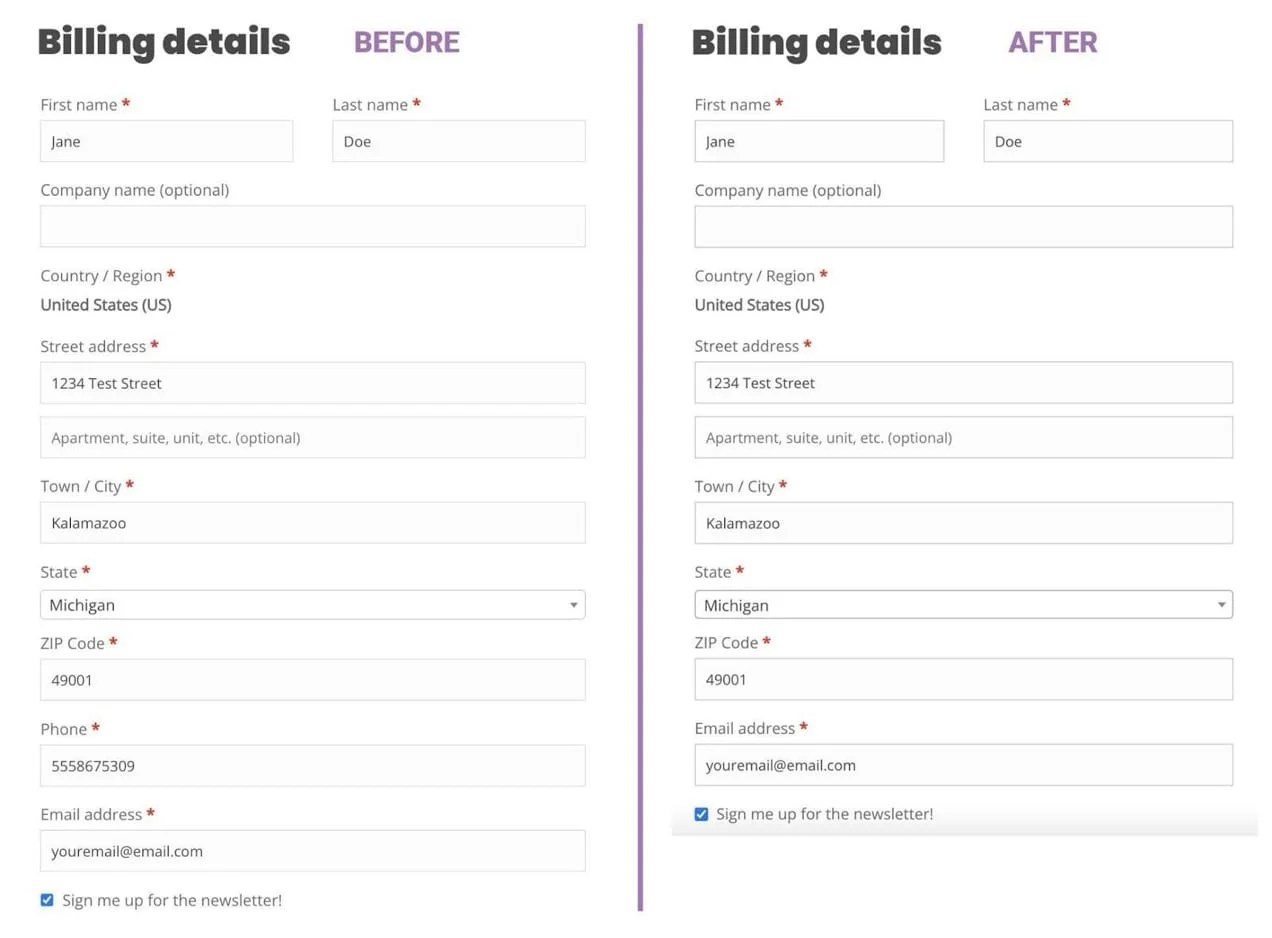
In your functions.php file, add the code for the fields you want to remove. As an example, let’s remove the phone number field from the checkout page.
add_filter( 'woocommerce_checkout_fields', 'remove_checkout_phone_field' );

function remove_checkout_phone_field( $fields ) {

unset( $fields['billing']['billing_phone'] );

return $fields;

}
Here’s a before and after of the billing fields area, demonstrating the edit:
Remove site header navigation and footer
While it might seem useful to show the header navigation and site footer on your checkout page, it’s more likely to be a distraction that leads to cart abandonment. You may want to display your site’s logo in the header during checkout to ensure a consistent, branded experience, but you’ll want to get rid of anything else that might cause shoppers to navigate away from the checkout page.
If you’re using a theme that supports the block editor, you should be able to edit or remove the header and footer by creating a new checkout template for use on your WooCommerce checkout page via the full site editor. If you’re using a page builder plugin, check the documentation to see if it offers an easy method for checkout template creation. Many popular page builder plugins for WordPress offer such options.
You can also hide the header and footer from a specific page completely by using some custom CSS or PHP.
How to remove the header and footer from the checkout page using the site editor:
For this example, we’ll look at removing the header and footer from the WooCommerce checkout page in the site editor using the Twenty Twenty-Four theme.
You will not be able to make these changes with the block editor simply by editing the checkout page on the Pages section of your WordPress dashboard. You will need to actually edit the WooCommerce checkout page template by going into Appearance → Editor → Templates → WooCommerce → Page: Checkout and then click the pencil icon to edit the template.
From there you can simply click on your header and footer blocks and delete them. Make sure to save changes.
Check out this short video to see the process in action:
How to hiding the site header and footer via CSS
If your theme doesn’t provide an easy way to customize the WooCommerce checkout page by using the block editor or another drag-and-drop editor tool, you can always use CSS to hide the header and footer on your custom checkout page.
.page-id-11 #header, #footer{

display:none;

}
Where .page-id-11 is above, insert whatever your page id number is after .page-id-.
Place this code in the Additional CSS field in the Site Editor (or Customizer if your theme doesn’t support full site editing) or directly in your child theme’s style.css file.
How to remove the site header and footer in functions.php
Note: This will not affect checkout pages that use the block editor.
If you want to use some PHP functions to remove the header and footer on your custom checkout page, you can add the following code snippet to your functions.php file:
function remove_header_footer_from_checkout() {

if(is_checkout()){ ?>
<style>header { display:none; }</style>
<style>footer { display:none; }</style>

<?php }
}

add_action( 'wp_head', 'remove_header_footer_from_checkout');
Provide convenient payment options
When setting up your online store, It’s important to consider the payment methods your customers are most likely to want. By using trusted payment processors and offering convenient alternatives like digital wallets, cryptocurrency, or third-party payment plans, you can make checkout much easier for your customers.
The payment gateways you use will depend on what country your business is based in, what currencies you want to accept, and where your customers live. There are around 70 payment extension options in the WooCommerce extension library alone, so if you’re not sure which ones you’d like to use, that’s a great place to start your research.
Some popular payment processors include WooPayments, Stripe, WorldPay, and Authorize.net. Digital wallet options include PayPal, Venmo, Google Pay, Apple Pay, Amazon Pay, and CashApp. For third-party payment plans, Affirm, Klarna, Afterpay, and even PayPal’s Pay Later feature are all well-established, trusted, and simple to integrate into your WooCommerce store.
If you choose WooPayments, you’ll benefit from multiple payment options in a single extension. It’s available in 38 countries and accepts over 130 currencies through traditional debit and credit cards, but also Apple Pay, iDeal, Bancontact, and more. It does all of this while keeping customers on your site — further streamlining the checkout experience and boosting conversions.
You can manage everything from within the WordPress dashboard and request fast (sometimes instant) transfers to your bank account. Plus, its native integration with Woo also means a faster setup of payment plan providers like Affirm and Afterpay, as well as funding providers like Stripe Capital.
Finally, use WooPayments to take in-person payments and sell anywhere you go. Eligible merchants can even use their iPhone as a payment terminal so there’s no extra hardware to take with you.
Pre-fill saved customer information, but allow guest checkout
For business owners, it’s a lot less hassle when a shopper creates an account. Logged-in users can see their order history and available downloads, save and edit credit card information, and update billing details and shipping addresses. Having these account details at the ready can make it quicker for customers to make a purchase in the future and can reduce support tickets.
If a user creates an account, you can offer them other benefits as well. For instance, you could use the Shipping Multiple Addresses or Saved Addresses for WooCommerce extension to give account holders the option of saving several different billing and shipping addresses to their account. You could also offer subscriptions, memberships, online courses, rewards programs, and referral opportunities.
Despite the upsides of account creation, some people just don’t want to create yet another account online (or at least not on their first purchase). Maybe they intend to make a one-time purchase, are in a hurry, or are worried about their account getting hacked. If you require that shoppers create an account, 22% will simply shop elsewhere. Fair enough. Convenience is king, after all.
Fortunately, unless the products or services you sell truly require a customer to create an account, you don’t need to mandate account creation during checkout.
You may be asking, “But if I don’t require customers to create an account, how will their information get saved so that the checkout process is faster?”
Never fear! There are other ways for shoppers to use saved information to complete their purchase.
Browser-based autofill
One method customers can use that requires no effort on your part is the autofill feature in their browser. Google, Safari (via iCloud), and Firefox accounts (among others) all have autofill features that allow usernames, passwords, credit card details, and address information to be stored. When they click on relevant fields during an online checkout process, their browser will suggest autofill options from the information they previously saved.
Autofill plugins
In case potential customers don’t use the autofill feature in their browser, you can always use an extension like Google Autofill Customer Addresses to pre-fill address fields based on the user’s IP address.
Saved payment details in digital wallets
Another way people can use saved information is by paying with a digital wallet. Their accounts with Google Pay, PayPal, Venmo, Apple Pay, and others contain payment details and billing information that can help speed up store checkout.
So, now you can feel a bit more relaxed about enabling guest checkout, but how do you still give customers the option to create an account during checkout? This is very simple to enable in WooCommerce → Settings → Accounts & Privacy.
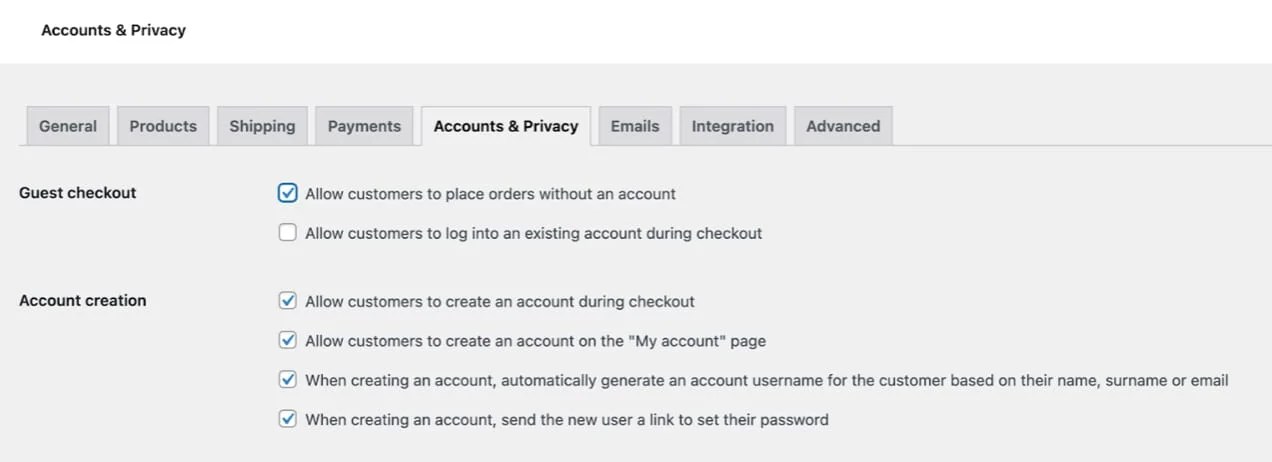
Check Allow customers to place orders without an account. Then check Allow customers to create an account during checkout and save changes.
Consider multi-step checkout or one-page checkout
The easiest checkout experience is a single checkout page design that fits completely in the user’s viewport. But this isn’t always possible. For instance, on mobile, your single page checkout can involve a lot of annoying scrolling even if you don’t have an excessive number of fields. Additionally, if your checkout requires more steps due to the type of product or service you’re selling, a single page checkout may be cumbersome even on a desktop computer.
One solution to this problem is to use a multi-step approach to your custom WooCommerce checkout page. A multi-step checkout, where the fields for each step display fully in the device viewport, can make the purchasing process much smoother for customers and help them know how far along they are in the process of completing their order.
The Flux Checkout for WooCommerce extension is a great multi-step checkout solution. With it, you can break the checkout process up into manageable sections, customize the number of fields in each step, and even use geolocation to autocomplete the customer’s address field.
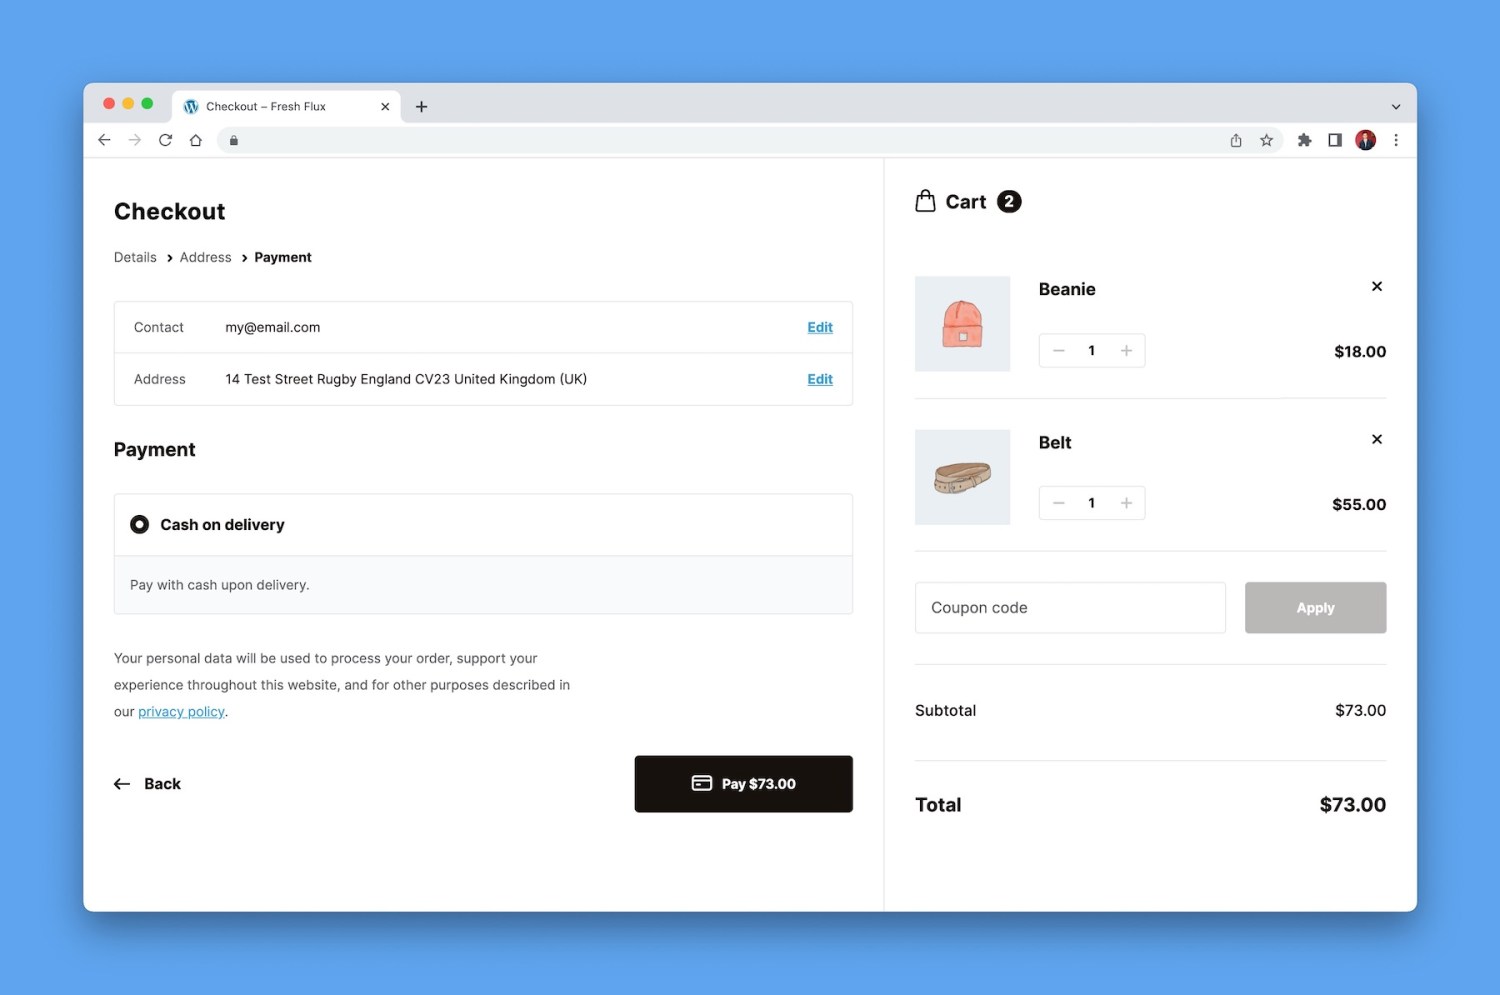
As each step of the process is completed, their information is saved and they are automatically moved along to the next step until finally completing payment.
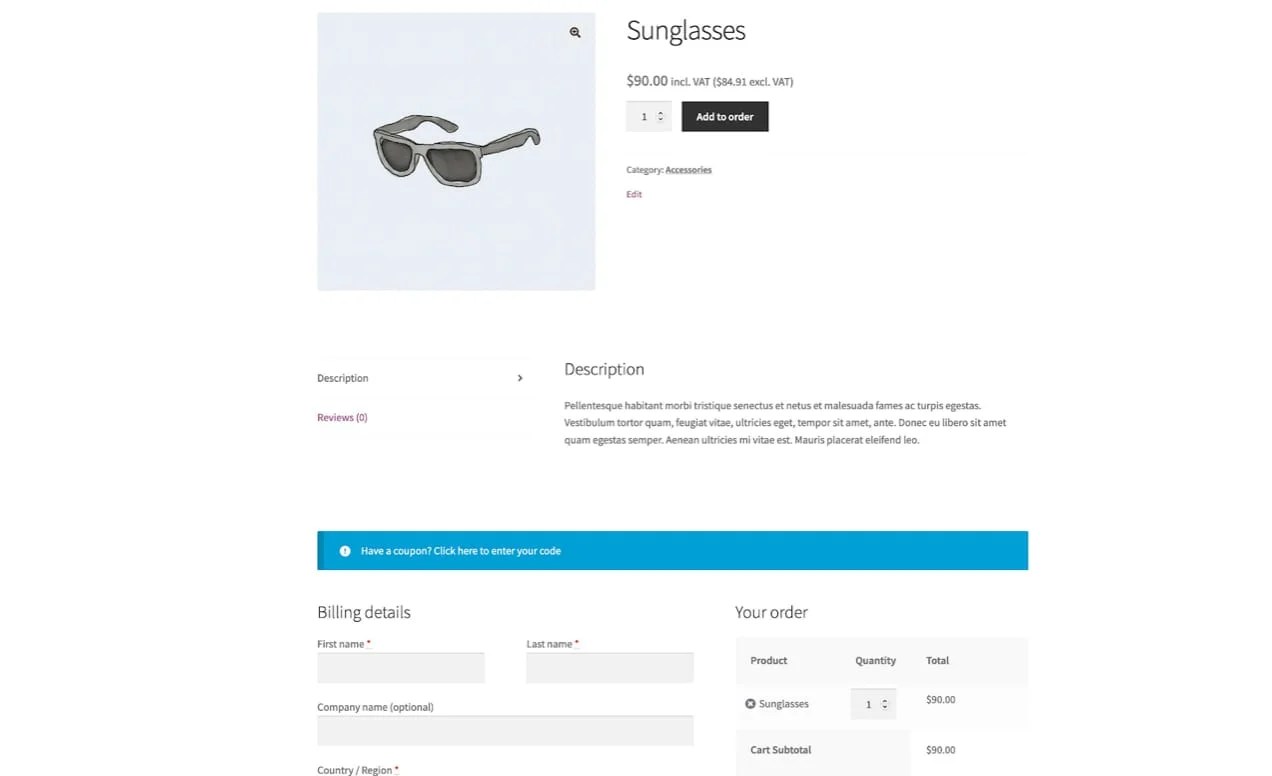
Alternatively, you could move the checkout form directly to your product page with a one-page checkout. This works best for sites with few products or when you want to create a targeted landing page tied directly to your digital ad campaigns.
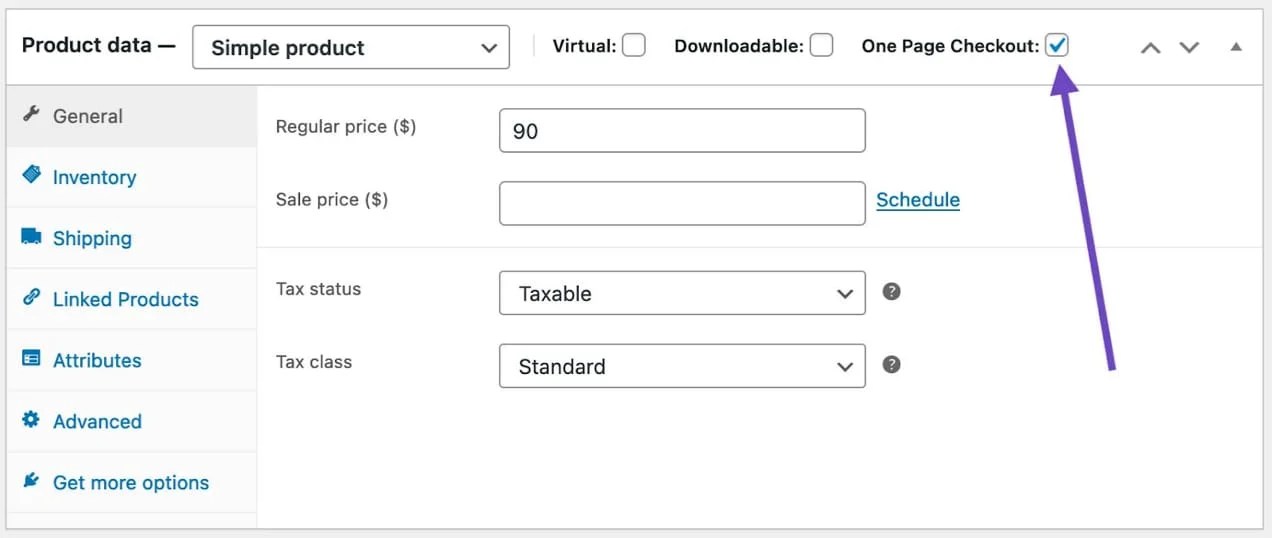
To accomplish this, you can use the WooCommerce One Page Checkout extension. WooCommerce One Page Checkout gives you the ability to place your checkout form anywhere on your site. You can add it to a product page in the Product data tab or you can manually add the shortcode [woocommerce_one_page_checkout] in the WordPress editor to any page, post, or custom post type.
Your checkout form will display right on the page you assign it to, helping to create an express checkout experience for your customers.
Automatically apply coupons to qualifying orders
In the default WooCommerce checkout experience, there’s a field for customers to apply a coupon code if they have one. Studies have shown that when customers encounter a coupon code field during checkout, they can feel like they are paying more than they need to if they don’t have a coupon code to apply to their order. They may leave your site to search for a coupon code, get distracted, and not return to finish their purchase.
You can avoid some of these abandoned carts by simply automatically applying coupons to qualifying purchases. Or, if there are multiple coupon options that might apply to an order, you can choose to have them displayed on the WooCommerce checkout page for the customer to easily select.
While WooCommerce’s default options for coupons don’t include a setting to automatically apply a coupon to a customer’s cart or display available coupons on checkout, you can enable this functionality with the Smart Coupons extension.
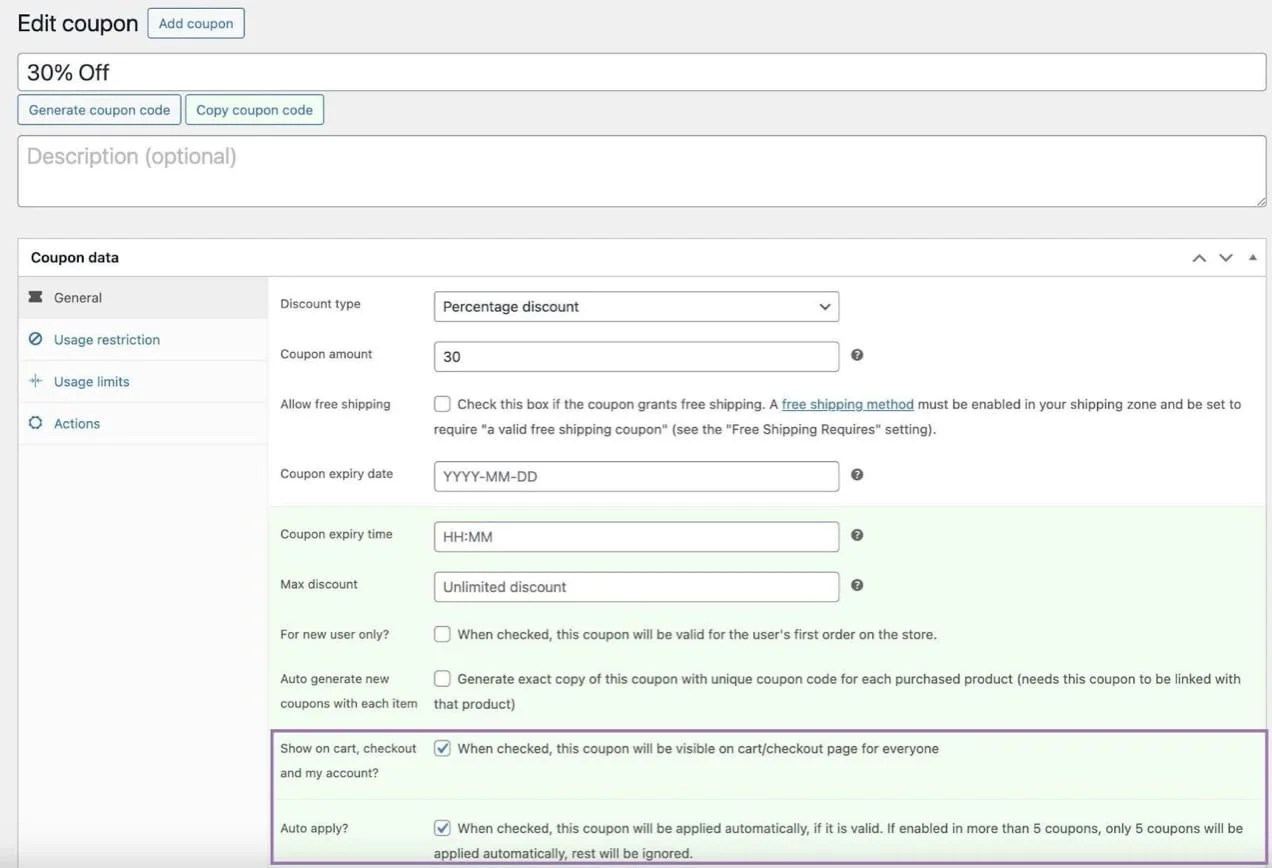
After installing Smart Coupons, go to Marketing → Coupons and either create a new coupon or select the one you want to appear on the checkout page or be automatically applied.
Under Coupon data → General, scroll down to Show on cart, checkout, and my account? and select the checkbox. If you want the coupon to auto-apply, select the checkbox next to Auto apply? and then save changes.
Now your customers won’t have to hassle with remembering coupon codes and can get through the purchase process more quickly.

Speed up page load time
While this isn’t necessarily a WooCommerce checkout page customization, per se, making sure that your WordPress website is optimized for fast load times can help make the checkout process quick and painless. Even if you are using caching plugins and a content delivery network (CDN), cart and checkout pages are usually excluded from serving cached content.
While using server-side cache and caching plugins are often recommended for sites so that relatively static content can be served quickly, you really don’t want highly dynamic pages like My Account, Cart, and Checkout to be cached for visitors. If they are, you can run into a number of issues, like:
- Customers being unable to update their cart
- Encountering incorrect cart items on the checkout page
- Cached checkout information from other user accounts showing up during customer checkout
- Recent purchases not displaying in My Account area
This is why, by default, WooCommerce-optimized hosting and most caching plugins will exclude these, and other dynamic pages, from caching. But this means that if you are relying on caching plugins and a CDN to speed up your site, without making other server-side optimizations, your non-cached pages like the checkout page, may load more slowly than the rest of your site.
There’s a lot that goes into creating a lightning-fast ecommerce site, which we can’t exhaustively cover in this article. Instead, we recommend that you reference this comprehensive guide to improving your WooCommerce site speed.
2. Improve checkout page appearance
Your WooCommerce checkout page may inherit styles from your theme or it may use the default WooCommerce styles. Regardless of the scenario, an out-of-the-box checkout appearance won’t be suitable for every online store.
You may want to change your checkout page’s styling to make it more consistent with your site’s branding or even just a simple font size tweak to make field labels easier to read. Or, better yet, ditch those field labels altogether and save space by using the placeholder text to label your fields.

To remove the field labels from a block-based checkout form, add the following CSS to your child theme’s style.css file or in the Additional CSS field in the full site editor.
components-form .wc-block-components-text-input label, .wc-block-components-text-input label {

display:none;

}

.wc-block-components-combobox.is-active .wc-block-components-combobox-control label.components-base-control__label, .wc-block-components-combobox:focus-within .wc-block-components-combobox-control label.components-base-control__label, .wc-block-components-form .wc-block-components-combobox.is-active .wc-block-components-combobox-control label.components-base-control__label, .wc-block-components-form .wc-block-components-combobox:focus-within .wc-block-components-combobox-control label.components-base-control__label {

   display: none;

}
You don’t want to leave the input fields totally blank, though, so you can add some code snippets to the your child theme’s functions.php file to customize the placeholder text as follows:
add_filter( 'woocommerce_checkout_fields' , 'override_placeholder_text_checkout_fields', 20, 1 );

function override_placeholder_text_checkout_fields( $fields ) {

$fields['billing']['billing_email']['placeholder'] = 'Email Address ';
 $fields['billing']['billing_first_name']['placeholder'] = 'First Name '; $fields['billing']['billing_last_name']['placeholder'] = 'Last Name '; $fields['billing']['billing_postcode']['placeholder'] = 'Postcode ';
$fields['billing']['billing_city']['placeholder'] = 'Town/City '; $fields['shipping']['shipping_first_name']['placeholder'] = 'First Name '; $fields['shipping']['shipping_last_name']['placeholder'] = 'Last Name '; $fields['shipping']['shipping_postcode']['placeholder'] = 'Postcode '; $fields['shipping']['shipping_city']['placeholder'] = 'Town/City *';

return $fields;
}
Whatever aspects you want to style, you can do so with a combination of CSS, actions, and filters. Experiment with your layout, fonts, color scheme, and field and button sizes. And don’t forget to make sure that your Checkout page is readable for accessibility purposes.
WebAIM’s color contrast checker as well as their recommendations on typeface readability are useful resources to make sure that your custom WooCommerce checkout page is accessible for the majority of users.
3. Improve customer satisfaction and foster loyalty
While streamlining the store checkout process is important, there’s so much more you can do with your checkout page to provide a great user experience. You can offer choices in shipping, order add-ons, and the opportunity to earn points and rewards.
You can style checkout forms to make these options take up very little space while still highlighting them during checkout. And, of course, the majority of these fields should be entirely optional.
Let’s look more closely at some ways that you can modify your checkout to focus on increased shopper satisfaction and loyalty.
Offer multiple shipping and delivery options
Over 60% of shoppers cite unexpected shipping costs, taxes, and other fees as a reason for abandoning their carts. 23% abandon their cart if they feel the delivery time is too slow.
You can manage your shipping zone options in WooCommerce → Settings → Shipping and select the shipping zone you want to edit.

Enable the free shipping method and save your changes. If you want to add another shipping method like expedited shipping, you can click Add shipping method, then select flat rate shipping. Choose a name for your shipping method, choose whether the shipping fee will be taxable, and enter a cost.
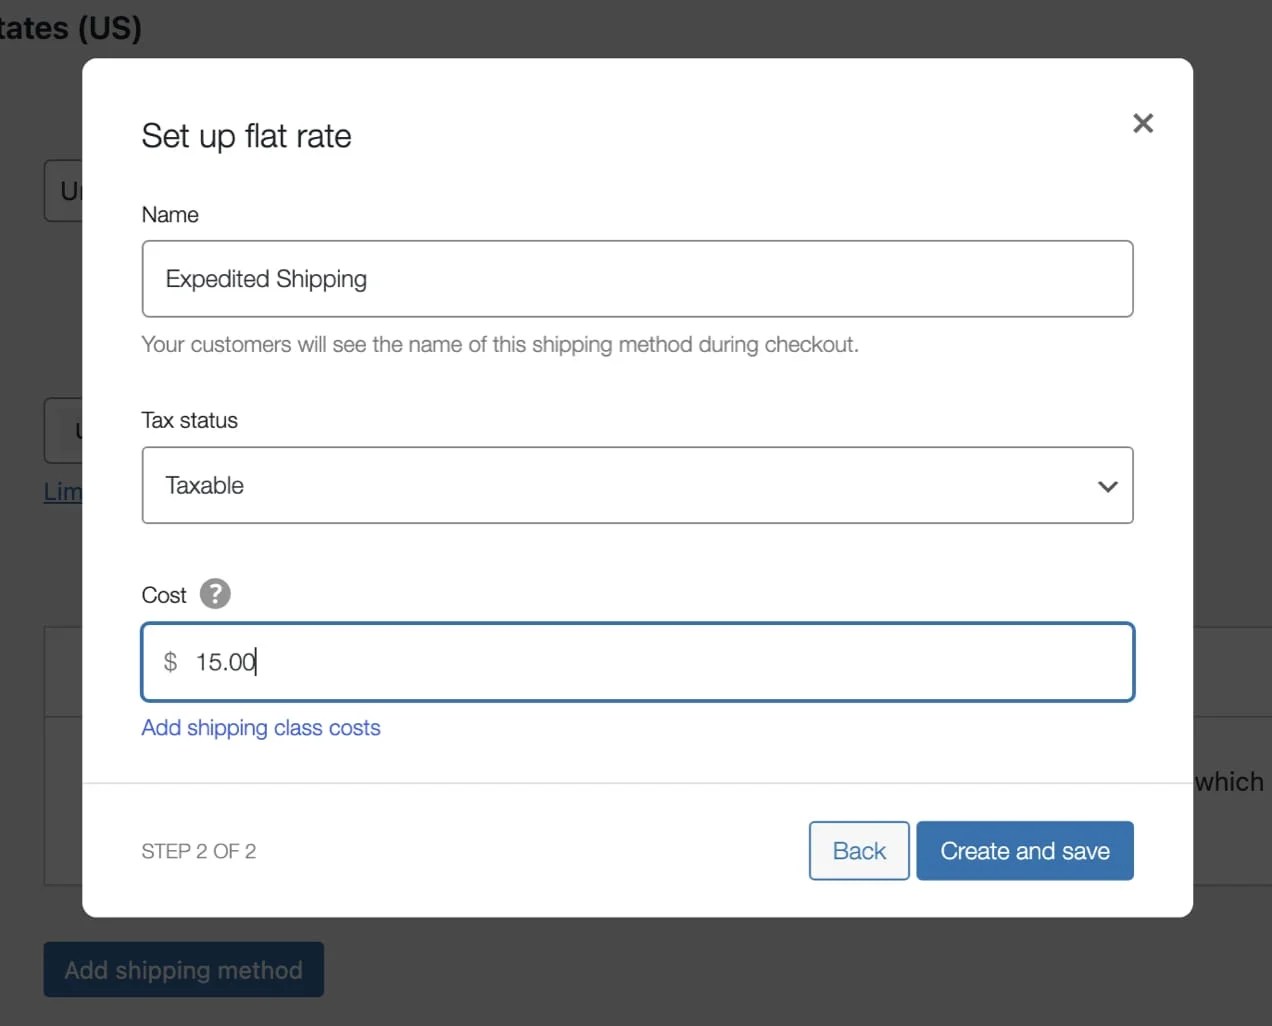
Create and save your new shipping method.
In addition to enabling free and expedited shipping methods, you can also let customers choose a specific date and time for their order to be delivered with Order Delivery for WooCommerce. This type of feature is especially useful if you run a restaurant, flower shop, or other business that offers local delivery.
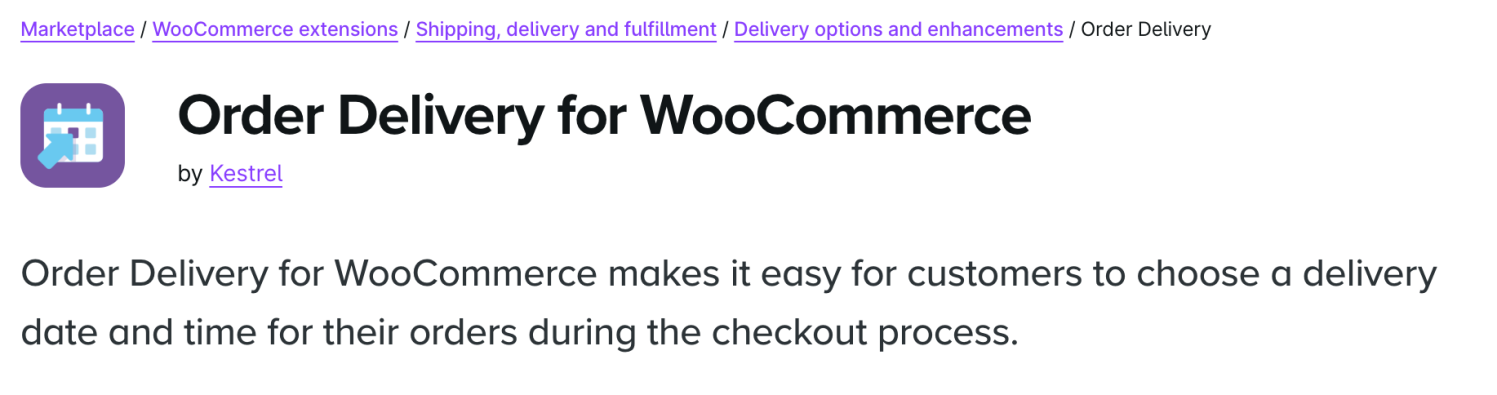
Here are some of the things you can do with Order Delivery for WooCommerce:
- Display a delivery date picker
- Show the estimated delivery period
- Let customers choose specific times or time frames for delivery
- Define the delivery timeframe for each shipping method
- Limit the number of orders that can be delivered on a specific day or time frame to prevent work overloads and delivery delays
- Charge additional fees to the customers for specific delivery days and time frames
- Assign dates where deliveries are not available (e.g. weekends and holidays)
By offering convenient shipping and delivery options to your customers, you’ll show shoppers that you care about their experience.
Include checkout add-ons
Offering optional services for your customers during checkout can be a great way to improve customer satisfaction as well as increase your average order value. You could use the Order Notes field for this, but that has a lot of drawbacks.
If you rely on the Order Notes field for these types of order customizations, it can be hard to keep organized while processing the order — especially if the customer has asked for several special services. There’s also no way to charge for additional services this way. Furthermore, you won’t have a very good way to track how many customers are requesting each add-on service that you might offer.

The best way to manage checkout add-ons is to use the WooCommerce Checkout Add-Ons extension. With WooCommerce Checkout Add-Ons, you can:
- Offer free or paid services like engraving or other personalization, shipping insurance, company swag, or rush processing
- Add gift options, such as gift messages, wrapping, and receipts
- Accept tips
- Accept file uploads
To stay mindful of the number of fields on your WooCommerce checkout page, you can display add-ons conditionally based on cart subtotal, certain products in the cart, or the value of another add-on.
Add trust symbols to your checkout (or don’t)
Another big reason customers will abandon their cart is if they don’t trust the site with their credit card information. Many shoppers simply won’t complete the checkout process if they don’t feel that the site is secure.
More hosting providers are automatically including a free version of a security certificate (SSL/TSL) with their hosting plans to meet current web standards (since 2017, Google has been flagging any website without a security certificate as unsafe). So it’s likely you already have a security certificate enabled on your WooCommerce site. If not, here’s how you can get a free SSL certificate.
Once you’ve got your SSL certificate enabled on your site, your transactions and other information submitted by visitors will be encrypted. But your customer won’t necessarily be aware that their transactions are secure. So how do you help reassure shoppers that your site is trustworthy?
There are a couple of schools of thought on this. The first one is that adding trust symbols to your checkout near your payment options or the “pay now” button can help with user confidence. Types of trust badges include:
- SSL certificate badge. You can contact your security certificate provider to see if they have any trust badges you can use.
- Accepted payments badge. Most of the payment gateway integrations for WooCommerce will either add accepted payment method images by default or give you the option to enable them in their settings. (Visa, Mastercard, Discover, etc).
- Third-party endorsements badge. These could include your Better Business Bureau accreditation, GDPR compliance status, etc.
- Policy-related badges. Use these to remind customers of your return policies and money-back guarantees at checkout.
The other perspective on this is that you should simply have a well-designed checkout and good security in place. Trust logos don’t really mean anything. Anyone can slap a fake trust badge on a checkout page to scam customers — they are just images after all. And those who know that may be more suspicious of websites with tons of trust badges on them.
Plus, these site seals are just taking up more space in your checkout. Some of the ones provided by third parties may even include JavaScript that unnecessarily slows down your page load time.
You could A/B test whether using a few trust symbols, many, or none at all, work best for your site. Start with the most useful information that has the least impact on page load times — like accepted payments and policy-related badges. If you do decide to use a security certificate badge or a third-party endorsement badge, avoid any that load their own javascript — and don’t display fraudulent endorsements.
Recommend additional products
Depending on the type of store you’re running and your customer base, including upsells on the WooCommerce checkout page might help or hinder your checkout page performance.
Some companies enthusiastically upsell multiple products to customers during checkout. Other ecommerce stores suggest related products only on product pages or in the cart where a customer might be reviewing their order to make sure they didn’t forget something.
Some people find upselling during checkout really annoying. It’s just another thing to distract from completing your purchase. But other folks might appreciate the opportunity to add something they forgot, or an extra item that would qualify them for free shipping, right before they make a payment.
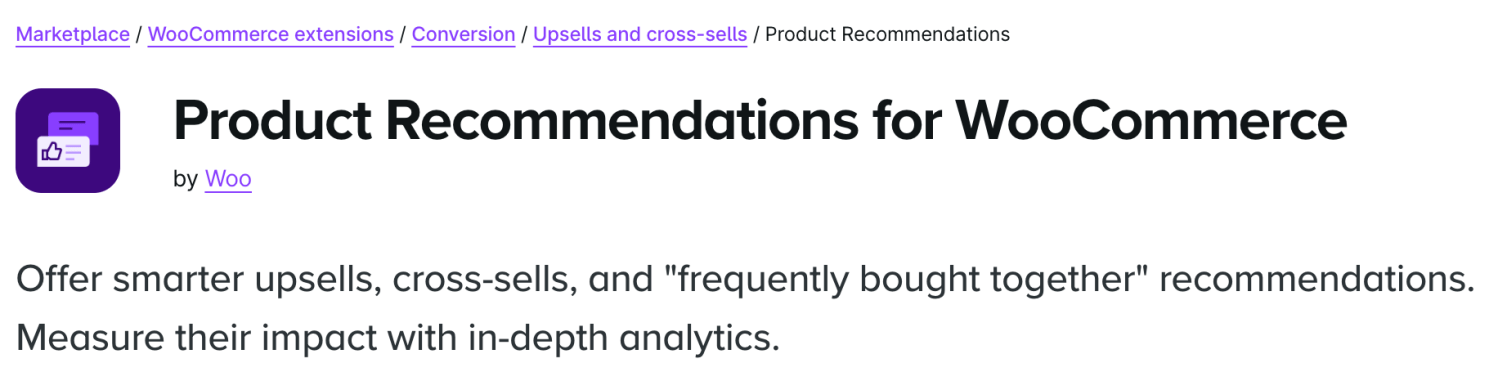
To experiment with whether recommending additional products on the WooCommerce checkout page is right for your store, try the Product Recommendations extension. With Product Recommendations you can customize where your upsells and cross-sells are displayed. Choose from:
- Shop page
- Product pages
- Category/tag pages
- Cart page
- Checkout page
- Order Pay page
- Order Received page
Do some A/B testing to find the most effective placement during the shopping process for your suggested products.
Offer a last-minute deal
One common way to deal with cart abandonment is by sending follow-up emails with special offers in hopes to convince them to complete their purchase. But in those precious minutes, hours, or days between when a shopper leaves the WooCommerce checkout page and receives one of these emails, they may have already purchased a similar product elsewhere. Why not try to keep your customers from leaving in the first place by offering them an exclusive, limited-time deal?
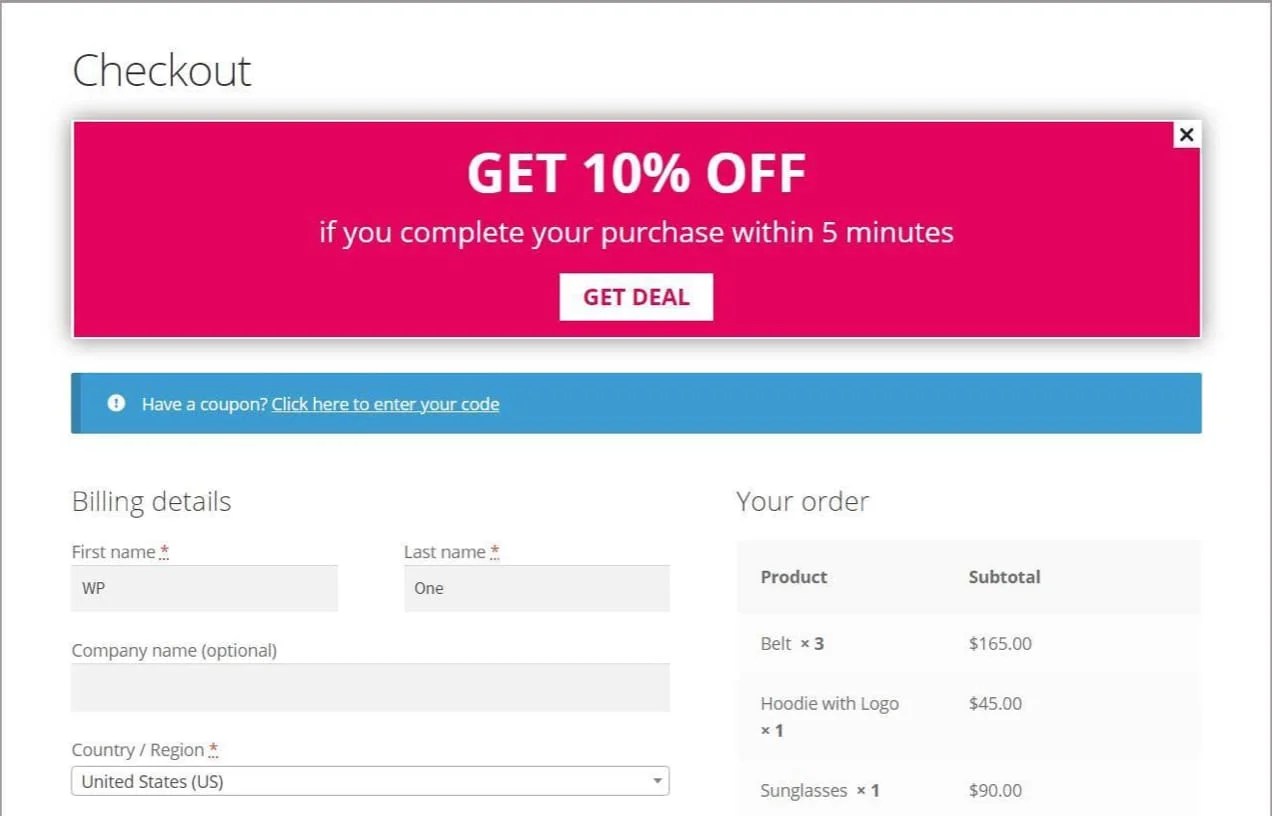
Checkout Deal for WooCommerce offers a way to display last-minute deals on the Checkout or Cart page that expire within a certain amount of time. Once the customer clicks on the “Get Deal” button, a single-use coupon is created that expires within the timeframe you set (e.g. five minutes).
It creates a sense of urgency that can lead shoppers who would have otherwise navigated away to comparison shop or saved their cart for later (and then forget all about it) to make their purchase right away.
4. Subscribe customers to marketing channels
Another goal you might have for your WooCommerce checkout page is to funnel customers to opt in to remarketing channels like email marketing and SMS text messaging.
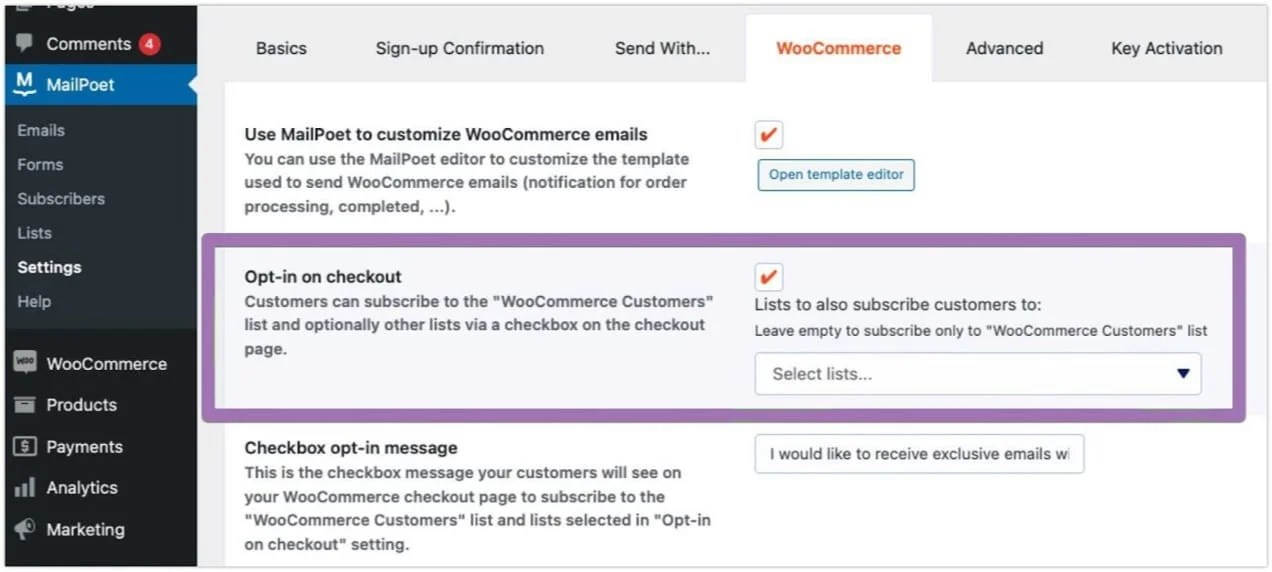
If you’re already using an email marketing platform, chances are there’s a WooCommerce integration for it. Most of these integrations will give you the ability to add an opt-in checkbox to your checkout page. For example, MailPoet includes settings for this as well as customizing the opt-in message.
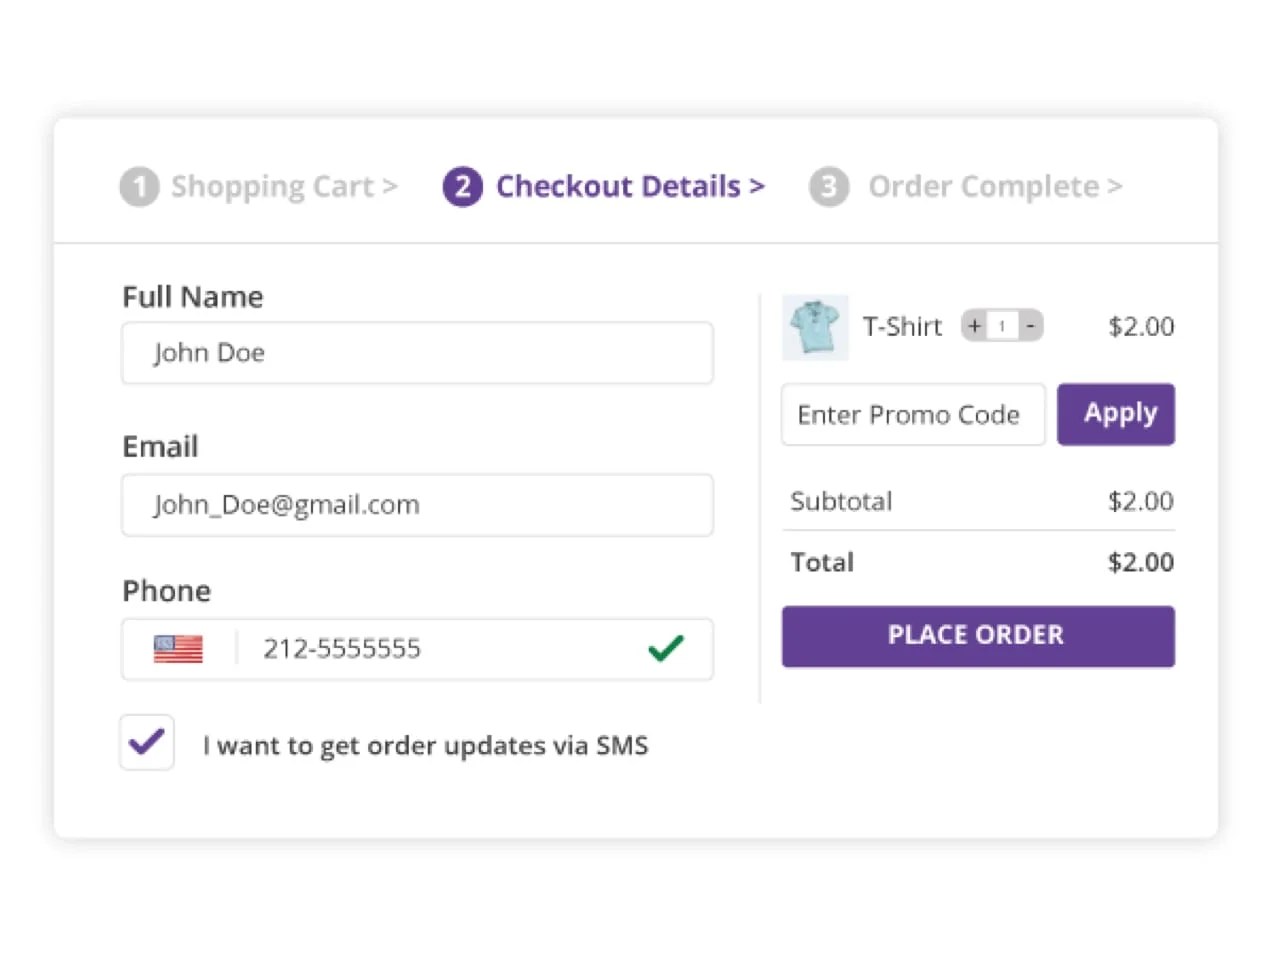
If you’d like to give your customers the option to receive order updates and special offers via SMS text messaging, you can use SMS for WooCommerce. This extension will add an opt-in checkbox below the phone number field on the WooCommerce checkout page.
The checkout page is your store’s final opportunity to make sure you stay connected with your customers before they navigate away. If you want to make sure they keep coming back, give them the opportunity to sign up for continued communication.
5. Meet specific business or legal requirements
Some online stores may need to add or customize fields on the checkout page to meet niche business requirements or legal obligations.
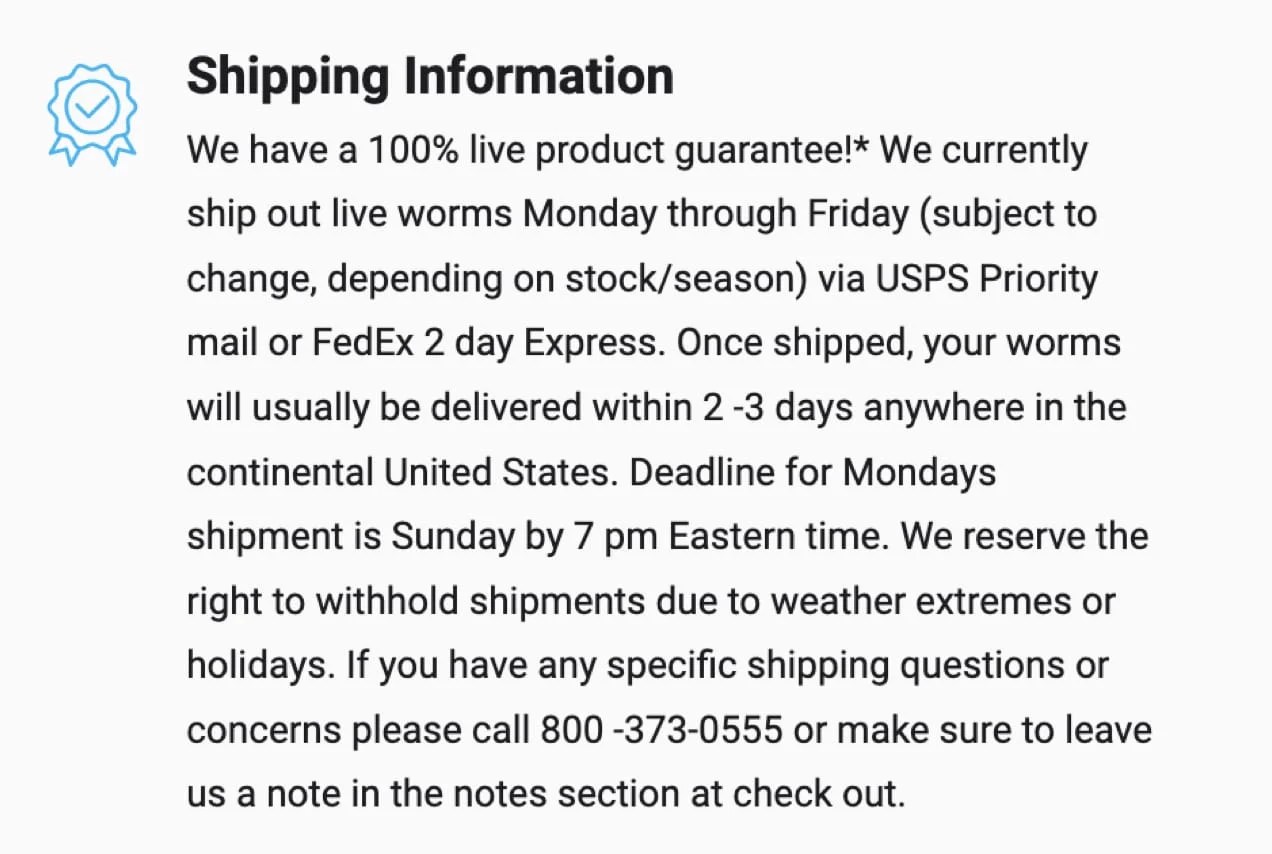
For example, if you ship live animals, like Uncle Jim’s Worm Farm, you might want to add information on how and when orders are shipped, delivery times, and include certain disclaimers.
Or perhaps you’re offering accommodation bookings for your bed and breakfast and you need to add an option to request early check-in or late checkout, add on booking upgrades like having a bottle of wine and a charcuterie tray waiting in a guest’s room upon arrival, or require a pet deposit.
There may also be situations where you need to conditionally display fields on the checkout page due to laws in different countries.
For instance, let’s say you’re a U.S.-based store that ships internationally and normally your policy is to not accept returns. Well, if you sell products to customers in the E.U., you’re required to provide them with a two-week, no questions asked return policy.
In a case like this, you might want to clearly display “No returns. All purchases final.” on your custom WooCommerce checkout page for shoppers in the U.S. However, for customers in the E.U., you may display something like “Returns accepted within 14 days of purchase.”
An easy solution to both adding extra industry-specific custom fields and making some of them conditional is to use Conditional Checkout Fields & Edit Checkout Fields for WooCommerce. You can select from 15 different field types, order them as you like on the WooCommerce checkout page, and make them display based on a variety of conditions and dependencies.
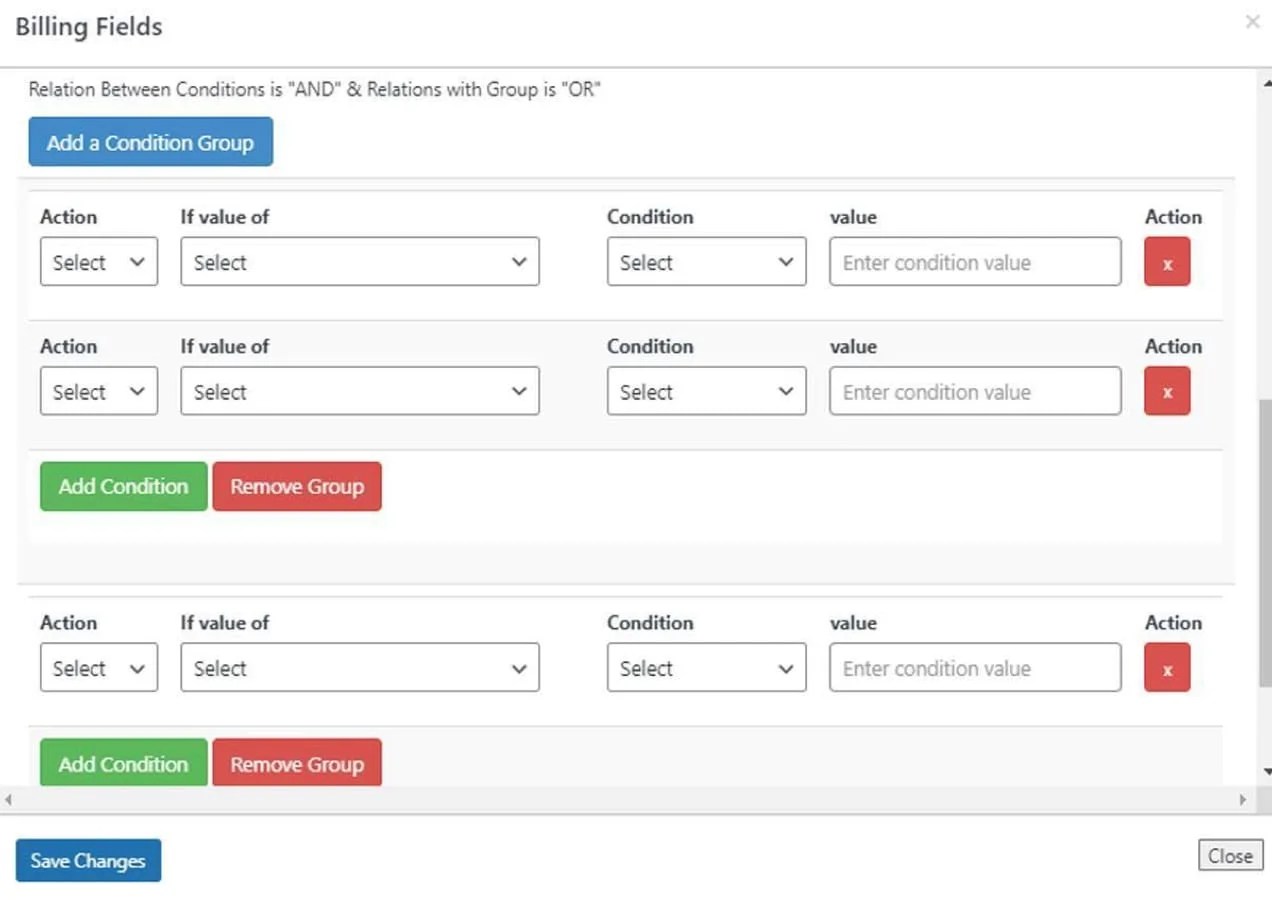
For instance, for a country-specific returns policy, you could create a custom paragraph field for your U.S. returns policy and another one for your E.U. returns policy. Then you could use conditional logic to display one or the other depending on the billing country that’s entered in the checkout form.
Here’s how the conditional fields interface looks in the admin area:
Create a checkout page that sells
↑ Back to topCustomizing your store checkout page is essential for increasing revenue, strengthening brand identity, and meeting the needs of your unique audience. But there’s a lot that can be involved in making an optimized store checkout that meets your needs and goals. No one solution will fit every online store.
The wealth of options available for customizing your checkout may seem a bit overwhelming, but by identifying the features you need and knowing how to implement them, you’ll be well on your way to creating a WooCommerce checkout page that stands out and performs well.
Frequently asked questions
↑ Back to topHow can I add a custom checkout field in WooCommerce?
You can add some types of custom fields using the site editor on the WooCommerce checkout page template, if your theme supports it. You’re limited to the types of content that you would be able to add to any page in WordPress, however.
For example, you won’t be able to add an interactive custom field whose input would then be added to the order. For this reason, the site editor is really best suited for adding informational text, infoboxes, and icons to your checkout page.
If you need to add an interactive custom field — like a checkbox, text input, or radio buttons — whose input will display within the order for both the customer and in the admin panel, then you’ll want to either use a plugin or add custom code for that purpose in your child theme’s functions.php file.
WooCommerce extensions that can add custom fields to your WooCommerce Checkout page include WooCommerce Checkout Add-Ons, Checkout Field Editor, Checkout Fields Manager, and Conditional Checkout Fields & Edit Checkout Fields for WooCommerce.
For complete instructions on how to use PHP to add custom checkout fields or modify core fields, review the WooCommerce developer doc Customizing checkout fields using actions and filters.
How can I speed up my WooCommerce checkout page?
If your WooCommerce checkout page is slow, chances are your whole site is slow, too. Before you do anything else, make sure you’ve followed these steps to check for the sources of your slow load times and fix those issues. Then, install a caching plugin and a tool like Jetpack Boost.
Next, you’ll want to eliminate unnecessary resources loading on your checkout page, like the site header and footer, and limit the number of custom fields.
Depending on how many steps you have for your checkout, a single page checkout may be faster, or a multi-step checkout may provide a smoother experience for your customers. You could even opt for a one-page checkout form that is added directly to a products page so customers can shop and check out on the same page.
How do I customize the WooCommerce checkout page without a plugin?
To customize the WooCommerce checkout page without plugins, you’ll want to use PHP and CSS.
This will only work with WooCommerce checkout pages using the [woocommerce-checkout] shortcode. It will not work with a checkout page built with the block editor.
To create custom checkout fields or edit fields in the existing WooCommerce checkout page, you can add actions and functions in your child theme’s function.php file.
The WooCommerce developer doc Customizing checkout fields using actions and filters includes instructions on how to use actions and filters to customize your checkout page. The Action and Filter Hook Reference doc has a complete list of actions and filters.
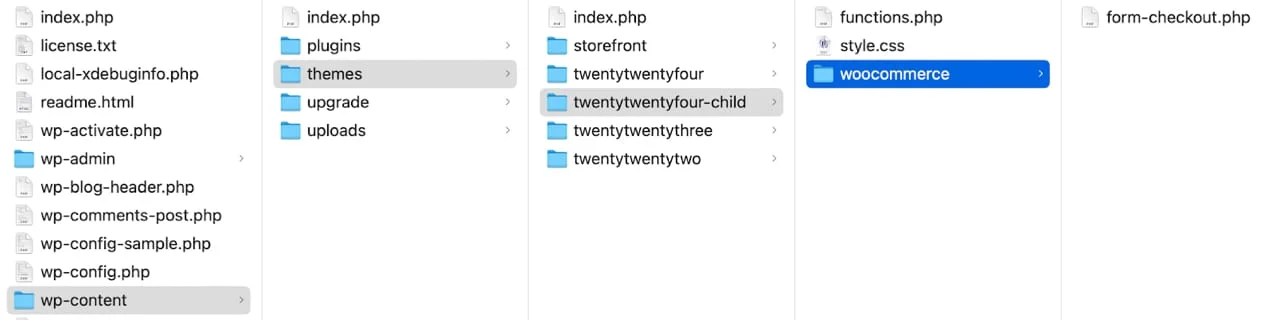
You can also code your own custom checkout templates from scratch. When completed, place your checkout page template in your child theme under the following folder structure:
child-theme/woocommerce/checkout/form-checkout.php
Just take care not to omit any action hooks or markup that are integral to the WooCommerce checkout page functionality or that other plugins you’re using make use of, as this could cause critical errors on your website. Make sure to test your custom checkout page on a staging or development site before using it on your live site to ensure there are no issues.
Once your checkout page is organized to your liking and includes all the features you need, you can style it using CSS added to your child theme’s style.css file. Another optional placement for your CSS is to add it to Additional CSS in the full site editor by navigating to Appearance → Editor → Styles→ Edit Styles → Additional CSS. If your theme doesn’t support full site editing, you can add your CSS to the Customizer in Appearance → Customize → Additional CSS.
How can I improve my checkout conversions?
There’s a lot of ways to improve your checkout conversions and they aren’t all limited to an optimized checkout page. Here’s a brief list of ways you can boost sales both before, during, and after checkout:
- Offer unique products at reasonable prices
- Strategically use sales and coupons to encourage purchases
- Improve load time across your WooCommerce site — including the checkout page
- Make sure your website is secure with an SSL certificate and a security plugin like Jetpack Security
- Minimize the number of fields on your checkout form — if you need to add a custom field, try to make sure it doesn’t disrupt the checkout process
- Streamline your checkout form appearance
- Style your WooCommerce checkout page so that matches the rest of your site
- Offer free shipping and expedited shipping
- Offer express checkout with digital wallets
- Allow guest checkouts
- Make use of incentives like points and rewards and offer savings if a customer signs up for a membership or subscription
- Include multiple payment options (but not so many that it confuses customers)
- Suggest product add-ons like gift-wrapping or personalization
- Create a sense of urgency with messages on your customized WooCommerce checkout page about offer expiration times or how far away in spending customers are from qualifying for free shipping
- Opt-in shoppers to email marketing and SMS texts so you can stay connected and bring them back to your WooCommerce store
- Optimize your digital ad creative and targeting so that you’re bringing the right customers to your store in the first place
How can I change the default WooCommerce checkout page?
In WooCommerce → Settings → Advanced you can assign any page that you’ve created to be used as your customized WooCommerce checkout page. You can then use the block editor to add the WooCommerce checkout form and make some minor customizations.
If your WordPress theme does not support the block editor, you can add the shortcode [woocommerce_checkout] to your custom checkout page to display the WooCommerce checkout form.

About