Overview
↑ Nach obenRequirements
↑ Nach oben- An Avalara account
- WooCommerce 3.9.4 or newer
- WordPress 5.6
- PHP 7.4 or newer (you can see this under WooCommerce > Status)
- Taxes enabled on your WooCommerce store (head to WooCommerce > Settings, and ensure that the Enable tax rates and calculations checkbox is selected. If not, select it and click the Save changes button to continue)
Installation
↑ Nach obenAdd to site
Make sure you have your WooCommerce store set up on your WordPress account and your store URL is publicly accessible.- On the WooCommerce dashboard, select the Add to site option. It displays your available WooCommerce sites on your WordPress account.
- Select an existing site to install the Avalara for WooCommerce plugin.
If you want to add a new store, select the Add a new site option and provide the URL of your WooCommerce store to install the plugin.
The Installing extension page shows that the plugin installation is in progress. After the installation is complete, it displays the plugin page. You can proceed with connecting and configuring your plugin.
Download and install
- Download the extension from your WooCommerce dashboard.
- Go to Plugins > Add New > Upload and select the ZIP file you just downloaded.
- Click Install Now, and then Activate.
- Click Configure and read the next section to learn how to set up and configure the plugin.
Getting started
↑ Nach oben-
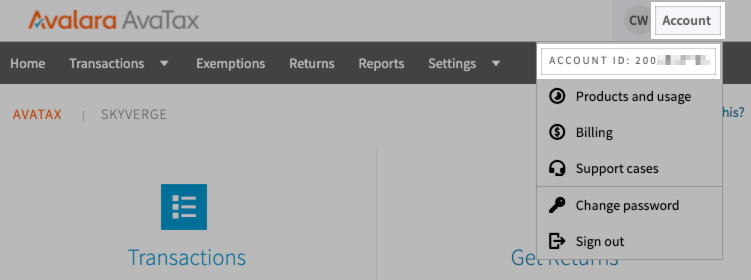
- Login to Avalara.
- Select Account and copy your Account ID to add to the plugin settings.
-
- If you recently created your account, you should have received your license key via email from the account admin. If you don’t have that email, you can reset your license key by following these steps:
- Go to Settings > License and API Keys > Generate License Key.
- Click Generate. This will create a new license key that you’ll need to use anywhere a license key is required, including the plugin settings.
- From your WooCommerce site, go to WooCommerce > Settings > Tax > AvaTax and paste these values in the Account Number and License Key fields.
- If you recently created your account, you should have received your license key via email from the account admin. If you don’t have that email, you can reset your license key by following these steps:

- Click Save Changes. When the page refreshes, you’ll be able to enable Tax Calculation and Address Validation.
Extension settings
↑ Nach obenConnect to Avalara
- Account ID: Enter your Avalara account ID. Click here for instructions on finding your account number.
- License key: Enter your Avalara license key. Click here for instructions on finding your license key.
- Connect to Production: Connects your WooCommerce store to your default company in your production account in Avalara. Use this account to calculate taxes for customer transactions on your storefront.
- Connect to Sandbox: Connects your WooCommerce store to your default company in your sandbox account in Avalara. Use this account to perform test transactions. You can switch between your multiple Avalara accounts by entering the respective Account ID/License key and selecting Update Connection.
Advanced Settings
↑ Nach obenTax Calculation
- Enable tax calculation: Allow AvaTax to calculate taxes for your store. This will override all configured WooCommerce tax rates and only use rates from AvaTax.
- Save transactions in Avalara for reporting: Submit transactions as “committed” any time the order is sent to AvaTax (which will not be editable). Disable leaving transactions as “uncommitted” in AvaTax for your manual review and commit.
- Company name: Displays your default company name if you have configured a single company in Avalara. If you have multiple companies, it displays a drop-down to select the company of your preference.
- Calculate Colorado retail delivery fee: Set to enable calculation of the Colorado retail delivery dee automatically. This option is available only to those users who have enabled Colorado in the nexus. Retails delivery fee collection does not apply to all business. Read more information.
- Shipping tax code: The default shipping tax code for all shipping methods in your store. FR is used by default. Start typing in this field to search and select the default tax code from the auto-lookup results.
Address validation
- Validate address: Allow customers to validate their addresses at checkout for US and Canada using the Validate Address option. After you set up address validation, it displays the Validate Address button for billing and shipping addresses at the Checkout page when placing orders. You need to select the Validate Address button to validate your address.
Exemption certificate management
- Enable exemption certificates: Enables WooCommerce admins and storefront customers to add, create, or manage exemption certificates. The plugin reads the country or exposure zone details from your nexus configuration. This option is available to you and enabled by default only if you have a subscription to the Avalara exemption certificate management service.
Transactions outside the US
- Collect Business VAT ID: Allow customers to enter a VAT ID at checkout.
- Calculate customs duties: Allow customers to calculate customs duties for orders outside of the US. In AvaTax, line items must have fully qualified tariff code to calculate customs duties for the destination country. After you enable this, you need to connect to AvaTax again to synchronize your products in WooCommerce with AvaTax. You also need to select the the countries outside of the US to automatically assign the HS Codes. The following settings are available only after you enable this options:
- AvaTax username: If taxes should be calculated in the cart, calculate taxes in the cart for international addresses.
- AvaTax password: Allow customers to enter a VAT ID at checkout.
- Countries for HS Code assignment: Select the countries outside of the US where you want to calculate the customs duties. Avalara assigns HS Codes automatically only for the selected countries.
- Sync products with Avalara: Select Connect to synchronize your products in WooCommerce with Avalara.
Additional setting
- Avalara Transport: Specify who will be responsible for the transportation of goods in a VAT transaction. This setting is available when you edit the specified shipping method at Settings > Shipping > Add Shipping Zone > Add Shipping Method.
Logs
- Enable logging: Log API requests to the WooCommerce > Status > Logs to assist with troubleshooting. You can view the transactions logs at .
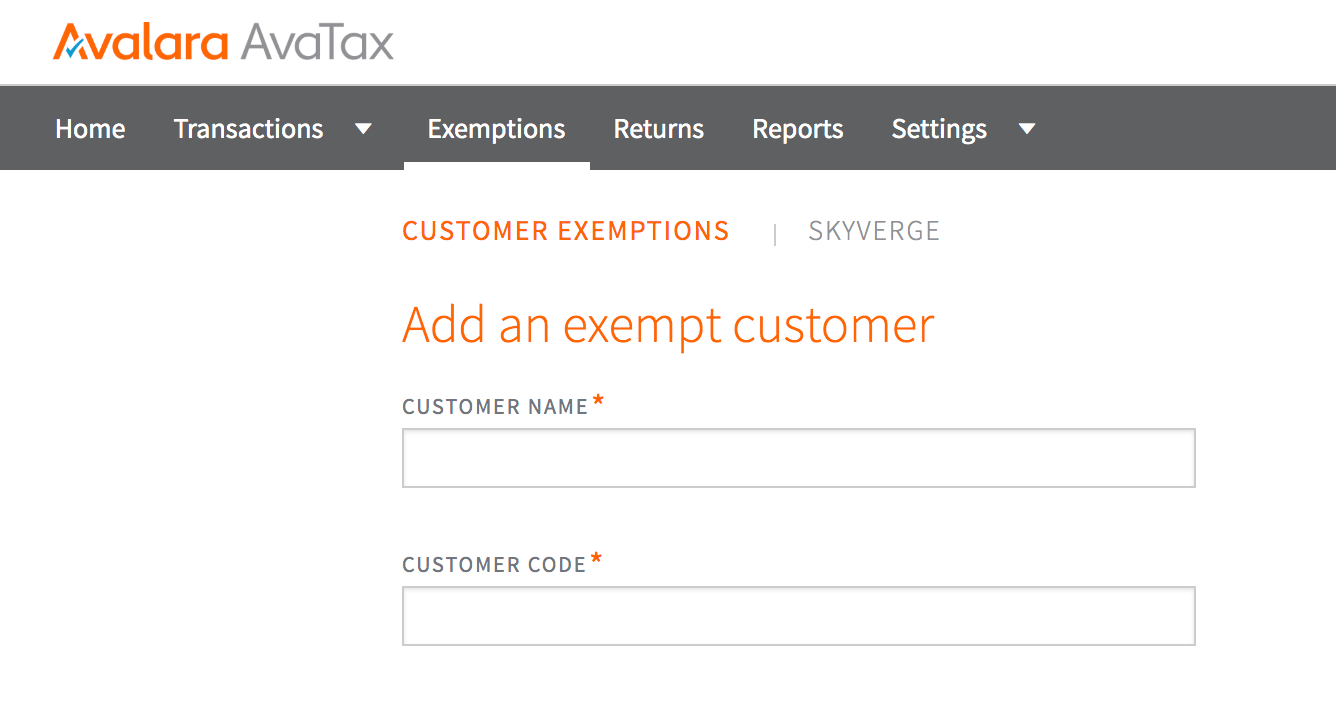
Exempt users
↑ Nach obenExempt users in AvaTax
By setting up exemptions directly in AvaTax, you can ensure that customers are exempt from taxes whether they’re a registered user of your site or a guest. To do this, set the user’s email address as thecustomer code in the AvaTax exemption certificate. Their exemption will then be applied based on their eligibility in AvaTax when they enter their email address at checkout.
Exempt users in WooCommerce
You also set up exemptions in WooCommerce by going to Users, selecting the user in question, and updating the Tax Exemption field. When this user places an order on your site, they’ll be exempt from taxes (partially or fully, based on the type of exemption). Click here to learn more about tax exemption.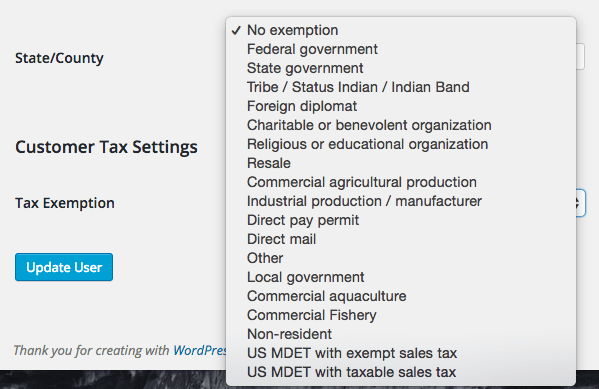
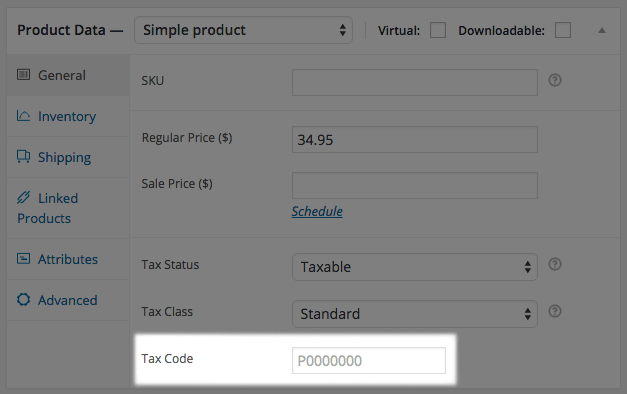
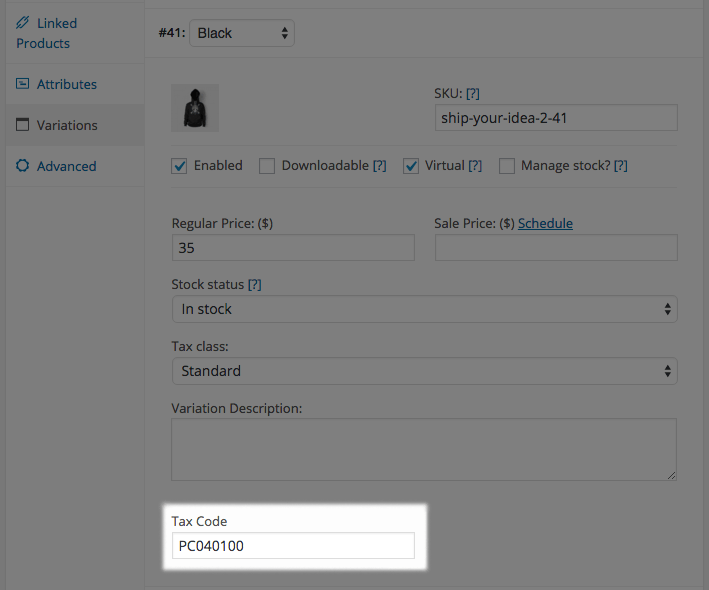
Setting product tax codes
↑ Nach oben
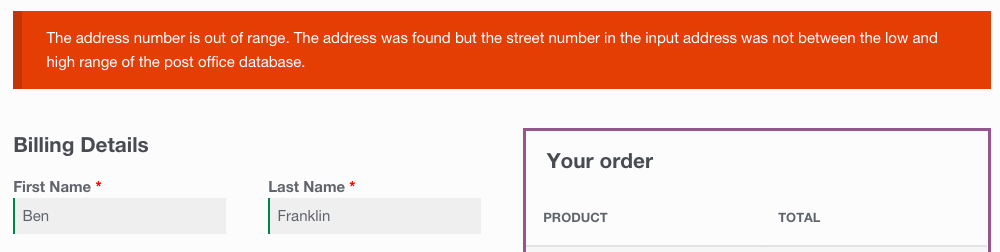
Address validation
↑ Nach oben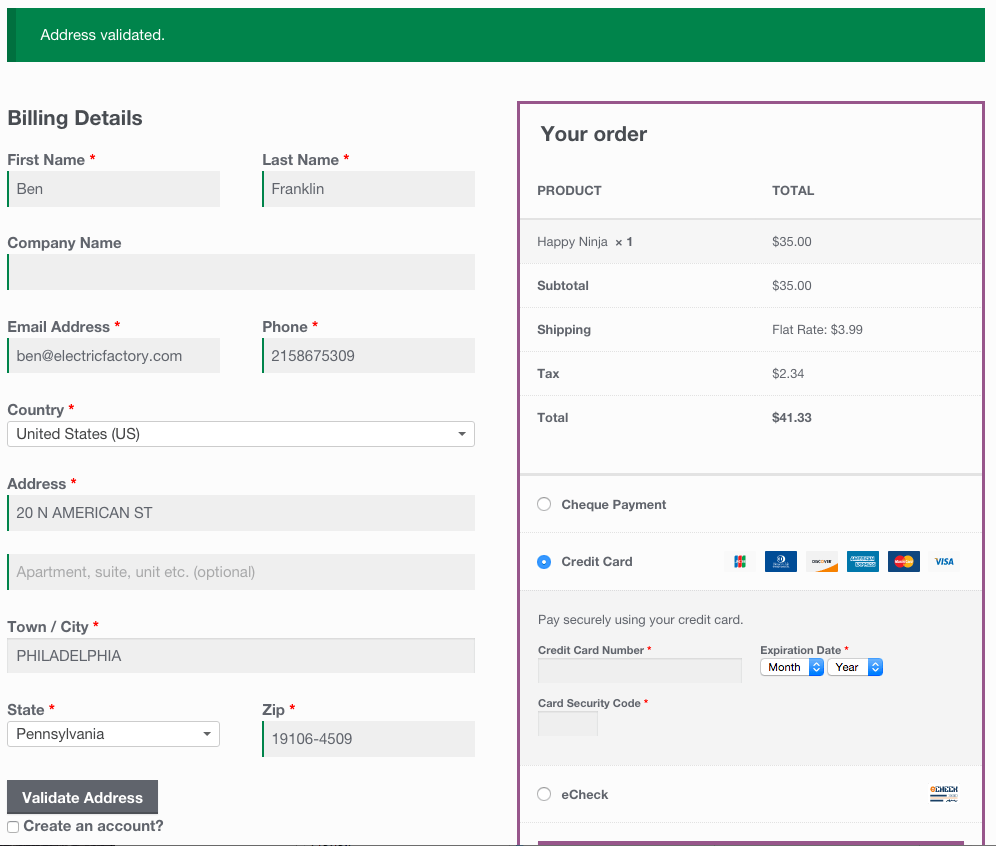 If the address is incorrect, a notice will be displayed with whatever error is returned so the customer can make the suggested adjustment and re-validate the address.
Submit transactions to AvaTax
↑ Nach obenCustomer orders
↑ Nach oben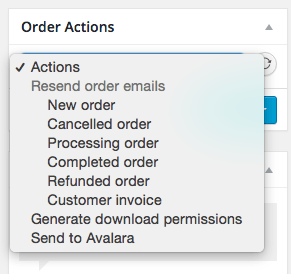 This action can only be taken once per order, so it should be done when the payment is complete.
Manually created orders
↑ Nach oben- Select the customer (if they’re already registered) or enter their full billing and/or shipping address and email address.
- Add products to the order.
- Save the order.
- Click Recalculate.
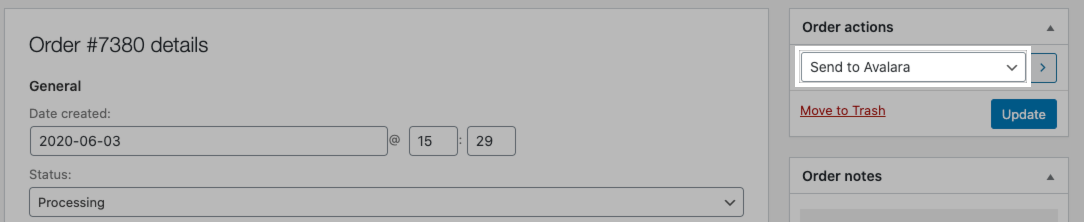
 This won’t immediately record a transaction document in Avalara, but is meant to estimate the taxes to charge the customer. Once the customer has paid and a shop admin marks the order as “Processing” or “Complete” (and the totals are no longer editable), the shop admin can use the Send to Avalara action to record the transaction officially. This action can only be used once.
Refund orders
↑ Nach obenNote: Refunds issued before updating the plugin to version 1.15.0 (released on November 13th, 2021) will still show as voided docs. If you need to adjust refund data for orders before the update, please contact Avalara.
If you’re not using the latest version of the plugin, the old process will apply:
To refund an order in WooCommerce:
- When an order is refunded in full, the corresponding Avalara document is voided and no return adjustment is sent.
- If you need to partially refund an order, you should create a Return Invoice in Avalara to determine the correct amount of tax to refund for each order item.
- Log into WordPress.
- Navigate to WooCommerce > Orders.
- Select an order and click the Refund button.
- Set the quantity or manually input the refund amounts for each item you’d like to refund. The refund total amount cannot be more than the order total amount.
- Click the Refund button to automatically refund the order. You will see a note under Order notes that the refund has been sent to Avalara.
Refunds for committed versus uncommitted transactions
↑ Nach oben- Log into WordPress.
- Navigate to WooCommerce > Settings > Tax and select the AvaTax page.
- Enable Set transactions as “committed” when sending to Avalara.
- Save changes.
Refund scenarios
↑ Nach obenFull refunds
To refund the entire order, set the quantity to match the original order quantity for each item you’d like to refund. This will automatically populate the total including tax to be refunded.Tax-only refunds
To refund the full taxes for an order, set the refundable tax amount to match the original tax for each item. You can also partially refund the tax for one or more items within the same order. If taxes are refunded partially, the amount will be distributed across all tax rates because AvaTax does not support tax-rate-based refunds. To refund an order in full after refunding only taxes, set the quantity for all items to match the original quantity. Then set the refundable tax amount to zero, or manually enter the refund amount for each item. Please be sure to enter the correct tax as WooCommerce does not validate the tax refund amount. For example, if an item’s tax is $2, it’s possible to set the refund tax amount to more than $2 as long as it doesn’t exceed the total refundable amount for the order.Partial refunds
To fully refund a single item in an order, set the quantity to match the original order quantity for a particular item. To partially refund one or more items, set the quantity for a particular item or manually set a refund amount for each item. To partially refund particular items in an order, manually set the refund amount. Please be sure that you enter partial refund amounts correctly. Partial amounts are not validated so the refund amount can be greater than the quantity sold. It’s possible to refund a single item multiple times, for example, if you need to refund an item in two parts. Or if you refund the tax for an item first, then later the rest of the amount.VAT support
↑ Nach obenAvalara Transport field for VAT transactions
The Avalara Transport field specifies who will be handling the transportation of goods in a VAT transaction. This helps to apply VAT correctly. You can set this from the WooCommerce shipping settings.- Go to WooCommerce > Settings and select the Shipping tab.
- Select Add Shipping Zone.
- Enter the Zone Name and select the Zone Regions.
- Select Add Shipping Method and select an appropriate shipping method, and then select Add Shipping Method.
- After you have added the shipping method, select Edit to edit the shipping method.
- In the Avalara Transport field, specify the transporter of the goods for a VAT transaction. The default value is Seller.
Plugin Compatibility
↑ Nach obenSubscriptions
↑ Nach obenCustomer/Order/Coupon Export
↑ Nach obenvat_id and this will appear after the billing_company column if set, or at the end of the row if not.
For customer exports, the customer VAT ID and tax exemption code are automatically added as new columns titled vat_id and tax_exemption, respectively. These are included after the billing_company column if set, or at the end of the row if not.
Local Pickup Plus
↑ Nach obenFrequently Asked Questions
↑ Nach obenTroubleshooting
↑ Nach oben- Please ensure that your site meets the plugin requirements.
- Check the FAQs to see if they address your question.
- Confirm that your Account Number and License Key are correct.
- If your gateway submits paid transactions (such as a credit card), but these orders are not sent to Avalara immediately, it usually means your gateway does not properly trigger the
woocommerce_payment_completedaction. While we’re happy to help debug this issue, it will need to be fixed by the payment gateway. Using the PayPal Standard gateway is a good way to compare this. - If tax is incorrectly calculated, you’ll need to get in touch with the Avalara team since the rates are pulled from there.
- If tax is not calculated at all, please review the order notes for error sources and confirm that your origin address and tax codes are set.
- If you manually created the order, please ensure you follow the correct steps for manual orders.
- Enable logging and submit a help request with the log so we can review the transaction notes to help troubleshoot.
For Developers
↑ Nach obenFilters
↑ Nach obenapply_filter( 'wc_avatax_validate_address_button_label', $label ) – lets you change the label for address validation from “Validate Address”
apply_filters( 'wc_avatax_checkout_origin_address', $origin_address, $cart ) – filters the tax origin address at checkout. Origin address is an array of address fields, $cart is the WC_Cart instance.
apply_filters( 'wc_avatax_checkout_destination_address', $destination_address, $cart ) – filters the tax destination address at checkout. The destination address is an array of address fields, $cart is the WC_Cart instance.
apply_filters( 'wc_avatax_order_origin_address', $origin_address, $order ) – filters the tax origin address when processing an order. Origin address is an array of address fields, $order is the WC_Order object.
apply_filters( 'wc_avatax_order_destination_address', $origin_address, $order ) – filters the tax destination address when processing an order. The destination address is an array of address fields, $order is the WC_Order object.
apply_filters( 'wc_avatax_tax_origin_address', $address ) – filters the tax origin address right before sending data to AvaTax.
apply_filters( 'wc_avatax_tax_destination_address', $address ) – filters the tax destination address right before sending data to AvaTax.
apply_filters( 'wc_avatax_order_ready_statuses', $statuses ) – filters an array of order statuses that allow manual order sending
Actions
↑ Nach obendo_action( 'wc_avatax_after_checkout_tax_calculated' ) – fires after calculating tax for a cart at checkout.
do_action( 'wc_avatax_after_order_tax_calculated', $order_id ) – fires after calculating tax for an order.
do_action( 'wc_avatax_order_processed', $order_id ) – fires when an order is sent to Avalara.