Managing Time Availability
↑ Back to topOur Booking and Appointment for WooCommerce plugin has different Booking Types.
Earlier, for the Duration-based Booking Type and Fixed Time Booking Type, you could only set the start and end times for the duration, which was limited to all Weekdays/Dates.
That was not possible if someone wanted to disable the particular time range.
Now, with v5.9.0 of Booking and Appointment Plugin for WooCommerce, you can manage the time availability of these booking types with our feature ‘Manage Time Availability’.
This feature is available for Date & Time Booking Type and Dates & Fixed Time Booking Type only.
B. Time Availability for different Booking Types
A. Admin Settings
↑ Back to top1) At Global Level
To configure this setting at the Global level, you can go to WooCommerce > Booking and Appointment > Booking > Settings > Bulk Booking:
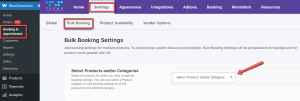
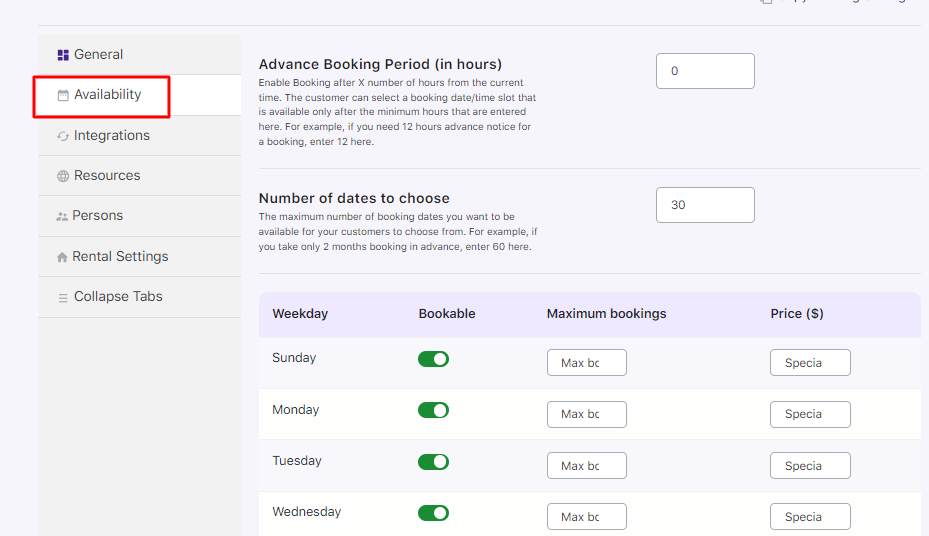
Select the Bulk Products or Product Category. Go to the Availability Tab:
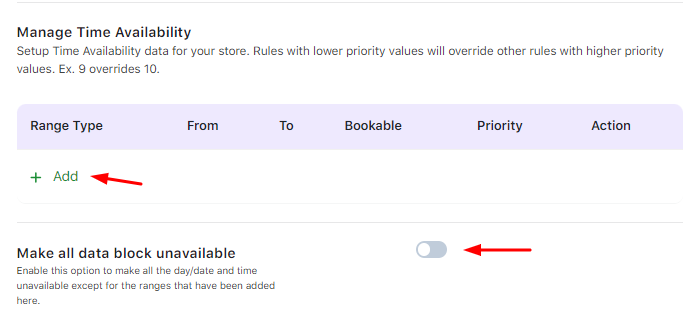
Scroll down to find the Manage Time Availability setting. Click the Add button:
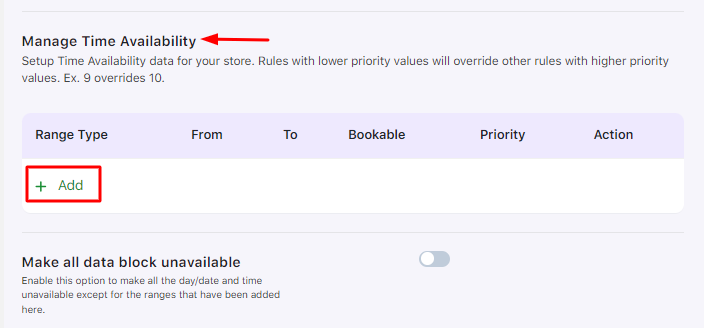
This will ensure that the settings you choose here will be applied to all the products in your store.
2) At Product Level
If you wish to apply these settings to a particular product then you will have to configure this setting at the Product level.
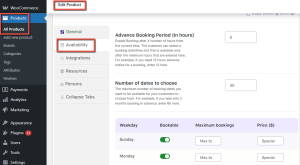
You can go to the Edit Product Page & scroll down to the Booking meta box.
Go to Availability Tab > Manage Time Availability:
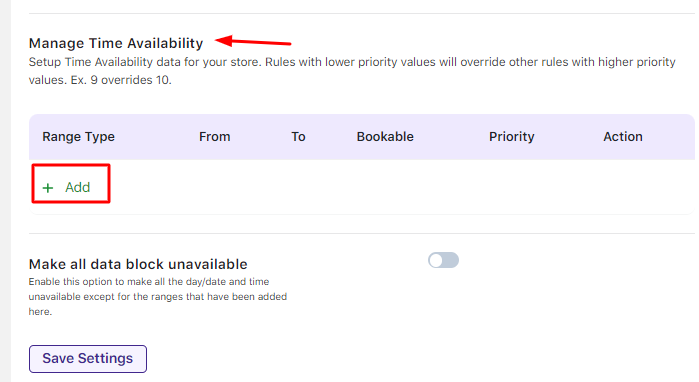
Now, let’s have a look at the settings.
The different range types for managing time availability are as such:
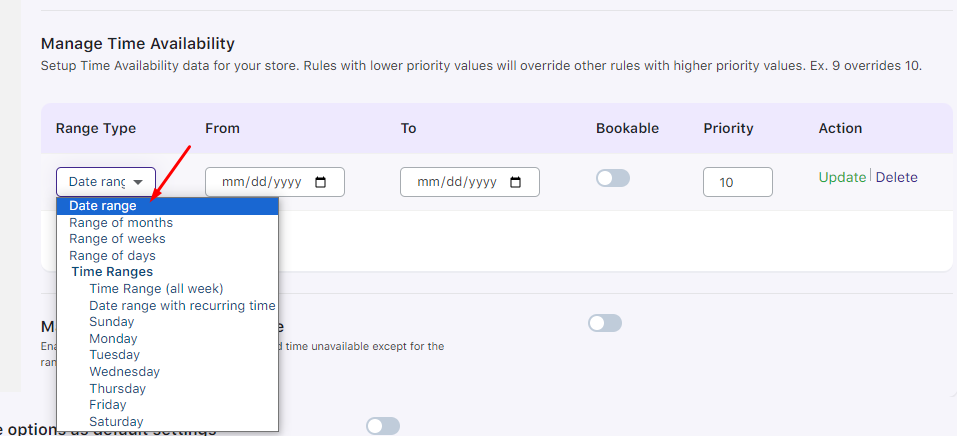
Selecting this will allow you to set a range from one date to another.
For instance, if you wish to manage the time availability of a booking from 1st December 2021 to 5th December 2021, then you can choose this option.

If you wish to manage time availability from one month to another, for instance, from January to March, then you can choose this option.

In a Range of weeks, you can either assign the full week for availability or make it disabled for booking, by enabling or disabling the bookable option.
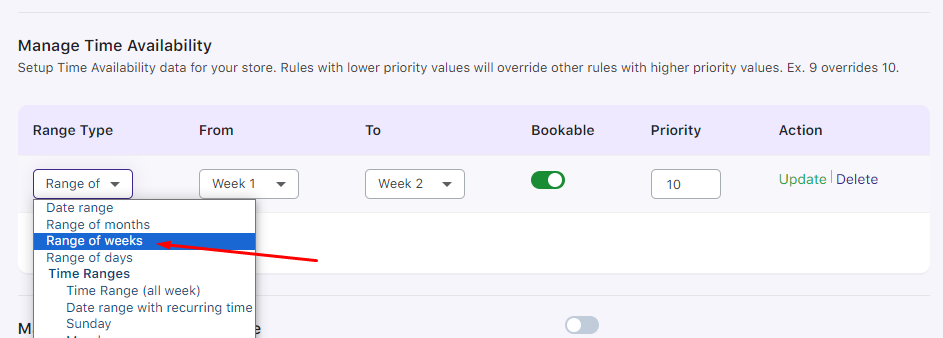
If you wish to manage time availability from one specific day to another, for instance from Monday to Wednesday, then you can choose this option.

The following are the different options that fall under Time Ranges:
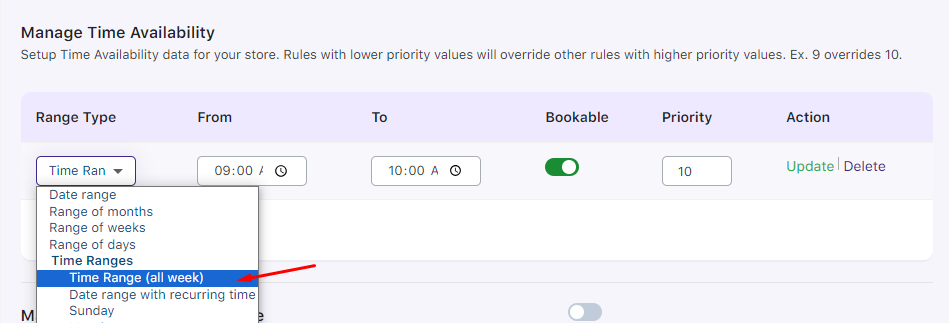
a) Time Range (all week)
If you wish to set a specific time range for all weeks then you should select this option.
For example, if you wish to make 9 AM to 10 AM bookable for the whole week, you can choose this option.

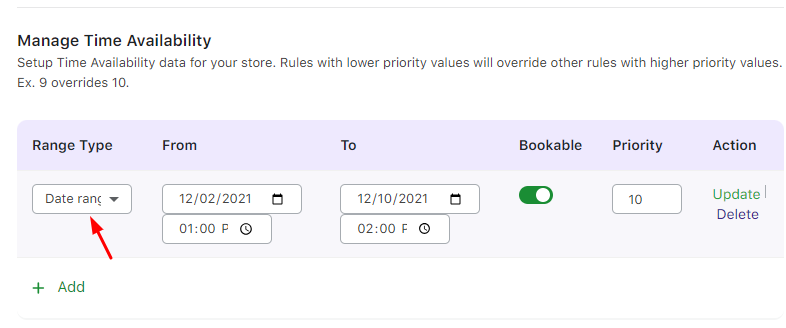
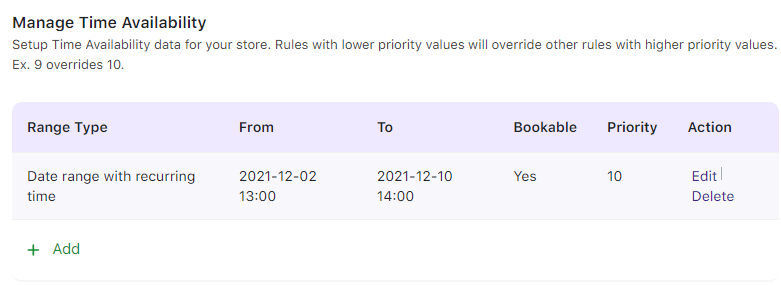
b) Date range with recurring time
You wish to allow bookings for a particular date range at a particular time.
For instance, if you want bookings to be enabled from 2nd December 2021 to 10th December 2021 only from 1 PM to 2 PM, then you can choose this option.
This would allow the recurring time of 1 PM to 2 PM from the specific date range to be enabled.
c) Specific Days
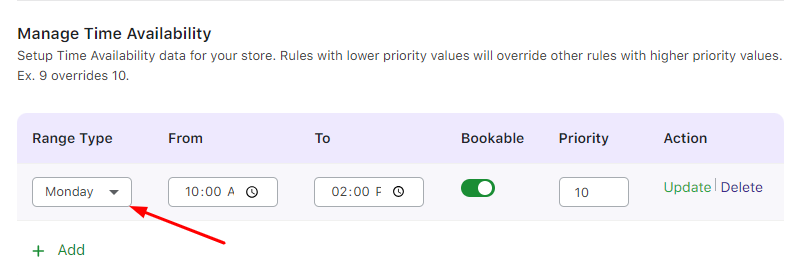
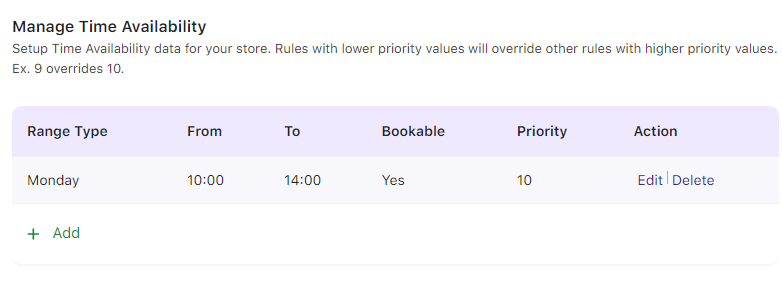
This option will allow you to set a time range for the selected specific days.
For instance, if you wish to enable bookings for Mondays from 10 AM to 2 PM, you can choose this setting.
As discussed earlier, here you can select the Date, Day, or Time from which a certain range will begin and end.
This setting will allow you to enable or disable the booking for the range that you have selected.
This setting will allow you to choose which range type will be considered first.
If one of your ranges is set to the lowest priority, that range will be considered first.
For instance in the following case:
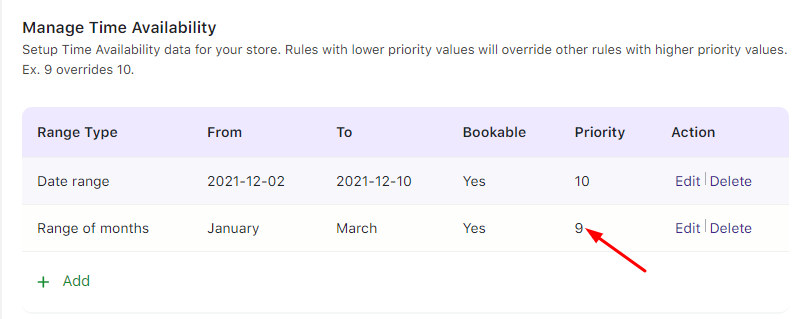
The Range of Months has a lower priority than the Date range, thus, the Range of months would be considered first.
This section allows you to Edit or Delete a particular Range Type and its settings.
After editing the range type, you can press the Update button.

6. Make all data block unavailable
If you enable this option then all the dates in the calendar will be disabled.

You can enable desired dates for bookings using the different Range Types.
Now, let’s how Manage Time Availability works for different Booking Types.
B. Time Availability for different Booking Types
↑ Back to topThe different booking types that will be covered here are:
1) ‘Duration Based Time’ under Date & Time Booking Type
Let’s say that you offer Bookings for a Conference Hall.
Here are the settings that have been configured for the Conference Hall based on the Booking Type Duration Based Time:
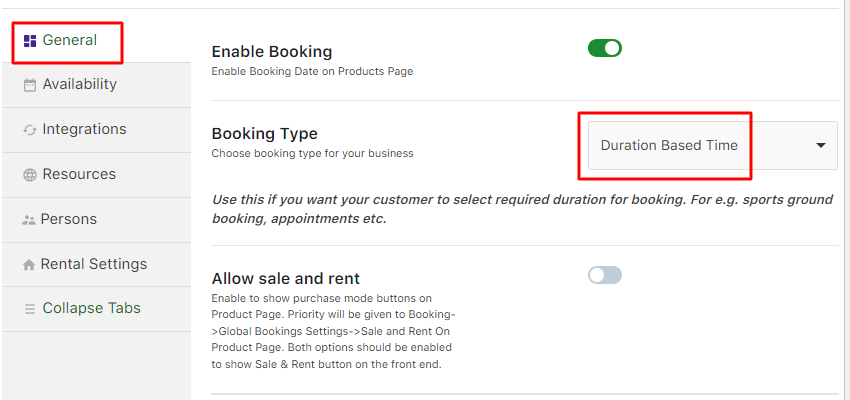
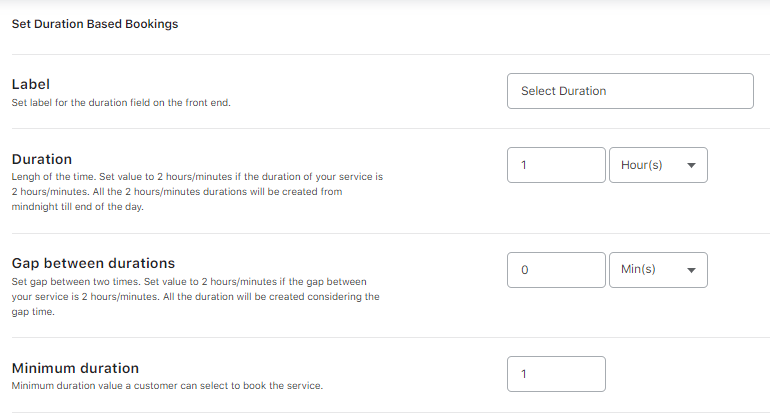
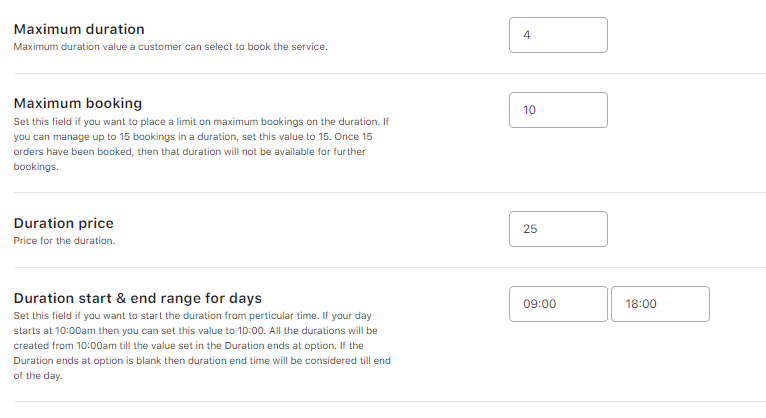
The Duration of our Conference Hall is set to 1 hour.
The Duration Start Range is 9:00 (9 AM) and the Duration End Range is 18:00 (6 PM).
Scroll down to set the Manage Time Availability for Mondays, Wednesdays, and Fridays as shown below:
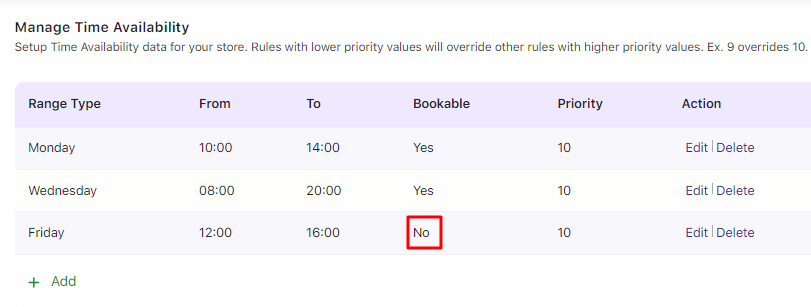
The Time Availability for Mondays is set to be Bookable from 10 AM to 2 PM.
For Wednesdays, it is set to be Bookable from 8 AM to 8 PM.
For Fridays, it is set to Non-bookable from 12 PM to 4 PM.
Let’s see how these Time availability settings will work in different Cases.
Make all data block unavailable – Disabled
Monday – 10 AM to 2 PM – Bookable
Wednesday – 8 AM to 8 PM – Bookable
Friday – 12 PM to 4 PM – Non-bookable.
On the front end, All the days/dates will start from 9 AM and end at 6 PM.
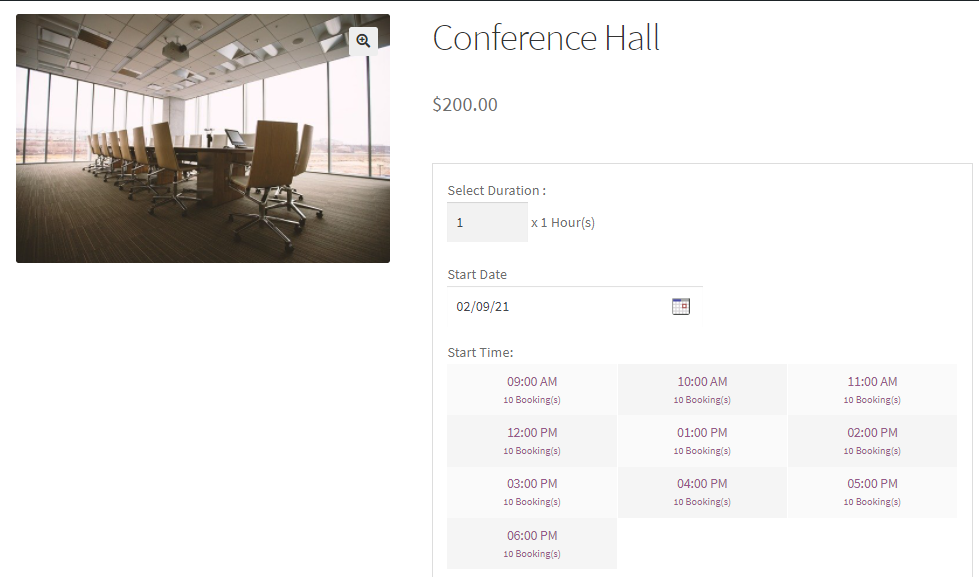
Since the main bookable time is set from 9 AM to 6 PM, the bookable time added for Mondays (10 AM to 2 PM) and Wednesdays (8 AM to 8 PM) will not be effective.
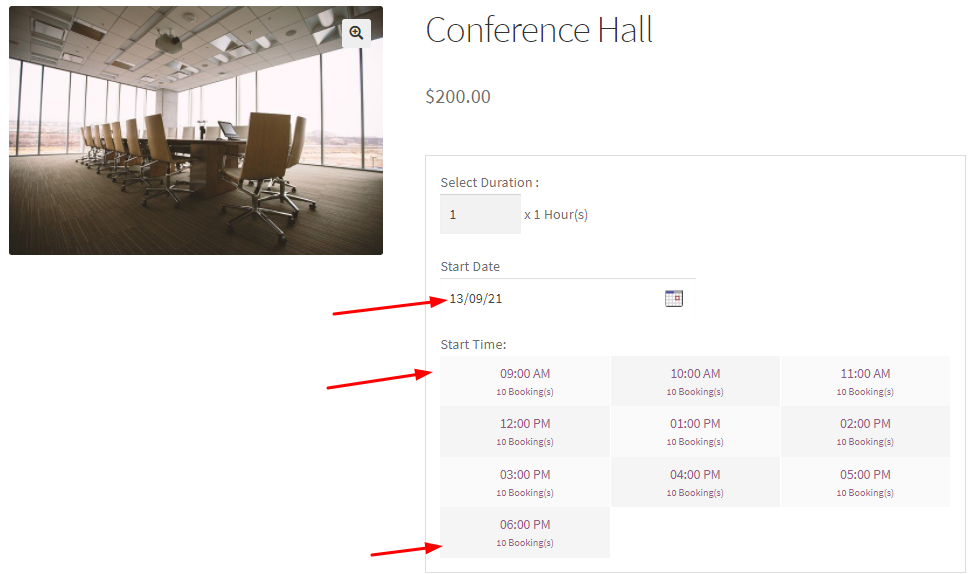
This means, that for dates falling on Mondays and Wednesdays, the Bookable Time would be from 9 AM to 6 PM because of our main bookable time.
For example, here’s how the Booking calendar will appear for Monday 13th September 2021:
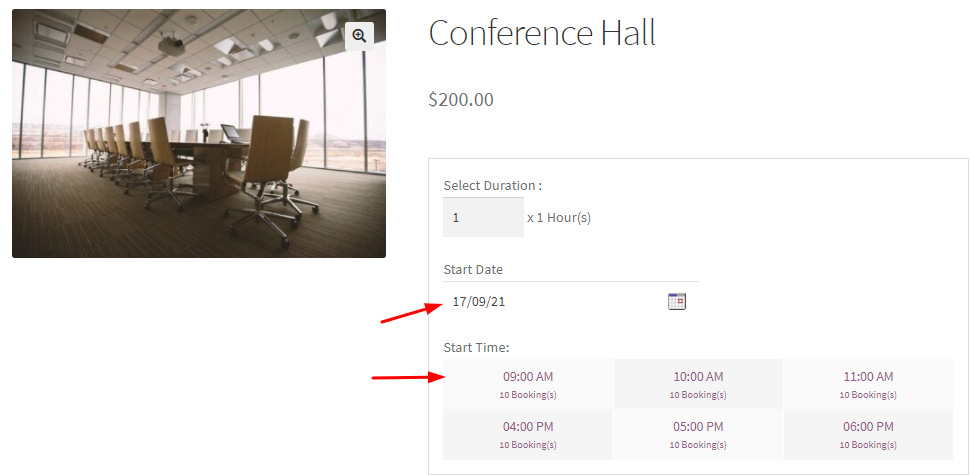
Since 12 PM to 4 PM is set as Non-bookable, then on the front end, for Friday, the booking time slots that would be available would be from 9 AM to 12 PM and 4 PM to 6 PM.
For example, here’s how the Booking calendar will appear for Friday 17th September 2021:
Make all data block unavailable – Enabled
Monday – 10 AM to 2 PM – Bookable
Wednesday – 8 AM to 8 PM – Bookable
Friday – 12 PM to 4 PM – Non-bookable.
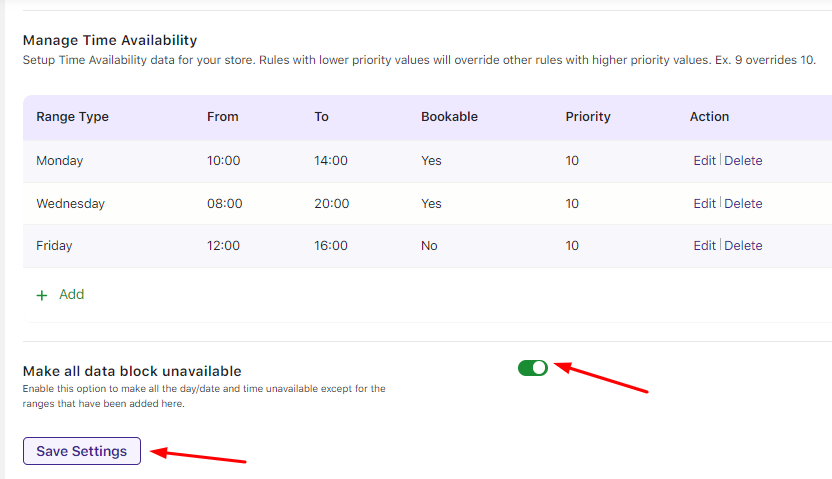
All data block unavailable are enabled on the front end.
Thus, all the days/dates will be disabled except Mondays and Wednesdays because those were the two days that were set to be Bookable.
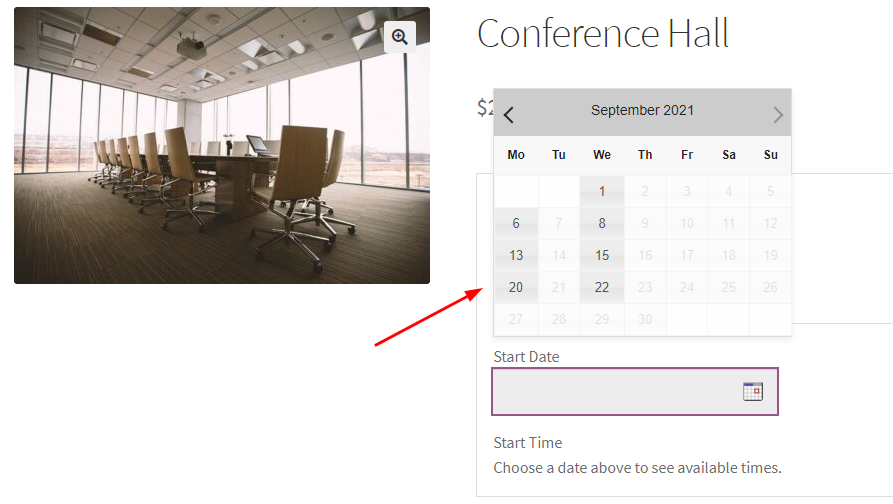
Since Friday’s booking was not enabled, the added range for Friday will not be effective & thus it will not appear as Booking Dates in the Calendar as shown below:
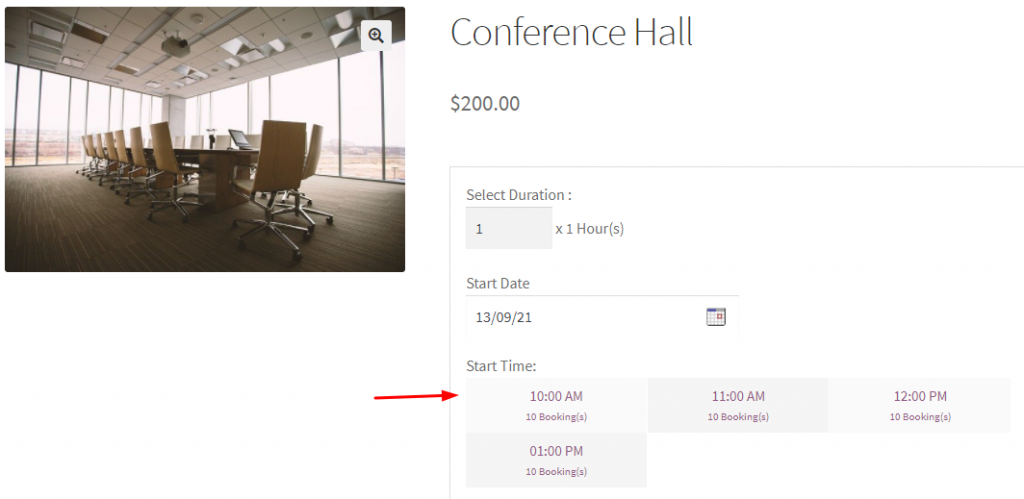
The Start & End times for them will be 10 AM to 2 PM and 9 AM to 6 PM respectively.
If a customer chooses a date on Monday, then they will get to view booking timeslots from 10 AM to 2 PM since that is the start time and end time.
For example, after selecting Monday, 13th September 2021, the booking timeslots available are as shown below:
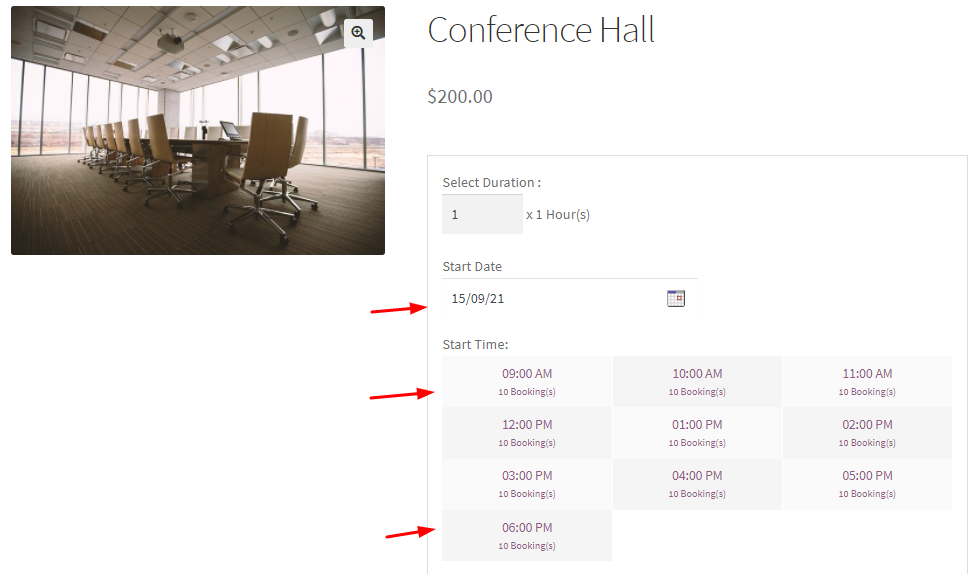
If a customer selects a date on Wednesday, the time availability displayed will be from 9 AM to 6 PM since the main start and end time is set to 9 AM to 6 PM.
Adding a range out of Wednesday’s time range will not be effective.
Here’s how it will appear on the front when Wednesday 15th September 2021 is chosen by a customer:
Make all data block unavailable – Disabled
No Ranges are added.
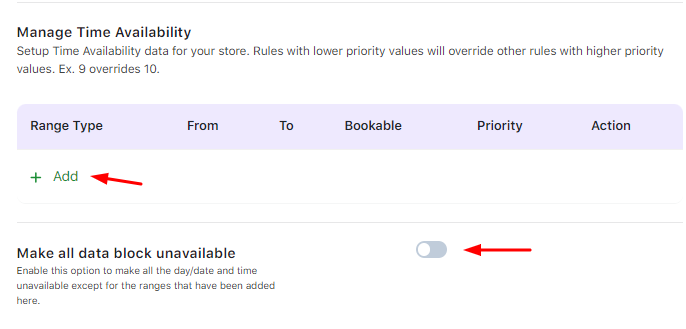
Since a range has not been added to manage time availability, the Duration Start and End range for days added will be displayed for all the enabled weekdays.
For example, if you have enabled all the weekdays, then selecting any one of them will display the start and end time as 9 AM to 6 PM:
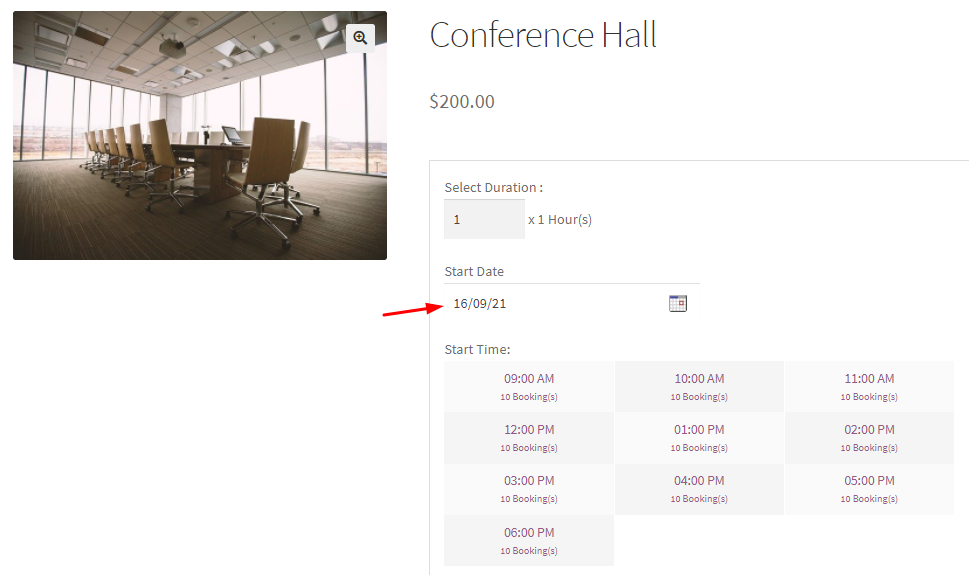
Make all data block unavailable – Enabled
No Ranges are added.
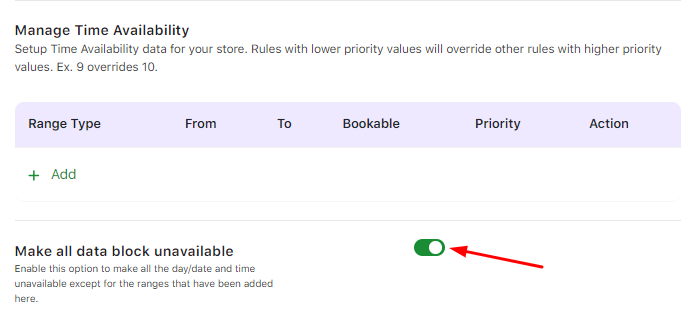
In this scenario, ‘all data block unavailable’ is enabled.
This would mean that all the dates in the calendar would be disabled except for the ones added to the Range.
Since a Range type hasn’t been added, no dates would be available for the customer.
Thus, on the front end, ‘The product is currently unavailable for the booking. Please try again later’ message will be displayed.

2) ‘Fixed Time’ under Date & Time Booking Type
Let us say that you offer medical appointments.
For this, you have selected the Booking Type as Fixed Time.
Here are the settings that have been configured for the medical appointments:
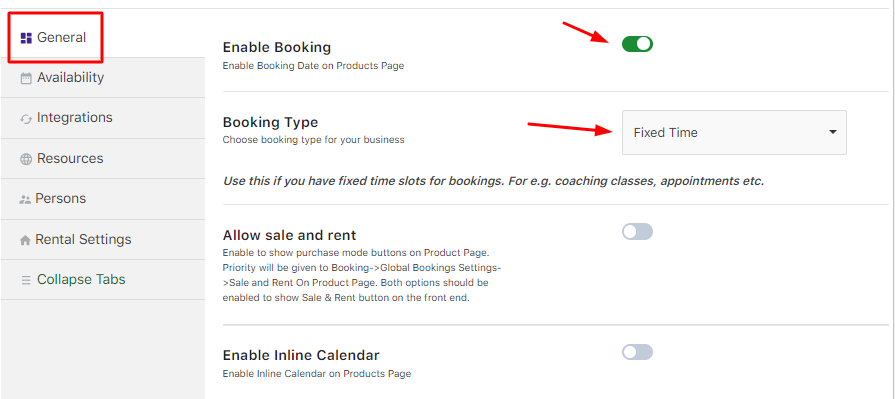
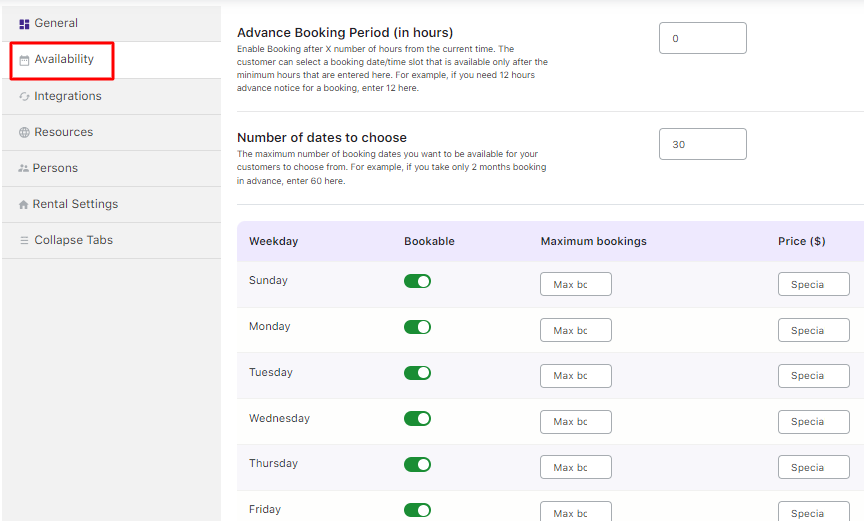
Go to the Availability tab and select our Appointment Days:
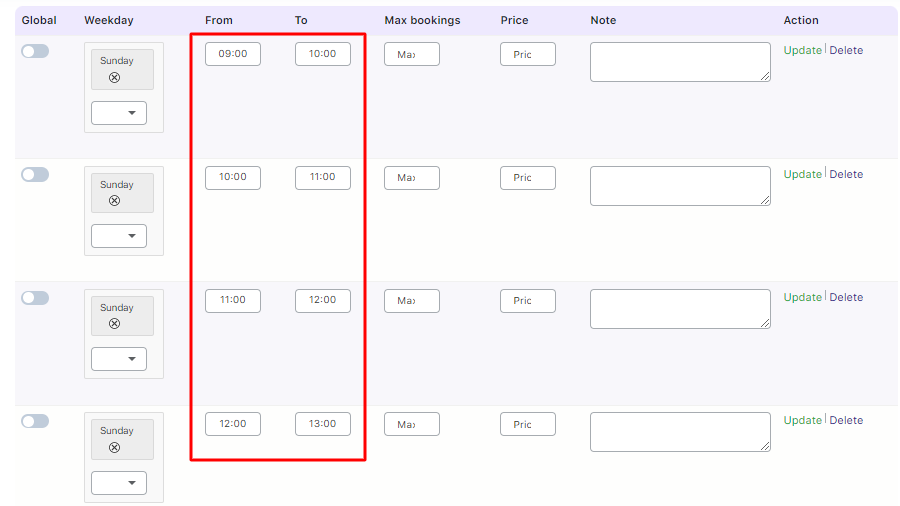
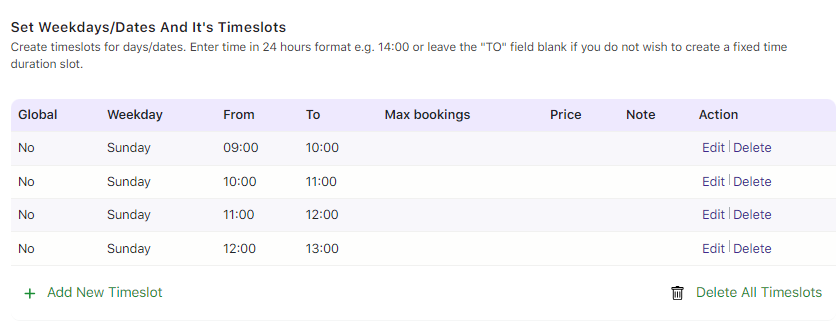
Next, let’s keep one-hour timeslots from 9 AM to 6 PM.
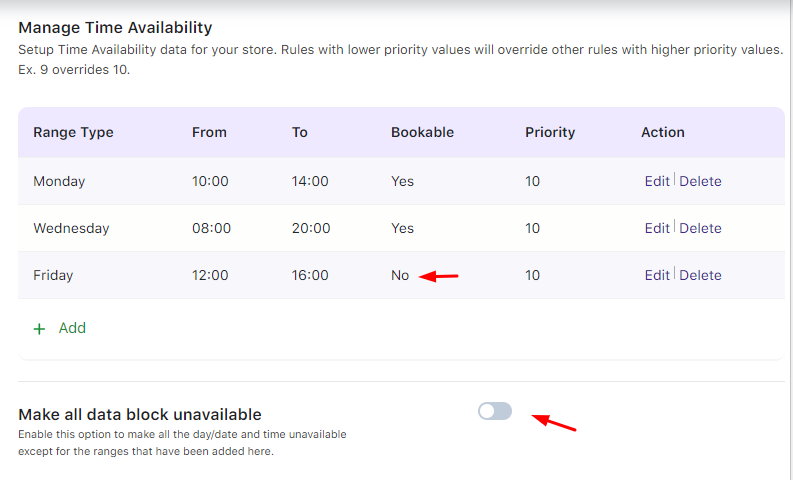
Make all data block unavailable – Disabled
Monday – 10 AM to 2 PM – Bookable
Wednesday – 8 AM to 8 PM – Bookable
Friday – 12 PM to 4 PM – Non-bookable
On the front end, the customer views all the days/dates with all the time slots that have been added from 9 AM to 6 PM.
For instance, if the customer selects a date on Tuesday, 7th September 2021, they will get to choose their time slots from 9 AM to 6 PM as shown below:
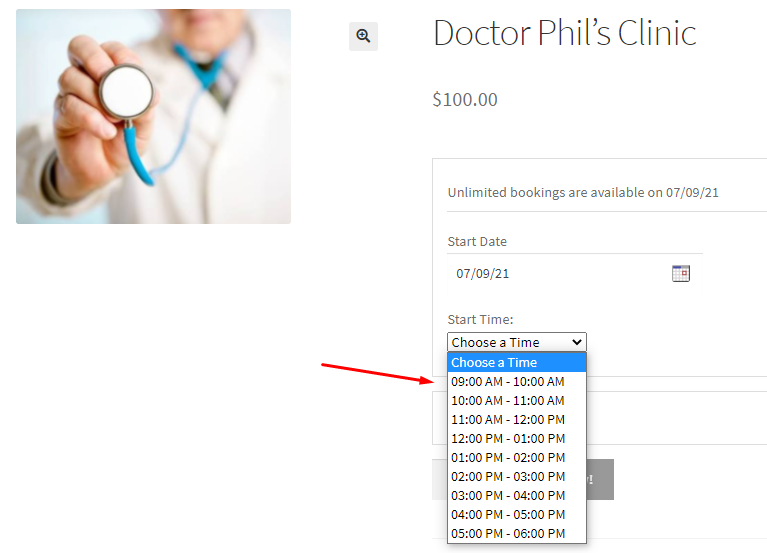
Now, if a customer chooses a date on a Monday or Wednesday, then they will be displayed the fixed timeslots that range from 9 AM to 6 PM since it was already set in the Set Weekdays/Dates and its Timeslots table.
Adding range as bookable out of this time range will not be effective.
This means the bookable timeslots added in Manage Time Availability for Mondays (10 AM to 2 PM) and Wednesdays (8 AM to 8 PM) will not be effective.
To illustrate, here’s the frontend display of choosing Monday, 13th September 2021:
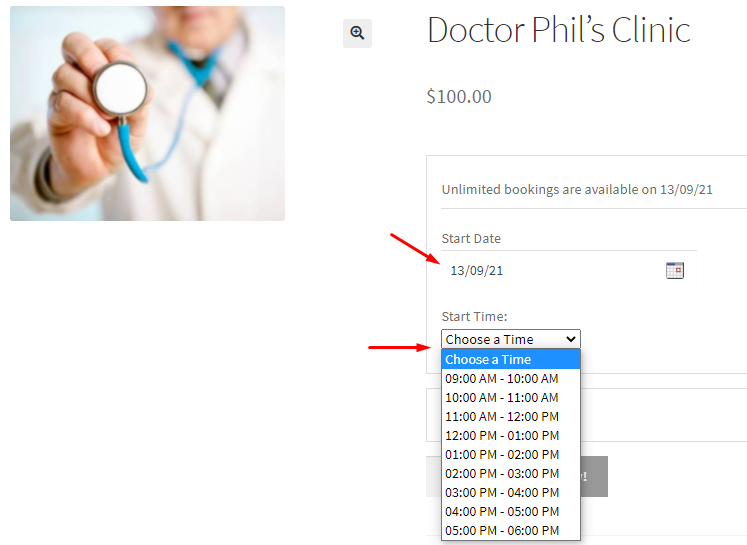
If the customer chooses a date on Friday, then the time slots that fall between 12 AM to 4 PM will be unavailable since we have made them non-bookable.
Here’s how it will appear on the front when the customer chooses Friday, 17th September 2021 as their appointment date:
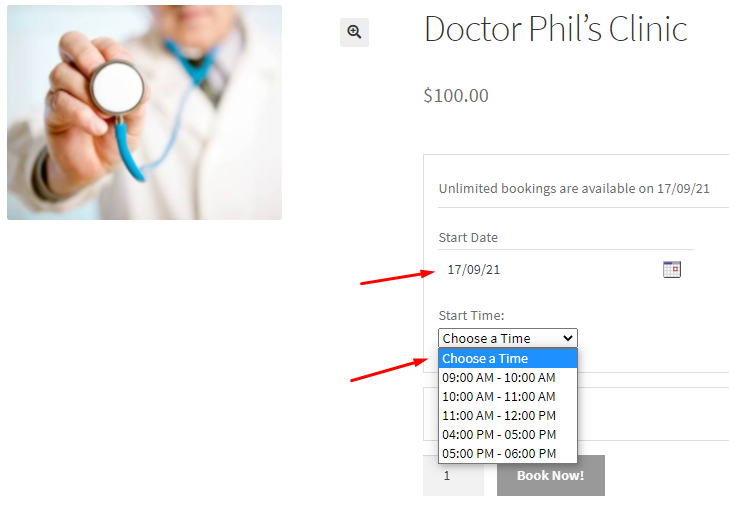
Make all data block unavailable – Enable
Monday – 10 AM to 2 PM – Bookable
Wednesday – 8 AM to 8 PM – Bookable
Friday – 12 PM to 4 PM- Non-bookable
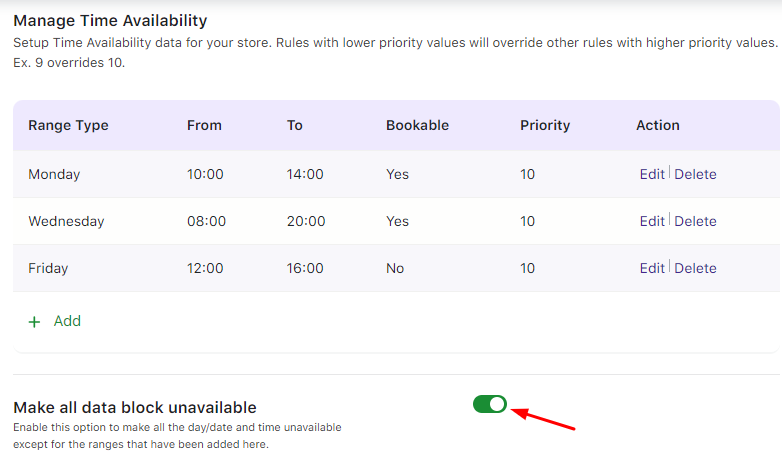
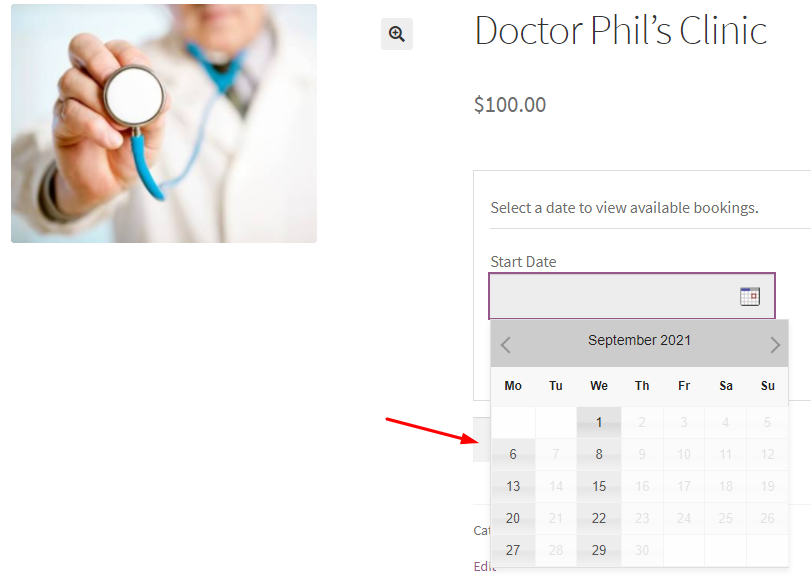
Since we have decided to enable Make all data block unavailable, this would mean that all the dates in the calendar would be disabled except for the ones added under the Manage Time Availability table.
This means that on the front end, all the days/dates will be disabled except Monday and Wednesday.
Since Friday is not enabled, the added range for Friday will not be effective & thus no dates would appear for Fridays:
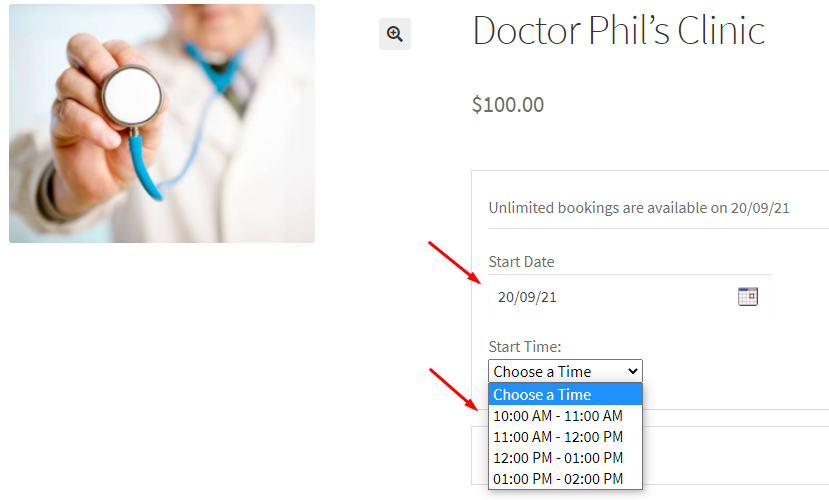
For Monday, the fixed time slots fall between 10 AM to 2 PM.
If a customer selects Monday, 20th September 2021, then they will be displayed those timeslots only:
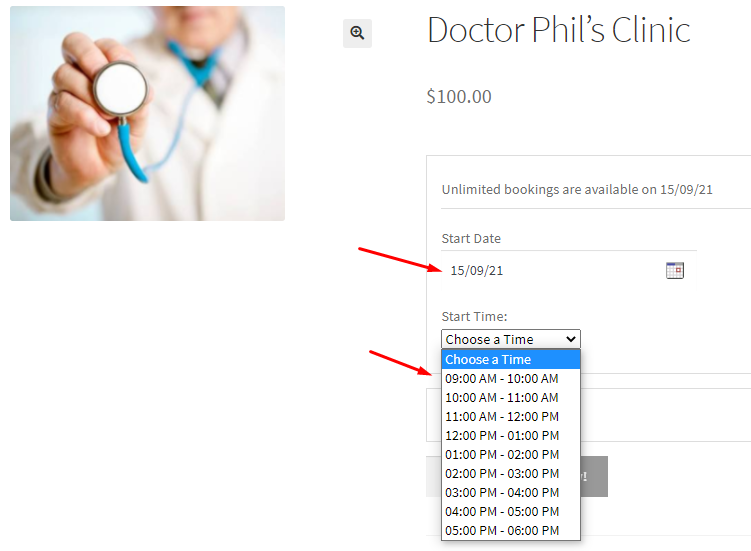
For Wednesday, the bookable time slots are from 8 AM to 8 PM.
However, the availability of the fixed time will fall between 9 AM to 6 PM since the main start and end time is set to 9 AM to 6 PM. That’s why, adding range out of this time range will not be effective.
For instance, on Wednesday, 15th September 2021, the customer will get to view all the fixed time slots from 9 AM to 6 PM as shown below:
Make all data block unavailable – Disabled
No Ranges are added.
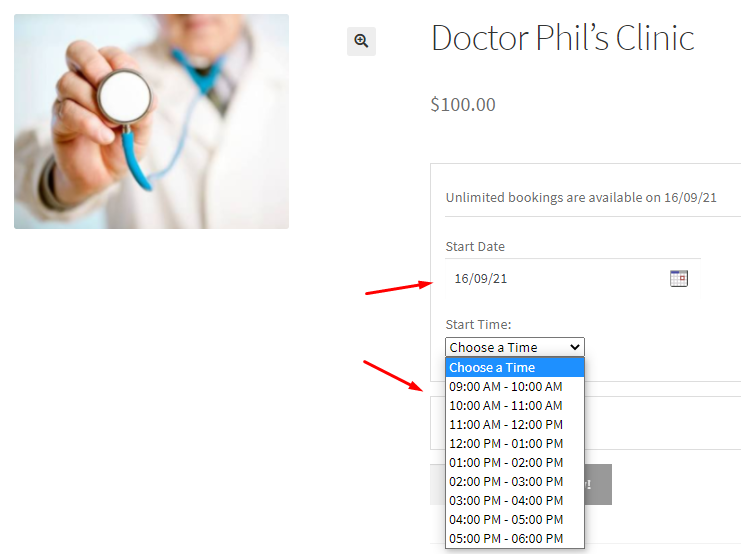
In the front end, all the enabled weekdays will be displayed and all the time slots will appear in the dropdown/list view.
Since appointments have been enabled for all days with one-hour fixed time slots from 9 am to 6 PM, then all of them will be displayed on the front as shown below:
Make all data block unavailable – Enabled
No Ranges are added.
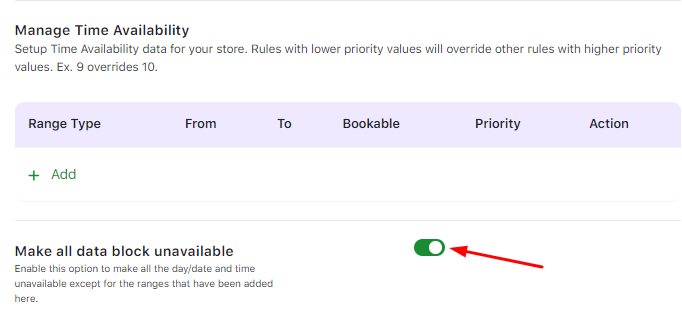
As discussed earlier, if Make all data block unavailable is enabled, then all the booking dates and timeslots will be disabled.
Thus, on the front end, instead of seeing appointment dates and timeslots, the customer will get a message that says ‘The product is currently unavailable for the booking. Please try again later.’

3) ‘Dates & Fixed Time’ under Multiple Dates Booking Type
Under Multiple Dates Booking Type, one of the booking types that you will see is ‘Dates & Fixed Time’.
Let’s say that you offer Guitar lessons. For this, you have selected the Booking Types Dates & Fixed Time.
Here are the settings that you need to configure for it:
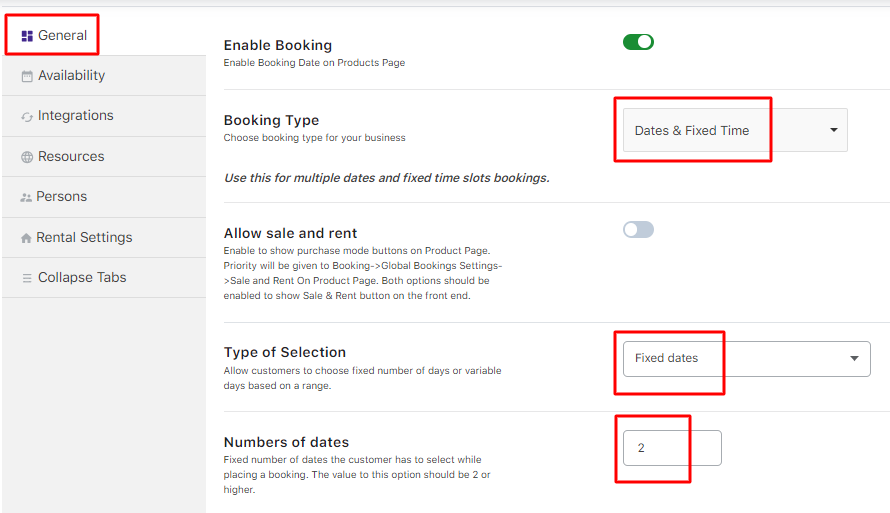
Go to the Availability tab.
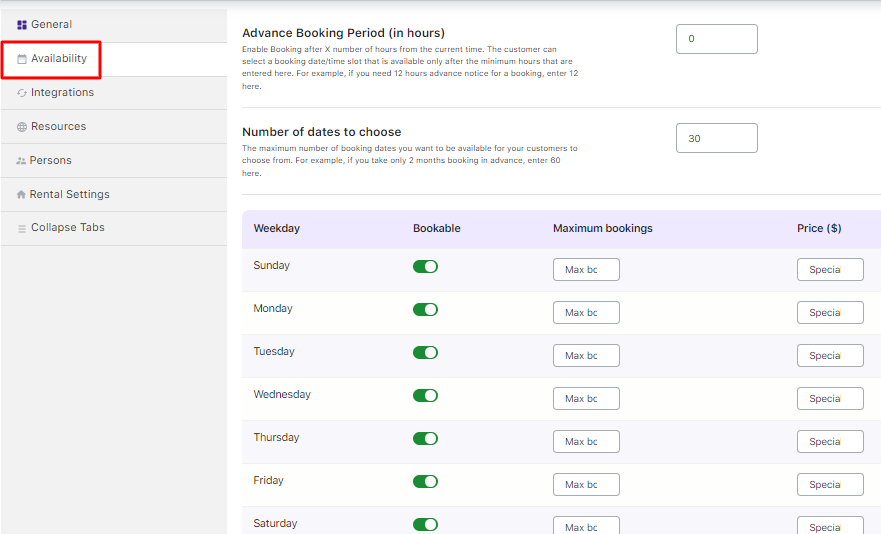
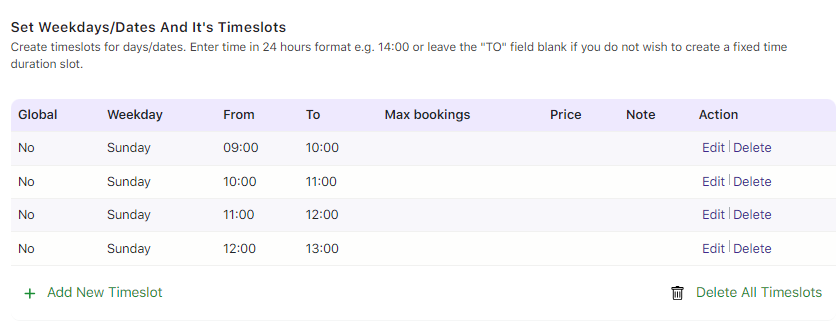
Add the following timeslots. For instance, the fixed time slots added are from 9 AM to 6 PM.
The timeslots are for one hour each. The customer will have to choose 2 dates for this booking.
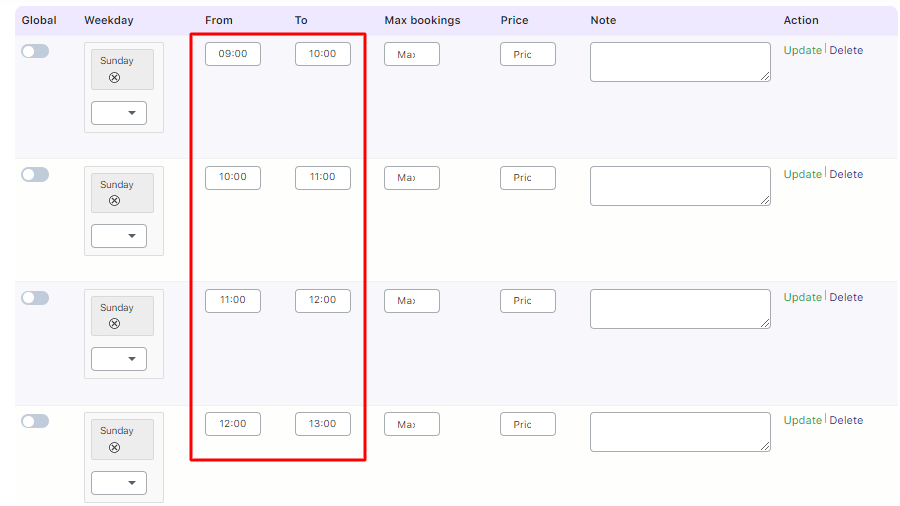
After adding them, it will look like this:
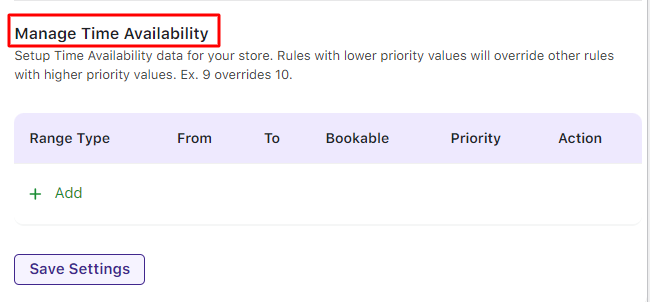
Next, go to the Manage Time Availability section:
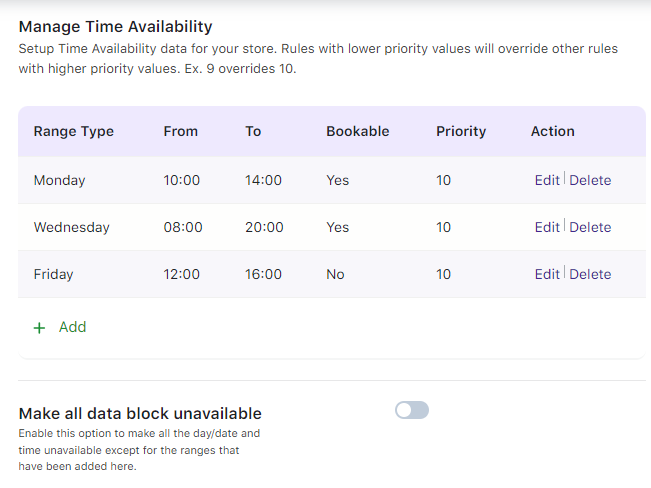
Make all data block unavailable – Disabled
Monday – 10 AM to 2 PM – Bookable
Wednesday – 8 AM to 8 PM – Bookable
Friday – 12 PM to 4 PM – Non-bookable
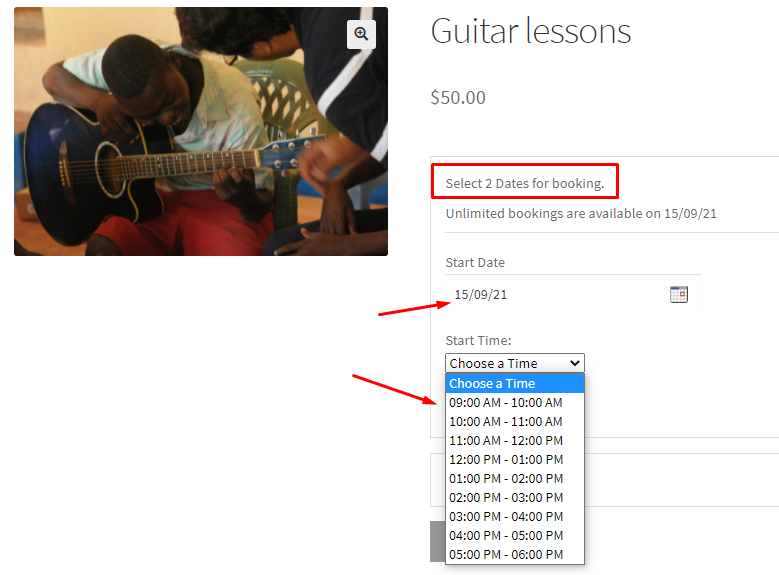
On the front end, the customer will view all the days/dates with all the time slots that were added from 9 AM to 6 PM.
The range added for Monday and Wednesday as Bookable will not be effective. This is because our main bookable time is already enabled.
For instance, if a customer chooses one of their dates as Wednesday 15th September 2021, all the time slots from 9 AM to 6 PM will appear for them:
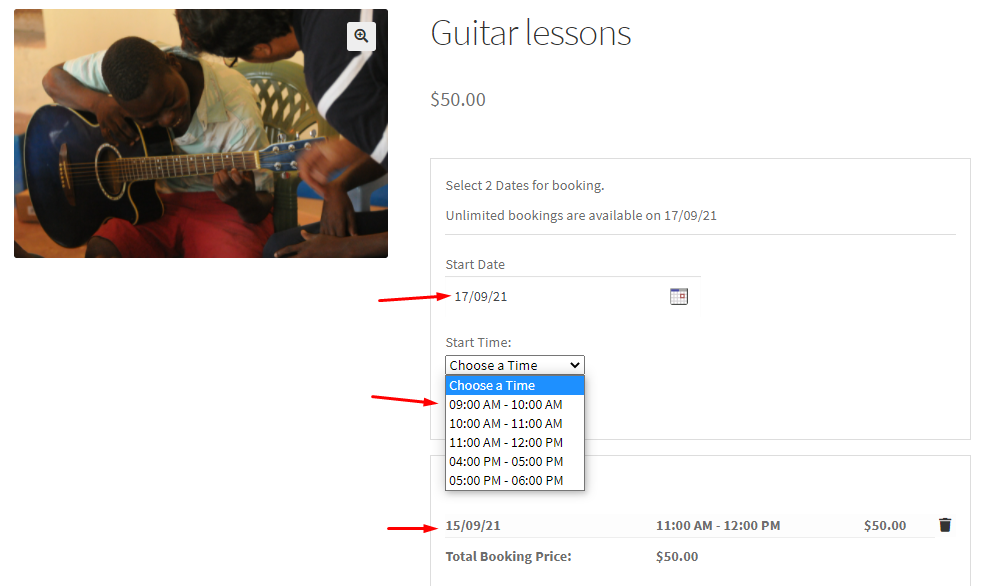
Now, if the customer decides to go for Friday 17th September 2021 as their second date, then they will get to view all the slots except the ones from 12 PM to 4 PM since they were made non-bookable:
Make all data block unavailable – Enable
Monday – 10 AM to 2 PM – Bookable
Wednesday – 8 AM to 8 PM – Bookable
Friday – 12 PM to 4 PM – Non-bookable
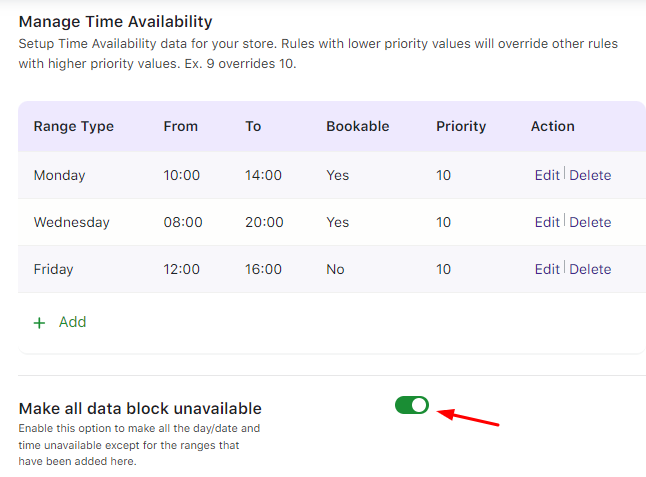
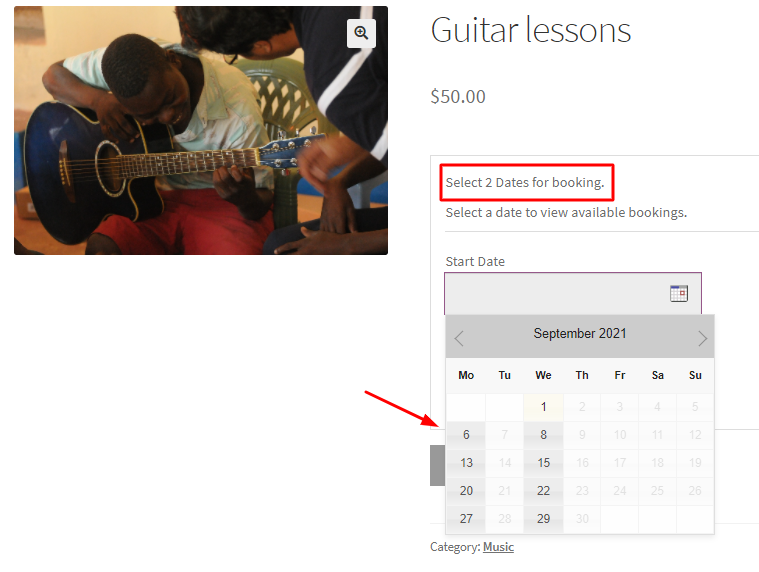
Since Make all data block unavailable is enabled, all the dates in the calendar would be disabled except for the ones added under the Manage Time Availability table.
This means that on the front end, all the days/dates will be disabled except Monday and Wednesday.
Since Friday is not enabled, the added range for Friday will not be effective & thus no dates would appear for Fridays:
For Monday, the fixed time slots fall between 10 AM to 2 PM.
If a customer selects Monday, 20th September 2021, then they will be displayed those timeslots only:
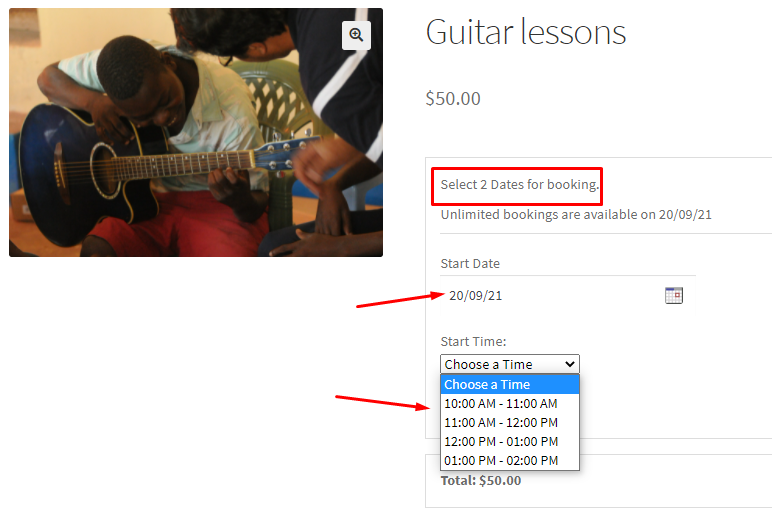
For Wednesday, the time slots set to bookable are from 8 AM to 8 PM.
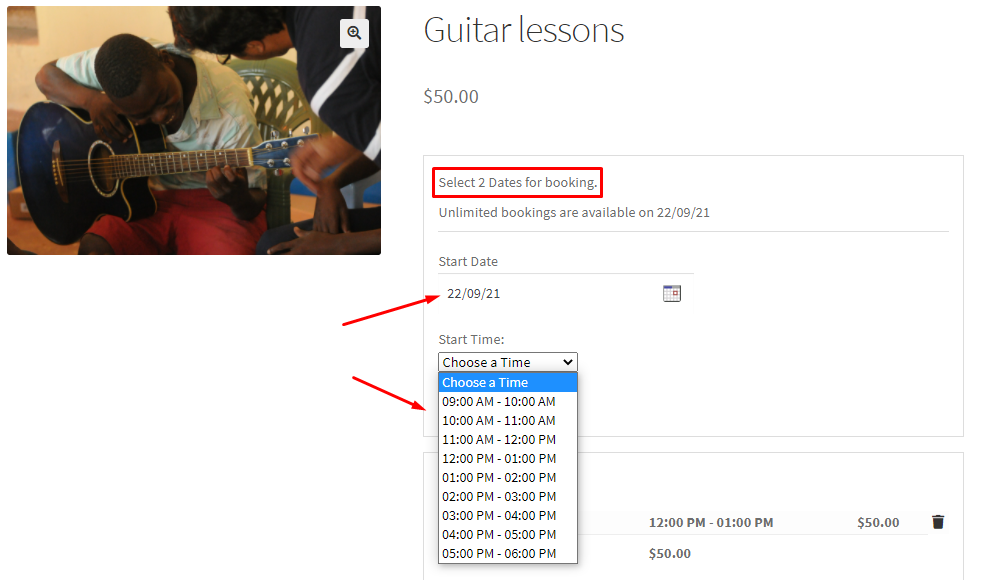
However, on Wednesdays, the customer will get to view all the fixed time slots from 9 AM to 6 PM because of the main bookable time.
The range added will not be effective. For instance, the second date & time is selected as Wednesday 22nd September 2021:
Using the Time Management Availability feature will easily help you manage time availability for different Time-based bookings & services that you provide on your WooCommerce store!
Time slots
↑ Back to topSet up Specific Dates with Timeslot using Fixed Time booking type
↑ Back to topMany businesses offer time-based services. They offer discounted prices to their customers on special occasions, such as festive seasons or during slack periods. One such business is a Salon & Spa.
If you have such an online business, you can set up your services with different rates in two ways with our Booking and Appointment Plugin for WooCommerce.
One way is by creating time slots for weekdays. The other way is by creating timeslots for certain dates.
Let’s see how to set up services on certain dates, offering special time-slot-based rates.
A. Admin Experience
At your Salon & Spa, you want your customers to be charged less than the normal price on particular time slots of a date.
Create this product from the Products > Add Product link.
Give it the product title Enrich Salon and Spa.
Set a regular price for it.
Scroll down to the Booking meta box.
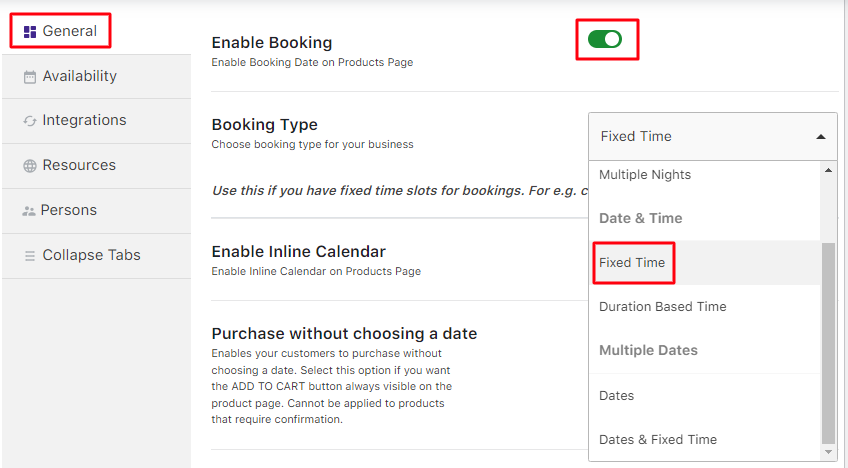
Enable the Booking option and select Booking type Date & Time > Fixed Time.
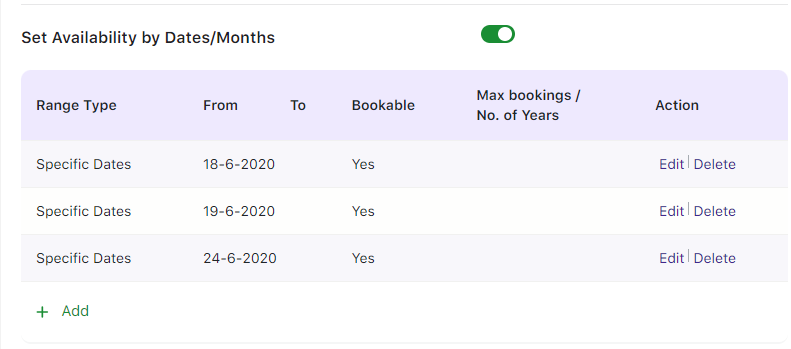
In the Availability tab, select range type ‘Specific Dates’ under the ‘Set Availability by Dates/Months’ option.
Set the Specific dates. The dates 18th, 19th, and 24th of June 2020 have been selected as the Specific dates.
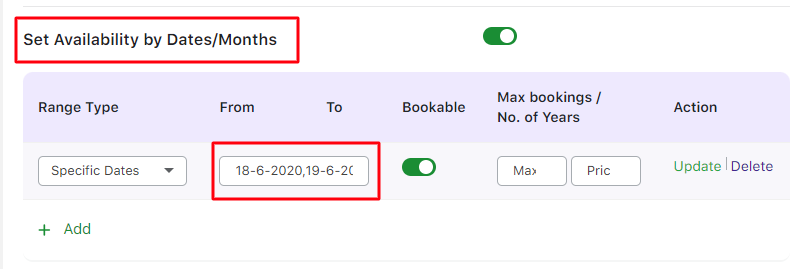
Once they are added, the table will look like this:
Scroll down to the Set Weekdays/Dates And Its Timeslots section.
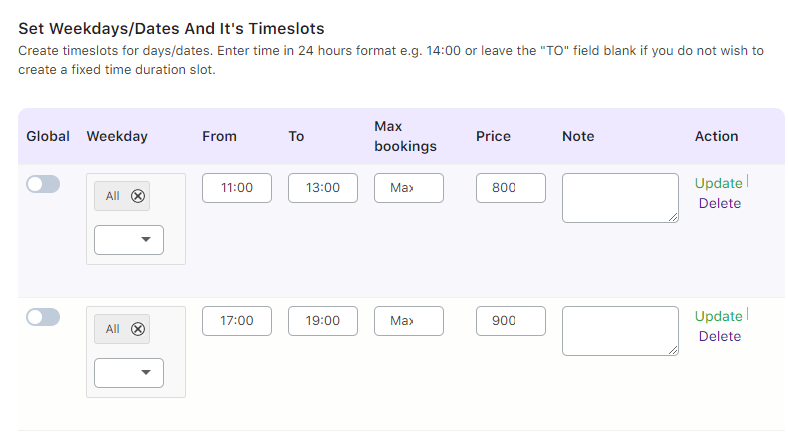
Add the time slots for these Specific dates by clicking the Add New Timeslot option.
Specify all the timings and rates for your salon and spa.
For instance, you can add these timeslots with their prices:
- 11.00 AM to 01.00 PM: Rs 800
- 05.00 PM to 07.00 PM: Rs 900
Once added, the table will look like this:
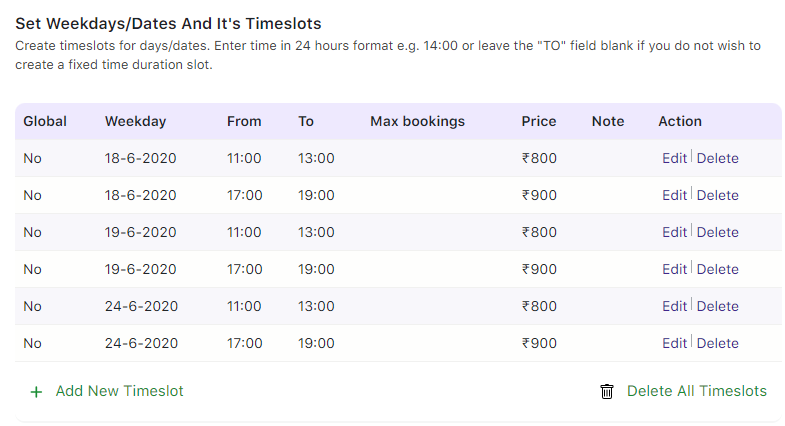
You can add more time slots by clicking the Add New Timeslot button.
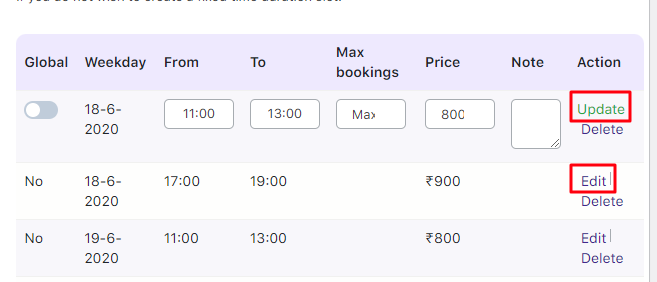
After saving them, you can edit or delete timeslots as per your requirements:
Publish the product once done.
The Enrich Salon and Spa will now be available for customers to book.
B. User Experience
Let’s say that a customer has decided to book an appointment at Enrich Salon and Spa for June 24, 2020.
After choosing the date, the available time slots displayed will be 11.00 AM to 01.00 PM and 05.00 PM to 07.00 PM.
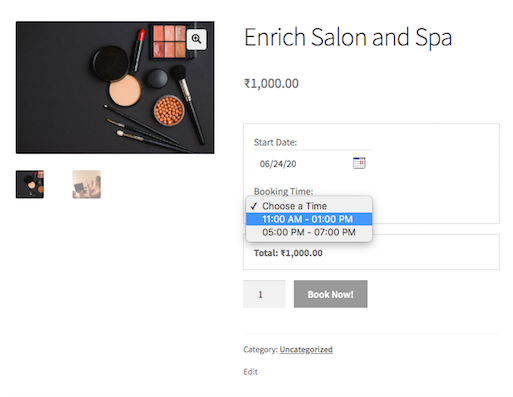
After selecting the booking date and time, the price of the chosen appointment will be displayed. The Book Now! button will be enabled.
Let’s say the customer chooses the 05:00 PM to 07.00 PM time slot for their appointment.
Accordingly, the price of Rs. 900 will be displayed.

After adding the product to your cart, you can go to the Cart Page, which will look like this:
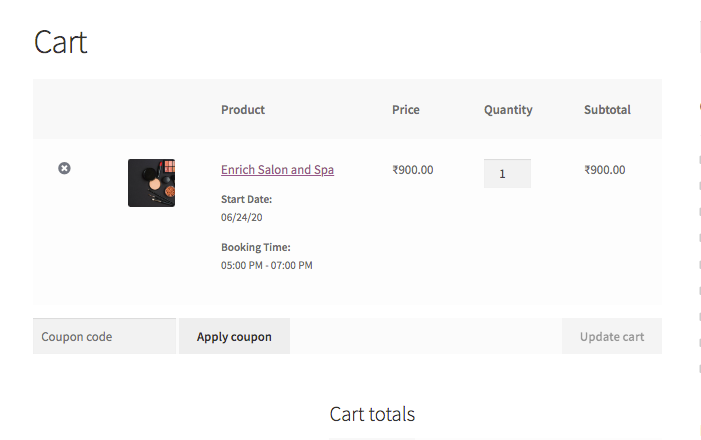
Next, click the Proceed to Checkout button to go to the Checkout page
The Checkout page will show the appointment details and your booking amount.
After placing the order, the Order Received page will look like this:
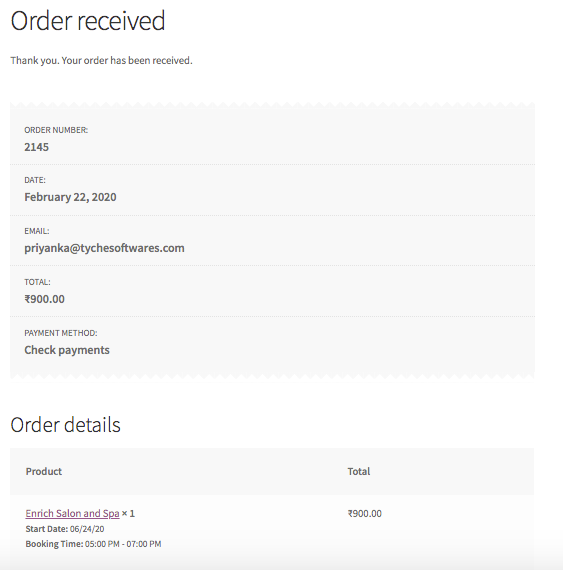
In conclusion, the Booking and Appointment Plugin for WooCommerce plugin enables you to easily set bookable products with different prices according to the timings for certain dates. This option and flexibility for your customers improve customer satisfaction to a great extent, enhancing their booking experience.
You can use it not just for simple products but also for WooCommerce variable products!
Set up time slot prices using the Fixed Time booking type
↑ Back to topDuring peak hours, many businesses provide services at varying prices. For instance, when booking a movie ticket online, you select the day first. After this, all the available show times of the movie will be listed. The prices will differ for every show.
Usually, the tickets for the morning shows are cheaper. The prices are comparatively higher for the last show of the day.
To set such flexible rates for such services during peak hours with Booking and Appointment Pro for WooCommerce plugin, here’s what you will have to do:
1. Admin Experience
For instance, you can set up The Jungle Book movie as a bookable product.
Create a product from the Products > Add Products link.
On the Products page, find the Booking Meta Box and Enable the Booking option. Your product will now be converted from a normal WooCommerce product into a bookable one.
Select the Booking Type as Date & Time > Fixed Time as shown below:
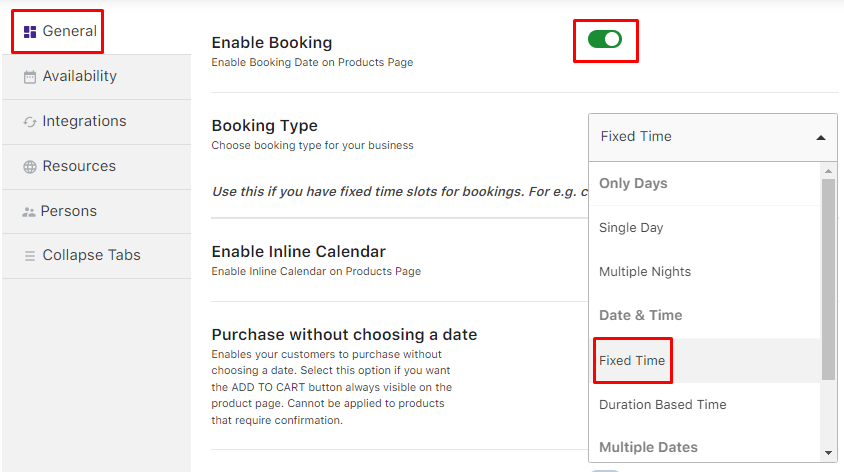
Enable Booking option
The movie tickets are sold for all weekdays.
Enable the bookable setting for all weekdays in the Weekday table from the Availability tab as shown below:
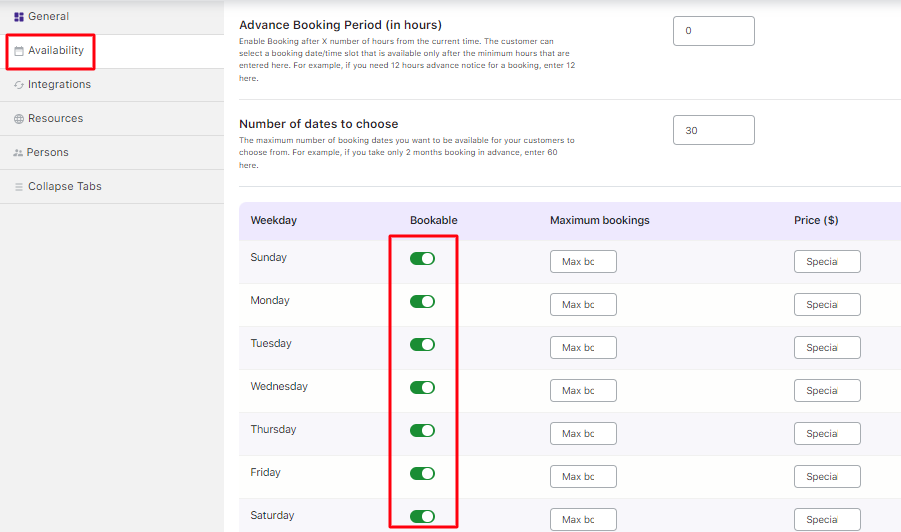
Enable Bookable Weekdays
Go to the Set Weekdays/Dates And Timeslots section to create movie show timings.
Click the ‘Add New Timeslot’ button as shown below:
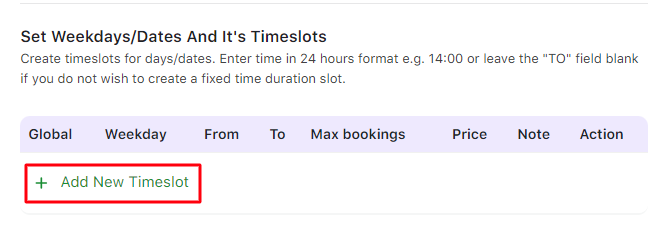
Enable Set Weekdays/Dates and its Timeslots option
Select the Weekdays, and add the Timeslots. Don’t forget to add the Maximum bookings and their Prices.
You can add 3 show timings. For instance, select All in the Weekday column to set timings for all weekdays.
The time slots added can be 8:10 to 10:00, 10:00 to 11:30, and 16:00 to 17:30 for a maximum number of 100 bookings in the morning and 150 bookings in the evening.
The Special Price for 8:10 to 10:00 is not set. Hence, it will pick up the regular price of $15. For 10:00 to 11:30, the special price is set to $20, while it is set to $25 for the evening show from 16:00 to 17:30.
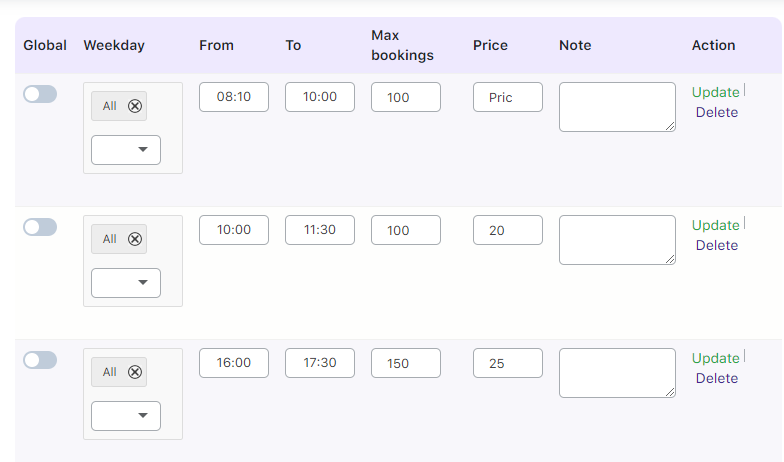
Add details of weekdays/dates and timeslots
Since all the weekdays have been selected and 3 show times have been added for each day, there will be 21 show times in total.
Once all the show timings are added for the movie, you can edit or delete the timeslots.
Find these options under the Action section:
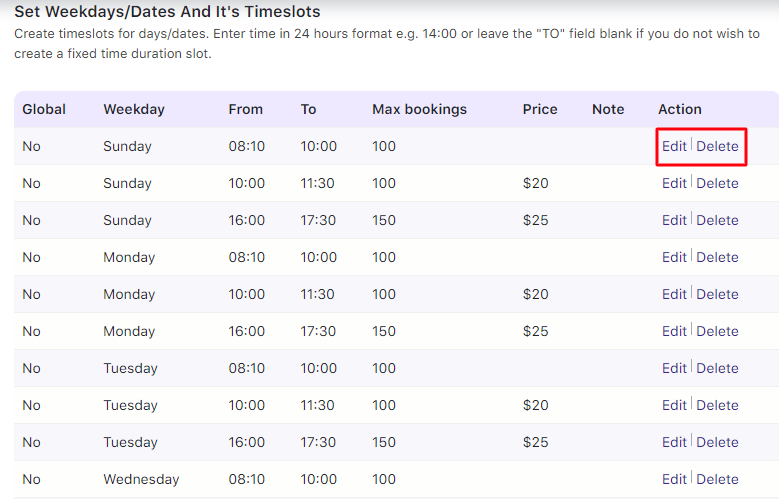
If you change the timing of an already added time slot, you will have to click the Update button once you are done editing.

Your product, The Jungle Book movie, can now accept customer bookings.
2. User Experience
This is how the created product appears on the front end:

Product displayed on the front end
Let’s assume the customer selects the date 15th April 2024 for the movie tickets.
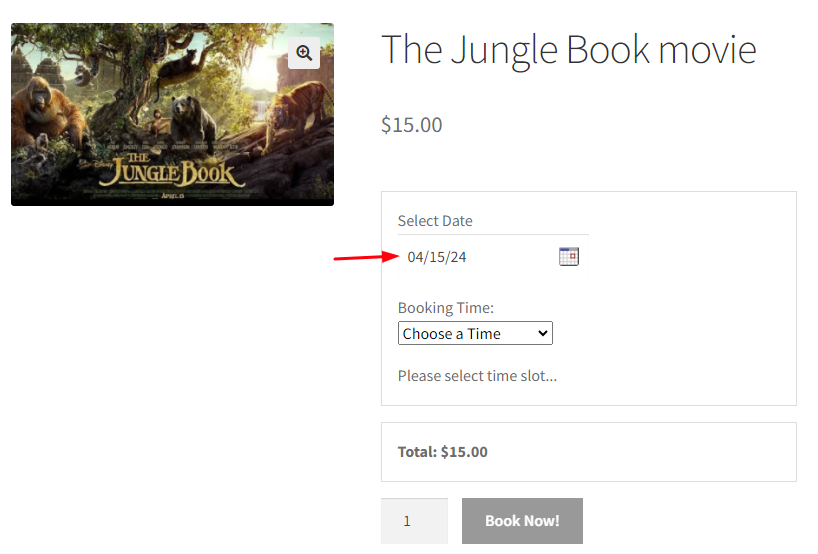
Selecting the date for booking the show
They’ve selected the time as 10:00 AM to 11:30 AM.
The price of the selected show will be displayed, and the Book Now! button will be enabled.
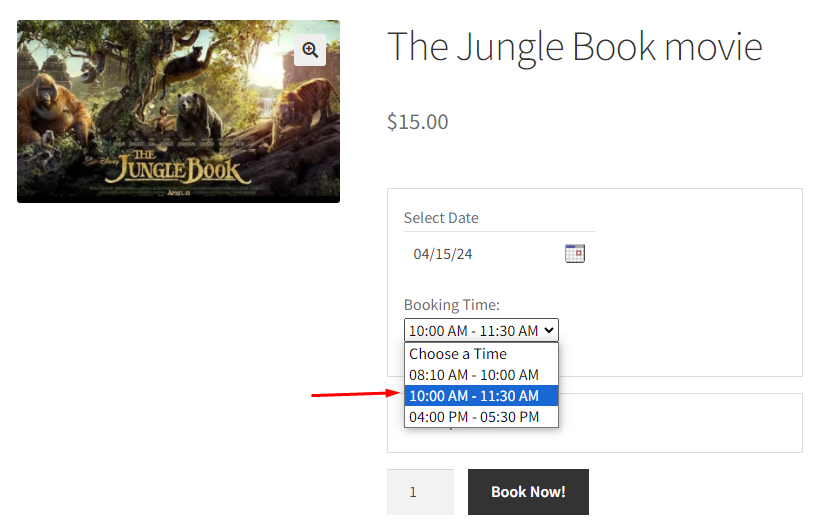
The show timings are selected for booking
Based on the selected show timings, the Price will be $20 as set above.
This is how the customer’s Cart Page will look like:
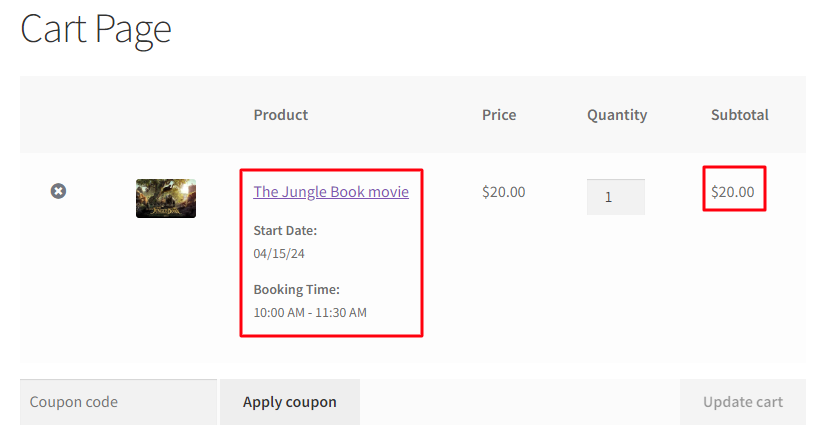
Cart page showing all booking details
Clicking on the Proceed to the Checkout button will take them to the Checkout page.
Here, the customer can place their order:
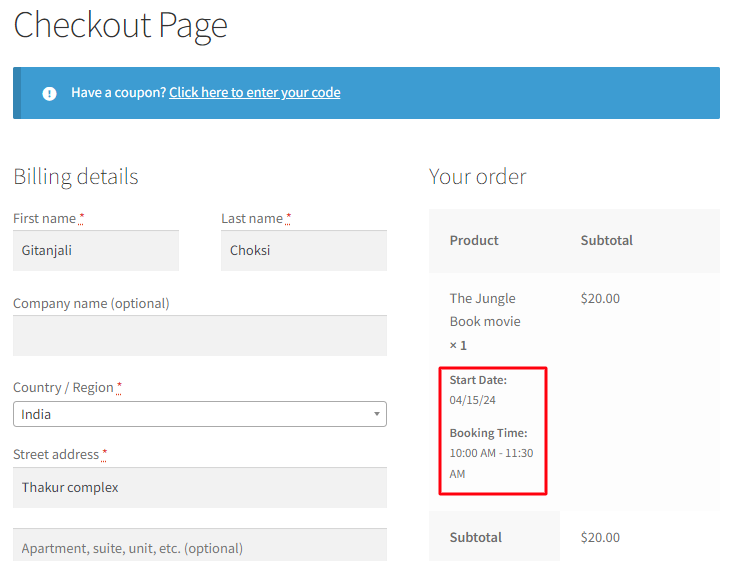
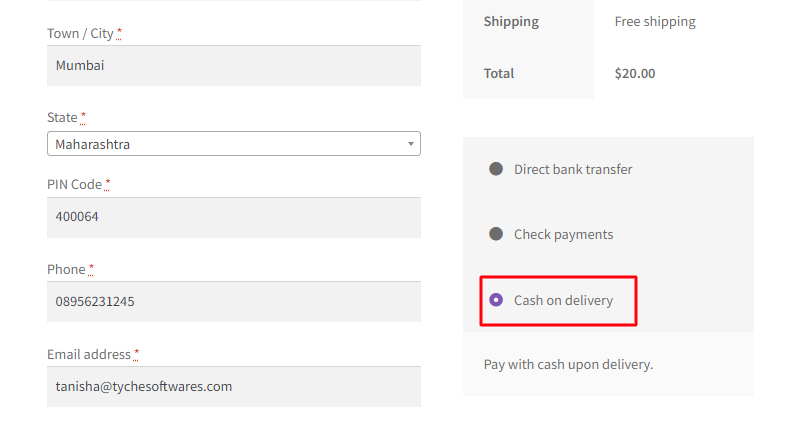
Checkout page displaying your order details
Once the order is placed, they will receive the confirmation with the following order details as shown below:
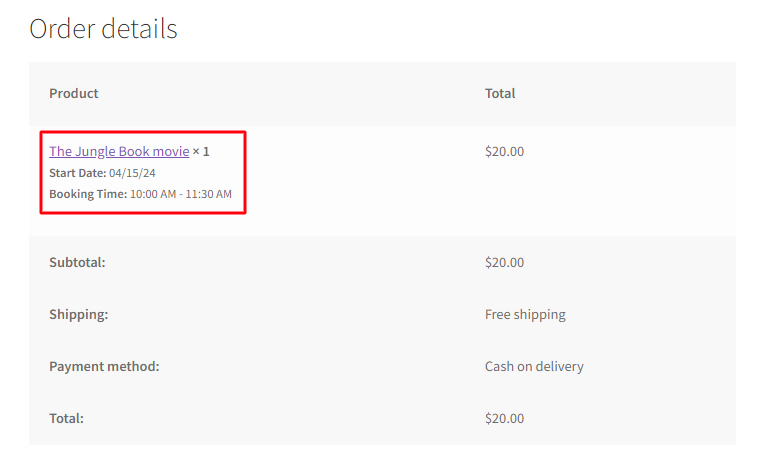
Order confirmation page with all details
Please note that this setup can also be used for WooCommerce Variable products!
To conclude, several businesses, such as football grounds on rent, music concerts, etc, provide services with flexible rates based on the preferred time. You can use the Booking and Appointment Pro for WooCommerce plugin to help your store become more interactive using this setup by providing time slot prices to your customers!
