Labels and Messages
↑ Back to topIn the case of “check-in date” and “check-out date,” labels and messages may not work out for every bookable product created using the Booking and Appointment Plugin for WooCommerce plugin.
For instance, movie ticket bookings require labels that are much different from the regular hotel booking labels.
Setting the right field labels for your services helps customers quickly identify and book your services.
Thus, in order to set the field labels, go to Booking and Appointment > Appearance > Labels & Messages.

You will find various editable fields mentioned here. The labels that are set on this page are applied to all the products listed in your store.
The labels are divided into the following sections:
2. Order Received Page & Email Notifications
5. Booking Availability Message on Product Page
6. Booking Availability Error Messages on the Product, Cart & Checkout Pages
1. Product Page Labels
↑ Back to top
This dropdown contains the following fields:
1. Check-in Date: It lets you set the start date label for the booking calendar on the Product Page
2. Check-out Date: It lets you set the end date label for the booking calendar on the Product Page
3. Booking Time: If your booking service provides an appointment, this label will help you out with the booking time
4. Choose Time Text: It lets you change the text of the default option of the drop-down list of the time slots added by you
5. Fixed Block Drop Down: This will change the text of the drop-down label when you have the Fixed Block Booking enabled
6. Booking Price: It lets you set the label of your service price being displayed after the booking details are selected
Let’s see how they will appear on the front end for different booking types:
HOTEL BOOKINGS
For Hotel Bookings, “Check-in date” or “Booking Date” and “Check-out date” labels seem ideal. You can set labels according to your business requirements, as shown below.
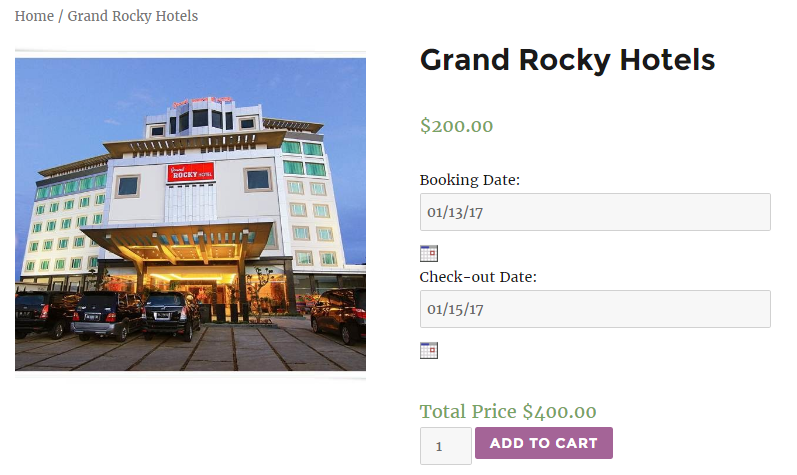
Hotel booking Product Page labels
MOVIE BOOKING
The labels for “Movie shows” don’t remain the same for all the pages. This is because movies require time slots. You also need to update Booking Time and Choose Time Text labels.
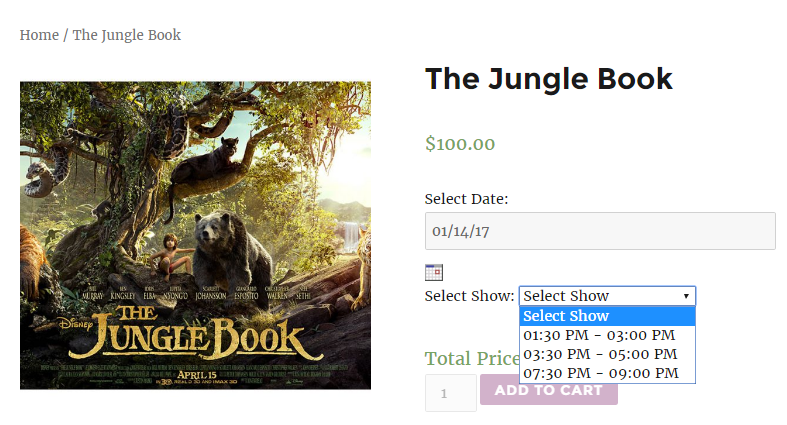 Movie booking Product Page labels
RENTAL APARTMENTS BOOKING
You are offering apartments which can be rented only for a fixed number of days: maybe a whole week or on weekends. Such services can be set up with the Fixed Block Booking feature available in our Booking plugin.
To set the label for selecting the period on the front end, we have a fixed block drop-down Label field where you can set the label as per your requirement.
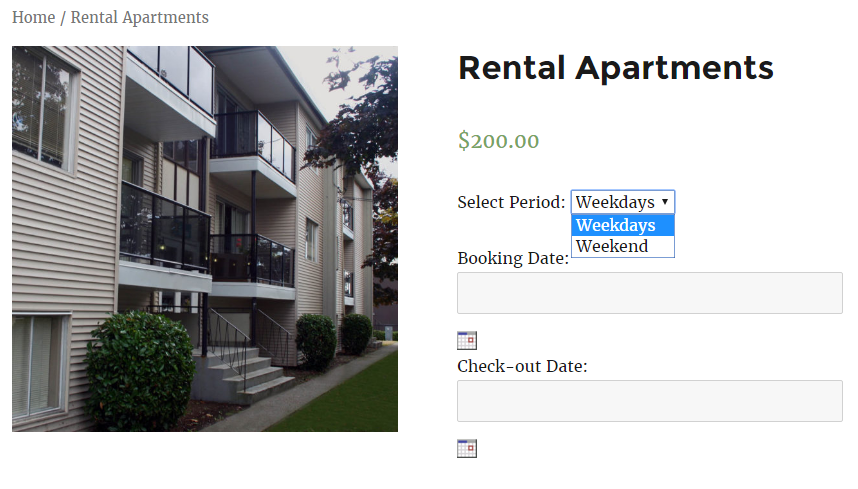 Rental Apartments booking Product Page labels
2. Order Received Page & Email Notifications
↑ Back to topThis dropdown deals with the labels displayed once the order is placed and when one receives an email for the same.

The first three fields of Check-in Date, Check-out Date, and Booking Time in this section are the same as mentioned above. However, the value will differ from the one on the product page.
The new label available is the ICS File Name field, where the value set is the name of the ICS file of the booking event sent in the email attachment.
Let’s see how they will appear on the front end for different booking types:
HOTEL BOOKINGS
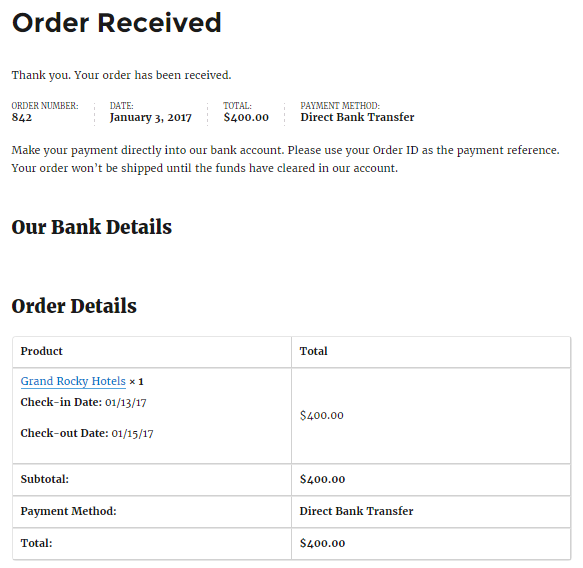
Order Received labels
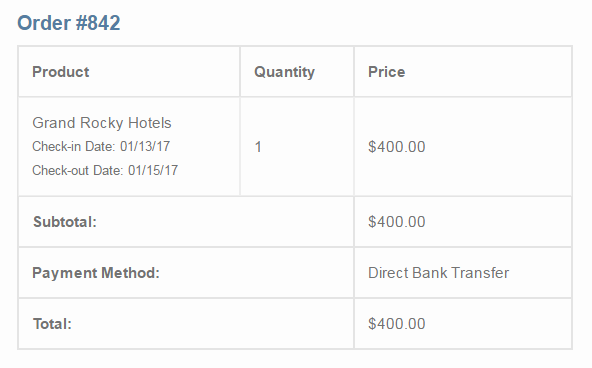
Email Labels
MOVIE BOOKINGS
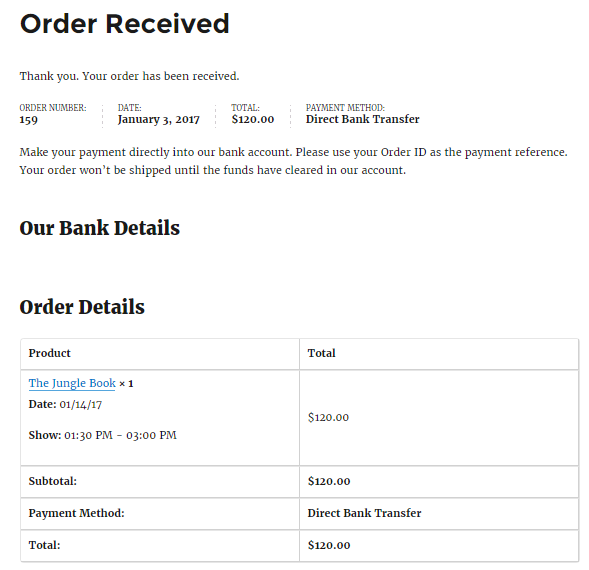
Order Received labels
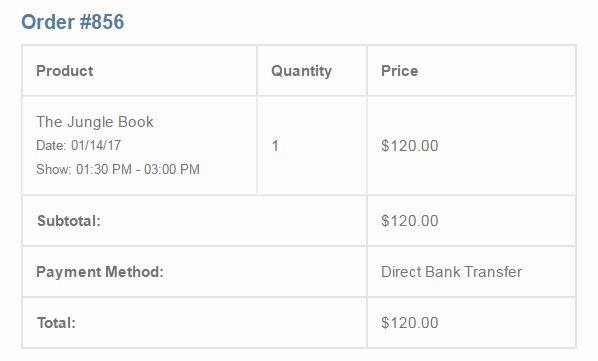
Email labels
3. Cart and Check-out Page
↑ Back to topHere, you will find the same three fields mentioned above.
However, please note that these labels will be seen on the Cart page and on the Checkout page.

Let’s see how they will appear in the front for different booking types:
HOTEL BOOKINGS
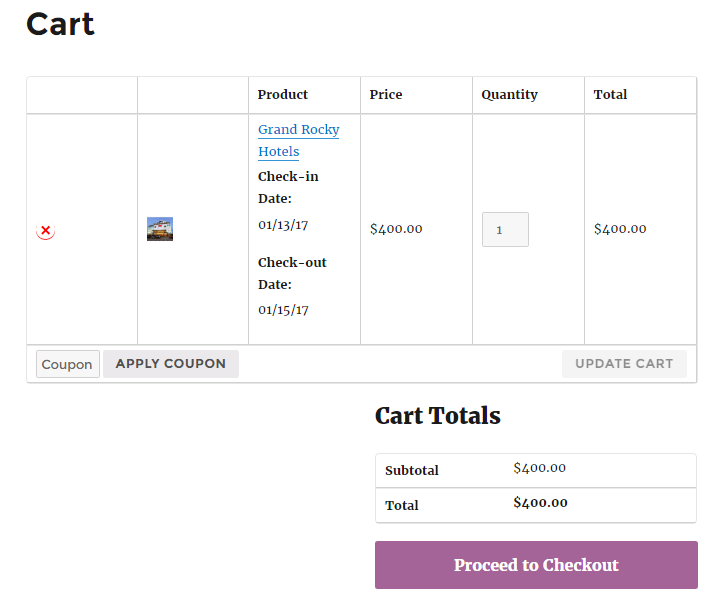
Cart page labels
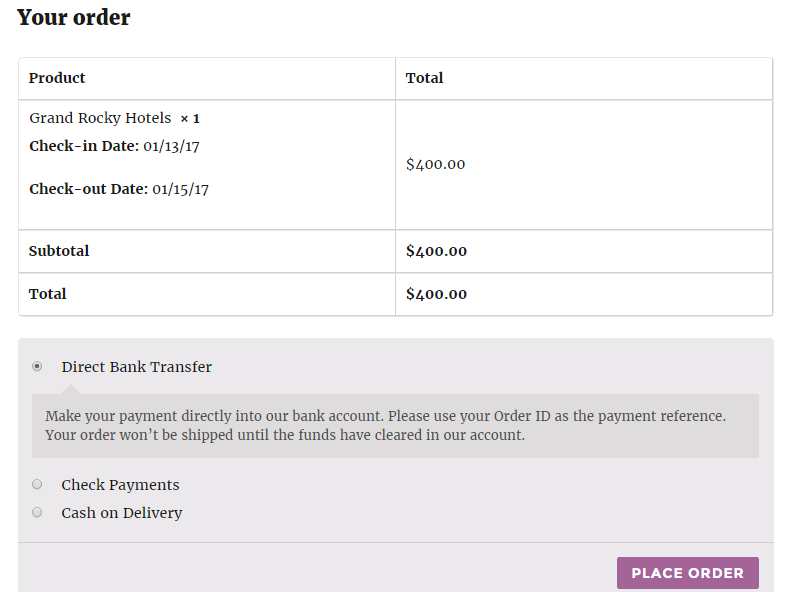
Checkout Page Labels
MOVIE BOOKINGS
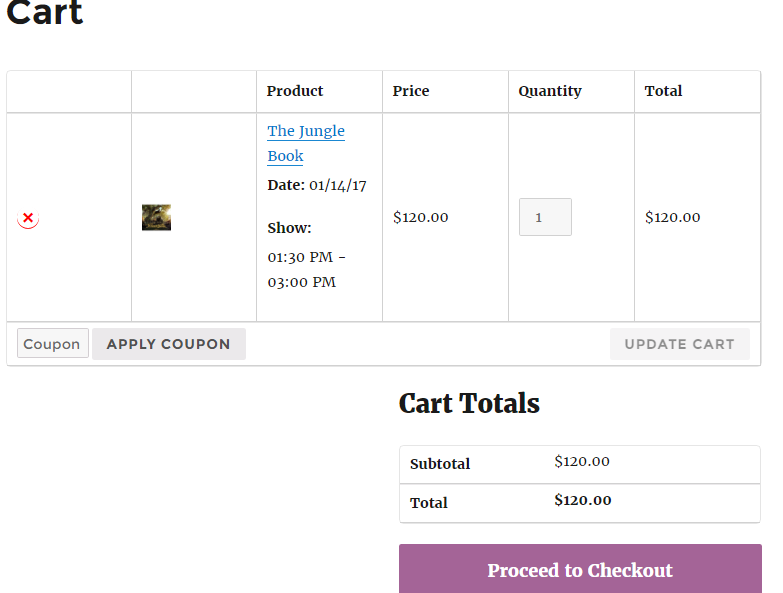
Cart Page Labels
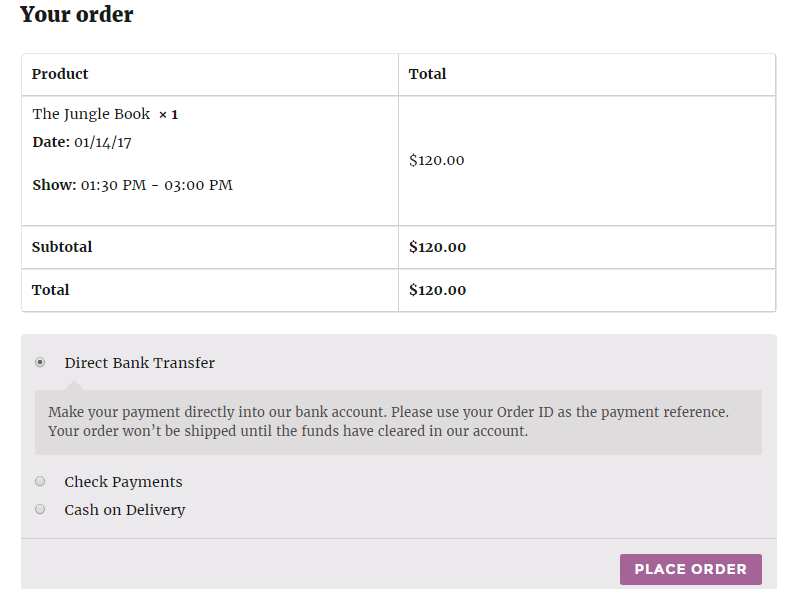
Checkout Page Labels
4. Add to Cart button
↑ Back to topIn this section, you can change the text for 2 buttons – Add to Cart Button and the Check Availability button, as shown below:
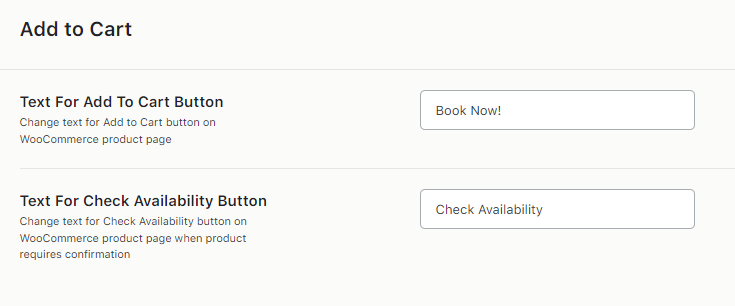
Now, let’s say that you’ve changed the text for the Add to Cart button to ‘Bookings Open’ and kept the exact text for the Check Availability button.
In the front end, these changes in texts would appear:

Add to Cart Button

Check Availability button
5. Booking Availability Message on Product Page
↑ Back to topIn this section, you can edit the messages for booking availability for different things such as Total stock available, available dates or time slots, when timeslots are unavailable, minimum and maximum booking dates available, etc.
Please note that you can use different placeholders for these messages, as shown below in the image:
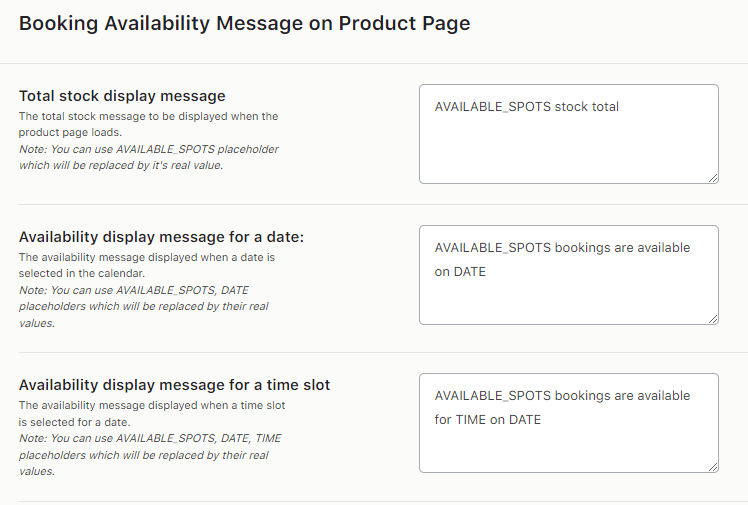
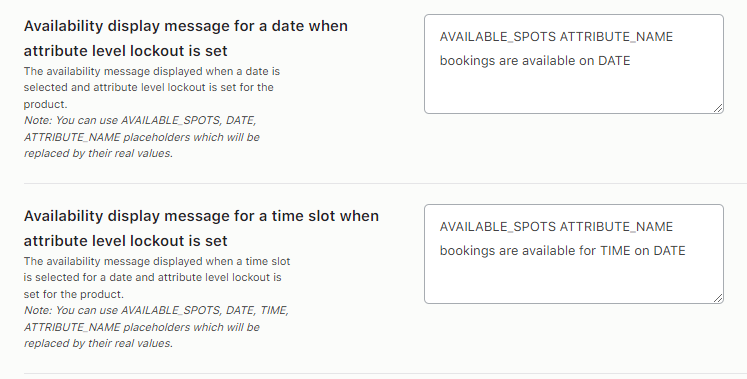
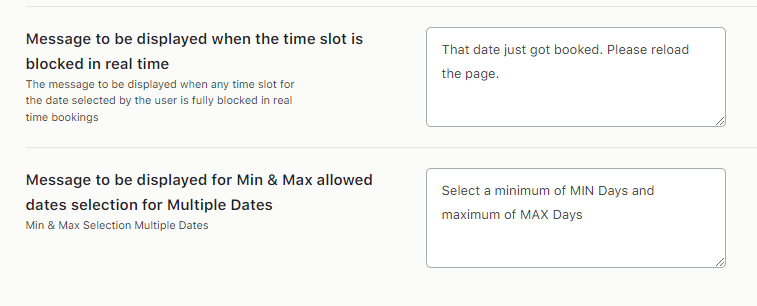
A. Total Stock Display Message
The Total Stock Display Message is shown when the customer visits a bookable WooCommerce product.
For instance, Dr. John’s Dental Clinic is operational from Monday to Saturday. This can be created using the Recurring Weekdays booking method.
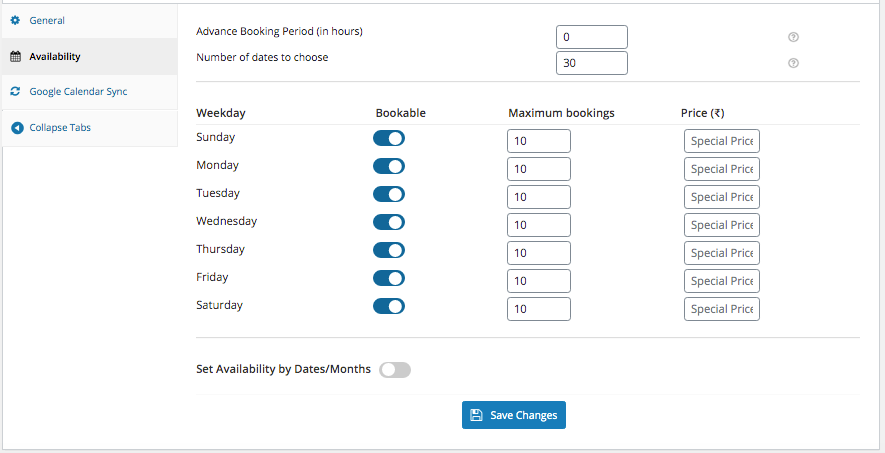
The “Lockout Date after X orders” is set to 10 while creating the product.
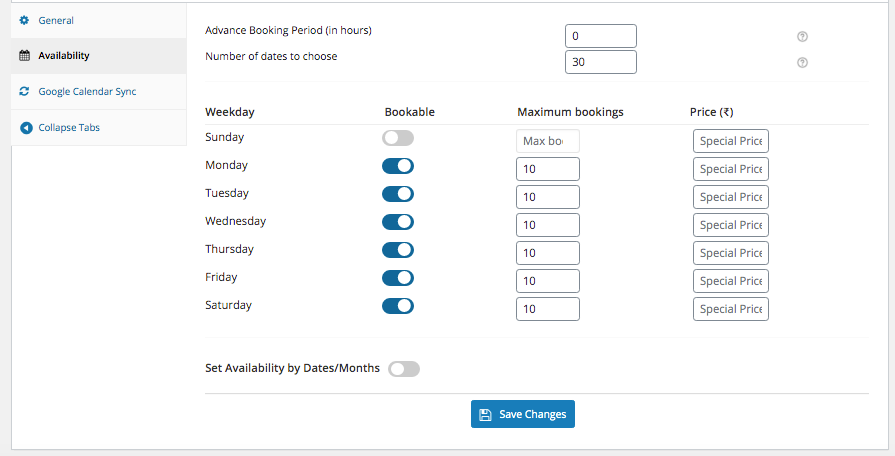
Lockout Date after X orders
As you have enabled this setting on the product page, the “Total stock display message” will be displayed as shown below.
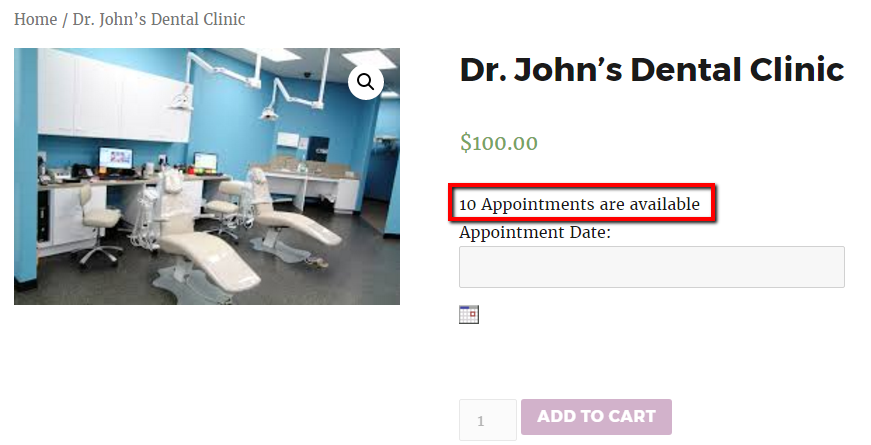
This shows the total availability of appointments on a particular date based on the “Lockout Date after X orders” set while creating your product.
As your product is appointment-based, the term appointments has been used in the “Total stock display message”. You can change it to meet your business requirements.
B. Availability Display Message For A Date
The Availability display message for a date is displayed on the product page when the customer selects a particular date for booking.
When the customer visits Dr. John’s Dental Clinic’s product page, the “Total stock display message” is shown as 10. This was set in the “Lockout Date after X orders”.
If the customer selects 25th May 2017, then the availability of booking an appointment on that particular date is displayed. You can see in the image below that the available appointments have been reduced to 7 from 10 as 3 appointments have already been booked.
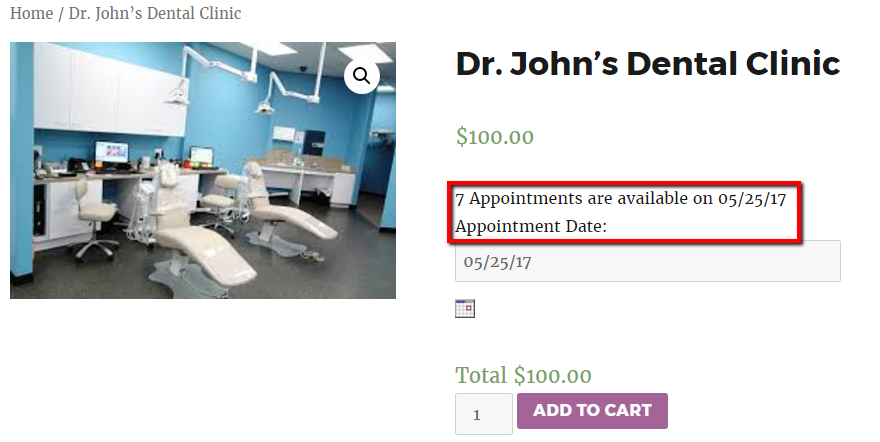
This shows the total availability of appointments on a particular date based on the “Lockout Date after X orders” set and the number of appointments already booked.
C. Availability Display Message For A Time Slot
When the customer selects a particular date and time slot for booking, the availability display message for that time slot is shown on the product page of any single-day booking products.
Suppose a customer selects a date of 25th May 2017 to book an appointment at Dr. John’s Dental Clinic. They also select a time slot from 06.00 PM to 08.00 PM.
The availability of booking an appointment on that particular date and time slot is displayed as 5 as set in the “Lockout time slot after X orders”.
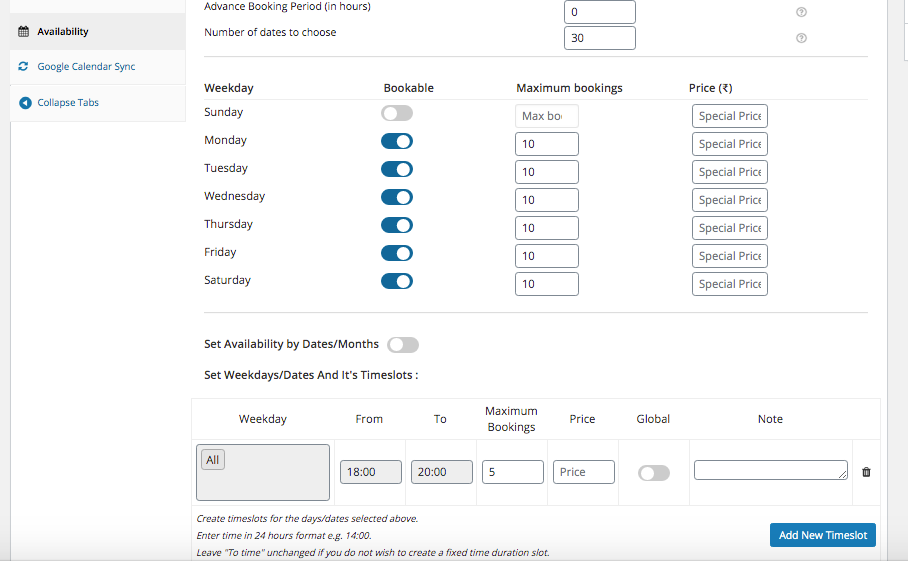
Lockout for timeslot
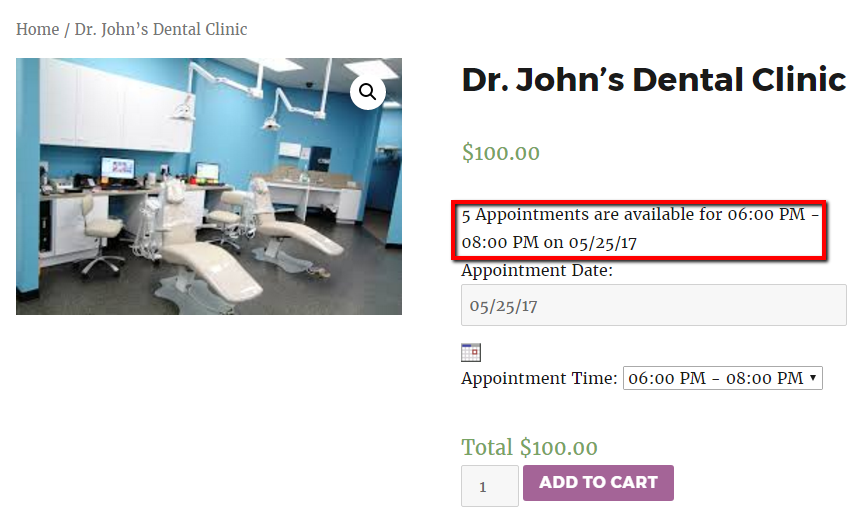
This shows the total availability of appointments on a particular date and time slot, as set in the “Lockout time slot after X orders” field when creating your product.
D. Availability Display Message For A Date When Attribute Level Lockout Is Set
When the attribute-level lockout is set, and the customer selects a particular booking date, the availability display message for that date is shown on the product page of variable products.
For instance, as a fitness trainer who provides Zumba training, if you want to train only 7 people on a particular day, you need to set lockout at the attribute level for the variable bookable product.
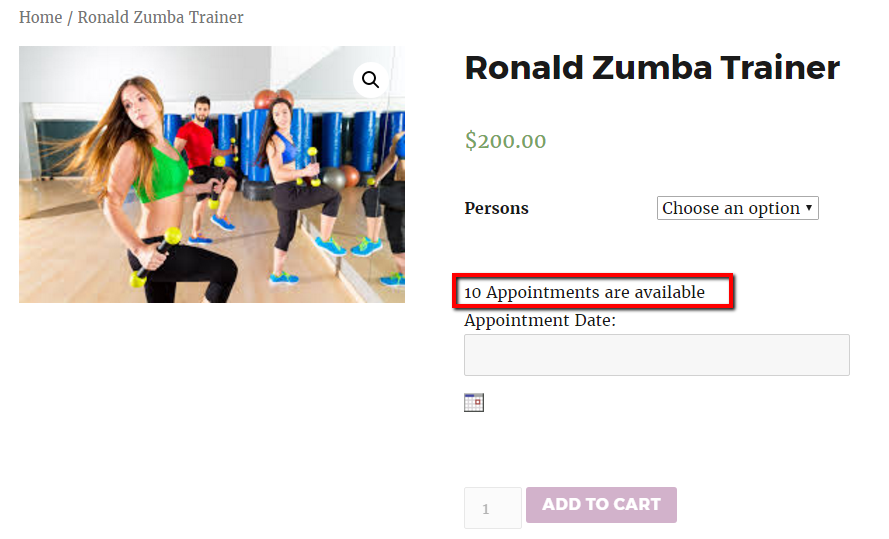
When customers visit your website, they can see the total number of available appointments for your services, which is 10, as set in the “Lockout Date after X orders,” as shown below.
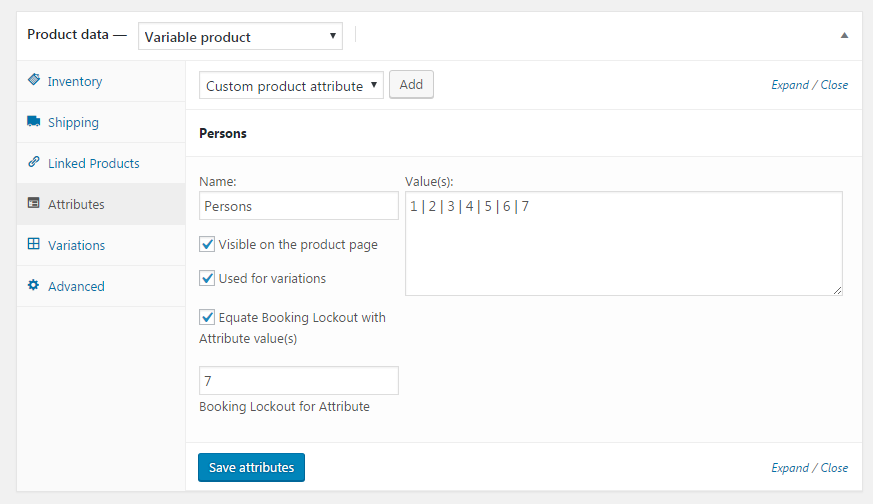
Now, the lockout set at the attribute level is set to 7, as you want to train only 7 persons on a particular day, as shown below.
If the customer selects any variation and date for the appointment, a message about the availability of appointments on that particular date for the selected variation will be shown as 7. This is based on the lockout set at the attribute level.
In the example, we selected variation 1 and the appointment date of 25 May 2017.
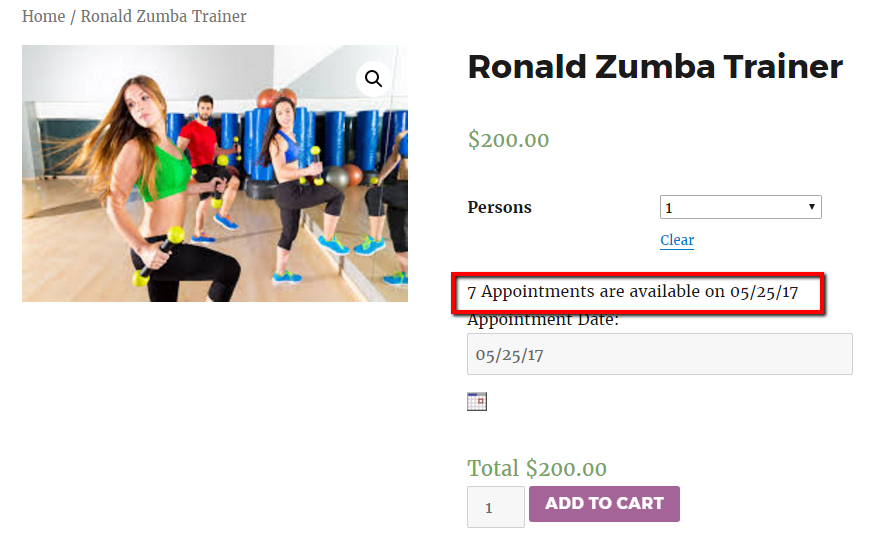
This shows the total availability of appointments for the attribute on a particular date based on the “Booking Lockout for Attribute” while creating your product.
E. Availability Display Message For A Time Slot When Attribute Level Lockout Is Set
The Availability display message for a time slot when attribute-level lockout is set is displayed on the product page of the variable product with the time slot where attribute-level lockout is set.
It is displayed when the customer selects a variation for a particular date along with the time slot for booking.
Let’s take the same example of Ronald Zumba Trainer. When a customer selects variation 1 for the date 25th May 2017 along with the time slot of 06.00 PM to 08.00 PM for an appointment, the availability of booking an appointment on the selected date and time slot is displayed as shown below.
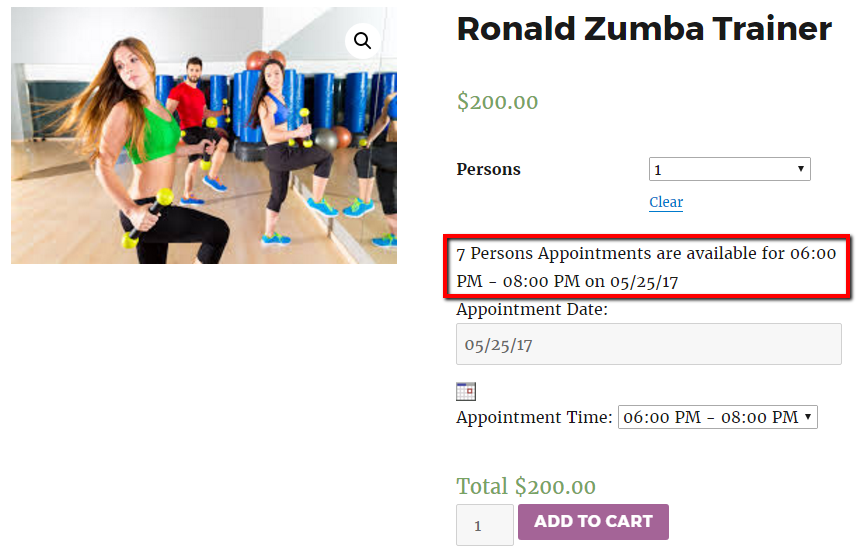
This shows the total availability of appointments for the attribute and the time slot selected on a particular date based on the attribute level lockout is set.
F. Message To Be Displayed When The Time Slot Is Blocked In Real Time
The message to be displayed when the time slot is blocked in real-time is shown on the product page of any booking method.
Let’s say there are two users on the product page simultaneously. One of the users has booked your services for a particular date and time slot, and the other user is trying to book the same date and time slot.
The message on the second user’s product page screen will be that this product has been fully booked for a particular time slot. Please try another time slot.
Let’s take the example of Dr. John’s Dental Clinic, which was created using recurring weekdays and the time slot booking method.
If two users are on the product page of Dr. John’s Dental Clinic at the same time and if User 1 selects the date 25th May 2017 with the time slot of 06.00 PM to 08.00 PM for booking an appointment, then they will be shown booking availability message as 5 as shown below, as the lockout of each time slot is set as 5.
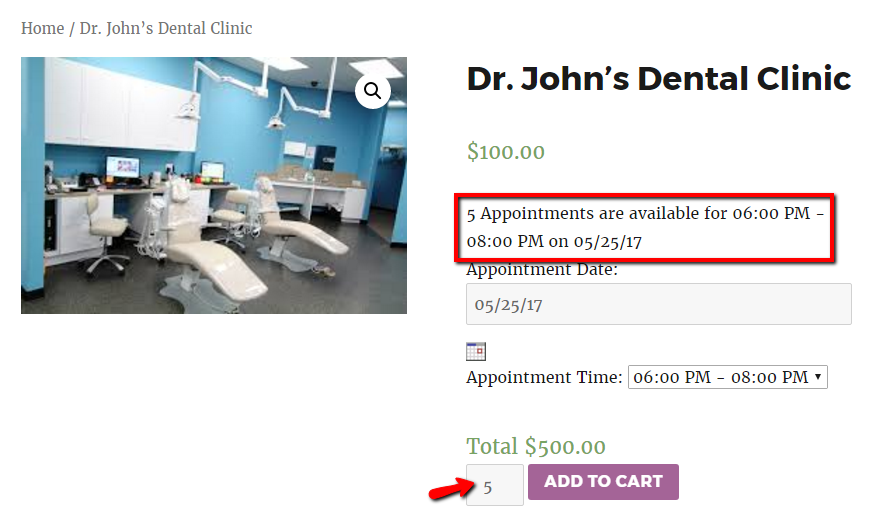
User 1 has made the booking for “5” people as set in the lockout of each time slot.
At the same time, when User 2 is also trying to book an appointment for the same date & time, the message will be displayed as shown below.
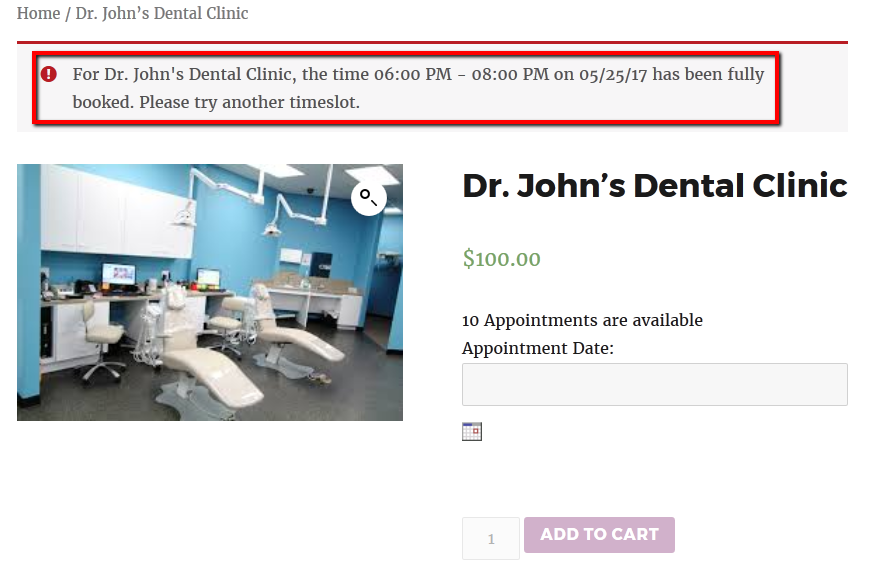
So now User 2 can book the appointment on “25th May 2017” but has to select another time slot as the time slot “06.00 PM to 08.00 PM” is fully booked by User1.
This shows how the booking availability for a particular date and time slot changes if two users are on the product page and are booking an appointment for the same date and time.
G. Message to be displayed for Min & Max allowed dates selection for Multiple Dates
This setting shows the minimum and maximum dates allowed for selection when a booking with multiple dates has been created.
For instance, a Guitar for Beginners booking has been created using multiple dates where a minimum of 2 dates selection and a maximum of 5 dates selection are required as shown here:
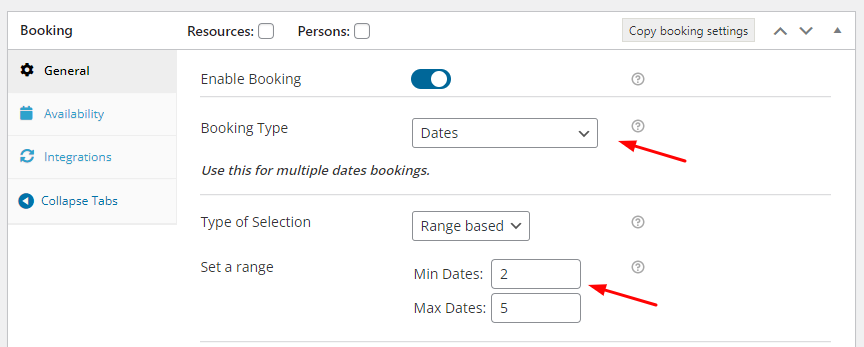
Please note that the booking has to be created using Range-based Multiple booking, as shown in the above image.
When a customer goes to the product page to book, ‘Select a minimum of 2 Days and a maximum of 5 Days’ message will be displayed:

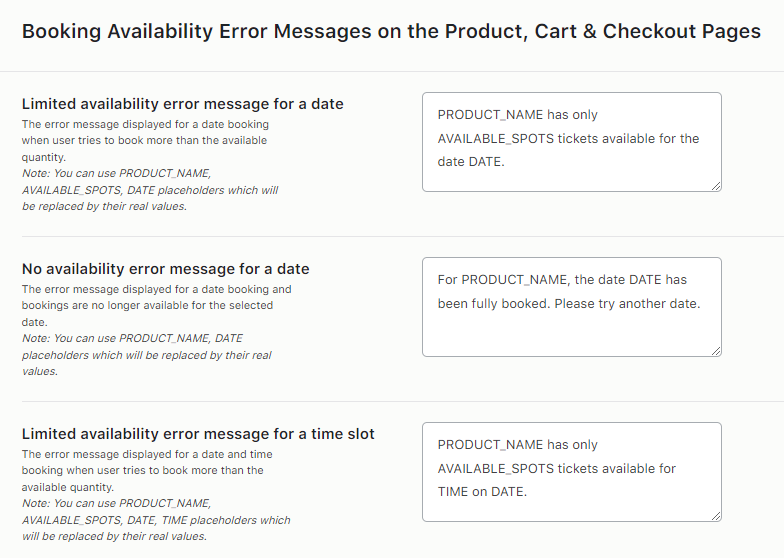
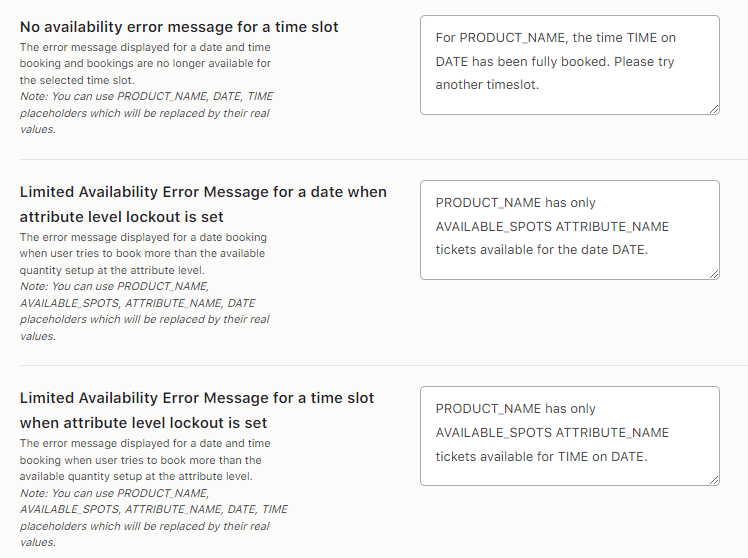
6. Booking Availability Error Messages on the Product, Cart & Checkout Pages
↑ Back to topIn this section, you find how to customize booking availability error messages on the Product page, Cart page, and Checkout page for your WooCommerce bookable products using Booking and Appointment Plugin.
This feature plays a vital role as it has two main benefits: It prevents overbooking and works in real time.
Here, the examples of Car Rentals and Tour Operators and terms relating to it have been used in all the “Booking Availability Error Messages on the Product, Cart & Checkout Pages”. You can change the terms as per your business requirements.
A. Limited Availability Error Message For A Date
The Limited Availability Error Message For A Date is shown when the customer selects a particular booking date but selects the slot that exceeds the lockout set for your product.
For instance, in order to provide Cars on rent for all weekdays, you have created “Rent A Car” using the Recurring Weekdays booking method.
The “Lockout Date after X orders” is set to 3 since you have 3 cars to provide on rent.
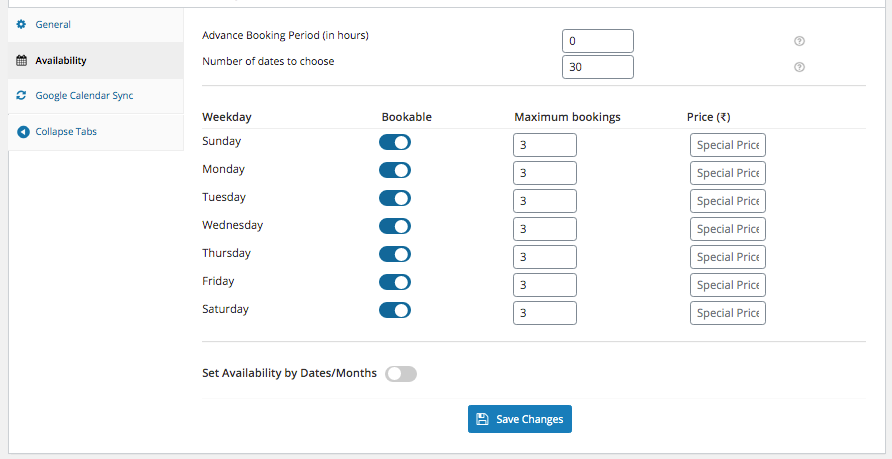
If the customer selects the booking date as 25th May 2017 for more than 3 cars for booking and clicks on the ADD TO CART button, then the Limited Availability Error Message For A Date will be shown on the Product page as shown below.
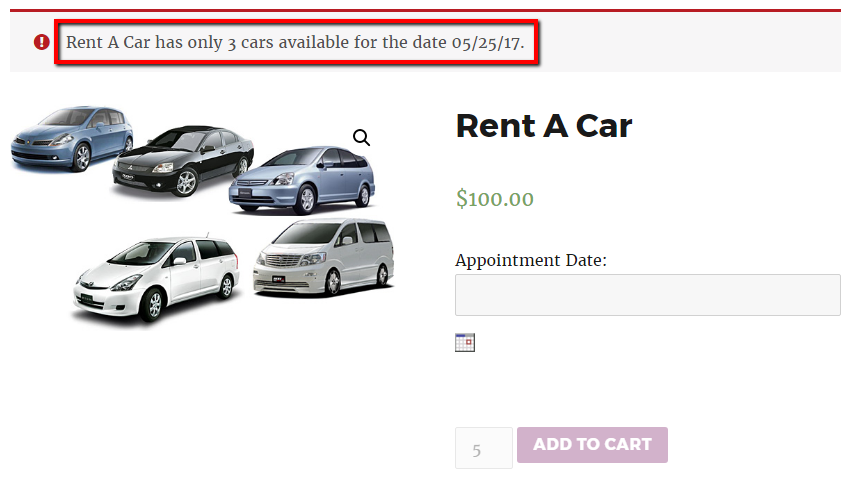
The error message “Rent A Car has only 3 cars available for the date 05/25/17” is shown on the Product page based on the “Lockout Date after X orders” set while creating your product.
Updating Product Quantity On Cart Page
Sometimes, the customer enters the Cart page by selecting the available booking details. Then, for some reason, it increases the number of bookings on the Cart page, which may exceed the lockout limits.
In the example below, the customer first selected Rent A Car on 25th May 2017 for 2 cars. They came to the Cart page by clicking the ADD TO CART button.
However, after coming to the Cart page, they increased the quantity from 2 to 4 and clicked the UPDATE CART button.
Then, a Limited Availability Error Message For A Date will be displayed on the Cart page as the slot has exceeded the lockout limit.
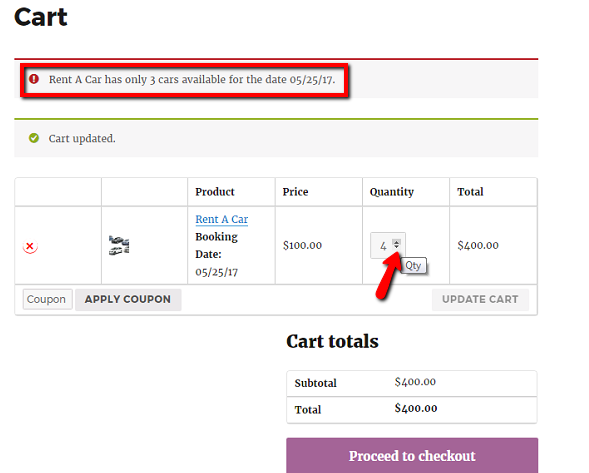
Sometimes, the customer ignores the error message and moves ahead by clicking on the Proceed to checkout button. The same error message will appear on the Checkout page.

Customers will be able to place an order only after returning to the Cart page and selecting the right quantity.
B. No Availability Error Message For A Date
When real-time booking takes place, no Availability Error Message For A Date is displayed on the Product page, Cart page, and Checkout page for any type of booking method.
Many times, two customers at a time are trying to book the same product for the same date.
However, if any customer moves ahead and makes the entire booking for a particular date while the other customer is trying to book the same date, then the No Availability Error Message For A Date will be displayed on the second customer’s screen on various pages.
Let’s take the same example of Rent A Car.
If two customers are on your product page at the same time and if Customer A books the date 27th May 2017 for 3 cars as shown below.
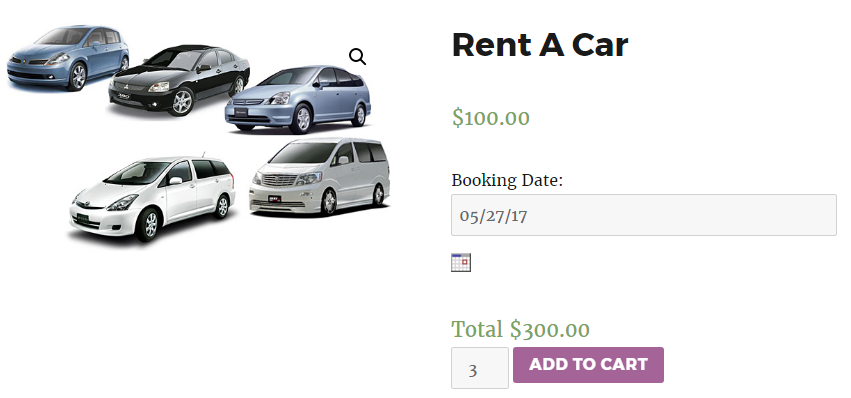
If Customer B also tries to book a car for the same date, 27th May 2017, then the No Availability Error Message For 27th May 2017 will be displayed on the Product page as “For Rent A Car, 05/27/17 has been fully rented.”
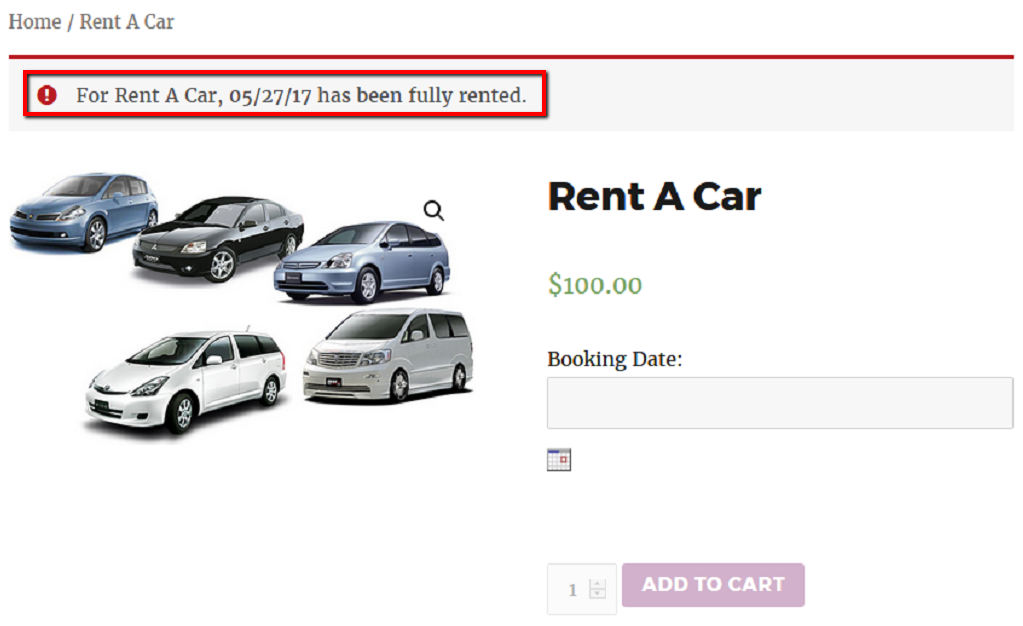
Updating Product Quantity On Cart Page
In some cases, both customers proceeded to the cart page with the same date selected for booking a car.
If Customer A places the order first and Customer B is still on the Cart page, then as soon as Customer B clicks on the View Cart button, the same error message will be displayed on Customer B’s Cart page, as shown below.
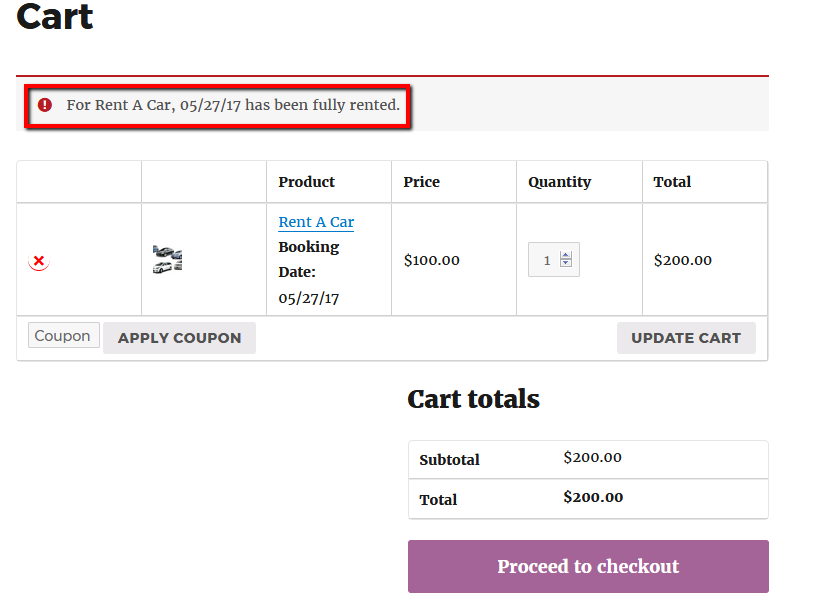
Still, some customers ignore the error message on the Cart page and click on the Proceed to Checkout button to book your services. The same error message will be displayed on the Checkout page, as shown below.

To rent a car, Customer B must return to the Cart page and select the available Booking Date.
C. Limited Availability Error Message For A Time Slot
The Limited Availability error message for a time slot is displayed on the product page of any single-day booking products with a time slot.
This happens when the customer selects a particular date and time slot but selects the slot that exceeds the time slot lockout set for your product for booking.
Let’s take the above Rent-A-Car example, where the “Lockout time slot after X orders” is set to 3, as shown below.
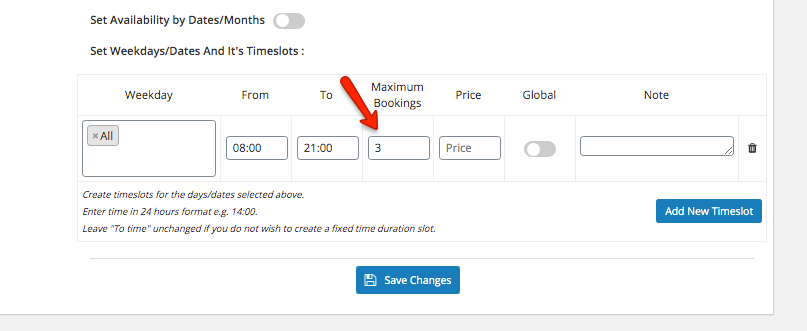
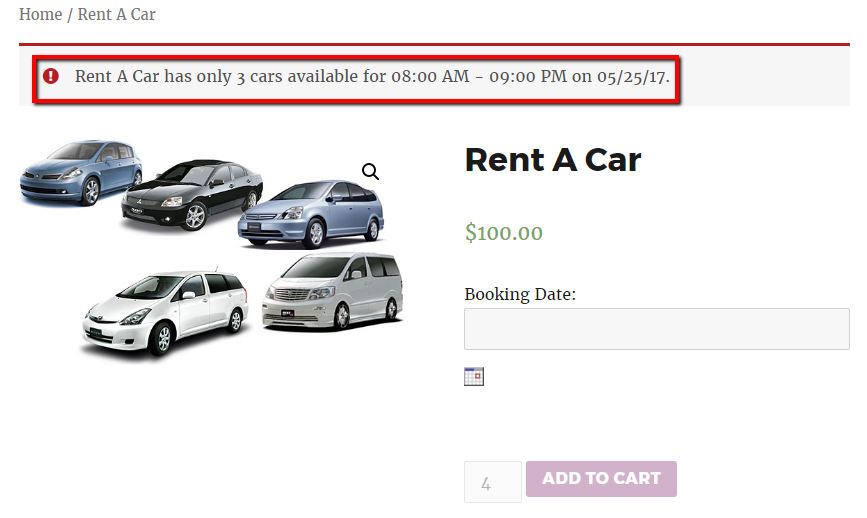
Suppose a customer selects a date, 25th May 2017, to book 4 cars along with the time slot as 08.00 AM to 09.00 PM. Then, the “Limited Availability Error Message for that time slot” is displayed on various pages.
This is based on the “Lockout time slot after X orders” set as 3, as shown above.
Updating Product Quantity On Cart Page
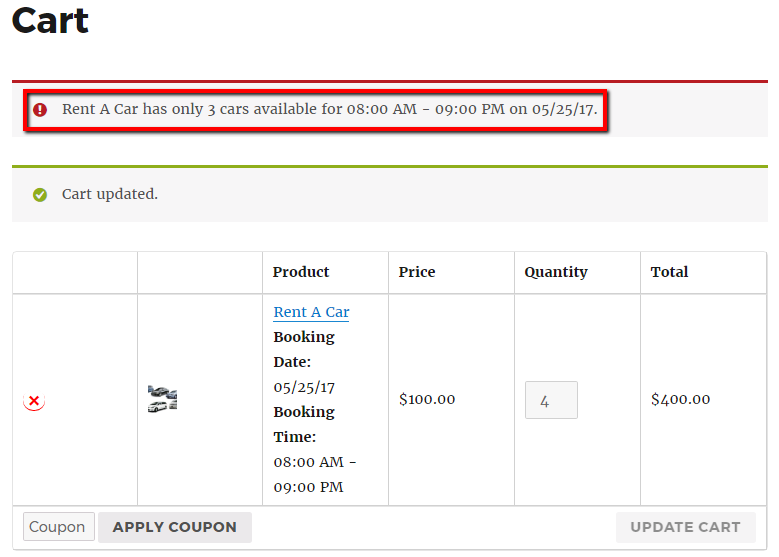
Customers sometimes add the available cars, i.e. 3, for the time slot 08.00 AM to 09.00 PM.
After entering the cart page, they try to increase the number of cars booked to 4, which exceeds the lockout you set.
When the customer clicks on the UPDATE CART button, the Limited Availability error message for a time slot message is shown on the Cart page, as shown below.
Some customers ignore the error message on the Cart page and click on the Proceed to Checkout button to book their services, and then the same error message will be displayed on the Checkout page.

The customers can place the booking only if they go back to the Cart page & select the available booking in that time slot.
D. No Availability Error Message For A Time Slot
No Availability Error Message For A Time Slot is displayed on the Product page, Cart page, and Checkout page of any type of booking method when real-time booking occurs.
Many times, two customers at a time try to book the same product for the exact same date and time slot.
However, if one customer has made the entire booking for that date and time slot while the other customer is trying to book with the same booking details, the No Availability Error Message For A Time Slot will be displayed on the second customer’s screen on various pages.
Let’s take the same example of Rent A Car. Now, if two customers are on the Product page of your product at the same time and Customer A selects the date 27th May 2017 to book 3 cars as shown below.
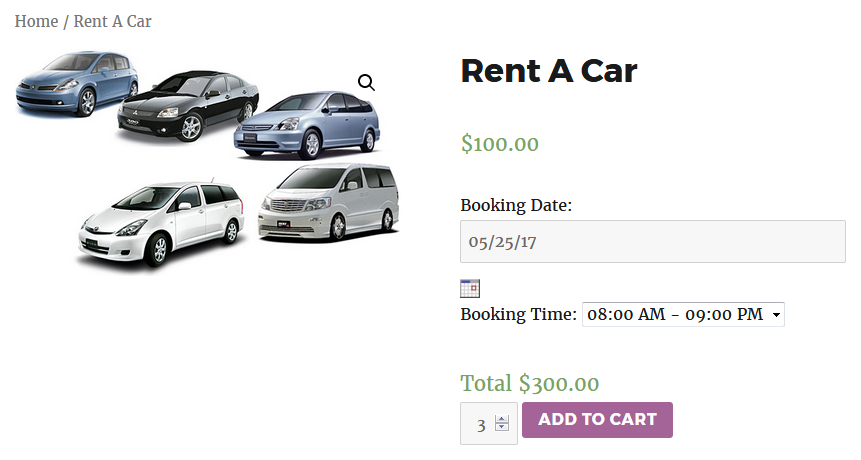
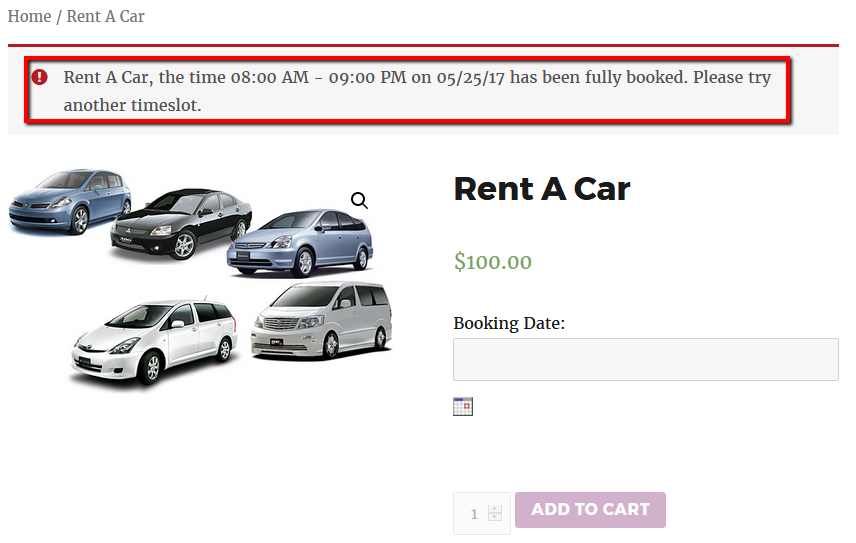
Now, if Customer B tries to book a car for the same date, 25th May 2017, and time slot 08.00 AM to 09.00 PM, then the No Availability Error Message For A Time Slot will be displayed on the Product page as “Rent A Car, the time 08:00 AM – 09:00 PM on 05/25/17 has been fully booked. Please try another timeslot”.
Updating Product Quantity On Cart Page
Suppose both customers have proceeded to the Cart page with the same date & time slot selected to book the car.
Customer A placed the order first, and Customer B is still on the cart page.
As soon as Customer B clicks on the View Cart button, the same No Availability Error Message For A Time Slot will be displayed on his Cart page, as shown below.

If the customer ignores the error message on the Cart page and clicks the Proceed to Checkout button to book your services, the same error message will be displayed on the Checkout page, as shown below.

Customer B has to return to the Cart page and select the available Booking Date and time slot to book your car for rent.
E. Limited Availability Error Message For A Date When Attribute Level Lockout Is Set
The Limited Availability Error Message for a date when the attribute level lockout is set is displayed on the product page of variable products when the attribute level lockout is set.
It occurs when the customer selects booking details that exceed the attribute-level lockout limit set for your product.
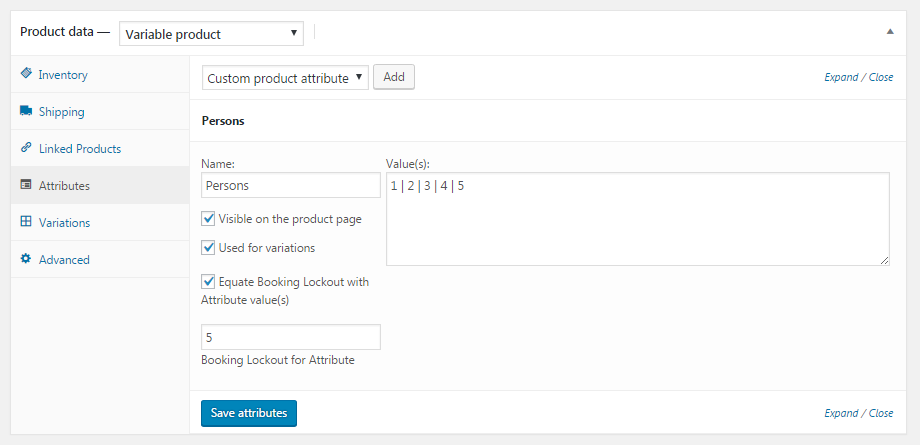
Let’s understand with the example of “Tour operators” who provide a Dubai Tour Package for 5 Persons only.
Now, you must create a Variable Bookable Product with attribute level lockout, as shown below.
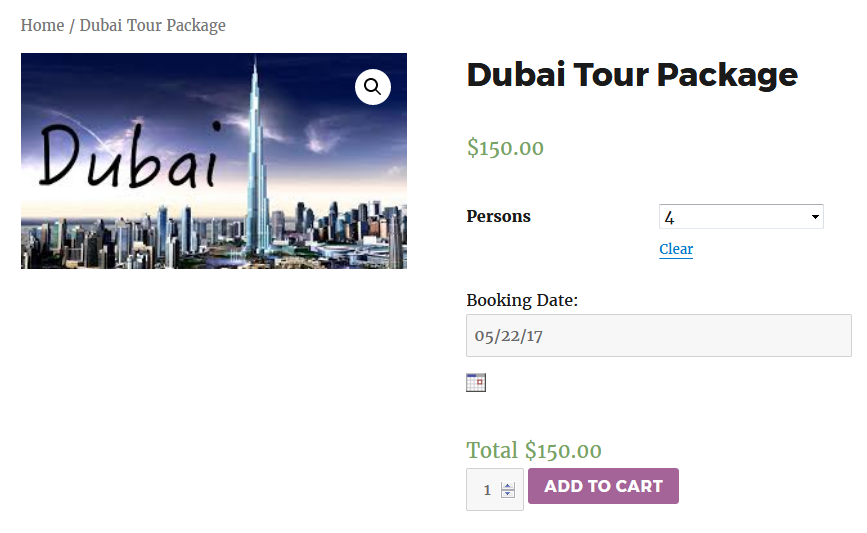
Now, if Customer A has booked the Dubai Tour Package on 22nd May 2017 for 4 Persons as in the below image.
Now if Customer B comes to the product page while trying to book a Dubai Tour Package for 3 Persons on 22nd May 2017, then the error message “Dubai Tour Package has only 1 Person booking available on 05/22/17” will be displayed on the Product page.
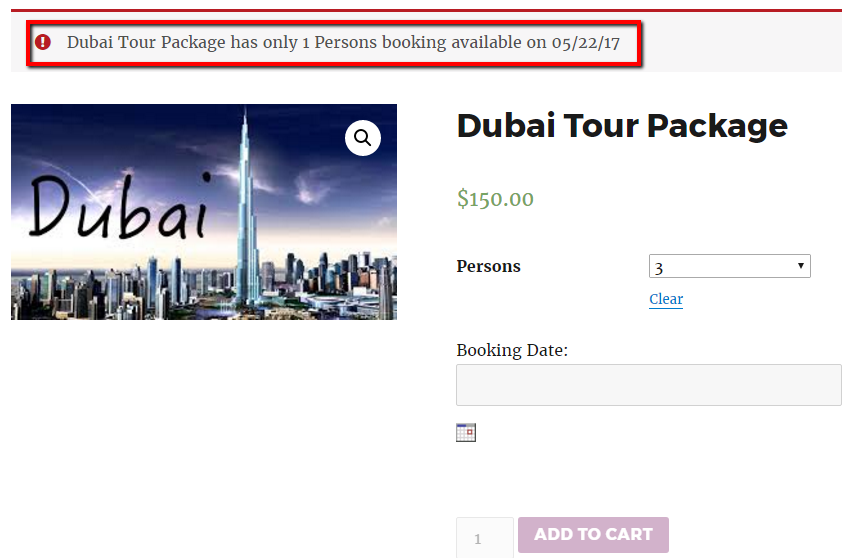
This error message is displayed using the “Booking Lockout for Attribute” while creating your variable product.
Customers will be able to place an order only after returning to the Product page and selecting the available booking details.
F. Limited Availability Error Message For A Time Slot When Attribute Level Lockout Is Set
The Limited Availability Error message for a time slot when attribute-level lockout is set is displayed on the product page of the variable product with a time slot where attribute-level lockout is set and the customer tries to book more than the lockout setting.
Let’s take the same example of the Dubai Tour Package, where Customer A books the tour for 3 Persons on 31 May 2017, and the Booking Time is 08.00 AM to 10.00 AM.
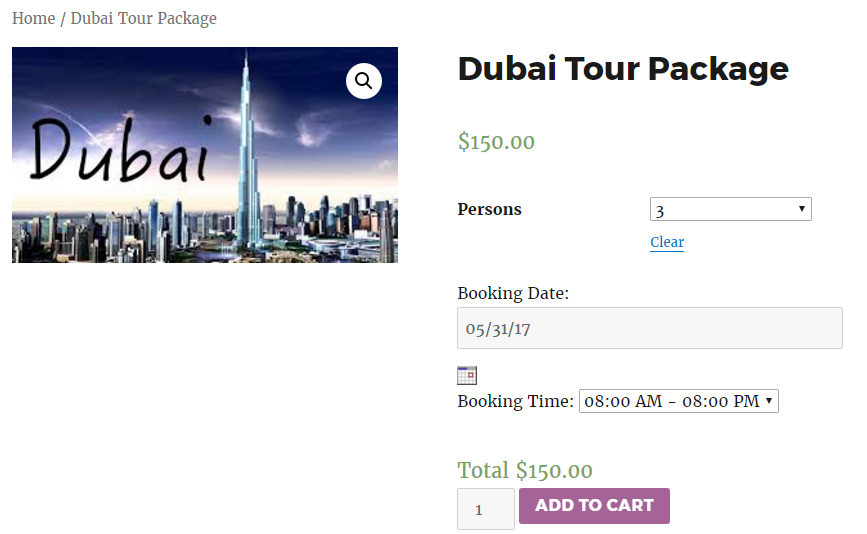
Now, if Customer B comes to the product page and tries to book a Dubai Tour Package for 3 Persons on 31st May 2017 and the Booking Time is 08.00 AM to 10.00 AM, then the error message “Dubai Tour Package has only 2 Persons booking available for 08.00 AM – 10.00 AM on 05/31/17” will be displayed on the Product page.
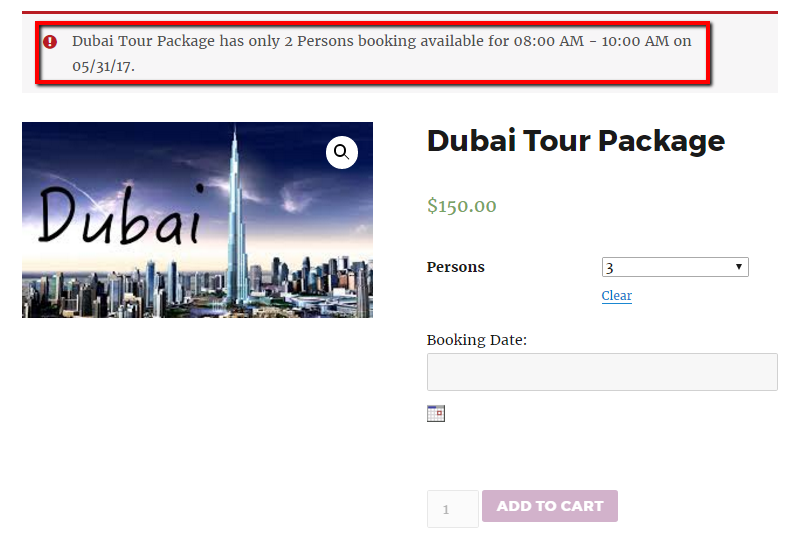
The Limited Availability Error message for a time slot when attribute level lockout is set is shown on the Product page based on the “Booking Lockout for Attribute” while creating your variable product.
The customers won’t be able to place an order until they return to the Product page & select the available booking details and the time slot.
Changing labels is a small but important part of setting up your WooCommerce bookable product. It is extremely easy to set and doesn’t take much time. All the label changes are immediately reflected on the respective pages.
Additionally, when the Booking Availability Error Messages are displayed on various pages, your customer will learn the availability of that product based on the selected booking details. Accordingly, they can change their booking details and book the product.
Similarly, the Booking and Appointment Plugin for WooCommerce lets you customize every aspect of your booking.
Calendar
↑ Back to top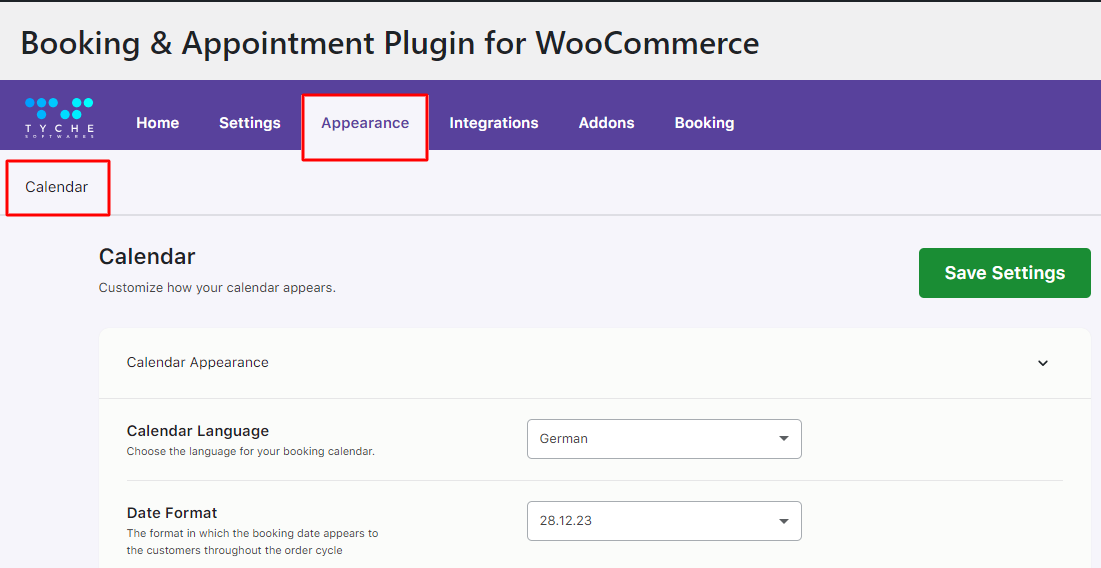
Let’s say you have set up online booking services using the Booking and Appointment Plugin for WooCommerce. You may have designed your store in your choice of format and language.
However, you also want the appearance of your booking calendar and the booking information to match the design and language of your store.
To do so, we have some global-level booking settings that allow you to change the appearance of the booking calendar and booking details on the front end of your store.
You will find this setting applicable to all the bookable services in your store. Simply go to WooCommerce -> Booking and Appointment > Appearance > Calendar.
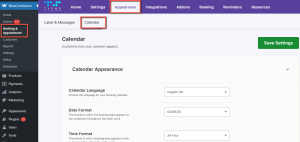
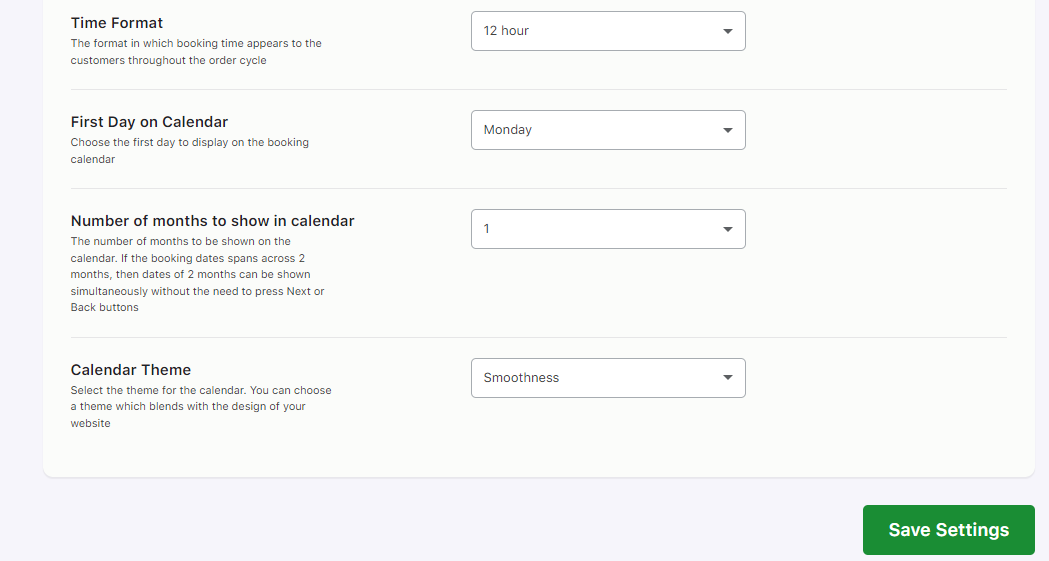
You will find the following settings:
5. Number of months to show in the calendar
Default Global settings page
All the above settings are set to default when you install the Booking plugin on your website. You can change their values as per your business requirements easily.
Here’s a business example to understand these settings:
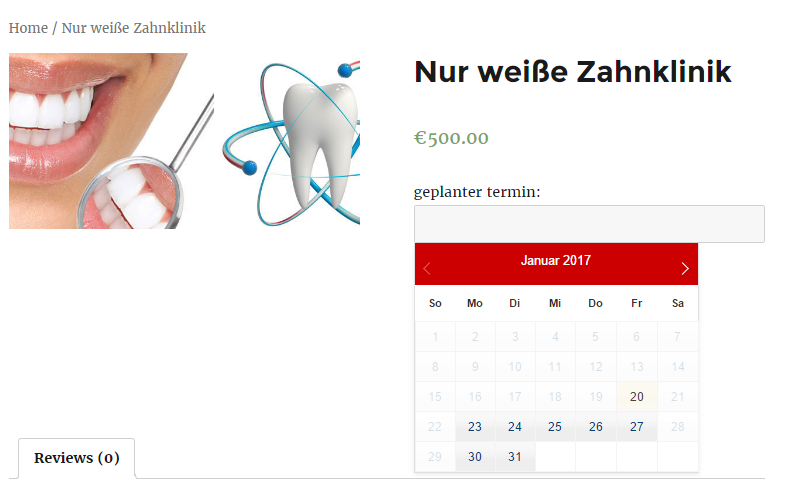
Let’s say that customers can easily book an online appointment for your dental clinic. Since you are located in Germany, you have set your website’s language to German. Additionally, you want to show the date & time format of the booking date and timeslot as per the standard date format followed in Germany.
The Booking and Appointment plugin has Recurring Weekday and Specific Date booking methods to help you create this bookable service available on a single day with a timeslot. Using any one or both of these methods can create your service as per your business requirements.
For instance, you have created a “Just White Dental Clinic” service using the Recurring Weekdays booking method.
The customer can book an appointment on any day from Monday to Friday.
Available timeslots on these days are 10:00 AM to 12:00 PM and 04.00 PM to 06:00 PM.
Below is the front end of the product created.
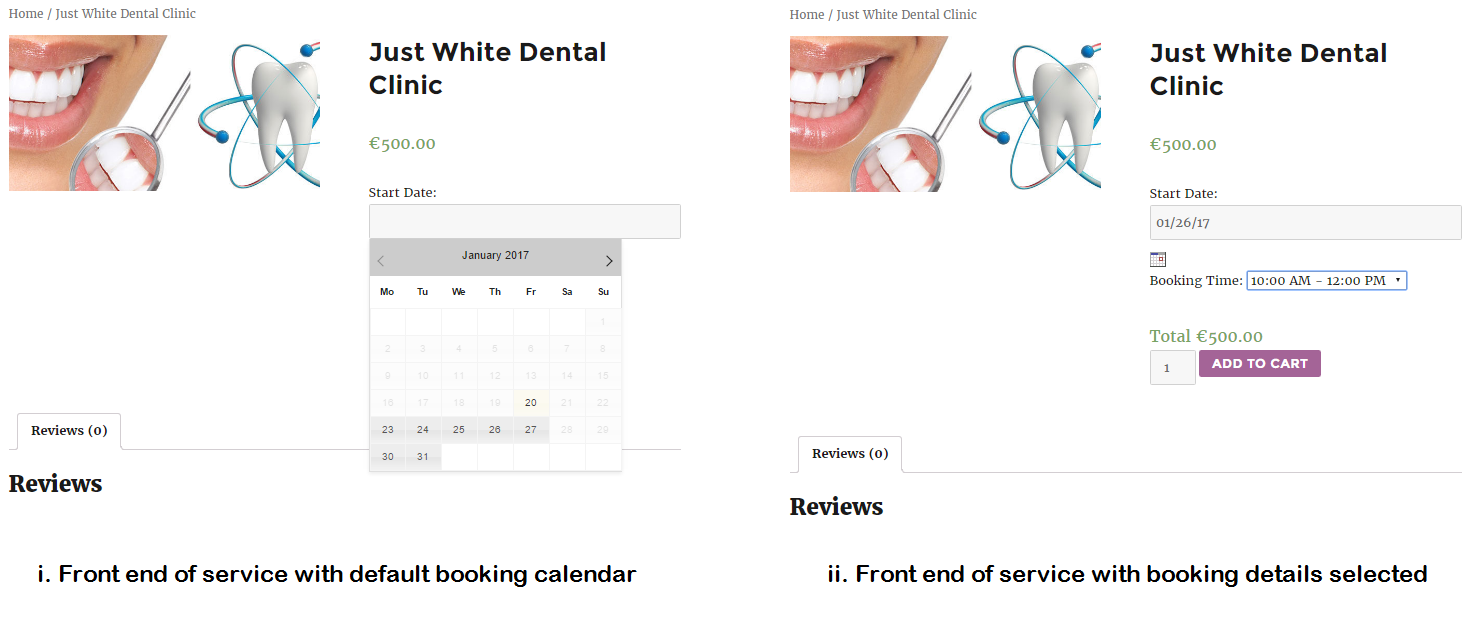
Please note that after changing the values of these settings, you will need to click on the “Save Settings” button to save the changes.
Let’s dive into them:
1. Language
There are 62 available languages from which you can choose any language suitable for your booking calendar.
As per the example, since you are located in Germany, you would want to show the booking calendar in German.
From the dropdown, choose “German” as the language option.

Language setting
After saving this setting, the Booking language will be changed to German, as shown below:
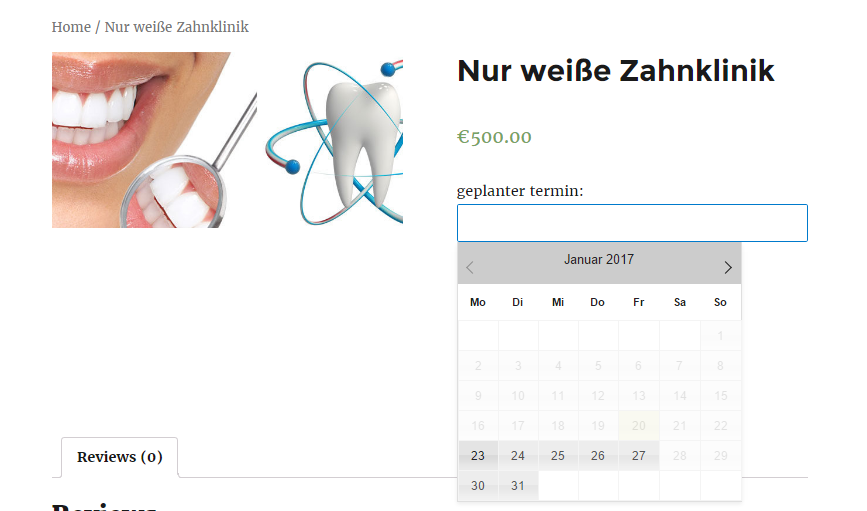
You must have noticed in the above image that the booking label has been changed to German.
To do so, you will need to manually change all the booking labels to the language you require, as shown in the previous documentation.
2. Date Format
As per your requirement, there are 16 types of date formats to display on the front end.
All the booking dates on your website will be displayed as per the selected date format.
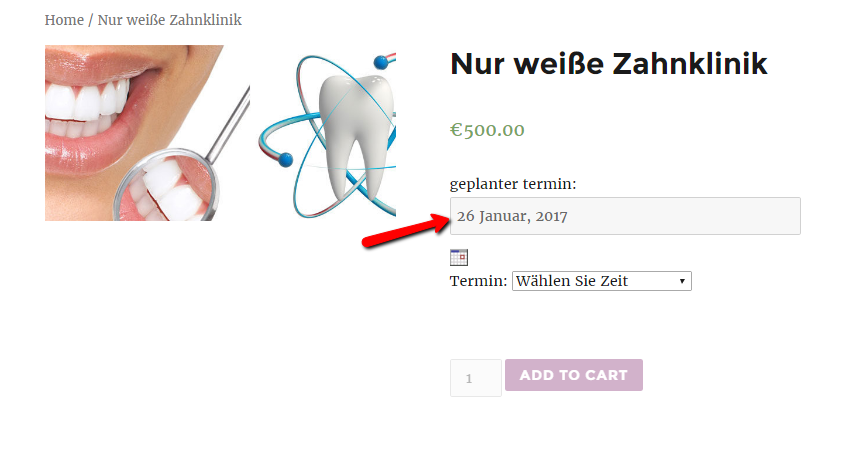
Suppose you want to show a booking date in the following format: 26 January 2017.
Go to the Date Format setting, select your format from the dropdown, and save the settings.
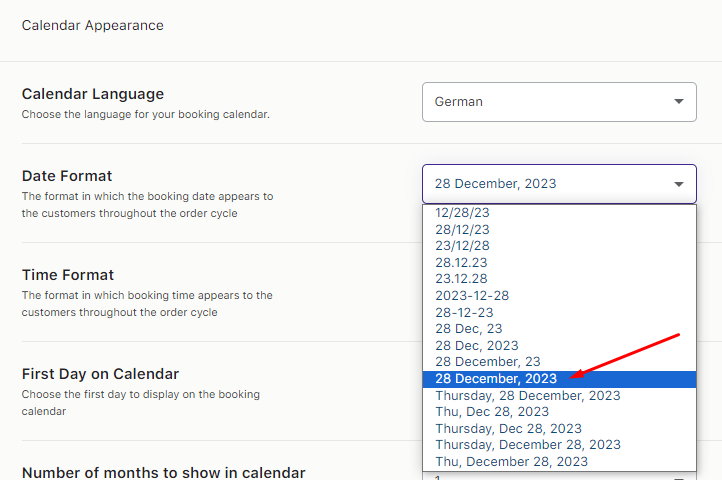
Date Format
The selected booking date will be displayed as per the selected Date Format “26 Januar, 2017”.
3. Time Format
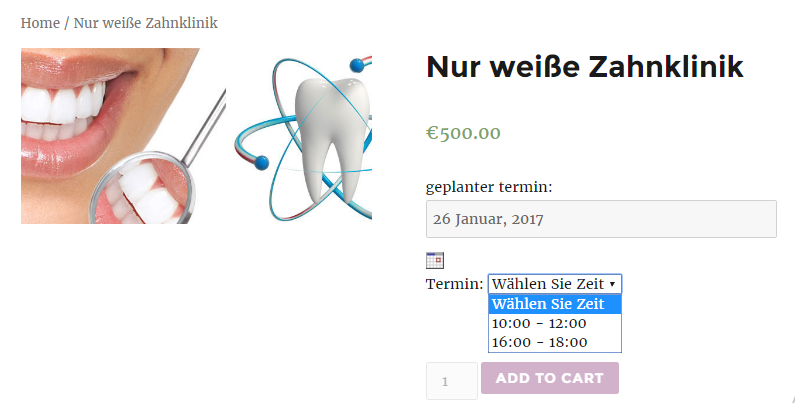
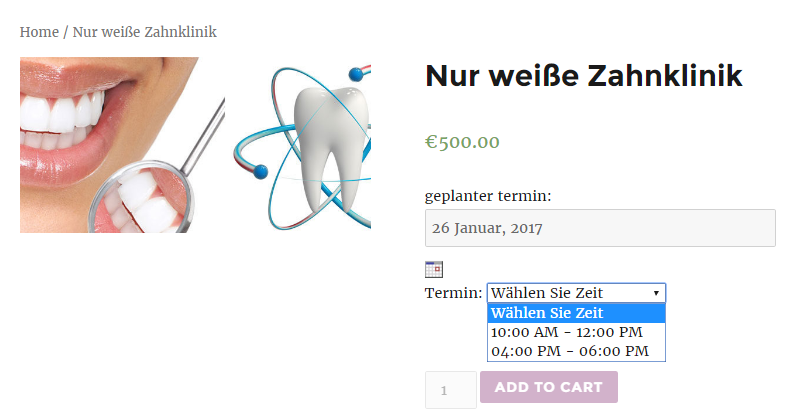
There are 2 options, “12 hours” or “24 hours” a day, to set the time format in which booking time appears to the customers on the product page once the time/time slot is selected.
By default, it is set to 12 hours. If you want to display timeslot hours in 24-hour format, choose “24 hours” in the Time Format option.

Thus, when the customer clicks the dropdown, all the available time slots will appear as per the 24-hour format.
If the 12-hour format has been selected, then the customer will see all the available time slots in the 12-hour format.
All the booking details of the services displayed on your website, whether it is on the Cart page, Checkout page, Thank you page, Email notifications, View Bookings page, or the Order Edit page, will be displayed based on the selected date and time format.
4. First Day on Calendar

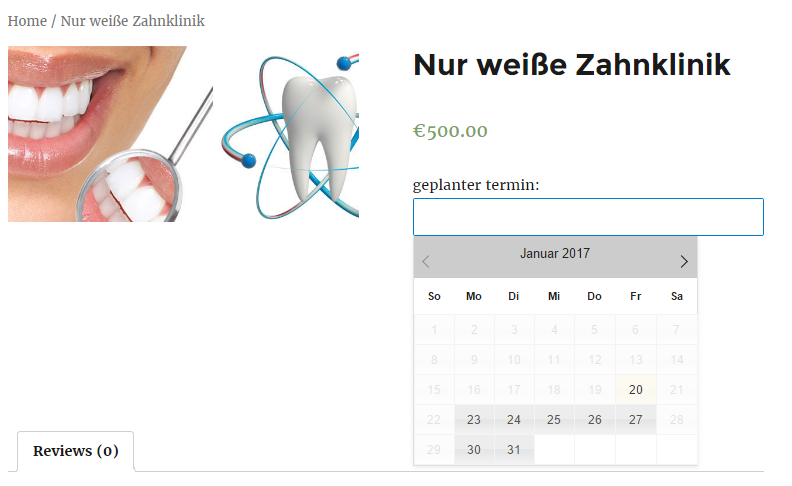
The default value for this option is “Monday,” which means the starting day of the booking calendar will be Monday for all the bookable services.
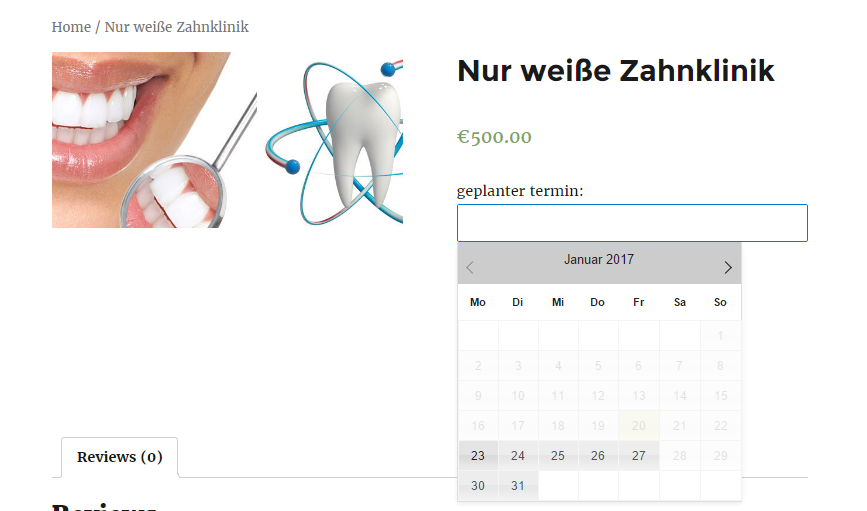
You can select any weekday from the option, and that selected day will be the starting day of the booking calendar. If you have selected “Sunday” for this option, then the calendar will appear like this:
5. Number of months to show in the calendar
This is the number of months you want to show in the booking calendar.

It is set to “1” by default, as shown in the image above.
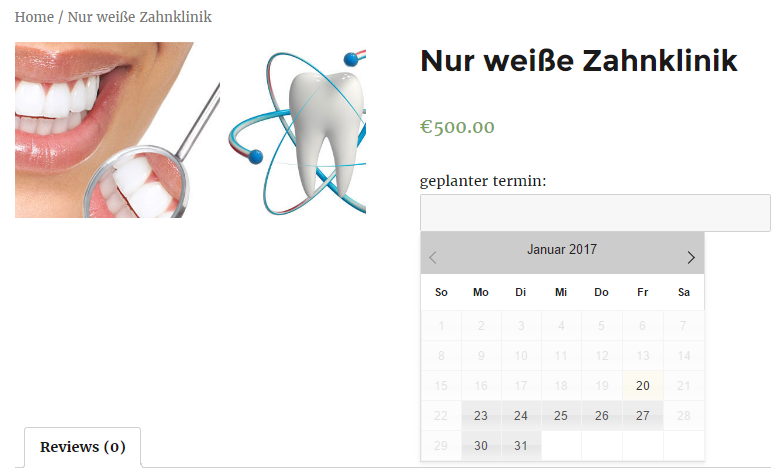
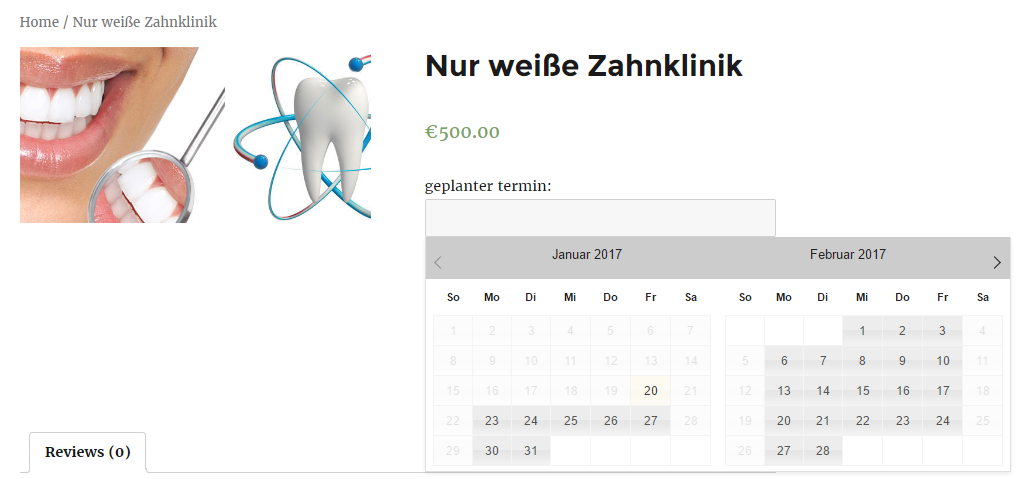
If you want to display two months in the booking calendar, select “2” from the drop-down menu.
If you select the value “2” in this option, the booking calendar will appear, as shown in the image below.
6. Calendar Theme
There are 24 available themes, and you can choose any one theme for your calendar that matches the design of your website.

By default, the selected theme is ‘Smoothness’, as shown below.
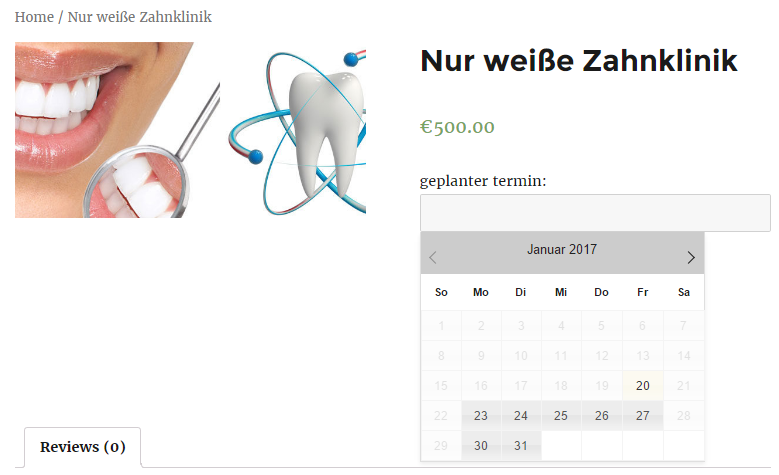
The “Blitzer” theme has been selected, as seen in the image below. Similarly, you can change the calendar theme to fit your business requirements.

Thus, the theme of the booking calendar will be changed to it for the customer as shown here:
Thus, with our Booking and Appointment Plugin for WooCommerce, store owners can make their booking services visually appealing and easily understood using these customizable calendar settings. This allows customers to check availability and make reservations seamlessly and effortlessly!
