NOTE
This product is no longer sold on WooCommerce.com. This document has been left available for existing users, but will no longer be updated.
We’ve created a new and more feature rich payment method for Authorize.Net. It’s our modern solution to accepting payments with Authorize.Net in WooCommerce. Read more about this payment method and start using it via the product below.
Documentation
↑ Back to topOpen this to see the documentation for the retired Authorize.Net AIM payment method
Overview
WooCommerce Authorize.Net AIM integrates with Authorize.Net payment services to provide secure and powerful payment processing for your WooCommerce store. Accept credit cards and optionally accept eChecks on your WooCommerce store via Authorize.Net!
This plugin also supports Accept.js from Authorize.Net for improved security and decreased PCI compliance responsibility. When Accept.js is used, customer credit card information is no longer sent directly through your server and instead is handled directly by Authorize.Net, meeting the lower level PCI SAQ A-EP compliance level. You can learn more about Accept.js here.
Please note: This plugin requires that you have an SSL certificate installed and active on your site.
Installation
- Download the extension from your dashboard
- Go to Plugins > Add New > Upload and select the ZIP file you just downloaded
- Click Install Now, and then Activate
- Go to WooCommerce > Settings > Checkout > Authorize.Net and read the next section to learn how to setup and configure the plugin.
Requirements
- An Authorize.Net account
- PHP 5.3+ (You can see this under WooCommerce > Status)
Setup and Configuration
Obtain Credentials from Authorize.Net
You need to have an active gateway account with Authorize.Net and follow the following steps to get your API credentials.
- Go to Authorize.Net
- Click on “Account Login” on the top-right
- Enter your Login ID and Password then press Log In
- From your home page, click on the Account Menu

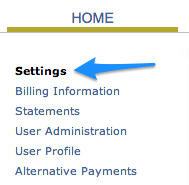
- In the left hand menu Account section click on “Settings”
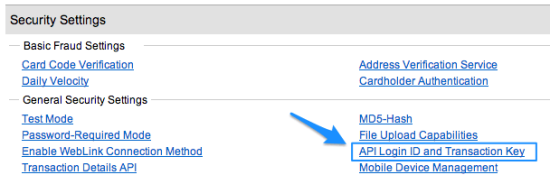
- In the Security Settings section click on “API Login and Transaction Key”
- Your API Login ID will be displayed on this page, which will be copied and entered in the extension settings:
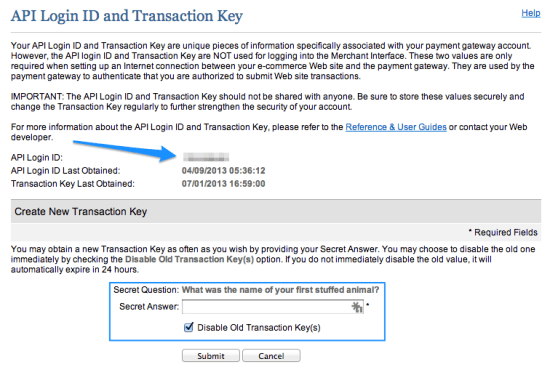
- To create a new Transaction Key, answer the security question at the bottom of the page, check the “Disable Old transaction Key(s)” checkbox and press Submit.
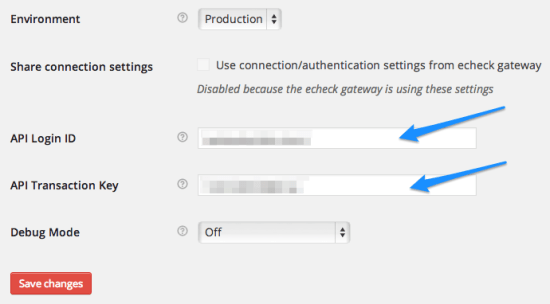
- Your new Transaction Key will be displayed on the next page – copy this transaction key, and enter it along with the API Login on the extension settings page:
If you would also like to enable Accept.js support, please see below for additional set up information.
Extension Settings
To configure the plugin, click on WooCommerce > Settings from the left hand menu, then the top tab “Checkout”. You should see Authorize.Net AIM as an option in the list at the top. Click this section to view the credit card settings.
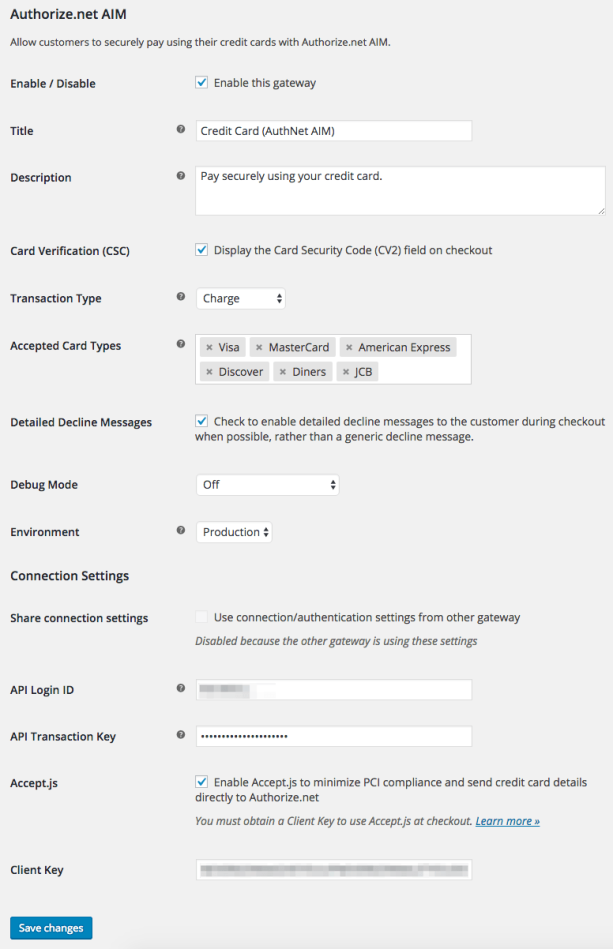
- Enable / Disable – This will enable the gateway to be used by customers to checkout.
- Title – This is the text shown for the payment during checkout and on the Order Received page.
- Description – This is the text shown under the title during checkout. Limited HTML is allowed. If you enable test mode, this section will also display a notice along with test credit card numbers.
- Card Verification (CSC) – Enable this to require customers to enter their CVV / CV2 (Card Security Code) when checking out. This can be useful if you have requirements in your Authorize.Net account for CV2 verification.
- Transaction Type – This controls how transactions are submitted to Authorize.Net. You may choose either “Charge” or “Authorization”. If you select “Authorization”, you must manually capture and settle payments in your Authorize.Net control panel or on the WooCommerce orders screen after the transaction has been submitted. This defaults to “Charge”.
- Charge Virtual-Only Orders – (Shown if Transaction Type is set to “Authorization”) Enable this to force charges on order containing only virtual items so they’re captured immediately instead of authorized (for example, to grant download access right away)

- Capture Paid Orders – (Shown if Transaction Type is set to “Authorization”) Enable this to automatically attempt to capture transactions when orders change to a paid status.
- Accepted Cards – This controls the card logos that display during checkout. This is purely cosmetic and has no affect on the cards actually accepted by your merchant account.
- Detailed Decline Messages – Enable to display detailed messages to customers to provide reasoning for declines when possible instead of a generic error message.
- Debug Mode – Enable this is you are having issues correctly processing transactions. You can either log API requests / responses directly to the checkout / thank you page, save them to the WooCommerce Error Log (found under WooCommerce > System Status > Logs) or both. All debugging messages are cleaned of sensitive information before display, but as a best practice, please do not enable this unless you are having issues with the plugin.
- Environment – Switch between “Test” and “Production” credentials. Enable “Test” to send transactions to your Authorize.Net Test Account. Note: This is not the “test mode” that is listed under your Authorize.Net account. This is an entirely separate sandbox environment that requires a separate login. You can sign up for a test account here. Once you have done this, you can enter a separate API Login ID and API Transaction Key for your test account. Do not place your Test Account (or regular account) into “Test Mode” within the Authorize.Net control panel as transactions will not process at all if that mode is set.
Connection Settings
- Share connection settings – Enabling this will allow you to use connection / authentication settings between the credit card and eCheck gateways. If this is enabled, you’ll have to enter your Authorize.Net API Login ID and API Transaction Key under the eCheck settings.
- API Login ID – This is the API Login ID for your Authorize.Net account (Test or Production). Follow the steps above to get this.
- API Transaction Key – This is the API Transaction Key for your Authorize.Net account (Test or Production). Follow the steps above to get this.
- Accept.js – Enable this to use Accept.js to send card information directly to Authorize.Net and minimize PCI compliance scope.
- Client Key – If Accept.js is enabled, enter the Client Key generated for your account. Follow the instructions below to generate a client key.
eCheck Settings
To configure the eCheck settings, click on WooCommerce > Settings from the left hand menu, then the top tab “Checkout”. You should see Authorize.Net AIM eCheck as an option in the list at the top. Click this section to configure the eCheck gateway settings.
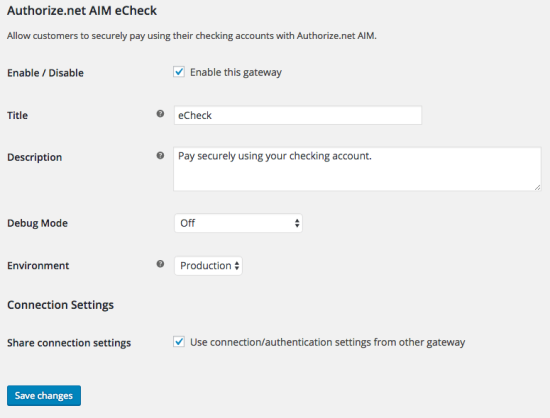
- Enabled – This will enable the eCheck gateway to be used by customers to checkout. IMPORTANT – You must have eChecks enabled on your Authorize.Net account for this to function correctly. Follow the process below under eCheck Issues to get eChecks setup and enabled.
- Title – This is the text shown for the eCheck gateway during checkout and on the Order Received page. This defaults to “eCheck”.
- Description – This is the text shown under the title during checkout. Limited HTML is allowed. If you enable test mode, this section will also display a notice along with a test bank account number.
- Environment – Switch between “Test” and “Production” credentials. Enable “Test” to send transactions to your Authorize.Net Test Account. Note: This is not the “test mode” that is listed under your account. This is an entirely separate sandbox environment that requires a separate login. You can sign up for a test account here. Once you have done this, you can enter a separate API Login ID and API Transaction Key for your test account. Do not place your Test Account (or regular account) into “Test Mode” within the Authorize.Net control panel as transactions will not process at all if that mode is set.
- Share connection settings – Enabling this will allow you to use connection/authentication settings between the credit card and eCheck gateways. If this is disabled, you’ll have to enter a new Authorize.Net API Login ID and API Transaction Key for eCheck transactions.
- Debug Mode – Enable this is you are having issues correctly processing transactions. You can either log API requests / responses directly to the checkout / thank you page, save them to the WooCommerce Error Log, or both. All debugging messages are cleaned of sensitive information before display, but as a best practice, please do not enable this unless you are having issues with the plugin..
Merchant Usage
It’s possible to use the WooCommerce Authorize.Net AIM extension with other gateways that support Authorize.Net emulation (such as eProcessing Network). You’ll need to enable the Authorize.Net Emulation gateway to use this. Read about how to enable and configure Authorize.Net emulation.
Please note that Authorize.Net Emulation only supports basic payment processing features. It does not support the advanced features like capturing charges and refunds listed below, as these are only available for the AIM plugin mode.
Capture Charges from WooCommerce Order Admin
Using version 3.0+ of the extension allows you to authorize charges during checkout, then manually capture them later. You can do this via your Authorize.Net control panel, or can easily do so from the WooCommerce Edit Order page.
You can read more about capturing charges with this plugin here.
Automatic Refund Support
Version 3.3.0 of Authorize.Net AIM adds automatic refund support for shops running WooCommerce 2.2+. This means that refunds can be processed directly in WooCommerce without the merchant logging into his or her Authorize.Net account.
You can read more about performing refunds with Authorize.Net AIM here.
Void Transaction Support
Transactions can be voided by using the same workflow as refunds. A void will occur if the transaction has been authorized, but not captured. In the case of Authorize.Net, voids will also occur for authorized & captured transactions that have not yet been settled. As funds haven’t been transferred, a refund can’t truly be processed.
Voided transactions must be voided in full; partial voids are not accepted by Authorize.Net. You can read more about voiding transactions here.
Authorize.Net Emulation
NOTE: Authorize.Net Emulation is no longer supported. If you are still using this feature, you may experience errors or issues moving forward. We recommend disabling this gateway.

Additional information on this gateway can be found in our GitHub repository: https://github.com/godaddy-wordpress/authorize-net-emulation-for-woocommerce
Please note that Authorize.Net Emulation does not support advanced features such as refunds, voids, and capturing charges from within WooCommerce. Only payment processing is supported.
To use Authorize.Net AIM with a gateway that supports Authorize.Net emulation, you need to enable the Authorize.Net emulator under Plugins > Installed Plugins — click “Enable emulation gateway”:

This allows you to use Authorize.Net’s emulation protocol for other gateways.
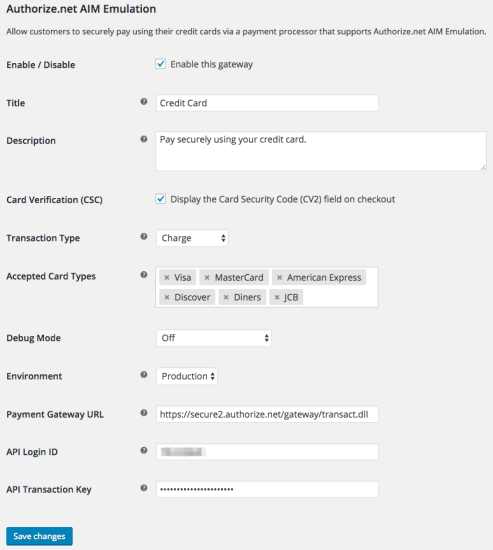
The Authorize.Net emulator settings will now be available under WooCommerce > Settings > Checkout. To use Authorize.Net emulation, you must enable the gateway and enter the Gateway URL and API credentials provided to you by your payment processor.
Extension Settings
- Enable / Disable – This will enable the gateway to be used by customers to checkout.
- Title – This is the text shown for the payment during checkout and on the Order Received page.
- Description – This is the text shown under the title during checkout. Limited HTML is allowed. If you enable test mode, this section will also display a notice along with test credit card numbers.
- Card Verification (CSC) – Enable this to require customers to enter their CVV / CV2 (Card Security Code) when checking out. This can be useful if you have requirements in your Authorize.Net account for CV2 verification.
- Transaction Type – This controls how transactions are submitted to Authorize.Net. You may choose either “Charge” or “Authorization”. If you select “Authorization”, you must manually capture and settle payments in your Authorize.Net control panel or on the WooCommerce orders screen after the transaction has been submitted. This defaults to “Charge”.
- Accepted Cards – This controls the card logos that display during checkout. This is purely cosmetic and has no affect on the cards actually accepted by your merchant account.
- Debug Mode – Enable this is you are having issues correctly processing transactions. You can either log API requests / responses directly to the checkout / thank you page, save them to the WooCommerce Error Log (found under WooCommerce > System Status > Logs) or both. All debugging messages are cleaned of sensitive information before display, but as a best practice, please do not enable this unless you are having issues with the plugin.
- Environment – Switch between “Test” and “Production” credentials. Enable “Test” to send transactions to your Authorize.Net Test Account. Note: This is not the “test mode” that is listed under your Authorize.Net account. This is an entirely separate sandbox environment that requires a separate login. You can sign up for a test account here. Once you have done this, you can enter a separate API Login ID and API Transaction Key for your test account. Do not place your Test Account (or regular account) into “Test Mode” within the Authorize.Net control panel as transactions will not process at all if that mode is set.
- Payment Gateway URL – The Gateway URL for the Authorize.Net gateway processor. Optionally, this URL can be changed to a different processor that allows Authorize.Net emulation.
- API Login – This is the API Login for your Authorize.Net account (Test or Production). Follow the steps above to get this. If you’re using this gateway for Authorize.Net emulation, then this will be the API Login provided to you by your payment processor.
- Transaction Key – This is the API Transaction Key for your Authorize.Net account (Test or Production). Follow the steps above to get this. If you’re using this gateway for Authorize.Net emulation, then this will be the API Transaction Key provided to you by your payment processor.
Other Information
eCheck Support
If you have enabled eChecks on your Authorize.Net account and within the plugin settings, customers will have the option to pay via Credit Card or eCheck. eCheck requires the customer to enter their bank routing number and bank account number. The billing first and last name entered during checkout is used as the Name on Account.
Accept.js Support
Version 3.9.0+ adds support for Accept.js from Authorize.Net. Accept.js improves security and decreases PCI compliance responsibility for merchants. To test or use Accept.js, you must have an SSL certificate installed on your site.
When Accept.js is enabled, customer credit card information is no longer sent directly through your server and instead is handled directly by Authorize.Net, meeting the lower level PCI SAQ A-EP compliance level.
You can learn more about Accept.js here. If you choose to enable Accept.js, you must generate a Client Key in your Authorize.Net account and enter this in the plugin settings.
To generate a client key, follow these steps:
- Log into your Authorize.Net Account and go to Account > Settings.
- Click on “Manage Public Key” in the “Security Settings” section.
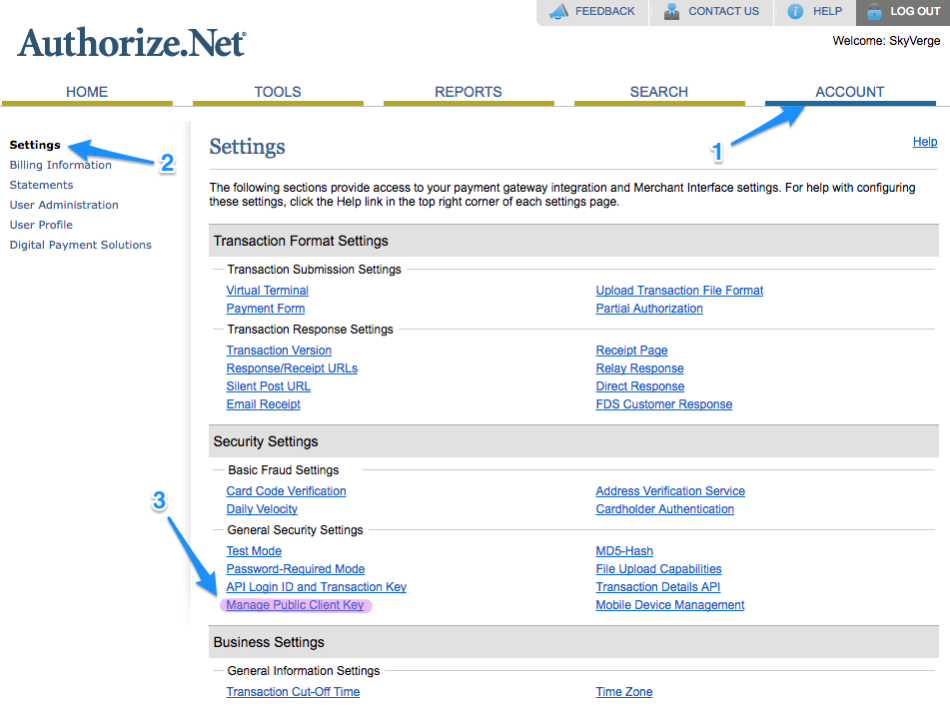
- If you already have generated a Client Key, you can copy it. If not, generate a new key by answering your security question and clicking “Submit” to generate the new key.
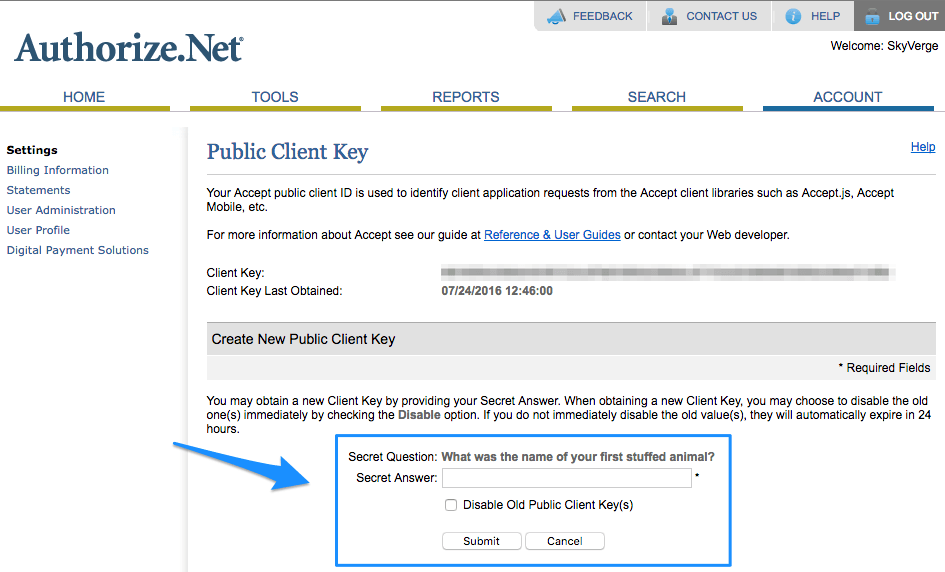
- Copy your new Client Key and paste it into the plugin settings.
Once Accept.js is enabled, your credit card processing is now secured. The checkout process will appear unchanged for customers, but secured behind the scenes.
Enhanced Checkout Form
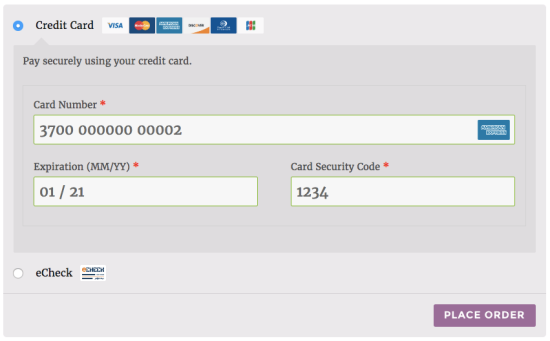
Authorize.Net AIM (v3.8.0+) supports an enhanced checkout form for all gateway modes. This improves both mobile and desktop checkout. You can read about the enhanced payment form here.
Detailed Decline Messages
When detailed decline messages are enabled, they will provide informative error messages to the customer at checkout when Authorize.Net returns a useful response. Detailed decline messages are supported by the AIM credit card and eCheck payment methods (not by the Emulation gateway).
You can read more about detailed decline messages here.
Apple Pay
Authorize.Net AIM contains a framework for Apple Pay, but Apple Pay can only be enabled by developers, as the certification process requires developer-only tools. If you work with a developer, please review the setup instructions and requirements here if you’d like to add Apple Pay to your store. Apple Pay support is not in the scope of plugin support, so we’re unable to assist with getting it enabled for your site.
Troubleshooting
If you’re using Accept.js, please note you may see a console error using Chrome developer tools at checkout:
XMLHttpRequest cannot load https://jstest.authorize.net/v1/AcceptCore.js. No 'Access-Control-Allow-Origin' header is present on the requested resource. Origin 'https://youstore.com' is therefore not allowed access.
This is expected by Authorize.Net and does not indicate a problem (transactions will process perfectly fine and are secure), annoying as it may be, which you can see here:
Right now I can tell you that the CORS warning “cannot load” is actually correct behaviour in that it’s alerting the fact that the page cannot call our core js library only the Accept.js library. So that will not impact functionality (we are nonetheless looking at ways to stop the browser doing this).
Authorize.Net Error Codes
Having a different trouble? First, please refer to the Authorize.Net Response Code Reference — enter the error code you see into this tool to view the source of the error. In some cases, such as a transaction being held for review or being declined, the plugin cannot change the issue and it must be resolved in your Authorize.Net account.
Notes
Orders with Response Code = 4 will be approved, but can be cancelled manually in the WooCommerce admin and Authorize.Net Merchant Area area later if they fail review.
Be sure to have “Partial Authorization” turned off in your Authorize.Net Merchant Area. This will restrict orders with with Response Code = 4 and Response Code = 295 from being approved. “Allow Partial Payments” is off by default, but to verify it is off, follow these steps:
- Login to your Authorize.Net Merchant Area
- Press “Account” in the top toolbar
- Under the “Transaction Format Settings” area click on “Partial Authorization”
- Verify “Allow Partial Payments” is not checked
Required Field Errors
If you receive an error like (E00027) - The transaction was unsuccessful. Error Code: 33 - [Field Name] is required., your Authorize.Net account is likely setup to require a field that our plugin cannot send. These errors can occur on orders, refunds, and void transactions.
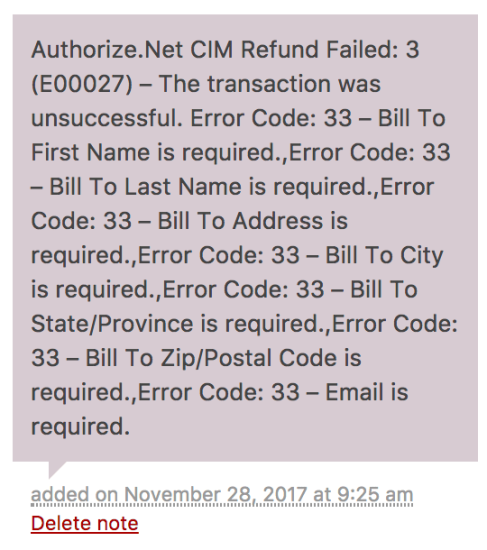
To resolve this issue, you should remove all field requirements from your Authorize.Net account by following the steps below:
- Login to your Authorize.Net Account.
- Go to Account > Payment Form > Form Fields.
- Uncheck the Required boxes for all fields.
- Click Submit.
eCheck Issues
Make sure the ‘WEB’ eCheck type is enabled on your Authorize.Net account, or you might see errors like [Code 246] - This eCheck.Net type is not allowed. To get this setup, follow these steps:
- Set up an eTicket and ask for the ‘WEB’ eCheck type to be enabled (be sure you are an account owner and know your gateway ID).
- WEB transactions are usually enabled within 2 business days, but there is a funding hold automatically placed on your account — you can take funds in, but not get them out, until you pass another security check with the underwriting department.
- To expedite the process, call them on the phone and they will check out your website while on the line with you. They will look to make sure you have a valid SSL on cart/checkout, and prominently placed terms of use and privacy policy pages.
- Once you meet those requirements, the funding hold should be removed.
Refund Issues
You may see an error message that looks something like this when trying to process an automatic refund:
Oops, you cannot partially void this order. Please use the full order amount.
This means that you’re trying to perform a partial refund, but the charge has not been settled (typically when you try to refund within a day of the purchase). The plugin tries to void this order since the funds have not been transferred (to cancel the order instead of refunding it), but Authorize.Net does not permit partial voids.
Please wait until the charge has settled (about one day after the charge was made) to refund this transaction.
Authorize.Net Test Credentials
Authorize.Net production credentials cannot be used in test mode. To test the plugin, merchants sometimes put their production accounts into the “Test modes” from their Authorize.Net accounts, which returns dummy data for live transactions. However, this will not work with the plugin’s test mode either, as these are still production credentials.
To use the plugin in test mode, you should get a set of dedicated test credentials from Authorize.Net. These work with the test mode in the plugin. Your production Authorize.Net credentials should always be live, and never set to test mode.
Frequently Asked Questions
Q: Isn’t the AIM API deprecated? Will your plugin still work?
A: Despite the similarity in the name, our Authorize.Net AIM plugin doesn’t use the AIM API. We use the recommended Authorize.Net API, so there’s no need to be concerned about the AIM API being deprecated.
Q: Can I accept subscriptions for Authorize.Net using ARB with the AIM extension?
A: At this time, accepting subscriptions using ARB with Authorize.Net AIM is not possible. Implementing ARB support is not optimal, as notifications for failed subscription payments are not reliable and this issue could cause significant problems for stores using this method. We recommend that you check out the Authorize.Net CIM extension for Subscriptions support instead.
Q: Can I process automatic refunds with eChecks or Emulation?
A: Unfortunately this is not possible with eChecks or with Authorize.Net Emulation. Refunds can automatically be processed from WooCommerce with a credit card purchase via AIM, but not for an eCheck purchase.
Q: My customers get email receipts from WooCommerce and Authorize.Net. How do I get rid of Authorize.Net receipts?
A: The plugin cannot disable these for you, but you can disable these emails in your Authorize.Net account — click here for instructions.
Q: How do I capture a higher amount than what is authorized (like a restaurant)?
A: Authorize.Net (along with most any eCommerce payment processors) cannot do this with card-not-present transactions (which is what online payments are). Captures can only be up to the value of what’s authorized: “As soon as the product is shipped, the merchant can capture an amount up to the amount of the authorization.”
When gas stations and restaurants do this, they’re using a particular POS system that gives them a certification to capture a certain percentage over the authorized amount. This isn’t available with eCommerce systems to be able to capture amounts higher than what’s authorized, so this is not possible on your WooCommerce site.
Q: Authorize.Net supports Apple Pay for web payments. Can I use this in my store?
A: This plugin does not support Apple Pay by default, as the set up process to use Apple Pay with Authorize.Net is not possible for most merchants to complete independently. If you work with a developer, please review the setup tips and requirements here, as the plugin does have tools developers can use to enable Apple Pay.
Questions & Support
Have a question before you buy? Please fill out this pre-sales form.
Already purchased and need some assistance? Please have a look at our troubleshooting steps to see if the issue can be resolved independently, or get in touch with support via the help desk for further assistance.
