
Passkeys let people sign in with the fingerprint reader, face scan, or PIN already built into their phone or laptop, or with a hardware security key. Biometric Passkey Login brings that to your WordPress site and your WooCommerce store, so customers and staff can sign in without typing a password. This guide covers what the plugin needs, how to configure it, what your users see, and how to extend it.
Overview
↑ Back to topBiometric Passkey Login adds passkey sign-in to WordPress and WooCommerce using the Web Authentication API (WebAuthn) and FIDO2 standards. It places a passkey button on the WordPress login screen, on the WooCommerce My Account login form, and on the classic checkout’s login prompt. Users register one or more passkeys from their WordPress profile page or from a Passkeys tab in My Account, and they receive one-time recovery codes in case a device is lost.
The private key never leaves the user’s device. Your site stores only the public key, the credential identifier, and a signature counter, in three custom database tables. The plugin also records registration, sign-in, recovery, and deletion events in an activity log you can filter and export from the settings screen.
Requirements
↑ Back to top- WordPress 6.4 or higher. See the WordPress requirements page
- PHP 8.2 or higher
- HTTPS. WebAuthn only runs in a secure context, so passkey sign-in will not work over plain HTTP. The plugin shows an admin warning when your site is not on HTTPS, and it treats
localhost,127.0.0.1,::1, and any host ending in.localas development exceptions - A passkey-capable browser and device. Current versions of Chrome, Safari, Firefox, and Edge all qualify, as do iOS 16 and later, macOS Ventura and later, Android 9 and later, and Windows 10 and later. passkeys.dev tracks support in detail
- WooCommerce 9.4 or higher, only if you want the WooCommerce integration. The plugin runs perfectly well without WooCommerce, and it registers its own settings page in that case
- The WordPress Abilities API, only if you want the AI assistant tools. Where
wp_register_ability()is unavailable the plugin skips that feature silently and everything else works as normal
There is no license key to enter, no external account to connect, and no third-party service involved. Everything happens between the user’s device and your site.
Installation
↑ Back to topTo start using a product from WooCommerce.com, you can use the “Add to store” functionality on the order confirmation page or the My subscriptions section in your account.
- Navigate to My subscriptions.
- Find the Add to store button next to the product you’re planning to install.
- Follow the instructions on the screen, and the product will be automatically added to your store.
Alternative options and more information at:
Managing WooCommerce.com subscriptions.

Two steps are specific to this plugin.
First, note that passkey functionality is disabled by default after plugin activation. Nothing appears on your login screens until you turn it on, so go to your settings screen and tick Enable Passkey Login. Where to find that screen depends on whether WooCommerce is active:
- With WooCommerce active: WooCommerce > Settings > Advanced > Passkey Login
- Without WooCommerce: Settings > Passkey Login
The Settings link next to the plugin on the Plugins screen takes you to whichever of those applies.
Second, passkeys are registered per person, not per site. Once the plugin is on, each user registers their own passkey from Users > Profile under “Your Passkeys”, or from My Account > Passkeys on a WooCommerce store. Nobody can register a passkey on someone else’s behalf, and neither can you as an administrator.
Usage
↑ Back to topThe settings screen has up to five tabs. Only General appears until you enable passkey login, and the Activity Log and Analytics tabs are hidden while activity logging is switched off. Changes on the General, Security, and Recovery tabs are saved with the Save Changes button at the bottom of each tab. The Activity Log and Analytics tabs are read-only views and have no save button.
General
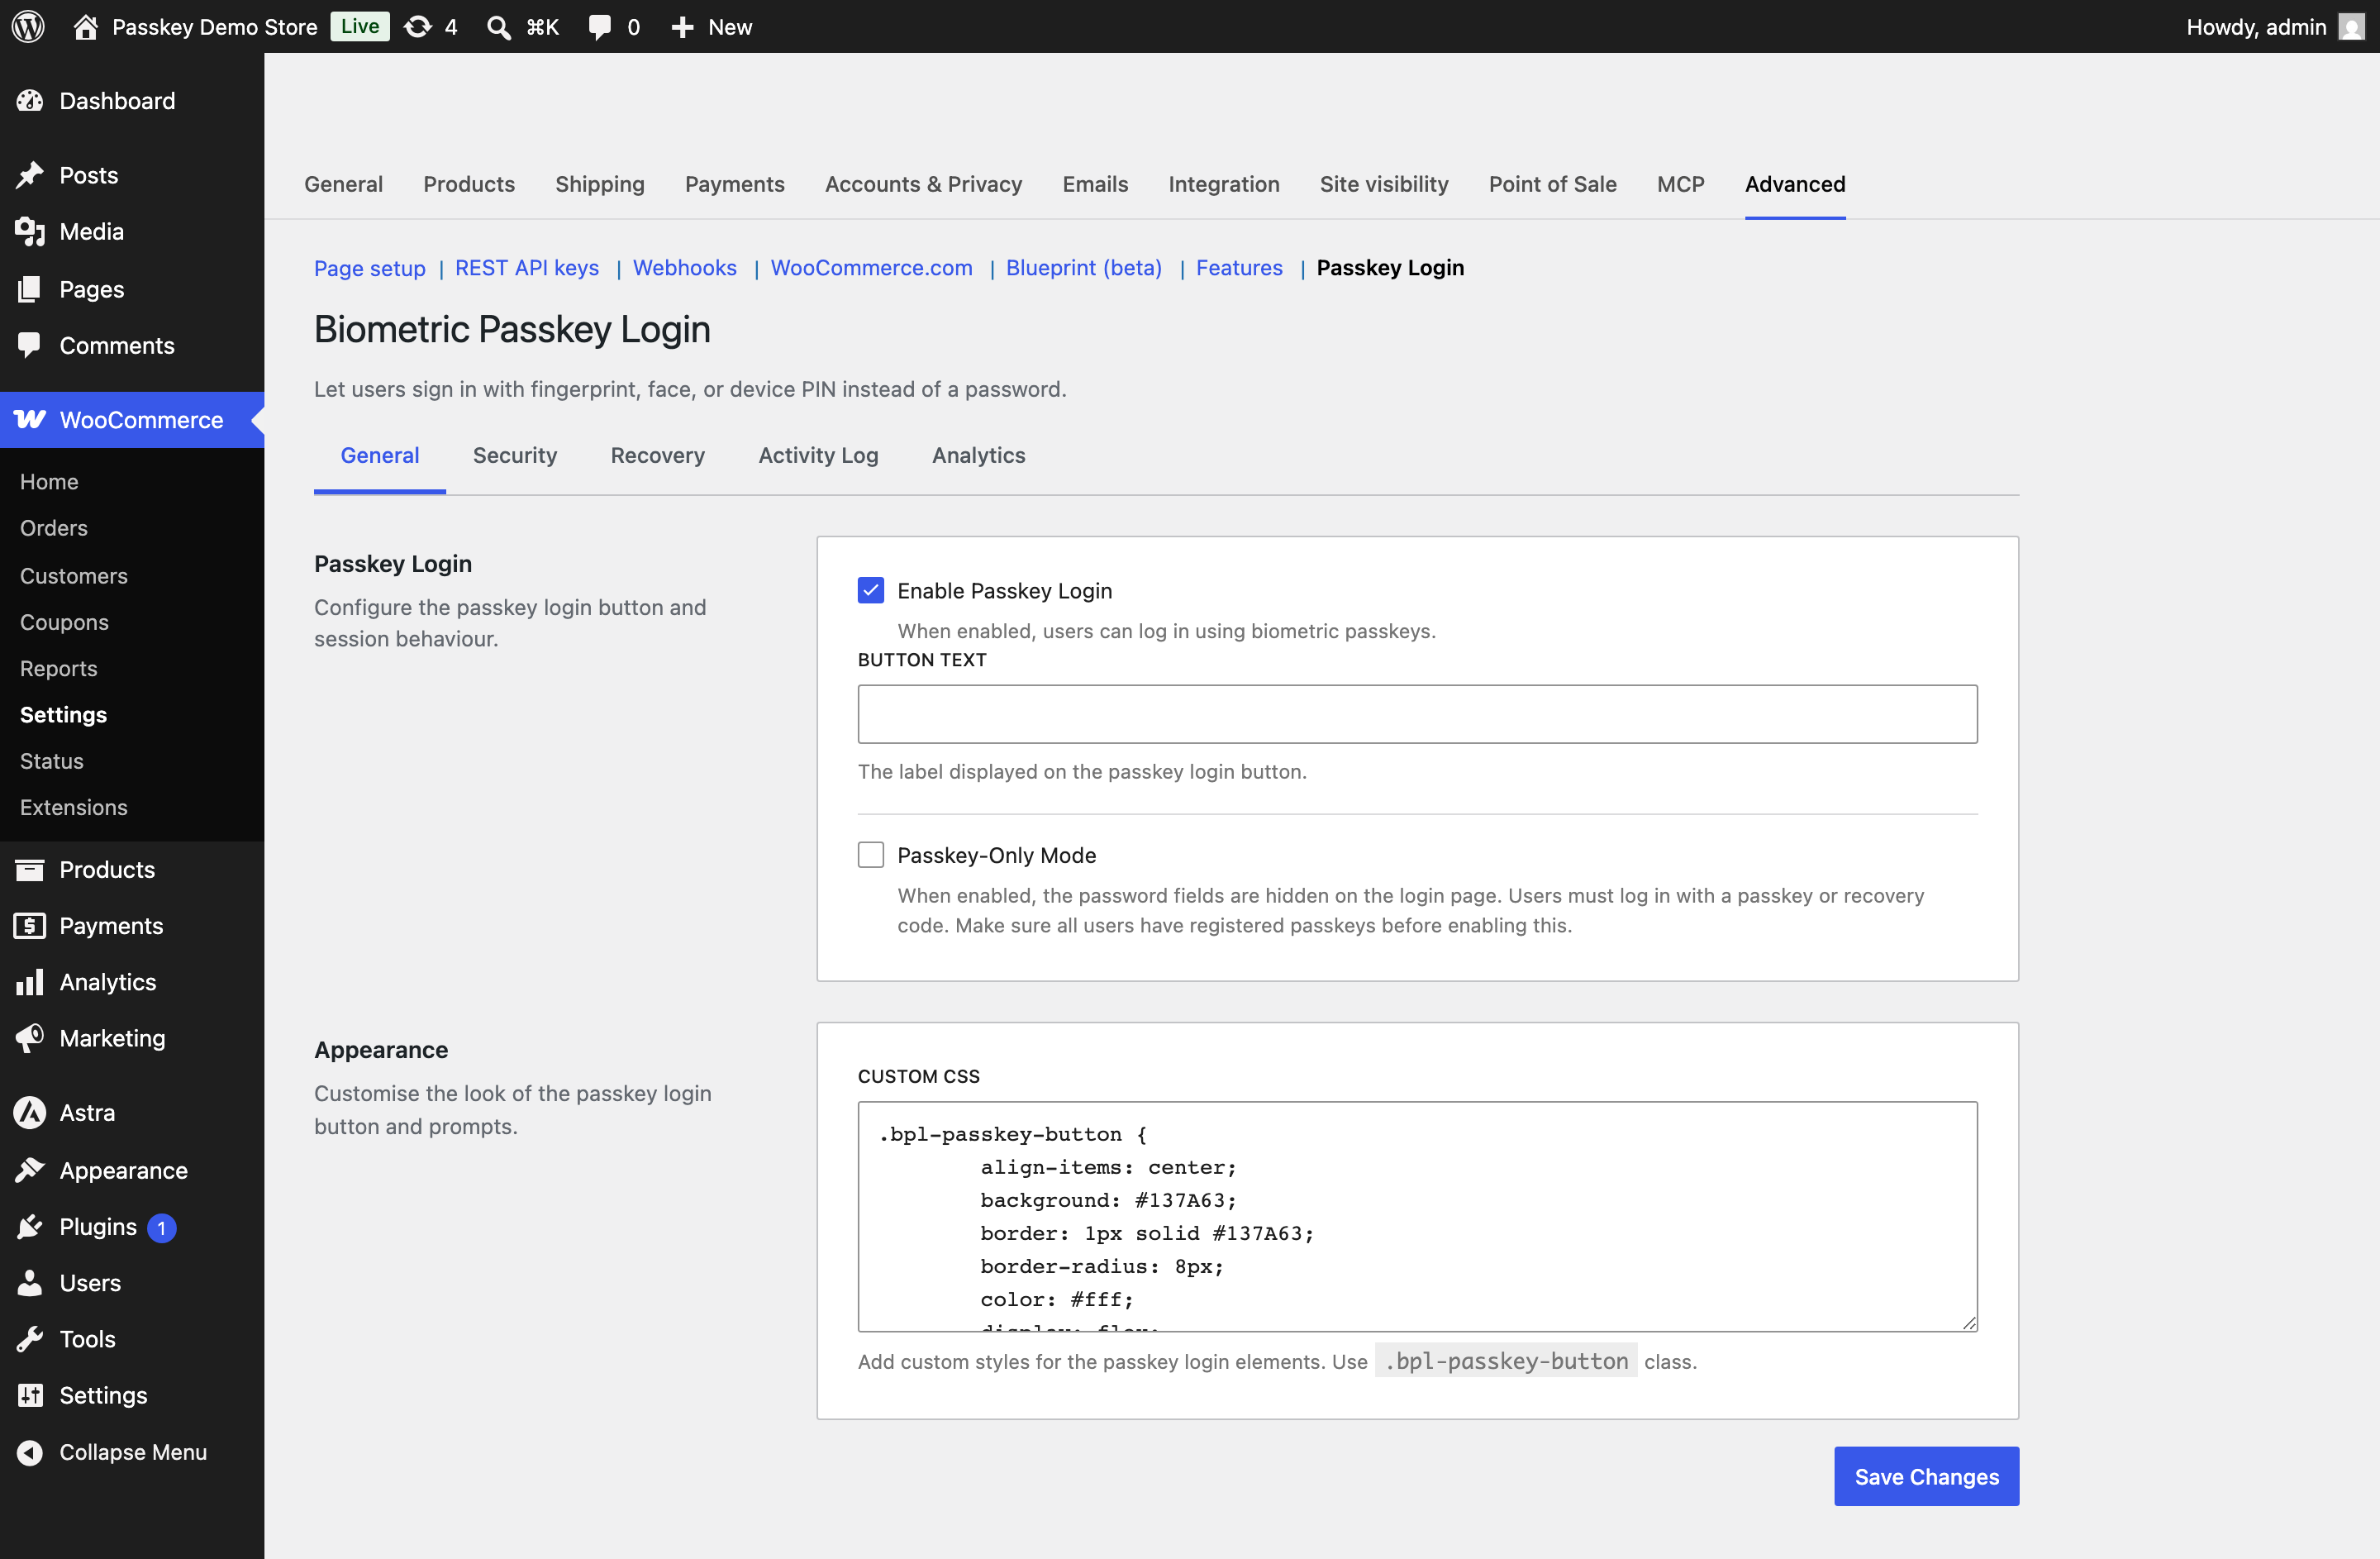
↑ Back to topThis tab controls whether passkeys are offered at all, and how the sign-in button looks.
Enable Passkey Login is the master switch, and it is off by default. When it is off, no passkey button appears anywhere, the registration and authentication endpoints refuse requests, and the other four tabs stay hidden. Existing passkeys are not deleted. Users can still see them on their profile and remove them, which is deliberate, so that switching the feature off does not strand anyone with credentials they cannot manage.
Button Text sets the label on the passkey sign-in button wherever it appears. Leave it empty to use the default, “Sign in with Passkey”. This field only appears once passkey login is enabled.
Passkey-Only Mode hides the password fields on the login page, so a user has to sign in with a passkey or a recovery code. This is a site-wide change and it applies to everyone, including you. Make sure every account that needs access has a registered passkey before you turn it on. If you want passwordless sign-in for some roles but not others, use the role settings on the Security tab instead, which are more precise.
Custom CSS under the Appearance section lets you restyle the passkey button and prompts. The button carries the .bpl-passkey-button class. Whatever you enter is stripped of HTML tags and injected as an inline stylesheet on the login screen and on the WooCommerce pages where passkey controls appear. See Styling the passkey button for worked examples.
Security
↑ Back to topThis is the largest tab, and it holds the role policy, the WebAuthn behavior, the AI assistant switch, and the per-user passkey limit.
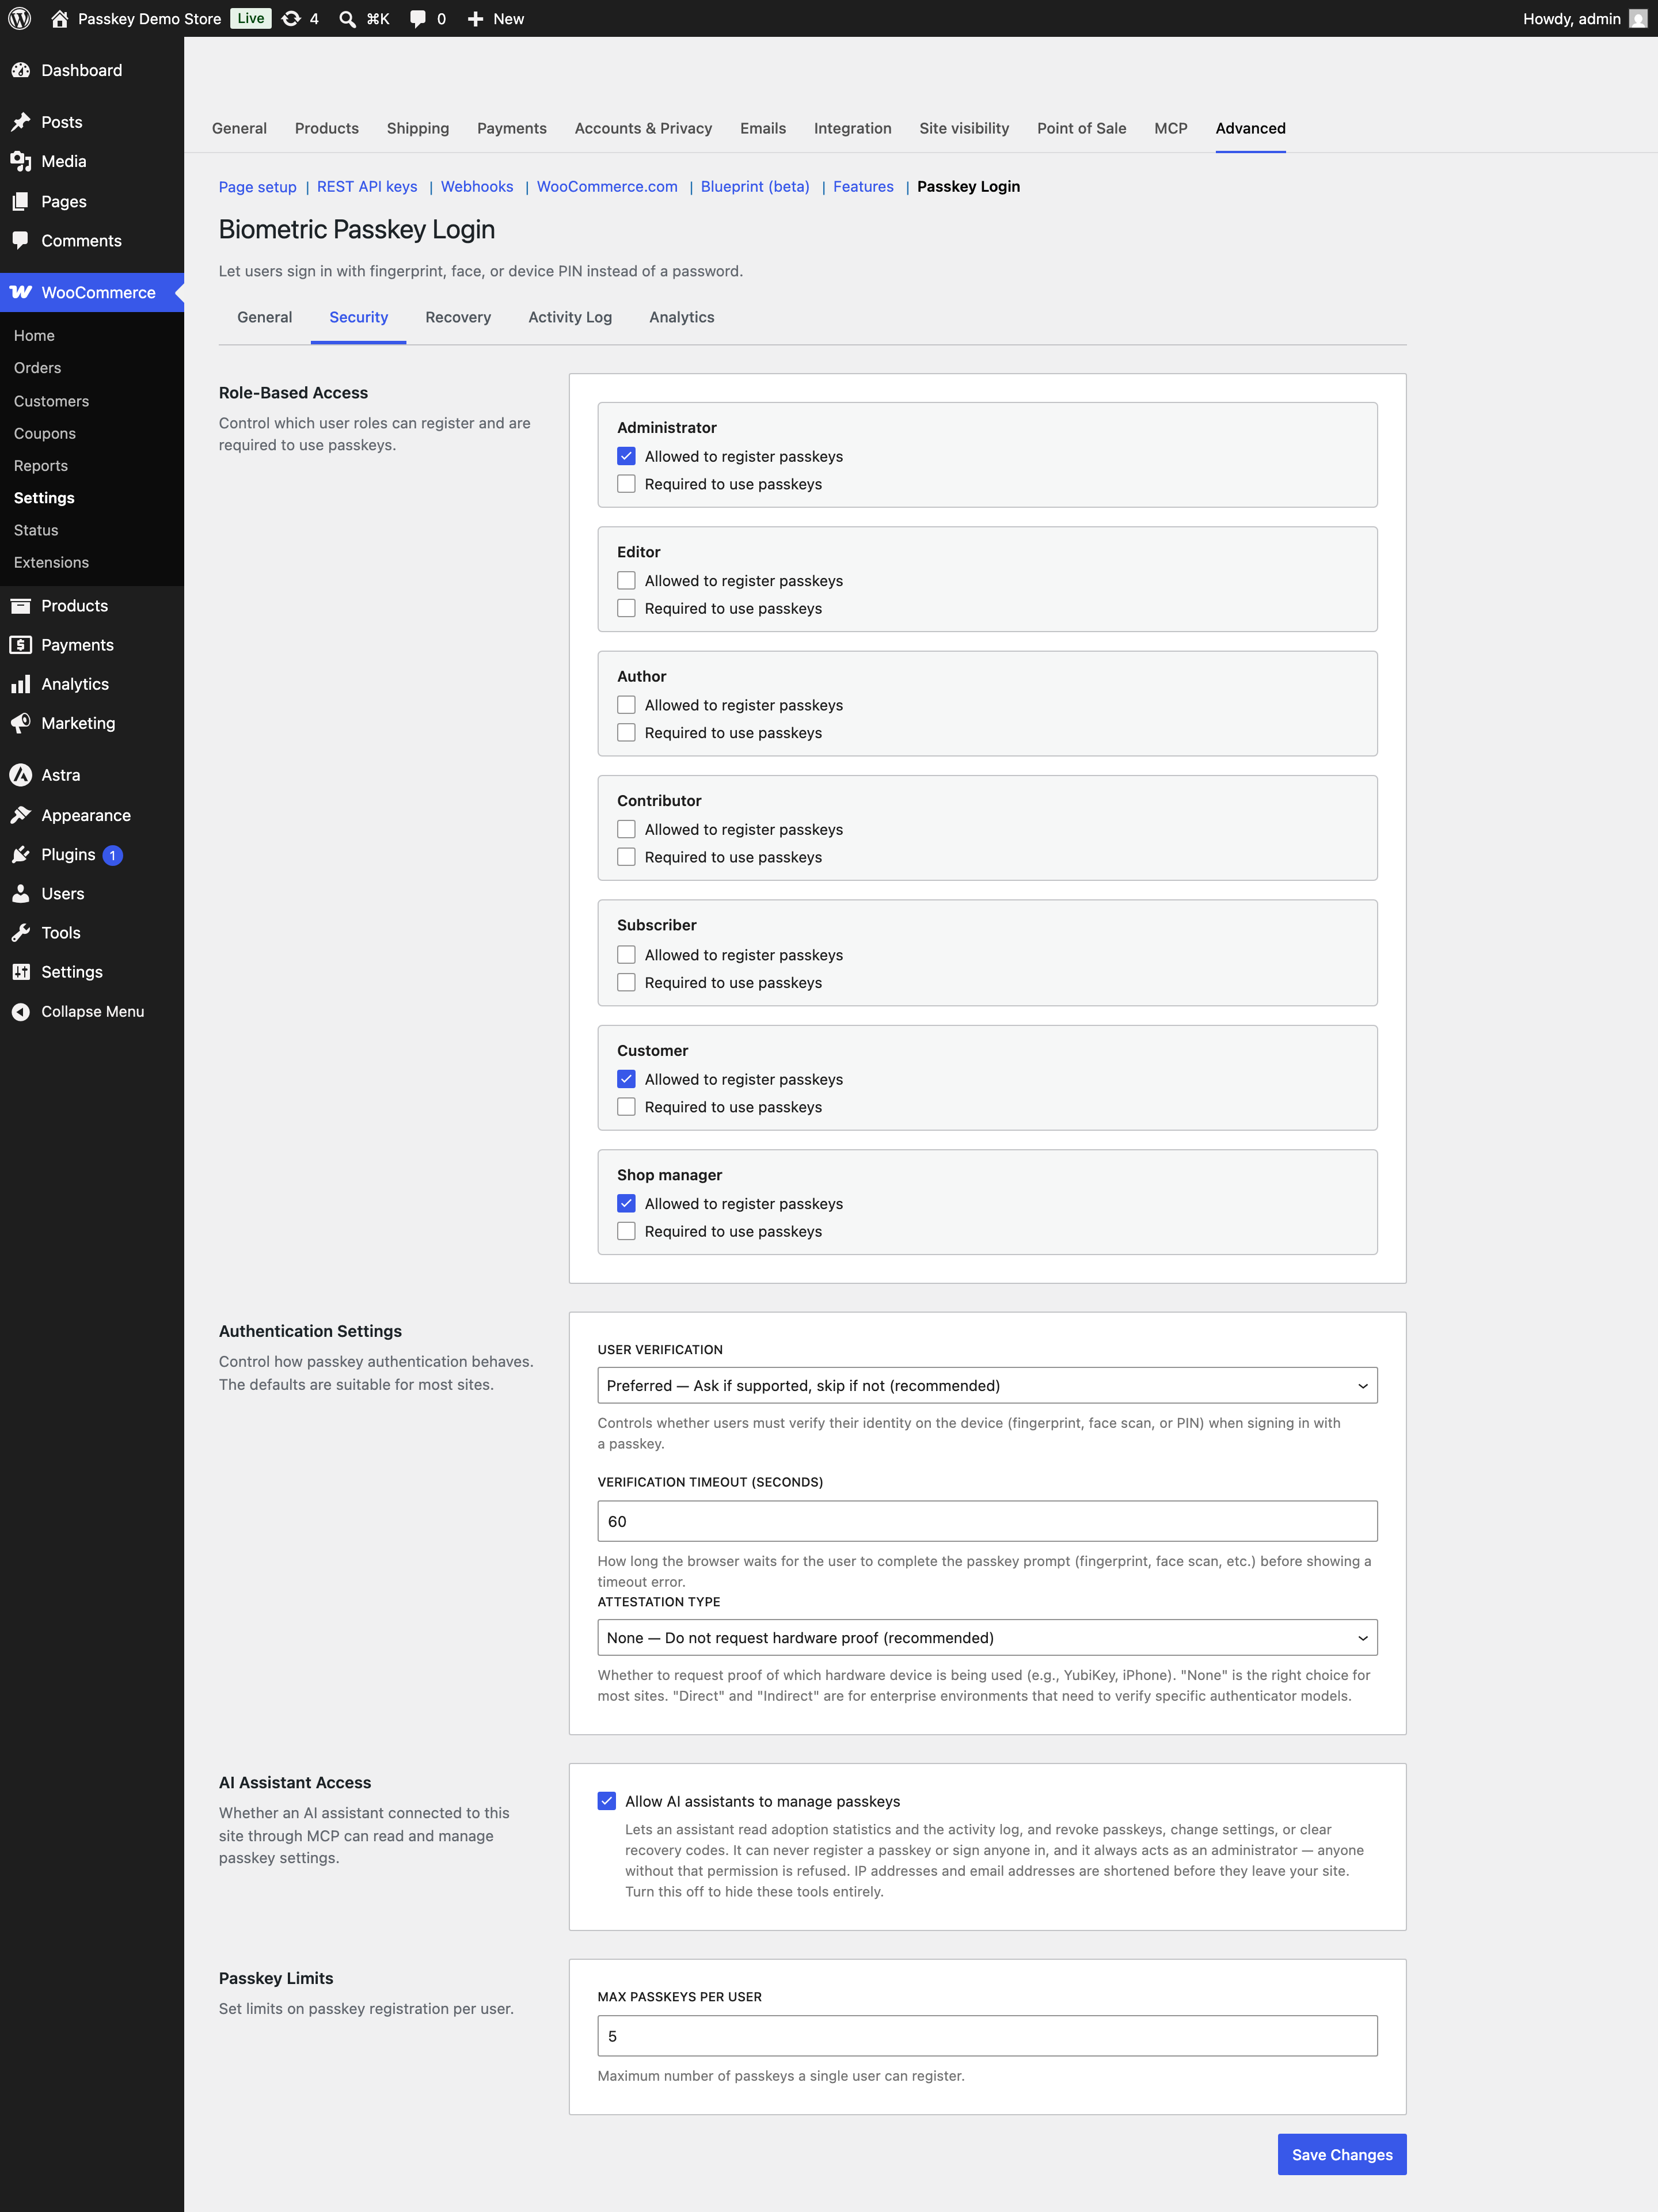
Role-based access
Every role on your site gets two checkboxes.
Allowed to register passkeys controls whether users in that role can add a passkey at all. There is a useful quirk here: if no role has this ticked, every role is allowed. That is the unconfigured state, and it means you do not have to fill in the whole list just to get started. As soon as you tick the box for one role, the list becomes an allowlist and every role you left unticked is blocked from registering. A blocked user sees no registration button, and their profile passkey section is hidden entirely.
Required to use passkeys enforces passkey sign-in for that role. A user in a required role who has at least one passkey can no longer sign in with a password, and they see a message pointing them at the passkey button. A user in a required role who has no passkey yet can still sign in with their password, but they are then sent straight to the passkey setup screen and held there. On a WooCommerce store that means My Account > Passkeys; without WooCommerce it means their profile page in wp-admin. Every other page redirects back until they register one.
Authentication settings
The defaults here suit most sites. Change them only if you have a specific reason.
User Verification decides whether the device asks the user to prove who they are, with a fingerprint, a face scan, or a PIN, at the moment they sign in. Set to Required, the check always happens. Set to Preferred, the default, the check happens on devices that support it and is skipped where it is not available. Set to Discouraged, possession of the passkey is treated as sufficient on its own. Preferred is the right balance for most stores: you get the biometric check nearly everywhere without turning away the occasional device that cannot do it.
Verification Timeout (seconds) is how long the browser waits for the user to finish the device prompt before giving up and showing a timeout error. The default is 60 seconds, and the accepted range is 15 to 300. Values outside that range are clamped to the nearest limit rather than rejected. Sixty seconds is generous for a fingerprint and tight for someone digging a security key out of a bag, so raise it if your users carry hardware keys.
Attestation Type decides whether your site asks the device for cryptographic proof of what model it is. None, the default, asks for nothing, and it is the right choice for a store. Direct requests proof of the exact authenticator model, and Indirect requests proof while letting the browser anonymize it. The two proof options exist for enterprises that have to restrict sign-in to approved hardware. They add friction and, in some browsers, an extra consent prompt, without making a typical store any safer.
AI assistant access
Allow AI assistants to manage passkeys is on by default and controls whether an AI assistant connected to your site over the Model Context Protocol can see and use this plugin’s tools. Turning it off unregisters the tools completely rather than leaving them visible but failing.
The plugin publishes those tools through the WordPress Abilities API, so anything that bridges abilities to MCP can call them. On a WooCommerce store the tested route is MCP (Model Context Protocol), which turns on WooCommerce’s MCP endpoint, lists this plugin’s abilities under WooCommerce > Settings > MCP > Add tools, and exposes the ones you enable to Claude, ChatGPT, and other MCP clients. Using the abilities over MCP covers the setup.
The assistant can read adoption statistics and the activity log, revoke or disable a passkey, change settings, and clear a user’s recovery codes. It cannot register a passkey and it cannot sign anyone in. Both of those need a real browser and a real device, so they are deliberately absent from the tool set. Every tool requires administrator permission, so an assistant connected under a lesser account is refused. Before any data leaves your site, IP addresses are truncated to their network and email addresses have their local part masked, and passkey public keys and credential identifiers are never sent at all. See Data that leaves your site.
There is also a guard against locking yourself out. If an assistant tries to make passkeys mandatory for a role in a way that would leave you unable to sign in, for instance requiring a passkey for your own role while you have none registered, the change is refused rather than applied. See The lockout guard.
Passkey limits
Max Passkeys Per User caps how many devices one person can register. The default is 5 and the range is 1 to 20. Once a user hits the cap the registration button disappears, and the registration endpoint returns an error naming the limit. Five covers a phone, a laptop, a work machine, and a hardware key with one to spare, which is enough for most people. Lowering the limit does not remove passkeys anyone has already registered.
Recovery
↑ Back to topThis tab covers backup codes and the activity log.
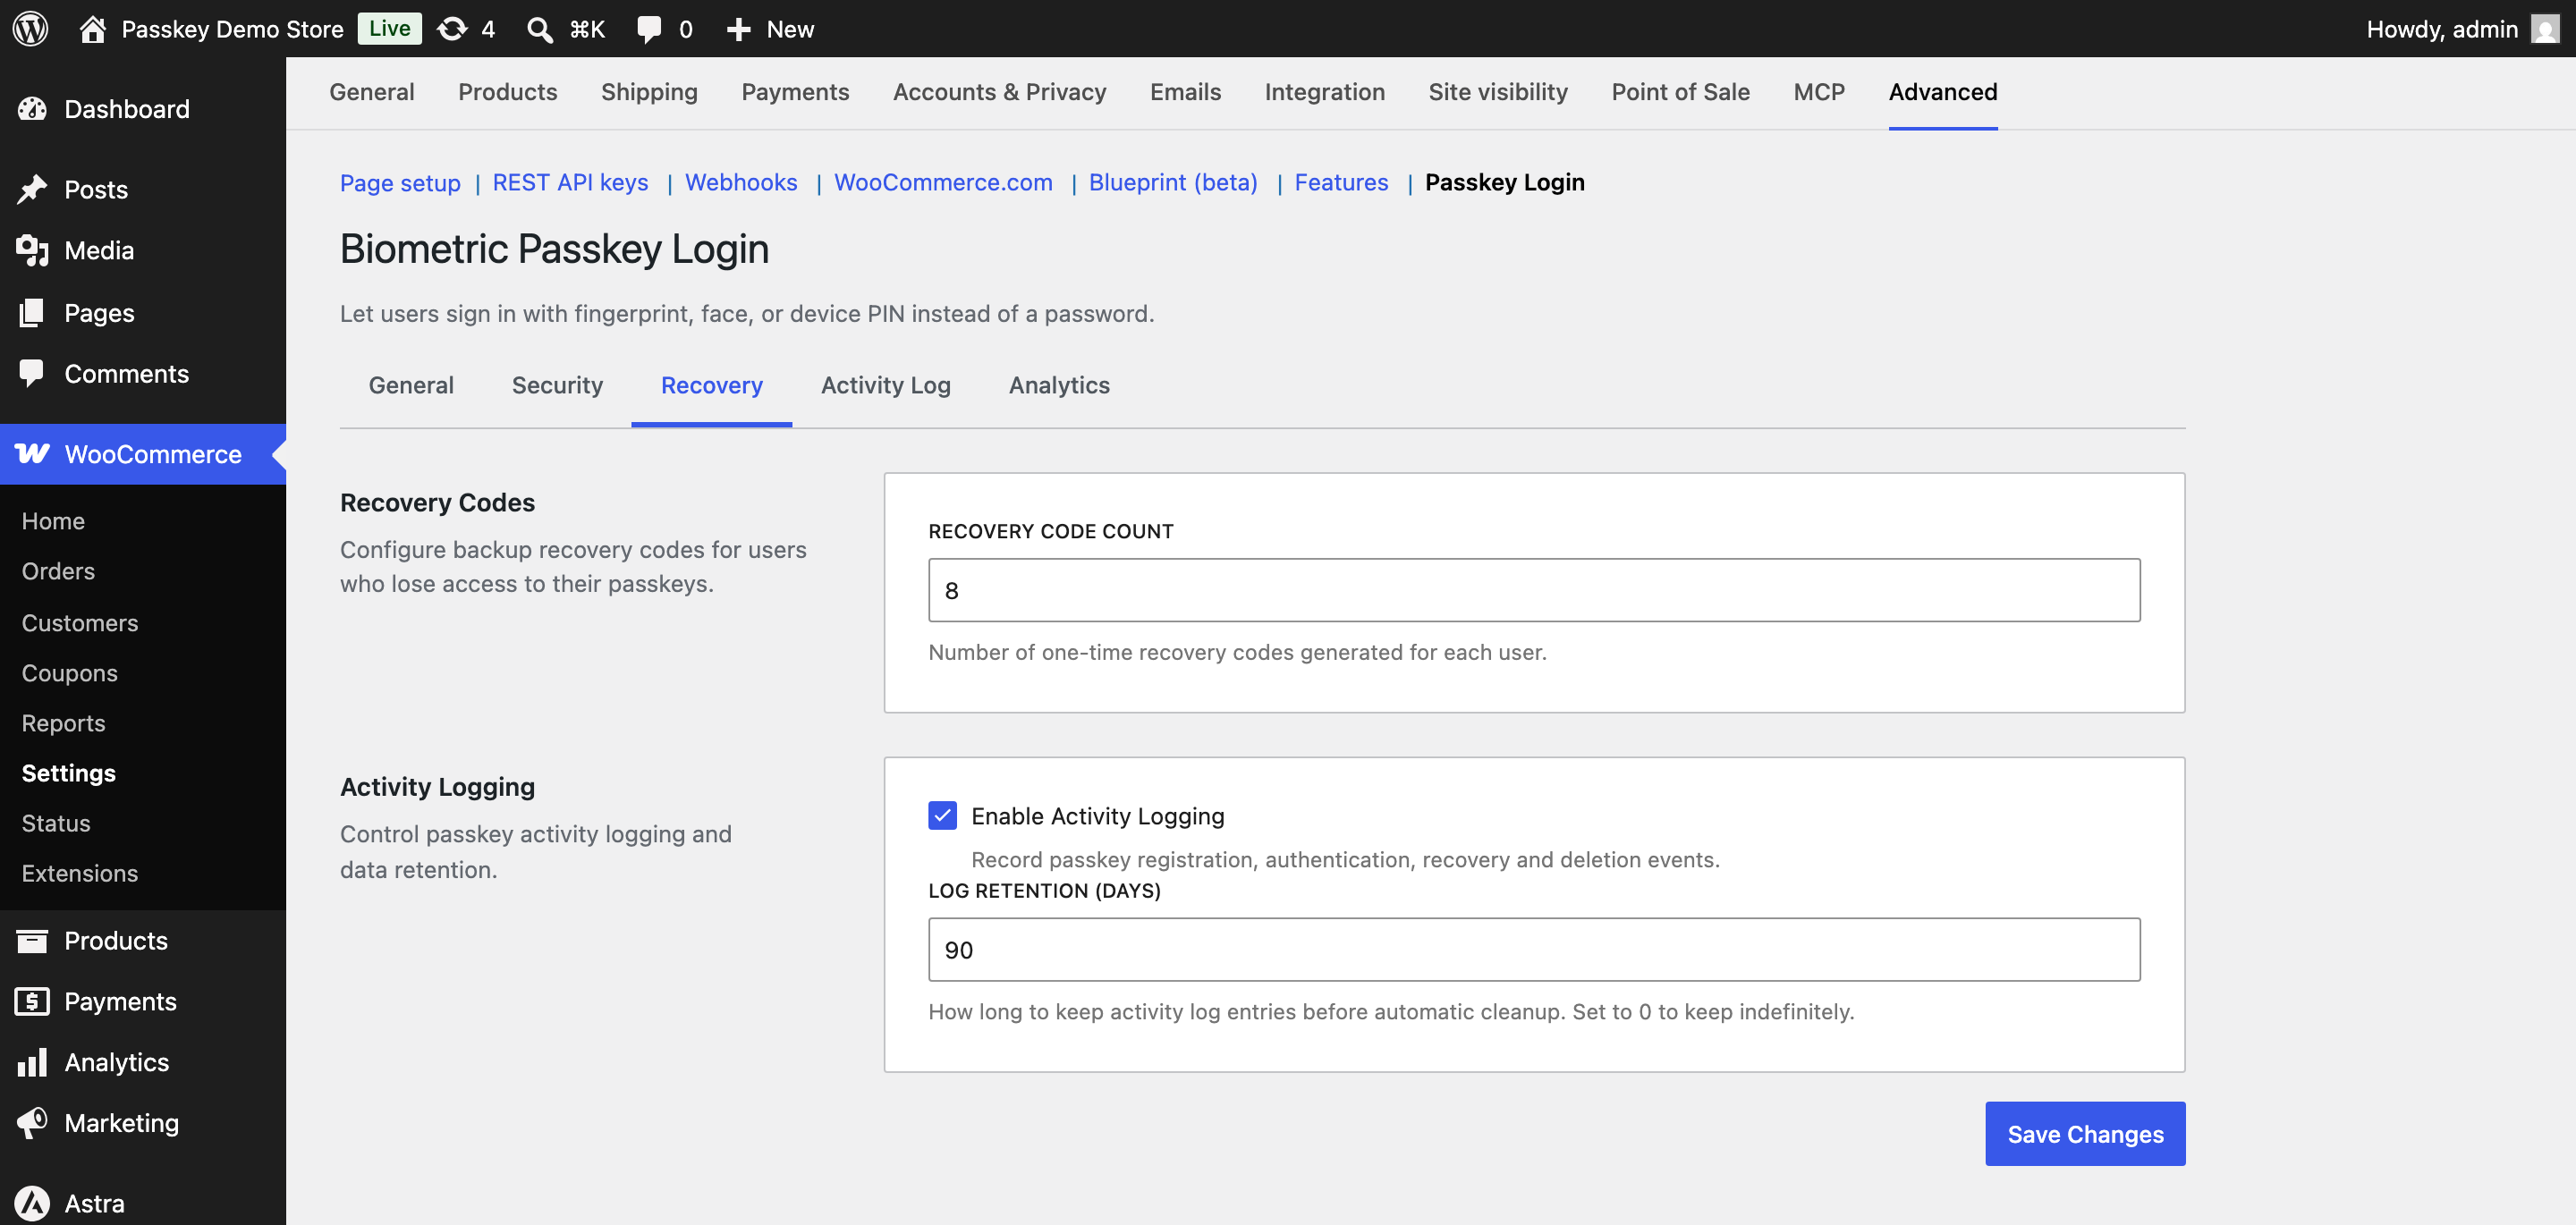
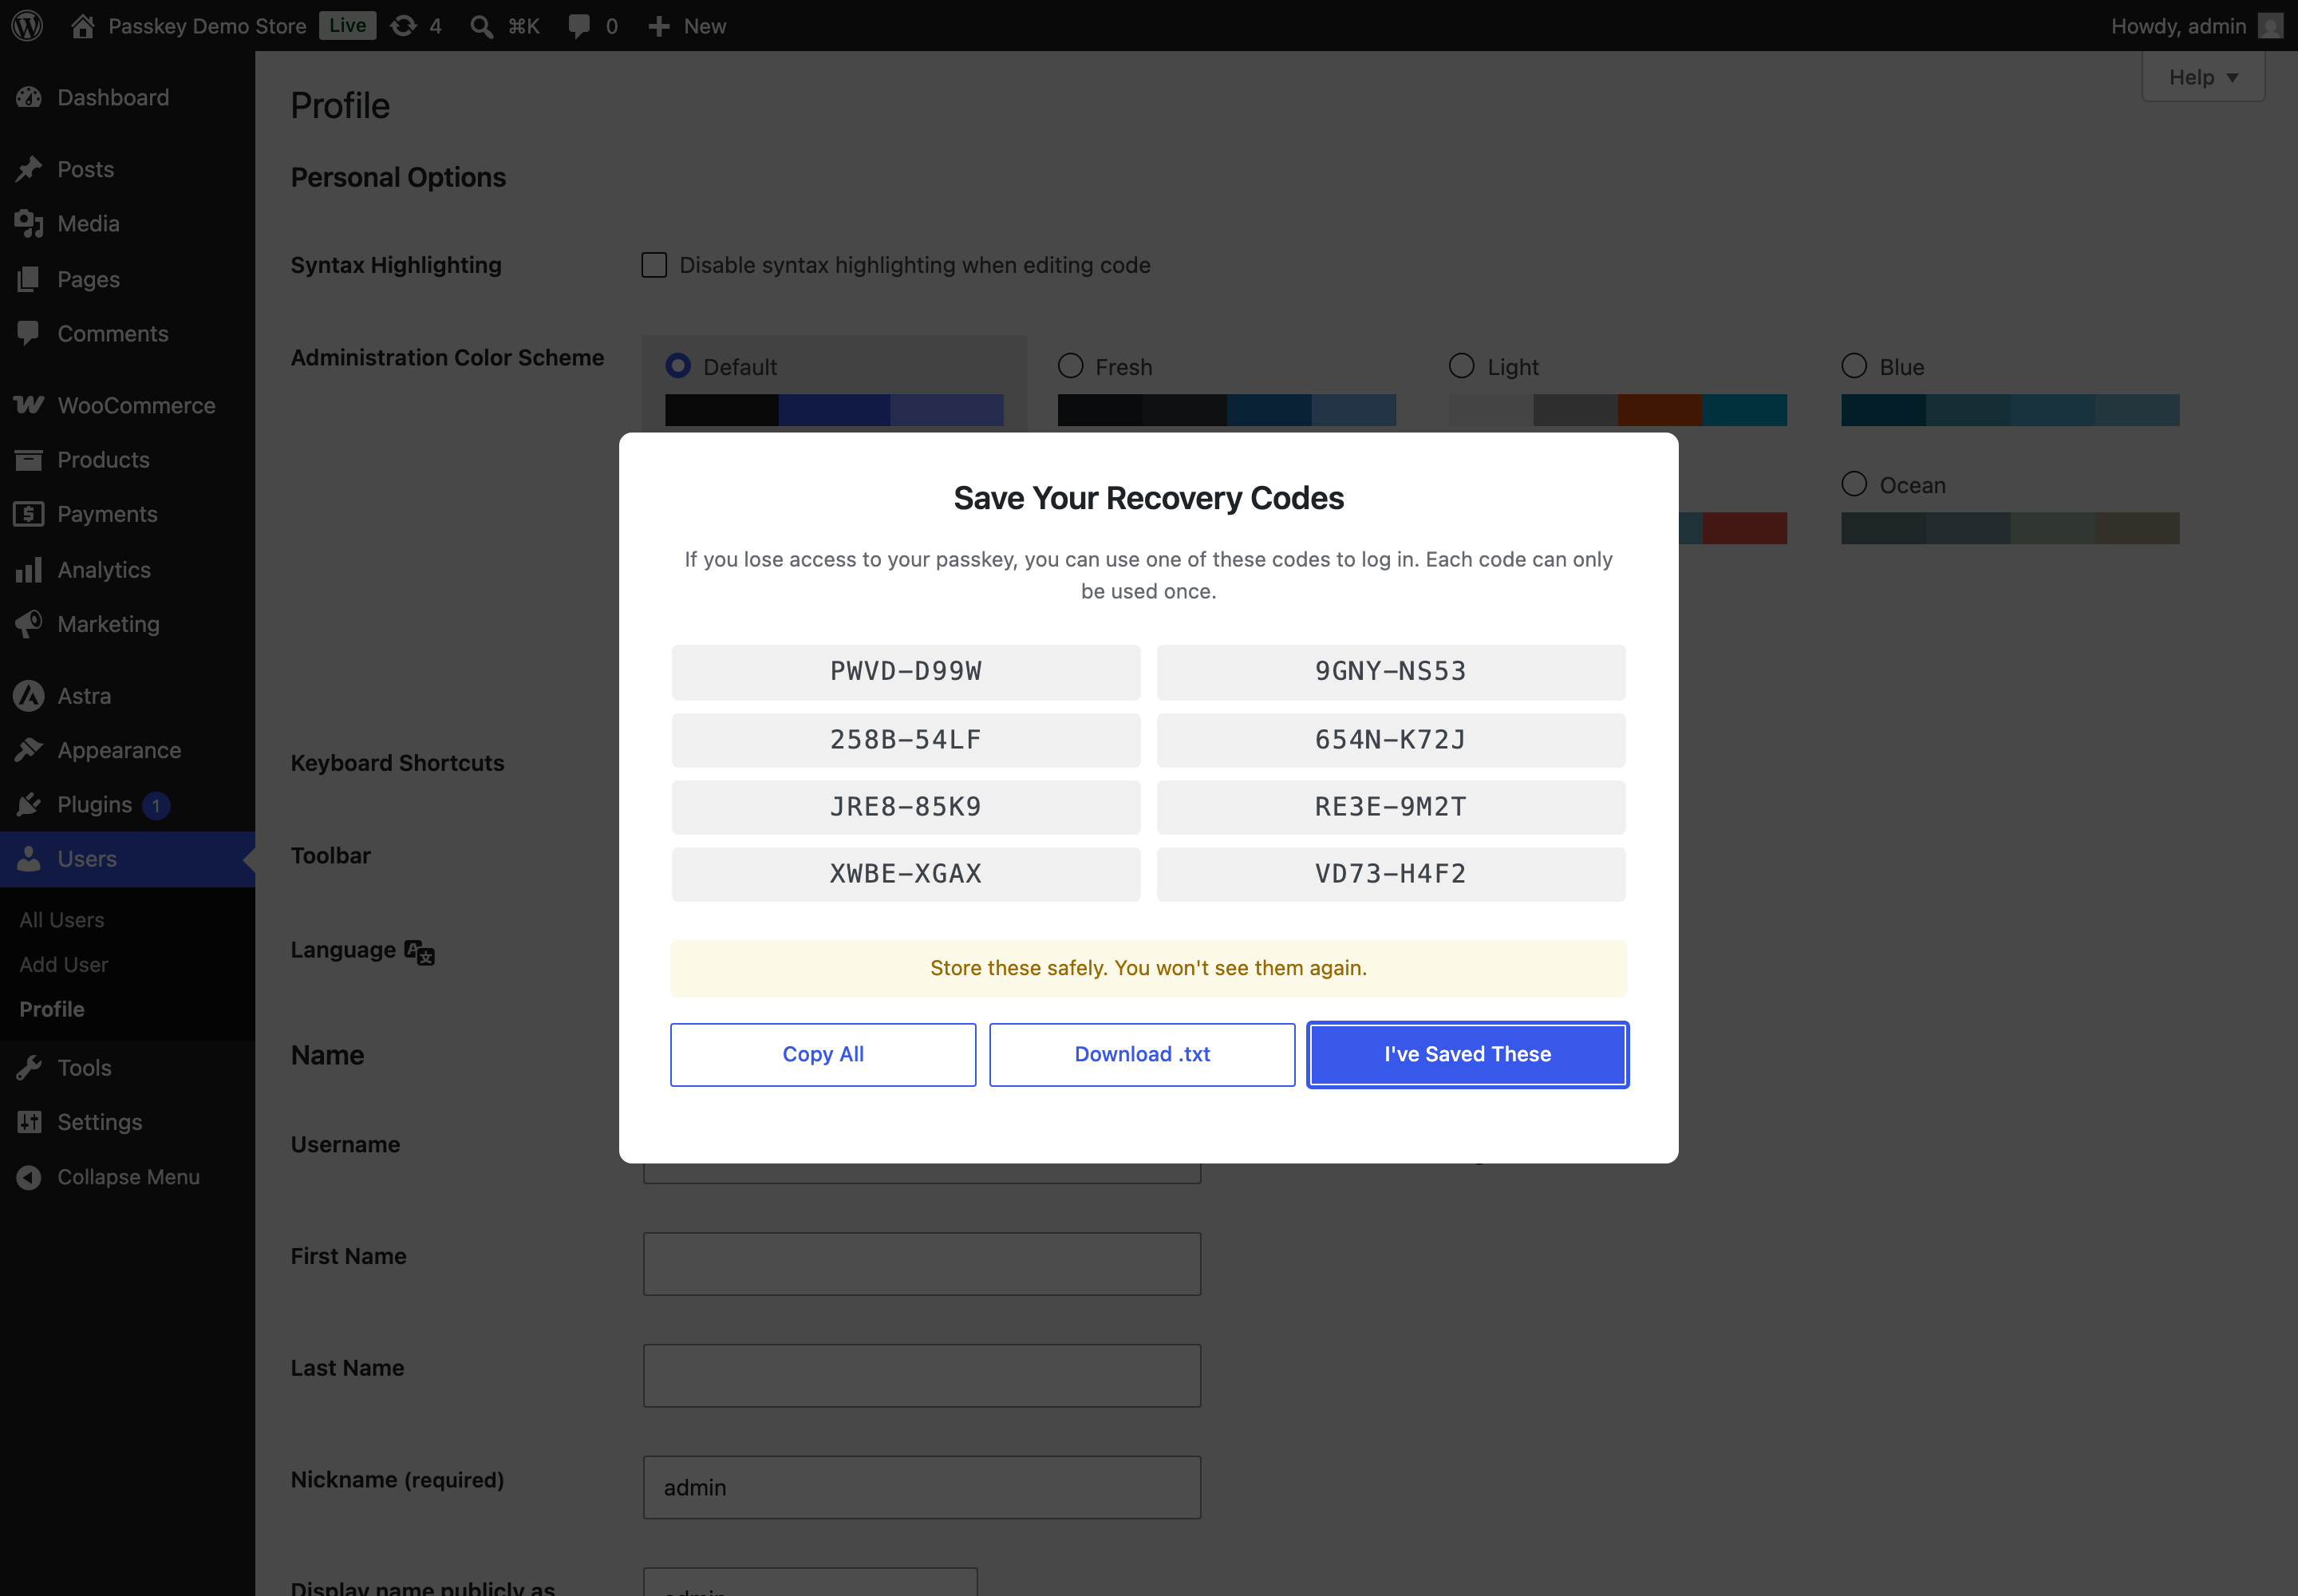
Recovery Code Count sets how many one-time codes are generated for each user. The default is 8, and the range is 4 to 16. Codes are generated automatically the first time a user registers a passkey, and they are shown once, in a modal with copy and download buttons. Your site stores only a hash of each code, so nobody, including you, can retrieve a code after that screen closes. A user who regenerates their codes invalidates the whole previous set. Each code works once, and a used code is cleared from the database 30 days later.
Codes use a XXXX-XXXX format built from uppercase letters and digits with the visually ambiguous characters left out, so there is no confusion between the letter O and the digit zero.
Enable Activity Logging records registration, authentication, recovery, and deletion events. It is on by default. Switching it off hides the Activity Log and Analytics tabs, since neither has anything to show.
Log Retention (days) is how long entries are kept before a daily cleanup job removes them. The default is 90 days, the field accepts 7 to 365, and setting it to 0 keeps entries indefinitely. Pick a number that matches whatever retention policy your store already follows for other logs.
Activity log
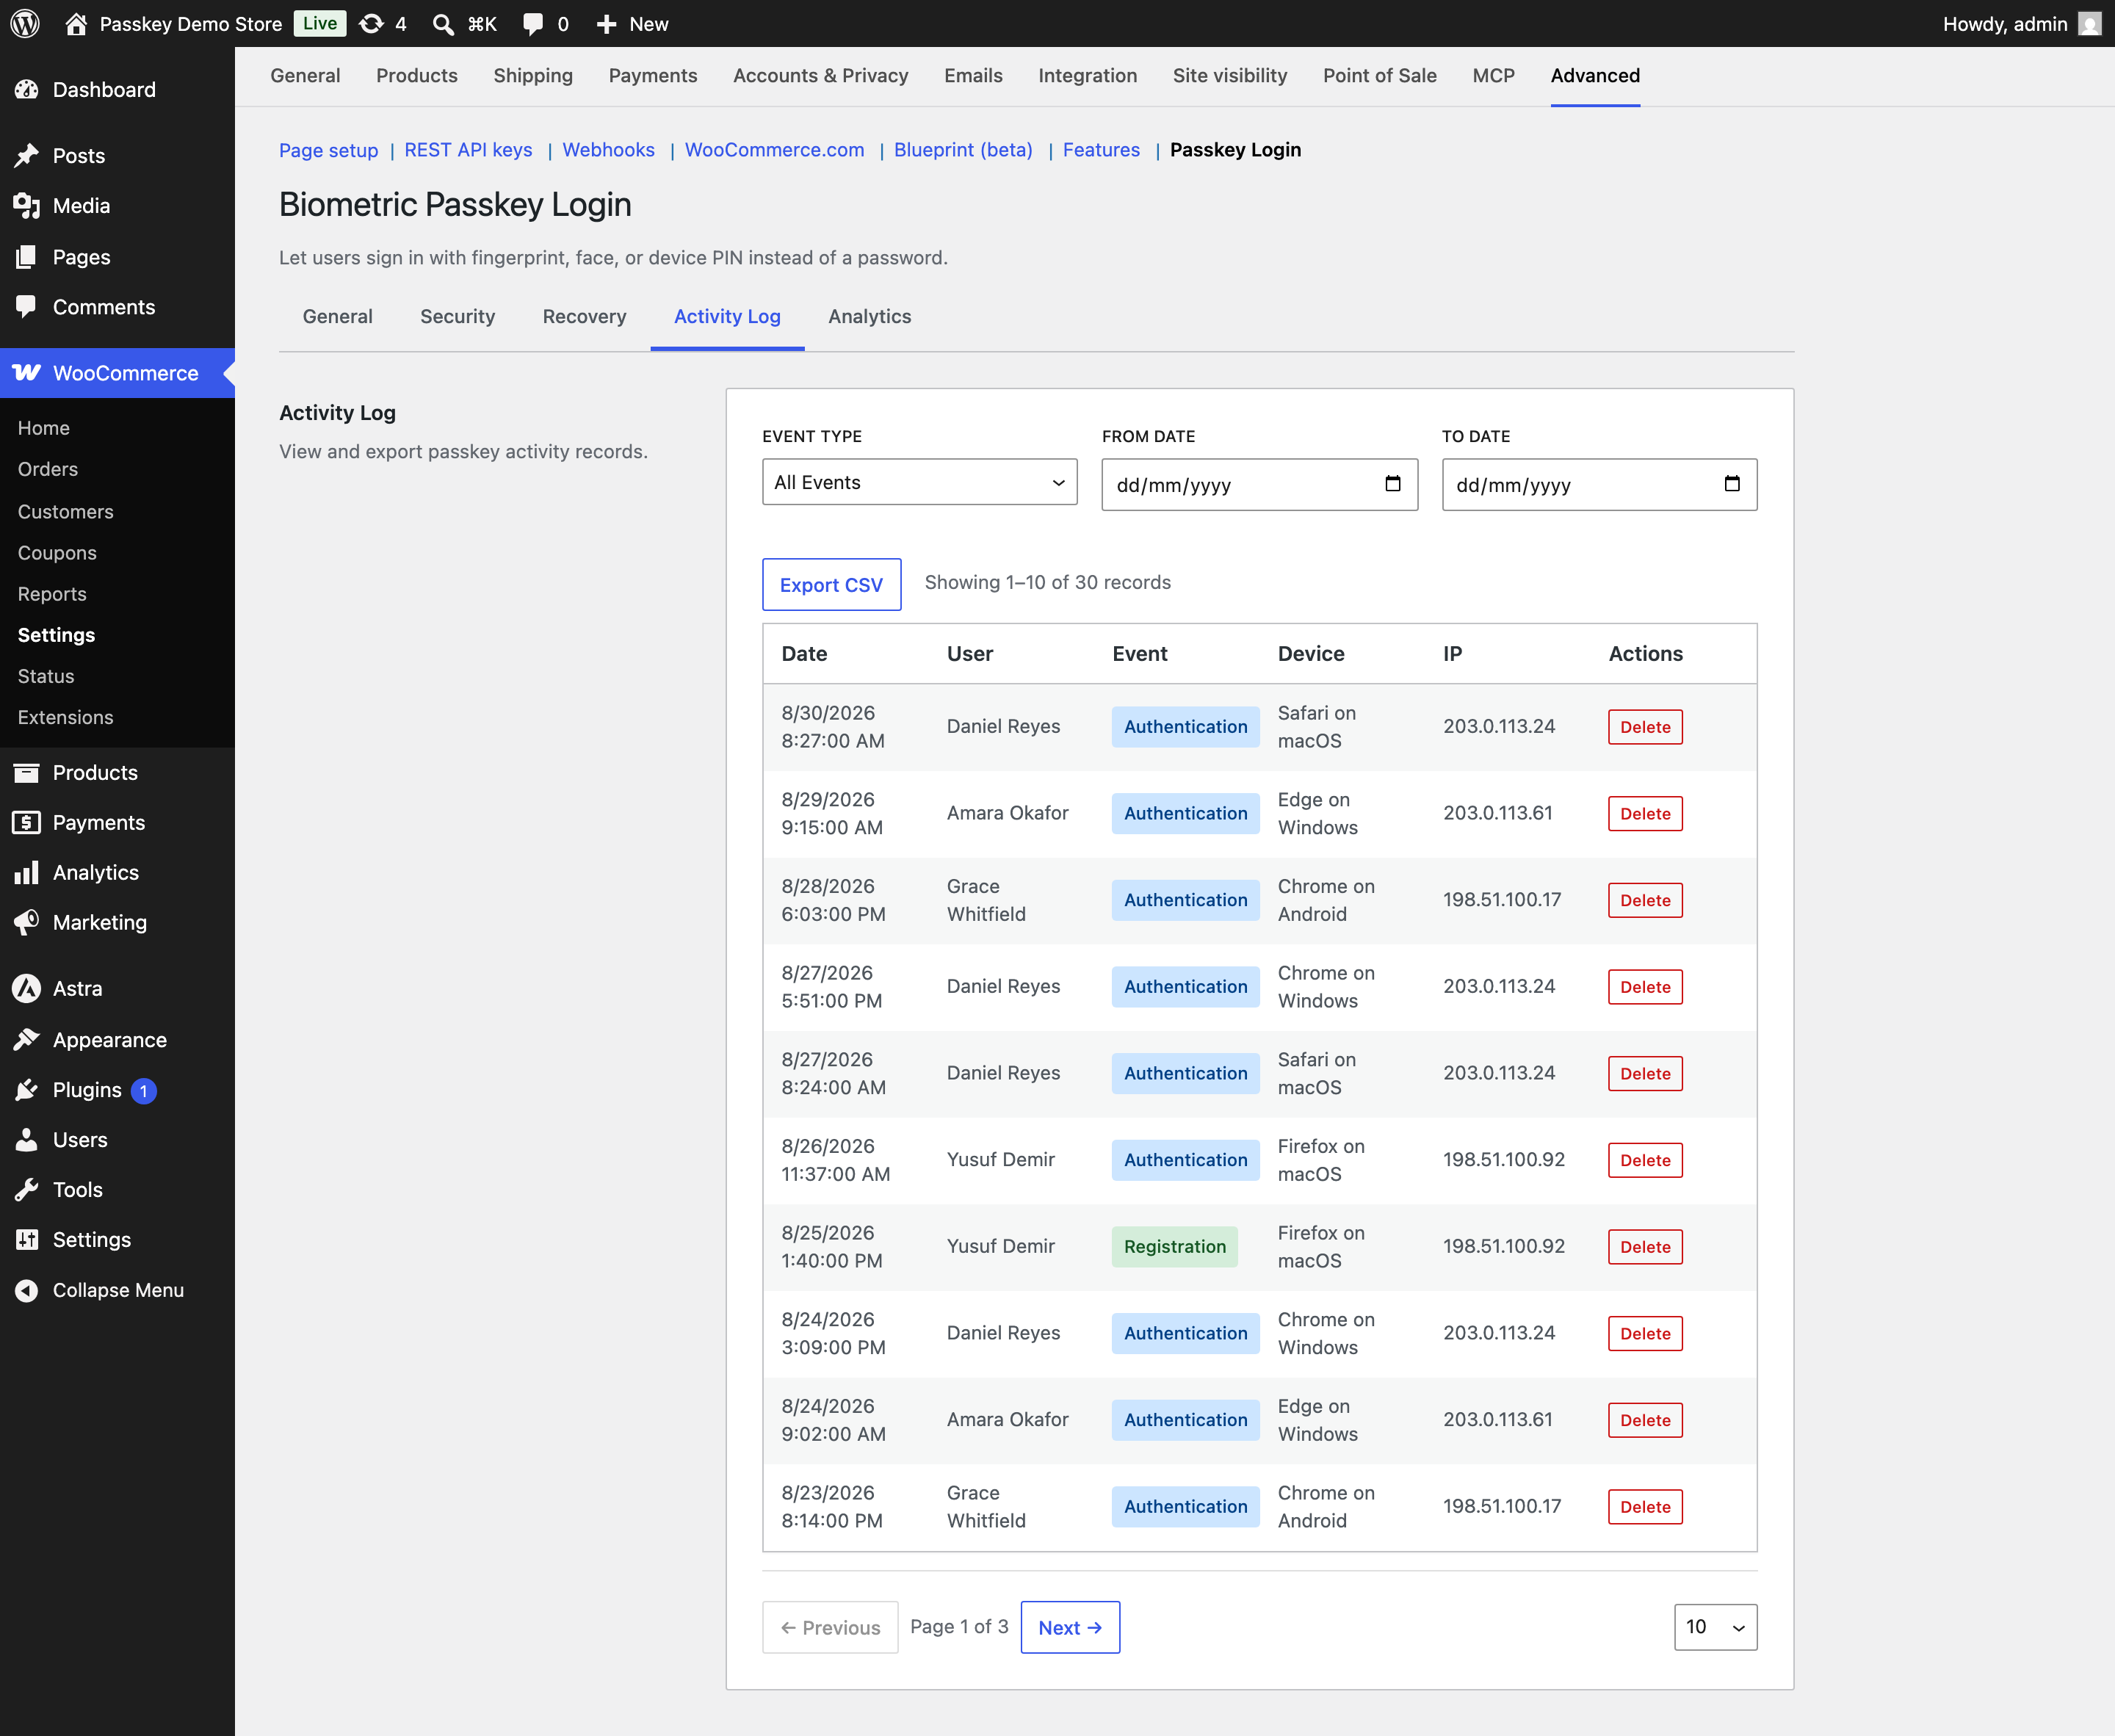
↑ Back to topA filterable table of everything the plugin has recorded. Each row shows the date, the user, the event type, a parsed device string, and the IP address the request came from.
Filter by event type, by a start date, by an end date, or by any combination. Export CSV downloads the filtered set, which is handy when a security review asks for sign-in history over a particular window. Paging controls sit below the table, with a per-page selector offering 10, 20, 50, or 100 rows.
Rows belonging to deleted users stay in the table with the user, IP address, and browser stripped out. That is intentional, so that deleting an account does not silently erase your audit history. The behavior is filterable with bpl_anonymise_activity_on_user_delete.
Analytics
↑ Back to topA read-only summary of how passkeys are being adopted on your site.
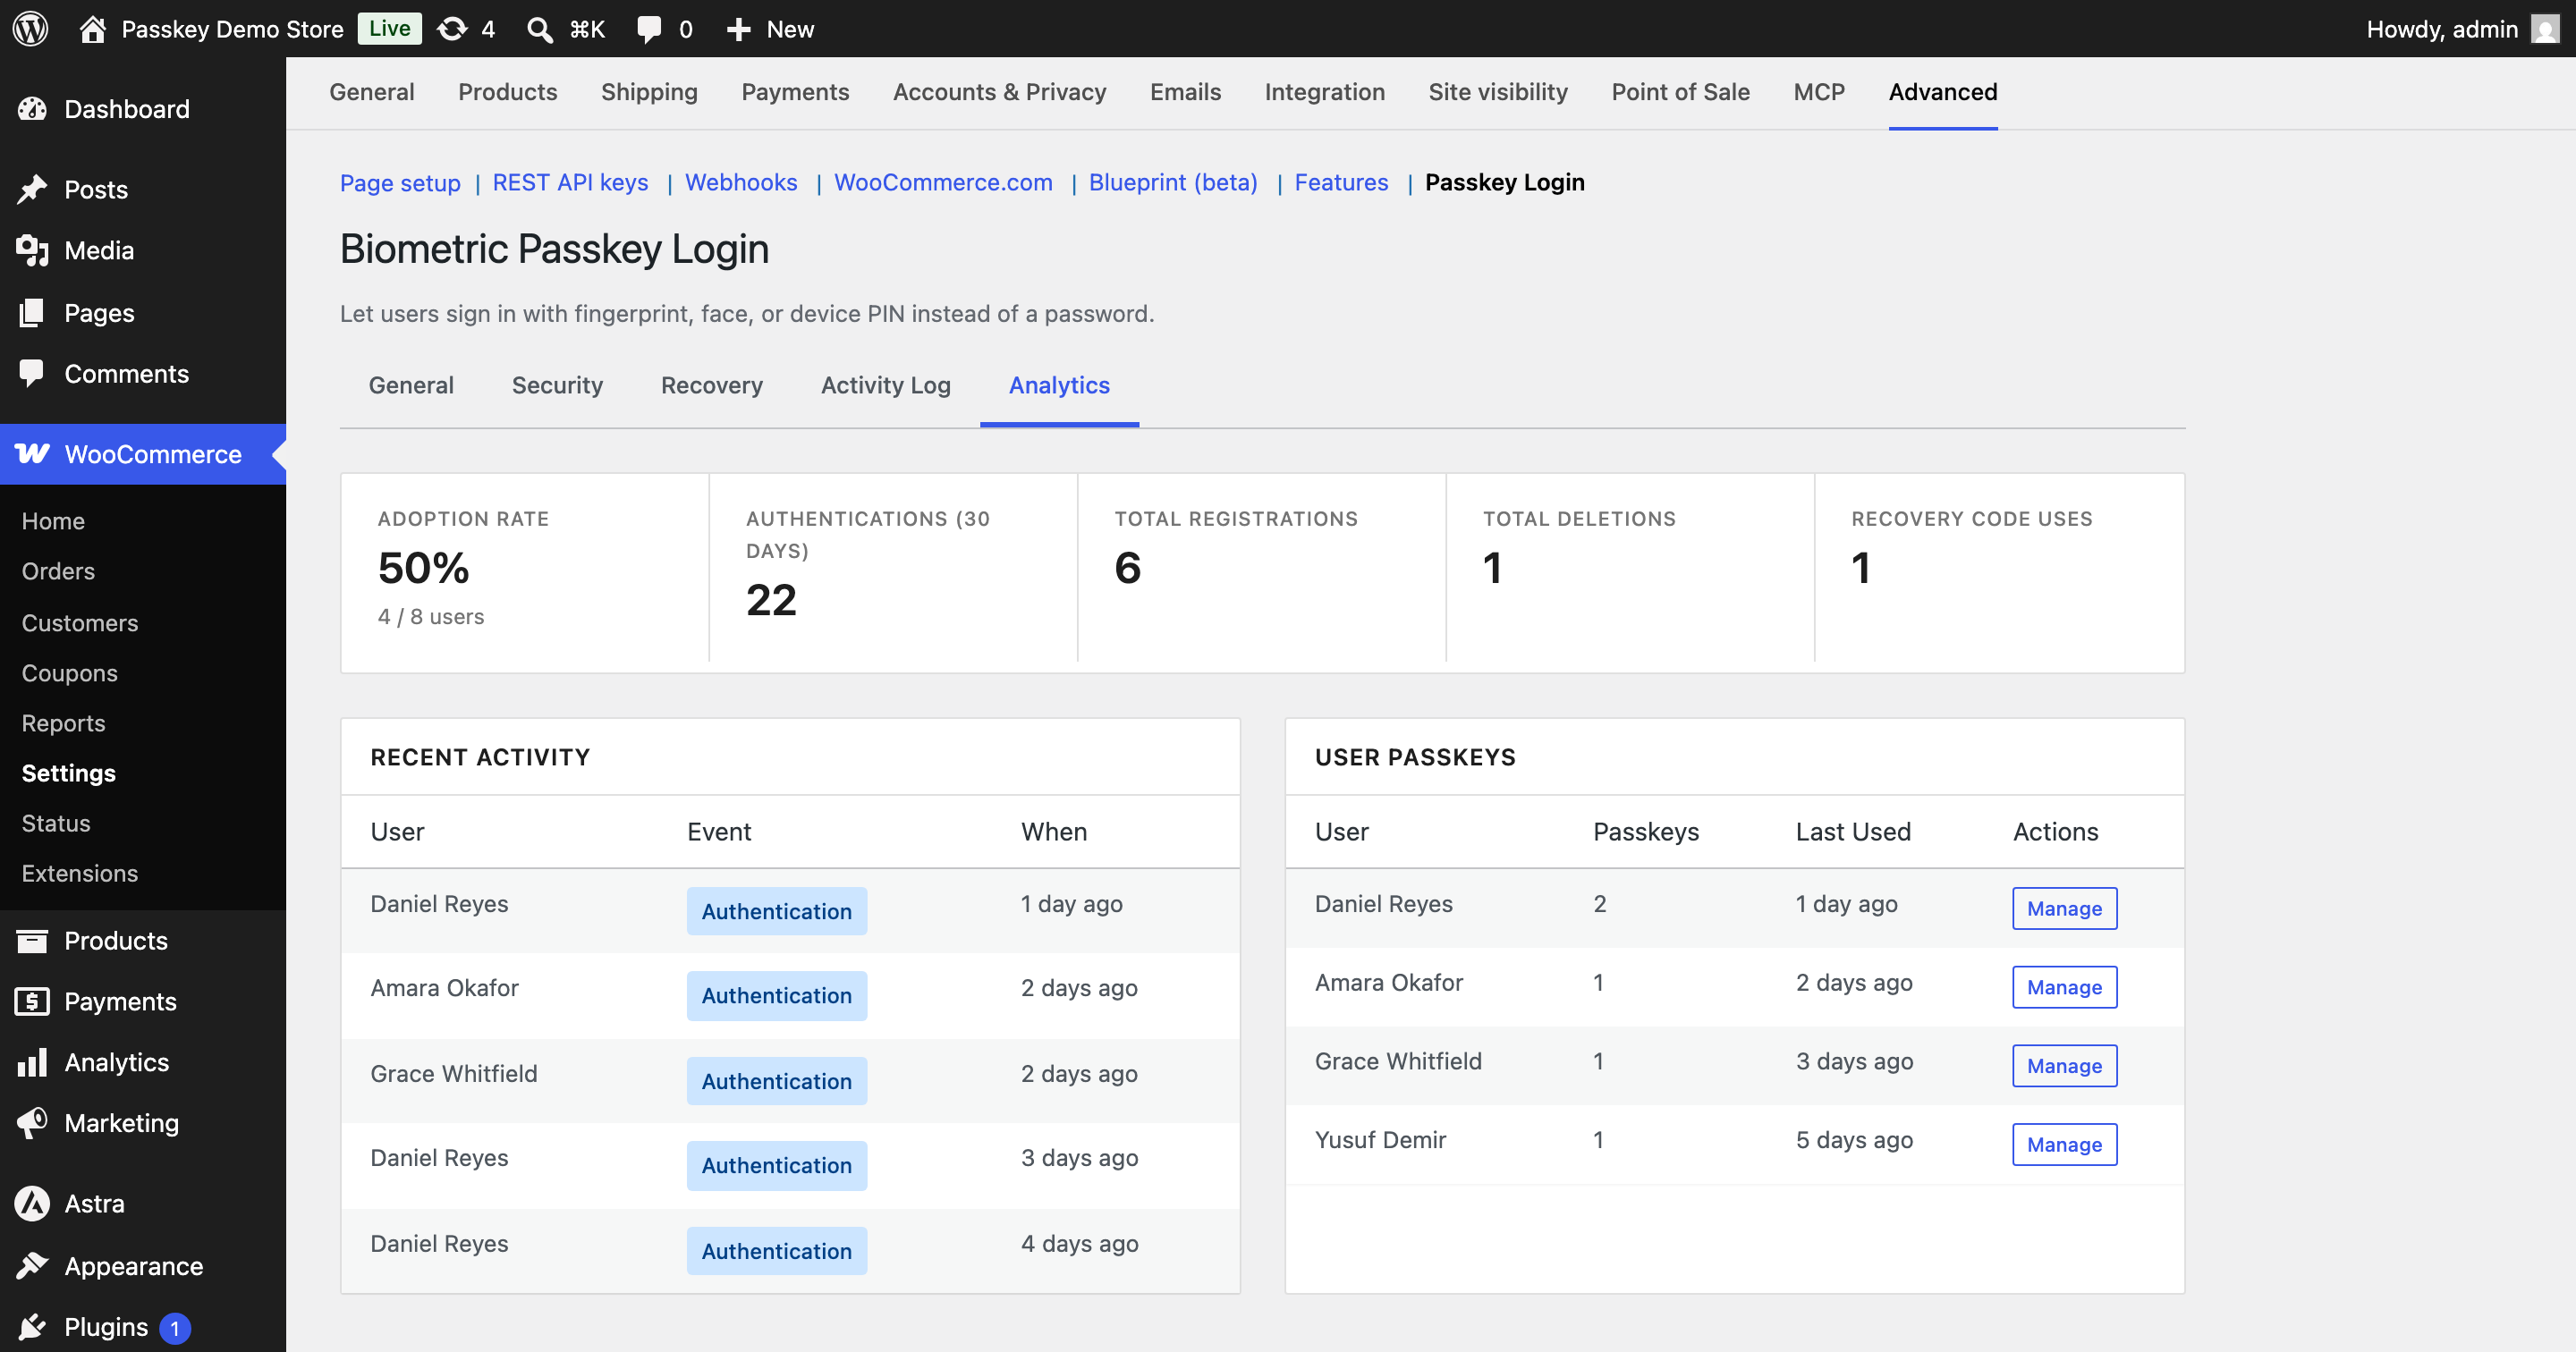
The row of figures across the top shows your adoption rate as a percentage with the underlying counts beside it, authentications in the last 30 days, total registrations, total deletions, and total recovery code uses. Below that sit two panels: the five most recent events, and a per-user breakdown showing how many passkeys each person has and when they last used one.
Adoption rate is the share of your WordPress users who have registered at least one passkey. It counts existing users only, so deleting an account adjusts the figure rather than leaving it inflated.
The same numbers are available to code through BPL_Activity_Log::get_stats() and to an assistant through the passkey-adoption-report ability.
Registering a passkey from the WordPress profile
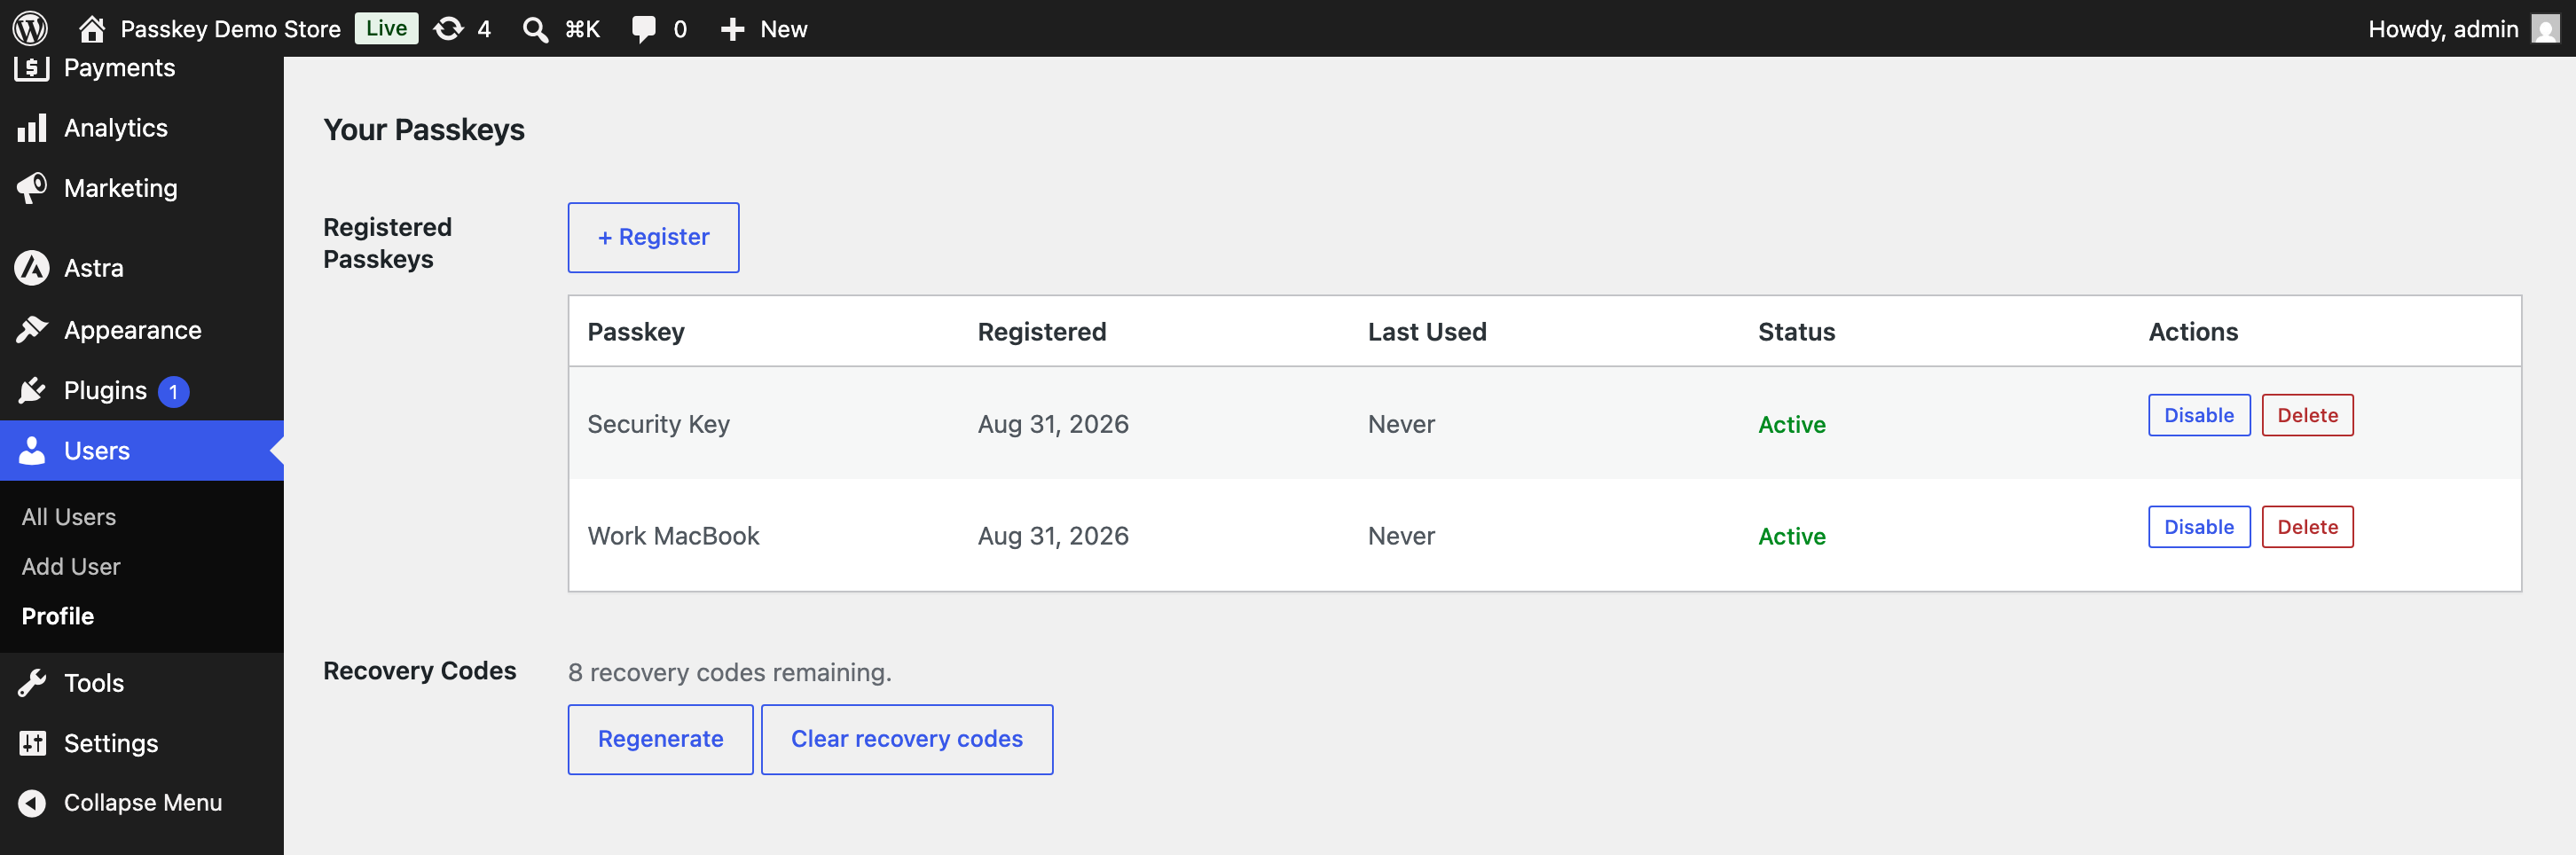
↑ Back to topGo to Users > Profile and scroll to “Your Passkeys”. Click + Register, give the passkey a name when prompted, for instance “Work MacBook”, and complete the prompt your device shows. The name is only a label to help the user tell their devices apart later.
The section lists every passkey with its name, status, registration date, and last use, and offers Disable, Enable, and Delete for each one. Disabling is the gentler option when a device has gone missing but might turn up. Deleting cannot be undone, and the user has to register the device again from scratch.
Recovery codes appear in the same section with a running count of how many are left and a Regenerate button. Administrators viewing another user’s profile also get a Clear recovery codes button, which is the right response to codes that have been shared or exposed. Clearing them does not issue new ones; the user regenerates their own set afterwards.
The first registration also generates the user’s recovery codes and shows them once. The modal ignores Escape and outside clicks on purpose, because the codes cannot be retrieved after it closes.
The Passkeys page in My Account
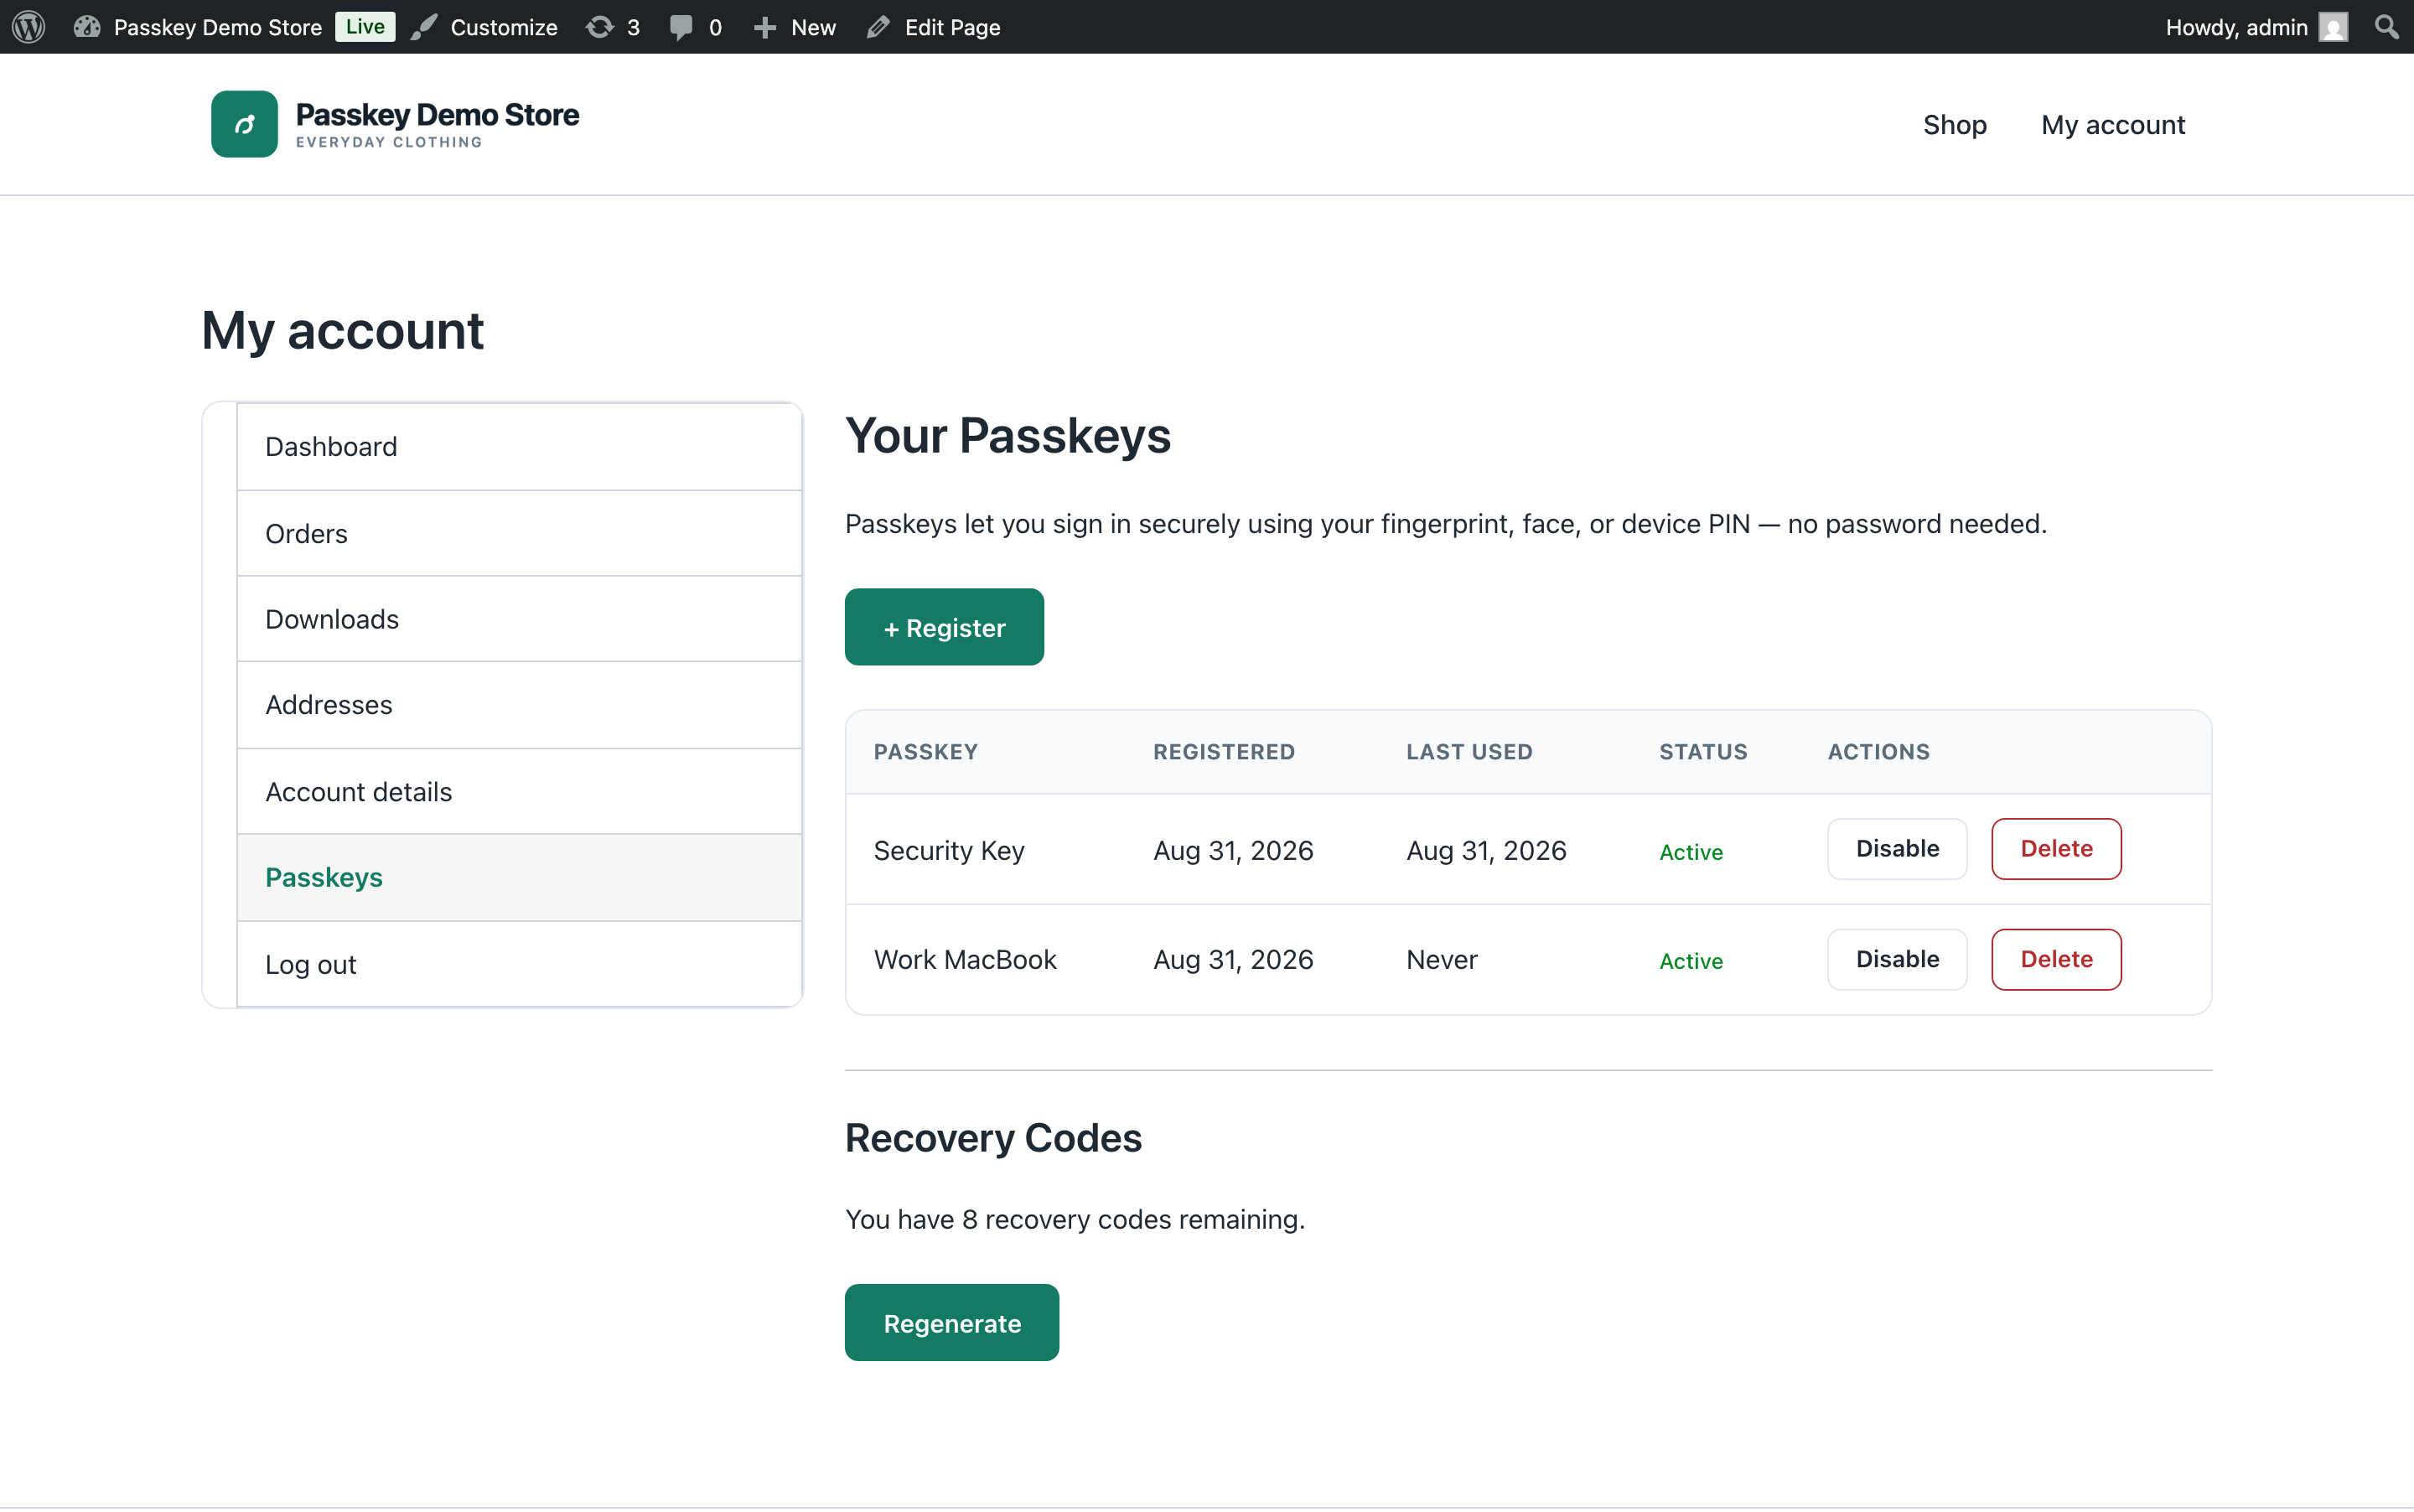
↑ Back to topWith WooCommerce active, customers manage their own passkeys from My Account > Passkeys, which the plugin adds just above Log out. The page does the same job as the profile section: register a passkey, name it, enable or disable it, delete it, and regenerate recovery codes.
Customers who reach the maximum see the register button disappear, and customers in a role that is not allowed to register passkeys see a short message explaining that instead.
The page is a template you can override, so it can be restyled to match your theme without touching the plugin.
Signing in with a passkey
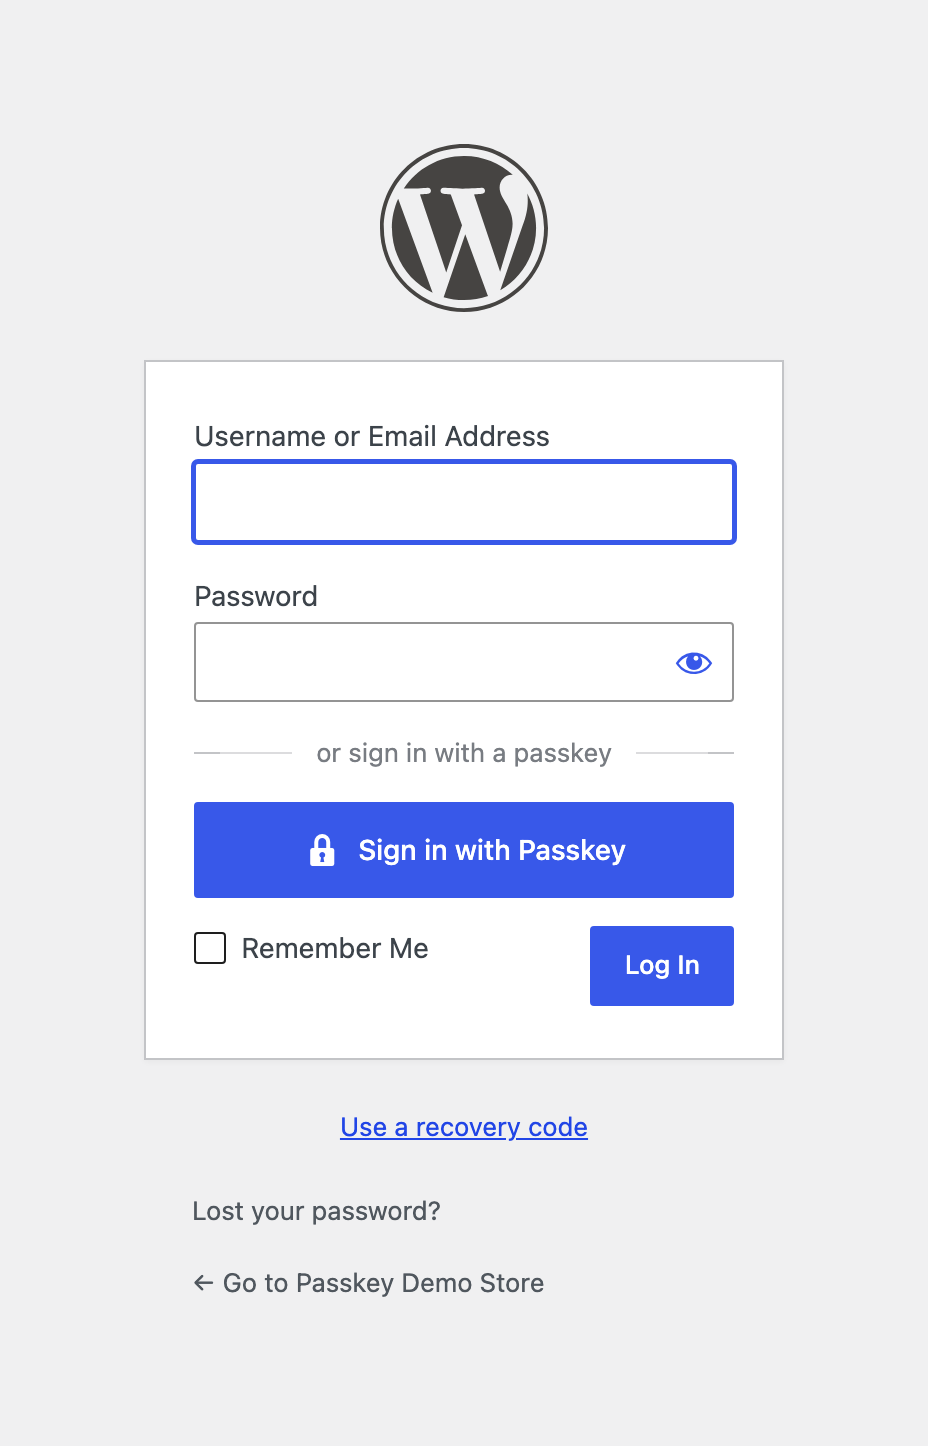
↑ Back to topOn the WordPress login screen the passkey button sits below the password field and above Remember me, separated by a divider. On the WooCommerce My Account login form it sits above the form, with a divider beneath it. Both buttons stay hidden until the page confirms the browser supports WebAuthn, so a visitor on an unsupported browser never sees a control that cannot work for them.
Clicking the button prompts the device, and a successful check signs the user in and sends them where they were heading. The Remember me checkbox is respected, so an unticked box gives a normal session rather than a persistent one.
On a store using the classic checkout, the passkey button appears in the checkout’s own login prompt. On the newer block checkout it appears on the login page that the checkout’s “Log in” link points to, and signing in there returns the customer to checkout with their cart intact.
Signing in with a recovery code
↑ Back to topBelow the passkey button is a “Use a recovery code” link, also hidden until WebAuthn is detected. Clicking it swaps the password form for a short panel asking for a username or email address and one recovery code. Entering a valid pair signs the user in and consumes that code permanently.
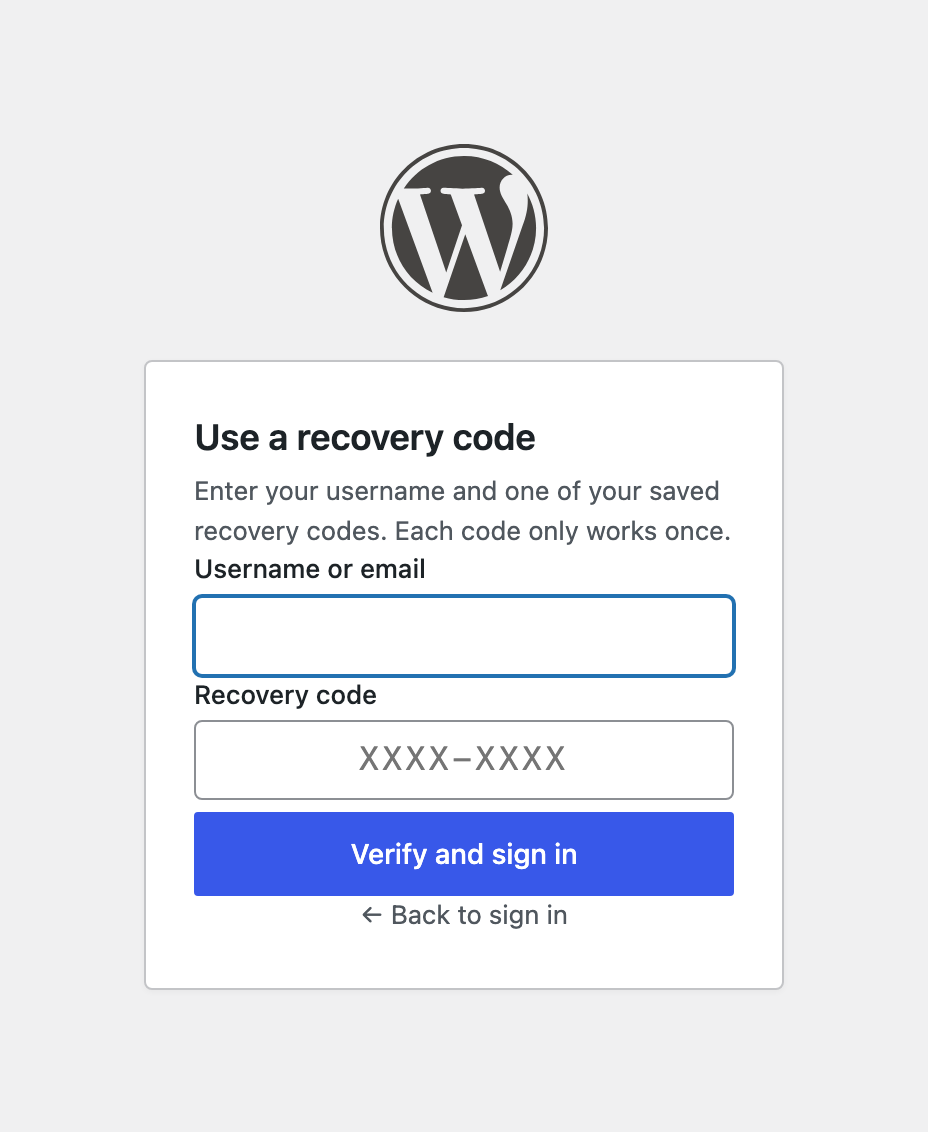
Recovery sign-in is throttled in two ways. Requests are limited by IP address, and failed attempts are counted per account, with 10 failures triggering a 15-minute cooling-off period. Attempts against usernames that do not exist are counted the same way as attempts against real ones, so the throttle cannot be used to work out which accounts exist on your site. See Rate limiting.
Shortcodes
↑ Back to topTwo shortcodes let you place passkey controls outside the standard screens.
[bpl_login] renders a passkey sign-in button. It accepts text to override the label, class to add your own CSS class, and redirect_to to set where the user lands after signing in. It renders nothing for users who are already signed in.
[bpl_login text="Sign in with Touch ID" class="my-theme-button" redirect_to="/my-account/orders/"][bpl_register] renders a registration button for signed-in users, and nothing for signed-out visitors. It accepts class and show_existing.
[bpl_register class="my-theme-button" show_existing="no"]Both render a plain <button> inside a wrapper div, so a theme that styles .bpl-passkey-button and .bpl-register-button styles every instance of them, wherever they appear.
Use cases
↑ Back to topPasswordless checkout for returning customers. Enable passkey login, leave the WooCommerce integration on, and leave the role policy unconfigured so every role can register. Returning customers register a passkey once from My Account > Passkeys and then sign in at checkout with a fingerprint. Keep Passkey-Only Mode off so first-time and unenrolled customers can still use a password.
Phishing-resistant sign-in for staff, passwords for customers. On the Security tab, tick both Allowed and Required for administrator and shop_manager, and tick Allowed for customer. Staff who have registered a passkey can no longer sign in with a password, so a stolen staff password is useless on its own, while customers keep the familiar password form. Register your own passkey before you tick Required for your role.
Rolling out passkeys to a team over a few weeks. Tick Required for the roles you are rolling out to, and leave passwords in place. Anyone in those roles who has not enrolled yet can still sign in with their password, but they are sent to the setup screen and kept there until they register. Watch the Analytics tab, and once adoption reaches 100 percent for those roles you know the rollout is finished.
Handling a lost phone. Ask the customer to sign in with a recovery code, then have them delete the lost device from My Account > Passkeys and register their replacement. If they cannot get in at all, open their profile in wp-admin and use Clear recovery codes, then help them through re-enrolment. If the device might still turn up, disabling the passkey rather than deleting it keeps it available to re-enable later.
A full lockdown for a small admin-only site. Have every user register a passkey, confirm each of them has signed in with it successfully, then turn on Passkey-Only Mode. The password fields disappear site-wide and recovery codes become the only fallback, so make sure everyone has saved theirs somewhere safe first.
Working with other W7S extensions
↑ Back to topBiometric Passkey Login secures the moment somebody proves who they are. These combinations from the W7S catalogue cover what happens on either side of that moment.
Stop the stolen password, then stop the stolen card. Shop Defender scores and blocks fraudulent orders using blocking rules and risk signals such as disposable email domains and failed-IP history. The two guard different halves of the same store: a passkey makes a leaked staff password worthless, while Shop Defender catches the guest checkout where there is no account to protect at all. Tick both Allowed and Required for administrator and shop_manager on the Security tab, and leave Shop Defender to score the orders that arrive with no session behind them.
Prove who agreed, not just that somebody did. Terms & Conditions Tracker stores a consent record for each order with its timestamp, IP address, user agent, and a hash of the document version. On its own that proves a checkbox was ticked in a particular browser. Pair it with this plugin’s activity log and you can also show the account was signed into with a phishing-resistant credential minutes earlier. Both screens export CSV, which is what a chargeback or a compliance review actually asks for.
Let customers act on their own orders safely. Self-Service Refunds puts refund requests in My Account, right beside the Passkeys tab this plugin adds. A refund request moves money on the strength of a session, so once adoption among customers is high, tick Required for the customer role and every request from a signed-in customer arrives from a passkey-verified session rather than a reused password. Guests keep that extension’s own order email, order ID, and purchase date check, which is the right fallback for someone with no account at all.
Verify age once, then recognise the person rather than the browser. Age Verification Manager remembers a signed-in customer’s verification in user meta instead of only in a cookie, so the check is worth exactly as much as the sign-in behind it. Gate add to cart or checkout there, offer passkey sign-in here, and a returning customer’s age check follows the account from their phone to their laptop instead of being re-run on every new browser. Both plugins keep their own log screen with CSV export, so an audit can be answered from two exports rather than a database query.
Ask about adoption instead of building the report. MCP (Model Context Protocol) connects Claude or ChatGPT to your store and picks up this plugin’s abilities automatically. Rather than reading the Analytics tab, ask which administrators still have no passkey, how adoption looks role by role, or whether anything used a recovery code this week. Using the abilities over MCP covers the setup. Because the same connector exposes the tools of the other W7S extensions you have installed, you can ask questions that cross products, such as which of the staff accounts approving refunds are still signing in with a password.
Keep the admin tables quick as the store ages. Archive Old Orders moves stale orders out of the working set so the orders list and reports stay fast. Do the same for sign-in history with Log Retention (days) on the Recovery tab. A busy store writes an activity row for every sign-in, and ninety days of them answers far more questions than three years of them.
FAQ
↑ Back to topWhat exactly is a passkey?
A cryptographic credential that replaces a password. It lives on the user’s device, or in their platform account such as iCloud Keychain or Google Password Manager, and it is unlocked with a biometric check or a device PIN. There is nothing to type, so there is nothing to phish, leak, or reuse. passkeys.dev is a good primer.
Does this turn off password login?
Not by default. Passkey sign-in is offered alongside the password form. Passwords go away only if you turn on Passkey-Only Mode site-wide, or tick Required for a role, in which case that role’s enrolled users can no longer use a password.
Is HTTPS really required?
Yes. WebAuthn only runs in a secure context, and passkey sign-in simply will not function over plain HTTP. Local development hosts are exempted from the warning so you can build against localhost or a .local domain.
What happens if a user loses their device?
They sign in with one of their recovery codes, delete the lost passkey, and register a new one. If they have run out of codes or never saved them, an administrator can clear their codes from the profile screen, and the user regenerates a fresh set after signing in another way.
Where are credentials stored, and what leaves the device?
Only the public key, the credential identifier, and a signature counter are stored, in a custom table on your site. The private key never leaves the user’s device, so a database breach does not hand anyone a way in.
Can more than one passkey be registered per person?
Yes, up to the Max Passkeys Per User limit, which defaults to 5. A phone, a laptop, and a hardware key is a common combination.
Does it work with the block checkout?
Yes, with one difference. On the classic checkout the passkey button appears in the checkout’s own login prompt. On the block checkout it appears on the login page that the checkout’s “Log in” link points to, and signing in there returns the customer to checkout with their cart intact.
Can I change how the Passkeys page looks in My Account?
Yes. Copy templates/woocommerce/myaccount-passkeys.php from the plugin to yourtheme/biometric-passkey-login/myaccount-passkeys.php and edit your copy. The plugin loads yours instead, and your changes survive plugin updates. This follows WooCommerce’s usual template structure; see Template overrides.
Why does the activity log show my proxy’s IP address instead of the visitor’s?
Since 1.2.0 the plugin reads visitor addresses from REMOTE_ADDR only. Headers such as X-Forwarded-For are set by the client and can be forged, so trusting them by default would let someone sidestep the rate limits protecting passkey and recovery sign-in. Sites behind a proxy that overwrites its header on every request can opt back in with the bpl_trusted_proxy_headers filter.
Does the plugin answer WordPress data export and erasure requests?
Yes. It registers with Tools > Export Personal Data and Tools > Erase Personal Data. An export includes the person’s registered passkeys, their recovery code status, and their passkey sign-in history with the IP addresses and browsers recorded against it. It deliberately leaves out the authentication material itself, meaning public keys, credential identifiers, and recovery code hashes, since those are secrets rather than personal data and an export file travels by email. An erasure deletes the person’s passkeys and recovery codes, and anonymizes their sign-in history rather than removing it. See Privacy.
What happens when I delete a user?
Their passkeys and recovery codes are deleted, and their activity records are anonymized, meaning the events stay in the log with the user, IP address, and browser stripped out. On multisite this clears the site the deletion ran on.
Does the plugin work without WooCommerce?
Yes. Without WooCommerce it registers its own screen at Settings > Passkey Login and works on the WordPress login screen and profile page. The My Account tab, the checkout button, and the storefront controls are the WooCommerce-only parts.
Is it compatible with High Performance Order Storage (HPOS)?
Yes. The plugin declares HPOS compatibility and does not touch order data.
Do I need an AI assistant to use the plugin?
No. The assistant tools register only when the WordPress Abilities API is present and the setting is on, and nothing else depends on them. Without them everything works exactly as before.
Where do I get help?
Open a ticket from your WooCommerce.com account.
Developer documentation
↑ Back to topFilter hooks
↑ Back to topbpl_trusted_proxy_headers
Filters the $_SERVER keys consulted for the client IP address ahead of REMOTE_ADDR, in priority order. Empty by default. Applied in BPL_Main::get_client_ip(), which is the source for both rate-limit bucketing and the ip_address column of the activity log. Only add a header your proxy overwrites on every request; a proxy that appends to a client-supplied value offers no protection and reinstating it would let a caller mint a fresh rate-limit bucket per request.
add_filter( 'bpl_trusted_proxy_headers', function () {
    return array( 'HTTP_CF_CONNECTING_IP' );
} );
bpl_register_abilities
Filters whether the plugin registers its Abilities API surface at all. Receives the boolean value of the abilities_enabled setting. Return false to force the tools off regardless of what the settings screen says, which is useful where that decision belongs to infrastructure rather than to whoever can reach wp-admin. Applied in BPL_Abilities_Bootstrap::is_enabled().
// Assistant tools on staging only, whatever the settings screen says.
add_filter( 'bpl_register_abilities', function ( $enabled ) {
    return $enabled && defined( 'WP_ENVIRONMENT_TYPE' ) && 'production' !== WP_ENVIRONMENT_TYPE;
} );
bpl_abilities_redact_pii
Filters whether abilities reduce personal data before returning it. Default true, which truncates IPv4 addresses to their network, shortens IPv6 addresses to their first three groups, masks the local part of email addresses, and withholds raw user agents. Return false to receive full values. Applied in BPL_Ability_Trait::should_redact_pii().
// Full values only for an internal bridge that never leaves the network,
// identified here by a constant set in wp-config.php.
add_filter( 'bpl_abilities_redact_pii', function ( $redact ) {
    return ! ( defined( 'BPL_TRUSTED_MCP_BRIDGE' ) && BPL_TRUSTED_MCP_BRIDGE );
} );
bpl_anonymise_activity_on_user_delete
Filters whether a deleted user’s activity records are anonymized or deleted outright. Receives ( bool $anonymise, int $user_id ) and defaults to true. Return false on sites that would rather lose the audit history than keep unattributable records. Applied in BPL_Activity_Log::anonymise_user().
// Keep audit history for staff, delete it outright for customers.
add_filter( 'bpl_anonymise_activity_on_user_delete', function ( $anonymise, $user_id ) {
    $user = get_userdata( $user_id );

    if ( ! $user ) {
        return $anonymise;
    }

    return (bool) array_intersect( array( 'administrator', 'shop_manager' ), (array) $user->roles );
}, 10, 2 );
Action hooks
↑ Back to topbpl_purged_user_data
Fires in BPL_Main::purge_user_data() after a deleted user’s credentials and recovery codes have been removed, their activity records anonymized, and their per-user transients cleared. Receives ( int $user_id ). Useful for clearing anything your own code keyed to that user’s passkeys.
add_action( 'bpl_purged_user_data', function ( $user_id ) {
    delete_transient( 'my_plugin_passkey_summary_' . $user_id );

    if ( function_exists( 'wc_get_logger' ) ) {
        wc_get_logger()->info(
            sprintf( 'Passkey data purged for user %d', $user_id ),
            array( 'source' => 'my-plugin' )
        );
    }
} );
The plugin also fires core’s wp_login and applies core’s login_redirect when a user signs in through the REST API, so WooCommerce customer sessions, audit plugins, and anything else listening for a sign-in behave the same way they would after a password login. The redirect target is validated against the site host with wp_validate_redirect() after the filter runs, so a third-party filter cannot reintroduce an off-site destination.
// Runs for a passkey sign-in exactly as it does for a password sign-in.
add_action( 'wp_login', function ( $user_login, $user ) {
    update_user_meta( $user->ID, 'my_plugin_last_seen', time() );
}, 10, 2 );
PHP API
↑ Back to topThe classes below are loaded on every request and are safe to call from your own code. Everything here reads or writes the plugin’s own tables; none of it performs a WebAuthn ceremony, which only a browser can do.
Reading a user’s passkeys
BPL_Credential_Store is instantiated, not static. get_by_user() returns active credentials by default; pass false as the second argument to include disabled ones.
$store       = new BPL_Credential_Store();
$credentials = $store->get_by_user( $user_id );          // active only
$all         = $store->get_by_user( $user_id, false );   // including disabled
$count       = $store->get_count_by_user( $user_id );

foreach ( $credentials as $credential ) {
    printf(
        '%s, registered %s, last used %s',
        esc_html( $credential->device_name ),
        esc_html( $credential->created_at ),
        esc_html( $credential->last_used_at ?: 'never' )
    );
}
A common need is simply “does this person have a passkey”, for example to decide whether to show a nudge:
add_action( 'woocommerce_before_account_navigation', function () {
    if ( ! is_user_logged_in() ) {
        return;
    }

    $store = new BPL_Credential_Store();

    if ( $store->get_count_by_user( get_current_user_id() ) > 0 ) {
        return;
    }

    wc_print_notice(
        sprintf(
            /* translators: %s: link to the Passkeys page. */
            __( 'Sign in faster next time. %s', 'my-plugin' ),
            '<a href="' . esc_url( wc_get_account_endpoint_url( 'passkeys' ) ) . '">'
                . esc_html__( 'Set up a passkey', 'my-plugin' ) . '</a>'
        ),
        'notice'
    );
} );
Recovery code status
BPL_Recovery_Codes is static. The codes themselves are hashed and cannot be read back, so only counts and timestamps are available.
$summary = BPL_Recovery_Codes::get_summary( $user_id );
// array( 'issued' => 8, 'remaining' => 6, 'last_generated' => '2026-08-31 09:14:22' )

if ( BPL_Recovery_Codes::has_codes( $user_id ) && BPL_Recovery_Codes::get_remaining_count( $user_id ) < 3 ) {
    // Prompt the user to regenerate before they run out.
}
Querying the activity log
BPL_Activity_Log::get_entries() takes the same arguments the Activity Log tab uses, and returns the page plus its paging totals. per_page is capped at 100. Dates are YYYY-MM-DD and are read as UTC.
$page = BPL_Activity_Log::get_entries(
    array(
        'page'       => 1,
        'per_page'   => 50,
        'event_type' => 'recovery',
        'date_from'  => gmdate( 'Y-m-d', strtotime( '-30 days' ) ),
    )
);

// array( 'records' => [...], 'total' => 4, 'page' => 1, 'per_page' => 50, 'total_pages' => 1 )

foreach ( $page['records'] as $record ) {
    // $record->user_display_name, $record->event_type, $record->device,
    // $record->ip_address, $record->created_at
}
Recovery sign-ins are worth alerting on, because a customer who used one has lost a device:
add_action( 'my_plugin_daily_check', function () {
    $recent = BPL_Activity_Log::get_entries(
        array(
            'event_type' => 'recovery',
            'date_from'  => gmdate( 'Y-m-d' ),
            'per_page'   => 100,
        )
    );

    if ( $recent['total'] > 0 ) {
        wp_mail(
            get_option( 'admin_email' ),
            'Recovery codes used today',
            sprintf( '%d recovery sign-ins were recorded today.', $recent['total'] )
        );
    }
} );
BPL_Activity_Log::get_stats() returns the figures behind the Analytics tab, cached in a transient for five minutes.
$stats = BPL_Activity_Log::get_stats();

$adoption = $stats['total_users'] > 0
    ? round( $stats['enrolled_users'] / $stats['total_users'] * 100 )
    : 0;

// $stats['recent_30_days'], $stats['by_event_type'], $stats['user_passkeys']
Settings and role policy helpers
BPL_Main exposes the settings and the role rules that the login handler itself uses, so your code can ask the same questions and get the same answers.
$settings = BPL_Main::get_settings();          // merged with schema defaults
$enabled  = 'yes' === $settings['enabled'];

BPL_Main::is_role_allowed( 'customer' );        // may this role register a passkey?
BPL_Main::is_role_required( 'shop_manager' );   // is a passkey mandatory for it?

$user = wp_get_current_user();
BPL_Main::is_user_role_allowed( $user );        // any of the user's roles allowed?
BPL_Main::is_user_passkey_required( $user );    // any of the user's roles required?
Writing settings goes through the schema, so a value outside its range is clamped rather than stored:
$settings = BPL_Main::get_settings();
$settings['verification_timeout'] = BPL_Main::sanitize_setting( 'verification_timeout', 900 ); // 300

update_option( 'bpl_settings', $settings );
Prefer the update-settings ability or POST /settings where you can, since both apply the same sanitisation and the lockout guard on top.
Adding a passkey column to the Users screen
Everything above composes into the sort of admin view a rollout actually needs.
add_filter( 'manage_users_columns', function ( $columns ) {
    $columns['passkeys'] = __( 'Passkeys', 'my-plugin' );
    return $columns;
} );

add_filter( 'manage_users_custom_column', function ( $output, $column, $user_id ) {
    if ( 'passkeys' !== $column ) {
        return $output;
    }

    $store = new BPL_Credential_Store();
    $count = $store->get_count_by_user( $user_id );

    if ( 0 === $count ) {
        $user     = get_userdata( $user_id );
        $required = $user && BPL_Main::is_user_passkey_required( $user );

        return $required
            ? '<span style="color:#b32d2e">' . esc_html__( 'Required, none set', 'my-plugin' ) . '</span>'
            : esc_html__( 'None', 'my-plugin' );
    }

    return sprintf(
        /* translators: %d: number of registered passkeys. */
        esc_html( _n( '%d passkey', '%d passkeys', $count, 'my-plugin' ) ),
        $count
    );
}, 10, 3 );
REST routes
↑ Back to topAll routes sit under the bpl/v1 namespace and follow the usual WordPress REST API conventions.
| Route | Method | Access |
|---|---|---|
/register/options | POST | Signed in, and passkey login enabled |
/register/verify | POST | Signed in, and passkey login enabled |
/authenticate/options | POST | Public, requires passkey login enabled |
/authenticate/verify | POST | Public, requires passkey login enabled |
/credentials | GET | Signed in |
/credentials/(?P<id>\d+) | DELETE | Signed in, must own the credential |
/credentials/(?P<id>\d+)/toggle | PATCH | Signed in, must own the credential |
/recovery/verify | POST | Public, requires passkey login enabled |
/recovery/regenerate | POST | Signed in |
/admin/stats | GET | manage_options |
/admin/activity | GET | manage_options |
/admin/activity/export | GET | manage_options |
/admin/users/(?P<user_id>\d+)/passkeys | GET | manage_options |
/admin/users/(?P<user_id>\d+)/recovery-codes | DELETE | manage_options |
/settings | GET, POST | manage_options |
Credential management deliberately stays reachable when passkey login is switched off, so that disabling the feature does not leave users holding credentials they can see but cannot remove.
From admin JavaScript, @wordpress/api-fetch carries the nonce for you:
import apiFetch from '@wordpress/api-fetch';

const credentials = await apiFetch( { path: '/bpl/v1/credentials' } );

await apiFetch( {
    path: `/bpl/v1/credentials/${ credentials[ 0 ].id }/toggle`,
    method: 'PATCH',
    data: { is_active: false },
} );
From outside the browser, authenticate with an application password belonging to an administrator. See the REST handbook on authentication.
# Adoption figures.
curl -u "admin:xxxx xxxx xxxx xxxx xxxx xxxx" \
  https://example.com/wp-json/bpl/v1/admin/stats

# Recovery sign-ins in the last week, as JSON.
curl -u "admin:xxxx xxxx xxxx xxxx xxxx xxxx" \
  "https://example.com/wp-json/bpl/v1/admin/activity?event_type=recovery&date_from=2026-08-24&per_page=100"

# The same window as a CSV download.
curl -u "admin:xxxx xxxx xxxx xxxx xxxx xxxx" \
  "https://example.com/wp-json/bpl/v1/admin/activity/export?event_type=recovery&date_from=2026-08-24" \
  -o passkey-recovery.csv
POST /settings writes the whole option. Any key absent from the request is reset to its schema default rather than left alone, so read first, merge, then send the full object:
$settings = BPL_Main::get_settings();
$settings['max_passkeys_per_user'] = 10;

$response = wp_remote_post(
    rest_url( 'bpl/v1/settings' ),
    array(
        'headers' => array(
            'Content-Type' => 'application/json',
            'X-WP-Nonce'   => wp_create_nonce( 'wp_rest' ),
        ),
        'body'    => wp_json_encode( $settings ),
    )
);
The update-settings ability accepts partial payloads and merges instead, if that suits your caller better.
Rate limiting
↑ Back to topPer-IP limits are enforced with transients inside the endpoint callbacks: 10 requests per minute to /authenticate/options, and 5 per minute to /authenticate/verify and /recovery/verify. Exceeding either returns HTTP 429.
Recovery sign-in adds a per-account throttle on top: 10 failed attempts trigger a 900-second cooling-off period. The throttle key is derived from the submitted login rather than a resolved user ID, so unknown and known accounts behave identically and the lockout cannot be used for user enumeration. Constants live on BPL_Rest_API as RECOVERY_MAX_ATTEMPTS and RECOVERY_LOCKOUT.
The IP used for bucketing comes from BPL_Main::get_client_ip(), so a site behind a proxy needs bpl_trusted_proxy_headers set correctly or every visitor shares one bucket.
Settings schema
↑ Back to topSettings live in the single bpl_settings option. BPL_Main::get_default_settings() is the canonical schema, and every write path runs through BPL_Main::sanitize_setting().
| Key | Type | Default | Range |
|---|---|---|---|
enabled | boolean (yes/no) | no | |
button_text | text | empty | |
max_passkeys_per_user | integer | 5 | 1 to 20 |
recovery_code_count | integer | 8 | 4 to 16 |
user_verification | select | preferred | required, preferred, discouraged |
verification_timeout | integer (seconds) | 60 | 15 to 300 |
attestation_type | select | none | none, direct, indirect |
role_settings | array keyed by role slug | empty | each with allowed and required booleans |
activity_log_enabled | boolean | yes | |
activity_log_retention_days | integer | 90 | 0 to 365, where 0 means keep indefinitely |
passkey_only_mode | boolean | no | |
woocommerce_enabled | boolean | yes | |
abilities_enabled | boolean | yes | |
custom_css | css | empty |
Integer values outside their range are clamped server-side rather than rejected, because the settings endpoint accepts values from clients that never touch the admin app. Note that activity_log_retention_days has a schema floor of 0 while the admin field enforces a minimum of 7; 0 is a valid stored value meaning indefinite retention, and cleanup_old_activity_logs() honors it by bailing out.
role_settings is keyed by role slug, and an empty array is the unconfigured state in which every role may register:
$settings = BPL_Main::get_settings();

$settings['role_settings'] = array(
    'administrator' => array( 'allowed' => true, 'required' => true ),
    'shop_manager'  => array( 'allowed' => true, 'required' => true ),
    'customer'      => array( 'allowed' => true, 'required' => false ),
);

update_option( 'bpl_settings', $settings );
Writing that directly skips the lockout guard, so confirm you hold a passkey for any role you mark required before you run it.
Other options: bpl_version, bpl_db_version, and the transient bpl_flush_rewrite_rules.
Database tables
↑ Back to topThree tables, all prefixed with $wpdb->prefix.
bpl_credentials: one row per registered passkey, holdinguser_id,credential_id,public_key,sign_count,device_name,is_active,created_at, andlast_used_atbpl_activity_log:user_id,event_typeas an enum ofregistration,authentication,recovery, anddeletion,credential_id,ip_address,user_agent, andcreated_atbpl_recovery_codes:user_id,code_hash,is_used,used_at, andcreated_at
Schema changes are gated on the BPL_DB_VERSION constant, which is separate from BPL_VERSION. BPL_Activator::maybe_upgrade() compares it against the stored bpl_db_version option on load and re-runs dbDelta() when they differ, which is what carries schema changes to sites that update in place rather than reactivating. Bump BPL_DB_VERSION, not BPL_VERSION, when you change a table definition.
Query the tables through the PHP API where you can. Where you cannot, always prepare, and read the table name from the prefix:
global $wpdb;

$table = $wpdb->prefix . 'bpl_credentials';

// phpcs:ignore WordPress.DB.PreparedSQL.InterpolatedNotPrepared -- table name from $wpdb->prefix.
$stale = $wpdb->get_col(
    $wpdb->prepare(
        "SELECT DISTINCT user_id FROM `{$table}` WHERE last_used_at IS NULL AND created_at < %s",
        gmdate( 'Y-m-d H:i:s', strtotime( '-90 days' ) )
    )
);
uninstall.php drops all three tables, deletes the plugin options, and clears every bpl_ transient.
Scheduled events
↑ Back to topThree WP-Cron events, registered on activation and cleared on deactivation:
bpl_cleanup_challenges, hourly, removes expired WebAuthn challenge transientsbpl_cleanup_activity_log, daily, deletes activity rows older thanactivity_log_retention_days, and returns immediately when that value is below 1bpl_cleanup_recovery_codes, daily, deletes used recovery codes older than 30 days
Sites that have disabled WP-Cron in favour of a system cron entry get the same result, since all three are ordinary scheduled hooks.
Template overrides
↑ Back to toptemplates/woocommerce/myaccount-passkeys.php is loaded through wc_get_template() with a template path of biometric-passkey-login/. Copy it to yourtheme/biometric-passkey-login/myaccount-passkeys.php to override it, following WooCommerce’s usual template structure.
The template receives $user, $settings, $max_passkeys, $credentials, $limit_reached, $recovery_count, $role_allowed, and $passkey_required.
<?php
/**
 * yourtheme/biometric-passkey-login/myaccount-passkeys.php
 */

defined( 'ABSPATH' ) || exit;

if ( ! $role_allowed ) {
    echo '<p>' . esc_html__( 'Passkeys are not available on this account.', 'yourtheme' ) . '</p>';
    return;
}
?>

<h2><?php esc_html_e( 'Sign in without a password', 'yourtheme' ); ?></h2>

<?php if ( $passkey_required && empty( $credentials ) ) : ?>
    <div class="woocommerce-info">
        <?php esc_html_e( 'Your account requires a passkey. Add one below to keep access.', 'yourtheme' ); ?>
    </div>
<?php endif; ?>

<p>
    <?php
    printf(
        /* translators: 1: registered passkeys, 2: maximum allowed. */
        esc_html__( 'You have registered %1$d of %2$d passkeys.', 'yourtheme' ),
        count( $credentials ),
        (int) $max_passkeys
    );
    ?>
</p>

<?php // Then keep the plugin's own markup for the list and the buttons. ?>
Output from the My Account endpoint passes through a whitespace-collapsing step before it is echoed, because the markup lands inside page content where wpautop() would otherwise turn newlines into stray <br> tags. Inside the flex-layout passkey button each of those became a flex item and displaced the icon and label.
Styling the passkey button
↑ Back to topWhatever you put in Custom CSS on the General tab is stripped of HTML tags and printed as an inline stylesheet on the login screen and on the WooCommerce pages carrying passkey controls. The classes worth knowing:
| Class or ID | Where |
|---|---|
.bpl-passkey-button | The sign-in button, everywhere it appears |
.bpl-register-button | The registration button rendered by [bpl_register] |
.bpl-login-shortcode | Wrapper div around [bpl_login] |
.bpl-register-shortcode | Wrapper div around [bpl_register] |
#bpl-passkey-login | The passkey section on wp-login.php |
#bpl-recovery-form | The recovery code panel on wp-login.php |
.bpl-passkey-button {
    background: #1a1a1a;
    border-radius: 999px;
    font-weight: 600;
    letter-spacing: 0.01em;
}

.bpl-passkey-button:hover {
    background: #333;
}

/* Give the login-screen section room to breathe. */
#bpl-passkey-login {
    margin-block: 1.25rem;
}
One catch on the WordPress login screen: the button there also carries core’s button-primary class, and core styles that as .wp-core-ui .button-primary, which out-specifies a rule written against .bpl-passkey-button on its own. Colour and background changes land on the storefront but not on wp-login.php unless you match that specificity.
/* Storefront only. */
.bpl-passkey-button { background: #1a1a1a; }

/* Storefront and the WordPress login screen. */
.bpl-passkey-button,
.wp-core-ui .bpl-passkey-button { background: #1a1a1a; }
For anything beyond colour and spacing, enqueue a real stylesheet instead. login_enqueue_scripts covers wp-login.php, and wp_enqueue_scripts covers the storefront.
add_action( 'login_enqueue_scripts', function () {
    wp_enqueue_style(
        'my-theme-passkey',
        get_stylesheet_directory_uri() . '/css/passkey-login.css',
        array(),
        '1.0.0'
    );
} );
Abilities
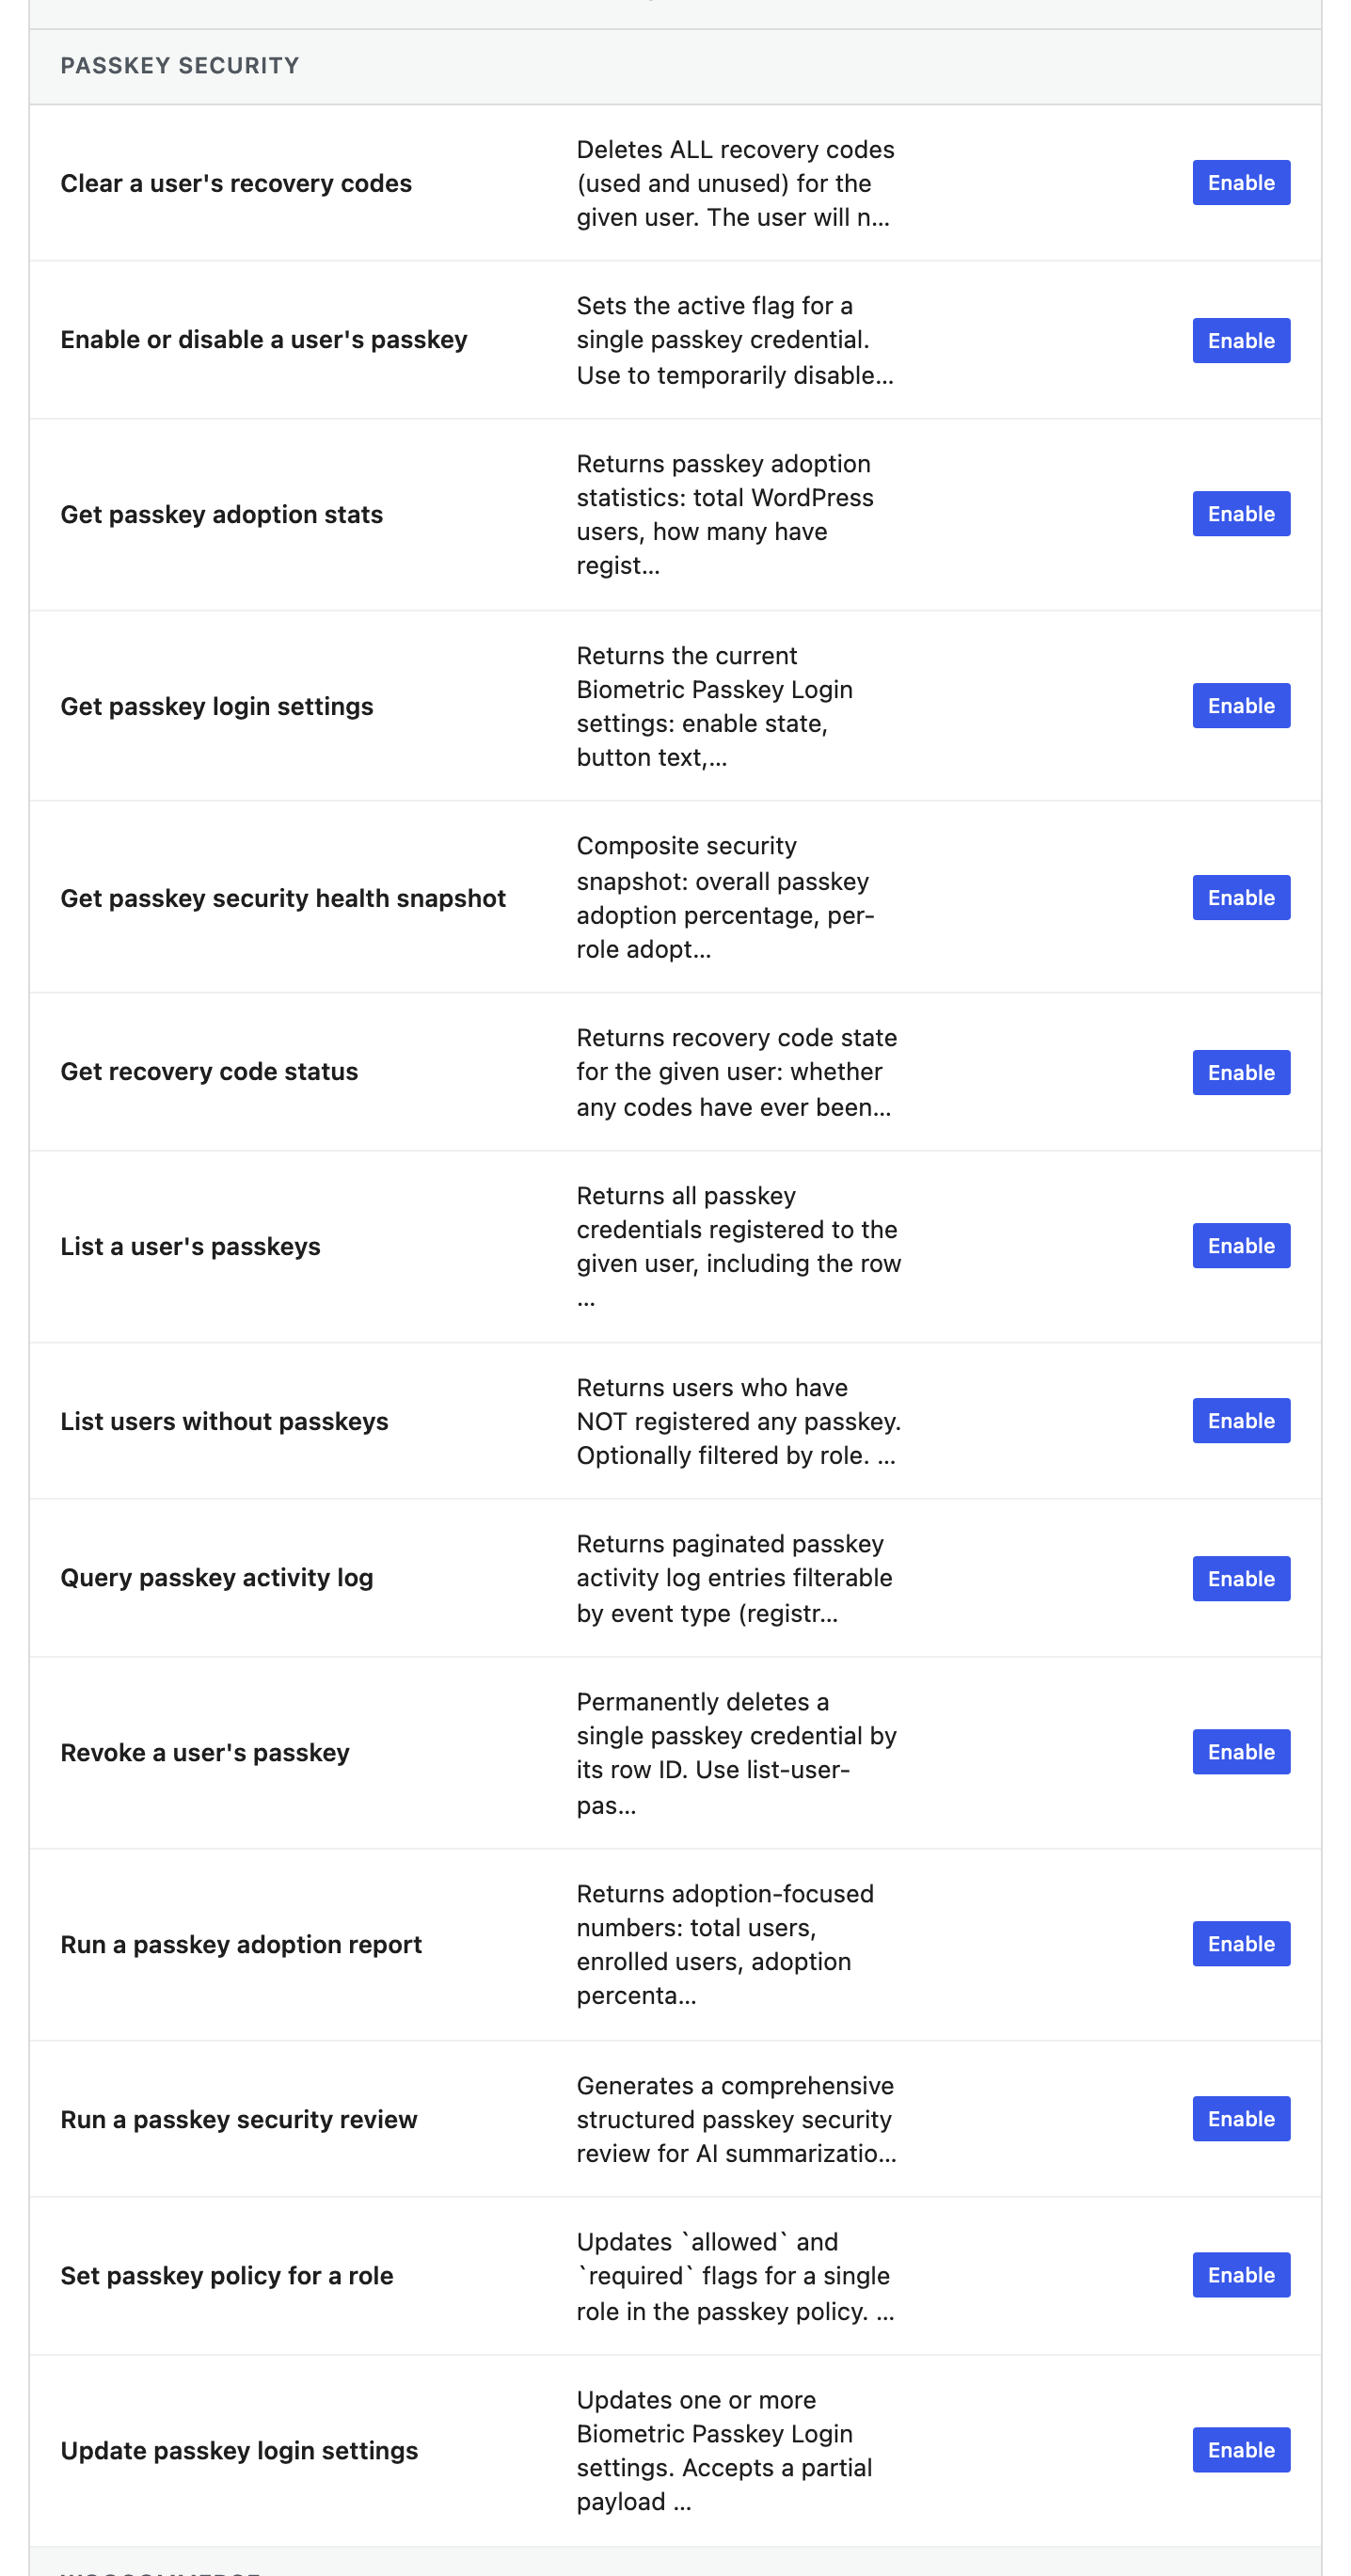
↑ Back to topThe plugin registers fourteen abilities with the WordPress Abilities API, all in the biometric-passkey-login namespace and the passkey-security category. This is what an AI assistant connected over MCP can actually do, and it is the same surface described under AI assistant access on the Security tab.
Registration is conditional on two things: wp_register_ability() being available, and the abilities_enabled setting being yes. When either is false nothing is registered, so an assistant sees no tools rather than tools that always fail.
Every ability, reads included, is gated on manage_options through BPL_Ability_Trait::require_cap(). That capability is deliberate rather than manage_woocommerce: WooCommerce grants manage_woocommerce to shop_manager, which would put authentication controls in the hands of a storefront role, and nothing outside WooCommerce grants it at all, which would leave every ability unreachable on a standalone install. The permission callback returns a plain boolean rather than a WP_Error, because core discards a WP_Error from a permission callback and calls _doing_it_wrong() on the way past.
Read abilities
| Ability | Input | Returns |
|---|---|---|
get-settings | none | Effective settings merged with defaults, plus the per-key type and default metadata that describes what update-settings will accept. custom_css is returned verbatim |
get-stats | none | Total users, enrolled users, authentication events in the last 30 days, lifetime counts by event type, and a per-user passkey summary capped at 50 rows ordered by user ID |
query-activity-log | page, per_page (max 100), event_type, user_id, date_from, date_to, all optional | A page of log entries with the user, event type, credential fingerprint, parsed device string, truncated IP address, and timestamp, plus paging totals and a redacted flag. Dates are YYYY-MM-DD in UTC |
list-user-passkeys | user_id, required | Every passkey on that account with its row ID, credential fingerprint, device name, active flag, sign counter, creation date, and last use. The row ID is what the write abilities take |
list-users-without-passkeys | role, limit (default 100, max 500), both optional | Users with no passkey registered, with login, display name, masked email, and roles. Filter by role to find privileged accounts still on passwords |
get-recovery-code-status | user_id, required | Whether any codes have ever been generated for that user, how many remain unused, and when the active set was created. The codes themselves are hashed and cannot be retrieved |
get-security-health | none | A composite snapshot: overall adoption, per-role adoption with a passkey_required flag on each role, recovery code coverage, and the specific users in required roles who have no passkey |
Write abilities
| Ability | Input | Effect | Annotations |
|---|---|---|---|
update-settings | settings, an object holding any subset of the settings keys | Merges the given keys over the current option and leaves the rest alone, unlike POST /settings. Each value is sanitized against the schema. Unknown keys and an empty payload are both rejected with an error naming the problem. Returns the keys it changed and the new effective settings | Not readonly, idempotent, not destructive |
set-role-passkey-policy | role, allowed, required, all three required | Sets both flags for one role and preserves every other role’s policy. Returns the role, the two flags, and the full policy map | Not readonly, idempotent, not destructive |
toggle-user-passkey | credential_row_id, is_active, both required | Enables or disables a single passkey without deleting it, which is the right response to a device that has gone missing but might come back. Writes nothing to the activity log, because no authentication event occurs | Not readonly, idempotent, not destructive |
revoke-user-passkey | credential_row_id, required | Permanently deletes one passkey credential and records a deletion event in the activity log. Cannot be undone; the user has to register the device again | Not readonly, not idempotent, destructive |
clear-user-recovery-codes | user_id, required | Deletes every recovery code for that user, used and unused. Records a deletion event. The user regenerates a fresh set themselves afterwards. The typical trigger is codes having been exposed | Not readonly, idempotent, destructive |
Annotations come from BPL_Ability_Trait::meta(), which defaults every ability to readonly, idempotent, and non-destructive, and lets each write ability override what applies to it. MCP clients use these to decide what needs a confirmation prompt, so keep them accurate if you add an ability.
Composite reports
| Ability | Input | Returns |
|---|---|---|
get-security-review | none | The one-call security report. Wraps get-security-health, adds the administrators who have no passkey, the 30-day authentication count, and a sample of up to 25 events from the last seven days. Built for an assistant to summarize in prose |
passkey-adoption-report | none | Adoption numbers on their own: total users, enrolled users, adoption percentage, registrations in the last 30 days, and a daily registration trend across that window. Use when you want the metrics without the wider security context |
Calling an ability from PHP
Abilities are not only for assistants. wp_get_ability() returns a WP_Ability, and execute() runs the permission callback first, so the caller must genuinely hold manage_options.
$ability = wp_get_ability( 'biometric-passkey-login/get-security-review' );

if ( $ability ) {
    $review = $ability->execute( array() );

    if ( ! is_wp_error( $review ) ) {
        // Same payload an assistant would receive.
    }
}
Write abilities take their input as an array, and the lockout guard applies here exactly as it does over MCP:
$policy = wp_get_ability( 'biometric-passkey-login/set-role-passkey-policy' );

$result = $policy->execute(
    array(
        'role'     => 'shop_manager',
        'allowed'  => true,
        'required' => true,
    )
);

if ( is_wp_error( $result ) ) {
    // e.g. the caller holds shop_manager and has no passkey registered.
    error_log( $result->get_error_message() );
}
update-settings merges, which makes it the safer way to change one value:
wp_get_ability( 'biometric-passkey-login/update-settings' )->execute(
    array(
        'settings' => array(
            'max_passkeys_per_user' => 10,
            'verification_timeout'  => 120,
        ),
    )
);
To discover what is registered, including abilities from other plugins:
foreach ( wp_get_abilities() as $ability ) {
    if ( 0 === strpos( $ability->get_name(), 'biometric-passkey-login/' ) ) {
        echo $ability->get_name() . ': ' . $ability->get_label() . "\n";
    }
}
Using the abilities over MCP
The Abilities API describes the tools; it does not expose them to anything. A bridge does that. On a WooCommerce store the tested bridge is MCP (Model Context Protocol), which enables WooCommerce’s MCP endpoint and adds the connection, tool pack, and logging screens around it. Its own documentation covers connecting Claude Desktop and ChatGPT.
The steps that matter for this plugin:
- Leave Allow AI assistants to manage passkeys ticked on the Security tab. While it is off, nothing is registered and no bridge can find the tools.
- In WooCommerce > Settings > MCP > Add tools, run the scan. This plugin’s abilities appear under the Passkey Security group.
- Enable the ones you want. A tool that is switched off is not offered to the assistant, and the limit is enforced when a tool runs rather than only hidden from the list.
- Connect under an API key whose user holds
manage_options. Every ability here checks that capability, so a key belonging to ashop_manageris refused on all fourteen.
Ability names are translated into MCP tool names by replacing / and - with underscores and prefixing ability_, so biometric-passkey-login/get-security-review is offered to the model as:
ability_biometric_passkey_login_get_security_reviewQuestions worth asking once it is connected:
- “Which administrators have no passkey registered?” runs
list-users-without-passkeyswithrole=administrator. - “Give me a passkey security review.” runs
get-security-review, the one call built to be summarised in prose. - “Has anyone used a recovery code in the last week?” runs
query-activity-logwithevent_type=recovery. - “Require passkeys for shop managers.” runs
set-role-passkey-policy, and is refused if it would lock the caller out. - “Revoke the passkey on Sam’s old laptop.” runs
list-user-passkeysto find the row ID, thenrevoke-user-passkey. The destructive annotation on that second call is what makes a well-behaved client confirm first.
Turning the setting off unregisters the abilities, at which point the bridge stops advertising them. Enabling it again re-registers them, though a bridge that caches its tool list may need a rescan.
What is deliberately absent
There is no ability to register a passkey and none to sign a user in. Both require a real browser and a real authenticator, and neither belongs on a token-authenticated connection where the caller is a script rather than a person at a device. No amount of assistant access can create a credential or produce a session.
Data that leaves your site
Ability output goes to a third-party model provider, so it is reduced first. IPv4 addresses are truncated to their network and IPv6 addresses to their first three groups, the local part of email addresses is masked, and raw user agents are dropped in favor of the parsed device string. Passkey public keys and raw credential identifiers are never included at all: where a credential needs to be identifiable across calls, a twelve-character hash of it stands in, which correlates query-activity-log records with list-user-passkeys rows without shipping the identifier itself.
Redaction is on by default and controlled by the bpl_abilities_redact_pii filter. The credential fingerprint is not covered by that filter and applies unconditionally, since no caller is better served by the raw value.
query-activity-log builds its records field by field rather than passing the query result through, so a column added to the table later cannot start leaving the site simply by existing.
The lockout guard
update-settings and set-role-passkey-policy both run guard_role_policy() against the settings as they would be saved, and refuse the write if it would strand the caller. The case it catches is requiring a passkey for a role the caller holds while the caller has none registered, which would cost them everything except the setup screen. The error names the roles involved and tells them to register a passkey first.
Requiring a passkey for roles the caller does not hold is a legitimate policy decision and goes through. So does turning passkey login off entirely: nothing is enforced while the plugin is disabled, because BPL_Login_Handler returns early from its constructor and never hooks authenticate, admin_init, or template_redirect. A policy set while the plugin is off becomes live only when someone enables it, and enabling runs back through the same guard with the merged settings, so the lockout is still caught at the point it would actually happen.
Note that the guard lives on the ability layer. Writing bpl_settings directly with update_option(), as in the settings schema example above, bypasses it.
Registration timing
BPL_Abilities_Bootstrap::init() is called on plugins_loaded, not init. Both ability registries are lazy singletons, and core fires wp_abilities_api_init the first time anything asks for one, which can be any point from init onwards. Subscribing from an init callback is a race: anything touching the registry at a lower priority fires the hook before the listener exists, and the abilities silently never register.
If you register abilities of your own alongside these, hook the same way:
add_action( 'plugins_loaded', function () {
    add_action( 'wp_abilities_api_init', 'my_plugin_register_abilities' );
} );
Privacy
↑ Back to topBPL_Privacy::init() registers an exporter and an eraser, both labelled “Passkeys and sign-in history”, against wp_privacy_personal_data_exporters and wp_privacy_personal_data_erasers. The exporter returns three groups: registered passkeys, recovery code status, and sign-in history. Public keys, credential identifiers, and recovery code hashes are excluded by design.
Logging
↑ Back to topThe plugin does not write to WooCommerce > Status > Logs and registers no logger source. Its record of events is the bpl_activity_log table, surfaced on the Activity Log tab and exportable as CSV from there, through GET /admin/activity/export, or through the query-activity-log ability.
Other notes
↑ Back to topThere are no WP-CLI commands and no registered blocks.
The Relying Party identifier is derived from the host of home_url(), and the Relying Party name from the site title. Changing your site’s domain invalidates every registered passkey, since credentials are bound to the origin they were created against. Plan a domain migration on the assumption that everyone re-enrols.
Supported signature algorithms are ES256 and RS256. Resident keys are requested as preferred, which is what makes usernameless sign-in work.
The vendored WebAuthn implementation is web-auth/webauthn-lib, under vendor/.

