Partial Deposits
↑ Back to topThe Partial Deposits addon, which is part of the Enterprise license of the WooCommerce Booking and Appointment plugin, allows you to pay only a part of the price of the product or service when purchasing it.
This addon lets you decide and set up the partial payment.
It provides three types of deposit payments: Flat Amount, Security, Deposit, and Percentage. The admins can set the partial payment amount as per their needs.
- Installation
- Setting up a partial deposit addon on a product
- Percentage Method
- Flat Amount Method
- Security Deposit Method
- Allow Full Payment when Booking
- Only Full Payment within X days from today
- Default Payment Type
- Front end
- Quick Start Guide & Tips
1. Installation
↑ Back to topDownload the zip file and install it from the Plugins > Add New Plugin.
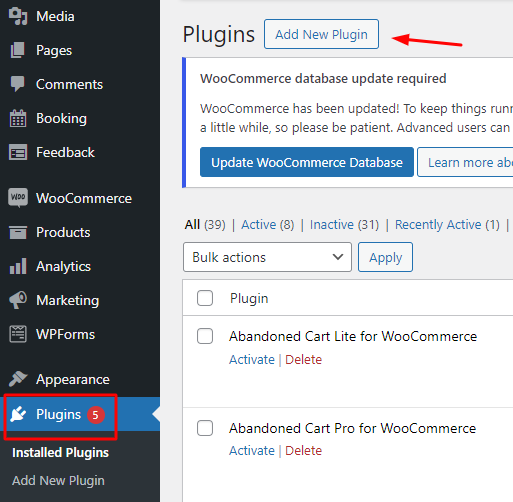
Activate the plugin in your WordPress admin area.

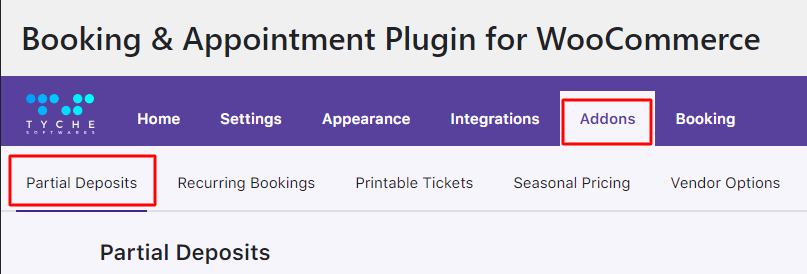
The other settings related to the deposits addon will be available under Booking and Appointment > Addons > Partial Deposits Addon tab > Settings dropdown.
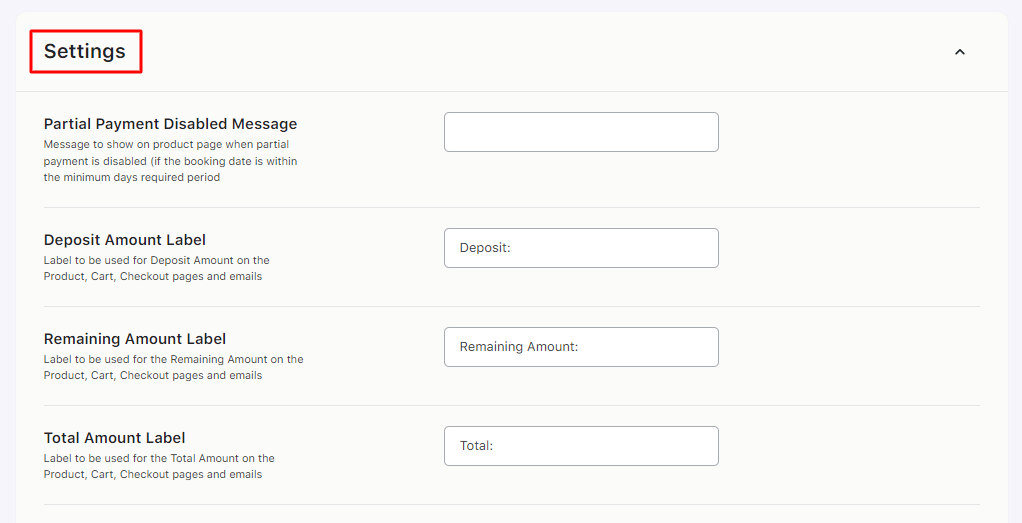
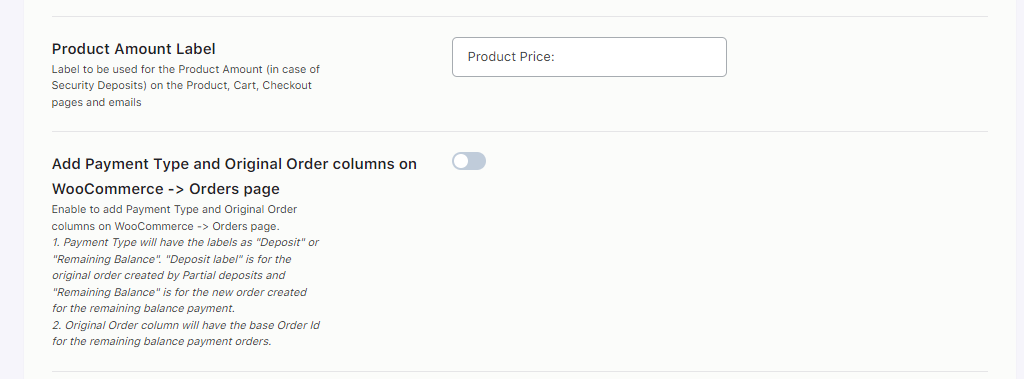
Here, you can set different labels and messages that will be displayed to the customers on the front end.
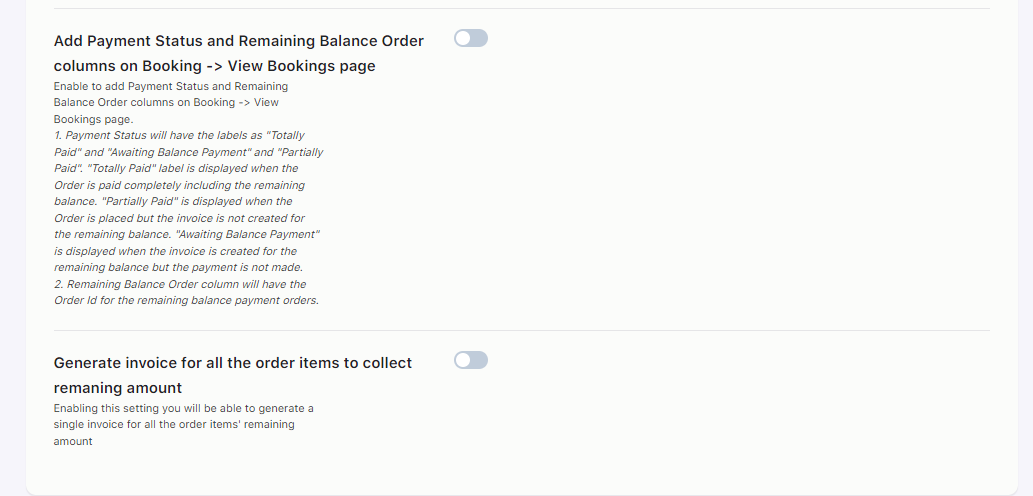
Along with this, you can enable a few settings. They are:
- Adding Payment Type and Original Order columns on the Order Page
- Adding Payment Status and Remaining Balance Order columns on the View Bookings page
- Generating a single invoice for all the order items’ remaining amount
Once done, click on the Save Changes button.
2. Setting up the Partial Deposit addon for a product
↑ Back to topTo set up the Partial Deposit add-on for specific bookable products, you will have to go to the Edit Page for that particular product.
Go to Products > All Products > Select a product > Edit Product.
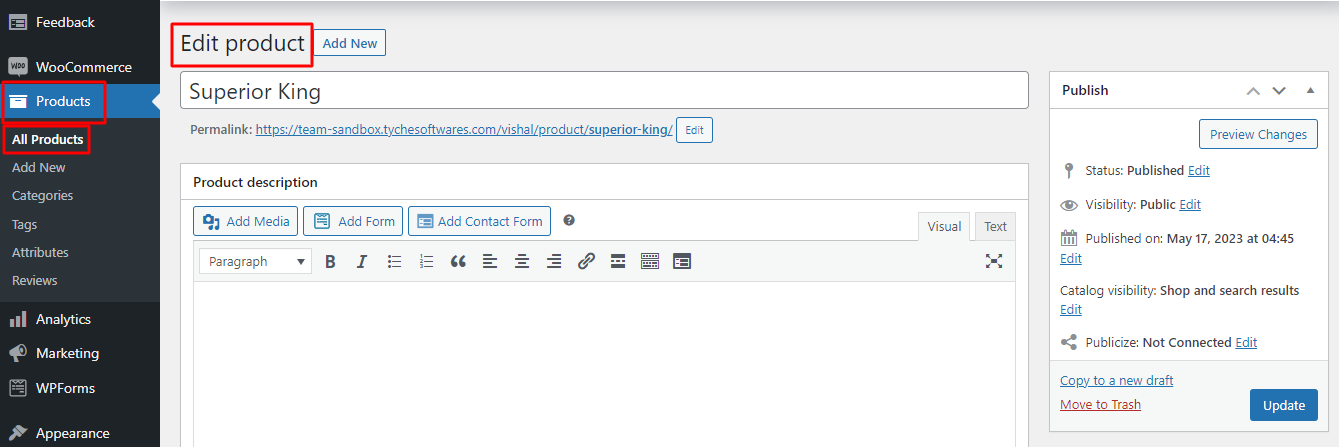
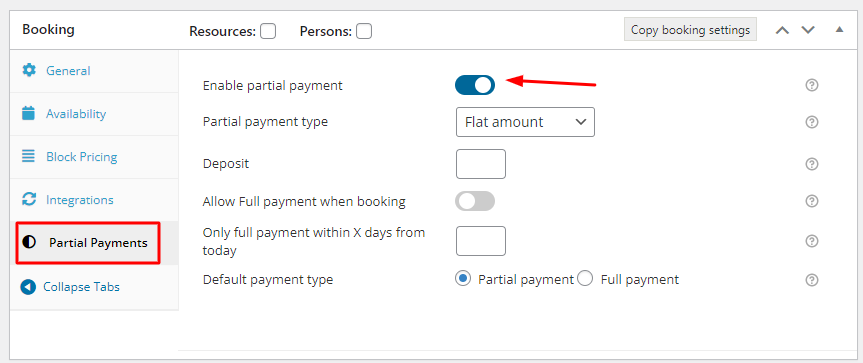
Scroll down to find the Booking meta box and click the Partial Payments tab.
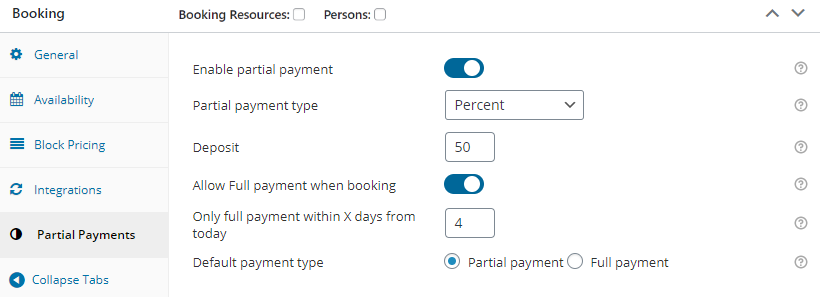
Enable the partial payment addon by sliding the toggle as shown here:
Here, you will find 3 methods to set up the addon: Percentage, Flat Amount and Security Deposit.
3. Percentage Method
↑ Back to topIn this method, the Percentage type of payment will let you select a particular percentage of the base price that will be charged while booking the product/service.
You have to select the Percentage option from the drop-down and put the percentage in the Deposit option’s box shown below.

For instance, if you input 20 in the box, it will claim 20% as a partial payment from customers while booking the product or service.
4. Flat Amount Method
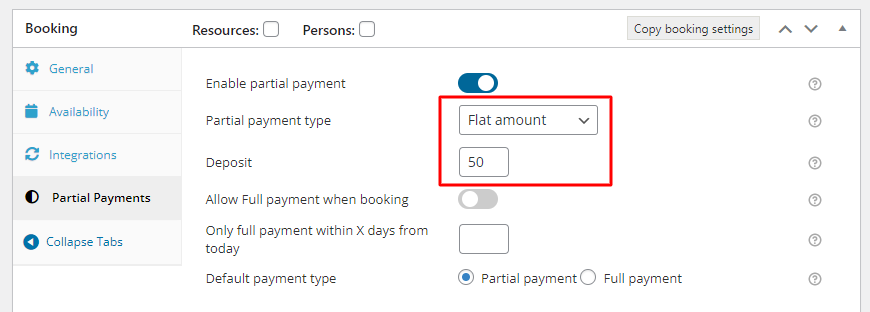
↑ Back to topIn this method, the admin can set a particular amount that would be paid by the customer while placing the order.
For example, you have set $50 as the partial payment amount.
So now, when the customer books the service for a total charge of $200, the customer has to pay $50 while booking the product/service.
They can pay the remaining $150 later.
5. Security Deposit Method
↑ Back to topIn this method, the admin can ask for a security deposit along with the booking payment. The security deposit amount is added to the payment.
This amount is added only once, whether it is for a single-day or multiple-day booking.
This means that for multiple-night bookings, the security deposit won’t be multiplied by the number of nights.
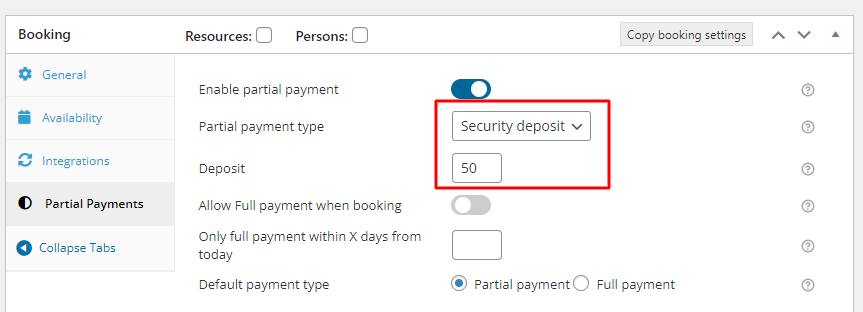
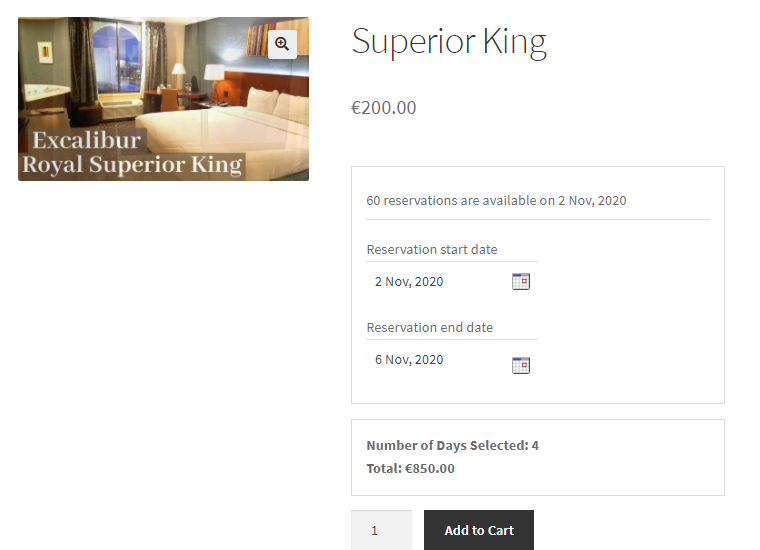
In the below example, the price for one night is €200, and the selected period is for 4 nights.
Thus, €200 x 4 = €800.
The security deposit is €50 so the total price is €800 + €50 = €850
6. Allow Full Payment when Booking
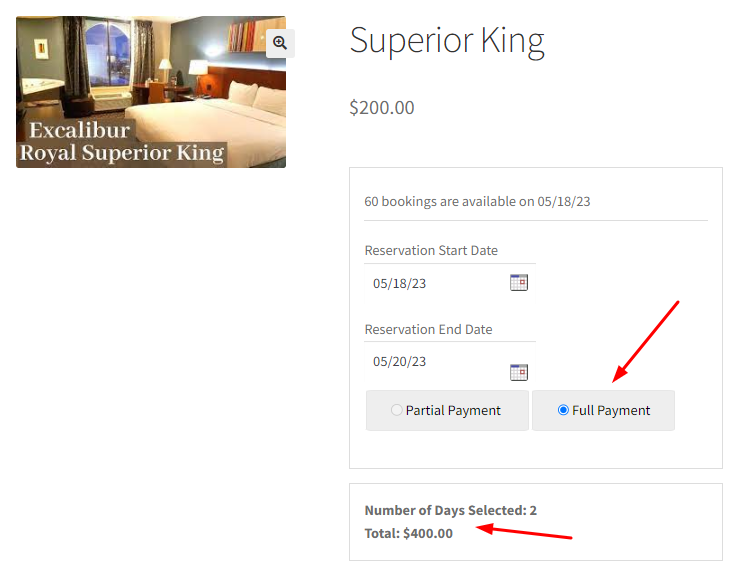
↑ Back to topThe ‘Allow Full Payment when Booking’ method will let customers select the ‘Full Payment’ option from the product page.
They can either choose to pay the partial deposit or the full payment.

7. Only Full Payment within X days from today
↑ Back to topThis setting allows the admin to ask for full payment only if the booking date is within the number of days mentioned in it.
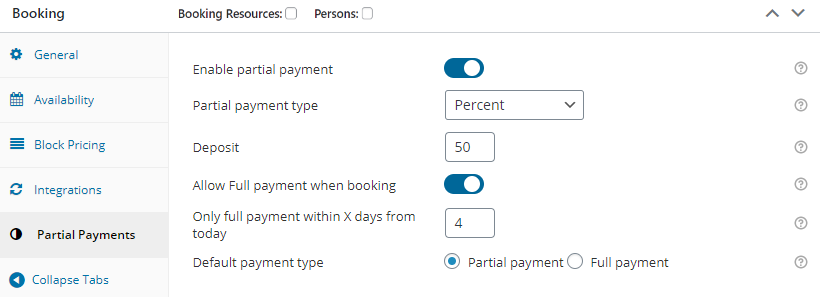
For instance, you can set the number of days to 4.
This means that if the customer selects the booking date within the next 4 days, they won’t be able to select a partial payment method.
They will be forced to pay the full amount for the booking.
8. Default Payment Type
↑ Back to topThis setting allows the admin to select the default payment type.
This means that if ‘Partial Payment’ is selected in the setting, then it will be the default selection on the product page.
If ‘Full Payment’ is selected, then the default selected type on the product page will be ‘Full Payment’.
9. Front End
↑ Back to topOn the front end, you can have any booking method. This add-on is compatible with any booking setup using the WooCommerce Booking and Appointment Plugin.
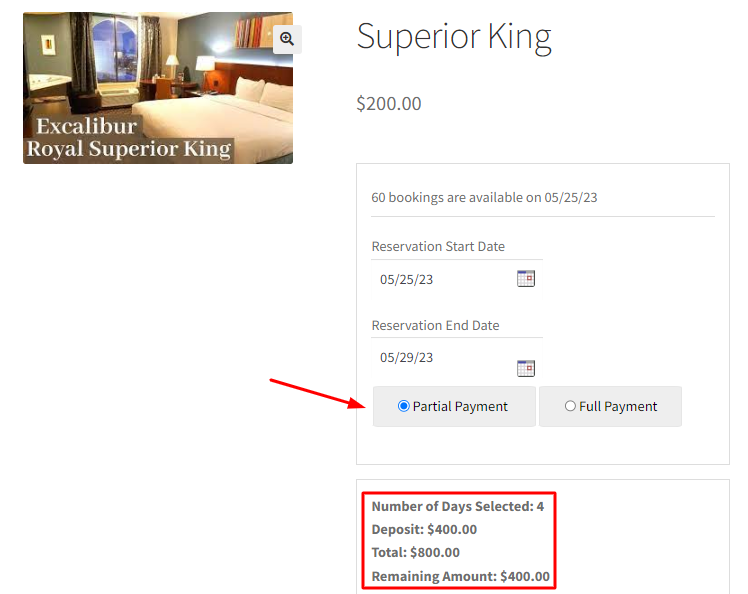
Let’s go with a multiple nights setup. The customer has selected dates from 25th May 2023 to 29th May 2023.
The partial payment is set as a percentage, and the percentage set is 50%.
The base product price is $200 per night, so the total price is $800 for 4 nights.
As the partial payment type is selected as mentioned above, therefore the price shown on the product is 50% of the total price which is $400.
Cart Page
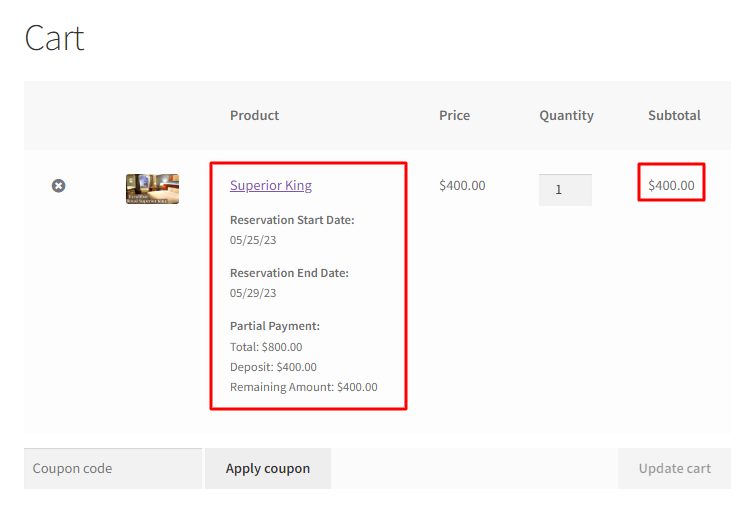
On the Cart page, the Booking details will be displayed along with the Partial payment details.
These details include the Total Amount to be paid, the Partial Payment made as a deposit while booking, and the remaining amount to be paid later.
Checkout
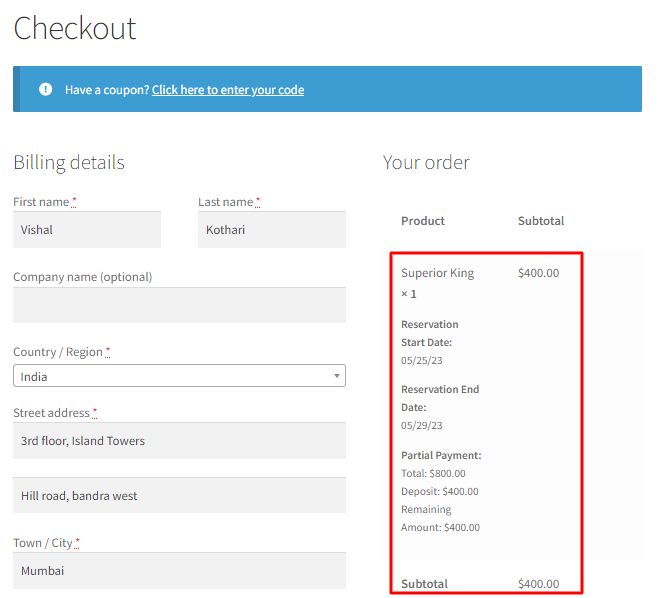
On the checkout page, the partial deposit details are displayed along with the other booking details.

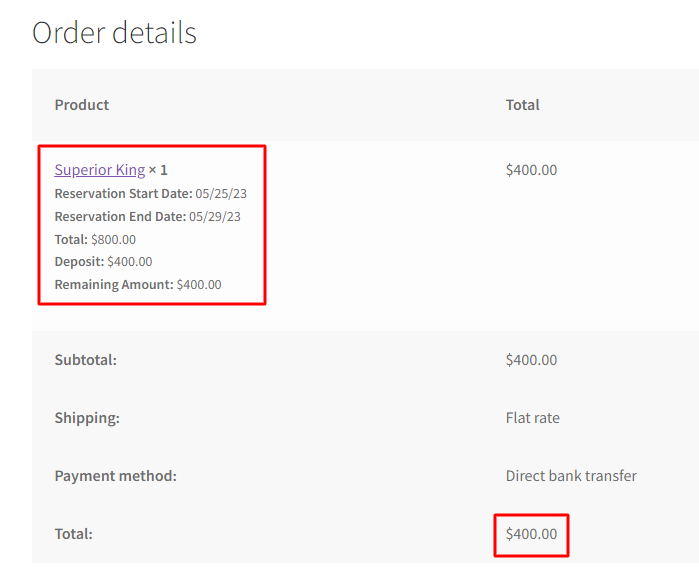
Order details page
On the Order details page, the customer is provided with the Partial payment along with the other booking details.
Customer Email Notification
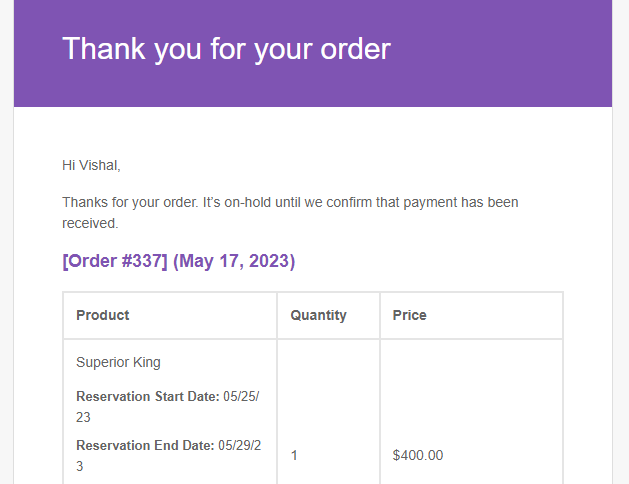
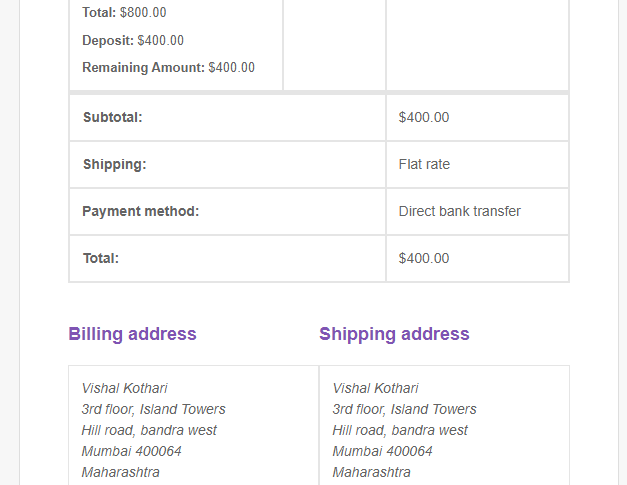
Customers can view the partial payment details in the email notification they receive after placing the order.
This would help them keep track of the partial payment made and when to pay the rest of the pending amount.

View Bookings page
The Booking and Appointment > Booking > View Bookings page is available to the admin to view all the booking details.
It displays the amount paid by the customer. In this case, it is a partial payment.

Edit Order page
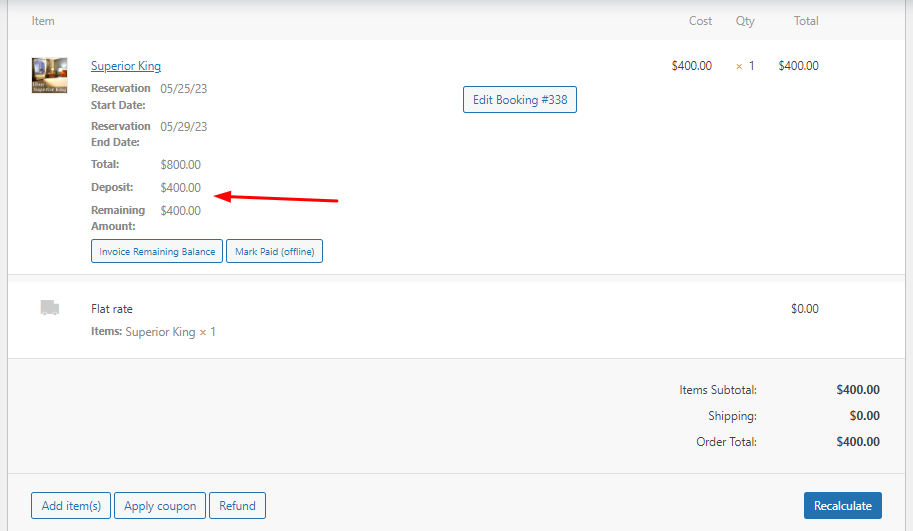
The Edit Order page is accessible by the admin to see the details of the partial payment.
The total amount of the product, the amount paid while booking, and the amount remaining to be paid are all mentioned here.
10. Quick Start Guide & Tips
↑ Back to top- While setting up the partial deposit addon, always keep the addon active
- You will have to make the setup for different products because deposits for different products might be different
- Always select the Payment type while setting the Partial Payment for a product
- Never leave the Amount/Percent field blank because the deposit will not be available on the product
- This addon is compatible with any of the booking methods with WooCommerce Booking and Appointment Plugin
Recurring Bookings
↑ Back to topThe Recurring Bookings addon which is part of the Business license of the WooCommerce Booking and Appointment plugin, allows customers to create recurring bookings with the help of the WooCommerce Subscriptions plugin.
3. Setting up recurring bookings with different booking types
5. Reschedule bookings for a subscription
1. Pre-requisites
↑ Back to topThe Recurring Bookings addon requires the following to be installed:
2. Installation
↑ Back to topDownload the zip file and install it from the Plugins > Add New Plugin.
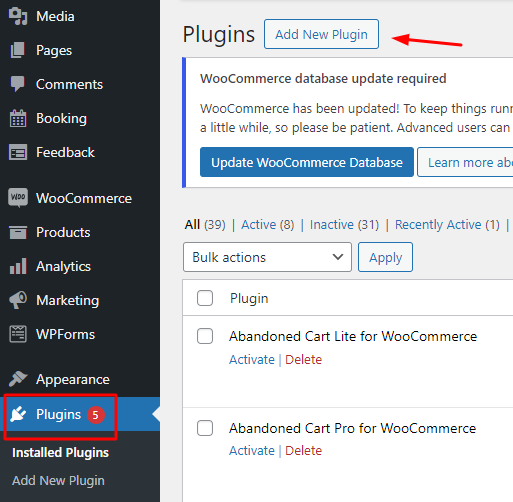
Activate the plugin in your WordPress admin area.

Go to Booking and Appointment > Addons > Recurring Bookings > Settings.
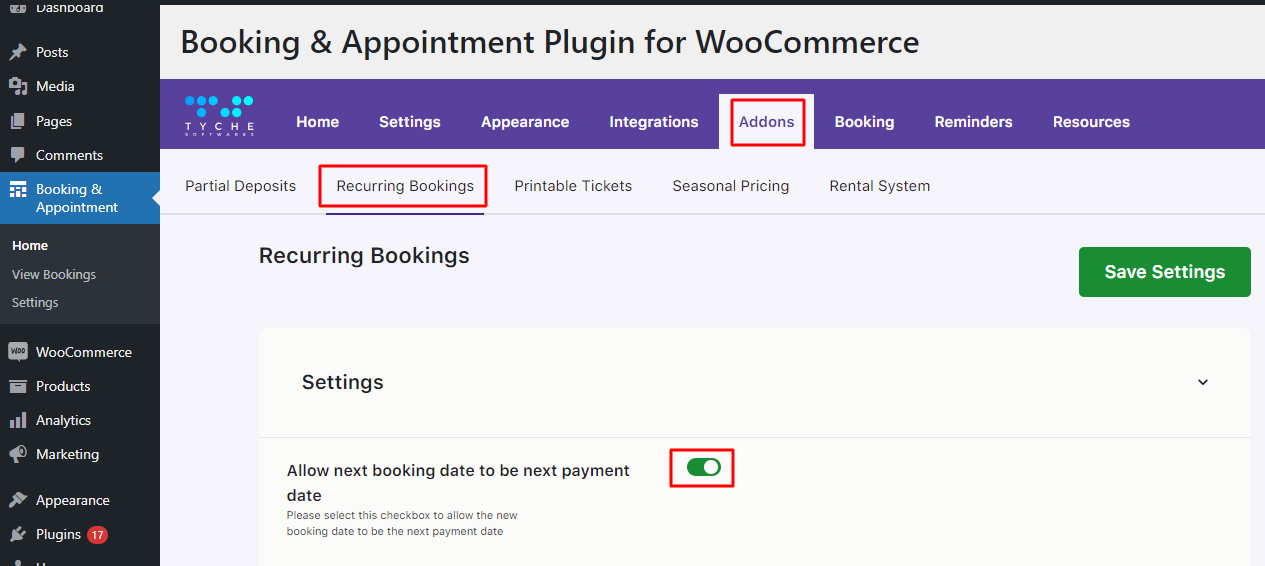
Here you can enable allowing the next booking date to be the next payment date.
3. Setting up recurring bookings with different booking types
↑ Back to topThe Booking and Appointment has different types of bookings.
These booking types can be used to create recurring bookings with your Simple Subscriptions as well as Variable Subscriptions.
Let’s consider an example of a recurring booking for the booking type Fixed Time for a simple subscription.
Let’s say that we offer piano lessons every week on an hourly basis.
You will have to create a Simple Subscription with the help of the WooCommerce Subscription plugin as shown below:
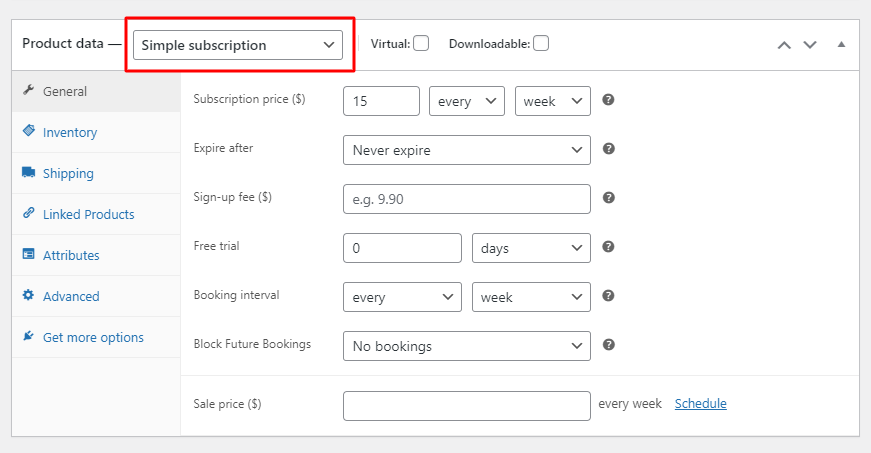
Simple Subscription
You have to ensure that your simple subscription charges a price of $15 every week & that it expires Never.
Set the Booking interval as ‘every week’. This would be different from your subscription order interval and essentially the interval that you would be creating for your bookings.
You can even Block any of your future bookings in the ‘Block Future Bookings’ section. For now, you can select the No bookings.
If you wish to create future subscription bookings for an x number of days, then you can fill that out here.
The Booking details need to be configured based on the booking type for which you want recurring bookings.
Here, you need to select the booking type Fixed Time because you need to create fixed time slots for this product.
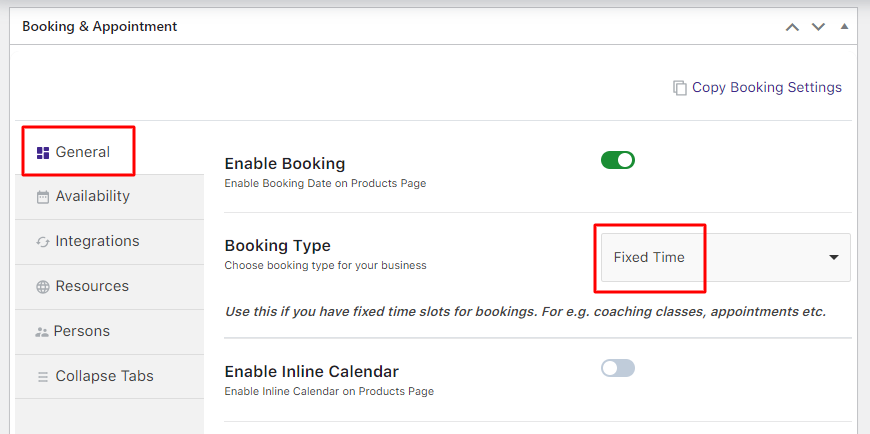
Booking Type for recurring bookings
Now you need to configure other options for your weekdays and time slots.
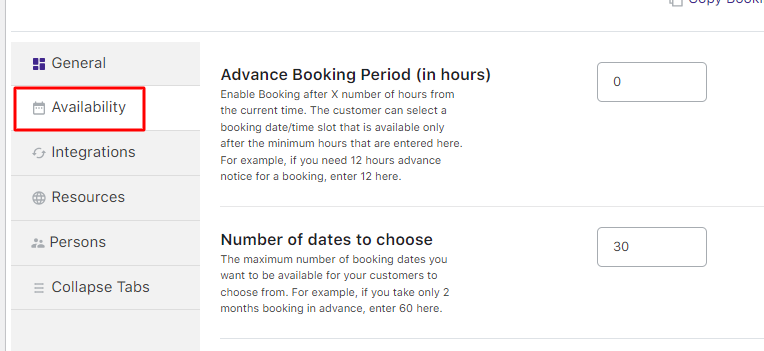
Clicking on the Availability tab gives you the option to add multiple configurations for a particular day and time slot.
Here you can set a special price of $10 for Wednesday. You can even add maximum slots for days.
In this case, let’s avoid adding any.
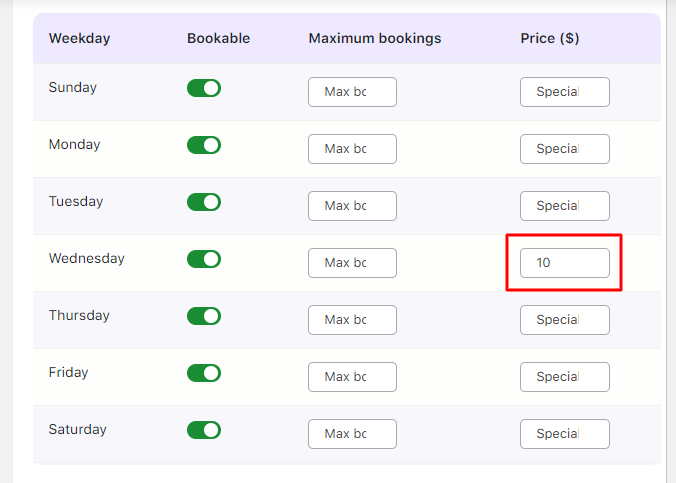
Applying special price
Now you shall be adding lockouts for the time slots you have added so that you have fixed bookings for that time slot.
Customers will not be allowed to book for that time slot once the count is reached.
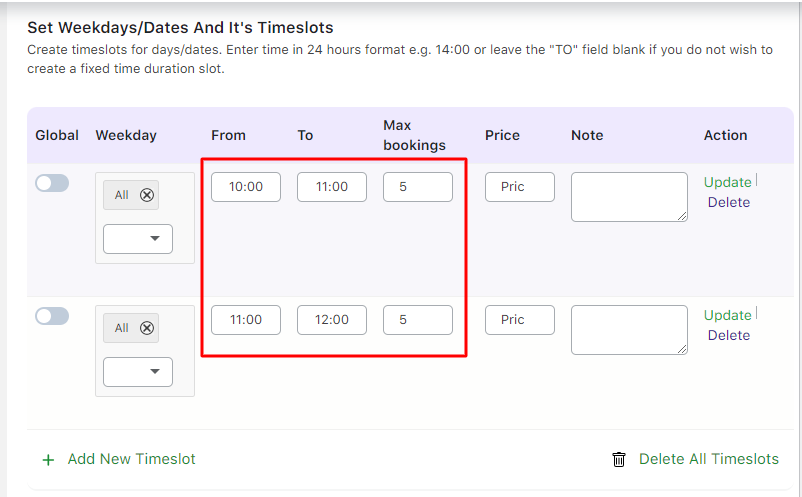
Time slots setting
As displayed above, you have 2 different time slots for all the days and you have the maximum bookings for each time slot as 5.
Once 5 bookings are made or if the quantity reaches 5 while placing the order, the time slot will not be available for further booking.
Maximum bookings count will also work with Variable Subscriptions or Simple Subscriptions with Attributes.
The piano lesson subscription is set to go and can start receiving recurring bookings.
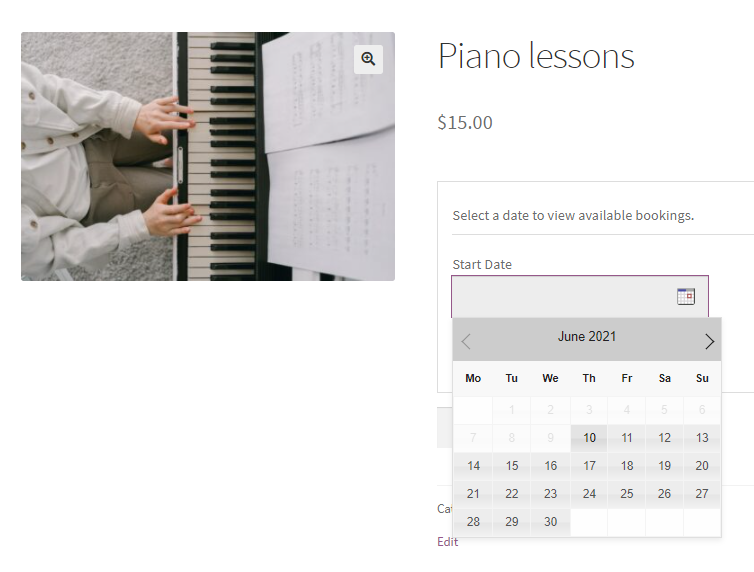
Product Page
On selecting a course start date and time slot, (Note: you can change the labels from Booking and Appointment > Appearance > Labels & Messages) availability for the particular date and time will be displayed.
Also if any special price is applicable for that day, the effective price shall be displayed.
For example, you had a special price of $10 on Wednesdays. Selecting a date and time on Wednesday will have an effective price of $10.
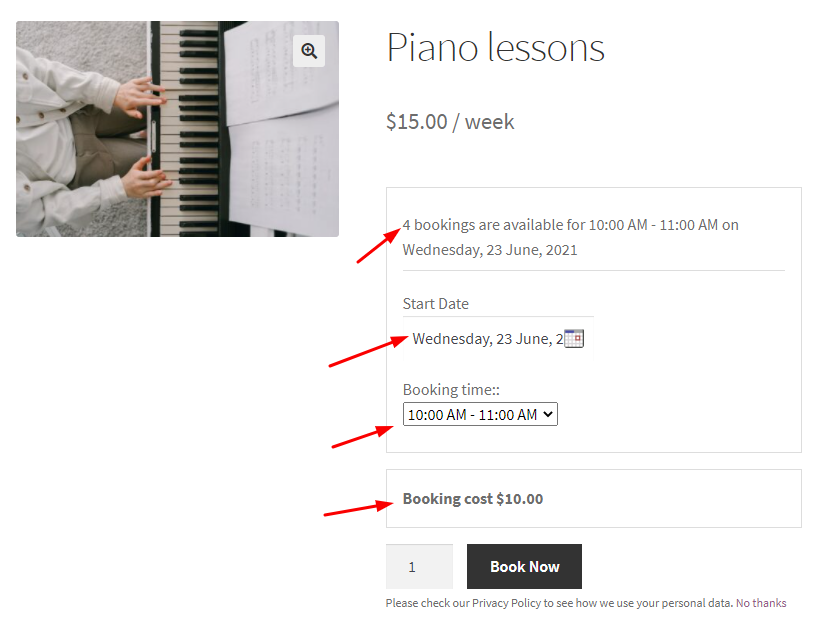
Product Page
4. Frontend Behavior
↑ Back to topNow that the subscription is ready along with the booking details, customers can start placing orders and start with the lessons.
Consider an order placed for booking a slot on 23rd June 2021 from 10:00 AM to 11:00 AM.
Here’s how the customer’s Checkout Page will look like:
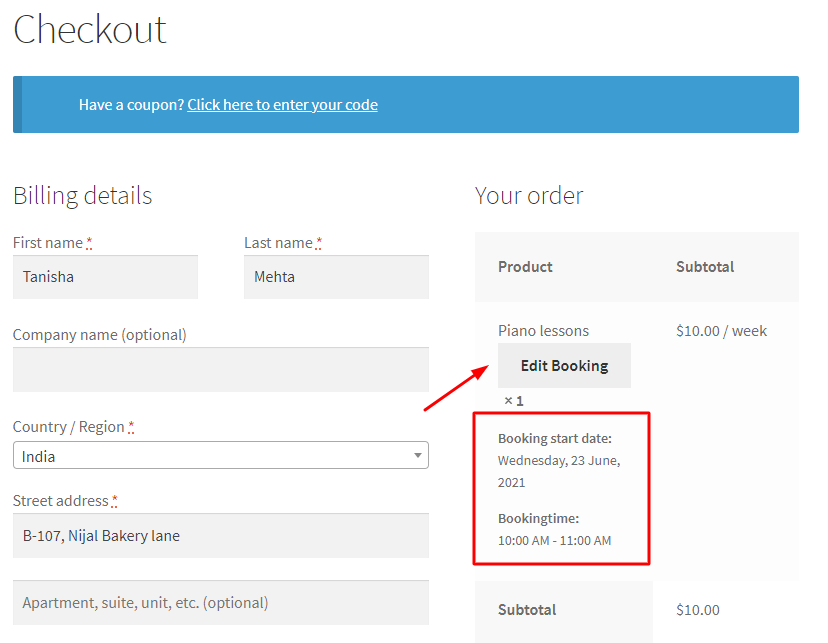
Checkout Page
It is important to note that if you have enabled Editing Booking (Booking and Appointment > Settings > Global > Booking Settings dropdown) then the customer will have the option of editing their bookings on the Cart Page or the Checkout Page.
This setting will be applicable for both current orders as well as renewal orders.
Next, here’s how the Thank You page will appear:
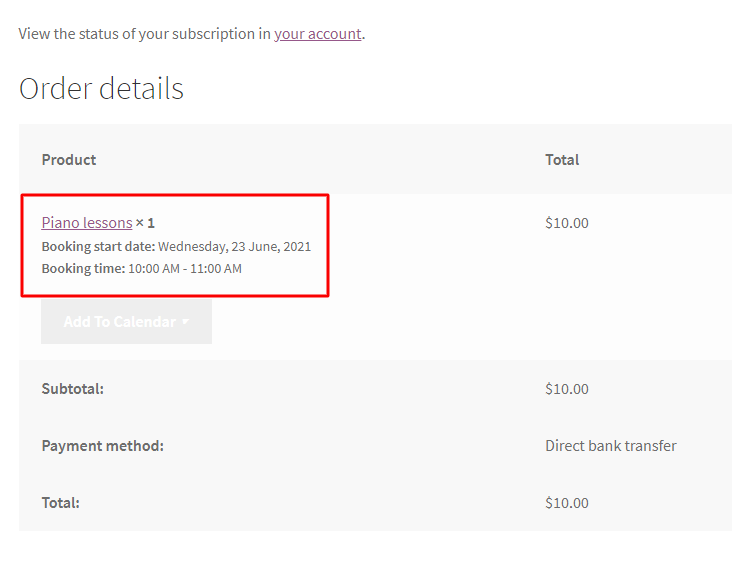
Order Received Page
Scrolling down, you will also see the Renewal Subscription under the title ‘Related Subscriptions’ as shown below:
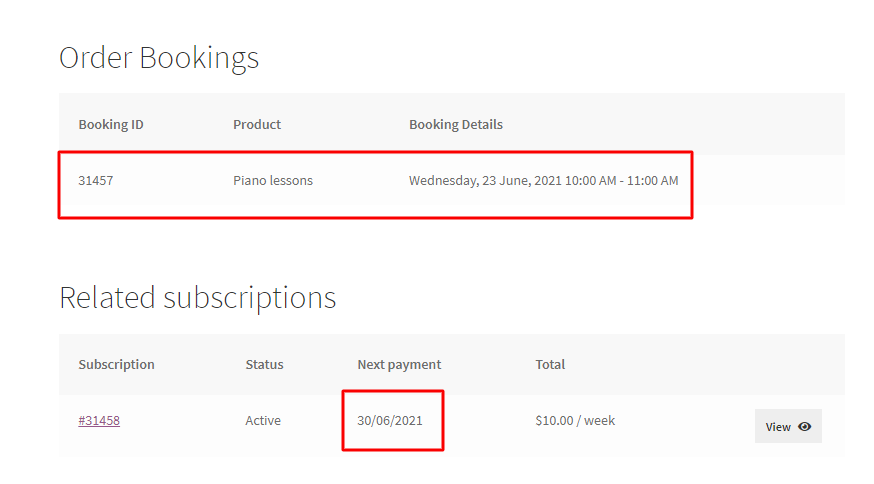
Related Subscriptions details
As per the WooCommerce Subscription plugin, a renewal order will be created on 30th June 2021.
This renewal order will have booking details one week after the last order booking details (since the subscription period was weekly) i.e. 30th June 2021 from 10:00 AM to 11:00 AM.
If the subscription payment is set to automatic the booking will be automatically generated and added to the completed order.
If the payment for the subscription is set to manual, customers will receive a Pay Now link in the email which will redirect to the checkout page.
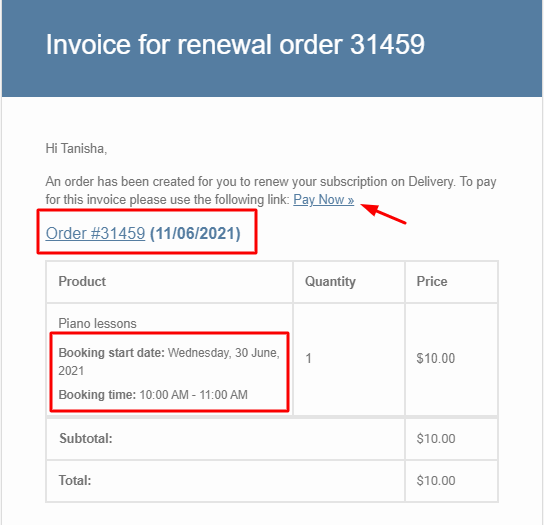
Order Invoice for the Renewal Booking Subscription
On clicking Pay Now, the customer will be redirected to the checkout page as shown below:
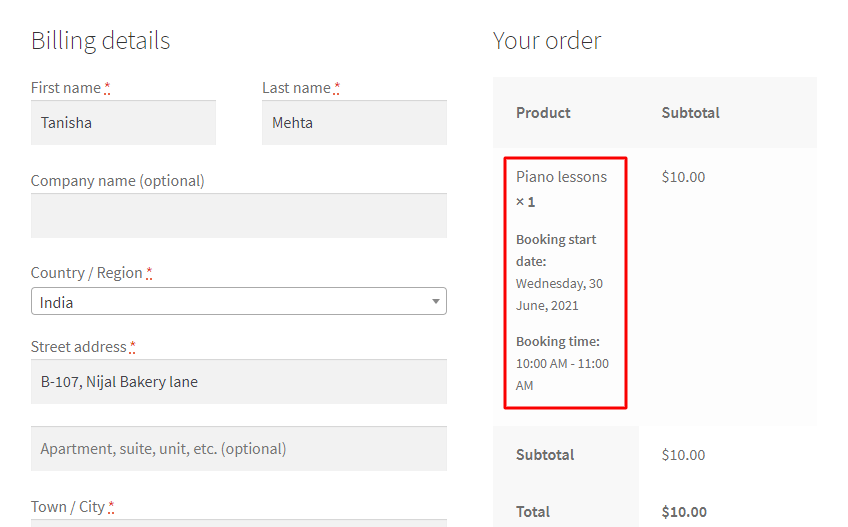
Checkout Page for the Renewal Booking Subscription
5. Reschedule bookings for a subscription
↑ Back to topAlong with the option to edit bookings for manual renewal of orders, customers can also be provided the flexibility to reschedule these bookings from the My Account > Orders page.
The shop manager can enable or disable this flexibility and also set the number of days before rescheduling can be allowed.
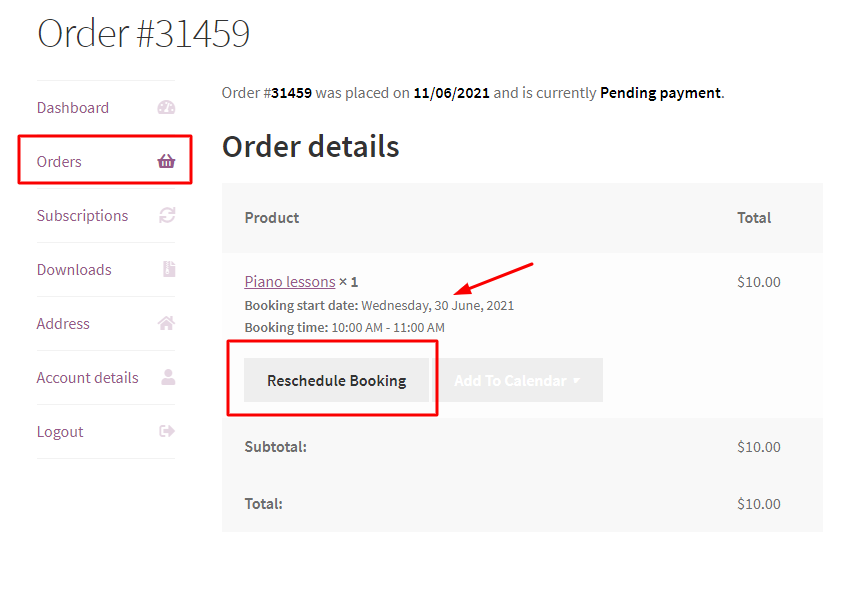
Reschedule Booking option for Renewal Booking Subscription
If you want to configure recurring bookings for other booking types then the process is similar to the one mentioned above.
However detailed steps about the other booking types can be found here.
Printable Tickets
↑ Back to topThe Printable Tickets add-on, which is part of the Enterprise license of the Booking and Appointment Plugin for WooCommerce plugin, allows you to email the tickets for the bookings to customers when an order is placed and completed.
2. Setting up Printable Tickets for all the products
3. Email Received by the Customer
1. Installation
↑ Back to topDownload the zip file and install it from the Plugins > Add New Plugin.
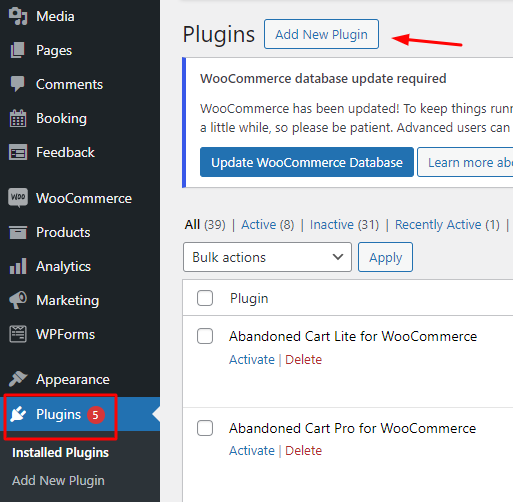
Activate the plugin from the Plugins tab.

As soon as the plugin is activated, the printable tickets addon settings can be found by navigating to Booking and Appointment > Addons > Printable Tickets.


2. Setting up Printable Tickets for all the products
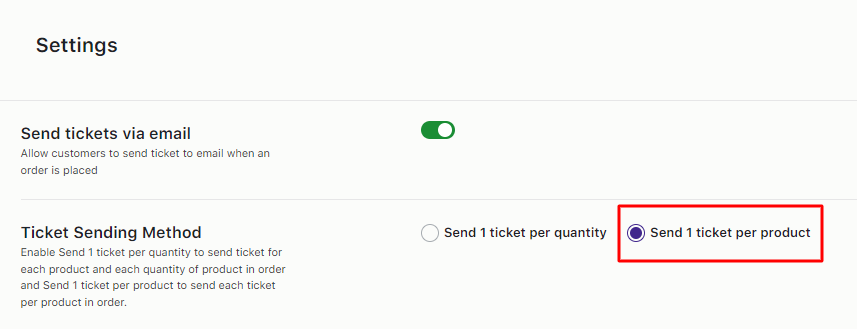
↑ Back to topNow in the Printable Tickets settings tab, you need to enable the “Send tickets via email“ option to be able to send the tickets via email.
You will also find a setting for the Ticket Sending Method with two radio buttoned options: Send 1 ticket per quantity and Send 1 ticket per product.
The ‘Send 1 ticket per quantity’ option generates and sends tickets by email according to the quantity of the products in the order. For example, if you have one product in your cart with a quantity of 2, then two tickets will be generated and sent to your email.
The ‘Send 1 ticket per product’ option generates and sends tickets by email according to the number of products in the cart. For example, if you have 2 different products in an order with a quantity of 3, only 2 tickets will be generated for the two products.

Tickets are generated for Single-day booking, Multiple-day booking, single day with time slot settings.
This addon is compatible with other addons like the Multiple Time slot addon too.
Note: The security code will be generated and the ticket will get sent to customers only when the WooCommerce order is Completed.
3. Email Received by Customer
↑ Back to topAfter a customer places an order and the order has Completed status, they will receive an email with a subject header like Ticket for Order #(your order number) along with the Customer Notification Email.
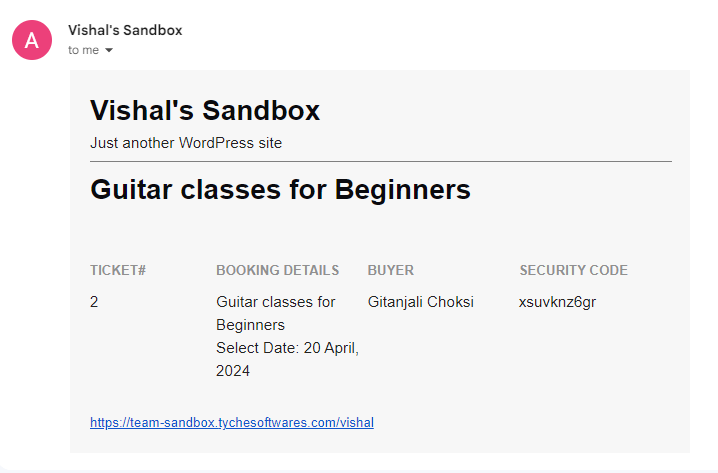
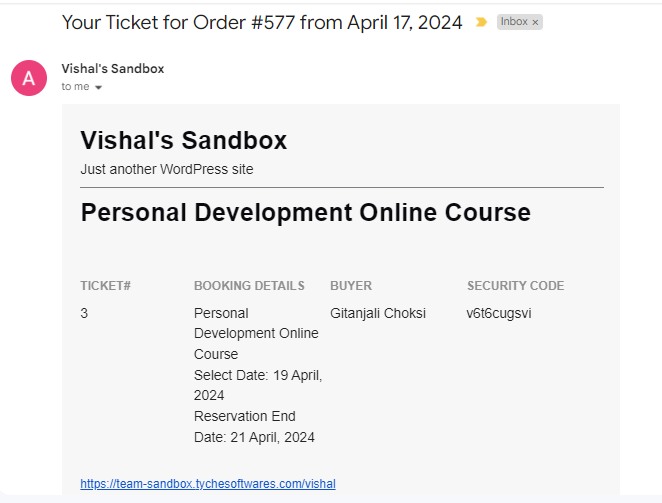
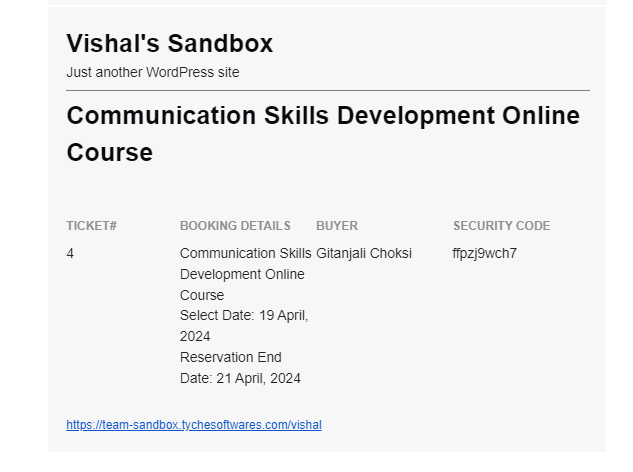
This ticket email will have the ticket number, booking details, customer name, and security code.
The security code generated is unique for all tickets.
For instance, let’s select ‘Send 1 ticket per quantity.’

In this case, the customer has booked ‘Guitar classes for Beginners’. They have selected only 1 quantity.
Since the order has 1 quantity, only 1 ticket will be created.
The ticket received by the customer over email will look like this:
Now, let’s say you have selected the Send 1 ticket per product option.
In this case, the customer has booked the ‘Personal Development Online Course’ and ‘Communication Skills Development Online Course’.
They have selected 2 different products. Therefore, for this order, 2 different tickets will be created.
The tickets received by the customer in the email will look like this:
4. View Bookings Page
↑ Back to topThe admin will have access to the Security code and the ticket number.
It can be displayed on the Booking and Appointment > Booking > View Bookings page.
The Guitar booking made will appear as such on the View Bookings Page:
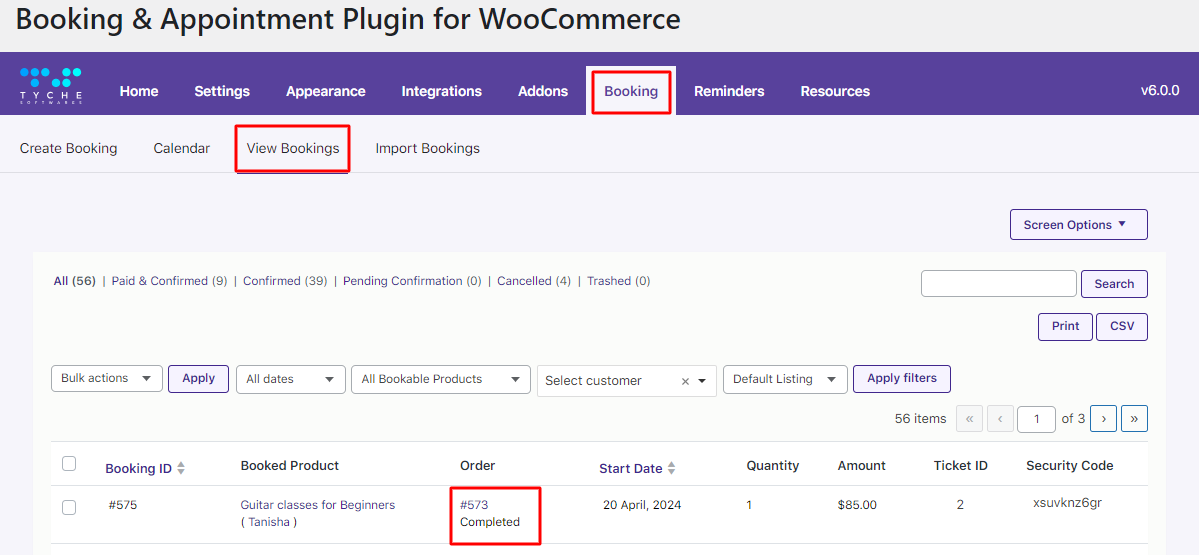
The ‘Personal Development Online Course’ and ‘Communication Skills Development’ bookings made will appear as such on the View Bookings page:

5. Quick Start Guide
↑ Back to top- You can generate the tickets by quantity or by the number of products in your order.
- These tickets would be helpful in security checks as every ticket generated will have a unique number and a security number.
- Always select the required method for the tickets to be sent with the customer email notification.
- The ticket number and the security code will be available with the admin on the View Bookings page.
Seasonal Pricing
↑ Back to topThe Seasonal Pricing addon for WooCommerce Booking and Appointment Plugin helps you differentiate the prices based on the dates.
This add-on helps you make different seasons where you can play with the product’s price based on the dates.
You could make seasons that could be applied to all the products in one shot.
2. Setup seasons pricing addon on a product
1. Installation
↑ Back to topDownload the zip file. Install it from the Plugins > Add New Plugin Page.
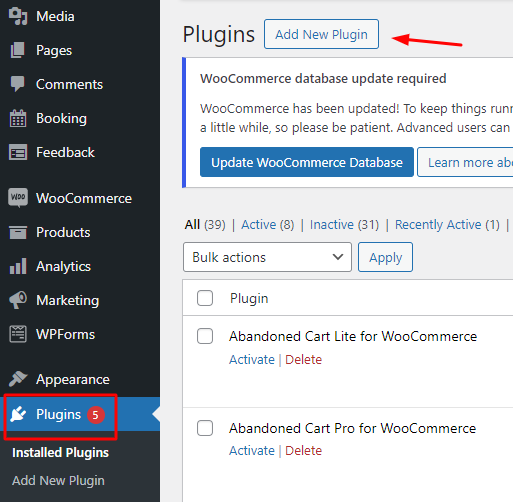
Activate the plugin in your WordPress admin area.

2. Setup season pricing addon on a product
↑ Back to topEnable product-level Seasonal Pricing settings by going to the Edit Product Page > Booking and Appointment meta box > Seasonal Pricing.
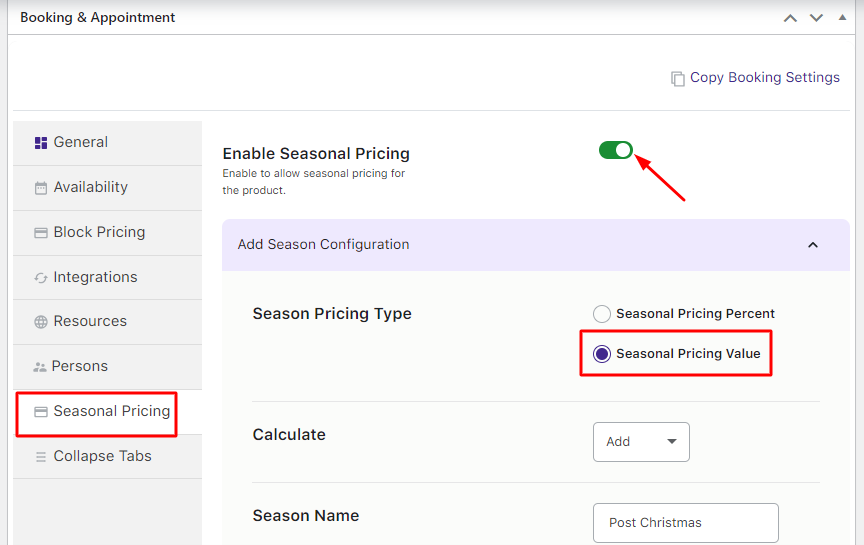
You will find the following fields:
- Seasonal Pricing Percentage: The season will be based on the percentage added or subtracted.
- Seasonal Pricing Value: The season will be based on the numerical value added or subtracted.
- Calculate: This option will let you Add or Subtract the calculated amount from the base price of the product
- Season Name: This lets you give a name to the season. For instance, you can give the name ‘Post Christmas’.
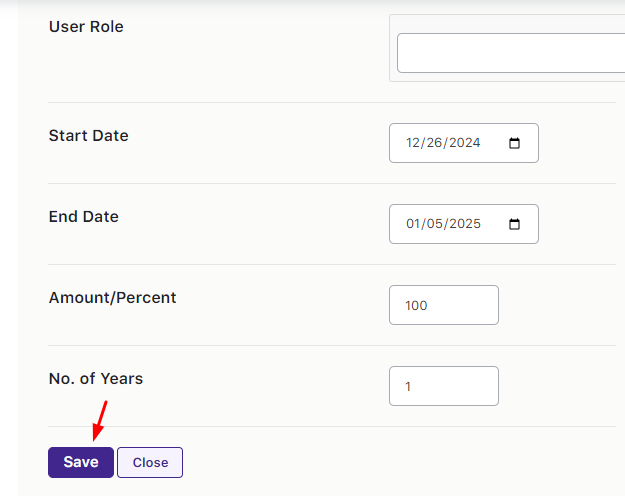
- Start Date: Here you will enter the start date of the season. For example, 26th December 2024.
- End Date: Here you will enter the season’s end date. For example, 1st January 2025.
- Amount/Percent: Here you will enter the percentage or the seasonal pricing amount. In this case, it is 100%.
- Number of Years: This lets you apply the seasonal pricing for the number of years entered in the field.
After filling in the details, the season will be created.
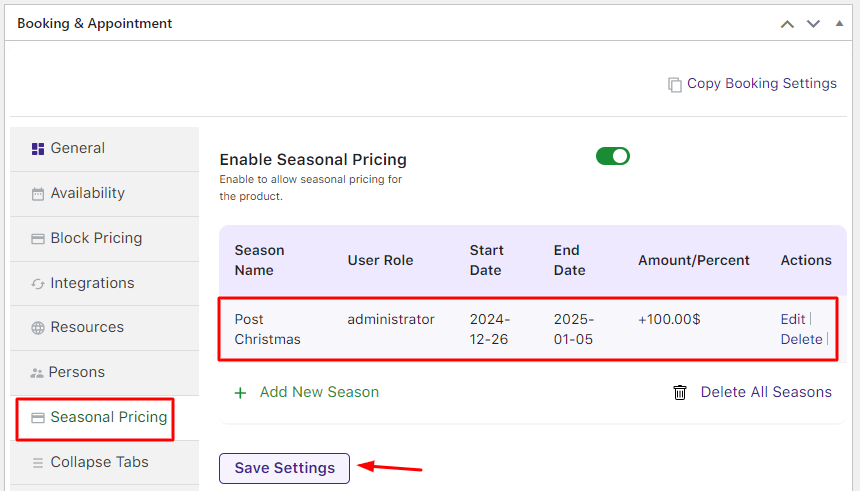
The product on the front end will have the set prices in the seasons.
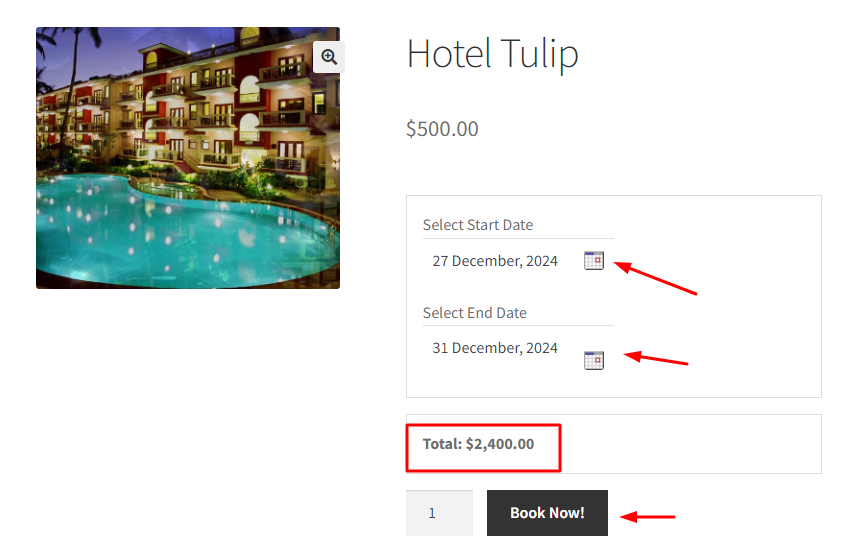
Here, the Per Night Price is $500 and the Seasonal Pricing = $400
4 Nights Price = $500 X 4 Nights
= $2000 + $400 (Seasonal Pricing addition)
= $2400
3. Setup Seasons Globally
↑ Back to topTo set seasons globally, go to the Booking and Appointment > Addons > Seasonal Pricing tab option on the admin side.
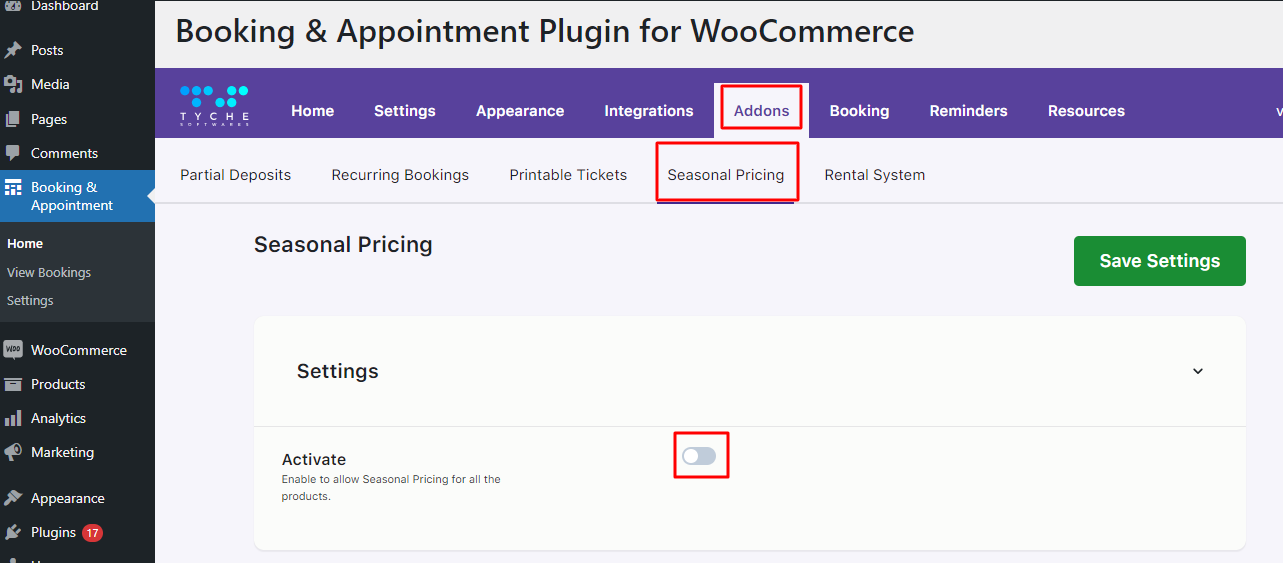
Activate it.
The seasons created here will apply to all the products with the seasonal pricing addon enabled.
Create a new season by clicking the Add New Season button.
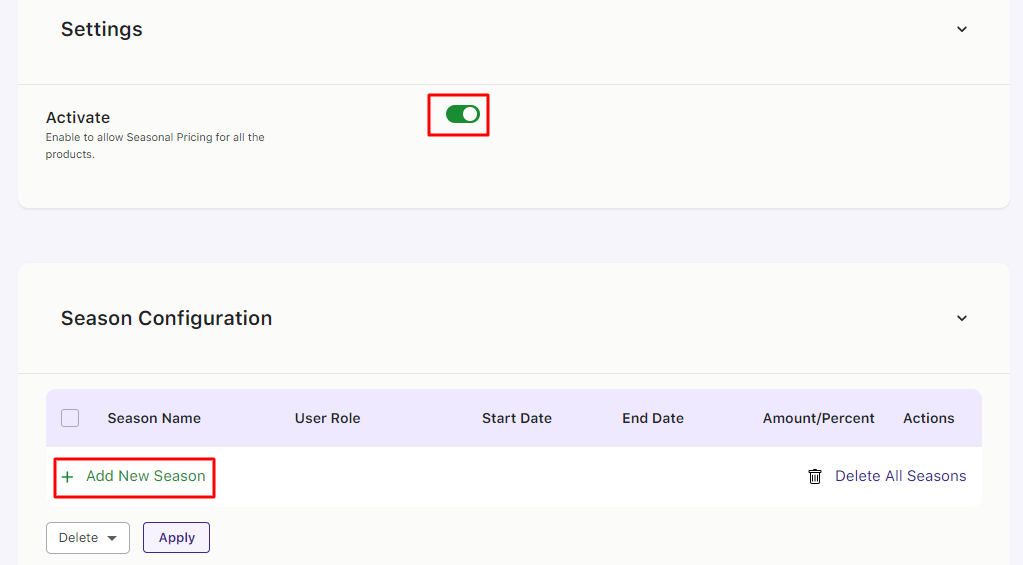
This time, you may go with Seasonal Pricing Percent option.
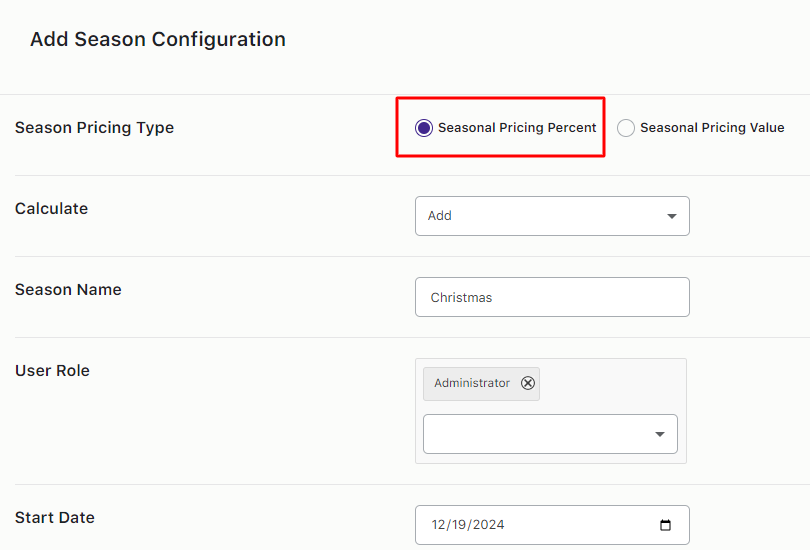
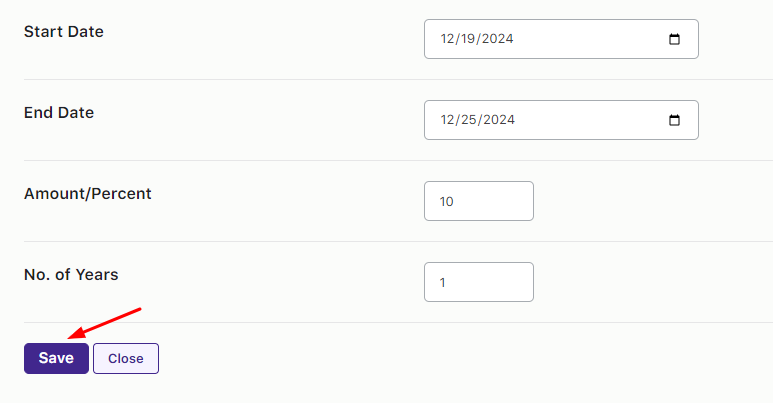
Add the season details and click the Save button.
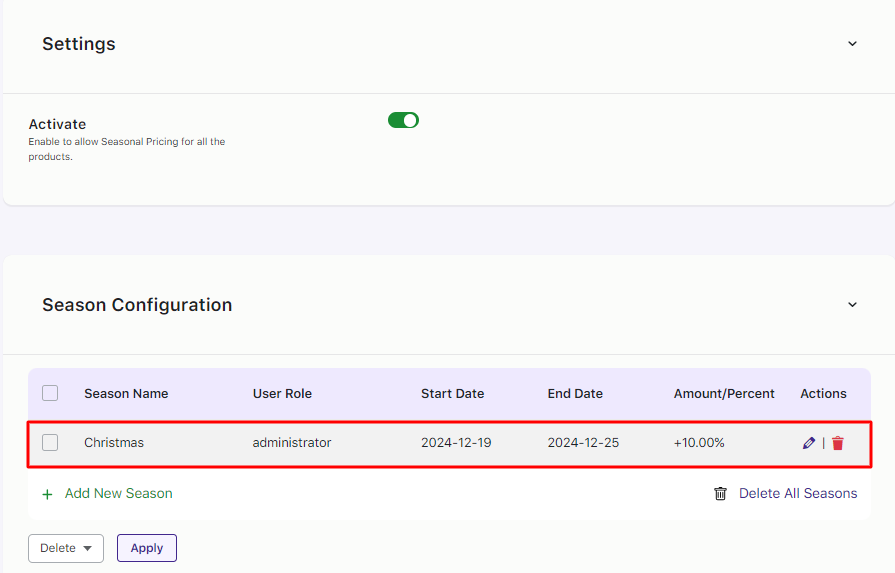
On the front end, both the seasons, from the Admin Edit product page and the Global Seasonal Pricing page, will be applied to the product price.
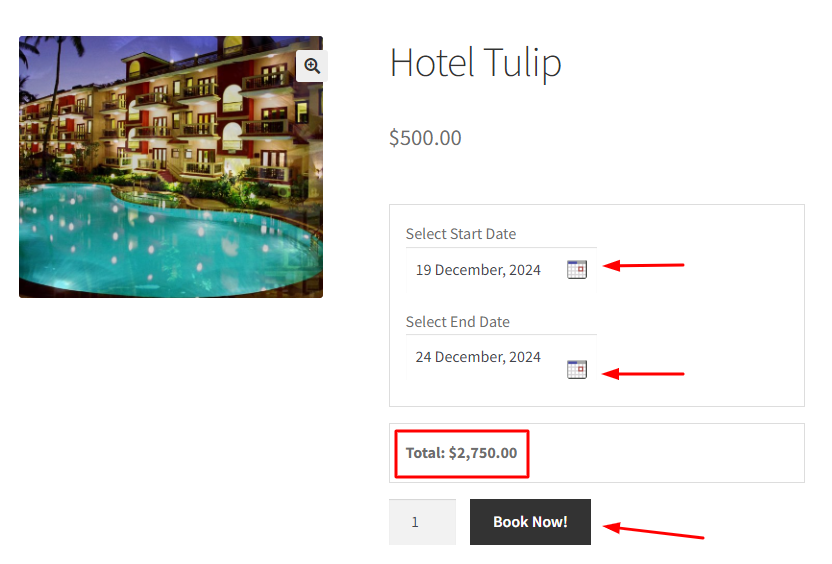
Here, the Per night price is $500 and the Seasonal Price addition is 10%
Price for 5 nights = $500 x 5 Nights
= $2500
= $2500 + 10 % (Seasonal Price addition)
= $2750
4. Front-end Behavior
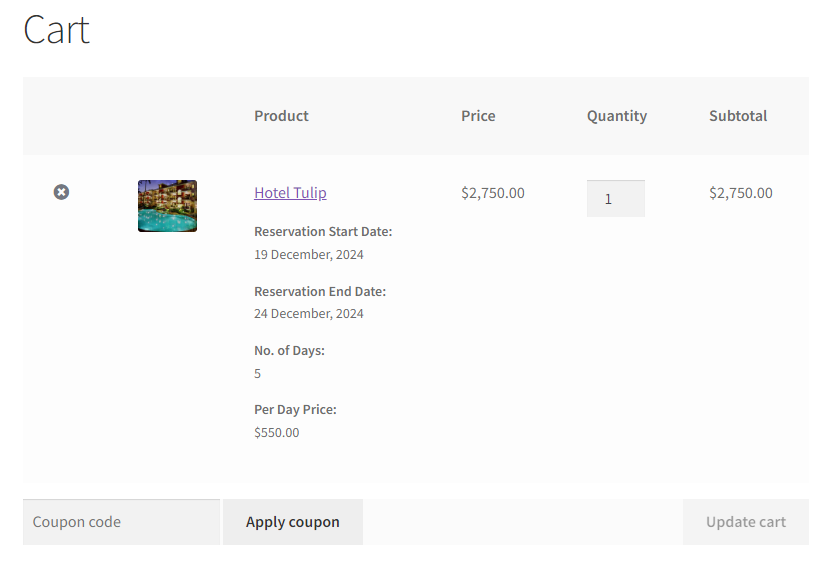
↑ Back to topa) Cart Page
After selecting the desired date range for your holiday to the Cart, the cart page has the amount after the seasonal charges are applied.
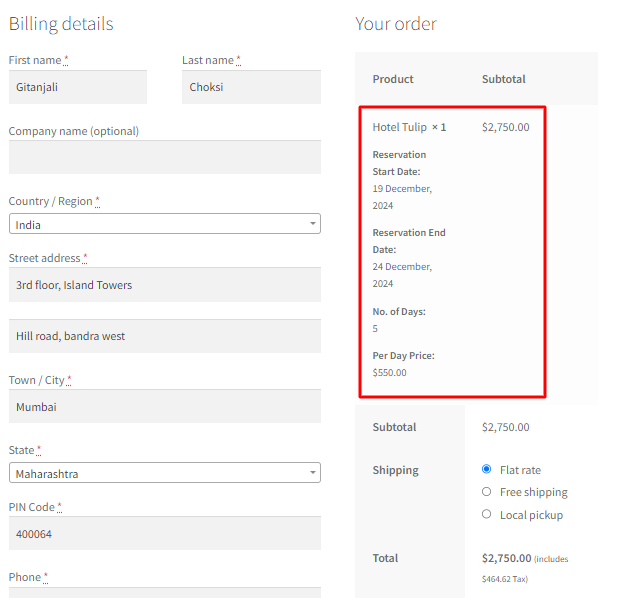
b) Checkout Page
The Checkout page also has the amount calculated according to the seasons made.
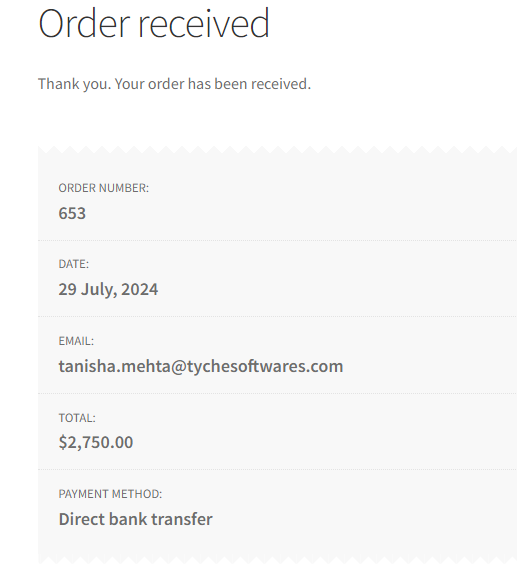
c) Order Received Page
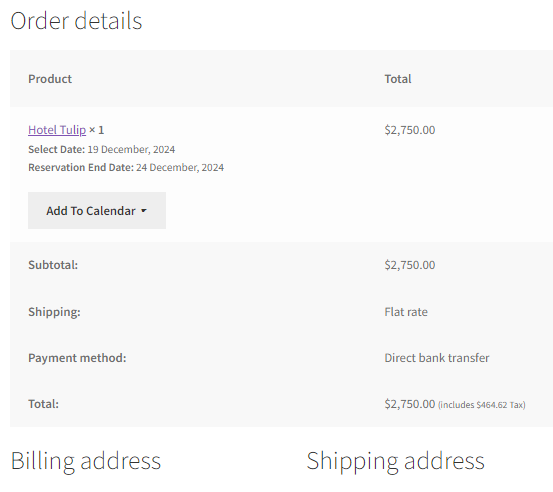
The Order Received page after placing the order will have the Dates selected by the user. Along with it, the price will be per season.
If the dates selected by the customer lie in the season made, the prices will be according to the prices set by the admin during the setting of the season.
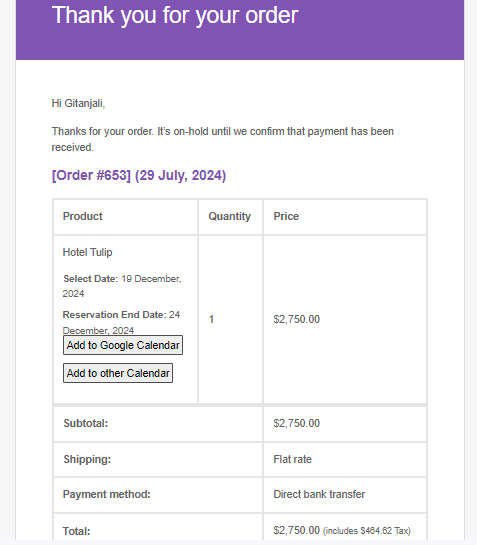
d) Customer Email Notification Page
After placing the order, the customer will receive the Notification Email.
It will have the amount that is generated after selecting dates while placing the order, it depends upon the selected dates.
If the dates are in the date range of the season, then the price will come accordingly.
5. View Booking Page
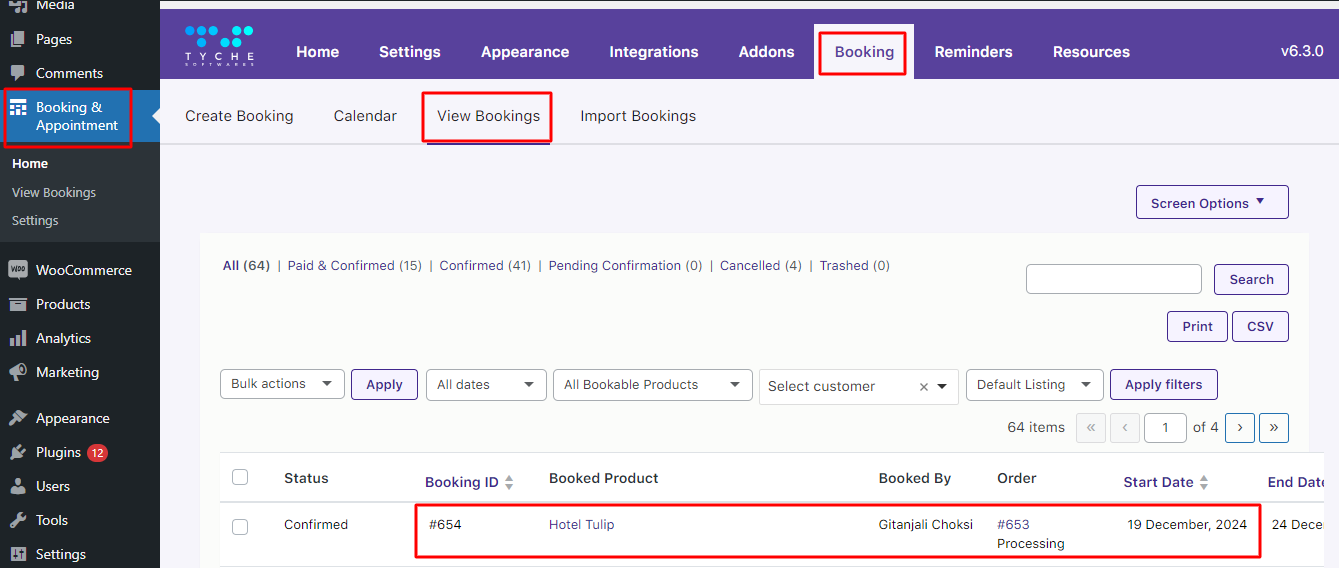
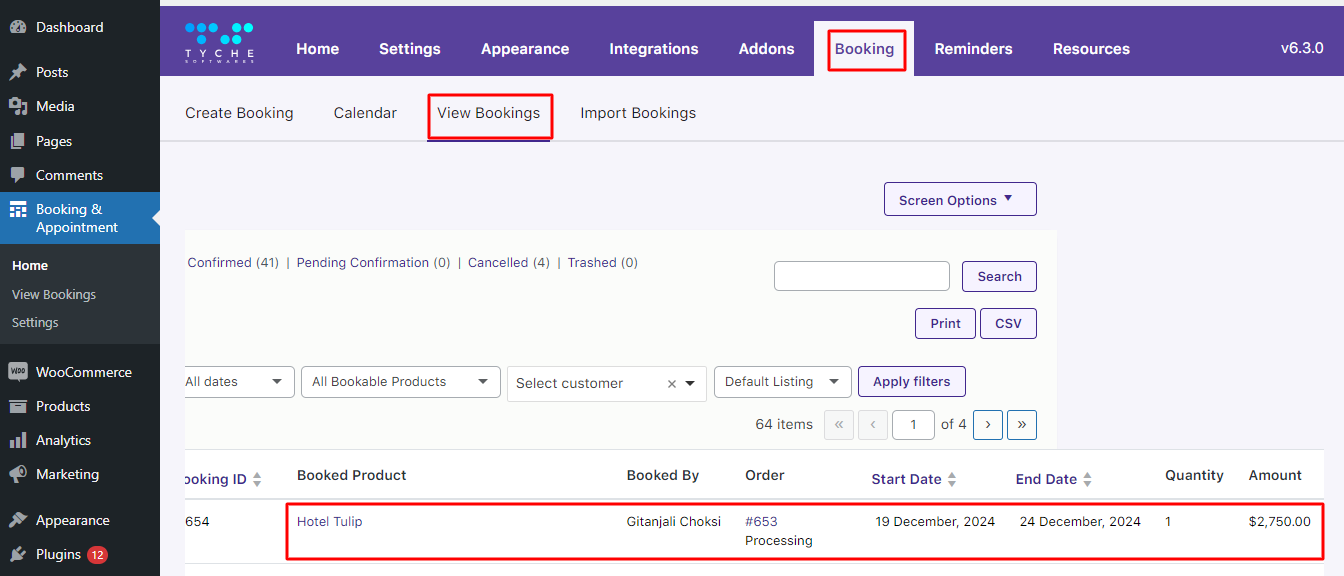
↑ Back to topThe Booking and Appointment > Booking > View Booking page on the admin side also has the price of the seasonal pricing amount along with the other booking details.
6. Quick Start Guide
↑ Back to top- Make sure you have the addon active on the Plugins page
- On the product page, make sure you have the addon enabled. Only then will the prices of the season be applied
- If you want the seasons made on the Global Seasonal Pricing to be applied to the products, ensure the addon is enabled on that particular product. The Global seasons will be applied on the product only when the product has the addon enabled
- You can have the addon disabled for some products that you wish where the seasonal pricing should not be applied.
Rental System
↑ Back to topAlong with the online booking option, the need for online rental services has gained traction. Therefore, online shop owners have found a potential market offering rental services for their bookable products!
The Rental System addon of the Booking and Appointment for WooCommerce Plugin transforms your ordinary WooCommerce store to make it function like a Rental system.
Please note that this addon is only for the Multiple-Nights booking type.
2. Setting up Rental Settings for a product
1. Installation
↑ Back to topDownload the zip file and install it from the Plugins > Add New Page
Activate the plugin in your WordPress admin area.

You will find a “Rental Settings” tab in the Booking Metabox below the Persons Tab.
2. Setting up Rental Settings for a product
↑ Back to topGo to the Edit Product Page of your product.
Select the ‘Multiple Nights’ booking type in the Booking type dropdown.

Go to the Rental Settings tab. In this tab, you will find fields such as:
- Book prior days of start date: This will disable the number of days mentioned here before the starting date of the Multiple-Nights booking. This will take place after reaching the lockout. In this instance, it is set to 1.
- Book later days of end date: This will disable the number of days mentioned here after the end date of the Multiple-Nights booking. This will take place after reaching the lockout. In this instance, it is set to 1.
- Flat Charge per day: This field lets you include the last day of booking in the amount calculation. Hence the last day of booking will be counted in the days of booking.
- Allow Same-day booking: This allows you to have your check-in date as your check-out date. This field will be displayed only if the Flat charge per day field is enabled.
Important Note: The number of days entered in the Book prior days of the start date and Book later days of the end date will be disabled after placing the order.

For instance, you’ve made a booking for the dates 3rd July 2021 to 6th July 2021.
The last day of booking gets included in the amount as the Flat charge per day setting is enabled.
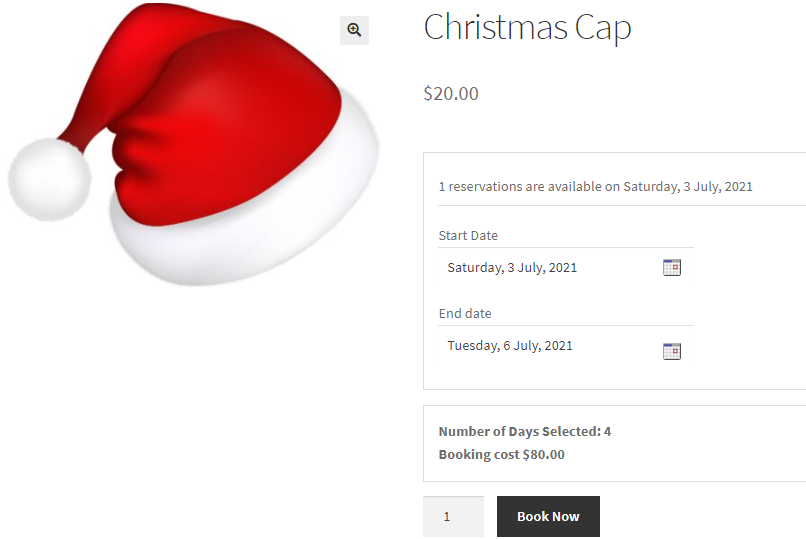
After placing the order, the dates 2nd July 2021 and 7th July 2021 will be disabled.
The days disabled will have the label Unavailable for Booking.
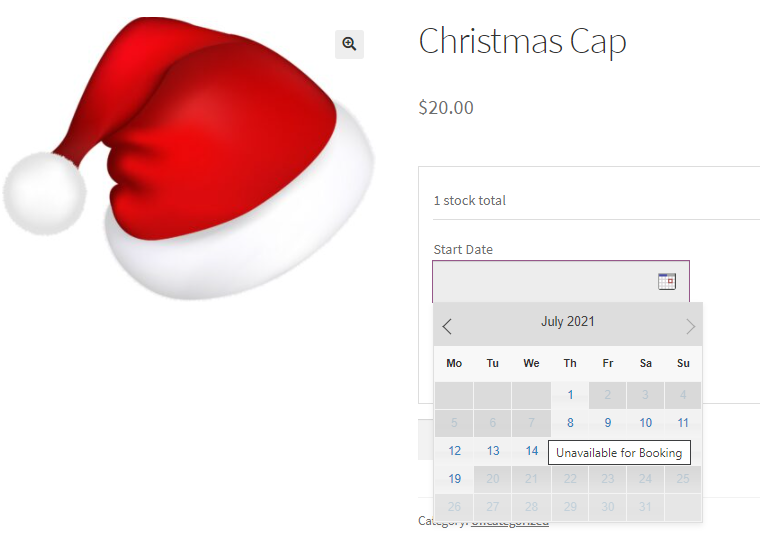
3. Quick Start Guide
↑ Back to top- If you wish not to disable any days after placing an order, enter 0 for the Prior days to book before the start date and Later days to book after the end date.
- If you want only Later days to be disabled after the end date, enter 0 in the Prior day to book before the start date.
- If you want the check-in and check-out date to be the same, enable the Flat charge per day field and then enable the Allow Same Day booking.
4. Sale and Rent
↑ Back to topUsing the Sale & Rent functionality, online shop owners can make their products available for customers for purchase or rent.
After activating the Rental System Addon, an Allow Sale and Rent option will appear under the General tab of the Booking Metabox found on the Edit Product Page.
When you enable the Allow sale and rent option, you will be asked to choose the mode for the product as Sale, Rent, or Both as shown below:

Allow sale and rent option appears under the General tab
Let’s understand these 3 modes – Sale, Rent, and Both with an instance of a Prop Shop that sells different props.
Let’s create a Multiple Nights product – Christmas Cap for this.
a) Sale Mode
If you select the Sale option in Choose mode as shown below, the product will be available for only purchase:

Choose the mode set as Sale
Therefore, on the frontend product page, you will see an Add to Cart button displayed which the customer needs to click to make the purchase of that product:
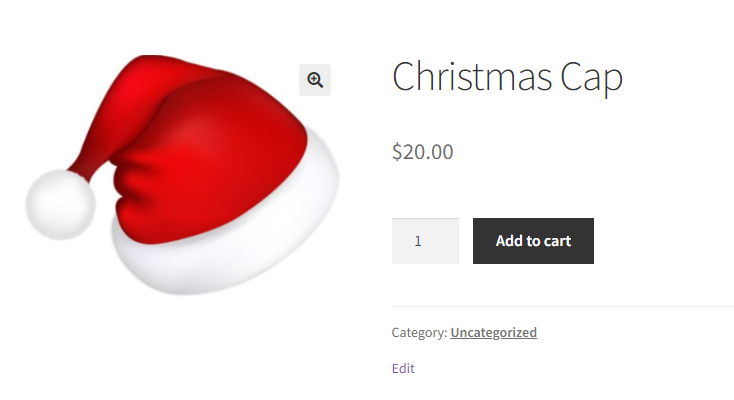
Frontend display of product when the Sale option is selected
b) Rent Mode
If you select Rent mode, the Enable Booking option gets enabled automatically.
This will allow customers to select a date for renting the product on the front end.

Choose mode selected as Rent
When the Rent option is selected, it will display a booking calendar for the Rent Date and End Date for renting:
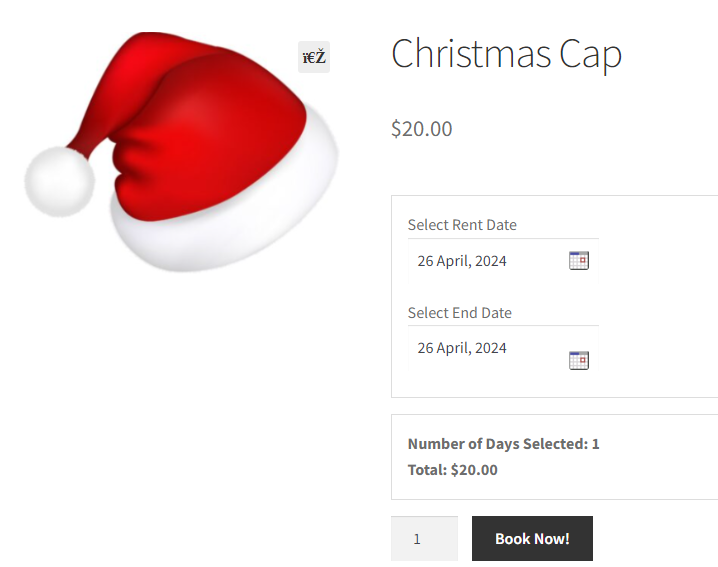
Frontend display of product when the Rent option is selected
c) Both Mode
When you select the Choose mode option as Both in the backend, the ‘Default mode should be’ setting will appear with 2 selections- either Sale or Rent which can be set as per the business requirement.
When Both mode is chosen, Enable Booking option and Purchase without choosing a date option both, will get enabled automatically as shown below:

The default mode should be selected as Sale
With this mode, the customers can either purchase the product or rent it.
For customers to select from these 2 options, there will be 2 buttons – Sale and Rent which will be displayed on the front end by enabling the Sale and Rent On Product Page option.
This setting can be enabled under Booking and Appointment > Addons > Rental System Tab > Settings as shown below:
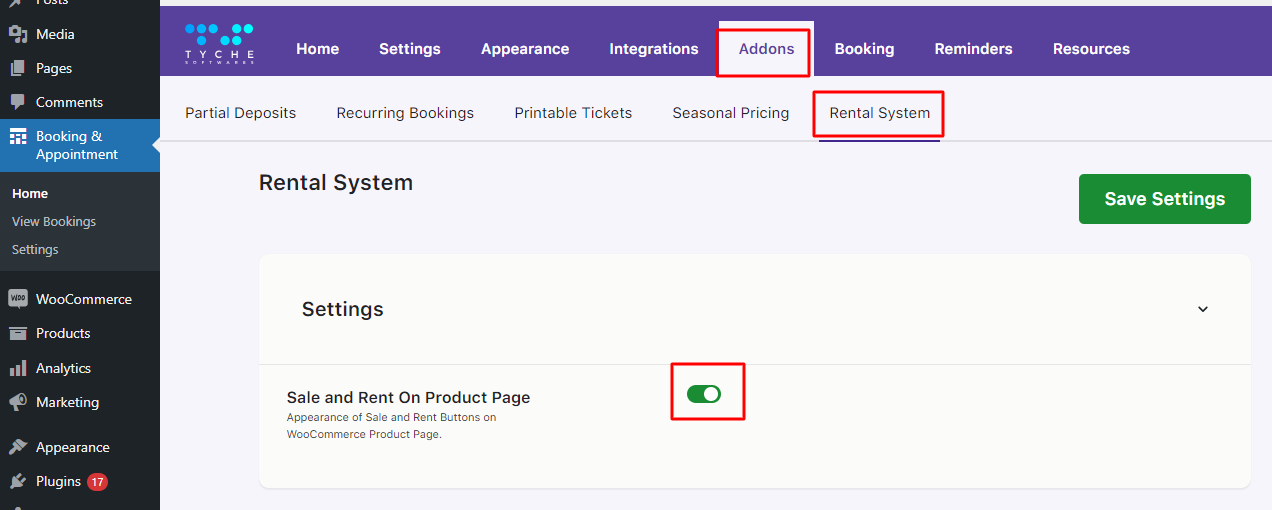
Sale and Rent On Product Page option enabled
With this, the customers can choose whether they wish to purchase the product or rent it.
Additionally, when you select the Both option, Default mode with 2 selections – Sale and Rent gets displayed.
This option allows the admin to select the default mode of the product, i.e. if they want the product to be rented by default or sold.
When Sale is selected in the Default mode should be option, the Sale button on the frontend product page will be enabled by default for the product Christmas Cap and an Add to Cart button will be displayed for purchasing the product as shown below:
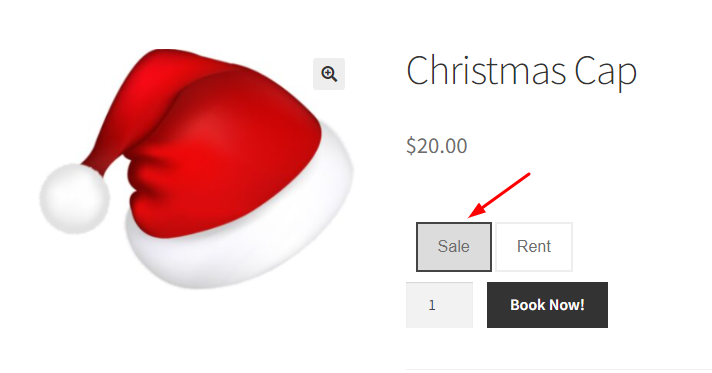
The sale button is enabled by default
Similarly, when Rent is selected in the Default mode should be option, the Rent button on the frontend product page will be enabled for the product Christmas Cap.
The booking calendar will be displayed for selecting the dates for renting the product as shown below:
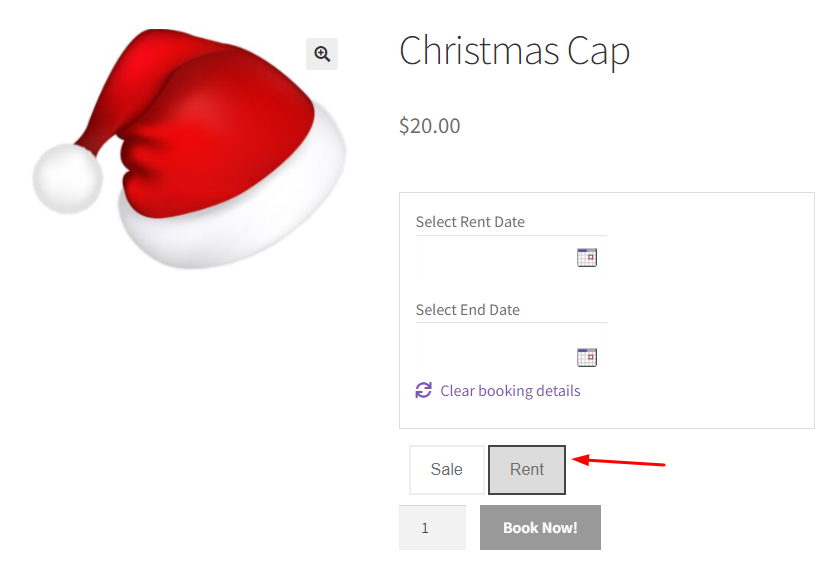
The rent button is enabled by default
Please Note that if the customer wishes to change the selection from Sale to Rent or Rent to Sale, they can do so on the product page depending on his requirements.
For instance, if the default mode is set to Sale and the customer wishes to rent the product, they can click the Rent button and the booking calendar will be displayed to add the Rent Date and End Date for the product.
If you wish to change the labels for the Sale and Rent buttons, you can do so under Booking and Appointment > Addons > Rental System.
Add appropriate text in the Sale Button Text and Rent Button Text fields:

Changing labels for Sale and Rent buttons
The text for Sale can be changed to BUY NOW and that of Rent can be changed to RENT NOW.
These will be changed on the frontend product page as shown below:

Changed labels will be displayed
To conclude, using this addon allows the customer to decide whether they wish to purchase a product or rent it.
Multiple Time Slot Addon
↑ Back to topThe Multiple Time Slot Addon to the Booking and Appointment Plugin for WooCommerce lets you select multiple timeslots on a date for each product on the website.
You can display the time slots in two ways: Multiple Time slots and Single Time slots.
2. Setting Multiple Time slots for a product
1. Installation
↑ Back to topDownload and install the zip file from the Plugins > Add New Page.
Activate the plugin in your WordPress admin area.
You can deactivate it by clicking the deactivate button.

2. Setting Multiple Time slots for a product
↑ Back to topAfter activating this addon, there will be an additional setting “Time Slot Selection” in the Availability tab of the Booking meta box.
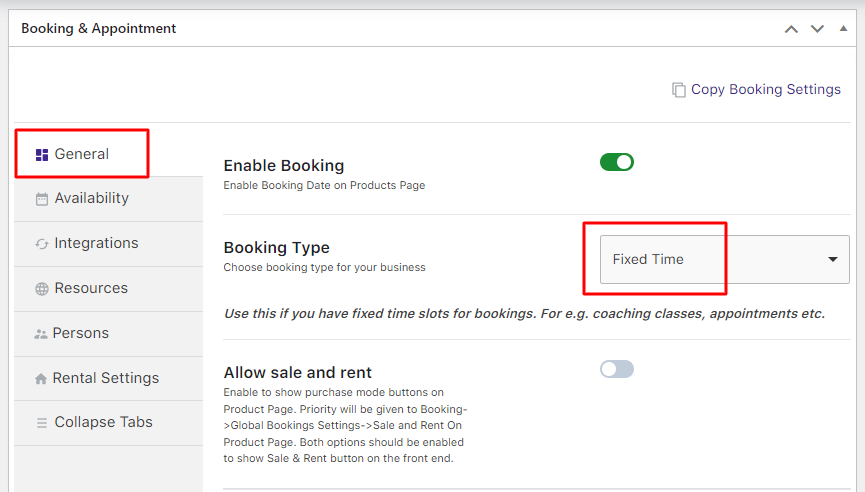
Under the General Tab, choose your booking type as Fixed Time.
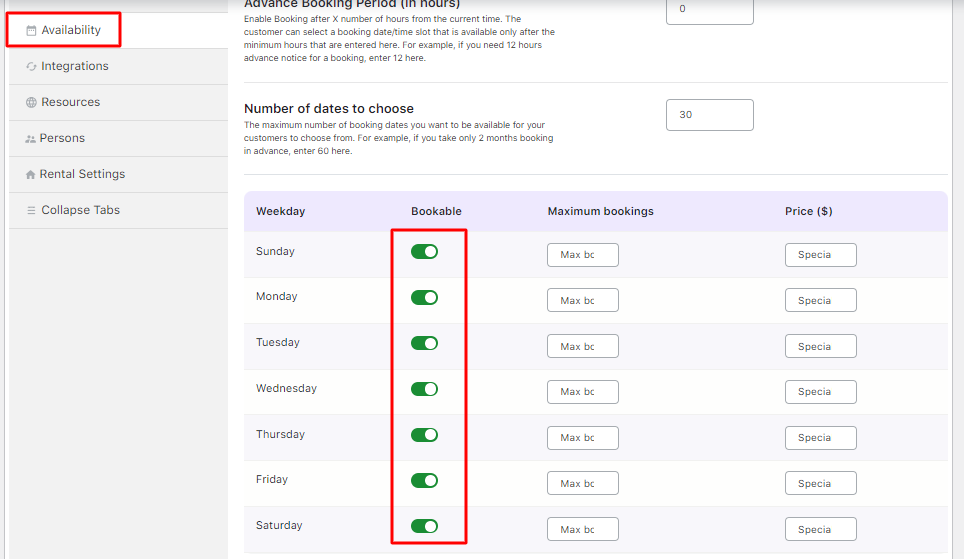
Move to the Availability Tab and enable your weekdays.
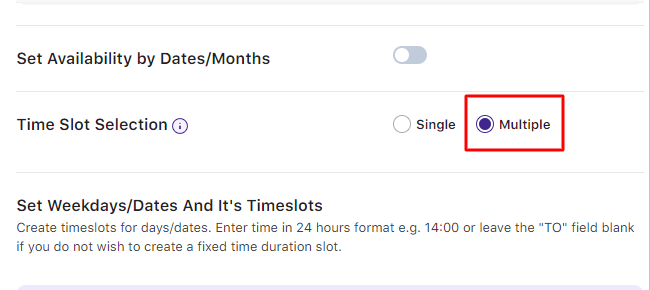
Scroll down to find the newly added section called ‘Time Slot Selection’.
Here you can choose the type of time slot displayed on the front end.

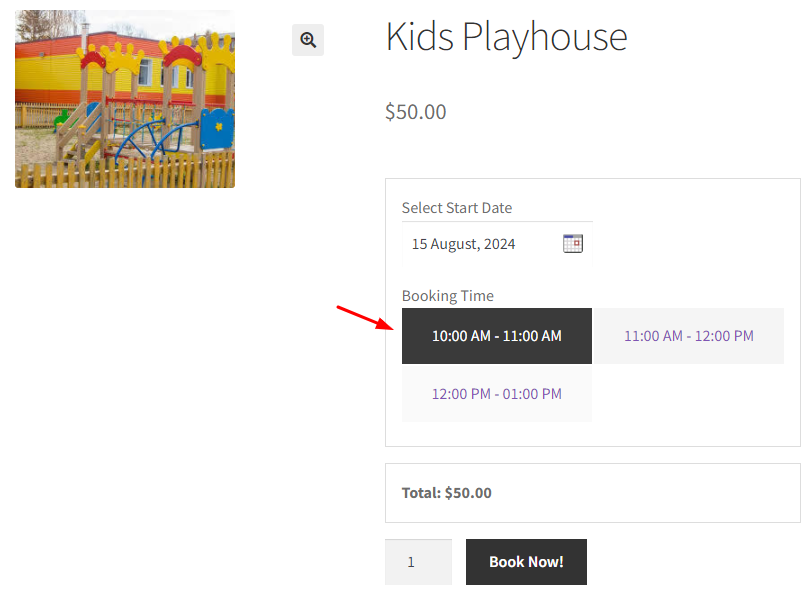
If you go with the Single option, you can select only one-time slot while booking the product.
For instance, only one time slot can be added by the customer here:
When the Multiple option is selected, the time slots will have checkboxes. You can select multiple time slots. Let’s go with the Multiple option.
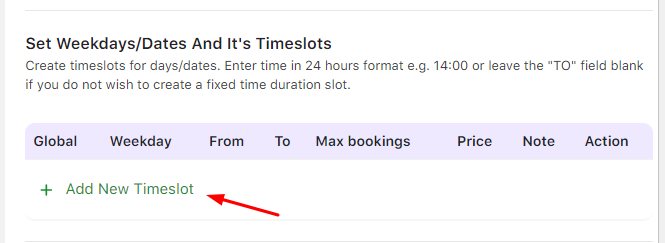
After selecting the type of time slot, add the time slots as per your need.
The time slots will get added as they were made by default.
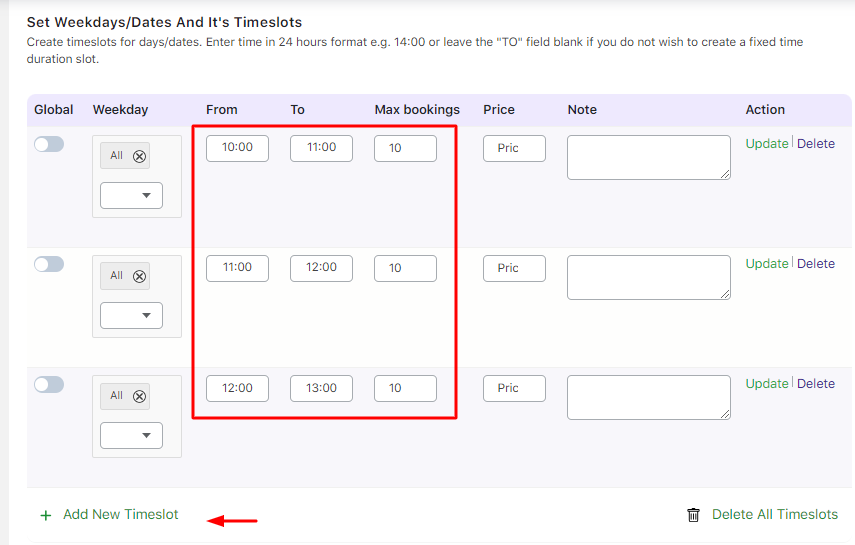
Note: If you want to change the time slot selection from Multiple to Single or vice-versa at any point, you will only need to select the required radio button. There will be no need to remake all the time slots.
3. Front End
↑ Back to top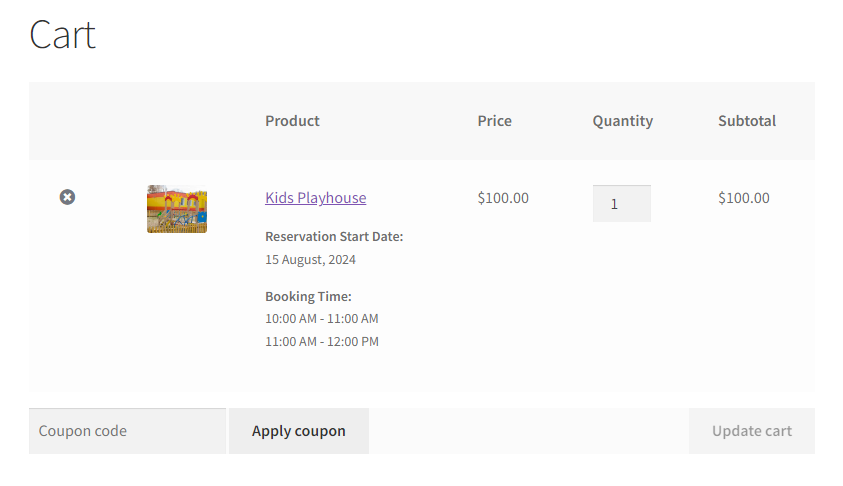
Once the time slots are created for the product, they will be displayed on the front end after selecting the booking date and time.
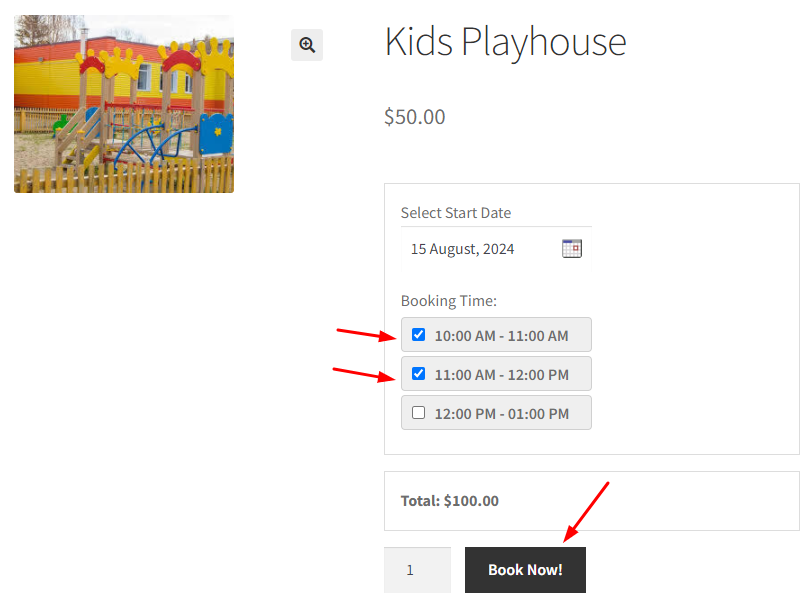
Each time slot is considered as one booking.
Hence the customer will be charged as per the number of time slots selected.
Here, the total amount is $100 because two timeslots were chosen, i.e., $50 + $50.
a) Cart page
This will be displayed once the product is added to the cart.
Here, all the time slots selected while adding the product to the cart are displayed along with the booking date.
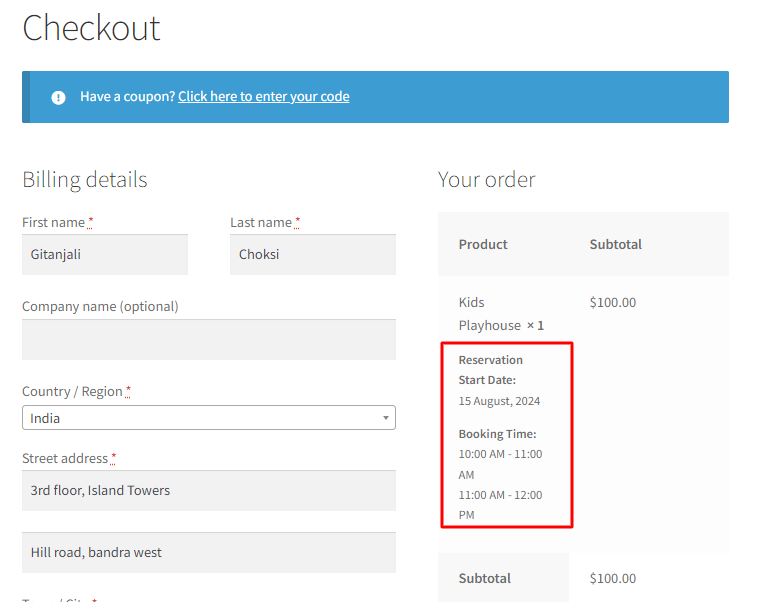
b) Checkout page
On the Checkout page, the product is displayed along with the booking date and all the time slots selected.
Please note that the lockout for each time slot is set.
For instance, 2-time slots were selected.
The 1st time slot has lockout as 1. The other time slot has lockout set to 2.
The time slot with a lockout as 1 will not be available after one booking is made using that time slot for that particular date.
However, the other time slot will be available after one booking is placed using that time slot.
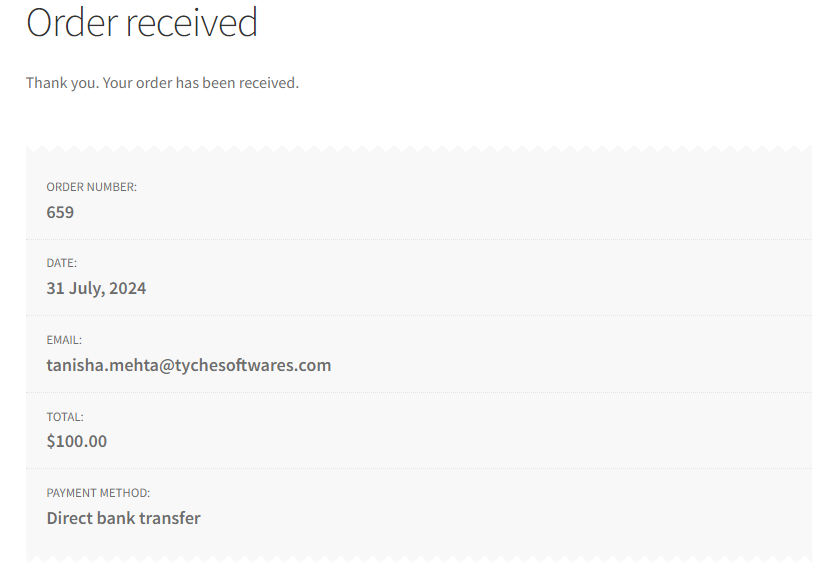
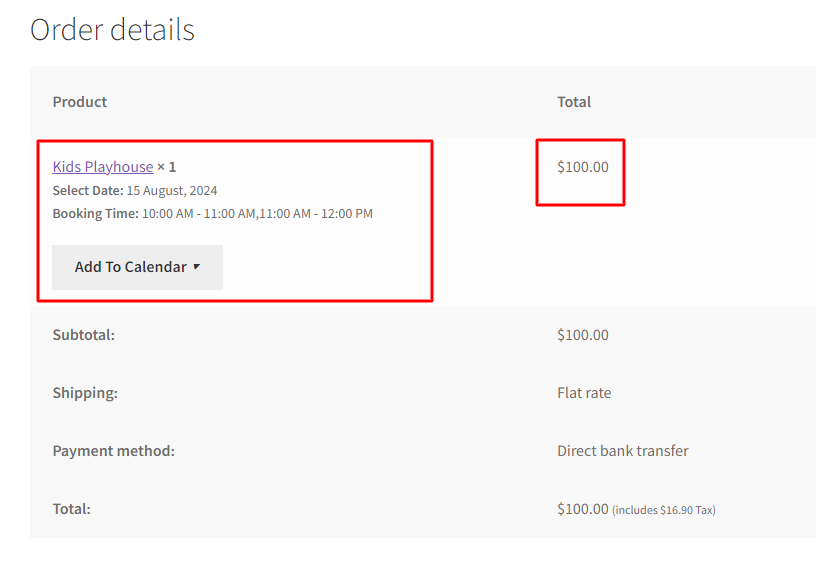
c) Order Received page
On the Order Received page too you will find the booking date and the selected time slots are displayed.
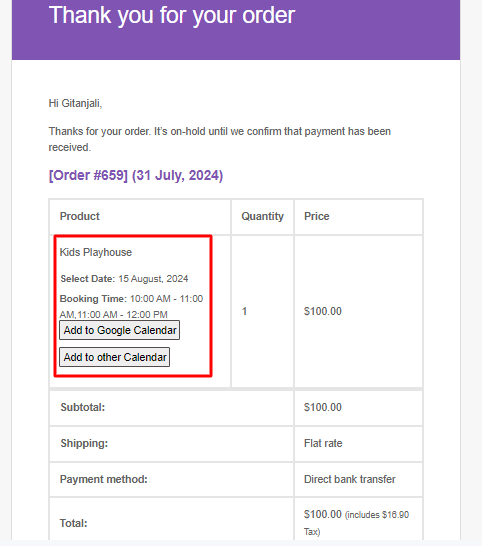
d) Customer Email Notification
After placing an order, the customer receives the email, and that customer email also has the selected time slots.
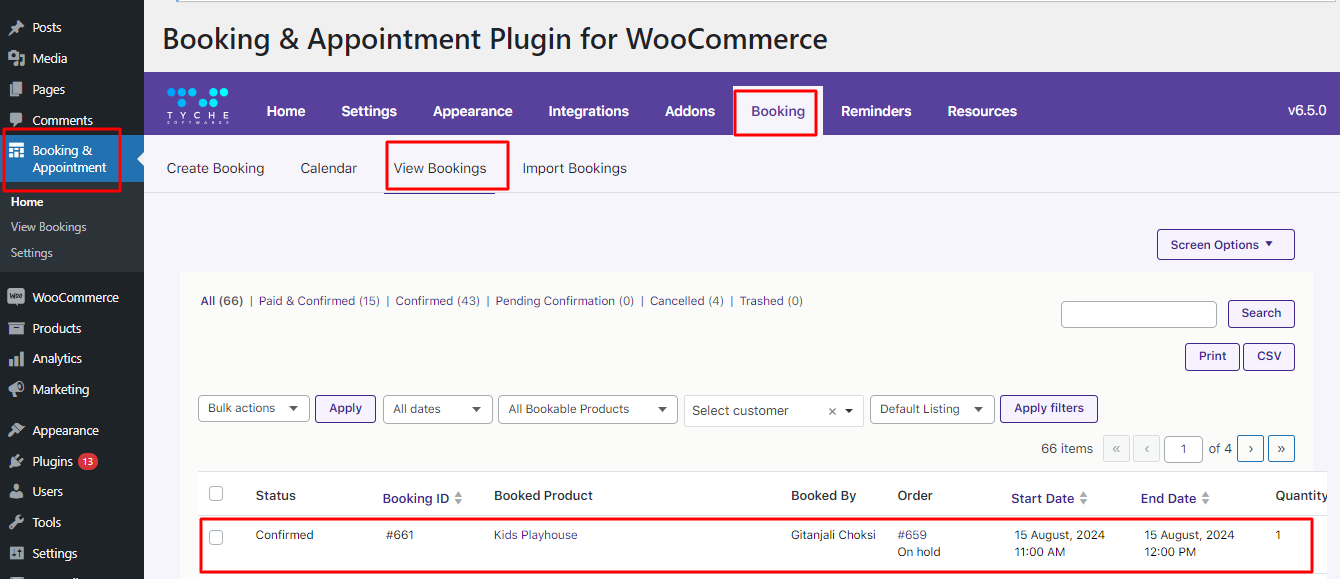
e) View Bookings page
After placing the order, the View Booking page on the admin side will record the Booking details.
Each time slot will be recorded in a new record for the same order number.
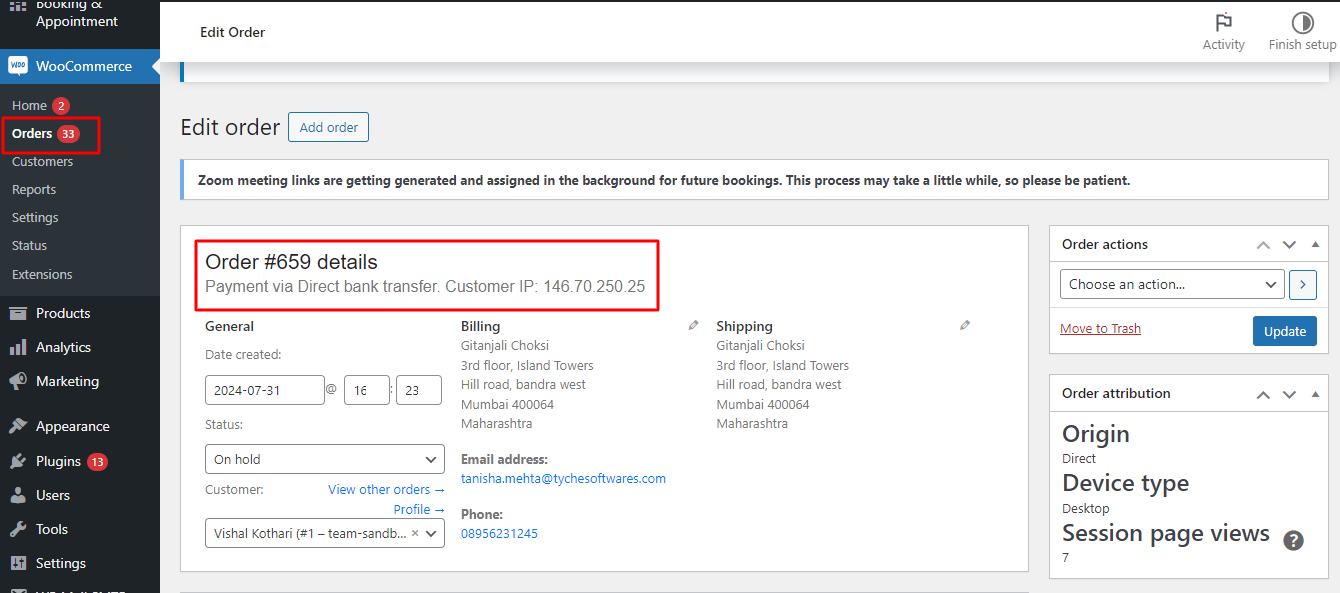
f) Edit Order page
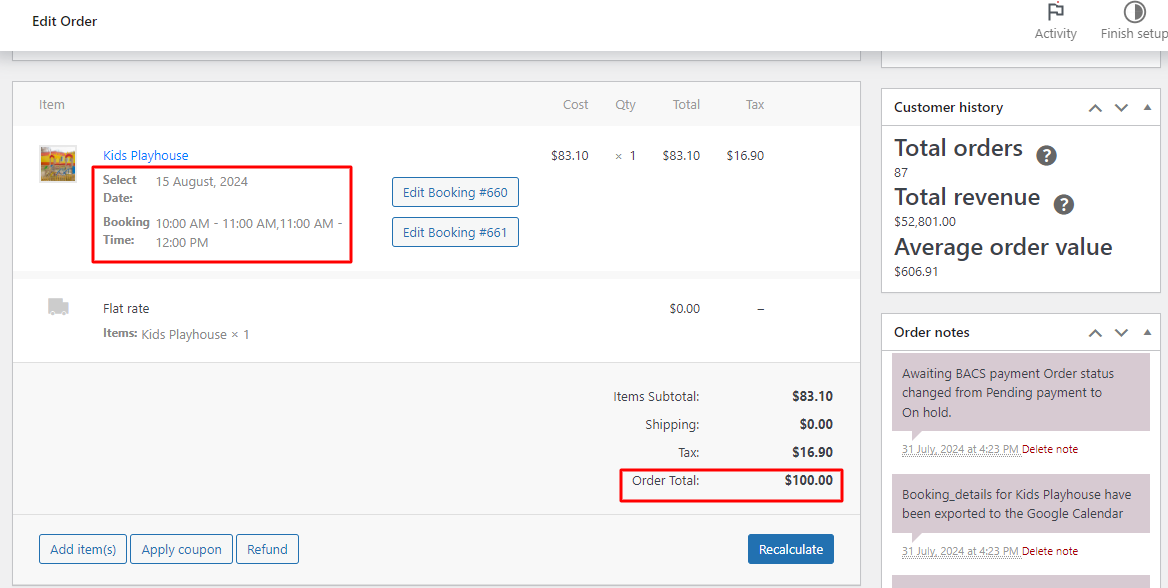
The Edit Order page will have all the selected time slots stored along with the other booking details.
There you have it! Your customers can choose multiple time slots in a giffy with this add on!
