Create Booking
↑ Back to topThe customers may call the website’s phone number or send emails for a manual booking.
That’s why store owners and admins can create bookings manually using the Booking and Appointment Plugin for WooCommerce.
Here’s how: Navigate to WooCommerce > Booking and Appointment > Booking > Create Booking.

Select the Create Booking option
Here, you will get to add the Customer, and Bookable Product details and select one of three ways you wish to create the manual order.
A. New Order
↑ Back to topThis lets you create a new order altogether. Here, you can select from either a Customer or a Guest.

Create Booking section
In this case, ‘Tanisha Mehta’ has been selected as the Customer. The Bookable product is ‘Guitar classes for Beginners’.
Choose ‘New Order’ under the Create Order option.
Note that a new order will be created here for the booking, which will be active only after the order is processed or completed.

Selecting the first option for creating an order
After clicking the Next button, you will be taken to the next page, where you can select the booking details according to the product’s availability.
You will need to add multiple dates since the Guitar lessons for Beginners allow you to select a faculty and multiple dates.

Create Booking where you add Booking Data
Select the booking details as your customer requested. In the case below, Kinjal has been selected as the Faculty. The Booking dates are 30th March, 31st March, and 2nd April, 2024.
The price calculated based on the dates selected is $240.
Once done, click the Create Booking button.

Adding booking dates for the order
A new booking order will be created, and you can now view that new order as can be seen below

Manual order created
The order ID in the above image is #561. Under the Order Notes section at the bottom right, you will see that the Manual Booking note was created on 28 March, 2024.
Note that if any error occurs during this booking process, you will be redirected to the Create Booking page with the specified error message.
B. Existing Order
↑ Back to topUsing this option, you can add the new booking to the existing order using the Order ID.
Go with the same selections for Customer and Bookable Product.
In the Create Order section, choose the Existing Order option.
Under the Existing Order ID, add the Order ID of an existing order to which you want to add the new booking. Let’s go with 561.

Assigning booking to an existing order
After clicking the Next button, you will be asked to add the booking dates on the Create Booking for Existing Order page.
You can enter the details as shown below:

Adding booking dates
Thus, this new booking will be added to the existing Order #561 as shown below:

Here, two bookings have been added to one order.
The Order Notes section shows that the bookable product ‘Guitar Classes for Beginners’ was manually added to this existing order.
These same order details will be reflected on the WooCommerce > Orders Page as shown below:

If you view the order by clicking the  icon, you will be able to see the booking details:

C. Only Booking
↑ Back to topThis setting allows you to create bookings manually without creating a WooCommerce order.
This is especially useful when you want to reduce the quantity of a product on a particular date and time or when you have received offline bookings for which you do not want to create any orders.
Add your customer and bookable product. In this case, it is Tanisha Mehta who will be responsible for the bookable product Conference Hall.
Select the Only Booking option in the Create Order section setting. Now click the Next button.

Since the Conference Hall is a duration-based booking type, you will have to select the duration, booking date and time as shown below:

Click the Create Booking button once you’re done. You will get to see the following message when your booking is successful.

To view the created booking, go to WooCommerce > Booking and Appointment > Booking > View Bookings tab as shown below:

Note that on the WooCommerce > Order Page, you will NOT find this booking as an order.
That’s it! The Booking and Appointment Plugin for WooCommerce is there to help you provide a complete solution for both online and manual service reservations.
Calendar
↑ Back to topThe Booking andAppointment for WooCommerce plugin lets admin view their upcoming bookings in one single place—a Calendar.
Navigate through to WooCommerce > Booking and Appointment > Booking > Calendar

This is how it will appear:

By default, you will see the calendar in Week view, as shown above.
You can view specific bookings using the Filter Bookings By Products option.

For instance, to search for Enrich Salon and Spa bookings, type it in the Filter Booking By Products field, as shown above.
You can even add more than one product in this field.
Click the Filter button, and you will see all the bookings under that title, as shown here:

Booking events will appear in the calendar for all the bookings placed on your WooCommerce store.
Clicking on a particular event will show a Qtip with booking information, such as Order ID, Product Name, Customer Name, Quantity, Start Date, End Date, and Time.

All the bookings will be displayed on monthly, weekly, and daily basis.
1. Month View
↑ Back to topThe Month View lets you see all the bookings on each day in a particular month.
For instance, here you can see all the bookings in April 2024.

2. Week View
↑ Back to topThe Week View highlights all the bookings made in a particular week of a month.
For instance, as can be seen in the calendar below, Grand Apartments is booked for all day from Monday, April 1st, 2024, to Sunday, April 7th, 2024, during the week of April 1st to 7th, 2024.
Additionally, the same week displays another booking for Enrich Salon and Spa on Thursday, April 4th, 2024, from 17:00 to 19:00.

3. Day View
↑ Back to topIn this view, you will see the booking date and time on a specific day of the month.
For instance, as seen in the day-wise calendar view below, an Enrich Salon and Spa booking for 17:00 to 19:00 has been made for 4th April 2024, a Thursday.

In summary, using the Calendar settings, you can easily view all your bookings in one place in month, week, or day-wise calendar format, allowing you to manage and maintain bookings and their schedules more efficiently.
View Bookings
↑ Back to topUsing the Booking and Appointment Plugin with WooCommerce plugin, you can view all booked services at one glance in your WooCommerce store. On the View Bookings Page, the store admin can view, filter, print, and download CSV of all the bookings placed on your WooCommerce store.
E. Bulk Actions on View Bookings
F. Different Filters to View Bookings
A. View Bookings
↑ Back to topNavigate through WooCommerce > Booking and Appointment > Booking > View Bookings page.
Using the Screen Options, you can configure which columns you wish to view and the number of items per page using the Pagination setting. For instance, if 20 is selected as the value, then 20 items will be displayed per page after clicking the Apply button.
Once done, click the Screen Options button to close these settings.

Here’s how all the columns will appear:


Below are the names and descriptions of the columns that will be displayed in the booking table:
- Actions– It is a way to either Edit that particular booking or Delete it.
- Status– It is the status of the order- whether it is confirmed, in process, or pending.
- Booking ID– It is a unique number of a booking.
- Booked Product– Name of service booked by the customer.
- Booked By– Customer’s first and last name entered on the checkout form.
- Order– It is a unique number of a particular order.
- Start Date– This is the start date chosen by the customer for the booking service.
- End Date– This is the end date chosen by the customer for the booking service.
- Persons– Number of Persons selected for that particular booking.
- Quantity– Quantity selected for service when booking is made.
- Amount– It is the total amount of the order.
- Order Date– This will show the date and time when an order is placed.
- Zoom Meeting– This will show the Zoom meeting link when you have chosen to integrate your bookings with the video calling application Zoom.
You can arrange them using the ascending or descending order icons near the specific columns: Booking ID, Start Date, End Date, or Order Date.

Here’s how pressing the descending order icon for the Booking ID will present the bookings:

B. Download CSV of Bookings
↑ Back to topWith the click of the CSV button, you can download data for all, searched, and filtered bookings into a file.

Once it is generated, you will get the following message:

A data.csv file, after being downloaded, will show all the booking details:

C. Print Bookings
↑ Back to topThe Print button can be used to print all, searched, and filtered bookings.

As you click the Print button, a print preview of all/searched/filtered bookings will be generated in a new window, as shown in the image below.

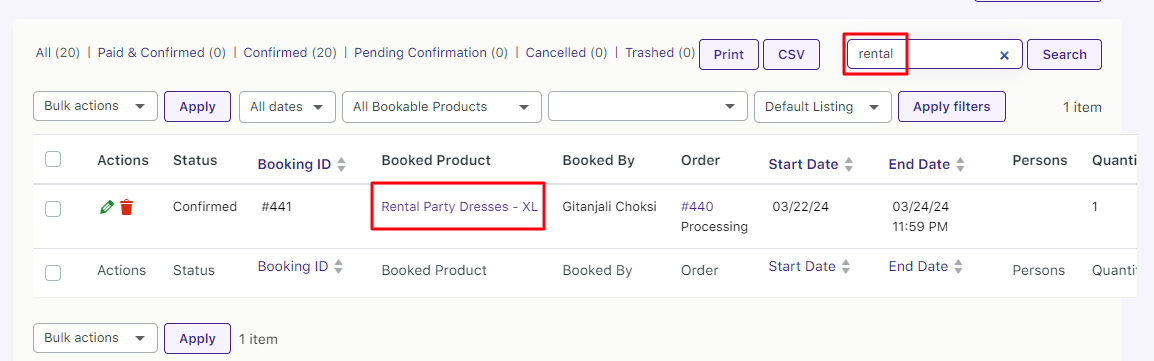
D. Search Option
↑ Back to topIf you wish to search the bookings, the Search box allows you to search by “Order ID” “Customer Name” “Product Name” “Check-in Date” “Check-out Date” or “Order Date”.
You can search using any of these options that are preferable to your needs. For example, when you search for “rental” all the bookings booked for the same Product Name will be listed in the booking table.
E. Bulk Actions on View Bookings
↑ Back to topIf you wish to apply a particular action on more than one booking, then you can use the Bulk Actions setting as shown below:

As you can see, you can choose to delete more than one booking by selecting ‘Delete Booking’ from the drop-down menu.
If you wish to change the status of the bookings to confirm, then you can choose the ‘Confirm Booking’ option.
If you wish to cancel more than one booking, you can choose the ‘Cancel Booking’ option.
Tick to select the checkboxes beside each of the bookings, select the Bulk actions that you wish to carry out and click the Apply button.

F. Different Filters to View Bookings
↑ Back to topThe View Bookings page has different filters by which you can easily view the details of different bookings suitable for your requirements. Here are the available filters:
1. Filtering by Dates:
Using this filter, you can see your bookings based on the dates.

In the dropdown option, you will find a list such as ‘All dates’ and different months with years. For example, the booking dates of April 2024 are filtered as shown below:

2. Filtering by Products:
Using this filter, you can view your bookings by selecting your products.

For instance, if you wish to view the bookings for your product ‘Parenting Goals and Expectations’, you can select it from the drop-down bookable product list. All bookings made with it will be filtered and shown, as can be seen below.

3. Filtering by Bookings:

Under this filter, you will find the following entries in the drop-down list:
- Default Listing – It displays the booking records in its default state – the way the bookings have been received.
- Today Onwards – It displays booking records of current and future dates.
- Today’s Check-ins – It displays all the booking records whose check-in date is today.
- Today’s Check-outs – It displays all the booking records for today’s check-out date.
- Imported Bookings – It displays all the booking records that were imported.
- Custom Dates – It allows selecting the custom date range on the View Bookings page, which displays the bookings made between that selected custom date range:

4. Filtering by Customers:
This filter will allow you to see bookings made by a specific customer.

Enter your customer’s first few letters or select a name from the list, and it will automatically bring up all the booked orders made by that customer. For instance, the name Gitanjali will give the following results:

Here are the bookings created under this customer’s name filtered in one place:

In summary, as can be seen, varied functions like view, filter, search, print, and download CSV of bookings on your WooCommerce store can be done with great ease on the View Bookings page with the Booking and Appointment Plugin for WooCommerce.
These features in the View Bookings page provide store owners with a comprehensive toolkit for managing and organizing their bookings more efficiently.
View Bookings for Customers
↑ Back to topThe WooCommerce Booking and Appointment plugin lets users view Bookings for Customers. So if your customers wish to view their bookings, they can easily find them in one place.
After visiting your site, your customers should go to their Account page by clicking on ‘My Account’

Once they click on it, they will find different tabs such as Dashboard, Orders, etc.
All the bookings made by that customer will be displayed under the ‘Bookings’ tab.

The Bookings Page is divided into two sections, ‘Upcoming Bookings’ and ‘Past Bookings’.
The Upcoming Bookings section displays all the bookings that you have currently made. It will display booking details such as the Booked Product’s name, Order ID, Booking’s Start date and End date, Booking Status, Zoom meeting link, and Actions.
You can see all of them below:

If your customer has made multiple bookings from the site, those bookings will also appear here.
Similarly, you will find the same columns for Past Bookings.
However, it will not have the Action column, as shown below:

If your customers need to search for a specific booking, they can look through the Search in Bookings field of Past Bookings or Upcoming Bookings.
Customers can search for a booking with their Order ID, Product Name, Booking Status, and Booking Date.
1. Order ID
↑ Back to top
2. Product Name
↑ Back to top
3. Booking Status
↑ Back to top
4. Booking Date
↑ Back to top
In summary, with the option to view bookings for customers, they can view all the details of their previous, new, and upcoming bookings in one place, as seen above. Customers can also search for a specific booking based on their Order ID, Product Name, Booking Status, and Booking Date to find more details or keep track of them.