Creating bookable products for Dokan Vendors
↑ Back to topUsing the Booking and Appointment for WooCoommerce plugin’s compatibility with Dokan allows your vendors to turn a product into a bookable one.
Let’s see how that works.
A. Creating a bookable product
↑ Back to topLogin into your Vendor account and go to the Products tab.
You can create a new product by clicking the ‘Add new product’ button or editing an existing product.

The Edit button can be found when you hover over the product:

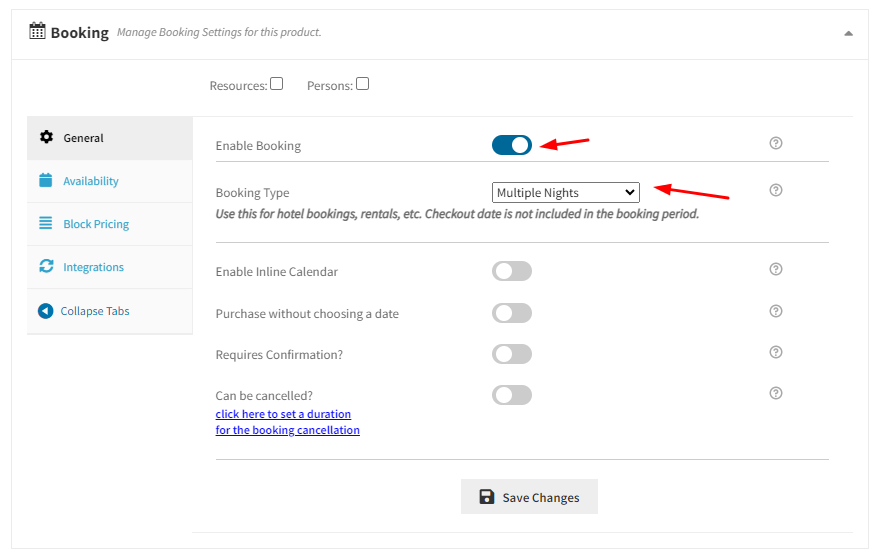
Scroll down to the Booking tab and enable booking first.
Select the Booking Type as Multiple Nights in the Booking meta box.
Click the Save Changes button to save these settings as shown below:
Next, you need to set the availability for this product for which you need to go to the Availability tab.
You can add the settings shown below:


Once all the values are set, click on the Update Product button and the booking settings for this product will be saved.
Thus, this bookable product will be displayed on the Shop page in this manner:

Your Vendors are now ready to configure bookings and accept orders for this bookable product.
B. Front-end booking process
↑ Back to topLet’s understand how the product will appear on the front end for the customer.
For instance, you as a customer wish to book Hotel The Pierre for 2 nights from 28th January to 30th January 2018.

After you add the dates, the total cost displayed is $2000.
After clicking the Add to Cart button to book this product, you will be taken to the Cart page where all your booking details will be displayed:

Here, the Vendor’s name will be displayed because this is a vendor product.
If you do not wish to change the details, click the Proceed to Checkout button to go to the Checkout page.
The Your Order section will appear as such:

Recheck all the booking details before confirming the order.
The vendor’s name will also be displayed on the Checkout page under the Your Order section.
If all looks fine, click the Place Order button to place the order.
This order once booked, will be seen under the Orders menu option for the Vendors as shown below:

To check the order details, you have to click on the Order ID and the details will be displayed.
When you click on Order 1996, the following details will be shown:


Thus your order has been placed.
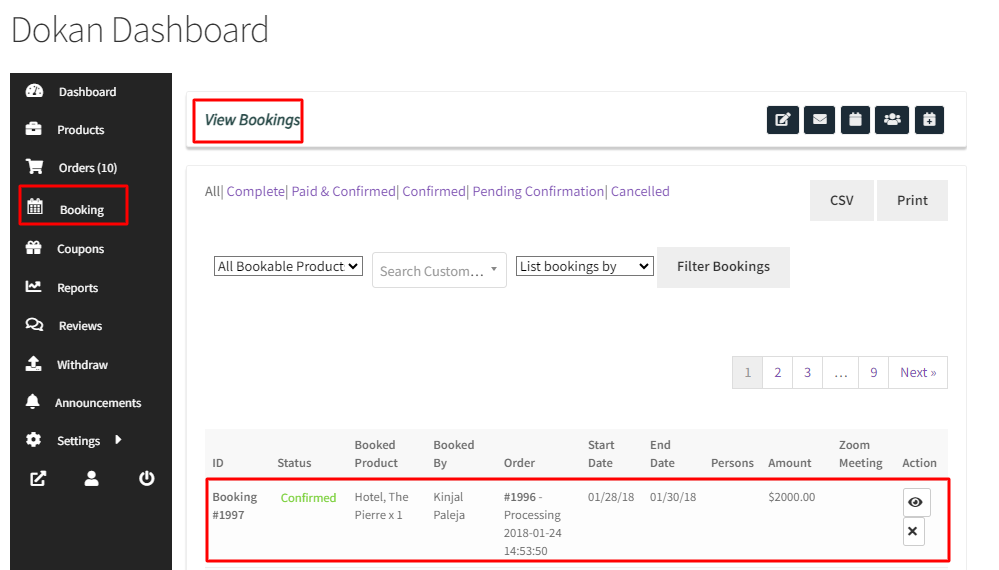
In addition to seeing the booking details in the order, you can also check this booking from the View Bookings page!
You will have to go to the Booking menu option and under the View Bookings tab you will find this booking added as shown below:
To summarise, in these easy steps, your Vendors can easily create bookable products!
Sending Reminder Emails and SMS for bookings
↑ Back to topTo send reminders for bookings, Dokan Vendors have 3 different options.
Let’s see how you can send reminders in these three ways.
Go to your Dokan Vendor Dashboard > Booking > Send Reminders.
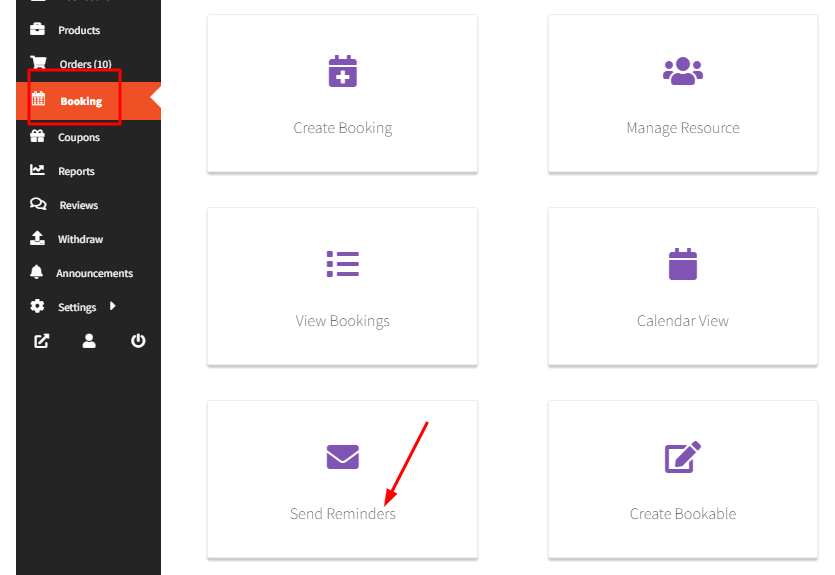
After clicking on it you will get all three options.
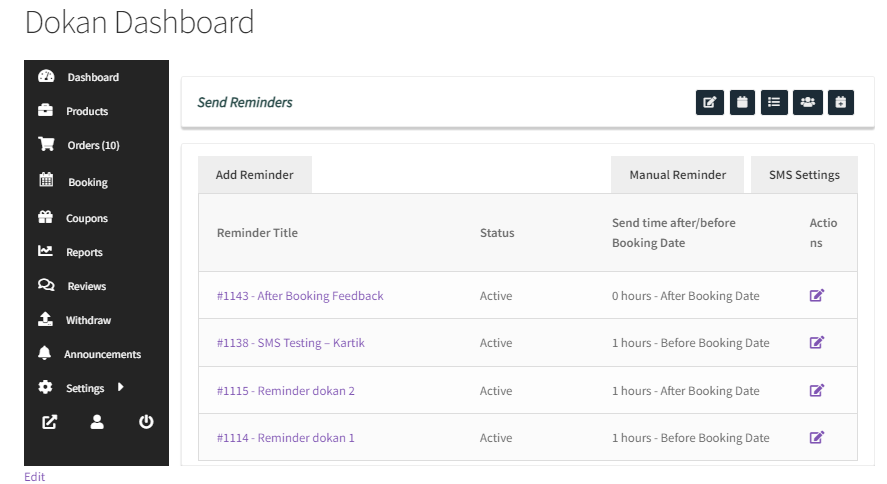
Let’s have a look at them one by one.
1. Adding an Email Reminder
↑ Back to topClick the Add Reminder button as found here:
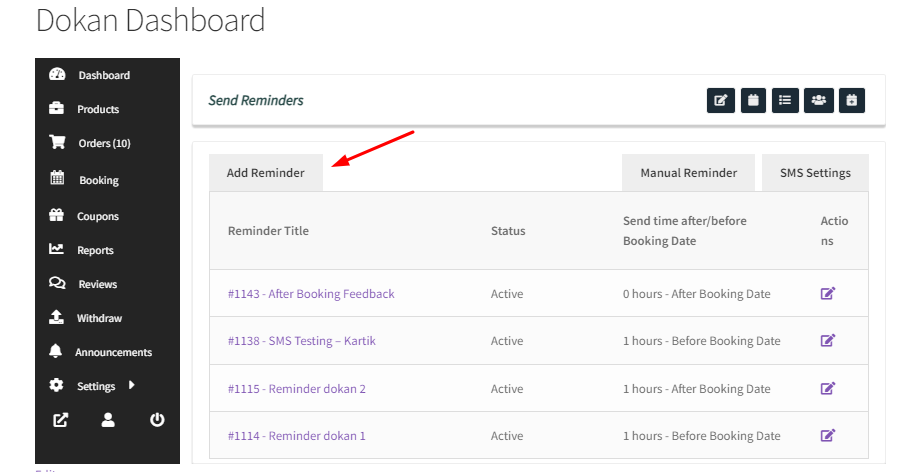
This is how the page will look like:
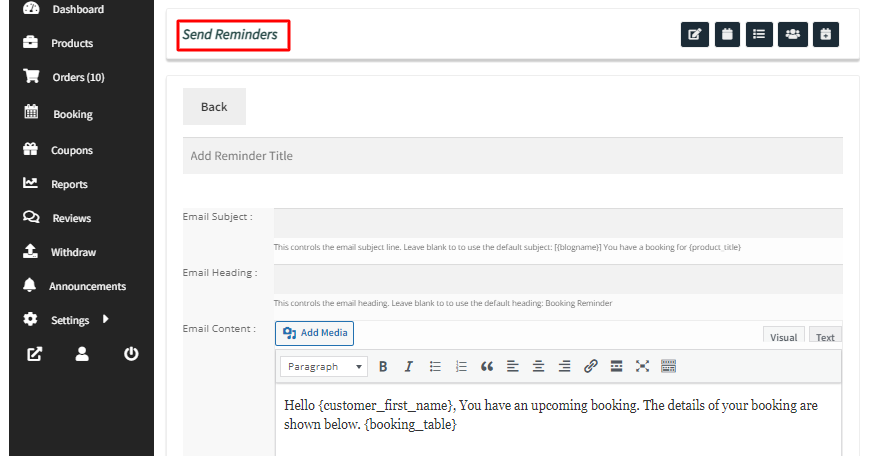
Add the Title, subject, and heading for this email.
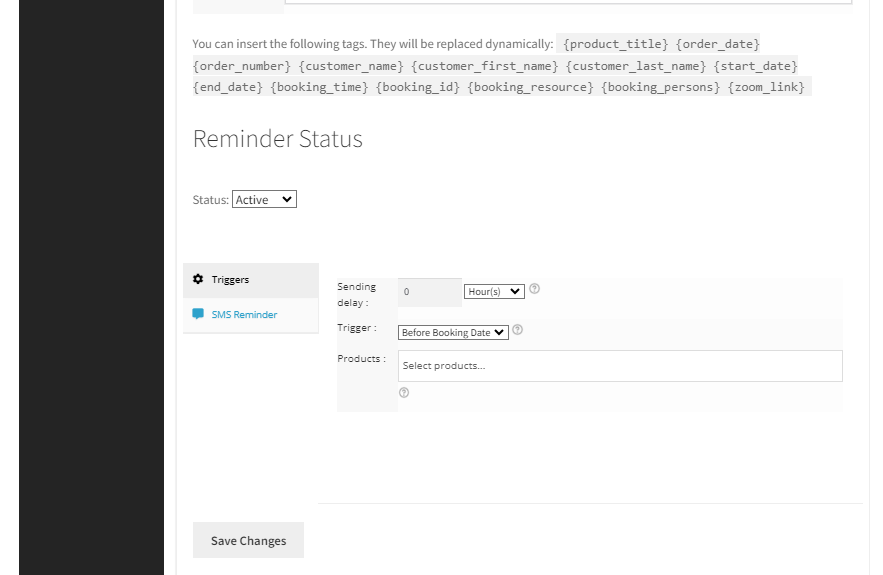
You can edit the Email Content using the shortcodes/tags given.
Set the Status of this reminder as Active.
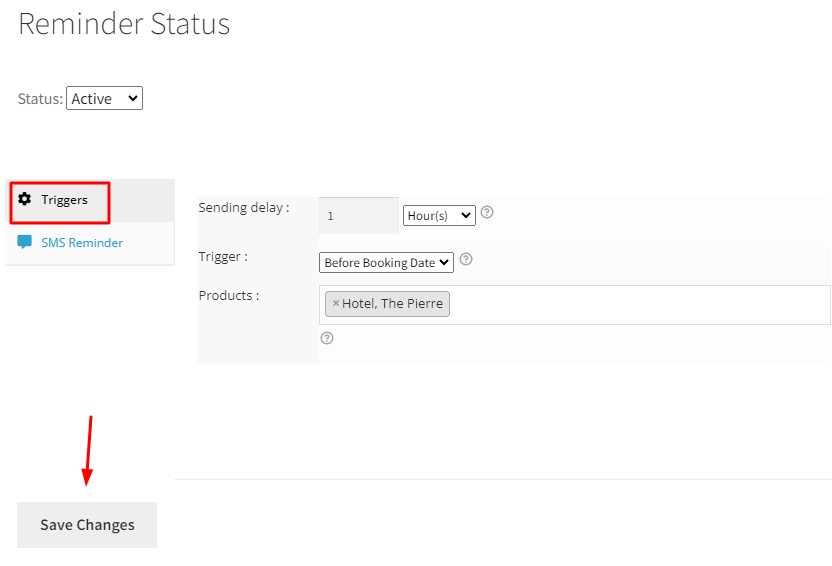
Under Triggers, you will find the following:
Sending Delay decides the time when the email will be sent. For instance, it could be after or before 1 hour, 2 days, 1 month, or even 2 years.
Trigger decides whether the email will be sent before or after booking.
The Products setting lets you choose more than one product for which this email reminder will be sent.
For example, you can enter a delay of 1 hour before the booking date for the product Hotel, the Pierre.
This would mean the customer will receive an automatic reminder email 1 hour before their booking date for the product Hotel, the Pierre.
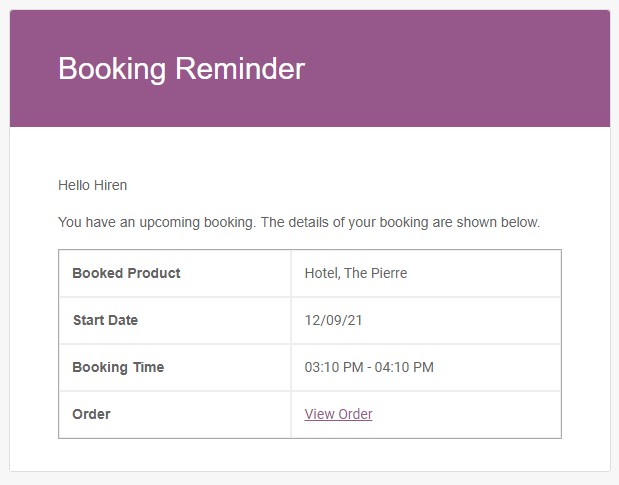
Let’s say a customer has booked a Hotel for 9th December – from 3:10 PM to 4:10 PM.
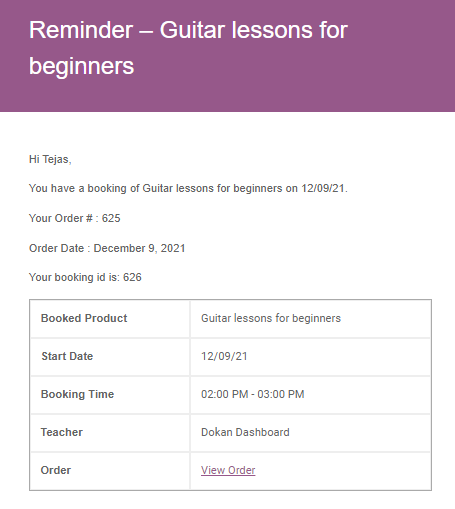
They will receive an automatic reminder email at 2:10 PM on 9th December as shown below:
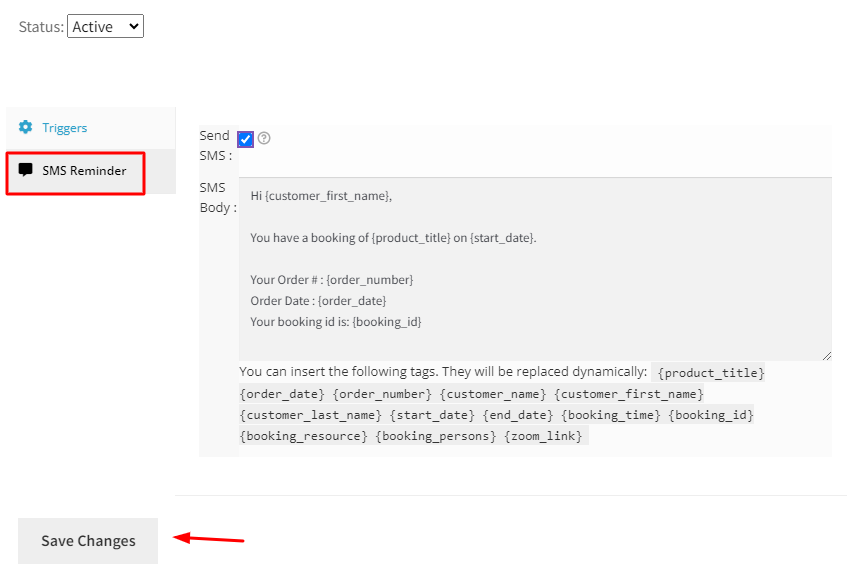
Similarly, you can go to the SMS Reminder tab.
Tick the checkbox for the Send SMS setting.
Edit the SMS Body using the short tags.
2. Manual Email Reminders
According to this feature, you can manually set up reminder emails.
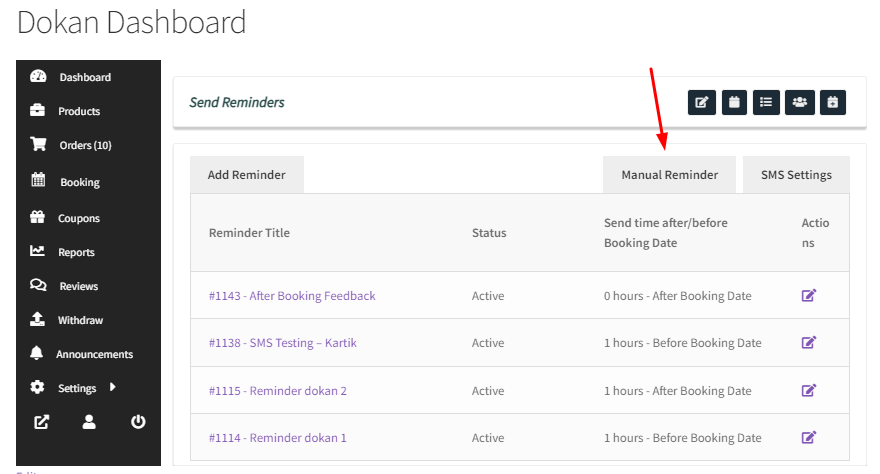
The template used for sending manual reminder emails is the same as the one used for automatic reminders but here you can add more content to the message.


Reminders can be based on specific Order, Booking ID, or Product. This can be done using the respective radio button in Send Reminder for the option.
If you select Order # in the ‘Send Reminder for’ option, you will see the list of Order IDs on clicking the Order IDs field as shown below:
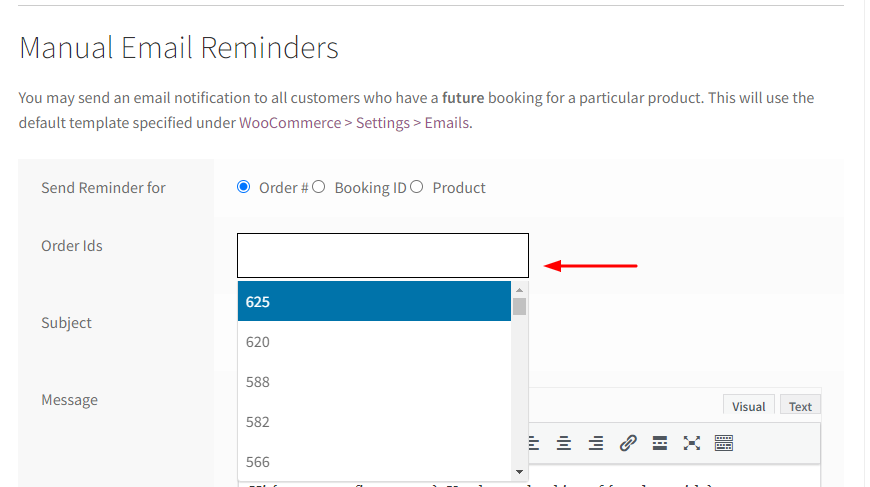
Now select from the list of displayed Order IDs.
You can send the reminder email to multiple Order IDs by selecting them from the dropdown.
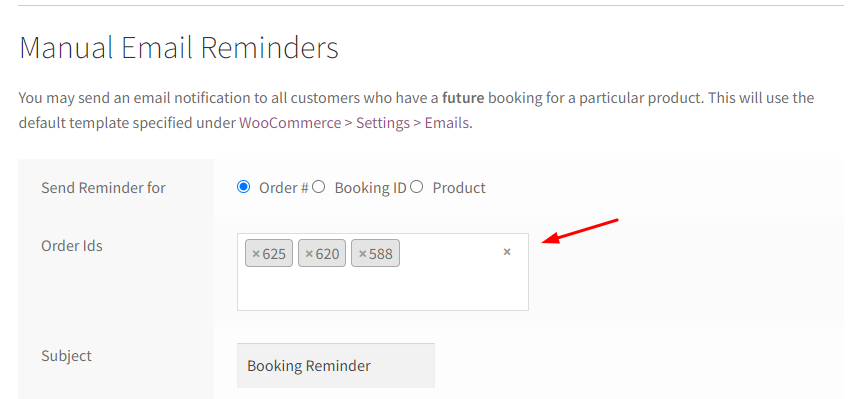
The reminder email will be sent to the selected Order IDs together.
Likewise, you can select the Booking ID for sending reminder notifications by selecting the booking IDs from the dropdown as shown below:
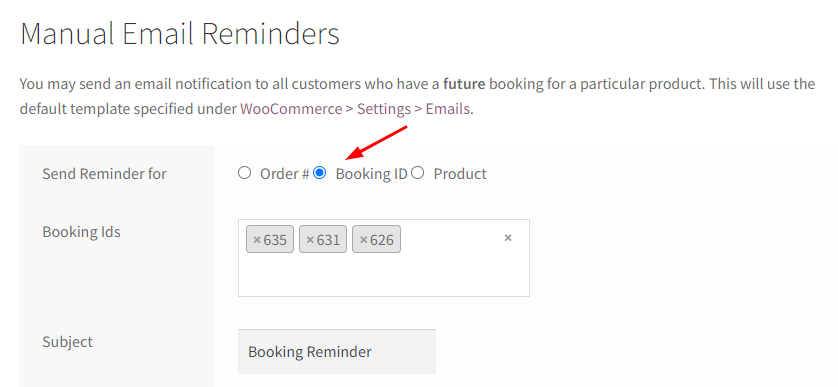
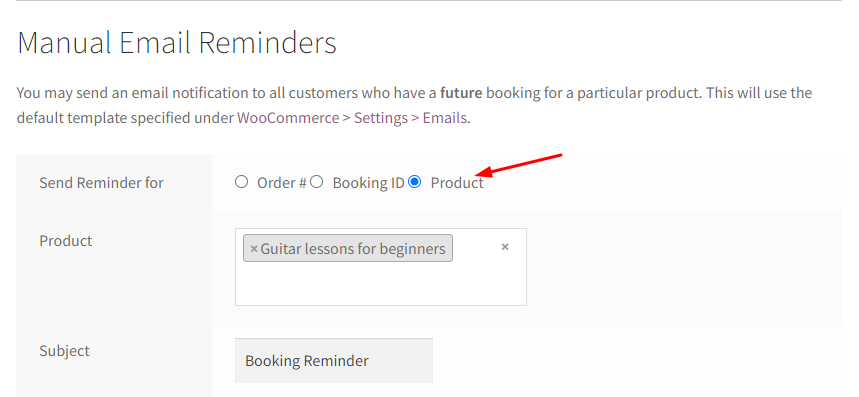
When you select the Product radio button, all the Booked Products will be displayed like Order IDs and Booking IDs.
You can select a single product or multiple products from the list as shown below:
Once you have selected the Order # or Booking ID or Product for sending reminder emails, you can add a Subject and Message to the email.
To understand this better, let’s take an instance. You want to send a reminder email to the customer for their booking for Guitar lessons.
Select product Guitar lessons for beginners, add the Subject as Reminder – Guitar lessons for beginners, and compose a message as shown below:
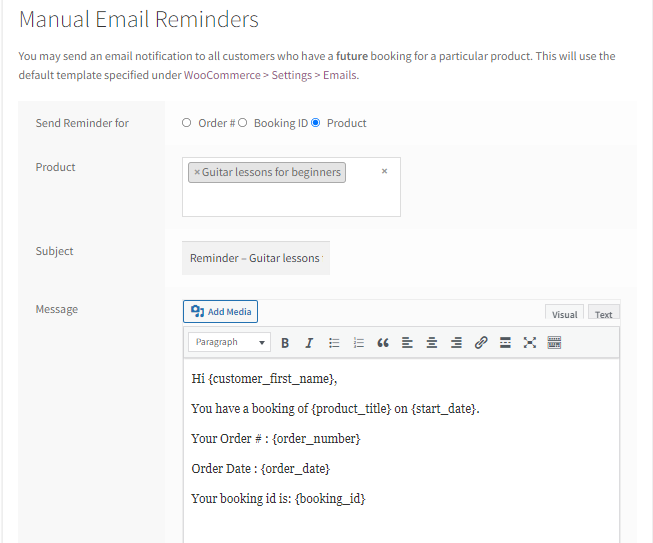
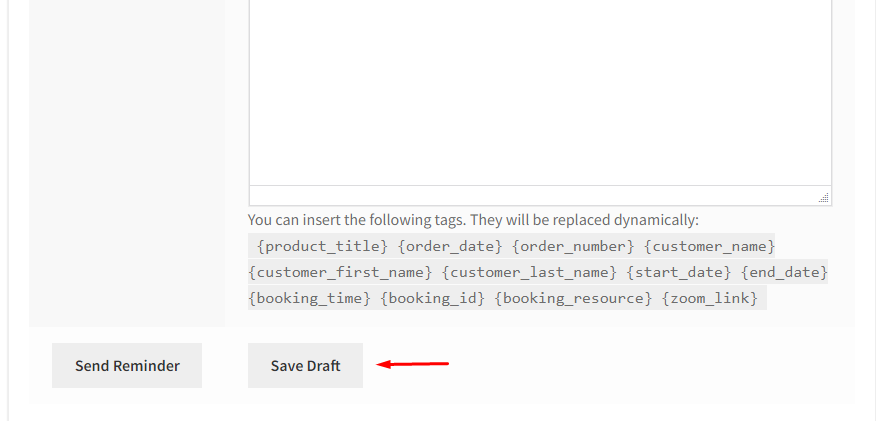
You can click the Save Draft button to save it as a draft and send the email later.
You can even click the Send Reminder button to send the reminder email immediately.
When you click on the Send Reminder button, the email reminder gets sent for all future bookings of Guitar lessons for beginners.
The reminder email sent to the customer will be displayed as shown below:
3. SMS Reminders
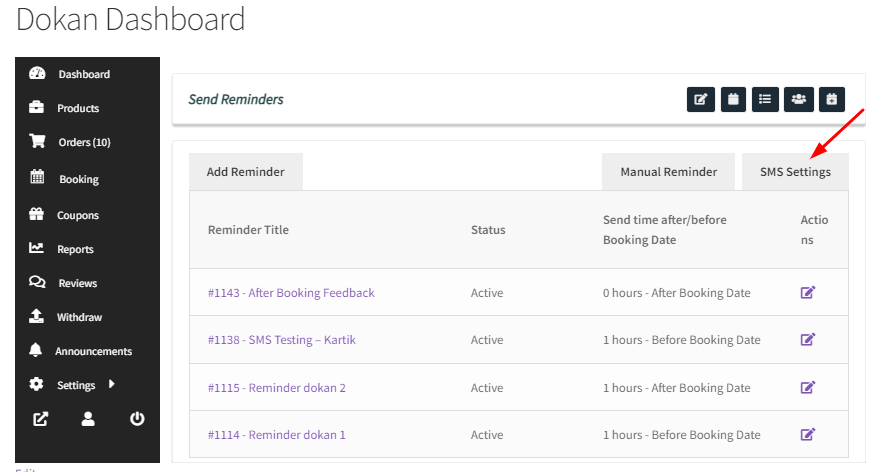
This setting lets you send SMS Reminders. Select the SMS Settings tab:
The SMS Reminders page will look like this:

To send SMS booking reminders, you must create a Twilio account.
You will collect your Account SID, Auth Token, and Twilio phone number.
Next, enter all these details after enabling sending reminder SMS by ticking the Enable SMS.
Next, you can make changes to the SMS Body.
There are some shortcodes available that can be used in the SMS body. They will be replaced by the actual information when sending an SMS to the customer.
Once you have filled in the details they will look like this:
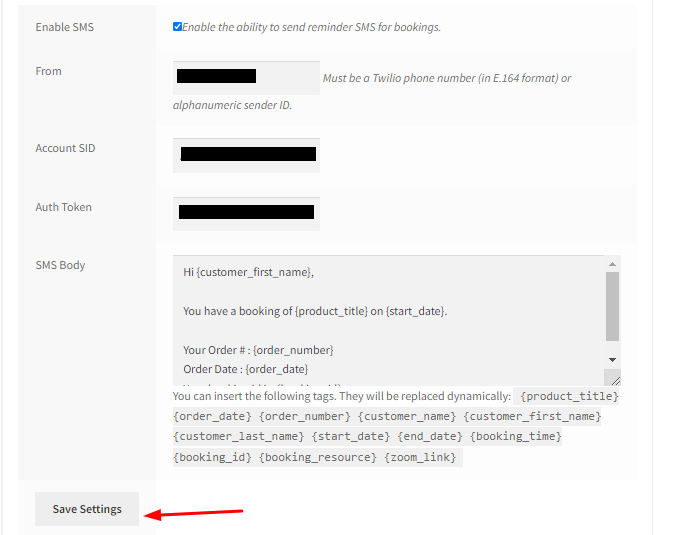
When you’re done, click on the Save Settings button.
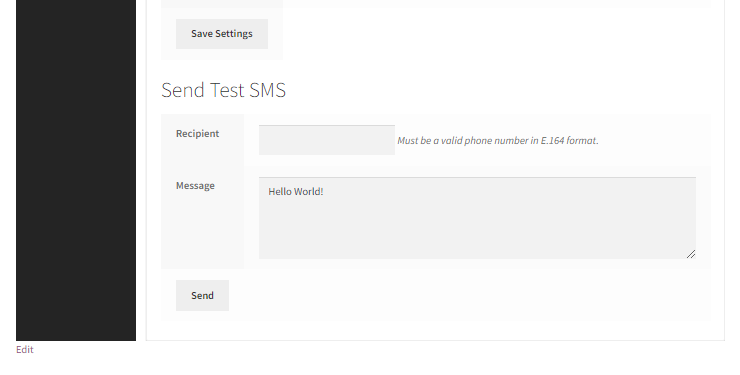
Now you will have to add details for sending a Test SMS to the added recipient so that you can check the message before it is sent to the customer.
The phone number in the Recipient field should be valid in the E.164 format.
Clicking the Send button will send an SMS to the number entered in the Recipient field.

Once done, you can click on the Send button.
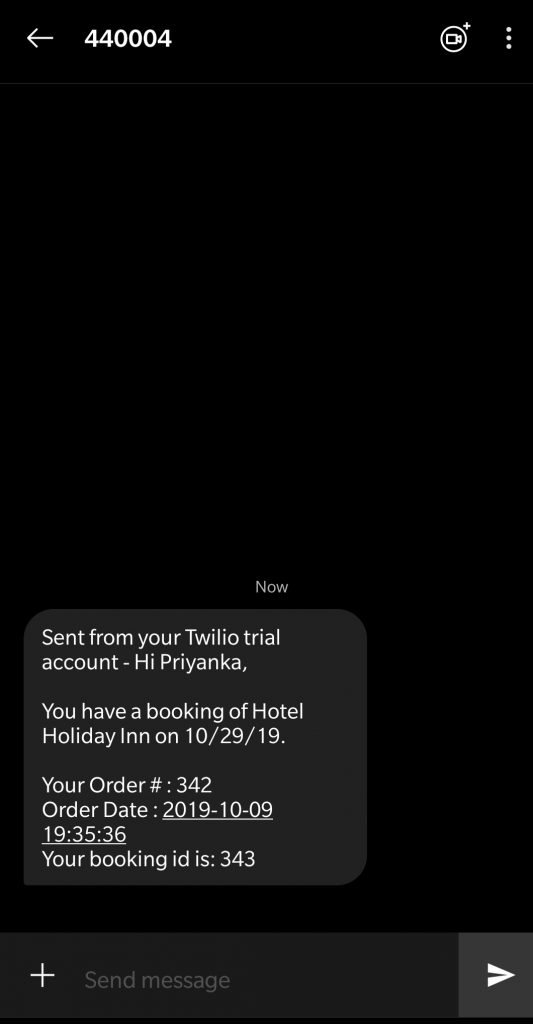
For example, let’s say that a booking for Hotel Holiday Inn is set from 29th Oct to 31st Oct 2019.
The SMS reminder will be sent to the customer about their booking with booking details as shown below:
In this way, Vendors can manage sending email and SMS reminders for the bookings automatically or manually!
View bookings in the Calendar & set up Holidays for Dokan Vendors
↑ Back to topDokan Vendors who wish to know about upcoming bookings at a glance can use the Calendar View.
A. Calendar View
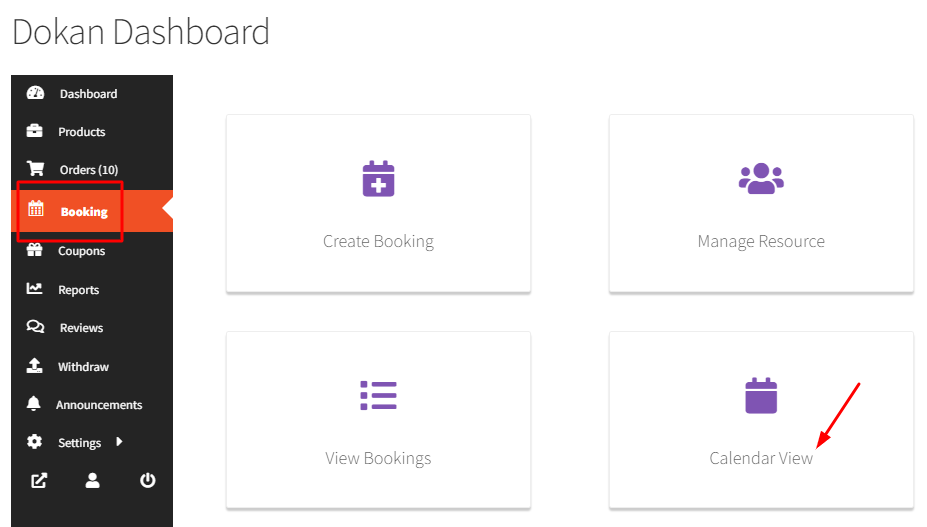
To access it, you will have to go to the Booking tab and click the Calendar View as shown below:
When you select it, by default you will be displayed the Week view:
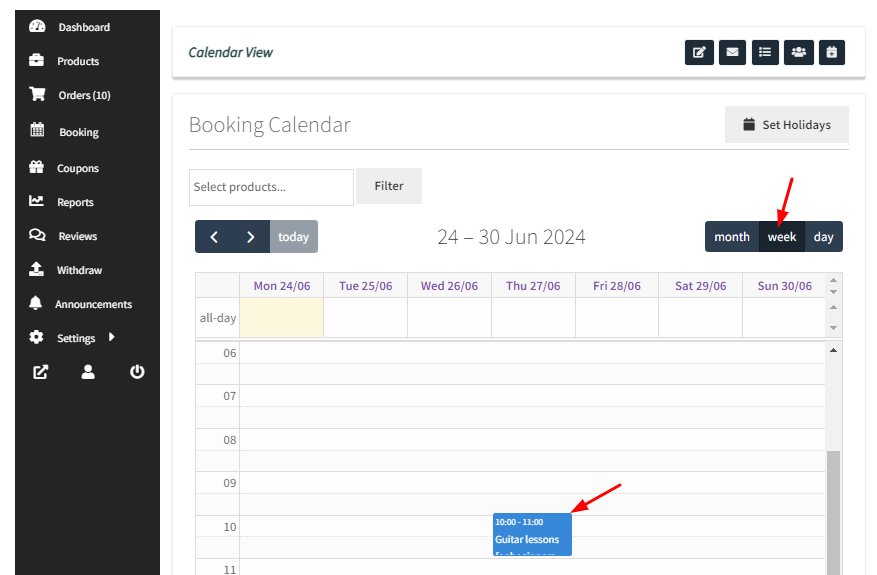
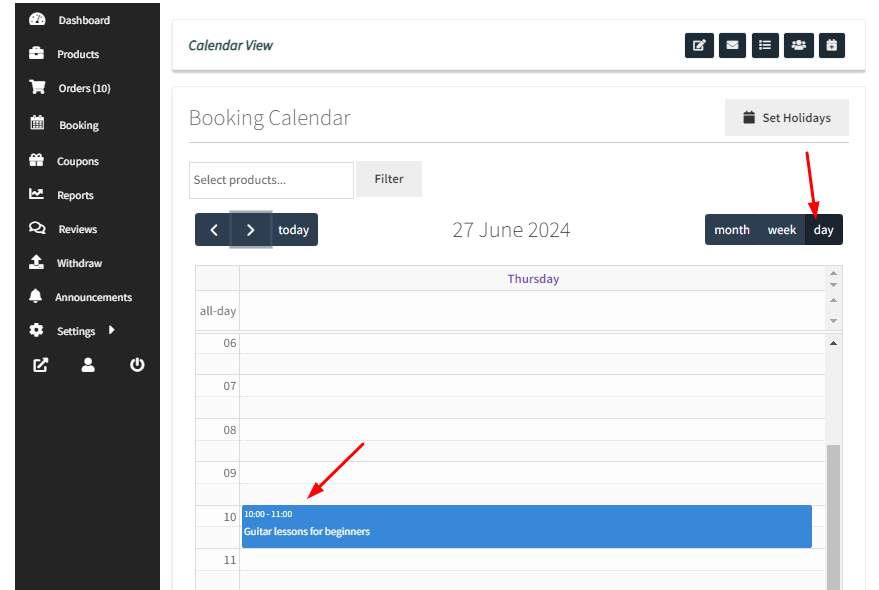
The upcoming booking is for 24th June 2024 with a timeslot from 10:00 to 11:00.
You can switch it up to Day view as shown here:
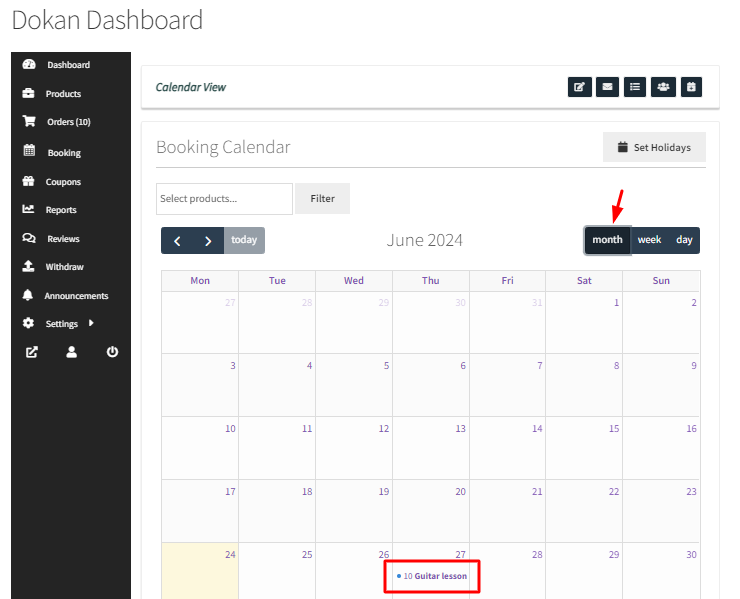
If you wish to view all the bookings in a particular month, simply choose the Month view:
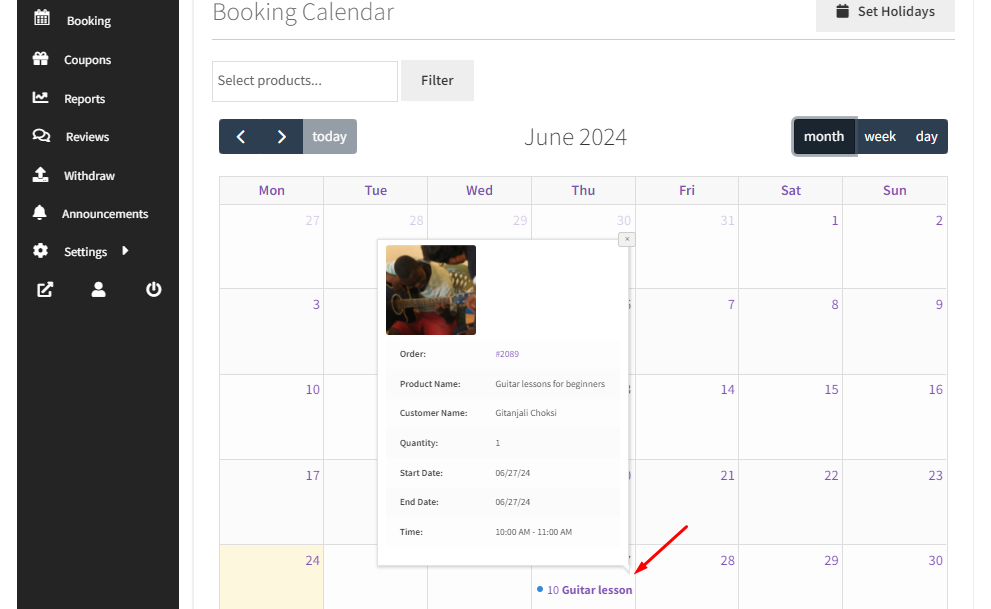
You will be displayed with different details such as Order ID, Product Name, Booking Date and Time, Customer’s name, etc when you click on the booking:
B. Setting up Holidays
When a Vendor wishes to set up Holidays, they can make use of the ‘Set Holidays’ feature as shown below:
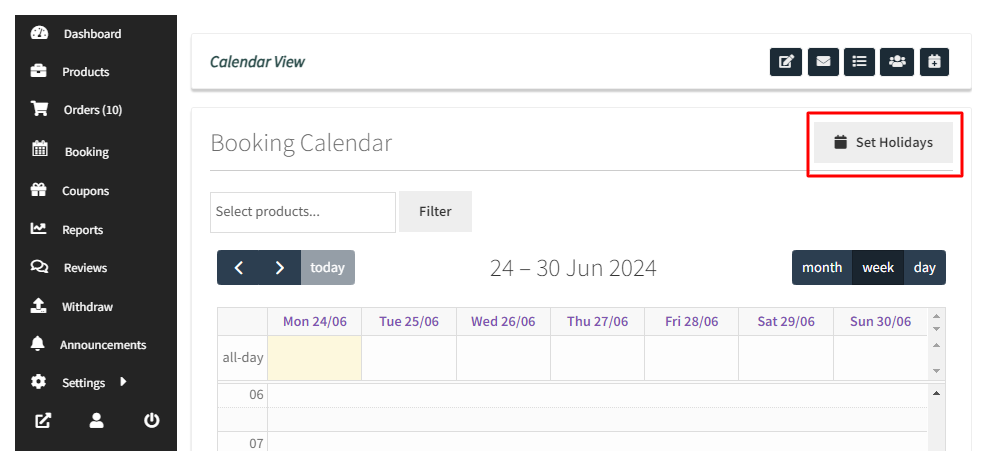
After clicking it, the Vendor will have to give a title to this holiday and add the duration, i.e., start and end date of this period.
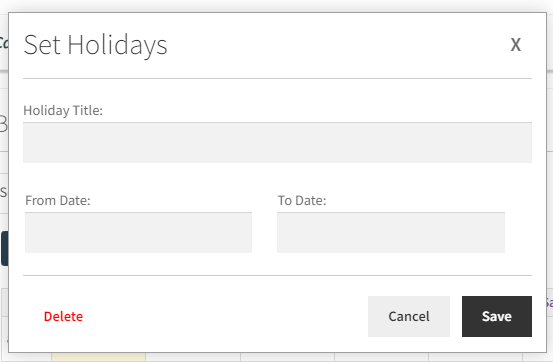
For instance, you want to set up holidays for Independence Day.
You can title it “Independence Day Unavailability” and set your dates from 4th July to 5th July 2021.
Click the ‘Save’ button once done.
You can also delete this holiday once it’s set up by clicking on the ‘Delete’ button.
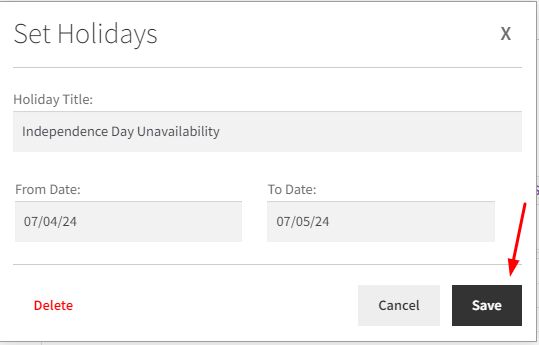
After saving it, your Holiday will appear like this on the Calendar:
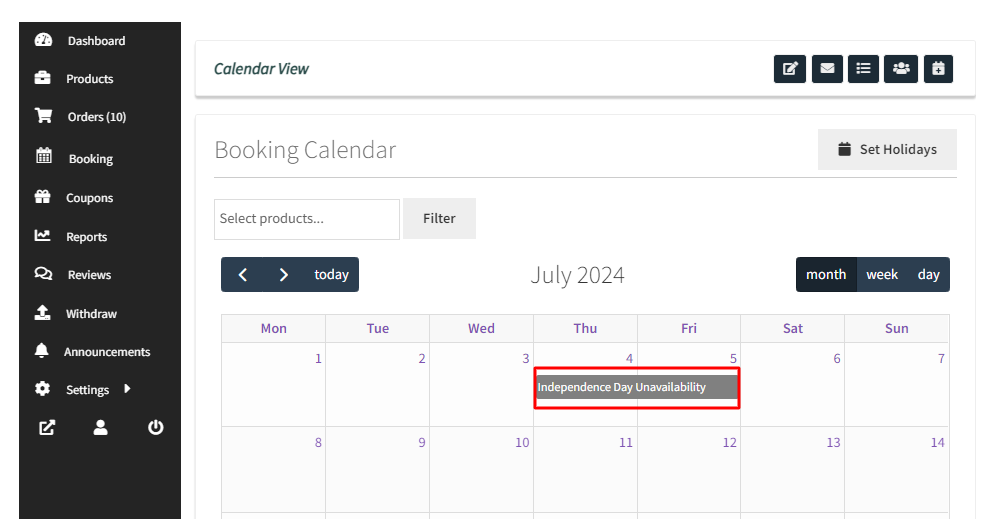
In this way, different vendors of your site can set up holidays for all their products using this feature.
Managing Resources for Dokan Vendors
↑ Back to topWith Booking and Appointment Plugin for WooCommerce, Dokan Vendors can easily manage resources for different bookings.
To make this possible you will require a few things:
- v5.10.0 of Booking and Appointment Plugin for WooCommerce
- v1.1.0 of Marketplace Integration Addon
- Dokan Plugin
Let’s get started!
Go to your Dokan Dashboard and find the Booking section. Click on the “Manage Resource” option here:
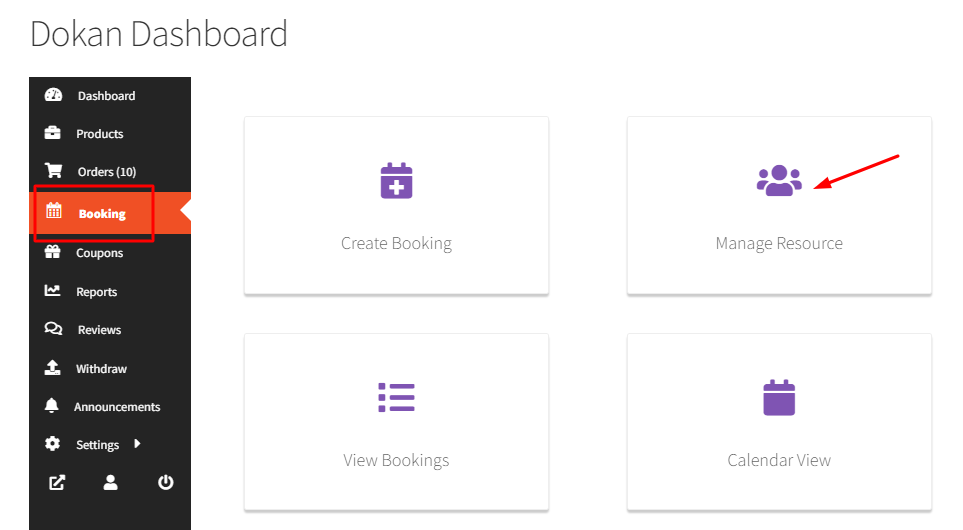
Find the “Add Resource” option and click on it:

It will appear like this:
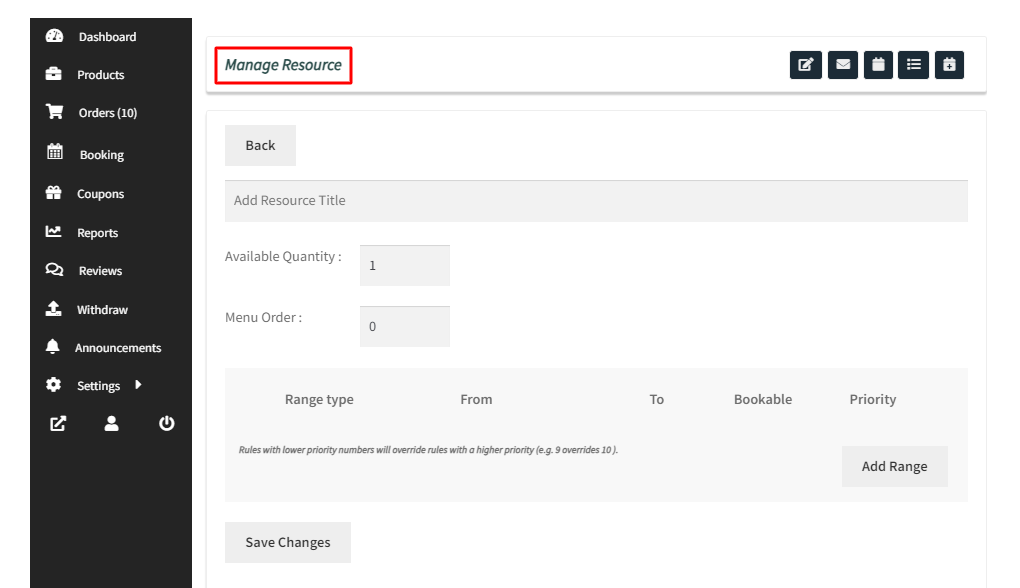
You will find the following values included here:
Resource Title: Here you can add the name of the Resource. For instance, you can add a person’s name here. Let’s go with Apeksha.
Available Quantity: This will let you select the number of resources that will be available at any given time. Let us go with 1.
Menu Order: This decides where the Resource will appear in the Menu. For instance, if 2 is entered here, the Resource Apeksha will appear 2nd in the Menu order.
Meeting Host: If you have connected the plugin to your Zoom account, you can select the meeting host of the online booking over here. You will not see this option if you have not linked it to Zoom.
Range Type: Here you can select a range for your resource person. For instance, your resource “Apeksha” is available to book only from 1st December 2021 to 15th December 2021. In this case, you will select the “Date Range” type. Learn about different range types such as the Range of months, weeks, days and even Time ranges by clicking here.
From: This indicates the start period of the range. For instance, here you can add 1st December 2021.
To: This is the end period of the range. Here you can add 15th December 2021.
Bookable: To make this range bookable, you can turn on the toggle. If the toggle is switched off, your booking for this range is unavailable. For instance, we will not switch on the toggle because we wish to block the dates from 1st December to 15th December 2021.
Priority: This will indicate which range of the Resource will get a priority. The range with lower priority numbers will override those with higher priority. For instance, if one range’s priority is set to 9 while the other’s is 10, the one with 9 will be given the first preference.
Add Range: This option will add another range for this resource.
Once you have filled in the details, it will look like this:
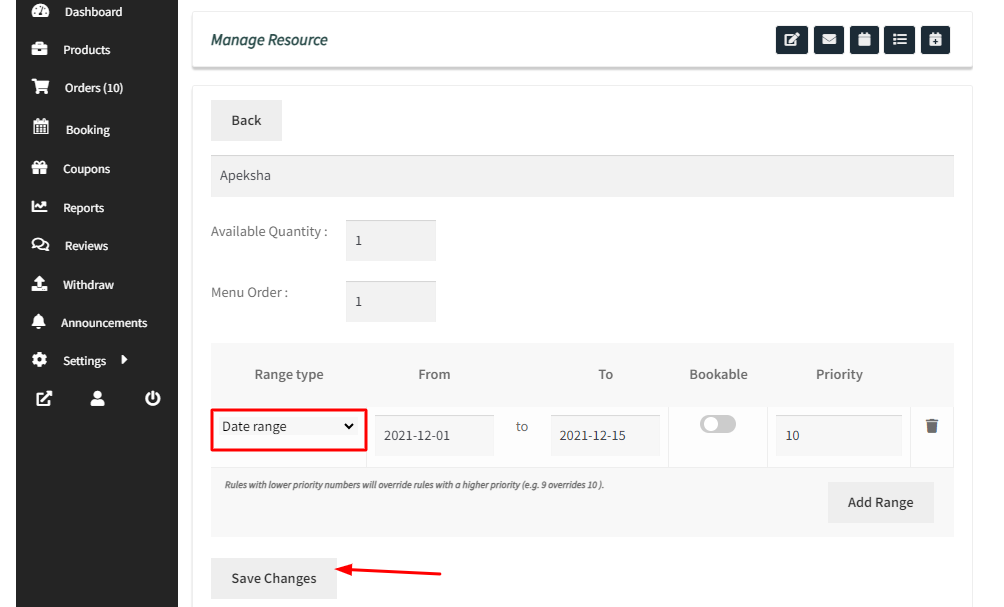
Once you have clicked “Save Changes” your resource will be added.
Similarly, you can create different resources and all of them will appear like this under the “Manage Resource” section:
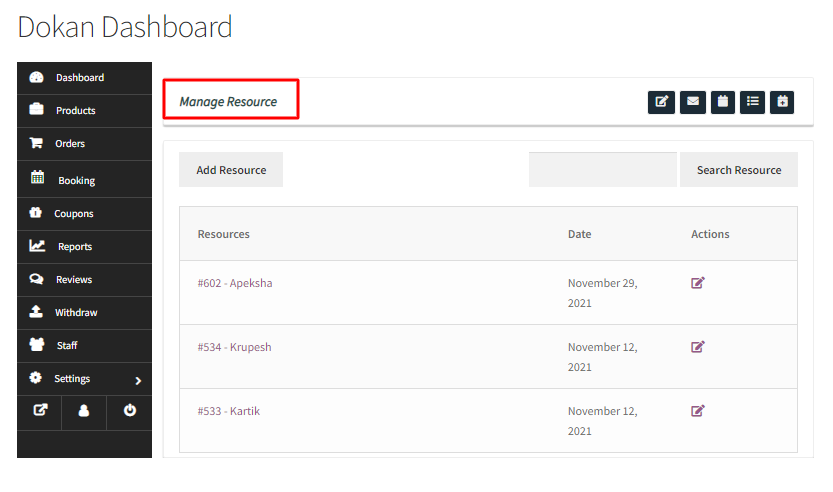
Here you will also find the option to search for a resource.
Type the resource name in the field and click the “Search Resource” button.
If you wish to edit any resource, click the Edit Resource icons under “Actions”.
Now, go to the Edit Product Page of the booking product where you wish to add your Resource.
For instance, you wish to add a resource to your product “Guitar lessons for beginners”.
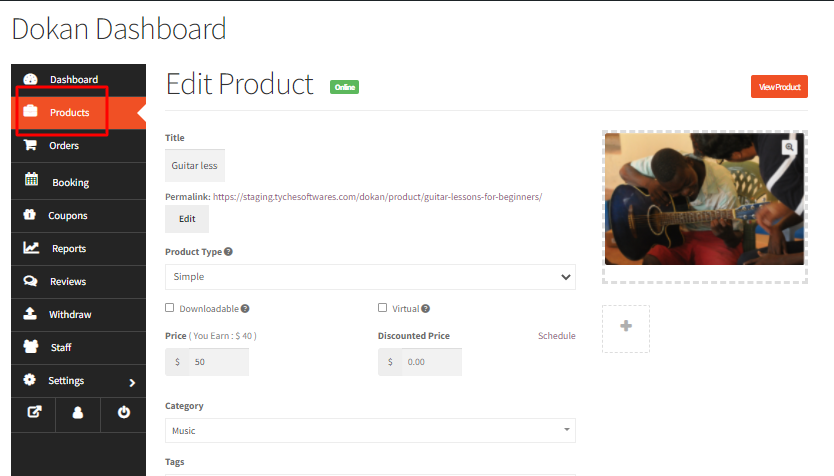
Scroll down to the Booking Metabox.
Tick the checkbox for “Booking Resource” as shown here:
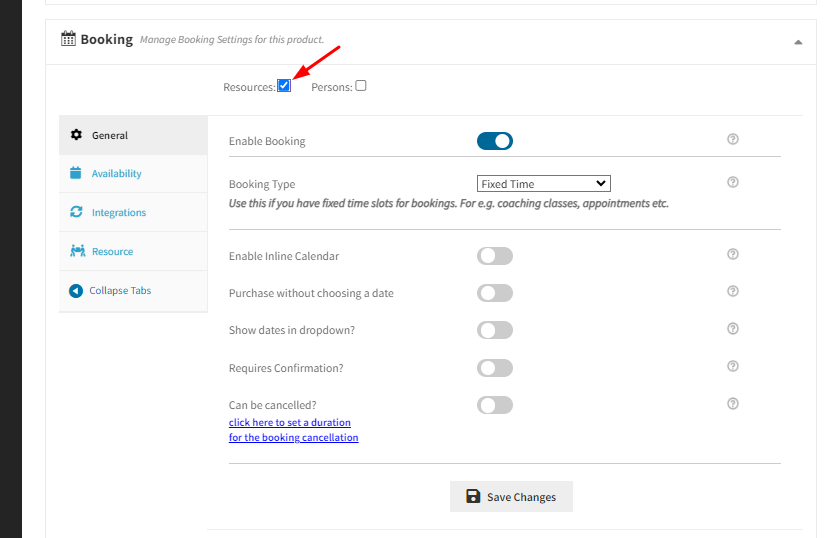
A new tab called “Resource” will be visible after doing this.
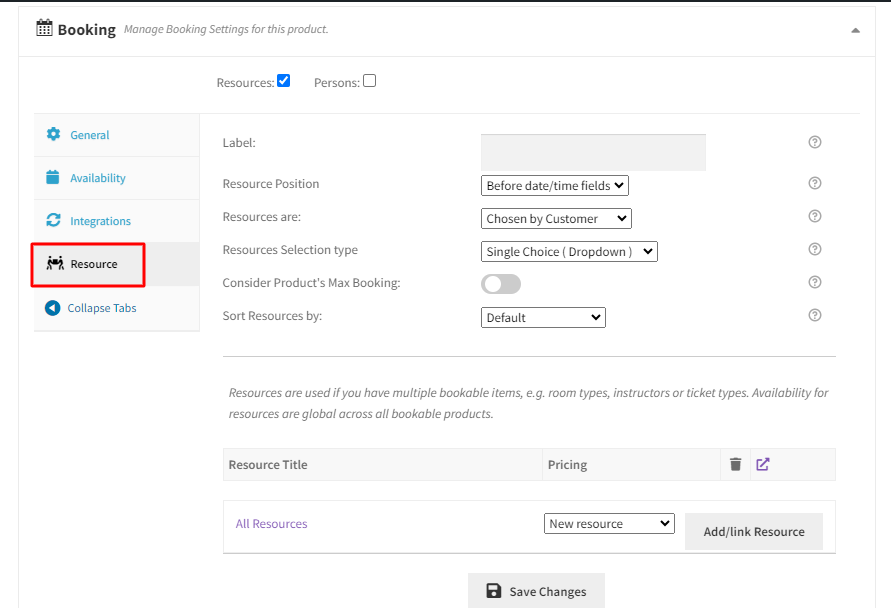
You can now give a label to the resources. For eg, you can label it ‘Teacher’.
Configure the resource position, selection type, sorting, etc here.
Next, click the dropdown that says ‘New Resource’ and choose a resource to add.
Click on the “Add/link Resource” button for this. Once filled, your details will appear like this:

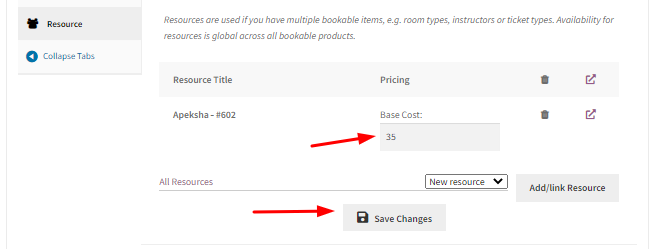
Next, you can add the Base Cost of the resource.
This means you’re charging a certain amount for the selected resource along with the booking amount.
Once done, click the “Save Changes” button and “Save Product”.
Let’s see how the resource added appears on the front end.
If a customer selects this product, they will get the option to choose the resource they want.
Let’s say that they went with the resource Teacher: Apeksha.
Once this resource is selected, only the days when this resource teacher is available will be visible to the customers.
For instance, when they try to choose the booking date, the dates from 1st December to 15th December will not be available since those days are “un-bookable” for this resource.
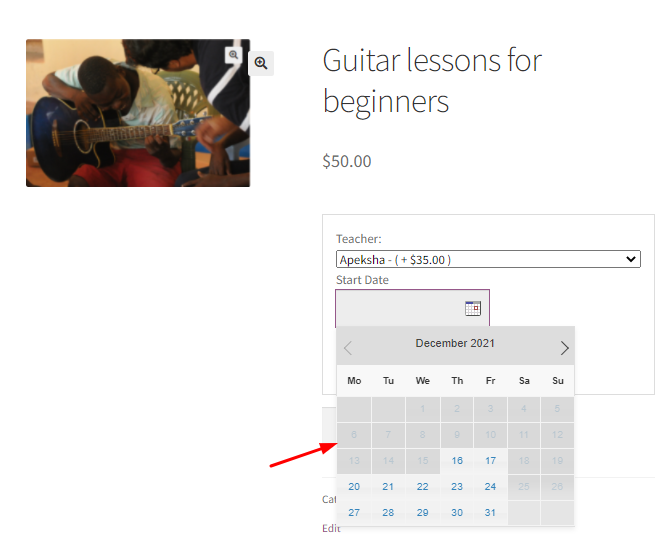
If the customer goes with any other booking dates, then they will get to proceed by selecting the booking time.
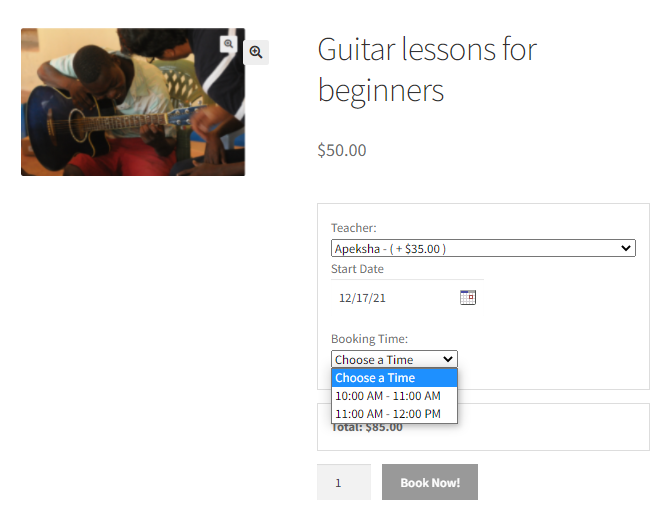
In this manner, Dokan Vendors can easily add resources to their booking products and even manage them!
Creating Manual bookings for Dokan Vendors
↑ Back to topWith the Booking and Appointment Plugin for WooCommerce, Dokan Vendors can manually add bookings.
To make this possible you will require a few things:
- v5.10.0 of Booking and Appointment Plugin for WooCommerce
- v1.1.0 of Marketplace Integration Addon
- Dokan Plugin
Let’s get started!
After logging in to your Vendor account, go to your Dashboard > Booking tab.
Here you can click on the “Create booking” section as shown below:
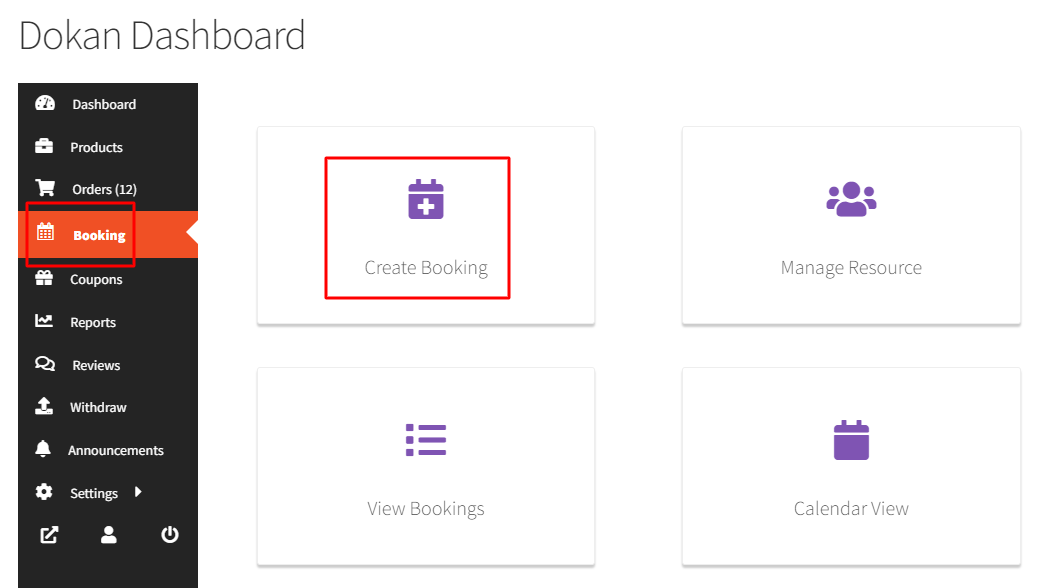
Once you click on it, the following will appear for you:
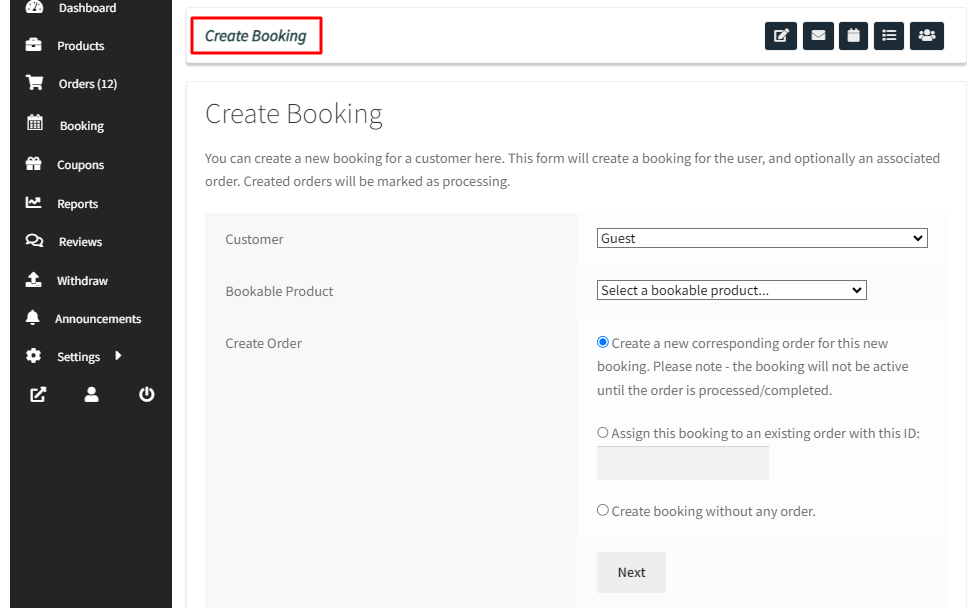
Add the Customer for whom you wish to create this booking.
Next, select the Bookable Product for which you’re making the manual booking. In this case, it is “Hotel, The Pierre.”
Now you can create bookings in these manners:
2. Assigning the booking to an existing order
3. Creating booking without any order
Let’s see how these settings work.
1. Create a new corresponding order for a new booking
After filling in these details, it will look something like this:
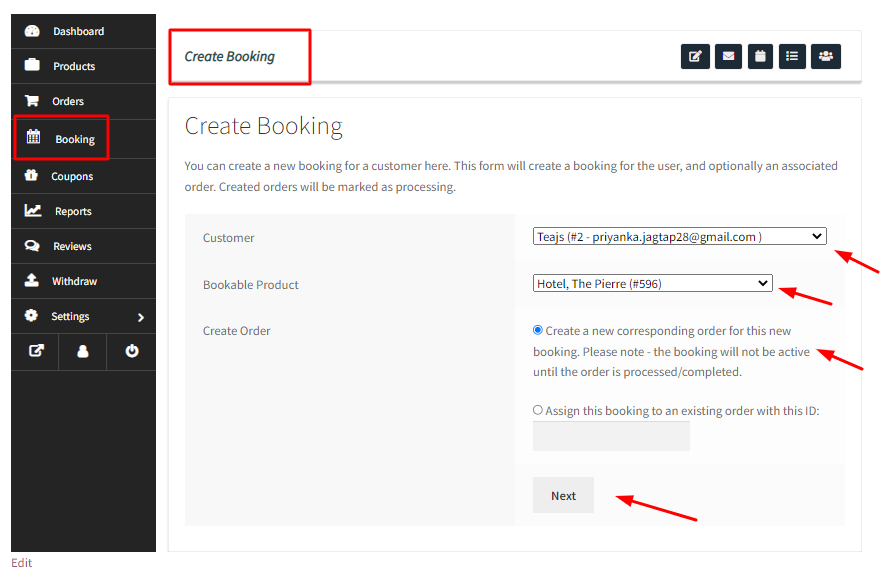
Once done, you can click on the “Next” button which will take you to a page where you can add in your booking date as shown here:
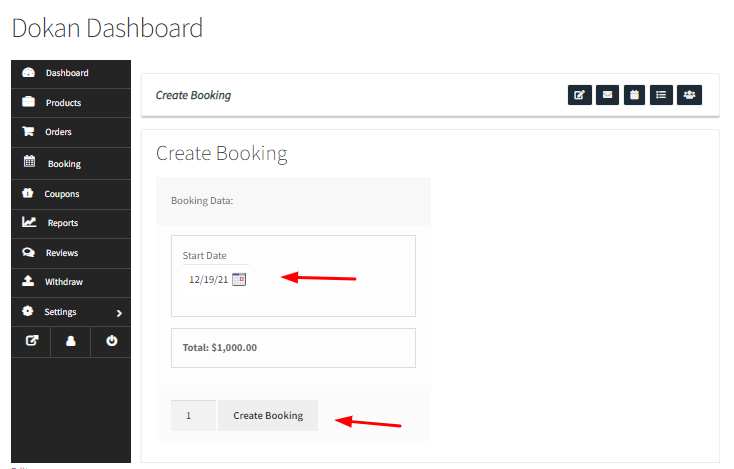
Once you have selected the booking date, click the “Create Booking” option.
Select how many bookings you wish to create. Voila! you’re done!
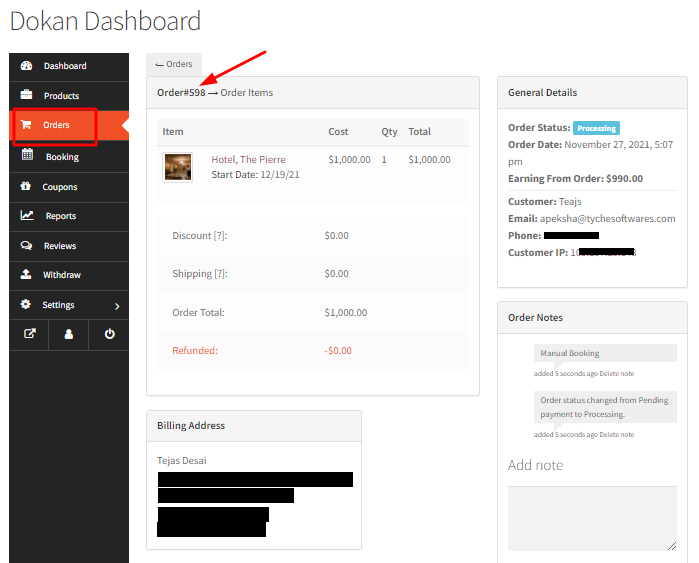
You will be redirected to the Orders Page where you’ll be able to see the newly created manual booking as shown below:
2. Assign this Booking to an existing Order
↑ Back to topUnder Create Order, choose “Assign this booking to an existing order with this ID”.
After that, enter the existing order ID in the blank field and click the Next button.
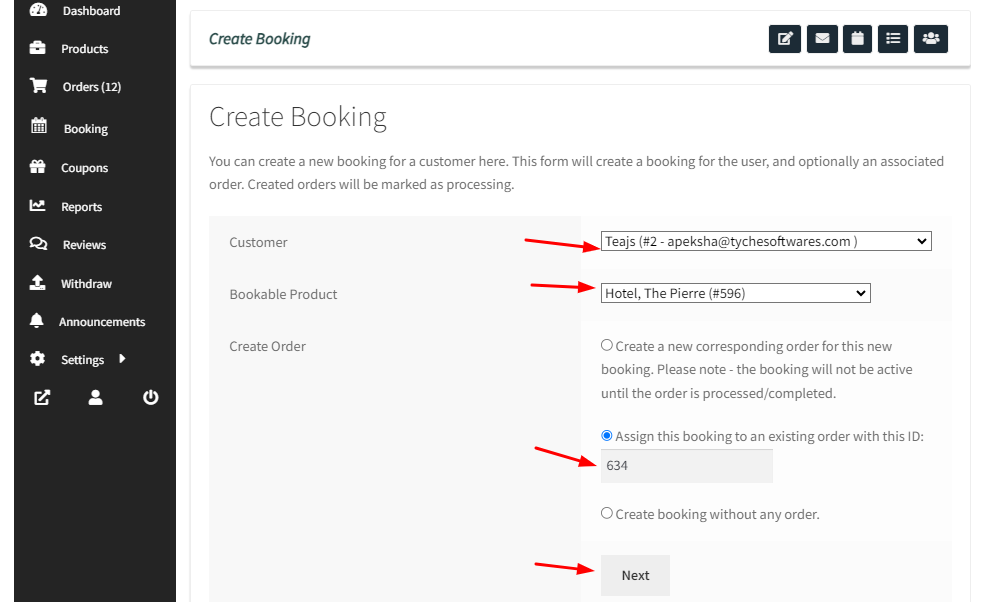
It will let you choose the start date of this booking.
You can go with ‘4th January 2022.’
Once done, click the ‘Create Booking’ button.
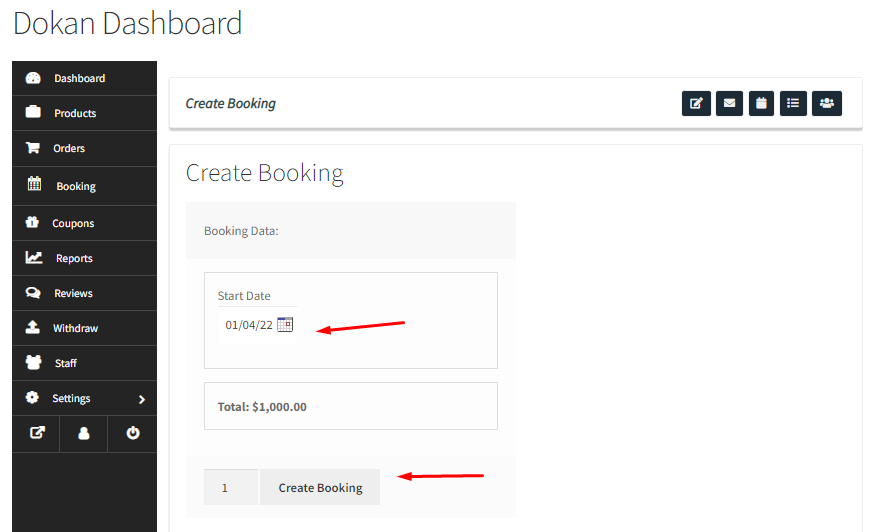
You will then be redirected to the Orders Page where the existing order will be updated with a new booking date.
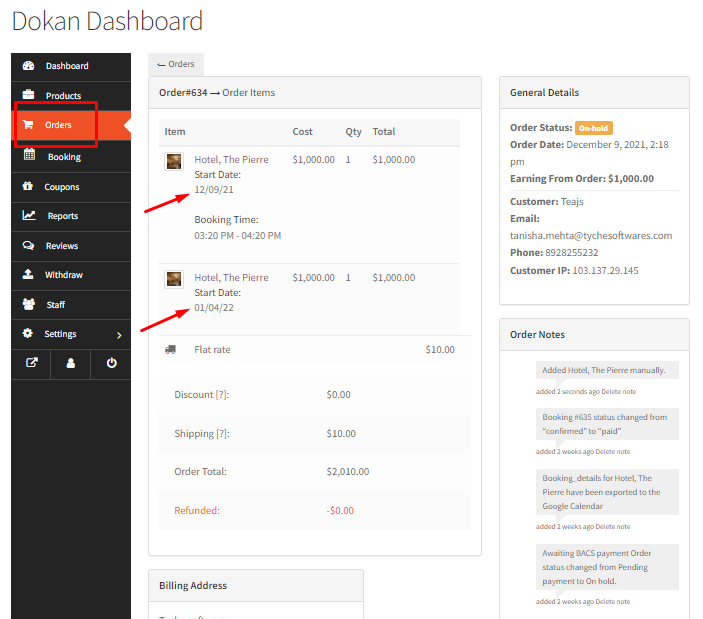
3. Create a booking without any order
The last option is creating a booking without an order.
Vendors can choose this option if they have accepted offline bookings and wish to manually create a booking without an order.
They can even use this option to decrease the number of bookings available on a particular day! For instance, the vendor regularly accepts 10 bookings. However, on a particular day, they can accept only 6 online bookings.
In this case, they can create 4 bookings without an order and ensure only 6 bookings are available.
Select the Create booking without any order option. Click the Next button.
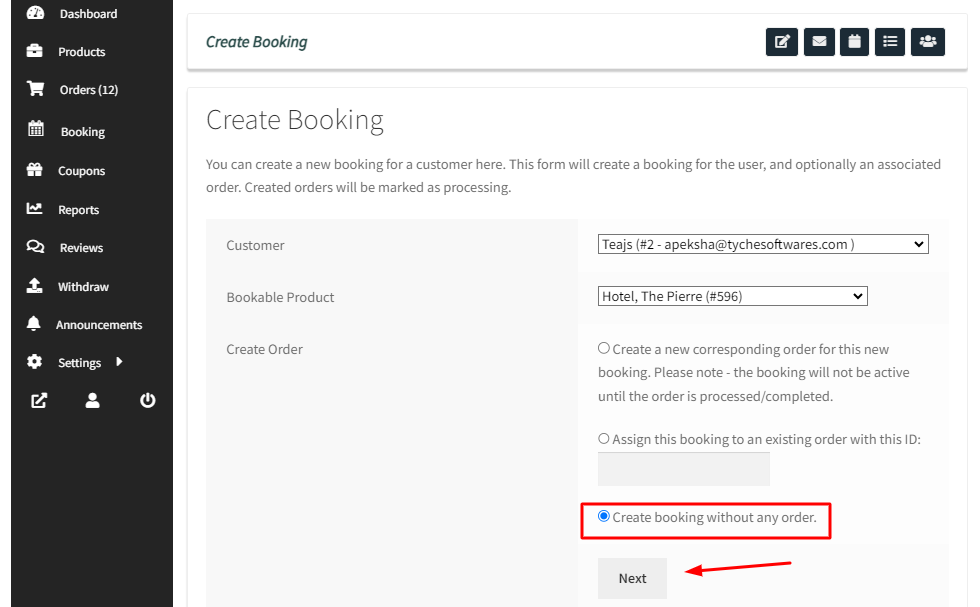
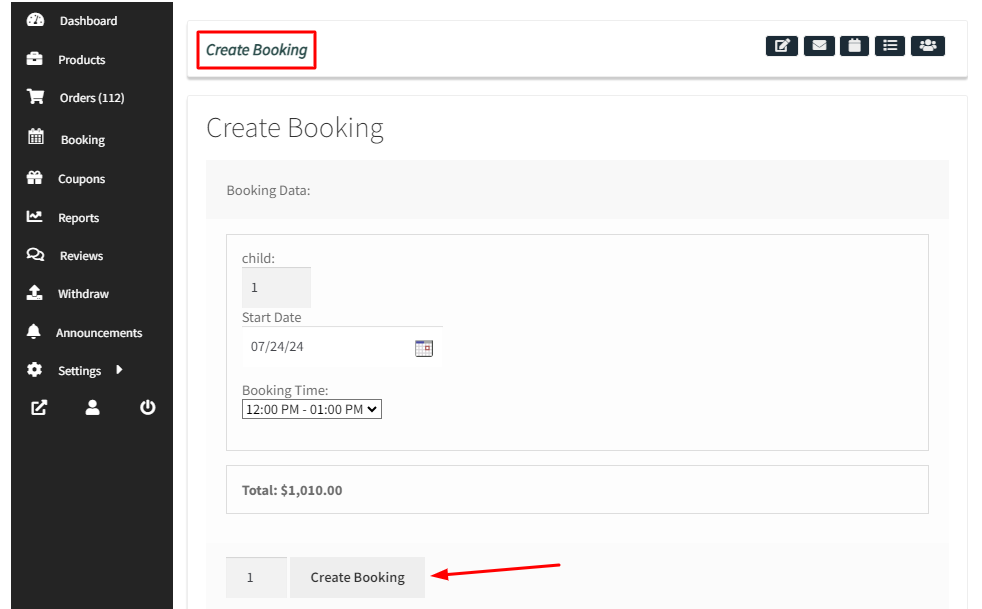
It will take you to a page where you will fill in the booking data. In this case, the number of persons, the start date, and the booking time have been added.
Click the Create Booking button.
Your Booking will be created with the Order number. You can see it by going to Booking > View Bookings :
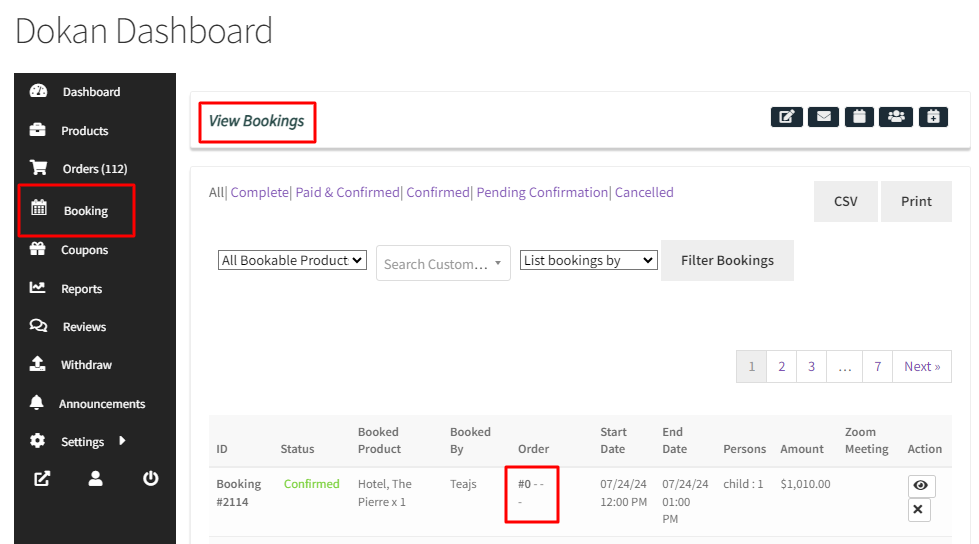
In this way, Dokan vendors can create manual bookings!
View Bookings for Dokan Vendors
↑ Back to topWith the Booking and Appointment Plugin for WooCommerce, Dokan Vendors can immediately find all the necessary booking information in the ‘View Bookings’ section.
Let’s learn about this section.
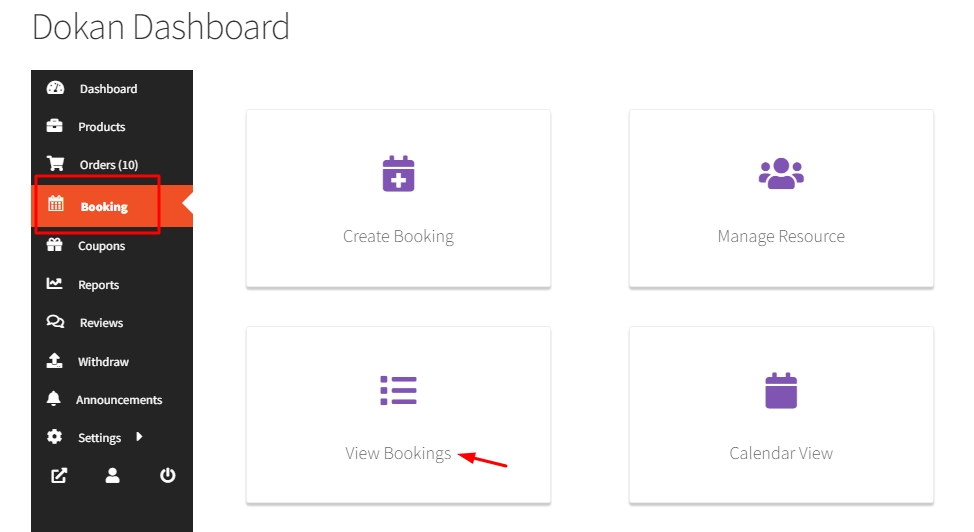
Go to your Dokan Vendor Dashboard > Booking > View Bookings as shown here:
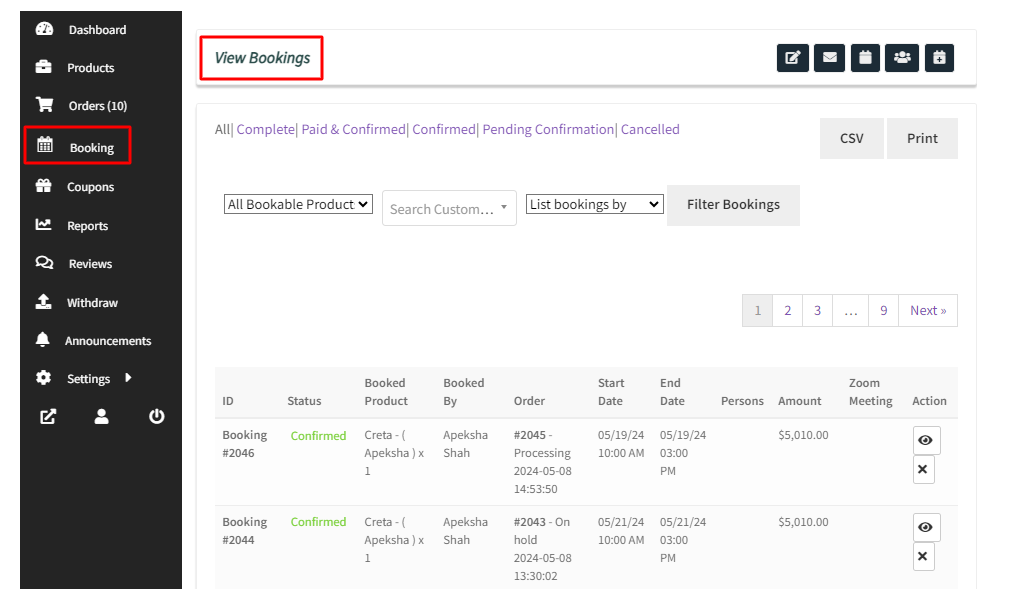
After clicking it, you will see the View Bookings Page:
A. View Bookings Table
↑ Back to topHere, you will find:
- Booking ID– It is a unique number of a booking
- Status- It will show the status (whether the order has been paid, or pending, etc) of the product
- Booked Product– This displays the name of service booked by the customer
- Booked By– This shows the customer’s first and last name entered in the checkout form
- Order– It is a unique number of a particular order
- Start Date– This is the start date selected by the customer for the booking service
- End Date– This is the end date selected by the customer for the booking service
- Persons– This will show the number of persons booked by the customer
- Amount– It is the total amount of the order
- Order Date– This will show the date and time when an order is placed
- Zoom Meeting– This will show in case you have chosen to integrate your bookings with the video calling application Zoom
- Actions– This comes with two settings:
A) The eye icon represents the View and Edit button.
If you click on it you can edit the selected booking like this:
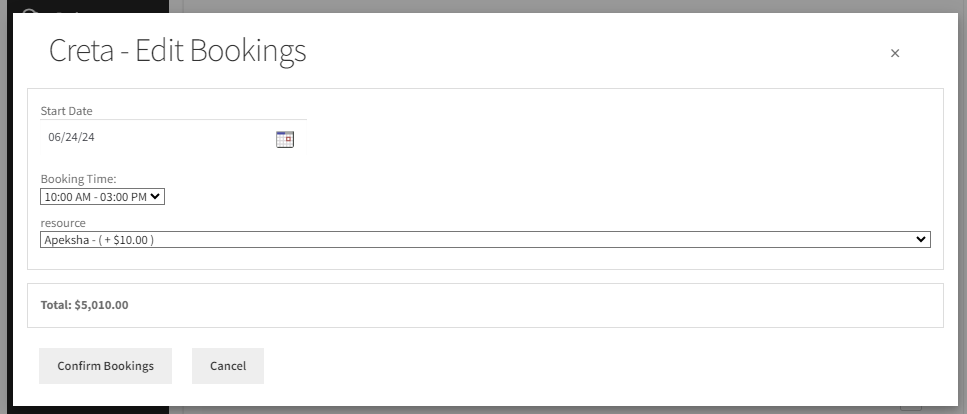
After selecting a suitable date, time, and resource as done below, you can click on ‘Confirm bookings’.
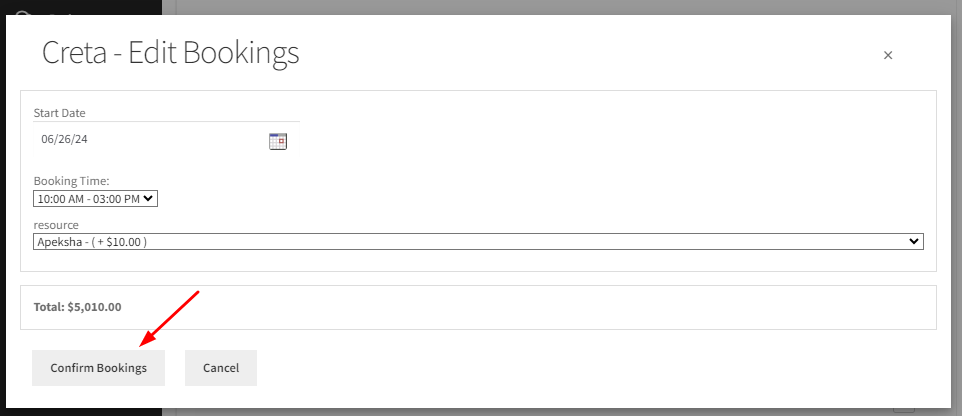
This way your booking date and time will be edited.
B) If you wish to cancel the bookings then you can click on the Cross icon under Actions as such:

B. Types of Bookings
Let’s move on to the different subsections available just below the words View Bookings.
They are:
- All: This will show all the bookings irrespective of their different statuses
- Complete: This will show all the bookings that have been completed
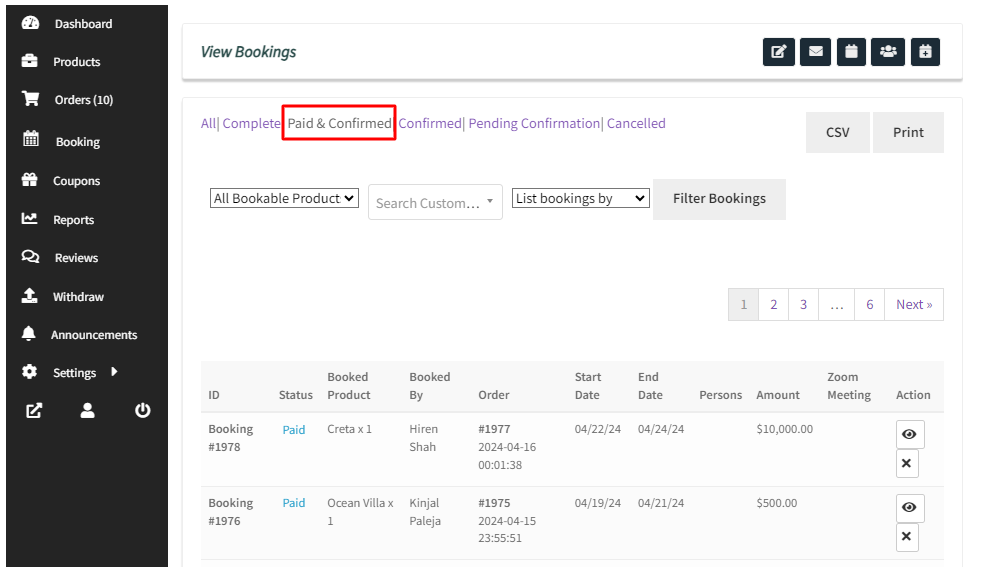
- Paid & Confirmed: This will show all the bookings that the customers have paid for and the bookings that have been confirmed by the store admin
- Confirmed: This will show all the bookings that have been confirmed by the store admin
- Pending Confirmation: All the bookings where approval is required from the store admin will be displayed here for the admin to approve or reject the booking request
- Canceled: All the bookings that have been canceled either by the customers or the store admin will be displayed here
For eg: If you choose the ‘Paid & Confirmed’ tab, then all of those bookings will be available as shown here:
C. CSV and Print buttons
↑ Back to topNext, on the top right-hand side corner you will find two buttons:
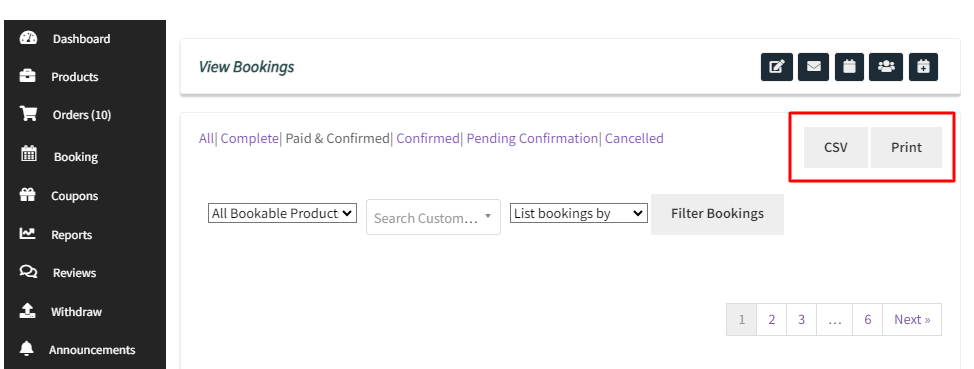
1. CSV: You can download data of all, searched, and filtered bookings into a CSV file with the click of the CSV button.
As you click on it, a data.csv file is downloaded and all the booking details can be viewed in that CSV file as shown in the image:

2. Print: The Print button on the All Bookings page to print all, searched, and filtered bookings.
As clicking it, a print preview of all/searched/filtered bookings will be generated as shown here:

D. Filter Bookings
↑ Back to topFurther ahead, if you wish to filter the bookings then you can do so by using any of the three filters available:

Let’s have a look at them:
1) By the Bookable Product
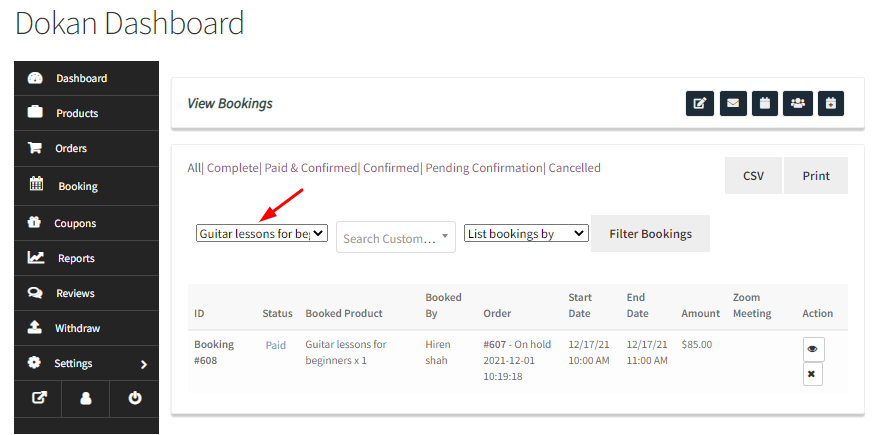
Using this filter, you can view your bookings by selecting your products.
For instance, if you selected “Guitar lessons for beginners” product, then you will get the bookings as such:
2) By Customers
This filter will allow you to see bookings made by a particular customer.
For instance, you can enter the name of your customer to find the bookings that were made by them.
3) By Bookings
Under this filter, you will find the following options in the dropdown:
- Today Onwards – It displays booking records of current and future dates.
- Today’s Check-ins– It displays all the booking records whose check-in date is today.
- Today’s Check-outs– It displays all the booking records whose check-out date is today.
- Imported Bookings– It displays all the booking records that were imported.
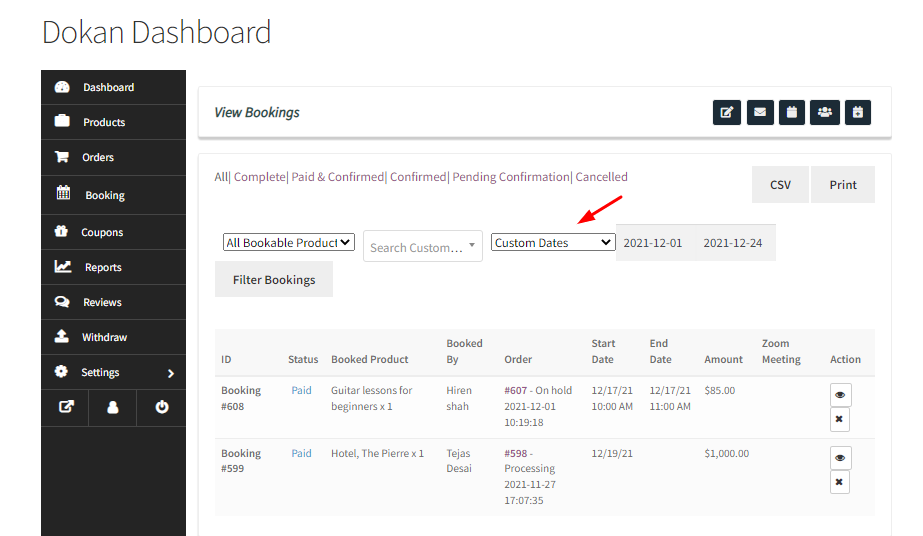
- Custom Dates– It allows selecting the custom date range on the View Bookings page which will then display the bookings made between that selected date range.
For instance, if you choose a custom date range from 1st December to 24th December 2021, then the filtered bookings will appear as such:
To conclude, these are all the different details of the bookings that will be available for Dokan Vendors.
They’ll now be able to quickly filter them & easily access the booking details of any particular order when needed!
