Global Settings
↑ Back to topBooking and Appointment Plugin for WooCommerce plugin’s Global Settings page allows you to set up a lot of settings that can apply to all of your bookable products (that is, on a global level).
Go to WooCommerce -> Booking and Appointment > Settings > Global.
1. Product Page Settings
↑ Back to topYou will find the following settings in this dropdown:

a. Enable Availability Display on the Product page
As soon as you enable it, various Booking Availability Messages on the Product Page are displayed on the product page depending upon the booking method used by you for your product.

To find the actual text of those messages you have to go to Booking and Appointment > Appearance > Labels & Messages tab.


To understand these display messages, you can go here.
b. Duplicate dates from first product in the cart to other products
Enabling this setting allows you to automatically pre-select a particular date on the front end of all the products for the customer when they add any products to their cart. This setting works with both Single Day Booking as well as Multiple Nights Booking methods.
Additionally, when this setting is enabled, the ‘Force Same Bookings’ setting will appear on the page as shown below:

Enabling the Duplicate dates from first product in the cart to other products settings
Let’s understand the setting using multiple-night booking and single-day booking methods.
i) Duplicate Dates For Multiple Nights Booking Method
You are running a business of renting Inventory Equipment like cameras and their lenses etc.
You want your customers to be able to book the camera and its lens on rent for one or more days. For this, you have created both products for multiple nights
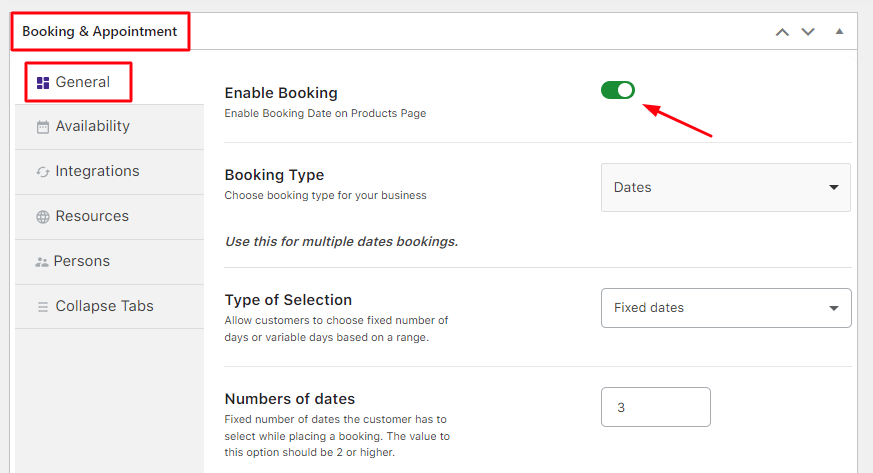
Creating a new product can be done from Products > Add Product. Find the Booking Meta Box and click the Enable Booking option.
Select the Booking type as Only Day and select Multiple Nights for your two products Cannon Camera and Camera Lens.

Enable Booking Type as Multiple Nights
Since the setting Duplicate dates from the first product in the cart to other products is enabled, it will apply to all the products on your website.
Let’s say that a customer selects Cannon Camera from 15th December 2017 to 20th December 2017 and clicks the Add to Cart button as shown below:

Selecting the date for renting the camera
When you go to the Camera Lens product on the front end, you will notice that the same dates will get automatically selected in the booking calendar of this product as shown below:
Camera lens showing the same dates automatically for renting
ii) Duplicate Dates For Single Day Booking Method
In this case, let’s take the example of you being a Party Organizer. Your services include providing Tattoo Artists and Magicians on hire for Specific Dates when the parties are scheduled.
Follow the same procedure mentioned above to create both services. Select Booking type as Single Day Booking for your two products Tattoo Artist and Magician

Selecting Booking Type as a single-day
Now go to the Availability tab and click on the Set Availability by Dates/Months option. This table will be displayed:

Enable Set Availability by Dates/Months option
Select Specific Dates from the Range Type dropdown and add the specified dates for both services as per the requirements.
For this instance, you can go with 16th December 2017, 20th December 2017, and 25th December 2017 for both services as shown below:

Adding specific dates for both products
Click the Save Settings button.
Let’s say that a customer comes to your website to book a Magician for his party. Here, they can only select the specified dates –16th December 2017, 20th December 2017, and 25th December 2017 from the calendar.
The customer chooses 20th December 2017 and clicks the Add to Cart button as shown below:

Selecting the desired date for hiring the Magician
Since the setting Duplicate dates from the first product in the cart to other products is enabled, whenever the customer comes next to the site to book another service/product, the same date would be pre-populated.
For instance, the customer selects another product – Tattoo Artist and clicks the Add to Cart button.
The previous selected date – 20th December 2017, automatically gets selected for your service as shown below:

Previous date pre-populated for hiring Tatoo Artist
In this way, your customer doesn’t need to select the date again and again for each WooCommerce bookable product.
c. Force same bookings
After you have enabled the ‘Duplicate dates from first product in cart to other products’ setting, you will find the ‘Force same bookings’ setting.
Enabling it will force the same booking details of the first product to all the other bookable products in the cart.

For instance, the Camera Cannon product is added to the cart. Its booking dates are from 12th to 14th January 2024.

When the customer tries to add the Canon Camera Lens to their cart, they will see the booking fields automatically pre-populated with the booking data of the Camera which is from 12th January to 14th January 2024.

If the customer proceeds to go with these booking details without changing them, then the product will get added to their cart:

The cart will thus look like this:

However, let’s say that the customer decides to change any of the dates.
In the below example, let’s say that the customer changes to End Date to 26th January 2024.

When they try adding the product to the cart, they will see the following message forcing them to book only for the 12th to 14th January 2024 dates.

This applies to any booking type.
In the example of a Canon Camera lens, the booking type was Multiple Nights (which is the same as the Canon Camera).
In the below example of a Camera Tripod,Fixed Dates Booking Type is used. The customer has to select 3 dates and they have decided to go with 30th December 2023, 3rd and 12th January 2024.

Since the customer has not selected 12th, 13th, and 14th January 2024 as their booking dates, they will see the following message:

Thus, the Force Booking Details setting applies to any type of bookable product regardless of their similarity with the first product added to the cart. Only the common settings will be considered.
d. Always display the Add to Cart and Quantity buttons
Enabling this functionality will allow you to always display the ‘Add to Cart’ and ‘Quantity’ buttons. This feature works with all the booking types offered by the plugin.

Let us understand this with the bookable product ‘Honeymoon Packages’ which is a multiple-night booking type.
Since this setting is enabled, the ADD TO CART button and Quantity button are displayed. However, they aren’t activated until all the booking details are filled in:

The customer goes ahead selecting the Booking Date as 26th January 2017 and the End Date as 28th January 2017. Accordingly, the booking price is calculated for 2 days and displayed.
Once all the booking details are selected, the ADD TO CART button and Quantity button are also available for the customers.

If this setting is disabled then the ADD TO CART button and Quantity button will be hidden on the product page.
It will display only when the user fills in all the booking details.
2. Timeslot Settings
↑ Back to topYou will find the following settings in this dropdown:
a. Timezone Conversion
The Timezone Conversion feature will automatically convert the time slots to the customer’s local time, which makes it easier and friendlier to offer services to customers in different time zones

Enabling this option will show all your bookable product’s timeslots as per the timezone of the customer who is trying to book it.
Let’s say that as a Tutor based in India, you provide online Personal Development lectures from 12:00 pm to 02:00 pm and 04:00 pm to 06:00 pm. These slots can be booked from anywhere in the world.
Create this product by going to Products > Add New. Add the title and price. Go to the Booking meta box and enable it. Select the Booking Type as Fixed Time.
Note: The Timezone Conversion option currently works with the Fixed Time booking type only. Soon it will work with the Duration Time booking type so that you can use this feature to the fullest.

Go to the Availability Tab next and add your timeslots.

Make sure to save changes and publish your product.
i) Front end of the website
The WooCommerce store timezone is set to UTC+5:30 which is nothing but the IST (Indian Standard Time).
When the customer browses this product, it will look like this:

Front end product page as IST
The timezone information will be displayed at the top of the booking form.
In the above screenshot “Asia/Calcutta” is shown as my machine’s local time is Asia/Calcutta.
Suppose, your customer John is from Australia/Sydney timezone. The information will thus appear like this to him:

Front end as per Sydney
In the above screenshot, 30th August 2019 is selected as the booking date, the timeslot 12:00 pm to 02:00 pm got converted to 04:30 pm to 06:30 pm and 04:00 pm to 06:00 pm converted to 08:30 pm to 10:30 pm.
Additionally, if John hovers over the time slot, then its respective time as per the store time zone will be displayed. After selecting the slot, John’s cart will appear like this:

Cart table with booking details and timezone information
Once the order’s been placed, John’s Order Received page will appear as shown below.

Order received page along with booking details
The same information will be sent in the email notification John will receive.
Using the Add To Calendar button John can add the booking to his own Google Calendar or he can download an ICS file of it and import that to any calendar he wants.
ii) View Bookings Tab
Admins can view this booking by going to WooCommerce -> Booking and Appointment > Booking > View Bookings.
John’s booking for the date 30th Aug 2019 and time 04:30 pm to 06:30 pm is now converted as per the store’s timezone and shown under the Start date & End date fields below.

The booking is created as per the store time which is 12:00 pm to 02:00 pm for 30th Aug 2019.
If you click on the Pencil icon under Status then you can see the actual booking details based on the store as well as based on the timezone of the customer in which the booking is placed.

Similarly, if a customer, based in the New York timezone, visits this product page then the booking information will appear as such:

Booking details according to New York timezone
In the above screenshot, 30th August 2019 is selected as booking date and the timeslot 12:00 pm to 02:00 pm got converted to 02:30 am to 04:30 am and 04:00 pm to 06:00 pm converted to 06:30 am to 08:30 am.
Hovering over the time slot will show its respective time as per the store time zone will be displayed. The booking process will be the same as we have seen above.
The Timezone Conversion option is also compatible with the Multiple Time Slot Addon which can be used if you want your customer to book multiple timeslots for a date in one shot.
b. Global Time Slot Booking
Let’s say you have set up all your services for a single day with timeslots.
Now, you want that if a service is booked on a particular date and timeslot then the availability of other services on the same date and timeslot should get reduced by the numbers of quantity selected.
That’s where the Global Time Slot Booking option will help you reduce the time slot availability of other services when a service is booked for the same time.

For instance, you are running “Painting Classes” for 3 types of painting i.e. Glass Painting, Canvas Painting, and Fabric Painting.
You can use Specific Dates with timeslots and/or Recurring Weekdays with timeslots to set up these classes as per your business requirements.
In this case, let’s set them up using Recurring Weekdays with timeslots. Below are all the created timeslots for all classes:
- Glass Painting Classes: 10:00 AM to 12:00 PM
- Canvas Painting Classes: 10:00 AM to 12:00 PM, 1:00 PM to 3:00 PM
- Fabric Painting Classes: 10:00 AM to 12:00 PM, 2:00 PM to 4:00 PM
You will have Lockout Date after X orders and Lockout time slot after X orders options to manage the booking at a date and timeslot level respectively.
If your service is set up with the timeslots then the value to the “Lockout Date after X orders” option should be the addition of the value set to the “Lockout time slot after X orders” option for all the timeslots.
For instance, if the “Lockout time slot after X orders” option is set to 3 for all the timeslots of the classes then only 3 students can attend the class on a particular timeslot. Based on that, you will have to set the value for the “Lockout Date after X orders” option.
As you can see in the below image, the selected date is 13th January 2017 for the classes, and all the available timeslots on this date are listed in the timeslot dropdown.

Frontend of all three painting classes
Let’s say a customer books the Glass Painting classes on the date 20th January 2017 from 10:00 AM to 12:00 PM.
If the same date and timeslot are available for the Canvas Painting and Fabric Painting then their availability should also reduce.
You have enabled the Global Time Slot Booking setting.
Now all the services of the same time slot are linked to each other on your store and if the user books one of the services on a particular time slot then this booking will be reflected on the same timeslot of other services.
If the customer books Glass Painting classes for 1 student on “20th January 2017” from 10:00 AM to 12:00 PM time slot then the availability of the same date and time slot for the remaining two painting classes will be reduced by 1.
This can be seen below as the booking of a service on a particular date and timeslot is affecting the availability of other services on the same date and timeslot:

Front end of all 3 painting classes after booking glass painting classes for 1 student for the time slot 10:00 AM to 12:00 PM
In case the user books the Glass Painting classes for 3 students on the date 20th January 2017 from 10:00 AM to 12:00 PM timeslot then on this date the timeslot 10:00 AM to 12:00 PM will not be listed in the drop-down for Fabric Painting and Canvas Painting. This is because the lockout of the timeslot has reached for these classes.
Additionally, the date 20th January 2017 will be disabled for the Glass Painting classes because the lockout of the timeslot has reached and no other timeslots are available on this date.

Front end of all 3 painting classes after booking glass painting classes for 3 students for the time slot 10:00 AM to 12:00 PM
To conclude, this feature can be useful for businesses that have limited manpower and can’t fulfill the requirements of the user in all places at a time.
c. Overlapping Time Slot Booking
Enabling this setting will allow you to make overlapping timeslots unavailable once the lockout for that time slot has been reached.
For instance, this setting has been enabled.

For you product you have chosen the Booking Type as Fixed Time. Under Availability Tab, you have to add your timeslots.

Scroll down to enable all the weekdays when the bookings will be accepted.

Furthermore, add your timeslots under ‘Set Weekdays/Dates And It’s Timeslots’.
Make sure to add your lockout period or maximum bookings.
In this case, it is 2 for all the timeslots.

When the customer chooses a date, they will see all the added timeslots:

The customer has chosen to go with the timeslot 10:15 AM to 10:45 AM. The quantity added is 2.
Therefore, the lockout period or maximum bookings for this timeslot is reached.
Due to this, the overlapping timeslots will be disabled for the customers when they visit this product after the booking for 10:15 AM to 10:45 AM has been made.
The customer will no longer see the timeslots 10:00 AM to 10:30 AM and 10:30 AM to 11:00 AM because they were overlapping with the 10:15 AM to 10:45 AM timeslot.

d. Display mode for Time slots
This setting will display your time slots in two different manners.
The first one is choosing to display the time slots as a dropdown. For this, you can select the ‘Dropdown View’ option as shown below:

Dropdown view
Once you have chosen this, the time slots will appear on the Product page as a dropdown as shown below:
 Dropdown view on Product Page
By default, this option will be chosen for you when the plugin is being installed for the first time.
The second option will display the time slot in a list view. For this, you can select the ‘List view’ option from the dropdown as shown:

List view setting
Once you have selected this option and clicked on ‘Save Settings’, the time slots will appear in a list view on the front like this:

Please note: The Display mode for the timeslot setting is not applicable for the Duration-based booking type. By default, your customer will get to view the timeslots as such:

3. Booking Settings
↑ Back to topYou will find the following settings in this dropdown:
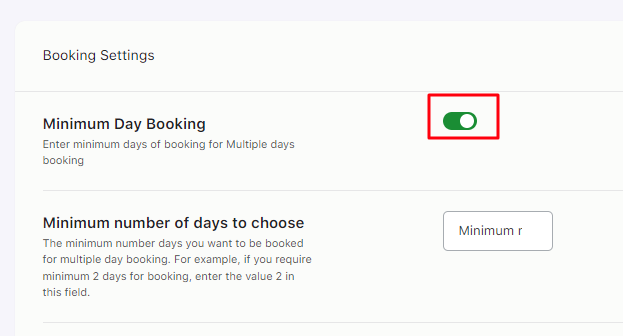 In this field, you can enter the value of the minimum days required.For instance, you have entered the value 6 here. This would mean that for all the Multiple Nights Booking Type products, the customer will have to select at least 6 days or more for their bookings.
 Let’s take the example of Hotel Sinclaire which is a Multiple Nights Booking Type product.
You can create this by going to Products > Add New Product > Booking and Appointment metabox > General > Booking Type > Multiple Nights.

Go to the Availability Tab and enable this product’s availability. In this case, the booking will be available every day.

Don’t forget to add a picture and price. Finally, click the Publish button.
Next, you have already enabled the Minimum Day Booking setting with 6 days as your minimum value. A reminder again that this setting will be applicable at a global level, thus including all the Multiple Nights Bookable products.
When the customer tries to book, they will see the Start Date and End Date of the booking. For instance, the customer decides to go with 9th January 2023 as their start date.

When the customer goes to select the End Date, they will see the next 5 days included in their selected days.
This is because you had selected the minimum booking day value of 6 days.
The calculation is:
5 days (10th to 14th January 2023) + 1 day (15th January 2023) = 6 days in total.
Thus, the first available End date for this booking would be 15th January 2023.

After selecting that date, you will see the number of days selected as 6.

In this way, you can ensure that a minimum count of booking days is mandatorily considered when a customer tries to make a booking for a Multiple-Night bookable product.
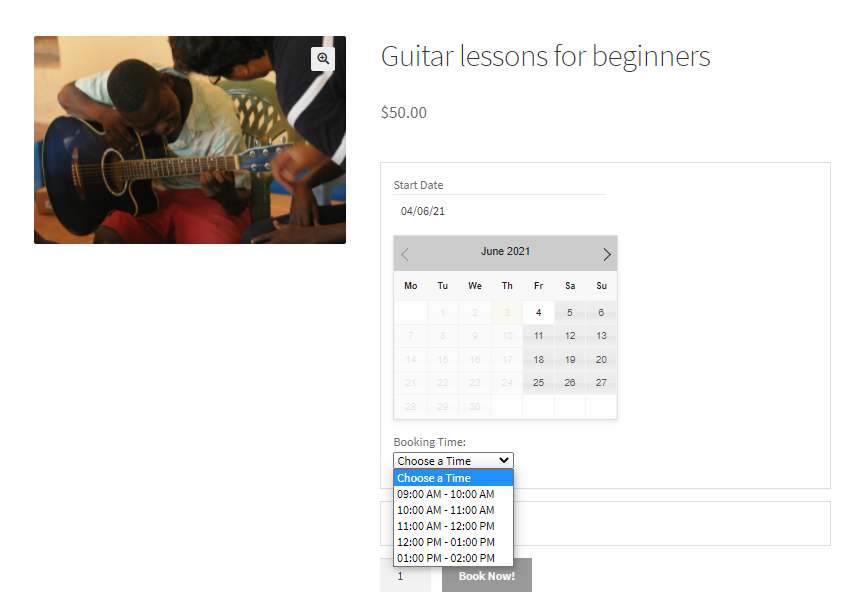
 For instance, if you wish to cancel a booking after 1 hour of it being placed where the admin has not yet approved it, then you will enter the value 1 in the field for this setting:
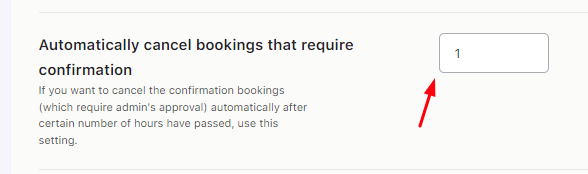 Click on ‘Save Settings’ and you’re done!For the frontend experience, let’s say a customer has made a booking for a Guitar lesson as shown here on the Order Details Page after the order has been placed:
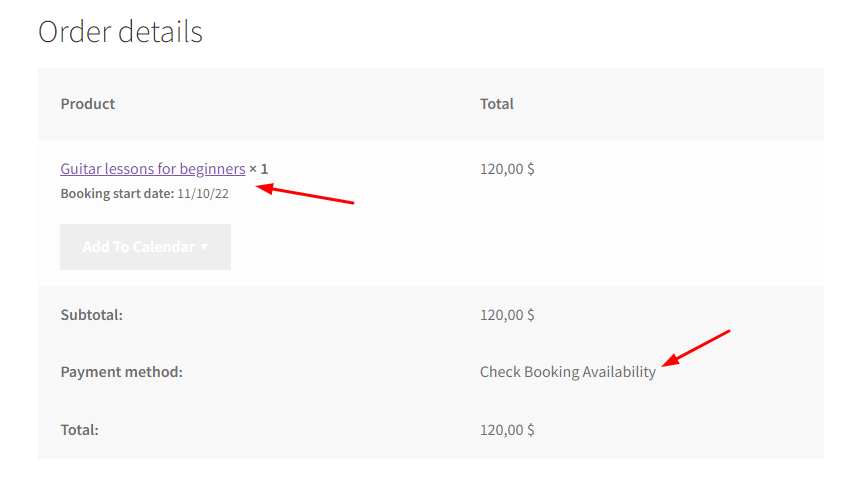 Since the order requires confirmation from the admin, the Payment would appear as ‘Check Booking Availability’.Once it is confirmed, the customer will be able to pay for the booking.Till then, for the customer, the booking would appear as ‘Pending-confirmation’They will be able to view the status of the booking by going to My Account > Bookings as shown here:
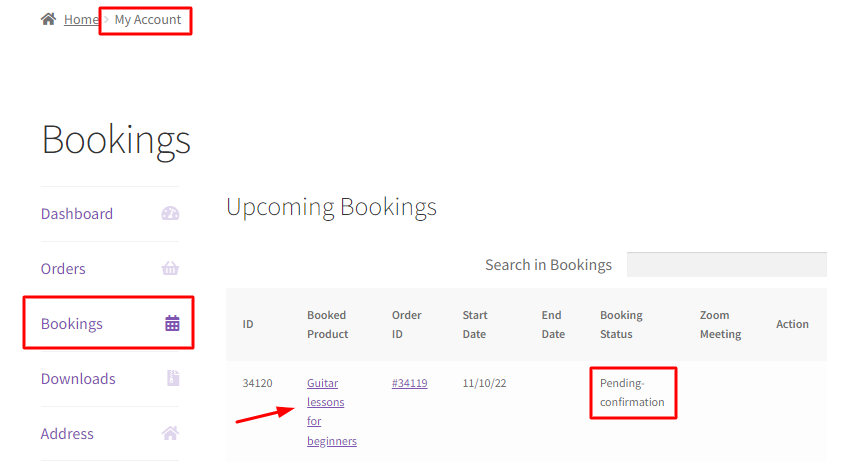 Let us say that since the order has been placed, 1 hour has passed and the admin has not yet confirmed the booking.In such a case, the order would be canceled. The customer will be able to see the same in their Account Page:
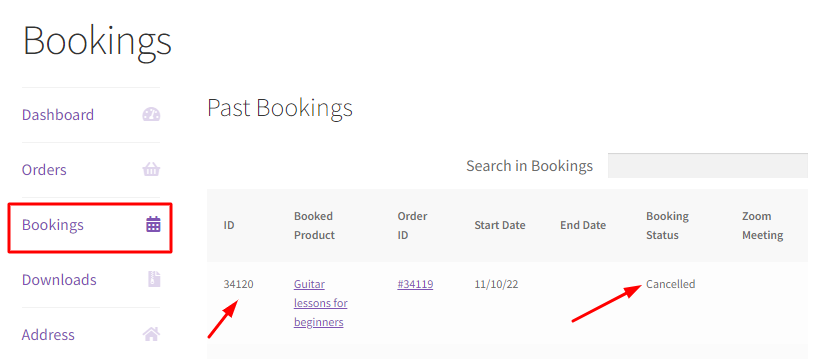 c. Minimum number of hours for cancelling bookingSometimes stores businesses lose a lot of money when customers cancel a booking at the last hour. Arrangements were already made, and now you’re facing the hassle of refunds and other policies.Therefore, this setting helps you create a minimum threshold time within which a customer can cancel an order.
 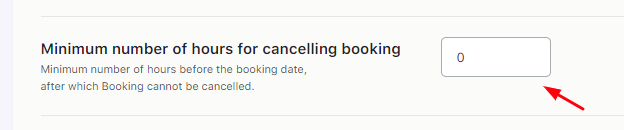 Enter the number of hours here as you prefer. If this time limit has been reached, it will not allow bookings to be cancelled.For instance, if you have entered 3 hours, customers would be able to cancel the booking only up to 3 hours before the booked time.
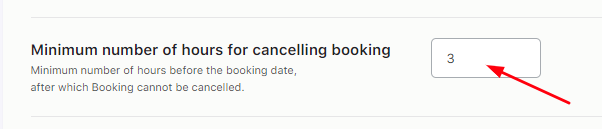 i) Booking Cancellation by CustomerCustomers can have multiple reasons for canceling orders. So, it’s not necessary for orders to always be cancelled from the Admin side. For instance, if a customer has booked a Kashmir Tour Package from 10th March 2017 to 17th March 2017, the dates get blocked.However, now the customer wants to cancel the bookings. They can go to My Account > Orders > Cancel button of the order.
 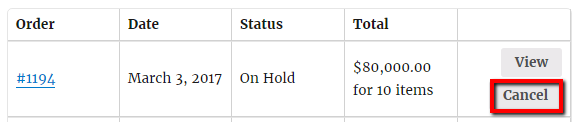 Once the Cancel button is clicked, the order gets cancelled, and the status of that order changes to Cancelled.
  Now, let us understandhow bookings can be canceled or deleted for a particular date for a specific timehow these canceled dates get released for further bookingsFor instance, you provide Party Halls for rent. For that, you have set up the Recurring Weekdays booking method with the timeslos.This is how your Flags Party Hall will appear with all the available booking dates available for the customer.
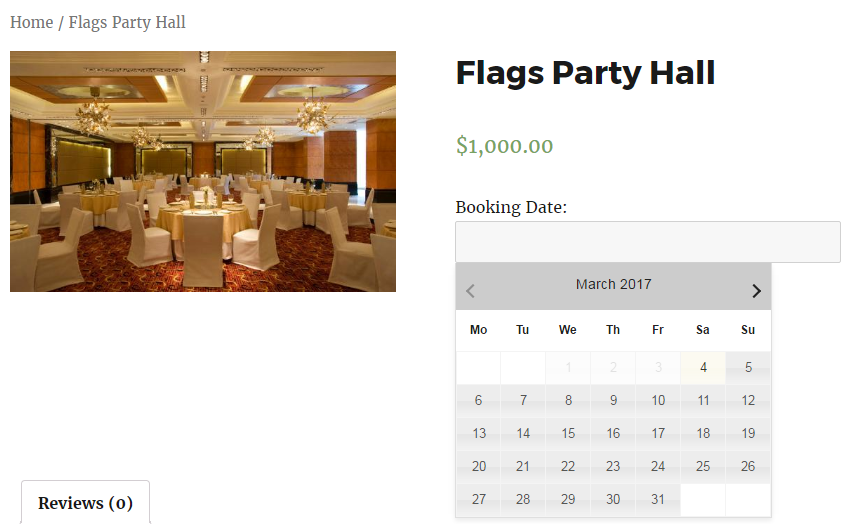 Frontend of Flags Party HallWhen the customer books your party hall for 10th March 2017 for both the timeslot i.e., 10.00 AM to 02.00 PM and 06.00 PM to 10.00 PM, then those dates will be shown blocked for further bookings.
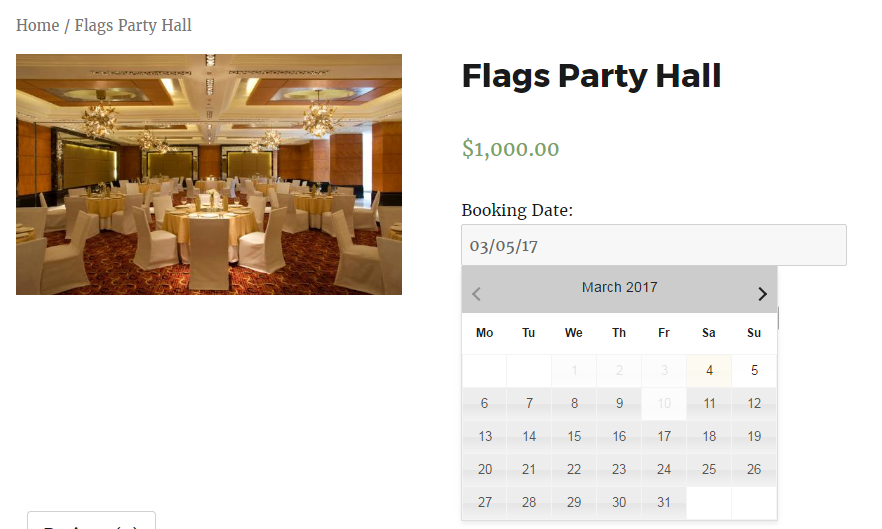 Now, for some reason, the party hall booking has been cancelled for the timeslot 10.00 AM to 02.00 PM from the Admin side or customer side as shown above.In such a case, that particular date gets released automatically for that particular date and timeslot for further bookings:
 ii) Minimum number of hours for cancelling bookingTo allow your customers to cancel their bookings, enable the toggle for the ‘Can be cancelled?’ setting. To find this, go to your product’s Edit Page > Booking and Appointment metabox > General > Can be cancelled.
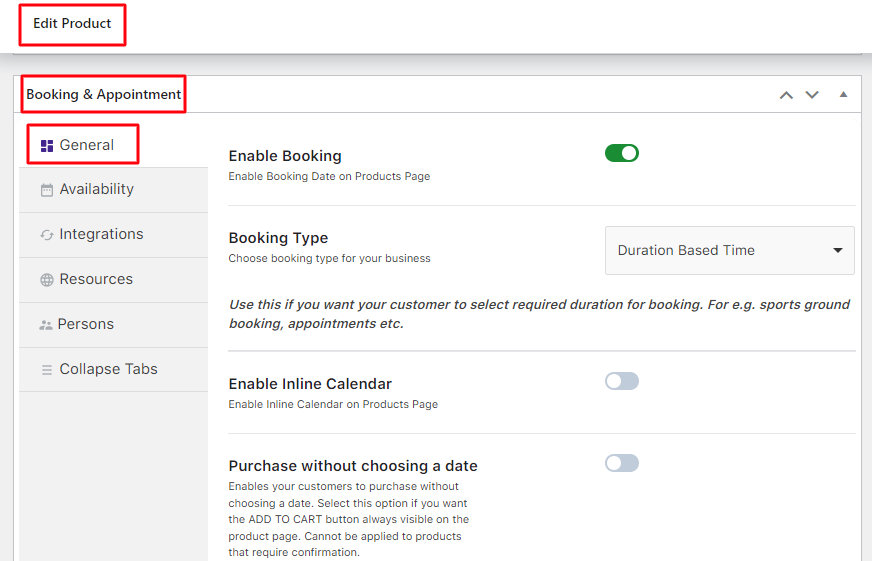
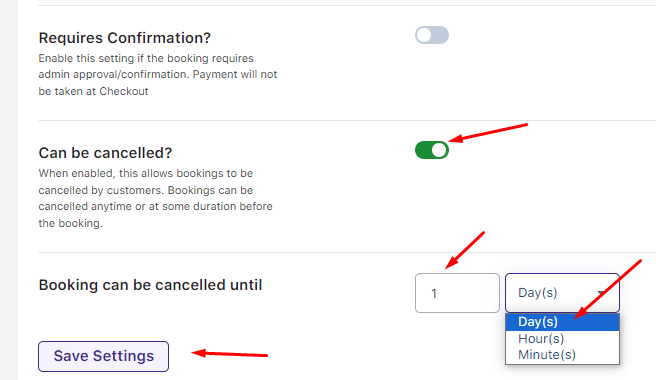 This setting will cancel the bookings automatically if the booking that requires the admin’s confirmation is not confirmed until a certain number of hours have passed.Next, you will see the ‘Booking can be cancelled until’ setting where you get to select the duration. You can go with either days, hours, or minutes.For instance, you can set the cancellation duration to 2 days. This would mean that the booking can be cancelled by the customer 2 days before the booking date.
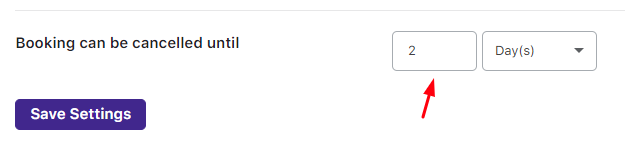 For instance, a customer wishes to cancel the Balaji Banquet Hall booking. They will have to log in to their account and go to My Account > Bookings.Under the ‘Actions’ column, they’ll be able to see the Cancel button if they’re trying to cancel it 2 days before the booking date. For instance, if the booking date is 28th May 2022 and the customer tried to cancel it on 25th May 2022 then they’ll be able to do it as shown here:
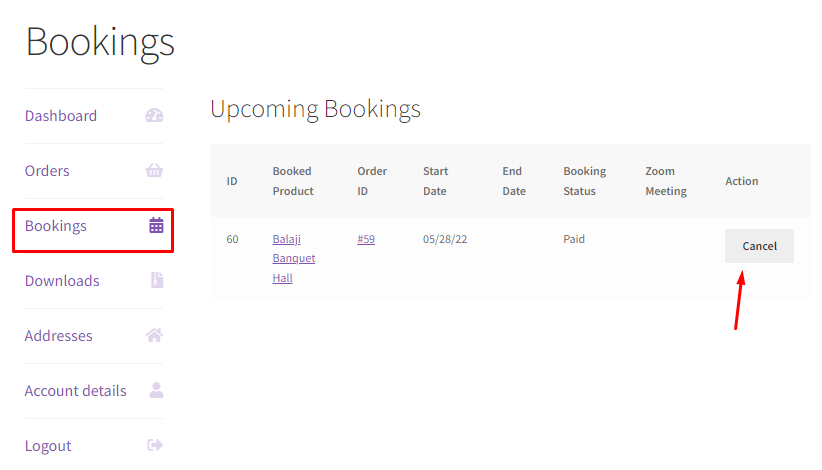 Once the customer clicks on it, a green banner confirming the cancellation will appear:
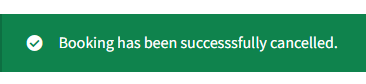 Along with this, under the Bookings section, the booking cancellation will show up like this:
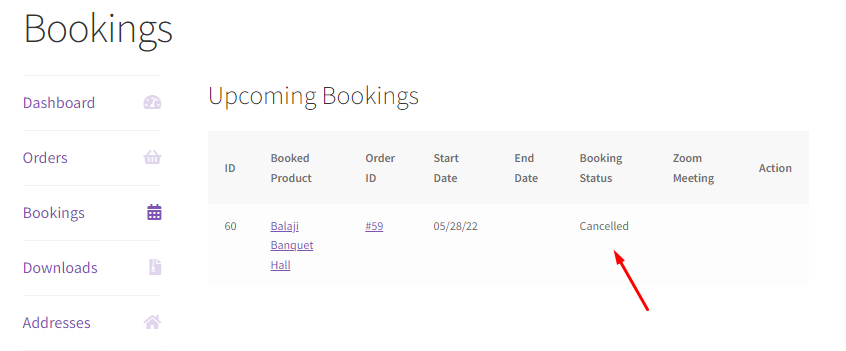 If the customer goes to cancel their bookings 1 day before the booking date, then the ‘Cancel’ booking button will not be available:
 d. Show Booking Information on Order NotesEnabling this setting will add the booking information such as the Booking Date and Time to your Order Notes.Additionally, if the Zoom Integration is enabled on your site and an online Zoom meeting booking is made, the Zoom meeting link will also be added to the Order notes.
For instance, a customer makes a booking for Guitar classes for Beginners. The Booking date is 19th January 2024 and the time slot is 2:00 PM to 3:00 PM.
To find the Order Notes, you will have to go to WooCommerce > Orders > Click the Order placed > Order Notes section.
When this setting is enabled, once the booking order is placed, you find this booking information added to the Order Note as shown below:

When this setting is disabled, you will not see any Booking information in the Order Notes.

e. Send bookings as attachments (ICS files) in email notifications
Enabling this setting will send a booking as an ICS file in an email notification to your customers once they have made a booking on your site. This file will help the customer import the booking or the meeting’s details into their calendars easily.

Here’s how to add your bookings to external calendar applications using ICS files for WooCommerce products.
ICS file is a calendar file saved in a universal calendar format used by several email and calendar programs. These files usually have an extension of .ics which are also known as iCalendar files.
The content of an ICS file appears as shown in the below image:

After enabling the setting, the ICS files can be sent to the customers in two ways:
1. The customer would get a button called Add To Calendar on the Order Received page. The customer can click on that button and download the ICS file.
2. The ICS files are attached to the order notification email that is sent by WooCommerce after the order is placed. The customer can download the ICS file by clicking on the Download button provided beside the file.
The customers can also import the ICS files into their Google Calendar to create it as an event in the calendar as it contains all the booking details.
For instance, you are running a salon named Smith’s Salon (simple product) which is operational on all days. For that, you have to create your product using the Recurring Weekdays booking method.
To do so, first enable Date & Time settings under Booking Type and choose Fixed Time as shown below:

Selecting Booking Type as Date & Time
Now under the Availability tab, select all bookable weekdays from the Weekday table, from Sunday to Monday because the salon is open on all days as shown below:

All weekdays are made bookable
As the salon business is time-based, enable the Set Availability by Dates/Months option and select the appropriate time slots from the Set Weekdays/Dates And Its Timeslots table.
For this instance, the selected time slots are set to 10.00 AM – 01.00 PM and 02.00 PM – 09.00 PM as shown in the below image:

Timeslots added to taking bookings
If you have finished with the above settings, your salon is ready to take appointments.
For better understanding, consider an instance where the customer comes to your product page and selects an appointment for 6th June 2017 for the time slot of 10.00 AM – 01.00 PM as shown below:
Selecting the date and timeslot for the salon appointment
As soon as the customer books an appointment and comes to the Order Received page, the Add To Calendar button is visible because the setting Show “Add to Calendar” button on the Order Received page has been enabled.

Order Confirmation page showing Add to Calendar button
By clicking the Add To Calendar button, the appointment gets added to your calendar when you open the ICS file (MyCal.ics) after downloading it.
Calendar event created for the appointment
As the setting Send bookings as attachments (ICS files) in email notifications is also enabled, the same ICS file will get downloaded when you click the ‘Add to other calendars’ button.

Email notification of the booking
Once downloaded, you find the file in your downloads. You can use it to get the appointment added to their calendar.

The benefit of ICS File is that you can add the bookings to external calendar applications to add it as an event. Thus, in these two ways, the ICS files can be sent to the customers after the order is placed.
f. Allow Bookings to be editable
Sometimes, while you make a booking, your customer may want to make changes to the added booking details. Enabling the Edit Bookings feature helps them edit the Booking dates from the Cart and Checkout page before confirming the order.

Enable Allow Bookings to be an editable option
One is on the Cart page after the customer has selected the desired booking dates.
For instance, the customer has booked the Hotel Country Inn for 2 Nights, from 23rd December to 25th December, 2017.
The customer adds the product to the cart:

Adding dates for booking a hotel for 2 days
It gets added to their cart which will show the booking details:

Booking details are shown on the Cart page
As you can see in the above image, the Edit Bookings button appears on the Cart page above the booking dates section.
This is because we had enabled the option to allow bookings to be editable.
Now the customer can click on the Edit Bookings button and change the booking dates as shown below:

Edit Booking dates on the Cart page
They change the End Date to 26th December instead of 25th December 2017 and click the Confirm Bookings button as shown below:

Booking dates changed using the Edit Bookings option
The Cart page will now showcase the new changed dates which are 23rd December to 26th December 2017 for checkout from Hotel Country Inn.

Edited booking dates appear on the Cart page
This way you can edit the booking dates on the Cart page.
Similarly, now the customer wants to edit the End Date from 26th December 2017 to its original date 25th December 2017 on the Checkout page. This can be done by clicking the Proceed to checkout button where they will be taken to the Checkout page.
Here you will see that the Start Date is 23rd December 2017 and the End Date is 26th December 2017.
The customer can click the Edit Bookings button available under the Your Order section to change the date from 26th December to 25th December 2017 as shown below:

Edit Bookings option available under Your Order section
When they click it, they will be able to make changes to the End Date by selecting 25th December 2017 in the booking calendar as shown below:

Making changes to the booking dates on the Checkout page
Next, they need to click the Confirm Bookings button, to save this change.
The End Date is now changed to 25th December 2017 on the Checkout page as shown below:

Changed dates appear under the Your Order section
In this way, you can edit the booking dates on the Checkout page.
g. Allow Bookings to be reschedulable
There are times when the need to edit your existing booking arises out of changes in the day’s schedule or any emergency.
Therefore, rescheduling the existing bookings and making additional payments can be easily configured using the Booking and Appointment for WooCommerce plugin.
Enabling this setting will allow Bookings to be rescheduled from the customer’s My Account page where all the booked orders are listed.

Reschedule booking settings
A typical Orders section of My Account page appears as below:

Orders section of the My Account page
Let’s say that you want to edit the first order, Order #1847 which was placed on 21st December 2017.
Then click on the View button next to the Total column and you will be taken to the Order Details page of Order #1847 as shown here:

Order details page showing booking details
An Edit Bookings button appears below the booking dates. Click on this button to edit the bookings and reschedule the Start and End Dates.
For instance, you’ve changed the Start Date from 29th December to 28th December, 2017.
When you click on this button, the Hotel Country Inn – Edit Bookings page will be displayed where you can make this change:

Changing the Start Date to 28th December, 2017
The rescheduled booking details will be saved once you click the Confirm Bookings button.

Changed booking dates are saved
Now the edited booking details show up on the Orders Details page where the Order updates section will display details of the actions performed on this order.

Bookings edited on My Account page for a confirmed order
In the above case, the Order Updates section displays a note that the booking for Rainforest Resort was rescheduled from 29 December 2017 – 31 December 2017 to 28 December 2017 – 31 December 2017.
It also indicates the difference in the amount to be paid via Order #1849 due to editing the booking dates. This is because the End Date has been extended for 1 night more.

The new order was created to make additional payment
This new order, Order #1849 will have a pending payment of $1,000 which is an additional amount that was calculated upon making the change to Order #1847.
If you want to pay this amount, you can click on the Pay button on the My Account page.
Upon clicking the Pay button, you will be directed to the Pay for Order page where you can select the mode of payment to pay the additional payment for Rainforest Resort (Order #1847) of $1000 as shown below:

Selecting the mode of payment for additional payment
In the above instance, the Direct bank transfer was chosen as the mode of payment. You can select any option as per your requirement and click on the Pay for Order button to execute the payment.
An email notification will be sent to the customer’s registered email address when they reschedule the bookings.

Another email notification is sent to the admin.
It consists of details like Order number, Rescheduled Booking dates, and Product name.

Email notification sent to admin after rescheduling bookings
The customer also receives an Order Invoice email informing them to make the additional payment for rescheduling bookings:

Order Invoice email received for making the additional payment
This email consists of details on the additional amount payable and the Pay link for making the payment.
When you click on this Pay link, you are taken to the same Pay for Order page where you select the mode of payment for making payment.
h. Minimum number of hours for rescheduling
Another setting associated with rescheduling is the Minimum number of hours for rescheduling. This setting allows you to reschedule till the set number of hours before the booking date.
So for this, on the Global Settings page, the Minimum number of hours for rescheduling is enabled and set to 24 hours.

The minimum number of hours for rescheduling is set to 24 hours
Let’s say that a customer has made a booking for 23rd October 2021 where the minimum number of hours for rescheduling is set to 24 hours (i.e 1 Day).
To reschedule their booking, the customer will have to log in to the store & go to My Account > Orders, and click on the particular order they wish to reschedule.
The order will appear & they can click on the ‘Reschedule Booking’ option as shown below:

Booking details on My Account > Orders Page
As we can see in the image, the booking date for this order is 23rd October 2021.
If the customer decides to reschedule the booking on any of the days before 22nd October, then they will get to view all the dates before the booking date (i.e., 23rd October 2021).

Reschedule Booking option on the Account Page
If the customer reschedules the booking on 22nd October 2021, i.e., 24 hours before the booking date (23rd October 2021), then they will not be able to reschedule.

The Reschedule Booking option will not be available on the Account Page
i. Allow adding bookings date
What if your customer was in a hurry while placing their order & didn’t end up choosing a booking date for the same?
In retrospect, they might be looking for a way to select a booking date after their purchase has been made.
a) Allow adding Booking dates later: Admin experience
Enabling this setting will allow them to add booking dates after their order has been placed.

Allow adding bookings date setting
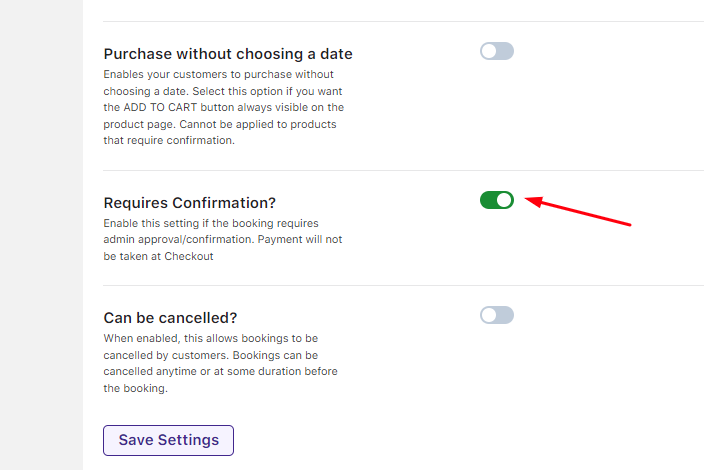
It is important to note that this setting will only work if you have enabled the option for your product to be purchased without selecting a booking date & no booking date is chosen during the initial order.
For example, under the booking meta box, you will have to enable the Purchase without choosing a date option:

Purchase without choosing a date option enabled
b) Allow adding Booking dates later: User experience
Let’s say that your customer has booked a One Day Bridal Package from your store. However, they haven’t chosen the day on which they would like to avail of this service.
This is the product page without choosing the booking date:

Product Page
Here is how the checkout page will appear:

Checkout Page
Once, they are done purchasing this service they can go to their Account and click on Orders to view them like this:

Customer’s Orders
The Order number #370 is the one that the customer purchased, so they can click on the View option.
After clicking on it, the order details will be displayed as such:

The customer can click on the ‘Add Booking Date’ option to add the booking date for their order. A popup will appear which will look like this:

‘Add Booking Date’ option
Here, the customer can click on the Calendar icon and add the date. For example, let’s go with 16th June 2021.

The booking date added to the order
The customer can then click on Confirm Bookings and the order details will be updated as follows:

Order details are updated with the booking date
In this manner, your customer can add booking dates to their order after placing an order without choosing a date
4. Pricing Settings
↑ Back to top
a. Hide Variation Price on Product Page
This functionality can be used with a single-day as well as multiple-day variable product. Enabling it will allow you to hide the variation price from the product page.

For instance, your site provides the booking for the Taj Lands End Hotel.
One of your customers has selected the booking start date of 16th January 2024 and the end date of 18th January 2017.
They’ve also selected the Room Type as Super Delux.
When this setting isn’t enabled, you will find the Total amount calculated and just below it, the price charged for the room selected.
In this case, the Super Deluxe room is charged $2000 per night.

To avoid the confusion of seeing two prices, you can enable the Hide Variation Price on the Product Page setting.
When it is enabled, you will not find the price charged per night based on the room type (variation) selected.
In this case, after selecting the room type as Super Deluxe, the customer will simply see the total price which includes the calculated price of the variation selected.

b. Hide Booking Price on Product Page
This functionality is used for single-day booking with timeslots. This setting is disabled by default.

Let’s say that you run the Enrich Salon and Spa and take bookings as per the time slots.
A customer selects the Booking Date as 26th January 2017 but Booking Time is not yet selected. The Booking Price will thus be displayed as the regular price.

This price will change once the user selects the time slot. By observing this price change, the user may get confused.
So to avoid this confusion, enable the Hide Booking Price on Product Page setting. The customer will get the calculated booking price only after all the booking details are filled in.
In the same example, the user has selected only the Booking Date as 26th January 2017.
However, unless the Booking Time is selected the Booking Price will not be displayed on the product page.

The user has now also selected the Booking Time from 11:00 AM to 01:00 PM. Accordingly, the booking price will be calculated and displayed.

5. Holidays
↑ Back to topa. Allow holidays in the date range
Enabling this setting will allow your customers to choose booking dates set under the Multiple Night Booking type as Holidays.
For instance, you have added 14th, 15th, and 17th August 2024 as Holidays. This setting is enabled.

Your bookable product ‘Hotel Tulip’ is created using the Multiple Nights Booking Type.
Since those 3 dates were added as Holidays, the customers will see them in the frontend as such:

Let’s say that the customer wishes to book this hotel from 13th August 2024 to 18th August 2024.

Since this setting is enabled, these 3 dates added as Holidays will be counted as booking dates.
The number of days selected will thus become 5, the price will be calculated accordingly and the Book Now button will be enabled:

When this setting is disabled, the Holidays will not get added to the customer’s cart.
For instance, the customer chooses to book from 13th August 2024 to 14th August 2024.
This booking will be possible since the Holiday day is 14th August.

Thus, the date gets added:

However, now the customer proceeds to select the date range from 13th August 2024 to 16th August 2024.
There are two Holidays (14th August and 15th August 2024) in this date range.

When the customer chooses 16th August 2024 as the end date, they will see the following message, no start date and the Book Now! button still disabled.

b. Select Holidays / Exclude Days / Black-out days
As a business, providing services on public holidays or during festival times may not be possible.
With the Select Holidays / Exclude Days / Black-out days setting, the site admin can prevent the bookings for all bookable products in their store.
It can be done in two ways: at the Global Level and the Product Level. Adding dates on the global level will apply to all the products in your store and adding dates at the product level will apply to that particular product only.
For instance, you run a Car Rental business that offers all kinds of cars for rent. You do not want your customers to make a booking on particular dates.
In the Select Holidays/ Exclude Days/ Black-out days option, you need to add the dates when your store cannot provide services.

Let’s say that you have added the 26th, 27th, and 28th of January 2024 as your dates. This would mean that the rental service will not be available on these dates.
After adding these dates, click on Save Settings. The added dates in the Select Holidays / Exclude Days / Blackout Days field will be disabled on the calendar of all the bookable products in your store.
On the front end, the calendar of all bookable products will show the dates 26th, 27th, and 28th of January 2024 disabled.
Let’s have a look at two instances of Express Renting Company bookable products that will be unavailable.
Bookable Product 1: Skoda Car

Bookable Product 2: Mercedes Car

This setup will help you block bookings on certain dates for an individual product.
Let’s say you run a Coaching Classes business and you want to prevent the bookings on the 29th, 30th, and 31st of January 2024
Create a Coaching Classes product from the Products > Add Product link.
Add the price, scroll down to the Booking Meta Box, and enable the Booking setting.

Select the Booking type as Single Day and click on the Save Settings button.
Add the days when the coaching classes will be functional by going to Availability tab where you need to enable the weekdays from the Weekdays table as shown below:

Enable the Set Availability by Dates/Months option to set the dates for holidays.
Click the Add button.

From the dropdown of Range Type, select Holidays as shown below:

Now you need to select the dates to set them as holidays so that these dates get disabled on the calendar.
You can select multiple dates here. For instance, since you want to prevent bookings on the 29th, 30th, and 31st of January 2024, add them as holidays here.

You can also set the No. of years for which these holidays will be applicable in the Settings field as shown below. For example, if you add 2 here, then this implies that these holidays will recur for 2 years.

Finally, click the Save Settings button.
Your added dates will appear like this:

Your product is ready and you can prevent bookings for those added dates.
When the customer clicks the Select Date field to make bookings for the classes, they will not be able to make a booking on the 29th, 30th, and 31st of January 2024 due to the settings added for holidays.
Hence these dates are disabled on the calendar as shown below:

Whenever the customer’s cursor hovers over these dates, they will be notified that it’s a holiday, and hence bookings are not accepted on these dates as shown above.
If the Holidays have been added at both the Global and Product Levels, then both settings will be applied to the individual product. For instance, you have added these settings:
Global Level Holidays – 26th, 27th and 28th January 2024
Product Level Holidays – 29th, 30th and 31st January 2024
When the customer visits the bookable product, the dates from 26th to 31st of January 2024 will not be available to book as shown below:

Thus this way, you can avoid receiving bookings on holidays or specific days when the classes will not be functional.
6. Additional Charges
↑ Back to top
a. Charge Resource cost on a Per Day Basis
If you want to charge a resource on a per-day basis, you can enable the setting Charge Resource cost on a Per Day Basis option.

According to this setting, the resource’s cost will be multiplied by the number of days booked to calculate the total price.
For instance, An Outdoor Wedding Booking costs $300 in your store. This Multiple Nights bookable product also offers resources.
A customer decided to book it from 30th January 2024 to 2nd February 2024 with the Resource Kinjal which costs $50.
If the setting is enabled, the total cost will be calculated in this manner as shown below:
300 x 3 nights = 900
50 x 3 nights = 150
Total cost = 900 + 150 = $1050

If the setting is disabled, the same dates with the resource will be calculated in the following manner:
300 x 3 nights = 900
Cost of resource person = 150
Total cost = 900 + 50 = $950

b. Charge WooCommerce Product Addons options on a Per Day Basis
Enabling the option Charge WooCommerce Product Addons options on a Per Day Basis will ensure that the price added to the WooCommerce Product Addons form will be multiplied by the total number of booking days for the Multiple Nights Booking option.
For this, you will require the WooCommerce Product Addons plugin.

For instance, you have enabled the WooCommerce Products Addons plugin and have added Meal options such as Lunch and Dinner for your Multiple Nights bookable product ‘Hotel Sinclaire’.

The Breakfast option costs $20 while the Dinner option costs $30 as shown above.
Let’s say that a customer chooses the dates 31st January 2024 to 2nd February 2024. This would mean that the customer has chosen 2 days. The price would be $2,000.
Additionally, the customer has selected the Breakfast meal option.
Since the Charge WooCommerce Product Addons options on a Per Day Basis setting is enabled, for 2 days, the cost would be $40.
The total cost of the booking will thus be $2000 + $40 = $2,040 as shown below:

If the setting is disabled, the Breakfast option will be added only once, making the total $2,020.

c. Charge WooCommerce Gravity Forms Product Addons options on a Per Day Basis
You need to first create forms based on documentation available at gravityforms.com and woocommerce.com.
Create these forms from the Gravity Forms menu from the admin side after installing Gravity Forms as well as the WooCommerce – Gravity Forms Product Add-Ons plugins.

Form created from Gravity Forms menu
From the Add/Edit Products page, you now need to create a Multiple Nights bookable product. Let’s go with Taj Hotels. Configure the availability for this product from the Availability tab.

Enabling Multiple Nights booking option
Now you just need to select the name of the form that you want to include in the product from the WooCommerce Gravity Forms Product Add-Ons meta box.
Once the form is selected, you can configure the settings like hiding the WooCommerce price, changing the Subtotal, etc.
You will need to click on the Update button to save the settings.

Gravity Forms Product Add-On’s Meta Box
For Multiple-night products, the amount from the Gravity Forms settings will be added for the number of days selected for booking.
Let’s say that a customer books a hotel room for 2 days from 29th December to 31st December 2017, and you have a form that helps you add breakfast and lunch for $15 and $20 respectively. The per-day stay cost for the hotel room is $500/night.
Then the amount will be calculated as $500 x 2 days = $1000
Breakfast and lunch = $15 + $20 = $35
The total amount payable would be $1000 + $35 = $1035 for a 2-night stay including breakfast and Dinner as shown below.

Multiple Nights booking using Gravity Forms
As you have noticed, the amount for breakfast and lunch was taken as a one-time payment for the entire stay.
However, if you want to charge the customer on per daily basis for breakfast and lunch then enable the Charge WooCommerce Gravity Forms Product Addons options on a Per per-day basis

This ensures that the price added to the WooCommerce Gravity Forms Product Addons will be multiplied by the total number of booking days for the Multiple Nights Booking option.
Let’s consider a customer booking Hotel Langkawi for the dates 24th December 2017 to 26th December 2017 which will be 2 nights x $250 = $500
They’ve selected breakfast and dinner options, so your additional amount on top of the actual stay amount will be ($15 + $20 = $30) x 2 = $70 as shown below. Thus the amount calculated is on per per-day basis.
The total amount payable for the entire stay will be $500 for the hotel stay + $70 for 2 days of breakfast and dinner, making it a total of $570.

That’s how the Gravity Forms plugin works for Multiple-night bookings.
7. Plugin Data
↑ Back to topReset usage Tracking
The Reset usage tracking setting allows you to stop sending usage data to us.

Once it is reset, the opt-in banner will be displayed as shown here:

Customers can choose to allow data to be sent or not here.
We do not track or store any personal or business-critical data from you or your clients.
The only sensitive thing we store is the admin email. We do this simply to get in touch regarding important updates or major bug fixes of the plugin.
Tracking data is sent automatically to our servers once you opt-in and then every week from thereon.
Below is the list of the data we track:
- Site URL
- WordPress admin email
- Theme
- WordPress version
- WordPress locale
- WordPress debug mode
- WordPress memory limit
- Webserver software & version
- PHP version
- Some PHP Settings like maximum post size, maximum input vars, if suhosin is enabled, if you have cURL, SOAP and fSock enabled
- MySQL version
- WooCommerce version
- List of activated plugins
- Total number of orders with delivery dates.
- Order Delivery Date settings
- Order Delivery Date licensing data
This is all done to make our plugin better. By seeing how our customers use the plugin and what their setup looks like, we draw conclusions that lead to helpful features, better documentation, and more good things.
We send everyone willing to opt-in for the greater good a coupon of 20% off on the next purchase for any of our plugins or bundles.
Bulk Booking Settings
↑ Back to topThe Booking and Appointment Plugin for WooCommerce comes with a time saver feature called ‘Bulk Booking Settings’, which allows the store owner to add booking settings to multiple products from one place.
Instead of visiting each individual product page and applying the booking settings to it, one can add booking settings to multiple products in one go. This saves the store owner time and makes adding settings easy.
Settings List
1. Configuring Bulk Booking Settings
2. Bulk Booking Settings for Products
3. Bulk Booking Settings for Products Categories
4. Save Selected Options as Default
1. Configuring Bulk Booking Settings
↑ Back to topGo to WooCommerce > Booking and Appointment Tab > Settings > Bulk Booking tab.

The ‘Select Products and/or Categories‘ field will be available to select multiple products or product categories.
Upon clicking this option, the dropdown will display an ‘All products’ option. This option will display a list of individual products in your store and options with different Product Categories.
You can select the option of your choice. Based on it, the Booking meta box will appear as shown below:


2. Bulk Booking Settings for Products
↑ Back to topLet’s say you run a website that allows people to book appointments with multiple doctors. You want to set up appointments with all or multiple doctors (products) using the Booking plugin.
All the doctors can be booked from 10:00 – 11:00, 11:00 – 12:00, 12:00 – 13:00, 16:00 – 17:00, 17:00 – 18:00, and 18:00 – 19:00 on all days.
Using Fixed Time booking type and Bulk Booking functionality, this can be set up easily for multiple products.

As can be seen above, Doctor A, Doctor B, and Doctor C are selected in the ‘Products and/or Categories‘ field. The required settings have also been enabled in the General tab.
Now, let’s create the time slots in the Availability tab.

After adding all the time slots, click the Save Settings button. This action will add all the selected booking settings in Doctor A, B, and C products.
3. Bulk Booking Settings for Products Categories
↑ Back to topNow, let’s say that you wish to add bulk booking settings based on different Product Categories.
You can select the specific product category you want.
For instance, here we have selected all the products that fall under the ‘Boat Tour’ product category.

Following this, you can enable the booking for it, select a Booking Type for it, configure the Availability settings, and then click on Save Settings to apply the settings to all the products in the selected Product Category.
If you want to add booking settings for all products, you can select the ‘All Products‘ option in the Products field and enable the required settings in the Booking Meta box. Clicking the Save Settings button will save selected booking settings for all products.
In the same way, booking settings can be applied according to the different booking types: Single-Day, Multiple-Night, and Duration-Based Time.
If you need to change a setting for a particular product after applying it in bulk, visit the individual product page.
Note: If the product selected in the ‘Products’ field already has booking settings, they will be overridden by the new settings selected in the Booking meta box.
If you want to add, delete, and update availability-related information only for multiple products, you can use the Booking plugin’s Manage Availability of Products functionality.
4. Save selected options as default
↑ Back to topSite admins can also set default booking options while adding bulk booking settings. This feature saves time setting values when you create a bulk booking.
The option to set the default booking option is present just above the ‘Save Setting’ button, as shown in the image:

You will have to tick the checkbox and click on Save Settings. Let us see how this setting can be used.
Let’s assume that you run online Guitar classes for different levels. You will most likely use the ‘Fixed Time’ booking type along with the ‘Persons’ setting as your Booking settings for most of your products.
You can fill in these settings and tick the checkbox for the default option setting, as shown here:


This would mean that the next time you try configuring bulk booking settings, the settings you added will be readily available by default.
There is a button with the ‘Reset Default Settings’ option to help you clear the default values and set unique product options.

Upon clicking this button, it will scrape off all the previous default booking options. While it is in this process, the button will have the message Default Booking Settings have been reset successfully in a green box, as shown below:

Once done, your Bulk Bookings Page will be refreshed as a new one without the previous default settings.
Thus, with the Bulk Booking settings, you can seamlessly set the same booking settings for all your products from one place.
Product Availability
↑ Back to topThe Booking and Appointment Plugin for WooCommerce offers a powerful “Manage Availability for Products” feature, revolutionizing how store owners handle their bookable inventory. This functionality enables bulk operations for adding, deleting, and updating availability-related information across multiple bookable products simultaneously, significantly streamlining inventory management.
For instance, you have multiple bookable products set up with the Fixed Time Booking Type. You want to add/delete a new timeslot or update the max booking and pricing for multiple products from one place. This functionality makes it easy to do so.
In the same way, you can make it work for different booking types available in the Booking plugin.
Go to the WooCommerce -> Booking and Appointment > Settings > Product Availability.


After selecting the products, you will find the following settings:
1. Select products: All the bookable products will be listed here. You can select as many products or all products to execute the added actions. In the above image, All Products have been selected.
2. Day/Date: You can select either the Day or Date you want to manage the availability.
3. Which Days/Dates: Here, you will select the days or dates you want to manage the availability.
4. Action: You can select the Add, Update, and Delete options for the selected days/dates.
5. From & To time: Here, you will input from time and to time values in the 24-hour format (HH: MM). Please note that this option is applicable only for Fixed Time booking type
6. Max Booking: You can enter the maximum bookings available when adding or updating the products.
7. Price: Here, you will enter the special price used when adding or updating the products’ availability.
8. Note: This field is for adding or updating note information for the chosen day/date and time information. This option applies only to the Fixed Time booking type.
One can add as many actions as they want in the Manage Availability table. Added action will be executed for the selected product in the ‘Select Products’ fields.
It is highly recommended to select the same booking type products for smooth execution and less number of actions to be performed! This will avoid any performance-related issues.
Here’s how the setting will work with different booking types available in the plugin:
A. Single Day
↑ Back to top1) Action: Add
↑ Back to topUsing a Single Day booking type, you can create a bookable product that takes the booking for the whole day. This booking type can be used in Tour Business, Events, Amusement Park, etc.
Let’s assume that you run one of these businesses and you have created multiple products (could be 100+) with the following availability:

In the above screenshot, all the weekdays are enabled except Monday and Tuesday. If you want to enable both these weekdays along with their max booking and pricing for all/multiple products, then you can do so by adding the following action in the manage availability table.
Bookable products: All the products where we want to add availability. In this case, it will be City Tour, City Tour A, City Tour B, and City Tour C.
Day/Date: Day
Which Days/Dates: Monday, Tuesday
Action: Add
From & To time: Blank
Max Booking: 100
Price: Blank
Note: Blank

In the table, the Add action has been used to enable Monday & Tuesday along with its Max booking as 100. Clicking on the ‘Execute Added Action‘ button will gather the selected data and execute it on the selected products.
In this case, Monday & Tuesday will be enabled in the selected product along with the Max Booking to 100.
In the same way, it is possible to add new dates to the products as shown in the below screenshot.
Bookable products: All the products where we want to add availability. In this case, they are City Tour, City Tour A, City Tour B, and City Tour C.
Day/Date: Date
Which Days/Dates: 9-02-2024, 10-02-2024 and 11-02-2024
Action: Add
From & To time: Blank
Max Booking: 100
Price: Blank
Note: Blank

After executing this action, 9th, 10th, and 12th February 2024 will be added to the selected products with 100 as its maximum booking.
Please Note: If the day/date is already enabled then nothing will happen for that day/date. Additionally, it would not matter if any values are set or not in the ‘From & To time’ and ‘Note’ columns if the booking type is Single Day.
2) Action: Delete
↑ Back to topUsing this option, you can easily delete or disable the available days or dates of the bookable product.
Let’s say that you have all the weekdays enabled in the products and you want to disable Saturday & Sunday. Here’s what you will fill in the Manage Availability Table.
Bookable products: All the products in which we want to delete the availability. In this case, they are City Tour, City Tour A, City Tour B, and City Tour C.
Day/Date: Day
Which Days/Dates: Saturday and Sunday
Action: Delete
From & To time: Blank
Max Booking: Blank
Price: Blank
Note: Blank

After executing this action, Saturday and Sunday will be disabled in the selected products. In the same way, it is possible to delete the dates from the product.
3) Action: Update
↑ Back to topSometimes, you will need to update the Maximum booking for the days/dates for multiple products. Visiting and updating each product can get tedious, so the ‘Update’ option will be handy.
For instance, you need to update the maximum booking and price for all weekdays for multiple or all products. Do so by adding the following action in the Manage availability table.
Bookable products: All the products in which we want to delete the availability. In this case, they are City Tour, City Tour A, City Tour B, and City Tour C.
ACTION 1
Day/Date: Day
Which Days/Dates: All
Action: Update
From & To time: Blank
Max Booking: 150
Price: 250
Note: Blank
ACTION 2
Day/Date: Date
Which Days/Dates: 16-02-2024 and 17-02-2024
Action: Update
From & To time: Blank
Max Booking: 150
Price: 250
Note: Blank

Executing the above-added action will update the Maximum booking to 150 and the pricing to 250 for the selected products on all weekdays, including February 16th and 17th, 2024.
If the selected day is disabled, then the details will not be updated. In this case, it should first be enabled by using the Add action.
B. Duration-Based Time & Multiple Nights
The above-mentioned actions are for the products that are set up with Duration Based Time or Multiple Nights. They will work in the same manner as explained in the Single Day booking type section.
The only difference is that the Max Booking field will not be considered for the days/dates.
Additionally, when adding dates for the products, only the pricing of the dates will be considered.
C. Fixed Time
↑ Back to topUsing the Fixed Time booking type, you can create a bookable product that allows booking the product on a date and time slot. This booking type can be used in businesses like hair spa to an appointment with a doctor.
Let’s assume you run one of these businesses and you have created multiple products (could be 100+) with the following availability.


Based on the above screenshot, the product will be available to book for all weekdays between 10:00 – 11:00, 11:00 – 12:00, 12:00 – 13:00 and 13:00 – 14:00 time slots.
1) Action: Add
↑ Back to topIf you want to add more time slots for particular or all weekdays, you can do so by adding the following action in the manage availability table: Let’s add a 14:00 – 15:00 time slot for Sunday in multiple products.
Bookable products: All the products for which we want to add availability. In this case, they are Doctor A, Doctor B, and Doctor C.
Day/Date: Day
Which Days/Dates: Sunday
Action: Add
From & To time: 14:00 to 15:00
Max Booking: 1
Price: 200 (You can keep it blank if you do not wish to set the price)
Note: Blank

In the table, the add action has been used to add the 14:00 – 15:00 timeslot for Sunday. Its Maximum booking is 1 and the time slot price is 200. Additionally, there’s a note.
Clicking on the ‘Execute Added Action‘ button will gather and execute the selected data on the selected products.
If the weekday or date is not available in the product then the weekday will be enabled and the date will get added to the product.
If you want to add or update only a day/date, you can do the same without adding any numbers in the From and To time fields.
In the same way, it is possible to add new time slots for dates to the products, as shown in the screenshot below.

After executing this action, the 18:00 – 20:00 timeslot will get added for the 15th, 22nd, and 29th February 2024 dates to the selected products with 1 as its maximum booking and price as 200.
Additionally, this action will add the 15th, 22nd, and 29th February 2024 dates in the specific dates if products don’t have these dates.
2) Action: Delete
↑ Back to topLet’s say you have some timeslots for all the weekdays in our products. You want to delete a particular time slot 13:00 – 14:00 for all weekdays. You can add the following action in the Manage availability table.
Bookable products: All the products in which we want to delete the availability. In this case, they are Doctor A, Doctor B and Doctor C.
Day/Date: Day
Which Days/Dates: All
Action: Delete
From & To time: 13:00 and 14:00
Max Booking: Blank
Price: Blank
Note: Blank

Once you click the ‘Execute Added Action‘ button, it will delete the 13:00 – 14:00 timeslot from all weekdays. When the delete action commences without time slot information then the weekdays will get disabled in the products. In the same way, this will work for the dates.
3) Action: Update
↑ Back to topLet’s say that you need to update the maximum booking and price for some of the time slots for all weekdays in multiple products or all products. You can add the following actions in the Manage Availability table.
Bookable products: All the products in which we want to delete the availability. In this case, they are Doctor A, Doctor B and Doctor C.
Action 1
Day/Date: Day
Which Days/Dates: All
Action: Update
From & To time: 10:00 and 11:00
Max Booking: 10
Price: 100
Note: Blank
Action 2
Day/Date: Day
Which Days/Dates: All
Action: Update
From & To time: 11:00 and 12:00
Max Booking: 10
Price: 100
Note: Blank
Action 3
Day/Date: Day
Which Days/Dates: All
Action: Update
From & To time: 12:00 and 13:00
Max Booking: 10
Price: 100
Note: Blank

Clicking the ‘Execute Added Action‘ button after adding the above actions will update the Max Booking and Price of the time slots in the selected products. If the From time and To time information is not added, then the Maximum Booking and Price will be updated for the selected day/date.
Thus, the Booking and Appointment Plugin for WooCommerce’s ‘Manage Availability for products’ functionality will help you simplify the process of adding, updating, or deleting specific settings for different products!