Google Calendar
↑ Back to top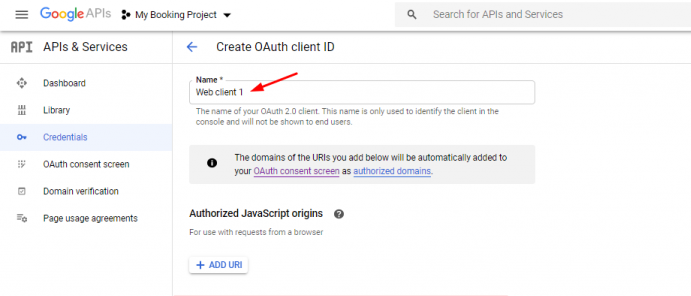
Booking and Appointment Plugin for WooCommerce allows integration with Google Calendar via OAuth.
A. Integration via OAuth
Go to the Google Developers Console. Select a project, or create a new one.

Give the Project name and click on the Create button.

Once the project is created, the Calendar API needs to be enabled. To do so, click the Enabled APIs & Services link > Enable APIs and Services.

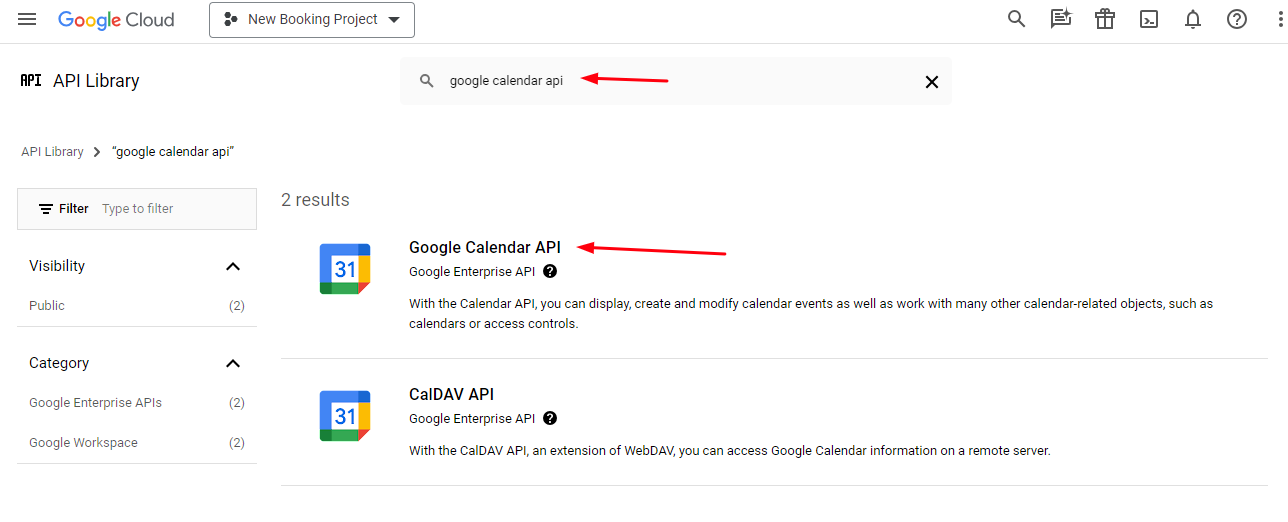
Next, search for Google Calendar API.
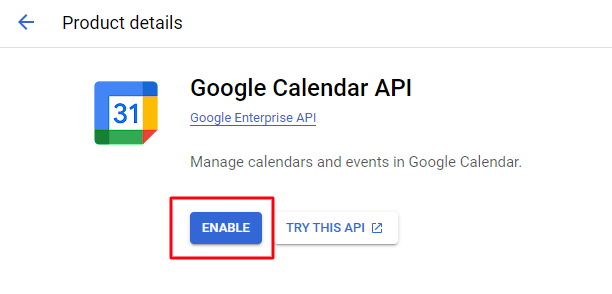
Click the ENABLE button.
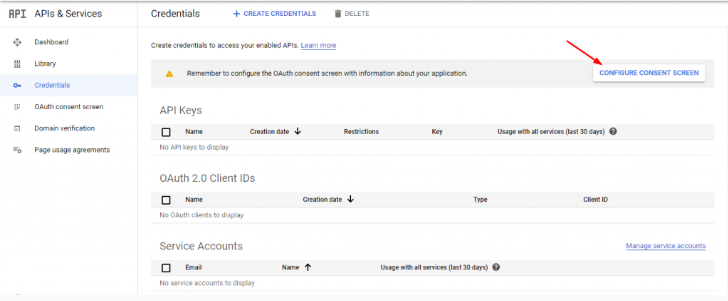
On the left, click Credentials. If this is your first time creating a client ID, you’ll be prompted to configure the consent screen.
Click the Configure consent screen.
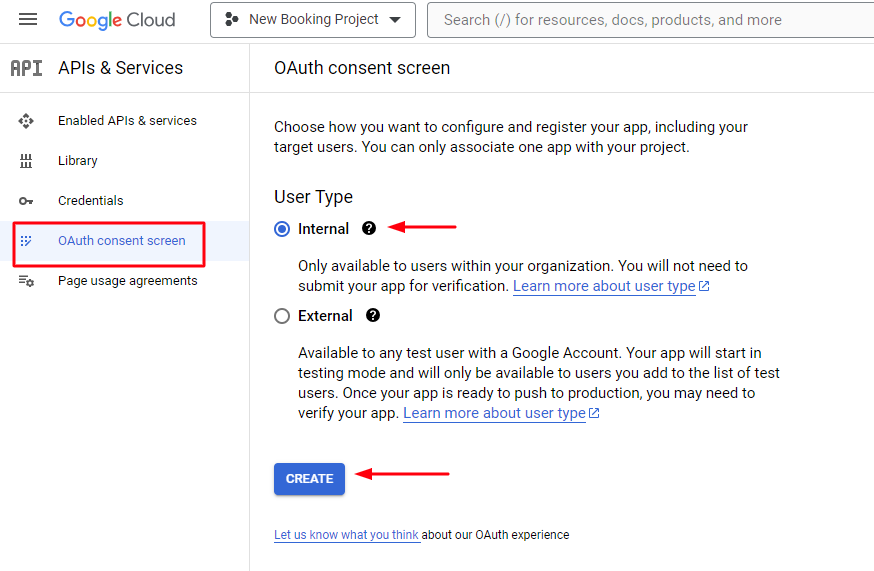
Go to the OAuth consent screen. Select User Type and click on the CREATE button.
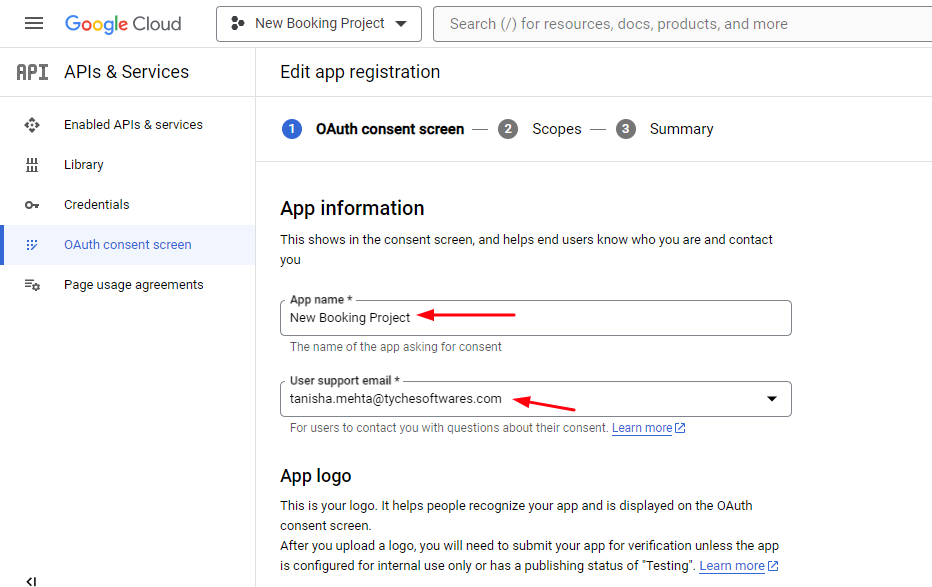
Set the Application name and add the User Support email.
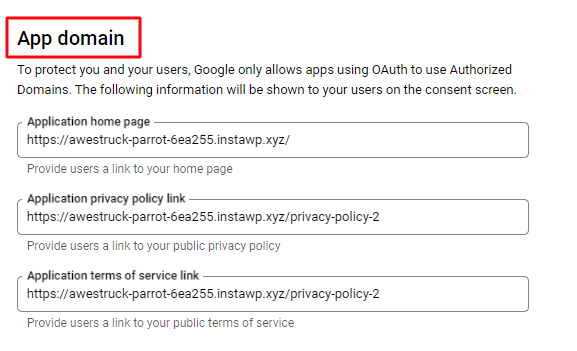
Go to the App domain section and enter the homepage and privacy policy page of your WooCommerce store.
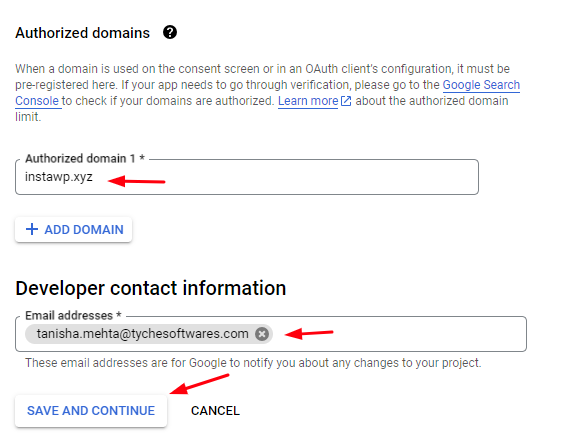
Scroll down provide the authorized domains and give the Developer contact information. Click Save and Continue.
You will be taken to the Scopes section now. Click the Add or Remove Scopes button.
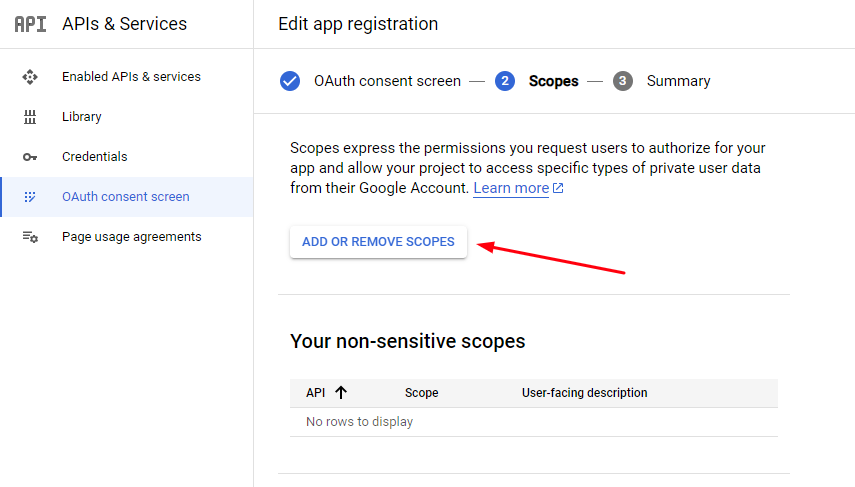
In the search box, type ‘Google Calendar’ so that you can find the option ‘See, edit, share, and permanently delete all the calendars you can access using Google Calendar’.
Select that option and choose this API. Click the Update button.
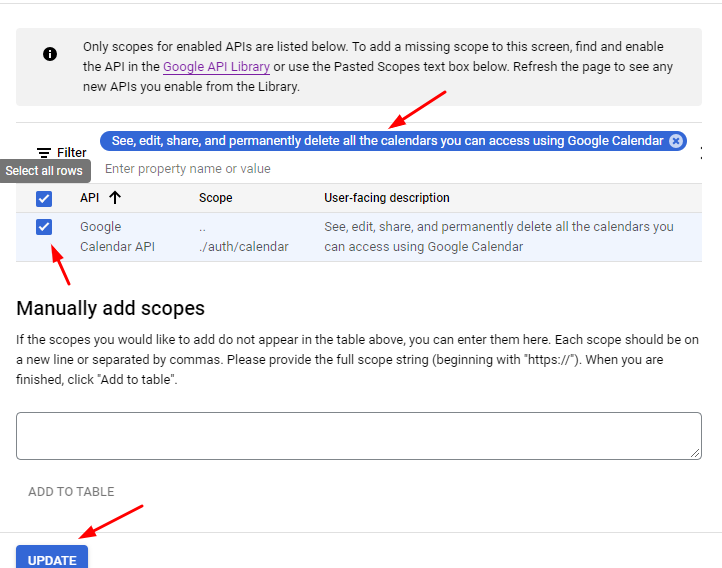
Click the Save and Continue button to proceed forward.
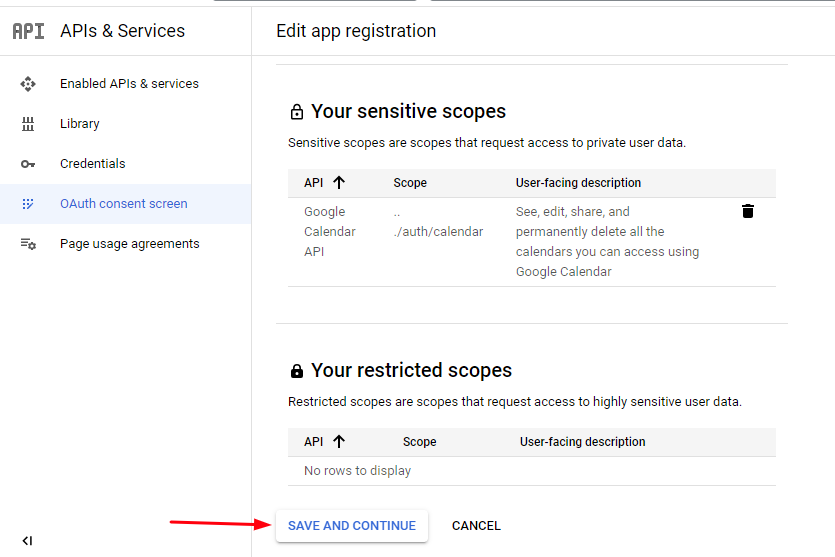
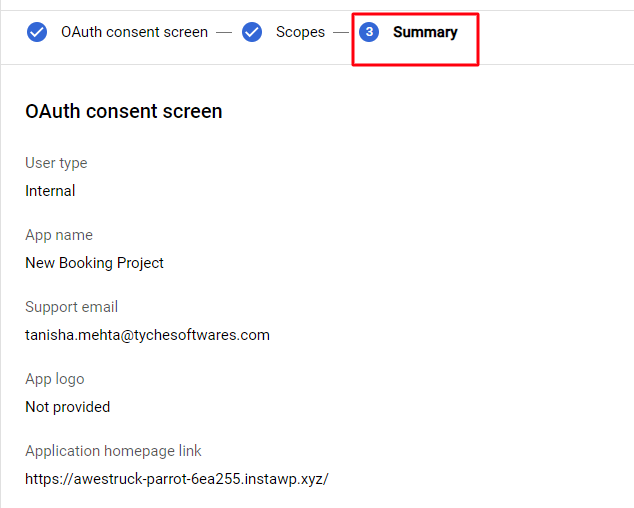
You will get a summary of what has been done so far.
Check for any errors and then proceed forward by clicking the ‘Back to dashboard’ button.
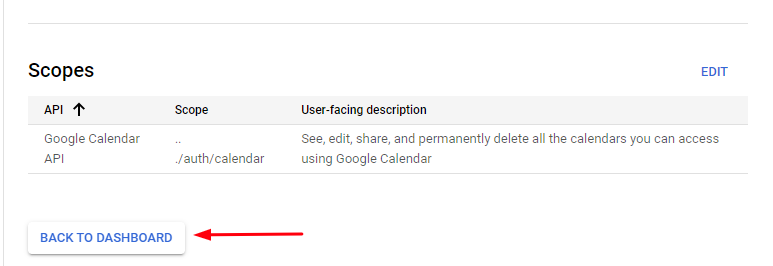
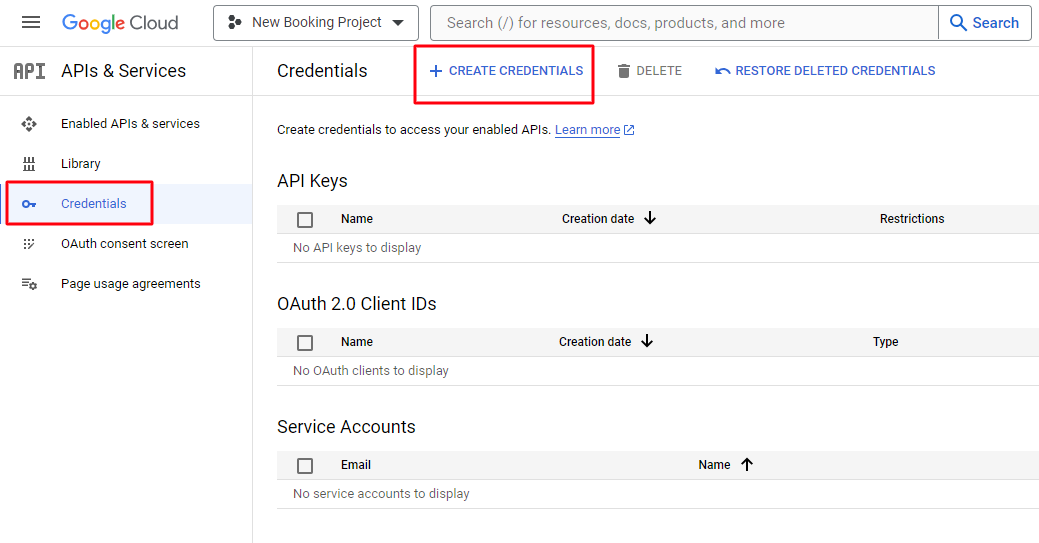
Now, go to the Credentials tab and click Create credentials.
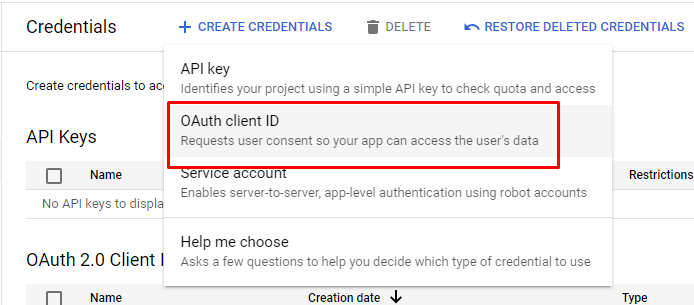
Then select OAuth client ID.
Select Web application under Application type and provide the necessary information to create your project’s credentials.
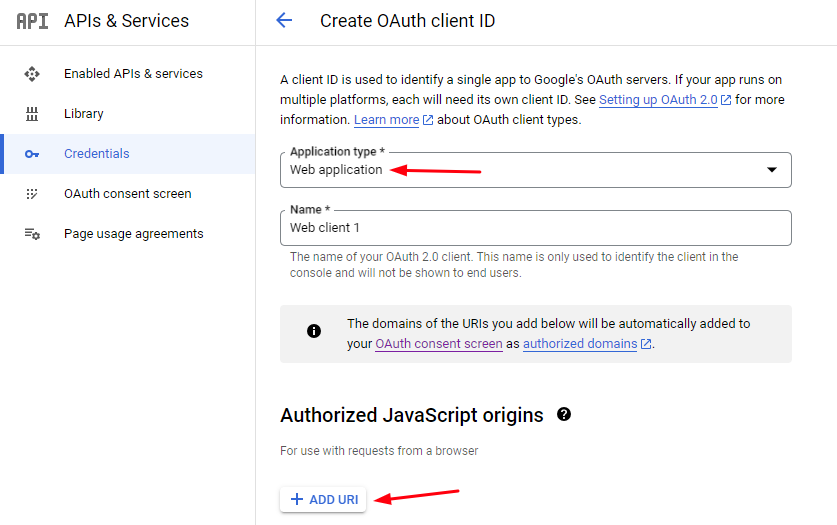
For Authorized redirect URIs enter the Redirect URI and then click Create.
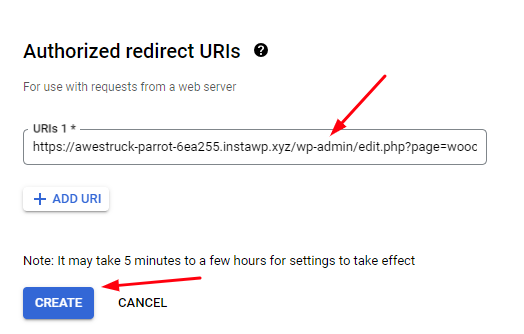
To find out the Authorized redirect URIs, there are two ways:
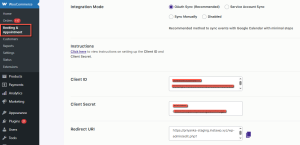
If you are trying to set it up at a global level then you have to use Redirect URI available on WooCommerce -> Booking and Appointment > Integrations > Google Calendar Sync > Admin Calendar Sync Setting section.
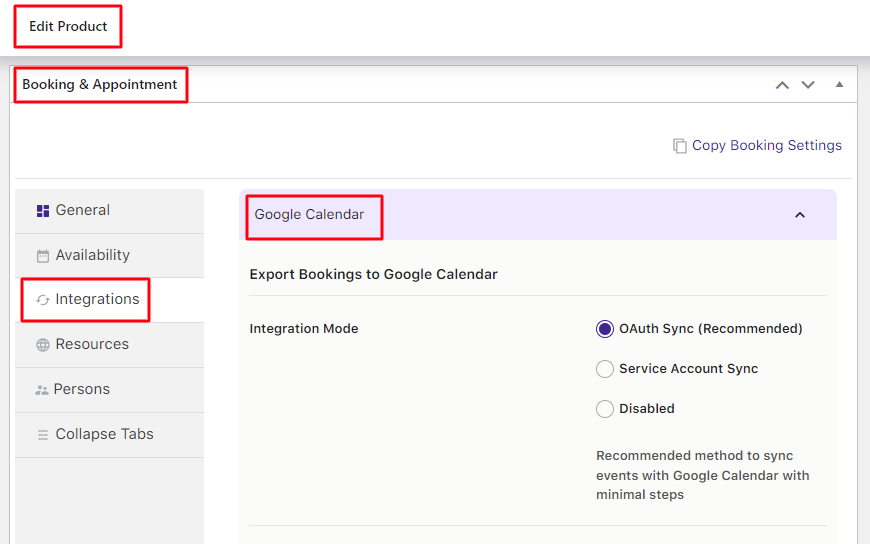
If you set it up at the product level, you have to use Redirect URI available on Edit Product > Booking Meta box > Integrations > Google Calendar Sync tab > Redirect URL.
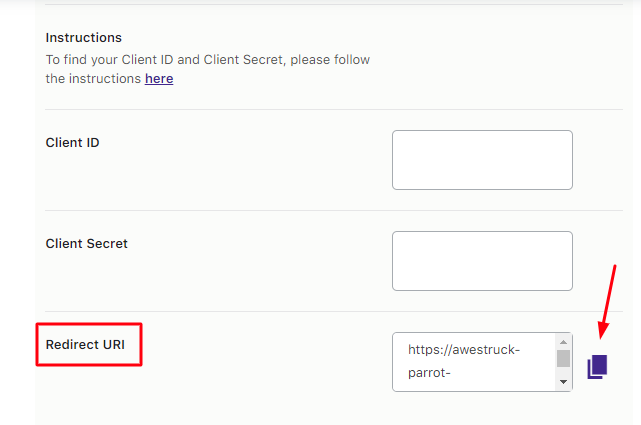
Paste the link and click Create.
You’ll see your Client ID and Client secret in the dialog box that appears next.
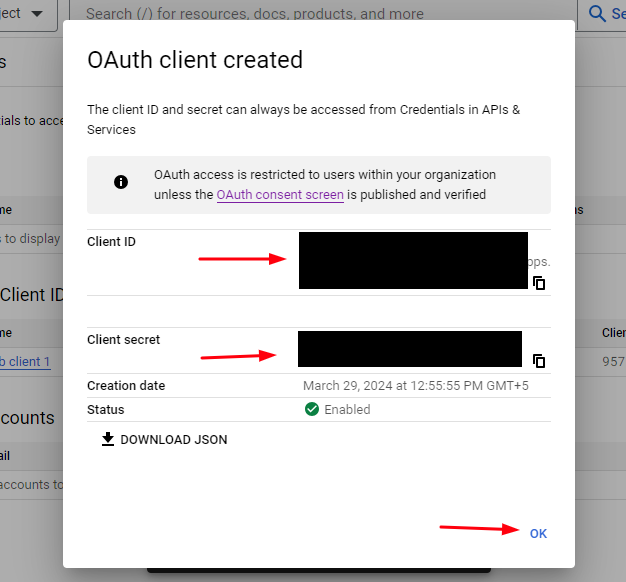
Use them in the Client ID and Client Secret fields that can be found under the WooCommerce -> Booking and Appointment > Integrations > Google Calendar Sync > Admin Calendar Sync Setting section. Make sure you copy and save them somewhere safe.
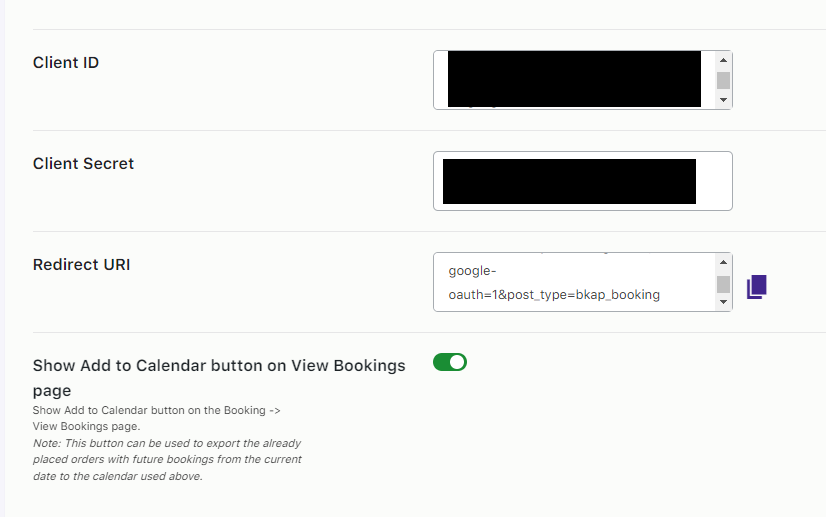
Once the information is entered, click the Save Settings button. The Connect to Google Calendar button will displayed if the connection is successful.
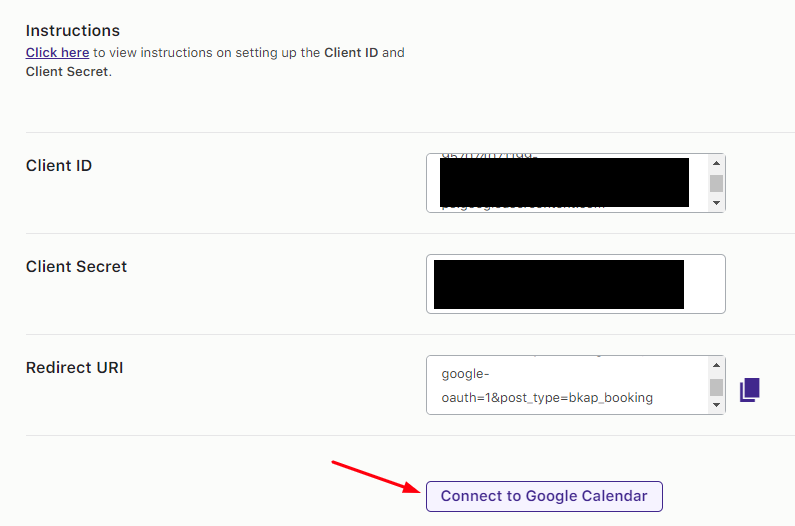
Next, click the Connect to Google Calendar button. It will ask your Gmail account to integrate with Google Calendar. Click the Allow button.
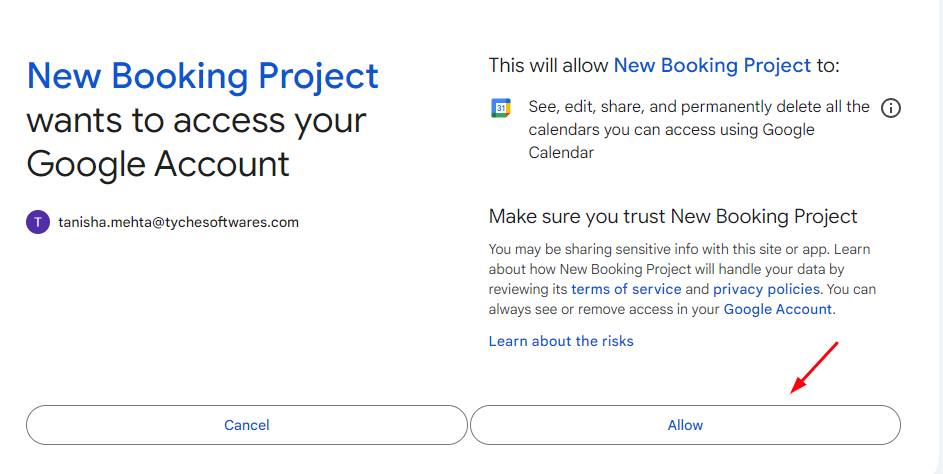
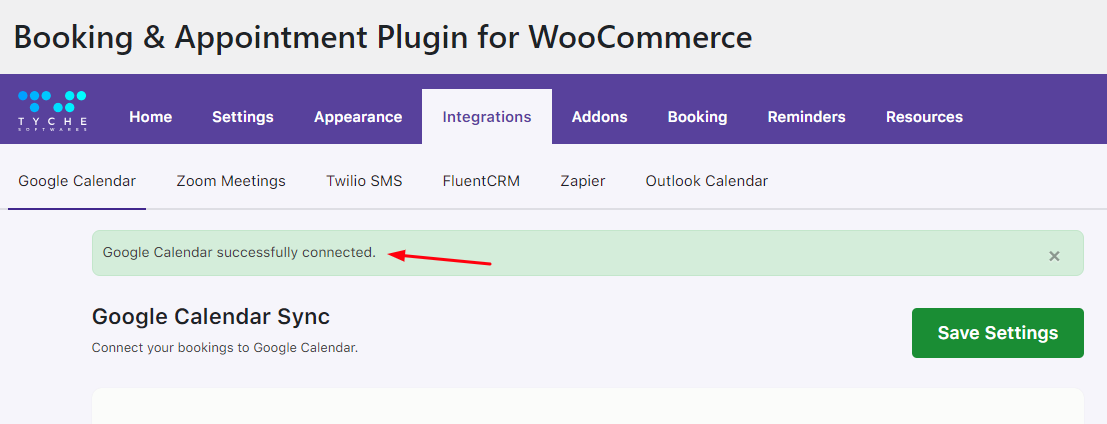
Once done, a message of successful integration will be displayed.
The plugin will export the bookings to the calendar as soon as an order is placed.
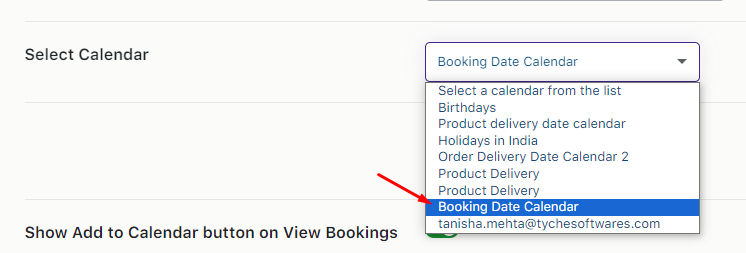
You simply need to select the calendar where you want the bookings to be added:
B. WooCommerce Settings
↑ Back to topYou will find the following settings when you go to the Google Calendar Sync settings in your WooCommerce store.
Go to Dashboard > WooCommerce -> Booking and Appointment > Integrations > Google Calendar.
1. General Settings Dropdown
In this section, you can customize the names of the Event Location, Event Summary, and Event Description here.
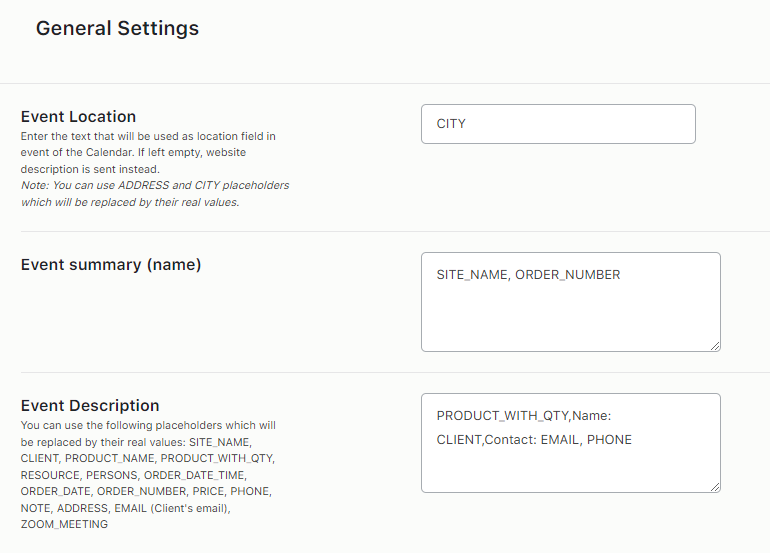
This text will be used to display the location of the event that will be created in the Google Calendar.You can use ADDRESS and CITY placeholders which will be replaced by their real values.
This text will give you a summary of the booking made by the customer. You can add different placeholders to help with the summary, however, by default, you will have the Site Name and Order Number included.
This text will add a description of the event. You can add all the additional details of the booking here. For instance, Product Name, Quantity, Email, Phone, etc.You can use the following placeholders which will be replaced by their real values: SITE_NAME, CLIENT, PRODUCT_NAME, PRODUCT_WITH_QTY, RESOURCE, PERSONS, ORDER_DATE_TIME, ORDER_DATE, ORDER_NUMBER, PRICE, PHONE, NOTE, ADDRESS, EMAIL (Client’s email), ZOOM_MEETING
2. Customer Add to Calendar button Settings Dropdown
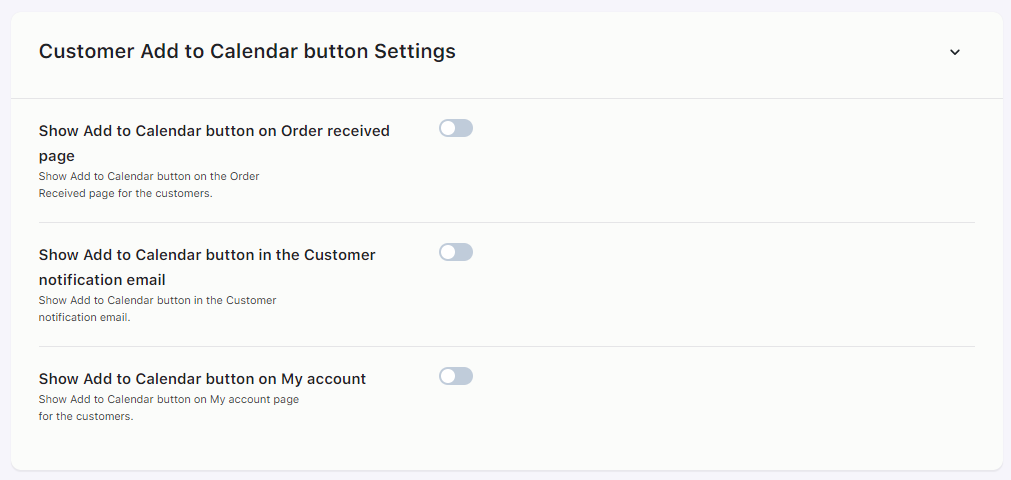
You will find the following settings here:
a) Show the Add to Calendar button on the Order Received page
Enabling this setting will show the Add to Calendar button on the customer’s Order Received Page.
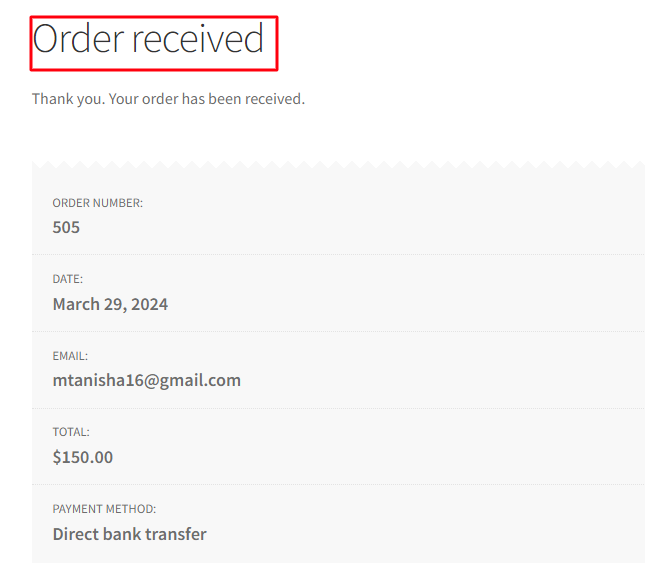
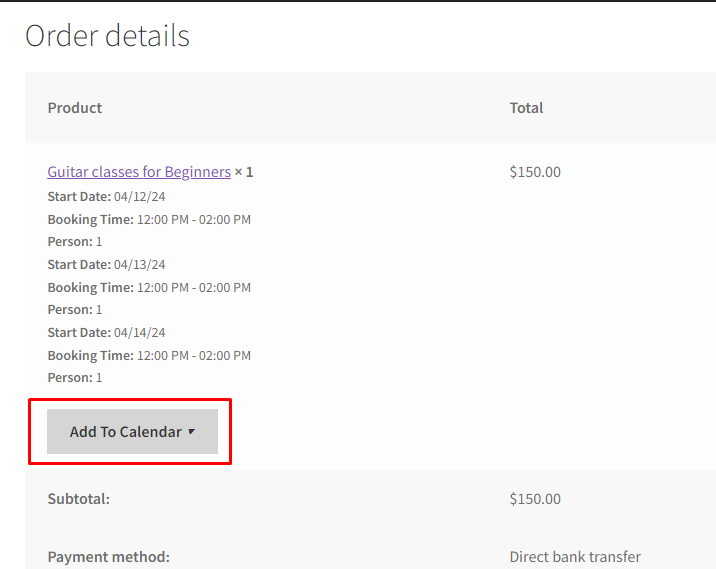
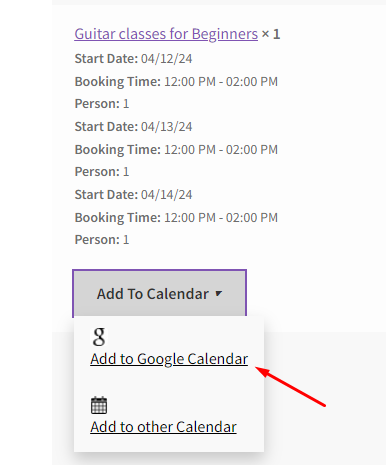
Once the customer clicks the button, they decide on which calendar they wish to add the event. Let’s say they go with the ‘Add to Google Calendar’
They will see the details of the event. They can click the ‘Save’ button to add it to their Google calendar.
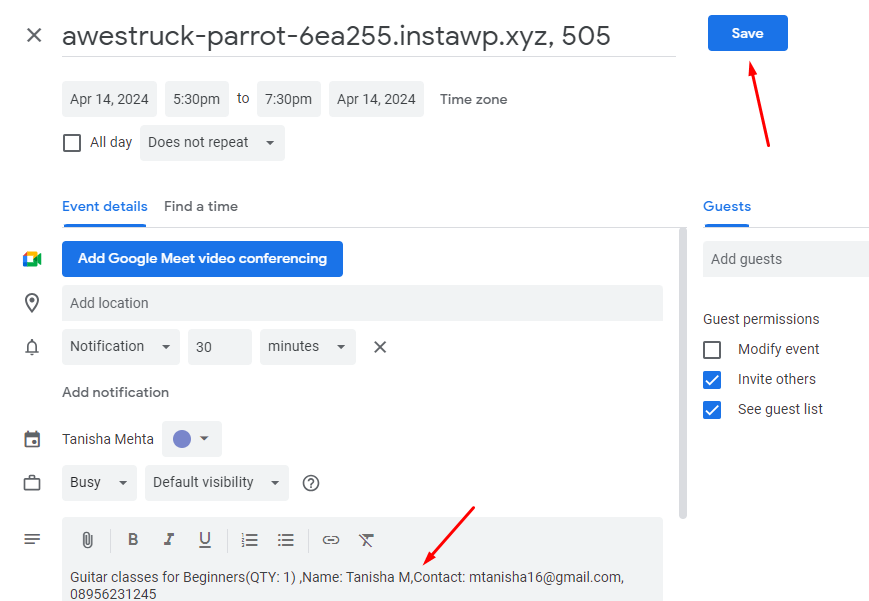
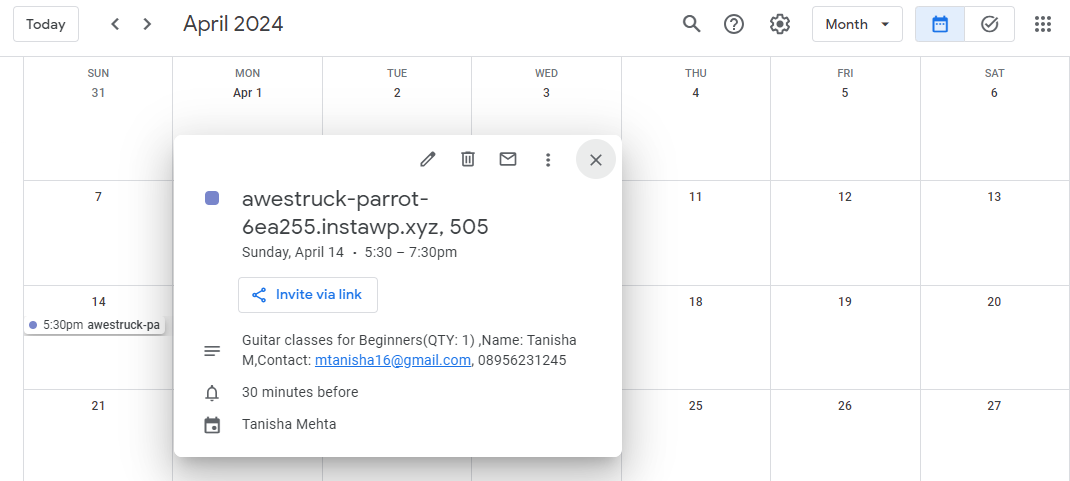
Once added, the event will look like this in their calendar:
b) Show the Add to Calendar button in the Customer notification email
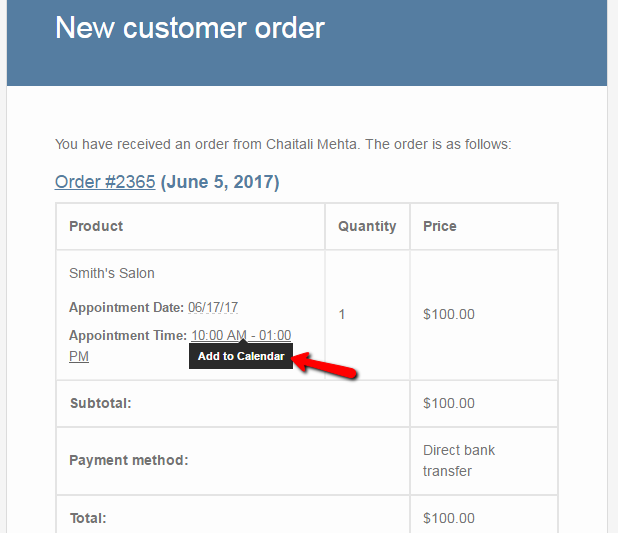
Enabling this setting will show the Add to Calendar button in the customer’s notification email.
c) Show the Add to Calendar button on My Account
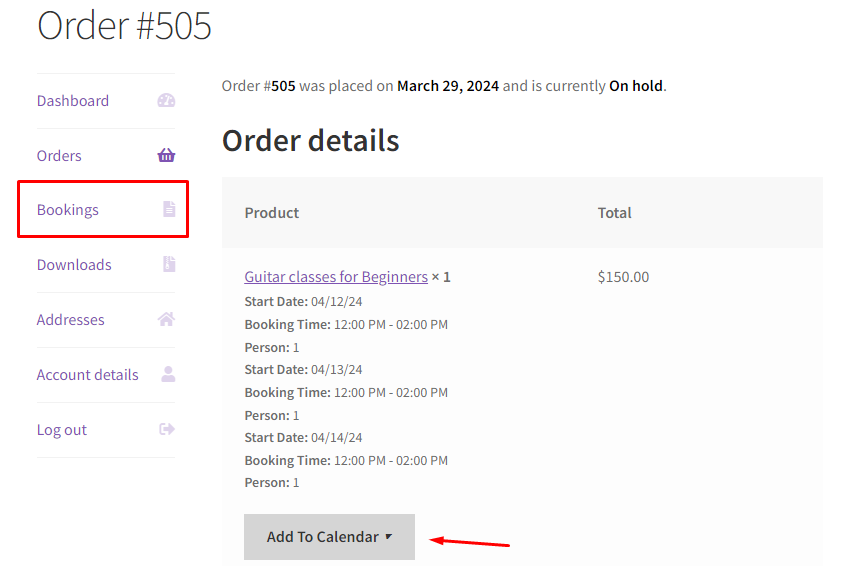
Enabling this setting will show the Add to Calendar button on the customer’s My Account Page > Bookings.
By default, all of these settings will be disabled.
3. Admin Calendar Sync Settings Dropdown
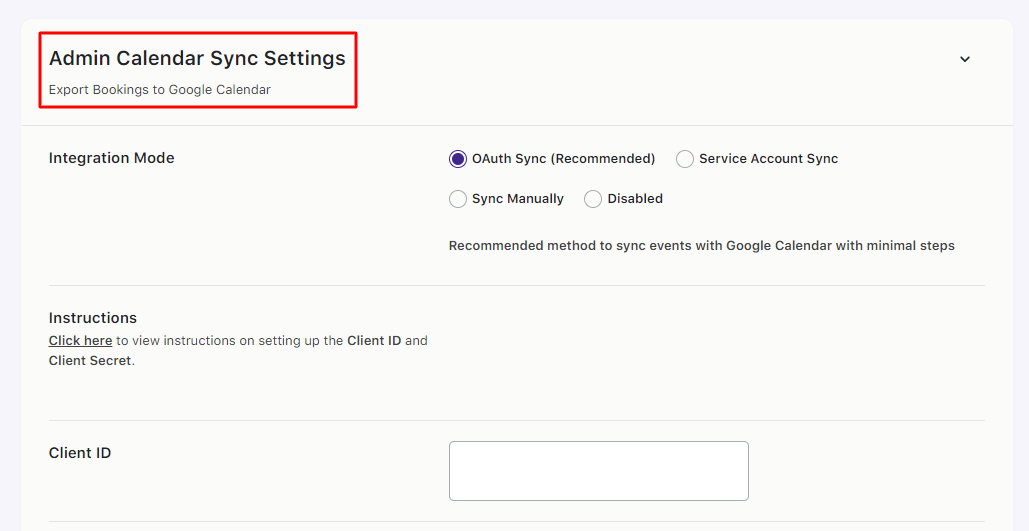
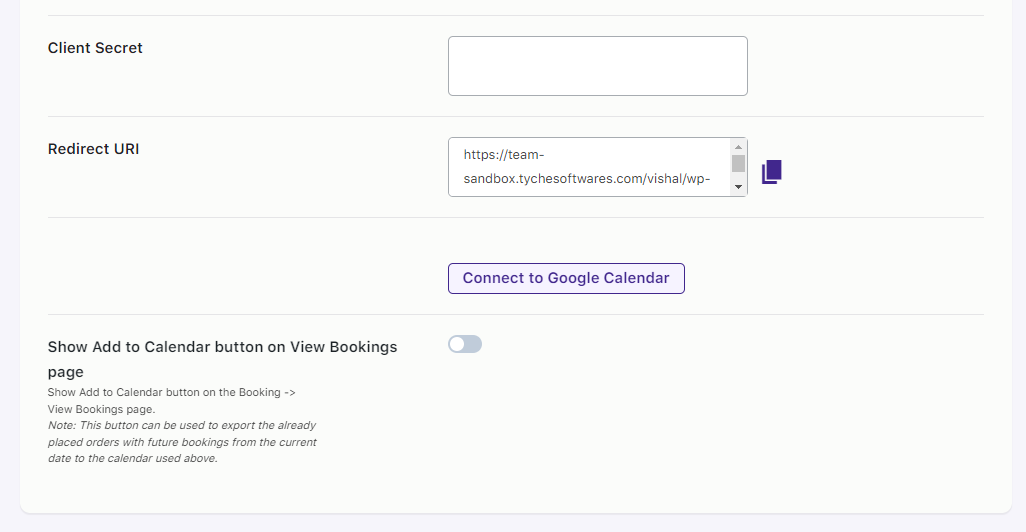
You will find the following settings here:
a) Integration Mode
You can decide the mode of integration here. The integration modes include:
i) OAuth Sync: It is recommended to use OAuth Sync as explained earlier.
ii) Service Account Sync: This is a more traditional method to sync events to Google Calendar. It will require more steps to configure. However, the end result is the same as OAuth Sync.
iii) Sync Manually: This will add an “Add to Calendar” button in Emails received on new bookings and the Order Received page. Events will then be synced manually with the click of the button.
iv) Disabled: This will disable the integration.
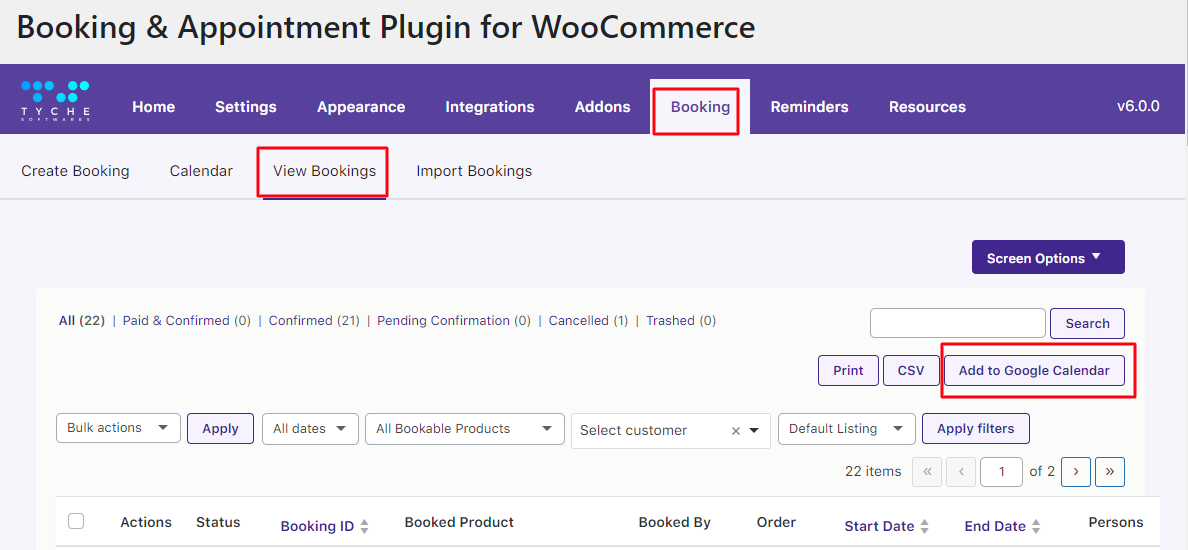
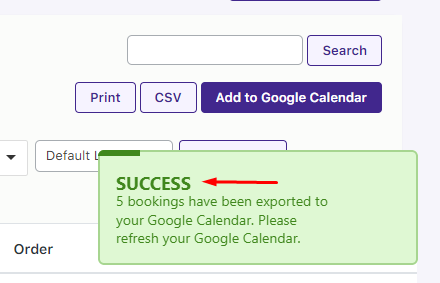
b) Show the Add to Calendar button on the View Bookings page
Enabling this setting will show the Add to Calendar button on the View Booking page.
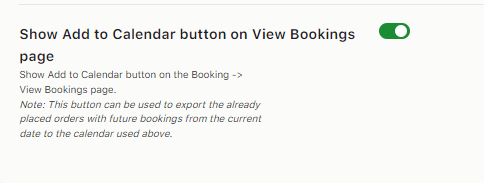
By default, this setting will be disabled.
4. Import Events dropdown
↑ Back to topThis section lets you import previous booking events using the ICS Feed URL.
Once the events have been imported, they will create a new event in your calendar based on the time and date set according to their booking.
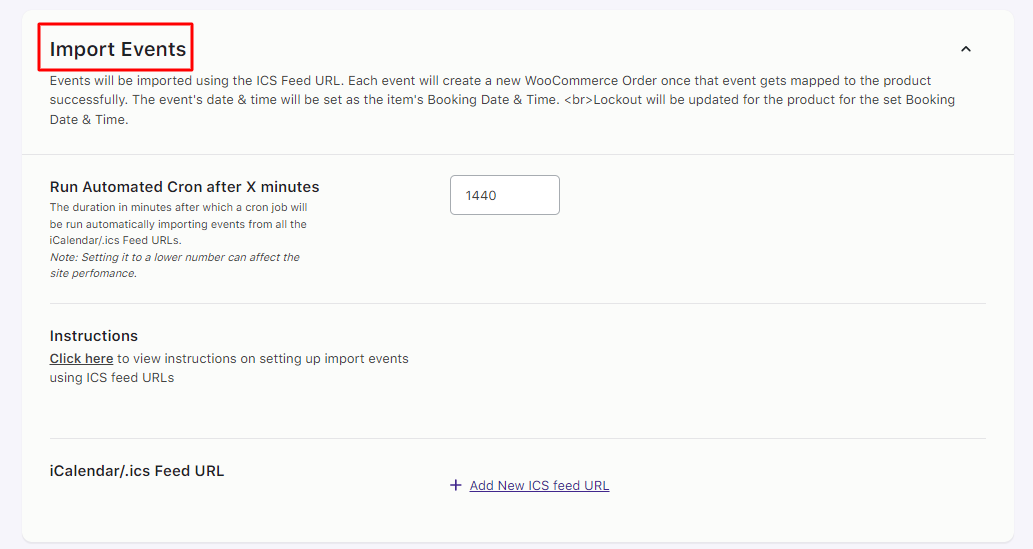
a) Run Automated Cron after X minutes
↑ Back to topThis will decide the time after which a cron will be run automatically to import events from all the iCalendar/.ICS Feed URLs.
Please note, this time will be in minutes. Additionally, setting it to a lower number can affect the site’s performance.
By default, the duration is set at 1440 minutes which is 24 hours, that is, 1 Day. You can set the run time to a number according to your needs.
b) iCalendar/.ics Feed URL
↑ Back to topTo import events, follow these instructions:
Open your Google Calendar by clicking this link: https://www.google.com/calendar/render
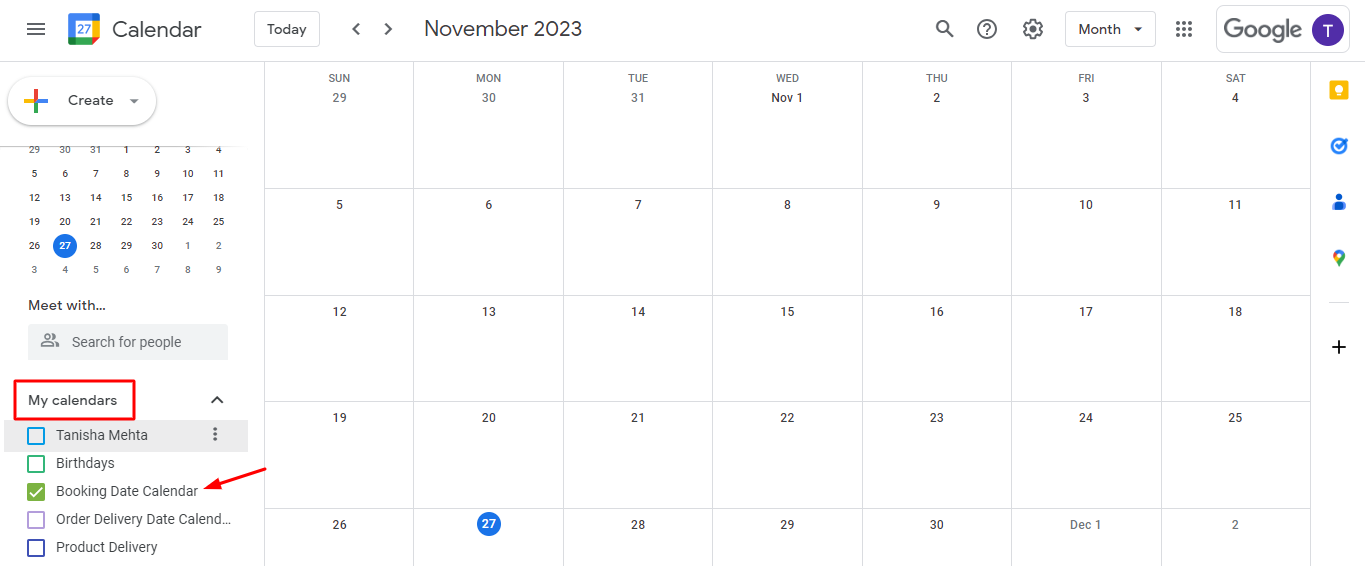
Select the calendar to be imported and click the three dots beside it. Find the Settings and Sharing option. Select it.
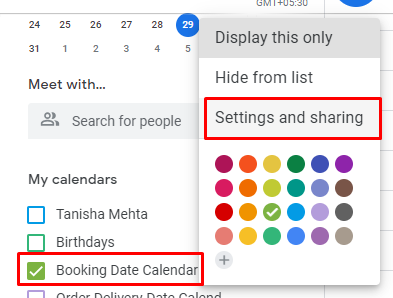
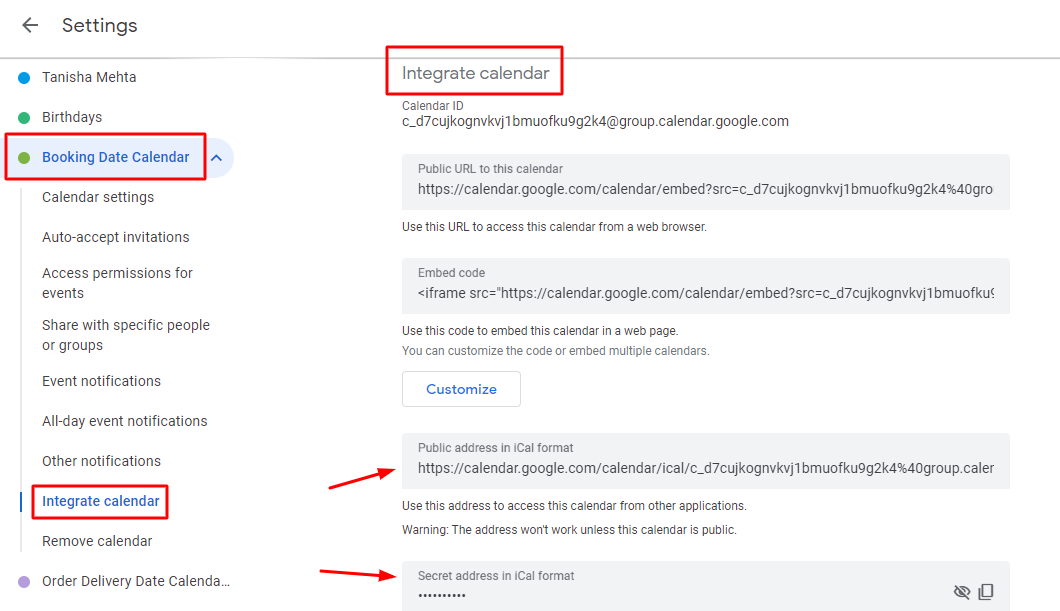
If your calendar is public, go to Integrate Calendar and copy the public address in the iCal format link.
If it is private, copy the Secret address in iCal format.
Paste this link in the text box under the iCalendar/.ics Feed URL.

Save the URL. You will receive the ‘ICS URL has been saved’ message when it is successfully done.

Click on the “Import” button to import the events from the calendar. You will see the Importing taking place:

Once it is successful, you will see the following message:

Similarly, you can import multiple calendars using ICS feeds. Add them using the Add New ICS Feed URL button.
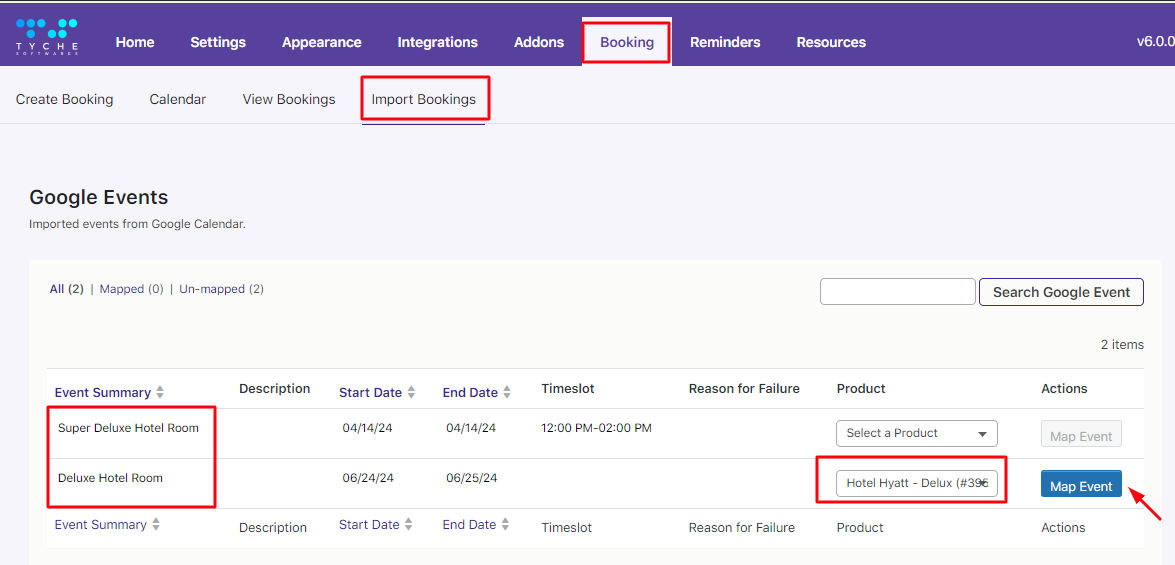
To see the various Imported Bookings (Google Events), go to the Booking > Import Bookings tab.
You can add a Product to the Google Event and under the Actions column, you can even Map this event.
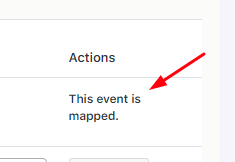
Once Mapping the event is successful, you will see the following message:
Phew! You have successfully integrated the Booking and Appointment plugin for WooCommerce with Google Calendar!
Twilio SMS
↑ Back to topIn v4.17.0 of Booking and Appointment Plugin for WooCommerce, you find Integration with Twilio SMS, which allows you to send booking SMS reminders to the customer.
Here’s how it works.
Go to WooCommerce -> Booking and Appointment > Integrations > Twilio SMS page, as shown in the screenshot below.
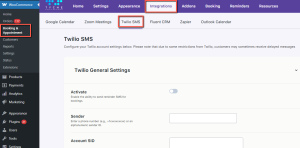
SMS reminders work the same way as that of sending Email reminders but here you need to first create a Twilio account.
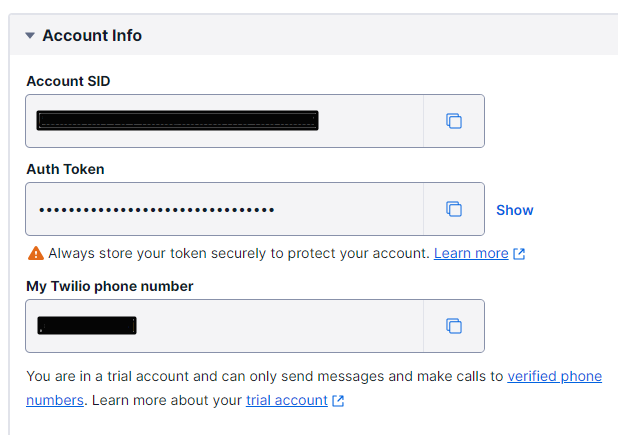
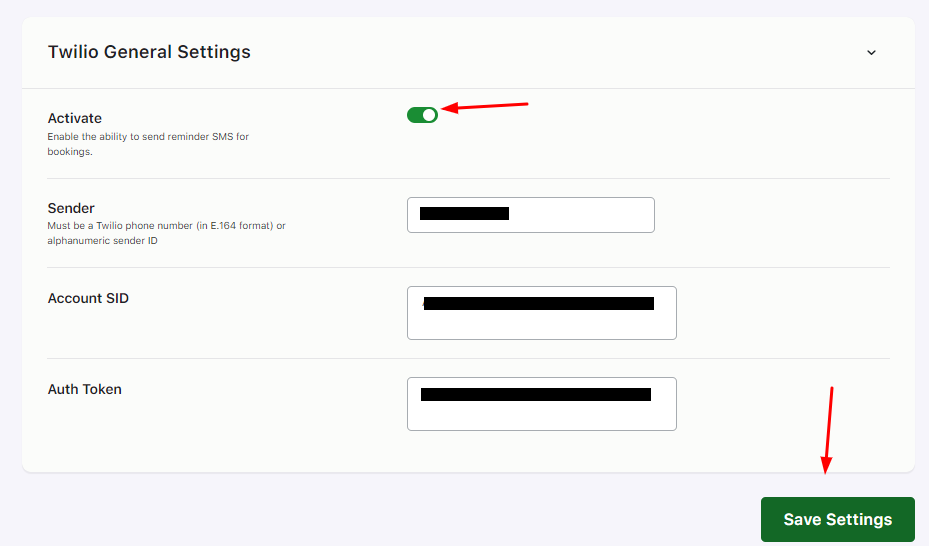
Log in to your account and Account SID, Auth Token, and your Twilio phone number under Account Info as shown here:
Enable the Activate setting. It will turn green.
Next, feed all the other information into your Twilio General Settings dropdown.
Click the ‘Save Settings’ button.
Now scroll down to find the Send Test SMS dropdown. Here’s where you try sending a test SMS before the real deal!
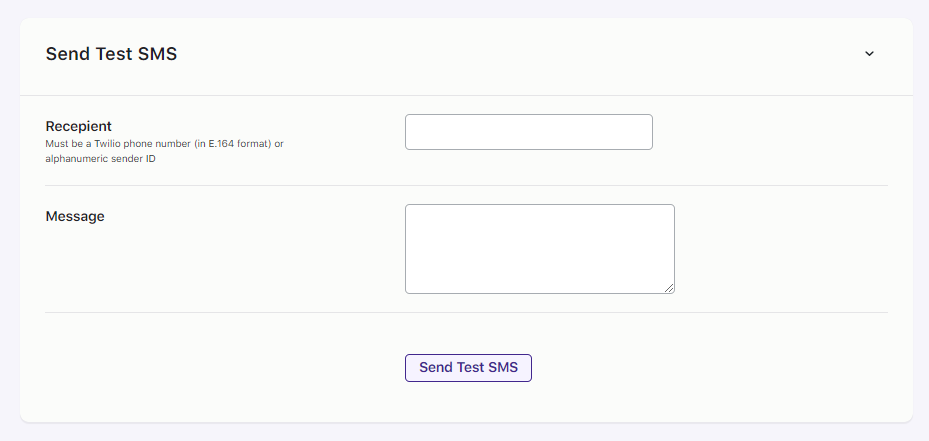
The phone number in the Recipient field should be valid in the E.164 format.
Next, enter your Message a.k.a, the SMS Body which is the actual content that will be sent in the SMS to the customer.
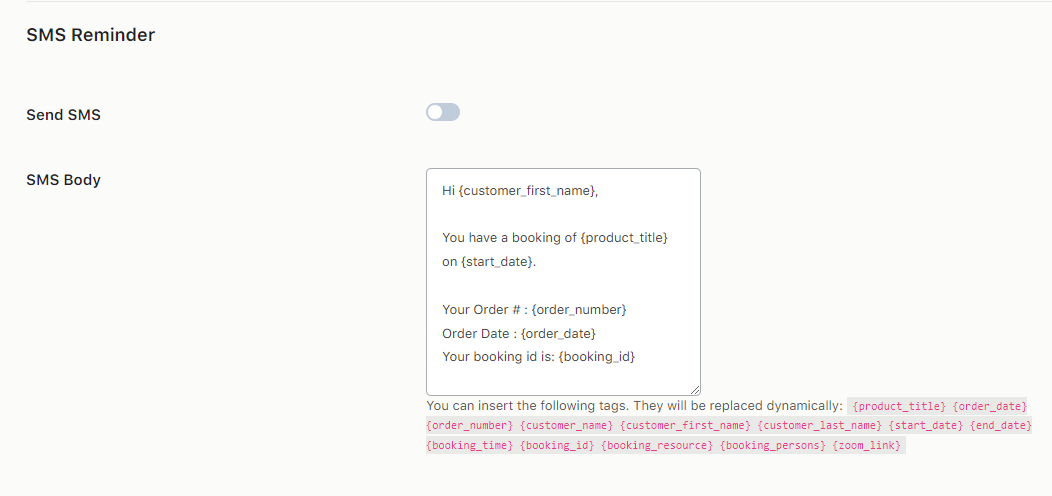
Note that we’ve made your job easier by providing you with some shortcodes that can be used in the SMS body. These shortcodes will be replaced by the actual information when sending an SMS to the customer.
The following are shortcodes that can be used in the SMS body.
{product_title} : Name of the product.
{order_date} : Date and time of the order is placed
{order_number} : Number of the order
{customer_name} : Display name of the customer
{customer_first_name} : First name of the customer
{customer_last_name} : Last name of the customer
{start_date} : Booking start date
{end_date} : Booking end date
{booking_time} : Booking Time
{booking_id} : ID of the Booking
{booking_resource} : Resource information about the booking
Create your message accordingly.
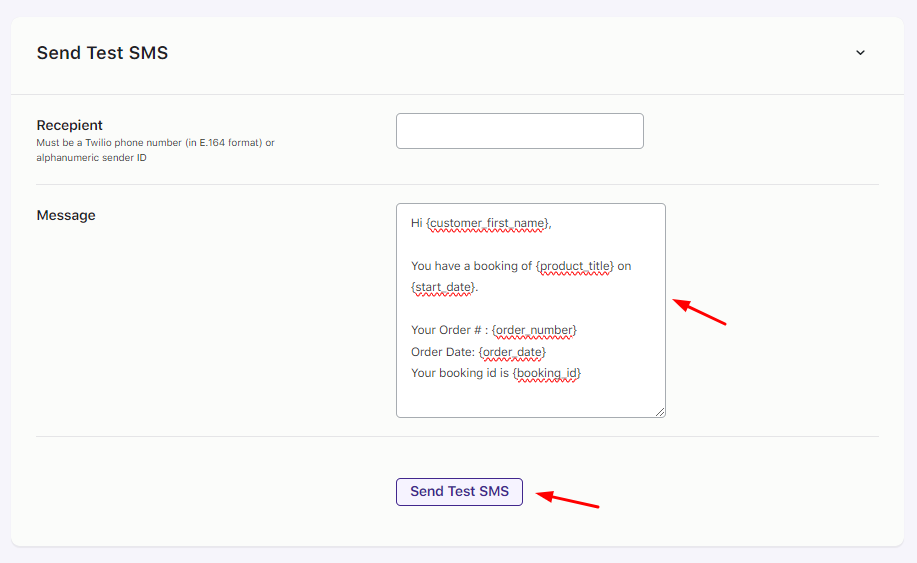
Clicking on the Send Test SMS button will send an SMS to the number entered in the Recipient field.
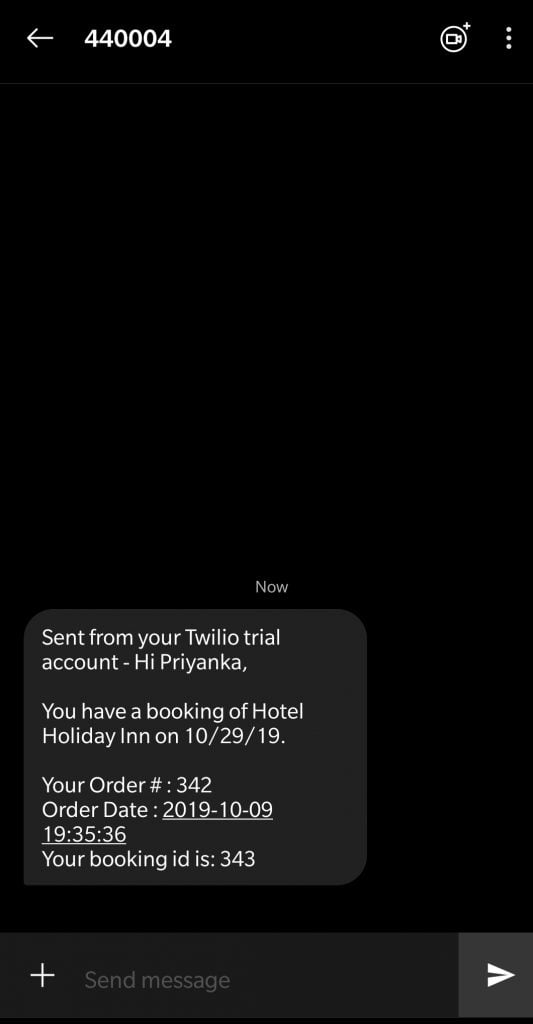
For instance, let’s say that the booking for Hotel Holiday Inn is set from 29th October to 31st October 2019.
Thus, the SMS reminder will be sent to the customer on 25th October 2019 reminding the customer about his booking with booking details as shown below:
Automatic SMS Reminders
If you wish to send automatic SMS Reminders, you need to go to Booking and Appointment > Booking > Send Reminders >Add New Reminder > Reminder Settings.
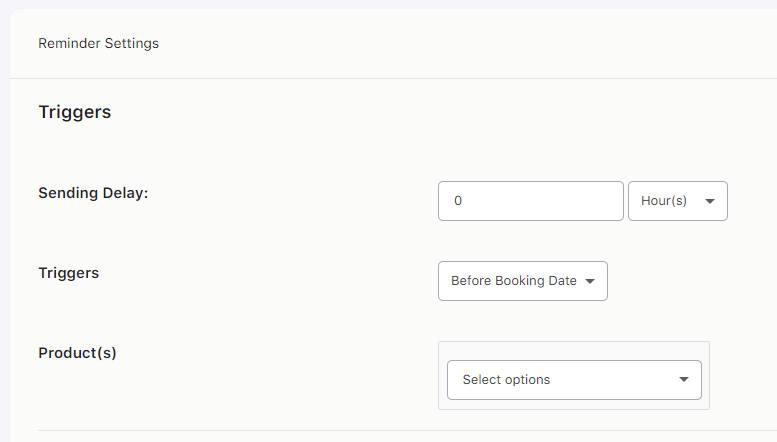
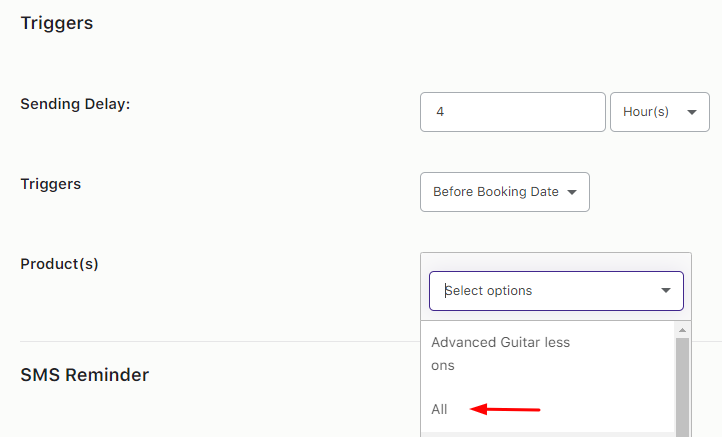
Fill in the settings under the Trigger section.
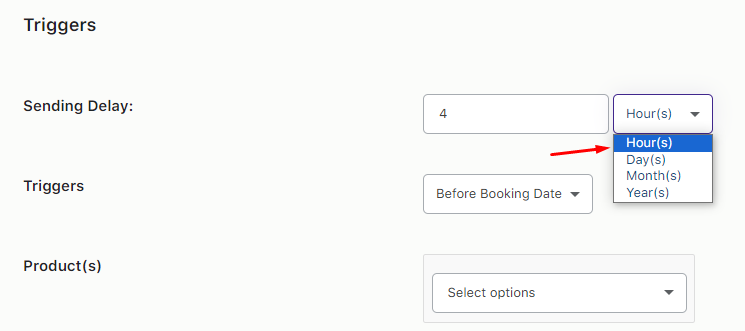
Sending Delay: The Reminder will be sent based on the value entered here. In this case, it will be 4 hours.
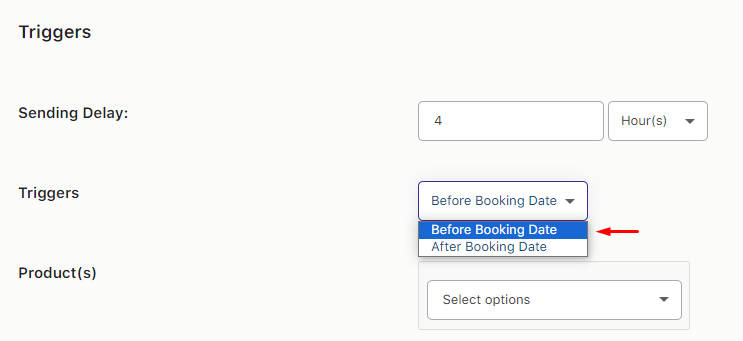
Triggers: Here, you will select whether the reminder SMS will be sent before the booking date or after the booking date.
Next, select the Products. When a booking is made for these products, the reminder SMS will be sent.
Enable the SMS Reminder setting and add the SMS Body.
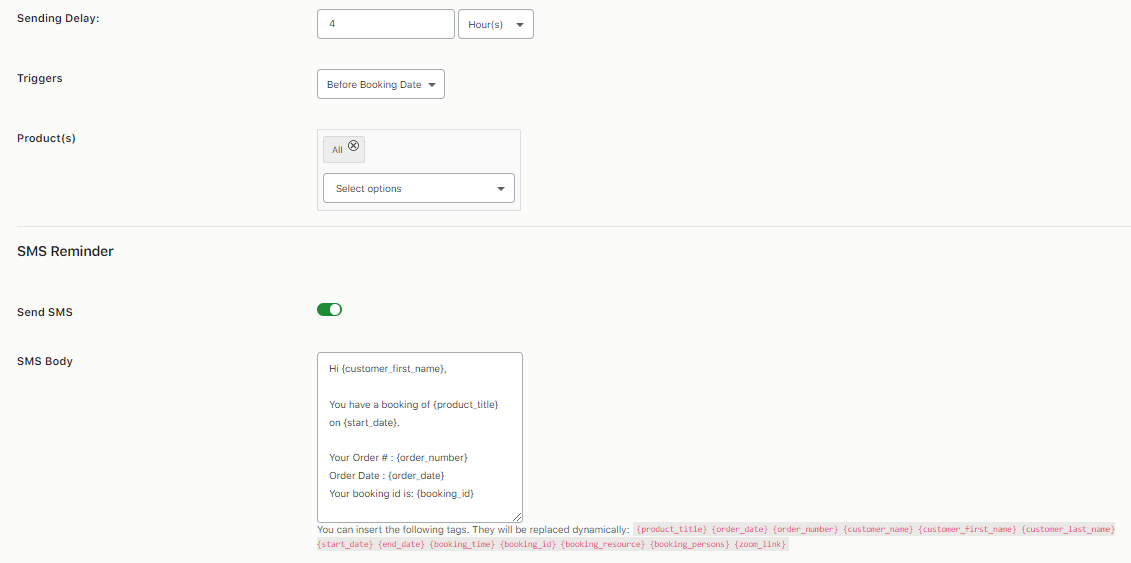
Thus, a reminder notification for all the booking products will be sent to the customer with complete booking details, 4 days before the booking date.
Lastly, this newly added automatic Reminder SMS will be available on the Send Reminder table as shown below:
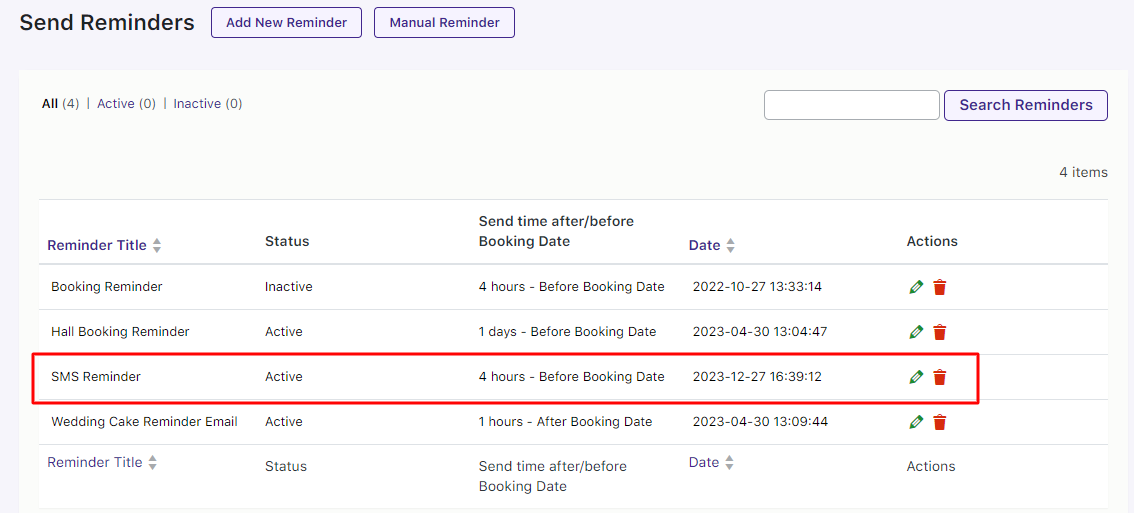
In conclusion, Booking and Appointment Plugin for WooCommerce keeps your customers well informed of their future bookings thereby making their overall booking experience pleasant.
FluentCRM
↑ Back to topWith Booking and Appointment Plugin for WooCommerce, you can integrate FluentCRM.
FluentCRM is a self-hosted email marketing automation plugin for WordPress. You can manage your leads and customers, email campaigns, automated email sequencing, learner and affiliate management, monitor user activities, and many more in one place.
After this integration, the booking data will be available in the FluentCRM when a customer books a product. Once the data is available, one can set up email automation and other tasks based on the customer’s booking data. You can also manage these contacts and send custom emails based on the action being taken on the Booking of that contact.
To make this integration happen, you will need the following:
- WooCommerce plugin
- v5.12.0 of Booking and Appointment Plugin for WooCommerce
- Free version of the FluentCRM plugin from the WordPress plugin library.
- FluentCRM PRO plugin. Login here and download your Pro file. Upload it to your WordPress site.
1. Creating REST API
↑ Back to topFirstly, you will have to create a REST API key.
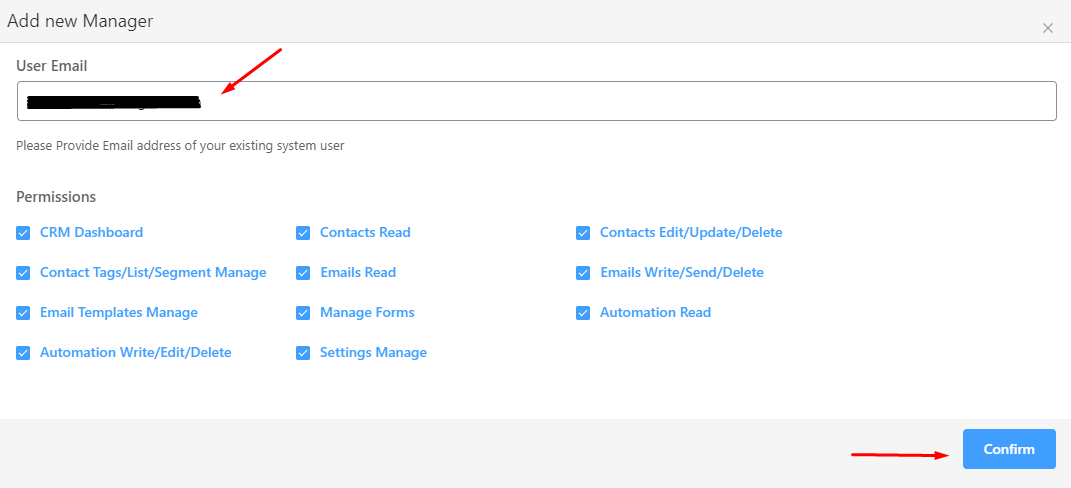
Go to FluentCRM > Settings > Managers > Add New Manager.
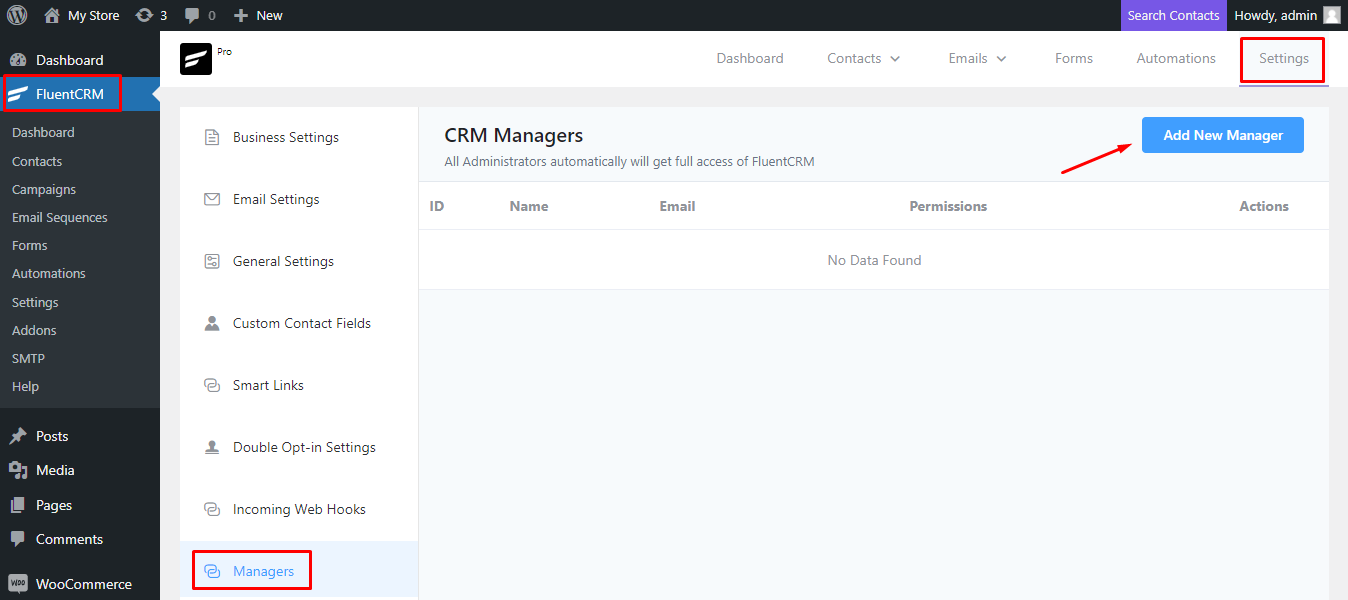
Add a manager from one of your existing users. Go for one who does not have admin access to your site- choosing a customer role would be appropriate.
Enter the email address of the same. After entering, select the permissions checkboxes and then click ‘Confirm’.
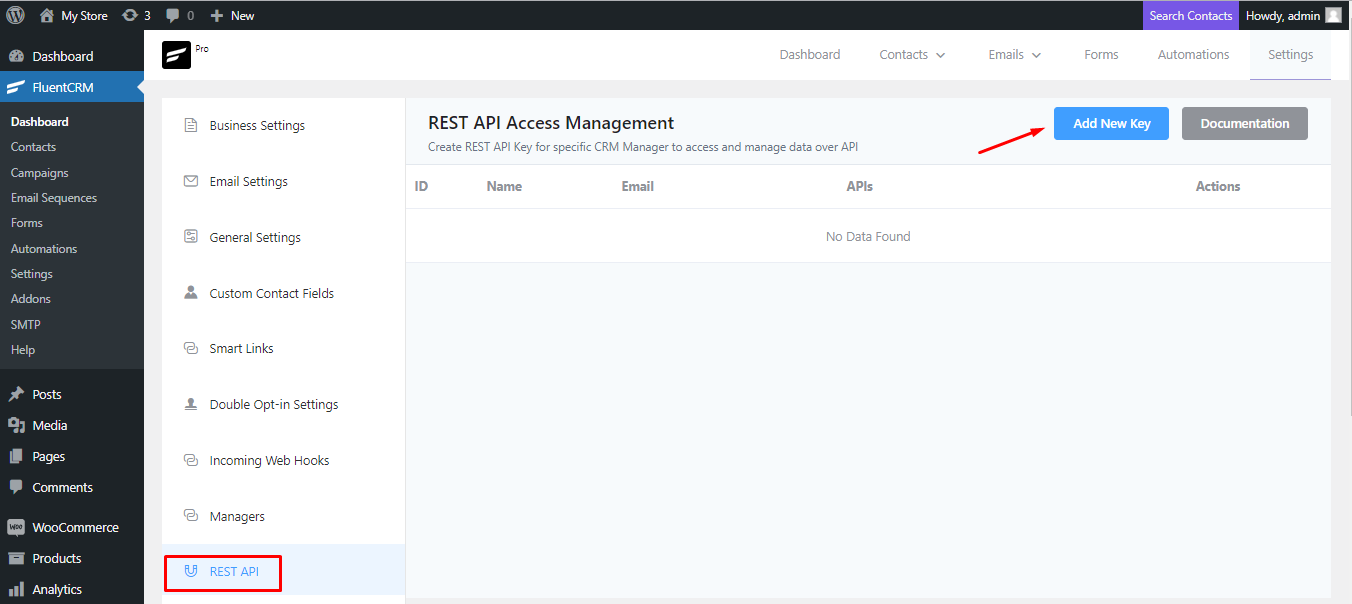
Now go to FluentCRM > Dashboard > REST API tab and click on the ‘Add New Key’ button as shown here:
You can add a name to your key. Let’s go with the name ‘Booking User’.
Under Associate FluentCRM Manager, you will select the user email you had added earlier as a Manager.
Once done, click on ‘Create’.

Your REST API Key will be created.
Copy the API Username and Password and save them for later.
Make sure to copy it correctly and save it, too.

2. Connecting FluentCRM with Booking and Appointment Plugin for WooCommerce
↑ Back to topNow, you need to connect FluentCRM with the Booking and Appointment Plugin for WooCommerce.
Go to Booking and Appointment > Integrations > FluentCRM.

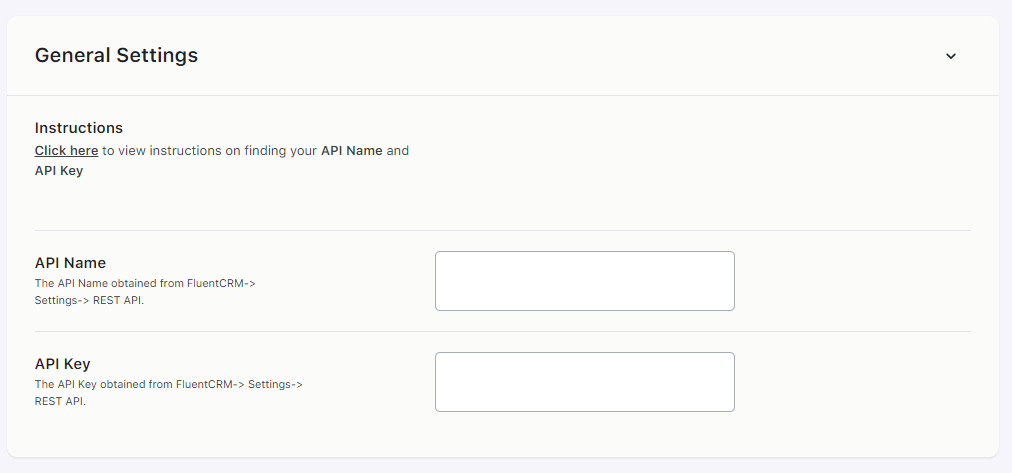
Input the API Name & Key you collected earlier and click ‘Save Settings’.
Once settings are saved, the option to select the list will appear on the successful connection.
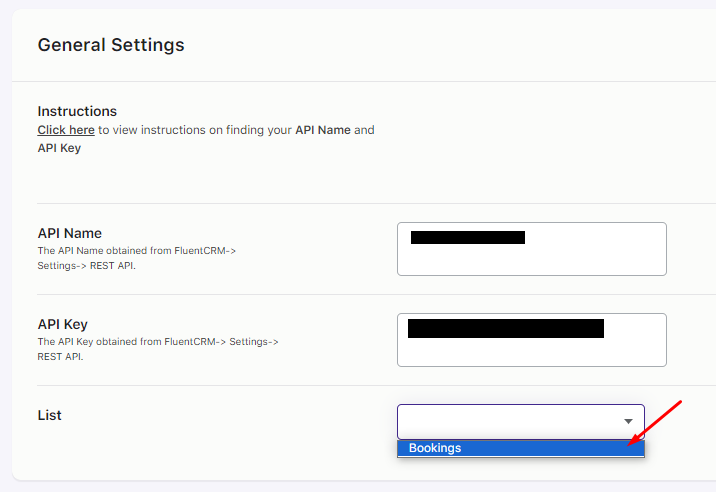
This option will display all the lists that you’ve created in the FluentCRM > Contacts > Lists.
If no lists are present in FluentCRM, then after saving the API Name & Key, a default list with the name Bookings will be created automatically.
Contacts that were created for the customers who booked the product will automatically be assigned to the selected list.
Select the list and click the Save Settings button to save the data.
An appropriate error message will be displayed in case of a failed connection.
Once it is connected, Custom Contact Fields will be added to store the Booking Data.
These are the fields that you can use in the email that will be sent to your customers.
You can find them by going to ‘FluentCRM’ > Settings > ‘Custom Contact Fields’.
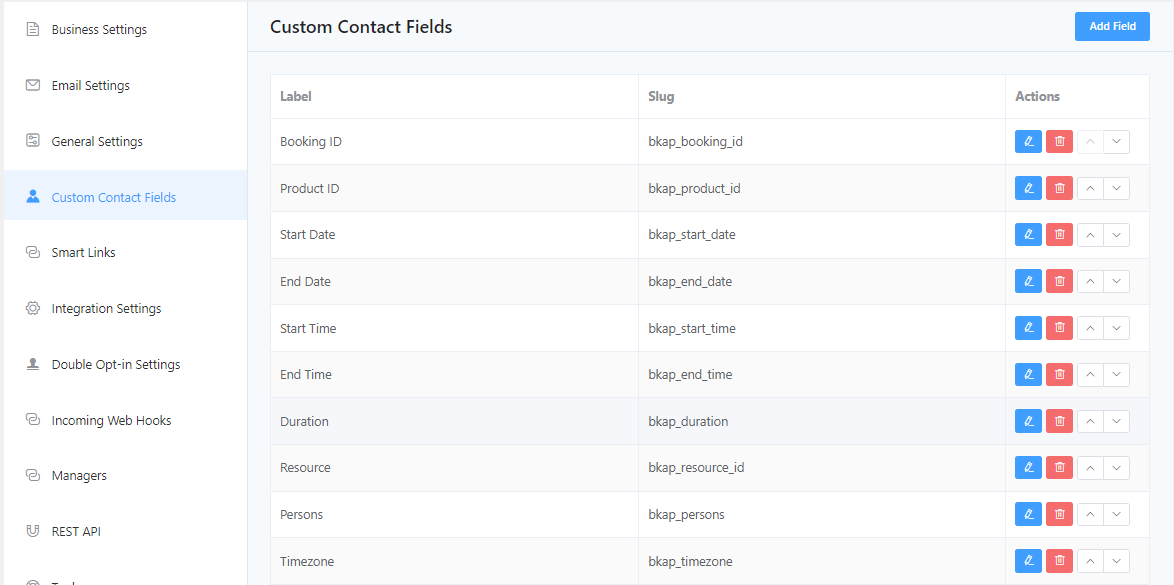
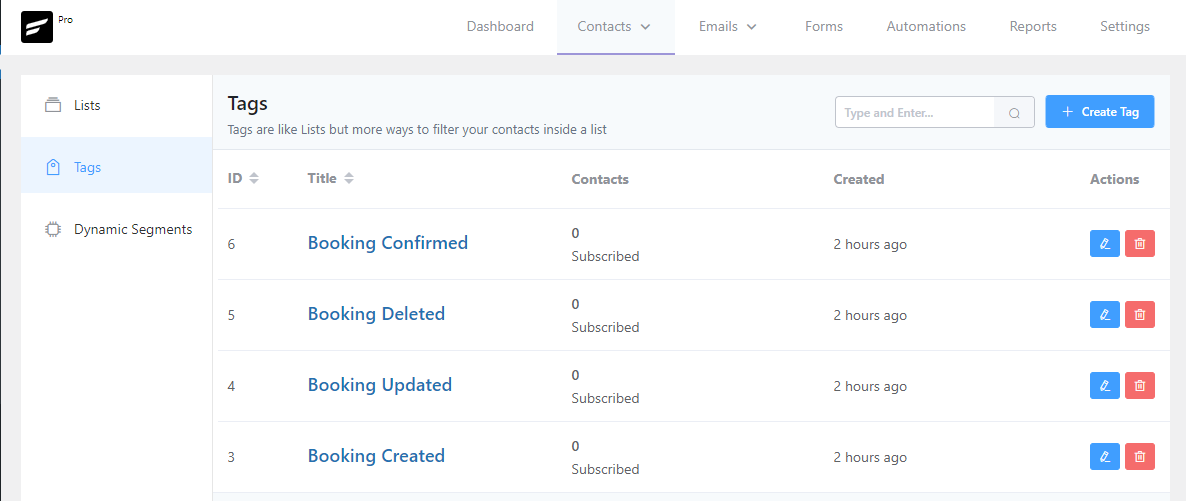
Additionally, the following tags will automatically get created in the FluentCRM.
These tags represent the current status of the Booking for the Contact.
- Booking Created – It will get assigned to contact when the booking is created.
- Booking Updated – It will get assigned to contact when the booking is updated.
- Booking Deleted – It will get assigned to contact when the booking is deleted.
- Booking Confirmed – It will get assigned to contact when the admin confirms the booking.
So far, you have seen how to connect the Booking plugin and FluentCRM. Also, you can see which data/fields are created automatically in the FluentCRM upon connection.
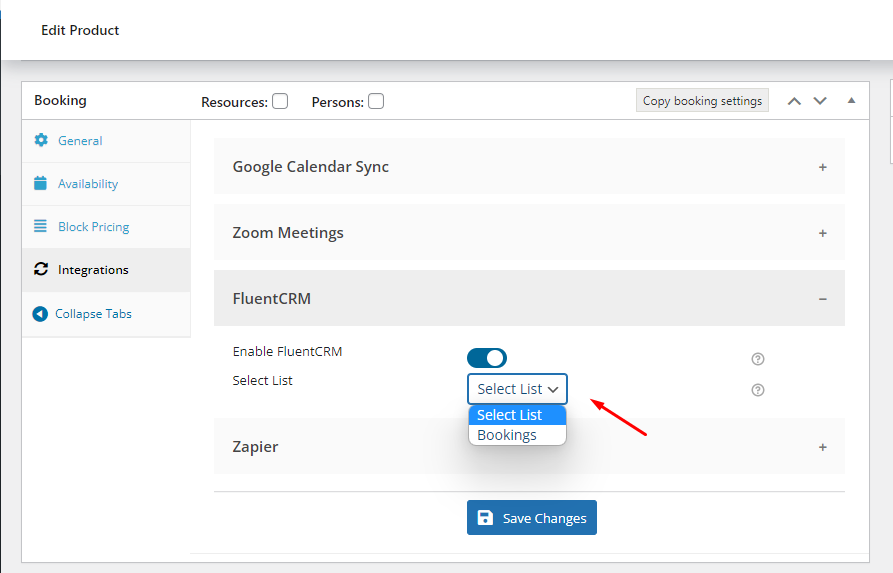
To make things work differently with individual products, you will have added options in the Booking Metabox > Integrations > FluentCRM tab.
So, to start sending the booking data to FluentCRM, enable the Enable FluentCRM option and select the list if you want to assign the contact to a list different from the one selected on the above screen.
Let’s say globally, the list is selected as List 1, and at the product level, you have selected List 2. Upon booking this product, the contact for it is created in FluentCRM and then assigned to the List 2 list automatically.
3. Booking Data in FluentCRM
↑ Back to topLet’s say that you have created a bookable product called Car on Rent, which is set up with Multiple Nights bookings.
You have enabled the FluentCRM option and selected the Bookings list.
This product was booked with the date 29th April 2022 and the 01:00 PM – 02:00 PM timeslot, as shown in the screenshot below.
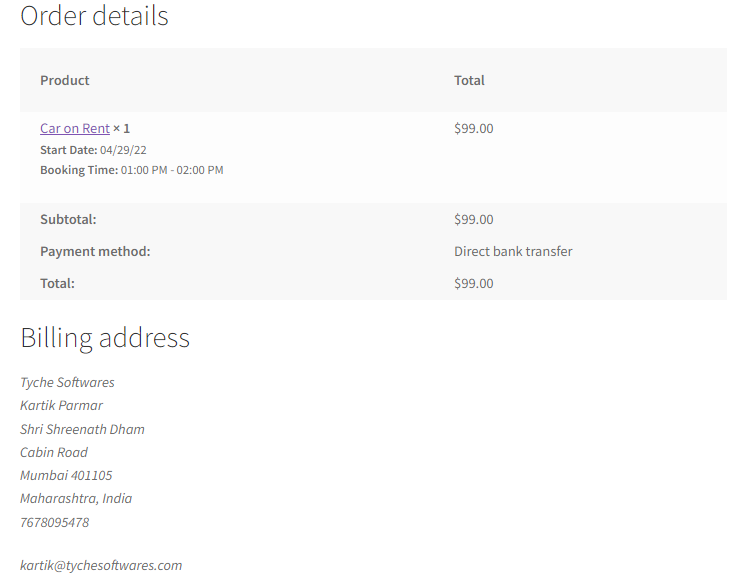
The Contact in the FluentCRM will be created automatically and assigned to the Bookings list.
Along with that, the Booking Created tag was applied to the contact.

Click on the Email address to view all the data of that contact.
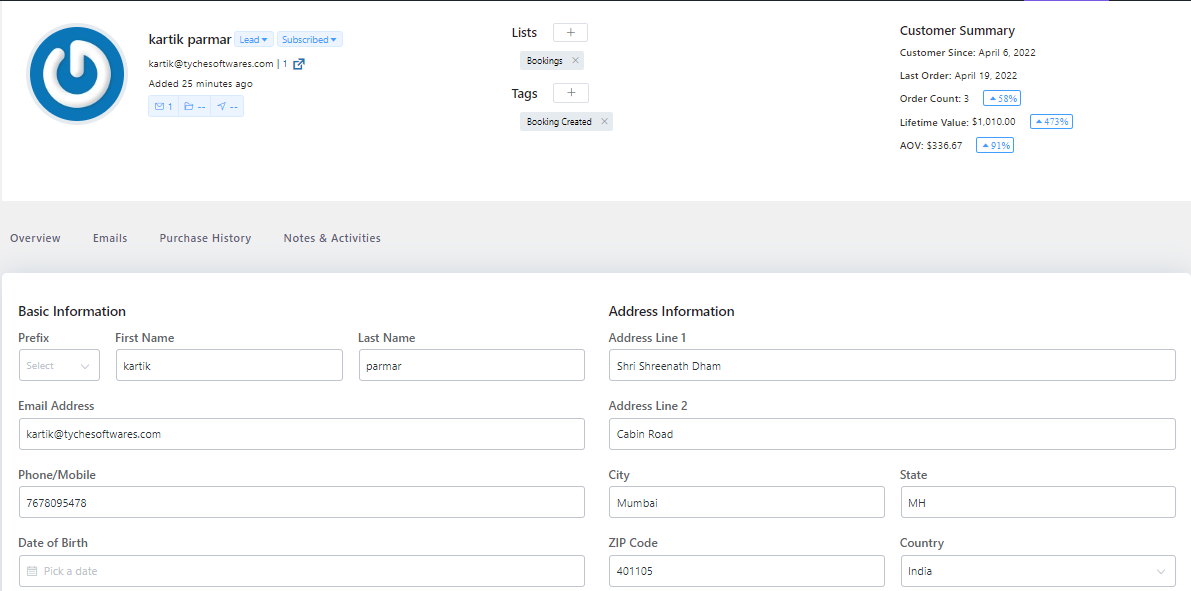
As shown in the above screenshot, in the Basic Information section, all the information that was entered by the customer during the checkout process will be present.
Below that, there will be a Custom Profile Data section to display that contact’s custom data.
Booking Data will also be displayed in this section.
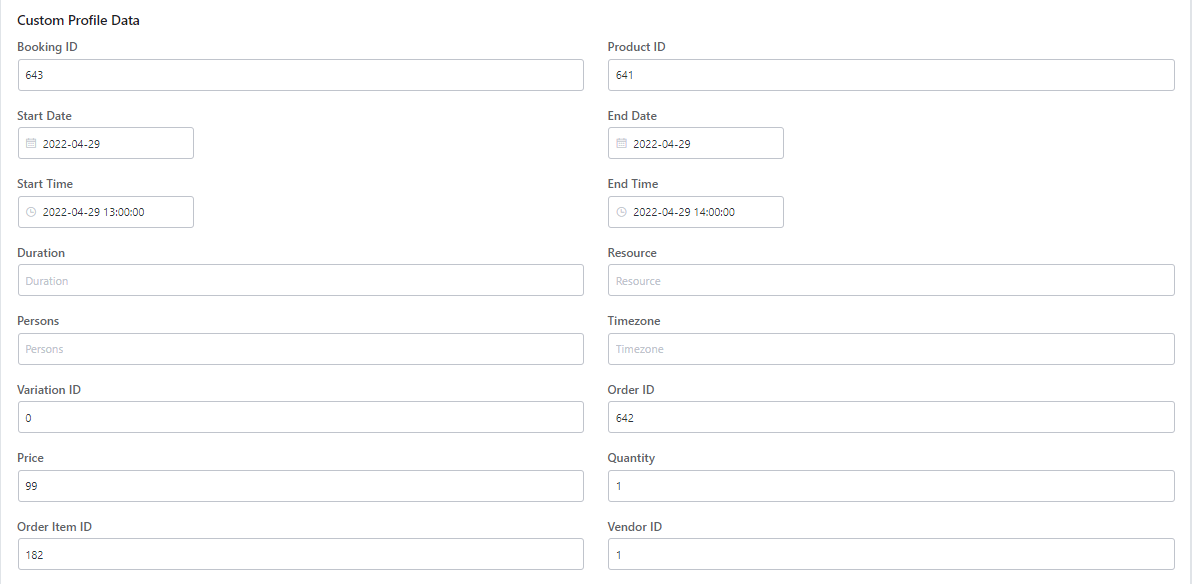
The booking information will be added to the Note as well.
This note will be added for each action done for the respective customer’s Booking.
All the Booking related notes will be available in the Contact Notes & Activities section as shown here:

For a quick summary, upon the order placed, a contact will be created in the FluentCRM with the List ‘Bookings’ and Tags ‘Booking Created.’
All the Booking data will be available in the custom fields of that contact, and a note for the same will be added to the Notes & Activities section.
4. Creating an Automation
↑ Back to topSince booking data is now available in the FluentCRM, you can set up the automation based on the actions performed on the Booking.
Let’s say that you want to send an email when a booking is created.
To do this, go to FluentCRM > Automations.
Please click on the ‘Create a New Automation’ button once you reach there:

Choose a name for the ‘Internal Label’. You can go with ‘Send Email on Booking Created’.
Then, click on ‘Tag Applied’ and ‘Continue’.
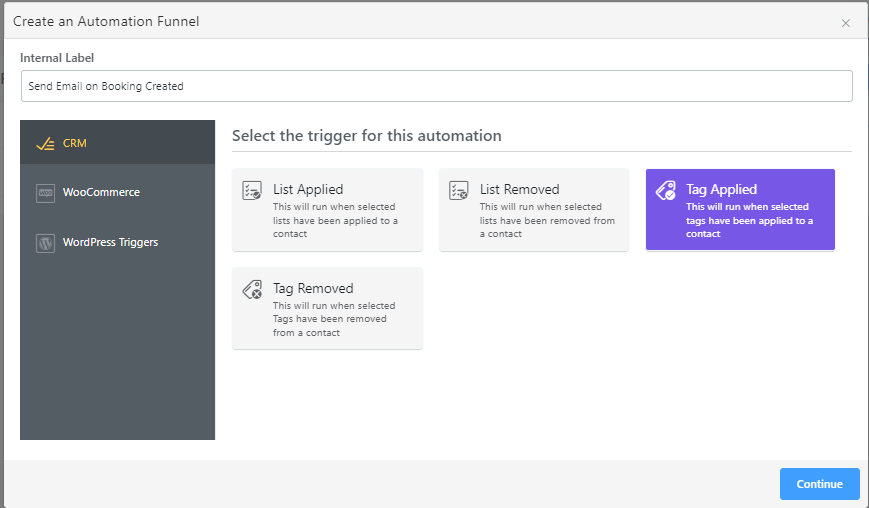
Under ‘Select Tags’ go withthe ‘Booking Created’ tag. This would mean that the tag will get assigned to a contact, and then the contact will be auto-added to the automation.
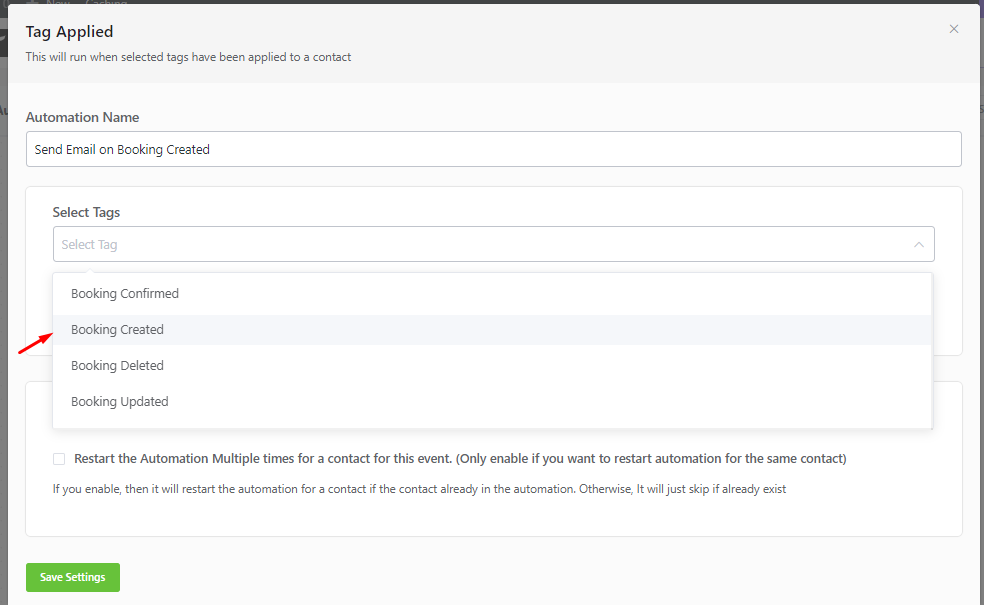
After this, you can check the ‘Restart the Automation Multiple times for a contact for this event’ option.
Enable it only if you wish to restart the automation for the same contact.
Finally, click on the ‘Save settings’ button.
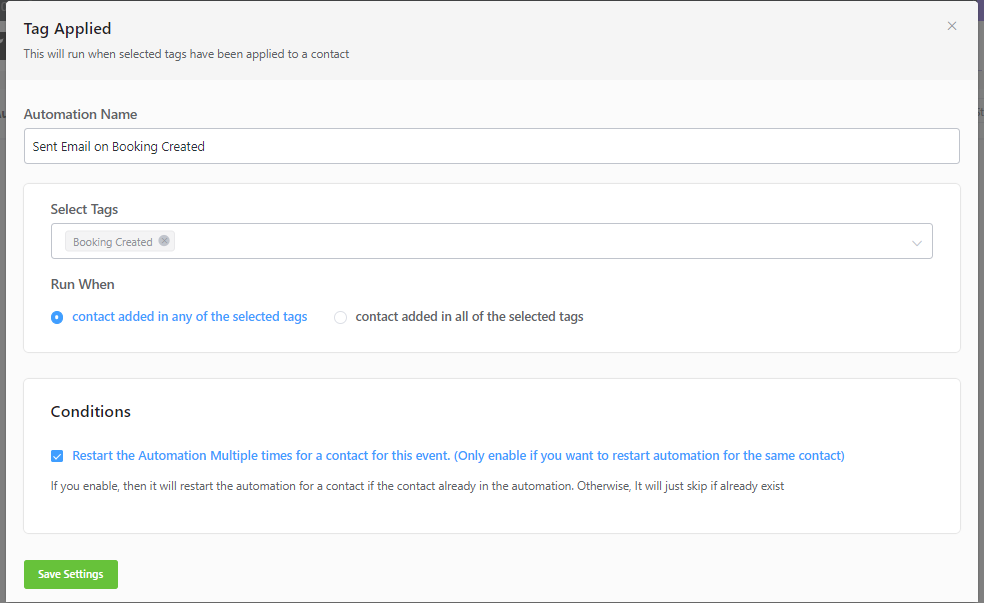
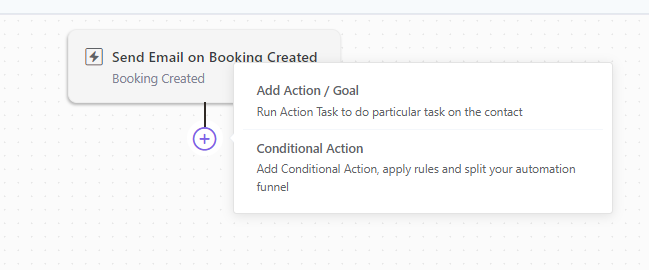
The automation will be created as shown below:

Hover over the + icon.
It will show two options: add the Action/Goal and the Conditional Action.
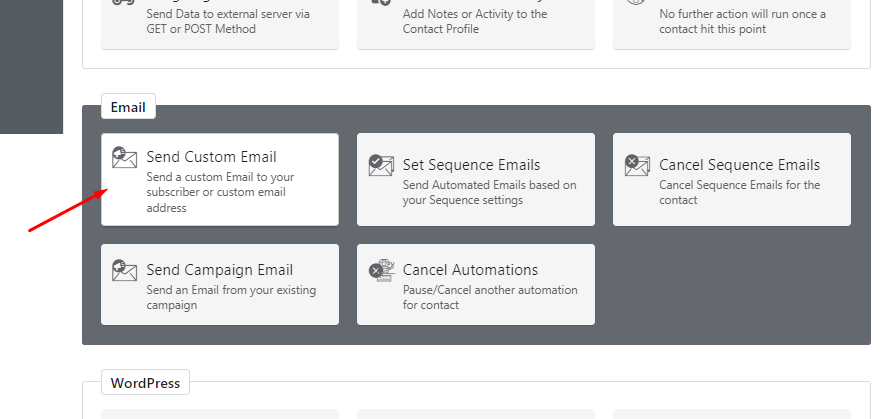
Click on the Add Action / Goal option and select the Send Custom Email option in the Email section.
Once selected, a popup will appear to enter the Email Subject and Email Body with other options, as shown in the below screenshot.
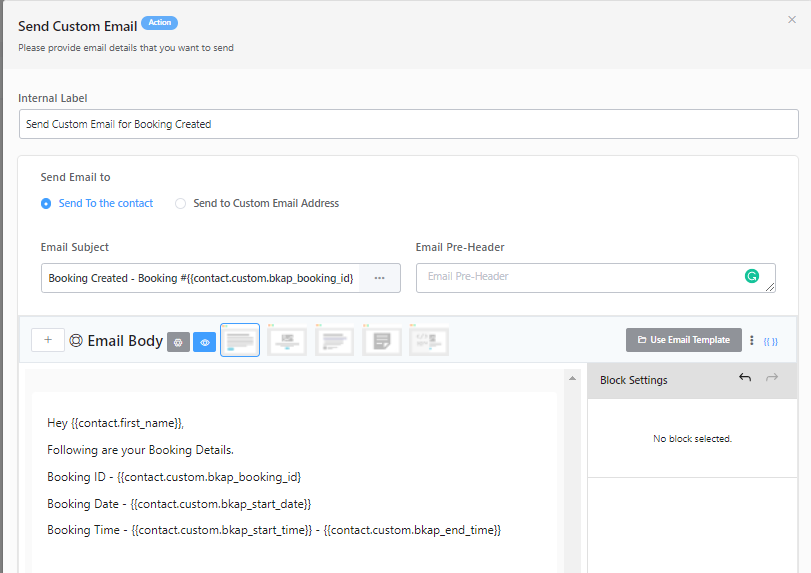
As shown in the above screenshot, you can use different merge codes to replace the data in the Email Subject and Email Body.
You can send a Test Email for the same and then click on ‘Save Settings’.
Once the booking is created, an email will be sent to the contact according to the automation setup. For instance, a customer has booked a Car on Rent product for the date 30th April 2022 from 11:00 am to 12:00 pm. Following will be the email that they will receive.
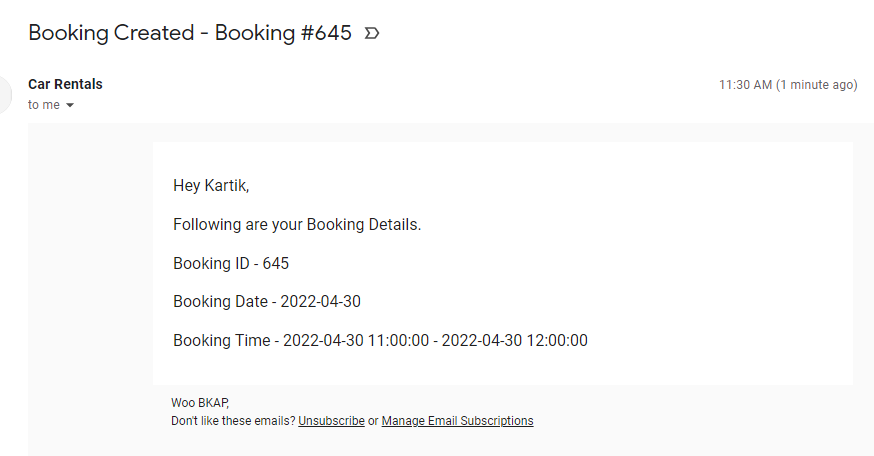
Similarly, you can send custom emails for Booking Updated, Booking Deleted, and Booking Confirmed.
Also, you can set up different Automations and Campaigns according to the Booking data available in the FluentCRM.
Zapier
↑ Back to topZapier is a helpful online tool that connects different apps and automates tasks between them. You don’t need to know how to code or hire a developer to use it.
Think of Zapier as a digital assistant that watches your apps. When something happens in one app, it can tell another app to do a specific task. For example, Zapier could automatically save any attachments to your cloud storage if you get a new email.
If you want to learn more about Zapier, visit their website ☞ zapier.com.
Good news for users of the Booking and Appointment Plugin for WooCommerce (BKAP)! Starting with version 5.12.0, BKAP now works with Zapier. This means you can connect your booking system to hundreds of other online tools and services through Zapier, making your work easier and more automated.
Automated connections called Zaps can be set up in minutes and can do the following:
- Automate your day-to-day tasks and build sophisticated workflows
- Automate tasks in the background so you can focus on more important work
- Perform Triggers and Actions: Zap starts with a trigger—an event in one of your apps that kicks off your workflow. It has one app as the Trigger (where your information comes from) which causes one or more Actions (where your data gets sent automatically) in other apps.
- Zapier Account
- WooCommerce 3.5+
- WordPress 4.4+
- Booking and Appointment Plugin 5.12.0+
- WordPress Pretty Permalinks – must be enabled
- WooCommerce Consumer and Secret Keys – must be generated
- Legacy REST API – must be enabled
Zapier Actions available in the Booking and Appointment plugin
- Create Booking – Creates a new booking on WordPress for a specified Product and Customer. Depending on the booking settings of the Product, certain required booking parameters have to be provided else the booking creation process will fail. Information on the required booking parameters is usually displayed after the selection of a Product
- Update Booking – Updates booking information of a specified Booking. The Booking ID of the booking to be updated is required.
- Delete Booking – Deletes a Booking. The Booking ID of the booking to be deleted is required
Note: Zapier Integration for the Booking and Appointment Plugin for WooCommerce is currently in early access. You can find it in the Zapier app directory here.
A. Setting up Zapier on WordPress
B. Setting up Zap Triggers on Zapier & WordPress
C. Setting up Zap Actions on Zapier
D. Configuring ‘Create Booking Action’ on Zapier using Google Sheet
A. Setting up Zapier on WordPress
↑ Back to topThis step is required to ensure that Zapier is allowed to successfully interact with WordPress.
Go to the WooCommerce -> Booking and Appointment Settings > Integrations tab > Zapier.
Click on Zapier Integration and activate the Zapier Integration option.
Activate the Zapier Trigger and the Log option to view debug and error messages.
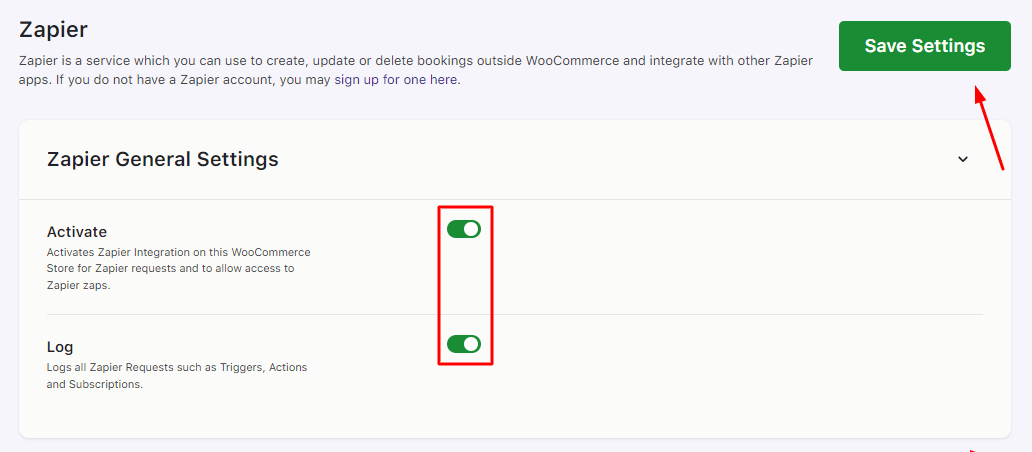
Make sure to Save your settings.
B. Setting up Zap Triggers on Zapier & WordPress
↑ Back to topA trigger is an event that starts a Zap.
For example, you may want to send a Slack message each time a customer places a booking on your WooCommerce site. In this case, the trigger is Create Booking while the action is Send Channel Message in Slack.
On WooCommerce, triggers are usually triggered during:
- Create Booking: During the checkout process and completion of the order.
- Update Booking: On the Edit Booking page on the Admin Panel. Quantity and Date can only be updated.
- Delete Booking: On the Edit Booking page when the “Move to trash” link is clicked.
Setting up a Zap is super easy! You just have to follow the following steps to complete your first zap!
1. Sign up for a Zapier account
To get started you’ll need a Zapier account.
You may need to create an account on Zapier if you do not have one already.
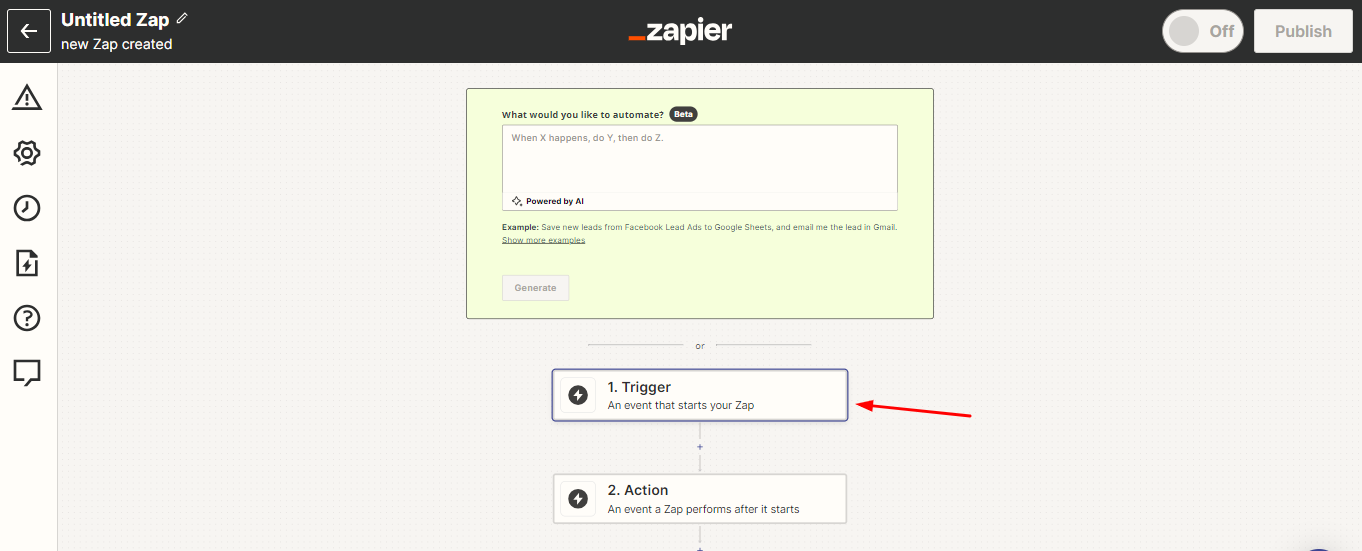
Once logged into the Zapier platform, click on the Create Zap button.

2. Select the Trigger app
Select the Trigger option.
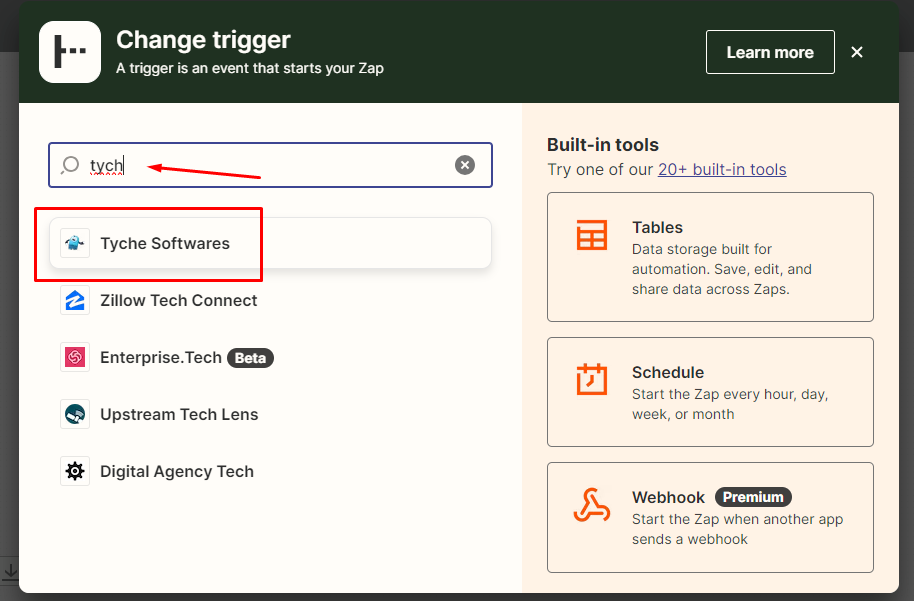
Select Tyche Softwares as your trigger app from the list of apps.
3. Select Trigger Event
Based on what you intend to do, you can select Create Booking, Update Booking or Delete Booking.
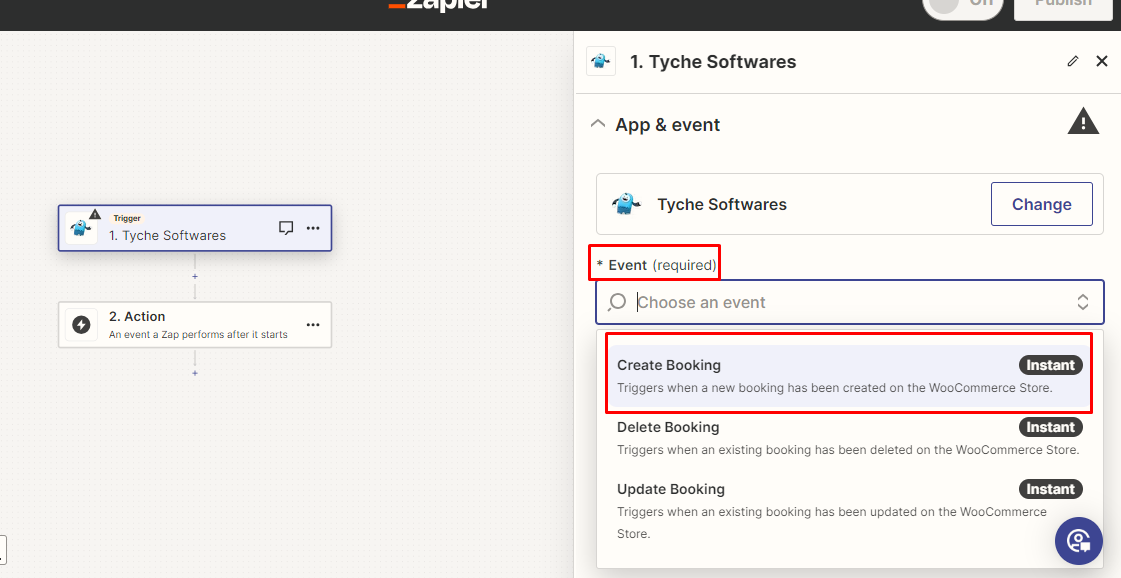
The steps to set up Zapier for Create Booking, Update Booking or Delete Booking are all similar.
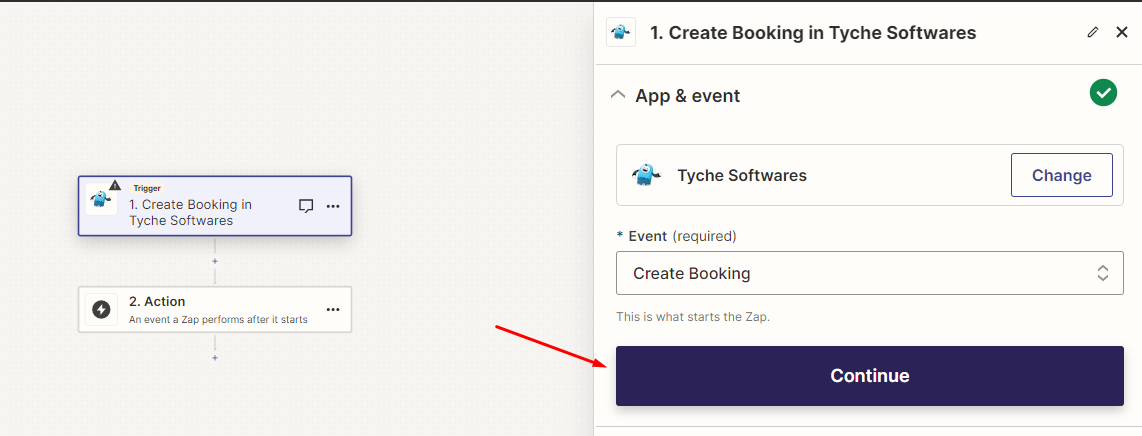
Click the Continue button.
4. Connect the WordPress account
Continue by clicking the Sign in button. This will help connect your Tyche Softwares to Zapier.
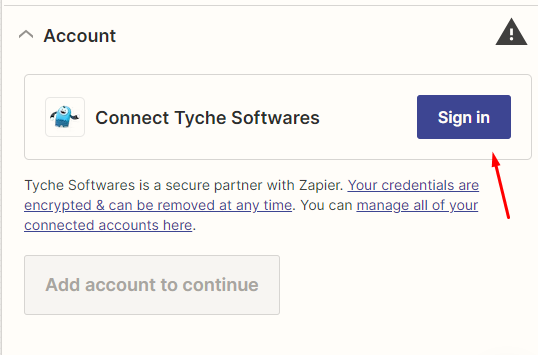
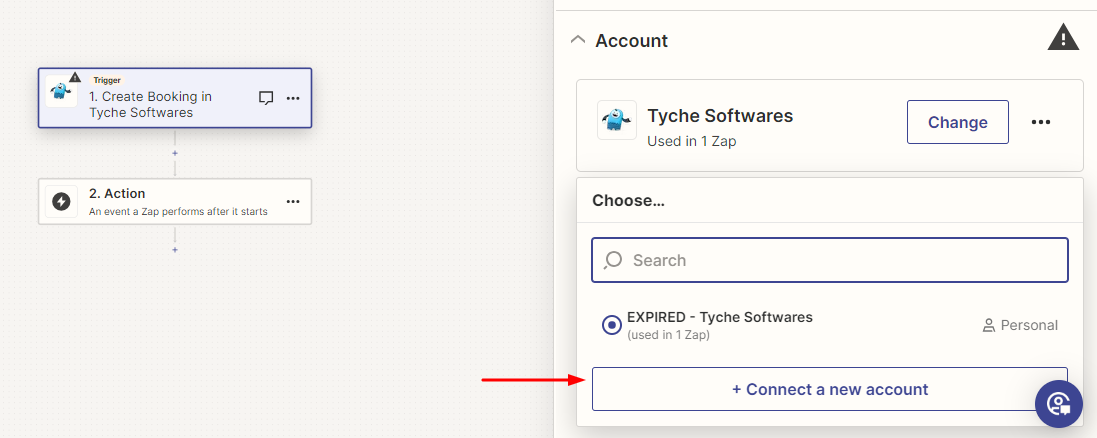
Select an account if you are already logged in. If not, connect to a new account.
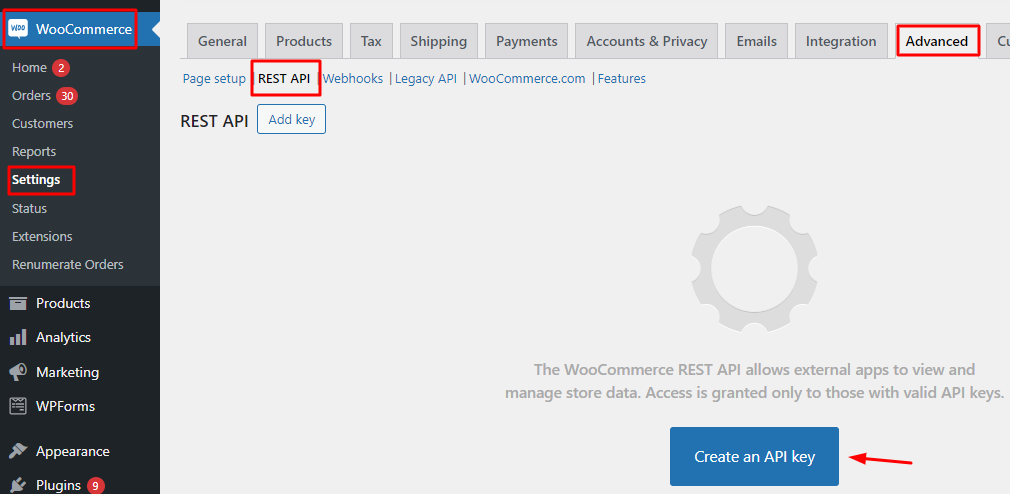
Here, you will need to create WC API Rest keys to generate the WooCommerce Consumer and Secret Keys.
After generating the keys, please keep them handy as they will be needed in creating a Zap.
Go to WooCommerce > Settings > Advanced > REST API > Create an API key.
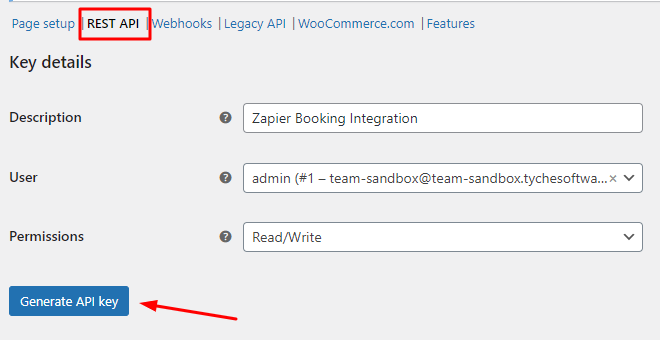
Add the description, User, and Permissions.
Click the Generate API Key button to create your key.
Make a note of the Consumer Key and Consumer secret. These details will not be available later when you go back to this page.
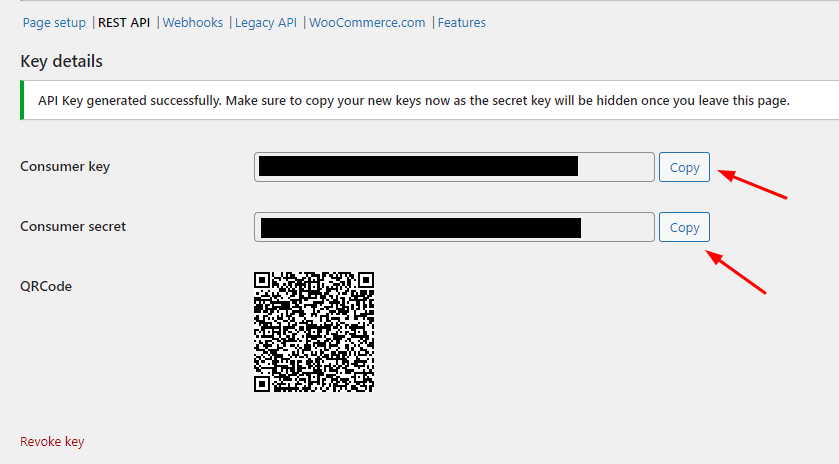
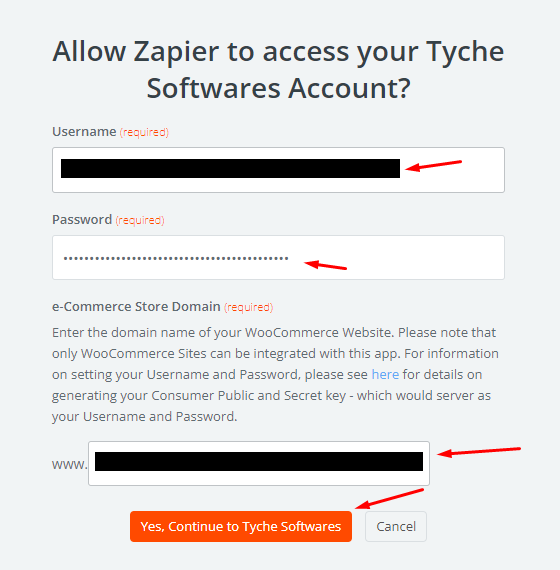
Go back to Zapier and add the Consumer Public Key as the Username and Consumer Secret Key as the password.
In the domain field, enter the domain for your WooCommerce store as shown below:
5. Enter Trigger Label
This label would be used to identify the Trigger setting on WooCommerce, so give the label a very descriptive word.
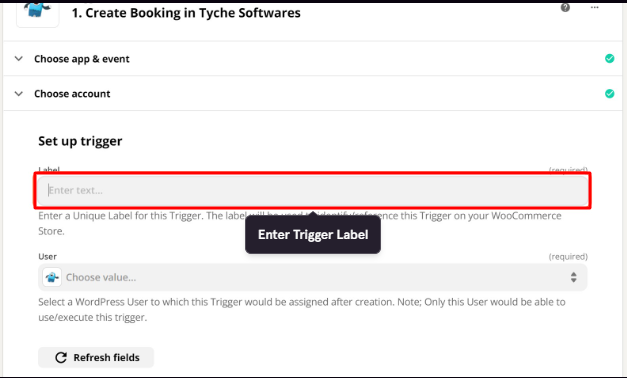
For instance, you can select the label ‘Create Booking Trigger’ here.
6. Select User
This Trigger would be assigned a User so select one accordingly.
Users cannot use or execute triggers not assigned to them.
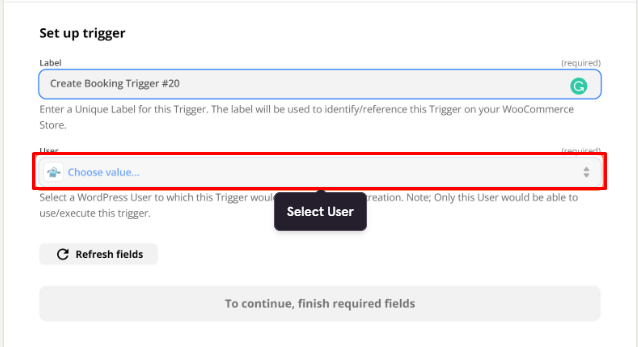
For instance, you can go with the User admin.
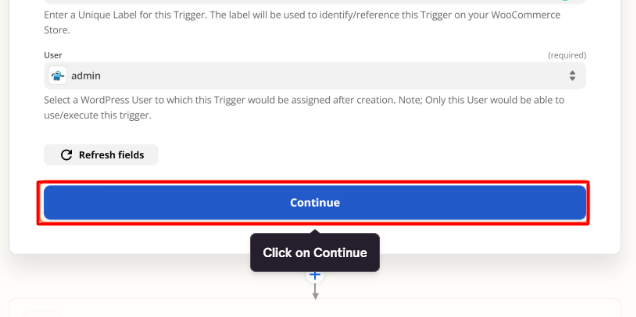
Click Continue after it.
7. Test Trigger
This will place a call to the Zapier API on WooCommerce and fetch a recent booking for testing purposes.
You will see a message that says Test your trigger. Click the Test Trigger button once done.
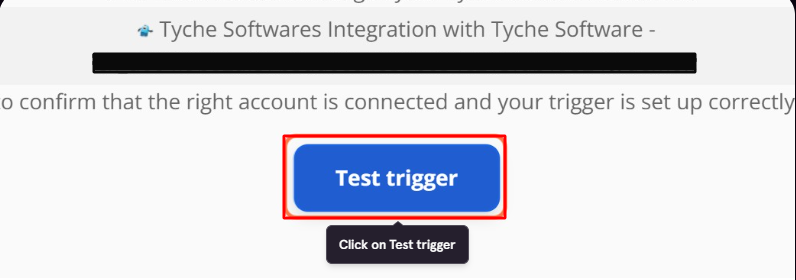
Next, click the Continue button.
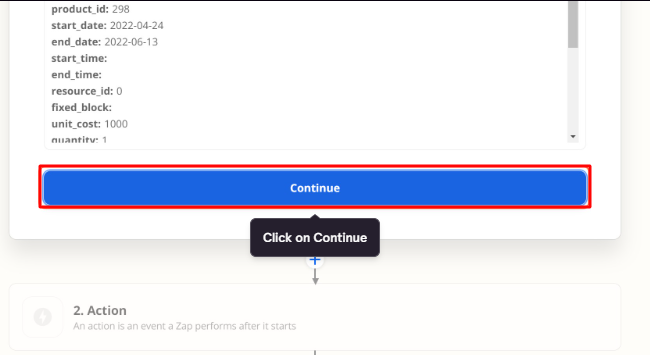
After the triggers, you will have to configure the Action step.
8. Complete your Zap by adding an Action step
This is the app or execution step that will occur when the Trigger is activated by WooCommerce.
For this tutorial, let’s use Slack (a widely used team messaging app), which will send a message to a Slack channel when a booking has been created/updated/edited on WooCommerce.
Search for the Slack application.
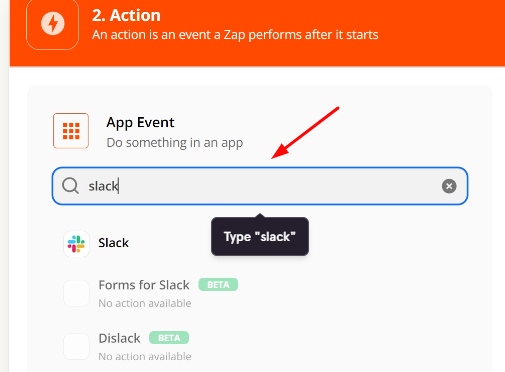
Select it.
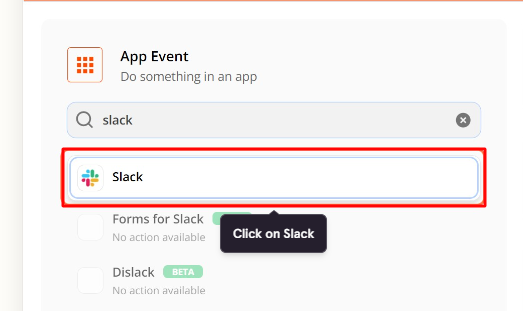
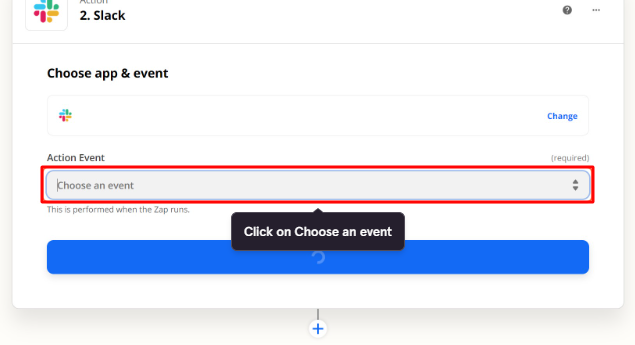
Under Action Event, choose an event.
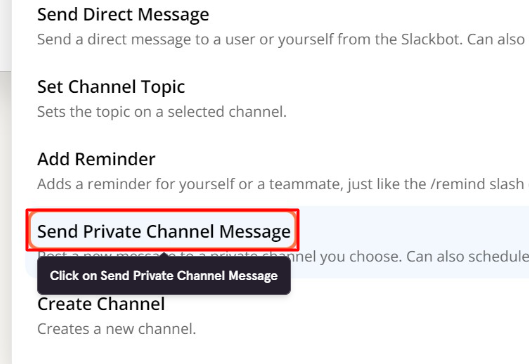
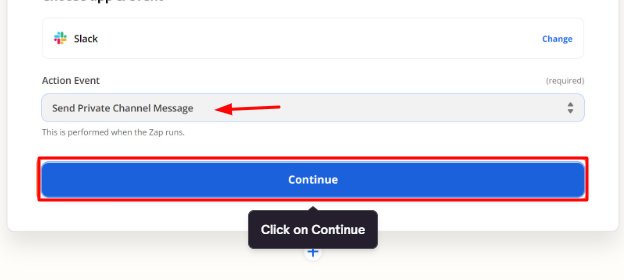
Select the Send Private Channel Message. This ensures that the trigger will send a private message to a person on Slack.
Click on Continue.
Go to Choose Account and Sign in to Slack.
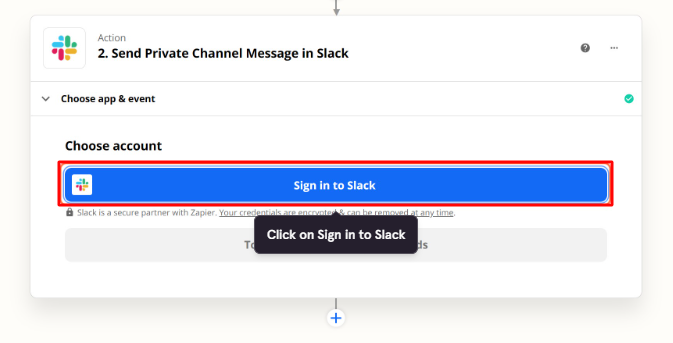
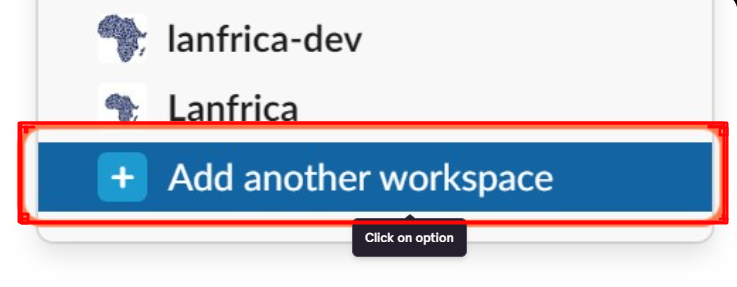
Select Add another workspace. It will allow your workspace to be connected.
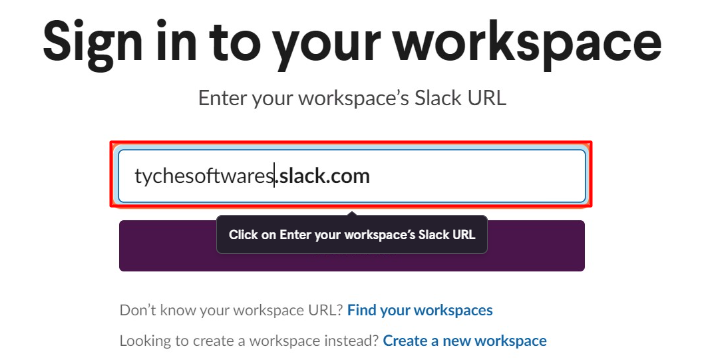
Enter your Workspace’s URL and proceed forward.
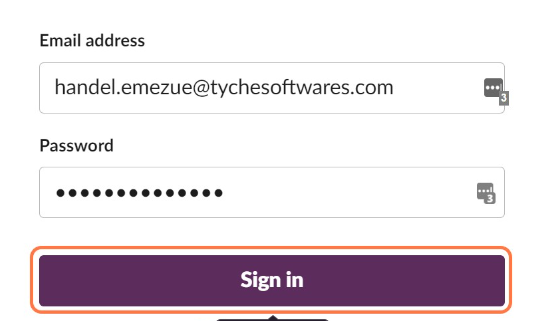
Enter your email address, and password and click the Sign in button.
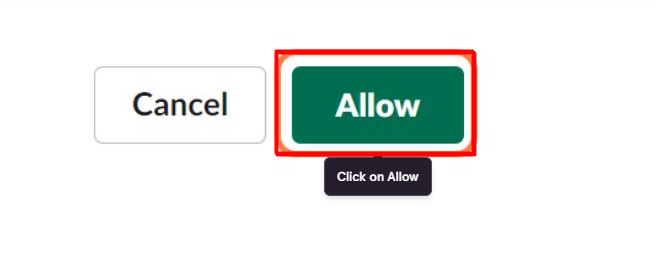
It will ask you what will be accessed by Slack. Click Allow and proceed forward.
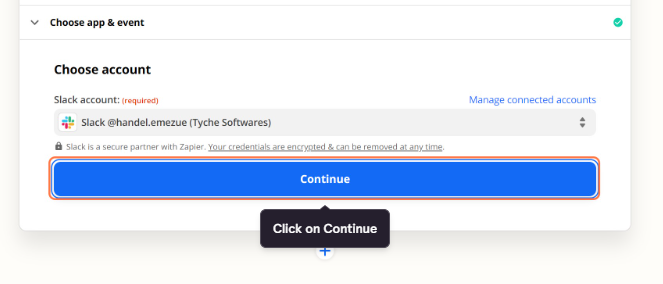
Under Choose app & event, choose your account once it has been linked. Click Continue.
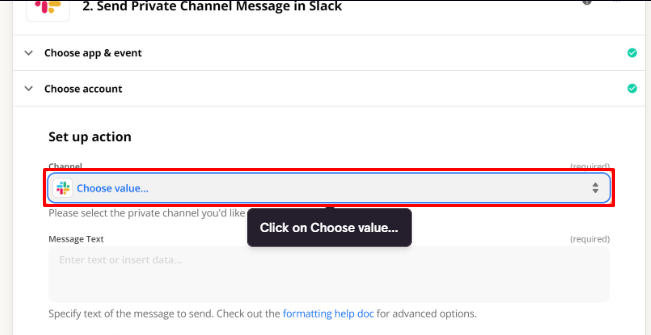
Next, set up the action. Choose value under the Channel field.
Search for Zapier and find the channel.
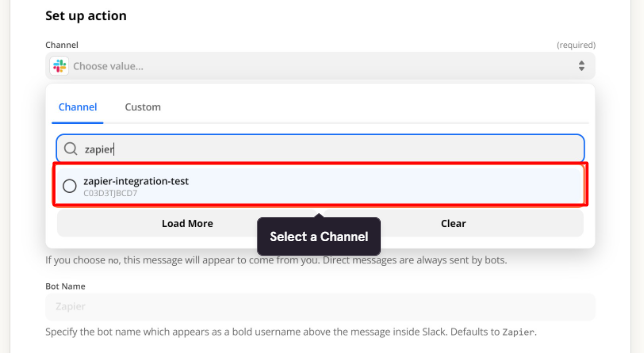
Select it and write the message text.
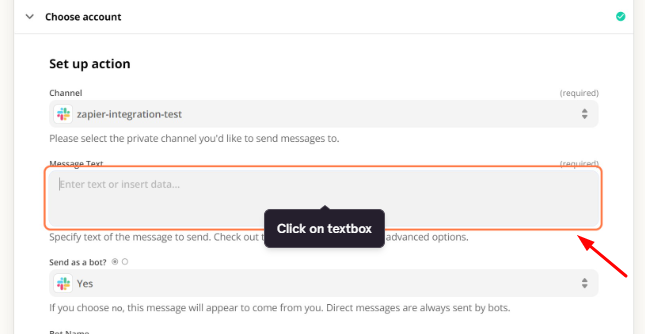
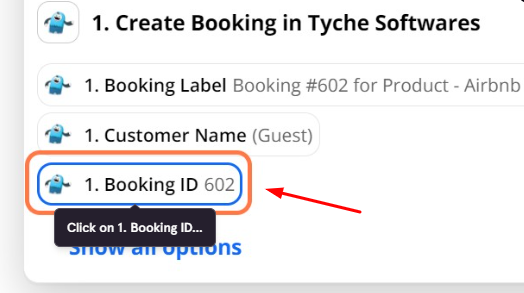
Add all the following things in your Text Message by clicking on the Booking ID next.
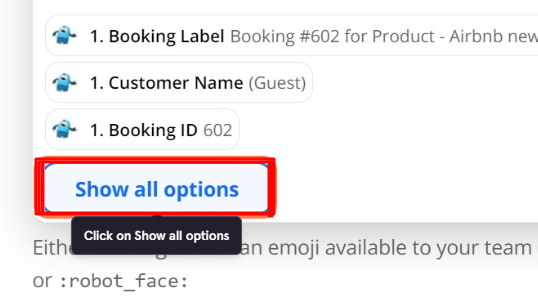
Follow it up with Show all options.
Select the Customer Name next.
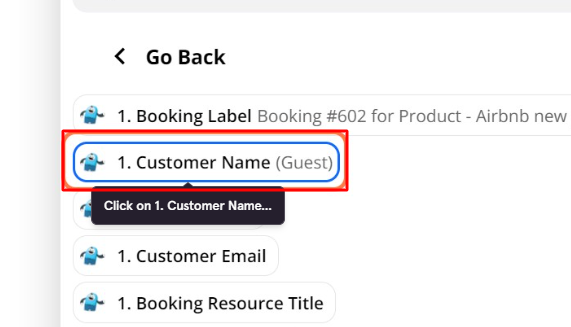
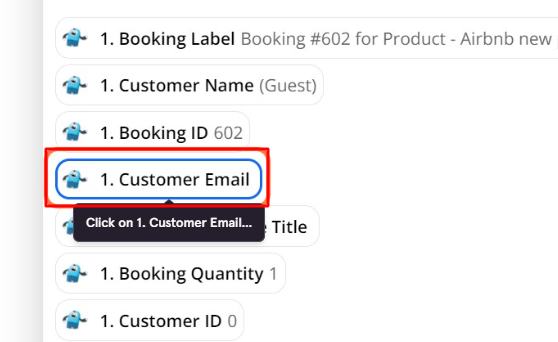
Choose Customer Email.
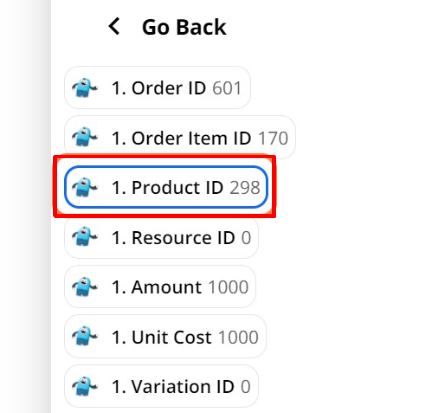
Lastly, select the Product ID.
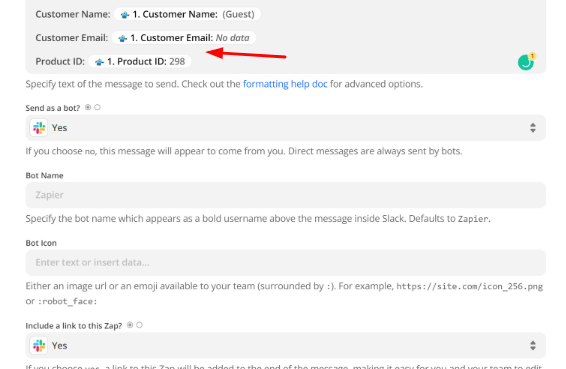
You have added all of these details in the Text Message as shown below. Configure other settings too.
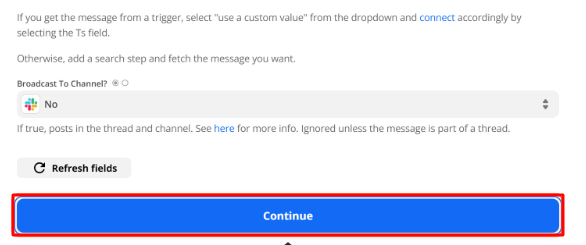
Click the Continue button.
You will get a summary of your settings. Choose the Test & Review button.
Once it is successful, click the Turn on Zap button.
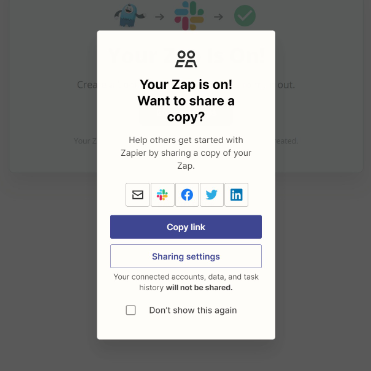
You will see the following message once done!
In the workflow above, Slack was used as the action step in configuring the Zapier Trigger.
During the configuration, Zapier would send a test message to the Slack channel to confirm that it can send messages to the channel.
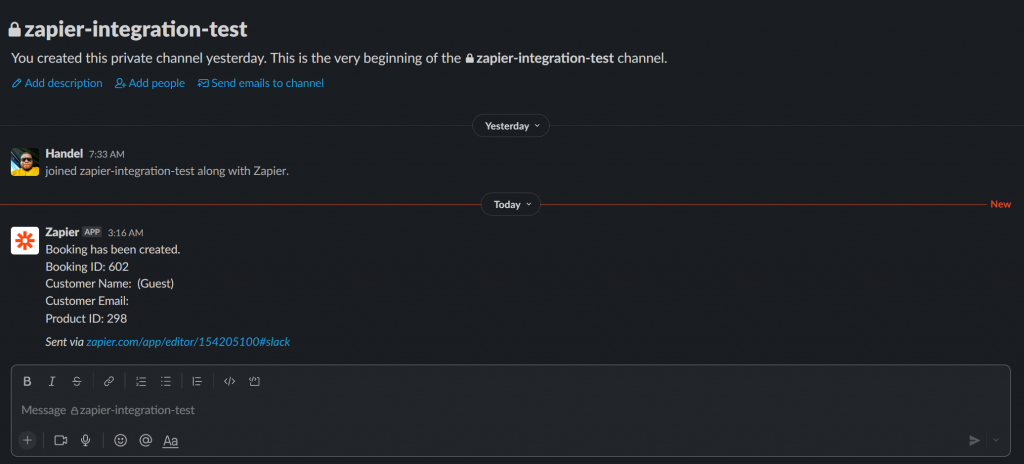
At this point, the Zap has been created successfully on Zapier.
9. Configure Zap Trigger on WordPress
Now it is time to configure the created Zap with the WooCommerce store on WordPress.
This way, WordPress would be able to effectively activate the Zapier trigger when a booking has been created, updated, or deleted.
The configuration of the Zap with the WooCommerce store on WordPress involves a direct connection with a specific booking product.
The booking event (create, update, or delete) associated with the Zapier trigger and originating from the booking product would initiate the Zapier Trigger.
Zapier triggers that are not configured on WordPress will not be activated even if they have been successfully created on Zapier.
Let’s start.
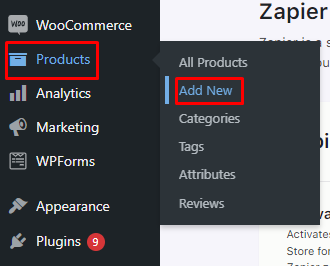
Go to Products > Add New.
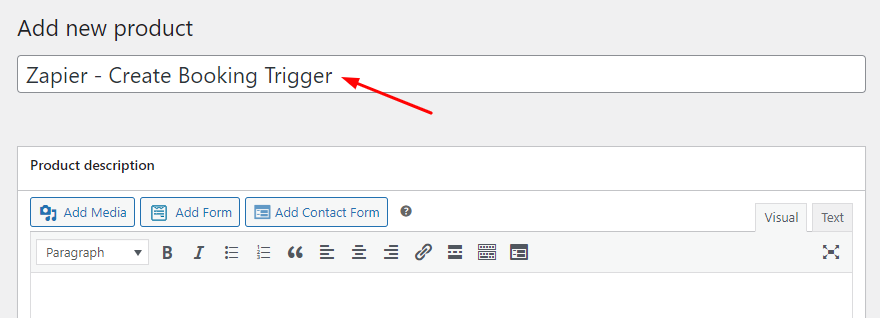
Give a name to the product. Since this is a sample product, you can go with the name ‘Zapier – Create Booking Trigger.’
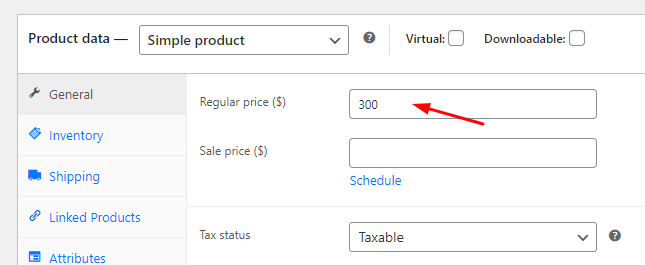
Add the price.
Enable the booking for this product and configure the Booking type.

Go to Integrations > Zapier.
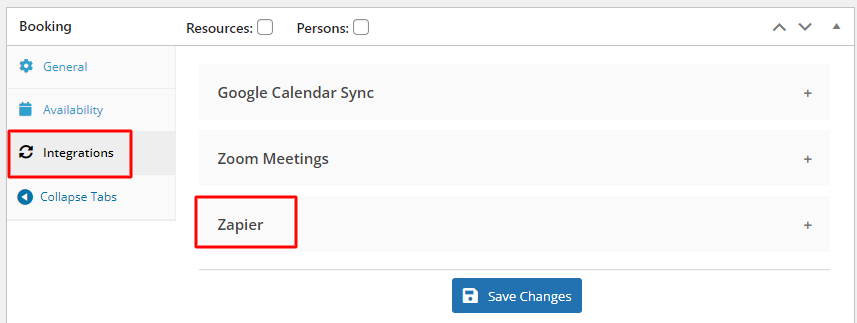
Enable the Create Booking Trigger.

In the Select Created Triggers field, choose your trigger. It would be Create Booking Trigger.
Click the Save Changes button once done.

Lastly, publish the product.

10. Test Zapier Trigger on WordPress (optional)
A test booking can be placed on the WooCommerce store to make sure that things are working right. This is optional.
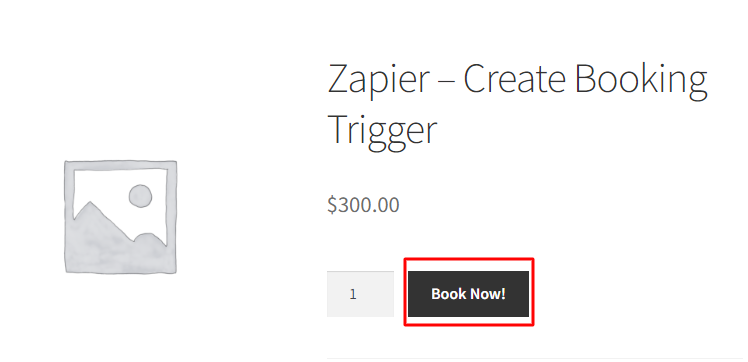
After creating your sample product, place an order for it by clicking the Book Now button.
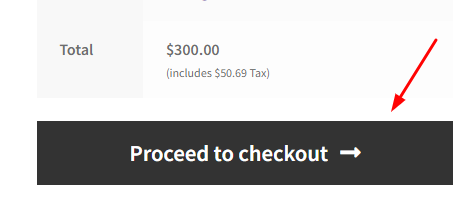
Proceed to View your cart.

Next, go to the Checkout.
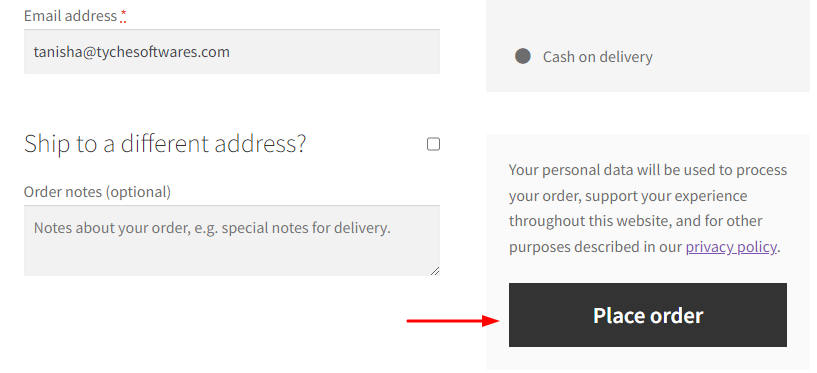
Lastly, place an order.
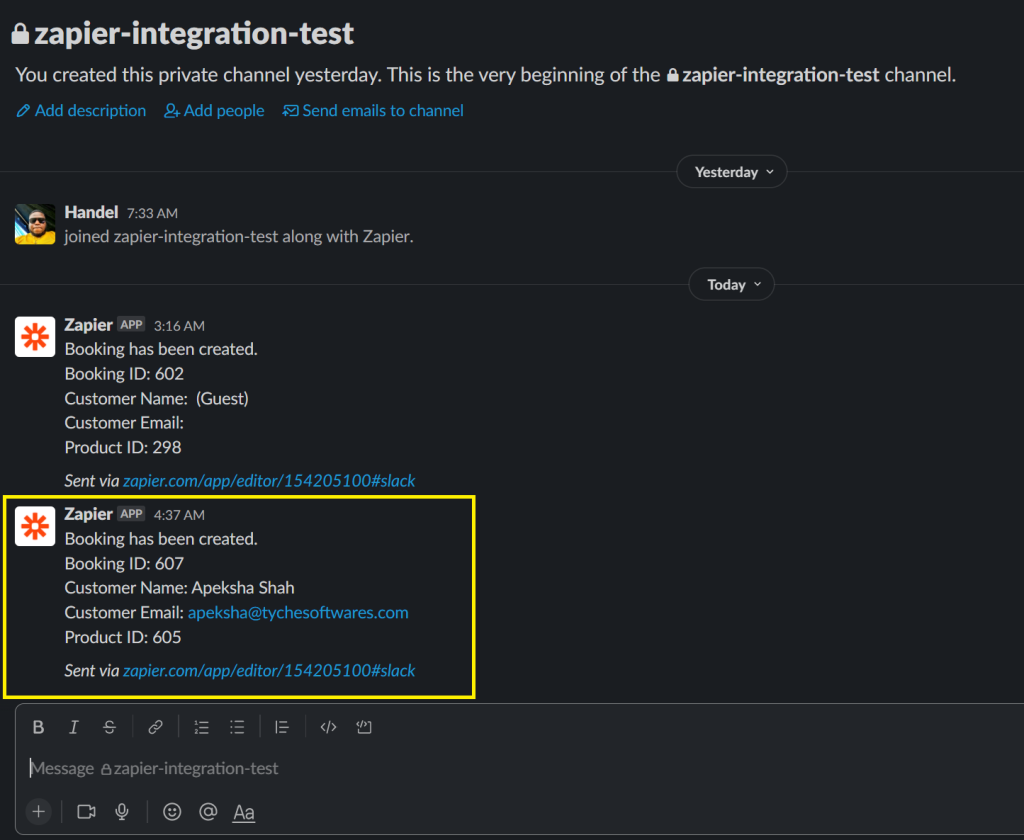
After the booking has been placed, a message containing the booking information will be sent to the Slack channel.
This will be based on the configuration of the Zapier trigger.
C. Setting up Zap Actions on Zapier
↑ Back to topZapier Actions are events that occur outside of WooCommerce and are expected to create, update, or delete bookings.
They are a result of the execution of a non-Tyche Zap app such as Gmail, Calendar, WordPress, WebHooks, etc.
Due to it, a corresponding action on the WooCommerce store – create, update, or delete bookings will be performed.
When setting up Zapier Actions, filling in a couple of required fields is necessary. Especially when creating bookings where the fields are dependent on the type of booking – single day, multiple dates, multiple nights, etc.
Values for these required fields can be set in two ways:
- Manually when setting up the action
- Using values from the Action Trigger execution (Gmail, Calendar, WordPress, WebHooks, etc
1. Create Booking Action
For the Create Booking Action, the Product and User must be specified while setting up the Zap.
Based on the booking type that has been configured for the Product on WooCommerce, Zapier displays information on the required fields.
Note: All data types are sent as strings to avoid data type mismatch errors.
single_day booking type
| Key | Label | Required? | Format |
| order_id | Order ID | No | – |
| quantity | Booking Quantity | Yes | – |
| start_date | Booking Start Date | Yes | YYYY-MM-DD |
| end_date | Booking End Date | Yes | YYYY-MM-DD |
| price | Booking Price | Yes | – |
multiple_days booking type
| Key | Label | Required? | Format |
| order_id | Order ID | No | – |
| quantity | Booking Quantity | Yes | – |
| start_date | Booking Start Date | Yes | YYYY-MM-DD |
| end_date | Booking End Date | Yes | YYYY-MM-DD |
| price | Booking Price | Yes | – |
| fixed_block | Fixed Block | Yes | – |
date_time booking type
| Key | Label | Required? | Format |
| order_id | Order ID | No | – |
| quantity | Booking Quantity | Yes | – |
| start_date | Booking Start Date | Yes | YYYY-MM-DD |
| end_date | Booking End Date | Yes | YYYY-MM-DD |
| price | Booking Price | Yes | – |
| start_time | Booking Start Time | Yes | H:i |
| end_time | Booking End Time | Yes | H:i |
duration_time booking type
| Key | Label | Required? | Format |
| order_id | Order ID | No | – |
| quantity | Booking Quantity | Yes | – |
| start_date | Booking Start Date | Yes | YYYY-MM-DD |
| end_date | Booking End Date | Yes | YYYY-MM-DD |
| price | Booking Price | Yes | – |
| start_time | Booking Start Time | Yes | H:i |
| duration | Booking Duration | Yes |
2. Configuring ‘Create Booking Action’ on Zapier using Google Sheet
You can use Google Sheets to configure the Create Booking Action on Zapier.
Google Sheets is used in this tutorial as it is usually used by most customers in keeping records of bookings. Let’s get started!
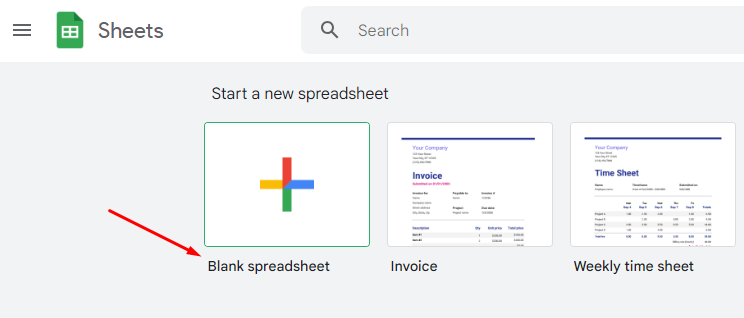
Here, you have to sign in to Google Sheets and create a new spreadsheet.
Create a new Blank spreadsheet.
You can call this spreadsheet Zapier Create Action.
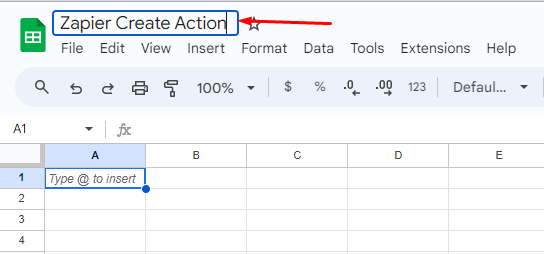
After creating the spreadsheet, you need to create column headers that match the required fields needed for each booking type.

You will have to add the following:
- Order ID
- Quantity
- Start Date
- Start Time
- End Date
- End Time
- Price
- Product ID
- Customer ID
2. Add Sample Data to Sheet Row
For Zapier to configure the Zap for the Create Booking Action, you will need to add some sample data to the first row of the sheet.

Zapier will use the sample data to test run the Zap, so you need to ensure that the sample data contains valid information.
3. Create Zap and select the Spreadsheet
Create a Zap on Zapier using Google Sheets as the trigger.
Search for Google Sheets and select it.
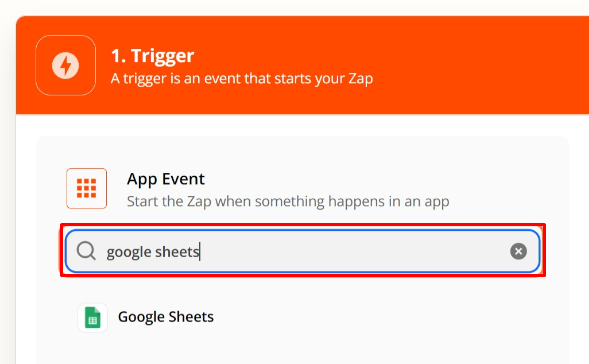
Select the trigger event.
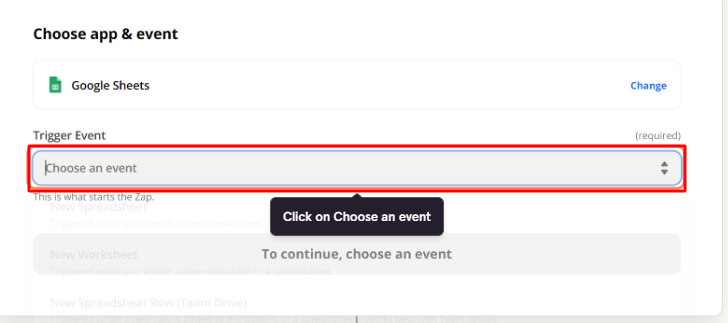
For the trigger event, select Create Booking and select “New Spreadsheet Row” as the Trigger Event.
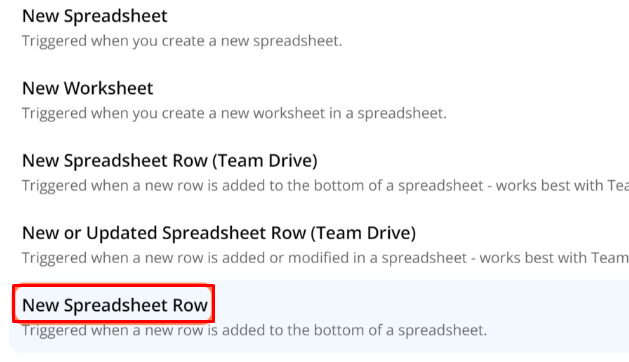
This is used because the Google Sheets Trigger needs to be activated only when a new row has been added to the spreadsheet.
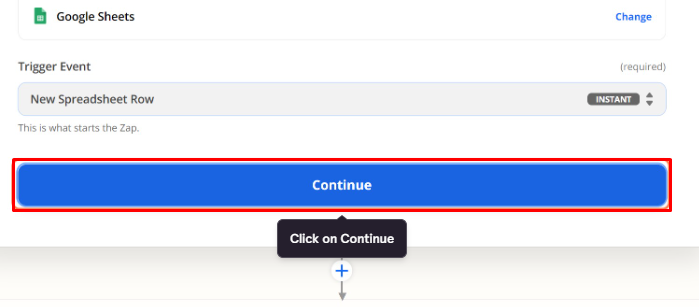
Press the Continue button.
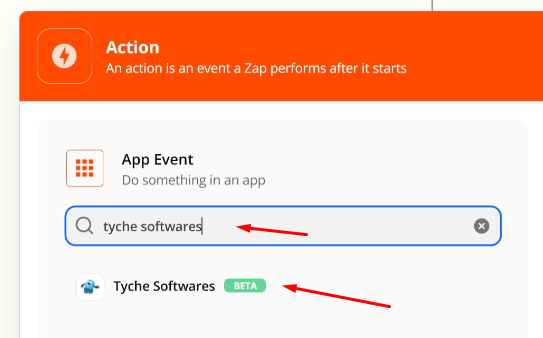
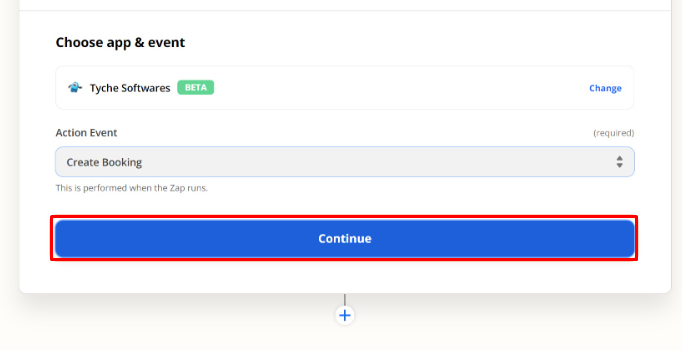
For the Action step, search for the Tyche Softwares Zapier app and select it.
Go to Action Event next.
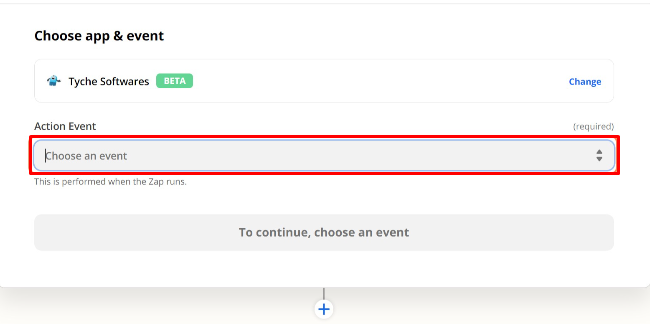
Choose Create Booking and proceed to Continue.
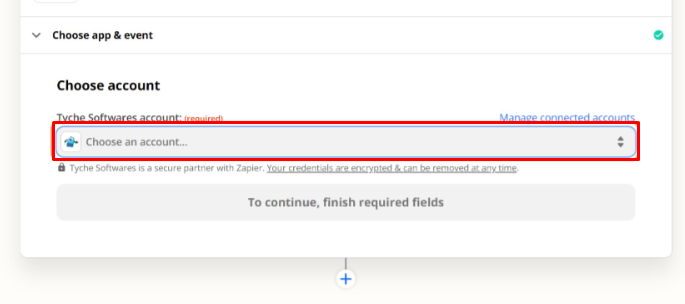
Choose an account.
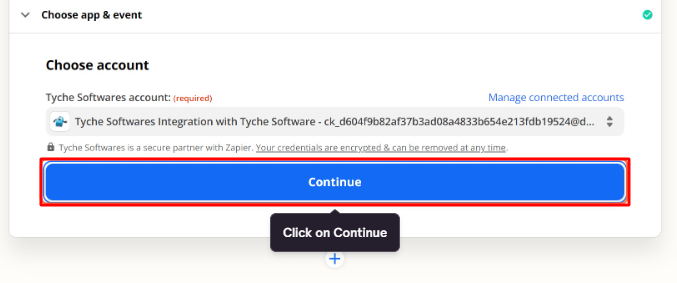
After selecting your account, click the Continue button.
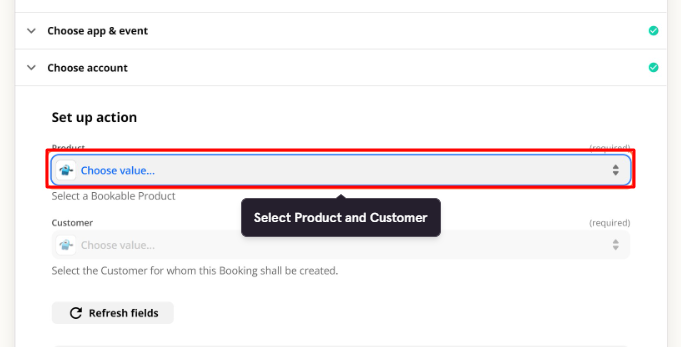
It’s time to set up the actions. Here, you will have to select the Product and Customer.
This selection will determine the required fields based on the booking type that has been checked on the selected product.
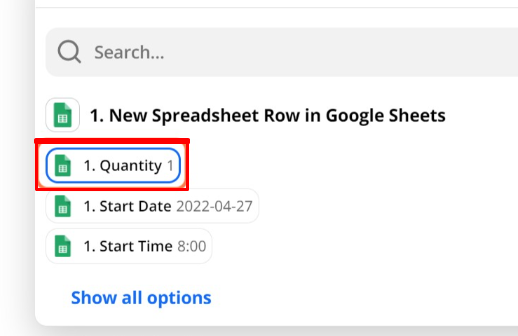
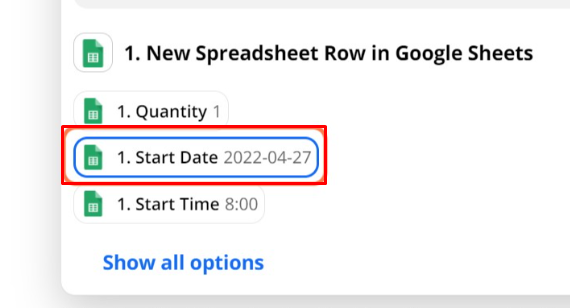
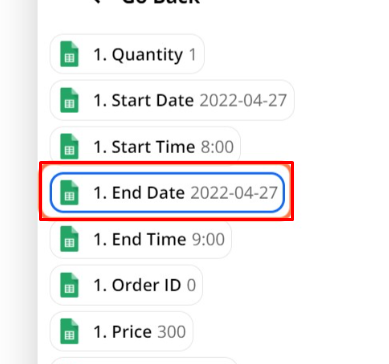
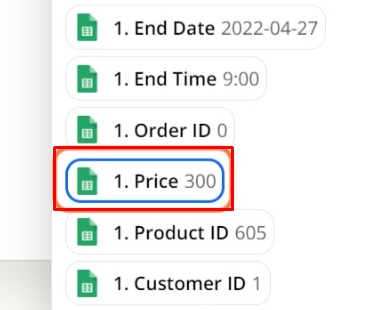
For each of the required fields that have been displayed (after selecting the Product), link the field on the Zap to the entry on the Google Sheet by selecting the corresponding label on the dropdown.
Start with Quantity.
Then Start Date.
Continue with the End Date.
Next is Price.
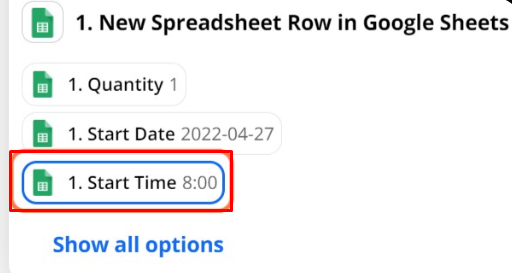
Following this is the Start Time.
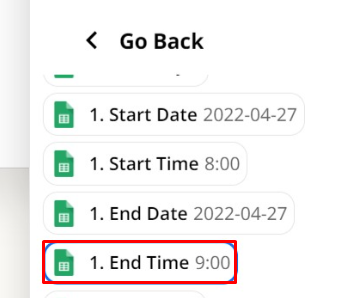
Then the End Time.
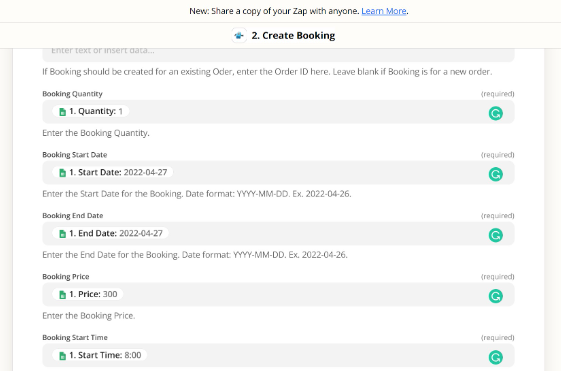
All of the information once filled will appear as such:
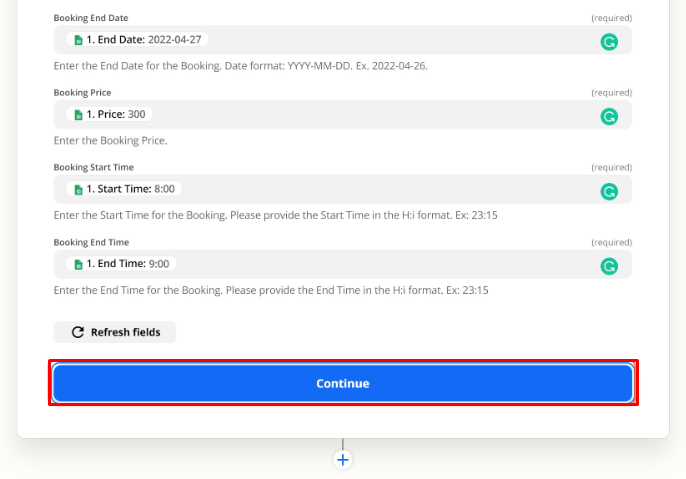
Proceed by clicking the Continue button.
You will see two options, proceed with the Test & Continue button.
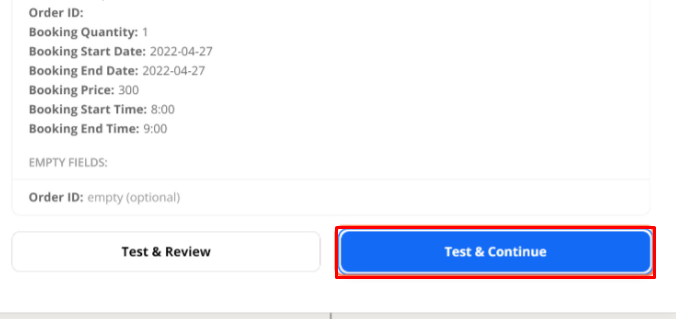
Turn on your created Zap so that it gets published on Zapier.
The Zap will watch out for newly created rows in the Google Sheet and create bookings accordingly on your WooCommerce store.
Outlook Calendar
↑ Back to topv5.6.1 of the Booking and Appointment Plugin for WooCommerce allows integration with Outlook Calendar.
Please note that the Outlook Calendar integration is available as an addon and only customers haveing an Enterprise License can take advantage of this integration.
Starter and Business Plan customers can continue to use the Google Calendar Sync & Zoom Integration.
A. ADMIN SETTINGS
↑ Back to top1. Activating your Outlook Calendar License
Go to Booking > Activate Outlook Calendar License.
Enter your License Key in the ‘License Key’ field. click on the ‘Active License’ button.
Click the ‘Save Changes’ button.
After activating your license, you may deactivate it by clicking the ‘Deactivate License’ button.

Under General Settings, you can personalize the information on how the bookings will appear on your Outlook Calendar.
Go to Booking and Appointment > Integrations > Outlook Calendar Sync > General Settings. Here’s how it will appear:
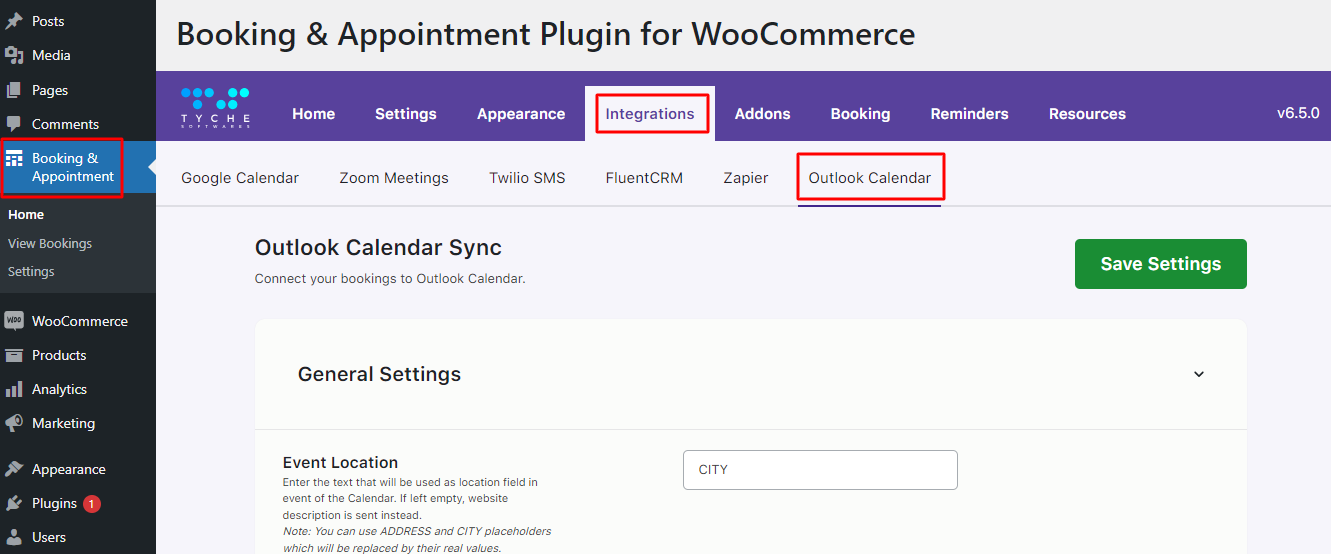
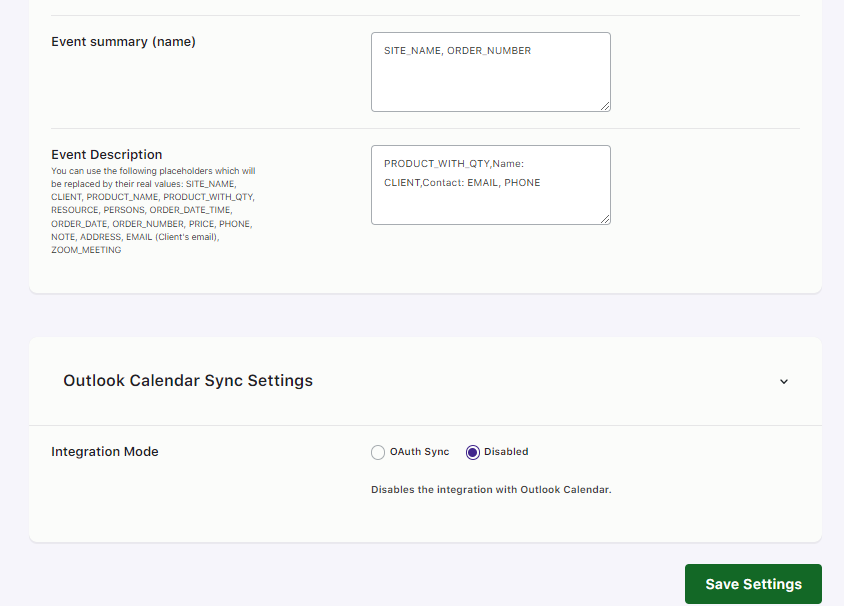
You can set different settings such as Event location, Event Summary (name), and Event Description.
Event Location: In this field, you can add the location that you wish to see on your Calendar. You can even replace the CITY placeholder with ADDRESS. Both the placeholders will be replaced by actual values.
Event Summary (name): Here, by default, you will find the placeholders SITE_NAME, ORDER_NUMBER added. You can replace it with other placeholders such as PRODUCT_WITH_QTY, RESOURCE, ORDER_DATE_TIME, etc.
Event Description: In this field, by default, you will find the placeholder PRODUCT_WITH_QTY, Name: CLIENT, Contact: EMAIL, PHONE added. Just like Event Summary, you can replace these placeholders with other such placeholders as ORDER_NUMBER, PRICE, ZOOM_MEETING.
b) Outlook Calendar Sync Settings
When you scroll down, you will find the ‘Outlook Calendar Sync Settings’.
Here, under ‘Integration Mode’ choose the option ‘OAuth Sync’.
By default, this setting will have the option ‘Disabled’ selected.
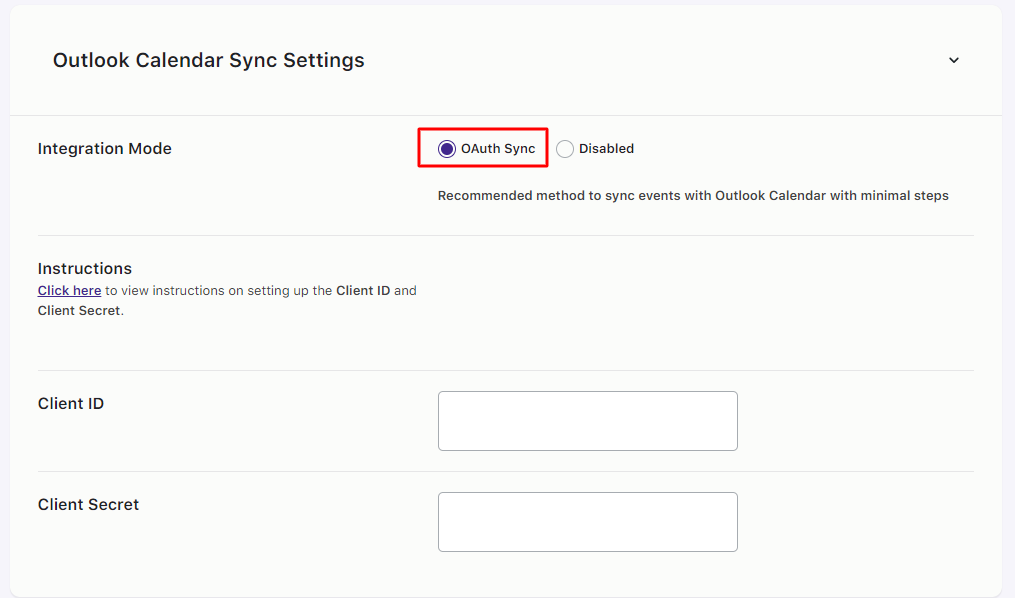
To configure the OAuth Sync, press the ‘Click here’ link under Instructions.
Below it, you will find the fields for Client ID and Client Secret.
To get the o to the Azure portal and sign in to either your work, school, or a personal Microsoft account.
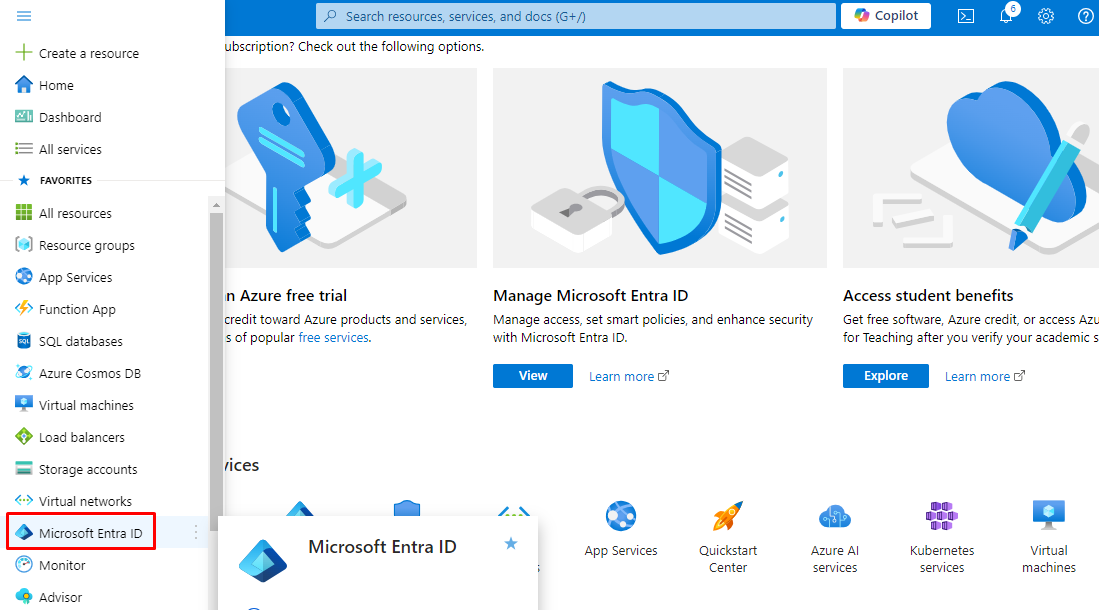
Once done, you can go to the Panel located on the left-hand side of the page and find the ‘Microsoft Entra ID’ option.
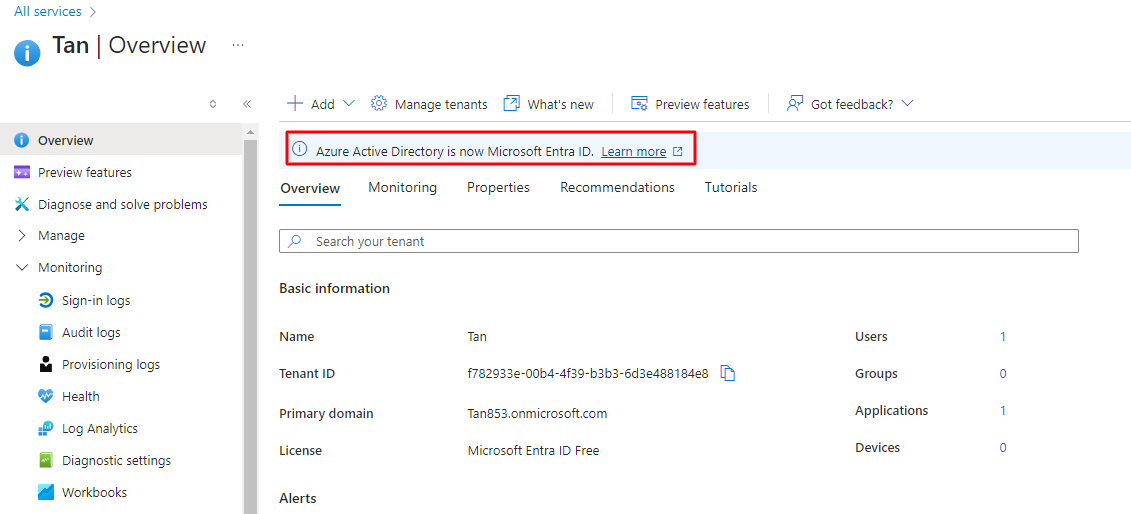
This is because Azure Active Directory is now Microsoft Entra ID:
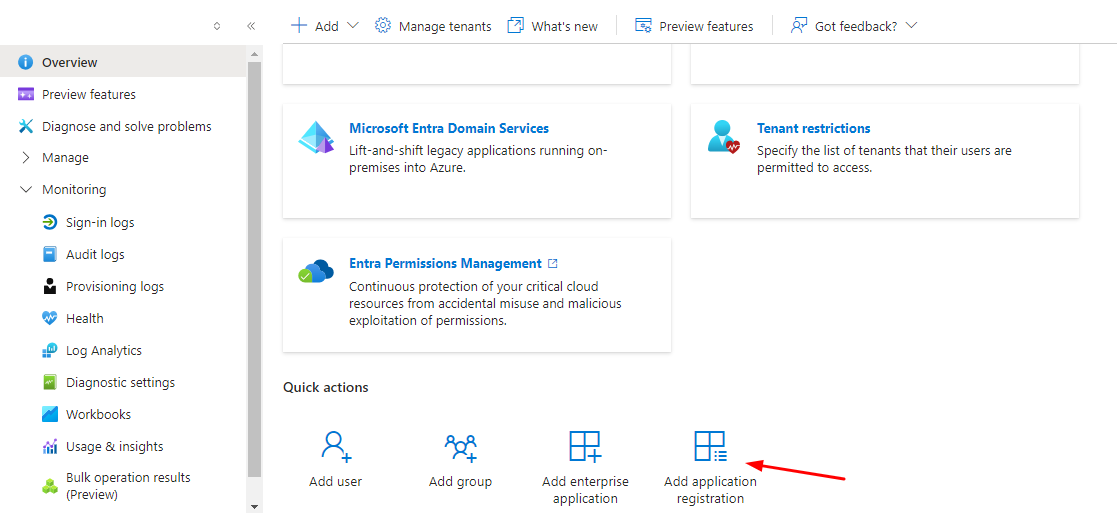
Scroll down and find the ‘Add application registration’ option.
You will now have to register your application.
Fill in the ‘Name’ field. For example, let’s say that you filled in the Display name as ‘Booking Outlook integration.’
Under ‘Supported account types’, choose the option ‘Accounts in any organizational directory (Any Microsoft Entra ID- Multitenant) and personal Microsoft accounts (e.g. Skype, Xbox).
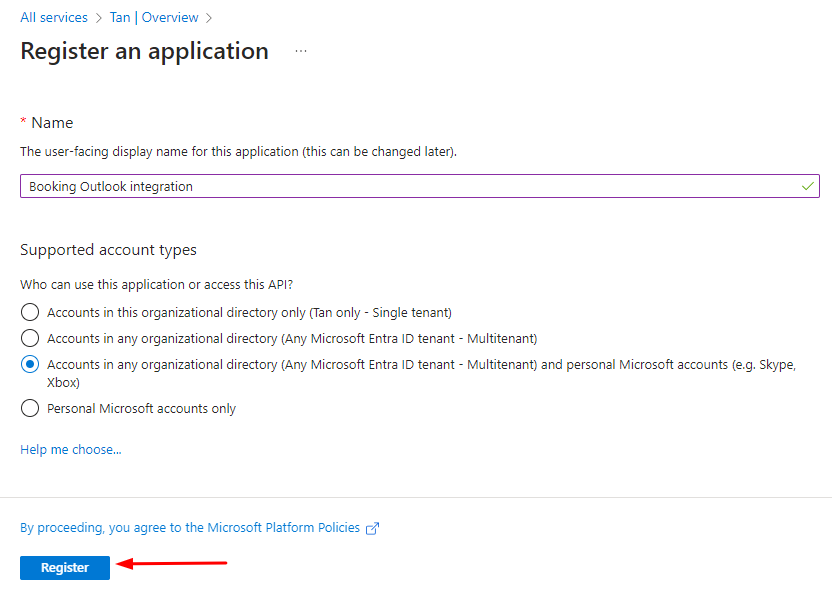
Click the Register button to proceed. You will then be taken to the Overview page where your application will be assigned an Application ID a.k.a Client ID.
Copy the Application (client) ID:

Proceed to your website.
Go to Booking and Appointment > Integrations > Outlook > Outlook Calendar Sync Settings > Client ID and paste it there:

Next, return to the Microsoft Azure site. Go to the Authentication tab > Add a platform.
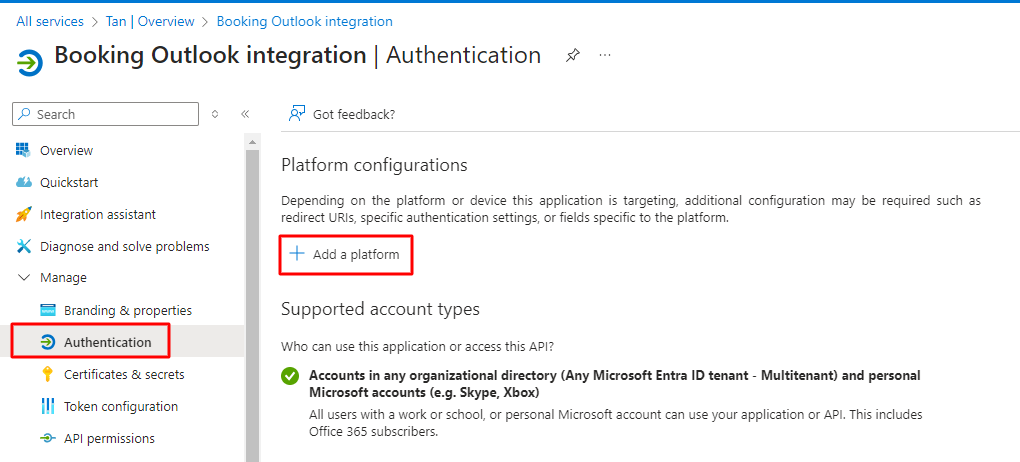
Choose the ‘Web’ option.
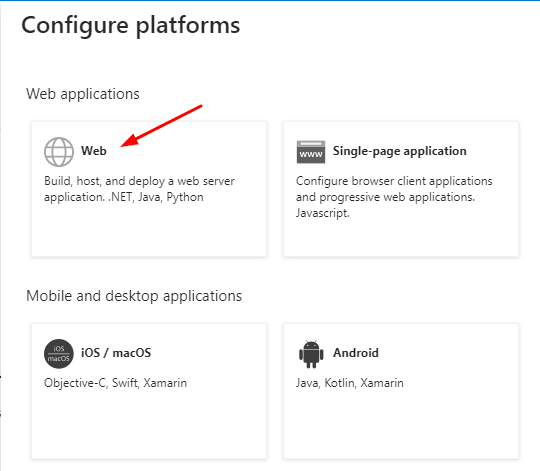
You will have to enter the Redirect URI here. Find it located in the Settings tab of your Booking and Appointment Plugin.
Go to your site. Go to Booking and Appointment > Integrations > Outlook > Outlook Calendar Sync Settings > Redict URl:

Copy and paste your unique Redirect URI in the ‘e.g’ field and click the ‘Configure’ button.
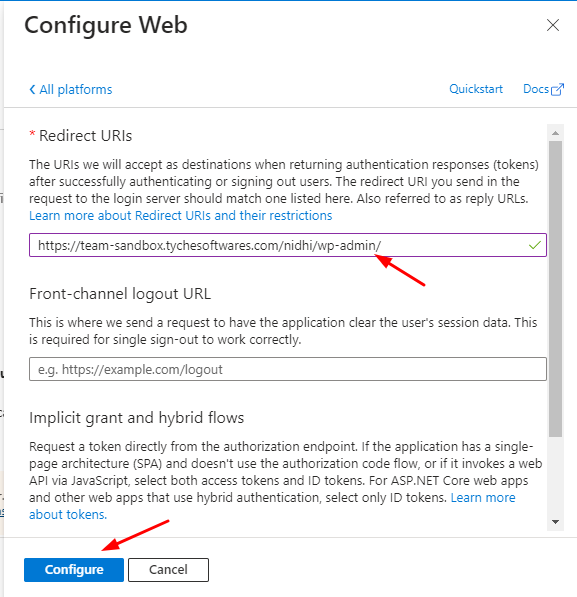
After finding your Application (Client) ID, next, you will need your Client Secret.
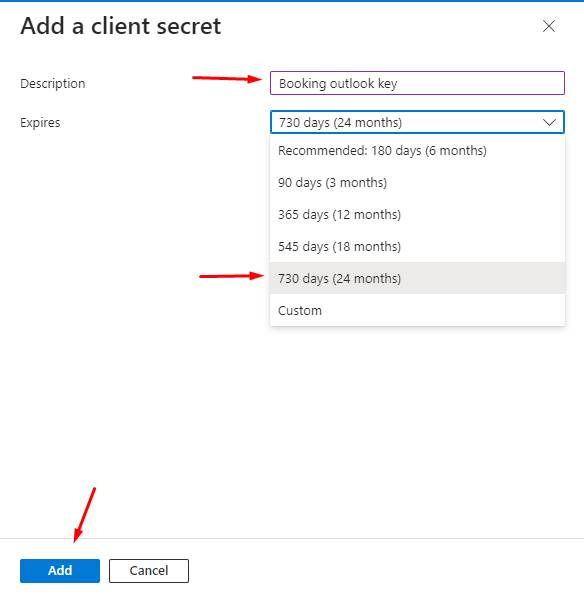
For this, go to ‘Certificates & secrets’ and click on the ‘New client secret’ option.
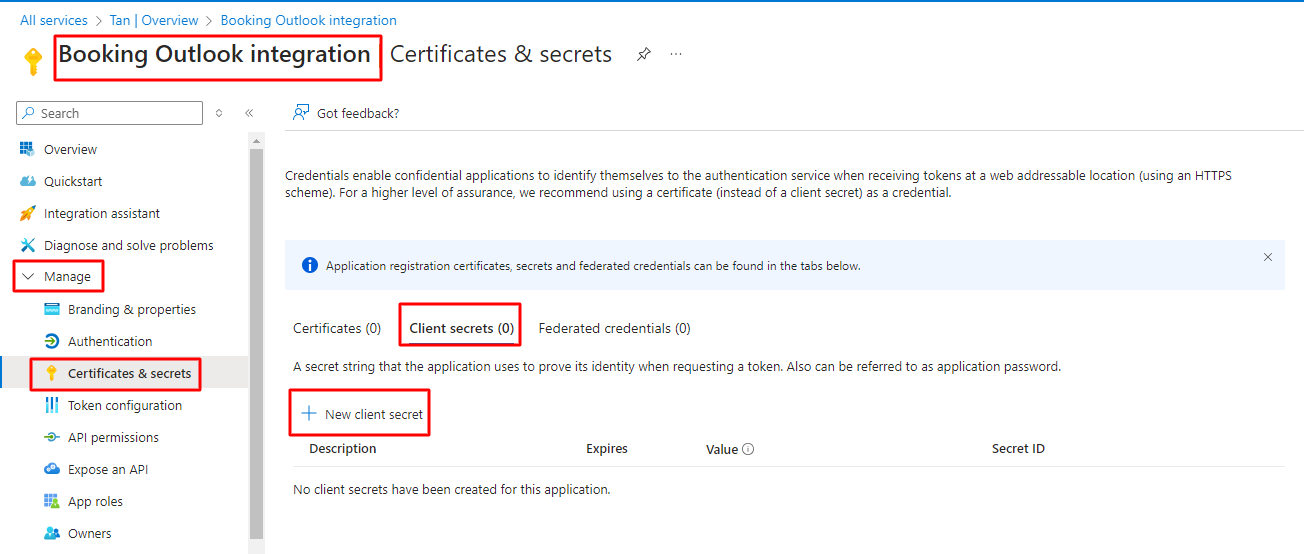
You can give a Description of your Client Secret if you’d like.
Under ‘Expires’ choose the option ‘730 days’ or custom days according to your requirements. Click the ‘Add’ button.
The Client Secret will be located under the ‘Value’ option between ‘Expires’ and ‘ID’.
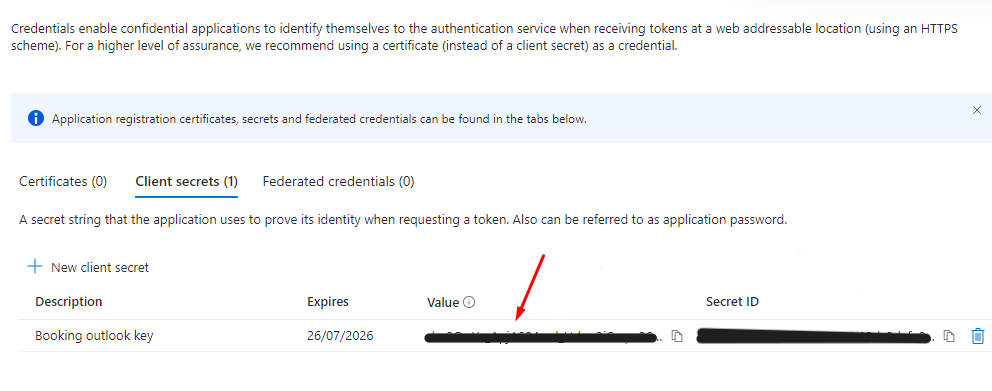
Make sure to copy the Value because this will become your Client Secret.
After copying it, you can paste it into the Client Secret field.
It is located on your WordPress site under Booking and Appointment > Integrations > Outlook Calendar Sync > Outlook Calendar Sync Settings > Client Secret.
The next thing that you will need to do is go back to the left-hand side panel and find the ‘API permissions’ option as shown below:
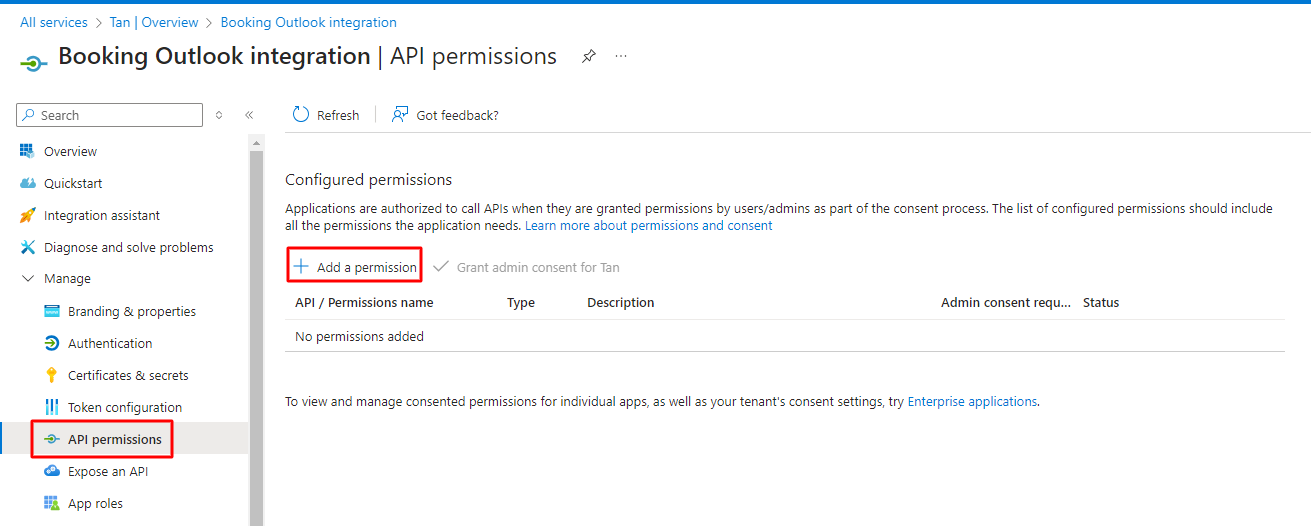
Click on it and under ‘Request API permissions’ choose ‘Microsoft Graph’.
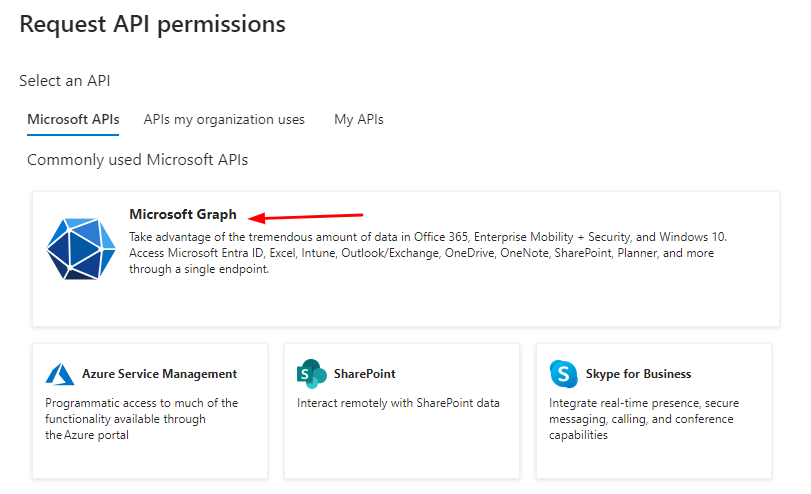
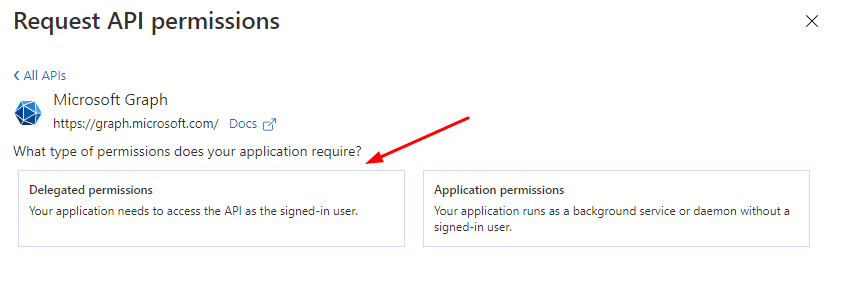
Proceed forward by selecting ‘Delegated permissions’ under ‘Microsoft Graph.’
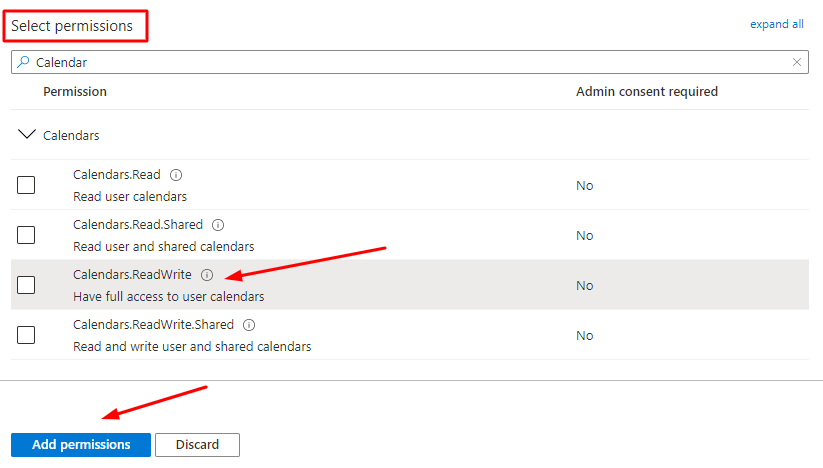
Next, search for the ‘Calendars.ReadWrite’ in the search panel, select it once found, and then click ‘Add permissions’.
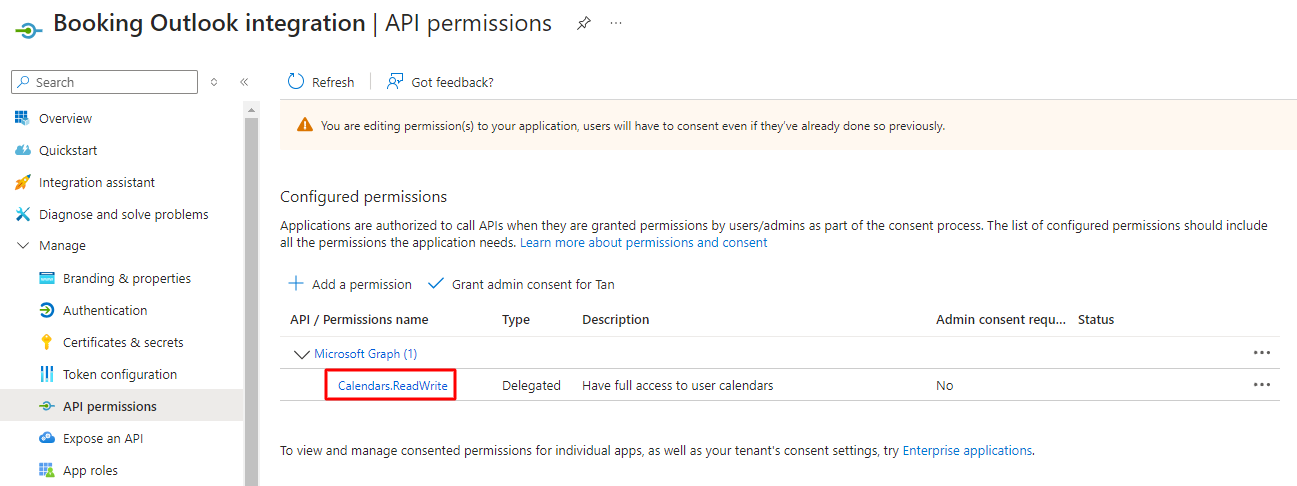
It will added in this manner:
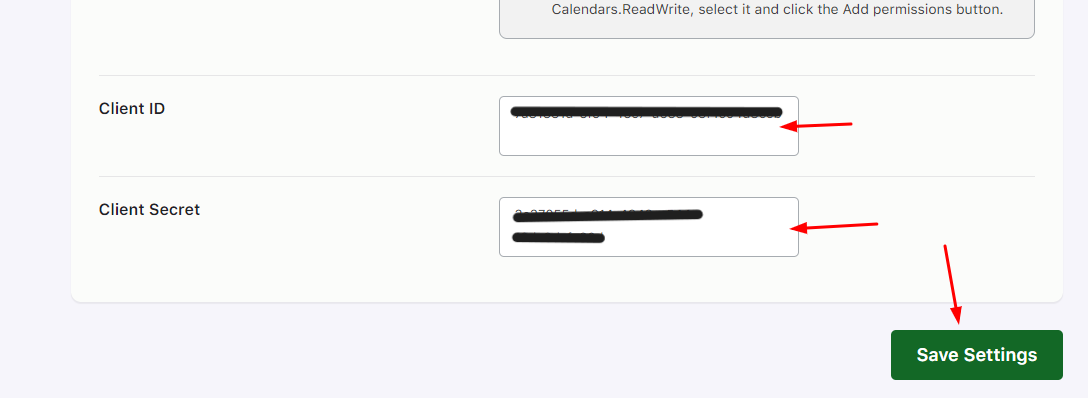
Now, go back to your WordPress site and enter your Client ID and Client Secret in the respective vacant fields.
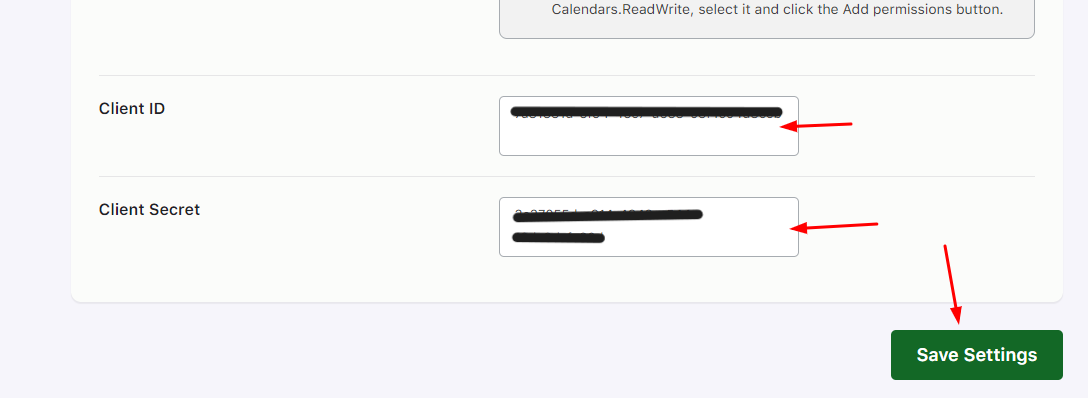
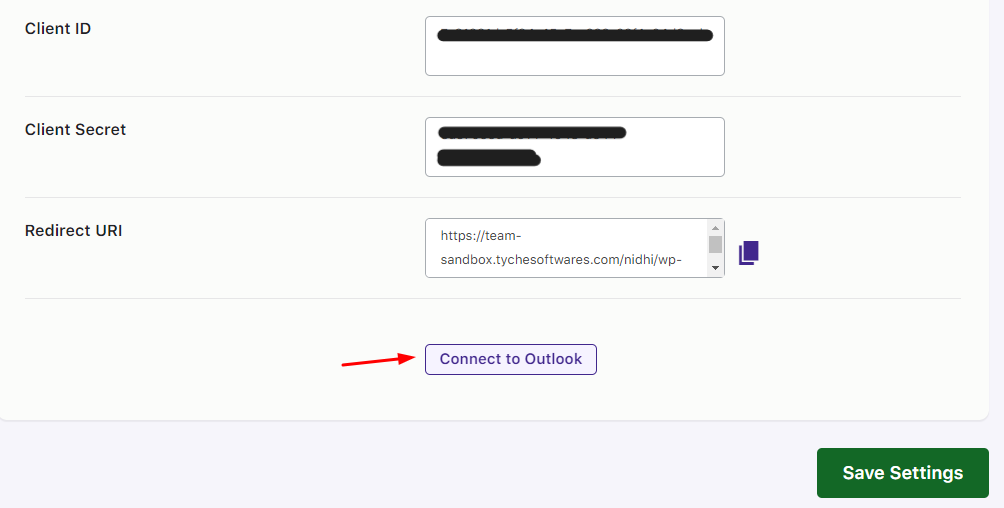
Save these settings first by clicking on ‘Save Settings’ and then choose the ‘Connect to Outlook’ button.
It will redirect you to your Microsoft email address page:
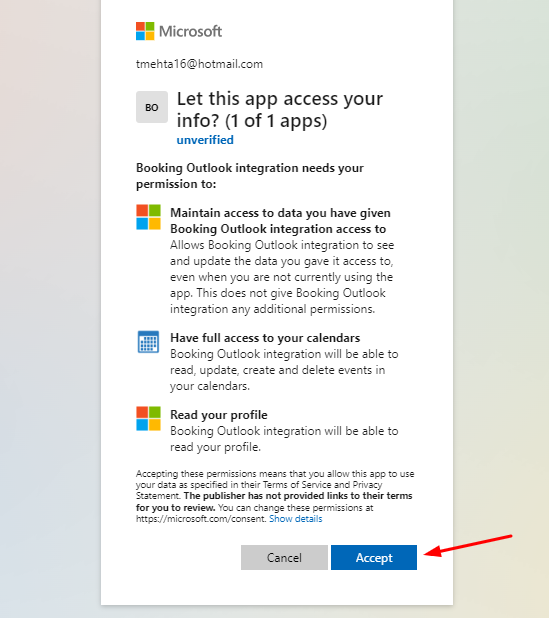
Accept the access rule.
Once you connect your Outlook Calendar, you can select the exact Calendar you wish to Sync with your Bookings!
For example, in the dropdown, you will see the calendars you’ve set up/created in your Outlook Calendar.

Choose your preferred calendar and click on ‘Save settings.’
FRONTEND VIEW
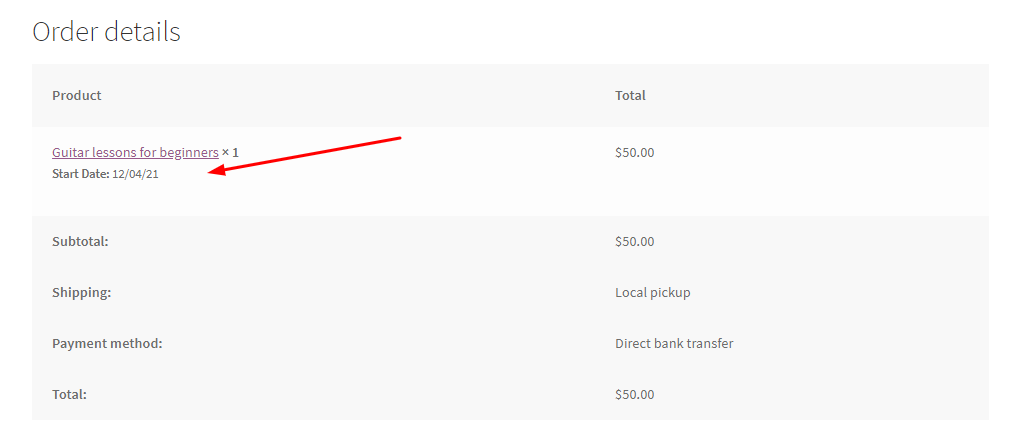
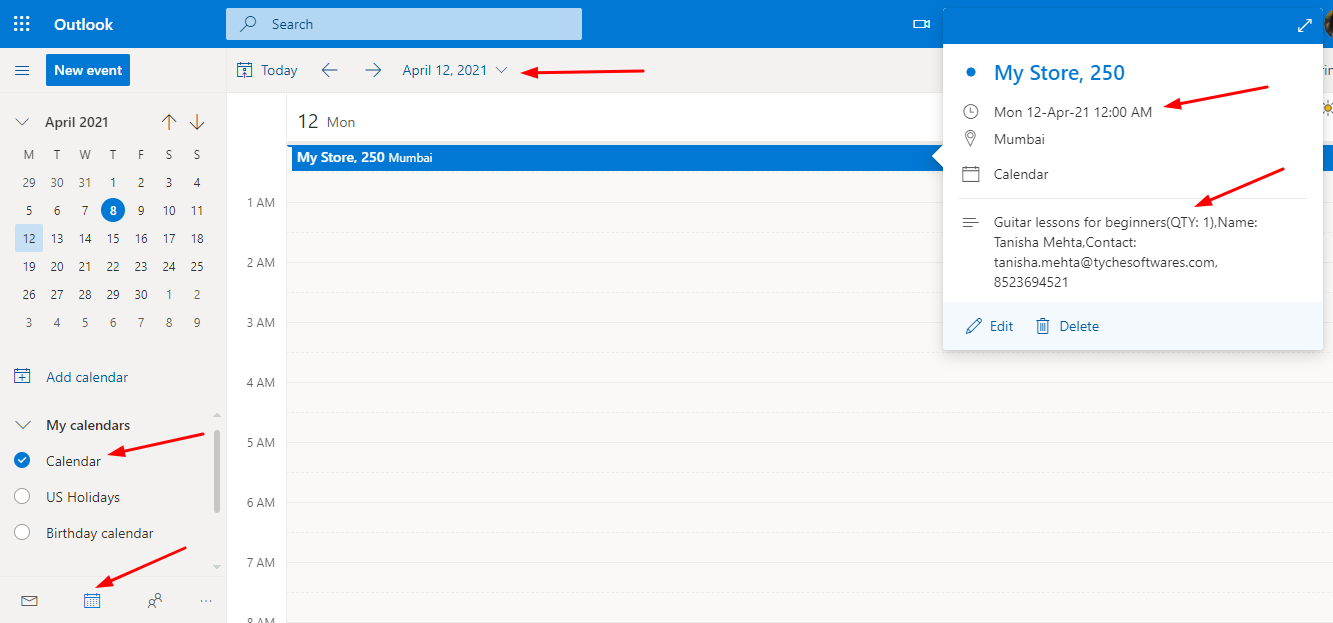
↑ Back to topLet’s say a customer has booked Guitar lessons for beginners on your site for 12th April 2021. Here’s how the Order Received Page of it will appear:
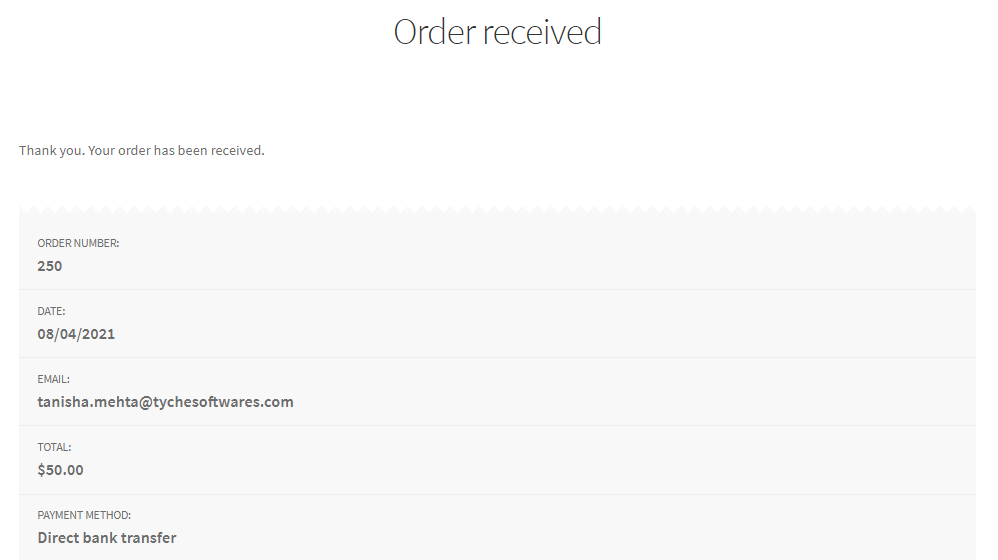
Now, if you wish to view this order on your Outlook Calendar, simply login to your Outlook account, and on the left-hand side panel, find the Calendar icon.
Click on it to open your Outlook Calendar where your bookings will appear.
Please note that to have a uniform view of the Order Time on your Outlook Calendar, you must keep your Website Timezone and Calendar Timezone the same.
You can change your Website Timezone by going to WordPress Dashboard > Settings > General > Timezone.
To change your Outlook Calendar Timezone, go to Settings > All Outlook settings > General > Current Timezone.
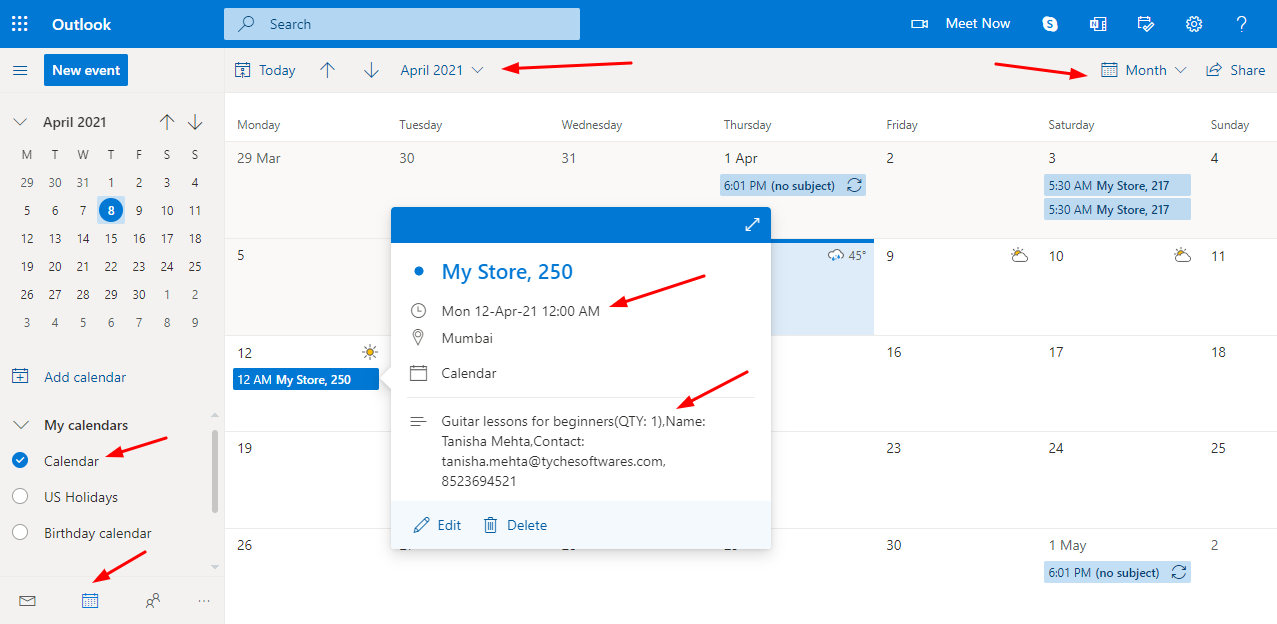
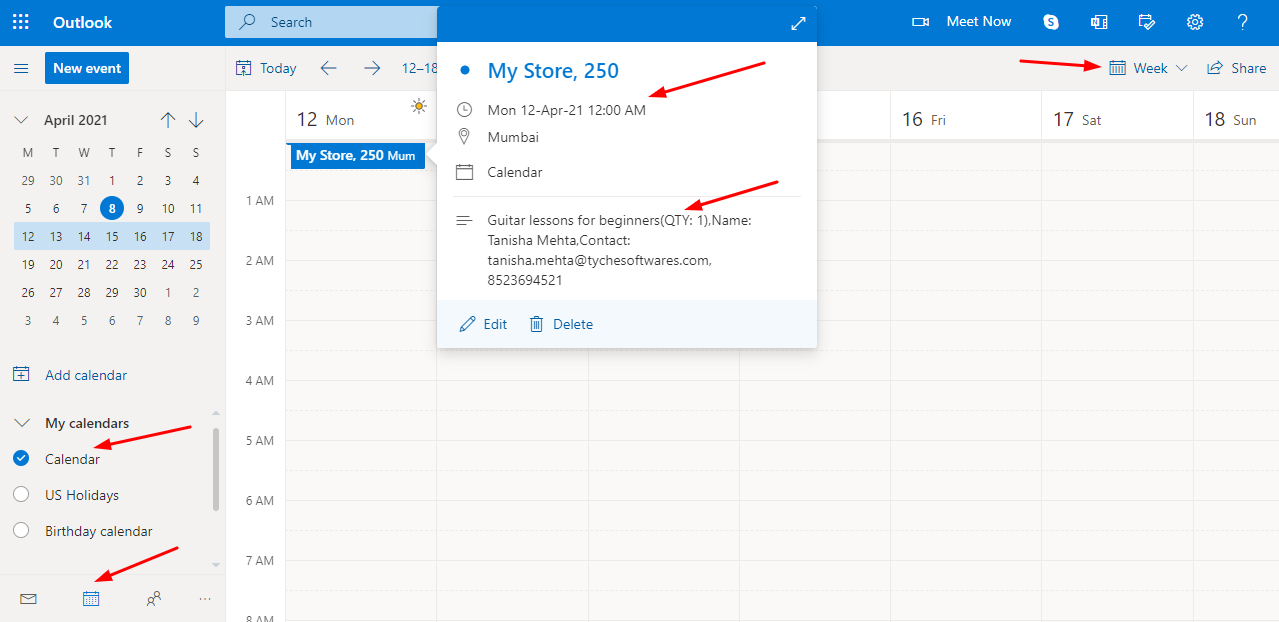
Here’s how the ‘Guitar lessons for beginners’ booking order will show when you click on ‘Month View’, ‘Week View’ & ‘Day View’ respectively:
MONTH VIEW
WEEK VIEW
DAY VIEW
In conclusion, this integration will help you keep track of your bookings directly on your Outlook Calendar.
Exporting Product Level bookings to Google Calendar
↑ Back to topSome Booking and Appointment Plugin for WooCommerce plugin users often wish to send WooCommerce Bookings to different Google Calendars for each Bookable product. For this, you set up Google Calendar Sync from the Product Level.
It allows you to automatically export the bookings for a WooCommerce product to Google Calendar in real time. This makes it convenient for the users to keep records of each product’s bookings in different calendars.
A. What is Google Calendar Sync?
↑ Back to topGoogle Calendar Sync is an integration process that allows you to synchronize your calendars to any device like mobile, tablet, laptop, etc.
By setting Google Calendar Sync, your events will be added to the Google Calendar.
You can also set up alerts for incoming messages and upcoming events. This helps in easier and faster access to all important booking dates.
B. Setting Up Google Calendar Sync At Product Level
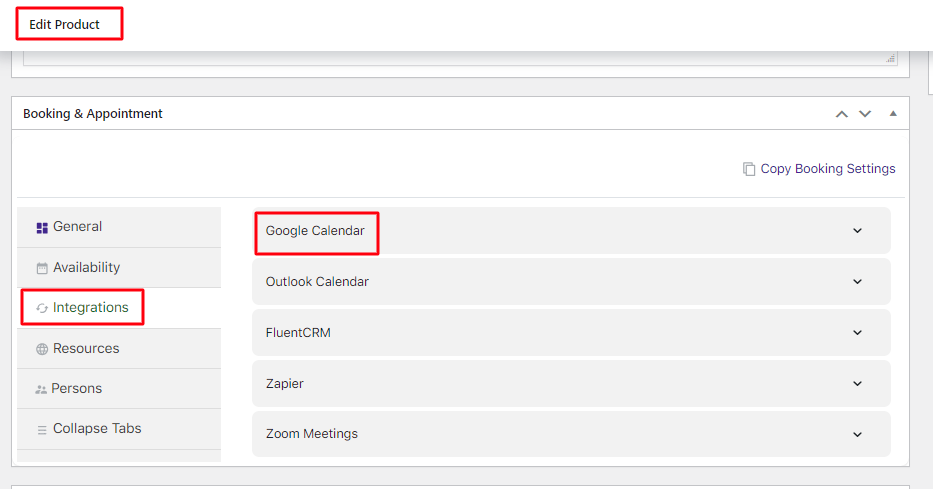
↑ Back to topYou can find the Google Calendar Sync tab under the Booking and Appointment meta box.
Go to Integrations > Google Calendar as shown below:
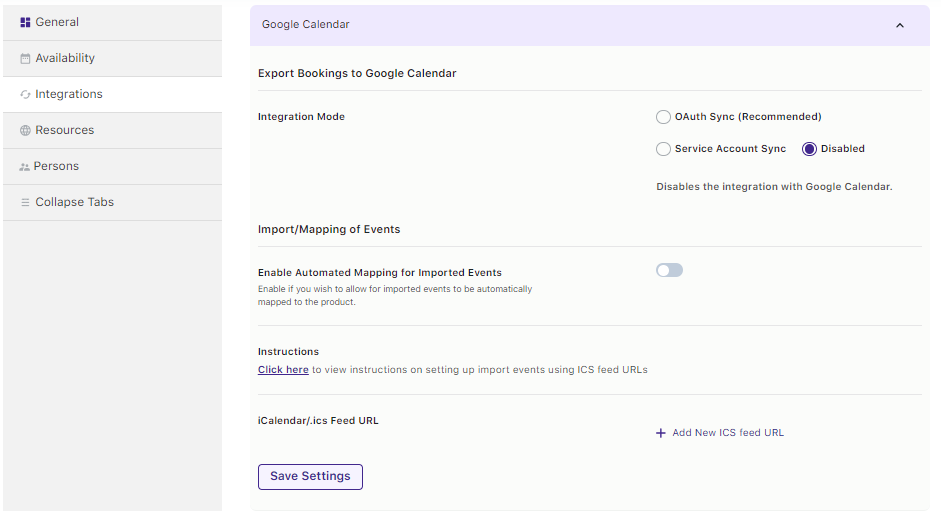
Here’s what the Google Calendar dropdown will look like:
Go to the Google Developers Console to set up a project. Log in to your Google account and create a new project by clicking on the top left side panel “Select a project” dropdown.
Click on the Create Project icon.

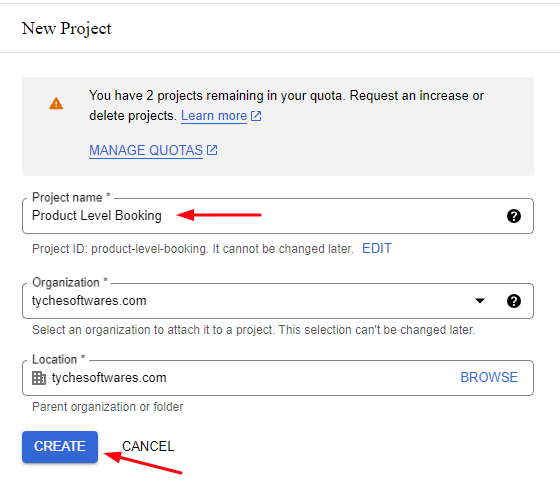
As you click on Create Project button a popup will be displayed asking for the Project Name.
Enter a Project Name of your preference. (e.g. Product Level Booking).
As you enter the name, the Project ID will be displayed automatically below the Project Name.
Click on the Create button after entering the details.
Once the project is created, go to the Library tab on the left-hand menu.
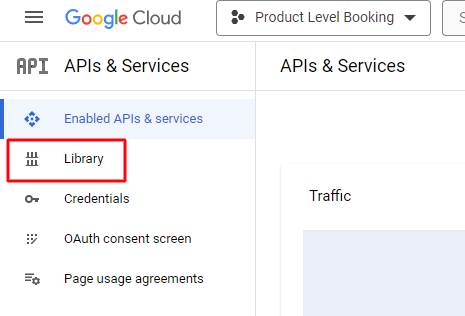
Search for Calendar API. Select it.

Click on Enable. Go to Credentials > Create credentials button.
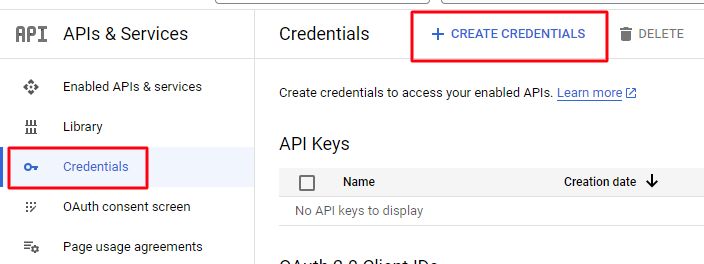
On clicking the Create credentials button, you will get different ways to create credentials.
You can go with an OAuth client ID or a Service account.
A. Integration via OAuth Sync
Click on OAuth Client ID in the drop-down.

You need to select the Application type as Web Application. Give it a name.
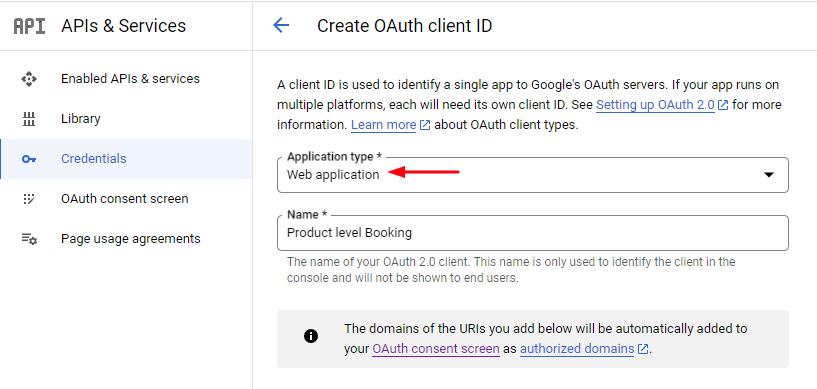
Proceed forward by adding the Authorised redirect URIs and clicking the Create button.
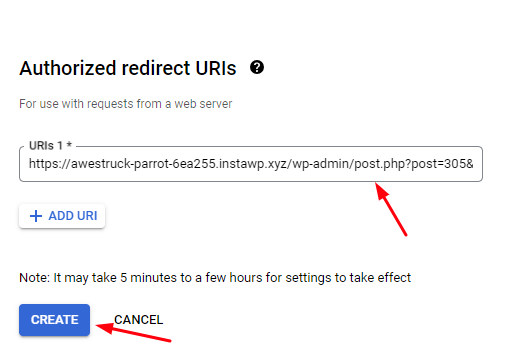
You will find the Authorized Redirect URI by going to the Edit Product Page of your product.
Go to the Booking meta box > Integrations > Google Calendar.
Select OAuth Sync under Integration Mode. Scroll down to find the Redirect URI. Copy and paste the link.
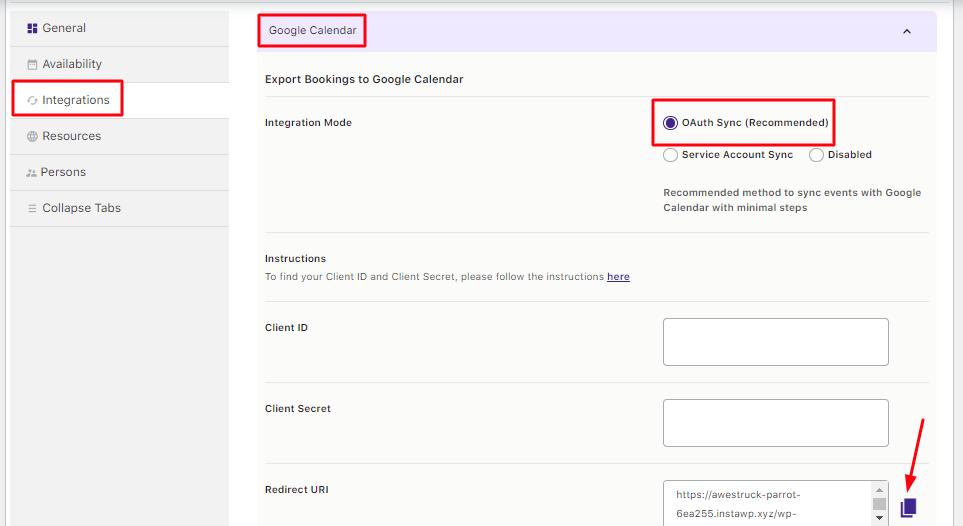
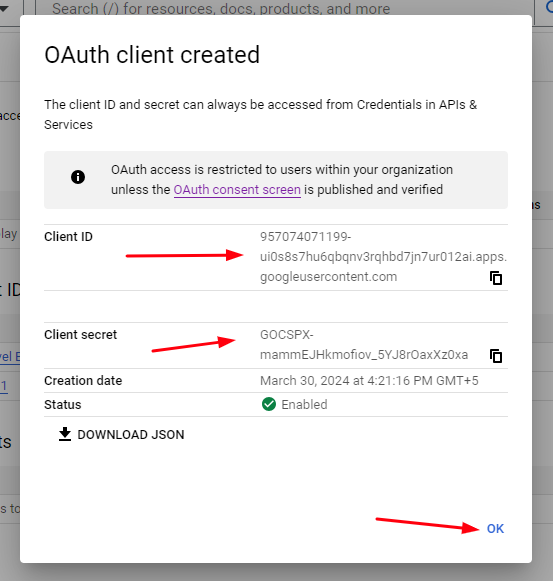
This will generate the OAuth Client and a popup will be displayed with your Client ID and Client Secret. Copy them and store them in a safe place.
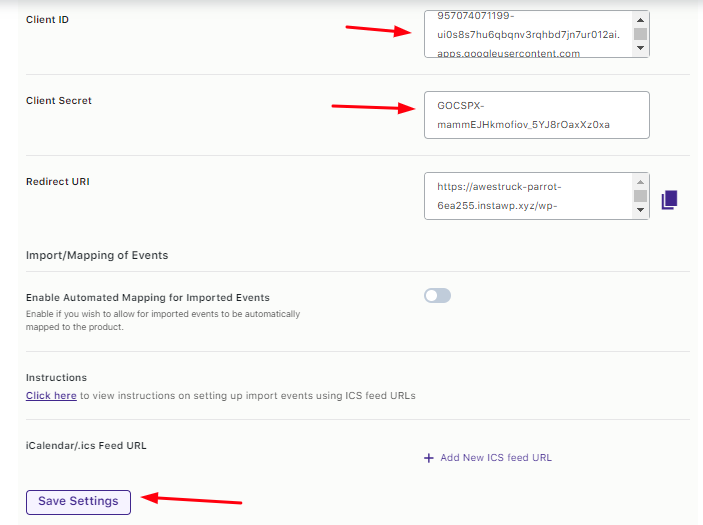
Go back to the Edit Product Page > Booking meta box > Integrations > Google Calendar.
Fill in the Client ID and Client Secret fields. Click on Save Settings.
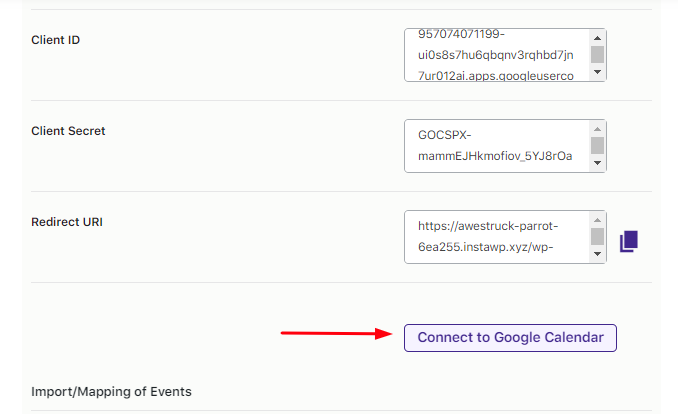
Click the Connect to Google Calendar button.
It will ask you to connect your Google account. Select it.
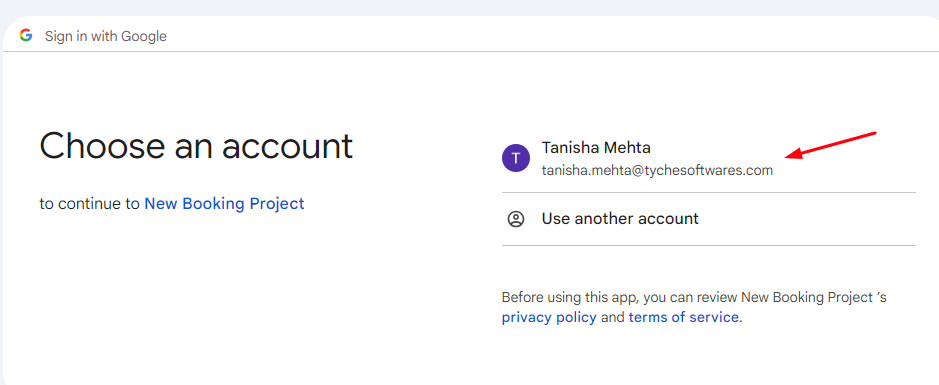
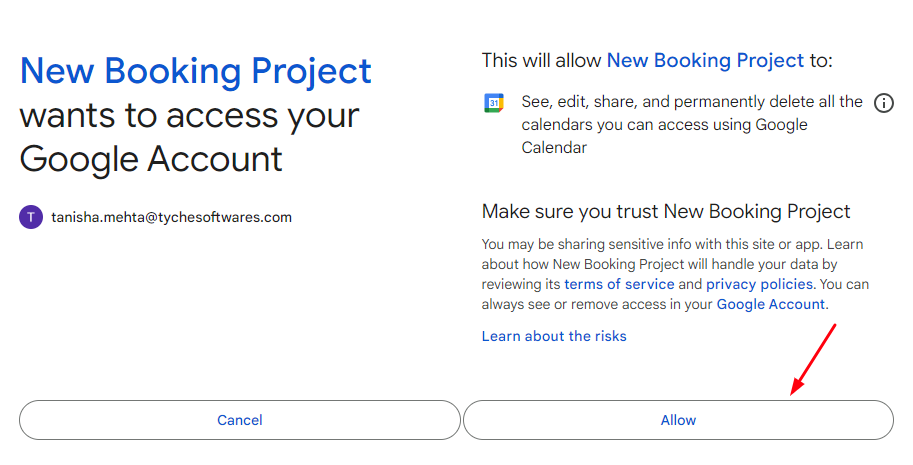
Allow the integration to take place.
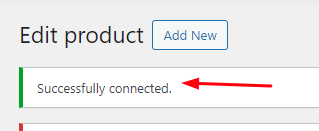
Once the integration is successful, you will see the following messages on the Edit product page:
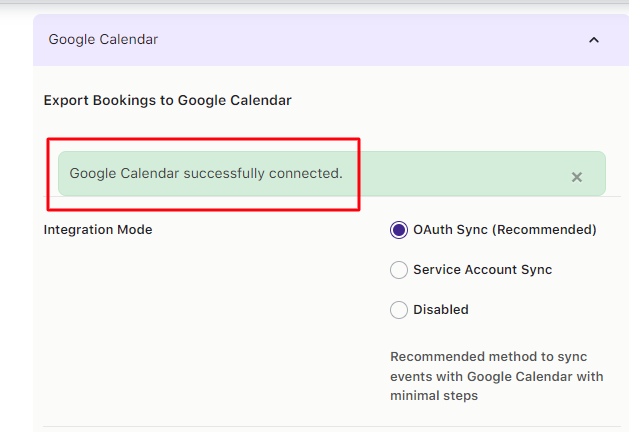
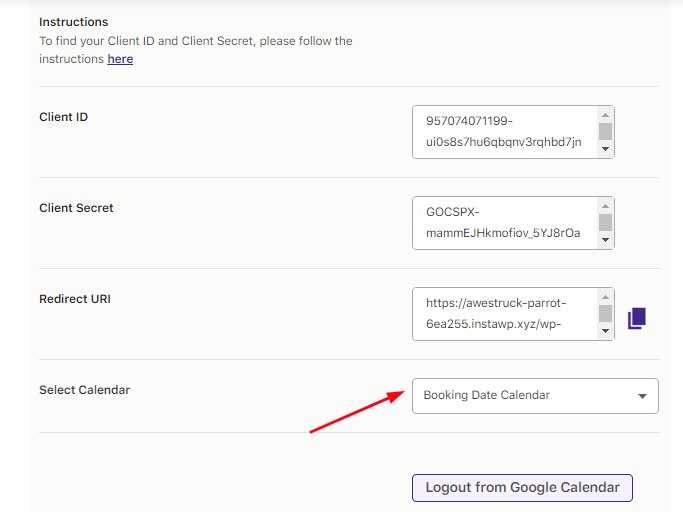
Select the Calendar where the new bookings will be added.
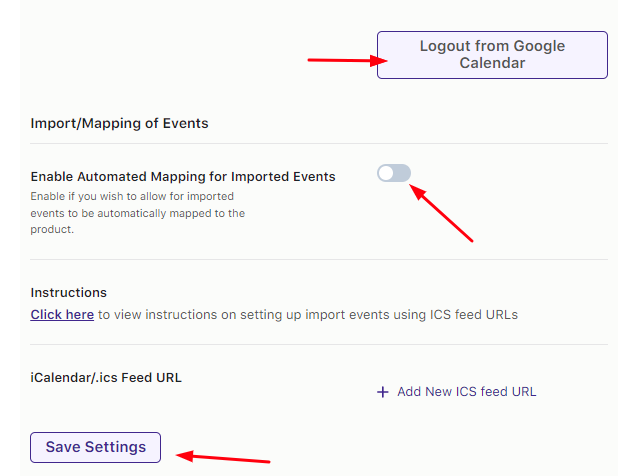
You can even enable automated mapping for events that will get imported.
For instance, you have integrated the product ‘Enrich Salon and Spa’ with Google Calendar at the product level.
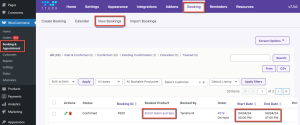
A customer places a booking for this salon. The booking date is 4th April 2024.
This booking can be seen by going to WooCommerce > Booking and Appointment > Booking > View Bookings as shown below:
This same event will get imported to your Google Calendar and will appear like this:
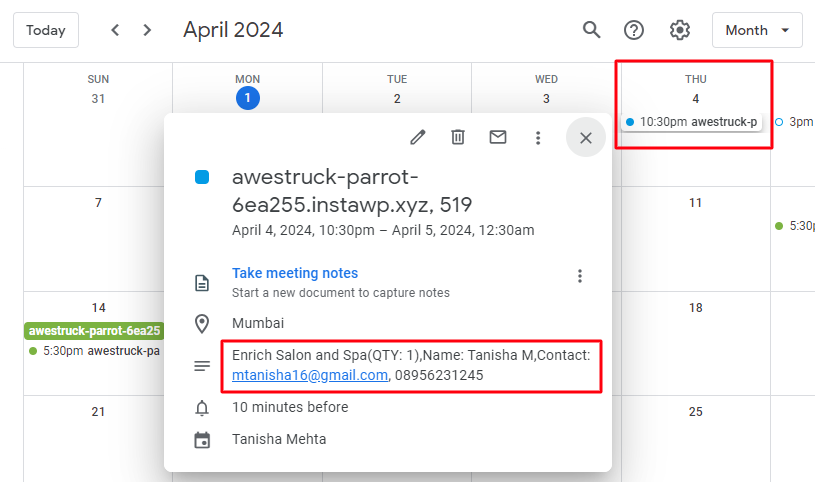
The booking event will show all the details such as Site Address, Booking ID, Booking Date, Booking Time, Name of the customer, and product name.
B. Integration via Service Account
To create a service account, click the Create Credentials > Service Account Key.

Add details such as the service account name and click the Create and Continue button.
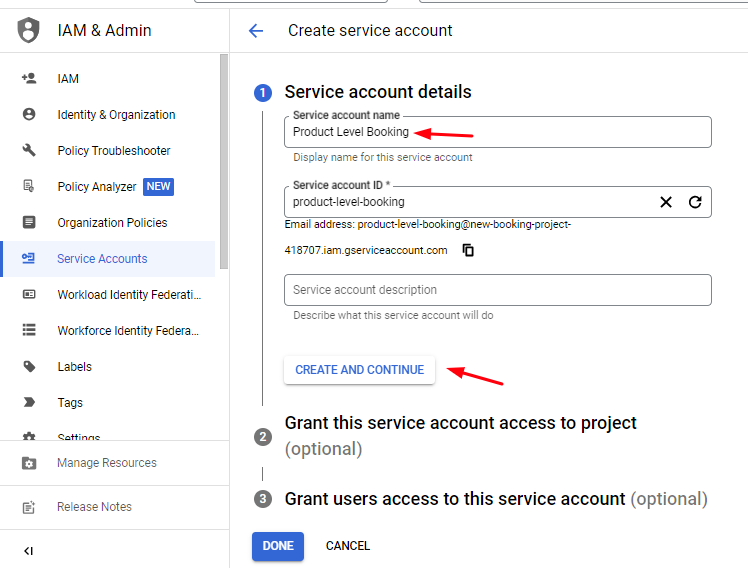
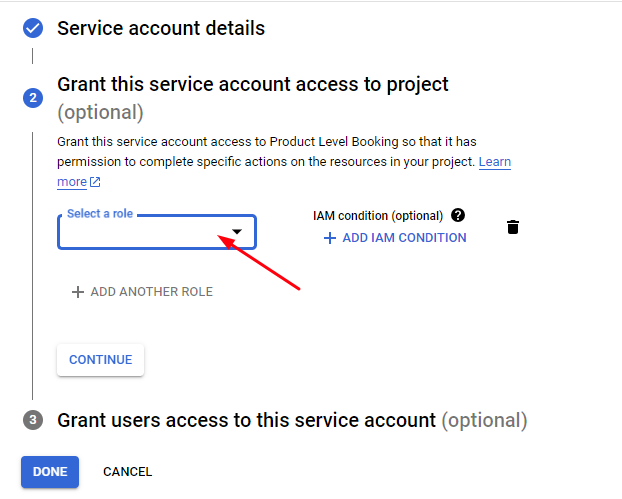
Move ahead and add a role. Select the dropdown.
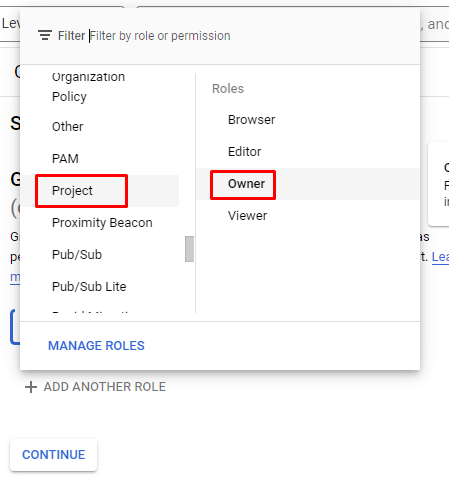
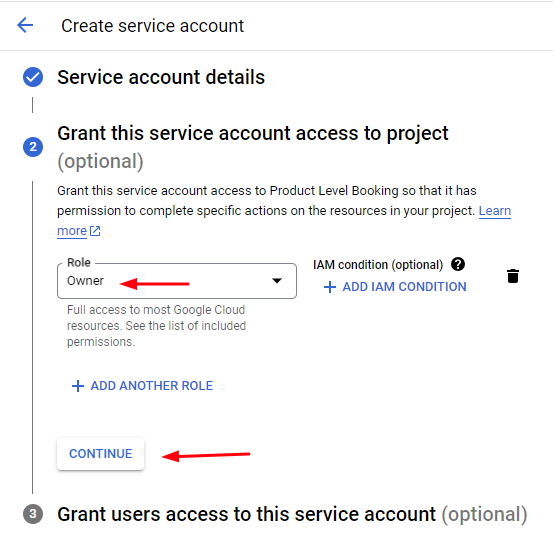
Go to Projects > Owner. Select that as your role.
Click the Continue button.
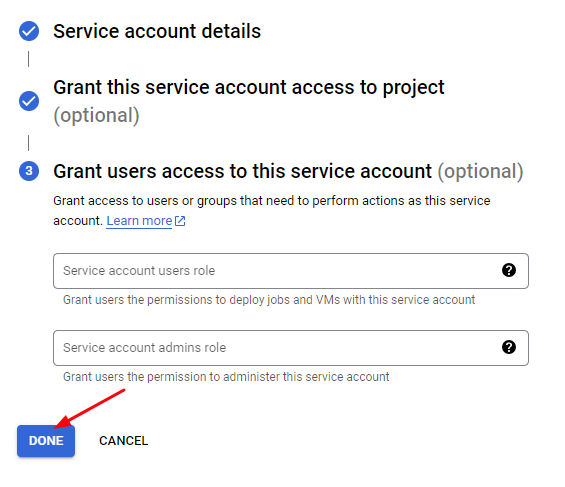
Grant users access by adding their email addresses. Once done, click the Done button.
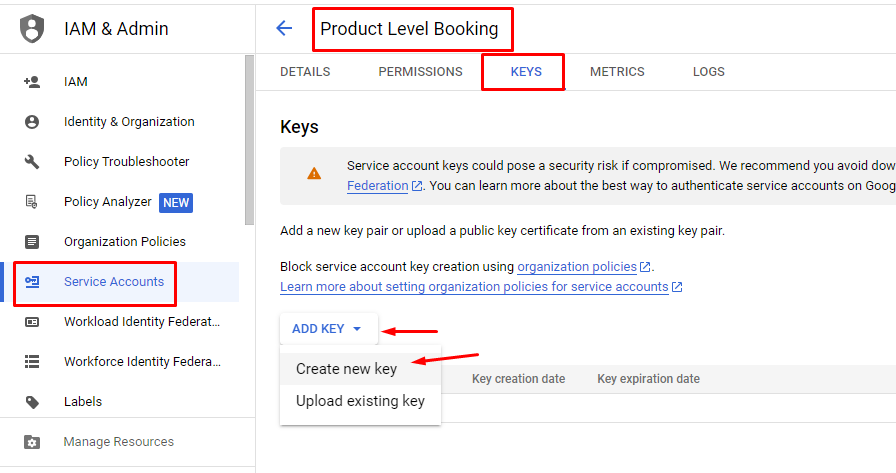
Go to the Service Accounts tab > Keys > Add Key.
Set the Key Type to P12 and click on Create.
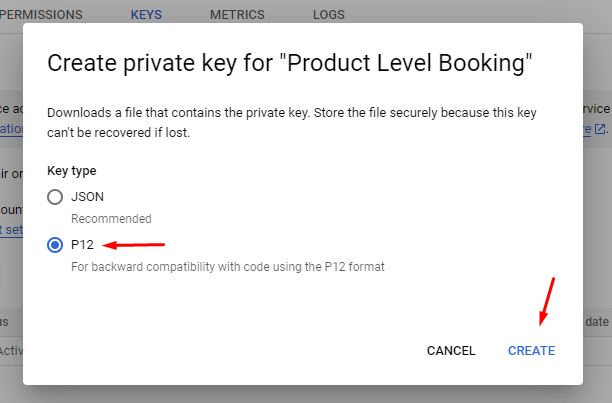
A file with extension .p12 will be downloaded and a pop-up will be displayed stating that the file has been saved on your device.

Please keep this file saved as this file needs to be uploaded to wp-content/plugins/woocommerce-booking/includes/gcal/key/ using the FTP client program.
This file is required as you will grant access to your Google Calendar account even if you are not online. So this file serves as a proof of your consent to access your Google calendar account.
Note: This file cannot be uploaded in any other way. If you do not have FTP access, ask the website admin to do it for you.
Copy the Key File Name (excluding the .p12 extension).

Then paste it into Booking > Google Calendar Sync Settings > Key File Name while creating the product.

To get the service account email address, go to Create Credentials > Manage Service Accounts. Here you will find details of Service accounts for your project as shown below.
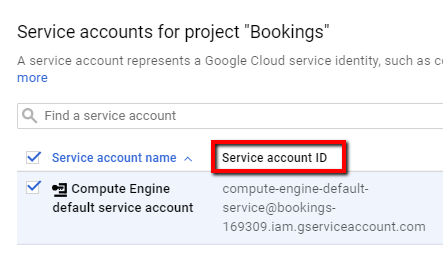
Copy the Service Account ID and save it in Booking > Google Calendar Sync Settings > Service Account Email Address field.

Open your Google Calendar by clicking this link: https://www.google.com/calendar/render.
Go to My Calendars > Create New Calendar.
Please try not to use the Primary Calendar.
Give the Calendar a name of your preference (e.g. Bookings & Appointments Details) and ensure that the Calendar Timezone matches the WordPress Timezone on your site.
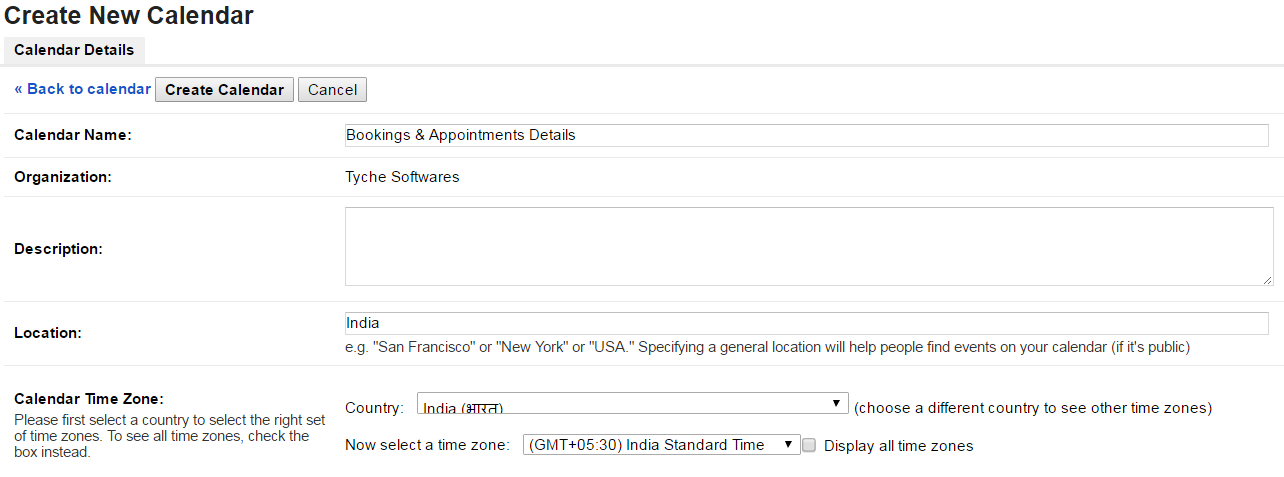
There will be a Share with specific people option below Timezone. You need to enter the email address entered in the Service Account Email Address field.
Set the “Permission Settings” to Make changes to events‘ and click Add Person. This will ensure that the application can create new events.
Lastly, click on Create Calendar.

Once the calendar is created, copy the Calendar ID from the Calendar Settings. Paste it by going to your Product’s Edit page > Booking and Appointment metabox > Google Calendar > Calendar to be used.

Since all the 3 fields have been filled, Publish your product. Then click the Test Connection link to test the connection.
If your connection is successful a message will be displayed below:

Note: If you get an error message, double-check your settings.
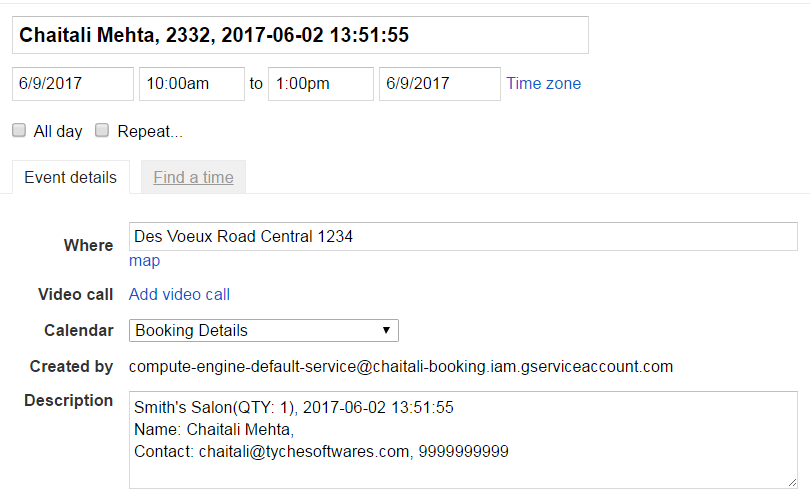
As the connection is successful it should add a current dated event in your calendar as shown below:

Once the settings are done, the plugin will export the bookings to the calendar as soon as an order is placed.

The event will contain the bookings and client details based on the merge tags inserted in Booking > Settings > Google Calendar Sync > General Settings.
In conclusion, exporting bookings automatically to Google Calendar at a product level helps the user keep records of each product booking in different calendars. It also ensures easier and faster access to all your bookings on suitable devices in different calendars.
The Booking and Appointment Plugin for WooCommerce also provides manual sync of the bookings to any other calendar using ICS files. By using ICS files we can manually export our bookings to external calendars.
