Adding and Viewing Resources
↑ Back to topThe Booking and Appointment Plugin for WooCommerce allows you to add and view resources. It lets you add a resource to multiple services and share its availability among all the products. The availability of resources will be global across all bookable products.
For instance, a Resource refers to a Beauty Salon expert who can be booked for several hours for a specific occasion, such as a birthday or Christmas party.
Moreover, this same resource can provide services for multiple nights for a destination wedding. Hence, the same resource can provide more than one service, but not at the same time.
Similarly, a Product (Party Hall) can be booked for different events at different times. The same hall can be booked for birthday parties, corporate events, marriages, etc., but not all at the same time.
*Note: Resources feature will only work with all the default product types provided by WooCommerce.
1. Add Resource Tab
↑ Back to topTo add or edit resources, go to WooCommerce > Booking and Appointment > Resources and then to the submenu Add Resource.

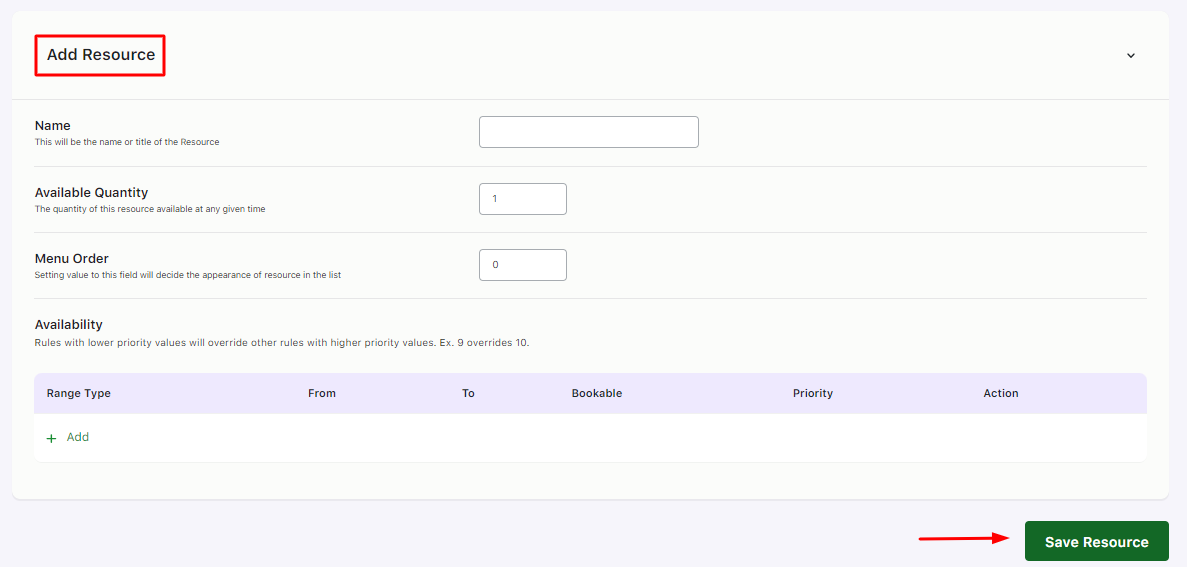
Adding resources at the global level
Here, you will find the following settings:
1) Name: Here, you will enter the Resource’s name, such as Nathan.
2) Available Quantity: The value added here is the resource quantity available at any given time. If 1 is entered here, it would mean that only 1 resource named Nathan can be added to a bookable product.
3) Menu Order: This decides where the Resource will appear in the Menu. For instance, if 2 is entered here, the Resource Nathan will appear 2nd in the Menu order.
4) Meeting Host: This setting appears when you enable the integration with Zoom Meetings. Here, you select the Zoom Meeting host from the dropdown. This means the online bookable product with this particular resource will be assigned to the selected host to start the Zoom meeting.
5) Availability: This setting lets you configure the resource’s availability based on different ranges.
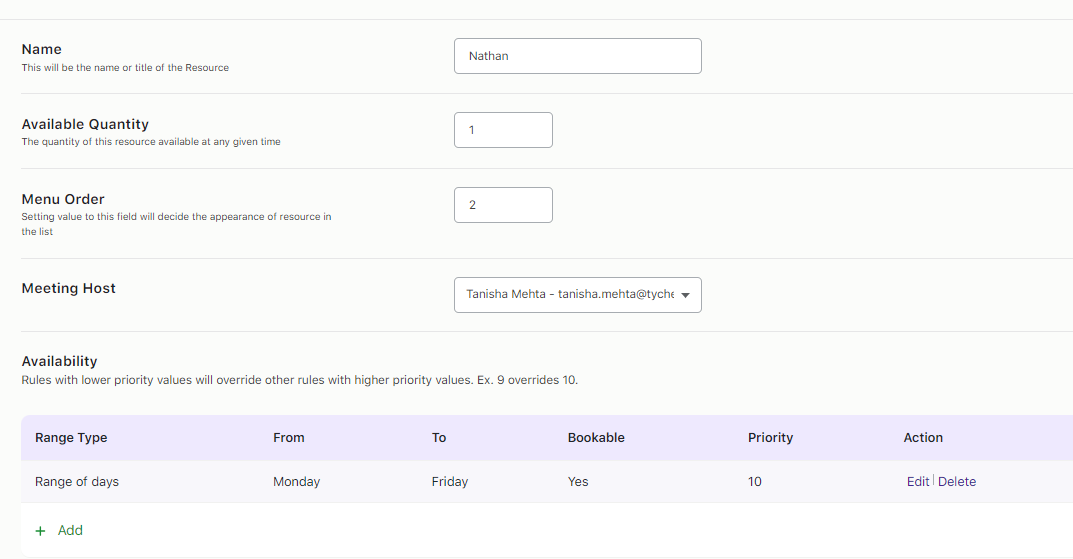
Click on the Publish button once you’re done. Your resource is ready to be used.
2. View Resource Tab
↑ Back to topSimilarly, you can add several resources according to your requirements.
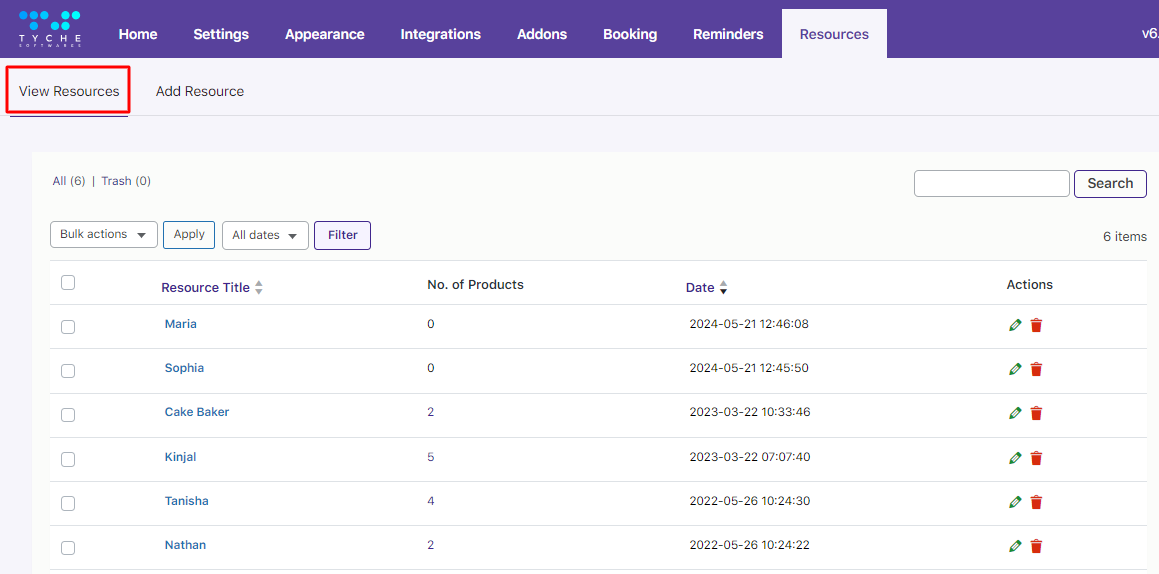
The View Resource Page will thus look like this:
a) Types of Resources
The ‘All’ Page shows all the resources regardless of whether products use them.
The ‘Trash’ page shows those resources which were deleted:

b) Search Box
You can use the Search Resource section to look for a specific resource.
Add the Resource’s name you are looking and click the Search button:

c) Bulk Actions
You can carry out Bulk Actions such as moving Resources to Trash.
Simply select the resources and choose the Trash option from the dropdown. Then, click the Apply button to apply it to the selected resources.

Press the Yes button.
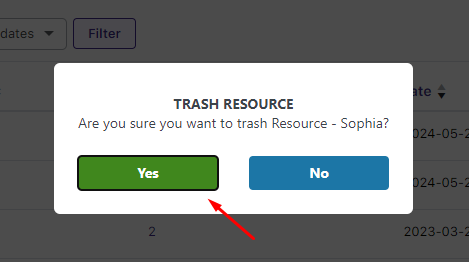
You will get the following success message, and the resource will now moved to the Trash Page:
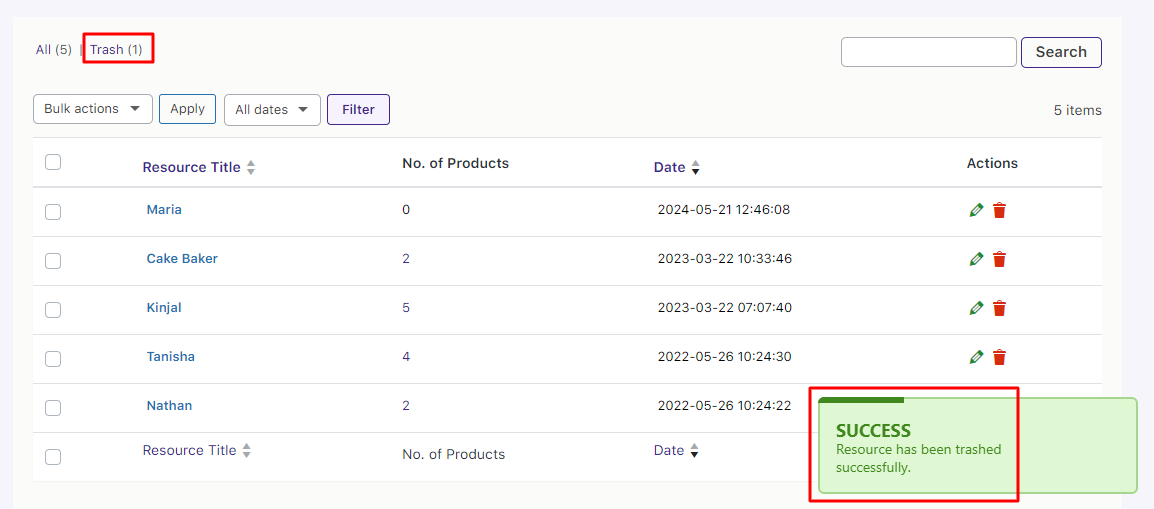
Here’s the Resource on the Trash page:

i) Under ‘Trash’ Resources Page
You can carry out bulk actions such as restoring or permanently deleting the resources.

If you choose to restore the resource, the following message will be displayed:
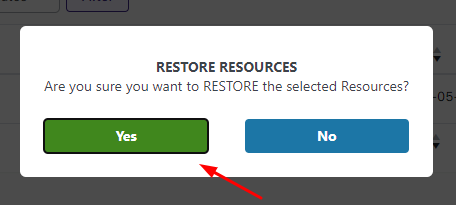
Clicking the Yes button will move the resource to the ‘All’ resources page.
d) Dates filter
You can also Filter your resources by selecting the specific dates and clicking the Filter button.

e) Resource Table
Lastly, you have the ‘Resource Table’ indicating the following:
i) Resource Title
The names given to the Resources will appear in this column.
You can use the up arrow to sort them in the ascending order:

You can use the down arrow to sort them into descending order:

ii) Number of Products
Here, you will find the ‘Number of products’ that are assigned to a specific resource.
For instance, the resource Tanisha has been assigned to 4 products.
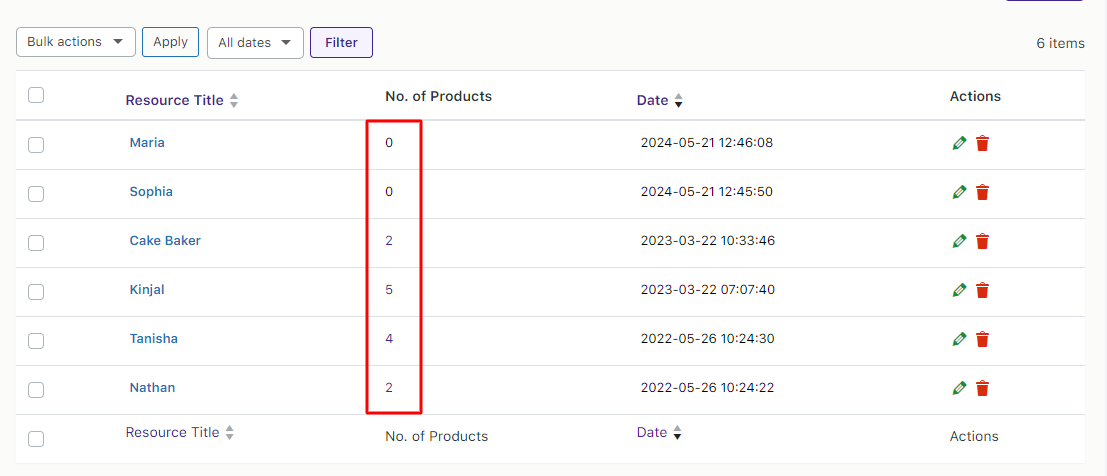
When you click this number, it will show you the list of products that have this resource assigned to:
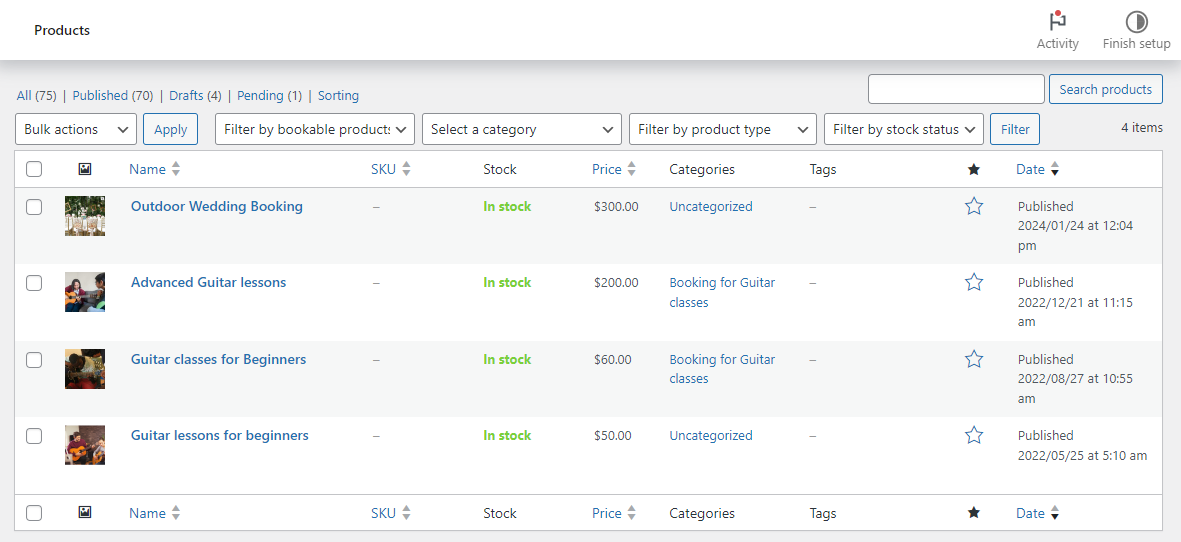
iii) Date
This indicates the date when the resource was created.
You can use the up arrow to sort them in the ascending order:

You can use the down arrow to sort them into descending order:

iv) Actions
Using this column, you can either Edit or Delete a Resource.
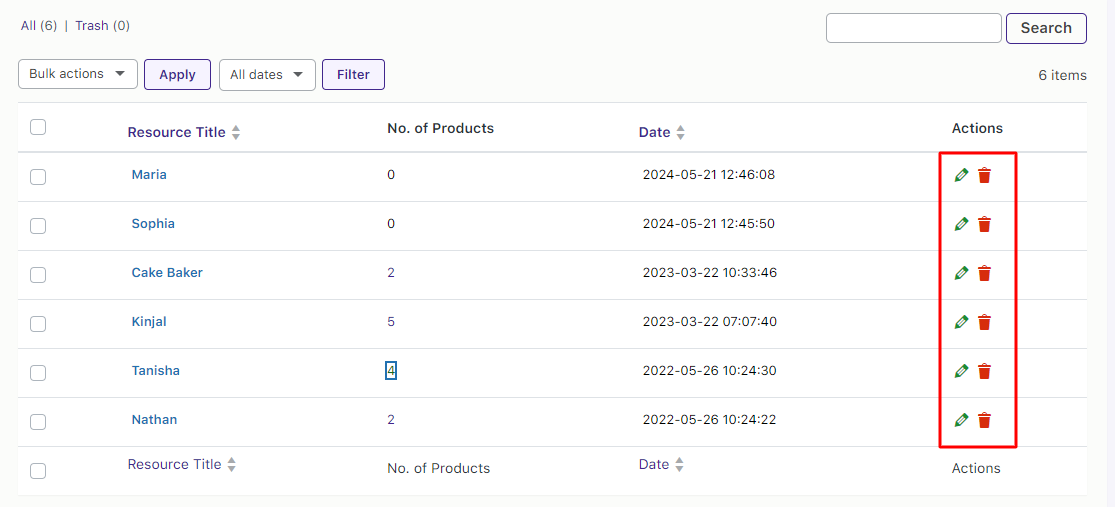
Clicking the Pencil icon of a particular resource will take you to its Edit Page:
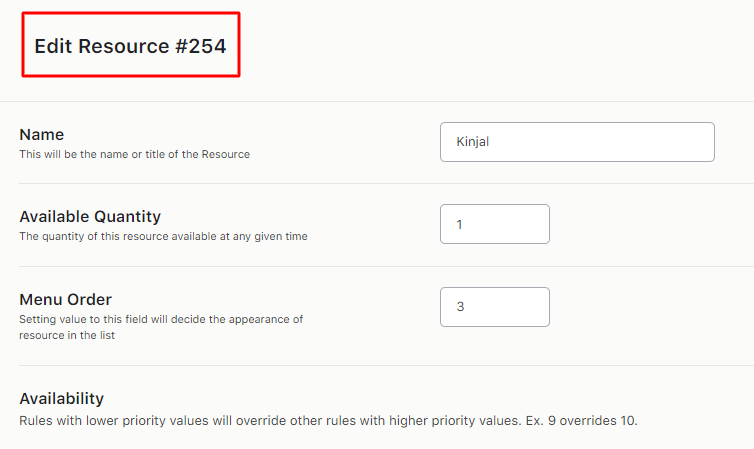
Clicking the Bin icon will move the resource to the Trash Page:

In this way, you can add a resource for your bookable products using our plugin.
Setting the Availability of Resources
↑ Back to topLet’s explore the Resources page and understand how to make your resources available for booking.
Go to WooCommerce > Booking and Appointment > Resources > View Resources.
The different resources listed on this page will look like this:
Resources page listing all the resources
Click the resource name or the pencil icon to edit it.
Let’s set a Resource called ‘Kinjal’ and add different settings for it.
The Edit Resource page for Kinjal will look as shown below:
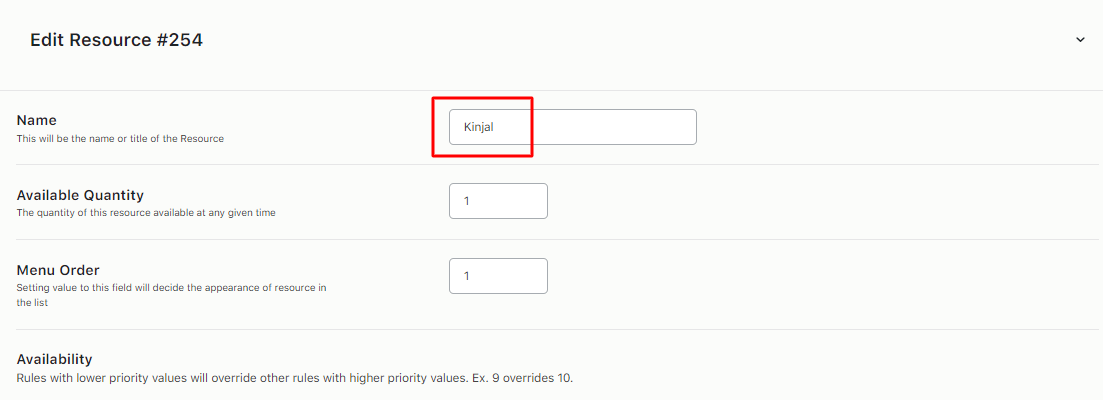
Resource Edit page appearance
Here, you can set the total availability for the resource. Moreover, you can add different settings in the Range Type.
Since there are 4 different range types, you can set her availability as per date range, months, weeks, or days.
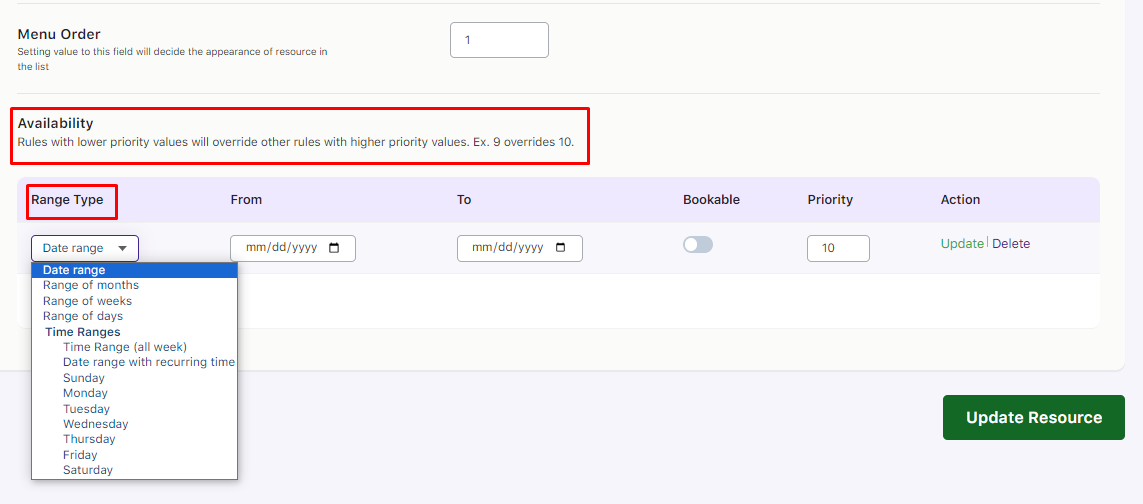
Resource Edit page options
You can enable the Bookable option to show Kinjal’s availability.
You can keep it disabled to show that Kinjal is unavailable on selected dates in the booking calendar.
Similarly, you can add holidays for her to show when she will be available for the services.
These resource settings will reflect on all products in the shop.
Let us understand all 4 Range types with examples:
1. Date Range
↑ Back to topSelect the range of dates from 15th February to 18th February 2018 when Kinjal will be unavailable to provide the service.
Hence, the bookable option is kept disabled and priority is set to 10.

Adding date range for the resource
Here’s how it will reflect on the front end of the product on the booking calendar.

The dates are disabled on the booking calendar
As you can see above, because Kinjal was set to not provide services from 15th February to 18th February 2018, these dates show disabled in the booking calendar.
2. Range of months
↑ Back to topLet’s select the Range type as a Range of months and add February and March as bookable for Kinjal. Its priority is set to 9.

Range of months setting for the resource
*Note: The resource setting for the range type with the lowest priority set will be considered first. For example, 1 will be given the highest priority while 10 will get the least.
Since the priority of the Range of months is lower than that of the date range, the settings for the range of months will be considered.
This means all the dates for February and March will be shown available for Kinjal as seen here:

All dates for February is shown as available
In the first example, Kinjal was unavailable from 15th February to 18th February 2018. However, here she is shown as available because of the priority settings.
3. Range of weeks
↑ Back to topIn the Range of weeks, you can either assign the full week for availability or make it disabled for booking, by enabling or disabling the bookable option.
Let’s make the resource Kinjal non-bookable for Week 8 of the year. Let’s set the priority to 8 as shown below:
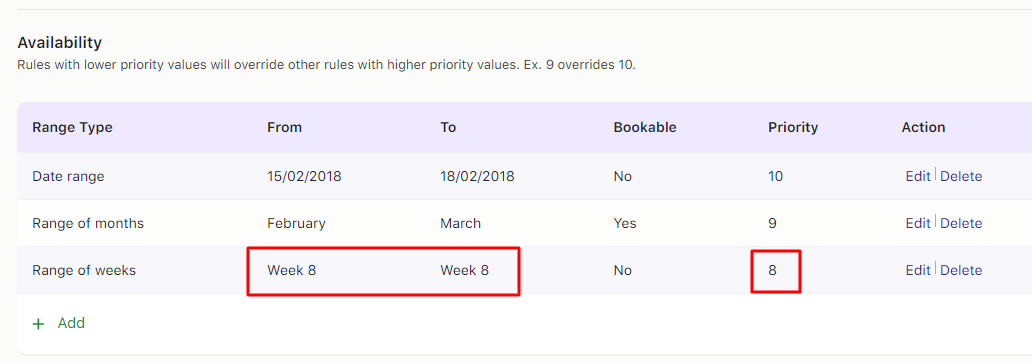
Adding details to the Range of weeks
Since the priority of the Range of weeks is lower than the Date range and Range of months, the settings of the Range of weeks will be considered.
This means Week 8 of the year which is from 19th February to 25th February 2018 will be shown unavailable to book for Kinjal as shown below:

Week 8 of the year is shown disabled on the calendar
4. Range of days
↑ Back to topIn the Range of days, you can have specific days of the week available or non-bookable.
For instance, in this case, it is set to all Tuesdays and Wednesdays unavailable for the resource Kinjal.
The priority settings are set to 7.
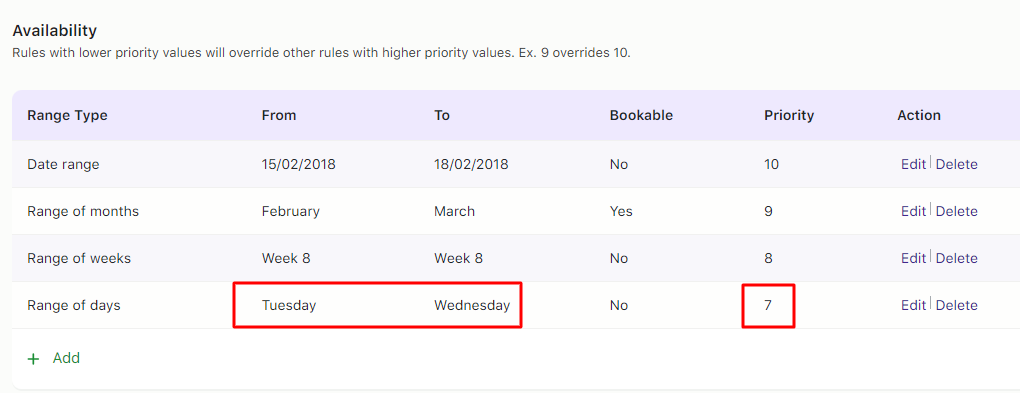
Range of days settings added for the resource
Here’s how it will reflect on the front end:
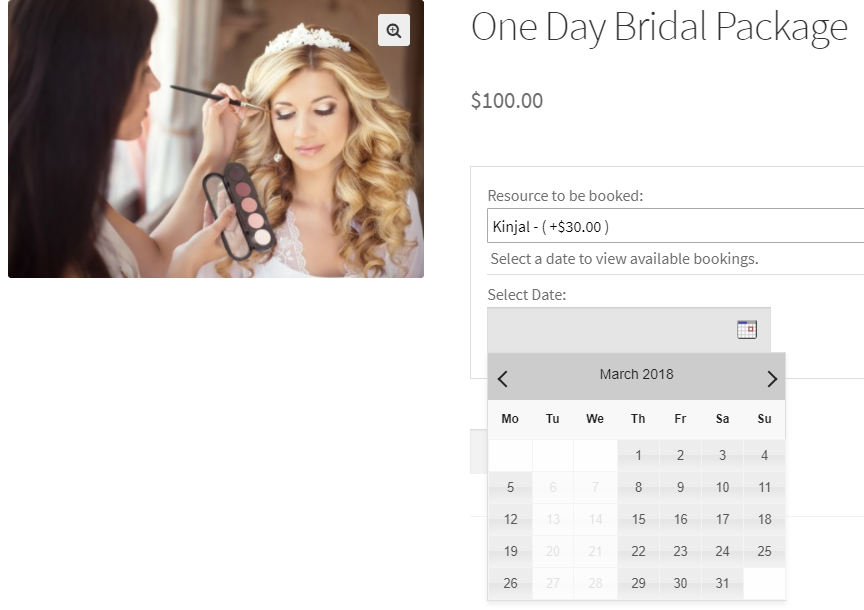
Tuesdays and Wednesdays disabled on the booking calendar
The above screenshot shows that Kinjal is unavailable for all Tuesdays and Wednesdays for this service.
Despite other settings, Range by days was considered because its priority was the lowest.
5. Time Ranges
↑ Back to topUnder Time Ranges you will be able to set up your Resources according to the:
- Time Ranges (all weeks)
- Date Range with recurring time
- Singular weekdays
With the time range options mentioned above, you can make your resources available at any preferred time. Each product can have various time slots, and a product can have multiple resources available. However, each resource might have its unique availability.
For example, let’s say that your product ‘Guitar lessons’ has weekend timeslots from 2 pm to 6 pm. However, your Resource A is only available for weekdays from 5 pm to 6 pm. Hence, it is advisable to have availability of resources based on time.
Note that this setting can be applied to the plugin’s various booking types.
To demonstrate, let’s apply this setting to the following booking types:
Now, let’s have a look at our three cases of this setting:
Case 1: Time Ranges (all week) with Booking type ‘Dates & Fixed time’
Let’s say that you offer ‘Guitar lessons for beginners.’ For this, you have added 1-hour time slots from 9 am to 6 pm daily.
Your resources are two teachers as follows:
Resource A: Priyanka
↑ Back to top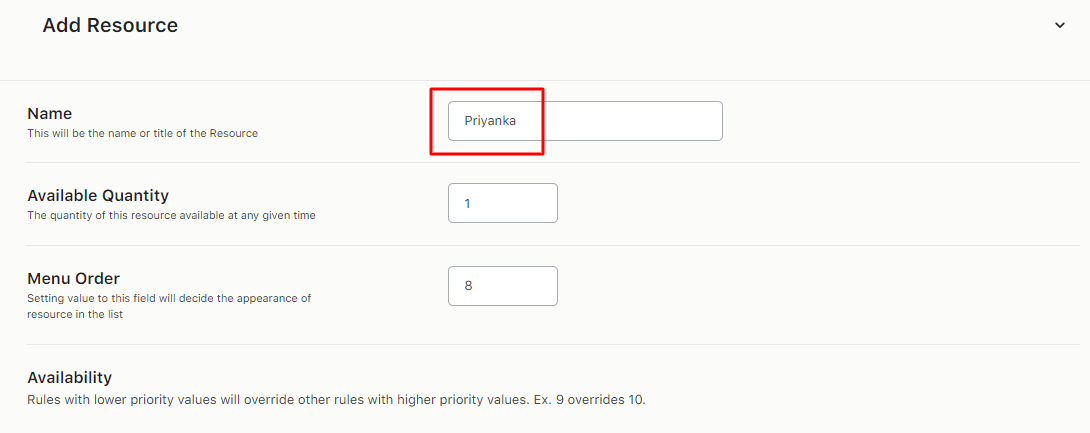
Let’s say that this teacher is available only from 10 am to 12 pm. Thus when you add this resource, you will have to ensure that the resource is non-bookable from 9 am to 10 am and from 12 pm to 6 pm.
Let’s choose ‘Range type’ as Time Ranges (all week) and create two non-bookable ranges as shown below:

Resource B: Kinjal
↑ Back to topSimilarly, let’s say that this teacher is available only from 9 am to 11 am and 12 pm to 6 pm.
Here, we will have to ensure that this resource is non-bookable from 11 am to 12 pm as shown below:

Frontend view:
Here’s how the customer gets to see the settings for each resource.
If the customer chooses Resource A, they will get the booking calendar showing all the dates.
However, the time ranges will only show the 10 am to 12 pm time slots.
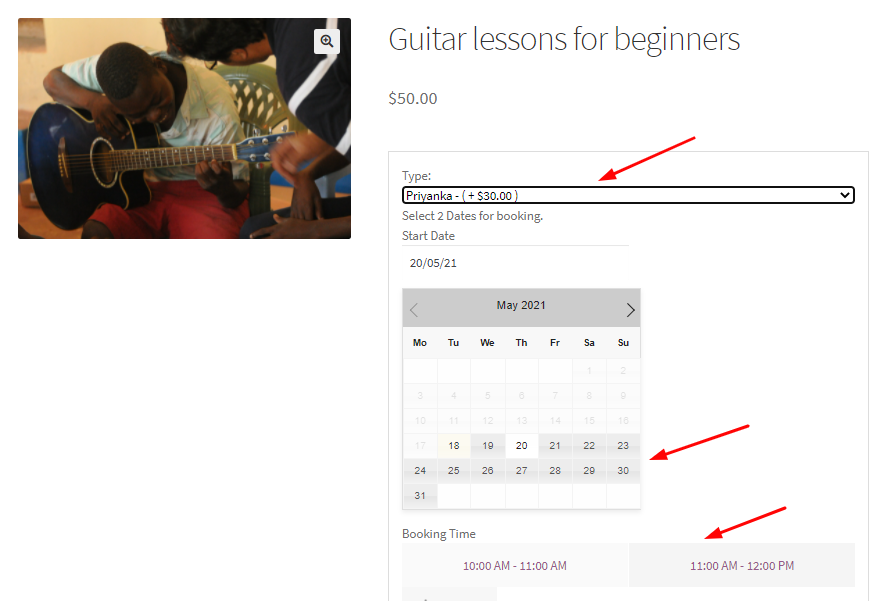
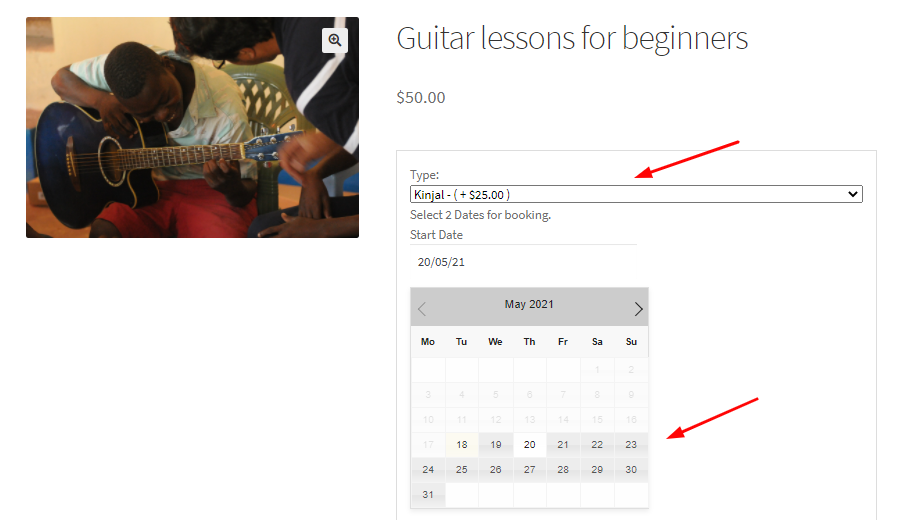
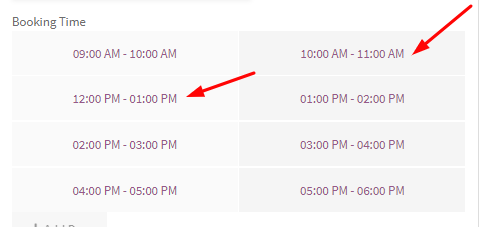
If your customer chooses Resource B, they will get the booking calendar displaying all the dates.
However, the time ranges will only show time slots from 9 am to 11 am and 12 pm to 6 pm.
Case 2: ‘Date range with recurring time’ for Booking type ‘Duration based Time’
Let’s continue with the product ‘Guitar lessons for beginners’.
For this, you have added 1-hour time slots from 9 am to 2 pm every Monday, Tuesday, Wednesday, and Thursday.
You have configured these settings by choosing the Booking Type ‘ Duration based time’ at the product level.
If your customer wishes, they can take more lessons from you by choosing more hours. Your resources are two teachers as follows:
Resource A: Kinjal
↑ Back to topLet’s say that this teacher is available only from 9 am to 11 am and 12 pm to 2 pm between the date range of 20th May 2021 to 30th May 2021.
Thus when you add this resource, you have to ensure that the resource is non-bookable from the date range 20th May 2021 to 30th May 2021 and the time range of 11 am to 12 am.
That’s why under ‘Range type’ you will choose ‘Date range with recurring time’ and fill it in as shown below:

Resource B: Priyanka
↑ Back to topSimilarly, let’s say that this teacher is available only from the recurring time of 12 pm to 2 pm between the date range of 20th May 2021 to 30th May 2021.
Here, you need to ensure that this resource is non-bookable from 9 am to 12 pm between the date range of 20th May 2021 to 30th May 2021 as shown below:

Frontend view:
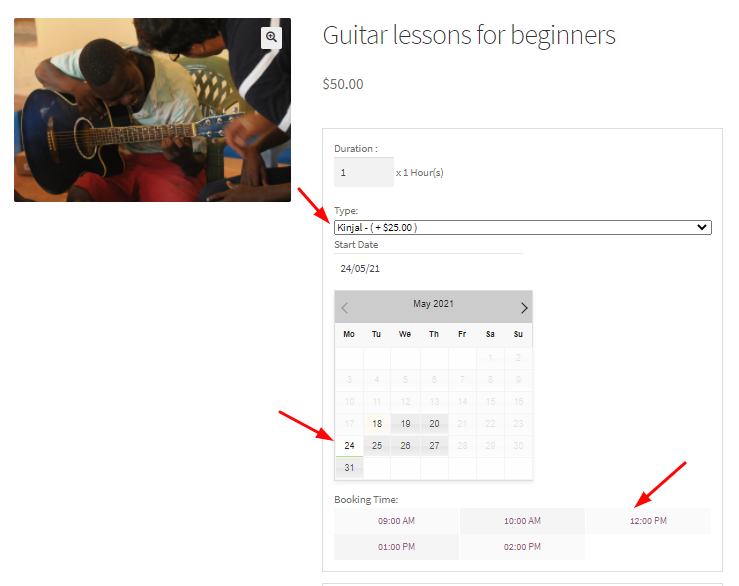
If the customer chooses Resource A- Kinjal, their booking calendar will show available dates falling on Monday, Tuesday, Wednesday, and Thursday from 20th May to 30th May 2021.
Under these dates, the available booking time slots will not display 11 am to 12 pm timeslots.
Thus the time slots that would be displayed are 9 am, 10 am, 12 pm, 1 pm, and 2 pm as shown below:
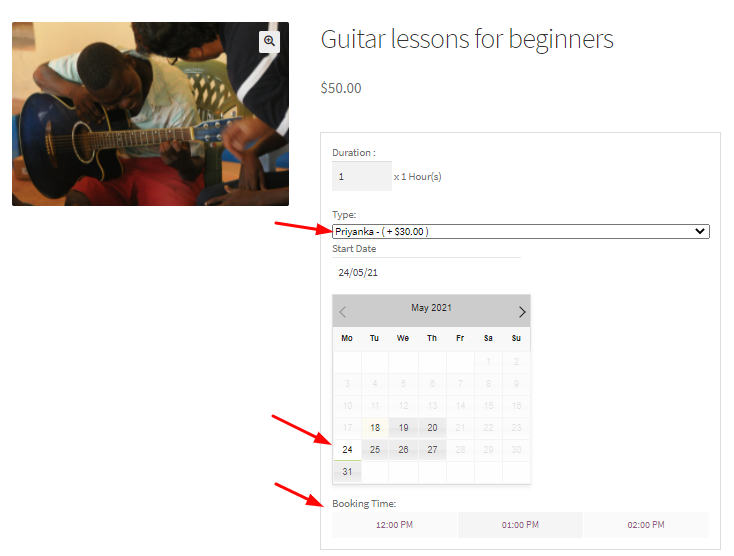
If your customer chooses to go with Resource B- Priyanka, their booking calendar will also show available dates falling on Monday, Tuesday, Wednesday, and Thursday from 20th May to 30th May 2021.
Under these dates, the available booking time slots would be 12 pm, 1 pm, and 2 pm since we had made the time slots from 9 am to 12 pm unbookable. It would appear as such on the front end:
Case 3: Singular weekdays with the Booking type ‘Fixed Time’
Continuing with our Guitar lessons example, let’s say that you offer these lessons for a ‘Fixed time’ of one-hour slots from 9 am to 2 pm on Fridays, Saturdays, and Sundays.
For this, you have one resource, i.e., Priyanka. However, Priyanka is only available to provide ‘Guitar lessons for beginners’ on all three days except for Fridays from 9 am to 12 pm.
To configure this out, under Time Ranges, select Fridays and make the time range 9 am to 12 am unbookable as shown below:

When customers choose to book these guitar lessons, they will see one resource person on the product page, i.e., Priyanka.
The available booking dates in the Booking calendar will be Fridays, Saturdays, and Sundays.
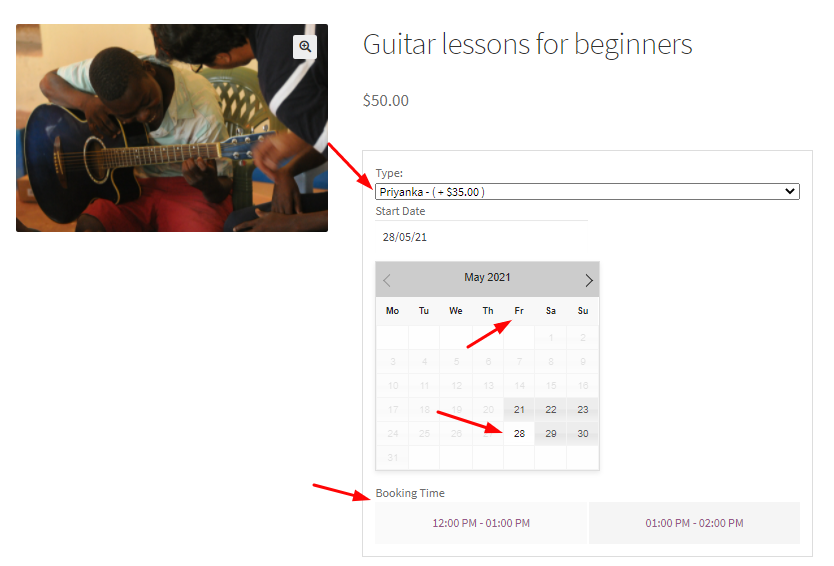
When the customer chooses a date that falls on Friday, then they will only get two slots, i.e, 12 pm to 1 pm slot and 1 pm to 2 pm slot as shown below:
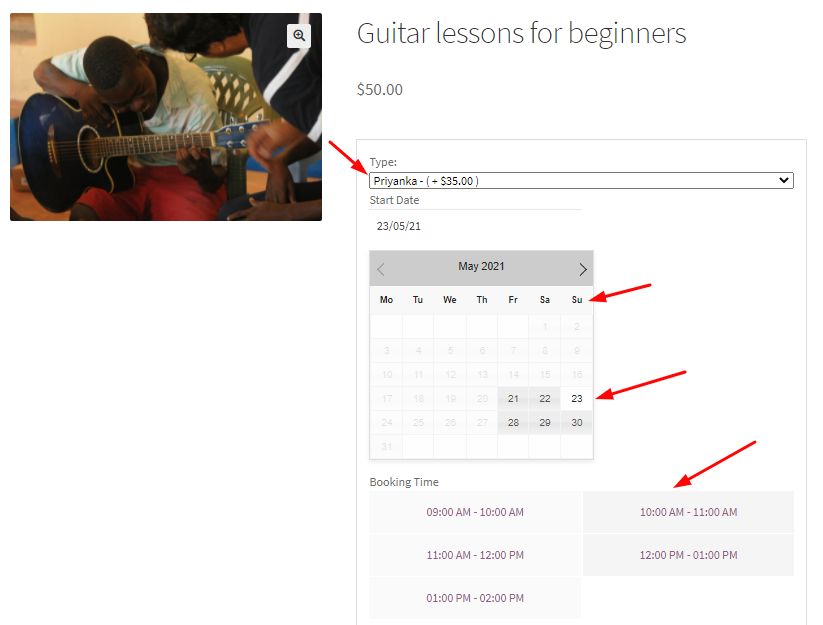
When the customer selects any day besides Friday, then the Resource’s booking time slots will be all the time slots from 9 am to 2 pm.
This means that on Saturdays and Sundays, Priyanka will be available to give lessons from 9 am to 12 pm as shown below:
Thus, using the Booking and Appointment Plugin for WooCommerce, you can customize the availability of your Resources without any hassle.
Assigning Resources to a product
↑ Back to top
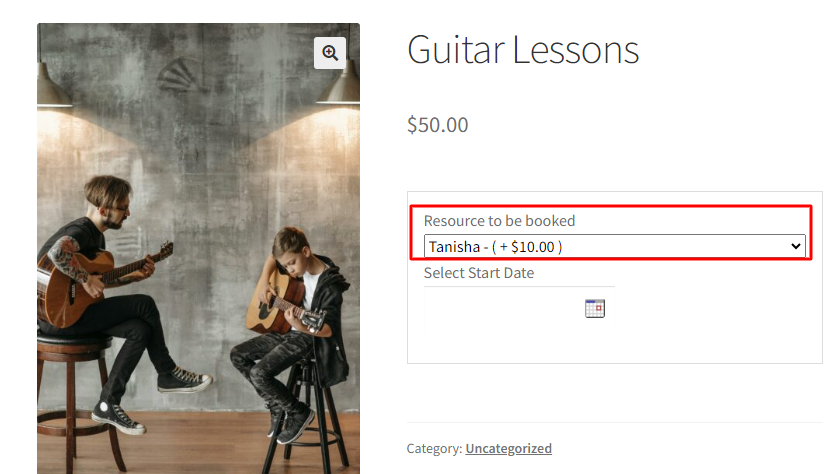
To use the Resource feature, you have to assign them to your bookable products.
For this, go to the Products page and select a product.
On the Edit Product page, under the Booking and Appointment meta box, find the Resources tab.
Enable the Resource Module by turning it green.
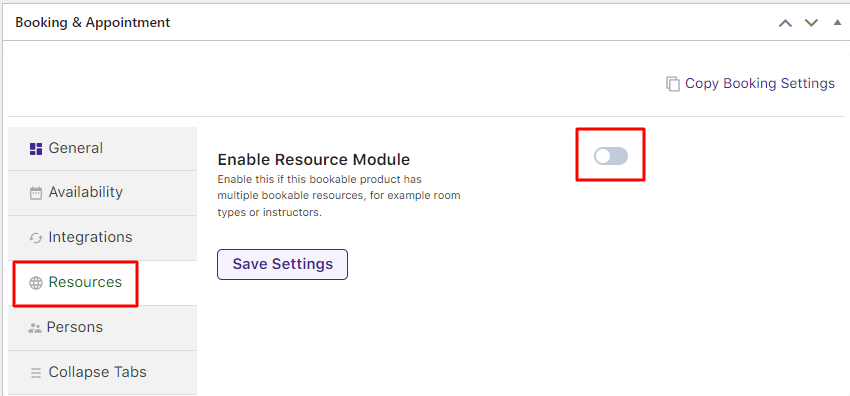
Here’s how the module will look like:
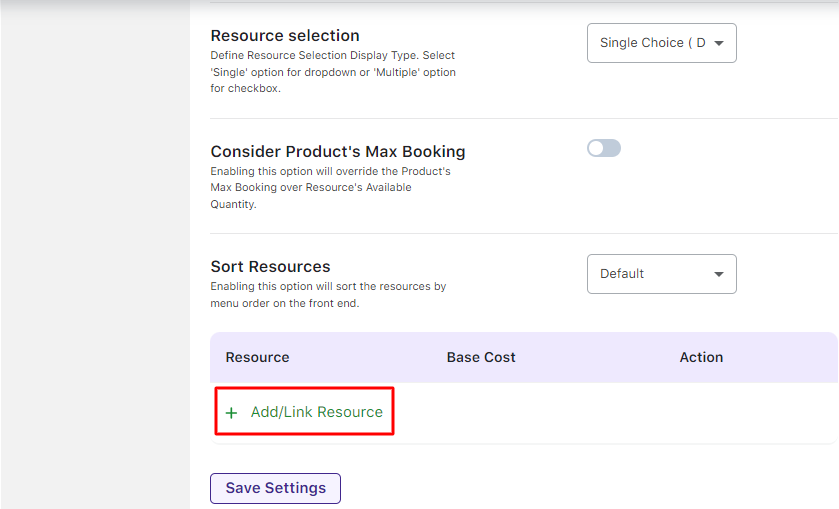
To assign a resource to a product, go to the Resource table. Click the Add/ Link Resource.
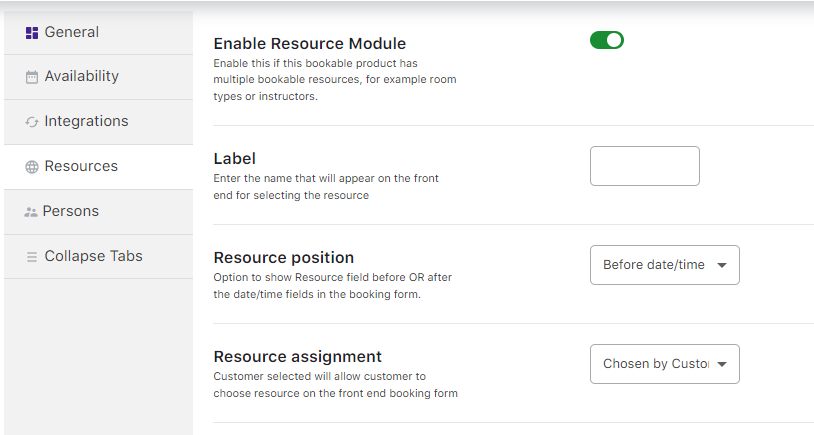
Under the Resource Tab, you will find the following settings:
1. Assigning Resources to a product
↑ Back to topThe Resource Table is where you can add an already-created resource.
Also, you can directly create a new resource by selecting the ‘Add new resource’ option from the dropdown. It will then ask you to give a name to your resource and configure its availability.
You can add it to the service by clicking the ‘Add/link Resource’ button.
Under the Resource Title, you can click the dropdown for the New Resource. You will be displayed all of your resources.
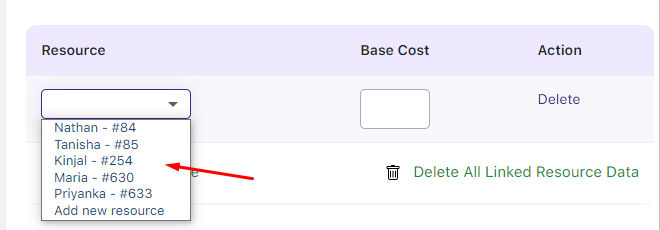
Choose the ones you wish to add:
After adding them, enter the base cost for these resources.
The base cost is the cost for the resource which will be added to the overall cost of the bookable product.
For example, the bookable product price is $100 and the base cost is $20. By adding the resource the cost will be $120.
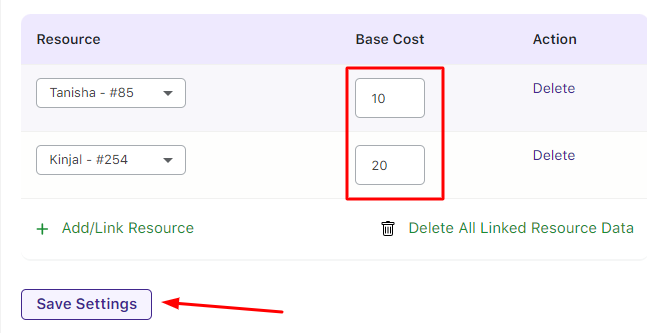
After clicking the Save Changes button, your resources will be assigned to the bookable product.
2. Label
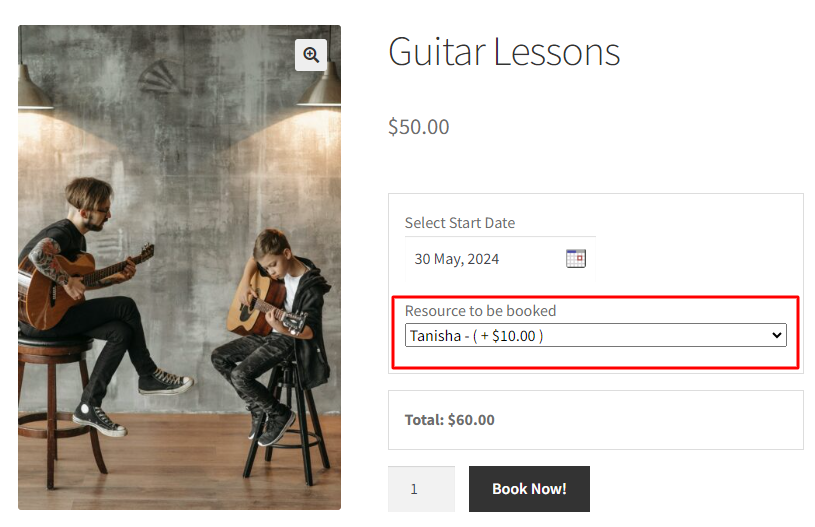
↑ Back to topYou can set the label for the Resources Dropdown that will appear on the front-end product page.

For instance, you can label it as ‘Resource to be booked’
3. Resource position
↑ Back to topThis setting lets you decide whether the Resource will be displayed before the date/time field or after.
When the ‘Before date/time fields’ is chosen, here’s how the Resource will be shown:
When the ‘After date/time fields’ is chosen, here’s how the Resource will be displayed after choosing the date and time:
4. Resources Assignment
↑ Back to topYou can allow your customer to select the available resource or the resource can automatically get assigned to the service when it is booked.

If you go with ‘Automatically Assigned’, then the customers will not get a choice to select the resource.
They will be automatically applied based on the resource availability allotted to them:
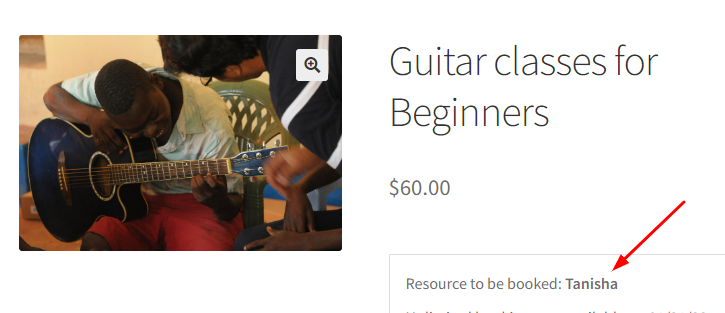
When you go with ‘Chosen by Customer’, the choice for the resources will be given to them:
5. Resources Selection Type
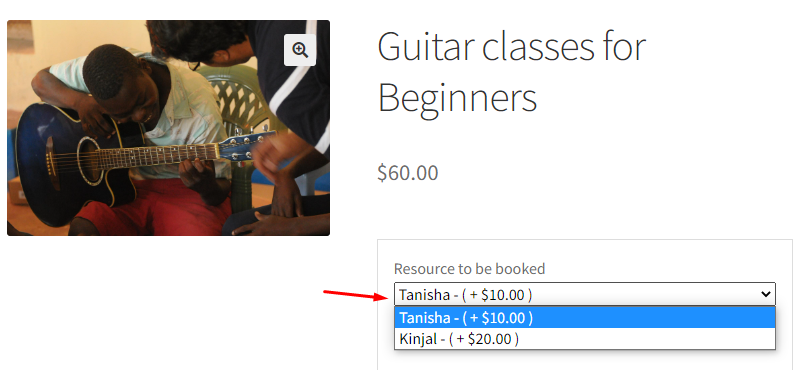
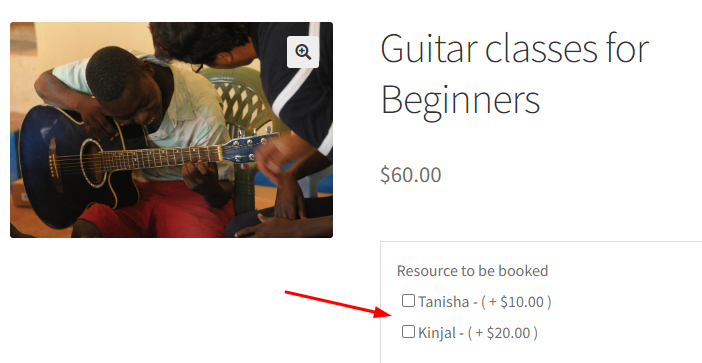
↑ Back to topThis setting lets you display the resources as dropdown or checkbox options for the customers.

If you choose Single Choice (Dropdown), the customer gets the resources in this manner:

When you choose Multiple Choice (Checkbox), then the customers will get to select the resources as shown here on the front end:
6. Consider Product’s Max Booking
↑ Back to topEnabling this setting will ensure that the Product’s maximum booking is considered over the Resource’s available quantity.

For instance, you own a cake business. You have 2 products with the same resource. You wish to consider the product’s maximum booking for one product while not for the other.
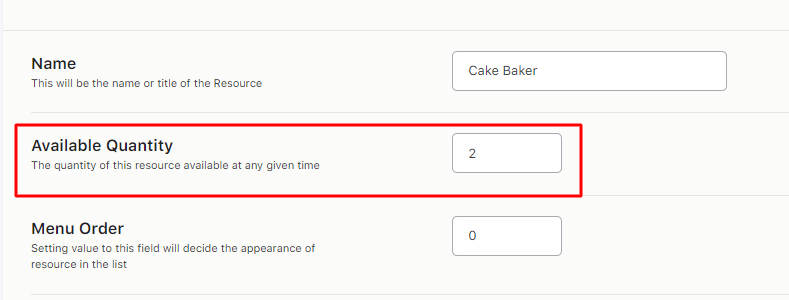
You can create your setup as such: Your resource is ‘Cake Baker’. You can set its quantity availability to 2.
To set the Resource’s available quantity, go to WooCommerce > Booking and Appointment > Resources > View Resources > Select your Resource > Available Quantity as shown here:
This resource will now be used for your two products.
The first product is ‘Wedding Cake’.
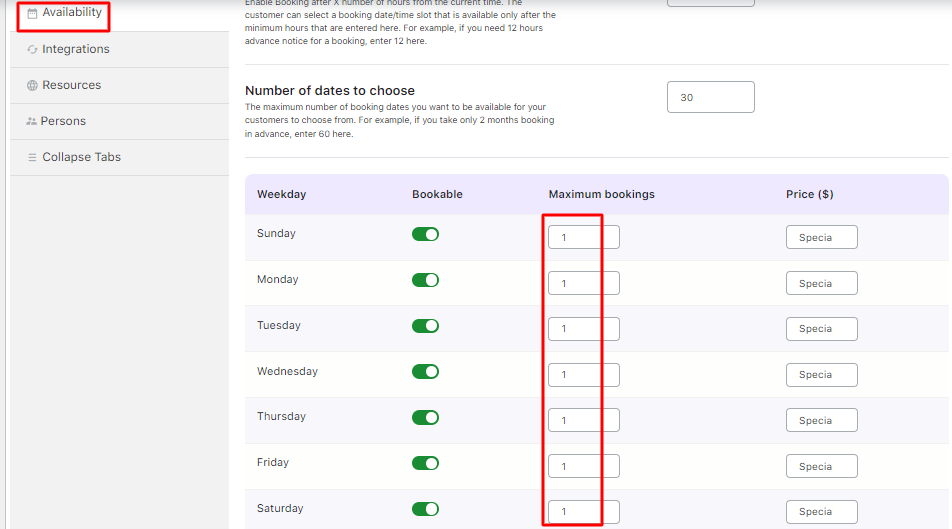
The selected product’s maximum booking can be set by going to the Availability Tab > Maximum bookings.
Since it’s a wedding cake, preparing it will take time. Your resource may only be able to prepare one of them every day.
So, setting the maximum bookings for each day as 1 makes sense.
Next, go to the Resource tab, add your Resource, and enable the ‘Consider Product’s Max Booking’.
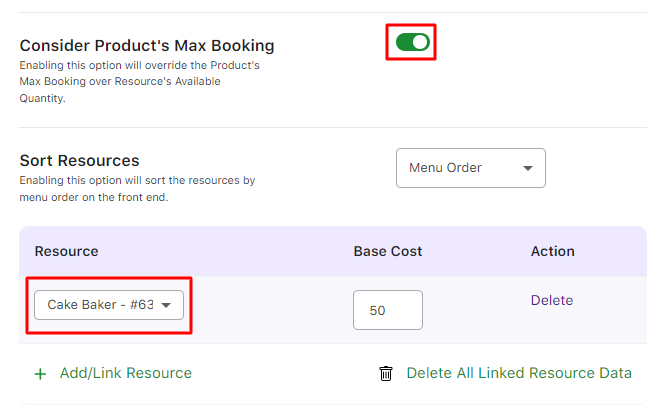
In this case, despite your resource’s quantity being 2, your product’s max booking which is 1 will be considered.
Let’s say a customer has decided to go with this product and booked it for 18th April 2023. Here, only 1 booking will be available as shown here:
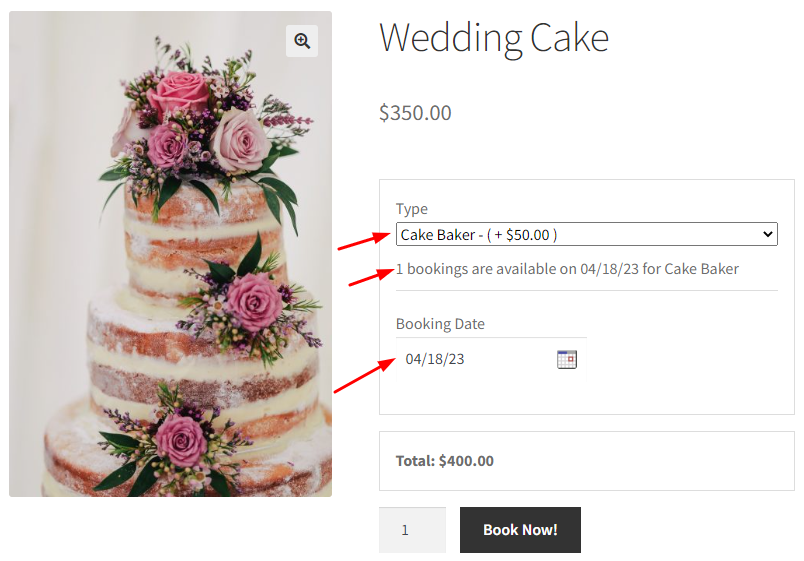
After this booking is completed, if another customer wishes to book this same product for 18th April 2023, they will not be able to do it with the “Cake Baker resource” because it will no longer be available.
This is because the product’s max capacity 1 was completed with the previous booking.
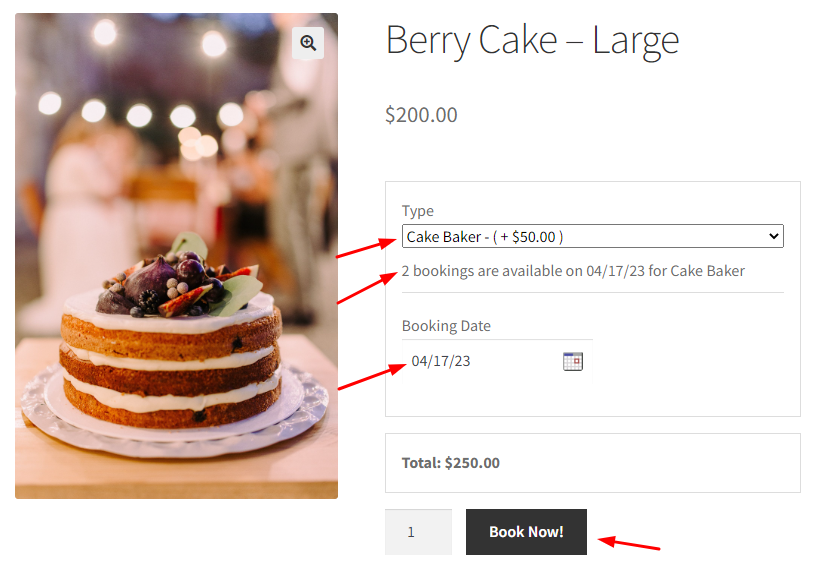
Now, let’s go with another product ‘Berry Cake – Large.’ The ‘Consider product’s max bookings’ setting will not be enabled for this product.
The resource available quantity will remain the same which was set earlier. It was set to 2.
Let’s say your resource can only make 2 of these large cakes on a particular date. You can thus fill its maximum bookings to 2.
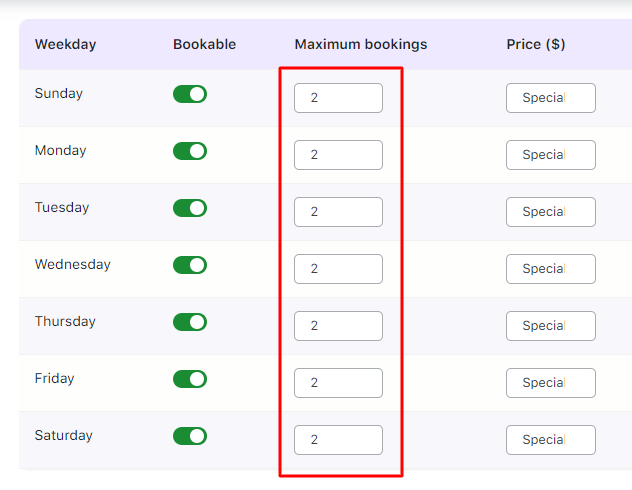
You’ll continue to fill the settings in the Resource tab but this time, you will not enable the ‘Consider product’s max booking’:
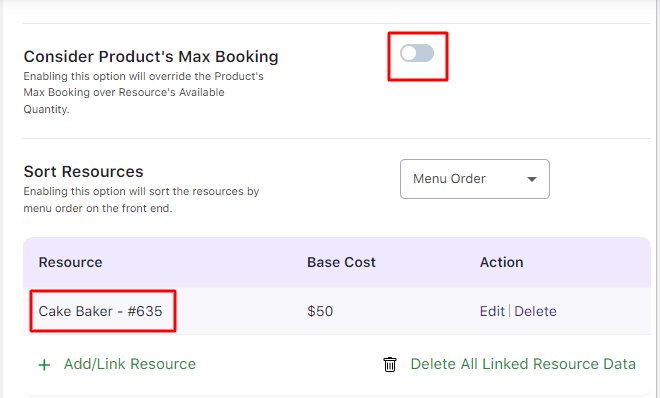
In this case, because your Resource’s available quantity is set to 2, the availability of the cake with the resource “Cake Baker” will be shown as 2 on the product page.
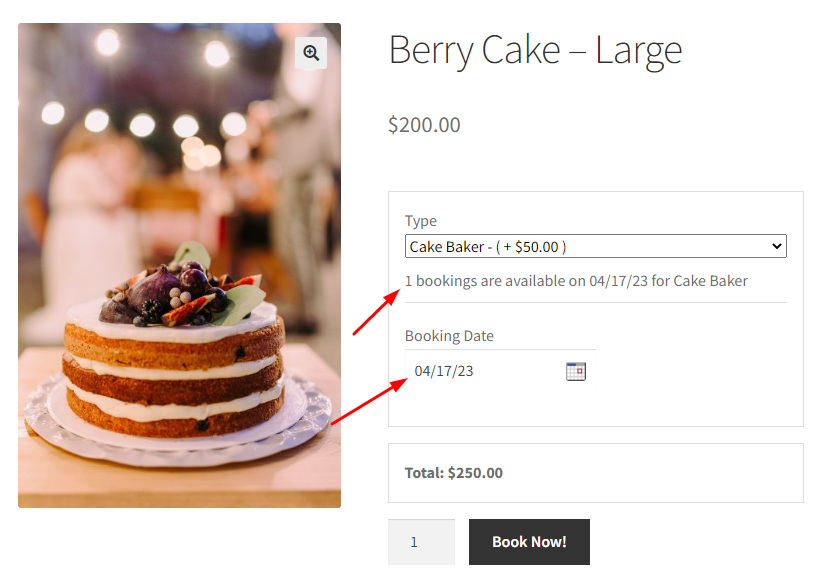
A booking for the Berry Cake – Large has been made for 17th April 2023.
If another customer tries to book the cake on the same date, then they will be able to book one because 1 booking is still available as shown here:
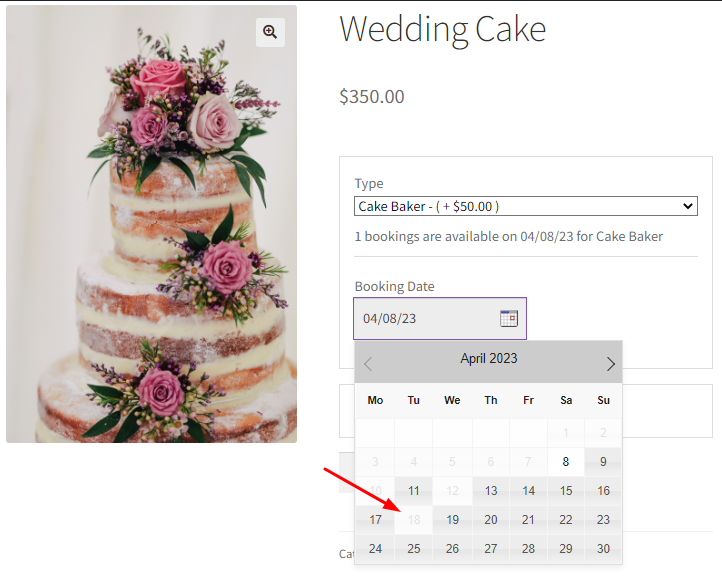
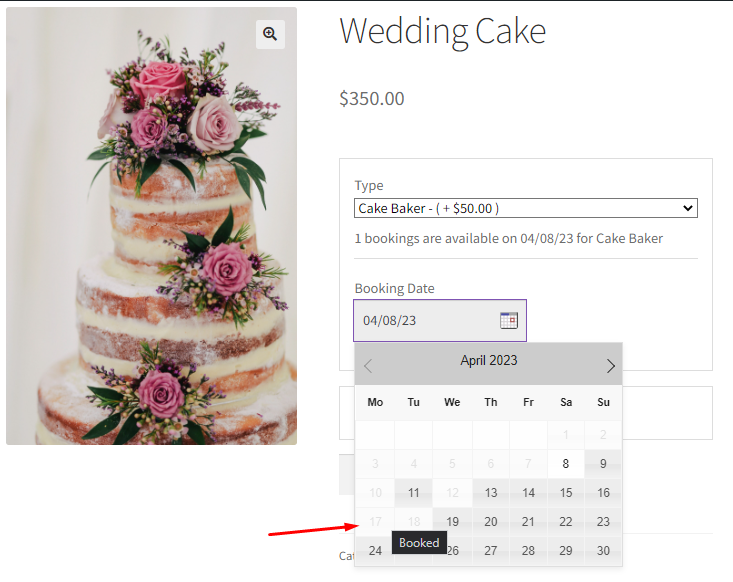
In another scenario, a customer tries to book the product Wedding Cake on 17th April 2023 after one booking has been made for Berry Cake- large on the same date (17th April 2023) with the resource ‘Cake Baker’.
The customer will not be able to book the Wedding Cake. That’s because, according to your settings, the Wedding Cake’s product’s maximum booking value of 1 will be considered.
When the customer hovers over this date, a ‘Booked’ message will be displayed:
7. Sort Resources by
↑ Back to topUsing this setting, you can ensure that the resources are visible to your customers in a particular order on the front end.
You can sort your resources according to these options:

The Default Resources where you have added the resources along with their prices will help you sort them.
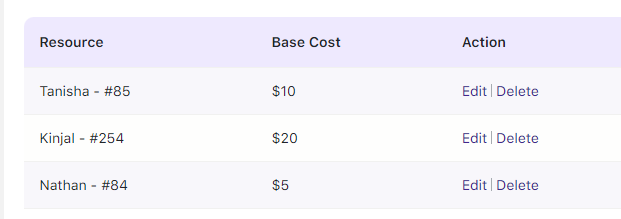
Default Resources Table
1. The Default option lets you display the resources in the manner they appear in the table
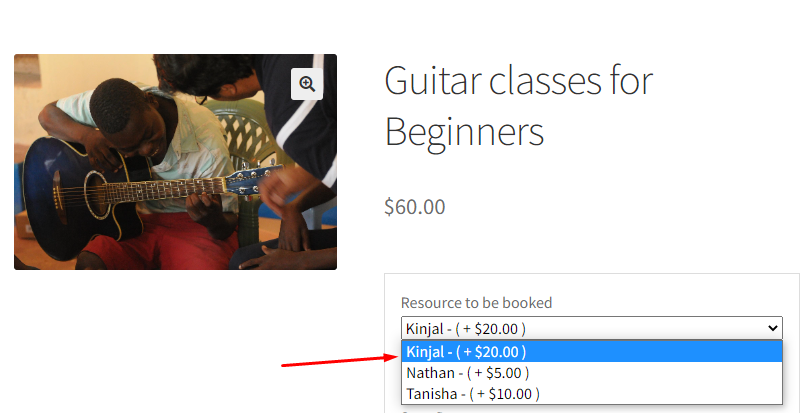
2. The Ascending option displays them in an ascending order starting from the alphabet A
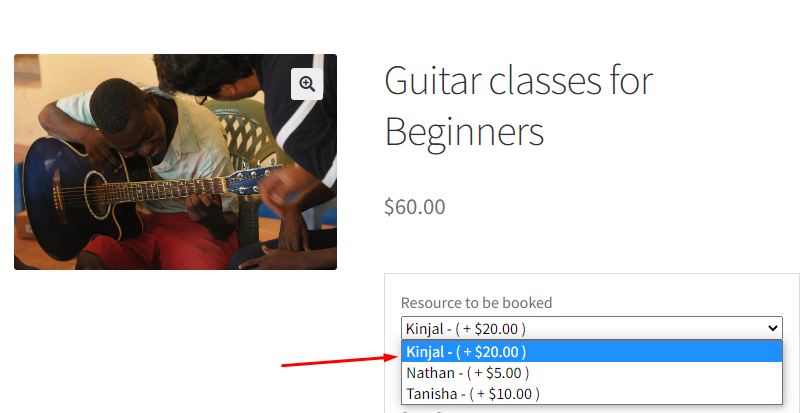
3. The Menu Order option will display them based on the value order set by you in the Menu of that particular Resource.
Choose the resource by going to Booking and Appointment > Resources > View Resources > Choosing your resource.
Under the Menu Order box, you can enter the value. For resource Tanisha, 1 has been added.
This resource will thus be displayed first in the dropdown on the front end for customers.
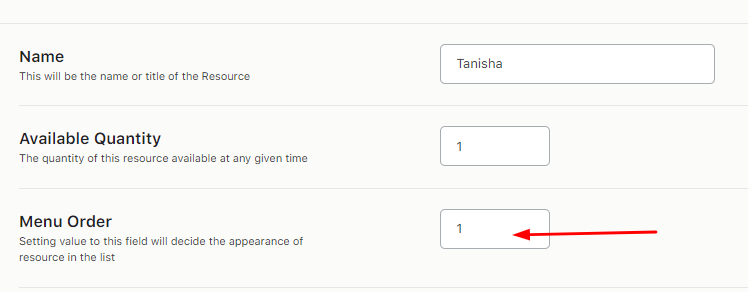
For resource Nathan, the entered value is 2. It will be displayed next in the line.
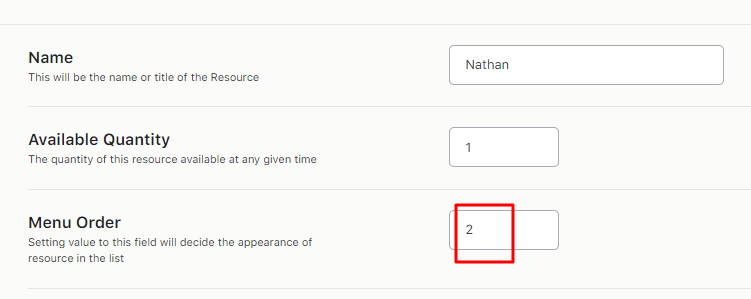
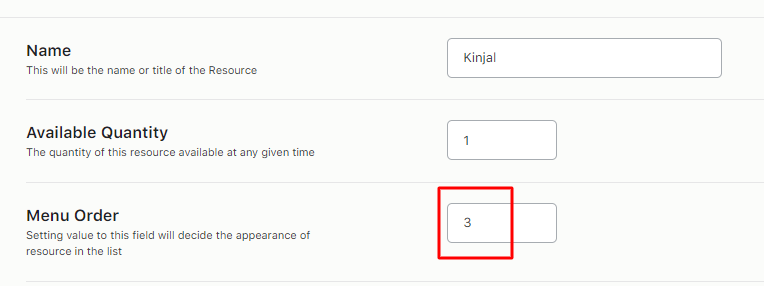
Lastly, for resource Kinjal, the entered value is 3.
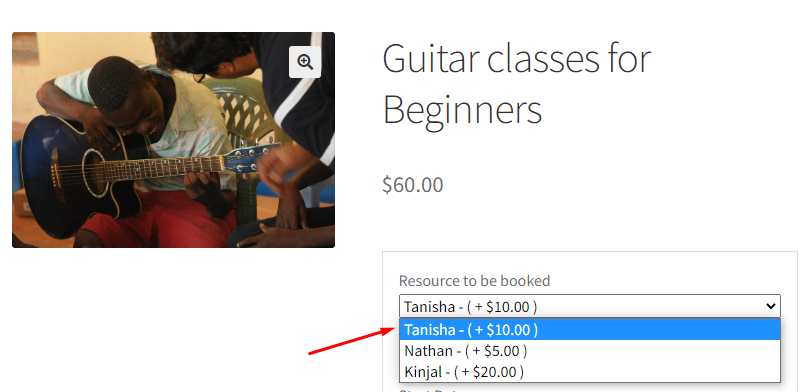
Thus, the order in which the resources will be displayed on the front end will be Tanisha, Nathan, and then Kinjal as shown here:
4. Price- Low to High option will display resources from low-priced resources to high-priced resources
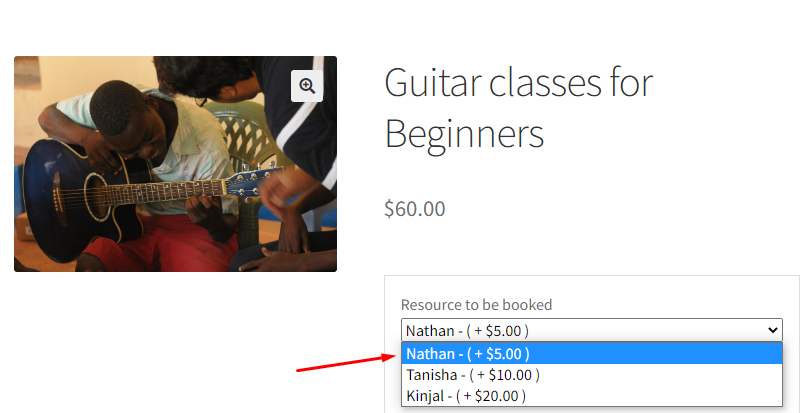
5. Price- High to Low option will display resources from high-priced resources to low-priced resources
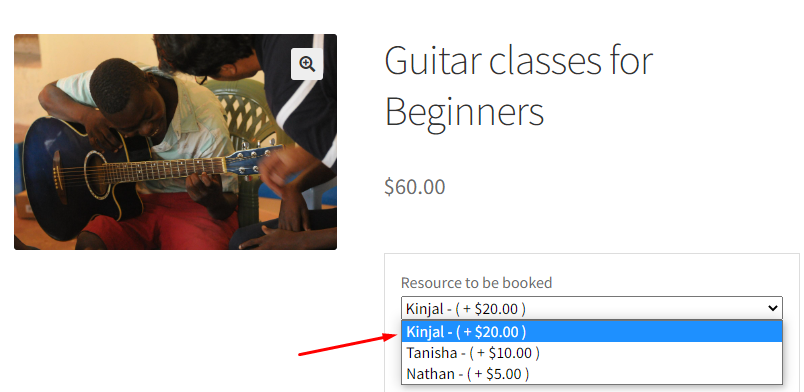
Thus using these settings you can set your resources according to your needs.
Using Resources for different Booking Types
↑ Back to topResources can be used for Simple Product Types. Let’s look at how they can be used for the three booking types in the Booking and Appointment for WooCommerce plugin.
Go to the Edit Product page > Booking meta box > Resource Tab.
Enable the Resource Module:
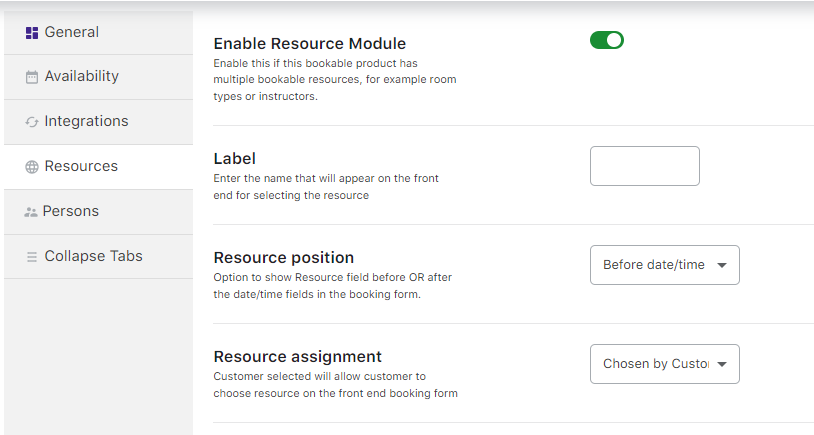
Resource tab in the booking meta box
Type 2 – Multiple Nights Booking
Let’s understand how resources can be booked per availability for each instance.
Type 1 – Single Day Booking
Product Name – One-Day Bridal Package
Here you can add a resource/person that provides service for the whole day. Depending upon the availability of the resource, maximum bookings can be taken for that day.
In this instance, we will create a product named One Day Bridal Package.
We will enable the Booking option and select Booking Type as Single Day.
Enable the Resource option and click on the Save Changes button.
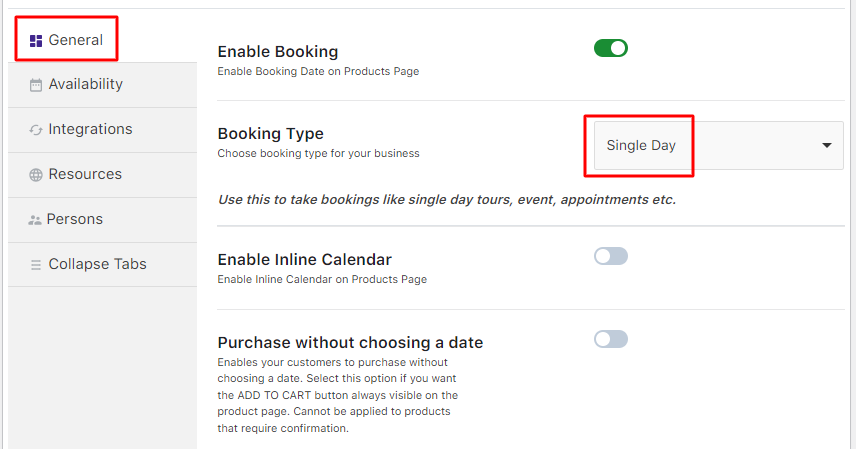
Selecting booking type as Single Day
Fill in the availability of this product by going to the Availability tab:
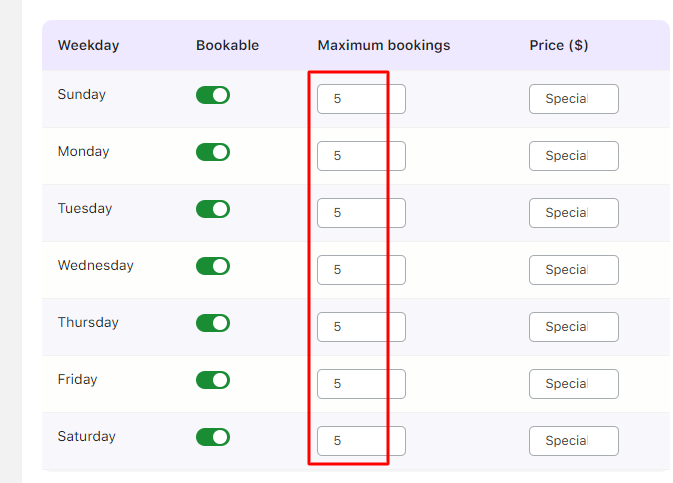
Adding Availability settings
Note: Always set maximum bookings greater or same as resource availability because resource availability value will be considered first.
Next, add the resource details to this product. For this, go to the Resources tab as shown below:
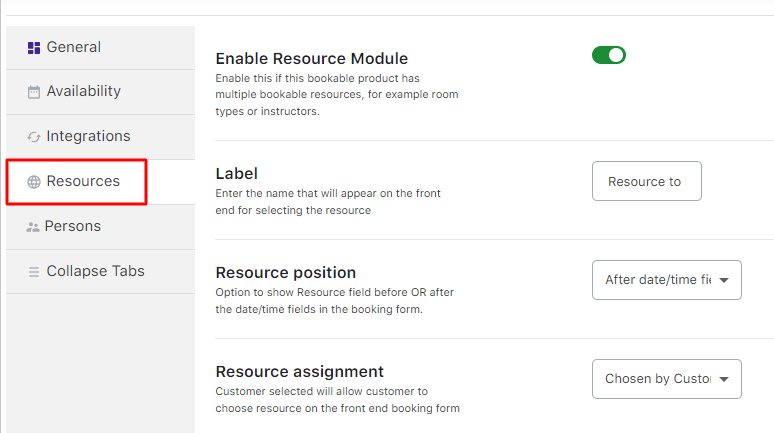
Default Resources tab
To understand each of these settings, you can click here.
For instance, you can add the resource, Kinjal, with her base cost of $30:
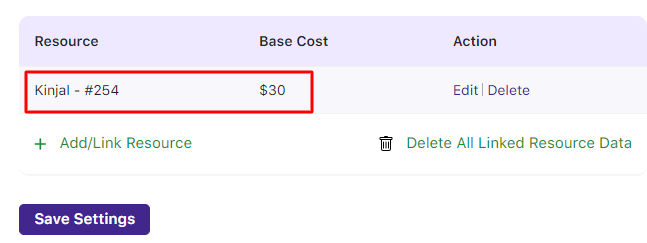
Adding settings for the resource Kinjal
Once you have saved all the booking details, availability settings, and resource details, click the Publish button.
You also need to configure Kinjal’s availability.
Go to WooCommerce > Booking and Appointment > Resources > View Resources > Kinjal > Available Quantity option.
Set it to 1 as shown here:
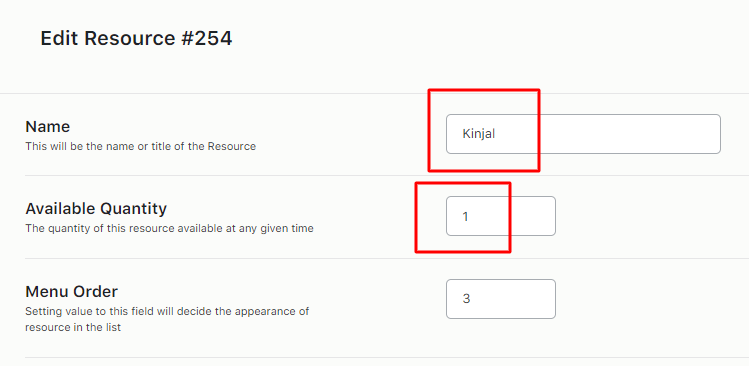
Available quantity for resource Kinjal
Here’s how the One Day Bridal Package product will appear on the front end:
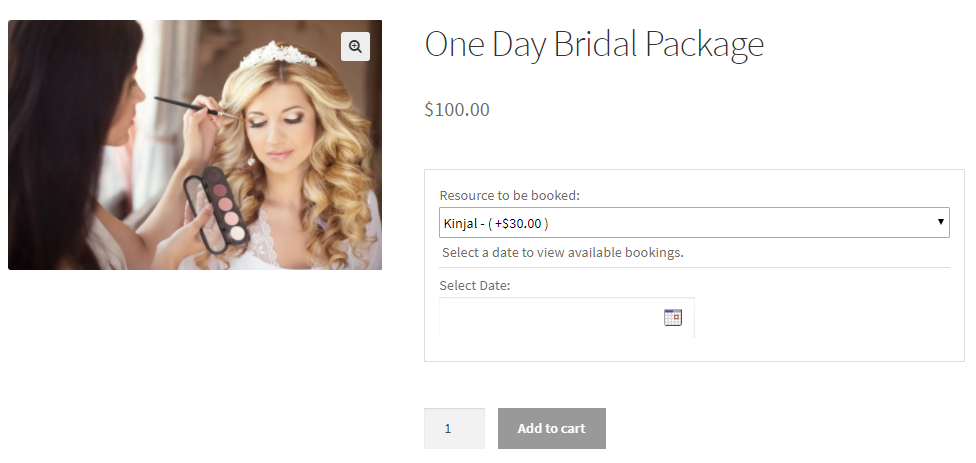
Front end display of product with the resource
The selected resource name appears on the product page with its base cost displayed as Kinjal – (+30.00).
Let’s say, a customer adds the resource Kinjal for 17th January 2018.
The total cost for the booking will be $130 because the Regular Price is $100 and Kinjal’s additional charge (eg. conveyance etc) for the service is $30.
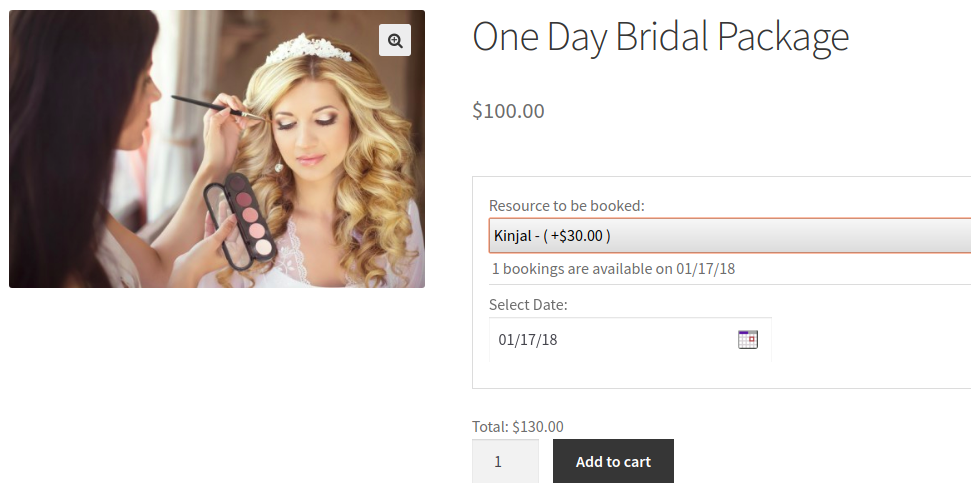
Selecting the date to book the resource
For the selected booking date, the customer will see that 1 booking is available for 17th January 2018. This is because the Resource’s availability was set to 1.
These details will be displayed to the customer on the Cart page:
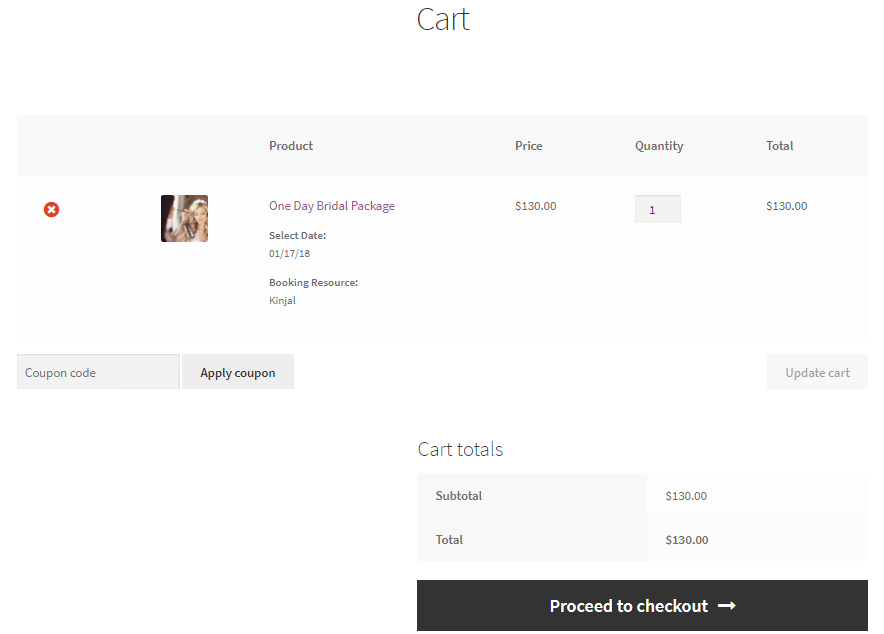
Booking details on the Cart page
The booking and resource details are displayed under the product name.
The order section on the Checkout page will appear as such:
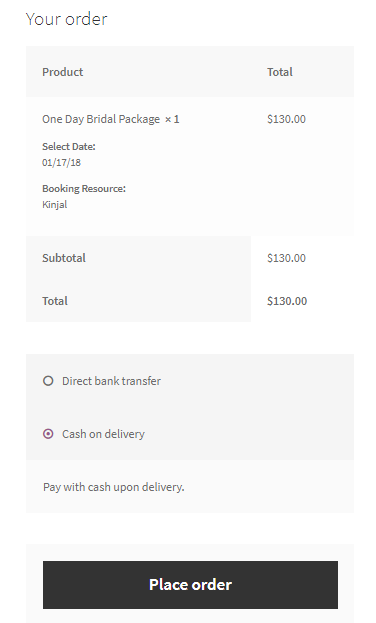
Booking details in the ‘Place order’ section
The Order Confirmation page where your Order details will then be displayed.
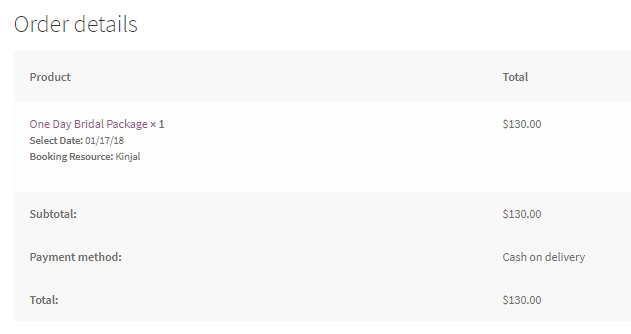
Booking details being displayed on the ‘Order Confirmation’ page
Voila! You have assigned a resource to a single-day product for booking service for the selected date.
You can see the details of this booking by going to the WooCommerce > Booking and Appointment > Booking > View Bookings page:
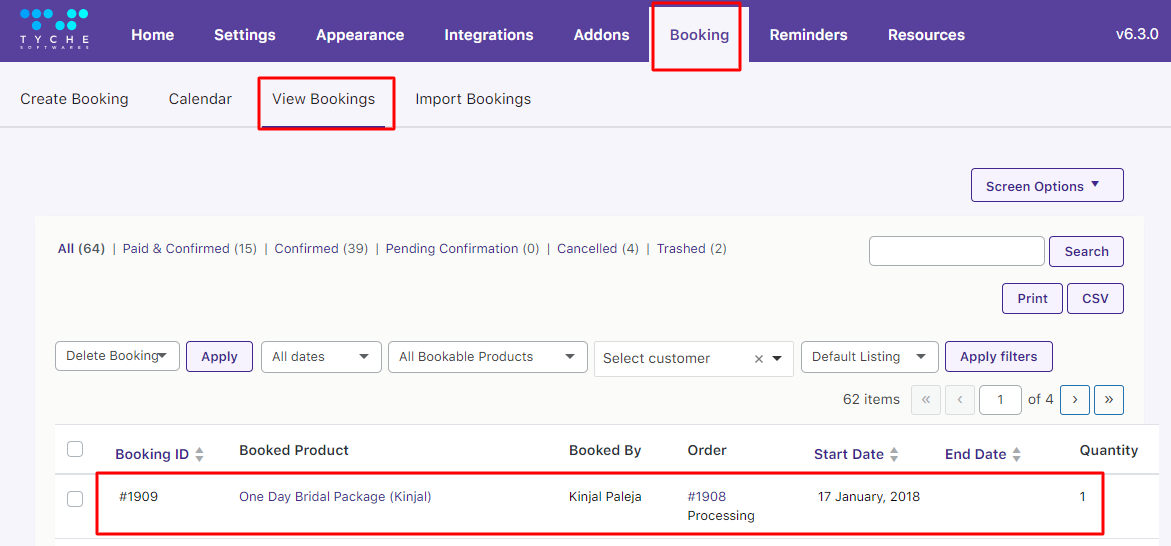
‘View Bookings’ page showing the added product with the resource name
Type 2 – Multiple Nights Booking
Product Name – Outdoor Wedding Booking
Here you can add a resource/person that provides service for one or more than one night.
The resource can be charged for the entire specified period of booking or on a per-day basis.
Let’s book a service for a Multiple Nigths product and assign the same resource to it.
Add a new product Outdoor Wedding Booking and set a regular price for it as $300.
Enable the Booking option, select Booking Type as Multiple Nights, and save changes as shown below:
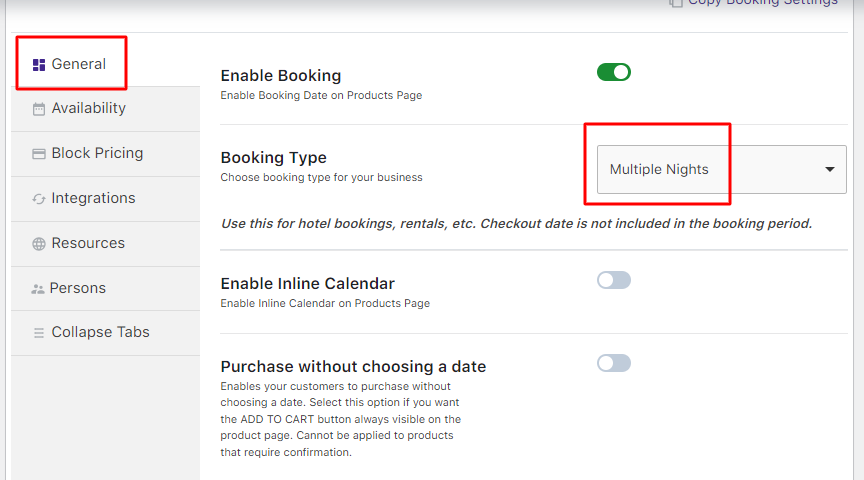
Selecting booking type as Multiple Nights
Next, go to the Resource tab in the Booking meta box to assign a resource to this product and its base cost,
For instance, you can add resource Kinjal whose base cost is $50 as shown below:

Resource for Multiple Nights product
You can add the availability settings by clicking the Availability tab and adding the values as shown below:
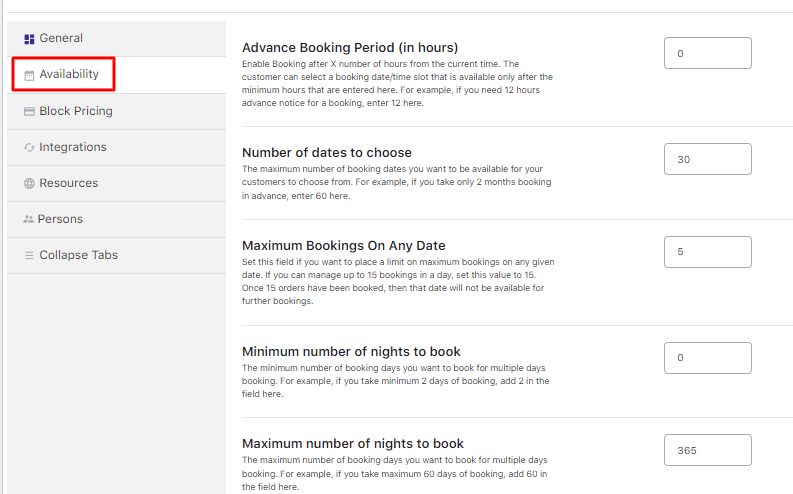
Availability settings added
Since this is a multiple-night product, you can add the Fixed Block Booking and Price By Range Of Nights feature along with the Resource feature.
Thus, the resource added to the product will be displayed on the front end as shown here:
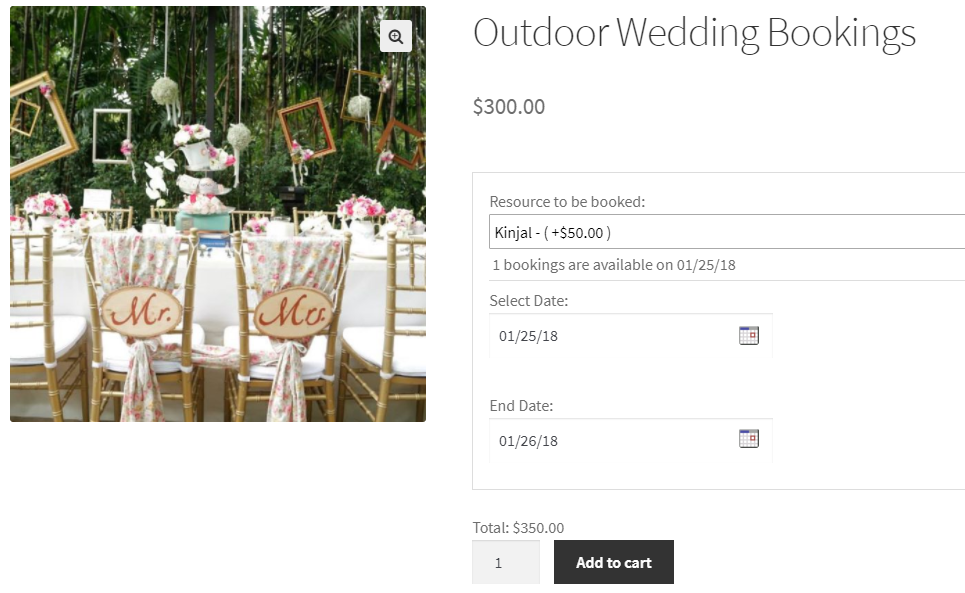
Front-end look of multiple nights product
The resource Kinjal has been selected for Outdoor Wedding Booking from 25th January to 26th January 2018.
The cost for this service booked is $350. The additional resource charge of $50 is added to the total.
When the product is added to the cart, its details will be displayed as shown here:
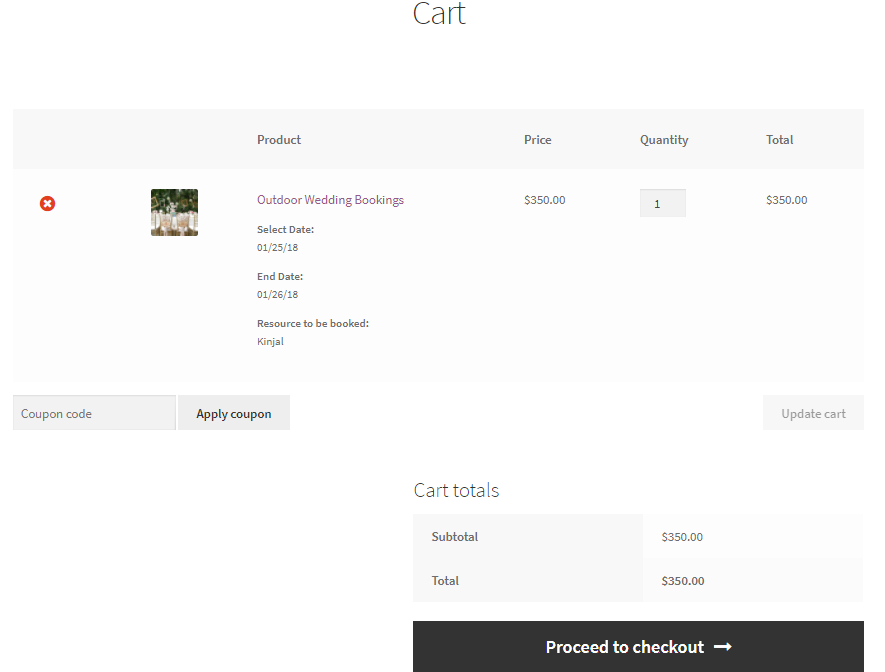
Cart Page showing booking details
After proceeding to the Checkout page and placing the order, the Your Order section will appear like this:
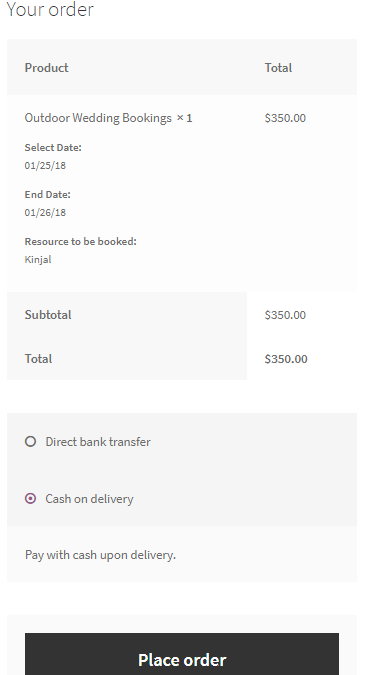
Booking details are shown on the Checkout page
The Order Confirmation page with your Order details will be displayed as shown below:
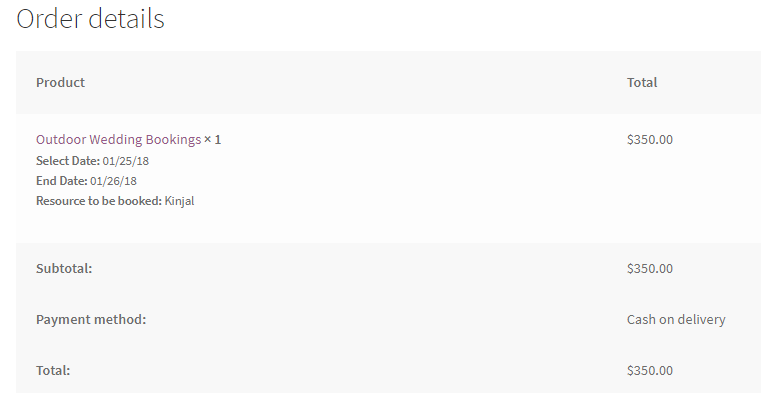
The ‘Order Confirmation’ page shows booking details
Thus, you have successfully assigned a resource to a multiple-night product.
The above instance showed how the cost for a resource is calculated for the full duration of the booked dates.
You can see the details of this booking by going to the WooCommerce > Booking and Appointment > Booking > View Bookings page:
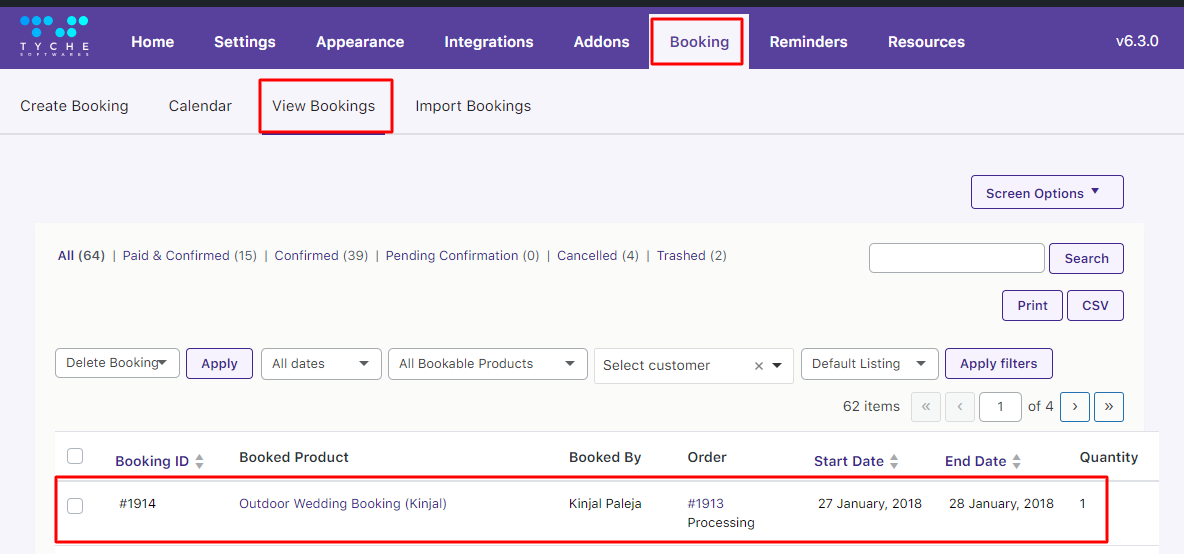
‘View Bookings’ page showing the added product with the resource name
However, if you want to charge a resource on a per-day basis, you can enable the setting Charge Resource cost on a Per Day Basis option.
Go to the General Settings tab under WooCommerce > Booking and Appointment > Settings > Global.

Proceed to the Additional Charges – for Multiple Nights Bookings dropdown > Charge Resource cost on a Per Day Basis page as shown here:
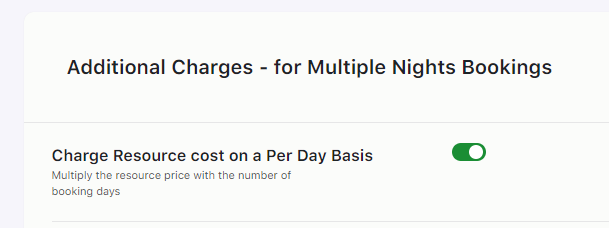
Selecting the option for charging on a Per Day basis
Enable it.
According to this setting, the resource’s cost will be multiplied by the number of days booked to calculate the total price.
Type 3 – Time Slot Booking
↑ Back to topProduct Name – Reva Beauty Salon.
Here, you can add a resource/person who provides services per the assigned time slots.
Services are booked as per the availability of the resource.
For this, you must add a resource to a bookable product with time slots.
Create a product named Reva Beauty Salon and add its regular price.
Enable the Booking option, select the Booking type as Fixed Time, and click on the Save Changes button:
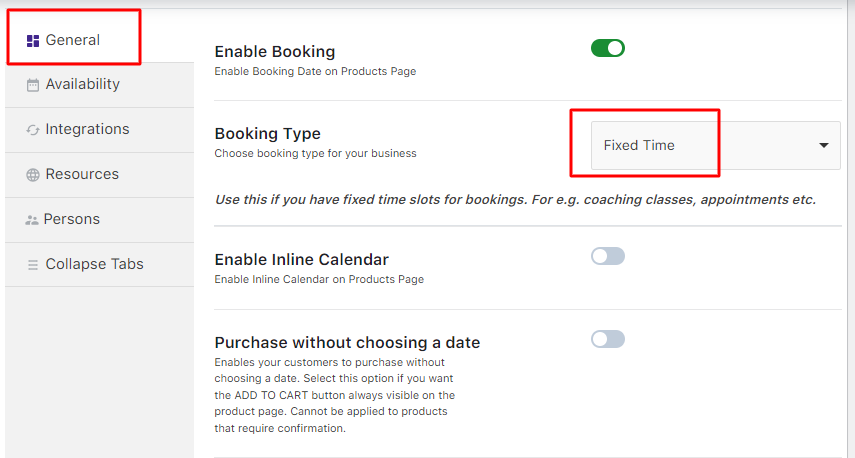
Enabling booking and setting booking type as Fixed Time
After this, add availability details from the Availability tab which is set to 10 bookings per weekday.
Add time slots for taking bookings. You can add two-time slots for all weekdays with maximum bookings set to 5.
You can add time slots from 9 am to 11 am and 1 pm to 3 pm with the additional price of $100 for each of them:
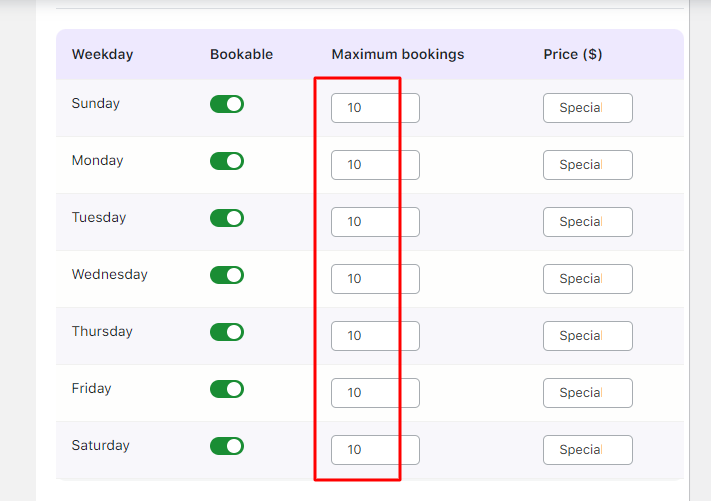
Adding availability and timeslot details
Enable the Booking Resource Module to add a resource to the product by going to the Resource Tab.
Add the resource Kinjal with her base cost of $30:
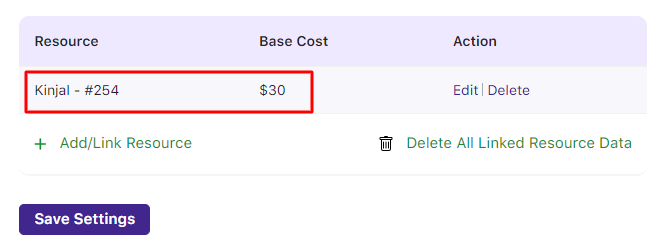
Added resource with the base cost
The front end of Reva Beauty Salon will appear like this:
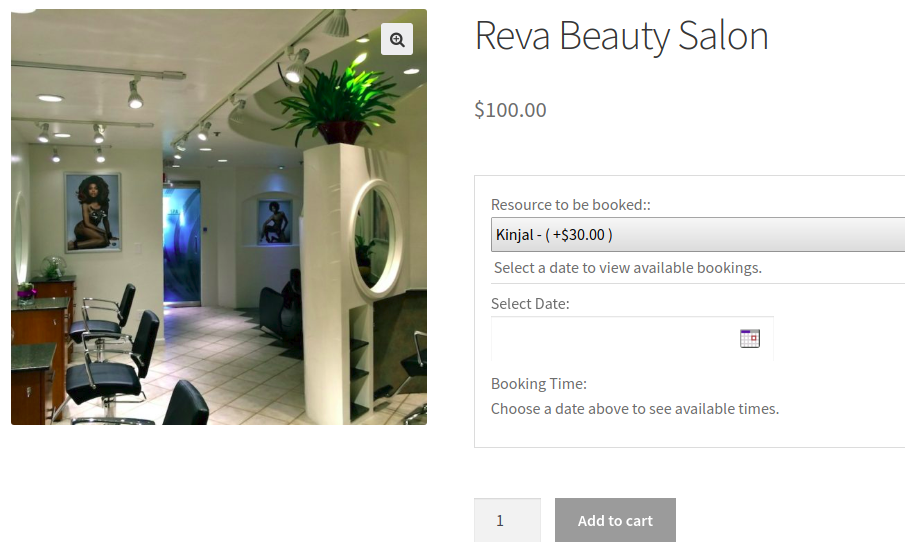
Front-end display of the product
The customer can add the booking details as shown below:
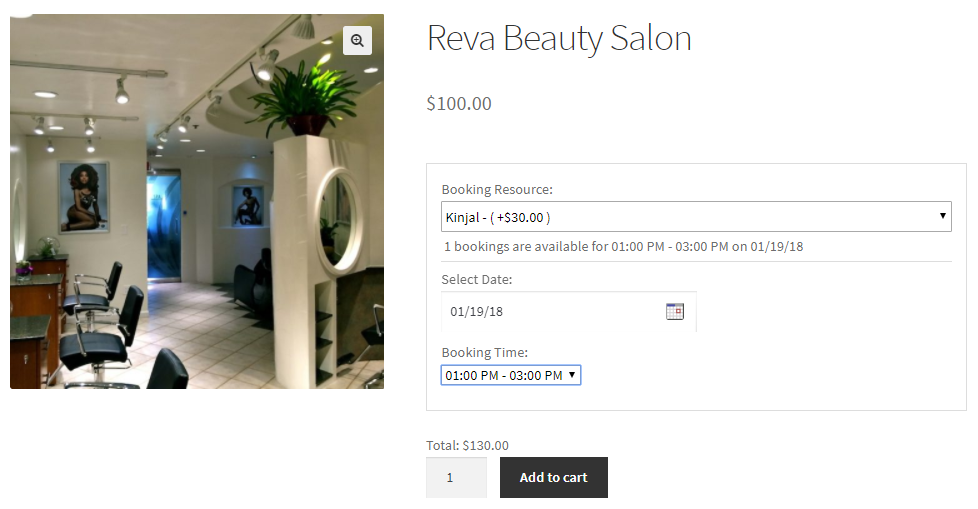
Front-end display of the product
Let’s say they have selected the resource Kinjal to be booked for 19th January 2018 for the 1 pm to 3 pm timeslot.
The total cost for this booking will be $100 + $30 (Kinjal’s charge) = $130.
After adding it to the cart, the Cart page will appear like this with all the details:
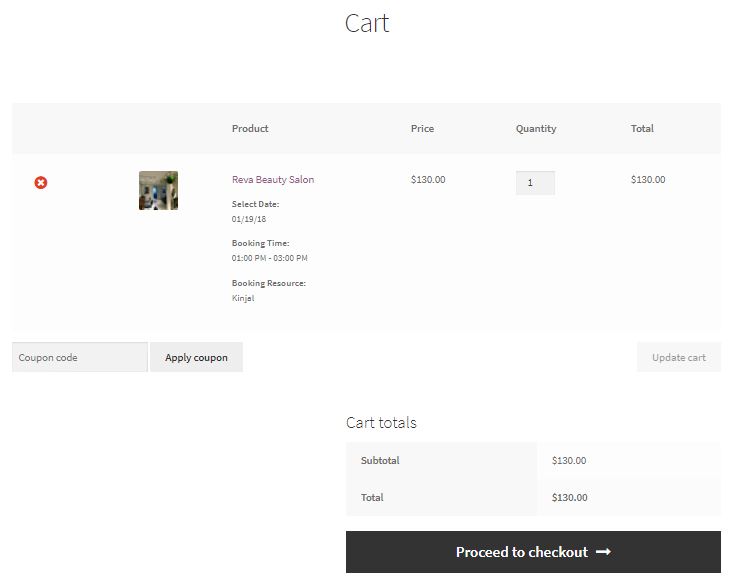
Cart Page showing all booking details
After completing the booking process, the Your Order section will look like this:
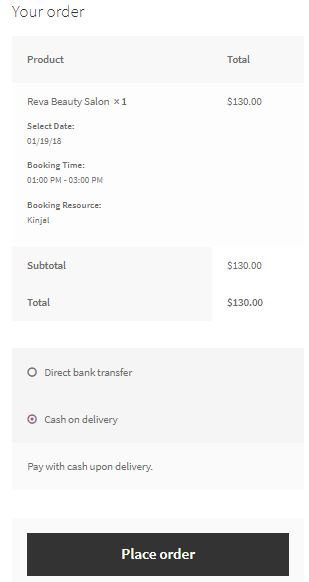
Checkout Page displaying all booking details
This is how the Order Confirmation page with all the Order details will appear:
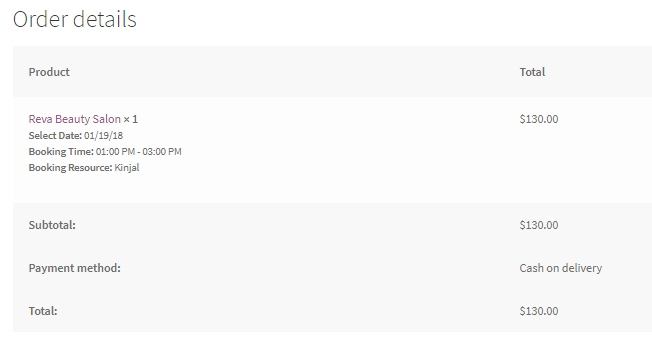
Order details are shown in the ‘Order Confirmation’ page
Thus, the product with the selected timeslot has been booked.
You can see the details of this booking by going to the WooCommerce > Booking and Appointment > Booking > View Bookings page:
‘View Bookings’ page showing the added product with the resource name
You may have noticed that when a resource was added, its name appeared at various places like:
- Product Page
- Cart Page
- Checkout Page
- Order Received Page
- View Bookings Page
Other than these, there are additional sections/pages where the resource name will be displayed. They are:
1. Order section on My Account page
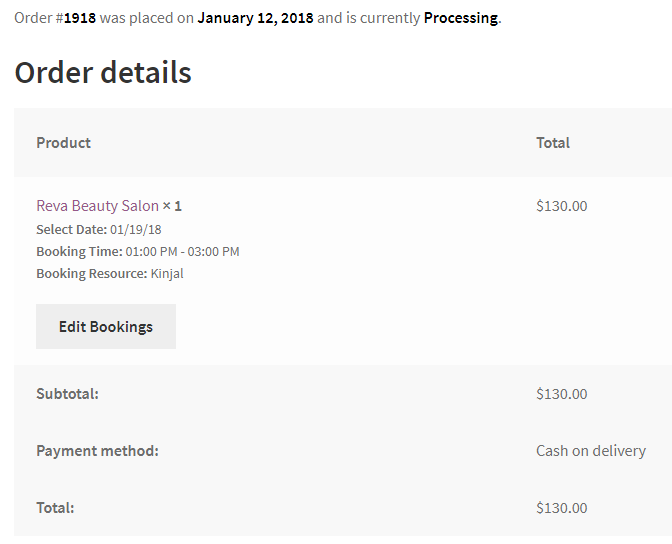
Resource name displayed on the Orders section of My Accounts page
2. Email Notification for order
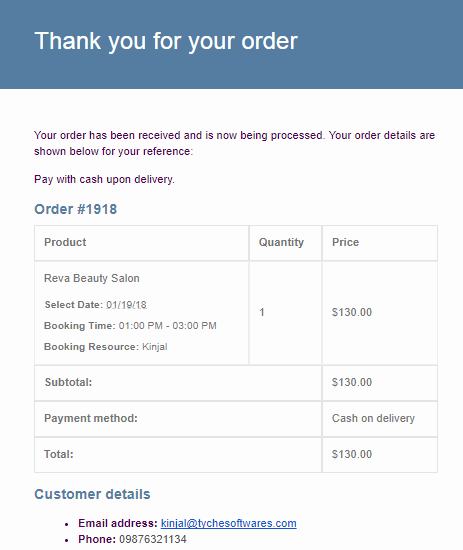
Email notification showing the resource name added
3. Calendar View of all bookings
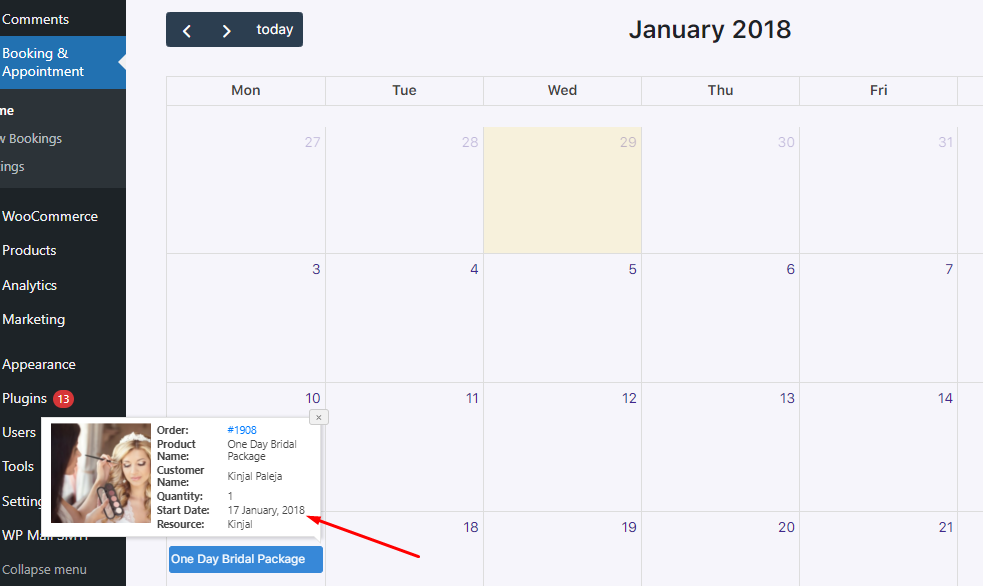
The resource book for One Day Bridal Package appears in the calendar
In this way, you can use Resources for different Booking types under your Simple Product Type.
Validation messages for Resources
↑ Back to topWith the Booking and Appointment for WooCommerce, a single resource can offer multiple services, but not simultaneously. Thus, understanding how validations apply to these resources is crucial.
Let’s dive into how resource validations work to ensure seamless service scheduling and avoid overlaps.
You have added the Resource – Kinjal to all 3 examples of different booking types explained here.
Let’s see how the availability of this resource appears in the booking calendar for the customers to select and how they are restricted to different services for the same day.
There are 2 types of validations:
1. Availability message validation
1. Availability message validation
↑ Back to topThe Availability message gives information about the product’s availability based on the chosen booking details. It is displayed above the booking field.
Let’s say that a customer has already added the bookable product to the cart. They revisit the product page and select the same resource and booking details.
The availability notification message will show ‘The booking is already added to the cart.’
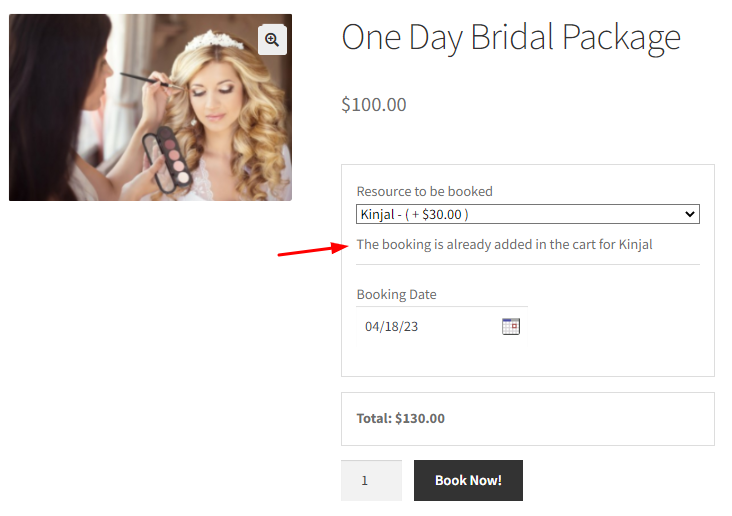
Adding the same date and resource again
Let’s say a customer books the resource Kinjal for 20th March 2018 for the One Day Bridal Package product.
After this, they return to the product page and select the same product with the same date and resource. However, here, the resource has reached its maximum availability.
In such an instance, the following message will be displayed:
‘You have all available spaces for this date in the cart. Please visit the cart to place the order.’
Since the customer has added all the available booking slots for this resource to the cart, it is recommended that they return to their cart to place the order.

Resource selected for One Day Bridal Package product
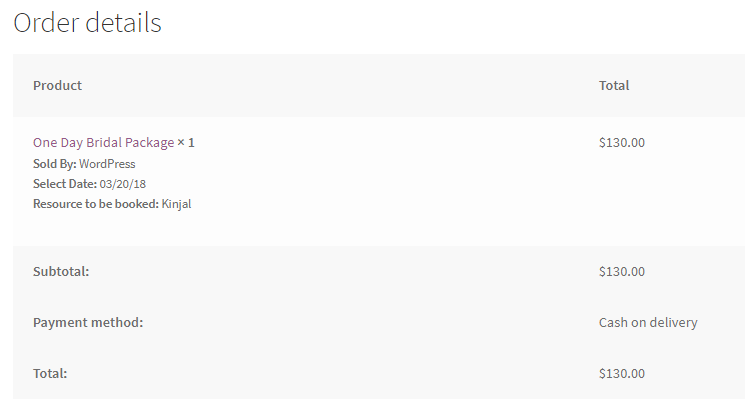
Let’s say an Order has been placed for 20th March 2018 for the resource Kinjal:
Order details for the booking
The Availability Quantity for this resource – Kinjal is set to 1 for each day as shown below:
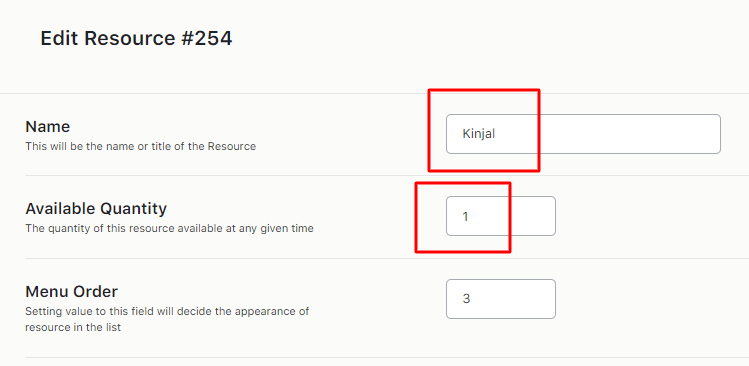
Maximum bookings to be taken for each day is 1
If some other customer books the same product for Kinjal for the same date 20th March 2018, then the booking calendar will show this date disabled as the availability for Kinjal for the given date is set to 1.

Resource booked for 20th March 2018
20th March 2018 will show a ‘Booked’ message in the booking calendar when a customer hovers on that date.
That’s because Kinjal is booked for the One Day Bridal Package on the same date.
2. Cart Page validation
↑ Back to topLet’s say a customer adds a particular resource and booking details for service in the cart.
If the same resource with a different service is already present in the cart with the maximum available quantity for the selected dates, then such an action should be validated.
For Example – A customer has booked Kinjal for Outdoor Wedding Bookings from 1st February 2018 to 19th February 2018.
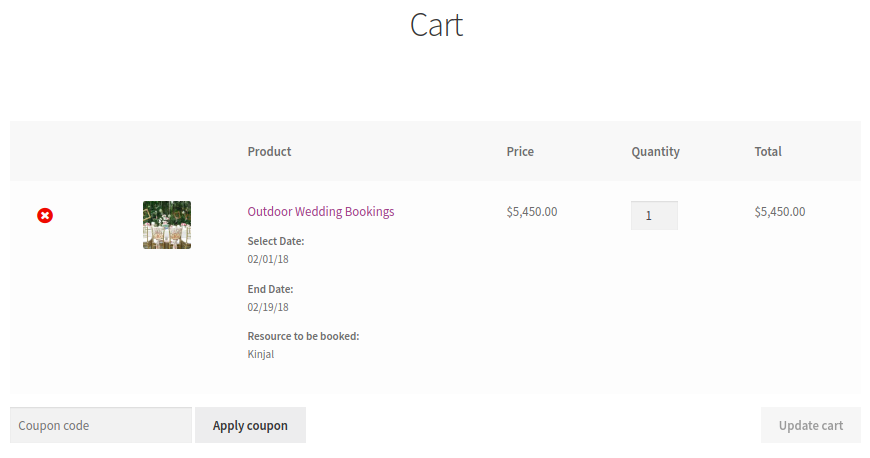
The cart shows resource Kinjal
Now if you try to add the One Day Bridal Package for 9th February 2018 for the same Resource Kinjal, it will show the following error message:
‘You have all available spaces for Kinjal on date 02/09/18 in your cart. Please visit the cart to place the order.’
It would mean that all the availability slots for the Resource Kinjal on the date 02/09/18 have already been added to the customer’s cart.
The customer needs to move to the cart page to place the order.
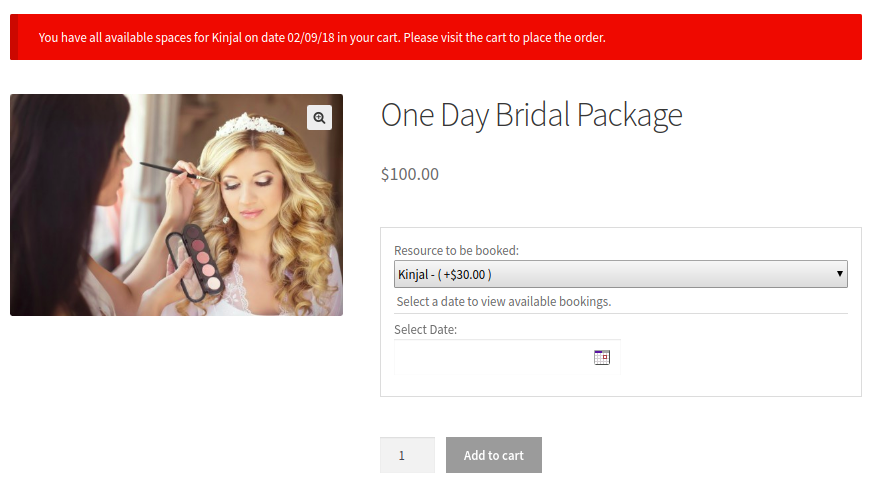
The cart shows an error message
On the Cart page, when a customer tries to increase the quantity of the product for more than the resource’s availability, a notification message will appear.
It will say ‘Kinjal can provide only 1 service for the date 02/09/18.’
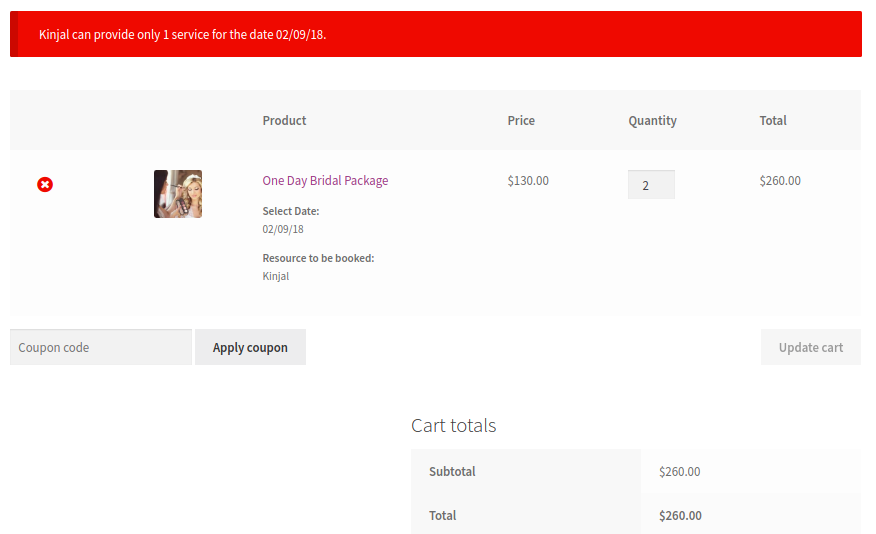
A notification message appears when the quantity exceeds
Kinjal is available for only 1 quantity.
If the customer tries to increase it, the notification message displayed above will be displayed.
The validations will thus be applied in this manner to all of your resources based on the conditions applied.
Compatibility of the Resources with Simple Subscription Products
↑ Back to topWith the Booking and Appointment Plugin for WooCommerce, you can effortlessly create resources for Simple Subscription Product Type. However, to create a Subscription product, you will require the WooCommerce Subscriptions extension.
Using the two plugins, let’s learn how to seamlessly assign resources to your simple subscription products.
a) Booking Type: Fixed Time
↑ Back to topThe Booking and Appointment plugin offers different types of bookings. Let’s look at an instance with the booking type ‘Fixed Time’.
Let’s say that you run a coaching class.
You have created a simple subscription product that offers English lessons every Monday, Wednesday, and Friday with a fixed time slot of 10 am to 12 pm.
To create an English lessons subscription product, go to Products > Add New.
Add the title ‘English lessons,’
Add a product image & then choose ‘Simple subscription’ under Product data.
Fill in other information such as the subscription price, expiry period, sign-up fee, etc as shown below:
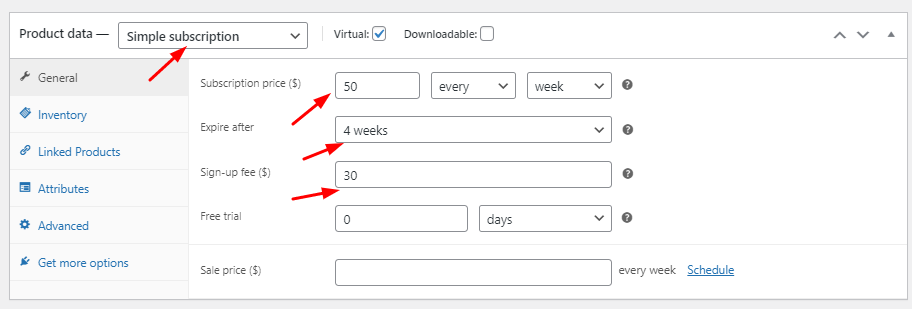
Product data page
Enable booking from the Booking Metabox and choose the booking type as Fixed Time. Enable the inline calendar, and save the changes.

Booking metabox
Move onto the Availability tab wherein you will add the days Mondays, Wednesdays, and Fridays.

Availability Page
Include the timeslots for them from 10 am to 12 pm as shown below:

Adding timeslots in the Availability tab
Once added, the timeslots table will look like this:

Timeslot Table
Next, you must go to the Resource tab, and enable the module.
Title the label as ‘Teacher’ and enter the information for other settings:

Resource Tab
Add in your Resource persons. In this case, they are Priyanka – #314 and Vishal – #320.

Adding Resources
Once done, click the ‘Save Settings’ button and publish the bookable product.
If you wish to make changes to the availability of any of the resources, go to Booking and Appointment > Resources > View Resources.
Choose the resource name. In this case, it is, Resource Vishal – #320.
Under Range type, choose Range of days and keep them from Monday to Friday. This would mean that Resource Vishal would be available/bookable for weekdays.
Don’t forget to turn this range into Bookable by enabling that option.

Edit Resource page
Once you’re done, click on the ‘Update’ button.
Since the charge for the English lessons subscription is $50 per week, here’s how it will appear on the Product page:
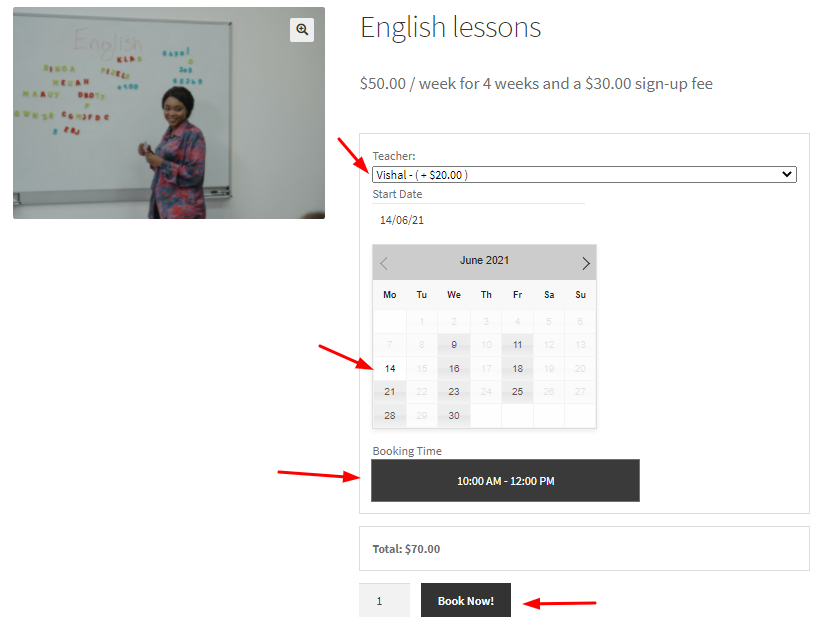
Product Page
The resource chosen is Vishal. For this, the customer will have to pay an additional $20.
After choosing this resource, the customer can select any day from Mondays, Wednesdays & Fridays.
Since the resource is available from Monday to Friday, he will be available on all three days: Mondays, Wednesdays & Fridays.
Lastly, the timeslot available on those days will be from 10 am to 12 pm.
The customer can click on ‘Book Now!’ once they are done selecting their booking details.
All of these details along with the Resource name, Booking date & time will be available on the Cart Page:
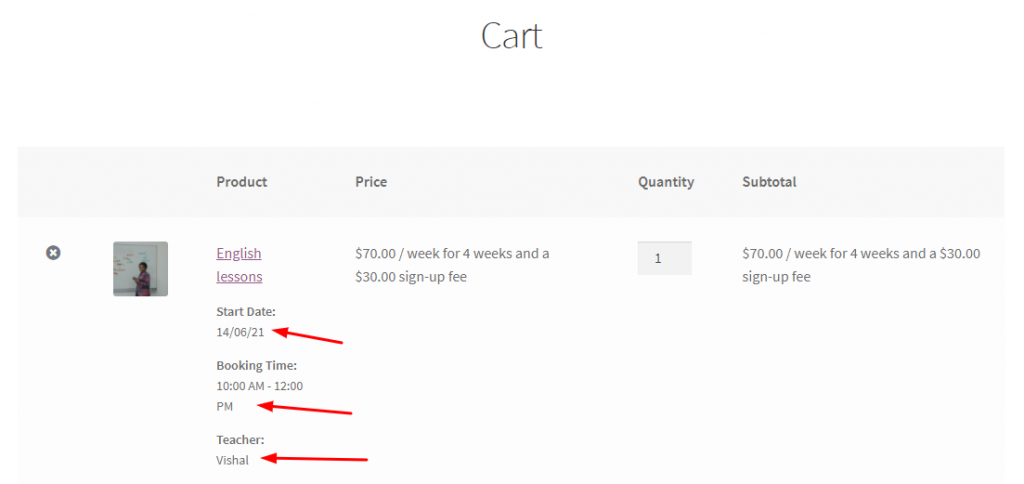
Cart Page
It will also be displayed on the Checkout page:
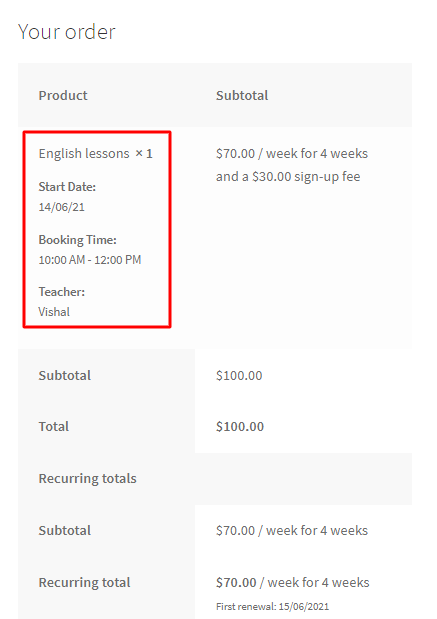
Checkout Page
Voila! You have successfully assigned a resource to your Simple Subscription Product in these few easy steps.
Compatibility of the Resources with Variable Subscription Products
↑ Back to topThe Booking and Appointment Plugin for WooCommerce helps you provide resources on your store with Variable Subscription product type.
For this, you will need the WooCommerce Subscriptions plugin.
You can provide resources for different booking types offered by the Booking plugin. Let’s look at an instance of using resources for the Booking type ‘Fixed Time’.
a) Booking Type: Fixed Time
↑ Back to topStart by creating a variable subscription product titled ‘English lessons for kids.’
Under the product data, choose Variable subscription & add your custom product attributes.
Give them a Name & different Values as shown below:
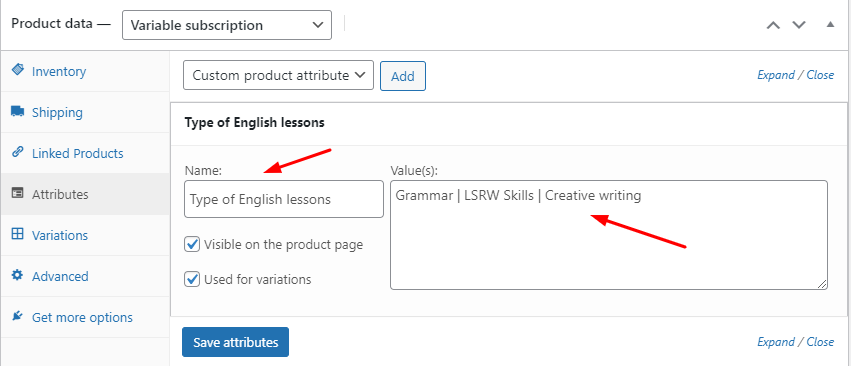
Attributes tab
After saving them, move to the Variations tab & add the prices for the subscription of your different attributes.
For example:
$50/month for 3 months & $10 sign-up fee for Grammar
$70/month for 3 months & $10 sign-up fee for LSRW Skills
$60/month for 3 months & $10 sign-up fee for Creative Writing.
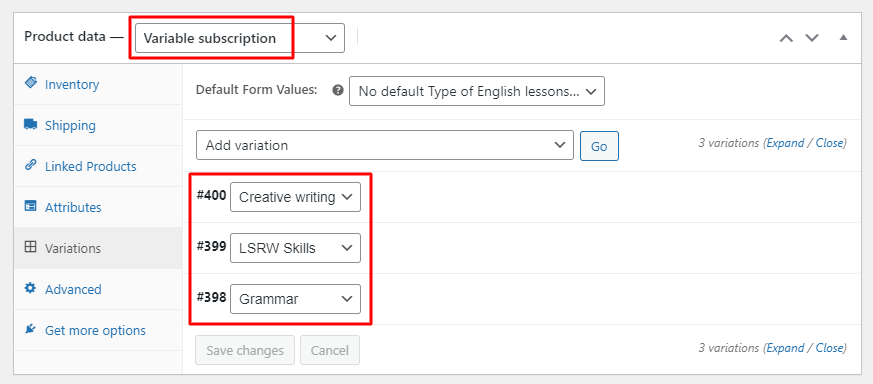
Variations tab
Once done, click the ‘Save changes’ button and move to the Booking meta box.
Enable Booking and choose your Booking type as Fixed Time under the General settings tab as shown below:
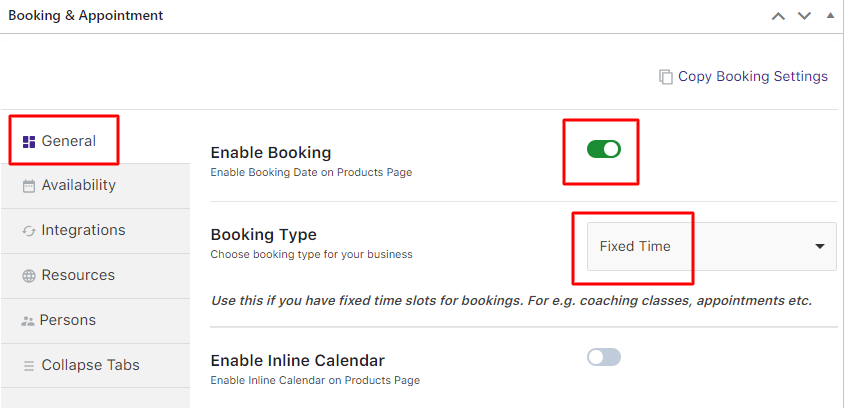
General tab in the Booking meta box
Next, move toward the Availability tab and enter the days & timeslots.
Enable bookings from Mondays to Fridays
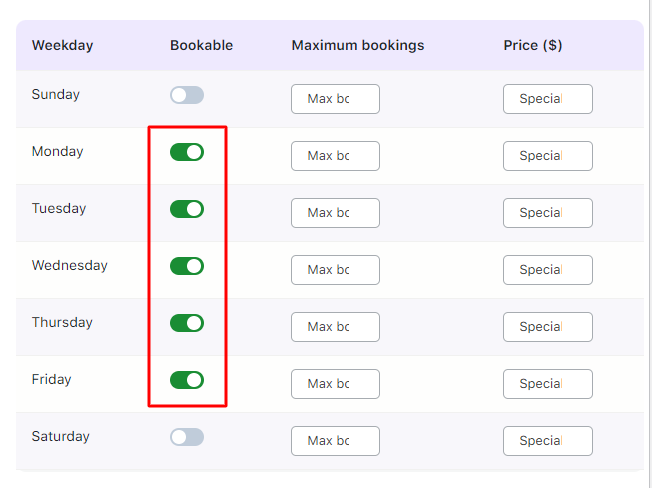
Availability tab in the Booking meta box
Add the timeslots from 9 am to 10 am & 10 am to 11 am as shown below:
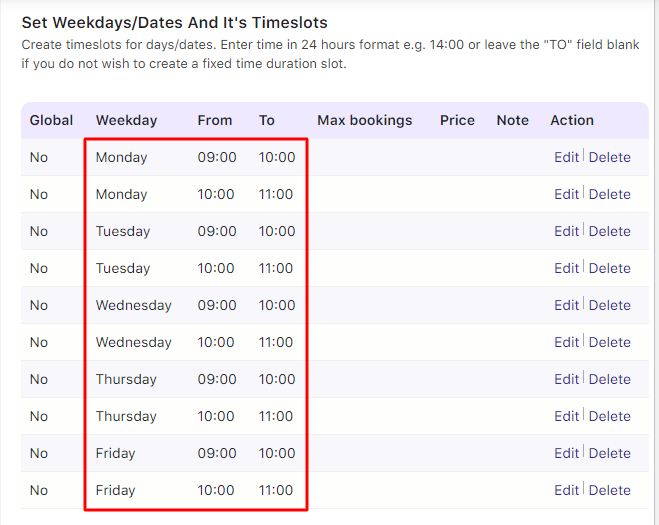
Availability tab in the Booking meta box
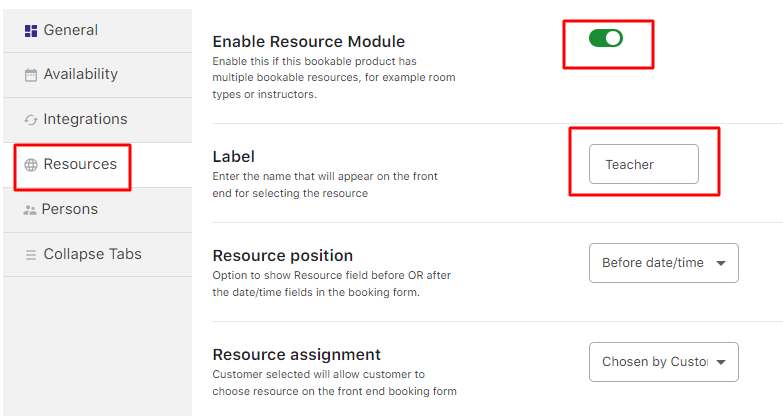
Go to the Resources tab next and enable the module. Add the Label Teacher.
Scroll down and add your Resources Ajay and Kinjal along with their prices. Click the Save Settings button.
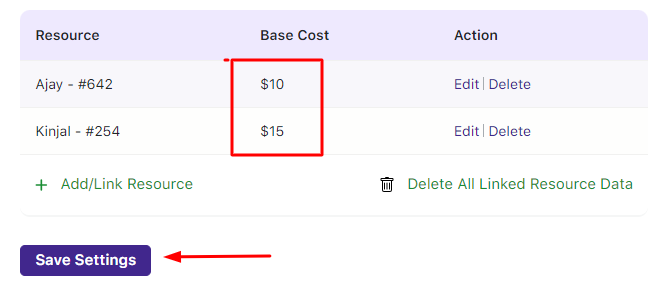
Resource tab in the Booking meta box
Lastly, publish the product.
Now go to the Edit Resource pages of the respective resources to ensure that they are available from Mondays to Fridays.
Do this by following the pathway Booking and Appointment > Resources > View Resource > Ajay and Kinjal.
Select Range of Days under Range Type and make it bookable from Mondays to Fridays.
Here’s how both the edit pages of the resources will appear:
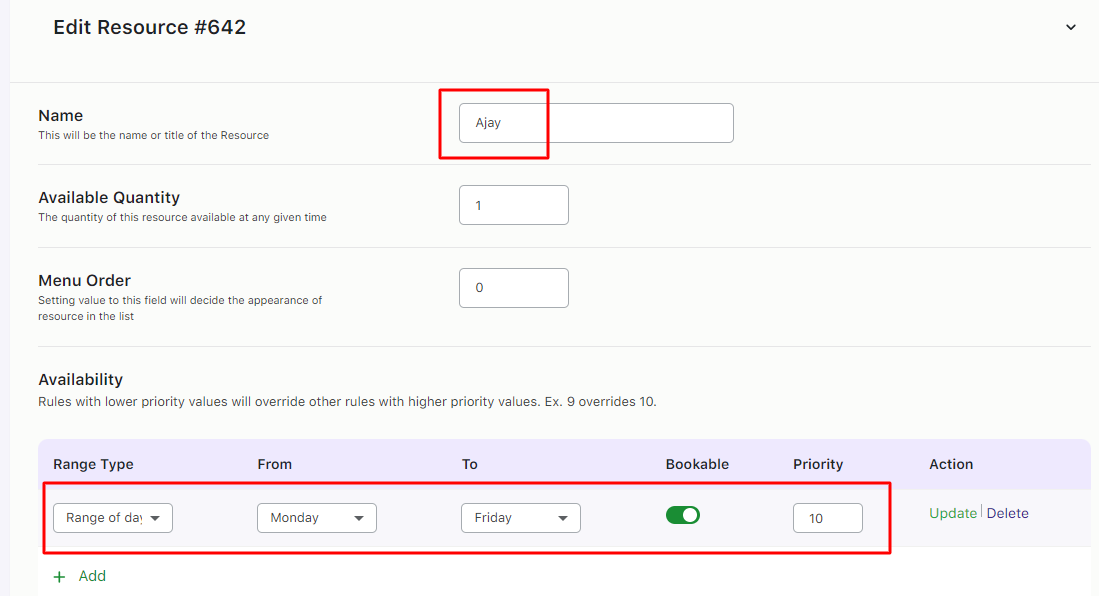
Edit Resource page for Ajay
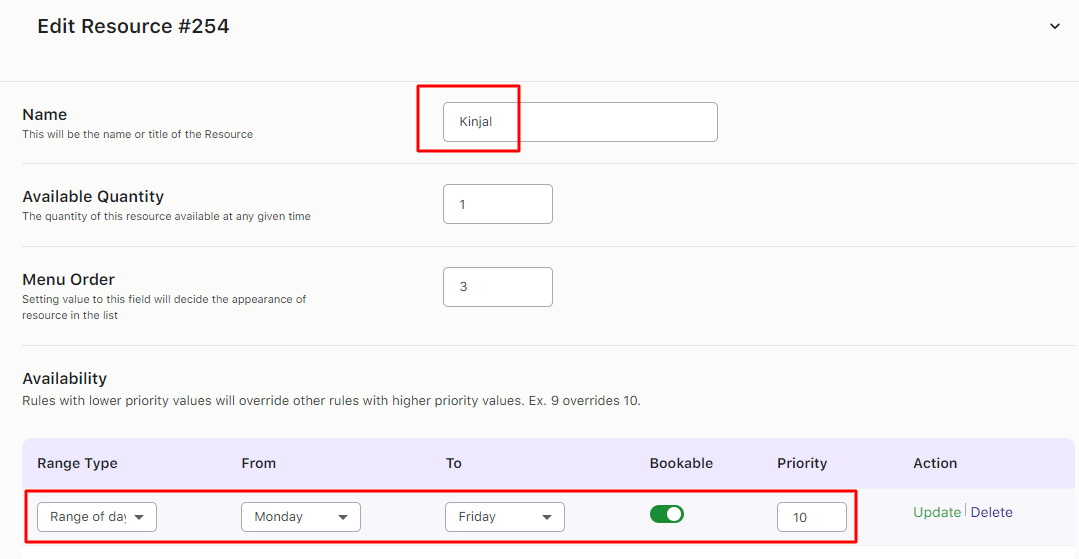
Edit Resource page for Kinjal
Don’t forget to click the Update Resource button for both.
Here’s how your published Variable Subscription product will appear on the front end.
The first one is the Grammar variable subscription:
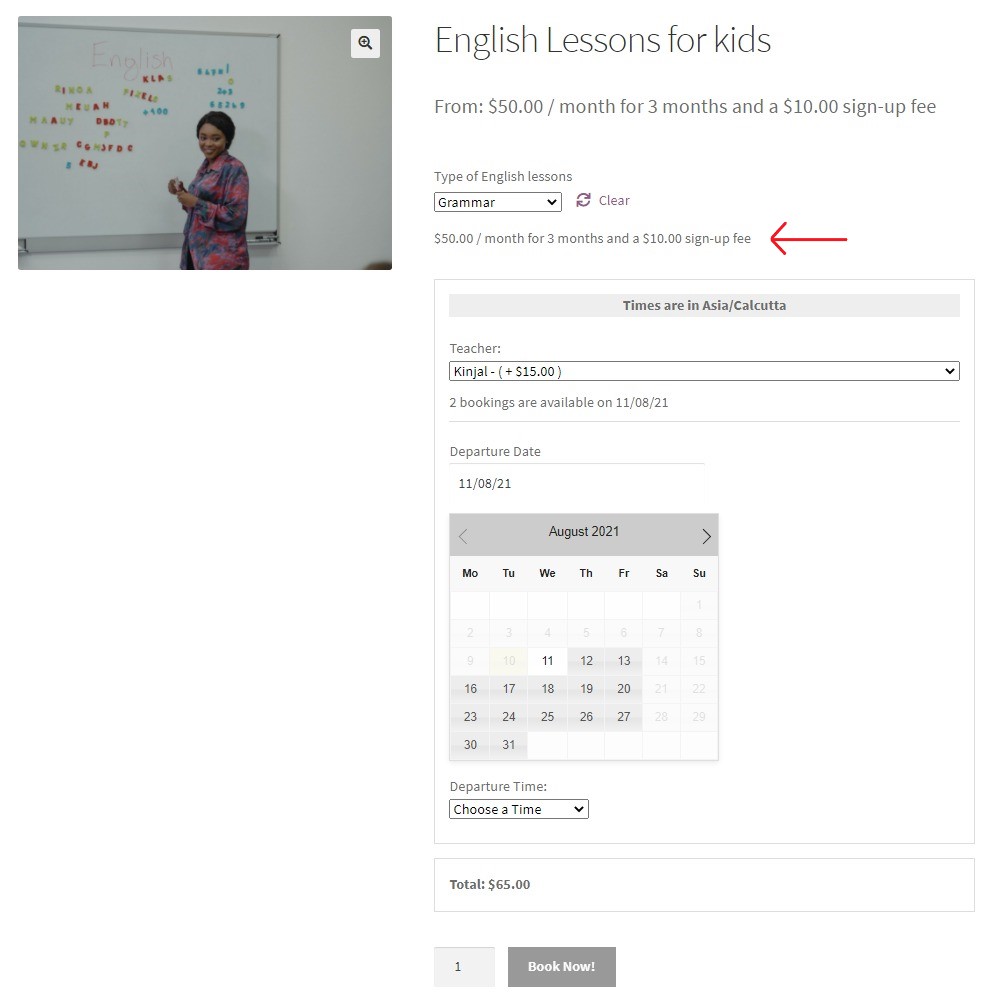
Product page when subscription variable ‘Grammar’ is selected
The second one is the LSRW Skills variable subscription:
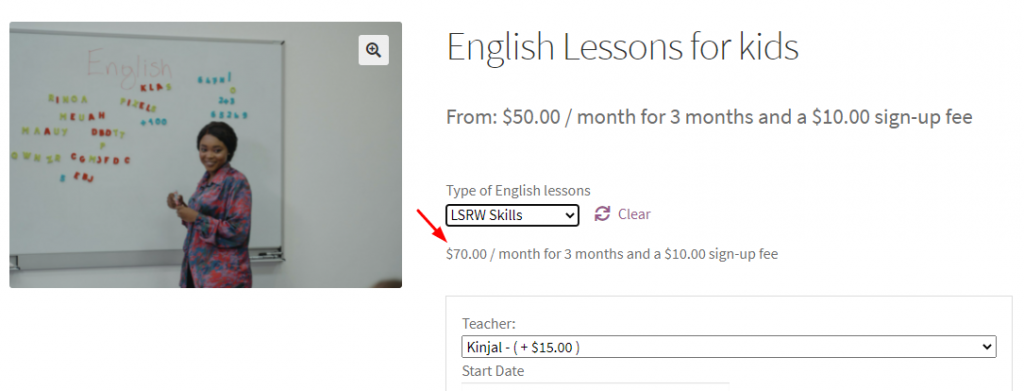
Product page when subscription variable ‘LSRW Skills’ is selected
Lastly, you have the Creative Writing variable subscription:

Product page when subscription variable ‘Creative writing’ is selected
Let’s go ahead by choosing the Creative writing option. This would mean that you will be charged $60/month.
At the Checkout Page, you will pay $60 + $10 (sign-up fee) = $70.
You can select the Resource – Kinjal. For this resource, you will be charged $15.
This would make your subtotal $85.
You can select your booking dates & time slot as 18th June 2021, 9 am to 10 am.
Here’s how our selection will appear on the product page:
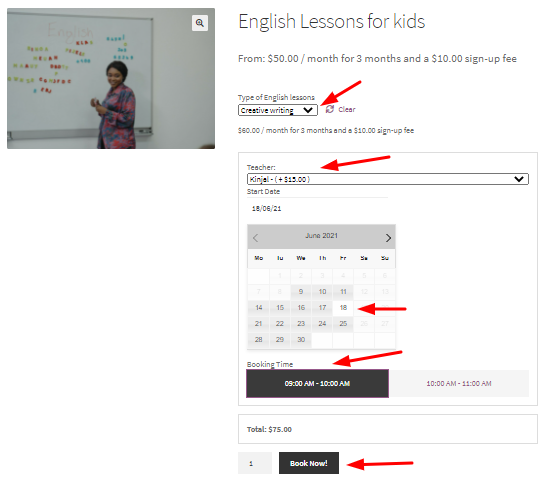
Product page with all the booking details filled in
After adding it to the cart, here’s how it will appear with your Resource, Booking Time, Start Date, and Price:
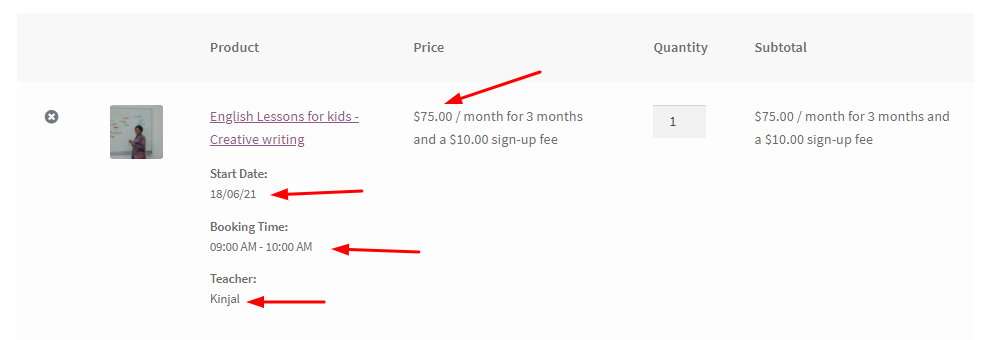
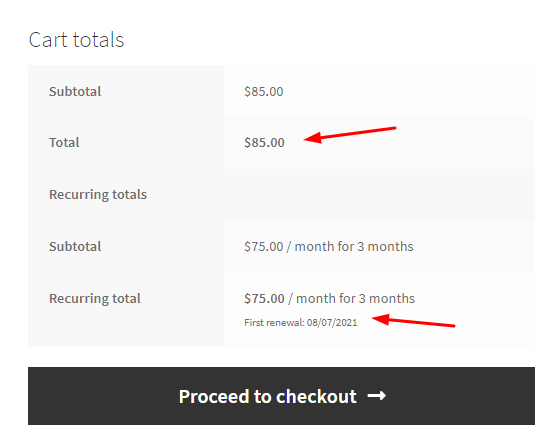
Cart Pages
Finally, here’s how the Checkout Page will be displayed:
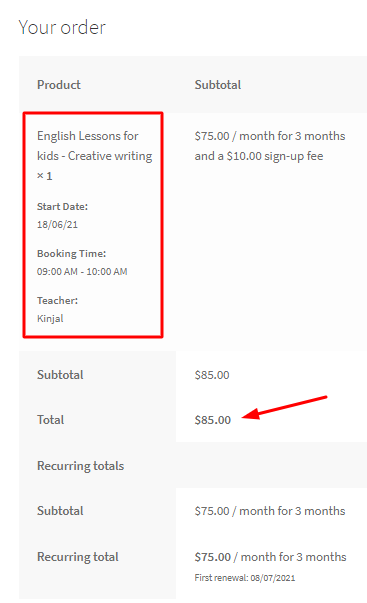
Checkout Page
In this manner, you can make your resources compatible with the Variable Subscription Product Type.
Compatibility of the Resources with Variable Product type
↑ Back to topThe Booking and Appointment Plugin for WooCommerce makes it a seamless affair when it assigns resources for Variable Product types.
Let’s see how it works with the Dates and Fixed Time booking type.
a) Booking Type: Dates and Fixed Time
For example, let’s say that you offer Guitar lessons. You have added this service to your WooCommerce store as a Variable product.
You have used the variations for the Guitar lessons as “Beginner, Intermediate, and Advanced” learners.
This means you offer 3 variations of the same product, i.e., Guitar lessons.
Go to its product page & enable the Booking setting in the booking meta box. Select the Booking type as Dates and Fixed Time as shown below:
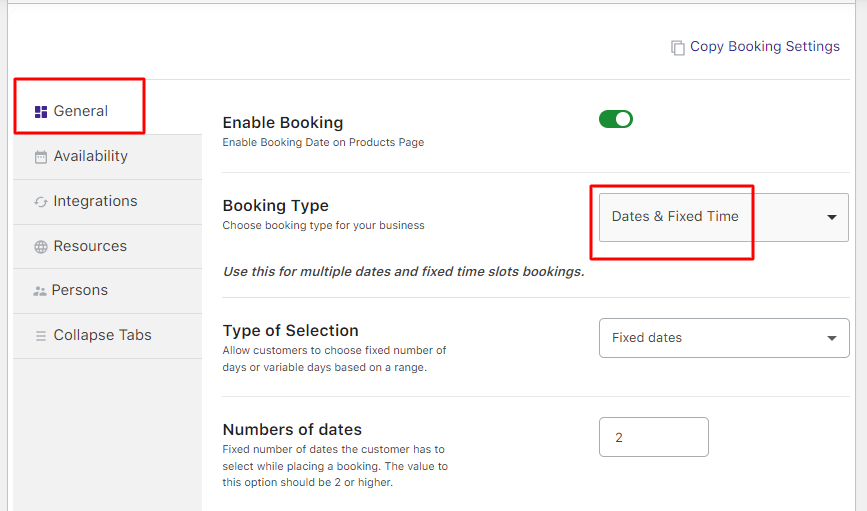
Booking meta box
From the Availability tab, set your booking days as Fridays, Saturdays, and Sundays.
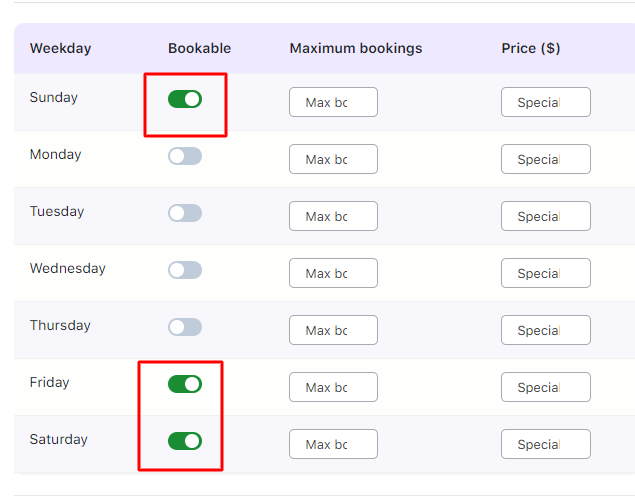
The time slots are one-hour time slots from 9 am to 2 pm.
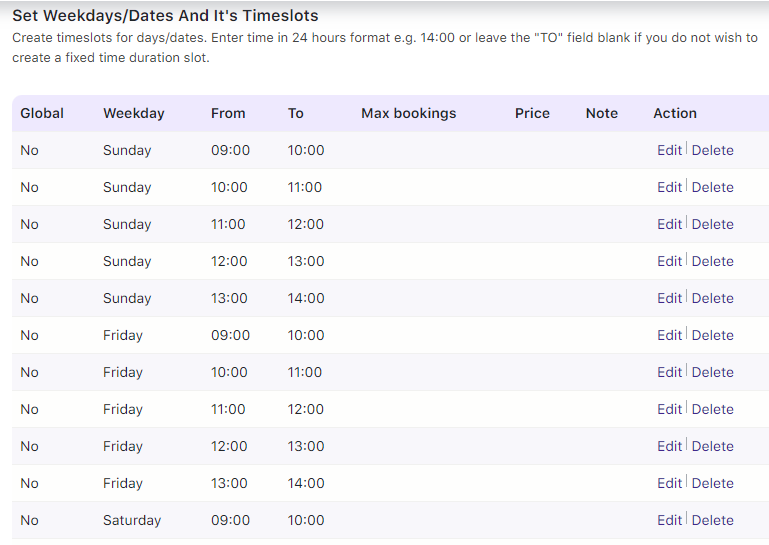
After that, go to the Resources tab and add your resources as follows:
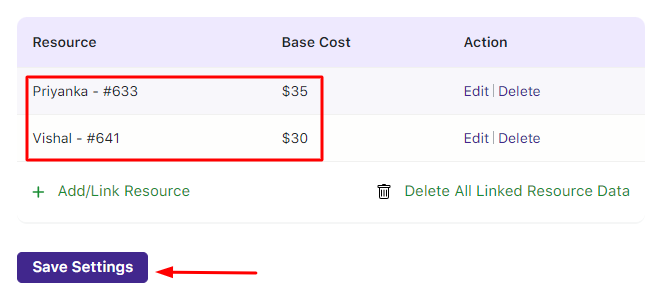
Adding booking Resources
Here, the Resource A “Priyanka” has a price of $35.
Resource B “Kinjal” costs $30.
After making these changes, click on the Save Settings button and then ‘Publish/Update’.
Your product (Guitar lessons) will be published/ updated accordingly.
Now let’s say that Resource A Priyanka is unavailable for specific time slots offered, i.e., on Fridays from 9 am to 12 pm.
To add this, go to Booking and Appointment > Resources > View Resources > Edit Resource Priyanka page.
Under Range Type, select Time Ranges > Friday, and add 9 am to 12 pm.
Make this time range unbookable & click the Update resource button.
Here’s how the page will appear once you have added the details:
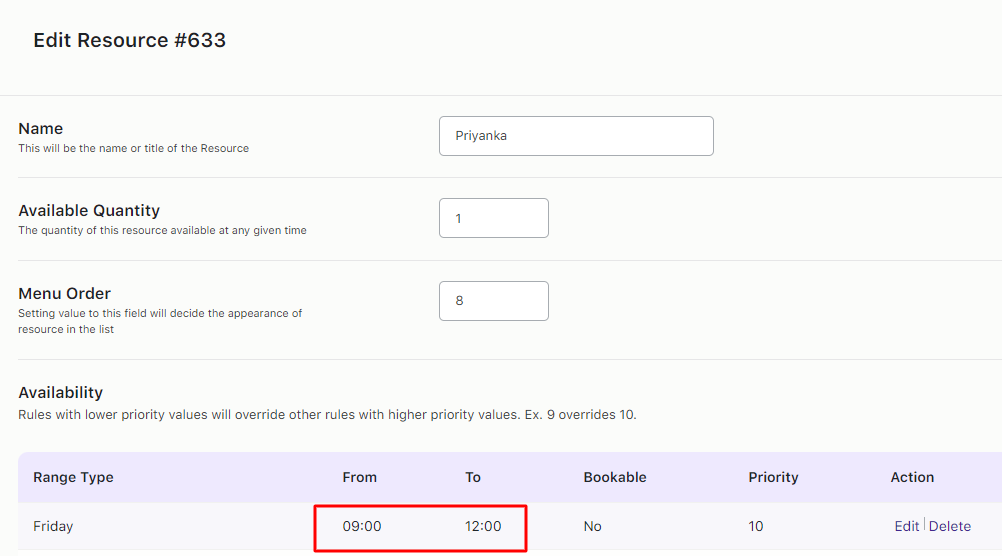
Resource details page
When the customer chooses Resource A Priyanka, they will see the timeslots from 12 pm to 2 pm for Friday bookings.
This is because the timeslots from 9 am to 12 pm are unbookable.
The customer has decided to choose an Intermediate lesson for your product.
For the resource person, they have chosen Priyanka.
Since the multiple dates option was enabled, the customer must choose 2 booking dates.
Since this service was made available only for Fridays, Saturdays & Sundays, the customer will only see those days in the Booking Calendar.
Let’s say that the customer has selected Friday- 18th June 2021.
According to the Resource person Priyanka’s availability, the customer will get only two slots.
They are 12 pm to 1 pm and 1 pm to 2 pm.
The customer decides to go with the 12 pm to 1 pm time slot.
Thus, here’s how our settings will appear on the frontend for your variable product:
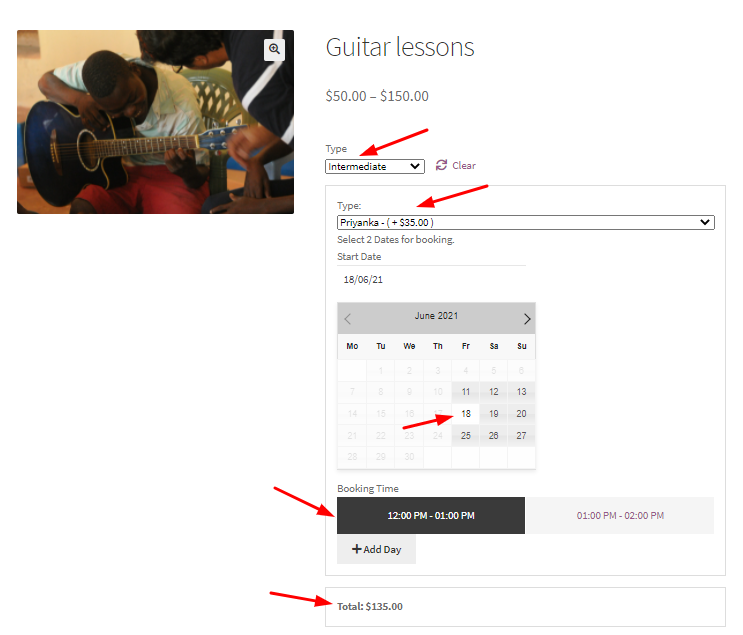
Product Page
Let’s say that the customer adds another booking with the same resource person.
However, this time the customer chooses Saturday as their booking day.
Here’s how our second booking will appear:
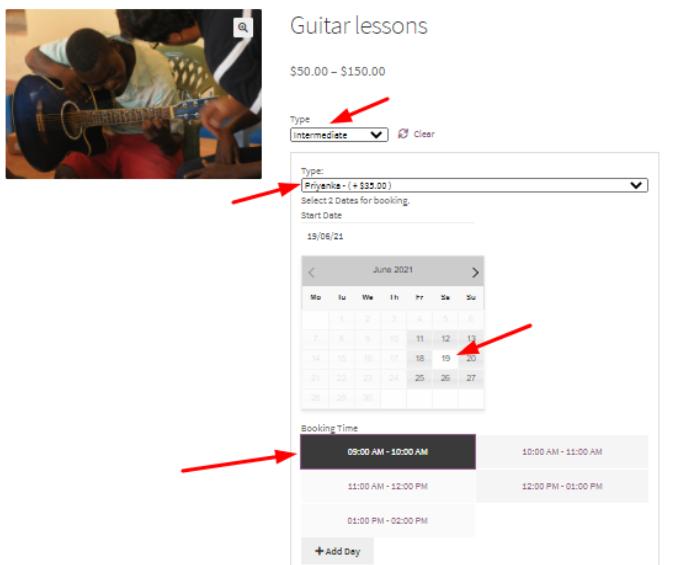
Product Page
They have selected 19th which is a Saturday. That’s why the timeslots available are from 9 am to 2 pm.
The customer has decided to go with the 9 am slot.
The booking summary will appear like this:
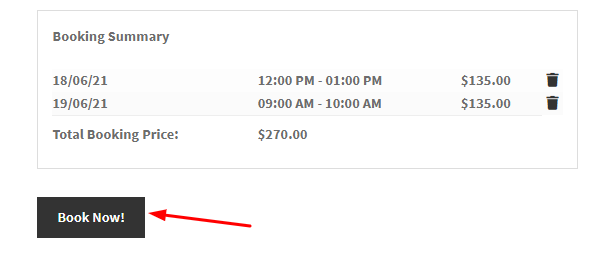
Booking Summary
Here’s how the booking order will appear on the Cart Page:
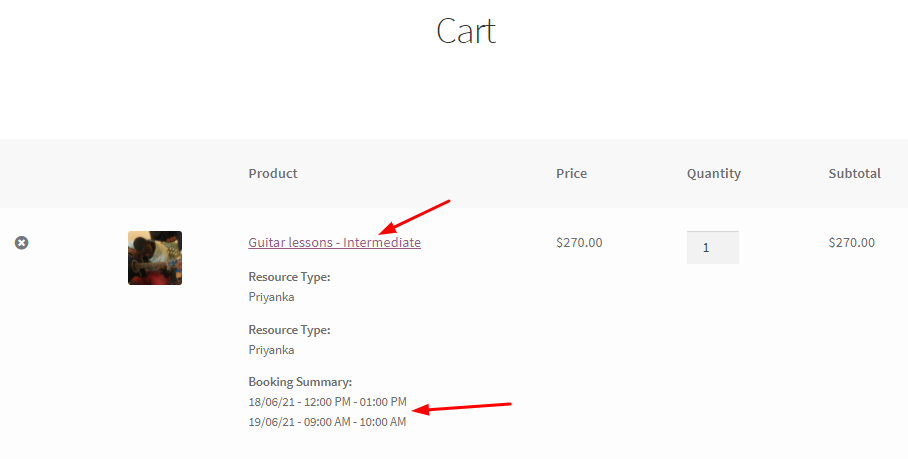
Cart Page
Here’s how it will appear on the Order Page:
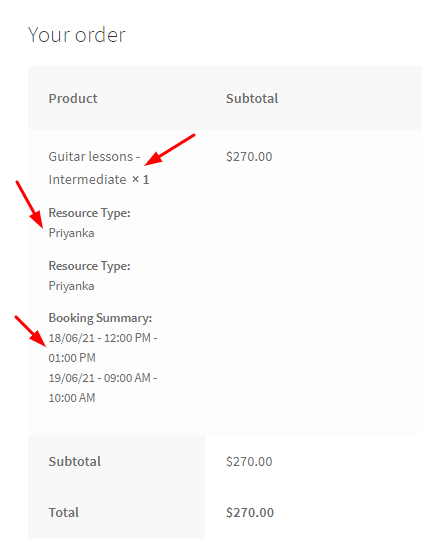
Order Page
Similarly, you can configure the resources for different booking types with the Variable Product type.
