Recurring Weekdays in the Single Day Booking Type
↑ Back to topIn Booking and Appointment for WooCommerce Plugin, for Single day bookings, you will find two booking types:
- Recurring Weekdays
- Specific Dates
These two can be used separately or together.
Let’s understand how to create a WooCommerce bookable product that can be booked for a single day using Recurring Weekdays booking.
What is a Recurring Weekdays Booking?
↑ Back to topIt is a type of booking that allows adding weekday bookings for recurring products every week.
For instance, if your service can be bookable from Monday to Friday, then you can add settings for weekdays from Monday to Friday & these will be open for booking by your customers.
This way, your customer can choose a date in the calendar available on those weekdays to book your service.
These work differently for Admin and Customers, so let us look at these two sections separately as below:
Admin Section
↑ Back to topLet’s say you provide party halls for rent so customers can book the hall for a single day.
Create a product from the Products > Add Product link.
Find the Booking Meta Box to set up your bookable product.
Click the Enable Booking option as shown below. By default, the Single-day booking type will be shown as selected in the booking type drop-down.
If you want to set this booking type for the product, you can click the Save Changes button to save this booking type. Otherwise, choose the booking type that fits your preference from the drop-down menu.

Enable the Booking Option and Selecting the Single Day option
Next, you need to add the days when this hall will be available for rent.
Go to the Availability tab, whereyou must enable the weekdays from the Weekdays table. This ensures that the hall will be available for rent on these particular days of the week.
For instance, the Party hall is available for all Mondays, Tuesdays, Wednesdays, and Thursdays, so those weekdays should be enabled as shown below.
You can set the price to $200 for one day’s rent and a maximum of 20 bookings can be taken for each day as shown below.
These can be changed as per your requirements at any time.

Enabling weekdays, adding maximum bookings & price
Thus, selected weekdays will be showcased on the front end, facilitating customers’ selection of their desired day for booking. Once you have completed all the above steps, the product is now ready to take the bookings for Party Hall.
Ensure that the settings are saved and publish the product once it is done.

Note – It is mandatory to add the regular price for the product on the Product Page, regardless of the price being added in the Availability tab. This ensures that the product is available for sale on the Shop page, and you can move that to the cart.
Customer Experience
↑ Back to topThe Party Hall Booking product will appear on the front end of the website as shown in the below:

Party Hall Bookings product
Customers can select a desired day and add the booking to the cart. You will see the Book Now! button.
Let’s say that the customer has chosen the date 24th February 2024 at the rate of $200, as shown below:

Day selected for Booking a Hall
The product is added to their cart when they click the ‘Book Now!’ button.
Clicking the View Cart button will redirect them to the Cart page, which will show the Party hall booking details as shown below:


Cart page showing details of the Booking
On clicking the Proceed to checkout button, your customer will be taken to the Checkout page, which will display the booking details and the total amount of their order.

Your customer’s order is now placed, and they will receive an order confirmation as shown below:


Order received confirmation details
Thus, the availability of the party hall will automatically be reduced by the quantity chosen.
In Summary
↑ Back to topAlthough the above example was for Simple Products, you can try using this setting with other WooCommerce Product Types!
Moreover, you can use the Booking and Appointment for WooCommerce Plugin’s Recurring Weekdays settings to rent Party Halls and businesses like Amusement Parks, One Day Tours, etc.
Specific Dates Booking in the Single Day Booking Type
↑ Back to topIn Booking and Appointment for WooCommerce Plugin, for Single day bookings, you will find two booking types:
- Recurring Weekdays
- Specific Dates
These two can be used separately or together.
Let’s understand how to create a WooCommerce bookable product that can be booked for a single day using Specific Dates booking.
What is Specific Dates Booking?
↑ Back to topFor this type of booking, they are available only on specific dates.
These dates are randomly selected, and they do not have a fixed pattern. It is a booking which does not appear every week.
For instance, businesses that book Live Concerts and sell Movie or Cricket Match tickets have particular booking dates.
So, the Specific Dates setting enables their customers to book the product only on the added specific dates.
These work differently for Admin and Customers, so let us look at these two sections separately as below:
Admin Section
↑ Back to topFor instance, you sell Tickets for Live Music Concerts. The audience can book their tickets for the day when that concert will happen.
For this, create a product from the Products > Add Product link.
Find the Booking Meta Box to set up your bookable product.
Go to the Add Product page and enable settings in the Booking Meta box by clicking the Enable Booking option.
By default, the single-day booking type will be selected in the booking type drop-down.
If you want to set this booking type for the product, click the Save Changes button to save this booking type.

Enabling the booking settings in the General tab and selecting the Booking type
Now you need to add the dates when this event will take place.
For this, go to the Availability tab as shown below:

Since you want it enabled only on specific dates, make sure that the weekday availability is not bookable as shown below:

Availability tab section
Scroll down to find the Set Availability by Dates/Months setting because you have to add specific dates for Booking.
Enable it and click the Add option.

Set Availability by Dates/Months section
Set the Range type as Specific Dates from the dropdown.

Selecting Range type as Specific Dates
Add all the dates for live concert bookings.
For instance, the concert takes place on the 21st, 22nd, 28th, and 29th of March 2024.
Thus, select these dates in the From & To column.

Adding event dates from the calendar
Add the Maximum number of tickets (700) to be sold along with its price ($50).
Turn the Bookable toggle button ON.
Update this range type.

Click the Save Settings button.

Adding event details
These dates will be showcased on the front end for your customers to help them select their desired dates.
Once you have completed all these steps, this bookable product is now ready to take the bookings of a maximum of 700 tickets for the Live Music Concert event occurring on the 21st, 22nd, 28th, and 29th of March 2024 at $50, as shown below:

Event details added in Booking > Availability section
Note – Adding the regular price for the product on the Product Page is mandatory regardless of the price in the Availability tab.
This ensures the product is available on the Shop page for sale, and you can move that to the cart.
Let’s see how these settings would reflect on the front end so that customers can book their tickets.
Customer Experience
↑ Back to topThe Live Music Concert product will appear on the front end of the website, where you can select the desired date and add the event to the cart:

Selecting the appropriate date for Booking
Let’s say that your customer has selected March 22, 2024, with a total of 2 tickets to be purchased:

Adding Booking details for the event
The order is added to your cart when you click the ‘Book Now!’ button.
Clicking the View Cart button will redirect you to the Cart page that displays all the Booking details as shown below:

Cart page displaying booking details
Clicking the Proceed to Checkout button will take you to the Checkout page which will display the booking details and total amount for your order.
The Checkout page gives you a preview of the actual order.

Your order is now placed, and you will receive an order confirmation message as shown below:


Order confirmation page
Thus, the availability of tickets for the event will automatically be reduced by the quantity chosen.
In Summary
↑ Back to topEven though the above instance was for Simple Products, you can also use this setup with other WooCommerce Product Types.
For example, when booking tickets for a live music concert, you can use the Booking and Appointment Plugin for WooCommerce plugin for businesses that book cricket match tickets, theatre tickets, etc.
Specific Dates & Recurring Weekdays Booking in the Single Day Booking Type
↑ Back to topUsing the Booking and Appointment Plugin for WooCommerce plugin, you can create Specific Dates & Recurring Weekdays Booking in the single-day booking type.
The 2 types of Single-day booking methods are –
- Recurring Weekdays Booking
- Specific Day Booking.
The Recurring Weekdays setting will allow you to add weekdays for your service, which will recur every week.
On the other hand, the Specific Dates setting will allow customers to reserve the service only on your added specific dates.
How to add Recurring Weekdays and Specific Dates bookings for booking services?
Let’s say that you run an Amusement park business.
The park is open to the public on all Fridays, Saturdays, and Sundays and on some specific dates.
In such a case, Recurring Weekdays and Specific Date booking methods are used together to set up bookings for the amusement park.
These work differently for Admin and Customers, so let us look at these two sections separately as below:
Admin Section
↑ Back to topFor this, create the Imagica amusement Park product from the Products > Add Product link.
Find the Booking Meta Box to set up your bookable product.
Go to the Add Product page and enable settings in the Booking Meta box by clicking the Enable Booking option.
By default, the single-day booking type will be selected in the booking type drop-down.
If you want to set this booking type for the product, you can click the Save Changes button to save this booking type.

Selecting Single Day option
Next, you need to add weekdays to let customers know when this amusement park will be open.
Go to the Availability tab and select the days from the Weekdays table.
Add the maximum number of bookings (30) that can be accepted for that day and at what price ($100) as shown below:


Selecting weekdays & adding maximum bookings with price
Now it’s time to add the specific dates when this park will be operational.
Enable the option Select Availability by Dates/Months.
Along with Fridays, Saturdays, and Sundays, your amusement park will remain open on the 4th, 6th, and 12th of March 2024.
For that, select the Range type as Specific Dates, add your 3 dates, enable the bookable option, and set the maximum bookings (30) and prices ($100) as shown below:

Selecting dates for showing the availability of the park
After clicking the Update button and saving your settings, your specific dates will appear as such:

After adding the specific dates
Thus, the park is open to the public on the 4th, 6th, and 12th of March and all Fridays, Saturdays, and Sundays.
The maximum number of bookings accepted for these days will be 30 per day for $100 per person.
Note – It is mandatory to add the regular price for the product on the Product Page, irrespective of the price being added to the Availability tab. This ensures that the product is available for sale on the Shop Page, and you can move that to the cart.
Let us look at how these settings would reflect on the front end for customers to book tickets for the amusement park.
Customer Experience
↑ Back to topThe Imagica Amusement Park product will appear on the front end of the website as shown here:

Magic World Amusement Park bookable product
Your customer can select the desired day and add the booking to the cart.
They will see all Fridays, Saturdays, Sundays, and 2nd, 6th, and 12th March 2024 enabled in the calendar per the settings.

Available dates are enabled on the booking calendar
Let’s say that your customer chose the date 17th March 2024 to book 2 tickets for Imagica Amusement Park as shown below:

Selection of date for booking tickets
The order will be added to their cart after clicking the ‘Book Now!’ button.
Clicking the View Cart button will redirect them to the Cart page, which will show the amusement park booking details as shown below:

Booking details are shown on the Cart page
Clicking on the Proceed to Checkout button will take you to the Checkout page, which will display the booking details and the total amount of your order.

Once the customer places the order, they will receive an order confirmation as shown below:


The order confirmation of the booking
Thus, the quantity chosen will automatically reduce the availability of the amusement park.
In Summary
↑ Back to topEven though the above instance was for Simple Products, you can also use this setup with other WooCommerce Product Types.
Similar to booking tickets for an amusement park using Specific Dates as well as Recurring Weekdays, you can use the Booking and Appointment Plugin for WooCommerce plugin for businesses that book Cricket Match Tickets, one-day tours, movie bookings, live event tickets, etc.
Multiple Nights Booking for Simple Products
↑ Back to topBusinesses like Hotel Reservations, Villa bookings, Tour Packages, Equipment or Costume on hire, etc., require a booking functionality that allows their customers to book or rent their products for multiple days.
For instance, while making a hotel reservation, you want customers to be able to choose the check-in date and check-out date for their reservation. Here’s when the Booking and Appointment Plugin for WooCommerce plugin’s Multiple Nights Booking type comes in.
Multiple Nights booking is divided into three types:
- Simple products booking
- Variable products booking
- Minimum Day booking for multiple days
These settings work differently for Admin and Customers.
1. Admin Section
↑ Back to topLet’s take the instance of booking a hotel room for 3 nights.
Create a bookable product from the Products > Add Product link.
Find the Booking Meta Box. Press the toggle button to Enable Booking.
You can convert your normal WooCommerce product into a bookable product by enabling these settings.
Now, select the Multiple Nights option in the Booking type drop-down as shown below:

Select Booking Type as Multiple Nights
Next, go to the Availability tab as shown below:

Adding additional settings
In this case, you can specify how long the bookings can be made or if they are available in advance. This ensures that customers avoid booking a room just a few minutes before.
For this, you will have to fill in the following fields to update settings in the Availability tab:
A. Advance booking period (in hours) field
↑ Back to topThis will help you specify the number of hours before you need an advance booking notice.
It is set to ‘0’ hours by default for the above-mentioned instance.
B. Number of dates to choose field
This field lets you determine the maximum number of days from the present day for hotel reservations.
It could be set to a month (30 days) or even a year (365 days).
For this instance, you can set it to 30 days, which means you can enable the customer to see in the calendar the dates for a month to book the hotel room.
C. Maximum bookings on any date field
This setting allows you to set the maximum number of hotel room reservations for that particular date.
Once the threshold is reached, the rooms will be unavailable for further bookings.
It is set to 60 bookings in a day in our above instance.
D. Minimum Number of Nights to book field
This setting enables hotels to keep a mandatory mark on bookings. It is where a customer needs to make a booking for at least those many days.
For instance, if you want the customer to select at least 2 nights for booking compulsorily, you will enter the value 2 here.
This option is used by some hotel booking businesses to acquire more sales or revenue.
Most hotels do not make this mandatory; hence, you can also set it to ‘0’ as in the above instance.
E. Maximum number of nights to book field
This setting allows customers to book for the maximum number of nights for multiple days of booking.
The bookings made cannot exceed that mark, and dates in the calendar will appear accordingly. For instance, if you want to accept only 5-night bookings for a room, you will add 5 here. This will let the customer select only a maximum of 5 bookings and not more.
For this instance, the field is set to 365 days above.
Scroll down to add all the bookable weekdays along with the above settings:

Selecting bookable weekdays
Once you have completed all the above steps, the simple product of hotel room reservation is ready for taking multiple night bookings.
Let us now look at how these settings would reflect on the front end for customers to make bookings.
2. Customer Section
↑ Back to topThe newly created simple product Hotel Sinclaire will appear on the front end of the website as shown here:

Product displayed on the front end
The Start Date and End Date options appear only in the Multiple Nights settings.
This implies you need to select the date of the check-in day and the check-out day of your stay in the hotel.
So click on Start Date and select a date from the calendar as shown below:

Selecting the Start Date for hotel booking
The date starts from 27th February 2024.
The month of March show dates are available till 27th March 2024, as shown below.
This is because 30 days from the present date was set in the Number of dates to choose field in the Availability settings.

Select the End Date for hotel booking
Let’s say the customer chooses the check-in date as 27th March 2024.
They now move on to select the check-out date.
Click on the End Date field and select the date from the calendar. The end date was selected as 30th March 2024.
Note that the price will be calculated by multiplying with the selected number of days to book the product.
Once the start date and end dates have been selected, the Book Now! button will be enabled as shown below:

Add to Cart button enabled
Clicking it will add the order to your cart.
Clicking the View Cart button will redirect you to the Cart page, which will show the selected booking details:


Details on the Cart page
Clicking the Proceed to Checkout button takes you to the Checkout page, which previews the actual order.

Order details on the Checkout page
Your order is now placed, and you will receive an order confirmation as shown below:


Order confirmation page showing all booking details
The above example demonstrated the setup for booking a hotel room for 3 nights using the multiple-booking method.
Similarly, you can set up bookings for making appointments, managing reservations, and renting with the Booking and Appointment Plugin for WooCommerce.
Multiple Nights Booking for Variable Products
↑ Back to topBusinesses like Hotel Reservations, Villa bookings, Tour Packages, Equipment or Costume on hire, etc., require a booking functionality that allows their customers to choose the check-in date and check-out date for their reservation. Here’s when the Booking and Appointment Plugin for WooCommerce plugin’s Multiple Nights Booking type comes in.
Multiple Nights booking is divided into these types:
- Simple products booking
- Variable products booking
- Minimum number of nights booking for multiple nights
- Maximum number of nights booking for multiple nights
Let’s look at how to configure the Multiple-nights bookings for Variable Products.
What is a Variable product?
↑ Back to topThe hotel industry is known for offering a wide range of options within a single service. For example, when booking a stay, customers can choose from various room types like single rooms, double rooms, and deluxe rooms. These different room categories represent variants of the core product offering, the Hotel Room, effectively making it a variable product.
You can set up variants for such products using WooCommerce Variable products and configure bookings with our Booking and Appointment Plugin for WooCommerce.
These settings work differently for Admin and Customers. Here is how it can be configured and work in both ends.
1. Admin Section
↑ Back to topLet’s understand the instance of Hotel Hyatt, which provides different types of rooms that include: Deluxe, Super Deluxe, and Suites.
A variable product will have to be created for this variation of rooms. For that:
Go to Products -> Add Product link and create a bookable Hotel Hyatt product.
To make it a Variable product, you will have to add attributes and variations using the WooCommerce guide for Variable products.
You need to utilize variations since your hotel offers diverse room types, each with distinct rates tailored to the specific category.
Implementing variations allows customers first to select their preferred room type and then proceed to choose their desired booking dates, facilitating an informed decision-making process.
For Hotel Hyatt, create the following attributes and variations in the respective tabs to set and display the available room options.
Go to Product data of the product page, select the Variable product that you created, and then update in the Attributes and Variation tab as shown below.
Type of Rooms
- Delux – $1000
- Super Delux – $2000
- Suite – $3000

The variations and their rates can be set as per your requirements in the Variation tab.

Once done, the overall price while booking a room will be based on the chosen room type and the number of days selected for reserving a room.
This can be fulfilled using the Multiple Nights booking setup.
On the same Products page, scroll down to find the Booking Meta Box that allows you to set up your bookable product.
Enable the Booking option and select the Booking type as Multiple Nights.

Selecting the Multiple Nights option
Next, go to the Availability tab and add all the bookable weekdays along with the other settings:


Enabling bookable weekdays and additional settings
The details on additional settings in the Availability tab for the Advance Booking Period, Number of dates to choose, Minimum Booking on any Date, Minimum and Maximum Number of Nights to book can be found in our post on Multiple Nights booking for Simple Products.
Once done, your product is now ready to be booked for a variety of rooms with different prices as per the customer’s requirement.
Let us now look at how these settings would reflect on the front end for customers to make bookings.
2. Customer Section
↑ Back to topThe newly created product to take bookings for Hotel Hyatt will appear on the front end of the website as shown here:

Variable product displayed on the front end
The Type of Room option will be available on the product page.
This is because the three variations were added to the product. It implies that the room charges will be based on the type of room chosen and the number of nights selected by the customer.
Click on the Choose an option to view the dropdown.
Select the room type you want to book. For this instance, you can go with the Super Deluxe Room as shown below:

Selecting the appropriate room type
Now select the Start Date and End Date by clicking on the calendar as shown below:

Selecting the Start Date
The Start Date, also known as the check-in date, is set to 23rd March 2024.
Select the End Date as shown below:

Selecting the End Date
The End Date, which is also known as the check-out date is set to 28th March 2024.
Note that the total price for the room is calculated by considering the start and end dates along with the type of room selected.
In the above instance, the Super Deluxe room’s rate is $2000 per night for 5 Nights.
Therefore, the total price for the booking is automatically calculated and displayed at $10,000 for the customer.
Once the start date and end date are entered, the Book Now!buttonwill get enabled as shown below:

Add to Cart button enabled after entering all details
The order gets added to your cart when you click the Book Now! button.
Clicking the View Cart button will redirect you to the Cart page, showing the customers their booking details.
In this case, you have selected the room quantity to be 2; therefore, the cost for two super deluxe rooms for 5 nights becomes $10,000 x 2 = $20,000


The Cart page showing details
Click the Proceed to checkout button to go to the Checkout page which gives you a preview of the actual order.
Review to ensure all the details are alright, then click the Place Order button.

Checkout page showing booking details
Your order is now placed, and you will receive an order confirmation message like the one shown below:


Order confirmation of the booking made
The above example illustrated how to configure a two Super Deluxe room booking for a 5-night stay, utilizing the Multiple Nights booking method designed for Variable products.
Likewise, this booking approach can be remarkably beneficial for rental businesses offering construction equipment, vehicles, properties for rent, and similar services.
These companies can set up their online storefront to showcase the available rental options with corresponding rates. This empowers customers to effortlessly browse and secure the desired rental services from conveniently presented assorted offerings.
In summary, implementing the Multiple Nights booking method for Variable products enables rental businesses to effectively organize and present their varied inventory in a user-friendly manner. Customers can easily identify, compare options, and complete bookings aligned with their specific requirements, streamlining the entire rental process.
Minimum Number of Nights to Book in the Multiple Nights Booking Type
↑ Back to topBusinesses such as hotels, apartment rentals, costume hire, or equipment rental services often require bookings that span multiple nights or days. In these industries, it’s crucial to have a set of well-defined rules in place, including advance booking requirements, minimum stay durations, and maximum stay limitations.
The minimum stay requirement is particularly important as it ensures bookings meet a certain length threshold. For example, a hotel may establish a minimum three-night stay policy, which means guests must book accommodations for at least three consecutive nights. Implementing this rule prevents extremely short stays that could disrupt operational efficiency or diminish the overall guest experience.
By setting a minimum booking duration of three nights, the hotel essentially requires guests to reserve their rooms for that specified period or longer. This safeguards against rapid guest turnover and allows the establishment to maintain consistent occupancy levels, streamlining housekeeping and other logistical processes.
Here’s when the Booking and Appointment Plugin for WooCommerce plugin’s Multiple Nights Booking type comes in.
Multiple Nights booking is divided into these types:
- Simple products booking
- Variable products booking
- Minimum number of nights booking for multiple nights
- Maximum number of nights booking for multiple nights
Let’s look at how to configure Multiple-night bookings for multiple days and set up the minimum stay for reservations.
1. Admin Section
↑ Back to topImagine you own and operate a hotel business. To ensure efficient operations and maintain a desirable guest experience, you want to implement a policy that requires all room reservations to be for a minimum of two consecutive nights or longer.
To set up this minimum stay requirement, start by creating a new bookable product for your “Hotel Country Inn” by navigating to Products > Add Product in your WordPress admin dashboard.
Once there, locate the Booking Meta Box section, which provides the necessary options to configure your bookable product offerings. Enable the Booking option, which will transform your standard WooCommerce product into a fully bookable product, allowing guests to reserve it for specific dates.
Select the Booking type as Multiple Nights from the dropdown as shown below:

Selecting Multiple Nights option
Then go to the Availability tab and add all the bookable weekdays along with all the settings as shown below. Within the Booking Meta Box, you’ll find settings to define the minimum and maximum night requirements for reservations.
Set the Minimum number of nights to book value to 2, ensuring that all guest reservations must be for at least two nights.


Adding setting and bookable weekdays
The additional settings in the Availability tab are Advance Booking Period, Number of dates to choose, Minimum Booking on any Date, Minimum and Maximum Number of Nights to book. The details for all the above-mentioned additional settings in the Availability tab are explained in our Multiple Nights Booking for Simple Products post.
As mentioned, only the field of Minimum number of nights to book settings in the Availability tab will be focused on here. It has been set to 2 Nights, as shown in the above screenshot.
This means that when a customer makes a reservation, they will have to reserve the room for at least 2 nights.
Click the Save Changes button after adding all the settings and enabling the bookable weekdays.
Below is how these settings will reflect on the front end so that your customers can make bookings.
2. Customer Section
↑ Back to topAs can be seen, the newly created product Hotel Country Inn is ready to accept bookings.

Newly created product displayed on the front end
The Start Date and End Date options are where you need to select the date of check-in and the check-out of your stay in the hotel.
Select the Start Date field from the calendar. For instance, here it has been selected 23rd March 2024.

Select the Start Date
Similarly, select the End Date.
The first available check-out date will be 25th March 2024. This is because the minimum number of nights to book was set to 2 nights, and hence, the 23rd and 24th of March will be disabled.
Note that the price for the rooms will be calculated based on the number of nights the room was booked.

Select the End Date
Once you select the Start date and End date, the Book Now!button will be enabled as shown below:

Add to Cart button enabled
When you click the Book Now! button, the order gets added to your cart.
Clicking the View Cart button will redirect you to the Cart page, which will show the booking details as shown below:


The cart page displaying the booking details
Click on the Proceed to Checkout button to go to the Checkout page, which will give you a preview of the actual order.
Please ensure you check everything and then click on the Place Order button.

Order details on the Checkout page
Your order is now placed, and you will receive an order confirmation as shown below:


Order confirmation of the booked product
While the previous example demonstrated the minimum night booking feature using a simple WooCommerce product, the true power of this functionality extends to Variable products as well. This allows you to offer different room types or accommodation options, each with its own set of booking rules and requirements.
In Summary
↑ Back to topSetting up hotel reservations with a minimum stay policy is a straightforward process using the “Minimum number of nights to book” option available in the Booking and Appointment Plugin for WooCommerce. This flexible feature empowers you to define the minimum duration for bookings, ensuring seamless operations and an enhanced guest experience at your hotel or rental property.
Whether you’re offering a single room type or a diverse range of accommodation choices through Variable products, the plugin provides a user-friendly interface to configure and enforce your desired minimum stay requirements. Guests can then easily browse, compare options, and complete reservations that align with your established policies, streamlining the entire booking process.
By leveraging the capabilities of the Booking and Appointment Plugin for WooCommerce, you can effortlessly implement industry-specific booking rules, such as minimum night stays, and tailor the experience to meet the unique needs of your hospitality or rental business.
Maximum Number of Nights to Book in the Multiple Nights Booking Type
↑ Back to topFor businesses in the hotel, rental, costume, or equipment hire industries, the feature of Maximum number of nights to book in multiple nights booking type offered by the Booking and Appointment Plugin for WooCommerce provides a much-needed convenience to manage and restrict customer bookings to a specific duration.
This setting allows you to define the maximum allowable number of nights for any given booking, ensuring that reservations do not exceed a predetermined length. By imposing this limit, you can better control your inventory, maintain operational efficiency, and provide consistent service levels across all bookings.
For example, let’s say you have set the “Number of dates to choose” option to 365 nights, allowing customers to select any date within the next year for their booking. However, you also have the “Maximum number of nights to book” set to 30 nights. In this scenario, while customers can make reservations for any date within the specified range, the maximum duration of their stay is capped at 30 consecutive nights.
By implementing this maximum night booking restriction, you can effectively manage guest turnover, housekeeping schedules, and overall resource allocation. It prevents excessively long bookings or stays that could potentially disrupt your operations or diminish the overall guest experience for others.
Multiple Nights booking is divided into these four types:
- Simple products booking
- Variable products booking
- Minimum number of nights booking for multiple nights
- Maximum number of nights booking for multiple nights
Let’s look at how to configure Multiple-night bookings for multiple days and set up the maximum stay for reservations.
Here is what the Admin and Customer sections will look like for this setting.
1. Admin Section
↑ Back to topSay, you run an all-year-round apartment rental business and you want your customer to be able to book and rent the apartment for a maximum of 30 nights or less but not more than 30 nights.
The first step is to create a bookable product for your apartment. Let’s say you named it Grand Apartments on the product page from the Products -> Add Product link.
On the same Products page, you will also find the Booking Meta Box that allows you to set up and configure your bookable product.
Enable settings in the Booking Meta Box by toggle pressing the button of the Enable Booking option.
Select the Booking type asMultiple Nights option as shown below and click on the Save Changes button.

Selecting the Multiple Nights option
Next, go to the Availability tab and add all the bookable weekdays along with all the settings. There you can set the Maximum number of nights to book value.
Click on the Save Changes button after it.


Adding setting and bookable weekdays
The additional settings in the Availability tab are Advance Booking Period, Number of dates to choose, Minimum Booking On Any Date, Minimum and Maximum number of nights to book. You can learn all about them in the Multiple Nights Booking for Simple Products post.
As mentioned, let’s focus only on the Maximum number of nights to book field above.
It is set to 30 Nights, and the Number of dates to choose settings is set to 365 nights, as shown in the above screenshot.
This implies that when a customer selects the date to rent your apartment, they will be shown 365 nights enabled on the calendar where they can reserve the apartment for a maximum of 30 nights or less than that.
Click the Save Changes button once it is done.
2. Customer Section
↑ Back to topNow the newly created product to take bookings for Grand Apartments will appear on the front end of the website for your customers.

Newly created product displayed on the front end
The Start Date and End Date options appear here. This is where you need to select the check-in and check-out dates for renting the apartment.
Click on the Start Date field and select a date from the calendar.
For this instance, it is selected 15th March 2024 as the Start Date from the calendar.

Select the Start Date
Now, select the End Date. You will find the first available End date as 16th March 2024.

When you move to another month to select a further date, you will notice that the last End Date available will be 14th April 2024, which is exactly 30 nights from the start date.

Select the End Date
Customers cannot select the End Date after 15th April 2024 as it will exceed the maximum number of nights to book limit, which was set to 30 nights for this instance.
Note that the rooms’ price will be calculated based on the number of nights to book the apartment.
Hence the total price for this booking will be $800 x 30= $24,000 as the number of nights selected is 30 nights.
Once the customer selects the Start Date and End Date, the Book Now!button will be enabled as shown below:

Add to Cart button enabled
The order will be added to your cart when you click the Book Now! button.
Clicking the View Cart button will redirect you to the Cart page, which will show the booking details as shown below:


The cart page displaying the booking details
Clicking the Proceed to Checkout button will take the customers to the Checkout page, which previews the actual order.
After checking the order details, the customer can click the Place Order button.

Order details on the Checkout page
The apartment booking order is now placed, and you will receive an order confirmation as shown below:


Order confirmation of the booked product
While the above example demonstrated the maximum night booking feature using a Simple WooCommerce product, it’s important to note that this functionality is equally applicable to WooCommerce Variable products. This versatility allows you to implement customized booking restrictions across different room types, rental categories, or equipment variations within your inventory.
In Summary
↑ Back to topTo recap, the “Maximum number of nights to book” option in the Booking and Appointment Plugin for WooCommerce provides a powerful and user-friendly way to set upper limits on reservation durations. This feature is particularly useful for businesses offering extended-stay accommodations, such as apartment rentals or vacation homes.
By leveraging this setting, you can easily define the maximum allowable booking period, ensuring that reservations align with your business policies and operational constraints. Whether you’re managing a diverse portfolio of rental properties or offering various accommodation options within a single location, this feature allows you to maintain control over booking durations while still providing flexibility to your customers.
Implementing these maximum stay restrictions not only helps in managing your property effectively but also allows for better inventory turnover and more equitable access to your rental offerings. It strikes a balance between accommodating longer-term guests and ensuring availability for a wider range of customers.
Remember, this feature can be fine-tuned for each product or variation, allowing you to tailor booking rules to the specific needs of different property types or rental categories in your WooCommerce store.
Fixed Time in Date and Time Slot Booking Type
↑ Back to topThe Date and Time slot booking type from the Booking and Appointment Plugin for WooCommerce plugin helps you set up WooCommerce appointments on a recurring weekday basis.
With it, your appointment schedules will be based on the same weekdays every week, i.e., every Monday or Friday, with specific timeslots.
These work differently for Admin and Customers, so let us look at these two sections separately as below:
Admin Section
↑ Back to topAppointments can be for various scenarios ranging from a simple hair spa to an appointment with the doctor.
Let’s take an instance of an appointment with a doctor who is available from Monday to Thursday from 10 AM to 2 PM and in the evening between 4 PM to 7 PM on these weekdays.
Here’s how the product will be created to book appointments.
Create a product from the Products > Add Product link.
Find the Booking Meta Box that allows you to set up your bookable product.
Click the Enable Booking option, and from the Booking type drop-down menu, select booking type as Date & Time > Fixed Time.

Go to the Availability Tab next.
The Advance Booking Period (in hours) field will allow you to specify how much time in advance the appointment can be booked. This ensures that the customers avoid booking a slot for an appointment just a few minutes before the actual time. In this case, let’s go with 24 hours.
This implies that an online appointment booking can be done only 24 hours before the appointment date. Thus, booking for the same day slot will not be possible, and only next-day bookings will be enabled.
Next, the Number of Dates to Choose field will let you determine the maximum number of days for booking appointments from the present day. It could be set to a month (30 days) or even a year (365 days).
Let’s set it to 365 days, which would mean that the calendar will show dates for a year to make this appointment.

Adding Advance Booking Period & Number of dates to choose
Moving forward, you need to add the weekdays and time slots when the doctor will be available for appointments.
First, select the days from the Weekdays table and add the maximum number of bookings that can be taken on that day, as shown below:

Selecting Weekdays for booking appointments
These settings will ensure that the selected weekdays will be available every week for an appointment and will be repeated for the number of dates you have selected in the Number of dates to choose a field, as shown in the above screenshot.
Next, add the appointment timeslots from the Set Weekdays/Dates & Its Timeslot table.
Click the + Add New Timeslot link to do so.

Adding Timeslots for booking appointments
The selected weekdays will appear, and you can add different timeslots for each weekday.
In this case, select All weekdays.

Selecting all weekdays
Enter the timeslots from 10 AM to 2 PM and 4 PM to 7 PM.
The Max bookings field allows you to set maximum appointments for that particular time slot. Once the threshold is reached, the timeslot is locked so that further bookings can be made. In this case, once 10 bookings have been made, this timeslot will not be available for selection.
The Price for the time slot field will let you add different prices for each time slot.
In this instance, the $100 price is already set to the Regular price ($) option in the Product data metabox.
Hence, you can leave that field blank and add the From time & To time for each time slot.

Updating a timeslot
Click on the Update button to save these settings.
Note – It is mandatory to add the Regular Price for the product on the Product Page irrespective of adding the price in the Availability tab. This ensures that the product is available on the Shop page for sale and can be moved to the cart.
Once your timeslots have been added, you can Edit or Delete them using the Actions section, as shown below:

Actions section
You can change the timings, max bookings, and price when editing a timeslot.
Once done, click the Update button on the right side in green.

Editing a timeslot
Your product is now ready to take bookings for doctor’s appointments.
Let us now look at how these settings would reflect on the front-end for customers to make bookings.
Customer Section
↑ Back to topThe newly created product is ready to accept Dr. Phil’s Clinic bookings.

Product displayed on the front end
As you can see below, you can select the date of appointment from the calendar by clicking the Start Date field. Only the selected weekdays, which were set in the admin section, will be enabled.

Selecting the Date for the appointment
Now, add the appointment timeslot by clicking on the Booking Time field.
The available timeslots for the selected date will be displayed, and you can book your preferred appointment time.

Selecting the timeslot from drop-down
Once you select the start date and time slot, the Book Now! button will be enabled as shown below:

Book Now! button is enabled
When you click it, the order is added to your cart.
Clicking the View Cart button will redirect you to the Cart page, which will show you the appointment details:

Details on the Cart page
Clicking the Proceed to Checkout button will take you to the Checkout page, which previews the actual order.

Booking details on the Checkout page
Your order is now placed, and you will receive an order confirmation as shown below:


Order Confirmation page showing all booking details
Once the booking is done, an email notification will also sent to the customer and administrator with these appointment details.
In Summary
↑ Back to topAlthough the above example was for Simple Products, you can try your hands on using this setting with WooCommerce Variations!
Ensure that you are never over-booked and set up appointments for Massage Centers, Hair Salons, Therapists, etc., with our Booking and Appointment Plugin for WooCommerce plugin hassle-free.
Duration Based Time in the Date & Time Booking Type
↑ Back to topThe Booking and Appointment Plugin for WooCommerce offers a helpful feature called Duration Based Time Booking. This feature allows customers to book time slots for a specific duration instead of booking for an entire day.
For example, let’s say you’re organizing a conference, seminar, party, or meeting. With Duration Based Time Booking, your customers can conveniently book a time slot for the exact duration they need, such as a 2-hour seminar or a 4-hour party.
As an admin, you can set these bookings’ minimum and maximum duration limits. You can also set the start time for the day. Based on these settings, the plugin will automatically create appropriate time slots on the front end for your customers.
Customers can select the duration that best suits their needs from the available time slots. This flexibility makes it easy for them to book the required amount of time without unnecessarily booking an entire day.
This guide will focus on a Simple Product, but using this setup with all WooCommerce product types is possible. Follow the walkthrough below to understand how Duration Based Time in the Date & Time Booking Type is utilized.
1. Configuring Duration Based Time Booking
1. A. ADMIN SECTION
↑ Back to topTo understand how the Duration Based Time setting works, let us take the example of a conference hall. The customers book this hall for a particular duration specific to their meeting hours.
Start by creating a new product, Conference Hall.
Enable the booking option and select the Booking Type as Date & Time > Duration Based Time under the General tab, as shown below.

Selecting Booking type as Duration Based Time
Set the availability for this product in the Availability Tab. You will find the following settings under this tab:


Settings added for Duration Based Bookings
- Label: It is the text that states what action is to be taken. It is set to Select Duration.
- Duration: It is the time in hours for which the slots will be created on the front end. This is set to 1 hour. You can also set this in minutes.
- Gap between durations: This will let you set a time gap between two booking times. Based on this gap, your durations will be created. This is set to 30 minutes.
- Minimum duration: It is the minimum duration that the customer has to select for their booking. This is set to 1 hour.
- Maximum duration: It is the maximum duration that a customer can select for their booking. This is set to 3 hours.
- Maximum booking: It is the maximum number of bookings allowed per slot (duration) created. This is set to 10 bookings per duration.
- Duration price: It is the price per time slot (duration) created. This is set to $50 per duration.
- Duration start & end range for days: This is the time when the first time slot/duration will be created for the day. This is set to 10:00 AM. This is also the time when the first time slot/duration will end for the day. It is set to 20:00 (08:00 PM).
You can publish the product once all the settings are added and saved.
*Note – It is mandatory to add the Regular Price for the product on the Product Page irrespective of adding the price for the duration in the Availability tab. This ensures that the product is available for selling on the Shop page, and you can move that to the cart.
1. B. CUSTOMER SECTION
↑ Back to topThe newly created product to take bookings for the Conference Hall will appear on the front end of the website as shown below:

Product displayed on the front end
Since we have selected Duration as 1 hour and Minimum duration as 1 hour in the backend, 1 hour will be automatically added in the Select Duration tab on the front end.
You can select a maximum duration of 3 hours. That’s because the Maximum duration was set to 3 hours in the backend.
Let’s say your customer selects the duration as 3 hours and the booking date as 14th March 2023.
This will create time slots for 1 hour with maximum bookings shown as 10 bookings (as set in the backend):

Time slots created as per the settings
As you can notice, the time slots are created for 1 hour each from 10 AM onwards because the First duration starts as the option was set to 10 AM and ends at 08:00 PM.
Since you had added 30-30 minute time gap between each booking, the timeslots have been created accordingly:
Time slot 1: 10:00 AM to 11:00 AM
a gap of 30 minutes
Time slot 2: 11:30 AM to 12:30 PM
a gap of 30 minutes
Time slot 3: 1 PM to 2 PM and so on.
Now, let’s select a 1:00 PM time slot on 14th March 2023. The price will be calculated for 3 hours as shown below:

Booking Time selected
The booking time gets added for 3 hours, and the total price displayed will be $150 because the price for each duration is set to $50. Hence $50 x 3 = $150.
For instance, if the Duration price is not set under the Set Duration Based Booking section in the backend, then the product price, which is $200, will be considered. Thus, the Total Price in this case will be $600 ($200 x 3 = $600).
It is also to be noted that currently, there are 10 bookings available for the 1:00 PM time slot.
Once the Conference Hall is added to the Cart Page, it will look like this:

Booking added to the Cart
It will show the booking details of the Conference Hall that has been booked for 14th March 2023 from 1:00 PM for 3 hours.
Click the Place Order button on the Checkout page to complete this booking.
2. Maximum Booking Availability
↑ Back to topTo understand Maximum Booking Availability, let’s consider the above instance where the maximum bookings per time slot are set to 10 bookings.
SCENARIO 1
Our customer has already booked the Conference Hall for 14th March 2023 from 1:00 PM for 3 hours.
Another customer visits the site and selects the same day as 14th March 2023 to book the Conference Hall at 1:00.
The maximum availability for that time slot will be displayed as 9 left till 4 PM, as shown below:

9 bookings left for time slot 1:00 PM – 4:00 PM
Thus, when a booking for a particular time slot is already made, the availability for that time slot decreases by the number of bookings made.
SCENARIO 2
Let us consider another scenario where the Conference Hall is booked for all 10 bookings for the time slot 1:00 PM on 14th March 2023.
In this case, this time slot will not be displayed on the product page as shown below:

Time slot 1:00 PM to 4:00 PM not being displayed
The time slot of 1:00 AM to 4:00 PM reached its maximum limit and, therefore, was unavailable.
Hence, unavailable time slots were not displayed on the front end when selecting the booking time.
Moreover, if the customer changes the Duration for the above instance to 2 hours, then time slots from 12:00 PM to 4:00 PM will not be displayed.
Hence, changing the Duration affects the display of available time slots on the front end.

The time slot 12:00 PM to 4:00 PM is not displayed
Thus, the Duration Based Time booking feature in the Booking and Appointment Plugin for WooCommerce plugin ensures that you are never over-booked for any time slot!
Setup Multiple Dates Booking
↑ Back to topWith the Booking and Appointment Plugin for WooCommerce plugin, you can allow customers to select multiple dates on the product page when trying to opt for your services.
Let’s say that you offer guitar classes for beginners and that you want to allow your customers to choose multiple dates for their classes in one go. That’s where this feature will be helpful.
With it, you can allow the number of multiple dates and time slots you wish your customers to choose from.
Here’s how you can configure and utilize Multiple Dates Booking features.
1. Admin section
↑ Back to topAfter adding your service as a product from the Products > Add Product link, you can find the Booking Meta Box situated on the same page.
Here’s where you will make all the changes to your bookable product.
A) General Tab
↑ Back to topUnder the General tab, you will have first to enable the booking option.
After enabling the ‘Enable Booking’ option, in the Booking Type drop-down menu, you can select ‘Dates’ or ‘Dates & Fixed Time’.

Multiple Dates Booking type
If you choose ‘Dates’, then on the product page, the customer will be able to choose only multiple dates.
If you choose ‘Dates & Fixed Time,’ the customers will be able to choose multiple dates and times.

Type of Selection setting
Under ‘Type of Selection,’ you will find two options in the dropdown: Fixed dates and Range-based.
If you select ‘Fixed dates’, the customers will be able to select a fixed number of multiple dates you chose.

You can set this number under the option ‘Numbers of dates’.
Fixed date based multiple bookings
If you choose ‘Range based’, then the customer can choose multiple dates based on the range you provide them.
You can set this range under the option ‘Set a range’, where you can decide the minimum and the maximum number of dates a customer can choose while making multiple bookings.
For example, setting 3 as your minimum dates and 5 as your maximum dates would allow your customers to choose between 3 to 5 different booking dates.

Range based multiple bookings
Once you have filled in all of these settings, you can move over to the Availability tab to add the dates of when your services will be available to book for customers.
B) Availability Tab
↑ Back to topHere’s how the settings will appear once you click on the Availability tab:

‘Availability tab’ setting
Here, you can choose which days you wish to enable your multiple bookings, their price on that specific day, and the number of maximum bookings you wish to take on that day.
You can even set your availability by Dates/Months. After enabling the ‘Set Availability by Dates/Months’ settings, you will find the following options:

‘Set Availability by Dates/Months’ setting
Under Range Type, you will find four options: Custom Range, Specific Dates, Range of Months, and Holidays.
If you choose Custom Range, you will be able to set your availability based on the custom range you select.
You can select the dates for the custom range under the From and To options.

Custom Range setting
If you choose Specific Dates, you can choose specific dates in a year to set your availability.
Under the From and To tab, you can select the specific dates from the inline calendar.
You will also be able to set Max bookings and the Price for them.

Specific Dates setting
If you choose Range of Months, you will be able to set your availability from one month to another as such:

Range of Months setting
If you choose the Holidays option, you can choose the dates you wish to make the selection unavailable on the booking calendar on the front end.

Holidays setting
If you have chosen to set your Booking Type as ‘Dates and Fixed Time,’ you will also find an option to set the Fixed time slots under the Availablity tab.
Here’s how it will appear:

Set Weekdays/Dates and timeslots setting
Once you click ‘Add New Timeslots,’ you can select the Weekdays (All days as well), the period, the number of bookings, their Price, and Note, and even enable/disable the Global option.
Let’s say you offer two services, Product A- Guitar lessons for beginners and Product B- Guitar lessons for Kids.
Enabling the Global option for the time slot of a particular product will directly impact the same or the overlapping time slot for another product.
For example, if you have enabled this option for Product A, i.e., Guitar lessons for beginners for 14:00-16:00, then the overlapping time slot of 14:00-16:00 for Product B, i.e., Guitar lessons for Kids, will be blocked.
This feature is handy for store owners who have only one person offering two or more services at a time.
Depending on their availability, the store owner can receive bookings.

Add New Timeslots setting
With the help of this option, customers can choose a separate delivery time slot for each date, too!
You can create all of your time slots in this manner by clicking on ‘Add New Timeslots’. Here’s a look at them:

Different timeslots for multiple dates setting
2. Customer experience
↑ Back to topHere’s how all the multiple-date booking settings will appear on the Guitar Lessons for Beginners product page:
A. Fixed Dates selection
↑ Back to topa) Multiple Dates Booking Type

b) Multiple Dates & Fixed Time Booking Type

B. Range-based selection
↑ Back to topa) Multiple Dates Booking Type
↑ Back to top
b) Multiple Dates & Fixed Time Booking Type

C. Cart Page
↑ Back to top
Multiple Dates Booking Type on the Cart page

Multiple Dates & Fixed Time Booking Type on the Cart page
D. Checkout Page
↑ Back to top
Multiple Dates Booking Type on the Checkout page

Multiple Dates & Fixed Time Booking Type on the Checkout page
E. Order Received (Thank you) Page

Multiple Dates Booking Type on the Order Received page

Multiple Dates & Fixed Time Booking Type on the Order Received page
Please note: If your customers wish to reschedule their existing bookings with Multiple Dates, they can easily do so by going to their My Account Page and using the Reschedule option.
To check out our documentation on how to reschedule a booking, head over here.
For instance, if a customer has booked 3 dates for Guitar lessons, then they should go to My Account > Orders and the details will show up:

They can scroll down to Order Bookings and find the option to reschedule all the 3 dates by simply clicking on the ‘Reschedule Booking button’:

After clicking on one of them, you can choose the new date:

We’ll go with 3rd June 2022 and then click on Confirm Bookings:

You’ll see that the date has been rescheduled under Order Updates:

In Summary
↑ Back to topIf you have an online business that requires multiple bookings on its e-commerce site, this feature of the Booking and Appointment Plugin for WooCommerce will be handy for you.
Your customers can now forget the hassle of going back to book another date for an event or a service. Simply use this plugin and the feature to provide multiple booking dates and time slots in one place, i.e., the product page!
Multiple Days and Time Booking Type
↑ Back to topWith the Multiple Days and Time booking type, you can now allow customers to make bookings that span across multiple days, while also choosing specific time ranges or individual time slots within those days.
This setup is particularly useful for businesses offering rentals or services that run for several days and need precise control over the start and end times, such as vehicle rentals, holiday packages, ferry rides, airport cab bookings or workshops.
By enabling this configuration, you can:
- Let customers choose a start date & time and an end date & time for their booking.
- Define whether the entire booked period should be blocked or just specific time slots should be restricted.
- Set prices per day, per hour, or per time slot, giving full flexibility for hourly or duration based pricing models.
- Ensure availability updates are automatically based on the selected blocking method.
Admin Configuration
↑ Back to topOnce your service or rental product is added from Products > Add Product, you’ll find the Booking Meta Box on the same page.
All booking-related settings for the product will be configured here.
General Tab
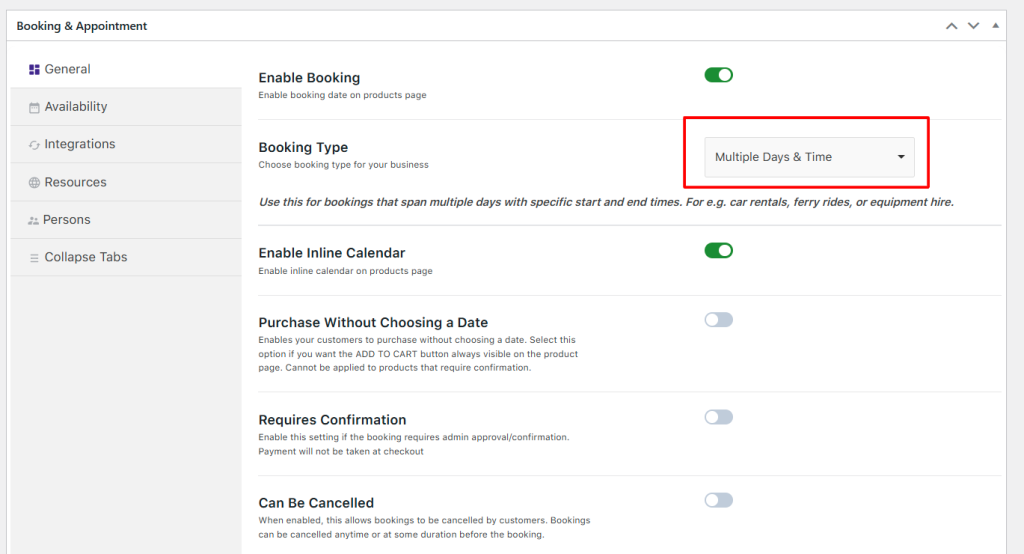
↑ Back to top- Under the General tab, enable the Booking option.
- Select Multiple Days & Time as the booking type.
This ensures that customers can choose both dates and time slots for their bookings.
Once you have filled in all of the other settings as per your preferences, you can move over to the Availability tab to add the dates of when your services will be available to book for customers.
Availability Tab
From the availability tab, you’ll define the booking rules, including how availability is managed, how prices are applied, and what kind of time slots are available.
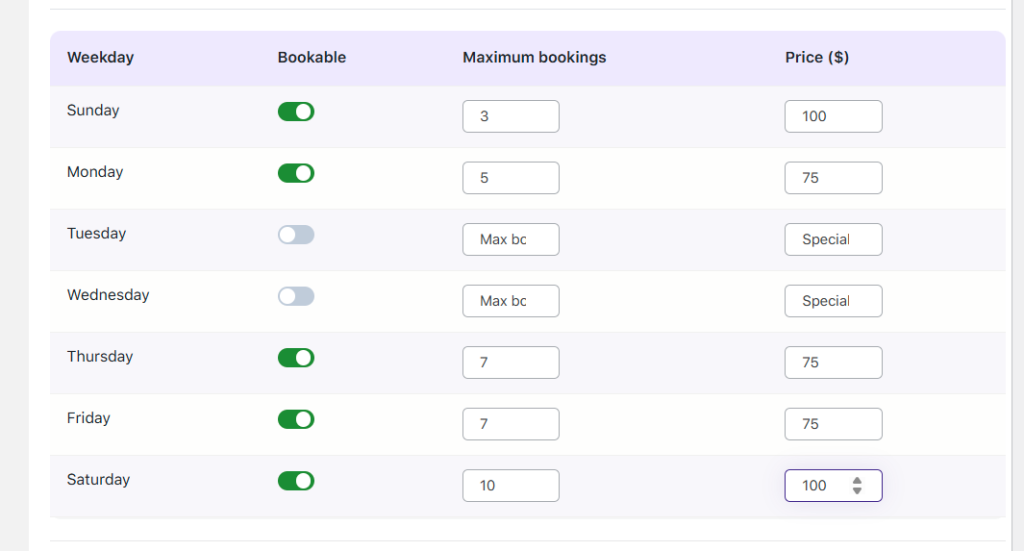
Here, you can choose which days you wish to enable your multiple bookings, their price on that specific day, and the maximum number of bookings you wish to take on that day.
You can even set your availability by Dates/Months. After enabling the ‘Set Availability by Dates/Months’ settings, you will find the following options:
Set Availability by Dates/Months
This feature lets you set bookable availability for specific date ranges, months, or holidays. You’ll see the following options under Range Type:
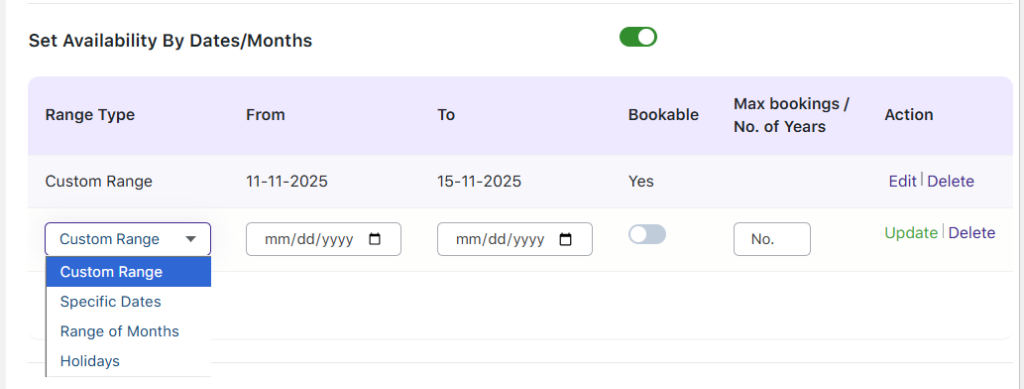
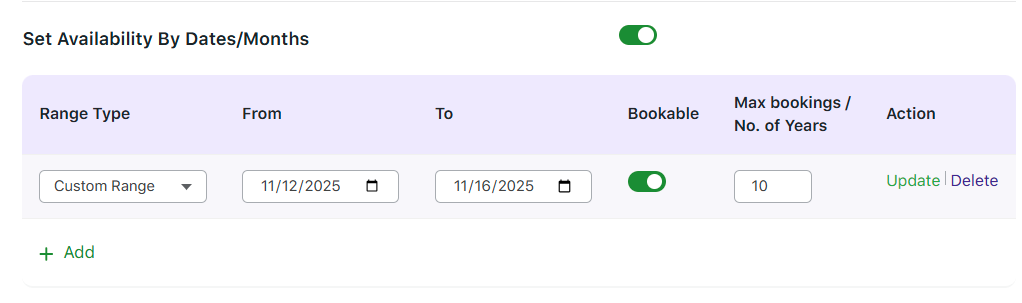
- Custom Range – Define a specific “From–To” date range (e.g., 11th Nov 2025 – 15th Nov 2025). You can select the dates for the custom range under the From and To options.
- Specific Dates – If you choose Specific Dates, you can choose specific dates in a year to set your availability. Under the From and To tab, you can select the specific dates from the inline calendar. You will also be able to set Max bookings and the Price for them.

- Range of Months – If you choose Range of Months, you will be able to set your availability from one month to another as such as bookings open from January–March.
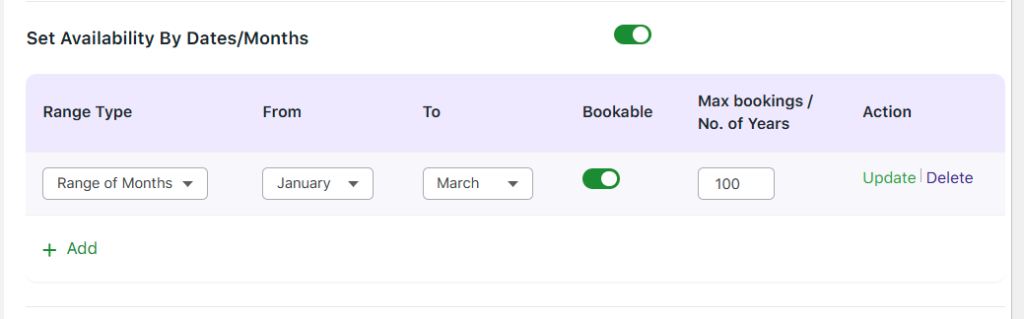
- Holidays – If you choose the holidays, you can Mark specific dates like public holidays or maintenance days as non-bookable.
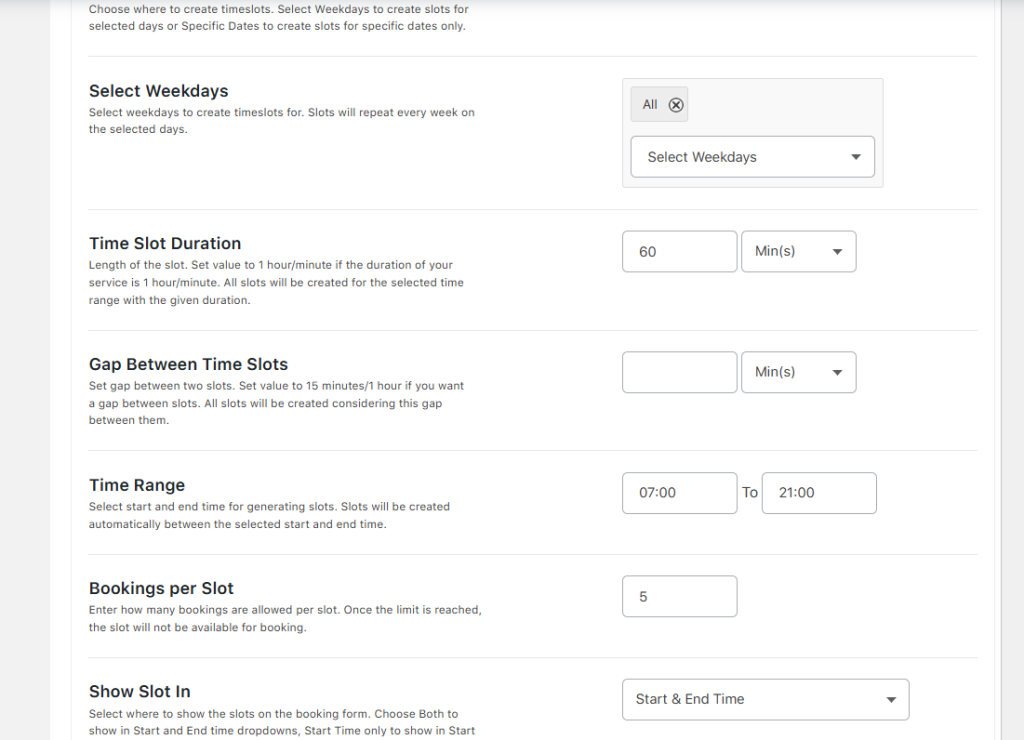
Add Bulk Time Slots
↑ Back to topThe Add Bulk Time Slots feature helps you quickly create multiple time slots instead of adding them one by one. This is essential for setups involving multiple-day bookings with specific time ranges.
You’ll first choose where to create the time slots. Under Time Slot For, you can select either Weekdays or Specific Dates.
This is especially useful for car rental businesses that provide vehicles at specific times of the day or for a set number of hours.
Start by selecting Time Slot For:
- Weekdays – Use this if your rentals are available on specific days of the week (e.g., Monday to Friday).
- Specific Dates – Use this for limited availability, such as weekend offers or holiday rentals.
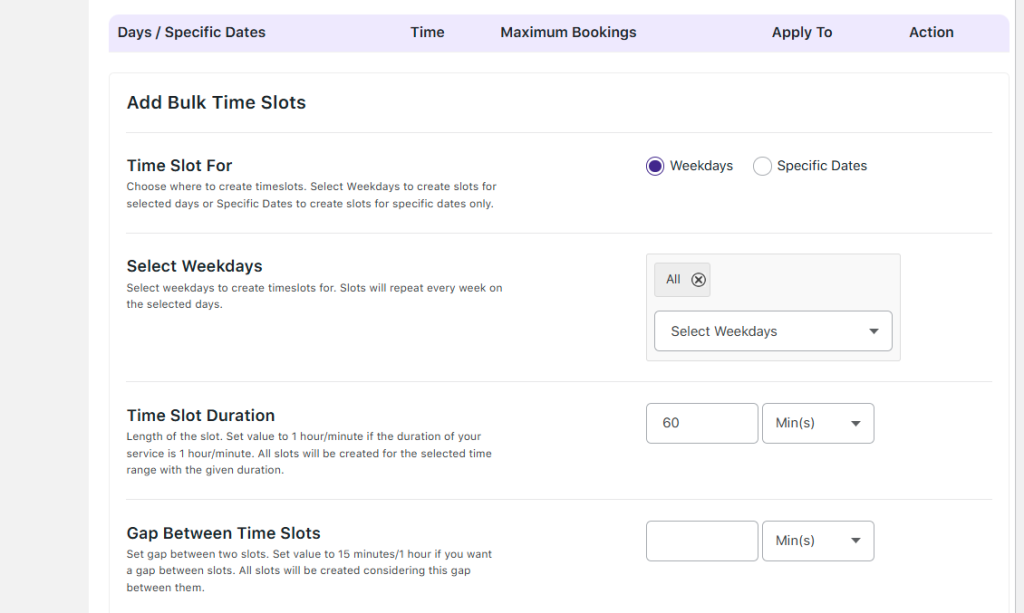
Next, define the Time Slot Duration, which specifies how long each rental lasts.
If you rent cars in 4-hour slots, set the duration as 4 hours.
You can also add a Gap Between Time Slots. For example, adding a 30-minute gap ensures a buffer before the next booking begins.
Now, set the Time Range for your working hours — say, 07:00 AM to 09:00 PM.
The plugin will automatically create slots within this range based on your duration and gap settings.
Then, enter the Bookings per Slot, which defines how many cars are available for rent in each slot.
If you enter 5, that means only 5 cars can be booked for a particular 4-hour slot. Once 5 cars are booked, that slot will no longer be available.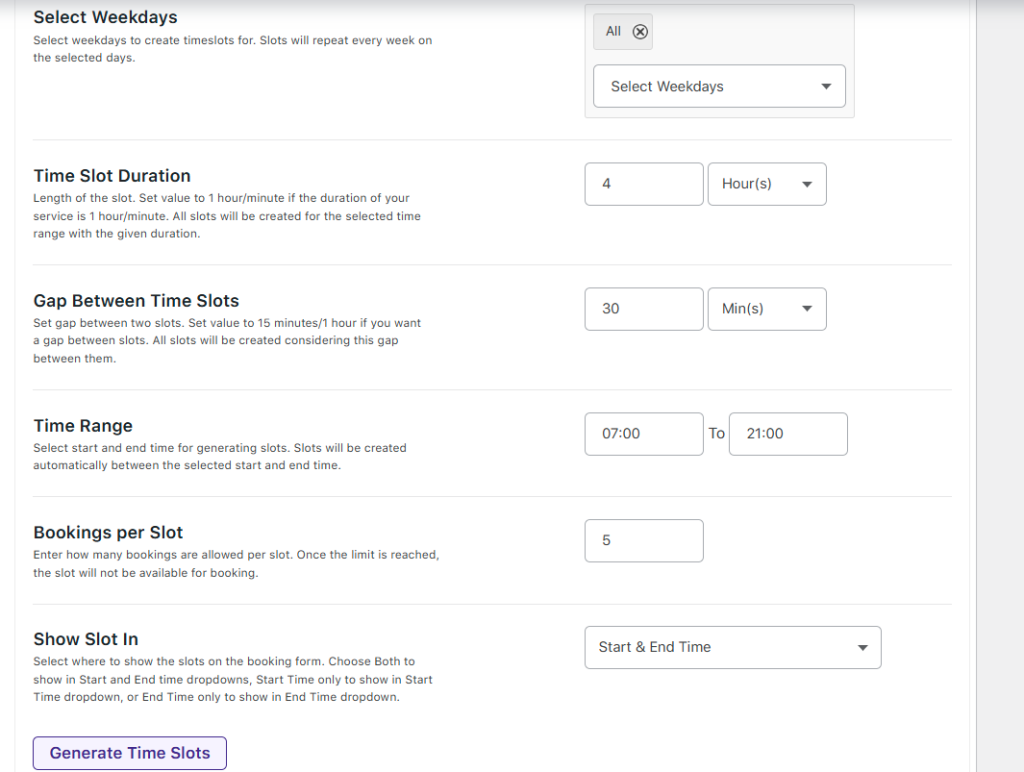
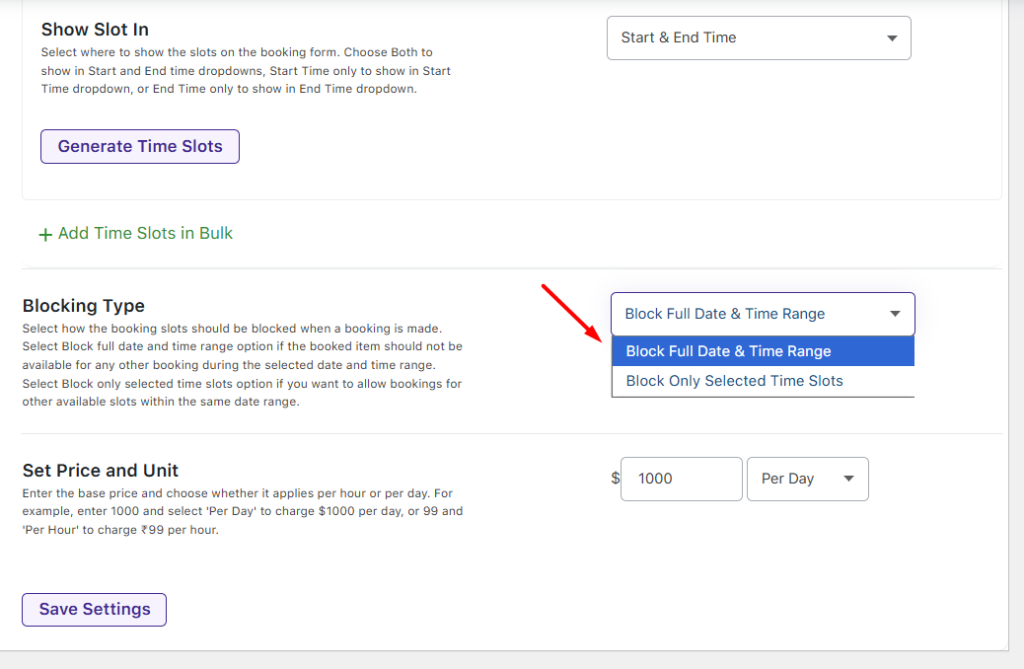
You can also decide how the time slots appear to customers under Show Slot In which is of 3 types:
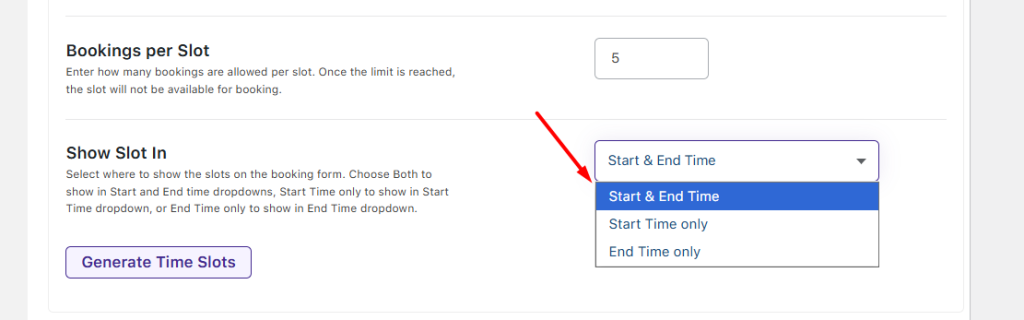
- Start & End Time –
When you select Start & End Time, the same time slots are visible in both the Start Time and End Time dropdowns on the booking form.
This allows customers to freely select any available start and end time combination within your defined working hours.
- Start Time only –
When you select Start Time Only, the generated time slots will only appear in the Start Time dropdown. - End Time only –
When you select End Time Only, the generated slots appear only in the End Time dropdown on the booking form.
This is useful for services where the completion time is the key factor for the booking.
Blocking Type: Control How Your Time Slots Work
↑ Back to topThe Blocking Type setting determines how your product availability is handled once a customer makes a booking. This option is crucial for managing resource allocation and ensuring that your bookings don’t overlap or conflict.
You have two main choices:
- Block Full Date & Time Range: Blocks the entire period between the selected start and end dates/times, preventing any overlapping bookings.
- Block Only Selected Time Slots: Blocks only the chosen time slots, allowing other slots within the same date range to remain available for booking.
Block Full Date & Time Range
Consider a car rental service available from 12th November to 16th November, you can configure the backend to create time slots across the working hours. For example, if your cars are available from 07:00 AM to 09:00 PM and you want to create 1-hour slots with a 1-hour gap, you would set the following in the Add Bulk Time Slots section:
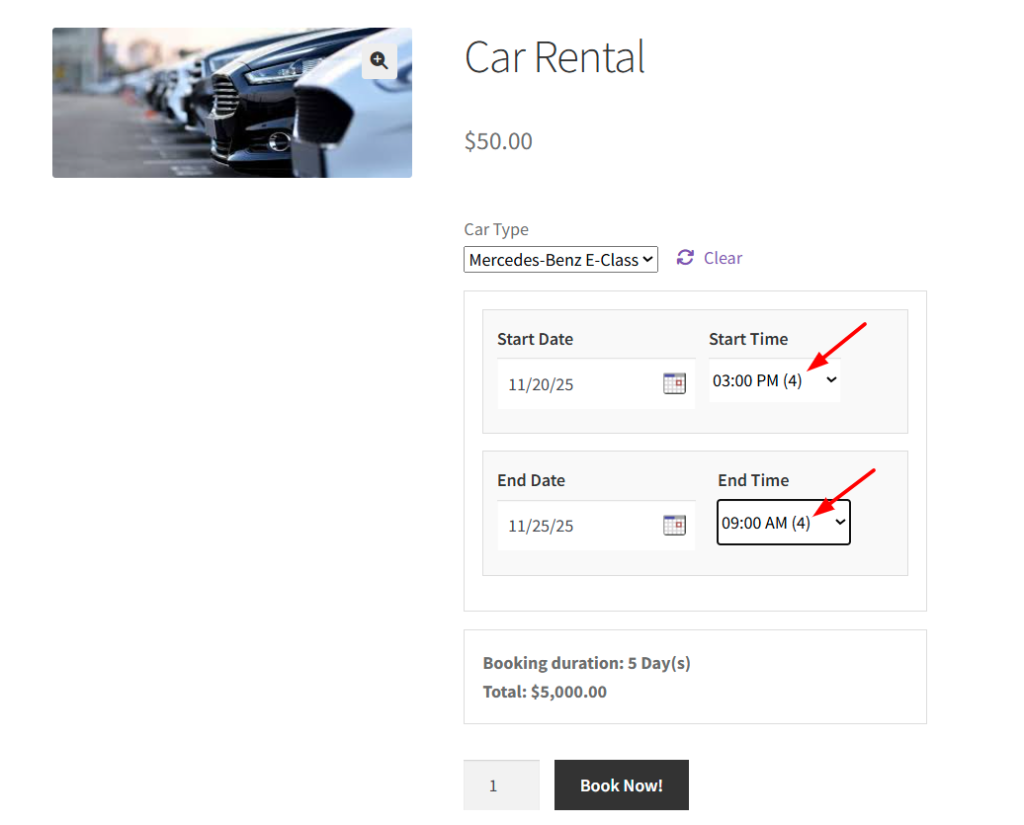
For a car rental service available from 12th November to 16th November, when a customer books a car from 12th November, 3:00 PM to 16th November, 9:00 AM, that specific car is reserved for the entire duration.
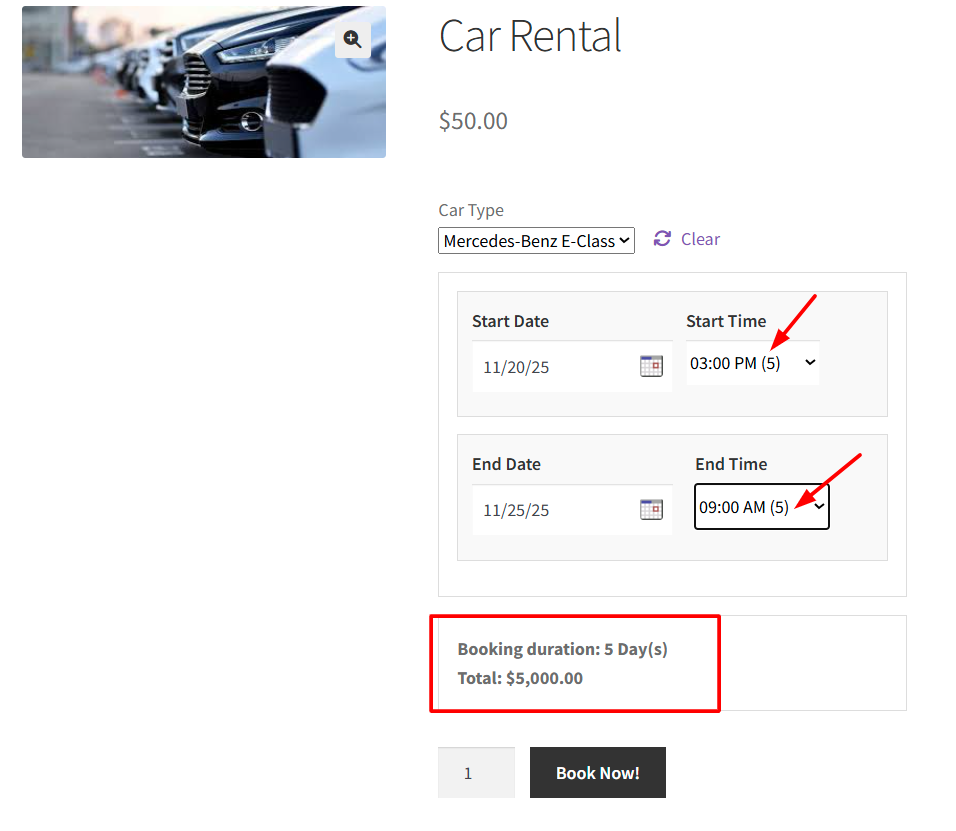
Other customers when they book the same car during this time duration, you can see that the availability gets reduced.
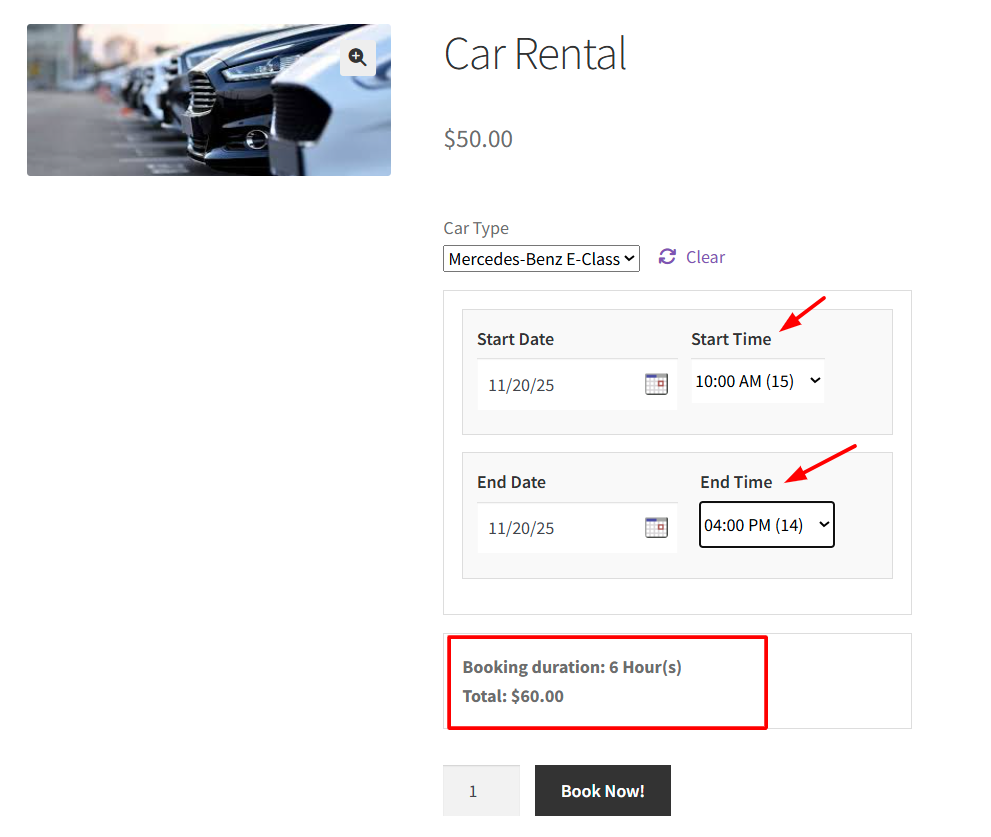
How Per-Hour Booking Works
In a car rental service, you can rent a car for specific hours rather than full days. The cost is calculated based on the number of hours booked.
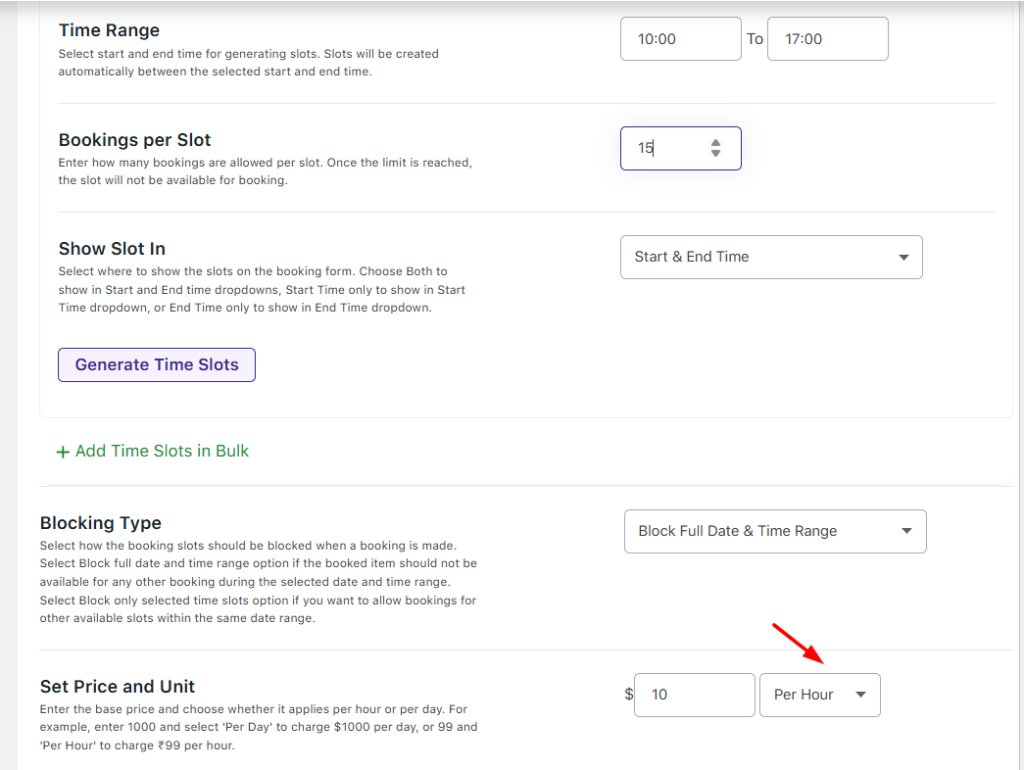
For example, if a car is available on 12th November 2025 from 8:00 AM to 5:00 PM at a rate of $10 per hour, and a customer books it from 10:00 AM to 4:00 PM, the total cost will be 6 hours × $10 = $60.
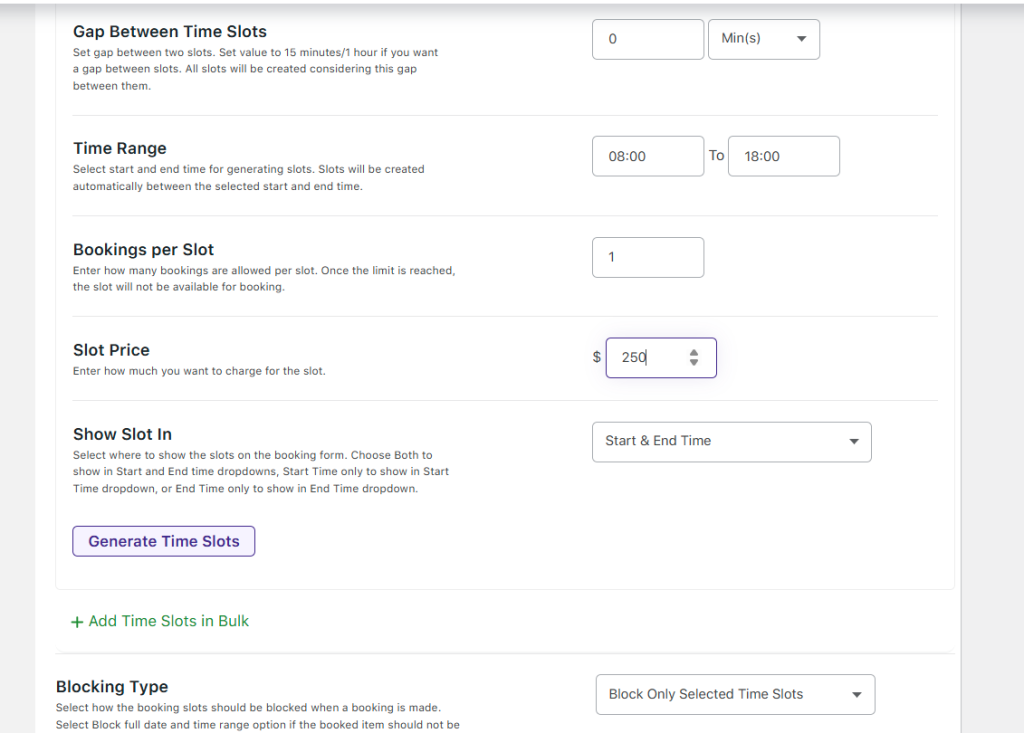
Block Only Selected Time Slots:
With the Block Only Selected Time Slots option, only the specific time slots chosen by the customer are blocked, while other slots within the same date remain available. This is ideal for businesses that offer services in fixed time intervals, such as airport cab services, shuttle pickups, or hourly rentals, where multiple customers can be accommodated on the same day at different times.
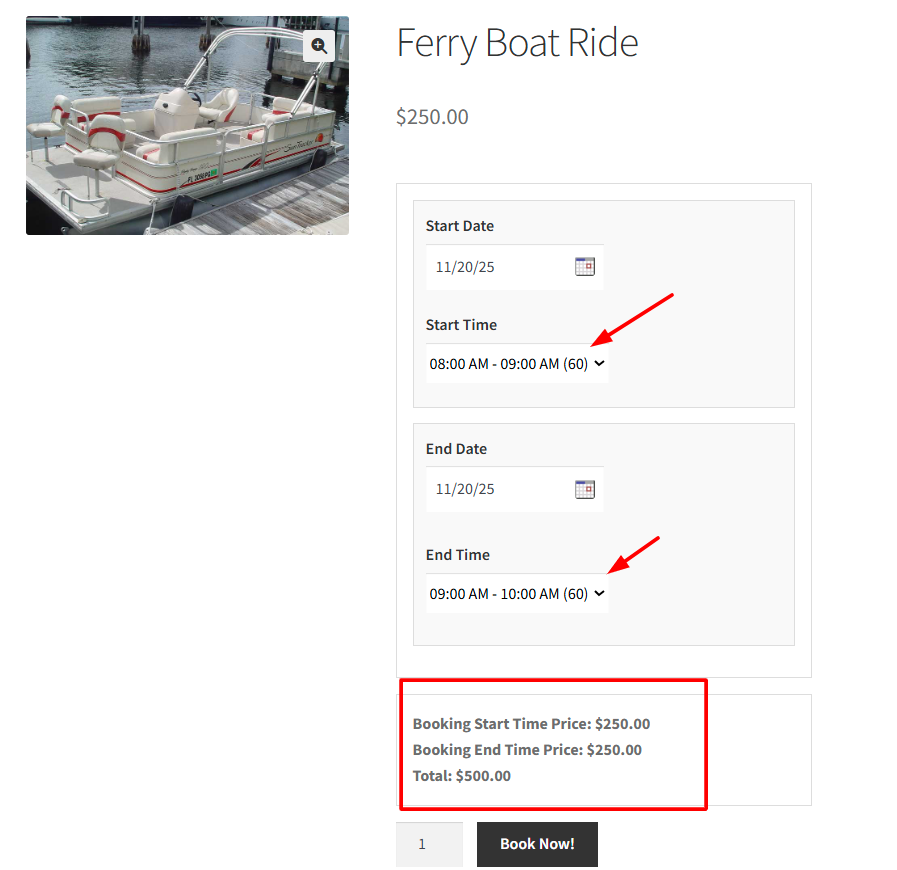
Let’s consider a ferry boat ride service on 12th November 2025, with rides available from 08:00 AM to 06:00 PM, each ride lasting 1 hour, and 1 ferry available per slot. Each ride costs $250. You can set the price of the individual time slot using the slot price field, as shown in the image below.
If a customer books a ride from 08:00 AM – 10:00 AM, only those two selected slots are blocked, while all other slots on the same day remain available. The total price will be $500 ($250 × 2 slots).
The Multiple Days & Time booking feature makes life easier for both you and your customers. Your customers can select multiple dates and time slots in one go, whether they’re booking a car, a holiday package, or a workshop. By blocking full date ranges or specific time slots, you prevent double bookings, track availability easily, and make sure every rental, appointment, or service is used effectively.