
Xero for WooCommerce allows you to create invoices in Xero for all sales on your WooCommerce site, and also tracks and sends data on items, shipping, discounts, and tax to your Xero records to keep everything in balance.
Requirements
↑ Back to top- cURL and curl SSL need to be installed on your server. Ask your host if they have these modules installed.
- A valid SSL certificate.
- Ensure that strong customer authentication is enabled. Recommended minimum is two-step authentication.
- Ensure your host follows industry accepted security standards including, but not limited to, ensuring sensitive data is properly encrypted; data isn’t hosted in high-risk areas; proper security monitoring and reporting is in place.
- WooCommerce version 10.8 or higher.
- WordPress version 6.9 or higher.
- PHP version 7.4 or higher.
Installation
↑ Back to topTo start using a product from WooCommerce.com, you can use the “Add to store” functionality on the order confirmation page or the My subscriptions section in your account.
- Navigate to My subscriptions.
- Find the Add to store button next to the product you’re planning to install.
- Follow the instructions on the screen, and the product will be automatically added to your store.
Alternative options and more information at:
Managing WooCommerce.com subscriptions.

Setup and Configuration
↑ Back to topThere are two main steps to connect your WooCommerce store to Xero:
- Create an OAuth 2.0 app in the Xero developer portal.
- Connect the app to WooCommerce.
Step 1: Create a Xero OAuth app
↑ Back to topBefore creating the app, go to WooCommerce > Xero and copy the Redirect URI displayed below the Client ID field. This address is generated for your site.
- Sign in to the Xero developer portal’s My Apps page and select New app.
- Complete the app details:
- App name: Use a recognizable store or business name. Do not include “Xero” in the name. For example,
Example Store Accounting. - Grant type: Select Auth Code. Do not select PKCE or Custom Connection.
- Company or application URL: Enter the public HTTPS address of your store’s homepage.
- Redirect URI: Paste the exact address copied from WooCommerce > Xero.
- App name: Use a recognizable store or business name. Do not include “Xero” in the name. For example,
- Select Create app.
Note:
You do not need to select API scopes manually. The extension requests the required permissions when you sign in to Xero.
For a staging site, create a separate app with a clear environment name and use that site’s own redirect URI and credentials.
Xero connection limits
An uncertified Xero app can connect to up to 25 Xero organizations, and each Xero organization can connect to no more than two uncertified apps. Most stores only need one app for the live site and a separate app for each staging environment.
Step 2: Connect the Xero app to WooCommerce
↑ Back to top- Open the app’s Configuration page in Xero and copy the Client ID.
- Select Generate a secret, then copy the Client Secret before leaving the page.
- Go to WooCommerce > Xero, paste the Client ID and Client Secret, then select Save changes.
- Under Authenticate, answer Was your Xero application created before March 2, 2026? based on the date the app was created:
- Select Yes for an app created before March 2, 2026.
- Select No for an app created on or after March 2, 2026.

Note:
Xero introduced granular API scopes for apps created on or after March 2, 2026. If you choose the wrong date range, the connection fails with an unauthorized_client - Invalid scope for client error. Select the correct option and reconnect.
- Select Sign in with Xero, sign in, review the requested permissions, and select the Xero organization you intend to connect.
- After Xero returns you to WooCommerce, confirm that Connection status is [OK] and that the correct organization is named.
Protect your credentials
Xero displays a client secret only once. Store it securely, and never share it or include it in a screenshot. If you replace the client ID or client secret, save the new credentials in WooCommerce and reconnect the app.
Reconnect after an authorization error
If an order note reports invalid_grant, go to WooCommerce > Xero and reconnect. Xero refresh tokens expire after they have not been used for 60 days, so a store that has not communicated with Xero for that period needs to be authorized again.
Resolve repeated connection errors
An invalid_request or 401 Unauthorized error can have more than one cause. First, confirm that the client ID and client secret match the current Xero app, save the settings, and reconnect.
If the connection fails again after your host or a security tool changes the WordPress authentication keys and salts, ask a developer to follow Use stable encryption keys for Xero credentials. The extension uses the WordPress values by default to encrypt stored OAuth tokens. Changing those values, or the custom Xero encryption keys, requires reconnecting.
Reconnect to an active Xero organization
If an order note reports token_rejected | The organization for this access token is not active, confirm that the organization is active and that your Xero user can access it. Then reconnect under WooCommerce > Xero and select the intended organization. If the person who originally authorized the app no longer has access, another Xero user with access must reconnect it.
Set up default account codes
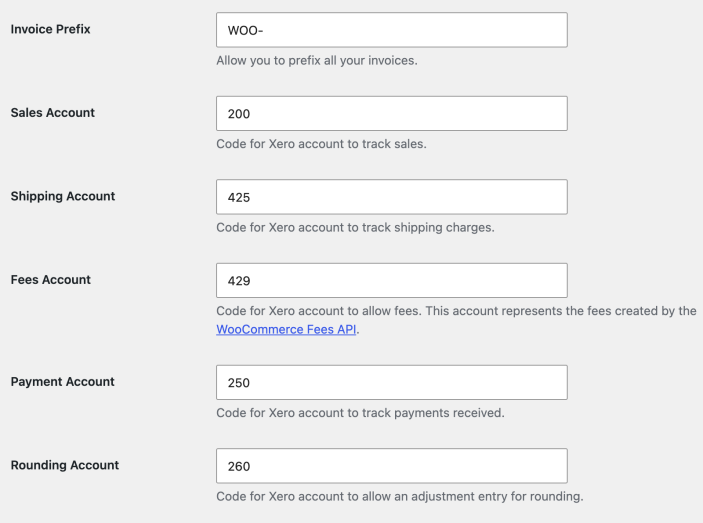
↑ Back to topInvoices and payments sent to Xero must use account codes from your Xero chart of accounts. In Xero, go to Accounting > Chart of accounts. You can use Xero’s standard accounts, edit them, or add an account. Available codes vary by organization and country.
- Sales Account — Collects product sales.
- Shipping Account — Collects shipping charges. Match Treat Shipping As in WooCommerce to the account type in Xero.
- Fees Account — Collects fees added through the WooCommerce Fees API. Match Treat Fees As in WooCommerce to the account type in Xero.
- Payment Account — Collects every payment sent by the extension, regardless of the WooCommerce payment gateway. Use an active Xero bank account or an account with payments enabled.
- Rounding Account — Collects rounding adjustments.
In your site’s dashboard, go to WooCommerce > Xero. Enter an invoice prefix and all five account codes.
Important
The tax rate associated with each Xero account must match the corresponding tax setup in WooCommerce. If the integration cannot match a tax rate, see Append Rate Percentage When Matching.
Miscellaneous Settings
↑ Back to topSend Invoices
This setting controls when WooCommerce creates or updates an invoice in Xero:
- Manual — Send the invoice from the order’s Order actions menu.
- On creation — Send the invoice as soon as the WooCommerce order is created.
- Payment completion — Send the invoice when WooCommerce confirms payment.
- On order completion — Send or update the invoice when the order reaches Completed.
Payment completion is the recommended setting for most stores.
Send Payments
This setting controls when WooCommerce applies a payment to the associated Xero invoice:
- Manual — Do not send payments automatically.
- Payment completion — Send the payment when WooCommerce confirms payment.
- Order completion — Send the payment when the order reaches Completed.
Use Manual if another integration records payments in Xero. Xero can apply a payment only after its invoice exists and is authorized. The extension uses the single Payment Account configured above for every WooCommerce payment gateway. After an invoice is fully paid, Xero limits the changes that can be made through the API, so later invoice changes may need to be made in Xero.
Fix a payment that was not exported
If the invoice was created but its payment was not, confirm that the invoice is authorized in Xero and that the configured Payment Account is active and accepts payments. Check the order notes for the error returned by Xero.
Fix a rejected payment account
If an order note reports Account type is invalid for making a payment to/from, verify that Payment Account contains the code of an active Xero bank account or an account with payments enabled, then try the payment again.
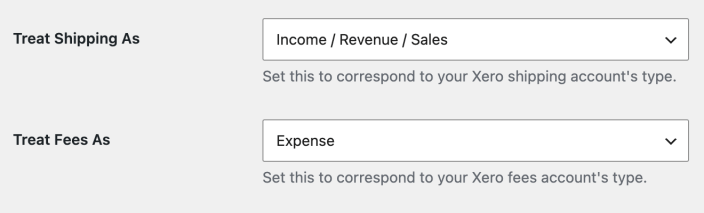
Treat Shipping As
The costs associated with shipping line items in your WooCommerce orders can be treated either as Revenue or Expenses. To avoid errors, this setting must match the account type in your Xero chart of accounts.
Treat Fees As
The costs associated with any additional fee on your WooCommerce orders can be treated either as Income or Expenses. To avoid errors, this setting must match the account type in your Xero chart of accounts.
Fix a tax type and account code mismatch
If an order note reports The TaxType code 'xxx' cannot be used with account code 'yyy', the tax type is not valid for that Xero account.
- In Xero, go to Accounting > Chart of accounts and open account code
yyy. Note its account type and default tax rate. - In WooCommerce, go to WooCommerce > Xero. Set Treat Shipping As or Treat Fees As to match the Xero account type.
- If the error continues, confirm that the account’s default tax rate uses an appropriate Xero tax type.
Xero Branding theme
Select the Xero branding theme to apply to invoices created by the extension. The extension refreshes the available themes when you load WooCommerce > Xero. If a newly created theme is missing, reload the settings page. If WooCommerce reports that it cannot fetch branding themes, confirm the Xero connection is authenticated, then reconnect if necessary.
Match Zero Value Tax Rates
Enable this setting when a taxable product uses a 0% WooCommerce tax rate that should match a 0% rate in Xero. Give the WooCommerce rate the same name and percentage as the corresponding active Xero rate, assign that tax class to the product, and calculate tax from the customer’s billing address.
If a tax-exempt line does not use the intended 0% Xero rate, keep the product’s tax status set to Taxable. WooCommerce must calculate the matching 0% rate before the extension can send it to Xero.
For a MOSS sales tax type, include MOSS in the WooCommerce tax label. The extension recognizes that label without an additional code snippet.
Append Rate Percentage When Matching
By default, the extension appends the tax rate percentage to the WooCommerce tax label before matching it with an existing Xero rate. This keeps tax labels unique. For example, Standard Tax becomes Standard Tax (20.00%).
If your WooCommerce tax label already includes the percentage, the result can contain the rate twice, such as Standard 10% (10.00%). Go to WooCommerce > Xero, clear Append Rate Percentage When Matching, and save your changes to match using the label as entered. This setting is available in Xero 1.9.11 and later. Update the extension if you do not see it.
Fix a mismatched tax rate
Compare the WooCommerce tax label and percentage with the corresponding active Xero tax rate. The extension caches active Xero tax rates for one hour. After correcting a rate in Xero, wait for the cache to expire, then send the invoice again.
Four Decimal Places
This setting enables four decimal places for unit prices instead of two within the invoices.
Orders with zero total
Tick the box for Orders with zero total to enable the export of invoices for orders that have a grand total of zero.
Send Inventory Items
Enable this setting to send each WooCommerce product SKU to Xero as its item code. Before enabling it, create the corresponding inventory items in Xero and make sure every WooCommerce SKU exactly matches its Xero item code.
If an order note reports that an item code is not valid, compare the product’s SKU with the Xero item’s Item Code, including capitalization and spacing. This is not a two-way inventory sync. It allows Xero to reduce tracked inventory when a matching item is sold, but quantity changes made in one system are not copied to the other.
Use customer email in contact name
The extension first looks for an existing Xero contact with the order’s billing email address. When it finds one, it uses that contact; otherwise, it creates a contact from the billing details. Contact lookups are cached to reduce Xero API requests.
Enable this setting to append the billing email address when a contact with the same name already exists. This keeps contacts with shared names distinct without changing names that are already unique.
Debug
Enable Debug under WooCommerce > Xero to write extension messages to the WooCommerce status log. Go to WooCommerce > Status > Logs and select the xero log source. Logs can contain personal information, so disable logging and delete the logs when you finish troubleshooting.
Usage
↑ Back to topBased on the Send Invoices and Send Payments settings, WooCommerce sends orders to Xero as invoices and can apply their payments. A newly created invoice is normally Awaiting Payment. After a payment is applied in full, Xero marks it Paid. In Xero, go to Business > Invoices to view it.
Send an existing order to Xero
↑ Back to top- Go to WooCommerce > Orders and open the order.
- In Order actions, select Send Invoice to Xero.
- Apply the action.
For a controlled bulk transfer, use an automation tool that can trigger the Send Invoice to Xero order action. Start with a small batch and inspect the results before processing more orders.
Check whether an order was sent to Xero
↑ Back to topOpen the WooCommerce order and check Order notes. A successful invoice export adds a note containing the Xero invoice ID. Sending a payment adds a separate payment note. If Xero rejects the request, the order note contains the returned error.
Troubleshoot a Xero export
↑ Back to top- Open the WooCommerce order and read its latest Order notes.
- Confirm that all five account-code fields contain active Xero account codes.
- Confirm that the client ID and client secret match the current Xero app, and that Connection status is [OK] for the intended organization.
- Correct the problem named in the order note, then select Send Invoice to Xero again.
Common Xero error messages
↑ Back to topAn existing Xero invoice cannot be updated
Invoice not of valid status for modification can occur when Xero already contains an invoice with the same number and that invoice is paid or otherwise restricted. Check the matching invoice in Xero. Handle changes to a restricted invoice in Xero, and set an Invoice Prefix before future exports if this store could reuse order numbers from another site, such as a staging site.
A Xero invoice is inside a lock date
If Xero reports that a document is dated before the end-of-year lock date, the API cannot update that invoice. Review the invoice date and the organization’s lock dates in Xero. Resolve the accounting entry in Xero with the person responsible for the organization’s accounts before trying the export again.
Use the extension with multiple currencies
↑ Back to topThe extension sends the WooCommerce order currency to Xero. Your Xero plan must include multi-currency accounting, and each currency used by the store must also be enabled in the connected Xero organization. If Xero rejects an invoice because its currency is unavailable, add that currency in Xero and resend the invoice.
Refund an order that was sent to Xero
↑ Back to topWhen an order becomes fully refunded, the extension attempts to void the associated Xero invoice. Xero does not allow an invoice with an applied payment to be voided through this request, so paid invoices must be adjusted manually in Xero. Developers can disable the automatic void attempt using the linked customization below.
WooCommerce Order Fields Sent to Xero
↑ Back to topThe extension builds the Xero contact from the WooCommerce billing details. If Billing Company is present, it becomes the main contact name; otherwise, the billing first and last name are used.
- Billing name, company, email, phone number, and address
- Order date and order number
- Product name, quantity, unit price, tax, and line discount
- Product SKU as the Xero item code when Send Inventory Items is enabled
- Shipping, fee, tax, rounding, and order totals
- Order currency
Invoices are sent as Authorized, which Xero displays under Awaiting Payment. Developers can change this behavior using a documented filter.
Coupons and discounts
↑ Back to topThe extension sends the discount amount allocated to each affected order line. It does not send the coupon code.
| Coupon type | WooCommerce result | What Xero receives |
|---|---|---|
| Percentage discount | Reduces each eligible line by the coupon percentage | The discount amount for each affected line |
| Fixed cart discount | Allocates the discount across eligible lines | Each line’s allocated discount amount |
| Fixed product discount | Reduces eligible product lines | The discount amount for each affected line |
| Multiple coupons | Combines the discounts allocated to each line | The final combined discount amount for each affected line |
Payment processor fees
↑ Back to topThe extension does not retrieve transaction fees charged by Stripe or another payment processor. It sends only fees already recorded as fee line items on the WooCommerce order. Reconcile payment processor fees separately in Xero.
Developer customizations
↑ Back to topFor code examples, available hooks, and advanced configuration, see these Developer guides:
- Customize Xero invoices with code — Change invoice dates and status, disable automatic voiding, let Xero assign invoice numbers, and review available filters.
- Use stable encryption keys for Xero credentials — Prevent routine WordPress salt rotation from invalidating stored Xero OAuth tokens.
Questions and support
↑ Back to topSomething missing from this documentation? Still have questions and need assistance?
- If you have a question about a specific extension or theme you’d like to purchase, contact us to get answers.
- If you already purchased this product and need some assistance, get in touch with a Happiness Engineer via our support page and select this product’s name from the Product dropdown.

