Note:
If our new WooCommerce Shipping extension and WooCommerce Shipping & Taxes extension are both activated, WooCommerce Shipping will take over the shipping label functionality. The tax functionality will still be powered by the WooCommerce Shipping & Taxes extension.
Refer to the new WooCommerce Shipping documentation as needed for creating shipping labels
This documentation covers how to set up tax rates in WooCommerce, as well as how the platform handles taxes/VAT/GST based on these settings — not when or what to charge.
We are not tax professionals; our advice only applies to how to use our software. For advice on what — or when — to charge tax/VAT/GST etc., we recommend consulting a tax professional or accountant.
Every business is unique, and we are unable to cover all possibilities here.
Setup and configuration
↑ Back to topYou can find information on how to install the WooCommerce Shipping & Tax extension on the WooCommerce Shipping & Tax page. This documentation covers the extension’s tax functionality. For more details around general setting up of taxes in WooCommerce, please see the Setting up Taxes in WooCommerce documentation.
Automated tax calculation setup
↑ Back to topStep 1: Enable taxes in WooCommerce
↑ Back to topTo enable automated tax calculation, first ensure that “Enable taxes and tax calculations” is checked on WooCommerce > Settings > General.

Step 2: Enable automated taxes
↑ Back to topWith taxes enabled:
- Go to WooCommerce > Settings > Tax
- Select “Enable automated taxes”
- Click Save Changes
Important configuration changes
↑ Back to topOnce Automated taxes are enabled, many of the settings are disabled as Automated taxes “take over” from the WooCommerce core tax settings. This means that:
- “Display prices” will be set to Excluding tax
- Tax will be Calculated using Customer shipping address
Important note: Automated tax calculation depends on prices to be entered exclusive of tax.
How automated taxes override manual settings
↑ Back to topWhen automated taxes are enabled, this overrides:
- Any tax rates you have manually added for locations where you have a tax nexus
- The “Compound” and “Shipping” toggles for those tax rates
Backup creation: After switching to automated rates, a backup of your previous tax rates is created and can be found in your sites wp-content/uploads folder.

Supported countries
↑ Back to topThe “Automated Taxes” feature supports stores based in the following countries:
Primary supported countries
↑ Back to top- United States
- Canada
- Australia
- United Kingdom
European Union countries
↑ Back to topPlus a growing list of countries in the rest of the world including:
- Austria
- Belgium
- Bulgaria
- Croatia
- Cyprus
- Czech Republic
- Denmark
- Estonia
- Finland
- France
- Germany
- Greece
- Hungary
- Ireland
- Italy
- Latvia
- Lithuania
- Luxembourg
- Malta
- Netherlands
- Poland
- Portugal
- Romania
- Slovakia
- Slovenia
- Spain
- Sweden
EU recommendation: If your store is based in the EU, we recommend using our EU VAT Number extension in addition to automated taxes.
Troubleshooting
↑ Back to topSystem status and debug tools
↑ Back to topTo diagnose issues with your WooCommerce Tax setup:
- Go to WooCommerce > Status > WooCommerce Tax
- If you’re experiencing issues, enable debug and/or logging
The system status page displays issues that could cause WooCommerce Tax to stop functioning and contains helpful debug information, plus links to get further assistance.
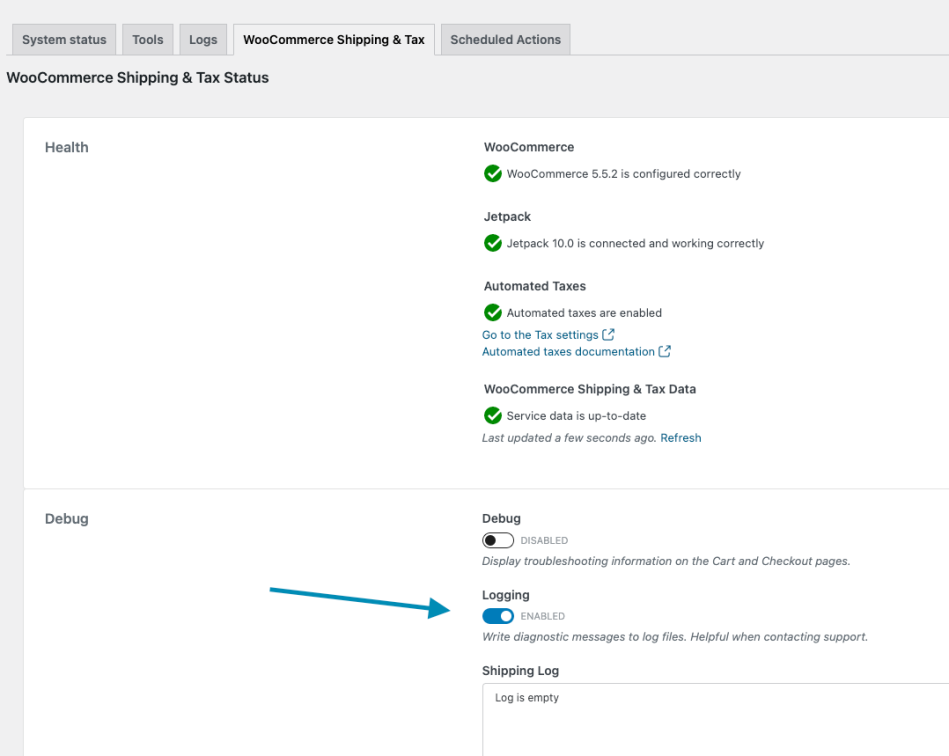
Viewing tax request logs
↑ Back to topRecent tax requests: Can be seen on the WooCommerce > Status > WooCommerce Tax under the Taxes Log section.
Older requests: Can be viewed by going to WooCommerce > Status > Logs.
Common issues and solutions
↑ Back to topAutomated taxes do not appear to be calculating
↑ Back to topEven if the tax value for an order is $0.00, Automated Taxes may be working correctly. A good way to test this if you are based in the US, is to try calculating taxes on the Checkout page of your site with an address that is located in the same State as your Store Address (which can be found on the WooCommerce > Settings > General page), as that is your default “tax nexus” and orders from that same State should have taxes applied.
Understanding tax nexus
↑ Back to topIf your store is based in the United States, you only need to collect sales tax from customers in locations where you have a “tax nexus,” which typically means a physical presence. By default, WooCommerce Tax uses your Store Address from the WooCommerce > Settings > General page as your “tax nexus”.
Additional tax nexus: Some US States require taxes to be collected if you exceed a certain yearly dollar value or order totals in that State, even if you don’t necessarily have a physical presence there. If you are unsure of your tax nexus status, please consult a certified local accountant.
Adding additional tax rates: If you need to charge tax for any other state, you can add a tax rate for that state in addition to using automated taxes to charge customers from that state tax as well. For more information about your States Tax Nexus and Destination Tax rules, please have a look at: State-by-state guide to economic nexus laws.
Overriding the default nexus address: While using WooCommerce Tax version 3.3.0+, it is possible to modify or disable the nexus address in API requests by using the woocommerce_taxjar_nexus_address filter, which will replace the standard from_* address fields when provided. A couple examples of how to use this filter can be found below but it’s important to confirm that you are using WooCommerce Tax version 3.3.0 or higher. Additionally, you should always back up your site before making changes like this and throughly test customizations on a staging environment before deploying them on your live site.
- Example: Modifying the nexus address: When using the
woocommerce_taxjar_nexus_addressfilter to modify the nexus address, the$nexus_addressarray should contain the following keys:country: Two-letter country code (required).state: Two-letter state/province code (required for US/CA).zip: Postal/ZIP code (required).city: City name (required).street: Street address (optional).
// Modify the nexus address.
add_filter( 'woocommerce_taxjar_nexus_address', function( $nexus_address, $body ) {
	$nexus_address['street'] = '123 Custom Street';
	return $nexus_address;
}, 10, 2 );- Example: Disabling the nexus address entirely: Return false or an empty array to disable sending nexus addresses entirely, which will cause the request to use the standard
from_*address fields instead.
// Disable nexus addresses entirely.
add_filter( 'woocommerce_taxjar_nexus_address', '__return_false' );
Florida shipping tax requirements
According to the Florida Department of Revenue, sales tax must be charged on shipping costs if the customer does not have an option to avoid paying the merchant for shipping costs by either picking up the merchandise themselves or arranging for a third party to pick up the merchandise and deliver it to them.
Default behavior: For merchants with Store Address (WooCommerce > Settings > General) set to Florida, we have enabled shipping tax for Florida by default since version 1.26.0.
To disable Florida shipping tax: If you would like to disable it, you can do so via a filter:
add_filter('woocommerce_taxjar_enable_florida_shipping_tax', '__return_false');
Analytics Taxes report and rate storage changes in WooCommerce Tax 3.2.1 and later
↑ Back to topWooCommerce Tax version 3.2.1 changed how tax rates are stored and how the Analytics → Taxes report displays rates. Tax rates are now saved as itemized entries broken down by jurisdiction level, instead of a single combined line per location. This section explains the change, its impact on tax reports, and what to expect for existing orders.
What changed in tax rate labels
Previous versions of WooCommerce Tax displayed tax rates as a single line that combined all jurisdiction details into one label:
US-OKLAHOMA COUNTY-MIDWEST CITY TAX-1
Starting with version 3.2.1, WooCommerce Tax splits tax rates into separate lines for each jurisdiction level:
US-OK-CITY TAX-1US-OK-COUNTY TAX-2US-OK-SPECIAL TAX-3US-OK-STATE SALES TAX-4
The Analytics → Taxes report now shows multiple line items per transaction where a single line appeared before.
Why WooCommerce Tax now stores itemized rates
This change resolves two issues present in earlier versions:
- Shipping tax calculation bugs — Itemized rates give WooCommerce Tax granular control over which jurisdictions apply to shipping, fixing cases where shipping taxes were calculated incorrectly.
- Tax rate data loss when changing display settings — Switching the “Display tax totals” setting between “Itemized” and “As a single total” previously cleared all stored tax rates. Storing rates in itemized format eliminates this problem.
This change is permanent and cannot be reverted.
Existing orders are not affected
WooCommerce Tax does not update tax data on existing orders. Orders placed before the update keep their original tax rate format and labels. Only orders placed after updating to version 3.2.1 or later use the new itemized format.
Your Analytics → Taxes report may show a mix of old-format and new-format labels during the transition period. This is expected behavior.
Update WooCommerce to version 10.4.0 or later
WooCommerce core versions earlier than 10.4.0 calculate incorrect totals in Analytics → Taxes when multiple tax rate priorities exist for the same location. Because itemized tax rates use multiple priorities, stores running WooCommerce Tax 3.2.1 or later should also run WooCommerce 10.4.0 or later to ensure accurate tax reporting.
I enabled automated taxes but now it won’t let me show prices inclusive of tax, why is that?
↑ Back to topIn WooCommerce Tax, the “Prices entered with tax“ setting under WooCommerce > Settings > Tax is a store-wide setting that applies to all products. You cannot mix and match, i.e. show some products with tax included and others without.
Choose one approach for your entire store
Option 1: Enter ALL product prices including tax When we say defined including tax, we are referring to the taxes of the store’s base country.
If you want to charge the same price regardless of location and taxes, the base price is then dynamically adjusted to compensate for the tax variance. Follow this link for how to enable that.
Option 2: Enter ALL product prices excluding tax
Handling products with different tax treatments
If you need to handle products with different tax treatments, you can still do this by:
- Using different tax classes for products
- Check if one of these unique tax setups applies to your store
Moving my store to a different state
↑ Back to topIf for some reason you need to change your store address to another state, it is important that you check the settings you are using.
Steps to relocate your store:
- Update store address: WooCommerce Tax uses your store address (WooCommerce > Settings > General), so it is important that you use this setting to add the new address where your store will be located
- Clear existing tax rates: You will also need to delete all information that you added to the Standard tax rates (WooCommerce > Settings > Taxes > Standard rates tab). When using the automated rate rates, you’ll want to remove those standard rates to reset the plugin to your new location
“Unauthorized Invalid token” error
↑ Back to topError example:
01-10-2018 @ 14:09:18 - Received (401): {"statusCode":401,"error":"Unauthorized","message":"Invalid token","attributes":{"error":"Invalid token"}}
01-10-2018 @ 14:09:21 - wcc_server_error_response Error: The WooCommerce Shipping & Tax server returned: Unauthorized Invalid token ( 401 ) (fetch_service_schemas_from_connect_server)
Solution: Reset the connection to WordPress.com by following this guide from our WooPayments documentation as the process is the same.
Why do the transactions to some Florida ZIP Codes result in a $0 tax calculation?
↑ Back to topIn Florida, sales associated with specific addresses may produce $0 tax, even if they are “Taxable”.
Explanation: According to the Florida Department of Revenue, specific addresses are allowed by the state to be exempt from state and local sales and use tax requirements. You can review and test the rates for specific addresses and ZIP Codes at the Florida PointMatch website.
Incorrect rates returned by WooCommerce Tax in the United States
↑ Back to topIf your shop is located in the United States, and automated taxes are enabled via the WooCommerce Tax plugin, but you feel the rate returned for a specific address is incorrect, you can double-check this using the TaxJar Sales Tax Calculator. The WooCommerce Tax plugin uses the tax rate database provided by TaxJar to find rates.
How to verify rates:
- Enter the order billing or shipping address (as per your Tax settings) in the online tester
- See the returned rate directly from the database
- If the rates returned by the online tester match what you are seeing on your site, then the issue is not a bug or error with the plugin
Important notes:
- The rates pulled from this database come directly from the state, county, or city that matches the source address
- If you feel a returned rate is incorrect, please first check with the governing body for that address to verify the correct rate, and provide these references when raising an issue with our support team
- There can sometimes be a mismatch in rates between the five-digit zip code and the nine-digit zip code. Again, this information comes directly from the state, county, or city where the address is located
- A zip code can fall into one area as a majority but the longer zip code may pinpoint it as being in a different area. Please double-check with the state on these rates and provide these references when reporting a tax rate error to our support team
Enabling automated taxes for U.S. Territories
↑ Back to topDue to this issue, you’ll need to remove U.S. Territories you wish to enable automated taxes for as standalone countries and add them to the list of U.S. states. Below is an example snippet you can use to do this for Puerto Rico. Additional states can be added using the same format:
add_filter( 'woocommerce_countries', 'wc_remove_pr_country', 10, 1 );

function wc_remove_pr_country( $country ) {
    unset( $country['PR'] );
    return $country;
}

add_filter( 'woocommerce_states', 'wc_us_states_mods' );

function wc_us_states_mods( $states ) {
    $states['US'] = array(
        'AL' => __( 'Alabama', 'woocommerce' ),
        'AK' => __( 'Alaska', 'woocommerce' ),
        'AZ' => __( 'Arizona', 'woocommerce' ),
        'AR' => __( 'Arkansas', 'woocommerce' ),
        'CA' => __( 'California', 'woocommerce' ),
        'CO' => __( 'Colorado', 'woocommerce' ),
        'CT' => __( 'Connecticut', 'woocommerce' ),
        'DE' => __( 'Delaware', 'woocommerce' ),
        'DC' => __( 'District Of Columbia', 'woocommerce' ),
        'FL' => __( 'Florida', 'woocommerce' ),
        'GA' => _x( 'Georgia', 'US state of Georgia', 'woocommerce' ),
        'HI' => __( 'Hawaii', 'woocommerce' ),
        'ID' => __( 'Idaho', 'woocommerce' ),
        'IL' => __( 'Illinois', 'woocommerce' ),
        'IN' => __( 'Indiana', 'woocommerce' ),
        'IA' => __( 'Iowa', 'woocommerce' ),
        'KS' => __( 'Kansas', 'woocommerce' ),
        'KY' => __( 'Kentucky', 'woocommerce' ),
        'LA' => __( 'Louisiana', 'woocommerce' ),
        'ME' => __( 'Maine', 'woocommerce' ),
        'MD' => __( 'Maryland', 'woocommerce' ),
        'MA' => __( 'Massachusetts', 'woocommerce' ),
        'MI' => __( 'Michigan', 'woocommerce' ),
        'MN' => __( 'Minnesota', 'woocommerce' ),
        'MS' => __( 'Mississippi', 'woocommerce' ),
        'MO' => __( 'Missouri', 'woocommerce' ),
        'MT' => __( 'Montana', 'woocommerce' ),
        'NE' => __( 'Nebraska', 'woocommerce' ),
        'NV' => __( 'Nevada', 'woocommerce' ),
        'NH' => __( 'New Hampshire', 'woocommerce' ),
        'NJ' => __( 'New Jersey', 'woocommerce' ),
        'NM' => __( 'New Mexico', 'woocommerce' ),
        'NY' => __( 'New York', 'woocommerce' ),
        'NC' => __( 'North Carolina', 'woocommerce' ),
        'ND' => __( 'North Dakota', 'woocommerce' ),
        'OH' => __( 'Ohio', 'woocommerce' ),
        'OK' => __( 'Oklahoma', 'woocommerce' ),
        'OR' => __( 'Oregon', 'woocommerce' ),
        'PA' => __( 'Pennsylvania', 'woocommerce' ),
        'PR' => __( 'Puerto Rico', 'woocommerce' ),
        'RI' => __( 'Rhode Island', 'woocommerce' ),
        'SC' => __( 'South Carolina', 'woocommerce' ),
        'SD' => __( 'South Dakota', 'woocommerce' ),
        'TN' => __( 'Tennessee', 'woocommerce' ),
        'TX' => __( 'Texas', 'woocommerce' ),
        'UT' => __( 'Utah', 'woocommerce' ),
        'VT' => __( 'Vermont', 'woocommerce' ),
        'VA' => __( 'Virginia', 'woocommerce' ),
        'WA' => __( 'Washington', 'woocommerce' ),
        'WV' => __( 'West Virginia', 'woocommerce' ),
        'WI' => __( 'Wisconsin', 'woocommerce' ),
        'WY' => __( 'Wyoming', 'woocommerce' ),
        'AA' => __( 'Armed Forces (AA)', 'woocommerce' ),
        'AE' => __( 'Armed Forces (AE)', 'woocommerce' ),
        'AP' => __( 'Armed Forces (AP)', 'woocommerce' ),
    );
    return $states;
}
Frequently asked questions
↑ Back to topWhy do I need to connect to WordPress.com?
↑ Back to topWe connect to your WordPress.com account to authenticate your site and user account so we can securely charge the payment method on file for any labels purchased. You can read our Terms of Service here.
Important notice regarding EU July 1st, 2021 taxes
↑ Back to topDate affected: July 1, 2021
On July 1, 2021, new taxation rules came into effect as part of the European Union (EU) Value-Added Tax (VAT) eCommerce package. When using WooCommerce Tax, the new changes affected the following kinds of merchants:
- EU merchants offering cross-border eCommerce within the EU above the EUR 10,000.00 threshold
- Non-EU merchants selling into the EU and opting to collect the VAT during the checkout
Additional resources
- Read more about it in the WooCommerce blog: New EU Tax Regulations: What OSS and IOSS Means for Your Store
- Consult the European Commission: Modernizing VAT for cross-border eCommerce
Important disclaimer: As always, we recommend consulting with a tax professional to ensure your business is following regulations and best practice.
Questions and support
↑ Back to topSomething missing from this documentation? Still have questions and need assistance?
- If you have a question about a specific extension or theme you’d like to purchase, contact us to get answers.
- If you already purchased this product and need some assistance, get in touch with a Happiness Engineer via our support page and select this product’s name from the Product dropdown.