Affiliate for WooCommerce plugin helps you to add, manage affiliates, and track performance from a single place – commissions, sales, payouts, leaderboard, etc. Earn money without hard work. Increase your brand outreach, and get potential customers.
The plugin provides a simple form that allows affiliates to sign up for your affiliate program. But you can also use Elementor Form Builder to create beautiful custom affiliate registration forms the way you want.
Add the form to any page of your site to show the affiliate registration form and allow users to sign up for your affiliate program.
Requirements
↑ Back to topYou would need two plugins installed and activated on your site:
Steps to create an affiliate registration form with Elementor form builder
↑ Back to top- Go to your WordPress Admin panel > Pages > Add or Edit an existing page.
- Edit this page with Elementor by clicking on “Edit with Elementor”.
- Now, follow this documentation from Elementor to create a form using the Form Widget.
- After adding the Form Widget, you can remove unwanted default fields by clicking on the cross icon(x) on each field.
- To set up affiliate registration form fields, click on + Add item to add fields one by one.
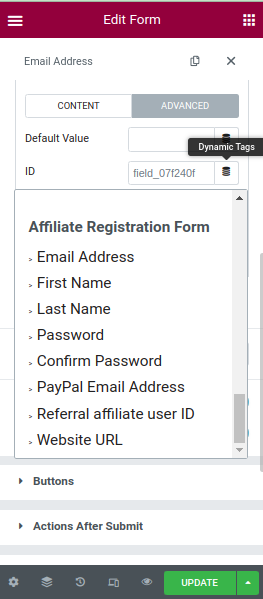
- Affiliate for WooCommerce plugin gives 8 default fields. For these default fields, we have introduced eight dynamic tags on Elementor which helps to set field id for the default fields. We recommend using those for field IDs only and not changing them.

- Default Fields: to select any of the following dynamic tags, click on Advanced on any item (the “type” and “field ID” should be the same as described below):
- Email Address: To enter the email address of the affiliate for registration.
- Type: Email
- ID: Click on the dynamic tag icon and choose Affiliate Registration Form > Email Address.
- Required: Enable
- First Name: To enter the affiliate’s First Name for registration.
- Type: Text
- ID: Click on the dynamic tag icon and choose Affiliate Registration Form > First Name.
- Last Name: To enter the affiliate’s Last Name for registration.
- Type: Text
- ID: Click on the dynamic tag icon and choose Affiliate Registration Form > Last Name.
- Password: To enter the affiliate’s Password for registration.
- Type: Password
- ID: Click on the dynamic tag icon and choose Affiliate Registration Form > Password.
- Required: Enable
- Confirm Password: To enter Confirm Password for matching with the Password field.
- Type: Password
- ID: Click on the dynamic tag icon and choose Affiliate Registration Form > Confirm Password.
- Required: Enable
- PayPal Email Address: To enter the affiliate’s PayPal Email Address for payout.
- Type: Email
- ID: Click on the dynamic tag icon and choose Affiliate Registration Form > PayPal Email Address.
- Referral affiliate user ID: To enter the referrer user ID.
- Type: Number
- ID: Click on the dynamic tag icon and choose Affiliate Registration Form > Referral affiliate user ID.
- Website URL: To enter the Website URL.
- Type: URL
- ID: Click on the dynamic tag icon and choose Affiliate Registration Form > Website URL.
- Email Address: To enter the email address of the affiliate for registration.
- You can set a Label, Placeholder, and Required options as per your choice. Note: Email Address and Password are mandatory (required) fields for creating an affiliate registration form.
- To validate the “Password”, you can add the “Confirm Password” field to enter the password again. Please make sure you have already added the “Password” field as Confirm Password is useful only with the Password field.
- For adding any extra fields other than the default fields, you can refer to this doc.
- Next, open the “Actions After Submit” section and then:
- Remove any default actions by clicking on the cross icon(x) before the action name, as there is no need to set any other action while doing the affiliate registration.
- Add the “Affiliate Registration” action by searching on the “Action” field for receiving the form data and other operations.
- Click on “Publish” and view the page to see the affiliate registration form.
Existing/logged-in users
↑ Back to topLearn more from here.
Actions after affiliate submit form
↑ Back to top- Approve/reject affiliate requests and see what details they have entered in the form
- Email notifications
Feature request
↑ Back to topHave a feature request or enhancement suggestion for Affiliate For WooCommerce? Submit it from here: Submit a feature request.