<div id="product-search-0" class="product-search floating">
    <div class="product-search-form">
        <form id="product-search-form-0" class="product-search-form show-submit-button" action="http://example.com/" method="get">
            ::before
            <input id="product-search-field-0" name="s" type="text" class="product-search-field" placeholder="Search products …" autocomplete="off">
            <input type="hidden" name="post_type" value="product">
            <input type="hidden" name="title" value="1">
            <input type="hidden" name="excerpt" value="1">
            <input type="hidden" name="content" value="1">
            <input type="hidden" name="categories" value="1">
            <input type="hidden" name="attributes" value="1">
            <input type="hidden" name="tags" value="1">
            <input type="hidden" name="sku" value="1">
            <input type="hidden" name="orderby" value="date-DESC">
            <input type="hidden" name="ixwps" value="1">
            <span title="Clear" class="product-search-field-clear" style="display:none"></span>
            <button type="submit">Search</button>
        </form>
    </div>
    <div id="product-search-results-0" class="product-search-results">
        <div id="product-search-results-content-0" class="product-search-results-content" style="display: none;"></div>
    </div>
</div>
product-search-0,product-search-form-0,product-search-field-0,product-search-results-0
product-search-1,product-search-form-1,product-search-field-1,product-search-results-1
- Adding a border to the Product Search Field
- Styling the Search Icon
- Changing the Search Icon
- Styling the Results
- Adding a border to the Results Container
- Styling the Add-To-Cart Buttons
- Styling the Clear Icon
Adding a border to the Product Search Field
↑ Back to top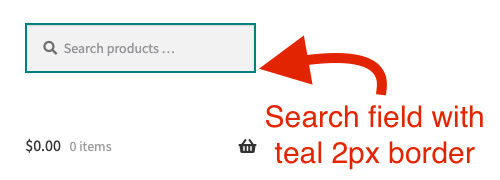 The HTML elements of interest could be any of the outer containers or the input field itself …
Outmost container:
As we can see, the corresponding IDs are …
<div id="product-search-0" class="product-search floating">
<input id="product-search-field-0" name="s" type="text" class="product-search-field" ...>
- #product-search-0
- #product-search-field-0
- div.product-search or div.product-search-form
- .product-search .product-search-form .product-search-field
#product-search-0 { border: solid 2px teal; }
#product-search-field-0 { border: solid 2px teal; }
Styling the Search Icon
↑ Back to top
The target we are interested in is
The CSS rule that we have used to style it is very simple:
#product-search-form-0 and specifically its ::before pseudo–element.
#product-search-form-0::before {
    color: #ff0000;
}
Changing the Search Icon
↑ Back to top\f00e
Notice the use of the backward slash before the Unicode value itself. This is because it is required in order to render on the browser. Here’s a link to FontAwesome’s Cheatsheet with lots of icons.
The HTML element of interest is the ::before pseudo-element found within the form. To target it, we can use the form’s ID.
This is the CSS rule we have used to change the search icon in this example:
#product-search-form-0::before {
    content: "\f00e";
    font-size: 18px;
    color: teal;
    margin: -4px -7px;
}
content: "\f00e"; while the other CSS properties, simply change the color, font size and margin.
Styling the Results
↑ Back to top
Adding a border to the Results Container
↑ Back to top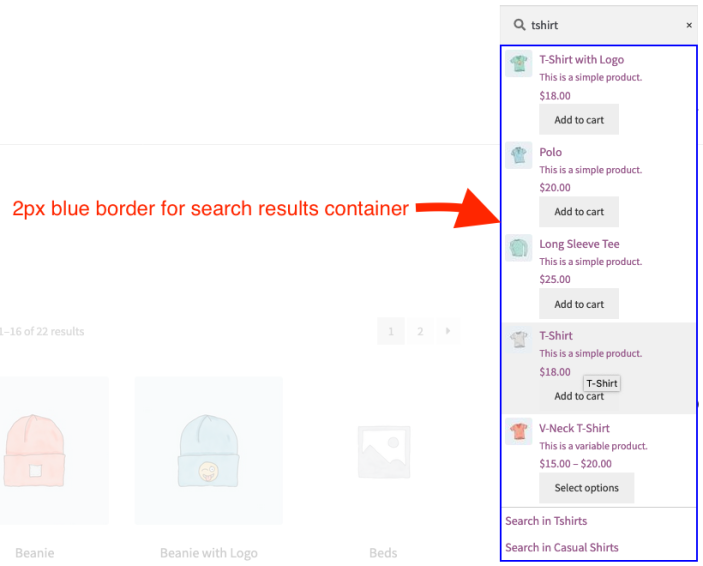 The HTML element of interest is the container that surrounds the results, so let’s apply a CSS rule that adds a blue border to it:
- ID we are interested in:
CSS used:
#product-search-results-content-0
    #product-search-results-content-0 {
        border: solid 2px blue;
    }
Styling the Add-To-Cart Buttons
↑ Back to top HTML elements of interest:
<div id="product-search-0" class="product-search floating">
...
<a ... class="button product_type_simple add_to_cart_button ajax_add_to_cart">Add to cart</a>
#product-search-0 as the container element’s ID
.wps_add_to_cart and .add_to_cart_button as the Add-To-Cart elements’ classes
#product-search-0 .wps_add_to_cart .add_to_cart_button {
    background-color: red;
    color: white;
}
Styling the Clear Icon
↑ Back to top- HTML elements of interest:
    <div id="product-search-0" class="product-search floating">
    <span title="Clear" class="product-search-field-clear" style=""></span>
- ID and class we are interested in:
CSS used:
    #product-search-0 , for ID
    .product-search-field-clear for class
    #product-search-0 .product-search-field-clear {
        font-size: 30px;
        color: red;
    }
Notes
↑ Back to topChild Themes vs. Inline Stylesheet
↑ Back to top