Cashier is an all-in-one WooCommerce checkout optimization plugin. You get checkout field editor, one-page checkout, direct checkout with Buy Now buttons and other enhancements.
This doc explains how you can edit/remove the core WooCommerce checkout fields and also add custom fields for an optimized checkout.
Configuring checkout fields
↑ Back to topGo to WooCommerce > Cashier. Click on the ‘Checkout Field Editor’ tab.
Fields
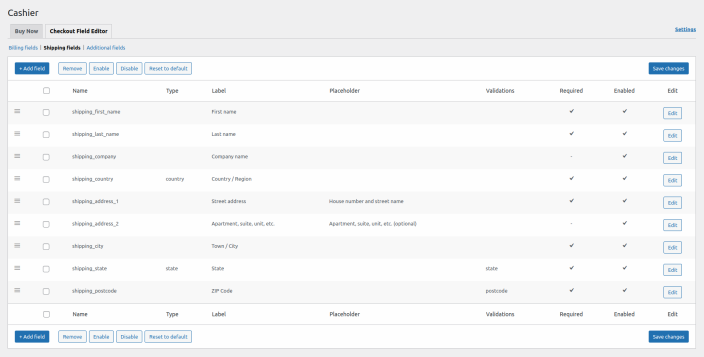
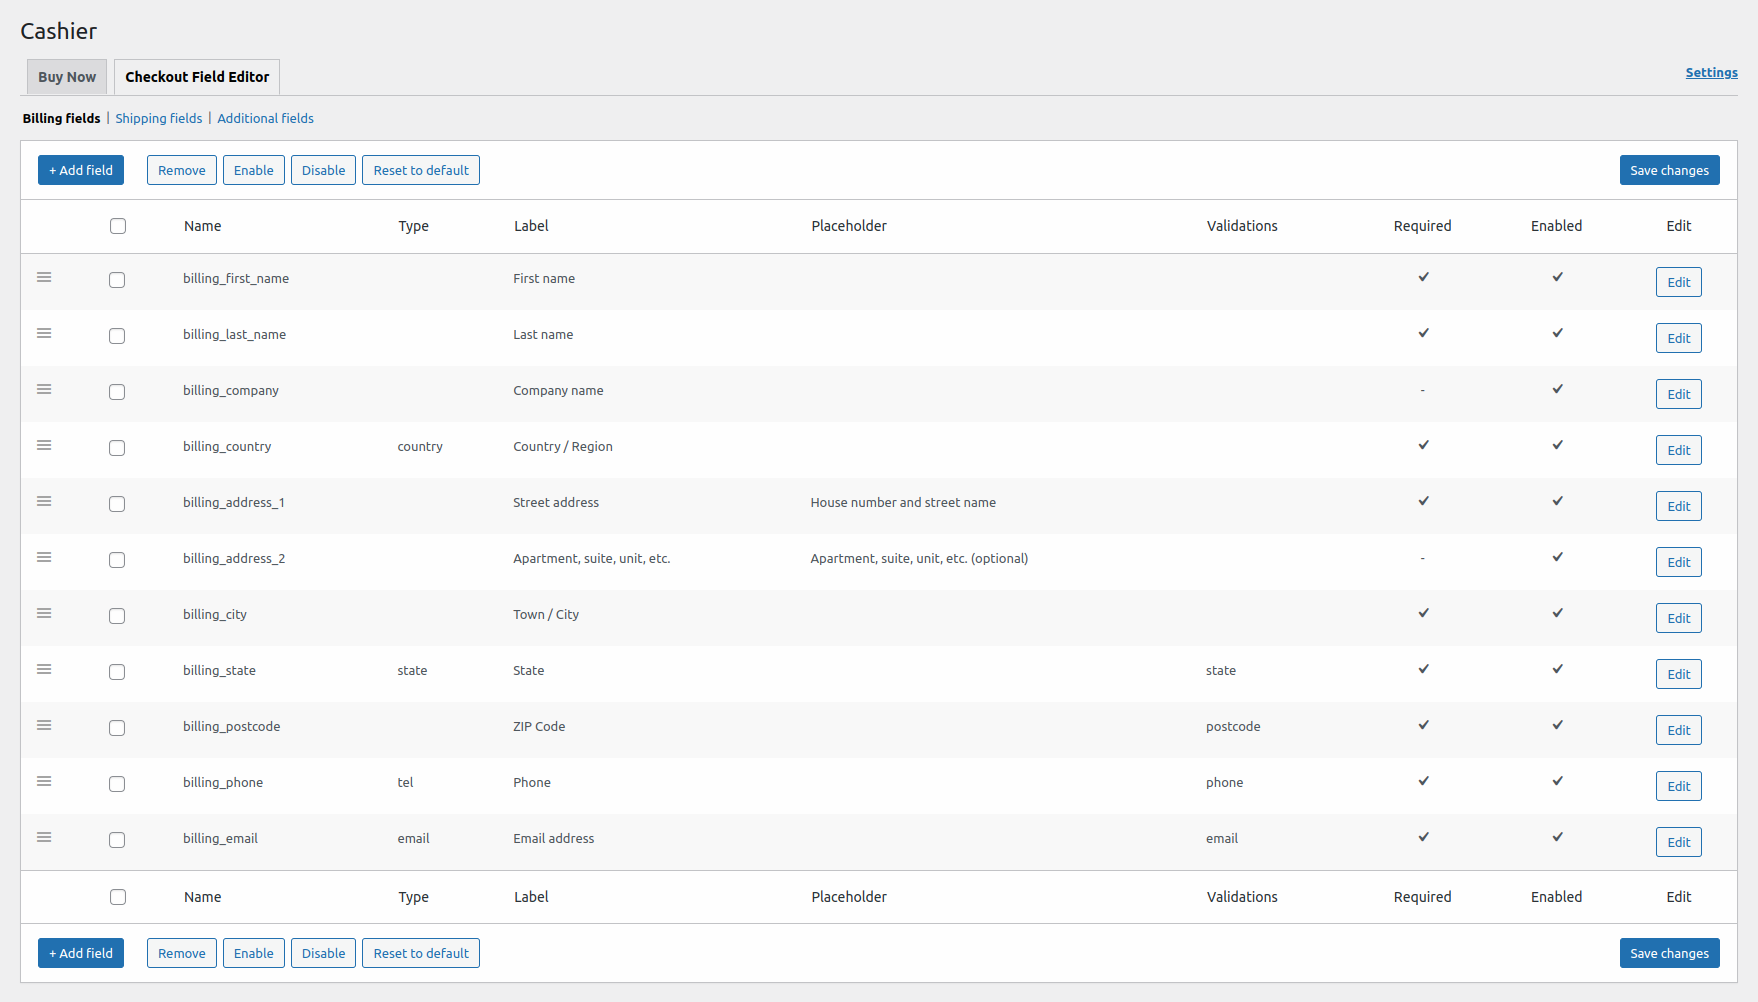
↑ Back to topHere, you’ll find the default WooCommerce checkout fields under three field sets:
- Billing fields – payment and billing address section of checkout (payment must be enabled)

- Shipping fields – shipping section of checkout (shipping must be enabled)
- Additional fields – appears after the billing and shipping sections of checkout, next to order notes (order notes must be enabled)


Attributes/options for fields
↑ Back to topYou can add nine different types of attributes or columns for the fields. These include:
- Name – the name of the field, which is used as the meta key to saving info. Must be unique.
- Type – the field should be text, radio, email or so on. Supports eight custom field types for now.
- Label – the field label shown in checkout. Whatever you add here will be suffixed to the Name after the underscore. For example, if you enter ‘state’ for the billing field, the Name of the field will be billing_state.
- Placeholder – text values. Describes the values that the store owner can add to the field.
- Validations – choose validation rules to apply. Email, phone, postcode, state and number are supported.
- CSS class – add some classes separate by a comma if you want to add some style elements to the fields.
- Default value – set a default value for the field.
- Required field – shows the fields that are required to be filled at checkout.
- Enabled field – shows the fields that are enabled at checkout.
Field types
↑ Back to topCashier supports these custom field types:
- Text – standard text input
- Password – password text input
- Email – email text input
- Phone – number input
- Select – dropdown/select box, requires options set, only one option can be selected in this type.
- Multiselect – multi-select box. requires options set, multiple options can be selected in this type.
- Textarea – textarea field
- Radio – set of radio inputs, requires options set
Adding new custom fields
↑ Back to topGet the required information from the buyers by customizing default fields/adding new fields to your WooCommerce checkout page.
Cashier’s WooCommerce checkout field editor (checkout manager) allows you to edit, enable, disable, remove the default checkout fields, rearrange checkout fields all in an easy and user-friendly interface.
You can edit the default checkout fields and also add/edit new custom fields in the three sections – Billing, Shipping and Additional.
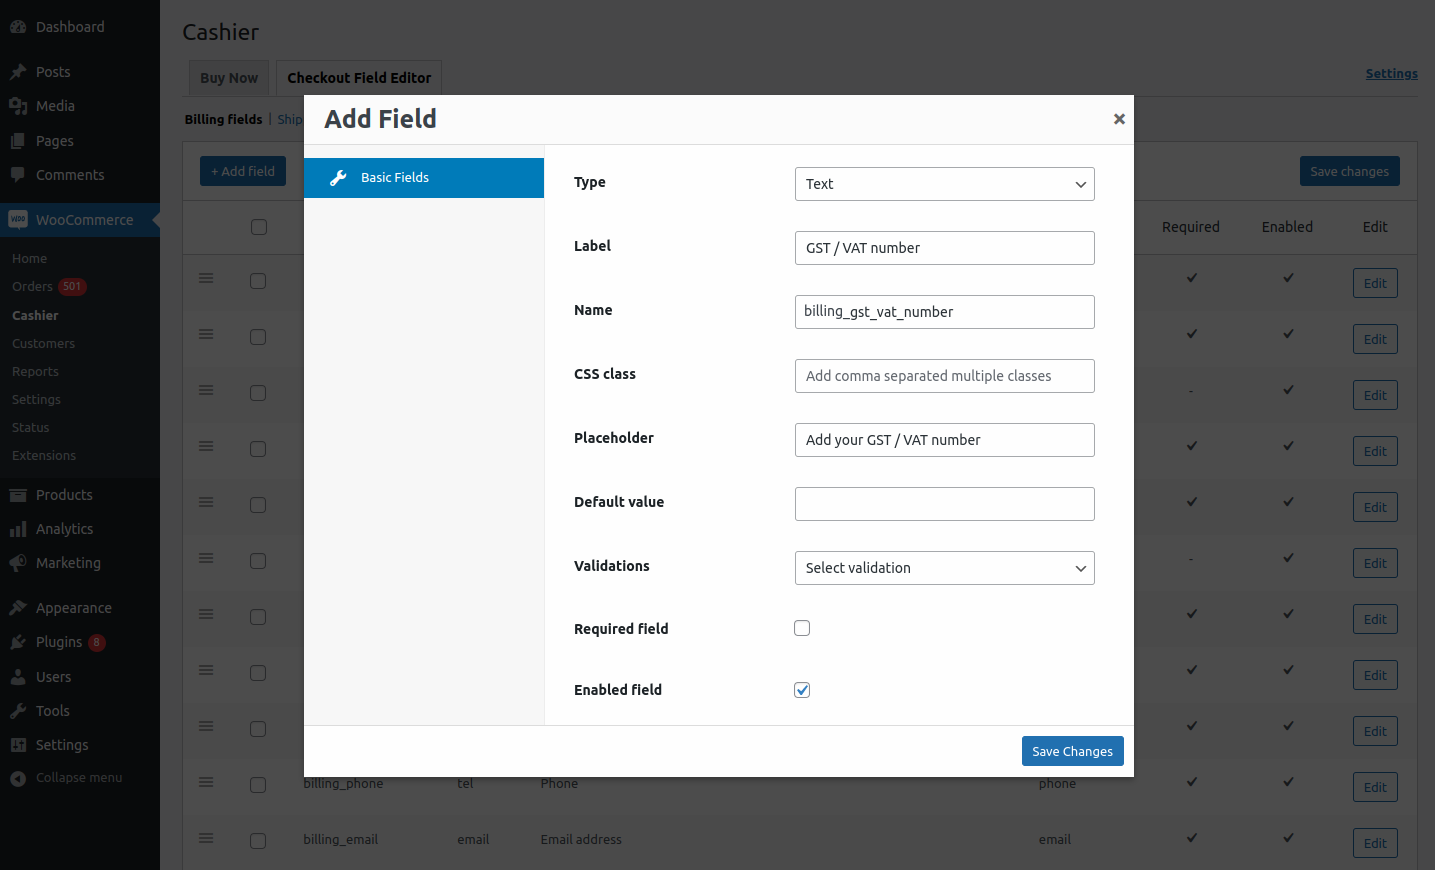
Go to WooCommerce > Cashier. Click on the ‘Checkout Field Editor’ tab. To add a new field for the billing section:
- Select the Billing fields option at the top.
- Click on the ‘Add field’ button.
- Choose the type, name, placeholder, required option and other details.
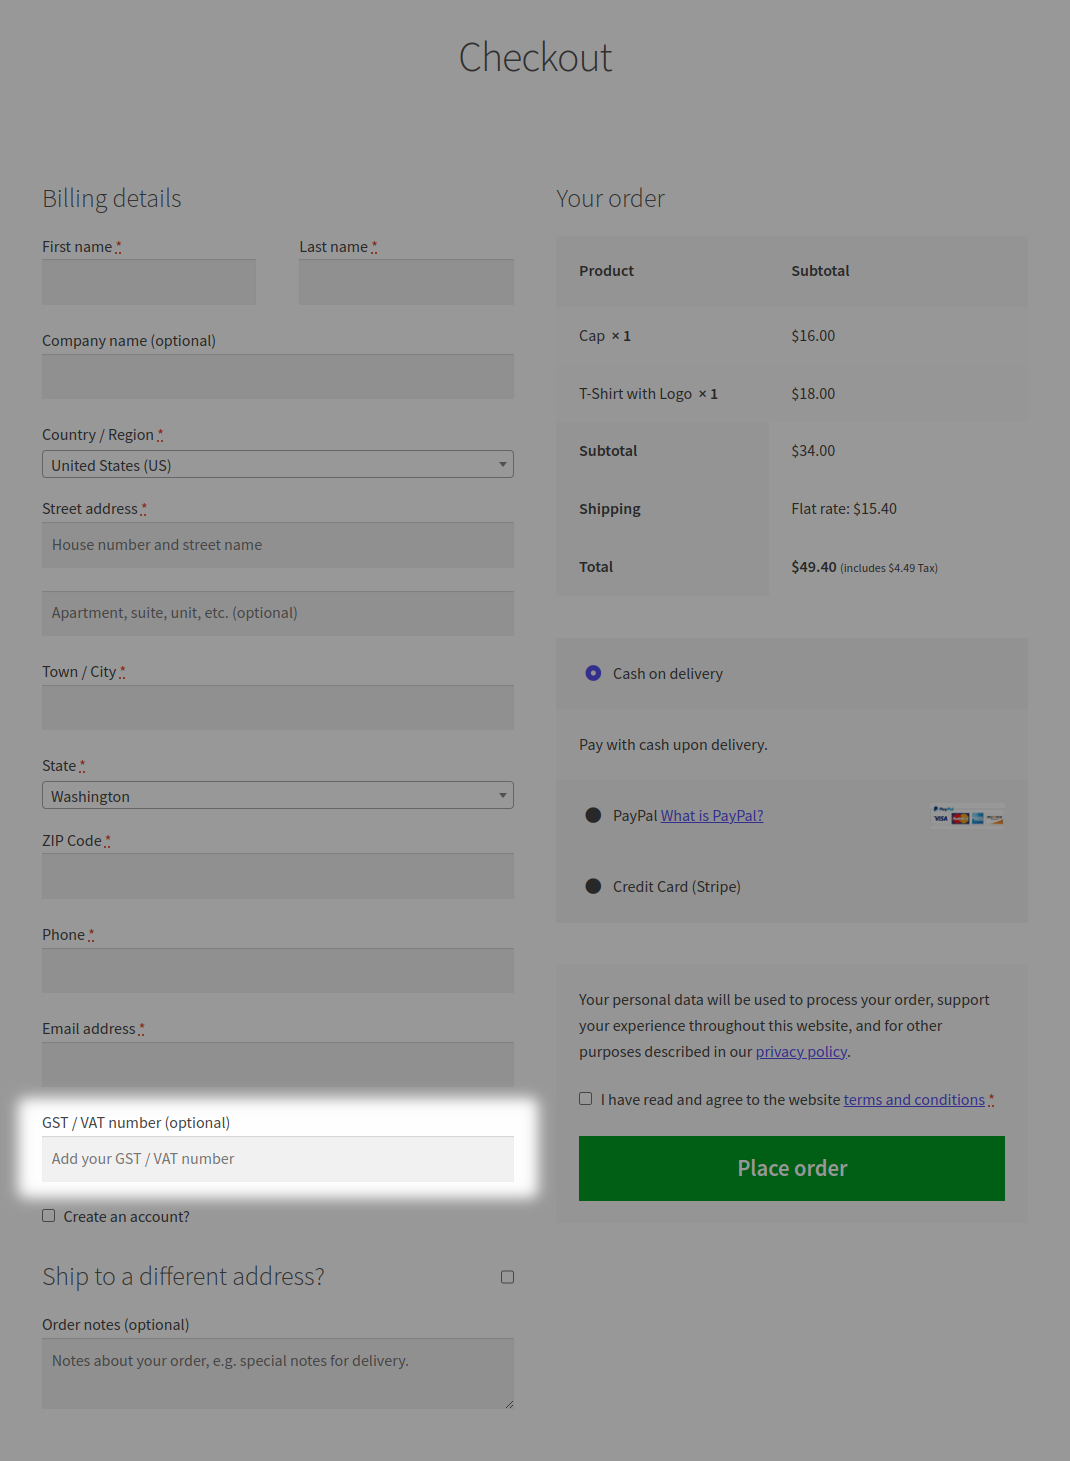
- For example, we want to ask for GST/VAT details from customers who are business owners. Keep it enabled but don’t keep it required.
- Click on Save changes.
That’s it.
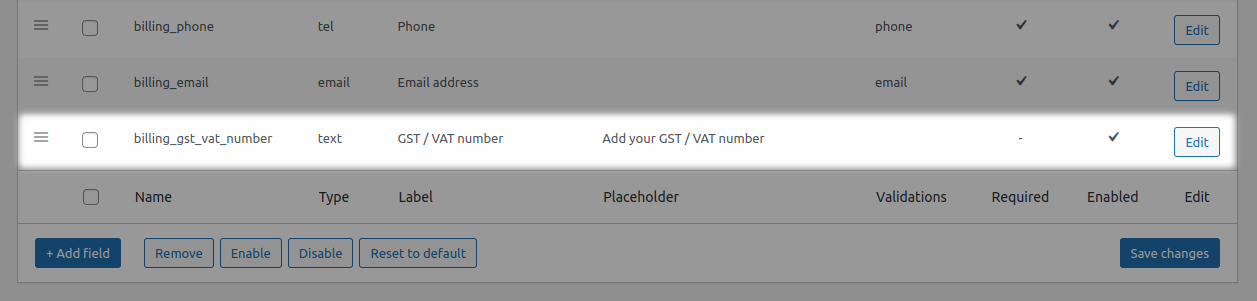
The custom field will be added to the dashboard as shown.
The custom field will appear like this on the checkout page:
Like billing fields, you can add new custom fields for the shipping fields and additional fields sections respectively.
Editing core checkout fields and new custom fields
↑ Back to topTo edit core fields/custom fields for billing:
- Select the Billing fields option at the top.
- Click on the Edit button at the extreme right for the field.
- Edit type, name, placeholder, enable/disable and other details as required.
- Click on Save changes.
You can also rearrange the fields by simply dragging the fields up and down.
Like billing fields, you can edit the core shipping fields and additional fields.
Enable/disable/remove core fields and custom fields
↑ Back to topUse the checkbox to select the fields you want to disable. Once done, click on the Disable button.
The disabled fields will be greyed out with the tick mark. To enable it again, click on the ‘Enable’ button.
To remove any field, use the checkbox to select the field and click on the Remove button.
To reset the fields to default, click on the ‘Reset to default’ button.
Note – Disabling or modifying core fields may cause unexpected results with some plugins. We recommend against them whenever possible.