Enhancer for WooCommerce Subscriptions adds new features to WooCommerce Subscriptions such as updating prices for existing users, a cancel delay, preventing cancel before specific days of renewal, auto-renewal reminder, expiry reminders, manual renewal reminder and separate shipping cycle for subscriptions.
Requirements
↑ Back to topEnhancer for WooCommerce Subscriptions Requires,
Installation
↑ Back to top- Download the enhancer-for-woocommerce-subscriptions.zip file from your WooCommerce account.
- Go to: WordPress Admin > Plugins > Add New and Upload Plugin with the file you downloaded with Choose File.
- Install Now and Activate the extension.
More information at: Install and Activate Plugins/Extensions.
Setup and Configuration
↑ Back to topUpdating New Price for Existing Subscription
↑ Back to topAs per the default behavior of Woo Subscriptions plugin, when the price of the subscription product is modified the new price won’t be reflected for old subscriptions. To charge the new updated price for existing subscriptions, price update feature can be used.
To configure this, follow the below steps:
- Go to “WooCommerce > Settings > Subscriptions > Renewals”.
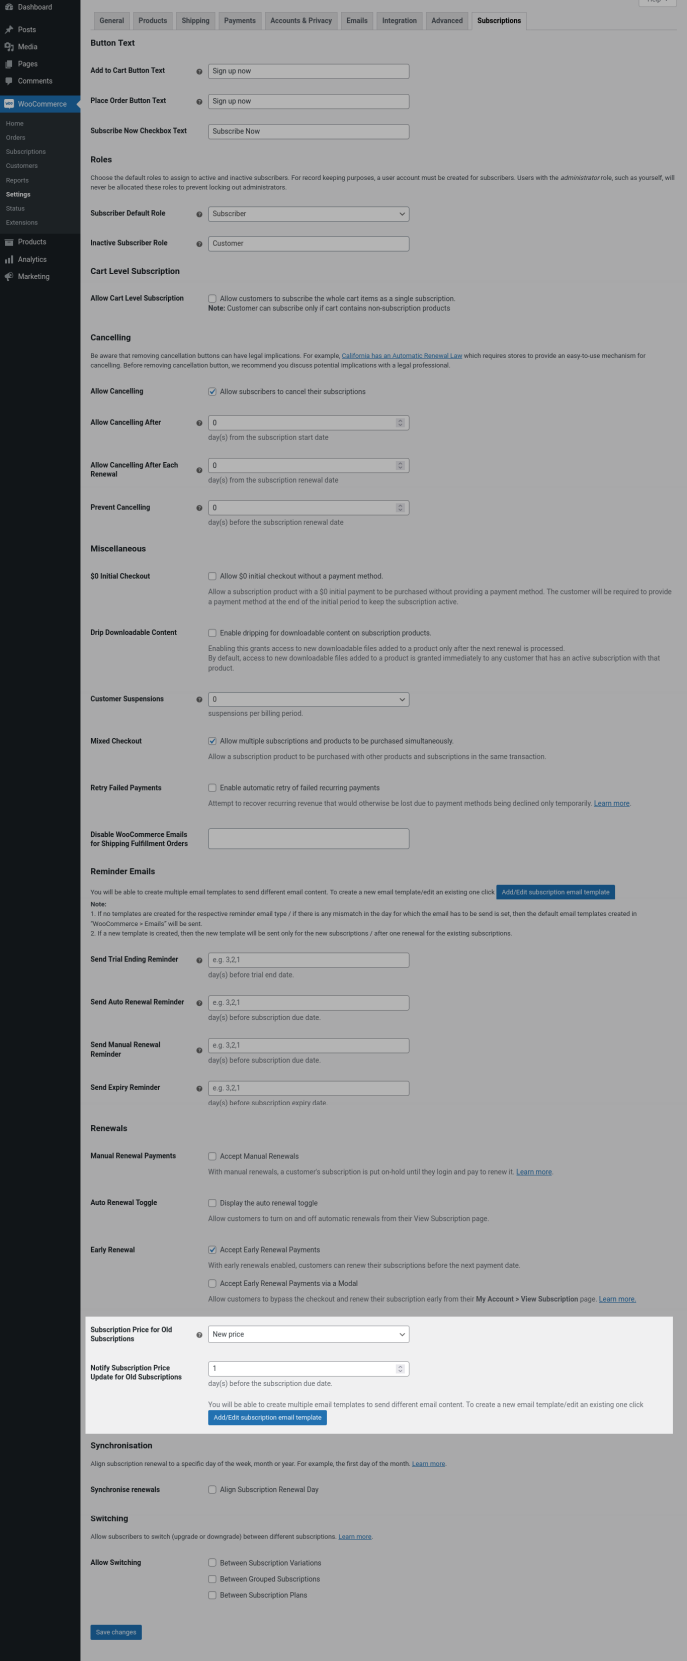
- In “Subscription Price for Old Subscriptions” option select “New Price”.
- If you want to notify the price update to the subscribers, then in “Notify Subscription Price Update for Old Subscriptions” option, set the number of days before which the renewal date for which the notification has to be sent.
- If you want to create a new email template for price update notification, then click “Add/Edit subscription email template”.
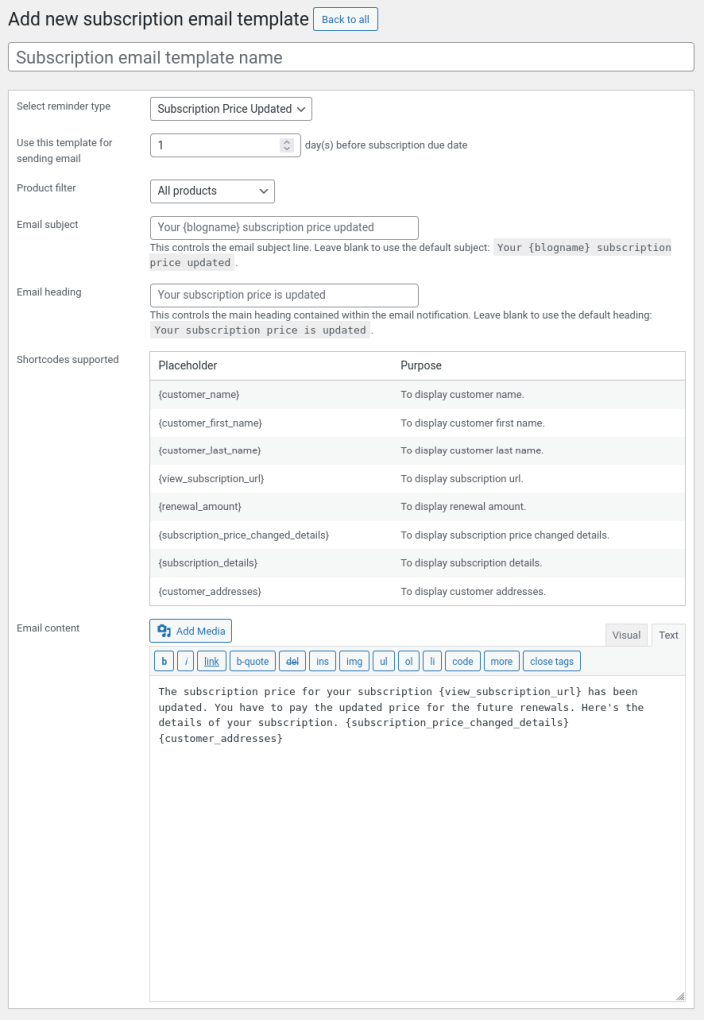
- In the title field, give the name for the template. The name won’t be displayed for the subscribers.
- In “Select reminder type” option, select “Subscription Price Updated”.
- In “Use this template for sending email” option, set the exact value which you have given in “Notify Subscription Price Update for Old Subscriptions”. If you have given a different value here, then notification won’t be sent using this template.
- Using “Product Filter” option, you can use selected subscription products to use this template. You can create multiple templates for multiple products as per your needs.
- You can fill the email subject, heading and body in “Email subject”, “Email heading” and “Email content” fields respectively.
Note: It is not mandatory to create email templates. If no templates are created, then the default template will be used for notifying subscribers. You can see the default template in “WooCommerce > Settings > Emails > Subscription Price Updated”.
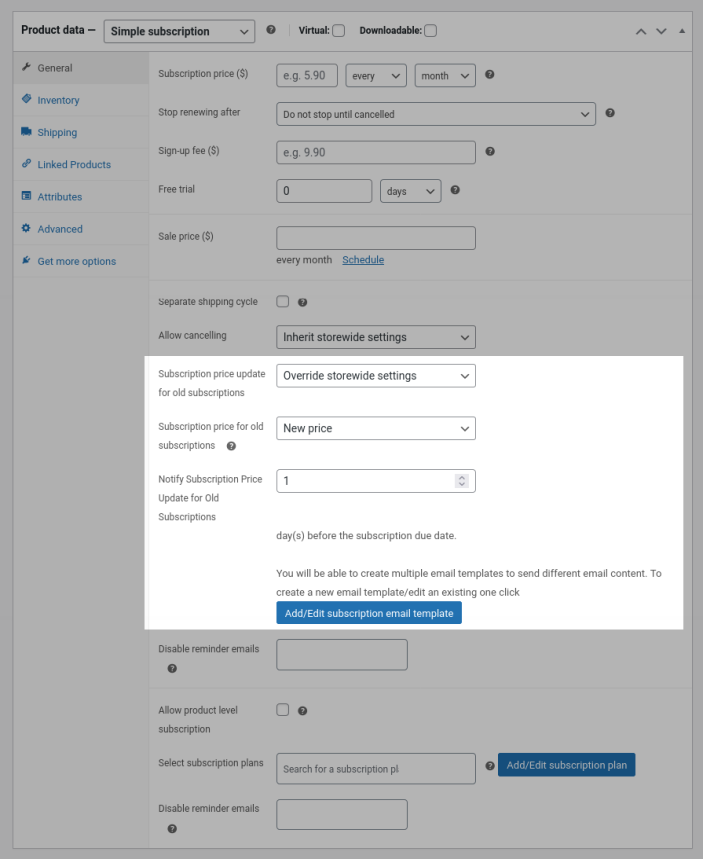
Alternatively, you can also override the global settings and configure each subscription product as per your needs. To override global settings, go to edit product page of the respective subscription product and in “Subscription price update for old subscriptions” option, select “Override storewide settings” and configure accordingly.
Buy Now/Subscribe
↑ Back to topUsing this feature, you can covert a Simple/Variable Products to Buy Now/Subscribe products.
To activate Buy Now/Subscription feature follow the below steps,
- Create a new product(simple/variable product type) or edit an existing product.

- Enable “Allow Product Level Subscription” checkbox.
- In “Select subscription plans” option, select the subscription plans which you want to link to the product. To create a plan, click the “Add/Edit subscription plan” button.
- In Subscription Plans table, you can see the list of plans already added. Click “Add subscription plan” button to create a new plan.
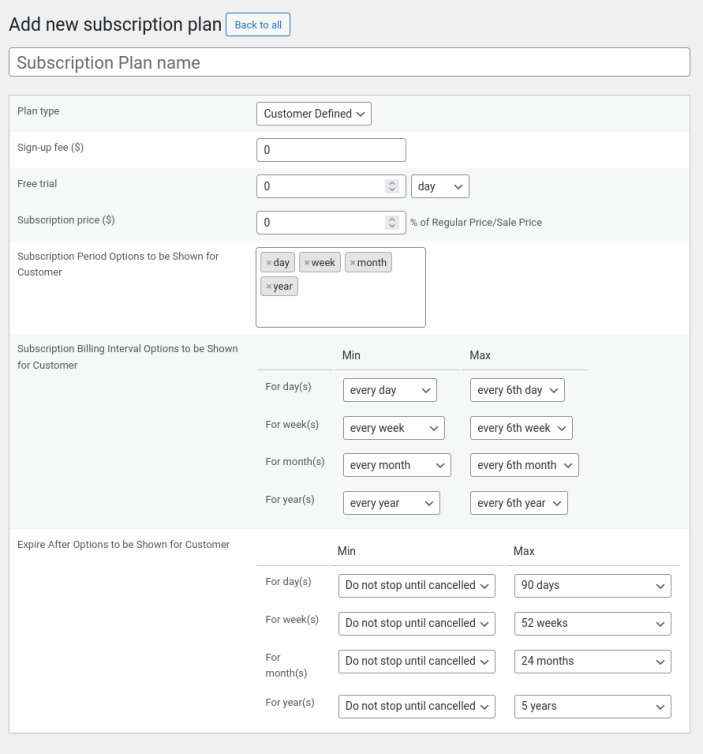
- In “Subscription Plan Name” field, give the name of the plan which the customer will see on the product page.
- In “Plan type” option, select “Predefined” if you want to preset the billing interval and period of the subscription. If you want the customer to choose the billing interval and period, then select “Customer Defined”.
- If “Predefined” is selected, set the price of the subscription, billing interval and period in “Subscription price” option. For price, you have to set the percentage of Regular/Sale Price of the product. In case if you want to give a discount/markup, then you have to set the percentage accordingly.
- If “Customer Defined” is selected, set the price of the subscription in “Subscription price” field.
- In “Subscription Period Options to be Shown for Customer” option, select the options(day, week, month, year) which you want the customer to choose.
- In “Subscription Billing Interval Options to be Shown for Customer” option, you will be able to set the minimum and maximum values for days, weeks, months and years for the billing interval.
- In “Expire After Options to be Shown for Customer” option, you will be able to set the minimum and maximum values for days, weeks, months and years for the subscription period(expiry).

- Configure the other subscription options as per your requirement.
- Finally Publish the Plan.
- Using these steps, create multiple subscription plans as per your needs.
- Now, go back to edit product page and link the subscription plans and publish the product.
- Customers can see the “Subscribe Now” checkbox in single product page which when enabled, they can see the plans which you have linked to the product.
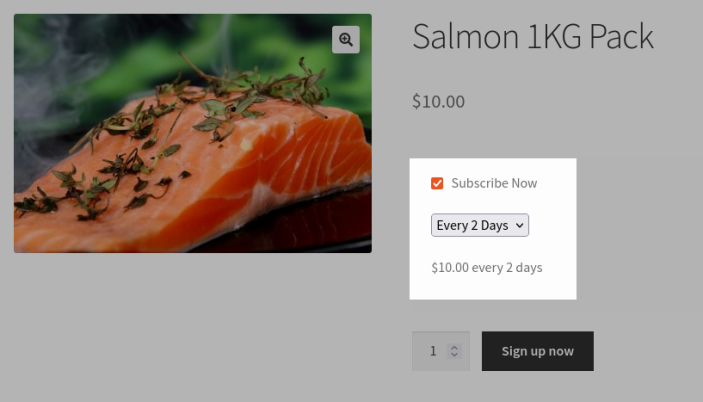
- If customer add the product to cart with the checkbox enabled, then the product will be added as a subscription product and then onwards it will work as per Woo Subscriptions behaviour.
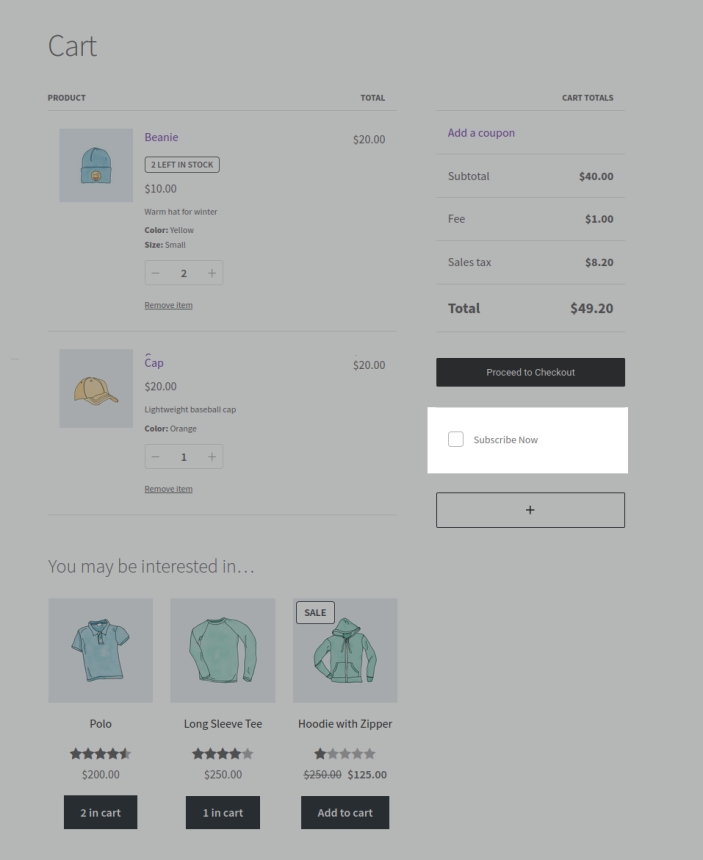
Cart Level Subscriptions
↑ Back to topUsing Cart level subscription feature, customers can purchase the whole cart items as a single subscription.
To configure cart level subscription, go to “WooCommerce > Settings > Subscriptions > Cart Level Subscription” and follow the below steps,
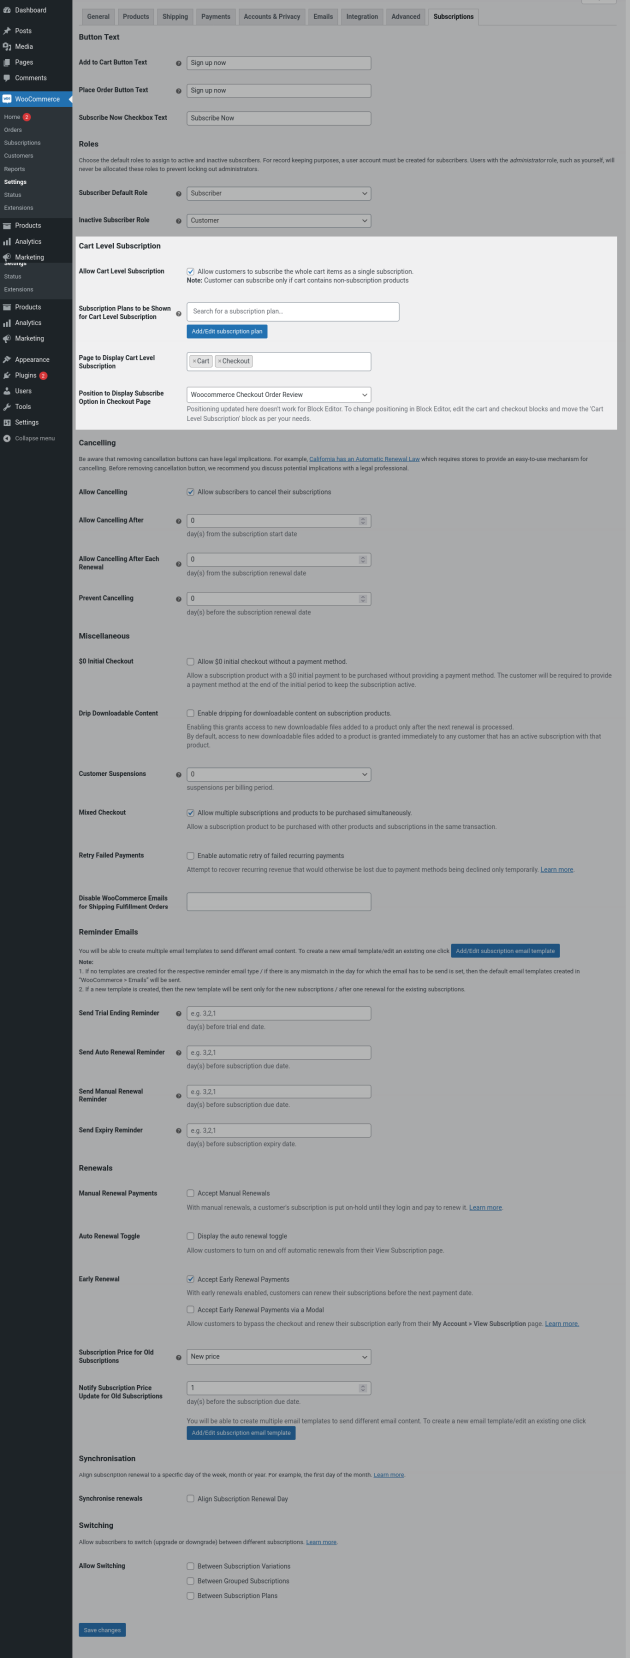
- Enable the “Allow Cart Level Subscription” checkbox.
- In “Subscription Plans to be Shown for Cart Level Subscription” option, search and select the subscription plans which you have already created. To create a new plan,
- To create a plan, click the “Add/Edit subscription plan” button.
- In Subscription Plans table, you can see the list of plans already added. Click “Add subscription plan” button to create a new plan.
- In “Subscription Plan Name” field, give the name of the plan which the customer will see on the product page.
- In “Plan type” option, select “Predefined” if you want to preset the billing interval and period of the subscription. If you want the customer to choose the billing interval and period, then select “Customer Defined”.
- If “Predefined” is selected, set the price of the subscription, billing interval and period in “Subscription price” option. For price, you have to set the percentage of Regular/Sale Price of the product. In case if you want to give a discount/markup, then you have to set the percentage accordingly.
- If “Customer Defined” is selected, set the price of the subscription in “Subscription price” field.
- In “Subscription Period Options to be Shown for Customer” option, select the options(day, week, month, year) which you want the customer to choose.
- In “Subscription Billing Interval Options to be Shown for Customer” option, you will be able to set the minimum and maximum values for days, weeks, months and years for the billing interval.
- In “Expire After Options to be Shown for Customer” option, you will be able to set the minimum and maximum values for days, weeks, months and years for the subscription period(expiry).
- Configure the other subscription options as per your requirement.
- Finally Publish the Plan.
- Using these steps, create multiple subscription plans as per your needs.
- Now, go back to Cart Level Subscription settings and link the plans created.
- In “Page to Display Cart Level Subscription” option, select on which pages you want to give customer to subscription. You can show subscription option in Cart/Checkout page or in both pages.
- If you are using shortcode based checkout, then in “Position to Display Subscribe Option in Checkout Page” option, choose the position which you want to display the option.
- If you are using block based cart and checkout, then you can edit the cart and checkout pages and you can find “Subscribe Now” block which you can reposition as per your needs.
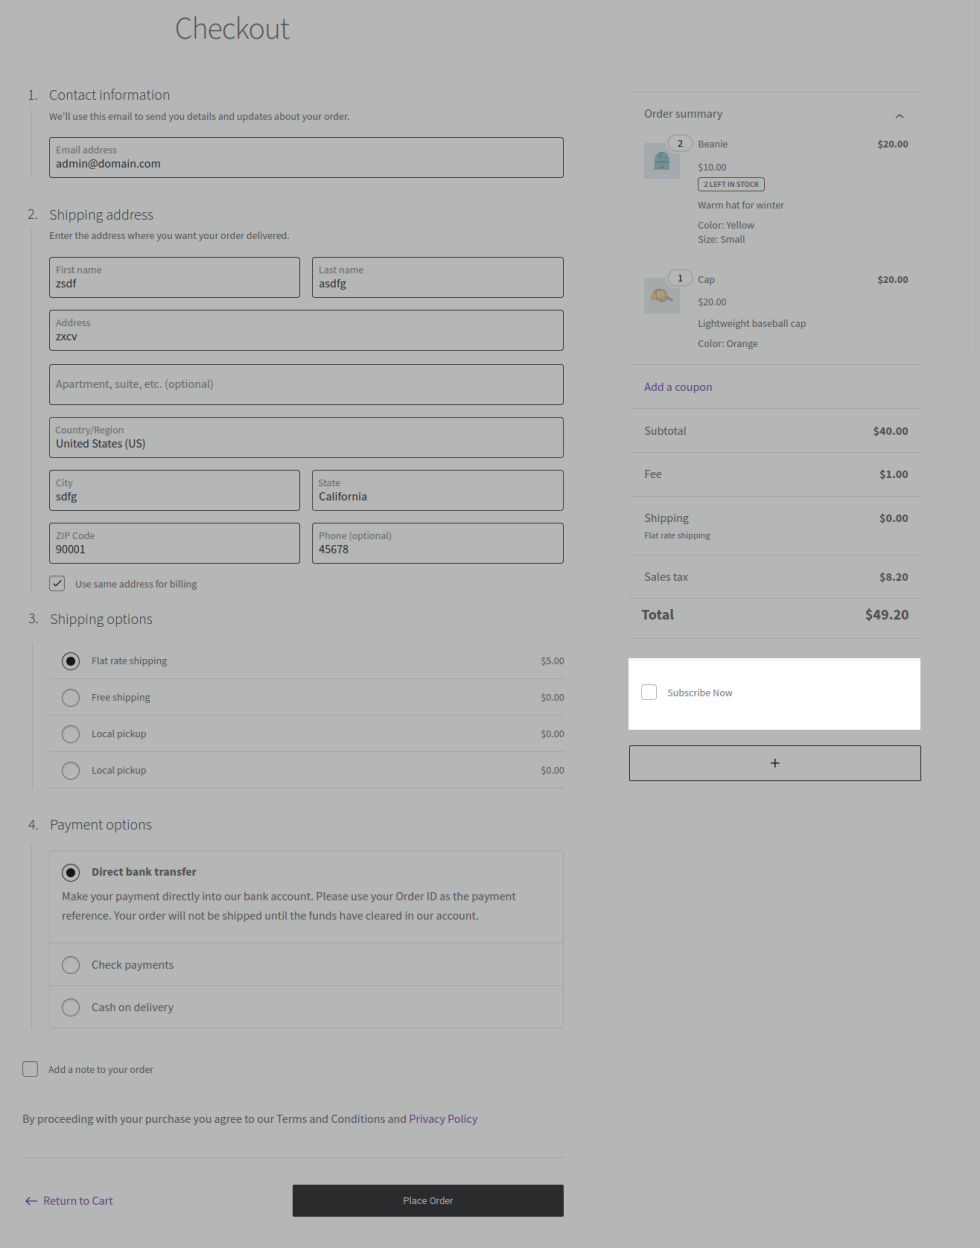
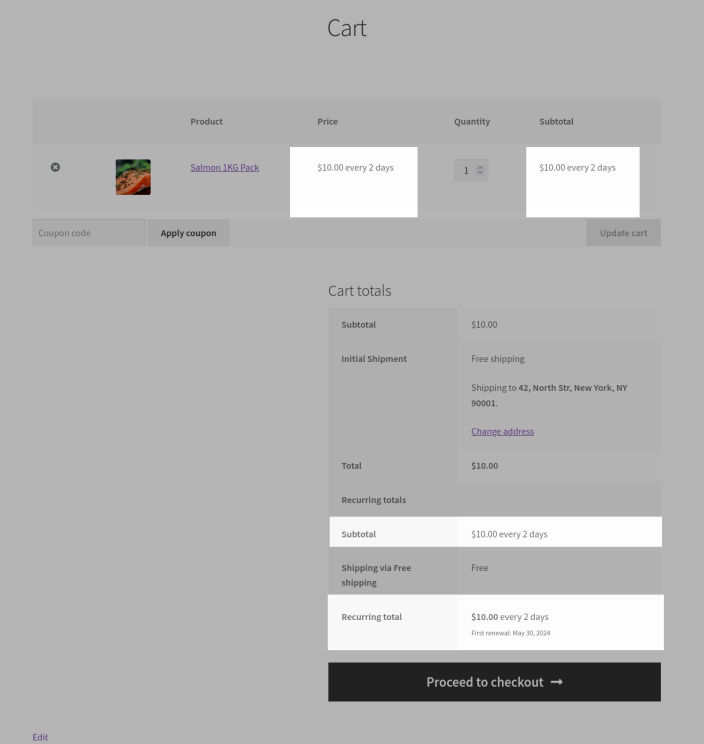
- Customers have to add products to the cart and they can see “Subscribe Now” checkbox in cart and checkout pages.
- When enabled, they can see the subscription options which you have added and will be able to choose from the list of available plans.

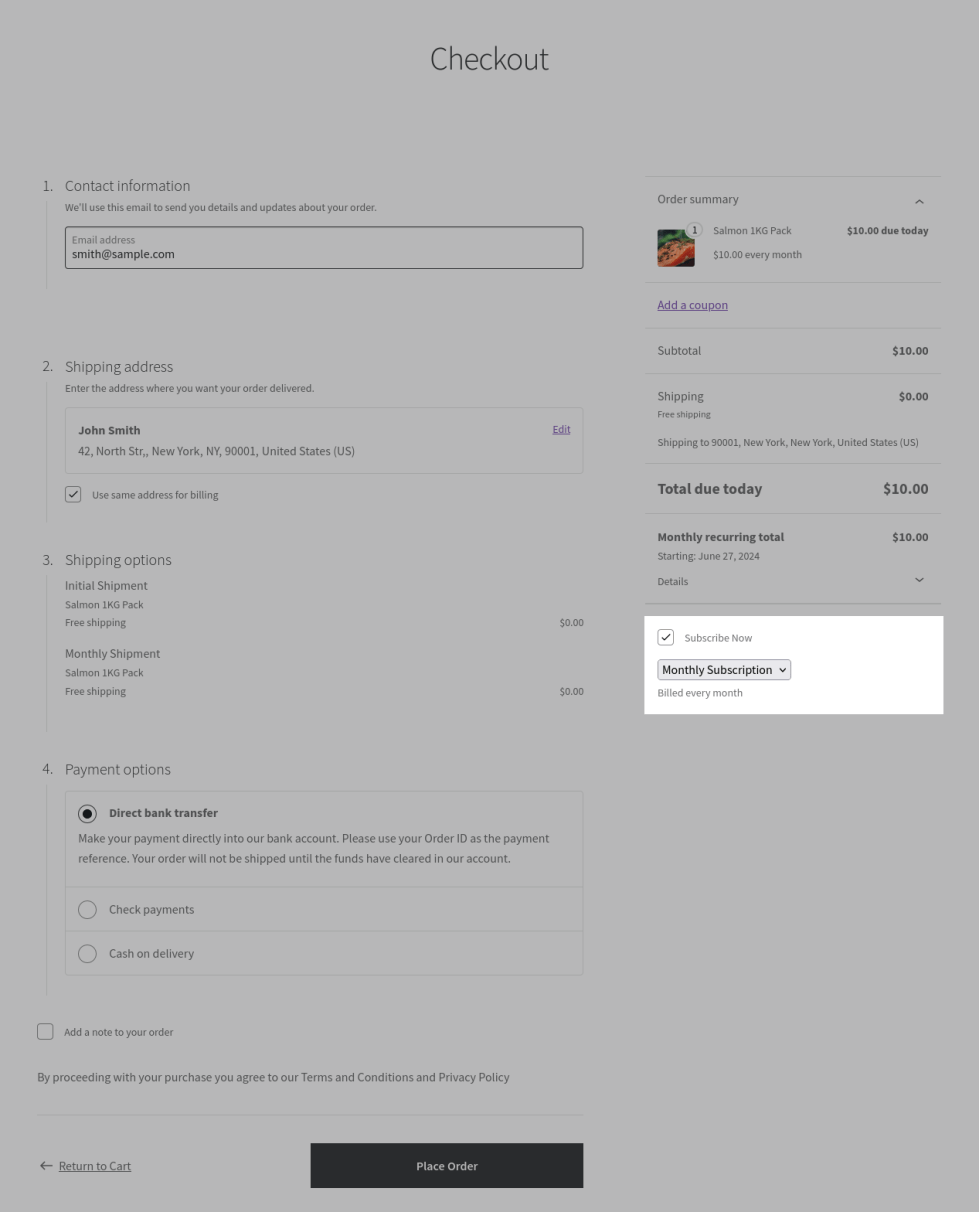
- Once the order is placed, it will be considered as a subscription order and renewal will happen as per Woo Subscriptions behaviour.
Separate Shipping Cycle
↑ Back to topIf you want to bill separately and ship separately or create multiple shipping for a single billing, then you can use Separate Shipping Cycle feature. When this feature is enabled, fulfillment orders will be automatically created with order price set as 0.
To configure this feature, follow the below steps,
- Create a new product(simple subscription/variable subscription) or edit an existing product. You can also apply this feature for subscription plans.
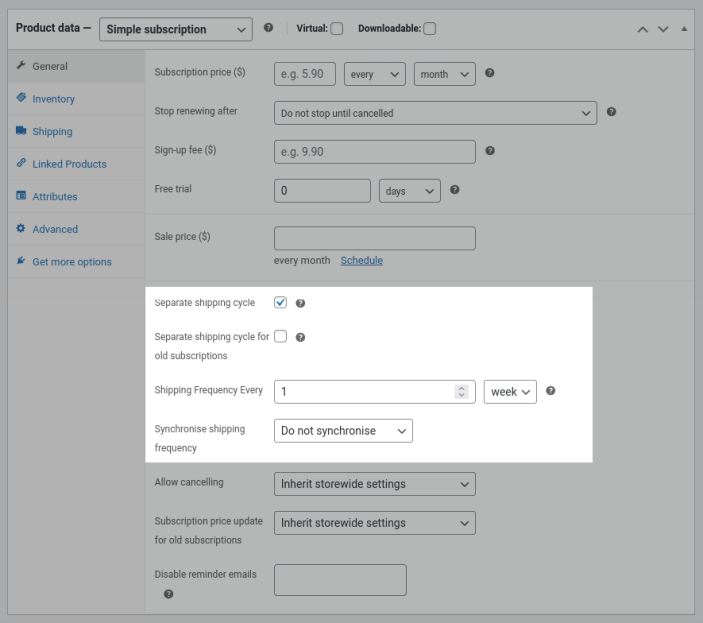
- Enable “Separate shipping cycle” checkbox.
- If you are applying this feature for an existing product(there are active subscribers for the product) and if you want to apply separate shipping cycle for existing subscribers from their upcoming renewal onwards, then enable “Separate shipping cycle for old subscribers” checkbox.
- In “Shipping Frequency Every” option, set the shipping interval as per your requirement. The value given here must be less than the billing interval of the product/plan.
- If you have selected “week” selectbox in the previous option, then you will be able to synchronize the fulfillment orders to be created on specific day of the week. Select the day which you want to synchronize in “Synchronize shipping frequency” option. If you have selected “month/year” selectbox in the previous option, then you will be able to synchronize the fulfillment orders to be created on specific day of the month. Select the day which you want to synchronize in “Synchronize shipping frequency” option.
Example 1:
Subscription Billing Cycle – every 6 months
Shipping Frequency Every – 1 month
Example 2:
Subscription Billing Cycle – every month
Shipping Frequency Every – every week
Synchronize Shipping Frequency – Monday each week

Prevent/Allow Cancelling
↑ Back to topAs per the behaviour of Woo Subscriptions, subscribers can cancel their subscriptions anytime from their My Account Page > Subscriptions > View the respective subscription.
To prevent/allow cancelling options for the subscribers with some limitations, go to “WooCommerce > Settings > Subscriptions > Cancelling” and configure the below options.
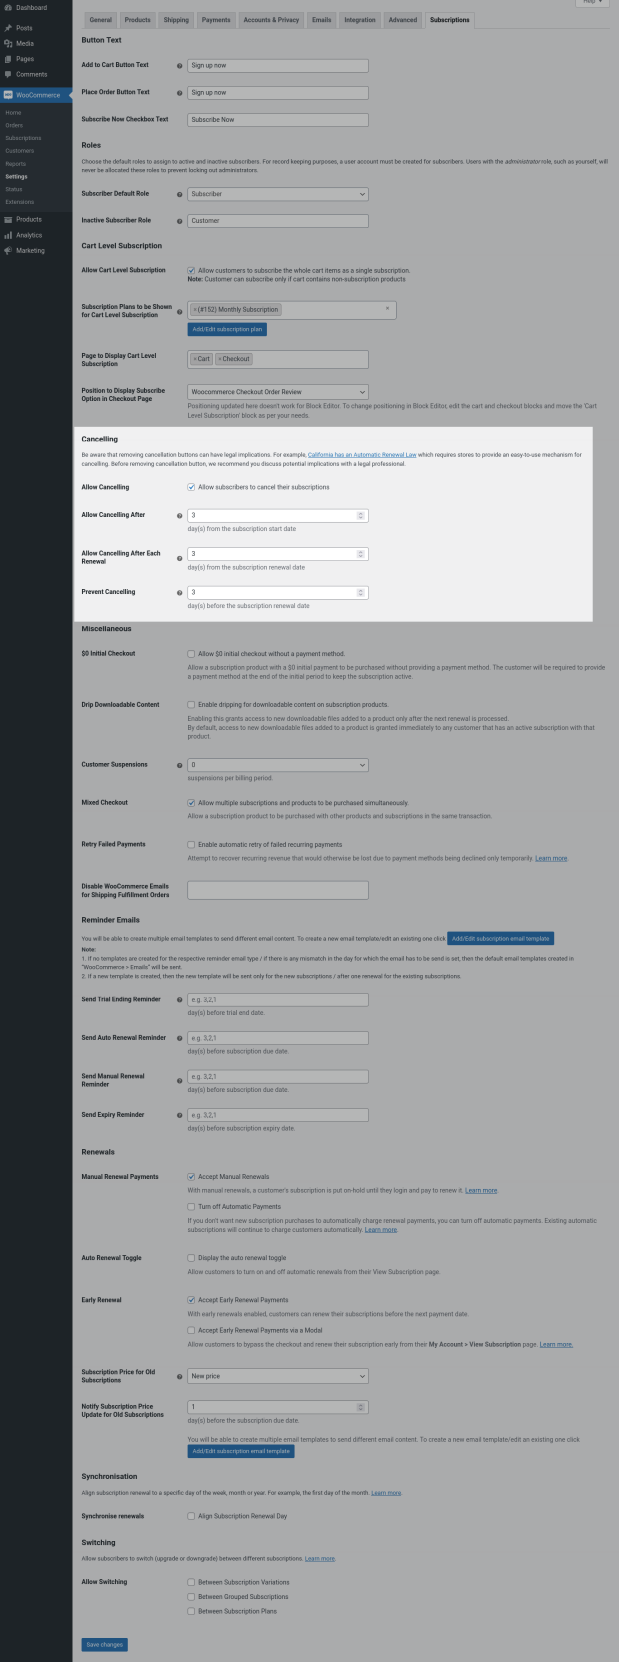
Allow Cancelling
If you don’t want to allow the subscribers to cancel their subscription, disable this checkbox. If you want to allow cancellation with some restrictions, then enable this checkbox and configure the below options as per your requirement.
Allow Cancelling After
Using this option you can control Cancel button to be displayed for the customer only after specific number of days of subscription start date. Leave the field empty or set 0 if you want to show Cancel button immediately after purchasing the subscription.
For example, if you have set 10 in this option, then if subscriber purchased the subscription on 10th January, they will see Cancel button in View Subscription page only after 20th January. During the period of 10th January – 19th January, cancel button will be hidden for the subscriber.
Allow Cancelling After Each Renewal
Using this option you can control Cancel button to be displayed for the customer only after specific number of days of subscription renewal date. Leave the field empty or set 0 if you want to show Cancel button immediately after renewing the subscription.
For example, if you have set 10 in this option, then if subscriber purchased a monthly subscription on 10th January and renewed the subscription on 10th February, they will see Cancel button in View Subscription page only after 20th February. During the period of 10th February – 19th February, cancel button will be hidden for the subscriber.
Prevent Cancelling
Using this option you can control Cancel button to be hidden for the customer before specific number of days of subscription renewal date. Leave the field empty or set 0 if you don’t want to prevent cancelling.
For example: if you have set 10 in this option, then if subscriber purchased a monthly subscription on 10th January and if the renewal date is 10th February, they will see Cancel button in View Subscription page until 30th January. During the period of 31st January – 10th February, Cancel button will be hidden for the subscriber.
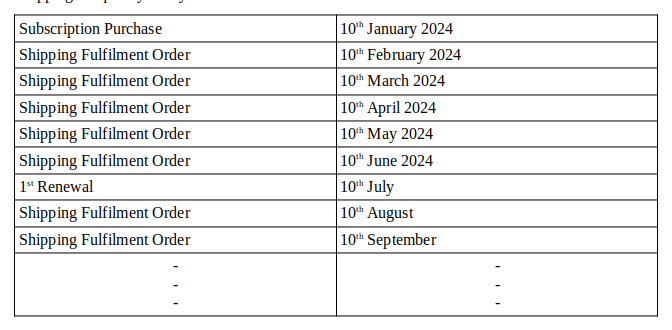
Example Scenario with all the 3 Cancelling options configured:
Subscription Billing Interval: every 2 weeks
Subscription Purchased Date: 01st January
Subscription 1st Renewal Date: 15th January
Subscription 2nd Renewal Date: 29th January
Allow Cancelling After: 7
Allow Cancelling After Each Renewal: 4
Prevent Cancelling: 3
Period which Cancel button will be shown as per the above scenario:
08th – 12th January & 19th – 26th January
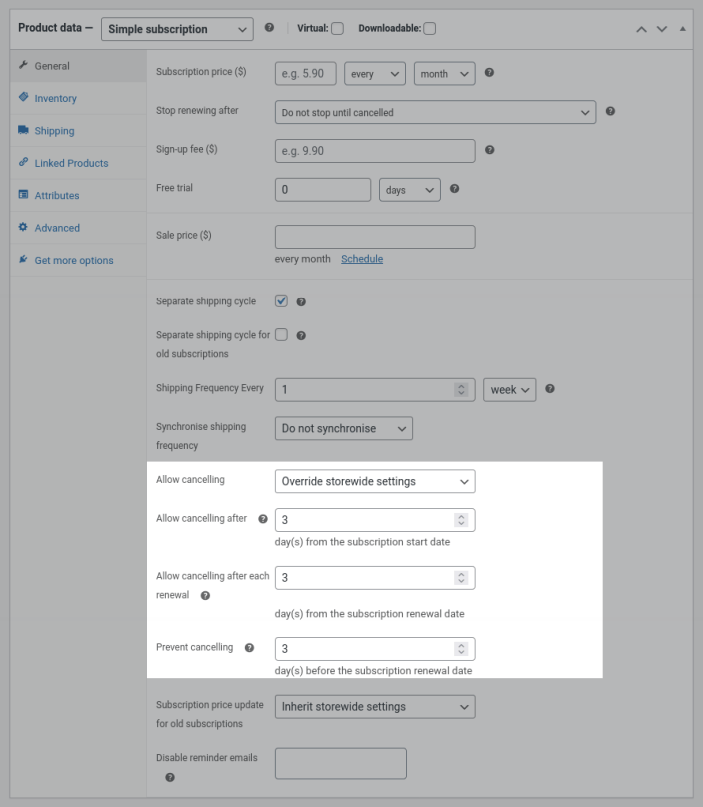
Alternatively, you can also override the global settings and configure cancelling options for each subscription product as per your needs. To override global settings, go to edit product page of the respective subscription product and in “Allow Cancelling” option, select “Override storewide settings” and configure accordingly.
Note:
Be aware that removing cancellation buttons can have legal implications. For example, California has an Automatic Renewal Law which requires stores to provide an easy-to-use mechanism for cancelling. Before removing cancellation button, we recommend you discuss potential implications with a legal professional.
Prevent/Allow Switching
↑ Back to topIf you have enabled switching feature in Woo Subscriptions, then subscribers will see switch button and able to switch without any restrictions. Using Prevent/Allow Switching feature, you can restrict subscribers to switch only during specific time.
To prevent/allow switching, go to “WooCommerce > Settings > Subscriptions > Switching” and configure the below options as per your needs.

Allow Switching – Between Subscription Plans
If you have created subscription plans using this plugin and want to allow subscribers to switch between one plan to another plan for their subscription, then enable “Between Subscription Plans” in “Allow Switching” option so that Switch(Upgrade or Downgrade) button will be displayed for Buy Now/Subscribe as well as Cart Level Subscriptions.
Allow Switching After
Using this option you can control Switch button to be displayed for the subscriber only after specific number of days of subscription start date. Leave the field empty or set 0 if you want to show Switch button immediately after purchasing the subscription.
For example, if you have set 10 in this option, then if subscriber purchased the subscription on 10th January, they will see Switch button in View Subscription page only after 20th January. During the period of 10th January – 19th January, Switch button will be hidden for the subscriber.
Allow Switching After Each Renewal
Using this option you can control Switch button to be displayed for the subscriber only after specific number of days of subscription renewal date. Leave the field empty or set 0 if you want to show Switch button immediately after renewing the subscription.
For example: if you have set 10 in this option, then if subscriber purchased a monthly subscription on 10th January and renewed the subscription on 10th February, they will see Switch button in View Subscription page only after 20th February. During the period of 10th February – 19th February, Switch button will be hidden for the subscriber.
Prevent Switching
Using this option you can control Switch button to be hidden for the subscriber before specific number of days of subscription renewal date. Leave the field empty or set 0 if you don’t want to prevent switching.
For example, if you have set 10 in this option, then if subscriber purchased a monthly subscription on 10th January and if the renewal date is 10th February, they will see Switch button in View Subscription page until 30th January. During the period of 31st January – 10th February, Switch button will be hidden for the subscriber.
Example Scenario with all the 3 Switching options configured:
Subscription Billing Interval: every 2 weeks
Subscription Purchased Date: 01st January
Subscription 1st Renewal Date: 15th January
Subscription 2nd Renewal Date: 29th January
Allow Switching After: 7
Allow Switching After Each Renewal: 4
Prevent Switching: 3
Period which Switch button will be shown as per the above scenario:
08th – 12th January & 19th – 26th January
Reminder Email
↑ Back to topYou can remind subscribers with reminder emails. It is possible to use default templates for reminding subscribers or else you will be able to create multiple templates for multiple products so that you can use different content for different subscription products.
You can send following reminder emails,
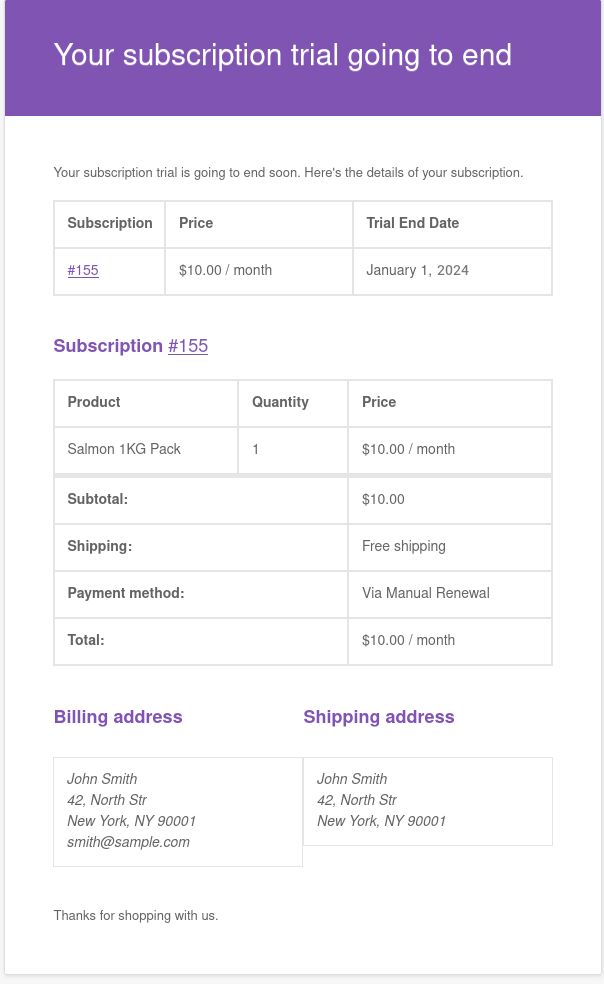
- Trial Ending Reminder
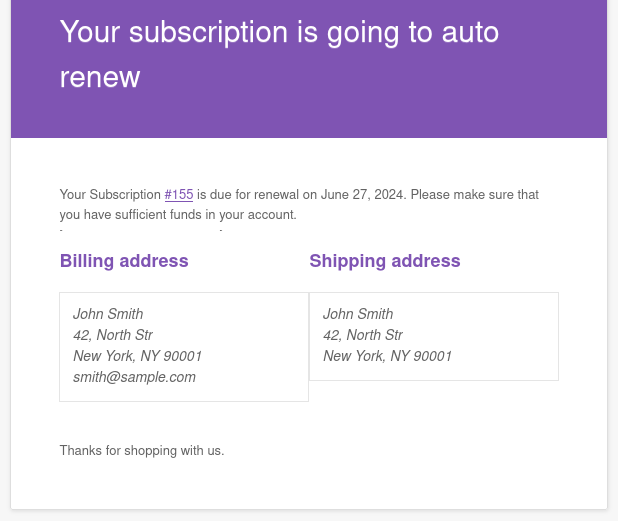
- Auto Renewal Reminder
- Manual Renewal Reminder
- Expiry Reminder
To configure reminder emails, go to “WooCommerce > Settings > Subscriptions > Reminder Emails”.

Configuring Trial Ending Reminder
- In “Send Trial Ending Reminder” option, set before how many days of trial ending date you want to remind subscribers with the email. To send multiple reminders, set the days before which you have to send the reminder emails separated by comma(,). Multiple values has to be given in descending order.
- If you haven’t created any template, then the default template will be used for notifying subscribers. You can see the default template in “WooCommerce > Settings > Emails > Trial Ending Reminder”.
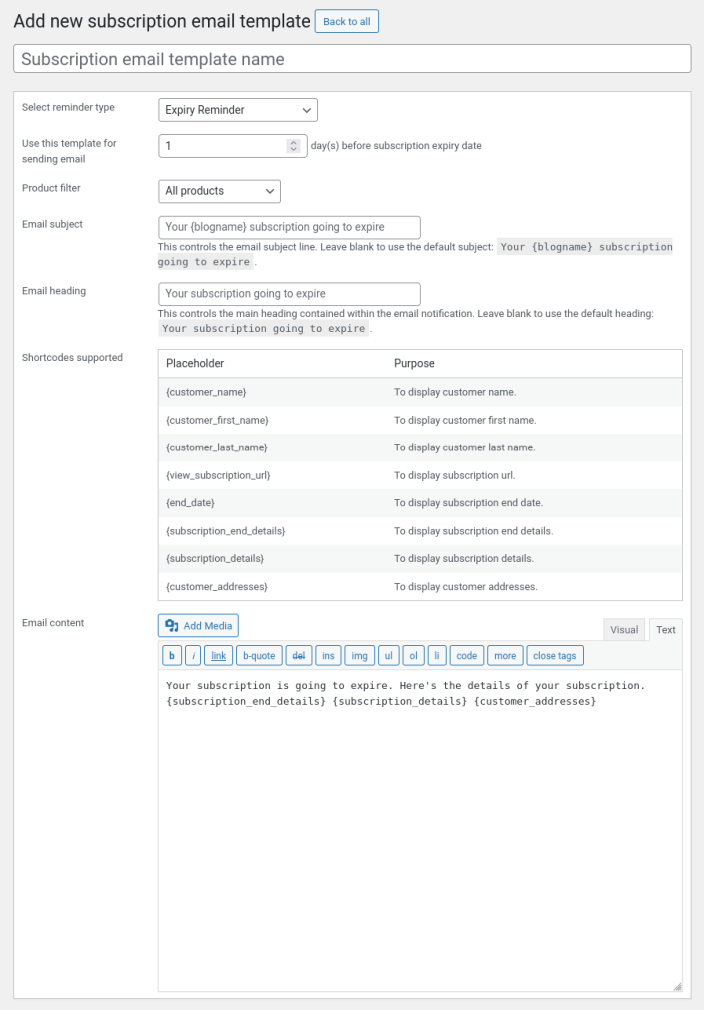
- If you want to create a new email template for trial ending reminder, then click “Add/Edit subscription email template”.
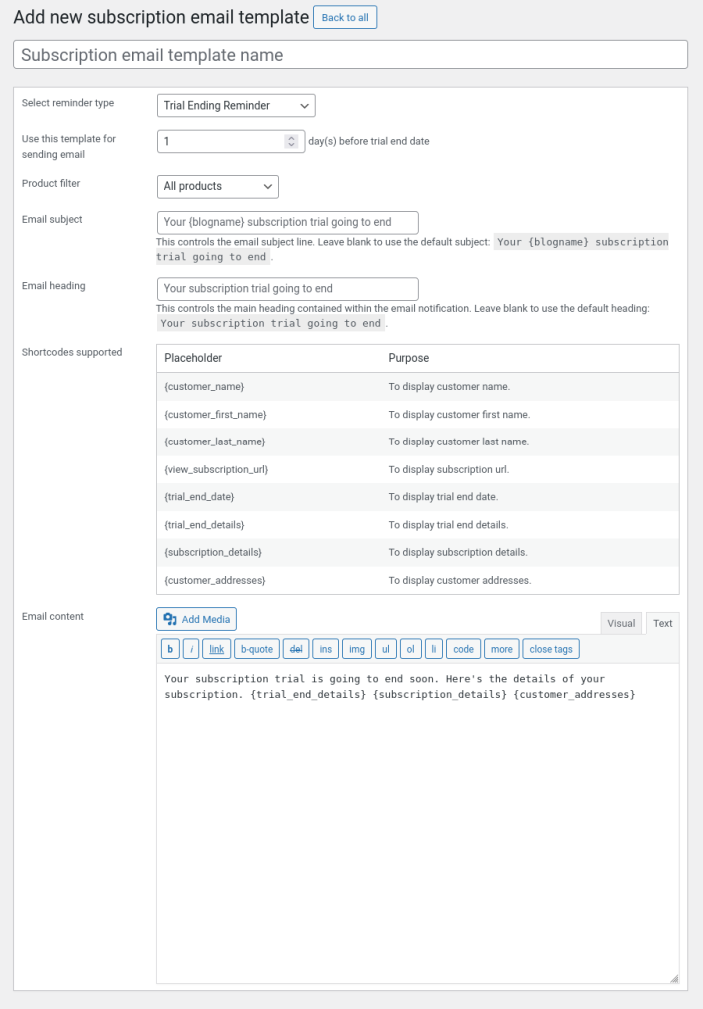
- In the title field, give the name for the template. The name won’t be displayed for the subscribers.
- In “Select reminder type” option, select “Trial Ending Reminder”.
- In “Use this template for sending email” option, set the exact value which you have given in “Send Trial Ending Reminder”. If you have given a different value here, then notification won’t be sent using this template. Instead, default template will be used for notifying subscribers.
- Using “Product Filter” option, you can use selected subscription products to use this template. You can create multiple templates for multiple products as per your needs.
- You can fill the email subject, heading and body in “Email subject”, “Email heading” and “Email content” fields respectively.
- Finally Publish the template and Save the subscription settings.
- If subscribers have placed the subscription with Trial, then before the set number of days of trial ending date, they will be reminded with Trial Ending Reminder emails.
Configuring Auto Renewal Reminder
- In “Send Auto Renewal Reminder” option, set before how many days of subscription renewal date you want to remind subscribers with the email. To send multiple reminders, set the days before which you have to send the reminder emails separated by comma(,). Multiple values has to be given in descending order.
- If you haven’t created any template, then the default template will be used for notifying subscribers. You can see the default template in “WooCommerce > Settings > Emails > Auto Renewal Reminder”.
- If you want to create a new email template for trial ending reminder, then click “Add/Edit subscription email template”.
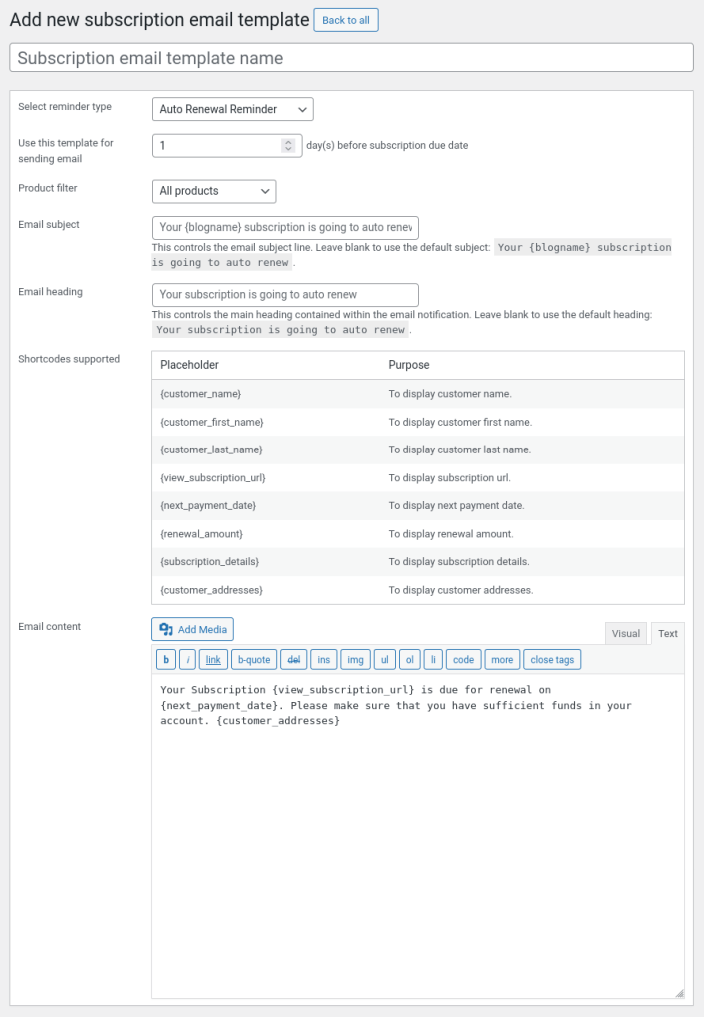
- In the title field, give the name for the template. The name won’t be displayed for the subscribers.
- In “Select reminder type” option, select “Auto Renewal Reminder”.
- In “Use this template for sending email” option, set the exact value which you have given in “Send Trial Ending Reminder”. If you have given a different value here, then notification won’t be sent using this template. Instead, default template will be used for notifying subscribers.
- Using “Product Filter” option, you can use selected subscription products to use this template. You can create multiple templates for multiple products as per your needs.
- You can fill the email subject, heading and body in “Email subject”, “Email heading” and “Email content” fields respectively.
- Finally Publish the template and Save the subscription settings.
- If subscribers have placed the subscription in automatic payment mode, then before the set number of days of renewal date, they will be reminded with Auto Renewal Reminder emails.
Configuring Manual Renewal Reminder
- In “Send Manual Renewal Reminder” option, set before how many days of subscription renewal date you want to remind subscribers with the email. To send multiple reminders, set the days before which you have to send the reminder emails separated by comma(,). Multiple values has to be given in descending order.
- If you haven’t created any template, then the default template will be used for notifying subscribers. You can see the default template in “WooCommerce > Settings > Emails > Manual Renewal Reminder”.
- If you want to create a new email template for trial ending reminder, then click “Add/Edit subscription email template”.
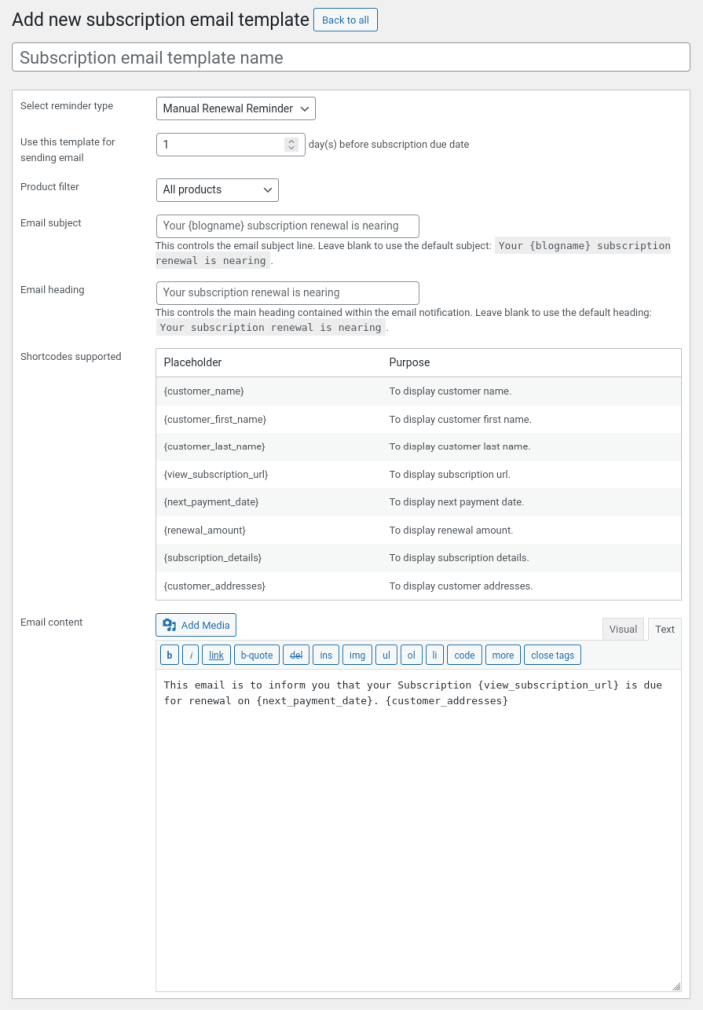
- In the title field, give the name for the template. The name won’t be displayed for the subscribers.
- In “Select reminder type” option, select “Manual Renewal Reminder”.
- In “Use this template for sending email” option, set the exact value which you have given in “Send Manual Renewal Reminder”. If you have given a different value here, then notification won’t be sent using this template. Instead, default template will be used for notifying subscribers.
- Using “Product Filter” option, you can use selected subscription products to use this template. You can create multiple templates for multiple products as per your needs.
- You can fill the email subject, heading and body in “Email subject”, “Email heading” and “Email content” fields respectively.
- Finally Publish the template and Save the subscription settings.
- If subscribers have placed the subscription in manual payment mode, then before the set number of days of renewal date, they will be reminded with Manual Renewal Reminder emails.
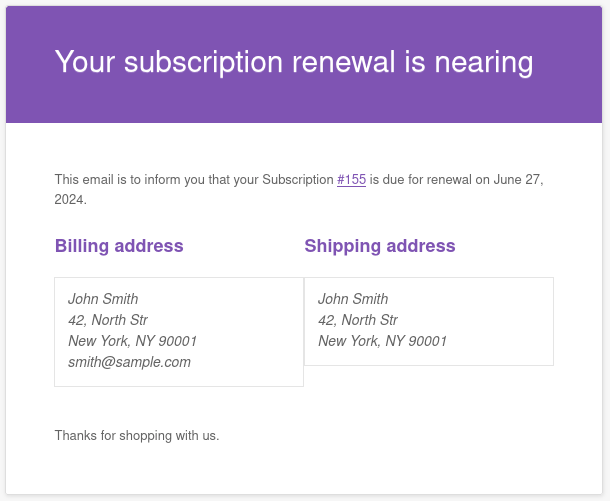
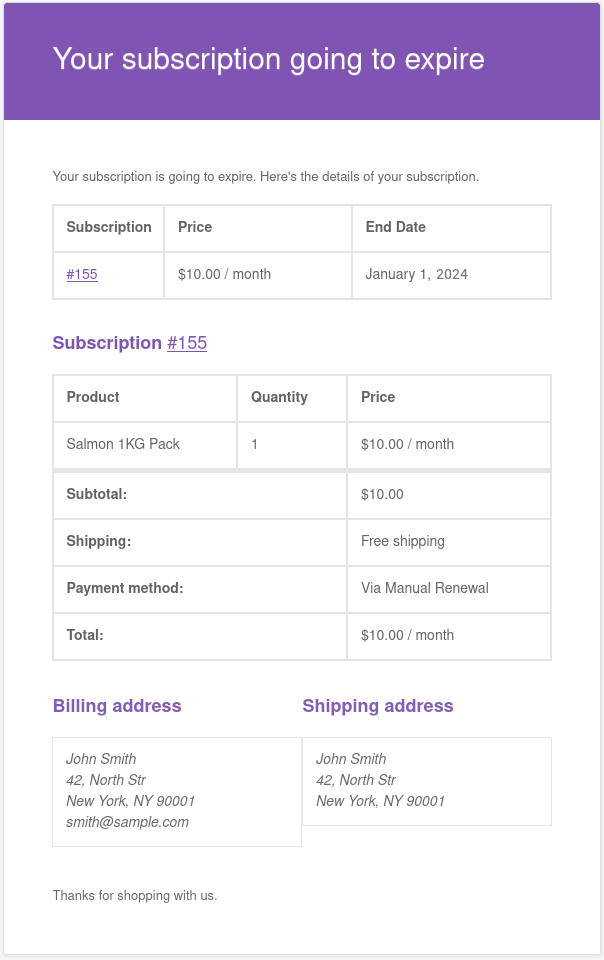
Configuring Expiry Reminder
- In “Send Expiry Reminder” option, set before how many days of subscription expiry date you want to remind subscribers with the email. To send multiple reminders, set the days before which you have to send the reminder emails separated by comma(,). Multiple values has to be given in descending order.
- If you haven’t created any template, then the default template will be used for notifying subscribers. You can see the default template in “WooCommerce > Settings > Emails > Expiry Reminder”.
- If you want to create a new email template for expiry reminder, then click “Add/Edit subscription email template”.
- In the title field, give the name for the template. The name won’t be displayed for the subscribers.
- In “Select reminder type” option, select “Trial Ending Reminder”.
- In “Use this template for sending email” option, set the exact value which you have given in “Send Trial Ending Reminder”. If you have given a different value here, then notification won’t be sent using this template. Instead, default template will be used for notifying subscribers.
- Using “Product Filter” option, you can use selected subscription products to use this template. You can create multiple templates for multiple products as per your needs.
- You can fill the email subject, heading and body in “Email subject”, “Email heading” and “Email content” fields respectively.
- Finally Publish the template and Save the subscription settings.
- If subscribers have placed the subscription with an expiry date, then before the set number of days of expiry date, they will be reminded with Expiry Reminder emails.
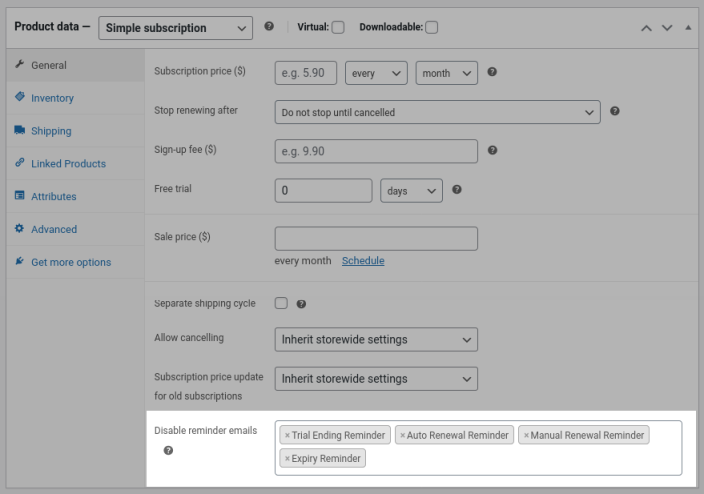
Disable Reminder Emails for Specific Products
If you don’t want to send reminder emails(Trial Ending Reminder, Auto Renewal Reminder, Manual Renewal Reminder, Expiry Reminder) for specific products, then go to Edit Product page of the respective product and select the emails you don’t want to sent in “Disable Reminder Emails” option.
Preview Subscription Emails
↑ Back to top- To preview subscription emails(Woo Subscriptions emails and Enhancer for WooCommerce Subscriptions emails) go to “WooCommerce > Settings > Emails” and you can see “Preview Subscription Emails” column.
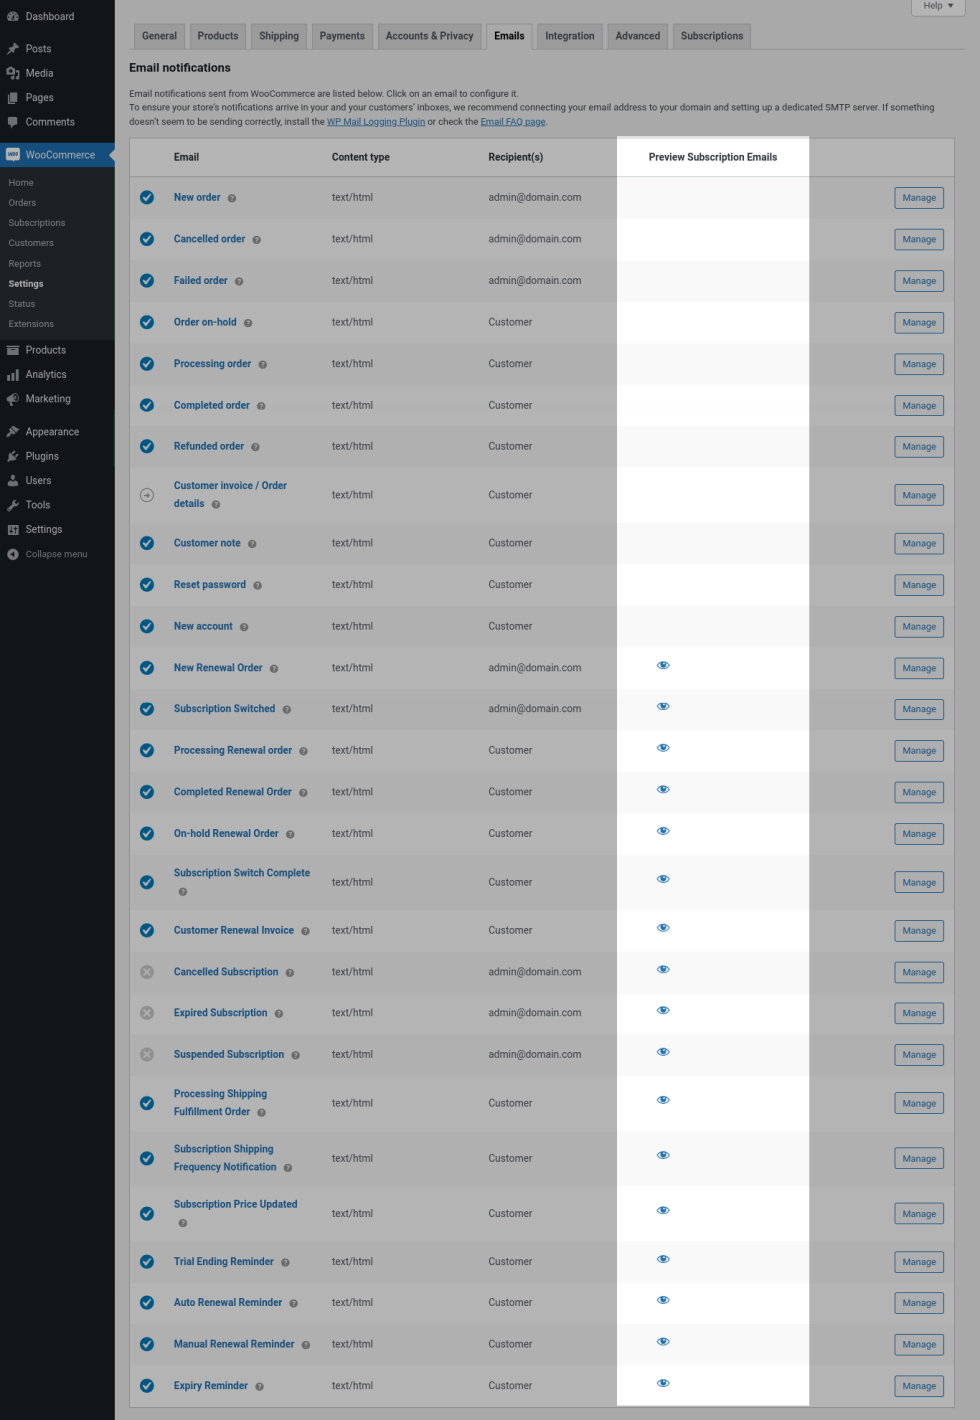
- For the subscription related emails, you can see eye symbol which when clicked you will be asked to input an actual order number/subscription number/both. Enter the number and click “Preview” button.
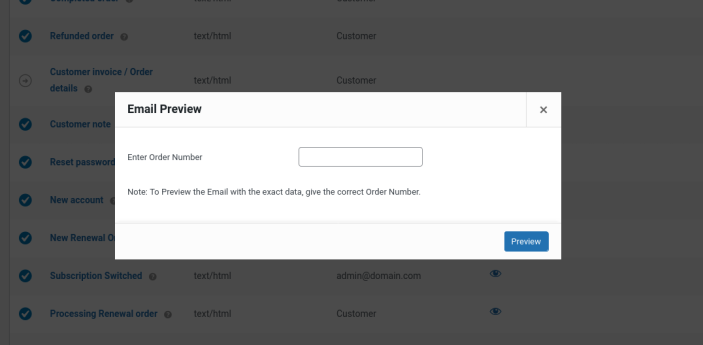
- Now, you can see the preview of the email which the subscribers receive.
Limit Subscription Trial
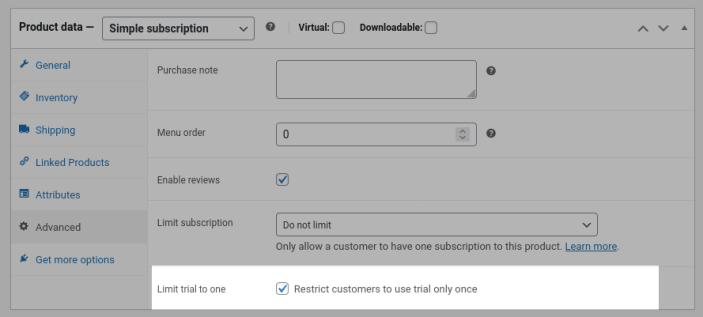
↑ Back to topAs per the behaviour of Woo Subscriptions, if Free Trial is enabled for the product then customers can access the Trial again and again. To control this and to limit to use the Trial only once, go to Edit Product page of the Trial given subscription product. In “Advanced” section, you can find “Limit trial to one” option. Enable this option so that customers can use the trial only once.
Limit Subscription in Variant Level
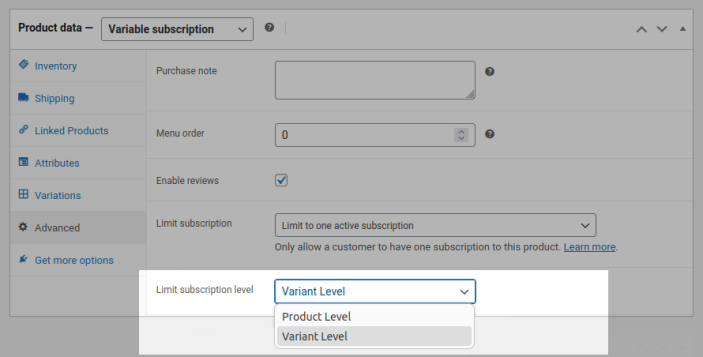
↑ Back to topAs per the behaviour of Woo Subscriptions, if you are limiting a variable subscription product, then the restriction will be applied for product level. i.e. if you are limiting to one active subscription, then customers will be able to have only one variation. It is not possible to purchase another variant. To limit the variable subscription product in variant level, go to Edit Product page of the variable subscription product and in “Advanced” section you can find “Limit subscription level” option. In this option select “Variant Level”.
Limitation
↑ Back to topUpdating New Price for Old Subscriptions – Limitation
This feature will not work if your users have subscribed through PayPal Subscriptions.
Separate Shipping Cycle for Subscriptions – Limitation
- Separate Fulfillment Cycle is not supported for Synchronization Subscriptions.
- If Trial is enabled for the Subscription, Fulfillment Cycle will start from the first renewal of the subscription(i.e. after the Trial ends).
Translation
↑ Back to topEnhancer for WooCommerce Subsriptions is translation ready, meaning you can edit the po files by which you can translate the text to any language. Steps to perform the translation are as follows. For example, a translation to French.
- Download and install Poedit
- Open the file enhancer-for-woocommerce-subscriptions > languages > enhancer-for-woocommerce-subscriptions.pot using Poedit.
- Create a new translation file by clicking Create new translation button.
- Choose the Source text and set its corresponding French text in Translation Text Area.
- Save the changes.
- Save the file name as enhancer-for-woocommerce-subscriptions-fr_FR.po.
- If you are using WordPress Version 3.9.13 or below, then in wp-config.php define the WPLANG as French. Syntax is define(‘WPLANG’, ‘fr_FR’);
- If you are using WordPress Version 4.0 or above, then go to WordPress dashboard > Settings > General and select the Site Language as French.
FAQ
↑ Back to topQ. Is Price Update feature restricted for any payment methods?
A. Price Update feature works if the subscriptions are placed using payment methods which supports “amount changes” subscription feature. To check this, go to “WooCommerce > Settings > Payments” and in “Automatic Recurring Payments” column hover the question mark symbol(?) for the respective payment method. If “amount changes” is listed under “Subscription features”, then it means the payment method is supported for price update feature.
Q: Why shipping fulfillment orders are not created?
By default, shipping fulfillment orders won’t be created for the old subscriptions which are already running before installing the “Enhancer for WooCommerce Subscriptions” plugin. If you want orders to be created for old subscriptions, then go to the edit product page and enable the “Separate shipping cycle for old subscriptions” checkbox so that from the next renewal onward, the shipping fulfillment orders will be created for the old subscriptions.
Q: Is it possible to send notification emails for subscriptions created using other WooCommerce Subscriptions addon plugins?
Yes, notification emails can be sent for all subscriptions.
Q: Is it possible to update the new price for subscriptions created using other WooCommerce Subscriptions addon plugins?
Yes, the new price can be updated for all subscriptions.
Q: Will the subscription price update if tax amount is updated on the site?
No, price update feature works only when there is an update in the Regular/Sale price of the product.
Q: Why reminder emails are not being sent from custom templates?
The Day by which the reminder email to be sent has to be mapped correctly in “WooCommerce > Settings > Subscriptions > Reminder Emails” and in edit template has to be the same. If you have set 3 days before settings and 2 days before in the template, then a reminder email from the template won’t be sent. Instead, the default template content which was set in “WooCommerce > Settings > Emails” will be sent.
Troubleshooting
↑ Back to topQ. Reminder emails are not being sent.
1. Confirm whether standard WooCommerce emails(order confirmation emails for example) are being sent without any issues.
2. Go to “Tools > Scheduled Actions” and search with the subscription number for which emails are not being sent. Check whether reminder related actions are scheduled. If they were not scheduled edit the subscription and update the subscription status to on-hold and reactivate it. Now, again check the scheduled actions and verify whether actions are scheduled for reminders. If they are scheduled, then emails will be sent.
Q. Subscribers are not eligible for a Trial even if they haven’t used the Trial before when “Limit Subscription Trail” feature is used. Why is that?
In case if the subscription order placed by the customer is unsuccessful, then as per WooCommerce behaviour, product stock will be hold for certain period of time based on the configuration in “WooCommerce > Settings > Products > Inventory > Hold stock”. If the customer immediately tries to purchase the same subscription product, they won’t get the Trial since an order is already in Pending status.
To overcome this situation, you can reduce the “Hold stock” duration so that the unpaid order will be automatically Cancelled after the set duration and hence when the customer purchase the same subscription product, they will get it with Trial.
Questions and Feeback
↑ Back to topHave a question before you buy? Please fill out this pre-sales form.
Already purchased and need some assistance? Get in touch with us via the Help Desk.