Flexi BOGO for WooCommerce allows you to create customized “Buy One, Get One” (BOGO) offers tailored to your store’s needs. With this plugin, you can set up flexible discount rules where customers can get free or discounted products based on their purchases. You can define conditions such as the number of products bought, product categories, or specific items eligible for the offer. The plugin makes it easy to add BOGO offers globally or for individual products.
Installation
↑ Back to topTo start using a product from WooCommerce.com, you can use the “Add to store” functionality on the order confirmation page or the My subscriptions section in your account.
- Navigate to My subscriptions.
- Find the Add to store button next to the product you’re planning to install.
- Follow the instructions on the screen, and the product will be automatically added to your store.
Alternative options and more information at:
Managing WooCommerce.com subscriptions.

Setting Up Discount Rules
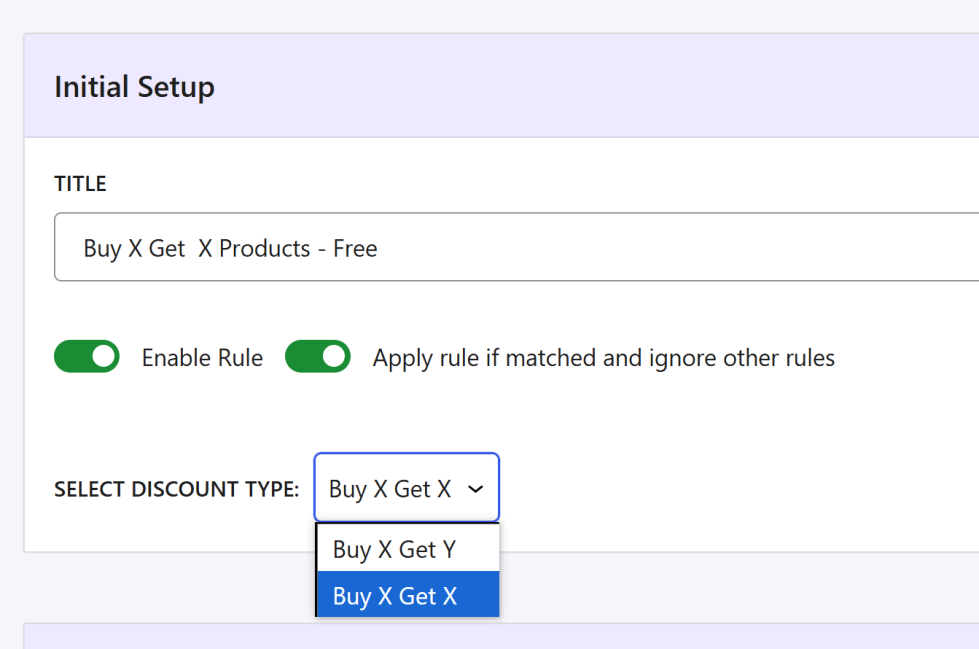
↑ Back to topSelecting the Discount Type
↑ Back to topOnce activated, navigate to WooCommerce > Flexi BOGO. Choose the Discount Type that fits your promotion:
- Buy X Get Y: Buy one product and get another product for free or at a discount.
Buy X Get Y discount rule, refers to a promotion where customers who purchase a specific product (X) are eligible for a discount on another product (Y).For example, if a customer buys M2 iPad Air(X), they can get Free/ Discount on iPad Air Sleeve (Y). This type of promotion is the most popular BOGO deal in the e-commerce world.
- Buy X Get X: Buy a certain quantity of a product and get the same quantity for free.
Buy X Get X discount is a promotion offered in a WooCommerce store where customers receive a discount or free product after purchasing a specified quantity of the same product. This is a popular deal offered by online stores where customers get a free quantity of the same product. For example, “Buy 3 Get 1 Free” or “Buy One Get 50% off on the second quantity of the same product.” This type of discount encourages customers to purchase more products and can help increase sales and customer loyalty.
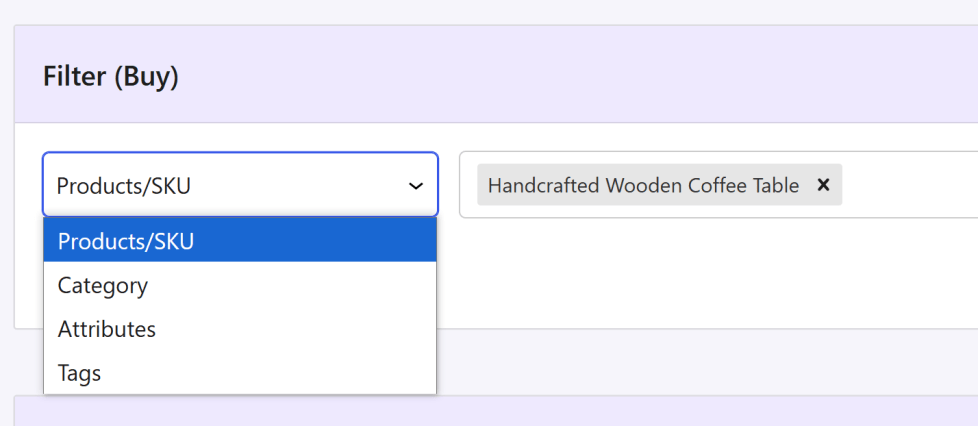
Filter (Buy) Options
↑ Back to topDefine the criteria for what products or categories a customer needs to purchase to qualify for the discount. This can include selecting specific products, SKUs, categories, attributes, or tags that will trigger the discount. Setting up these filters ensures that the discount only applies when the predefined conditions are met.
Discount Settings
↑ Back to topAfter defining the Filter (Buy) criteria, specify what discount the customer will receive. This involves selecting the Get Y Discount Type (e.g., product or category) and configuring the Discount Style (e.g., free, fixed, percentage). You can also set whether the discount is recursive, allowing customers to receive multiple discounts based on the quantity purchased.

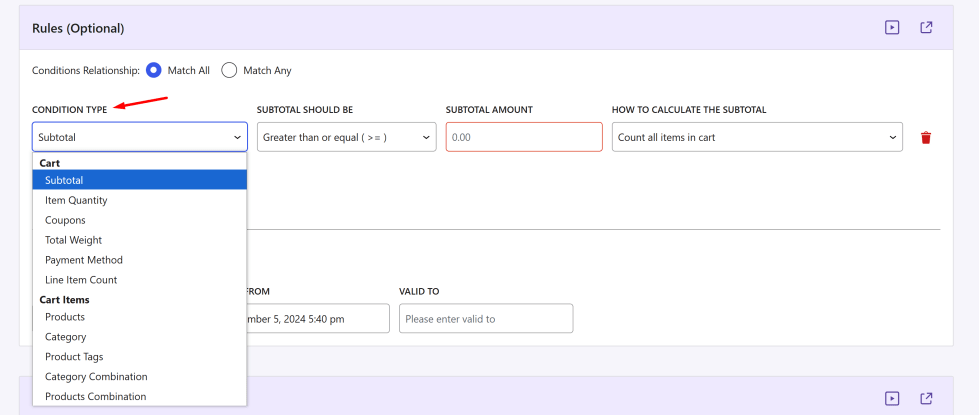
Additional Conditions
↑ Back to topWhen creating discount offers with the Flexi BOGO (Buy One, Get One) for WooCommerce plugin, additional Conditions allow you to set specific criteria that must be met for a discount to be applied. These criteria can be based on factors such as cart subtotal, product categories, specific products, coupons, product combinations, or the quantity of items in the cart. By using these conditions, you can create more focused and effective discount offers. The plugin checks these conditions before applying any discount.
Accessing the Rules Section
To access the Rules section, go to WooCommerce -> Flexi BOGO -> Discount Rules -> Click on ‘+ Create Rule’ button. On the Rule page, you’ll find all the “Rules (Optional)” as below:
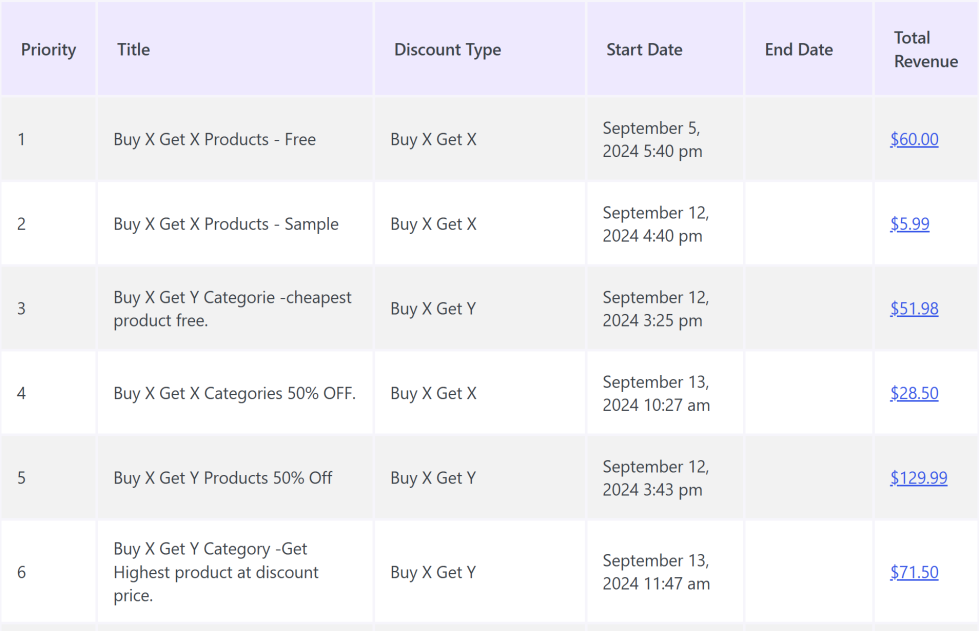
Revenue Tracker
↑ Back to topFlexi BOGO for WooCommerce lets you easily set the type of discount sales you want and track the revenue generated by each discount sale in real time. You can see the revenue data in the Flexi BOGO dashboard at a glance and promote the sales if it is working or simply turn off the discounts that are not working. It’s that easy.
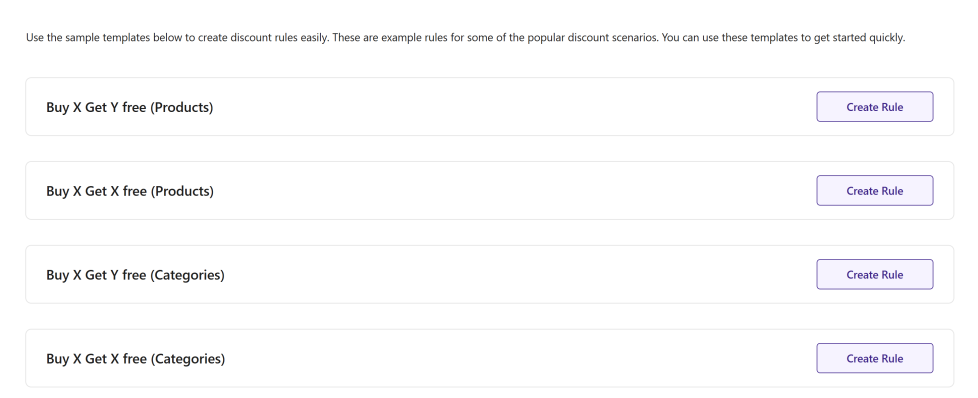
Ready-to-use Rule Templates
↑ Back to topFlexi BOGO offers pre-configured discount rule templates designed to simplify your setup process. Use these templates to quickly establish discount rules and customize them to fit your specific promotional needs. Available templates:
- Buy X Get Y free (Products)
- Buy X Get Y free (Categories)
- Buy X Get X free (Products)
- Buy X Get X free (Categories)
Countdown Timer for BOGO Offers
↑ Back to topCreating urgency is one of the most effective ways to boost conversions during promotions. With Flexi BOGO’s Countdown Timer for BOGO offers feature, you can now display a live countdown bar for your BOGO offers. The timer can be fixed (count down based on a fixed date/time) or dynamic (starts only when the shopper triggers an event).
In this guide, we’ll explain how to configure both Fixed and Dynamic timers, and how the timer behaves on the front end.
How Countdown Timers Work
↑ Back to topLet’s start by creating a new rule or editing an existing one. In your WordPress dashboard, go to WooCommerce > Flexi BOGO > Discount Rules. Here, you can either click Add New Rule or edit an existing rule to enable the Countdown Timer. Scroll down past the rule details and you’ll see a section labelled Countdown Timer. This is where you can turn on and configure the countdown bar for your offer.
- Enable Countdown Timer: This toggle turns the countdown bar on or off. Switch it on to display a live timer on your store’s front end.
- Timer Mode: choose whether you want a fixed timer or a Dynamic timer.
Below, we’ll look at both timer types in detail so you can decide which one fits your offer best.
Fixed Timer
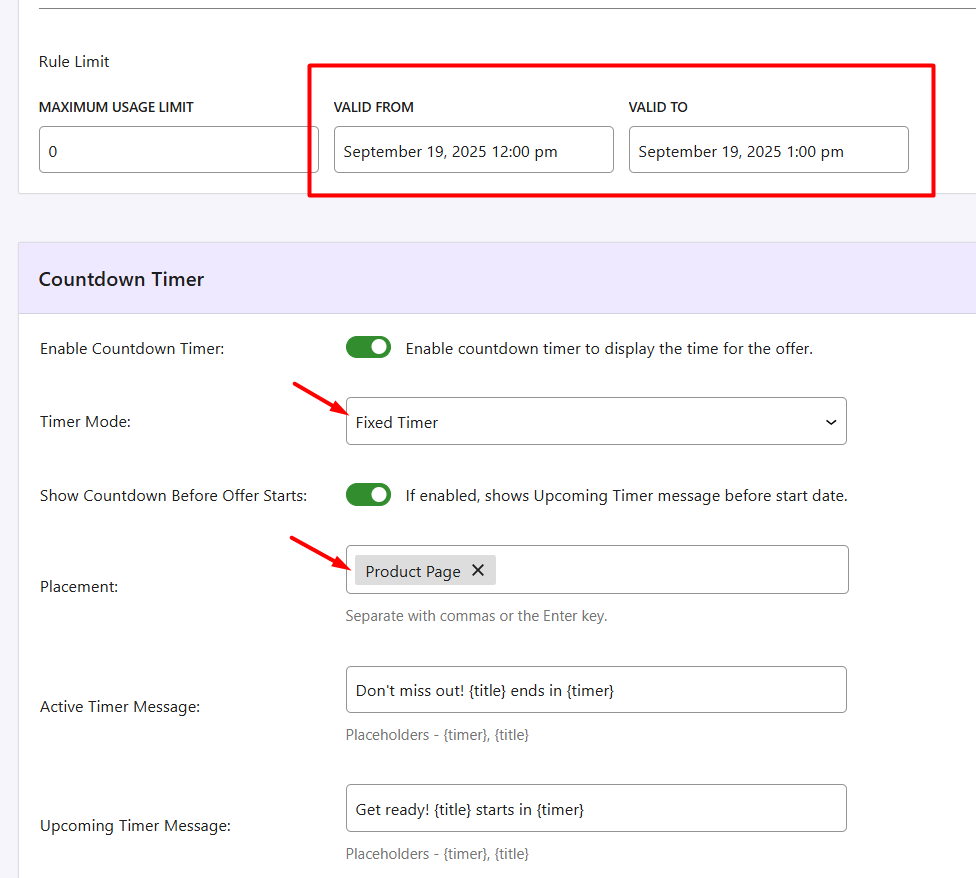
↑ Back to topA Fixed Timer counts down to a specific start and end date/time that you set in the rule section. All shoppers see the same countdown because it’s tied to your campaign start and end dates.
Steps to Configure:
- Enable the Countdown Timer in your BOGO rule.
- Select Timer Mode → Fixed Timer.
- Set your start and end date/time from the rule’s section “Valid From” and “Valid To” fields.The countdown timer automatically uses the “Valid From” and “Valid To” values you entered earlier in the Rule Limit settings section. The countdown automatically uses the start and end dates you’ve configured in the rule settings.
- Decide if you want to show the Countdown Before the Offer Starts. This displays an “Upcoming” message before the timer begins.
- Choose where the timer appears (product page, cart, checkout, storewide).
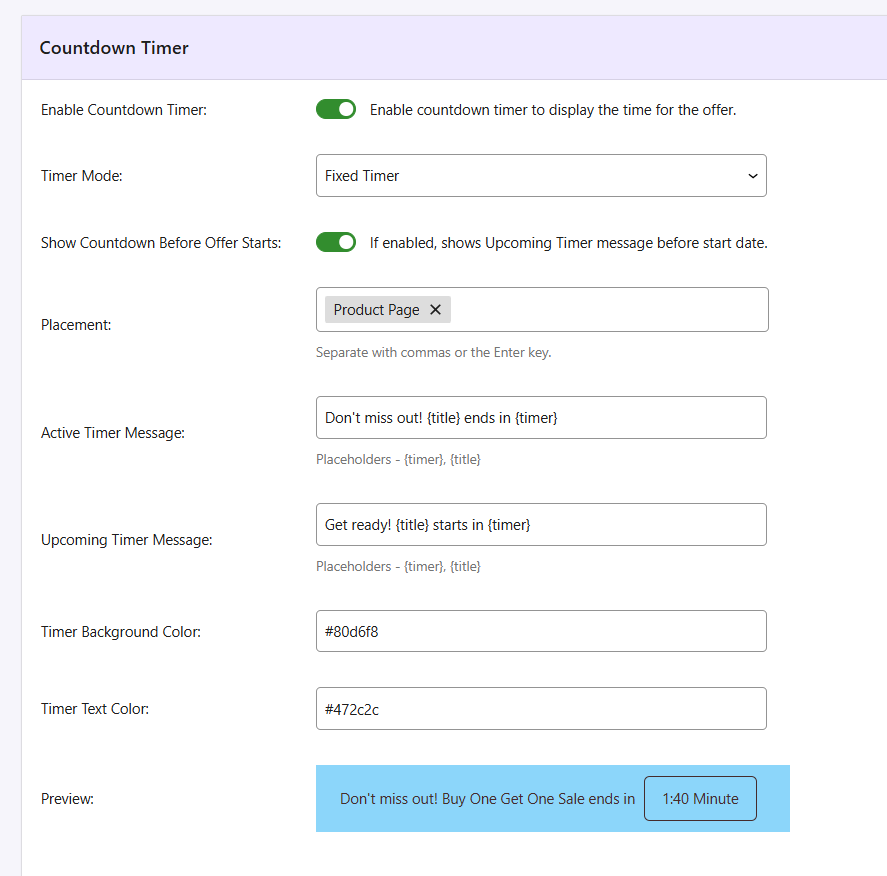
- Customize messages: Enter the text you’d like customers to see about the active offer. The {title} placeholder is automatically replaced with your rule title (“Buy One Get One Sale”), and the {timer} placeholder shows the live countdown time.
– Active Timer Message: Text while the offer is running, e.g., “Don’t miss out! {title} ends in {timer}.”
– Upcoming Timer Message: Text before the offer starts.
7. Set colors for the timer bar and text to match your store theme.
8.Use Preview to see how it looks before saving.
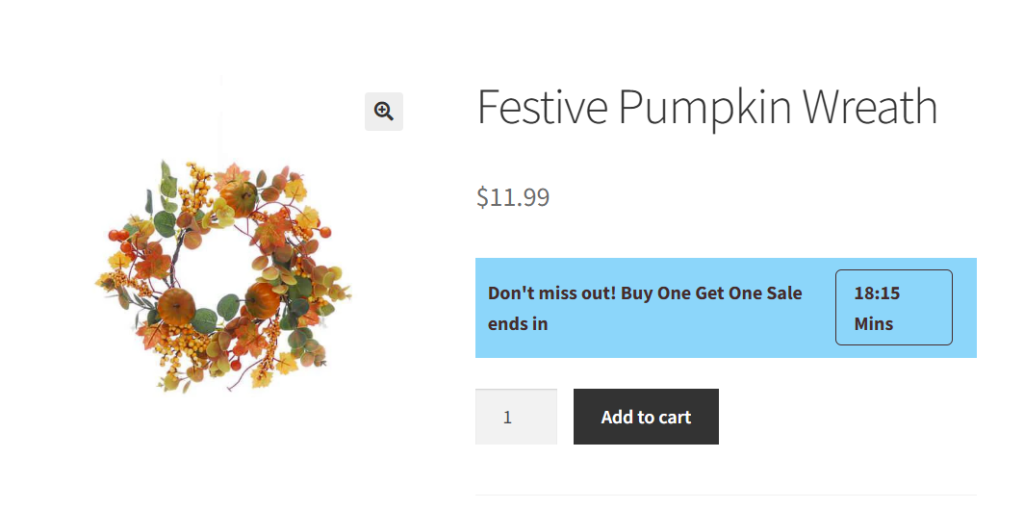
What customers will see:
In the above settings, we’ve created a Buy One Get One Sale for the product Festive Pumpkin Wreath. On the product page, shoppers see a blue bar with your message: Don’t miss out! Buy One Get One Sale ends in 18:15 mins.
As time runs out, the counter updates in real time until it reaches zero, after which the offer expires and the free product or discount no longer applies.
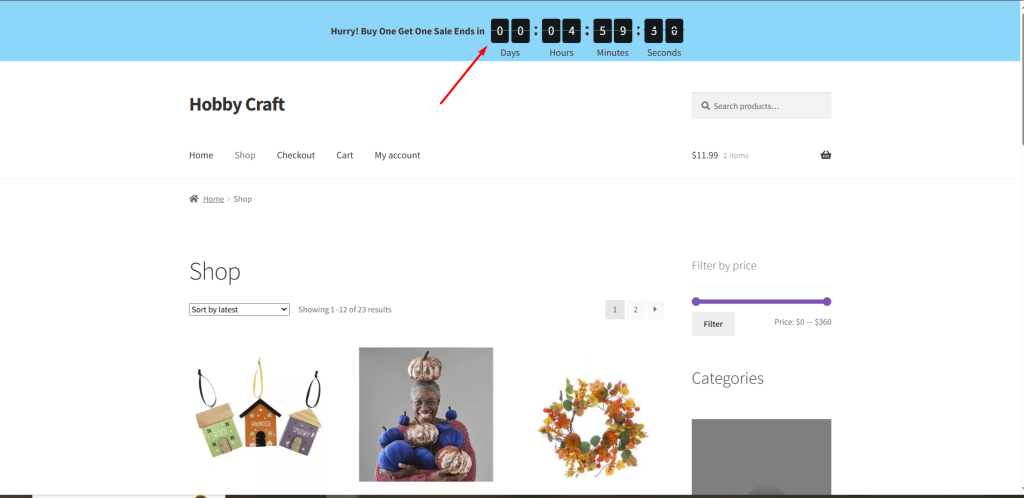
Dynamic Timer
↑ Back to topA Dynamic Timer provides a personal countdown for each shopper, starting from a trigger event such as visiting a product page, adding a product to the cart, or starting checkout.
Steps to Configure:
- Enable the countdown timer in your BOGO rule.
- Select Timer Mode → Dynamic Timer.
- Set Timer Duration (e.g., 5 hours).
- Choose the Trigger Event:
- Product added to cart-Timer Triggered When Product is Added to Cart
- Product page first viewed-Timer Triggered When Product Page is First Viewed
- Checkout starts-Timer Triggered When Checkout Starts
5. Select the timer placement (product page, cart, checkout, storewide). 6. Customize active/upcoming messages and colors. 7. Use Preview to check the timer.
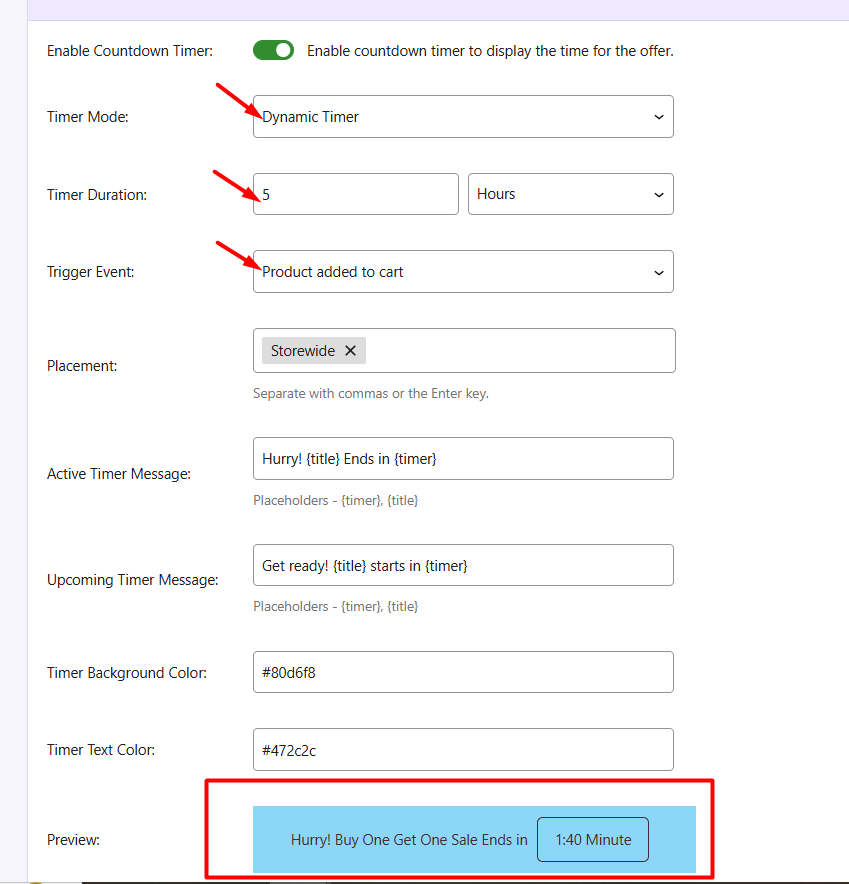
What customers will see:
In a “BOGO Halloween Sale” targeting Halloween-category products, you can set a Dynamic Timer for 5 hours. If you choose the trigger “Product Added to Cart,” the countdown starts as soon as the customer adds the qualifying product to their cart.
Flexi BOGO’s Countdown Timer feature allows you to create urgency for your promotions in a flexible way. Using this feature with seasonal campaigns, such as BOGO offers, ensures your promotions are clear, compelling, and effective.
Shareable URLs for BOGO Offers
↑ Back to topMaking your BOGO offers easy to use is a game-changer for conversions. With Flexi BOGO’s Shareable URLs for BOGO offers, you can create a one-click link that:
- Automatically adds the qualifying products to the cart
- Applies the BOGO discount
- Redirects the shopper straight to checkout
In this guide, we’ll show you how to create, use, and share these URLs effectively.
How Shareable URLs Work
↑ Back to topWhen you save a BOGO rule, Flexi BOGO automatically generates a checkout URL.
When a customer clicks this link:
- Both the qualifying and free products are added to their cart automatically.
- The BOGO discount is applied instantly.
- The customer is redirected to the checkout page.
This URL can be shared anywhere, such as emails, social media, ads, or your own site. So your customers can grab the offer with a single click.
Creating a Shareable URL
↑ Back to topFollow these simple steps:
- Go to WooCommerce → Flexi BOGO.
- Add a new rule or edit an existing one.
- Set up your Buy X Get Y configuration (products, quantities, discount type).
- Click Save Rule.
- After saving, the Shareable URL will appear in the rule settings. Copy it to your clipboard.
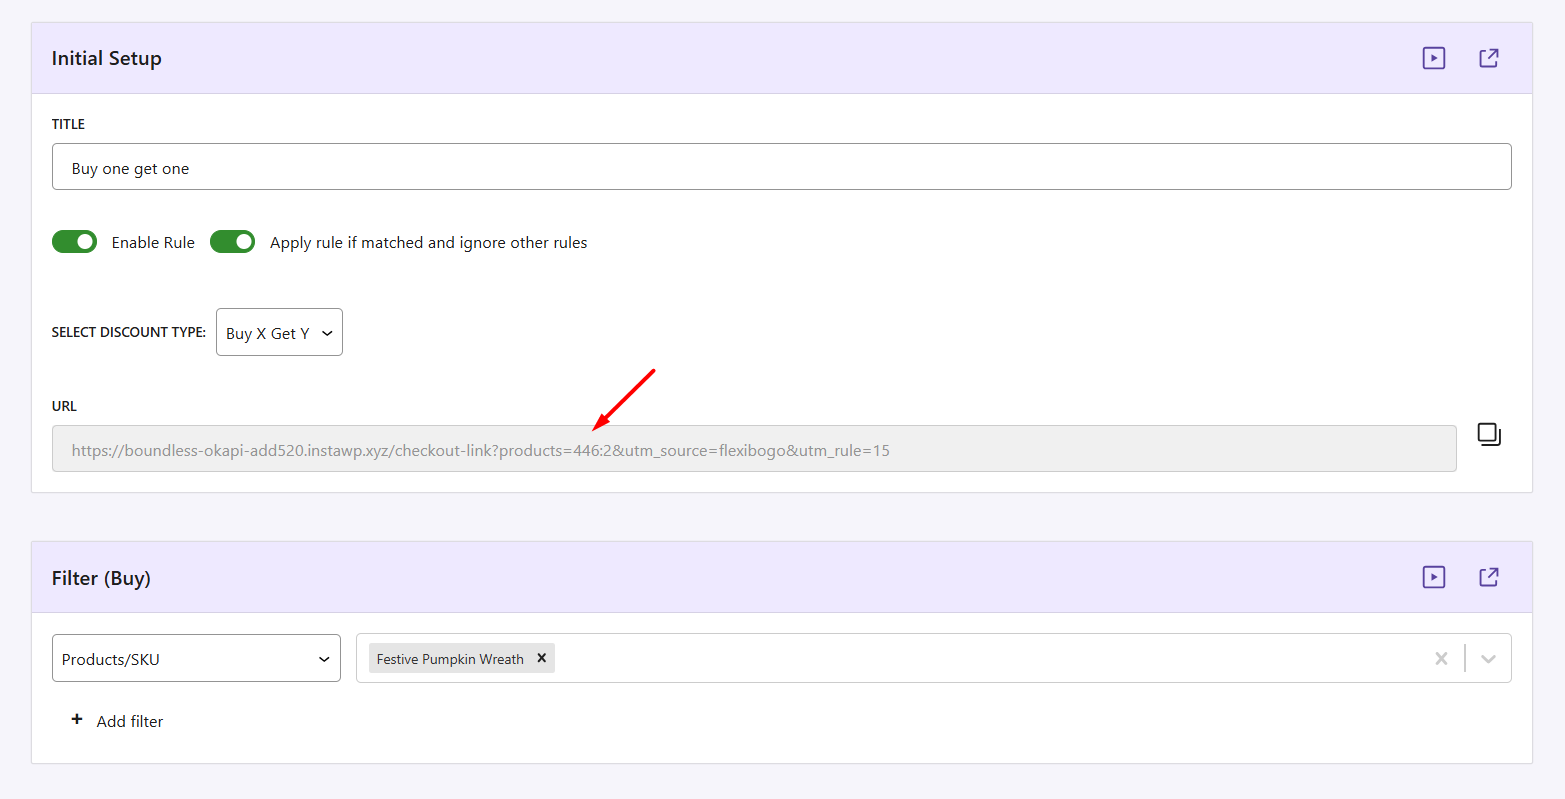
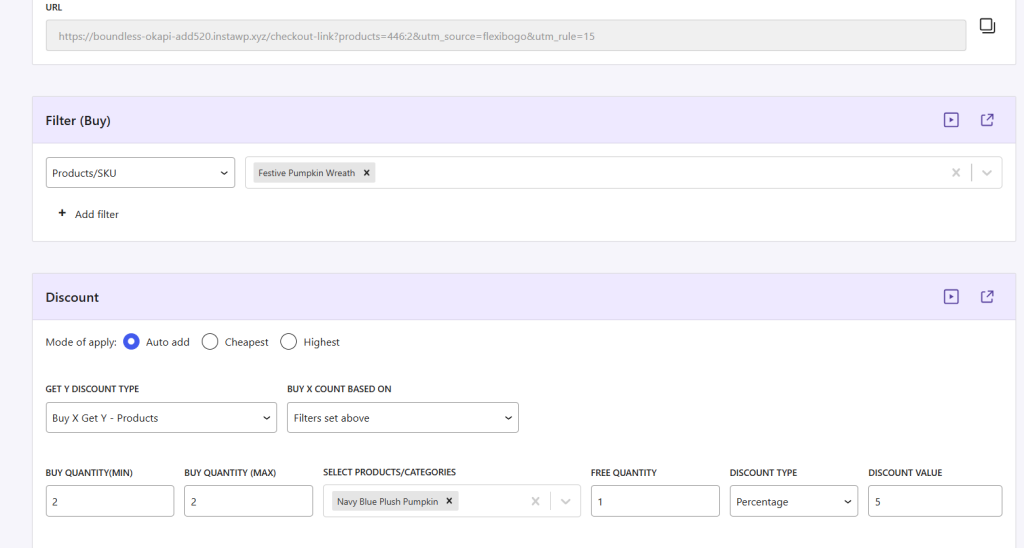
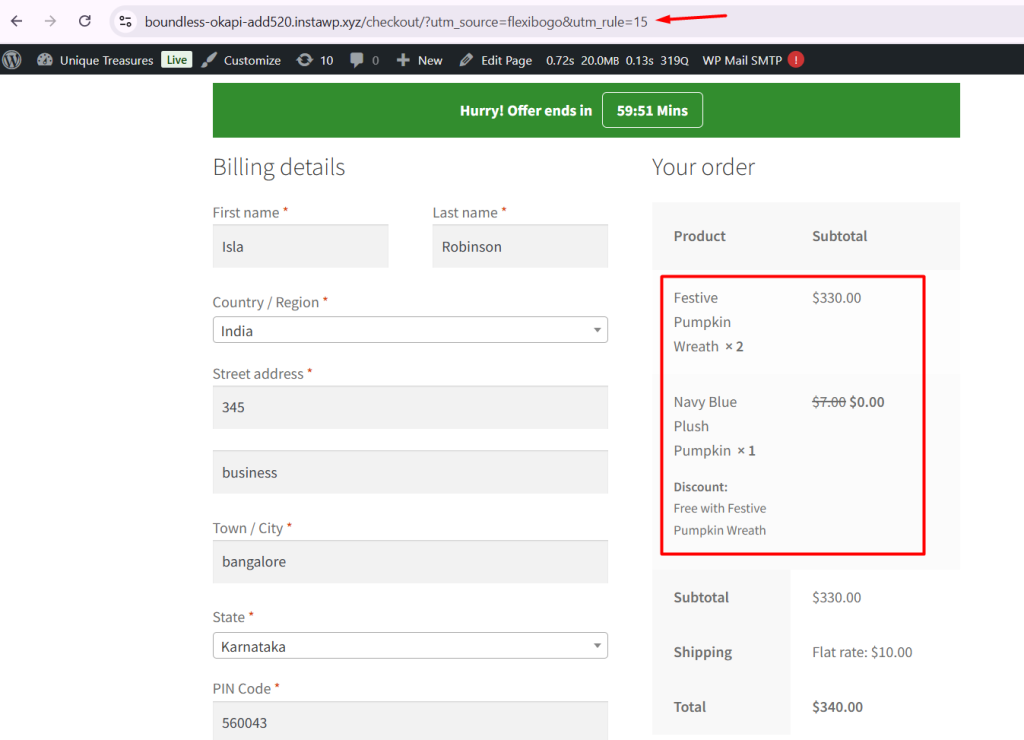
Example
You create a BOGO Sale rule:
- Buy 2 Festive Pumpkin Wreaths
- Get 1 Navy Blue Plush Pumpkin free
After saving, Flexi BOGO shows a URL like: https://yourstore.com/checkout-link?products=657:2,659:1&utm_source=flexibogo&utm_rule=15
This URL includes both the required and free products with the correct quantities, which are all ready for one-click checkout.
Clicking the link adds 2 Festive Pumpkin Wreaths + 1 Navy Blue Plush Pumpkin to the cart, with the discount applied automatically.
What customers will see:
When a customer clicks a Flexi BOGO shareable URL, they are redirected immediately to your store’s checkout page. Flexi BOGO preloads the qualifying products and applies the discount or free product added automatically. The customer sees the discounted line items and the final price at checkout without needing to enter coupon codes or manually add items.
Flexi BOGO’s Shareable URLs turn your promotions into one-click offers. By preloading the cart with the right products and discounts, they reduce friction and boost conversions.
Additional Settings
↑ Back to top- Applying Discounts to Regular Prices
- Displaying Messages on Cart Page When Discount Is Applied
- Adding a Discount Bar on the Product Page
- Setting Priority for Discount Rules
- Applying Discounts: Auto Add Products vs. Discounts on Cheapest or Highest Products
- Target Discounts based on User Roles and Specific Users
FAQ’s
↑ Back to topView all FAQ’s from here.
Questions & Support
↑ Back to topHave a question before you buy? Please fill out this pre-sales form.