WooCommerce now directs merchants from Follow-Up Emails to AutomateWoo. Existing Follow-Up Emails are not imported automatically, so you need to rebuild each email as an AutomateWoo workflow.
This guide explains how to record an existing Follow-Up Email, recreate it in AutomateWoo, test the new workflow, and switch without sending duplicate emails.
Before you start the migration
↑ Back to top- Back up your store and, when possible, complete the migration on a staging site.
- Update WooCommerce, Follow-Up Emails, and AutomateWoo before comparing their settings.
- Review the Follow-Up Emails and AutomateWoo comparison for features that do not have a direct equivalent.
- Make a list of the active Follow-Up Emails you still need. You can skip inactive, duplicated, or obsolete emails.
- Keep each new AutomateWoo workflow disabled until it has been tested.
Record each Follow-Up Email
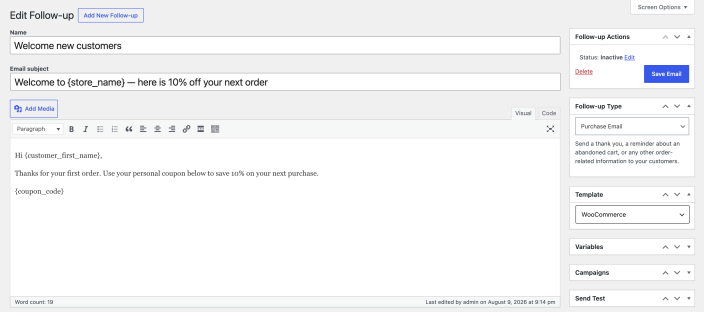
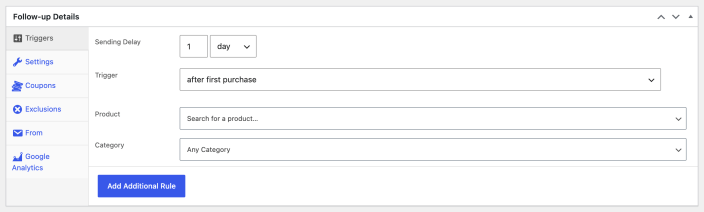
↑ Back to topOpen each Follow-Up Email and record its status, email type, trigger, delay, product or category restrictions, rules, sender details, subject, content, variables, coupon settings, and tracking options.
Check AutomateWoo presets
↑ Back to topAutomateWoo includes preset workflows for common campaigns. Check the presets before building a workflow from scratch. A preset creates a disabled workflow that you can review and configure for your store.

Rebuild the workflow
↑ Back to top- Go to AutomateWoo > Workflows.
- Create a workflow from a suitable preset, or select Add New Workflow.
- Leave the workflow Disabled while you configure it.
- Select a trigger that matches the event used by the Follow-Up Email.
- Add rules for any customer, order, product, category, or subscription conditions.
- Configure the workflow timing to match the original delay.
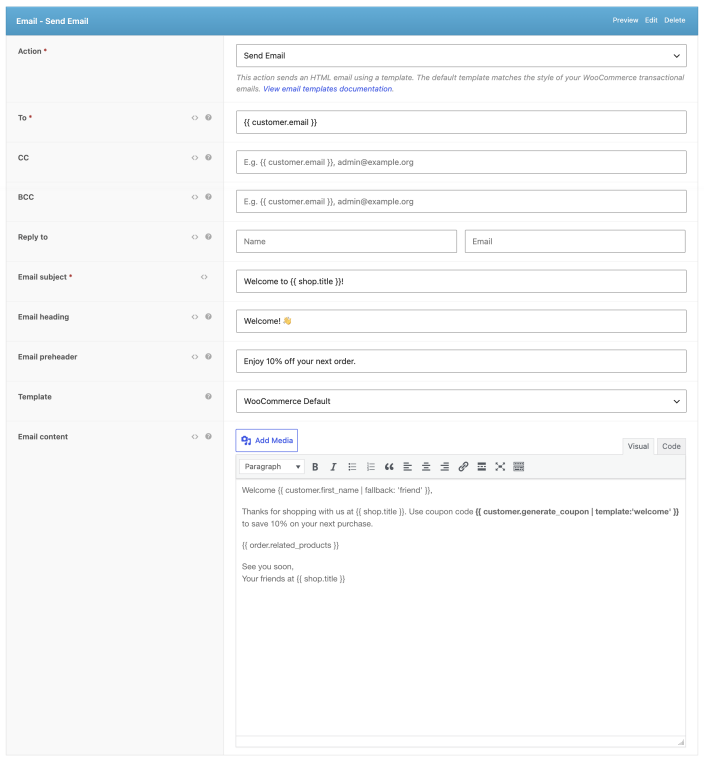
- Add a Send Email action and recreate the sender, recipients, subject, heading, preheader, template, and message.
- Replace every Follow-Up Emails variable with its AutomateWoo equivalent.
- Review the workflow options, including transactional status and tracking.
| Follow-Up Emails setting | AutomateWoo setting |
|---|---|
| Email type and trigger | Workflow trigger |
| Delay | Workflow timing |
| Product, category, customer, or order conditions | Workflow rules |
| Sender, recipient, subject, and content | Send Email action |
| Placeholders and variables | AutomateWoo variables |
| Generated coupon | Coupon template and the generated-coupon variable variable |
| Tracking and email purpose | Tracking and transactional workflow options |
Example: welcome a first-time customer with a coupon
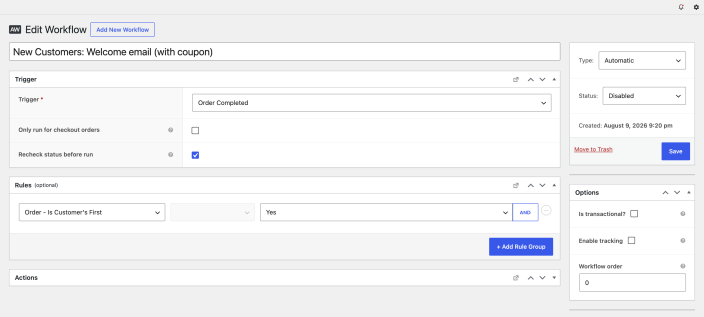
↑ Back to topIn this example, the Follow-Up Email sends one day after a customer’s first purchase and includes a 10% coupon. Start with the New Customers: Welcome email (with coupon) preset, then configure:
- Trigger: Order Completed
- Rule: Order – Is Customer’s First equals Yes
- Timing: Delayed for one day
- Recipient: customer email address
Create a percentage-discount coupon to use as the template, and note its coupon code. Reference that code in the email with the generated-coupon variable. For a coupon with the code welcome, use:
AutomateWoo creates a unique coupon for each recipient from the template’s discount, usage, product, and expiry settings.
Test and switch
↑ Back to top- Use the action’s Preview option to review the email with test data.
- Run a complete test with an order, customer, or other event that matches the trigger and rules.
- Confirm the event appears in the AutomateWoo queue or logs and that the email content, links, coupon, delay, and recipient are correct.
- Disable the corresponding Follow-Up Email so the two extensions cannot send the same message.
- Enable the AutomateWoo workflow and monitor its first live runs.
Repeat this process one workflow at a time. Keeping the old email available—but inactive—makes it easier to compare settings or roll back while you verify the migration.
If a test fails, troubleshoot the workflow before enabling it: leave it disabled, review the trigger, rules, queue or logs, and compare the resulting email with the original.