Scenario
Creating a customer-centric store where shoppers can easily filter and browse products based on brand, size etc providing a seamless and personalized shopping experience.
Requirements
↑ Back to top- A WordPress site running the WooCommerce plugin
- WooCommerce Brands extension to display and organize products by brand, making it easier for customers to find and purchase products from their favorite brands.
- Product Filters for WooCommerce extension allows for the creation of advanced product filtering options, empowering customers to efficiently and effortlessly search for products that align with their individual preferences and requirements.
Setup
↑ Back to topCreate the brands on your site.
- Go to: WooCommerce > Products > Brands. The interface looks and works similar to adding categories and tags — the form on the left lets you add a brand, which are then displayed on the right.
- Enter a Name and Description. Image is optional. Brands can be hierarchical, specifying a ‘parent’ with ‘child’ brands under it.
- Select Add New Brand to save.
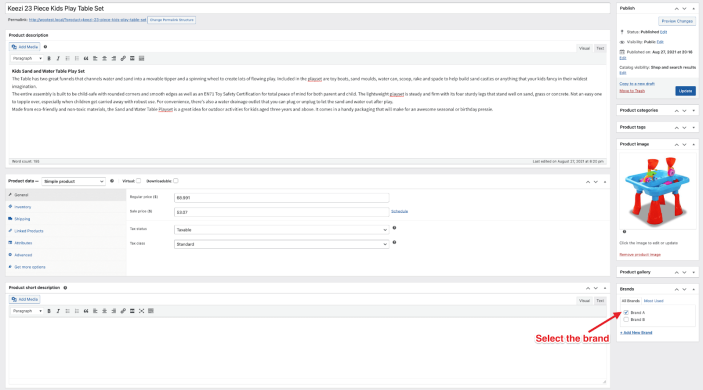
Assigning a brand to a product
That being said, assigning brands to products is the same process as adding categories and tags.
- Go to: WooCommerce > Products.
- Select a product to assign a brand.
- Find the Brands box in the right sidebar.
- Tick the box of brands you wish to assign to the product.
- Update or Publish to save changes.

Build the Product Filter
There are two panels in the editor.
- The left side shows a list of elements.
- The right side contains Settings for current element or project settings. By default, right panel contains project settings. To save the project, click Save on elements panel.
- Go to: WooCommerce > Filters > Add New. Name the project title.
- On the left side click Add Element > Checkbox list
- Once you add the Checkbox list element you will see the settings for the checkbox field. Add the title and URL key of the filter. To filter Brands you need to make sure to select the Source of options as Taxonomy and Taxonomy as Brands.
- You can add more elements like Categories, Price Slider etc based on your preference.
Assign the Product Filter for the archive pages
- Go to WooCommerce > Settings > Products > Filters and assign the filter that we just created as Filters for product archive.
Add the Product Filter block in the widget
- Go to Appearance > Widgets, click on the + to add a new block
- Search for the Product Filter block and select the Product Filters block from the list