Order Delivery allows you to configure your online store to offer your customers the option to choose the delivery date and time frame for their order. In this guide, we will go through the settings included in Order Delivery and how to set up this extension based on your online store’s availability.
WordPress Settings
↑ Back to topOrder Delivery relies on some settings included in WordPress for handling the dates.
Timezone
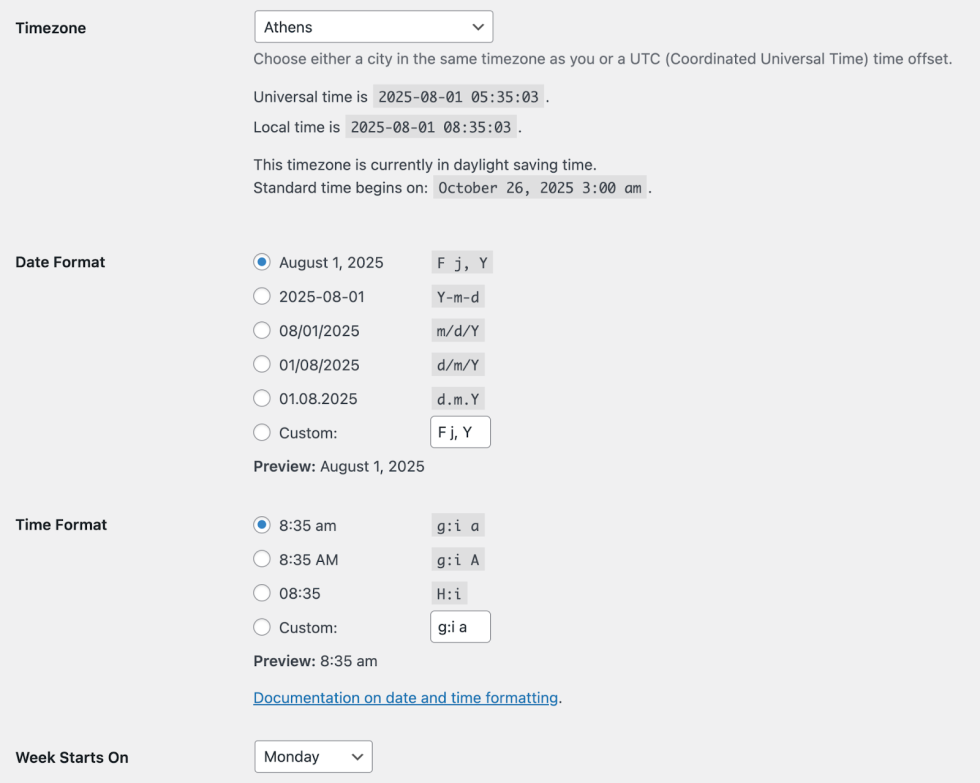
Our extension relies on the timezone set in the Settings > General page of the WordPress admin to properly calculate cut-off times, date localizations, and more.
You can find this setting under the Timezone section of the Settings > General. The default value for a new WordPress site is UTC-0, so make sure to change it to use your store’s timezone.
It’s important to choose the proper timezone for your online store to ensure that our plugin is working as expected.
Note: It’s recommended to use a city name option instead of a UTC-X value. This way, the DST (Daylight Saving Time) changes are automatically applied to your store’s timezone if your country observes daylight saving time.
Date/Time Format
Below the Timezone option, you will find the Date Format and Time Format options. Choose your preferred value for both of them.
Note: The date and time formats are just for localization purposes. Our extension stores the dates and times in the standard ISO-8601 internally.
Week Starts On
On the same page, you will also find the setting Week Starts On. As its name suggests, this setting allows you to define the first day of the week when displaying a calendar, and the Order Delivery date pickers also utilize this value.
WooCommerce Settings
↑ Back to topThere are also native WooCommerce settings we have to consider when working with delivery.
Shipping
↑ Back to topOrder Delivery heavily utilizes the shipping zones and the shipping methods provided by WooCommerce. Therefore, it’s important to understand how shipping works in WooCommerce and how to set it up properly.
In brief, shipping methods are categorized by zones. When a customer enters a shipping address during checkout, the first shipping zone that matches the location is selected, and its shipping methods are displayed to the customer. So, the order in which the shipping zones are listed is important.
As a rule of thumb, we recommend sorting the shipping zones based on how restrictive/specific their locations are. The more specific its location is, the higher it should be positioned in the list.
For example, a shipping zone that matches just a few postcodes should go first in the list, before the shipping zone that matches the entire city or country.
You can find more information about WooCommerce Shipping here.
Order Delivery Settings
↑ Back to topAt this point, you are ready to set up the Order Delivery extension for your WooCommerce store.
To get started, go to WooCommerce > Settings > Delivery or click on the Configure link of the extension if you are on the plugins page. On this page, you will find the following tabs:
Delivery settings
↑ Back to top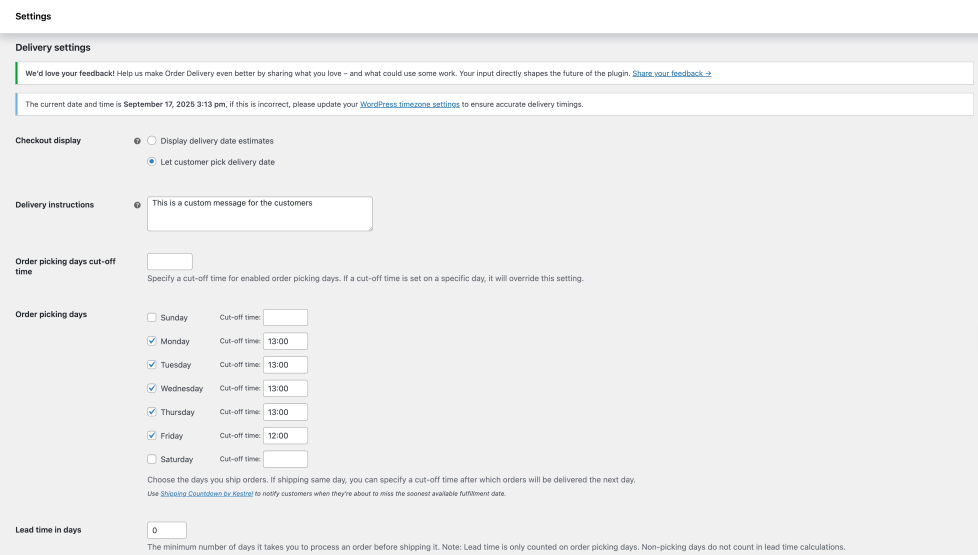
Checkout display – Choose the option to be displayed on the checkout page.
- Display delivery date estimates: A text block with information about shipping and delivery.
- Let customers pick delivery date: A calendar to let the customer choose a delivery date.
If you choose the Display delivery date estimates block option, our plugin will automatically display an informative text block on the checkout page, allowing your customers to know when to expect their order to be delivered. The rest of the plugin settings still contribute to the proper calculation of the estimation.
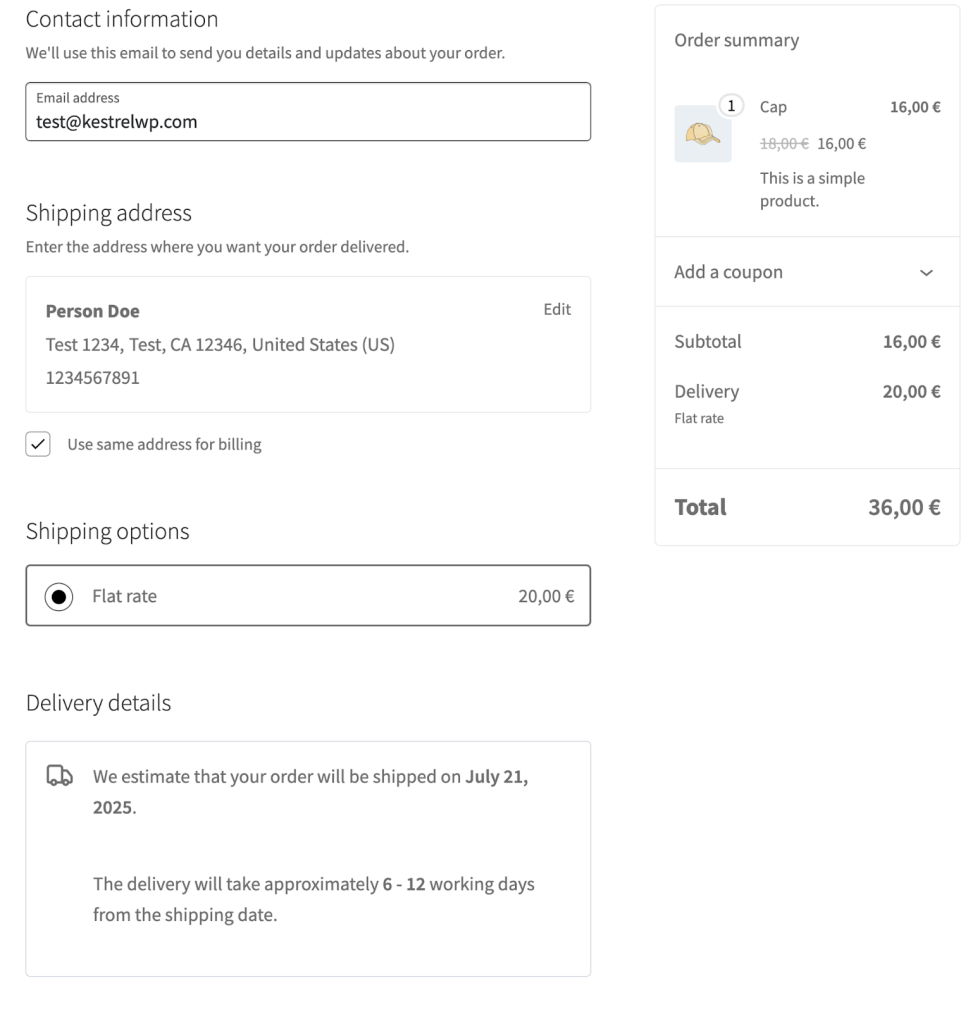
If you choose the Let customers pick delivery date option, customers will be able to choose their preferred day and time to receive their order based on the calculations made by Order Delivery for WooCommerce.
We recommend reviewing the lead time, cut-off time, and other plugin settings to ensure the estimation is as accurate as possible.
Delivery instructions – You can add more information that will appear over the calendar field in the Delivery details section of the checkout page to help your customers choose a delivery date.
Order picking days cut-off time – The default shipping days cut-off time. You can specify a cut-off time for enabled shipping days. If a cut-off time is set on a specific day in the Order picking days section, it will override this setting. Leave this field blank if there’s no cut-off time for your shipping days.
Order picking days – The shipping days and the cut-off time to ship orders. You can set the cut-off time to process an order on the same day.
Please note the following to configure the shipping days correctly for your store:
- Working days and shipping days are considered the same. Therefore, if you do not work on Sundays, disable this day.
- Disabled days are not counted as working days.
- Disable specific dates using the Shipping Calendar.
- If a day in the calendar is enabled and a customer places an order before the cut-off time, our extension assumes that you can start processing this order on the current day.
- If not, the order will be postponed to the next available day.
- Also, please note that the shipping date is set to the first available day after the lead time in days.
Note: It’s important to configure your WordPress timezone correctly. The Shipping Days setting uses your WooCommerce store’s local time to calculate the time limit.
Lead time in days – The minimum number of days it takes you to process an order. If you can do it in less than 24 hours, leave this field to 0.
Advanced delivery Ranges
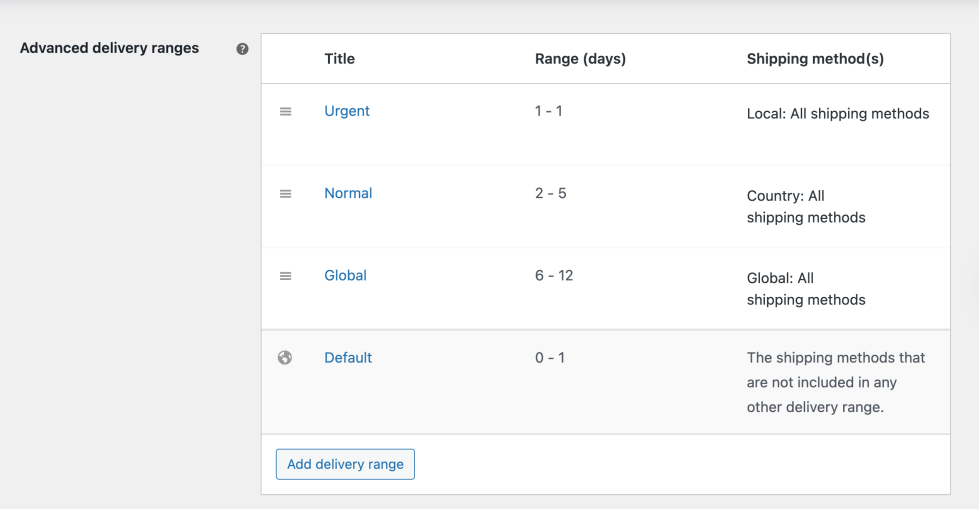
Use this field to define the different delivery ranges for your shipping methods.
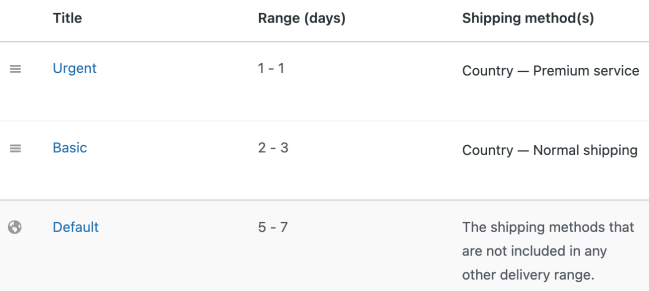
By using delivery ranges, you give more options to your customers on when they’d like to receive their order. Below, we’ll go through an example of setting up 3 delivery ranges:
- Urgent (1 – 1): This will be our most expensive shipment since it’s the fastest. The 1-1 range signifies that the delivery of the order will happen within 24 hours.
- Basic (2–3): This is our standard shipping method, offering a lower shipping price.
- Default (5 – 7): This is the fallback method that will be utilized by the rest of the shipping methods that do not meet the conditions.
Notes: It is very important to keep in mind that the Delivery ranges must be ordered from the most specific to the most generic, similar to what happens with Shipping Zones. You can find more information here about setting up Shipping Zones.
To add a new range, click on the Add delivery range button:

Enter the title, the range of days, and the shipping methods to configure a delivery range.
The first delivery range that matches a specific shipping method will be used to calculate the delivery details, so the position of a range in the list is crucial when defining delivery ranges. We recommend sorting them from more specific to more generic. For example:
- Urgent
- Basic
- Default
For example, as you can define the cost for each shipping method, you can make the Urgent delivery range (1 day) more expensive than the Basic delivery range (2-3 days).
Note: The title parameter is only visible to you; your customers will not view the title during checkout. That means you can group all shipping methods with the same range of days under a unique delivery range. There is no need to split the shipping methods into multiple delivery ranges, although it’s a completely valid setup.
Note: If you want to offer same-day delivery, create a delivery range with zero days in the option From (days). This might be a good range for local pickup.
After setting up delivery ranges, customers will see valid delivery dates during checkout based on their chosen shipping method. The system calculates these dates by adding the delivery range (e.g., 1 day for Urgent or 2 days for Basic) to the product’s lead time and shipping days. However, even if a 24-hour delivery is offered, it may not always be feasible depending on product preparation time and availability, so shipping settings should be configured carefully to avoid misleading customers.
Enable for local pickup
If your online store offers a local pickup shipping method, you can use our extension to allow your customers to choose the pickup date and time. To do that, you would first need to make sure you have configured your store to offer a local pickup method.
Then, you’d need to enable the following setting:
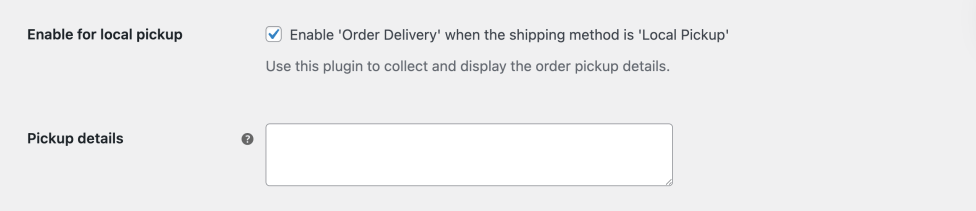
Use this plugin to collect and display the order pickup details.
You can also add Pickup details that will be shown to your customers during checkout.
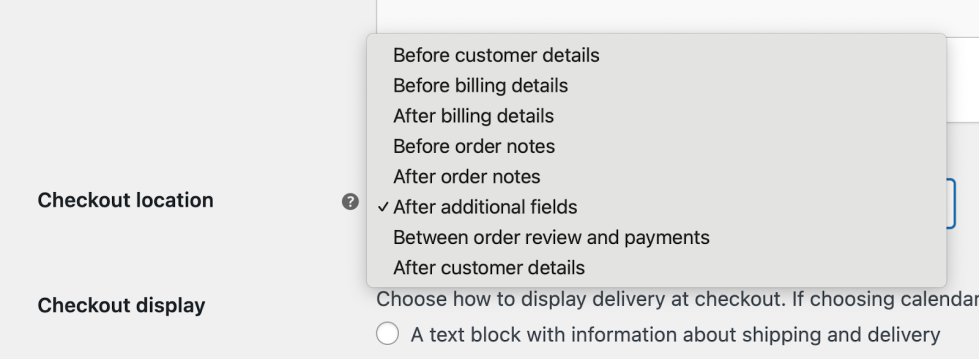
Checkout location – Choose the location in the checkout form where to display the delivery details.
Note: Kindly note that you can’t choose the location of the Delivery details section when the WooCommerce Checkout block is used. This setting is only available when the classic editor is used. You can find more information on how to enable the classic editor here.
Delivery scheduling
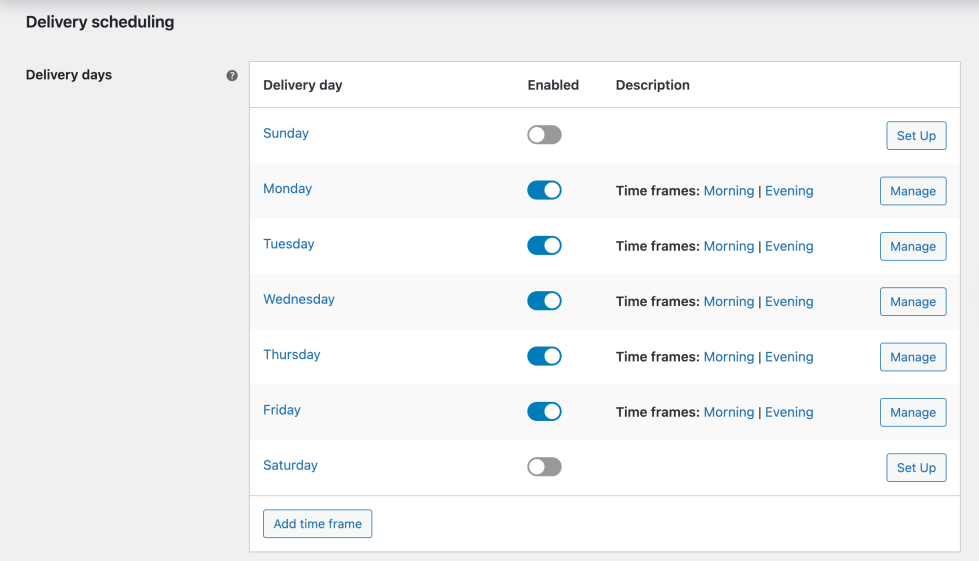
↑ Back to topIf you navigate to the WooCommerce > Settings > Delivery page, you can find the Delivery scheduling tab. Here, you can choose the available days for delivery and their conditions. You can define the available shipping methods for each delivery day and divide them into time frames.
Select the delivery day you want to modify the available shipping methods by clicking its name or the Manage button.
The Delivery day form has the following fields if you haven’t already set it up:
- Enable/Disable: Whether the day will be available for delivery or not.
- Order limit: The number of orders that can be delivered in a day. 0 means there’s no limit.
- Shipping methods: Can be set to:
- All shipping methods
- All shipping methods, except…
- Only specific methods
- Fee amount: Enter a fixed amount to be applied as a fee if this delivery day is set. This will be included as an order fee for the customer and calculated on the order’s total.
- Fee label: This is the label that will appear on the order’s details, indicating the fee. This field only appears if the Fee amount is set.
- Time frames: List of available time frames, if set.

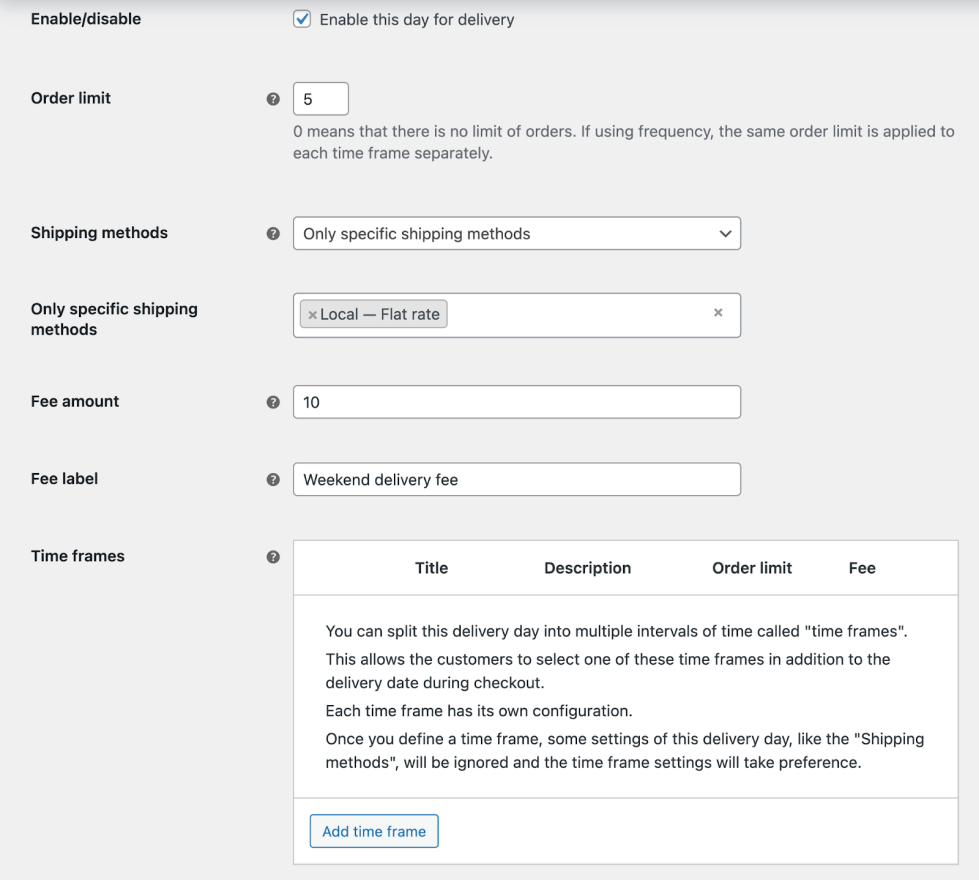
In our example, we have defined a Flat Rate shipping method that only works on Saturdays. To do so, we added this method to the Saturday delivery day configuration and excluded it from the rest of the weekdays. You can then set a delivery fee for this specific day, and fill in the Fee label so it’s clear to your customers why this fee is applied.
Note: If you define time frames for a delivery day, the fields for handling the Shipping methods and Order limit won’t appear in the delivery day form. The configuration of the shipping methods and the number of orders will be handled by delivery time frames.
You can add a time frame from the Delivery days setting. Just click on the button located in the bottom-left corner of the table.

When adding a time frame from this location, all the enabled delivery days will be selected by default in the Delivery days field. This allows you to add the same time frame to multiple delivery days at once. You are free to modify the delivery days for which the time frame will be added.
You can find later in this document how to set up time frames and fees.
In the Delivery scheduling tab, you can also find the following settings:
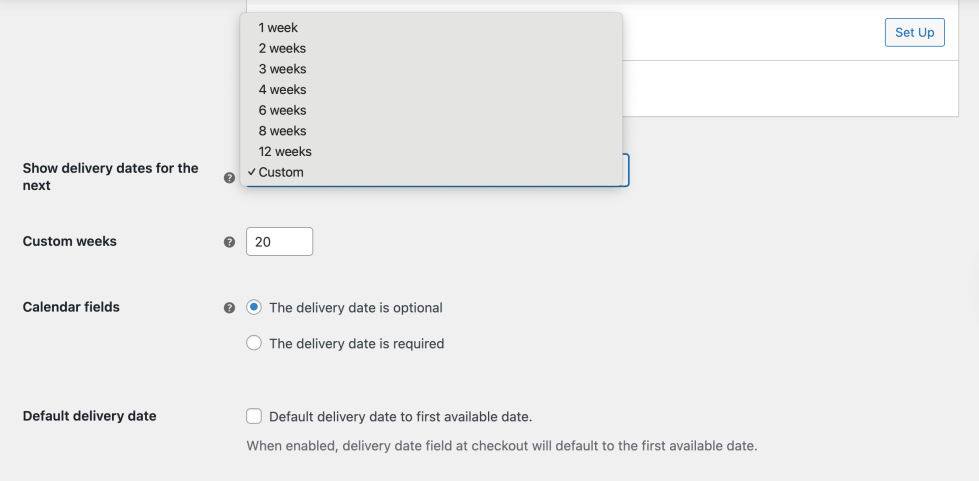
Show delivery dates for the next: Maximum days that the customer can choose from, starting on the current date, to receive the order. By default, it’s configured to Custom and has a limit of 20 weeks, but you can configure it to whatever works best for your online store. Later dates will be disabled. All days are used for this option, disabled or not.
Custom weeks: It only appears if the Custom option in the Show delivery dates for the next setting is chosen. Apply the calendar limit to available delivery days (excluding holidays and other disabled days) instead of all calendar days. You can set the limit of weeks you’d like your customers to be able to order a delivery up to.
Calendar fields – You can manage the behavior of the delivery fields in the checkout form with this setting. The options are:
- The delivery date is optional (default): The delivery fields are optional. Your customers can complete the checkout without choosing a delivery date and time frame. No delivery date will be assigned on the back-end, so you can plan the order’s shipping as needed.
- The delivery date is required: The delivery fields, both the delivery date and time frames, if configured, are required. Your customers will need to choose a delivery date and time frame to complete the checkout process.
Default delivery date – When enabled, the delivery date field at checkout will default to the first available date.
Time Frames
↑ Back to topA time frame is represented by the following data:
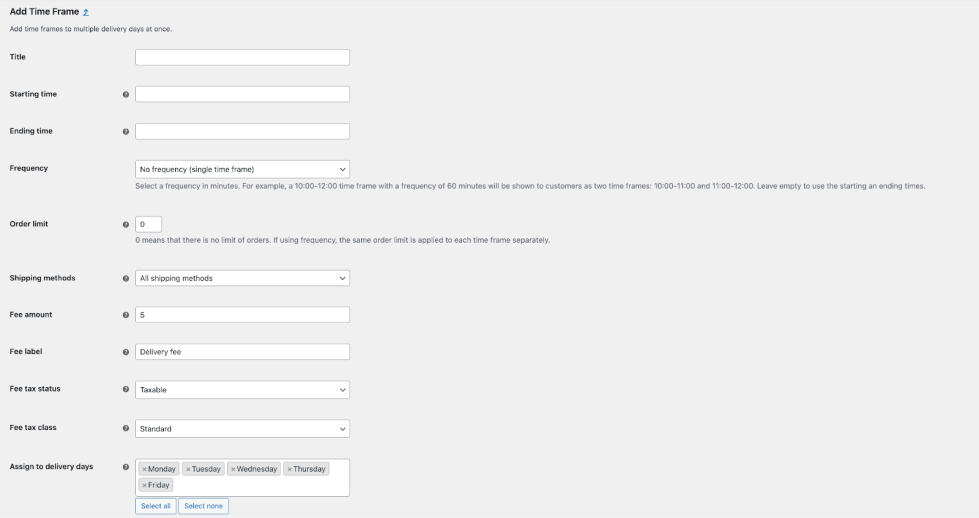
- Title: A title to identify the time frame.
- Starting time: The starting hour.
- Ending time: The ending hour.
- Frequency: The frequency of the available time frame, either in 30-minute or 60-minute increments. For example, a 10:00-12:00 time frame with a frequency of 60 minutes will be displayed to customers as two time frames: 10:00-11:00 and 11:00-12:00. Leave this field empty to use the default starting and ending times.
- Order limit: The number of orders that can be delivered in the time frame. Once reached, it won’t appear to be selected by the customer.
- Shipping methods: The available shipping methods for this time frame.
- Fee amount: An additional fee, which will be charged to the customer for choosing this specific time frame.
- Fee label: The label of the fee that will be charged to the customer. It will be added to the total order details. This setting will only appear if the Fee amount is set to a value over 0.
- Assign to delivery days: Select the delivery days for which this time frame is available.
Note: You can manually edit the Starting time and Ending time values after selecting an option from the list to define an interval lower than 30 minutes.Kindly note that the Ending time will only show valid values that are starting after the Starting time setting.
In addition, if you’d like to add a delivery fee for a specific Delivery day, you’ll need to select a delivery day or one of its time frames.
Note: When a delivery day is split into time frames, the fees must be specified within those time frames.
Fees
↑ Back to topA delivery fee is represented by the following data:
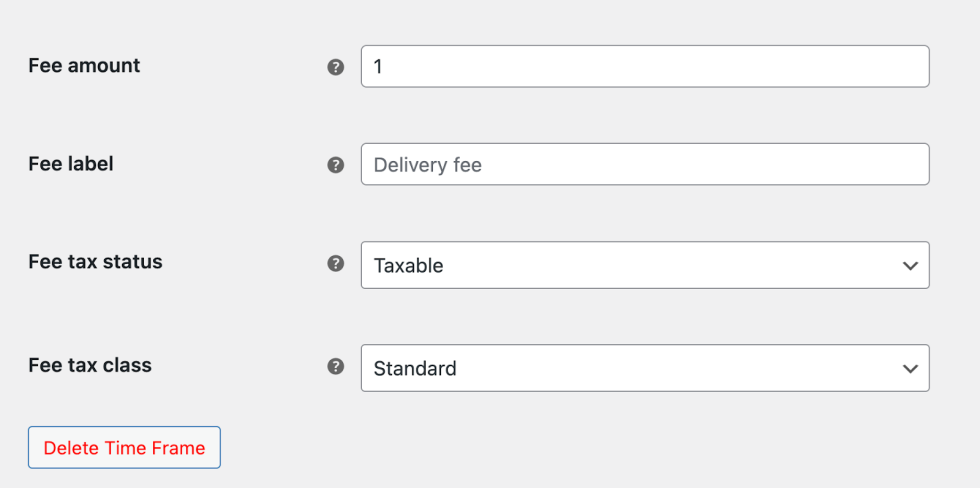
Amount
A fixed amount to charge the customer. The field only supports valid prices without the currency symbol.
The price format may vary depending on your store configuration. For example, if your store is using a comma as a decimal separator, then you’ll need to add a price formatted like this: 4,50.
This is the only required field to create a fee. Once you enter a non-zero value, the rest of the fee options will appear. To remove a fee from a delivery day/time frame, click on the Delete Time Frame button on the bottom of the page.
Label
The label to use in the Order details. Use a descriptive text like Saturday delivery fee.
If you leave this field empty, the label Delivery fee will be used.
Tax status
This option defines whether the fee is taxable or not.
The fee amount entered previously is always before tax, but you can apply taxes to the fee. Just select the option Taxable.
Tax class
This option is only available for taxable fees, and it allows you to define the class used to apply the different tax rates like standard, reduced rate, etc.
Note: The Tax status and Tax class settings will only appear if the WooCommerce > Settings > General > Enable taxes setting is turned on.
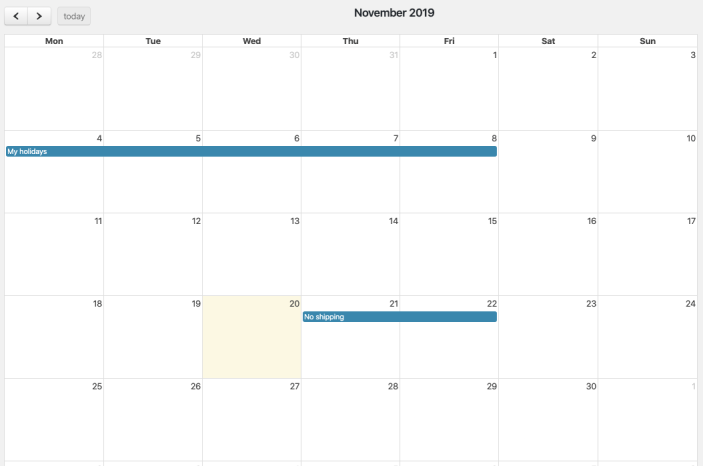
Order picking days calendar
↑ Back to topThis calendar overwrites the default Shipping Days setting. You can access it in the WooCommerce > Settings > Delivery page on the Order picking days calendar tab.
It is useful if you’d like to define:
- Holiday periods
- Bank holidays. (Days the shipping company won’t operate)
- Any other time/situation when orders won’t ship
To create an event, drag or click the calendar and add a name to the event.
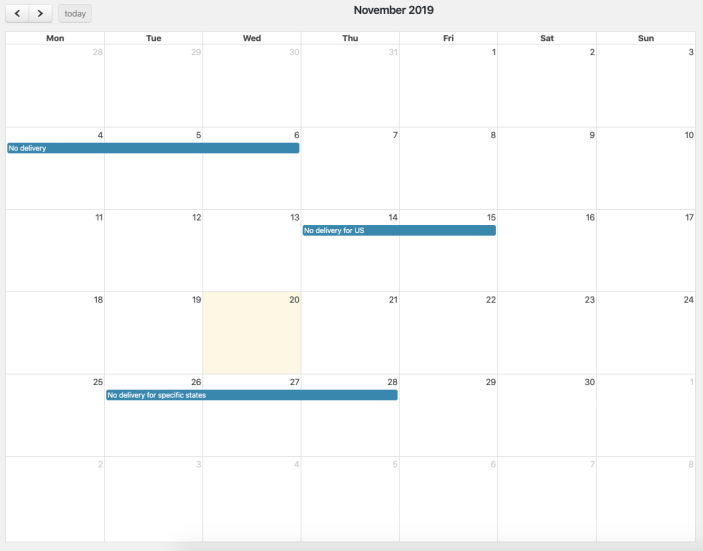
Delivery days calendar
↑ Back to topThis calendar overwrites the default Delivery Days setting. You can also disable a date range for a specific country or state.
You can find it on the WooCommerce > Shipping & Delivery > Delivery Calendar page.
It is useful to define:
- Holiday periods in the country or state of the delivery
- Bank holidays
- Non-working days
- Any other time/situation when orders won’t be delivered
To create an event, drag or click the calendar and add a name to the event.
Conclusion
↑ Back to topYou can now set up and use Order Delivery for WooCommerce for your shop. If you have more questions regarding our extension, you can check the rest of our documentation here.
Also, don’t hesitate to reach out to our support team if there’s anything we can help you with.