Table Rate Shipping (TRS) makes it possible for you to create complex rules for shipping your products worldwide.
You can define multiple rates based on the product’s destination, have multiple rates per zone, and add rules based on product weight, the number of items, shipping class, and price.
Every store is unique, with its own products and shipping needs, so every setup is different. This page introduces you to the concepts behind Table Rate Shipping, guides you through setup, and provides real-life examples that demonstrate its concepts in action.
Installation
↑ Back to topTo start using a product from WooCommerce.com, you can use the “Add to store” functionality on the order confirmation page or the My subscriptions section in your account.
- Navigate to My subscriptions.
- Find the Add to store button next to the product you’re planning to install.
- Follow the instructions on the screen, and the product will be automatically added to your store.
Alternative options and more information at:
Managing WooCommerce.com subscriptions.

How it works
↑ Back to topWhen a customer checks out items in their cart, the plugin looks at the destination of items and then uses the table of rates you created to calculate total shipping. Each destination can have its own rules, or multiple sets of rules, based on your shipping requirements.
To calculate shipping correctly, you need to create shipping zones and shipping rules. The plugin will take care of all the calculations for you from that point.
Setting up Table Rate Shipping requires some thought and planning on your part. Before getting started with the plugin, you need to do the following:
- Set up your shipping classes if you need different rules for different classes of products.
- Determine and set up your shipping zones.
- Get shipping rates from your chosen courier so you know how you want to charge.
Setup and Configuration
↑ Back to topShipping Classes
↑ Back to topShipping classes are used to indicate products that are similar for shipping. For example, you may have a shipping class called “small” to apply to bookmarks and “medium” for books. You may also wish to apply the “small” class to pencils and pens, as all are similar in size and weight, and can have the same shipping rules applied.
You can create tables of rates that apply to different shipping classes. This gives you considerable flexibility when creating shipping methods.
Product Shipping Classes guides you in setting up shipping classes.
Shipping Zones
↑ Back to topNote:
This shipping method has to be added to a Shipping zone. If you haven’t configured your Shipping zones yet, please check our Setting up Shipping Zones guide before proceeding.
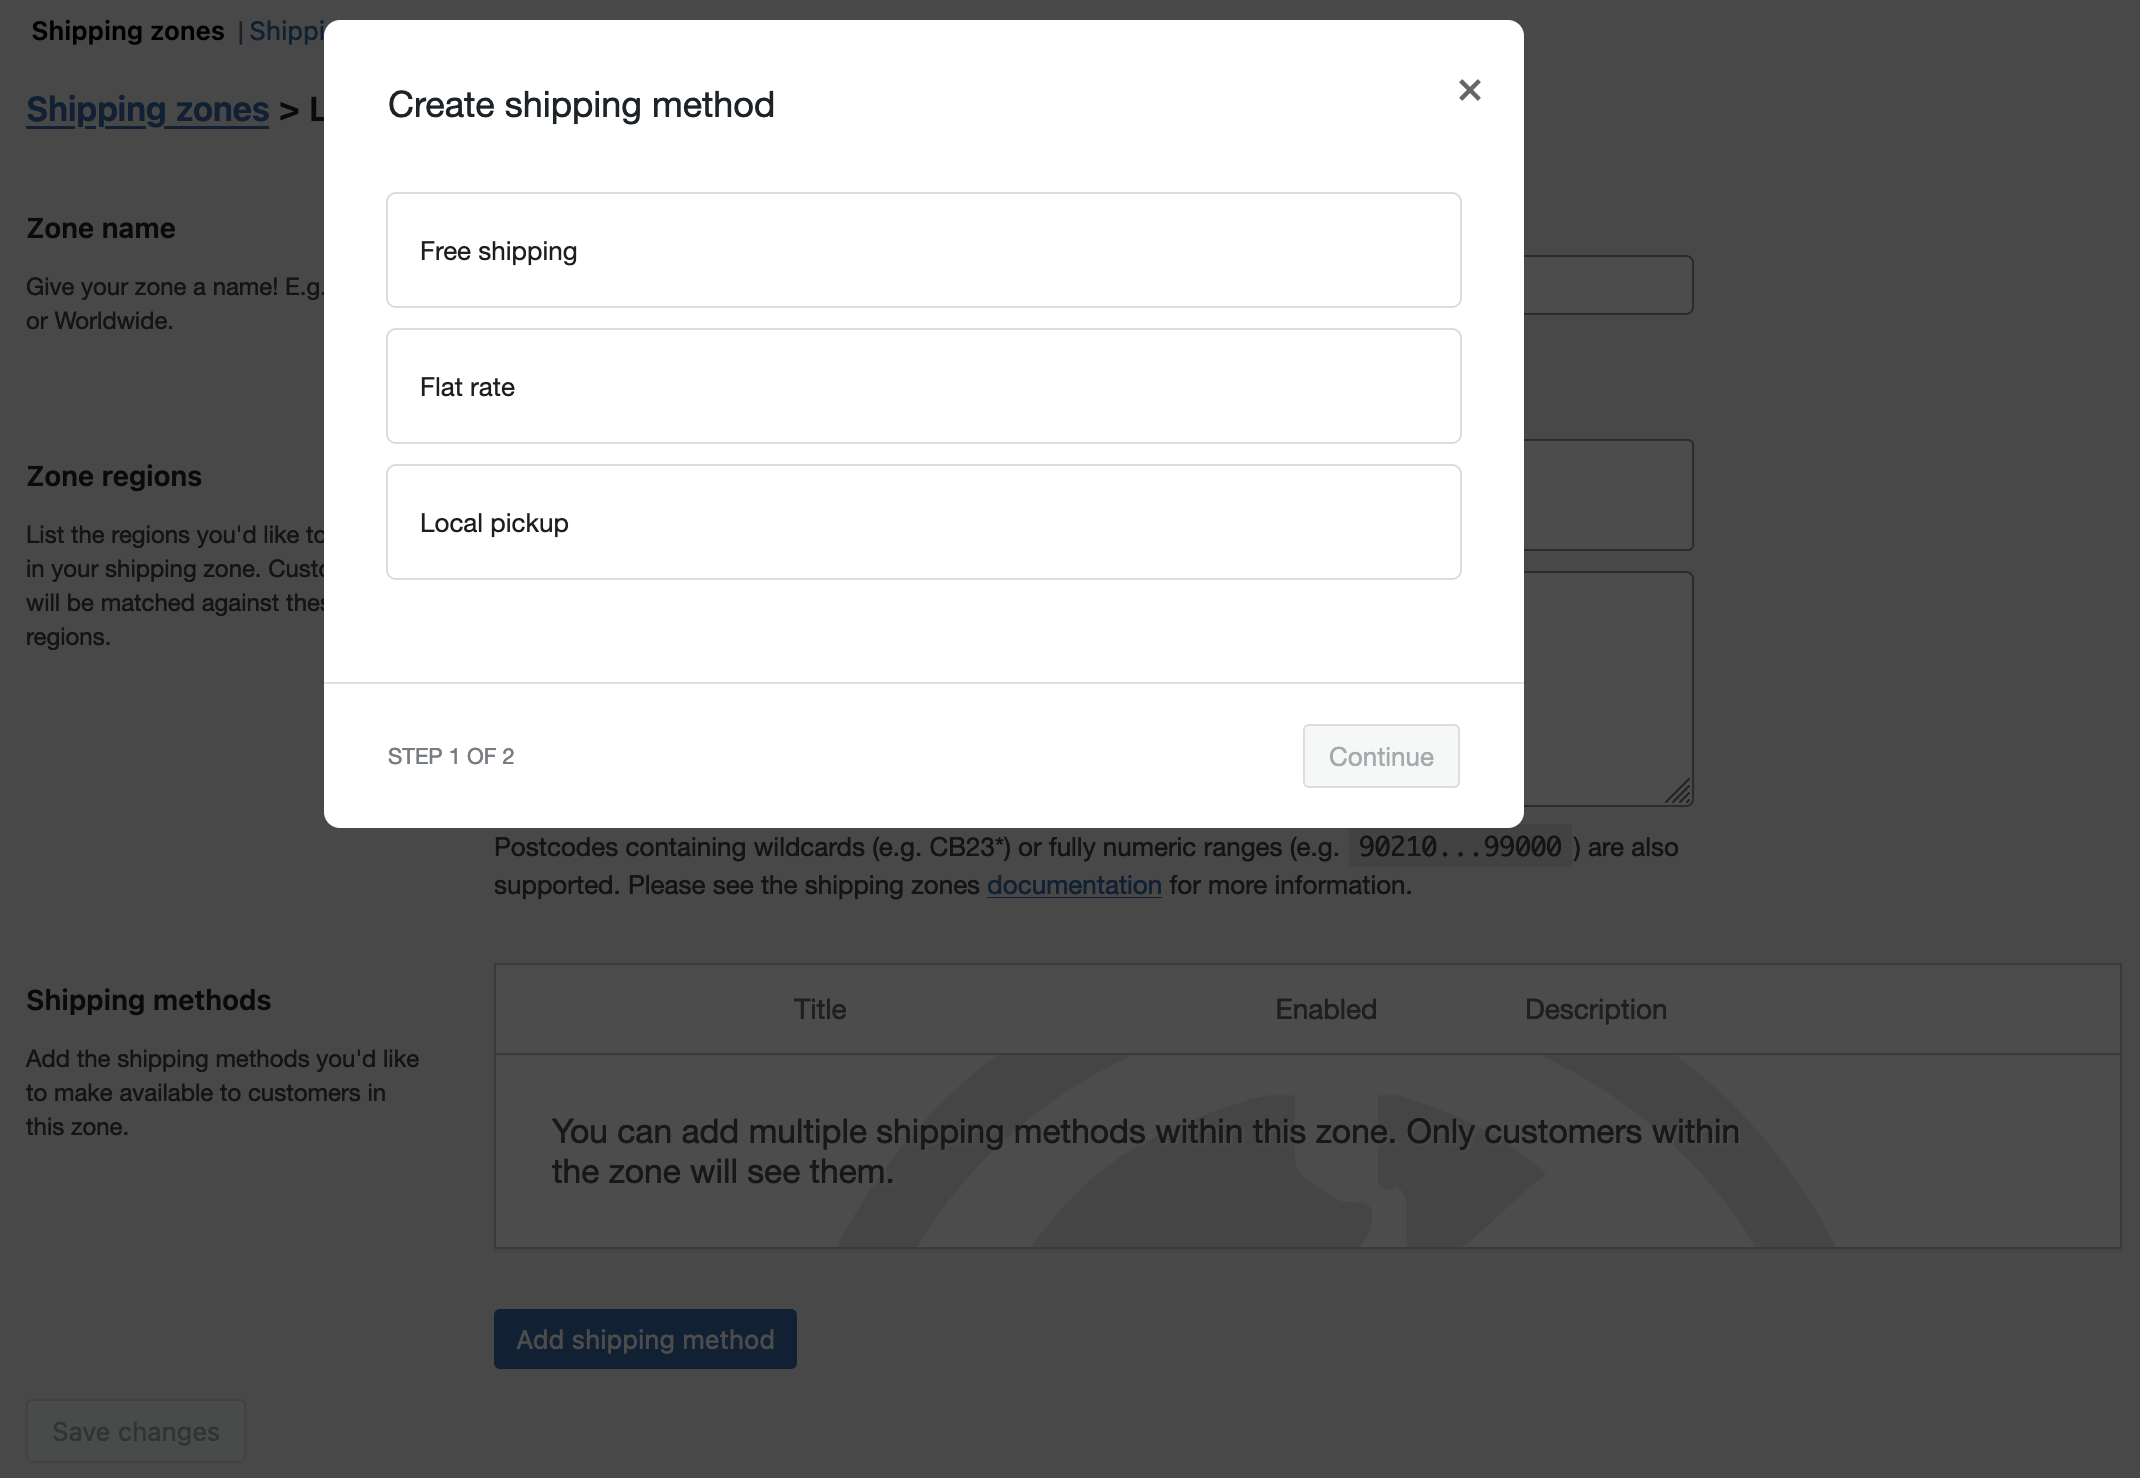
- Go to WooCommerce > Settings > Shipping > Shipping zones.
2. Click the Edit button on the shipping zone where you want to offer this method.

3. Inside the shipping zone, click the Add shipping method button.

4. Then, select the shipping method and click the Continue button.
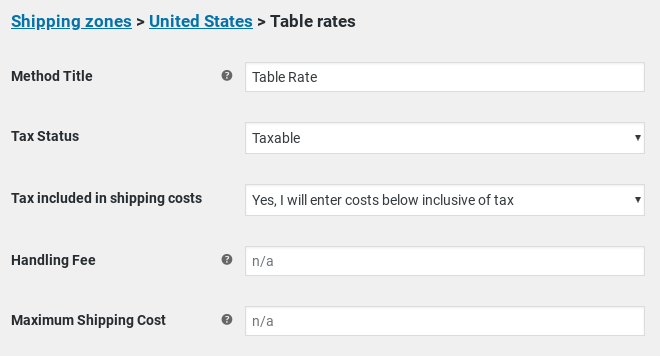
- Click the Edit button on the right side of the Shipping methods table to configure the settings:
- Method Title — Name of shipping method displayed to customers. For example, 1st Class and 2nd Class, if there are two methods for a zone.
- Tax Status — Define whether or not tax is applied to the shipping amount.
- Tax included in shipping costs — Define whether the shipping costs defined in the table are inclusive or exclusive of taxes.
- Handling Fee — Additional fee. Can be a fixed amount (2.50) or leave blank for no handling fee.
- Maximum Shipping Cost — Can assign a maximum cost to a method. For example, if the total calculated is greater than the maximum cost, the price is decreased to maximum cost amount.
Rate Settings
↑ Back to top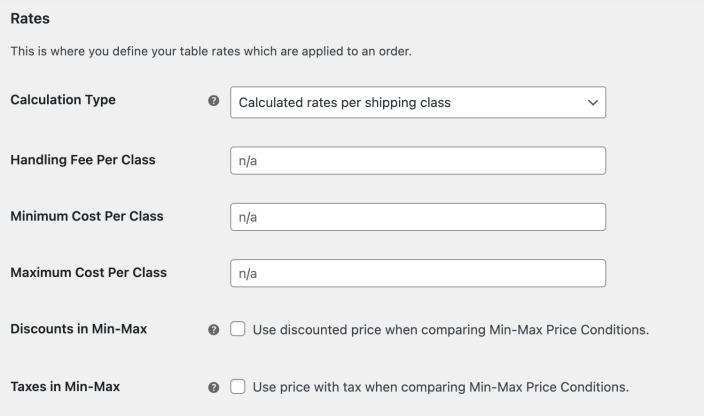
Calculation Type — Tells plugin how to calculate shipping on customer’s cart. Choices are:
- Per order – calculates shipping for the entire cart. If there are varying shipping classes in the customer’s cart, the class with the highest priority will be used (where 1 is the highest priority). These can be set in the table that appears underneath the rate table when per order is selected.
- Calculated rates per item – calculates the rate by checking each item in the customer’s basket against the table of rates.
- Calculated rates per line – looks at each line in the basket and checks that against the table. Multiple of the same item are on the same line, so the customer will only be charged once for multiples of the same item.
- Calculated rates per shipping class – each shipping class in your basket is totaled and offered at a final rate.
Example:
A customer has the following items in their cart:
| Number of item | Item | Shipping class |
|---|---|---|
| 2 | red t-shirt | small |
| 1 | green t-shirt | small |
| 1 | black jumper | medium |
The following costs are set for medium and small shipping classes.
| Cost for shipping class | Cost | Priority |
|---|---|---|
| medium | 10 | 2 |
| small | 5 | 1 |
Total for each calculation type is:
| Per order | Per item | Per line | Per class |
|---|---|---|---|
| 5 | 25 | 20 | 15 |
- Enter Handling fees per order/item/line/class.
Add a flat additional fee to the cost of each calculated item (this could be an individual item, line or shipping class based on the above settings). - Enter Minimum cost per order/item/line/class.
Set the minimum cost per calculated item (this could be an individual item, line or shipping class based on the above settings). - Enter Maximum cost per order/item/line/class.
Set the maximum cost per calculated item (this could be an individual item, line or shipping class based on the above settings). - Discounts in Min-Max.
Enable this option if you want to use discounted prices in the Min-Max Price Conditions for Table Rates. When unchecked, the original, pre-discount prices will be used for comparison. - Taxes in Min-Max.
Enable this option if you want to use prices inclusive of tax when assessing the Min-Max Price Conditions for Table Rates. When unchecked, the calculations will be based on pre-tax prices. - Enter Rates.
Adding Rates to a Table Rates
↑ Back to top
Once you’ve chosen how to calculate rates, it’s time to start adding rates. The plugin will compare items in the customer’s cart against the table of rates to calculate shipping costs.
Shipping Class
Choose the shipping class to which this rate will apply. You can also choose to apply the rate to items in any shipping class or in no shipping class.
Condition
This column tells the plugin what product information it should use to calculate rates. Your options are:
- None – you don’t wish to use product information to calculate the total
- Price – the price of the items
- Weight – the weight of the items
- Item Count – the number of an individual item
- Item Count (same class) – the number of items in the shipping class
Remember that the calculation is determined by the Calculation Type dropdown.
Min/Max
The minimum and maximum amounts for your chosen condition. These will be:
- Price – the minimum and maximum price
- Weight – the minimum and maximum weight. The weight unit used is determined in WooCommerce > Settings > Products
- Item Count – the minimum and maximum number of an individual item. For example, you may wish to have one price for 1-50 items and another for 50+ items
- Item Count (same class) – the minimum and maximum number of items in a specific class
Break
When you check this option, you’re telling the plugin: If you reach this row of the table, stop the calculation from going any further. Meaning, you’re telling the process to break.
This is used for:
- Per order – to tell the plugin to offer a specific rate and no others
- Calculated – to stop any further rates being matched, with priority given to the top of the list. This is particularly important when merging shipping (see below).
Abort
Enable this option to disable all rates or the shipping you are editing if the row you are editing matches any item/class being quoted.
Shipping Prices
This is where you set the cost for your shipping. You can add the following figures:
- Row Cost – the base cost for shipping this item. This could include the cost of your packaging.
- Item Cost – the cost for each individual item. This is in addition to the cost.
- Cost per kg – the cost per kg for the items.
- % Cost – the percentage of the items’ total that should used to calculate shipping.
Label
If you are creating a per-order table of rates, you can add a label for each individual rate.
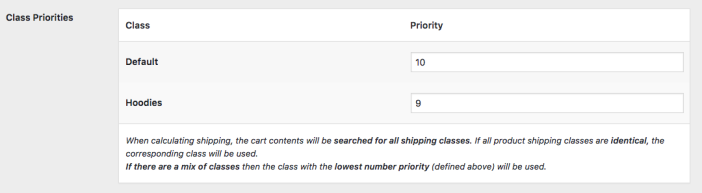
Class Priorities
↑ Back to topIf you have created shipping classes under WooCommerce > Settings > Shipping > Shipping Classes and if you have chosen “Per order” as Calculation Type, you will see a section called “Class Priorities”.
If there are items in different shipping classes in the cart, the Table Rate will be calculated based on those items in the shipping class with the highest priority (or the lowest number). In the example below, the Hoodies shipping class is more important than the default class.
Merging Shipping
↑ Back to topThere are times you may wish to merge shipping of a specific product. For example, imagine you have a bookmark and a book. The bookmark is in the small shipping class, and the book is in the medium shipping class. If a customer orders a book and a bookmark then you can simply bundle this shipping together. There’s no need to charge to customer for shipping the book and the bookmark separately.
If shipping for the bookmark is usually $2.50 and shipping for the book is $5, then you want to offer a shipping cost of $5, not $7.50.
To properly merge items for shipping, you need to ensure that the table is set up with the highest rate at the top and the lowest rate at the bottom.
What you need to do is to tell the plugin: Go down this table of rates and stop when you get to the first condition that matches.
To merge rates in a simple setup:
- Choose Calculated rate (per shipping class) for your calculation type.
- Create rates on the table, with the highest rate at the top. In our example of books and bookmarks, the medium shipping class is above the small shipping class.
- Ensure that the Break option is checked.
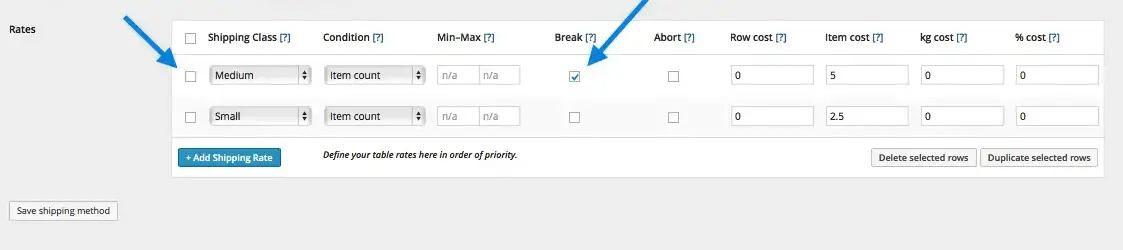
Let’s take a look at the difference when the order and the break checkboxes are used.
In the first example, the table is set up correctly. Medium is above small on the table, and the break checkbox tells the plugin to stop its calculation when the first condition is met. The shipping price for the customer is $5. i.e., The bookmark is correctly bundled with the book.
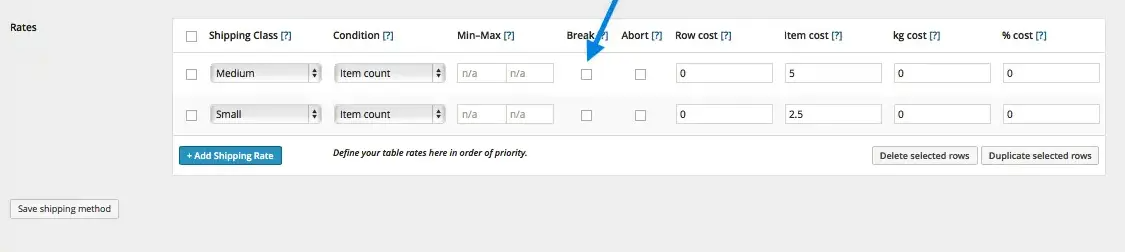
In the second example, medium is correctly above small, but the break checkbox hasn’t been checked. This means that the plugin continues to calculate through the table for all of the items, calculating separately for each item and offering a final price of $7.50.
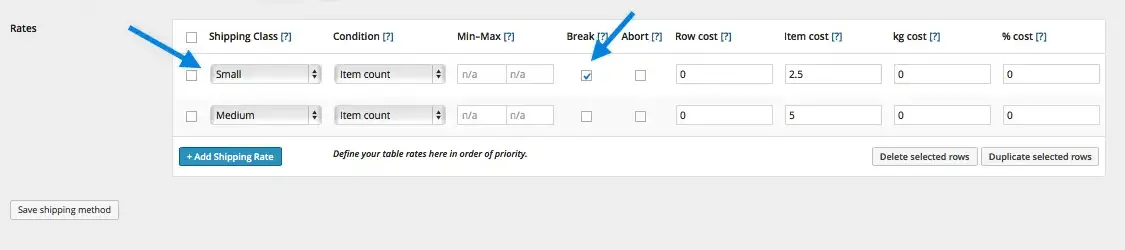
In this example, the break checkbox is checked, but small is above medium in the table. As the plugin calculates down through the table stopping at the first row in which its condition is met, it stops at small. The customer is offered the price of $2.50, which is the shipping cost for the bookmark, not the book.
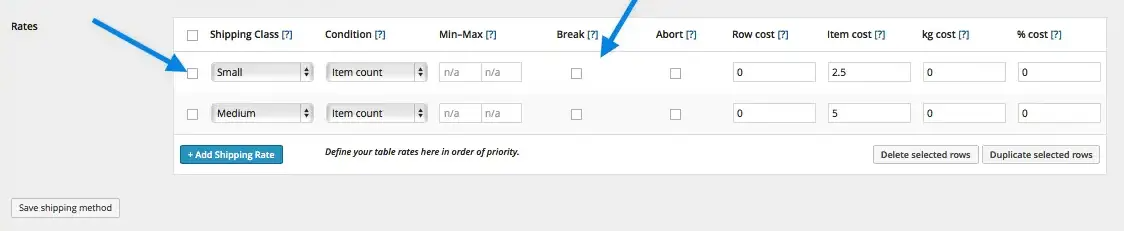
In the final example, small is above medium in the table and the break checkbox is not checked. This time, the plugin checks every item in the basket against the table without stopping. It offers the price of $7.50 for shipping, totaling the cost for each line item, rather than combining.
All fine adjustments made to the table of rates will affect your final total. Below are working examples of calculations for an online t-shirt store. These should help demonstrate the practical application of the plugin.
Import Rates / Export Rates (CSV)
↑ Back to topTable Rate Shipping version 3.4.0 added import/export functionality via buttons at the bottom of the rates table in the settings. This feature makes it quick and easy to add rates to multiple Shipping Zones or modify rates in bulk.

Note: The CSV export only contains the information in the rates table, so the rest of the Table Rate Shipping settings may need to be manually adjusted when importing rates to new instances of the shipping method.
Exporting Rates:
To use this feature, first add your rates to the table using the “Add Shipping Rate” button. Once your rates have been added, click the “Export Rates (CSV)” button to download the CSV file. The file will called table-rates-instance-[ID]-[date].
Bulk Updates:
If you are wanting to add additional rates to the CSV file or make bulk updates, you can add new rows or modify existing rows but the column names should not be changed.
Importing Rates:
To import rates, click the “Import Rates” button and select your CSV file. If you are updating existing rates, check the “Replace existing Table Rates with imported data.” box during the import process. If you are adding new rates, leave that box unchecked during the import.
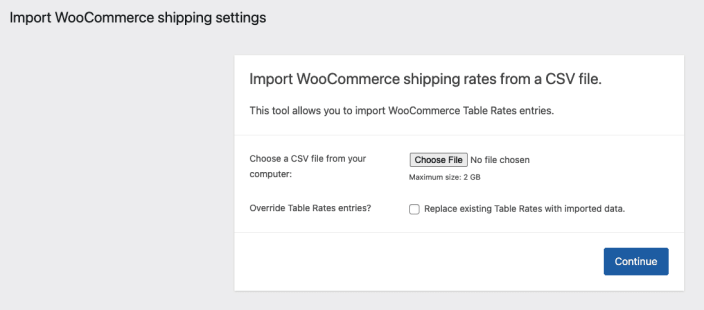
If the import is successful, you will see this notification:

CSV Columns and Values:
| Column | Value |
| rate_id | ID for the individual rate entry |
| rate_class | ID for specified Shipping Class | “0” for No Class | Blank for Any Class |
| rate_condition | Related to the “Condition” field |
| rate_min | Related to the “Min” field |
| rate_max | Related to the “Max” field |
| rate_cost | Related to the “Row cost” field |
| rate_cost_per_item | Related to the “Item cost” field |
| rate_cost_per_weight_unit | Related to the “[weight unit] cost” field (ex: “lbs cost”) |
| rate_cost_percent | Related to the “% cost” field |
| rate_label | Related to the “Label” field |
| rate_priority | Related to the “Break” checkbox – “1” for checked | “0” for unchecked |
| rate_order | Order of rates, starting with “0” and increasing chronologically (ex: 0, 1, 2, 3) |
| shipping_method_id | ID for the instance of Table Rate Shipping |
| rate_abort | Related to the “Abort” checkbox – “1” for checked | “0” for unchecked |
| rate_abort_reason | Related to the “Optional abort reason text” field |
Working examples
↑ Back to topSending multiples of similar items
↑ Back to topDave has a t-shirt shop. People often buy multiple t-shirts. The base shipping rate is $2, and each t-shirt adds $1. To create the shop’s shipping rules, Dave does the following:
- Creates a “Small” shipping class to apply to all of his t-shirts.
- Creates a shipping zone, Zone 1.
- Adds the “Table Rate” shipping method to Zone 1.
- Edits the Table Rate shipping method.
- Chooses the Calculated rate (per shipping class) calculation type.
- Adds a Shipping Rate with the following rules:
- Shipping Class: Small
- Condition: Item count (same class)
- Min:1 Max:1000
- Row Cost: 2
- Item Cost: 1
When customers purchase his t-shirts, they are charged as follows:
- 1 t-shirt: $3
- 2 t-shirts: $4
- 3 t-shirts: $5, etc
Applying multiple rules to the same shipping class
↑ Back to topIt’s all going well for Dave, but realized the basic shipping rate goes up when people buy more than 50 t-shirts. The shop needs another rate. The original rate is edited to a Minimum of 1 and a Maximum of 49.
The new shipping rate uses the following settings:
- Shipping Class: Small
- Condition: Item count (same class)
- Min:50 Max:1000
- Row Cost: 10
- Item Cost: 1
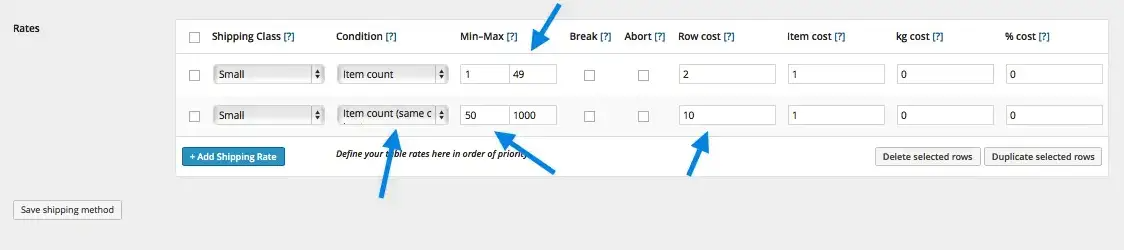
When customers purchase multiple t-shirts, they are charged as follows:
- Purchasing 49 t-shirts costs $51 for shipping (49*1)+2
- Purchasing 50 t-shirts costs $60 for shipping (50*1)+10
Merging shipping for different shipping classes
↑ Back to topDave’s been pretty successful with t-shirts, so he decides to get into selling jumpers. When a customer buys a jumper and a t-shirt, he knows that he can package the t-shirt and jumper together, so he doesn’t want to charge shipping for each separately. His base rate for shipping a jumper is $5, and each jumper costs $3. To create rules for shipping jumpers, he does the following:
- Creates a “Medium” shipping class to apply to all of the jumpers.
- Opens Zone 1 shipping.
- Creates the following rules:
- Shipping Class: Medium
- Condition: Item count (same class)
- Min:1 Max:1000
- Row Cost: 5
- Item Cost: 3
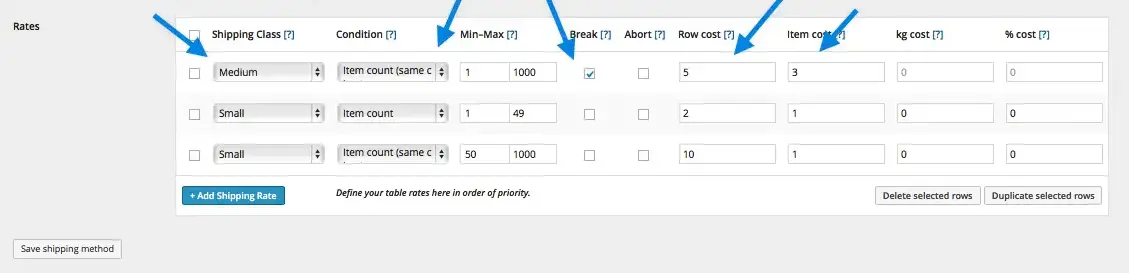
As described in the section on Merging Shipping, the most expensive shipping class needs to be at the top of the table. The system charges only the jumper’s shipping rate.
Sending by weight
↑ Back to topDave decided to move to a new courier company. It’s more cost-efficient for him to ship by weight, so he needs to rethink his shipping rates. The new rates provided by the courier are:
- 0-750g: $2.70
- 751-1000g: $4.30
- 1000g-2000g: $8.30
This time the calculation type is Per Order. This will calculate the total based on the weight of the entire order. He needs to create three rows, one for each rule he wishes to create. These will apply to any shipping class, with the weight condition, and a minimum and maximum weight applied.
Offering Multiple Shipping Options
Dave wants to give his customers as much flexibility as possible, so he decides to offer customers in the shipping zone both 1st and 2nd class mail options. To do this, he does the following:
- Calls his original rate 1st class
- Navigates to the Shipping Zone, and selects Add Shipping Method
- Calls his new table 2nd Class
- Creates a per order table with the 2nd class rates
Comparing prices after discounts
↑ Back to topCustomizations are not covered under our support policy, so this isn’t something we can help implement or troubleshoot on your site.
When a price range comparison is used in the table rates, it is based on the actual product price, which includes taxes but excludes discounts/coupons. Using the filter below, it is possible to compare the prices based on the line item total, i.e., with discounts / coupons and taxes applied.
FAQ
↑ Back to topHow do I indicate “Free Shipping”?
↑ Back to topIf some of the rates are set to 0, you’ll want to clarify that to customers by editing the Label column with a message such as “Free Shipping,” which will display when viewing the cart and at checkout.
How can I ship from multiple countries?
↑ Back to topYou can’t use multiple region-specific shipping extensions at the same time in WooCommerce. This issue affects stores that ship from warehouses in different countries, since each shipping service requires its own currency.
For example, if you have warehouses in both the US and Canada:
- USPS requires US Dollars (USD)
- Canada Post requires Canadian Dollars (CAD)
Since WooCommerce only allows one store currency at a time, you must choose one primary shipping service.
Workaround
You can use Table Rate Shipping as a workaround:
- Install the shipping extension that matches your store’s currency
- Set up Table Rate Shipping to match the rates of the other shipping service
While this solution requires manual rate matching in Table Rate Shipping, it allows you to offer shipping options from multiple countries.
Note: This is a workaround rather than a complete solution, but it can help meet your shipping needs.
Troubleshooting
↑ Back to topSome users can see TRS options but others can’t
↑ Back to topIf Table Rate shipping isn’t available to some users on your site, check extensions such as Role-Based Shipping / Payment Methods extension settings. This type of extension controls which shipping methods each user role can access.
Old Shipping Methods Appearing in Role Settings
↑ Back to topSometimes, your Role-Based Shipping settings may show shipping methods from shipping plugins you’ve deleted. This happens when an old plugin leaves data in your database after being removed.
What’s Happening
When you uninstall a shipping plugin, it might not clean up all its data from your database. This can cause the Role-Based Shipping extension to display these non-existent shipping methods in its settings.
Solution
You’ll need to remove these old shipping methods from your database manually. Since database editing requires technical knowledge and can cause site issues if done incorrectly, we recommend:
- Create a full backup of your site
- Contact your hosting provider for help
- Or hire a WordPress developer to safely remove the old data
Note: Do not edit your database directly unless you have experience with database management.
Questions and support
↑ Back to topSomething missing from this documentation? Still have questions and need assistance?
- If you have a question about a specific extension or theme you’d like to purchase, contact us to get answers.
- If you already purchased this product and need some assistance, get in touch with a Happiness Engineer via our support page and select this product’s name from the Product dropdown.