NOTE
This product is no longer sold on WooCommerce.com. This document has been left available for existing users, but will no longer be updated.
Installation
↑ Back to topTestimonials by WooThemes is a free plugin that helps you organize and display customer testimonials on your website. You can install it through your WordPress dashboard in Plugins > Add New.
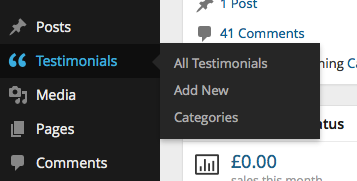
After installing and activating the plugin, you will see a new menu in your WordPress dashboard called Testimonials.

Adding a Testimonial
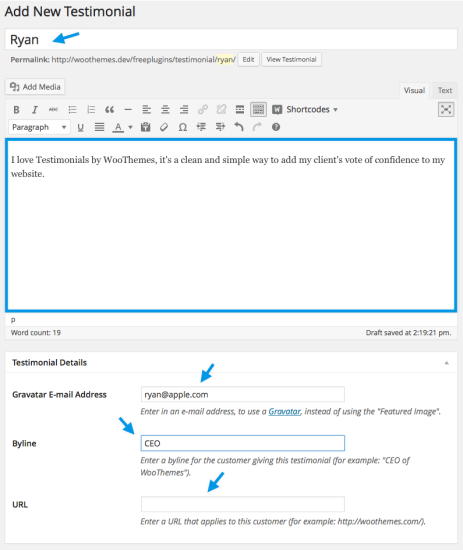
↑ Back to topTo add a new testimonial, go to Testimonials > Add New:
- Add a name in the title field.
- Add a testimonial in the text editor.
- Add a Gravatar e-mail in the Testimonial Details panel. Setting a Featured Image will override the Gravatar image.
- Add a byline in the Testimonial Details panel.
- Add an URL in the Testimonial Details panel.
- Click Publish.
Instead of Gravatar, you can add an image through the “Featured Image” panel.

Usage
↑ Back to topYou have 3 options for displaying your Testimonials, you can insert them with a shortcode, widget, or add them via a php template file or custom plugin.
Widget
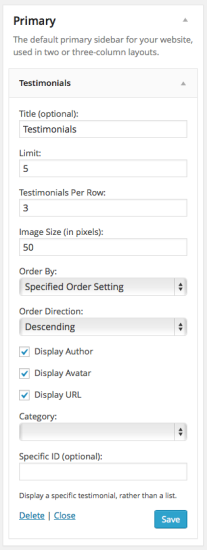
↑ Back to topTo add your testimonials as a widget go to: Appearance > Widgets to find the Testimonials Widget. With this you can modify the following settings.

Shortcode
↑ Back to topTo insert testimonials into a post or page with a shortcode use the following example as a guide:
[woothemes_testimonials limit="10" size="100"]You can find all the available parameters listed below. You can simply include these in your shortcode as well.
PHP
↑ Back to topTo display your testimonials via a theme or a custom plugin, please use the following code:
<?php do_action( 'woothemes_testimonials' ); ?>Additional Parameters
↑ Back to topTo add arguments to this, please use any of the following arguments, using the syntax provided below:
limit=>5(the maximum number of items to display)orderby=>menu_order(how to order the items – accepts all default WordPress ordering options)order=>DESC(the order direction)id=>0(display a specific item)display_author=>true(whether or not to display the author information)display_avatar=>true(whether or not to display the author avatar)display_url=>true(whether or not to display the URL information)echo=>true(whether to display or return the data – useful with the template tag)size=>50(the pixel dimensions of the image)per_row=>3(when creating rows, how many items display in a single row?)title=> ” (an optional title)before=><div>(the starting HTML, wrapping the testimonials)after=></div>(the ending HTML, wrapping the testimonials)before_title=><h2>(the starting HTML, wrapping the title)after_title=></h2>(the ending HTML, wrapping the title)category=>0(the ID/slug of the category to filter by)
The testimonials ID can be found under Dashboard > Testimonials. From there, edit the testimonial you want to get the ID from. Once you do that, the URL will be http://yoursite.com/test/wp-admin/post.php?post=4&action=edit. In this case, 4 is the ID of the testimonial.
Similarly, the category ID can be found under Dashboard > Testimonials > Category. From there, edit the category you want to get the ID from. In the URL, you’ll find something like &tag_ID=6 with in this case 6 being the ID number you need.
The various options for the orderby parameter are:
noneIDtitledatemenu_order
<?php do_action( 'woothemes_testimonials', array( 'limit' => 10, 'display_author' => false ) ); ?>The same arguments apply to the shortcode which is [woothemes_testimonials] and the template tag, which is <?php woothemes_testimonials(); ?>.
Usage Examples
↑ Back to topAdjusting the limit and image dimension, using the arguments in the two possible methods:
do_action() call:
<?php do_action( 'woothemes_testimonials', array( 'limit' => 10, 'size' => 100 ) ); ?>woothemes_testimonials() template tag:
<?php woothemes_testimonials( array( 'limit' => 10, 'size' => 100 ) ); ?>