Affiliate for WooCommerce plugin helps you to add, manage affiliates, and track performance from a single place – commissions, sales, payouts, leaderboard, etc. Earn money without hard work. Increase your brand outreach, and get potential customers.
As a store owner, you can make selected users on your site as affiliates from their User Profile or by their user role.
But you also have the authority to accept or reject users for your affiliate program who sign up via the affiliate registration form.
In this documentation, we will walk you through each option of the registration form to ensure you can create an effective and user-friendly sign-up process for your affiliates.
Let’s get started!
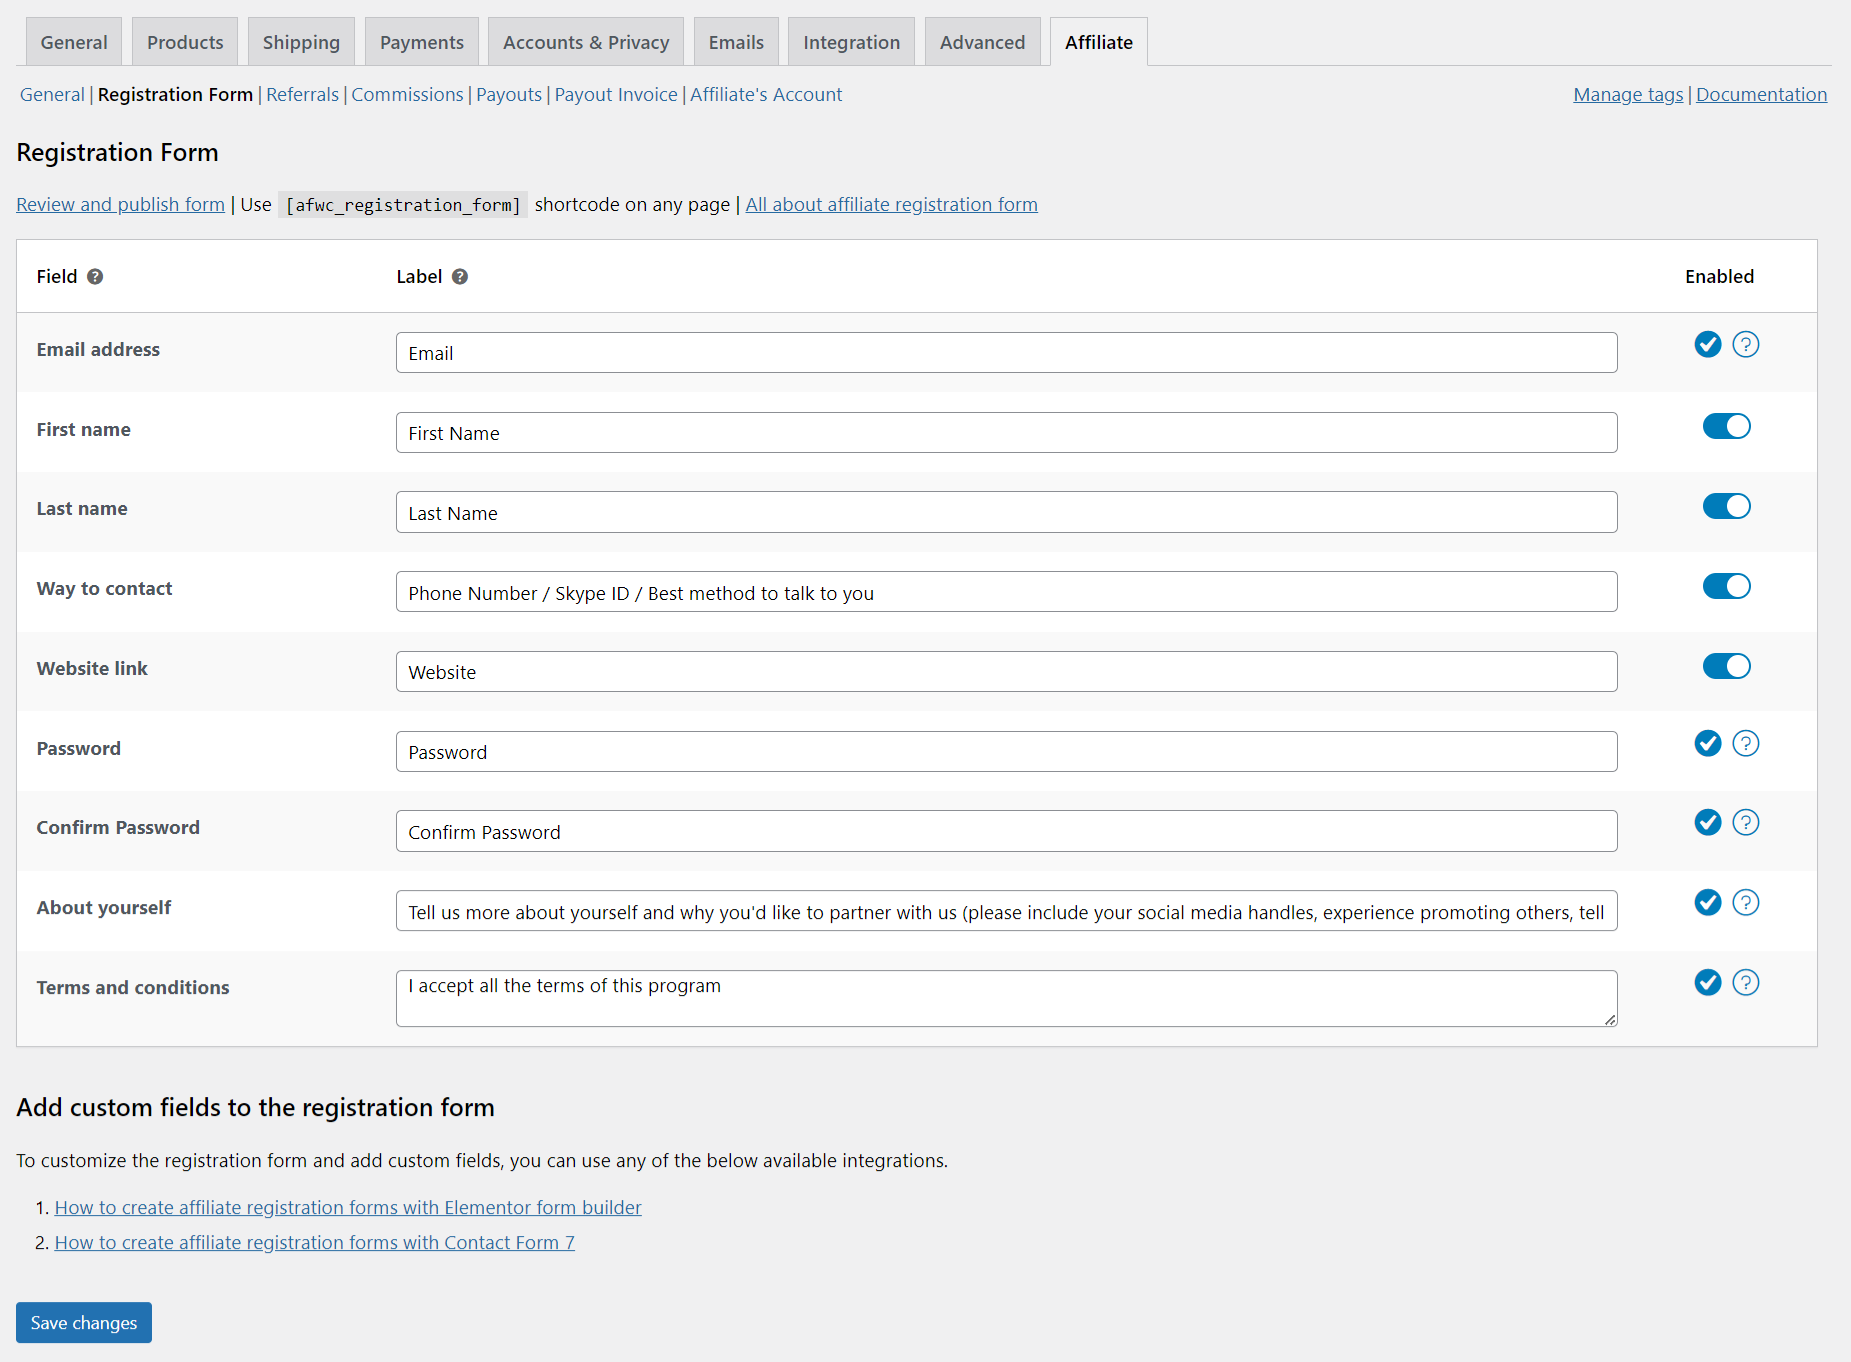
Registration form
↑ Back to topThe plugin gives you a shortcode [afwc_registration_form] that you can add on any page of your site to show the affiliate registration form.
You can use the [afwc_registration_form] shortcode to show the affiliate registration form on any page of your site. Users can sign up for your affiliate program using this form.
An example of the form can be seen here. Note – Form appearance may vary based on your theme.
Upon activating the plugin for the first time, a page is created automatically including the above shortcode with the title ‘Join our affiliate program’, in Draft status.
You can find that page from WordPress admin > Pages > All pages.
Alternatively, you can also click on the ‘Review and publish form’ link to directly edit the page from WordPress admin > WooCommerce > Settings > Affiliate > Registration Form.
Update affiliate registration form fields
↑ Back to topEdit existing form fields
↑ Back to topGo to WordPress Admin > WooCommerce > Settings > Affiliate > Registration Form.
By default, the form has the following fields with labels:
- Email address – email address of the user (Mandatory).
- First name – first name of the user.
- Last name – last name of the user.
- Way to contact – contact details of the user.
- Website link – user’s website from where they’ll be promoting your website or products.
- Password & Confirm Password – user’s account password (Mandatory).
- About yourself – this information helps you decide how the user will promote your website (Mandatory).
- Terms and conditions – Acceptance checkbox for your affiliate program terms (Mandatory).
You can rename these field labels.
Also, you can show/hide the following fields (as not mandatory): First name, Last name, Way to contact, and Website link by toggling the slider from the right side of the specific labels.
Add terms link to terms and conditions
↑ Back to topFollow these steps to add the terms and conditions page link:
- Go to WordPress Admin > WooCommerce > Settings > Affiliate > Registration form.
- Change the text “I accept all the terms of this program” to the following: I accept all the terms of this program
<a href="link-to-your-terms-page">View our terms</a>. - Click on Save changes.
Add new form fields
↑ Back to topCurrently, it is not possible to add any new form fields to the above default form. If you want to add new form fields, you can refer to our integrations:
Want integration with any other form builder plugin? Please submit a feature request from here along with a short description of the plugin and a link to that plugin or reach out to us directly from here.
Review and publish the form
↑ Back to topOnce the affiliate registration form fields are set up, you can follow these steps to publish the form/page:
- Go to WordPress admin > WooCommerce > Settings > Affiliate > Registration Form, and click on the Review and publish form from the top.
- It will take you to an automatically created registration page, which you can edit as per your requirements and then publish it.
Alternatively, you can create as many pages as you want and add the shortcode [afwc_registration_form] in it.
Affiliate’s user role
↑ Back to topBy default, a user who signs up to be an affiliate will be assigned a user role set under WordPress Admin > Settings > General > New User Default Role.
For multisite, go to My Sites > Network Admin > Sites > All Sites. Select Edit on the site that you want to set the default role for, then click Settings. Scroll down and you should see ‘Default Role’. Set the role to ‘subscriber’ (or whatever you want) and click on ‘Save changes’.
If you have any custom user role (created either via custom code or using any other plugin) you can set that too.
You can change affiliate users’ user roles anytime, once they are approved.
You can also assign a custom user role to affiliates upon approval by following this doc.
Approving users as affiliates
↑ Back to topYou have the option to approve all or selected users as affiliates.
Approve all users as affiliates
↑ Back to topIf you want all users who sign up for your affiliate program to become your affiliates automatically (without their request being reviewed), enable the Approval method setting from WordPress Admin > WooCommerce > Settings > Affiliate > General.
After enabling, all the users who sign up via the form will be automatically approved and will be your affiliates.
Approve selected users as affiliates
↑ Back to topIf you want to manually review and approve/reject all users who sign up for your affiliate program, disable the Approval method setting.
Once disabled, whoever signs up via the affiliate registration form, their affiliate status will be Pending, and you can follow these steps to approve or reject:
- Go to your WordPress Admin > WooCommerce > Affiliates.
- Click on the Search bar at the top, and it will open a box of predefined filters.
- From those filters, select Awaiting Approval from the Affiliate status row to filter a list of users whose approval is pending for your affiliate program.
- Select a user from the filtered list (in a light red background).
- You will see the Registration Form Details and buttons to Approve or Reject the request to become an affiliate.
- Click on the Approve (in Blue) to approve the affiliate request. Upon successful approval, you will notice a message like
Affiliate {affiliate’s name} is approved. - Click on the Reject (in Gray) to reject, and you will see a message like
Affiliate {affiliate_name} is rejectedupon successful rejection.
That’s it. You have approved/rejected a user’s affiliate request.
Email notifications
↑ Back to topAffiliate for WooCommerce plugin also sends emails for the following cases:
- Affiliate – Pending Request
Once a user signs up via the affiliate registration form and their request to join the affiliate program is in pending status, they will receive this email. - Affiliate Manager – New Registration Received
Once a user signs up via the form, an email will be sent to the affiliate manager notifying them about the new signup. If the affiliate manager email is not set, then this email will be sent to the store admin of the website. - Affiliate – Welcome Email
Once an affiliate’s request to join is approved, the affiliate will receive a welcome email. It includes their affiliate link, account link, site product catalog link, etc. to get started quickly.
You can manage these email notifications from WordPress admin > WooCommerce > Settings > Emails. Also, you can override email templates.
Allow existing users to join the affiliate registration form
↑ Back to topAn existing/already registered user on your site can also join your affiliate program in either of these two ways:
An existing/already registered user can sign up for your affiliate program either from:
- The affiliate registration form page OR
- from their My Account > Register as an affiliate tab.
Few fields are not visible to existing/logged-in users
↑ Back to topAn existing user will not see the following form fields of the registration form as this information is already available in their account:
- First name
- Last name
- Password/Confirm Password
The Email address field will be visible – pre-filled with the user’s email – but editing the email is not allowed.
Disable ‘Register as an affiliate’ from all the user’s My Account
↑ Back to topYou can disable the ‘Register as an affiliate’ tab by disabling the Register as an affiliate setting.
Note – The filter afwc_is_registration_open is now deprecated. If you have used it, then the plugin will automatically detect the filter’s return value and set that in the above setting (Register as an affiliate).
FAQs
↑ Back to top1. How to add Captcha to the affiliate registration form?
↑ Back to topThe Affiliate for WooCommerce plugin integrates with Contact Form 7 and Elementor Form Builder.
You can create custom affiliate registration forms using any of them as explained here and add reCAPTCHA to prevent spamming or fraud.
Visit this doc for adding reCAPTCHA in Contact Form 7 and this doc for integrating it in Elementor Form Builder.
2. Does the Affiliate for WooCommerce plugin create any user role upon activation?
↑ Back to topNo, it doesn’t. But, if you want to assign a custom user role to affiliates upon approval, please visit this doc.
Feature request
↑ Back to topHave a feature request or enhancement suggestion for Affiliate For WooCommerce? Submit a feature request or send it to us from here.