Directly migrate your PrestaShop products, orders, and customers to your WooCommerce store in a few clicks.
Installation
↑ Back to top- Download Prestashop Migration for WooCommerce and have your .zip file
- At the WordPress admin panel, go to the Plugins section, and click ‘Add New’ to upload and install the plugin you just downloaded from WooCommerce.
- Upload the .zip file to proceed with the installation.
- Wait until the plugin installs. After successful installation, activate the plugin, and move on to configuration settings.
Configuration
↑ Back to topAt the WooCommerce admin panel go to WooCommerce > Settings > PrestaShop to WooCommerce for configuration. Here you will find the Six tabs: API Settings, Product Import Settings, Orders Import Settings, Customers Import Settings, Run Import, and Import Status.
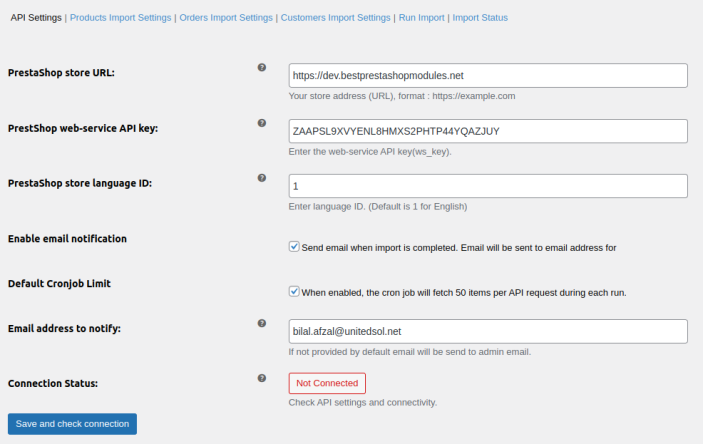
API Settings
↑ Back to topIn this section, you can configure the API settings. These include:
- PrestaShop Store URL: Enter the address of your PrestaShop store in the format “https://example.com/”
- PrestaShop Web-Service API Key: Enter the web-service API key(ws_key).
- PrestaShop Store Language ID: Enter the language ID of your PrestaStop store. (Default is 1 for English)
- Enable Email Notification: Click the checkbox to enable email notification once the import is completed.
- Default Cronjob Limit: When enabled, the cron job will fetch 50 items per API request during each run.
- Email Address to Notify: Enter the address on which the import completion email will be sent. If not provided by default email will be sent to admin email.
- Connection Status: Status of the API connection.
Follow These Steps to Get PrestaShop Store Web Services API Key:
- Open PrestaShop Store Backend Admin Panel.
- In the Advanced Parameters tab Click on the Webservice tab.
- Here You can Add, Edit, and delete Webservices.
- Click on Add new Webservice Key, Here you can generate the Key and set the Description and Status of Webservice. Set the resource permissions for the Key.


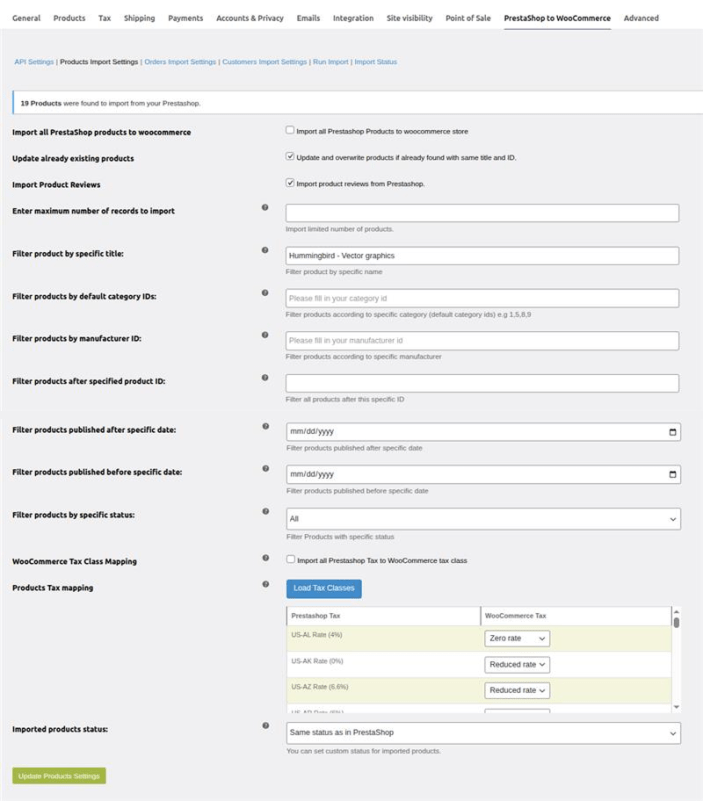
Product Import Settings
↑ Back to top- Import all PrestaShop products to WooCommerce: Enable the checkbox to import all products from PrestaShop to WooCommerce.
- Update Already Existing Products: Click the checkbox to update already existing products. If you do not want to import all products, uncheck the box and the following settings will appear.
- Import Product Reviews: Import product reviews from Prestashop.
- Enter Maximum Number Of Records To Import: Input the maximum number of products that you want to import.
- Filter Product by Specific Title: Enter specific product titles if you want to import products based on their titles.
- Filter Products By Default Category IDs: Filter products based on their specific category IDs. Use comma-separated values for multiple categories e.g. 1,3,5,8,9.
- Filter Products By Manufacturer ID: Fill in manufacturer IDs to filter products based on these IDs.
- Filter Products After Specified Product ID: Enter a specific product ID to filter all products after that specific ID.
- Filter Products Published After Specific Date: Select the date to filter all the products that are published after the selected date.
- Filter Products Published Before Specific Date: Choose the date to filter products published before that date.
- Filter products by specific status: Filter all products with specific status.
- WooCommerce Tax Class Mapping: Import all PrestaShop tax class to WooCommerce tax class.
- Imported Products Status: Select the status of the newly imported products. You can select:
- Same status as in PrestaShop
- Published
- Draft
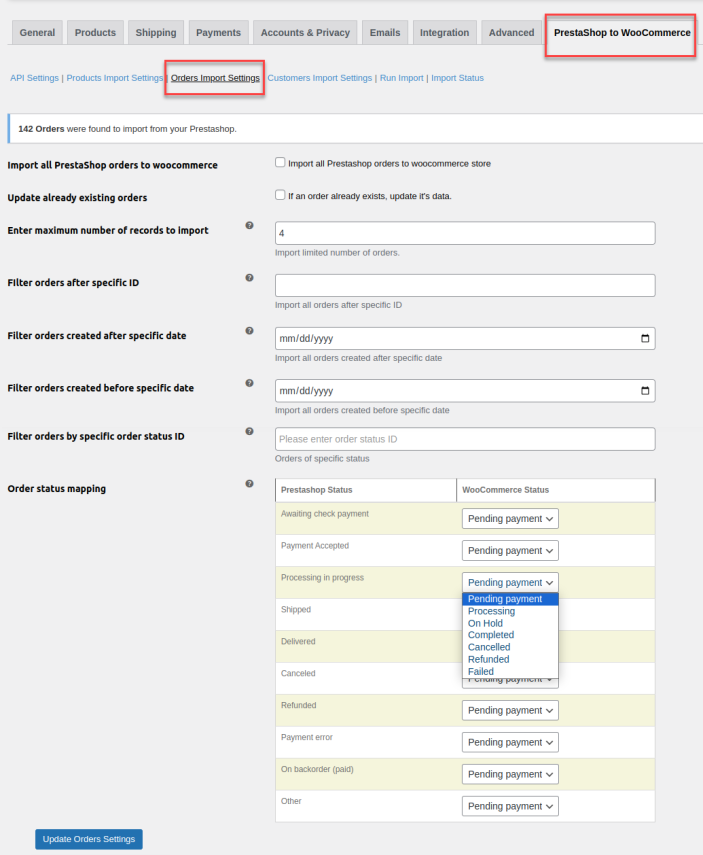
Orders Import Settings
↑ Back to top- Import All PrestaShop Orders to WooCommerce: Click the checkbox to import all orders from PrestaShop to WooCommerce.
- Update Already Existing Orders: Enable the checkbox to update existing orders in any. If you do not want to import all orders, uncheck the box and the following settings will appear.
- Enter Maximum Number Of Records to Import: Add the maximum number of orders that can be imported.
- Filter Orders After Specific ID: Enter a specific ID and get all orders that are created after that particular order ID.
- Filter Orders Created After Specific Date: Enter a date to get all the orders after that specific date.
- Filter Orders Created Before Specific Date: Select a date to import all the orders that were created before that specific date.
- Filter Orders by Specific Order State ID: Enter the order status ID and filter orders based on specific IDs.
- Order Status Mapping: Check the mapping status of each order in PrestaShop and WooCommerce. You can select the status of each WooCommerce order as:
- Pending Payment
- Processing
- On Hold
- Completed
- Canceled
- Refunded
- Failed
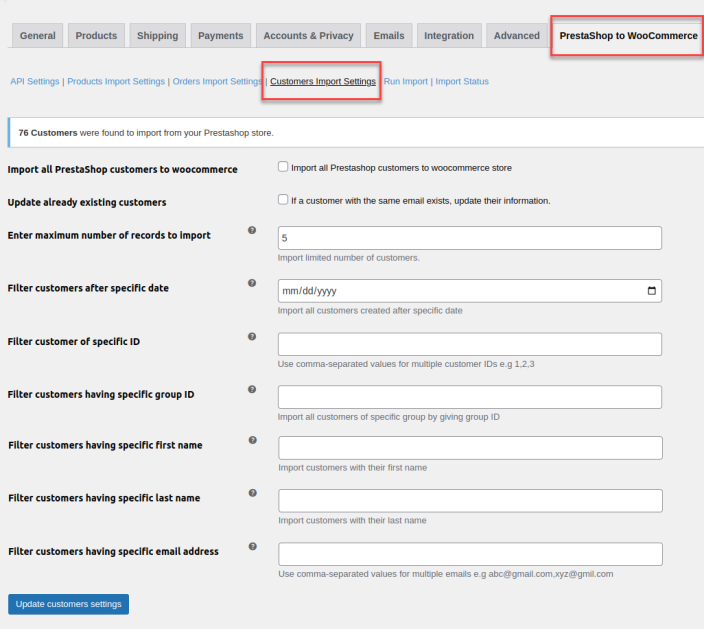
Customers Import Settings
↑ Back to top- Import All PrestaShop Customers to WooCommerce: Enable the checkbox to import all customers from PrestaShop to WooCommerce.
- Update Already Existing Customers: Update existing customers if any. If you do not want to import all customers, uncheck the box and configure the following settings.
- Enter Maximum Number of Records to Import: Enter the maximum number of customers that can be imported.
- Filter Customers After Specific Date: Select a date to filter customers created after that particular date.
- Filter Customers of Specific IDs: Filter customers based on their IDs. Use comma-separated values for multiple customer IDs e.g 1,2,3.
- Filter Customers Having Specific Group ID: Enter group ID to get all customers of that specific group ID.
- Filter Customers Having Specific First Name: Input specific first names to import all customers having that first name.
- Filter Customers Having Specific Last Name: Enter last name to get all customers with that specific last name.
- Filter Customers Having Specific Emails: Enter email addresses to filter customers based on their email address. Use comma-separated values for multiple emails e.g abc@gmail.com,xyz@gmil.com.
Note: User’s passwords will not be imported as PrestaShop APIs do not provide password data for security reasons.
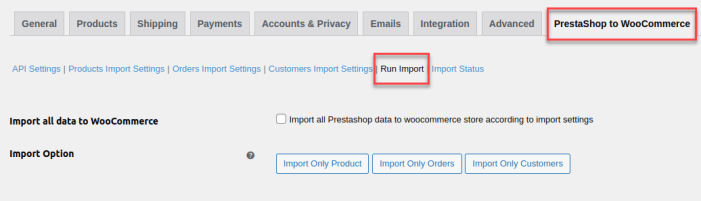
Run Import
In the run import tab, you can manage the import of all products, customers, and orders.
- Import All Data to WooCommerce: Click the checkbox to import all the data including products, orders, and customers from PrestaShop to WooCommerce according to import settings you have configured previously.
- Import Option: Choose options to import data from PrestaShop to WooCommerce. When “Import All Data to WooCommerce” is checked all data will be imported. When unchecked, you can select:
- Import Only products
- Import Only Orders
- Import Only Customers
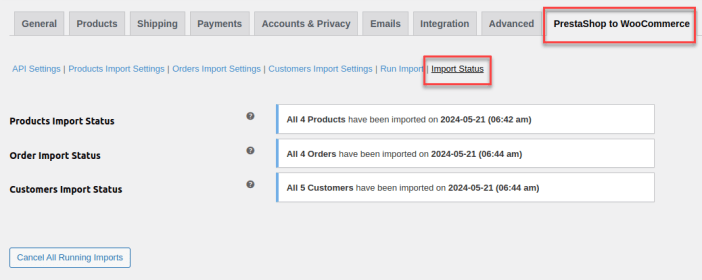
Import Status
In this tab, you can check the status of all running imports.
- Products Import Status: Check the status of product imports.
- Order Import Status: Import status of all orders.
- Customers Import Status: Status of all customer imports.
You can cancel all the running imports by clicking the “Cancel All Running Imports” button.