Installation
↑ Back to top- Download the .zip file from your WooCommerce account.
- Go to: WordPress Admin > Plugins > Add New and Upload Plugin. Select Choose File for the file you have downloaded.
- Click Install Now and Activate Plugin.
More information is available at Install and Activate Plugins/Extensions.
Setup and Configuration
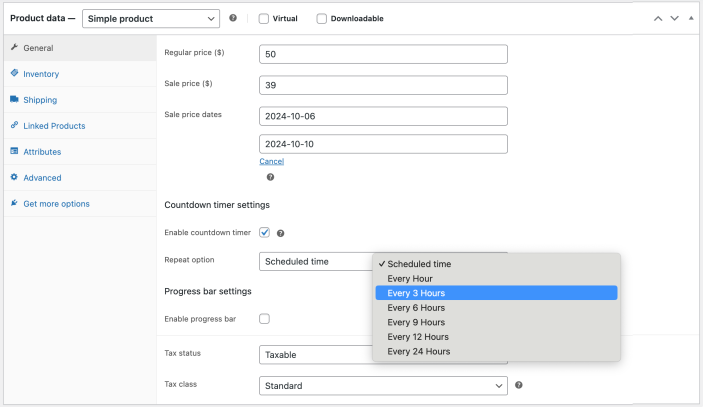
↑ Back to topAfter activation of the Product Sale Countdown extension, you can access extension settings from WP Admin > WooCommerce > Settings > Product Sale Countdown and activate countdown and progress bar from admin product edit sheet under the general pricing tab.
How to add sale countdown timer:
↑ Back to topYou can add countdown timer to any on-sale product to create urgency in customers mind to make purchase before the sale runs out. When putting any product on-sale the store admin can either schedule the start and end date of the sale or leave it empty to permanent run the sale until the admin manual removes the special price. When enabling timer you can customize following options,
Enable Countdown Timer: To encourage customers to make a purchase before the time runs out, simply enable the countdown timer on your product page. No customization option will work till the countdown timer is enabled!
Repeat Option: The plugin permits you to select how often the countdown timer will be reset. Below are the options you can set from:
- Scheduled Time: Choose a certain time for the countdown to restart (Note – For the scheduled time option to work, its necessary that you schedule a sale price. For more details on scheduled prices, visit FAQ section at the end.)
- Every Hour: Set the timer to reset every hour.
- Every 3 Hours: Set the timer to reset every three hours.
- Every 6 Hours: Set the timer to reset every six hours.
- Every 9 Hours: Set the timer to reset every nine hours.
- Every 12 Hours: Set the timer to reset every twelve hours.
- Every 24 Hours: Set the timer to reset every twenty-four hours.

Timer layout and design customization:
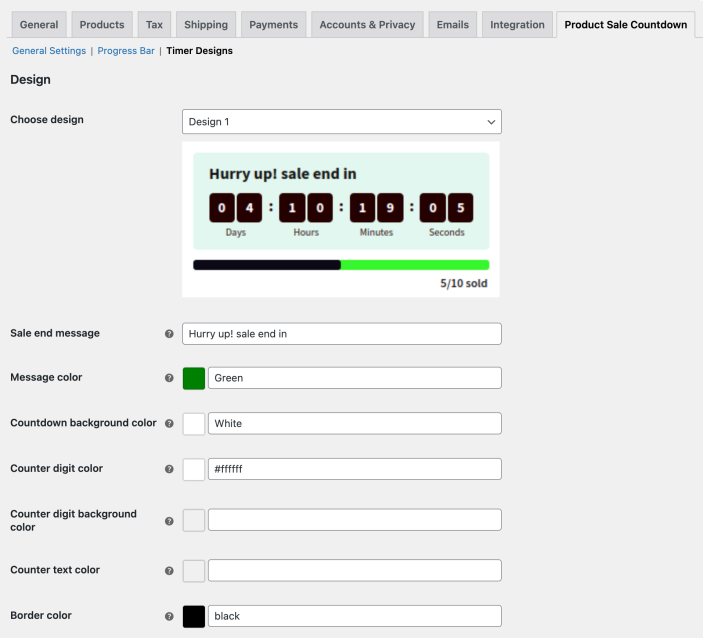
↑ Back to topYou can customize following timer options from WooCommerce > Settings > Product Sale Countdown > Timer Designs.
- Choose Design: Choose the layout and style for how the countdown timer appears on your product page.
- Sale End Message: Set a personalized message that will appear on top of the timer.
- Message Color: Set the color for the sale end message text
- Countdown Background Color: Set background color for the countdown timer
- Counter Digit Color: Select the color of the countdown digits.
- Counter Digit Background Color: Select a background color for the digits within the countdown timer.
- Counter Text Color: This controls the color of the text next to the countdown digits (e.g., “hours,” “minutes,” etc.).
- Border Color: Select the color for the border around the countdown timer.
Click “Save Changes” after making all necessary changes.

Timer position and other settings:
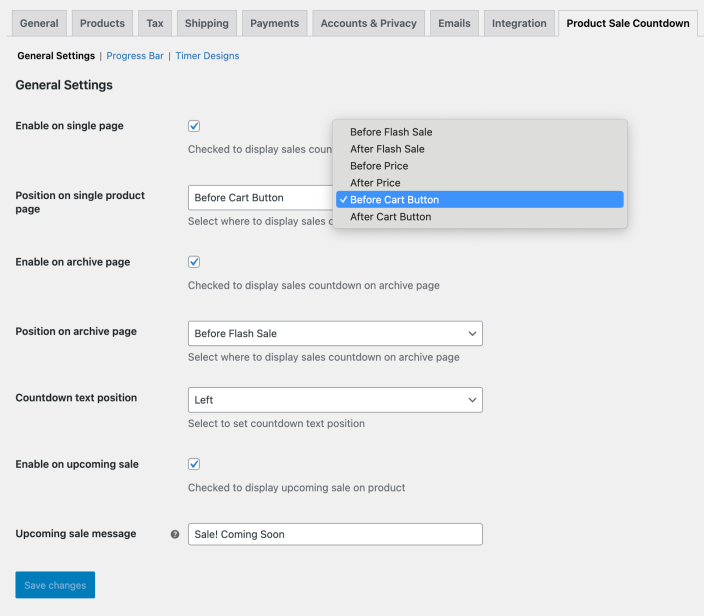
↑ Back to topYou can easily manage countdown timer on products with the following options from WooCommerce > Settings > Product Sale Countdown > General Settings tab.
- Enable on Single Product Page: You can choose to enable or disable the sales countdown timer on a single product page.
- Position on Single Product Page: Select where the countdown timer will be demonstrated on the product page. Here are the options:
- Before/ After Flash Sale
- Before / After Price
- Before / After Cart
NOTE: The timer will be positioned according to your selected option preference. Ensure it’s placed where you think it will be most effective in encouraging your customers to make a purchase.
- Enable on Archive Page: Check the Enable to Archive Page option to enable the countdown timer on product listing pages such as category, shop, etc.
- Position on Archive Page: Similar to the single product page, you can choose where the countdown timer will appear on archive pages. Here are the options:
- Before/ After Flash Sale
- Before / After Price
- Before / After Cart
- Enable on Upcoming Sale: By checking the Enable on Upcoming Sale box, you can opt to display countdown timer on products when you have scheduled a discount for coming days. For example, if you have set special price discount to run from day after tomorrow, the timer will start running from now and will display time remaining before the sale begins along with the custom heading given below. Please note that the timer checkbox must be checked from product detail page in order to show the countdown timer.
- If you leave this unchecked, the timer will only run from discount start date and time to end date and time.
- Upcoming Sale Message: Set a personalized message that will appear to keep customers informed about an upcoming sale.
Save Changes: Once you have made all the necessary adjustments, click Save Changes to apply them to your store.

How to add progress bar:
↑ Back to topChoose to display the Progress Bar option for your product by enabling it. If you don’t check this option, customers might miss out on the incentives to reach the goal. The progress bar and countdown timer can be display independently based on store preference.
- Goal: Specify the desired amount as your target
- Initial Quantity: Set the starting quantity shown on the progress bar

Progress bar customization option:
↑ Back to topProgress bar message: Choose to personalize the message displayed on your progress bar.
The following placeholders are available to show real-time data:
- {quantity_sold}/{goal} sold
- {quantity_left} – Number of products left
- {quantity_sold} – Number of products sold
- {percentage_left} – Percentage of products left
- {percentage_sold} – Percentage of products sold
- {goal} – The goal that you set for a single product
NOTE: By using these placeholders, the progress bar will automatically update with real-time data based on sales progress, giving customers a clear visual of how many products are left or sold. However, if you choose not to use these, customers may not be able to see updated sales information in your store.
- Progress Bar Type: Select how the progress bar should behave based on the order status:
- Increase: The progress bar will increase as more products are sold in the store.
- Order Status: Select when the progress bar should update on the basis of certain order statuses.
- Position: Select the position to display the progress bar on the product page:
- Above Countdown
- Below Countdown
- Progress Bar Height: Adjust the height of the progress bar
- Border Radius: Set the border-radius.
NOTE: A higher number will make the corners more rounded.
- Text Color: Select the color for the text displayed
- Background Color: Set the background color
- Fill Color: Select the color that fills the progress bar as sales increase.

FAQs
↑ Back to topHow to schedule sale price?
↑ Back to topIt is the default WooCommerce functionality that allows you to offer sale prices for specified periods. To set a scheduled sale price, go to WordPress > WooCommerce > Products > Specific Product > Product Data.
Once you are in the product data section, go to the general settings part, where you will see Regular prices and, below them, sale prices. Enter a sale price(lower than regular) and click on the schedule option adjacent to the sales price field. Select start and end dates for the sale price and save.
Can’t see countdown timer after setup?
↑ Back to topIf the sales countdown timer is not visible anymore on your desired pages, then
a) Ensure that the counter is not disabled from product-level settings.
b) The product must have a special price in order for timer to appear.
c) Another quite common mistake is using the matching colors in customization with the theme’s background color, the counter will be hidden in this scenario as well.
