Overview
↑ Back to topWooCommerce Authorize.Net Gateway integrates with Authorize.Net payment services to provide secure and powerful payment processing for your store. With this gateway, you can accept credit cards and eChecks and let customers save their payment details to your site for fast and easy checkouts. This payment gateway includes full support for WooCommerce Subscriptions and WooCommerce Pre-Orders!
If you plan to use this plugin with Subscriptions, Pre-Orders, or want to allow customers to save their payment details, the Customer Information Manager (CIM) feature must be enabled on your Authorize.Net account (additional monthly costs may apply).
This plugin also includes Accept.js from Authorize.Net for improved security and decreased PCI compliance responsibility. Customer credit card information is handled directly by Authorize.Net to offload some security concerns. Click here to learn more about Accept.js
Looking for details on 3D Secure? See this FAQ entry.
As of WooCommerce 8.3, Cart and Checkout blocks are available as the default experience. WooCommerce Authorize.Net Gateway is now compatible with those blocks!
Requirements
↑ Back to top- An Authorize.Net account
- An SSL certificate. An SSL certificate is also required on local test environments.
- WooCommerce 3.5+
- WordPress 5.6+
- PHP 7.4+ (you can see this under WooCommerce > Status)
Installation
↑ Back to top- Ensure your store meets the plugin requirements.
- Download the extension from your WooCommerce dashboard.
- Go to Plugins > Add New > Upload and select the ZIP file you just downloaded.
- Click Install Now and then Activate.
- Click Configure and read the next section to learn how to setup the plugin.
Getting Started
↑ Back to topTo begin using Authorize.Net, you must first connect the plugin to your Authorize.Net account. Follow the steps below to find your API credentials on Authorize.Net and setup the plugin:
- Login to your Authorize.Net account (Screenshots below are for both the “Old” Account User Interface and the “New” User Interface rolling out in 2026).
- Go to Accounts > Settings > API Credentials & Keys.
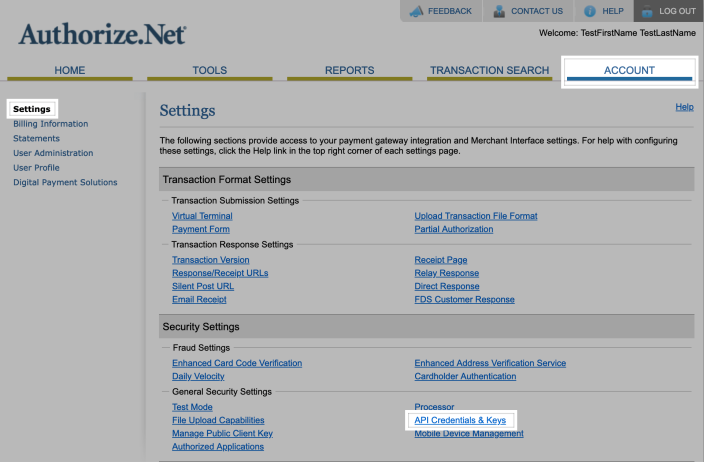
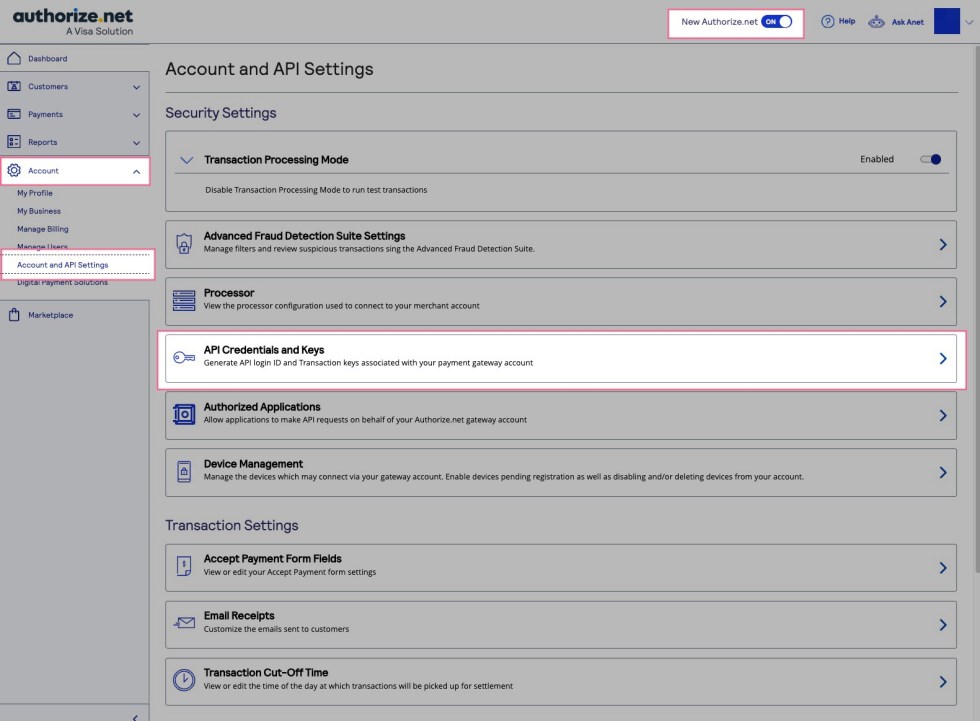
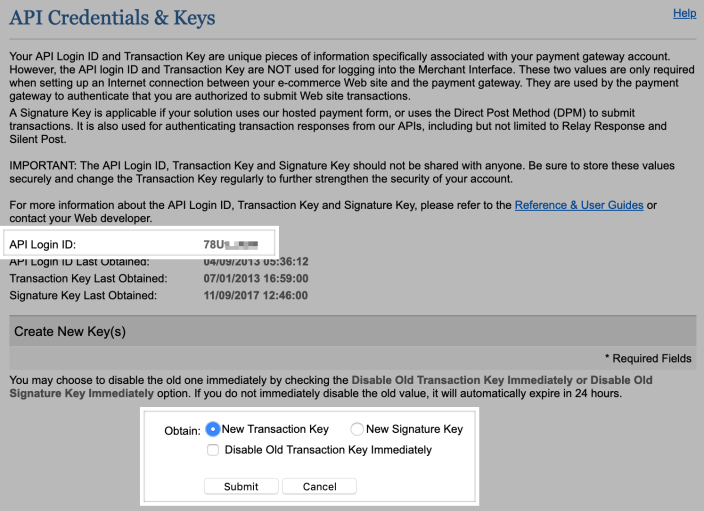
- Create and Copy your API Login ID.
- Select the New Transaction Key radio button and click Submit. Copy the Transaction Key.
- If you want to setup webhooks, select the New Signature Key radio button and click Submit to generate the Signature Key.
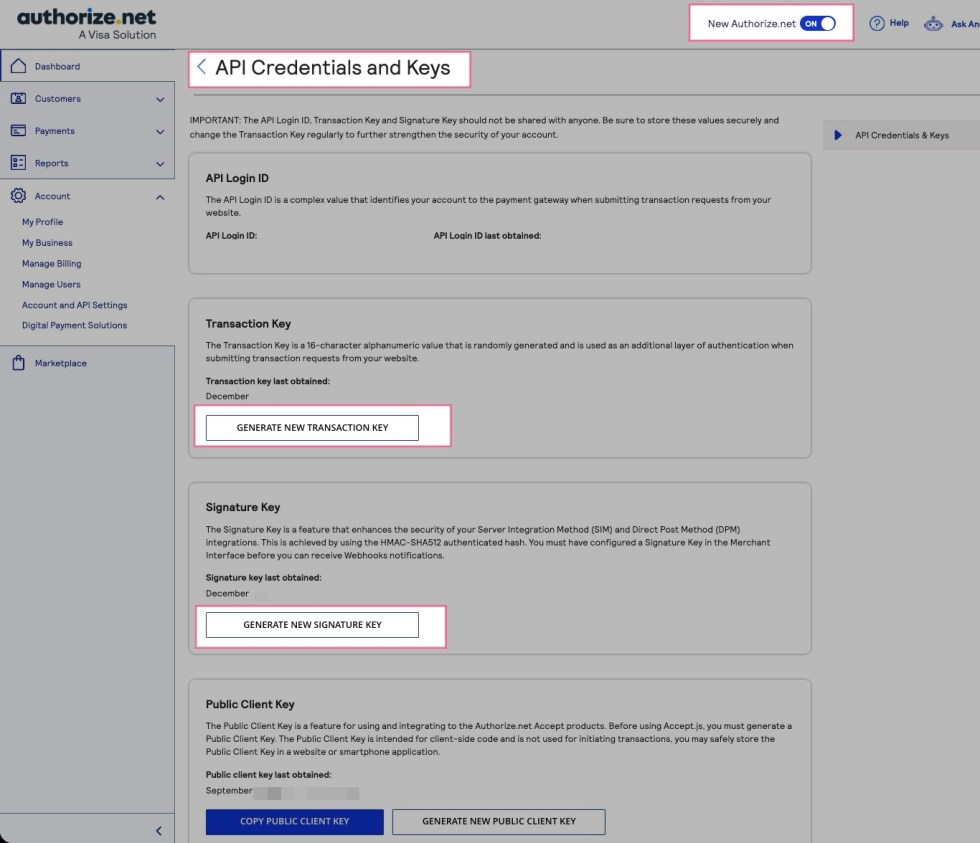
- Now, log into your site and go to WooCommerce > Settings > Payments and select WooCommerce Authorize.Net.
- Paste the API Login ID, API Transaction Key, and API Signature Key, if applicable.
- Click Save Changes.
That’s it! You are now ready to start accepting credit cards via Authorize.Net! Keep reading if you want to tweak settings and customize the checkout process.
Credit Card Settings
↑ Back to topYou can configure the following settings for the Authorize.Net credit card gateway:
- Enable / Disable: Allow customers to use this gateway to checkout.
- Title: The text shown for the payment during checkout and on the Order Received page.
- Description: The text shown under the gateway’s title during checkout. Limited HTML is allowed. If you enable test mode, this section will also display a notice along with test credit card numbers.
- Card Verification (CSC): Require customers to enter their card security codes when checking out. This can be useful if you have requirements in your Authorize.Net account for CV2 verification.
- Transaction Type: Controls how transactions are submitted to Authorize.Net. Select “Charge” to automatically capture payments. If you select “Authorization”, you must manually capture and settle payments in your Authorize.Net control panel or on the WooCommerce orders screen after the transaction has been submitted. This defaults to “Charge”.
- Charge Virtual-Only Orders: If Transaction Type is set to “Authorization”, enable this to automatically capture charges for orders with only virtual products. For downloadable products, this will grant downloads access right away.
- Capture Paid Orders: If Transaction Type is set to “Authorization”, enable this to automatically capture charges when orders move to a paid status.
- Accepted Cards: Determines which card logos are displayed during checkout. This has no impact on which cards are accepted by your merchant account.
- Tokenization: Let customers save their payment methods for future use at checkout. This is required for Subscriptions or Pre-Orders.
- Detailed Decline Messages: Display detailed messages to customers to provide reasoning for declines instead of a generic error message when possible. Click here to read more about detailed decline messages.
- Debug Mode: Enable when you’re having issues processing transactions. You can choose to log API requests directly on the checkout page, save them to the WooCommerce > Status > Logs page, or both. As a best practice, please do not enable this setting unless you’re having issues with the plugin.
- Environment: Switch between “Test” and “Production” credentials. Enable “Test” to send transactions to your Authorize.Net Test Account. Note: This is not the “test mode” that is listed under your account. This is an entirely separate sandbox environment that requires a separate login and separate API credentials. Do not place your Test Account (or regular account) into “Test Mode” within the Authorize.Net control panel as transactions will not process at all if that mode is set.
- Share connection settings: If using the credit card and eCheck gateways, select this setting to share credentials between the gateways so you don’t have to enter them twice.
- API Login ID: Follow the steps above to retrieve your API Login ID.
- API Transaction Key: Follow the steps above to generate your API Transaction Key.
- API Signature Key: Optional. Only required if you want to enable webhooks for Authorize.Net account updates. Follow the steps above to generate your API Signature Key.
- Payment Form Type: You can choose how you’d like to display the payment form. The Inline option meets SAQ-A EP PCI requirements while the Lightbox option supports SAQ A standards.
eCheck Settings
↑ Back to topYou can configure the following settings for the Authorize.Net eCheck gateway:
- Enable / Disable: Allow customers to use this gateway to checkout. You must enable eChecks on your Authorize.Net account to use the eCheck gateway. Follow the process below under eCheck Issues to get eChecks setup and enabled.
- Title: The text shown for the payment during checkout and on the Order Received page.
- Description: The text shown under the gateway’s title during checkout. Limited HTML is allowed. If you enable test mode, this section will also display a notice along with a test bank account number.
- Tokenization: Let customers save their payment methods for future use at checkout. This is required for Subscriptions or Pre-Orders.
- Authorization: Display an authorization message during the checkout process.
- Authorization Message: If Authorization is enabled, enter the message you want to show to your customers. You can use the following merge tags:
{merchant_name}: Your store name{order_date}: Date of purchase{order_total}: Total order value
- Recurring Authorization Message: If Authorization is enabled and WooCommerce Subscriptions is active on your site, you can enter the message you want to show your customers for recurring payments.
- Detailed Decline Messages: Display detailed messages to customers to provide reasoning for declines instead of a generic error message when possible. Click here to read more about detailed decline messages.
- Debug Mode: Enable when you’re having issues processing transactions. You can choose to log API requests directly on the checkout page, save them to the WooCommerce > Status > Logs page, or both. As a best practice, please do not enable this setting unless you’re having issues with the plugin.
- Environment: Switch between “Test” and “Production” credentials. Enable “Test” to send transactions to your Authorize.Net Test Account. Note: This is not the “test mode” that is listed under your account. This is an entirely separate sandbox environment that requires a separate login and separate API credentials. Do not place your Test Account (or regular account) into “Test Mode” within the Authorize.Net control panel as transactions will not process at all if that mode is set.
- Share connection settings: If using the credit card and eCheck gateways, select this setting to share credentials between the gateways so you don’t have to enter them twice.
- API Login ID: Follow the steps above to retrieve your API Login ID.
- API Transaction Key: Follow the steps above to generate your API Transaction Key.
- API Signature Key: Optional. Only required if you want to enable webhooks for Authorize.Net account updates. Follow the steps above to generate your API Signature Key.
- Payment Form Type: Choose to display the payment form inline or in a lightbox. Select “Inline” to support PCI-DSS SAQ A-EP compliance.
eCheck Setup with Authorize.Net
To enable eCheck processing on your Authorize.Net account:
- Setup an eTicket and ask for the “WEB” eCheck type to be enabled. Be sure you are an account owner and know your gateway ID.
- WEB transactions are usually enabled within 2 business days, but there is a funding hold automatically placed on your account – you can take funds in, but can’t take them out until you pass another security check with the underwriting department.
- To expedite this process, call the Authorize.Net underwriting department so they can check your website while on the phone with you. They’ll ensure you have a valid SSL on cart/checkout and prominently placed terms of use and privacy policy pages.
- Once you’ve met these requirements, the funding hold will be removed.
Webhook Setup
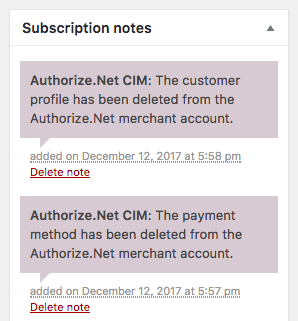
↑ Back to topWebhooks notify your WooCommerce site when customer profiles and payment profiles are deleted from your Authorize.Net account. This is helpful when using WooCommerce Subscriptions to ensure that payment token removals are logged on your site for troubleshooting purposes.
Follow the steps above to generate your API Signature Key, which you can enter in the plugin settings to enable webhooks. Once you enter your Signature Key and click on Save Changes, a notice will appear at the top of the gateway’s Settings page.
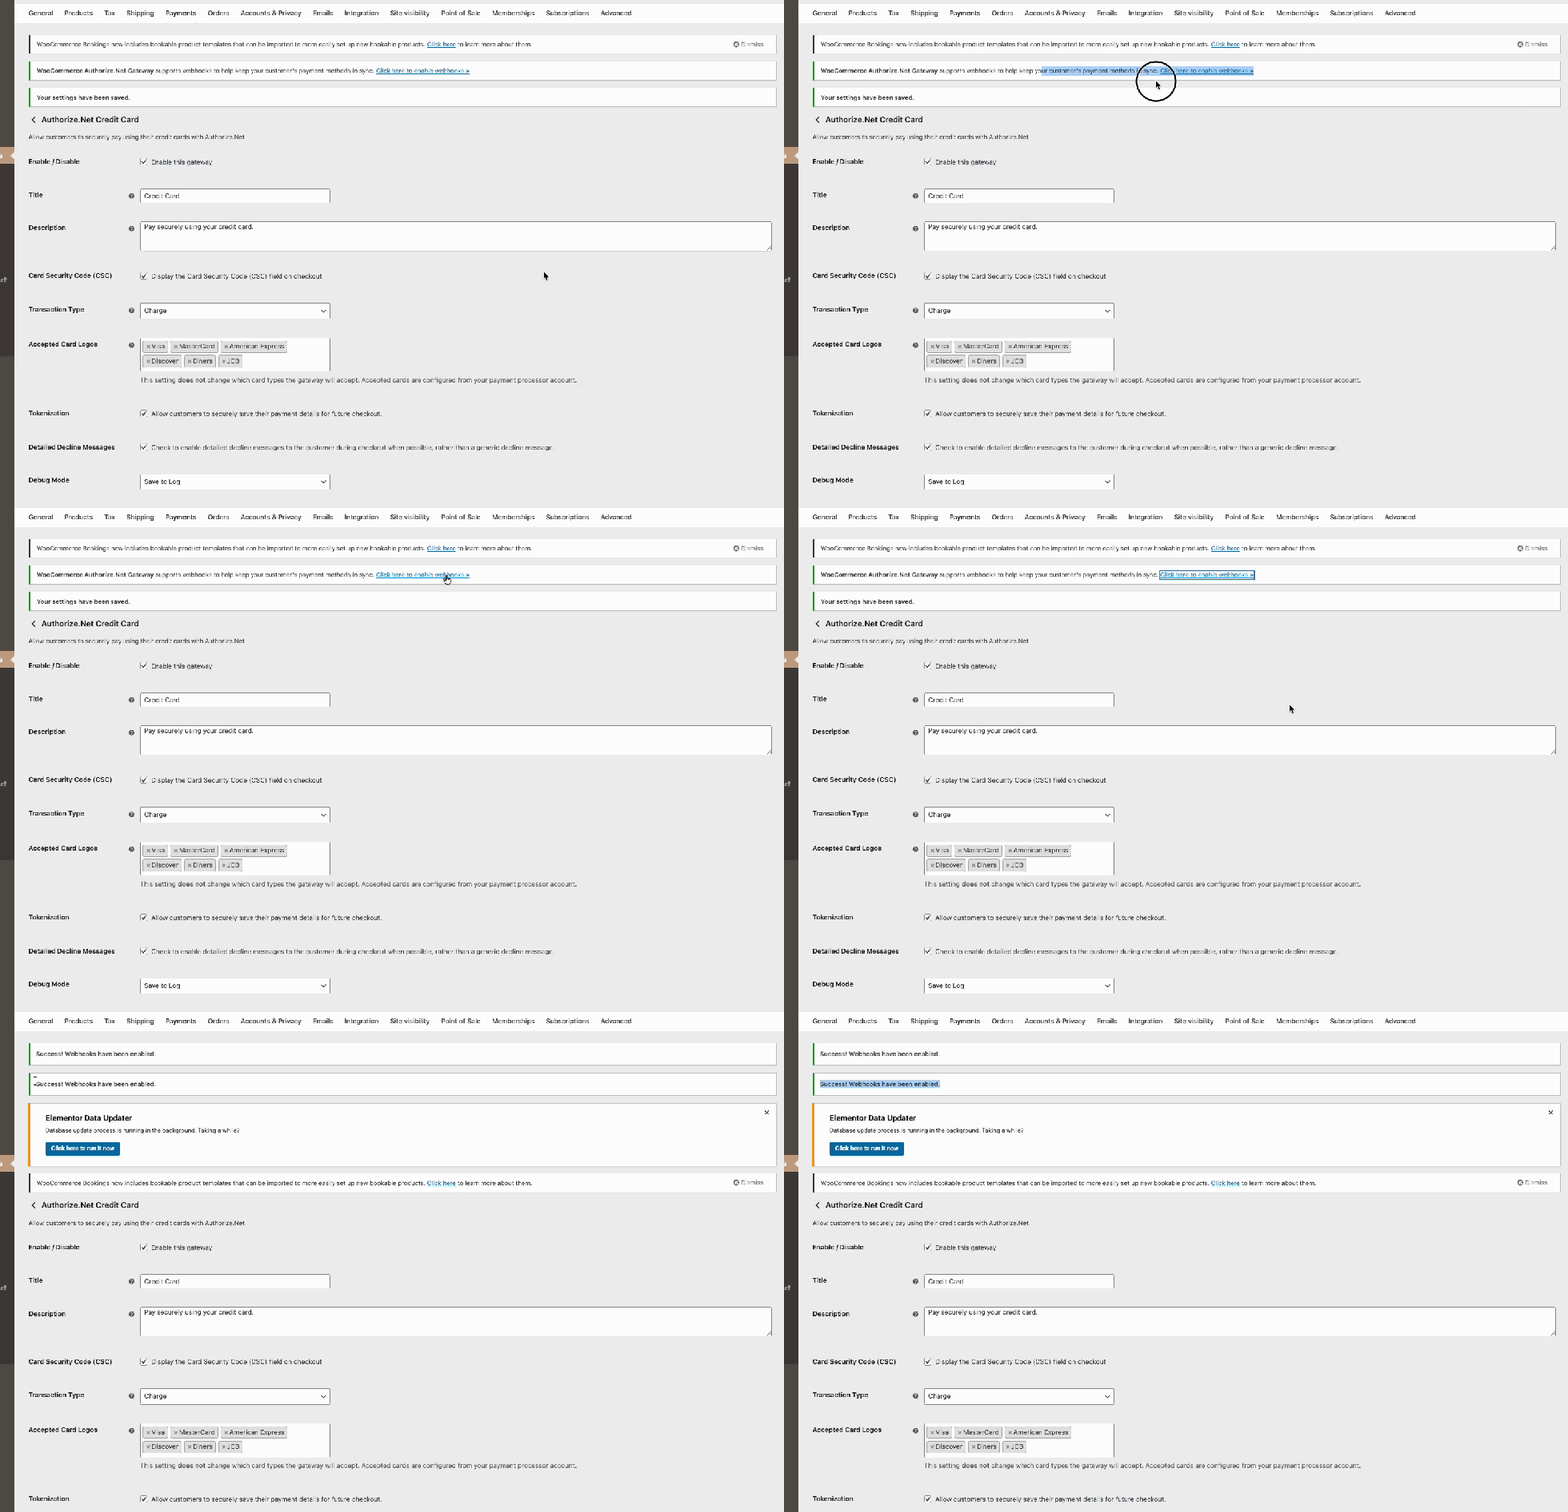

Click on the link “Click here to enable webhooks >>” in the settings notice to automatically enable the webhooks. This will push the required information into your Authorize.Net account. You will receive the following notice when the webhooks are created:

If you have incorrect or incomplete credentials in the settings, you may see this instead (for example, using Test Keys in a Production environment):

Authorize.Net will now notify your site when the customer or payment profiles are deleted from your account. We do, however, recommend avoiding changes within your account when possible.
Managing Orders
↑ Back to topAs a site administrator, you can use the WooCommerce Authorize.Net gateway to manually capture charges and automatically refund/void transactions as needed.
Capture Charges
↑ Back to topIf you are using version 2.0+ of the Authorize.Net gateway and the Transaction Type setting is set to “Authorization”, you can manually capture these payments from the WooCommerce Orders page. Click here to read more about capturing charges.
Note: If your Transaction Type setting is set to "Charge", you cannot use the Capture button.

Attempting to do so will result in the following error message:
3 (E00027) - The transaction was unsuccessful. Error Code: 33 - A valid referenced transaction ID is required.
Automatic Refunds
↑ Back to topIf you are using version 2.0+ of the Authorize.Net gateway and version 2.2+ of WooCommerce, you can process refunds for Credit Card transactions directly in WooCommerce without needing to log into your Authorize.Net account. Click here to read more about issuing automatic refunds from WooCommerce.
Void Transactions
↑ Back to topYou can void transactions directly in WooCommerce in the following circumstances:
- If your Transaction Type setting is set to “Authorization”, you can void when the transaction has been authorized but not yet captured.
- If your Transaction Type setting is set to “Charge”, you can void when the transaction has not yet been settled (e.g. funds haven’t been transferred from the customer’s account to your Authorize.Net account).
Authorize.Net does not accept partial voids. If a transaction is no longer eligible to be voided, you must refund the order. Click here to read more about voiding transactions in WooCommerce.
Gateway Features
↑ Back to topYour customers can take advantage of the following features when your site uses WooCommerce Authorize.Net.
Saving Payment Methods
↑ Back to topCustomers can save payment methods during the checkout process or from their My Account area. This lets them quickly select payment details during future checkouts and also lets your site support Subscriptions and Pre-Orders.
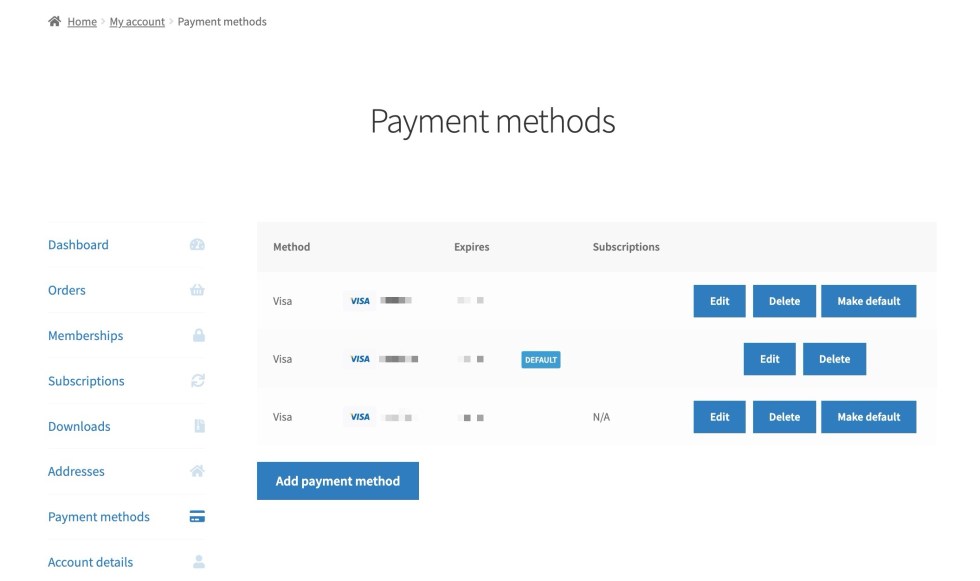
To manage their saved payment methods, customers can go to My Account > Payment Methods. From here, they can add new payment methods (credit cards or eChecks), set their default method, and delete any old or expired methods. Click here to read more about managing saved payment methods.
Notes:

Credit card information isn't stored on your site's server, but is tokenized and stored on Authorize.Net's secure servers. This reduces your site's PCI compliance burden. Click here to read more about Authorize.Net tokenization.

When using WooCommerce Subscriptions, customers cannot delete payment methods that are associated with active subscriptions. Click here to read more about saving payment methods with Subscriptions.
Subscriptions / Pre-Orders Support
WooCommerce Authorize.Net supports all features of WooCommerce Subscriptions and WooCommerce Pre-Orders for both credit cards and eChecks (if enabled).
Accept.js
↑ Back to topVersion 3.0+ of WooCommerce Authorize.Net includes automated support for Accept.js. Once you have configured the gateway, we can retrieve the information required to use Accept.js from your Authorize.Net account – no extra configuration steps required!
This feature means that customer payment information is handled directly by Authorize.Net, meeting the lower level PCI SAQ A-EP compliance level. Accept.js is handled behind the scenes, so your customers won’t notice any change to their checkout process. Click here to learn more about Accept.js.
Enhanced Checkout Form
↑ Back to topAuthorize.Net supports an enhanced checkout form that improves the checkout experience on mobile and desktop devices. Click here to read about the enhanced payment form.
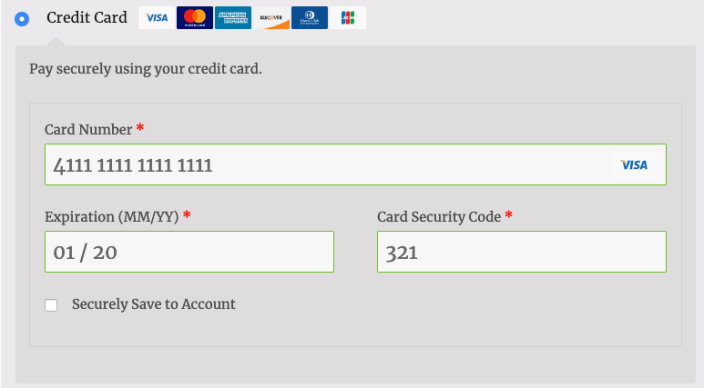
Note: The appearance of your checkout form may vary based on your site's theme.
Authorize.Net Emulation
↑ Back to topThe Emulation gateway has been retired and support for this feature is no longer available.
Current users of the WooCommerce Authorize.Net plugin may not have access to these settings.
Note: Authorize.Net Emulation does not support advanced features such as refunds, voids, and capturing charges from within WooCommerce. Only payment processing is supported.
To use Authorize.Net with a gateway that supports Authorize.Net emulation, you need to enable the Authorize.Net emulator under Plugins > Installed Plugins — click “Enable emulation gateway”:

This allows you to use Authorize.Net’s emulation protocol for other gateways.
The Authorize.Net emulator settings will now be available under WooCommerce > Settings > Payments. To use Authorize.Net emulation, you must enable the gateway and enter the Gateway URL and API credentials provided to you by your payment processor.
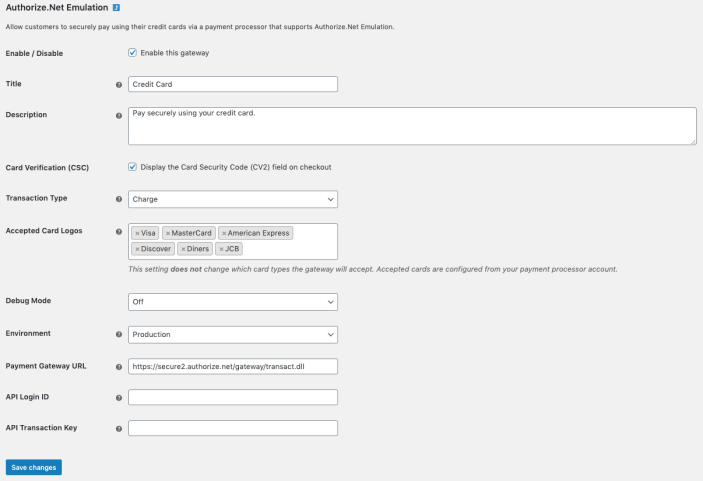
Authorize.Net Emulation Settings
↑ Back to top- Enable / Disable – This will enable the gateway to be used by customers to checkout.
- Title – This is the text shown for the payment during checkout and on the Order Received page.
- Description – This is the text shown under the title during checkout. Limited HTML is allowed. If you enable test mode, this section will also display a notice along with test credit card numbers.
- Card Verification (CSC) – Enable this to require customers to enter their CVV / CV2 (Card Security Code) when checking out. This can be useful if you have requirements in your Authorize.Net account for CV2 verification.
- Transaction Type – This controls how transactions are submitted to Authorize.Net. You may choose either “Charge” or “Authorization”. If you select “Authorization”, you must manually capture and settle payments in your Authorize.Net control panel or on the WooCommerce orders screen after the transaction has been submitted. This defaults to “Charge”.
- Accepted Card Logos – This controls the card logos that display during checkout. This is purely cosmetic and has no effect on the cards actually accepted by your merchant account.
- Debug Mode – Enable this is you are having issues correctly processing transactions. You can either log API requests / responses directly to the checkout / thank you page, save them to the WooCommerce Error Log (found under WooCommerce > System Status > Logs) or both. All debugging messages are cleaned of sensitive information before display, but as a best practice, please do not enable this unless you are having issues with the plugin.
- Environment – Switch between “Test” and “Production” credentials. Enable “Test” to send transactions to your Authorize.Net Test Account. Note: This is not the “test mode” that is listed under your Authorize.Net account. This is an entirely separate sandbox environment that requires a separate login. You can sign up for a test account here. Once you have done this, you can enter a separate API Login ID and API Transaction Key for your test account. Do not place your Test Account (or regular account) into “Test Mode” within the Authorize.Net control panel as transactions will not process at all if that mode is set.
- Payment Gateway URL – The Gateway URL for the Authorize.Net gateway processor. Optionally, this URL can be changed to a different processor that allows Authorize.Net emulation.
- API Login ID – This is the API Login for your Authorize.Net account (Test or Production). Follow the steps above to get this. If you’re using this gateway for Authorize.Net emulation, then this will be the API Login provided to you by your payment processor.
- API Transaction Key – This is the API Transaction Key for your Authorize.Net account (Test or Production). Follow the steps above to get this. If you’re using this gateway for Authorize.Net emulation, then this will be the API Transaction Key provided to you by your payment processor.
Frequently Asked Questions
↑ Back to topQ: Why am I receiving an error message on subscription renewals saying that Card Code is required? It’s not required in my plugin settings!
A: If you’re seeing an error like “Authorize.Net Payment Failed (3 E00027): Card Code is Required…”, it’s likely that Card Code is required on your Authorize.Net account. For PCI compliance and security reasons, Authorize.Net cannot store CSCs for subscription renewals, so card codes are unavailable for renewal orders. If your Authorize.Net account requires these, the orders will fail. Click here to learn how to disable this requirement.
Q: Why don’t Subscriptions display inside the Authorize.Net control panel?
A: Subscriptions aren’t shown in Authorize.Net because the gateway doesn’t use ARB (automated recurring billing). It tokenizes the customer’s payment method and then the Subscriptions plugin handles charging the payment method. This is far more flexible than ARB and thus supports a lot of features, such as changing payment dates and amounts, that ARB can’t handle.
Q: Why did I receive a “test transaction successful” email?
A: During checkout, the extension validates the payment information entered by the customer (i.e. confirms that the card number, expiration date, etc. are correct). This “test transaction” does not charge the customer, but generates an email to the merchant. You can email support@authorize.net to have them disable this email notification to you.
Q: Can I process automatic refunds with eChecks?
A: No – automatic refunds from WooCommerce can only be processed for credit card transactions.
Q: I’m migrating sites – can I import customer IDs and payment profile IDs to my new site?
A: The Authorize.Net plugin stores the customer ID, payment profile ID, and shipping profile ID as meta fields, so you could use an export plugin like Customer/Order CSV Export to pull down the IDs from your old site and use an import plugin like Customer/Order/Coupon CSV Import Suite to import these IDs to you new site! Other export/import plugins might work well here, too, so long as they are capable of exporting and importing customer/user meta.
Q: My customers get email receipts from WooCommerce and Authorize.Net. How do I get rid of Authorize.Net receipts?
A: You can disable these emails in your Authorize.Net account. Click here for instructions on disabling customer email receipts.
Q: How do I capture a higher amount than what is authorized (like a gas station or restaurant)?
A: Authorize.Net (along with most any eCommerce payment processor) cannot do this with card-not-present transactions, such as online payments. For these payments, you can only capture up to the value of the authorization: “The amount being requested for capture is less than or equal to the original authorized amount.”
When gas stations and restaurants do this, they’re using a particular POS system that gives them a certification to capture a certain percentage over the authorized amount. This functionality isn’t available for eCommerce systems, so this isn’t possible on your WooCommerce site or with the Authorize.Net plugin.
Q: Authorize.Net supports Apple Pay for web payments. Can I use this in my store?
A: Authorize.Net CIM contains a framework for Apple Pay, but it can only be enabled by developers, as the certification process requires developer-only tools. If you work with a developer and would like to add Apple Pay to your store, please click here to review the setup instructions and requirements. Please note that configuring Apple Pay support for this plugin is considered a customization and is not covered by our support policy.
Q: Does this plugin support 3D Secure? I need to meet Strong Customer Authentication (SCA) requirements.
A: WooCommerce Authorize.Net does not support 3D Secure at this time — Authorize.Net’s API does not support accepting the customer data required to meet 3D Secure v2.0 requirements (which is required for folks seeking to comply with PDS2 regulations / SCA requirements). If you need to enable SCA, please ask your Authorize.Net representative about migrating you to CyberSource. You can read more about PSD2 and Authorize.Net here, and see updates on 3D Secure with WooCommerce CyberSource here.
Q: I have a local test environment, do I need to have an SSL certificate installed?
A: Yes, an SSL certificate is also required on local test environments. In order to obtain an SSL Certificate for your local site, you can generate a self-signed certificate, or install a test certificate with a service such as the free Let’s Encrypt.
Q: When I delete a user on WordPress, is their saved payment method deleted on Authorize.Net?
A: When a user is deleted on WordPress, their payment profile will be deleted from their Authorize.Net customer profile as well. Their Customer Profile would still exist in the Customer Information Manager (CIM), and the payment profile section will display: “This Customer Profile does not have any associated Payment Profiles”.
Q: When I remove my webhooks from my Authorize.Net account, how do I run the webhook setup again on my site?
A: In your WordPress Dashboard go to WooCommerce > Status > Tools. From the Reset Authorize.Net Webhooks option click the Reset webhooks now button.
Q: Does WooCommerce Authorize.Net support Apple Pay for web payments when using a Cart and/or Checkout Block?
A: We’re still investigating the best way to implement Apple Pay with WooCommerce’s Cart and Checkout blocks. You can still use Apple Pay when using the Checkout shortcode option, but it’s not compatible with the Cart and Checkout Blocks at the moment.
Troubleshooting
↑ Back to topAuthorize.Net Test Credentials
↑ Back to topTo run tests with this plugin, you will need a set of dedicated test credentials from Authorize.Net. Your live credentials cannot be used in “Test” mode. When you change the Environment setting to “Test”, the Connection Settings fields will remove your live credentials and let you enter your test credentials. When you switch back to “Production”, the plugin will restore your live credentials.
Note: Do not set your production accounts into test mode from within your Authorize.Net account - this returns dummy data for live transactions, but does not work with the plugin's test mode, since you're still using production credentials.
Authorize.Net Error Codes
↑ Back to topAuthorize.Net provides many different error/response codes that can provide helpful information about what caused an error during payment processing. Click here to review Authorize.Net’s Response Code Reference. You can enter the code in this reference tool to see the cause of the error. In some cases, such as a transaction being held for review or declined, the plugin can’t resolve the issue. In those cases, you must fix the problem from your Authorize.Net account.
Notes:
- Orders with
Response Code = 4will be approved, but can be cancelled manually in the WooCommerce admin and Authorize.Net Merchant Area area later if they fail review. - Be sure to have “Partial Authorization” turned off in your Authorize.Net Merchant Area. This will restrict orders with
Response Code = 4andResponse Code = 295from being approved. “Allow Partial Payments” is off by default, but to verify it is off, follow these steps:- Login to your Authorize.Net merchant area.
- Go to Account > Partial Authorization.
- Ensure that Allow Partial Payments is unchecked and click Submit to save your changes, if applicable.
Required Field Errors
↑ Back to topIf you receive an error like (E00027) - The transaction was unsuccessful. Error Code: 33 - [Field Name] is required., your Authorize.Net account is likely setup to require a field that our plugin cannot send. These errors can occur on orders, refunds, and void transactions.
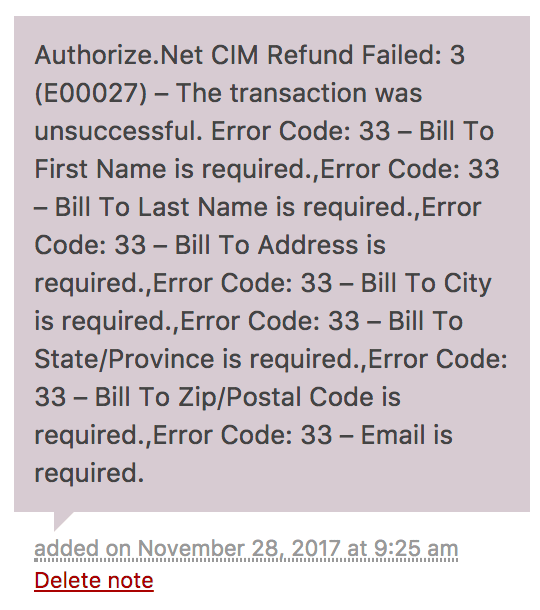
To resolve this issue, you should remove all field requirements from your Authorize.Net account by following the steps below:
- Login to your Authorize.Net Account.
- Go to Account > Payment Form > Form Fields.
- Uncheck the Required boxes for all fields.
- Click Submit.
Accept.js Errors
↑ Back to topIf you receive an error like Accept.js Error: payment nonce is missing, your checkout page is likely not loading the Accept.js file when our plugin expects it to. This is usually caused by a JavaScript conflict of some kind, typically with your theme or another plugin. Optimization plugins can interfere with how JavaScript loads on your checkout page and cause this error. A few conflicting plugins to look for are:
- Autoptimize
- SG Optimizer
- Hummingbird Pro
If you are using one of these plugins, disabling the plugin completely or adjusting its settings so they don’t optimize your checkout page should resolve the error.
eCheck Issues
↑ Back to topIf you enabled eChecks in the Authorize.Net gateway plugin but have not enabled WEB eCheck enabled on your Authorize.Net account, you may see errors like [Code 246] - This eCheck.Net type is not allowed. Click here for instructions on setting up eChecks on your Authorize.Net account.
Refund Issues
↑ Back to topWhen attempting to process an automatic refund, you may see the following error message:
Oops, you cannot partially void this order. Please use the full order amount.
This means that you’re trying to perform a partial refund, but the charge hasn’t been settled yet. This can happen when you try to refund within a day of purchase. The Authorize.Net plugin tries to void this order since the funds haven’t been transferred yet, but Authorize.Net doesn’t permit partial voids.
To resolve this, please wait until the charge has settled (about 24 hours after the order was charged) before trying the refund again.
Failed Subscription Renewals
↑ Back to topThe most frequent cause of failed subscription renewals is the “Payment token is missing or invalid” error. This occurs when payment data has changed on your site or within Authorize.Net for this user, but the subscription record hasn’t been updated.
For a renewal to process successfully, a few conditions must be met:
- The customer must have a payment token on your site. Click here for information on viewing user payment tokens.
- The payment token data in the user profile must match data on the subscription record. Click here to learn more about finding this information in the subscription record.
- The payment must be accepted by Authorize.Net. Our plugin has no control over declined transactions.
If the customer profile ID and payment profile ID (payment token) don’t match between the user and subscription records, any automated renewal orders will fail until you update the subscription record IDs to match the user record IDs.
We have a few recommendations for preventing mismatches between user and subscription records:
- Don’t use the same Authorize.Net API credentials on multiple sites. If customer payment information is changed on one site but not another site, your payment profile information may no longer sync with your Authorize.Net account properly.
- If you take customer information over the phone, be sure to update the payment information on your site instead of on Authorize.Net. Our plugin will push changes from your site to your Authorize.Net account, but won’t be notified of payment information changes in Authorize.Net, so it can’t update your site’s subscription records.
- If you make any changes to customer or payment profile information from your Authorize.Net account, be sure to also update the subscription records on your site. You should double-check customer profile ID and payment profile ID for the subscription any time you make changes in Authorize.Net.
- If your customers want to update a subscription payment method, they must use the subscription “Change Payment” process. Simply adding a new payment method to their site account won’t change the subscription’s payment method. If you’re doing this for them, we recommend using the free User Switching plugin to impersonate their account.
Other Issues
↑ Back to topHaving a different problem? Follow these steps to make sure everything is setup correctly before posting a support request:
- Please ensure that your site meets the plugin requirements.
- Check the FAQs to see if they address your question.
- Confirm that your API Login ID and API Transaction Key are correct.
- Enable Debug Mode and review the errors codes/messages provided by Authorize.Net. Click here to learn more about Authorize.Net error/response codes. In some cases, such as a transaction being held for review or declined, the plugin cannot change the issue and it must be resolved in your Authorize.Net account. If the error code indicates an issue with the plugin, please submit a support ticket and include the logs to help us troubleshoot.
For Developers
↑ Back to topHere is a couple of example snippets for some of the Authorize.Net CIM filters in place:
Default the “Securely Save to Account?” checkbox on the payment form to checked:
<?php
// force the "securely save to account" checkbox to default to checked
function wc_auth_net_cim_save_payment_method_default_checked( $html, $form ) {

	if ( empty( $html ) || $form->tokenization_forced() ) {
		return $html;
	}

	return str_replace( 'type="checkbox"', 'type="checkbox" checked="checked"', $html );
}
add_filter( 'wc_authorize_net_cim_credit_card_payment_form_save_payment_method_checkbox_html', 'wc_auth_net_cim_save_payment_method_default_checked', 10, 2 );
Adjust authorize-only transaction order status from “On hold” to something else:
<?php

function sv_wc_auth_net_cim_tweak_held_order_status( $order_status, $order, $response ) {

	if ( 'on-hold' === $order_status && $response instanceof SV_WC_Payment_Gateway_API_Response && $response->transaction_approved() ) {
		$order_status = 'processing';
	}

	return $order_status;
}
add_filter( 'wc_payment_gateway_authorize_net_cim_credit_card_held_order_status', 'sv_wc_auth_net_cim_tweak_held_order_status', 10, 3 );
Questions & Support
↑ Back to topHave a question before you buy? Please fill out this pre-sales form.
Already purchased and need some assistance? Please check out our troubleshooting tips and frequently asked questions for common issues or contact support via the help desk if you need more help.
