Cashier for WooCommerce is a single plugin for all major customizations in cart / checkout flow within WooCommerce.
Installation
↑ Back to top- Download the .zip file from your WooCommerce account.
- Go to: WordPress Admin > Plugins > Add New to upload the file you downloaded.
- Activate the extension.
More information at: Installing and Managing Plugins.
Enable plugin updates
↑ Back to topPlease follow the steps listed here to enable plugin updates for Cashier.
Setup and Configuration
↑ Back to topTo find the settings in the WordPress Admin, go to WooCommerce > Settings > Cashier.
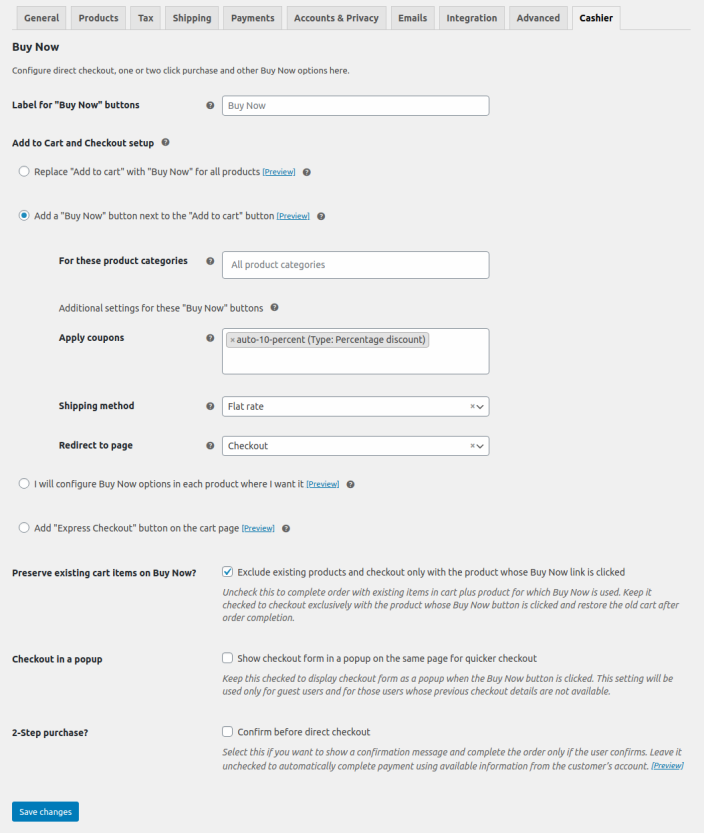
- Label for “Buy Now” buttons: Using this setting you can set a name for the Buy Now button.
- Add to Cart and Checkout setup: You can choose one option & this option will decide how this feature will behave storewide.
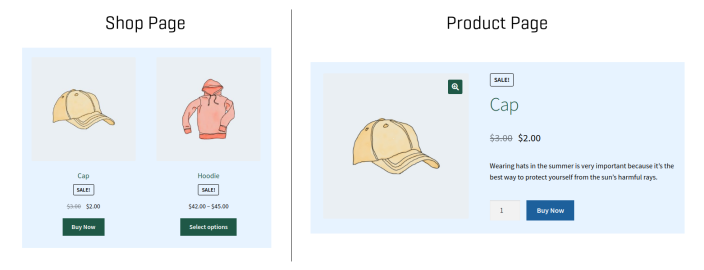
- Replace “Add to cart” with “Buy Now” for all products: Selecting this option will turn on quicker checkout with Buy Now for your entire store. However, you can override this default for individual products if you want.
- Add a “Buy Now” button next to the “Add to cart” button: Selecting this option will keep the default ‘Add to cart’ button, but also add ‘Buy Now’ option. You can override this default for individual products if you want.
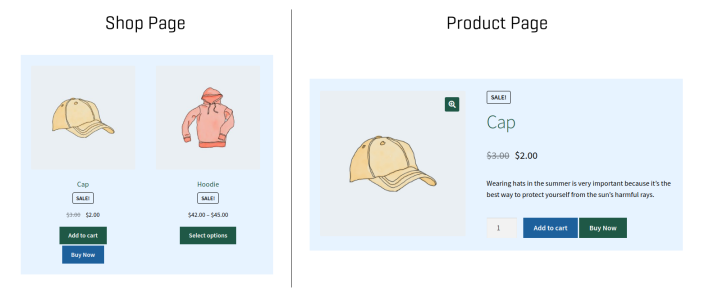
- For these product categories: “Buy Now” button will be added on products from these categories. Leave it empty to display on all products.
- Additional settings for these “Buy Now” buttons: These settings will be applied to the “Buy Now” buttons for product categories selected above.
- Apply coupons: Clicking on “Buy Now” button will automatically apply selected coupons to cart.
- Shipping method: “Buy Now” button will automatically select this shipping method.
- Redirect to page: Customer will be redirected to this page when “Buy Now” button is clicked. Leave it blank to complete the checkout.
- I will configure Buy Now options in each product where I want it: Selecting this option will disable “storewide” Buy Now behavior. If a product does not have Buy Now settings, it will follow the standard WooCommerce purchase process.

- Add “Express Checkout” button on the cart page: Selecting this option will speeds up the checkout process for logged in customers using payment method, billing address and shipping data from their recent order.
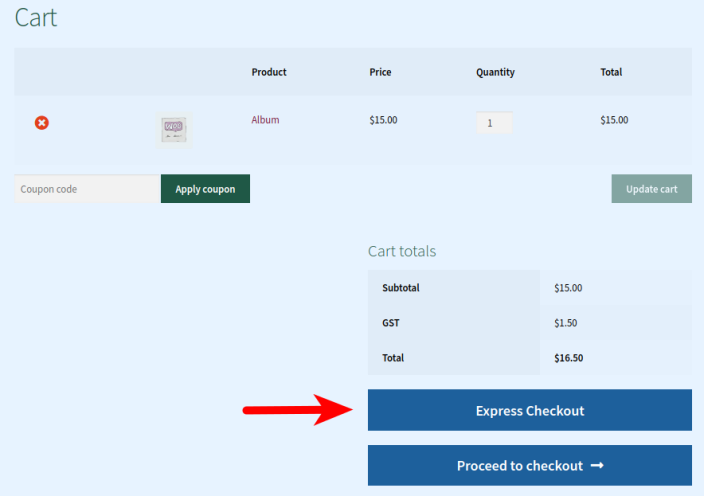
- Label for “Express Checkout” button: Using this setting you can set a name for the ‘Express Checkout’ button
- Replace “Add to cart” with “Buy Now” for all products: Selecting this option will turn on quicker checkout with Buy Now for your entire store. However, you can override this default for individual products if you want.
- Preserve existing cart items on Buy Now? – Exclude existing products and checkout only with the product whose Buy Now link is clicked: Enable this setting to complete order with existing items in cart plus product for which Buy Now is used. Keep it checked to checkout exclusively with the product whose Buy Now button is clicked and restore the old cart after order completion.
- Checkout in a popup – Show checkout form in a popup on the same page for quicker checkout: Enable this setting to display checkout form as a popup when the Buy Now button is clicked. This setting will be used only for guest users and for those users whose previous checkout details are not available.
- 2-Step purchase? – Confirm before direct checkout: Enable this setting if you want to show a confirmation message and complete the order only if the user confirms. Leave it unchecked to automatically complete payment using available information from the customer’s account.
Generate a Buy Now link
↑ Back to topThis setting can be found under WooCommerce > Cashier. Using this setting you can generate a Buy Now link to share in blog posts, emails, social media promotions or elsewhere.
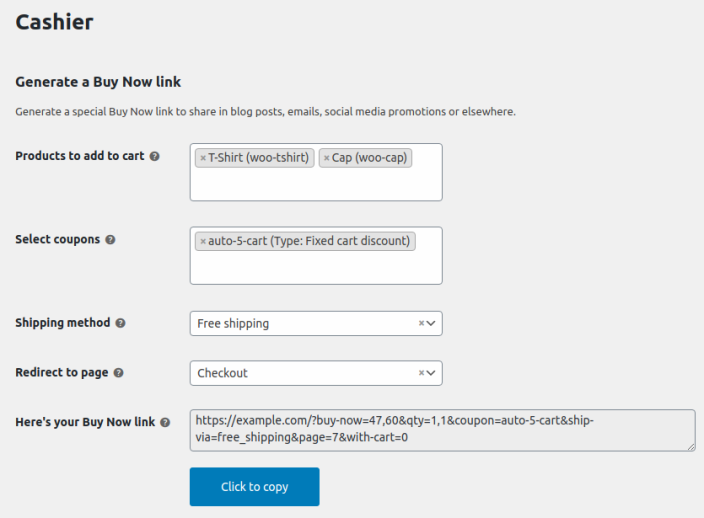
- Products to add to cart: Select one or more products that you would like ordered with this link.
- Select coupons: Optionally, select one or more coupons that you want to apply with this link.
- Shipping method: Optionally, select shipping method for the order.
- Redirect to page: Leave this blank to complete checkout as quickly as possible, or enter a URL to redirect to a page after the above items are added to cart.
- Here’s your Buy Now link: The generated Buy Now Link will appear here. Copy this link and use wherever you want.
Guest checkout
↑ Back to topHow do I enable guest checkout
Direct checkout
↑ Back to topHow to enable a direct checkout
One-click checkout
↑ Back to topHow to enable one-click checkout
One page checkout
↑ Back to topHow to enable one page checkout
Checkout field editor
↑ Back to topRedirect after add to cart
↑ Back to topHow to redirect to checkout or other pages on click of ‘Add to Cart’ link
Product recommendation
↑ Back to topHow to set up product recommendations automatically
Side Cart
↑ Back to topHow to enable Side Cart widget
Cost of Goods
↑ Back to topFAQs
↑ Back to top1. What are the requirements for one-click checkout?
Following are the requirements for one-click checkout:
- Your store is having WooCommerce 3.7.0+ & Cashier for WooCommerce 1.0.0+
(AND) - You are accepting payments via:
- WooCommerce Stripe (Free plugin) OR
- Authorize.Net CIM OR
- WooCommerce PayPal Powered By Braintree (Free plugin) OR
- Standard PayPal built-in with WooCommerce (Free)
(AND)
- Use of Saved cards is enabled in the above mentioned payment gateway’s setting
(AND) - After activating Saved cards, the customer should have paid at-least-once via Stripe OR WooCommerce Authorize.Net CIM OR WooCommerce PayPal Powered By Braintree OR PayPal
(AND) - Customer is registered and is having an account on your store and has minimum one order in completed status which are paid via any of the above-mentioned payment gateways
When the above-mentioned requirements are fulfilled, all existing Buy Now buttons/links will act as one-click checkout.
