After you’ve connected to Stripe and have webhooks working, you can begin using the Stripe extension. However, you may also want to adjust some of the settings in order to configure the plugin in a way that best suits your store.
This guide will walk you through the Stripe extension settings, which are shown under WooCommerce > Settings > Payments > Stripe in your WordPress dashboard. The page is broken down into five sections:
NOTE: Many settings that pertain to your Stripe account (e.g. Radar rules) can only be changed in the Stripe dashboard. Please consult Stripe’s docs for more information on configuring the settings in the dashboard.
Payment Methods
↑ Back to topThe Payment Methods tab lists all available payment methods you can use on your site, including cards, express checkouts, and buy now pay later options.
To enable a payment method, simply check the box next to its name, scroll to the bottom, and click Save Changes.

Enabling or disabling a payment method in this list will automatically turn it on or off in the Stripe dashboard as well. To see that, go to Settings > Payments > Payment methods in the Stripe dashboard and click the payment method configuration labelled WooCommerce Inc. configuration.

Similarly, turning a given payment method on or off via the Stripe dashboard will also turn it on or off in the Stripe plugin payment methods list.
However, there are some things to keep in mind:
- Although Apple Pay and Google Pay appear separately in Stripe, they are controlled together. Enabling one in the Stripe dashboard will enable both in the Stripe plugin.
- If you enable a method via Stripe, but your site doesn’t meet the requirements for it, it will not work until the requirements are met.
- Although the Stripe dashboard shows many payment methods, our Stripe plugin can only support a subset of those. Here’s the list of what our plugin supports.
From the Payment Methods tab you can also change the display order of the methods.
General
↑ Back to topThis section controls if and how the Stripe payment option is presented to customers.

The Enable Stripe setting determines whether or not the Stripe extension payment methods are shown in checkout. What this setting does not do is disable the Stripe extension. To do that, you can disable the plugin itself.
The Enable test mode box controls if test mode is enabled or not. Unless you’re testing payments, refunds, disputes, or other such processes, and you are somehow preventing real customers from completing purchases, this should likely be disabled.
Account details
↑ Back to topThis section shows the status of your Stripe account as well as the status of the connection between that account and the Stripe extension.
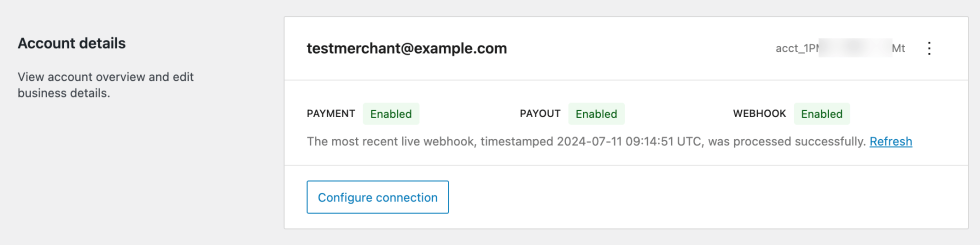
Ideally, the Payment and Payout statuses should be “Enabled.” If they aren’t, then Stripe may have restricted your payments or payouts for some reason. You’ll need to consult the Stripe dashboard for more information in such cases.
Similarly, the Webhook status should also say “Enabled.” If it does not, it means you either have not connected to Stripe at all yet, or you connected prior to version 8.6.1, and you still need to re-authenticate.
By clicking the Configure connection button, you can see the status of the connection between your Stripe account and the Stripe extension on your site.
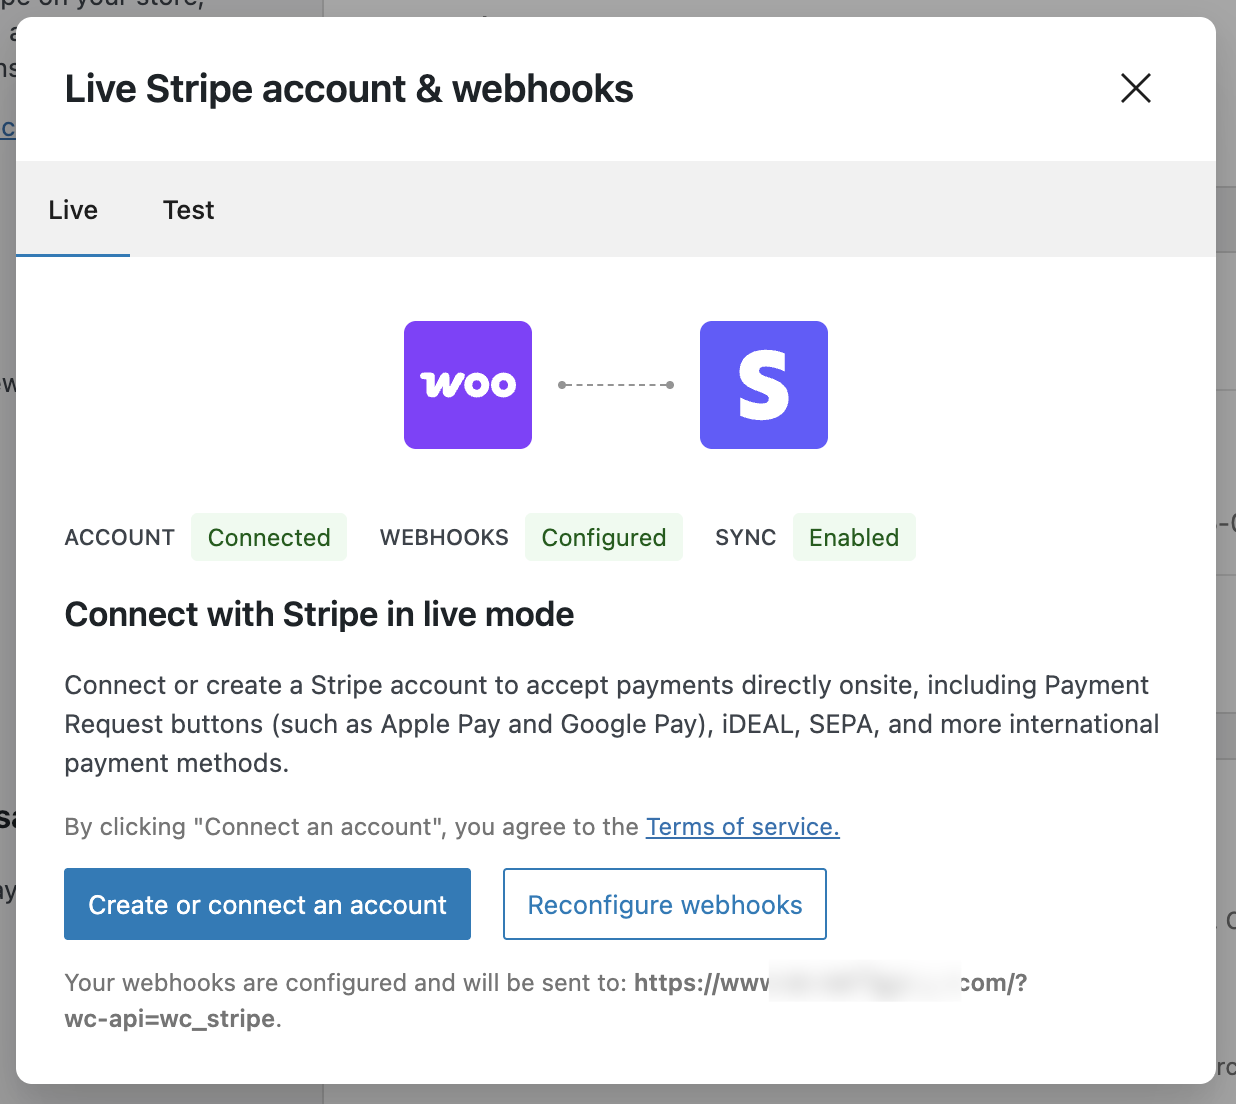
If the Stripe extension is properly connected to your Stripe account, the Account status should be “Connected” and the Webhooks status should be “Configured.” If they say anything else (e.g. “Incomplete”), you may need to re-authenticate your connection.
Note the tabs in the pop: Live and Test. Using them, you can check the Account and Webhooks statuses for each mode. Because each mode is configured separately, it’s possible to be connected to live mode but not to test mode, or vice versa.
Lastly, if you’d like to disconnect the Stripe extension from your Stripe account, you can do so by clicking the three dots, and then Disconnect.

Payments & transactions
↑ Back to topThis section contains settings related to how transactions function on your site, and how they appear to customers in emails, receipts, and bank statements.
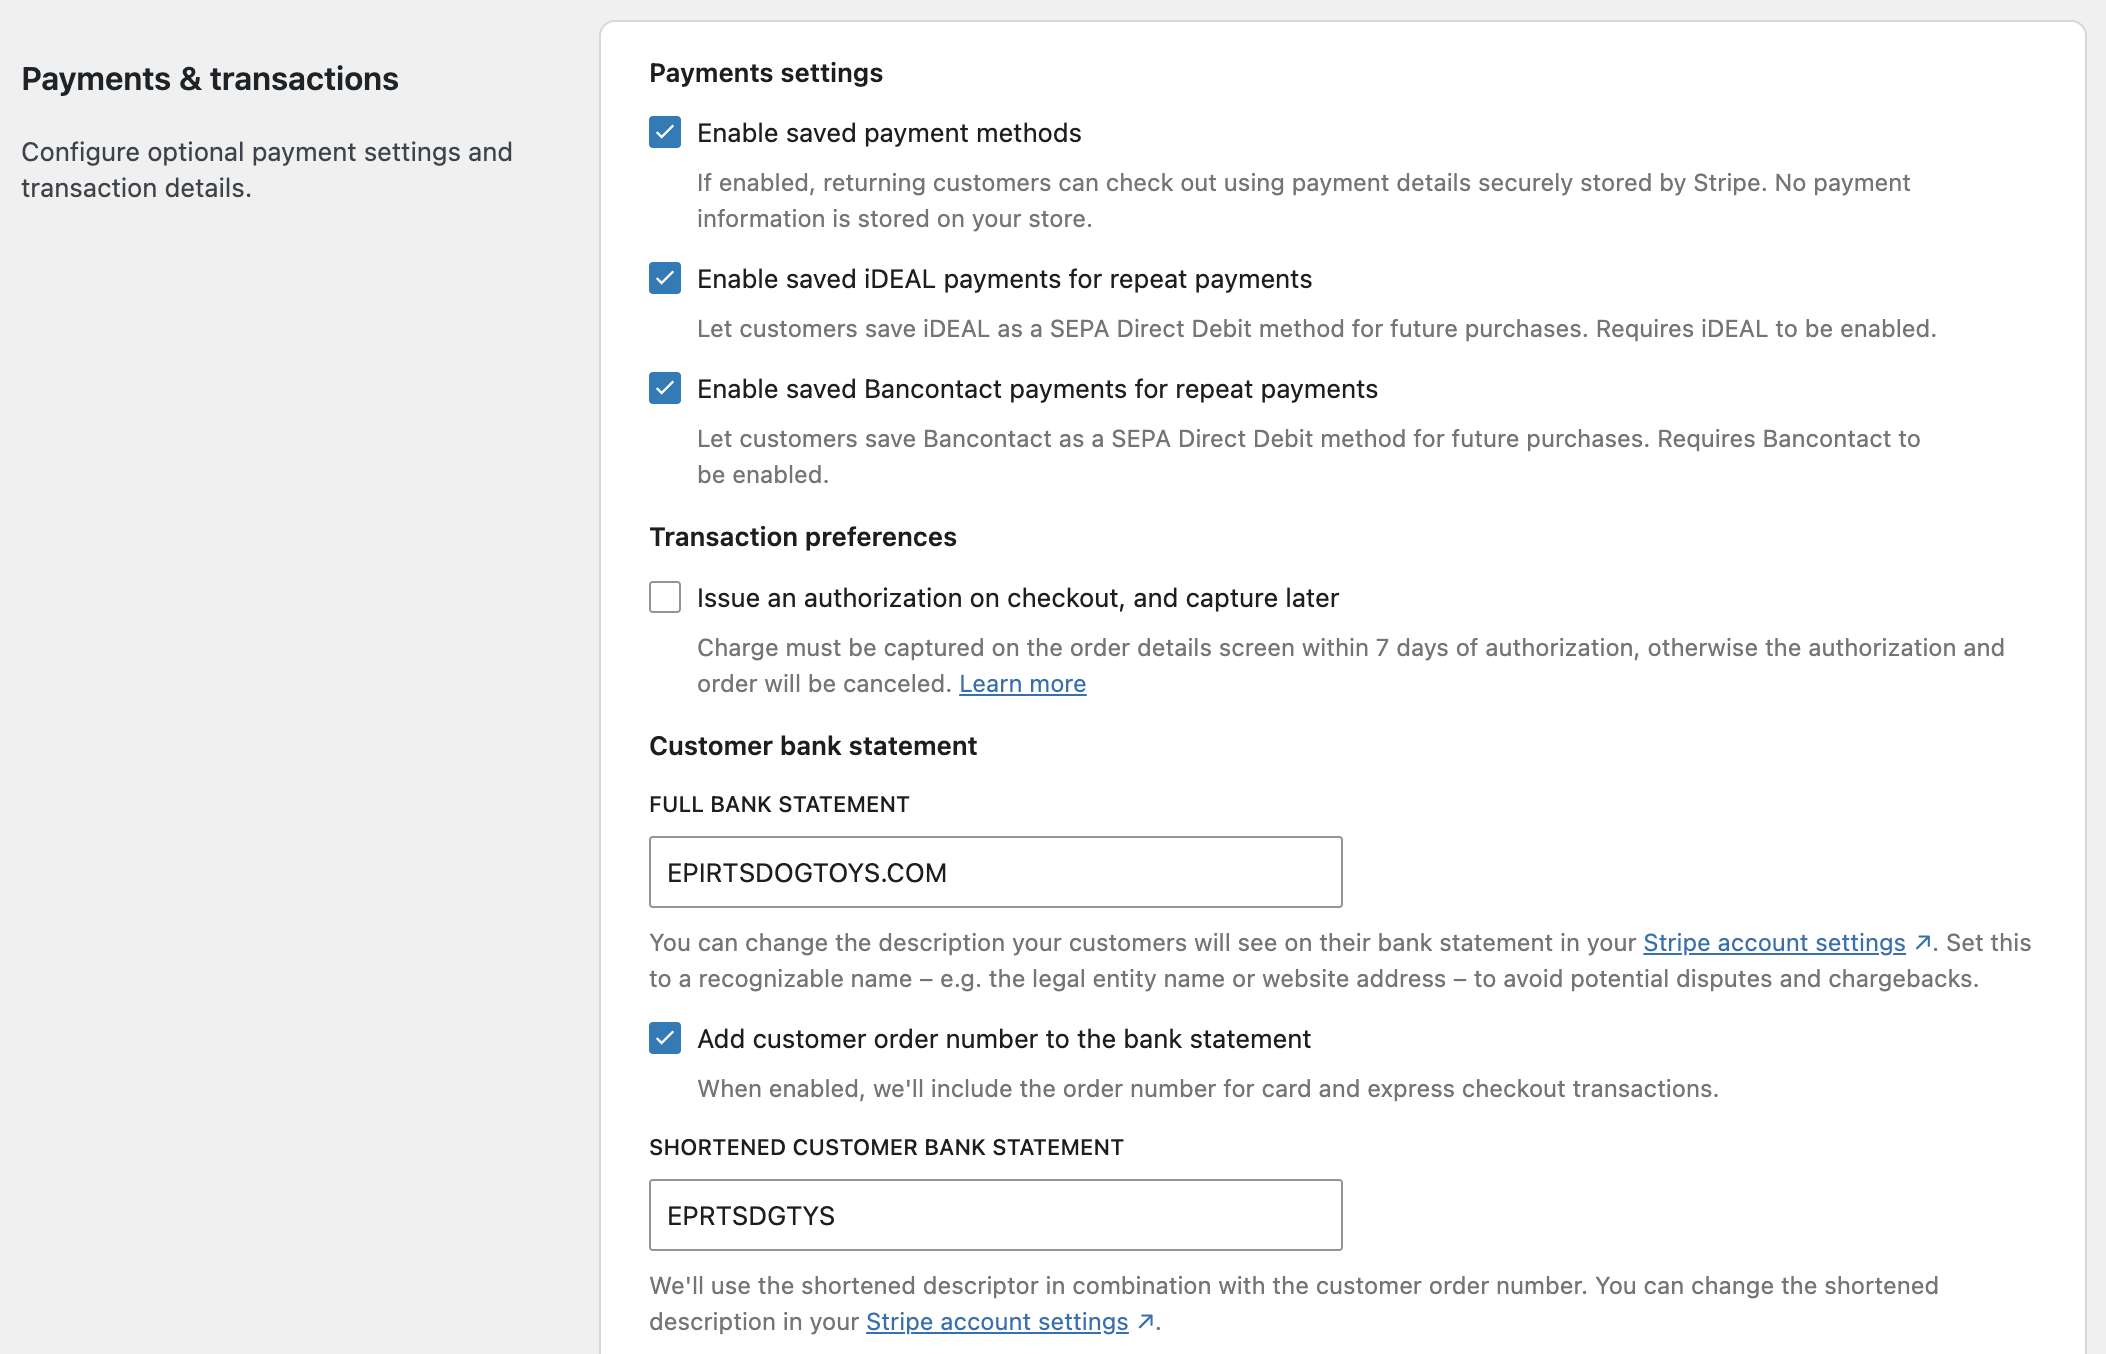
Enable saved payment methods, if checked, allows your customers to securely save their payment information. This lets them check out much faster in the future.
Keep in mind that your site must be configured to allow for account creation in order for this to work. Guest checkouts cannot save their payment information, since of course they do not have an account to save it to.
NOTE: The Enable saved payment methods setting does not need to be enabled to process subscriptions via the Subscriptions extension.
The Enable saved iDEAL | Wero payments for repeat payments setting allows you to control if customers can save their iDEAL | Wero payment methods for later purchases. (They are saved as SEPA Direct Debit tokens.) The Enable saved Bancontact payments for repeat payments setting does the same, but for Bancontact payments.
The Issue an authorization on checkout, and capture later setting, if checked, merely places a hold on customers’ cards instead of automatically capturing the funds. This allows you to manually capture the charge at a later time, such as when you ship the order. We strongly suggest reading this page before enabling this setting.
The Full bank statement setting shows how transactions with your store will appear on customers’ bank statements or in their online banking systems. This is called a “descriptor”, and it can be changed in the Stripe dashboard.
The Add customer order number to the bank statement setting can be used if you wish to also add the order number to the descriptor. Enabling this will also cause the Shortened customer bank statement setting to appear just below.
The Shortened customer bank statement setting shows the short form of your descriptor. Because descriptors are limited in length, and because the order number will take up some of that limit, this setting should show a shorter or abbreviated version of the full descriptor. This setting only applies to card and express checkout transactions, and is also managed in the Stripe dashboard.
Lastly, the Payments & transactions section will show a preview of your full-length and shortened bank statement descriptors:
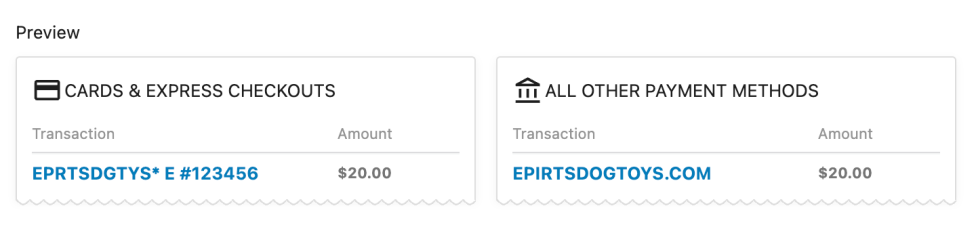
NOTE: Cash App Pay charges appear on customers’ bank statements with the CashApp* prefix and then the store name. This cannot be changed.
Advanced settings
↑ Back to topThis section shows additional options that you shouldn’t need to change very often.
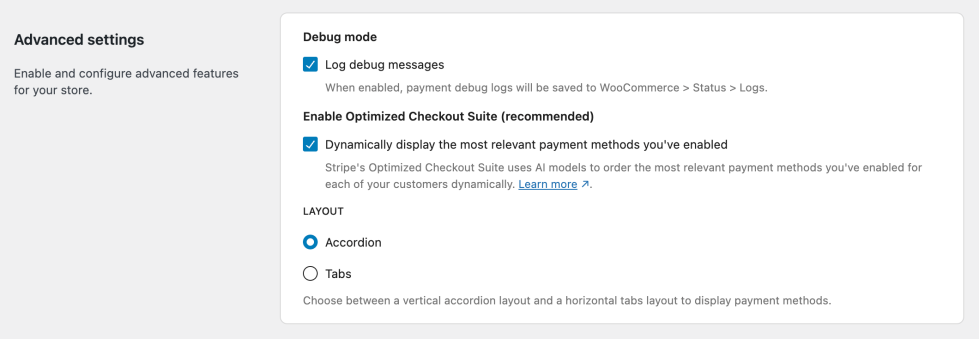
Debug mode. If you enable the Log error messages setting, the Stripe extension will start logging all activity to the WooCommerce logger. This option should only be enabled if you’re troubleshooting the Stripe extension.
Enable Optimized Checkout Suite. If enabled, the extension will use machine learning to decide the order in which payment methods are displayed to shoppers. (Starting with version 10.2.0, this setting is enabled by default for new merchants.)
The Layout option controls how various payment methods are shown in the Optimized Checkout Suite. (This option is only shown if OCS is enabled.)