Ultimate Order Approval for WooCommerce lets you review and approve orders before they are processed. With smart rules, flexible workflows, and built-in notifications, you control which orders move forward—helping you reduce risk, prevent fraud, and manage your store more efficiently.
Installation
↑ Back to topTo start using a product from WooCommerce.com, you can use the “Add to store” functionality on the order confirmation page or the My subscriptions section in your account.
- Navigate to My subscriptions.
- Find the Add to store button next to the product you’re planning to install.
- Follow the instructions on the screen, and the product will be automatically added to your store.
Alternative options and more information at:
Managing WooCommerce.com subscriptions.

Setup and Configuration
↑ Back to topHow to use
↑ Back to topAfter activation of Ultimate Order Approval, navigate to: WooCommerce > Settings > Order Approvals to setup the plugin settings.
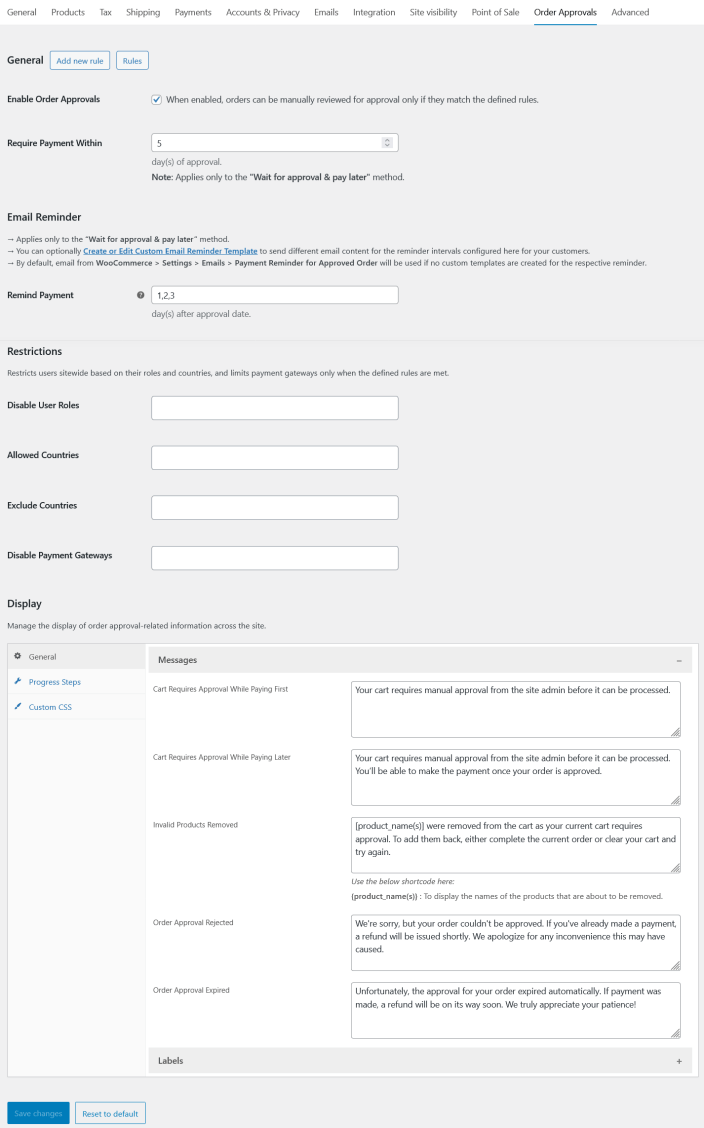
Enable the option “Enable Order Approvals” to manually review and approve orders only when they match the defined rules.
Order Approval Methods:
↑ Back to topThe site admin can configure 2 approval methods based on business needs:
1. Pay First & Wait for Approval
↑ Back to topChoose this method if you want customers to complete payment first and then manually review the order for approval or rejection.
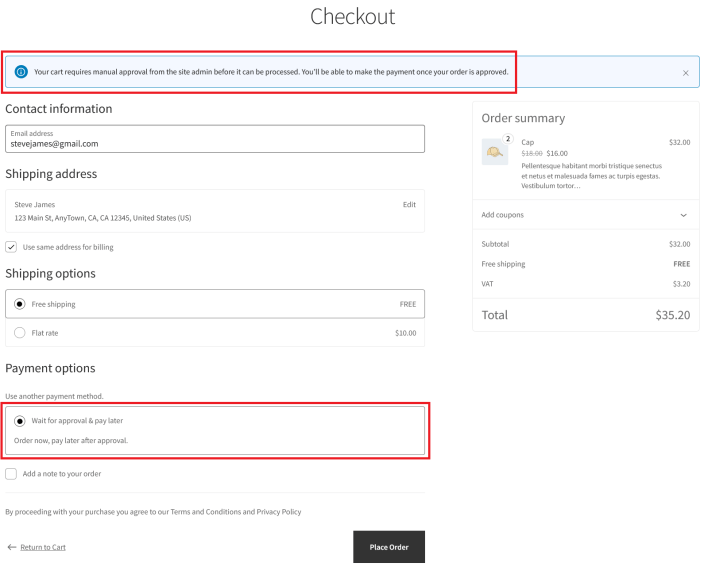
2. Wait for Approval & Pay Later
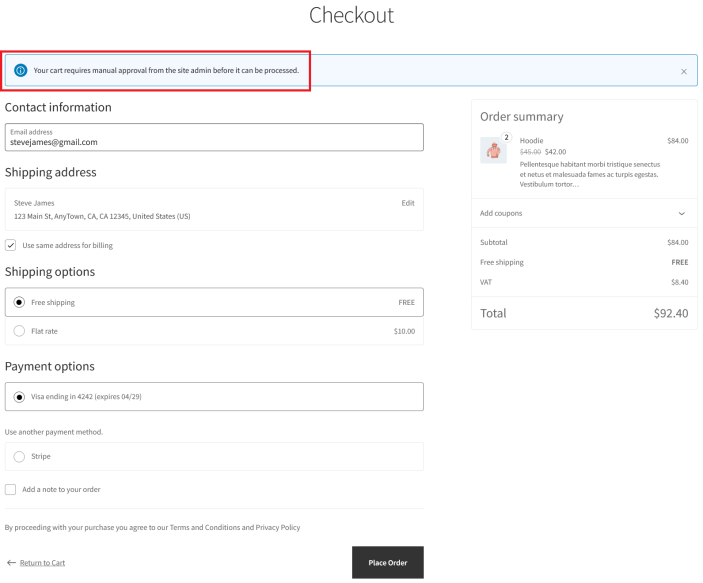
↑ Back to topChoose this method if you want customers to submit the order for approval first, and allow them to pay only after the site admin approves the request.
Setting Up “Pay First & Wait for Approval” Method:
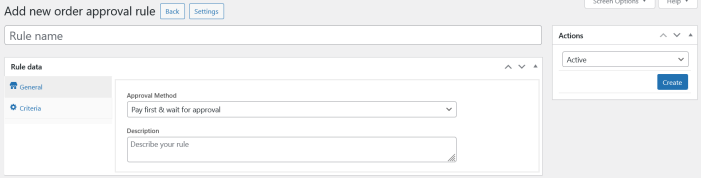
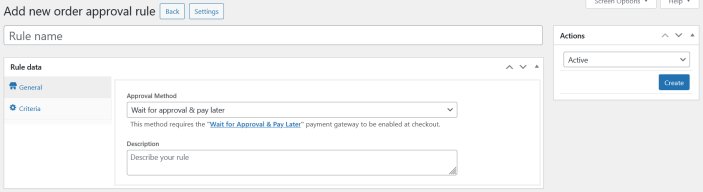
↑ Back to topGo to WooCommerce → Settings → Order Approvals → Add New Rule → Approval Method → Pay First & Wait for Approval
Adding a New Rule
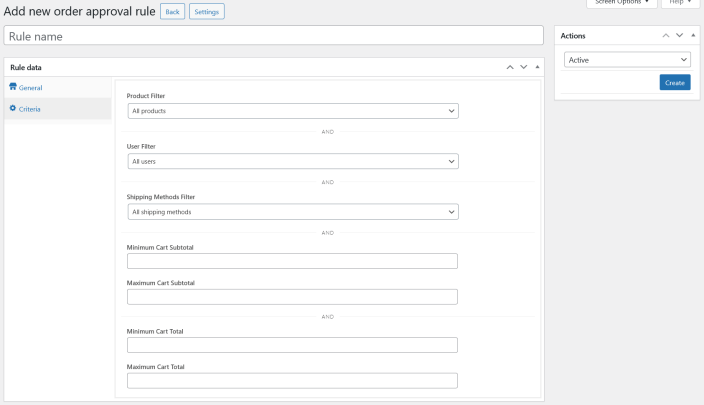
↑ Back to topApplying Rule Criteria
↑ Back to topWhen the Rule Matches the Customer’s Cart
↑ Back to topAfter the Customer Places the Order
↑ Back to topCustomer View
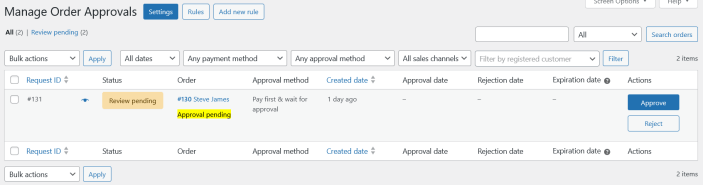
Admin View
When the Site Admin Approves the Request
↑ Back to top
- The order status is changed to Processing
- The customer is notified that their order has been approved and is now being processed
When the Site Admin Rejects the Request
↑ Back to top
- The order status is changed to Cancelled
- The customer is notified that their order will not be processed
- If payment was already made and the payment gateway supports automatic refunds, a full refund will be issued and the order status will be updated to Refunded
Setting Up “Wait for Approval & Pay Later” Method:
↑ Back to topGo to WooCommerce → Settings → Order Approvals → Add New Rule → Approval Method → Wait for Approval & Pay Later
This method requires the built-in payment gateway “Wait for Approval & Pay Later” to be enabled at checkout so customers can submit orders without making a payment.
Adding a New Rule
↑ Back to topApplying Rule Criteria
↑ Back to topWhen the Rule Matches the Customer’s Cart
↑ Back to topAfter the Customer Places the Order
↑ Back to topCustomer View
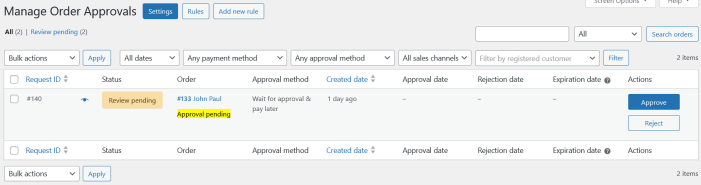
Admin View
When the Site Admin Approves the Request
↑ Back to top
- The order status is changed to Pending Payment
- The customer is notified that the order has been approved
- A payment link is included in the email so the customer can complete the payment
⚠️ Important Notes:
- The customer must complete payment before the approval expires
- To configure the expiration period, refer to the section: Setting Up Automatic Expiration for Approval Orders
- If you want to send multiple reminder emails before the approval expires, refer to the section: Setting Up Email Reminders Before Approval Expiration
When the Site Admin Rejects the Request
↑ Back to top
- The order status is changed to Cancelled
- The customer is notified that their order will not be processed


Setting Up Automatic Expiration for Approval Orders:
↑ Back to top⚠️ Applies only to Wait for Approval & Pay Later Method.
To automatically expire approved orders when payment is not received:
Go to WooCommerce → Settings → Order Approvals → Require Payment Within
- Set the number of days allowed for payment after approval
- If payment is not received within this period, the approval request expires automatically
- By default, this value is set to 5 days
Setting Up Email Reminders Before Approval Expiration:
↑ Back to top⚠️ Applies only to Wait for Approval & Pay Later Method.
Step 1: Enable the Email Notification
↑ Back to top
- Go to WooCommerce > Settings > Emails.
- Enable “Payment Reminder for Approved Order” and save changes.
Step 2: Configure the Reminder Schedule
↑ Back to top
- Navigate to WooCommerce → Settings → Order Approvals → Email Reminder → Remind Payment.
- Enter comma-separated day values (for example:
1,2,3) to send reminder emails after the approval date.
- Each value represents the number of days after the approval date when the reminder will be sent.
Step 3: Create a Custom Reminder Email Template (Optional)
↑ Back to topIf you do not want to use the default WooCommerce email template, you can create a custom reminder template:
- In the same section, click Create or Edit Custom Email Reminder Template.
- Add a new template, select Customer Payment Invoice Reminder from the Template Data dropdown, customize, and save.
- Use the Test Email option to preview and verify the email layout and content.

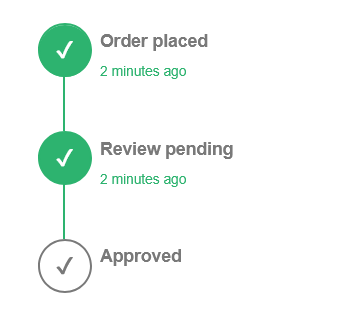
Displaying Order Approval Progress Steps:
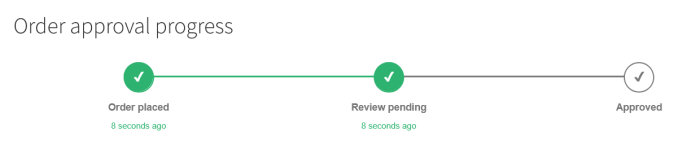
↑ Back to topThe site admin can display the order approval progress to customers in 2 different styles:
Horizontal
Vertical
To Configure:
Go to WooCommerce → Settings → Order Approvals → Display → Progress Steps → Display Type