WooCommerce PickingPal is a shipping and fulfillment accuracy app that helps you ship orders faster and more accurately, and reduce returns. Scan your order barcode, scan your items, and let PickingPal do the rest! No scanner or barcodes? We’ll help with that, too. Visit PickingPal.com.
Note: This product is no longer for sale on WooCommerce.com. Documentation is not being updated. Please visit PickingPal.com for updates.
Installation
↑ Back to top- Download the .zip file from your WooCommerce account.
- Go to: WordPress Admin > Plugins > Add New and Upload Plugin with the file you downloaded with Choose File.
- Install Now and Activate the extension.
Usage
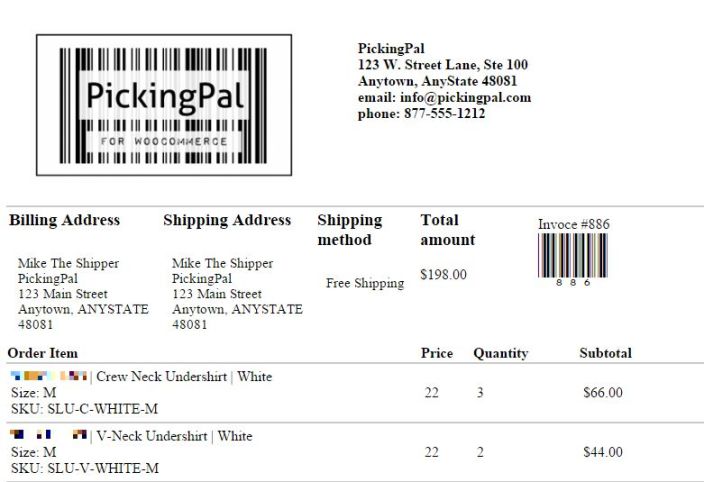
↑ Back to top- Once a new order comes in, print the PickingPal Pick Ticket / Invoice (included)
- “Pick” all of the order items from inventory, pull up the PickingPal main screen, and then scan the Order barcode on the Pick Ticket. This will load all the Order items into “Unpicked items” section of the screen
- Scan the barcode of each picked item, and let PickingPal go to work. > If you’ve picked the correct item, PickingPal will display a green indicator, provide an “OK” confirmation tone, and move that item to the “Picked items” section. > If you’ve picked an incorrect item, PickingPal will display a red alert indicator, and provide a “NOT FOUND” warning tone.
- Along the way you’ll see a progress indicator and once the order is pick-complete, the system will confirm it onscreen and audibly too with a 100% pick-complete tone!
Printing PickingPal Pick Tickets
↑ Back to topPrint One (1) Pick Ticket
Find the Order you would like to ship, and click the “Print Pick Ticket” action button.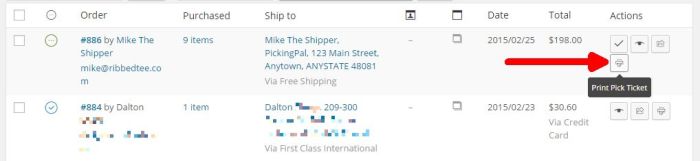
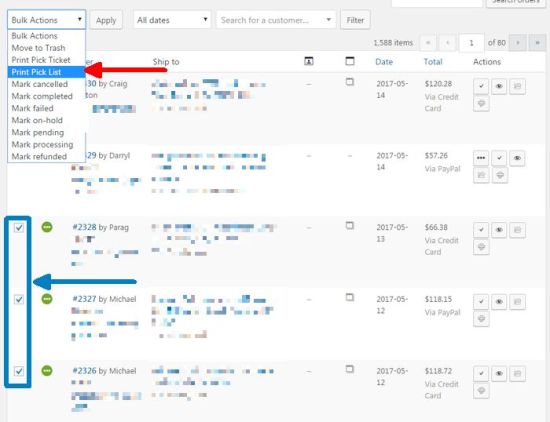
Print Multiple Pick Tickets
Using the checkbox on the far left, select the Orders you would like to ship, then use the “Print Pick Ticket” option from the Bulk Actions dropdown.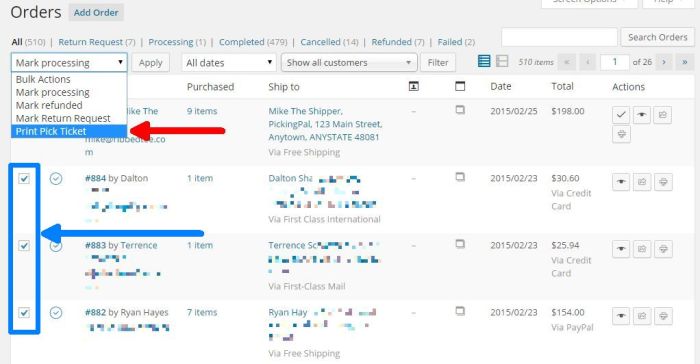
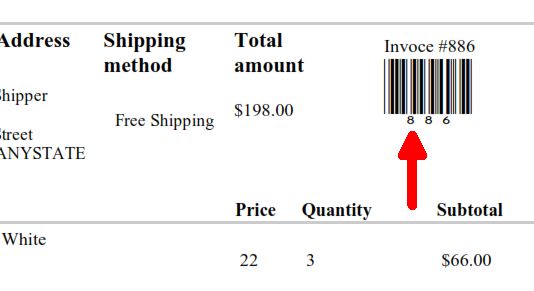
Scan Order Barcode on Pick Ticket
↑ Back to top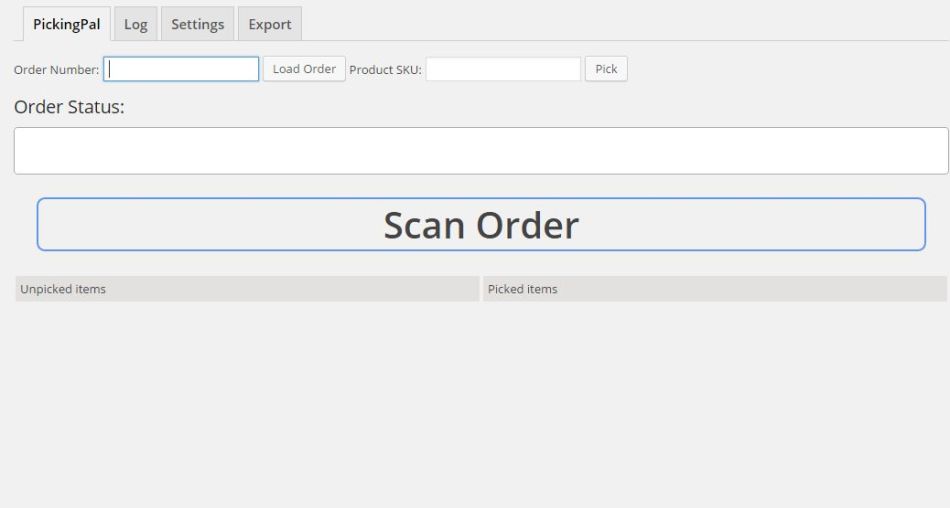 Using your barcode scanner, scan the Order barcode on the PickingPal Pick Ticket.
Scan barcode
Order Loaded
Once the Order is loaded, you’ll see that all the Order line items appear in the “Unpicked items” list, and the cursor has moved to the Product SKU field above.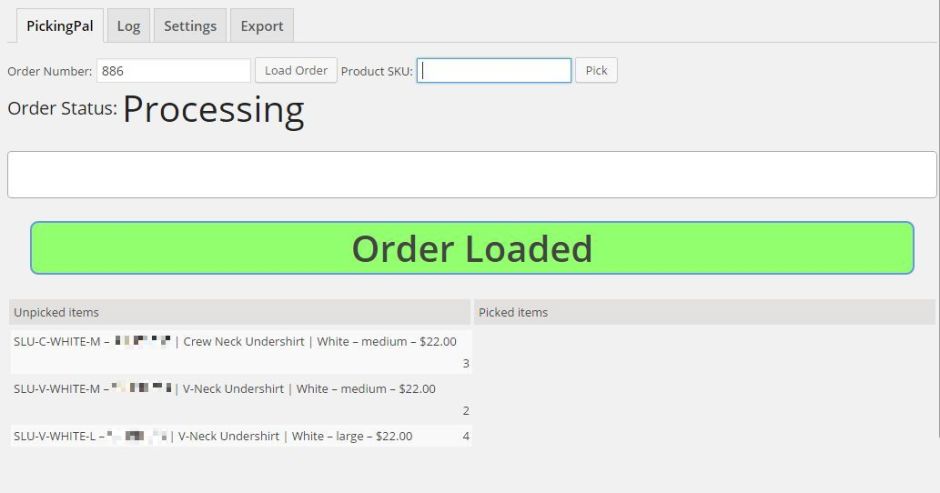 Now, you’re ready to start scanning barcodes on items themselves.
Scan Barcode on Order Items
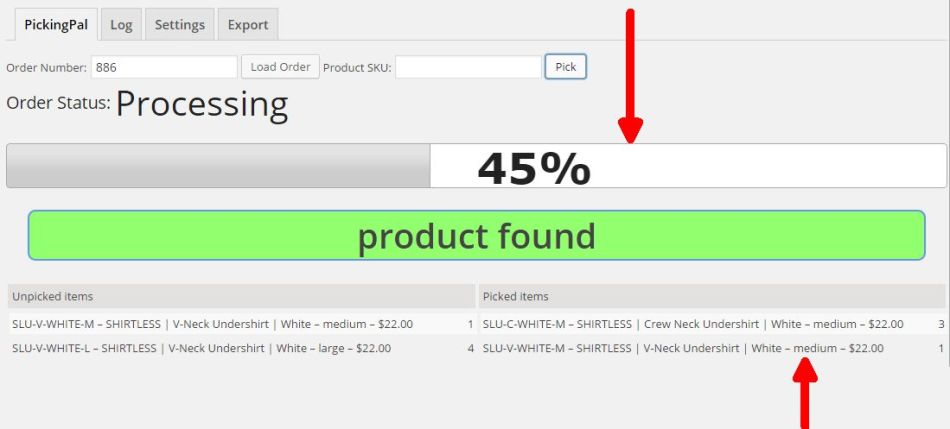
Grab your first Order item (the physical item you’re shipping) and scan the barcode on that item. In our example, we’ll start by scanning the White, Medium, Crew Neck Undershirt item.

When using a barcode scanner, they are generally configured to automatically add an “Enter” after successfully scanning a barcode. This is equivalent to entering the SKU in the field above, and clicking the Pick button.
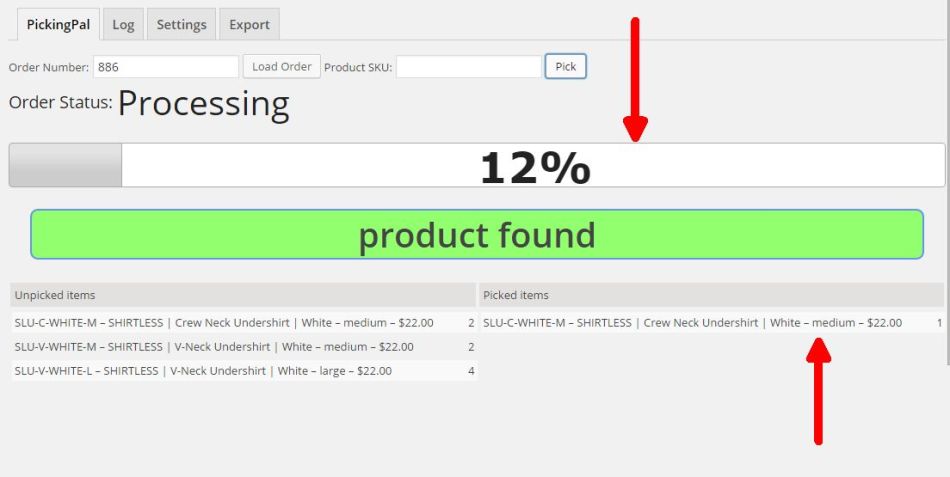
Picking Progress
↑ Back to top- Progress bar will show an increase % scanned, and the grey shaded area will grow
- Green “product found” indicator
- “OK” audible sound
 Repeat the above process for each picked item:
 Once picking is complete, PickingPal will show the progress indicator at 100%, play a “pick complete” audible sound, and reset the cursor into the Order Number field to prepare for the next Order barcode scan.
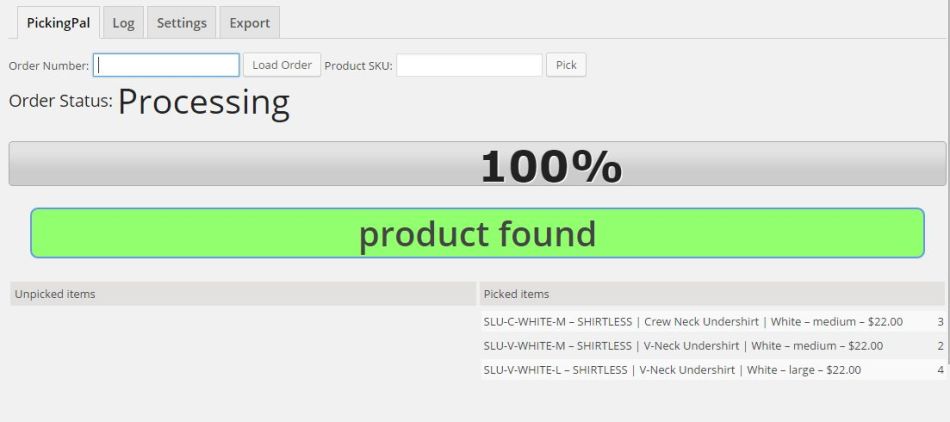
Congratulations! You successfully scanned and verified your first order. Ship with confidence that all items in the order are correct.
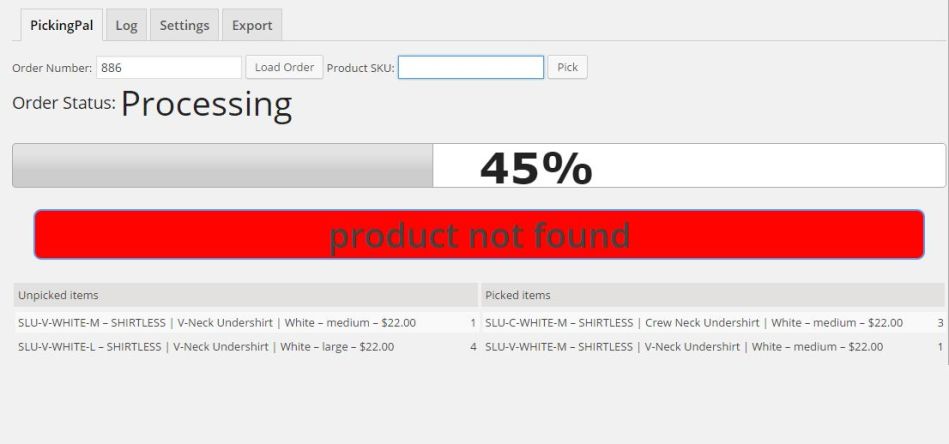
Scanning Incorrect Items
↑ Back to top- Progress bar will NOT show an increase % scanned, and the grey shaded area will NOT grow
- Red “product not found” indicator
- “NOT FOUND” audible sound (a buzz)
Scan Log
↑ Back to top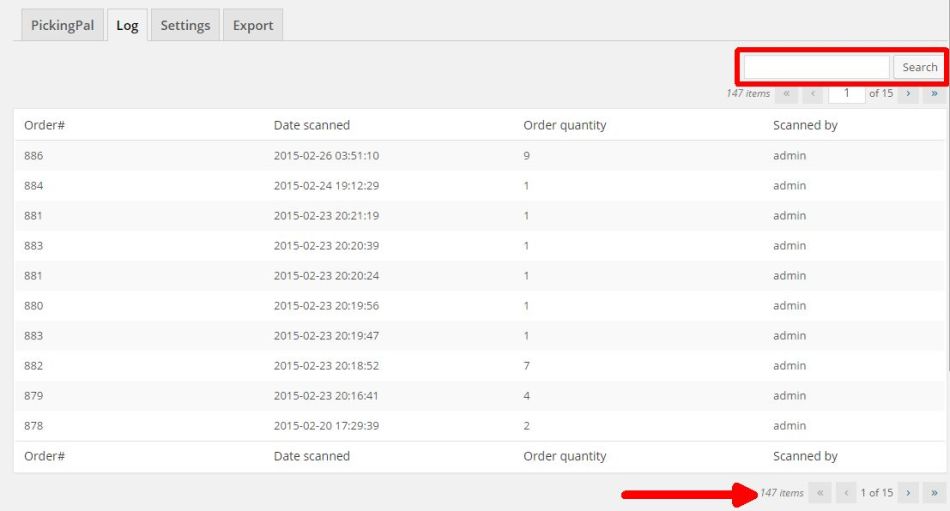 To search for an Order, enter the Order # in the upper right Search box, or navigate through the Order pages using the Navigation arrows at the top and the bottom of the Scan log table.
Setup and Configuration
↑ Back to topPick Ticket Template Setup
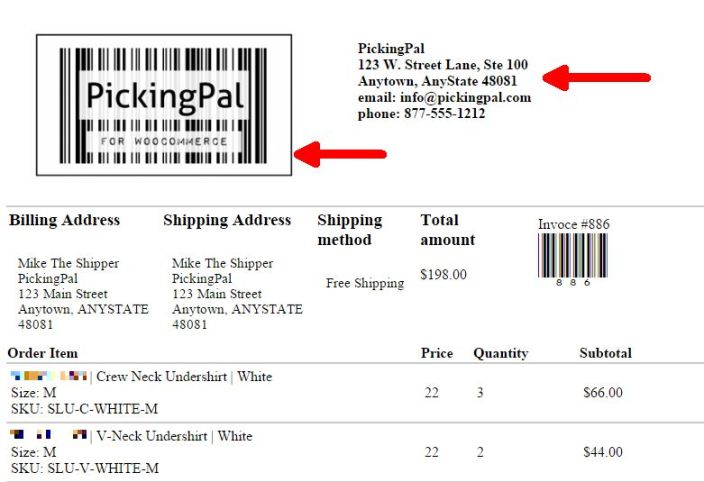
↑ Back to top- Select/Upload a Banner Image. Max: 300px wide
- Add in up to 5-6 lines of your Company Information such as your company name, address, phone/fax, and email
- Use the bubble help for additional information
- Save Changes.
Customizing Your Pick Ticket & Packing Slip Layout
You can use the default Pick Ticket & Packing Slip templates, or create and style your own. Create your own Pick Ticket & Packing Slip by following these steps:- Copy the
woocommerce-pickingpal-templatefolder from thewoocommerce-pickingpalplugin directory to your/wp-content/themes/{your-active-theme}/woocommerce/directory - If you are utilizing a child theme, you may need to create the /woocommerce/ folder first within that theme folder
- Edit the templates as you wish
woocommerce-pickingpal-template folder.
This will reset the system to use the included Pick Ticket & Packing Slip Templates.
Export Setup
↑ Back to topNote: PickingPal displays three (3) system variables SKU, Name, Price by default as well as other system-wide defined Attributes (Products > Attributes).
Use the check boxes in the “Select Export Fields” column to determine what fields you want included in your CSV Export file.
Use the Export Field Order to determine what order you want the fields in. Simply drag the fields to reorder them.
3rd Party Developers: If you’d like to include fields/values from your Extension in the PickingPal Export, we have implemented two (2) filters: wc_pickingpal_custom_fields and wc_pickingpal_custom_field_value. The code is commented with an example in woocommerce-pickingpal.php
Export
↑ Back to top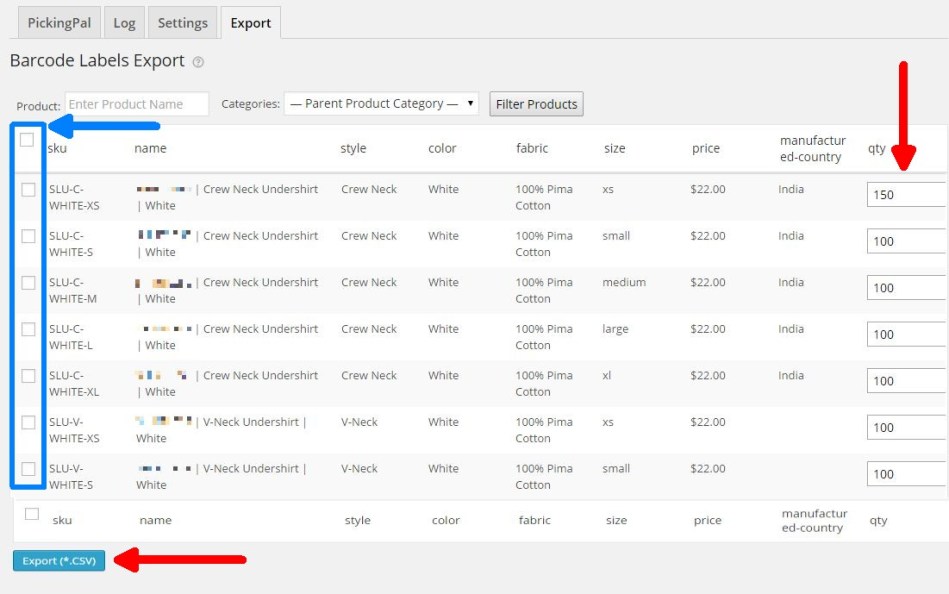 When ready, just click the “Export (*.CSV)” button to download the CSV barcode label file.
Provide your barcode CSV file to your barcode label printing provider.
When ready, just click the “Export (*.CSV)” button to download the CSV barcode label file.
Provide your barcode CSV file to your barcode label printing provider.
FAQ
↑ Back to topCan I create barcode labels myself?
↑ Back to topI don’t want to create my own barcode labels. Can anyone help me purchase barcode labels?
↑ Back to topWhere do I find a barcode scanner?
↑ Back to topWhat barcode scanners is PickingPal compatible with?
↑ Back to topCan I use PickingPal from a tablet using wifi?
A. Yes, this is possible with the use of a bluetooth-enabled (Android & iOS) or microUSB (Android) scanner. We have tested this configuration with some finger/mini/handheld laser barcode scanners .Can I use a scanner app on my mobile phone with PickingPal?
↑ Back to topIs there a PickingPal Mobile App for iOS or Android?
↑ Back to topDoes PickingPal work with shipping software solutions such as ShipStation or Ordoro?
↑ Back to topCan I add (insert Order or Line item data here) to the PickingPal Pick Ticket?
A. Yes. Please refer to the “Customizing Your Pick Ticket Layout” section above.We use the WooCommerce Print Invoice & Packing List (PIP) Extension. Can a barcode be added to those documents?
A. Yes. Please refer to the “Creating Custom Templates“ section of the PIP documentation.Version Updates
↑ Back to topVersion 1.3.0
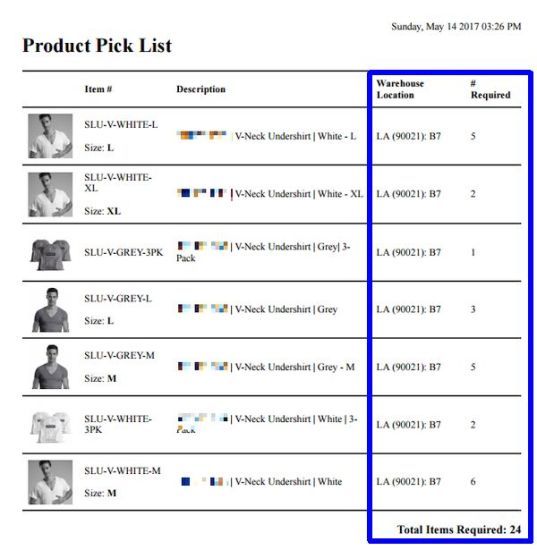
↑ Back to top- Visit WooCommerce > Orders view
- Tick the checkbox next to the orders that are ready for shipment
- Use the “Print Pick List” option from the Bulk Actions dropdown
- Click the “Apply” button
- Visit WooCommerce > PickingPal
- Click on the “Settings” tab
- Scroll down to the “Warehouse Location” section
- Click “Add Location“

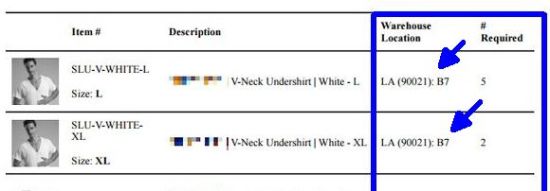
- Visit Products > Products
- Open a Product
- Warehouse locations can be assigned on the “General” tab for the following types of products: Simple product, External/Affiliate Product, and Product Bundle
- Warehouse locations can be assigned in the “Variations” tab/section for Variable products

Version 1.2.2
↑ Back to top Once enabled, for each product in your catalog, you can define an alternate SKU for scanning purposes. In the screenshot above, we have shown the creation of a “UPC” Additional SKU.
Once defined, we can now input a UPC value for every product (including products with variations) that correlates to the value printed on the manufacturer’s barcode label.
At shipping time, as long as your product has a barcode equivalent to the UPC (or whatever number barcode is on the product), you can scan that barcode for picking verification on an order in place of the SKU.
PickingPal supports scan-picking for the WooCommerce native SKU, plus any additional skus you have created for that product via the Additional SKU feature.
Fields:
Once enabled, for each product in your catalog, you can define an alternate SKU for scanning purposes. In the screenshot above, we have shown the creation of a “UPC” Additional SKU.
Once defined, we can now input a UPC value for every product (including products with variations) that correlates to the value printed on the manufacturer’s barcode label.
At shipping time, as long as your product has a barcode equivalent to the UPC (or whatever number barcode is on the product), you can scan that barcode for picking verification on an order in place of the SKU.
PickingPal supports scan-picking for the WooCommerce native SKU, plus any additional skus you have created for that product via the Additional SKU feature.
Fields:
- Enabled: Check to enable this Additional SKU on the Product page inside of WooCommerce admin
- Product Page: Hide/Show – Determines whether or not the Additional SKU is displayed on the front-end website’s product page (under native SKU)
- Label: Field label describing the Additional SKU’s value (i.e. UPC, EAN, ISBN, Etc.)
Version 1.2.0
↑ Back to top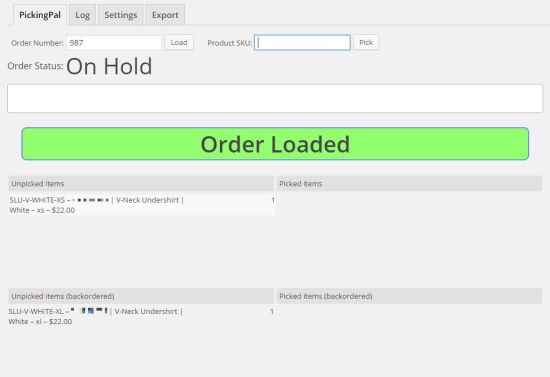 In cases of back ordered items, PickingPal will always use a top-down scan order. Meaning it will scan/verify items at the top first, then proceed down the list. It will not prevent back ordered items from being scanned, but it will allow the shipper to scan the items that are currently in stock, and then come back at a later time to ship the back ordered items once they are in stock.
Partial scan support
In earlier versions, PickingPal would not register scan events into the log until the order was 100% Pick-complete. Starting in version 1.2.0, PickingPal logs every pick event separately and allows orders to be partially scanned.
In cases of back ordered items, PickingPal will always use a top-down scan order. Meaning it will scan/verify items at the top first, then proceed down the list. It will not prevent back ordered items from being scanned, but it will allow the shipper to scan the items that are currently in stock, and then come back at a later time to ship the back ordered items once they are in stock.
Partial scan support
In earlier versions, PickingPal would not register scan events into the log until the order was 100% Pick-complete. Starting in version 1.2.0, PickingPal logs every pick event separately and allows orders to be partially scanned.
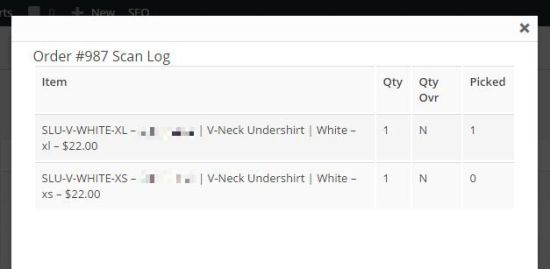 To view the details of the a scan log, just click on the date/time link and a pop-up box will appear. The first column indicates the total quantity, and the third column indicates the number of items that have been picked for the line item.
Added printable Packing Slip based on items picked
A “Packing Slip” has been added in this release to allow shippers to print the items that are being currently shipped.
Pick Tickets are used to pick orders, but there may be occasions where an order cannot be shipped complete. In these cases, a Packing Slip may be printed to show what items are actually being shipped.
To view the details of the a scan log, just click on the date/time link and a pop-up box will appear. The first column indicates the total quantity, and the third column indicates the number of items that have been picked for the line item.
Added printable Packing Slip based on items picked
A “Packing Slip” has been added in this release to allow shippers to print the items that are being currently shipped.
Pick Tickets are used to pick orders, but there may be occasions where an order cannot be shipped complete. In these cases, a Packing Slip may be printed to show what items are actually being shipped.
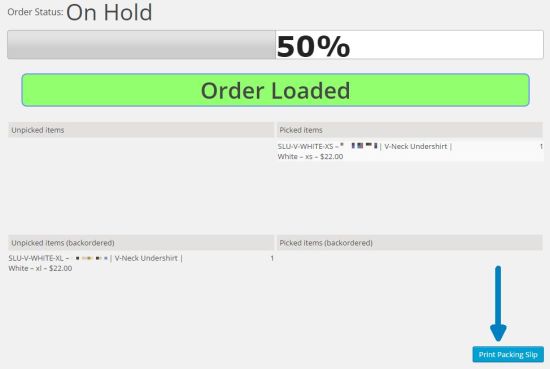 Once the Print Packing Slip button is pressed, a print dialog will appear and show a form similar in appearance to the Pick Ticket.
The Packing Slip will include Quantity Order, Quantity Shipped, Quantity Backordered columns and values.
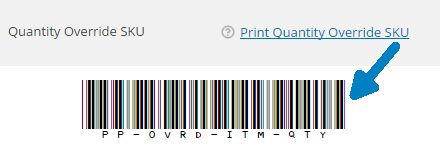
Quantity override barcode
For stores that ship large multiples of the same item, where the item quantity is pre-sorted and counted, the new quantity override barcode may be used to avoid having to scan the item many times.
This is especially helpful when a shipper has to scan over 20 of the same item.
To print the barcode, visit the PickingPal > Settings tab, and use the Print Quantity Override SKU link.
Once the Print Packing Slip button is pressed, a print dialog will appear and show a form similar in appearance to the Pick Ticket.
The Packing Slip will include Quantity Order, Quantity Shipped, Quantity Backordered columns and values.
Quantity override barcode
For stores that ship large multiples of the same item, where the item quantity is pre-sorted and counted, the new quantity override barcode may be used to avoid having to scan the item many times.
This is especially helpful when a shipper has to scan over 20 of the same item.
To print the barcode, visit the PickingPal > Settings tab, and use the Print Quantity Override SKU link.
 To Use Quantity Override:
Visit the PickingPal main tab, load the order
Scan the Quantity Override barcode, an Override item dialog will appear.
Scan the barcode of the item you want to override the quantity.
To Use Quantity Override:
Visit the PickingPal main tab, load the order
Scan the Quantity Override barcode, an Override item dialog will appear.
Scan the barcode of the item you want to override the quantity.
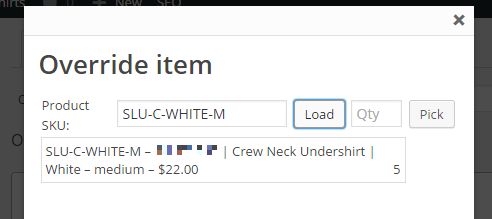 Enter the override quantity amount in the Qty field, then click the Pick button to pick that quantity of the item.
New “Print Pick Tickets” filter in Orders view
To make locating orders that need picking easier, a new “Print Pick Ticket” filter has been introduced in the Orders view.
Enter the override quantity amount in the Qty field, then click the Pick button to pick that quantity of the item.
New “Print Pick Tickets” filter in Orders view
To make locating orders that need picking easier, a new “Print Pick Ticket” filter has been introduced in the Orders view.
 This view will show only those orders that have not had Pick Tickets printed. Once a Pick Ticket has been printed on an order, it will no longer show up in this filtered view.
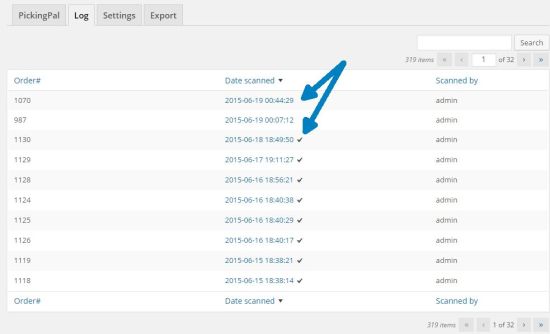
Update to log interface
The log view has been simplified and now includes only 3 columns.
Any orders that are 100% pick complete will have a check to the right of the date/time of scan.
This view will show only those orders that have not had Pick Tickets printed. Once a Pick Ticket has been printed on an order, it will no longer show up in this filtered view.
Update to log interface
The log view has been simplified and now includes only 3 columns.
Any orders that are 100% pick complete will have a check to the right of the date/time of scan.
 To view the details of the scan log, just click on the date/time link and a pop-up box will appear. The first column indicates the total quantity, and the third column indicates the number of items that have been picked for the line item.