Dynamic Coupons for Klaviyo allows your WooCommerce store to automatically create, apply, and manage discount coupons directly through Klaviyo flows and segments. Additionally, you can track advanced WooCommerce events in Klaviyo and use them to create segments or automate flows, and hide coupon codes at checkout for a seamless customer experience—all without manually creating or managing coupons in WooCommerce.
Installation
↑ Back to topTo start using a product from WooCommerce.com, you can use the “Add to store” functionality on the order confirmation page or the My subscriptions section in your account.
- Navigate to My subscriptions.
- Find the Add to store button next to the product you’re planning to install.
- Follow the instructions on the screen, and the product will be automatically added to your store.
Alternative options and more information at:
Managing WooCommerce.com subscriptions.

Setup and Configuration
↑ Back to top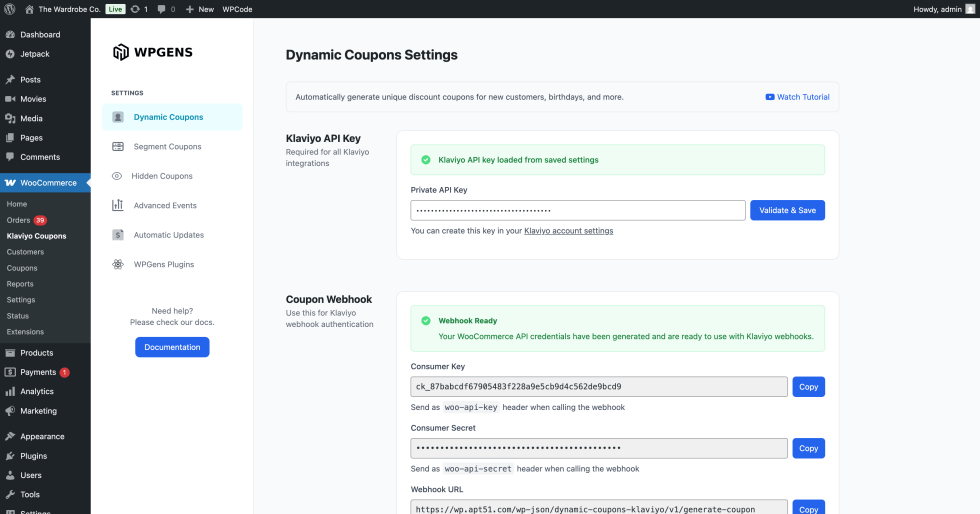
Before you begin
↑ Back to topThis plugin requires a Klaviyo account and Klaviyo tracking script installed on your website. We suggest using the official Klaviyo plugin for WooCommerce which handles this for you.
Getting Started
↑ Back to topA valid Klaviyo API key is required for all plugin features. Follow these steps to create a new API key and onnect the plugin to Klaviyo:
- Create a new private API key in Klaviyo with Full Access. You can follow the steps in the official Klaviyo documentation.
- Go to: WooCommerce > Klaviyo Coupons > Dynamic Coupons
- Enter your Klaviyo API key
- Click Validate and Save
Usage
↑ Back to topCreate Dynamic Coupons using Klaivyo Webhooks
↑ Back to topTo create WooCommerce coupons using Klaviyo flows, you need to use the Webhook settings created by the plugin. You can find these settings on the Dynamic Coupon page. Follow the steps or the video tutorial below for details.
Step 1: Create a Klaviyo Flow to Trigger Coupon Creation
- In Klaviyo, go to Flows and click Create Flow.
- Name it (e.g., “10% Off for New Customers”) and click Create.
- Set the desired trigger, such as Added to List.
- Save the trigger.
Step 2: Add a Webhook Action in Klaviyo
- In the flow, drag the Webhook action into your sequence.
- From the plugin’s Dynamic Coupons page, copy the Webhook URL and paste it into the Webhook settings in Klaviyo.
- Add two security headers:
woo-api-key(value from the plugin)woo-api-secret(value from the plugin)
- Add the JSON body for the coupon (use the example from the plugin’s instructions).
- Save the webhook.
Step 3 – Create the Coupon Email in Klaviyo
- In the flow, add an Email action after the webhook.
- Name it (e.g., “Coupon Email”) and set the subject
- Choose an existing template or create your own.
- Replace any hardcoded coupon code in the email with the Woo coupon field created by the plugin:
– Search fordckin personalization fields.
– Select Woo coupon and insert it into the email body. - Save the email.
Step 4 – Activate & Test Klaviyo Flow
- Review your flow.
- Turn it on and save.
- Subscribe to the form that triggers the flow.
- Check your email inbox for the coupon email.
Step 5 – Verify Coupon Creation
- In WooCommerce, go to Coupons to see the newly created coupon.
- In Klaviyo, go to the customer’s Profile to see the coupon code and expiry date.
Configuring Coupon Settings

To configure coupon settings:
- Navigate to WooCommerce > Klaviyo Coupons > Dynamic Coupons
- Scroll to Coupon Settings section
- Set the coupon prefix you want to use. All coupons created from Klaviyo webhooks will use this prefix.
- Set the default expiry days. This determines the validity of the created coupons.
- Enable Auto Cleanup to automatically remove expired coupons.
Create Klaviyo Segment Coupons
↑ Back to topThe Segment Coupons feature in Dynamic Coupons for Klaviyo allows you to automatically apply WooCommerce coupons to customers who belong to specific Klaviyo lists or segments. This is perfect for rewarding VIP customers or offering exclusive discounts without requiring them to enter a code. Once configured, the discount is applied instantly at checkout whenever an eligible customer logs in, creating a seamless and personalized shopping experience.
Important Note: This feature uses Klaviyo’s getGroupMembership API to identify user segments. It is available only for Advanced KDP (Klaviyo Data Platform) customers. Please ensure your Klaviyo plan includes Advanced KDP before enabling this feature. For more details about the _klaviyo JavaScript object and its capabilities, refer to the official Klaviyo documentation.
Step 1 – Create the WooCommerce Coupon
- In your WordPress dashboard, go to WooCommerce → Coupons.
- Click Add New.
- Enter a coupon code (e.g.,
VIP10). - Set the discount type to Percentage Discount and the amount to
10%. - Save the coupon.
Step 2 – Link the Coupon to a Klaviyo Segment
- Go to the Dynamic Coupons for Klaviyo plugin settings page.
- Select the Segment Coupons tab.
- Click Add Segment Coupon.
- Find your Klaviyo Segment ID:
- In Klaviyo, go to your desired Segment or List.
- Open the Settings tab.
- Copy the List ID from the List ID section.
- Paste the Segment/List ID into the plugin’s Segment ID field.
- Enter the coupon code you created in Step 1.
- Click Save.
Step 3 – Test the Segment Coupon
- Log in to your site as a customer who belongs to the linked Klaviyo segment.
- Add products to your cart.
- Go to Cart or Checkout — the coupon should already be applied automatically.
Step 4 – Hide the Segment Coupon (Optional)
- In the plugin settings, go to the Hidden Coupons section.
- Enable Hide Segment Coupons.
- Click Save.
- Refresh the checkout page — the coupon code will no longer be visible, but the discount will still be applied.
Send Advanced WooCommerce Events to Klaviyo
↑ Back to topThe Advanced Events feature in Dynamic Coupons for Klaviyo lets you send detailed, custom tracking events from WooCommerce to Klaviyo. In addition to standard page view event, you can enable tracking for custom post views, category views, and WooCommerce Subscription events. All events are sent with useful details (e.g., category name, page URL) and can be used in Klaviyo Flows or segments to create highly targeted campaigns.
Step 1 – Enable Advanced Events in the Plugin
- In your WordPress dashboard, open the Dynamic Coupons for Klaviyo plugin.
- Navigate to the Advanced Events page.
- Select the events you want to track (e.g., Product Category Views).
- Click Save.
Step 2 – Test the Event Tracking
- On your WooCommerce site, perform the action you enabled tracking for — for example, open a product category page like Jackets.
- In Klaviyo, go to Analytics → Metrics (or the event stream) and refresh the page.
- Look for the newly captured event (e.g.,
View Product Category) along with its details such as category name and page URL.
Step 3 – Use the Event in Klaviyo
- In Klaviyo, create or edit a Flow or Segment.
- Use your custom event as a trigger or filter.
- Build automations or personalized campaigns based on this event data.
Hide Coupons
↑ Back to topYou can use the hidden coupons feature to hide Dynamic Coupons, Segment Coupons or any coupon that matches a custom pattern.

To hide a coupon pattern:
- Go to WooCommerce > Klaviyo Coupons > Hidden Coupons
- In the Hide Coupon Pattern section, enter a pattern to hide. For example, if you enter “KLV-*”, all coupons that start with “KLV-” will be hidden. Use * as a wildcard.
- Click Save.
All coupons matching the set pattern will now be hidden during checkout.
To hide dynamic coupons:
- Go to WooCommerce > Klaviyo Coupons > Hidden Coupons
- Turn on Hide Dynamic Coupons toggle
- Click Save.
All coupons generated using the Dynamic Coupons feature will now be hidden during checkout.
Important: this will hide the dynamic coupons based on the current coupon prefix configured on the Dynamic Coupons page. If you change this prefix after some dynamic coupons have already been created, the coupons with the old prefix will not be hidden. To hide them, use the Hide Coupon Pattern feature described above.
To hide segment coupons:
- Go to WooCommerce > Klaviyo Coupons > Hidden Coupons
- Turn on Hide Segment Coupons toggle
- Click Save.
All coupons generated using the Segment Coupon feature will now be hidden during checkout.
Troubleshooting
↑ Back to topI’m getting an error when I try to validate the Klaviyo API key.
Please double check you copied and pasted the correct key. You have to create a new private key with full access permissions.
I turned on Hide Dynamic Coupons feature, but some coupons are still not hidden.
This feature will hide the dynamic coupons based on the pattern currently configured in Dynamic Coupons. If the pattern changed, use the Hide Coupon Pattern feature to hide the old coupons.