Installation
↑ Back to top- Download the .zip file from your WooCommerce account.
- Go to WordPress Admin Dashboard> Plugins > Upload Plugin > Choose File.
- Install Now and Activate Plugin.
Description
↑ Back to topA Loyalty Points Plugin helps businesses reward customers for their purchases and engagement, encouraging loyalty and repeat sales. Store owners can create a points-based system where customers earn points for actions like purchases, daily logins, sign-ups, referrals, and reviews. These points can be redeemed for discounts or product purchases. Features such as point-to-coupon conversion, point sharing, customizable messages, notifications, and emails ensure the system aligns with business goals while enhancing the customer experience.
Features
↑ Back to topPoints Assignment
- Earn Points on your purchase.
- Signup points
- Referral Points. Refer to a New User for registration.
- Comment/review Points
- First order points
- Daily login point
- Points on the number of orders
- Global product points
- Per product points
- Category points
- Cart total points (Tiered based)
- Points on payment method
- Birthday points
Points Redemption
- Redeem points on the cart and checkout.
- Purchase with points
- Share points
- Convert points to a coupon
- Points Notification
- Customization
- Points log
- Send Points
- Points Settings
- User points adjustment
Getting Started
↑ Back to topPoints Assignment
↑ Back to top- All the tabs for configuring the loyalty points system are in WordPress Admin Dashboard > WooCommerce > Loyalty Points.
- The Points Assignment tab contains all the settings related to earning points. It consists of three sub-tabs:
- Points
- Order Points
- Product Points
Points
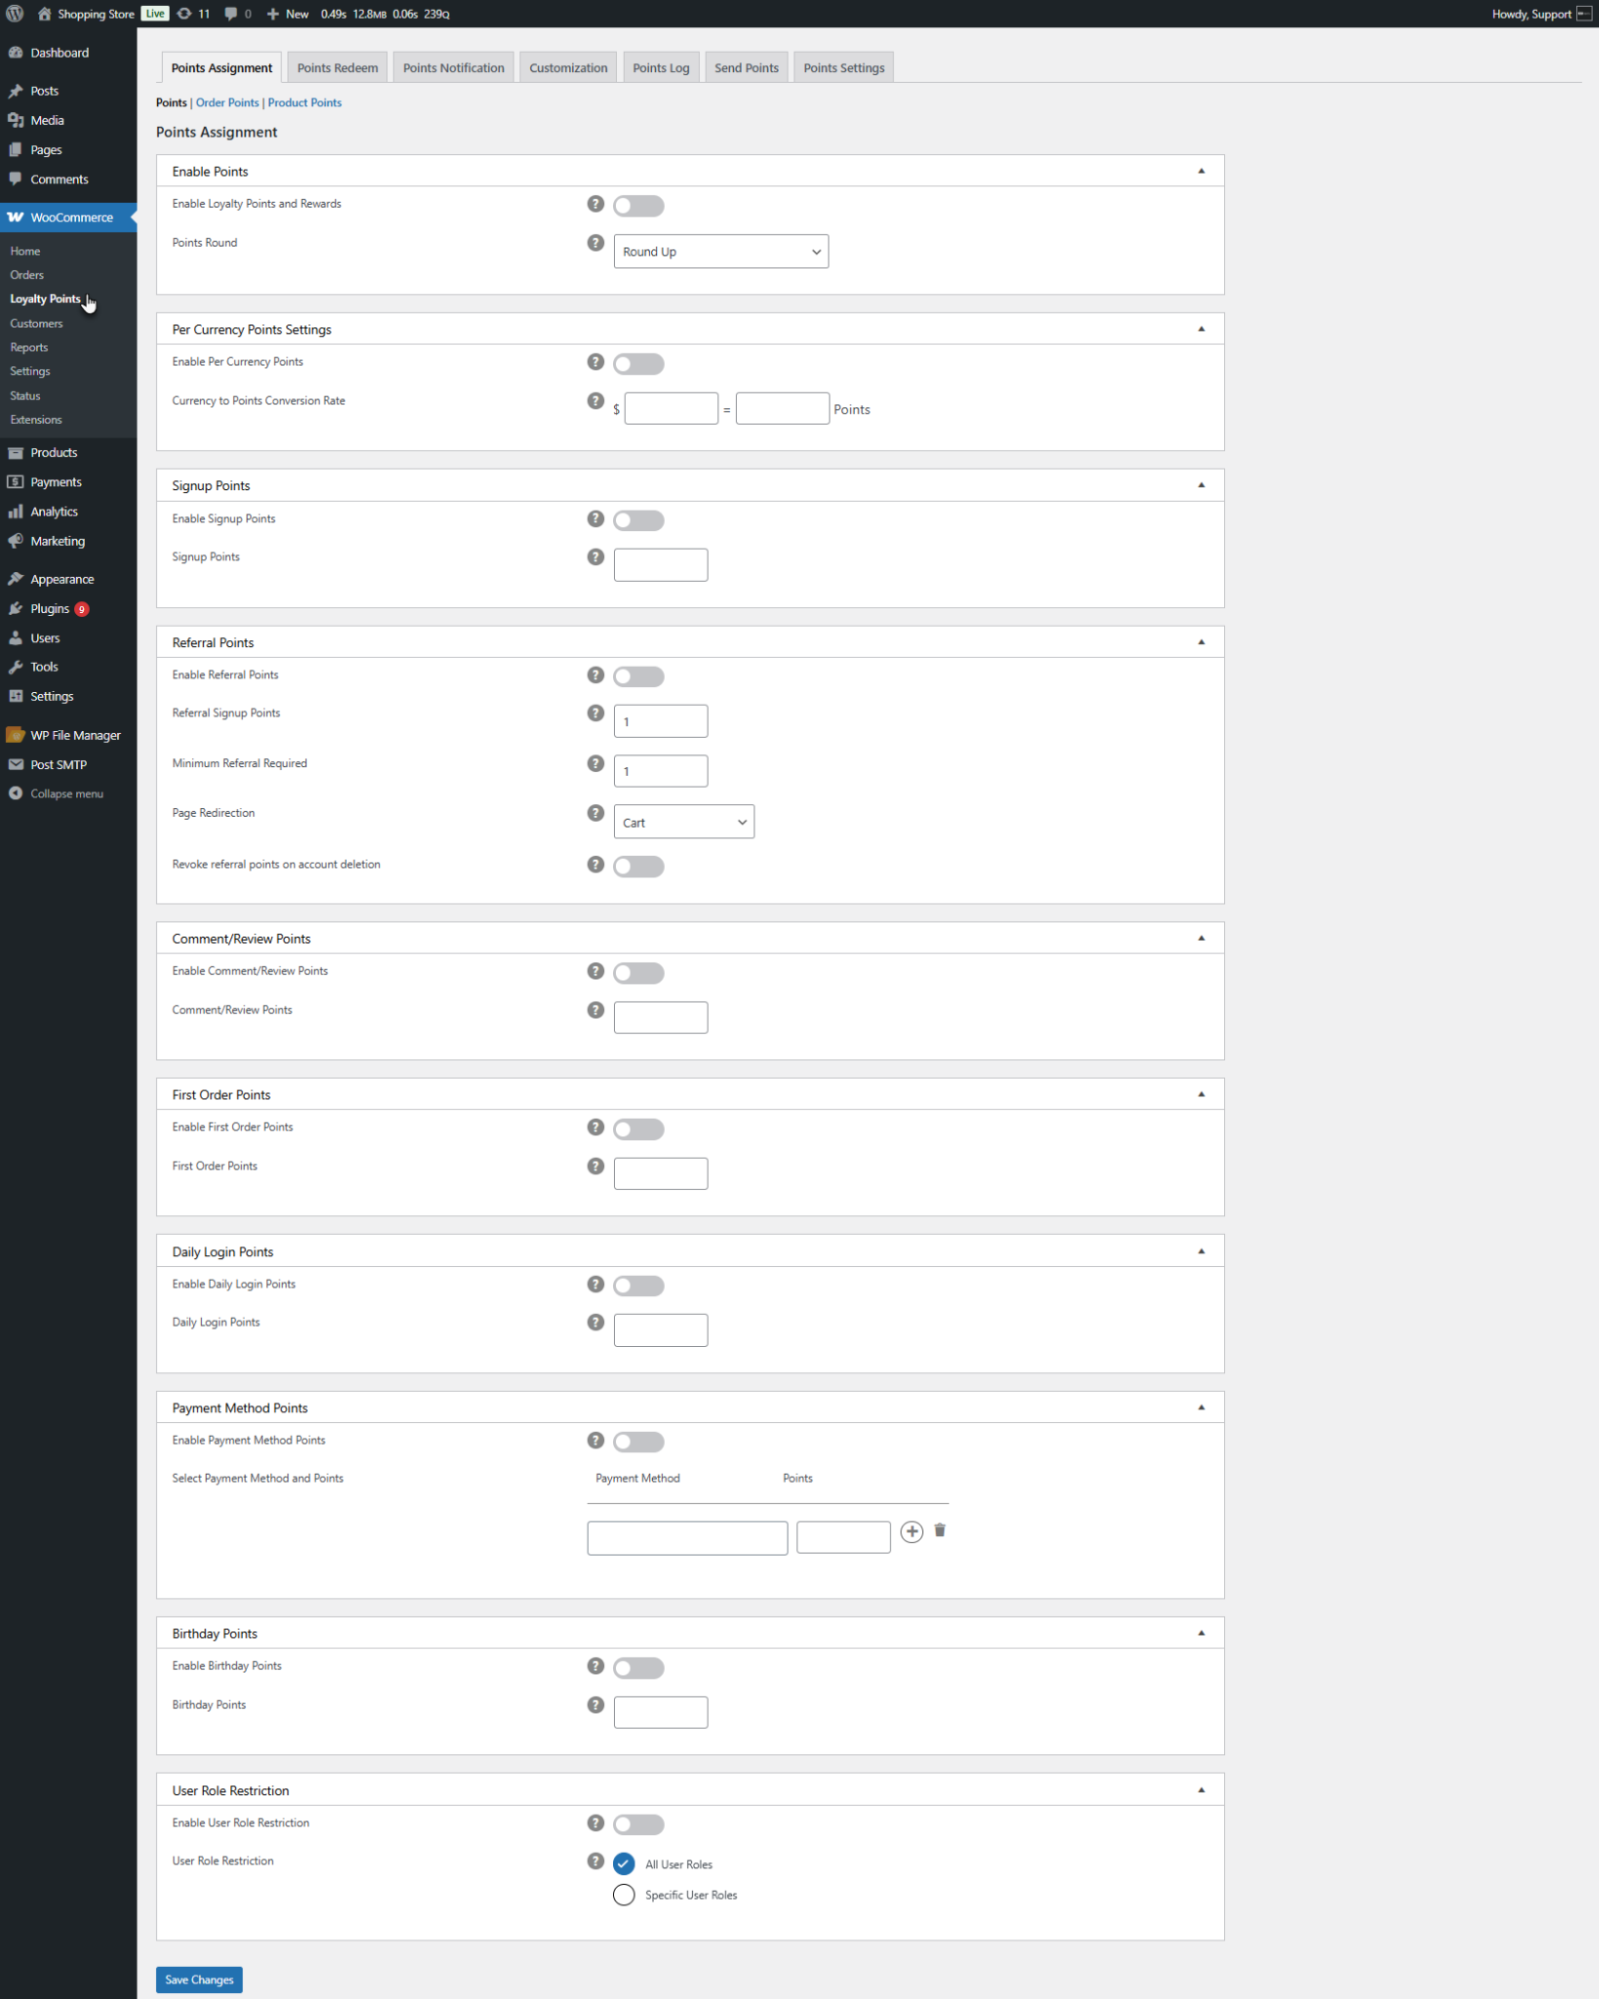
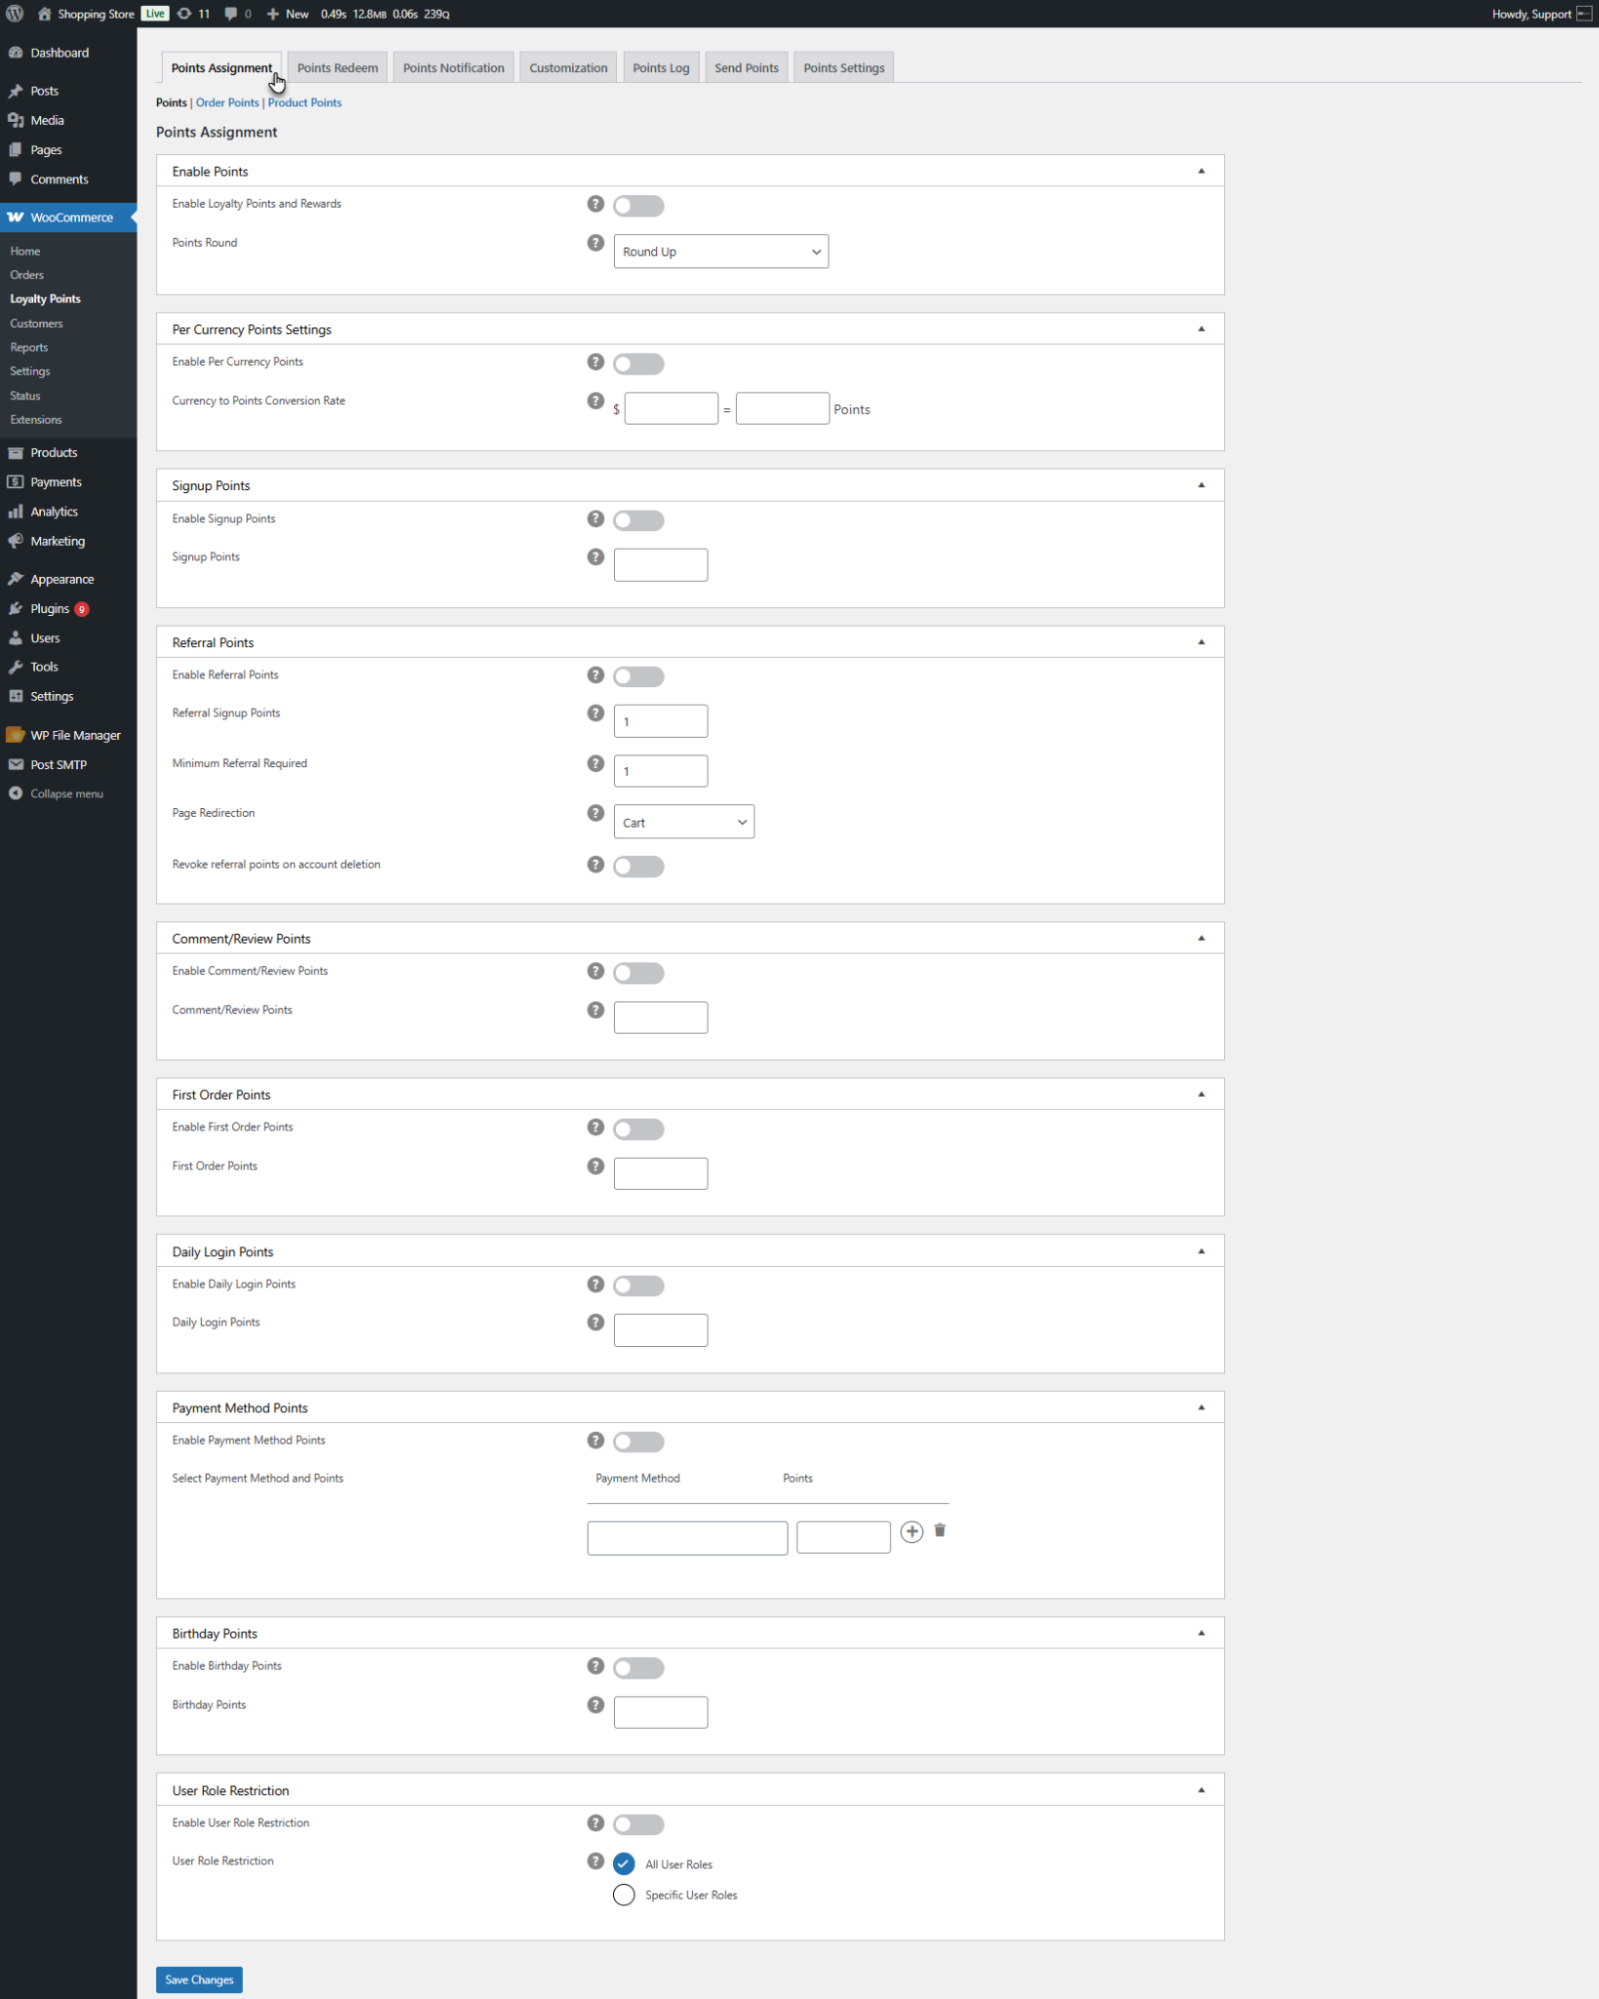
↑ Back to topEnable Points
- This section provides general point settings.
- Enable Loyalty Points: A toggle switch enables or disables the entire loyalty points system across the website. If disabled, no points can be gained or redeemed. The admin can disable this instead of deactivating the plugin as a whole.
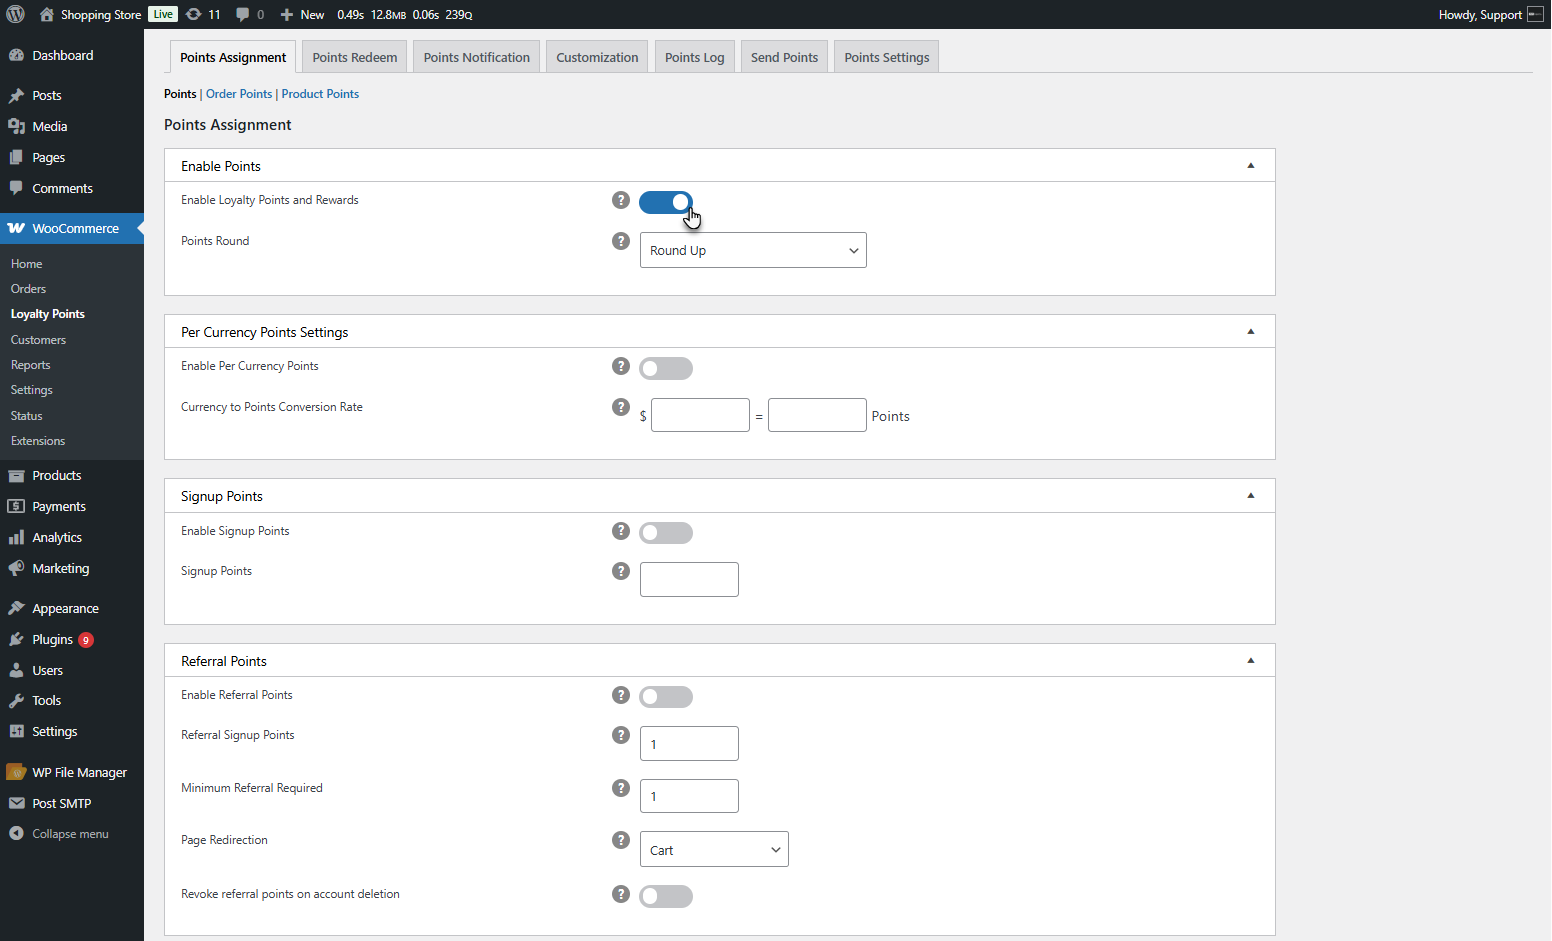
- Points Round
- Round-Up: Rounds up points to the nearest integer.
- Round Down: Rounds down points to the nearest integer.
- Nearest Integer Value: Automatically rounds to the closest whole number.
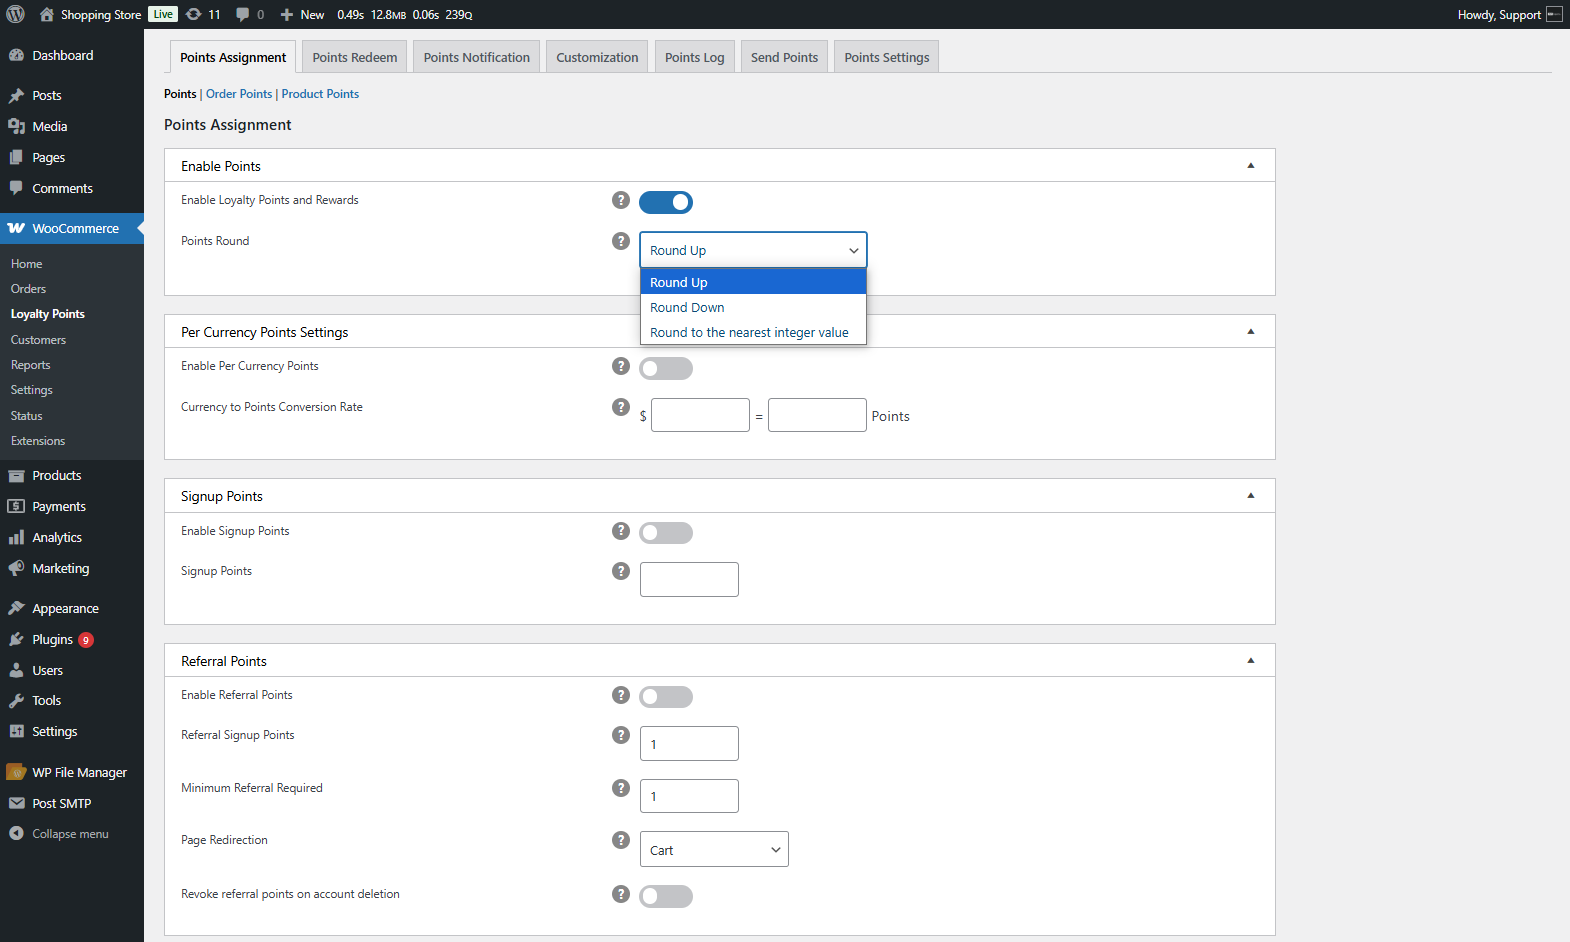
- Example
- If conversion is set as $10 = 1 point and Round Up is enabled, $15 or $14 will be rounded to $20, and 2 points will be awarded.
- If Round Down is enabled, $15 or $14 will be rounded to $10, and 1 point will be awarded.
- If Nearest Integer is enabled, $12 will round to 1 point, while $17 will round to 2 points.
Per Currency Points Settings
↑ Back to top- Enable Per Currency Points: Toggle switch to enable currency-based points.
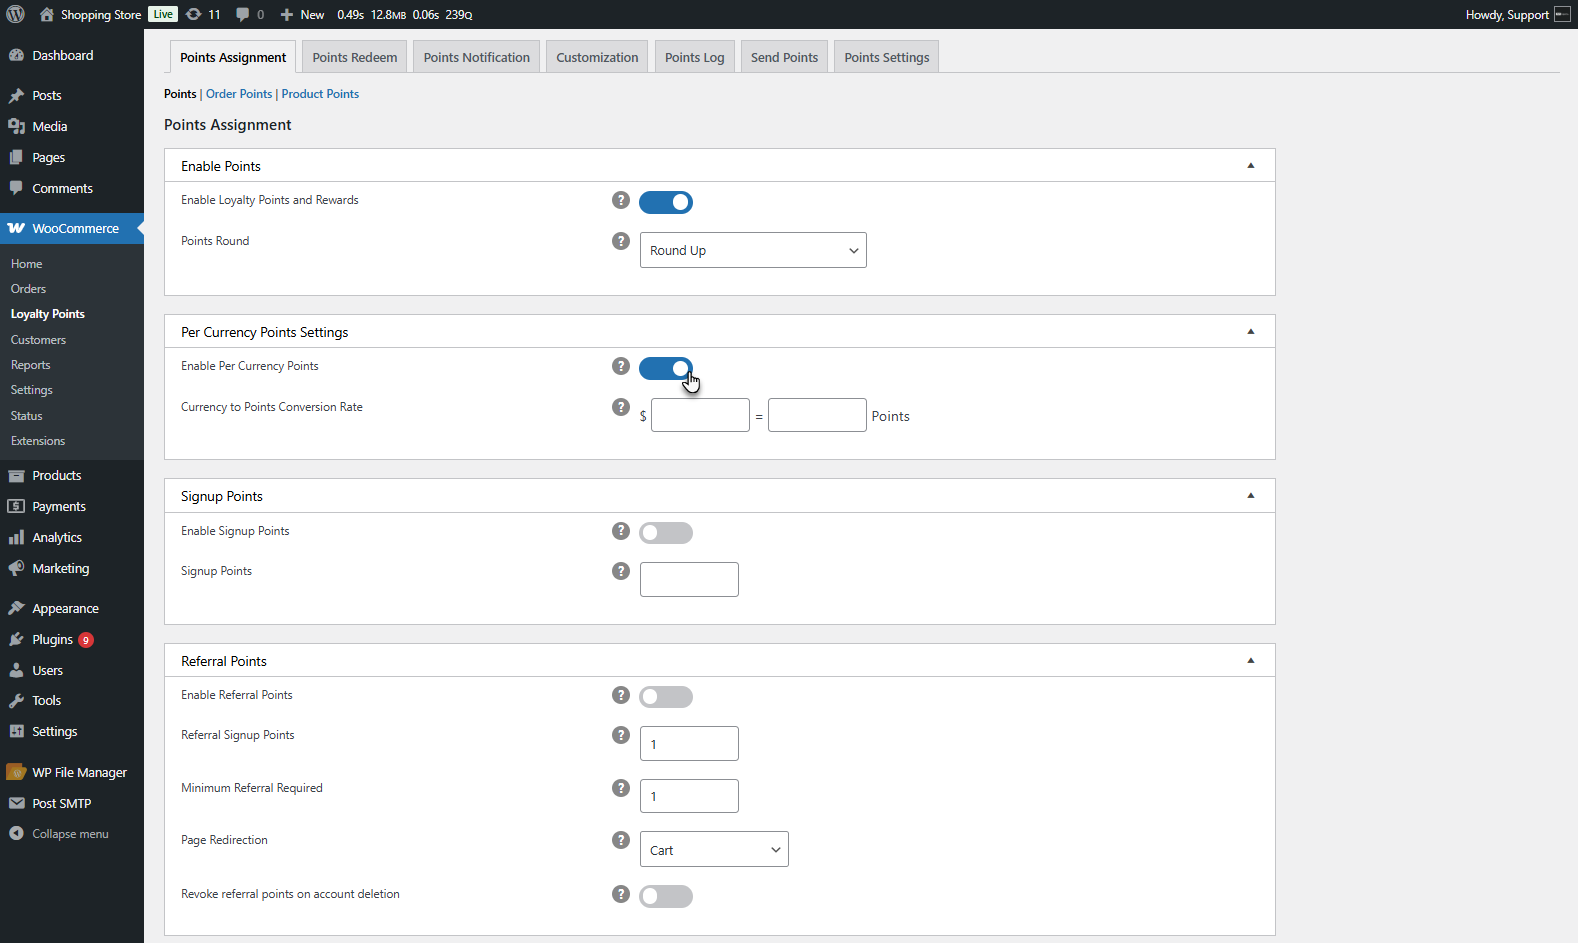
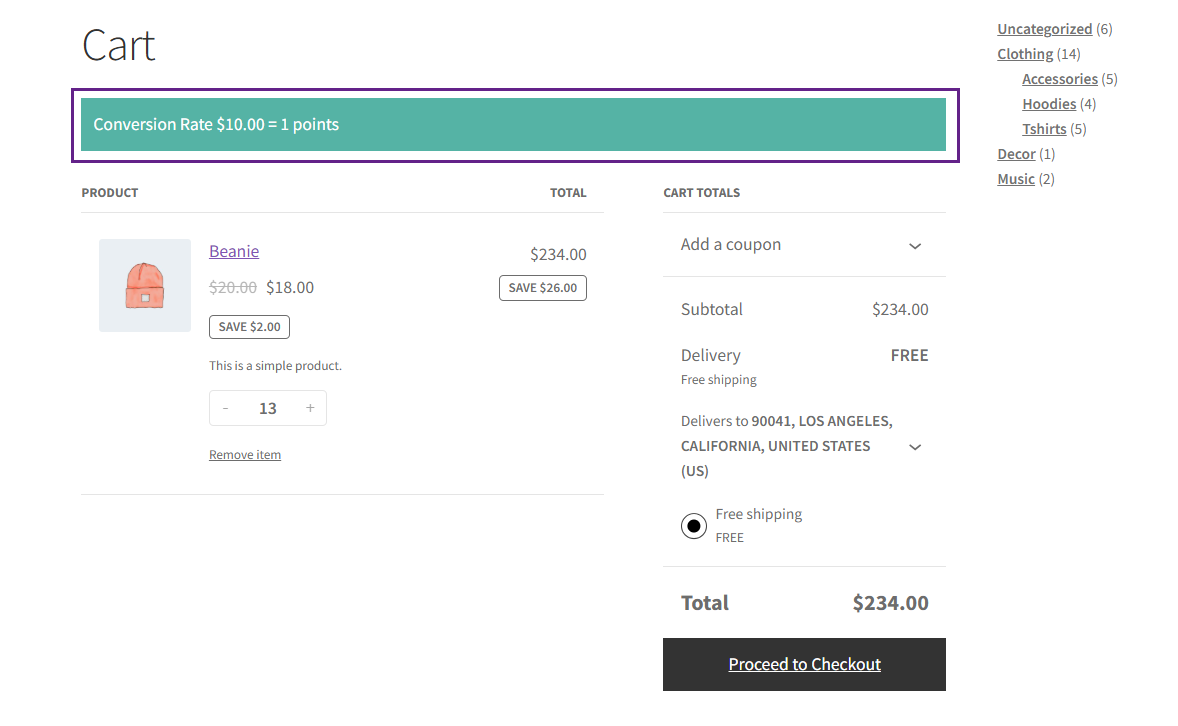
- Currency to Points Conversion Rate: Admin sets the rate. Points are gained based on the total amount. Admin can display the conversion rate on the cart and checkout page.
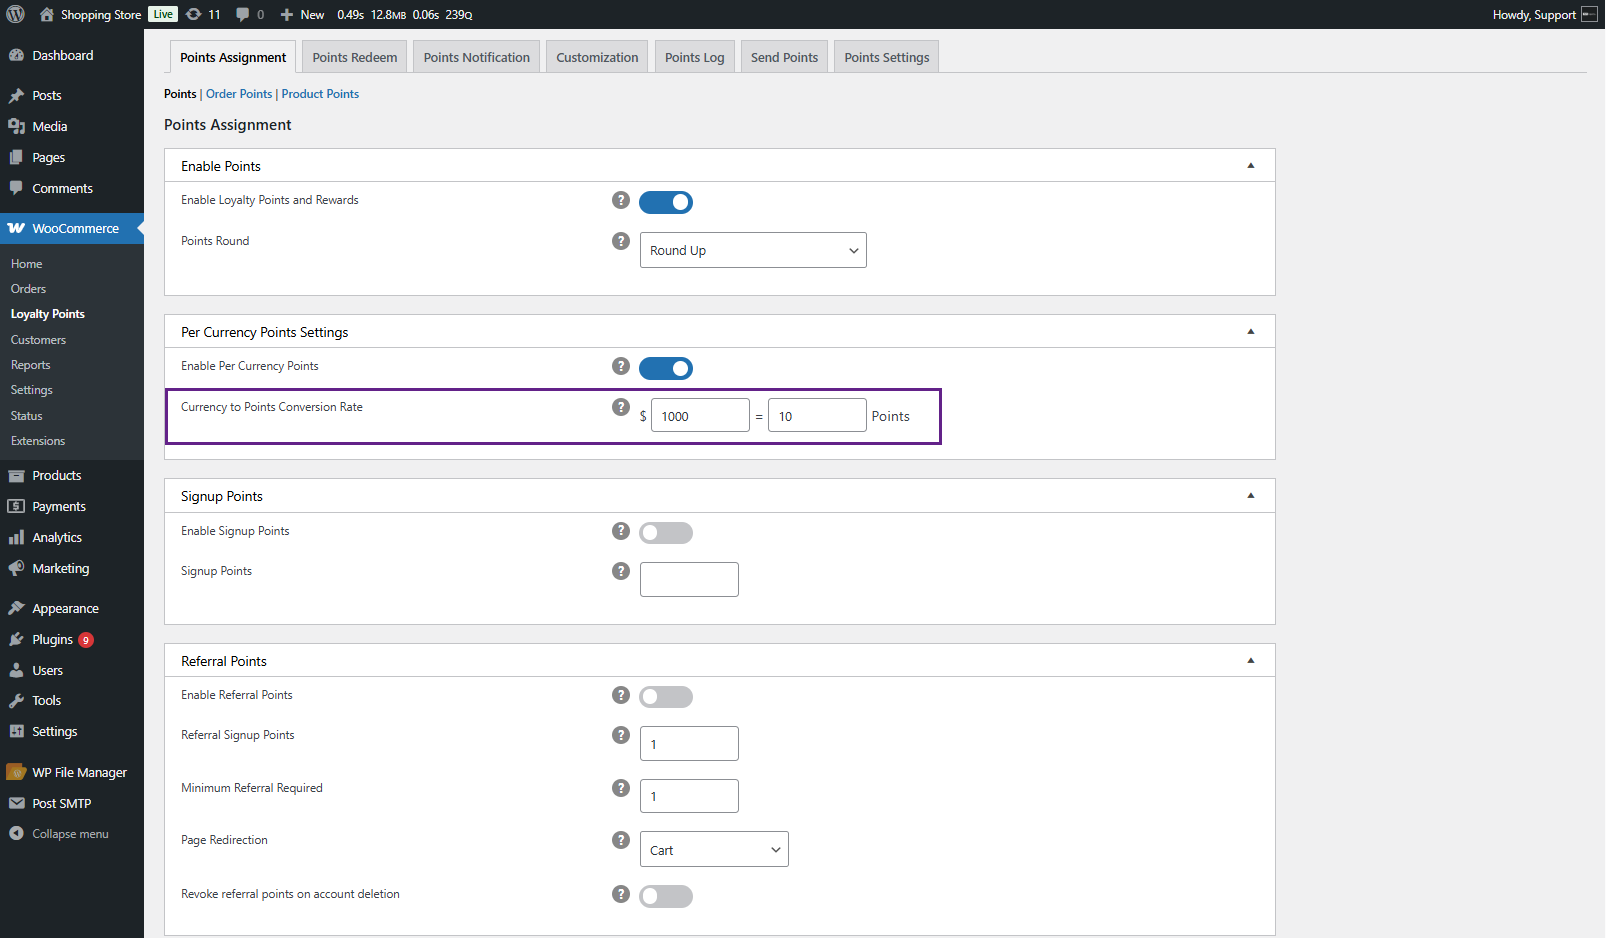
- Example: If a customer purchases an order of $300 and the conversion rate is $10 = 1 point, then the customer earns 30 points.
Front End Impact
Signup Points
↑ Back to top- Users earn points for registering a new account. Admin can enable/disable the feature.
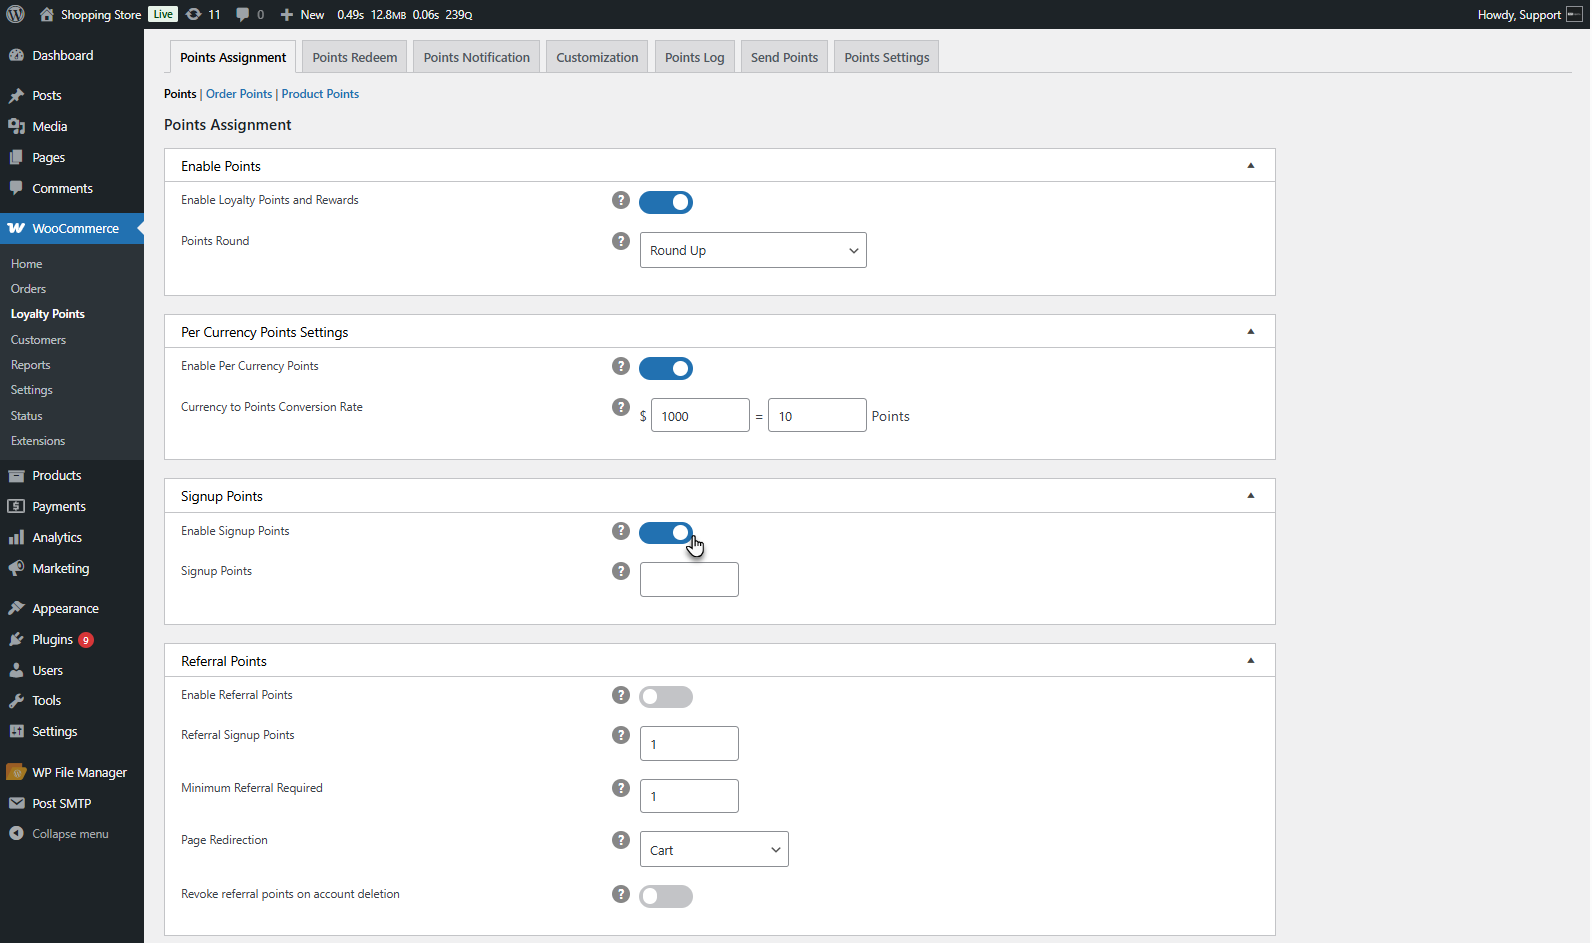
- The admin sets the number of points awarded for signing up.

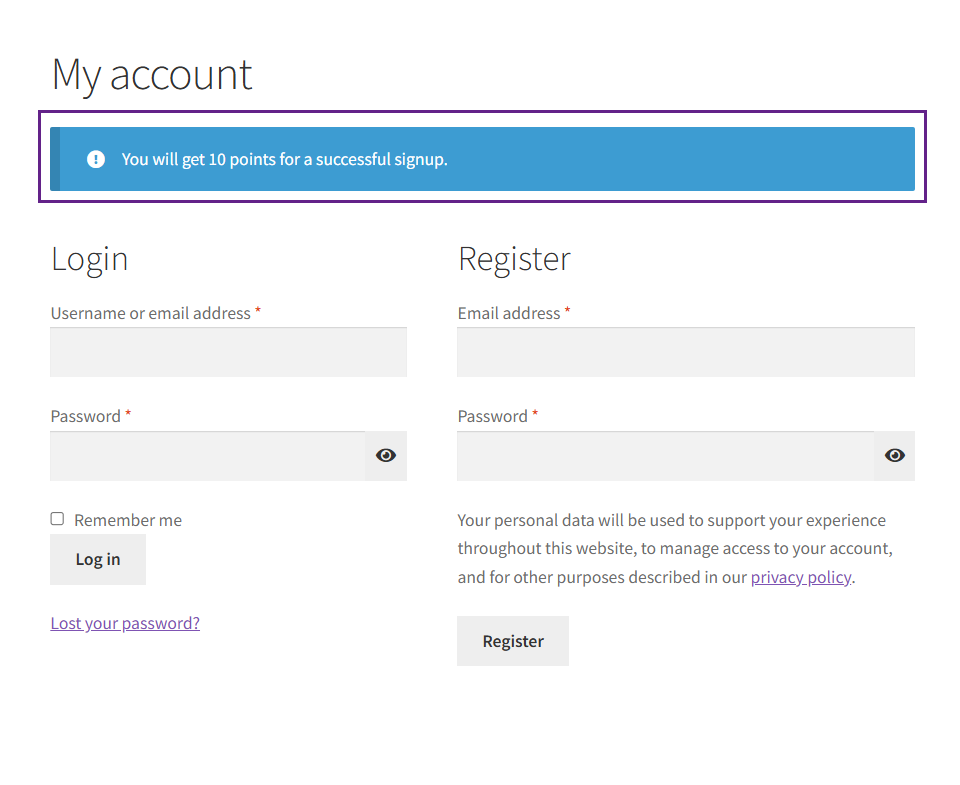
Front End Impact
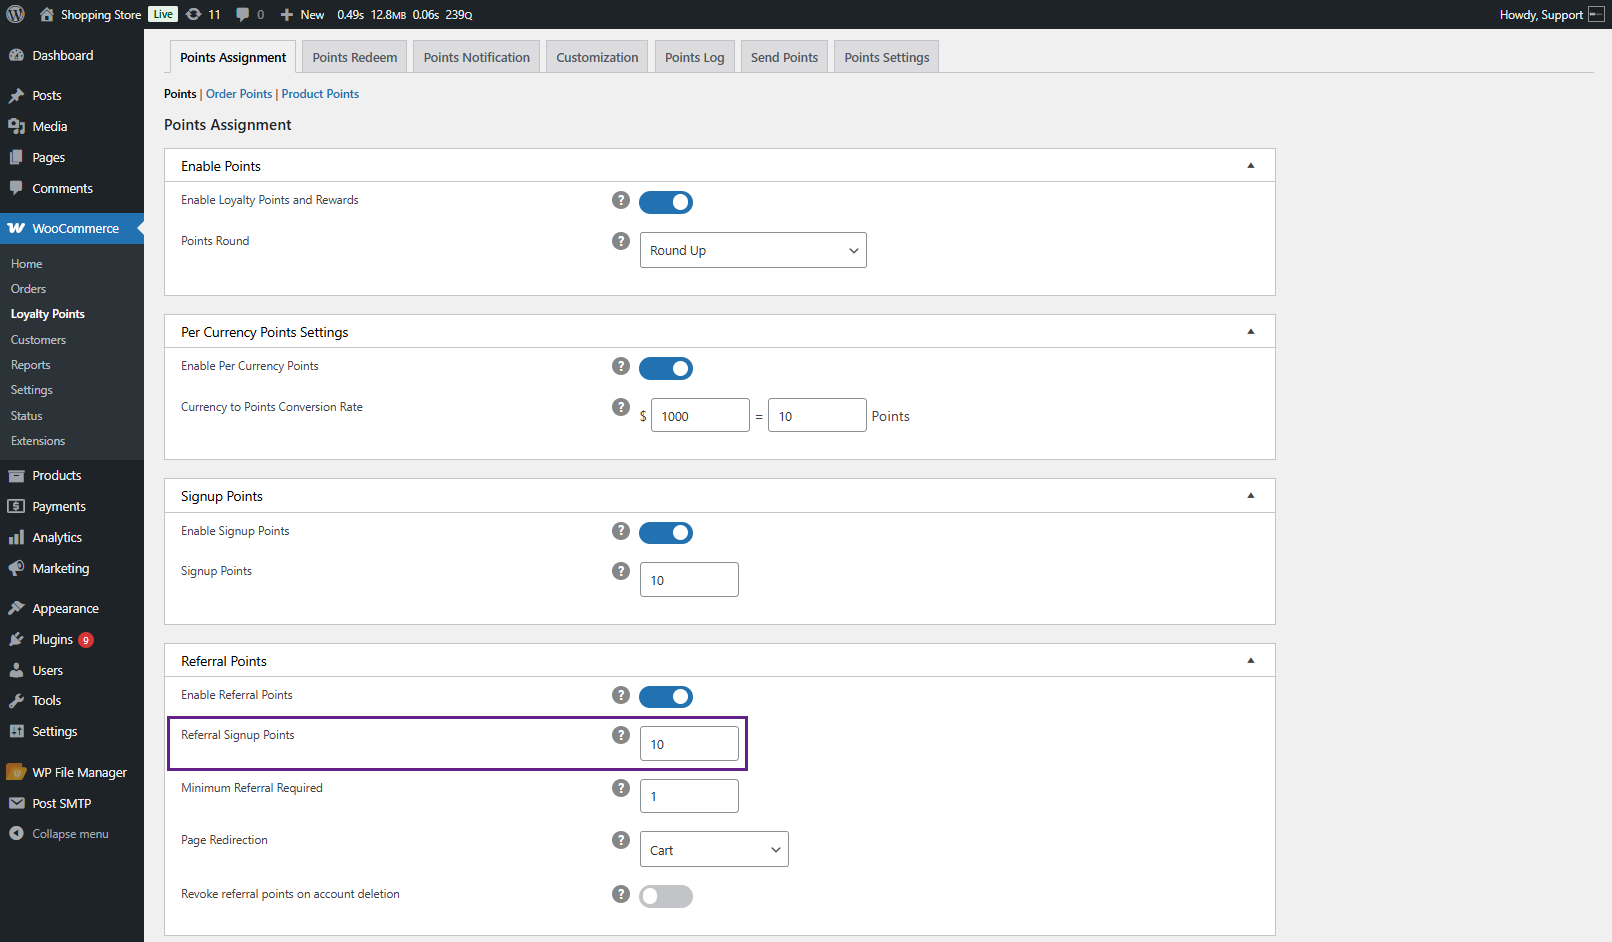
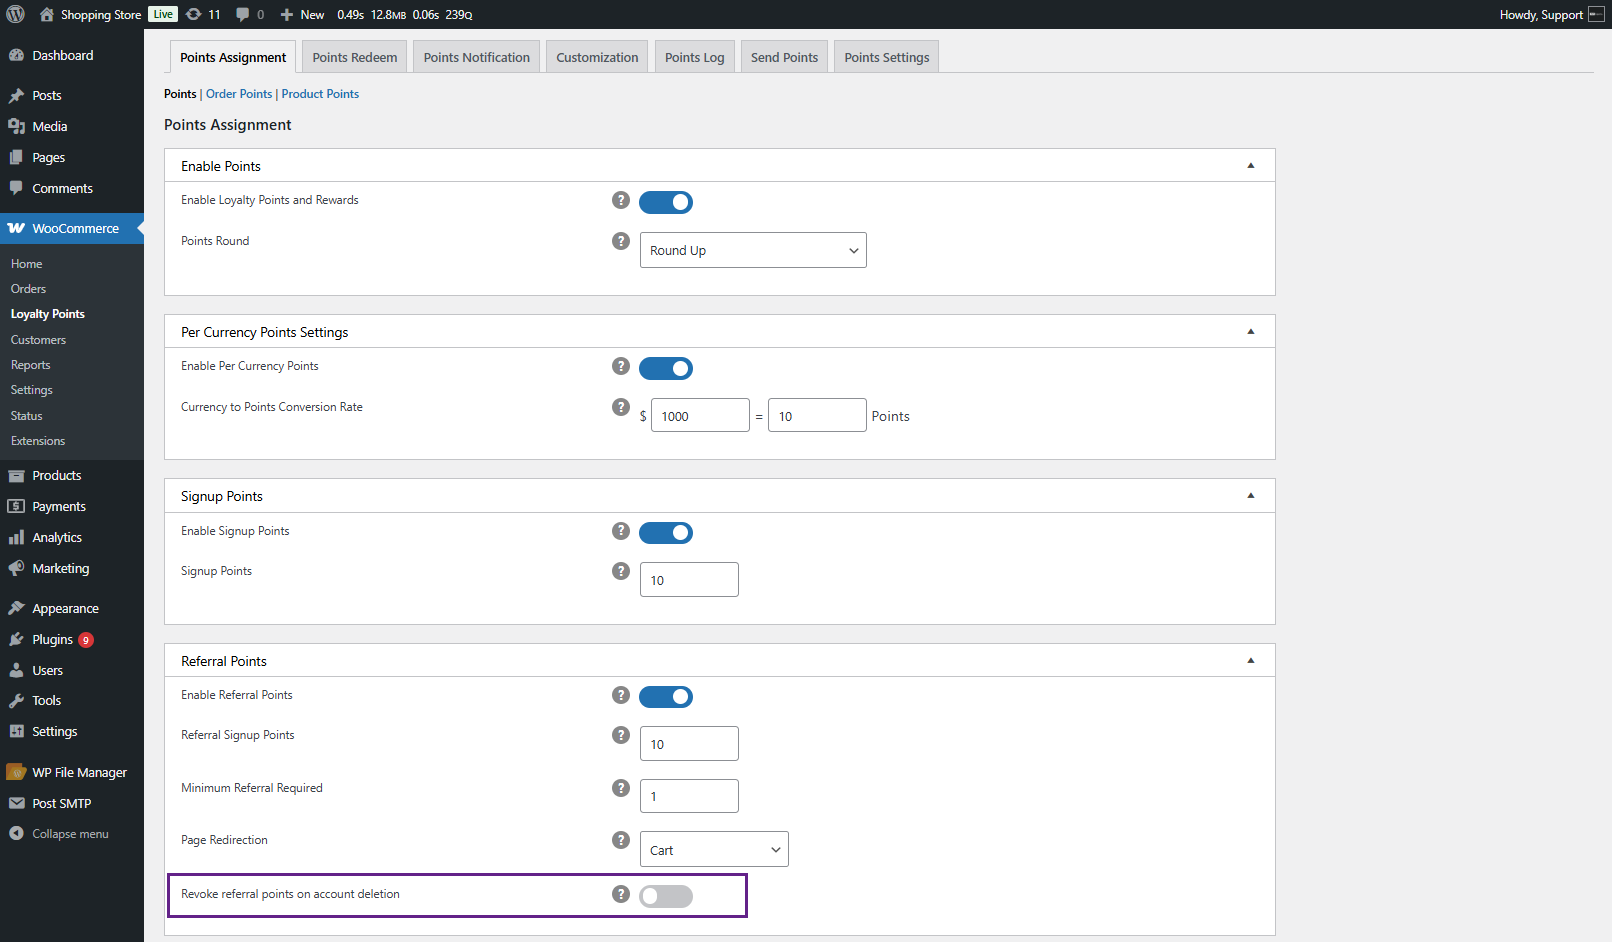
Referral Points
↑ Back to top- Users earn points for referring new users who register. The admin can enable/disable this feature.
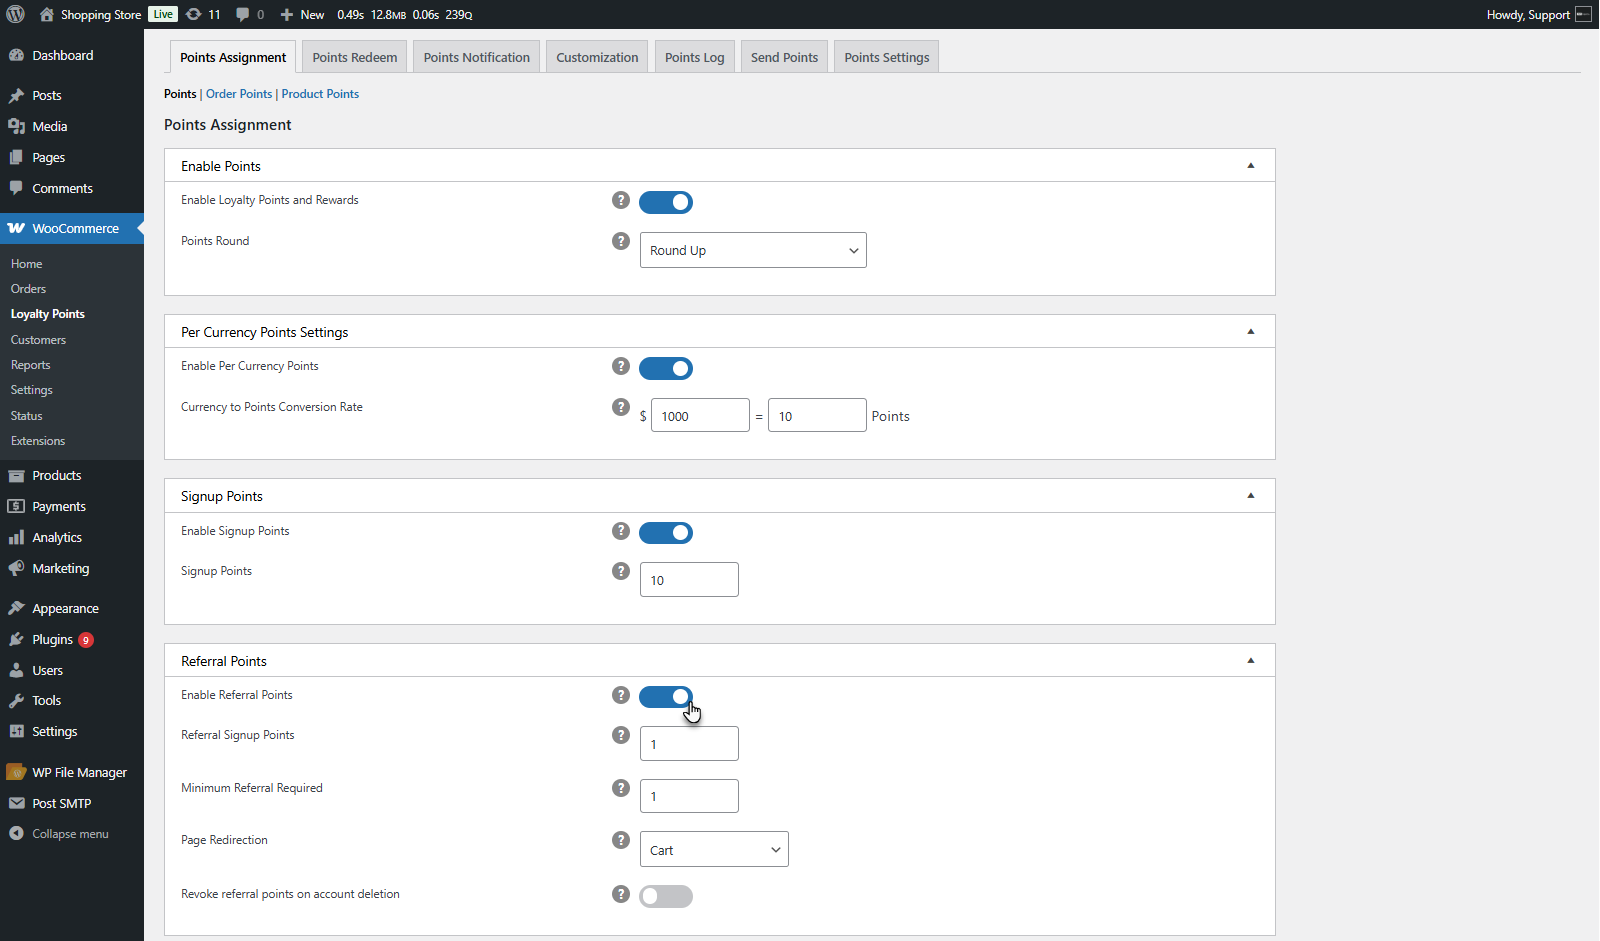
- The admin sets the points earned per referral.
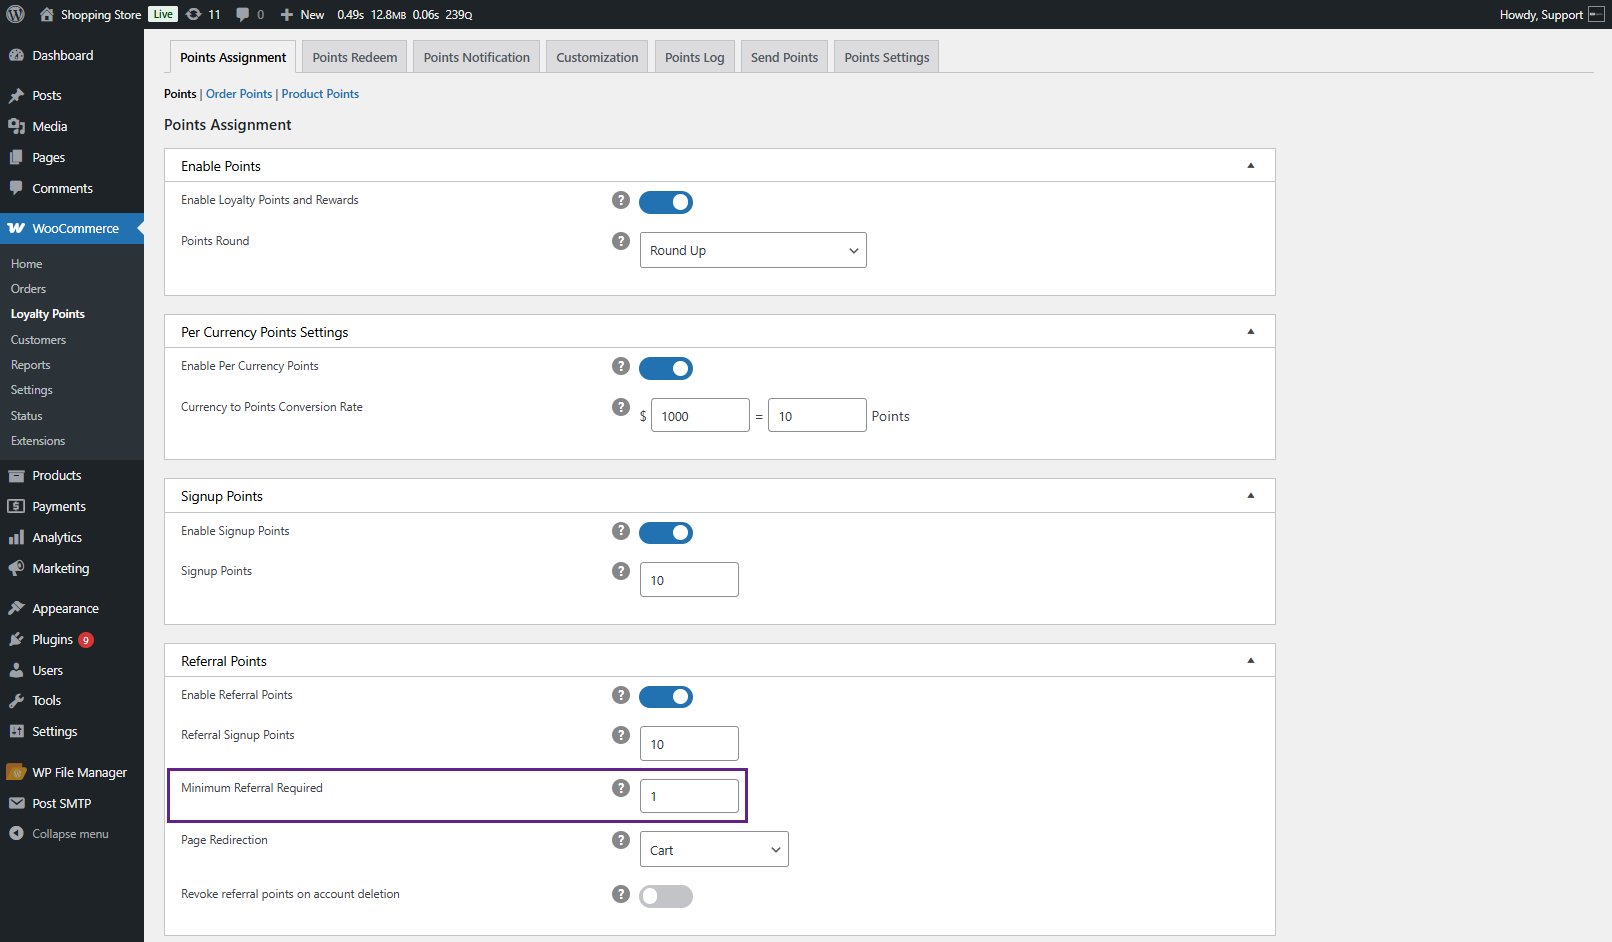
- Minimum Referrals Required: Admin sets the number of referrals required to earn points.
- Page Redirection: Admin can set where the referral link redirects.
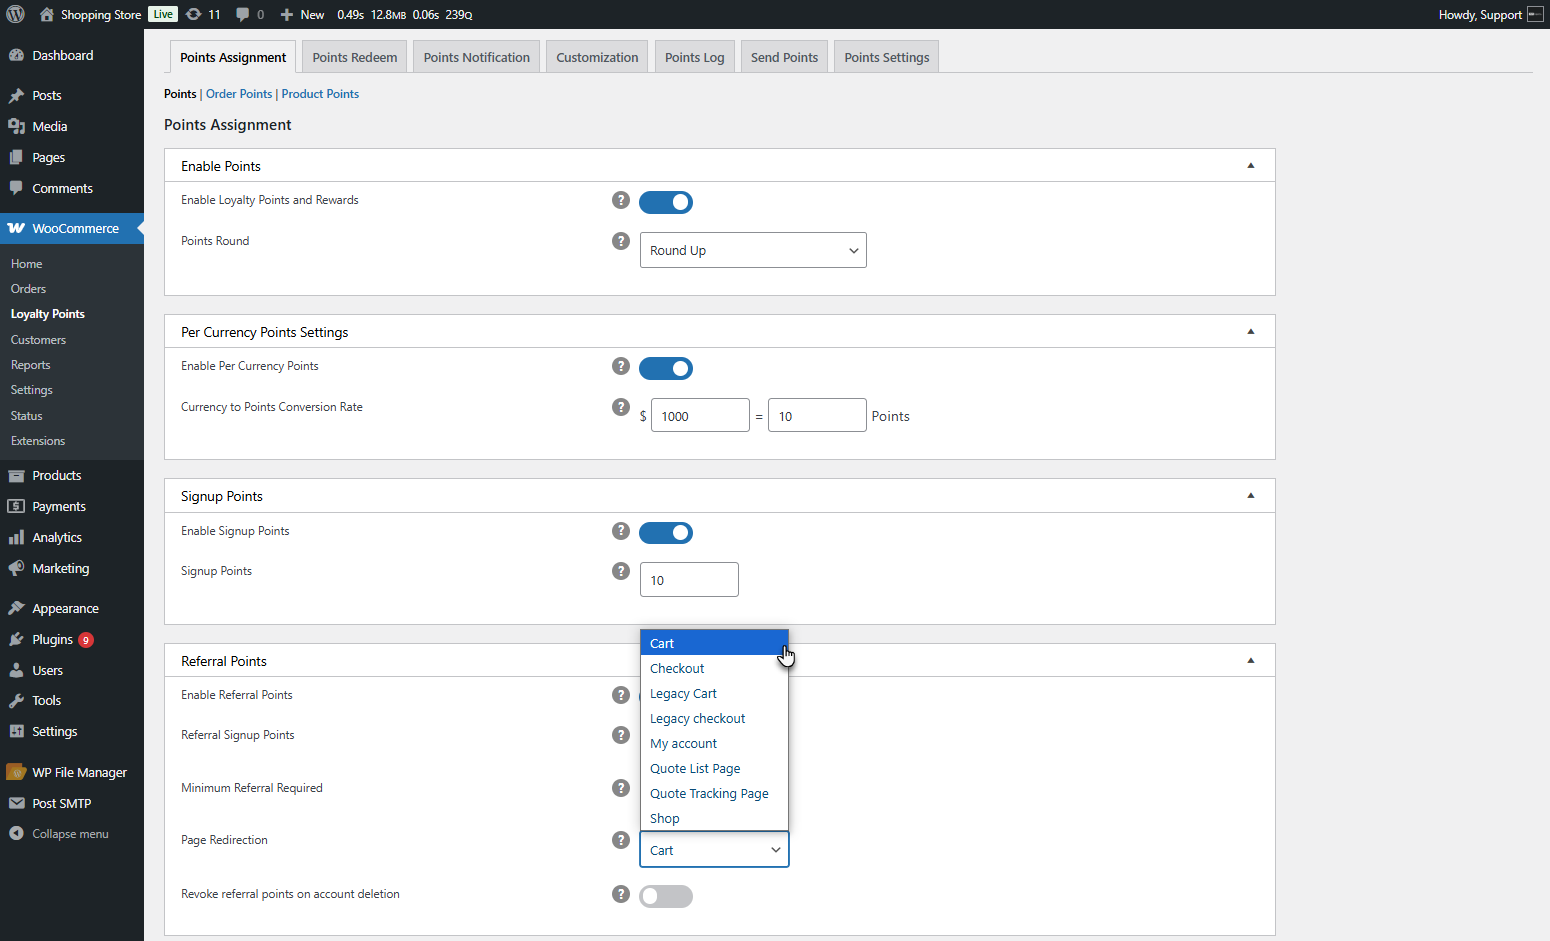
- Revoke referral points on account deletion. Allow this if you want to revoke referral points when the referred user account is deleted.
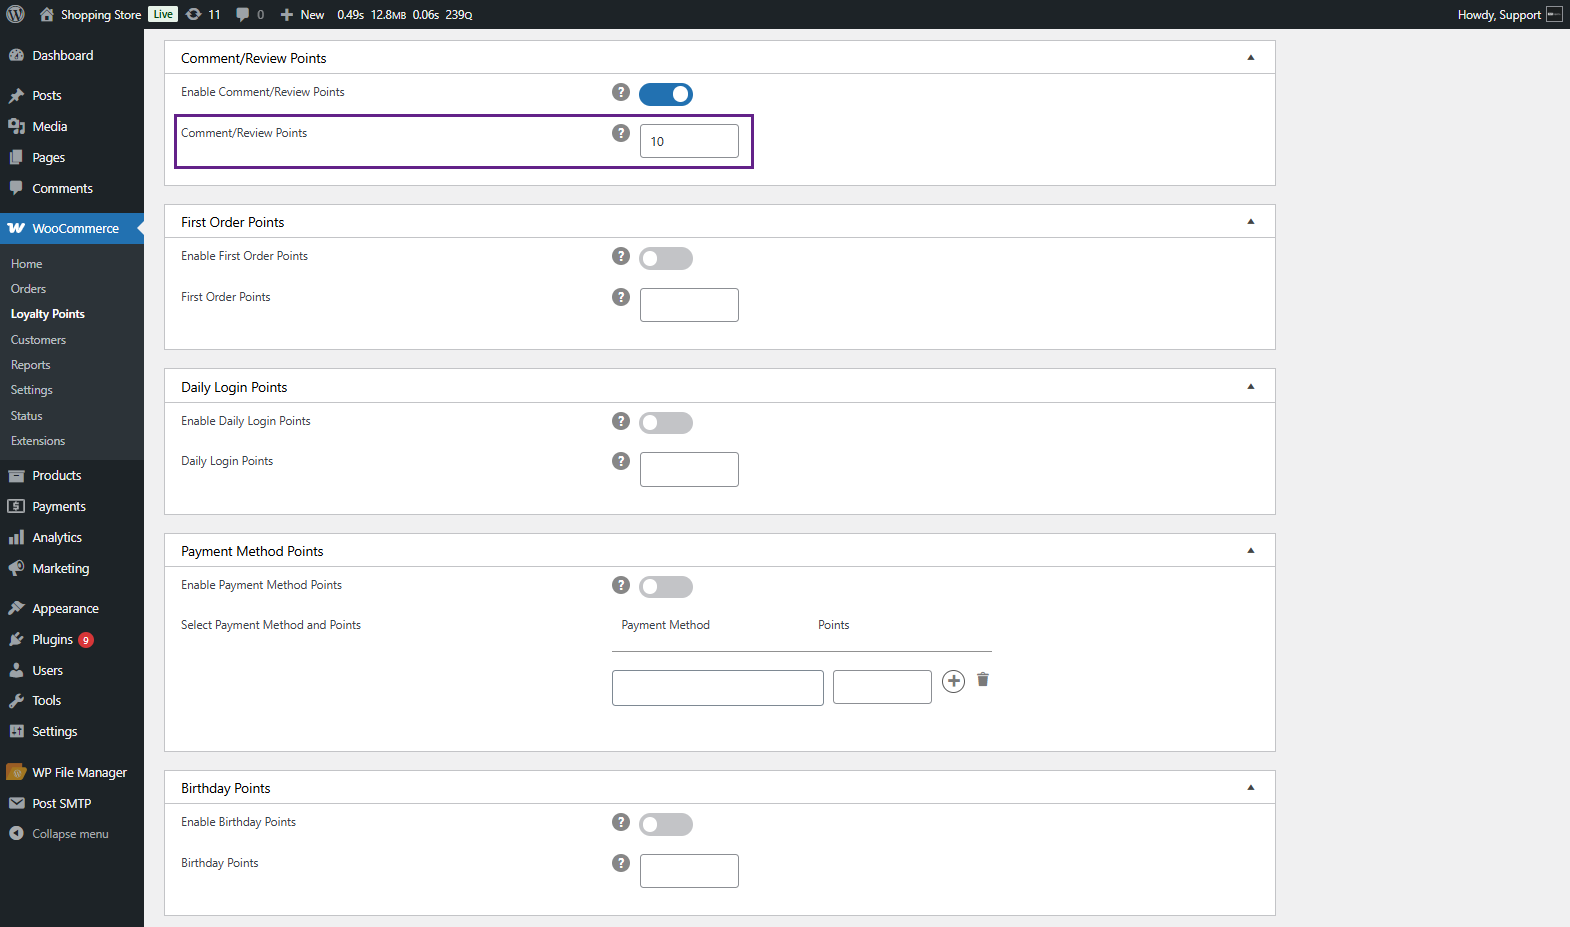
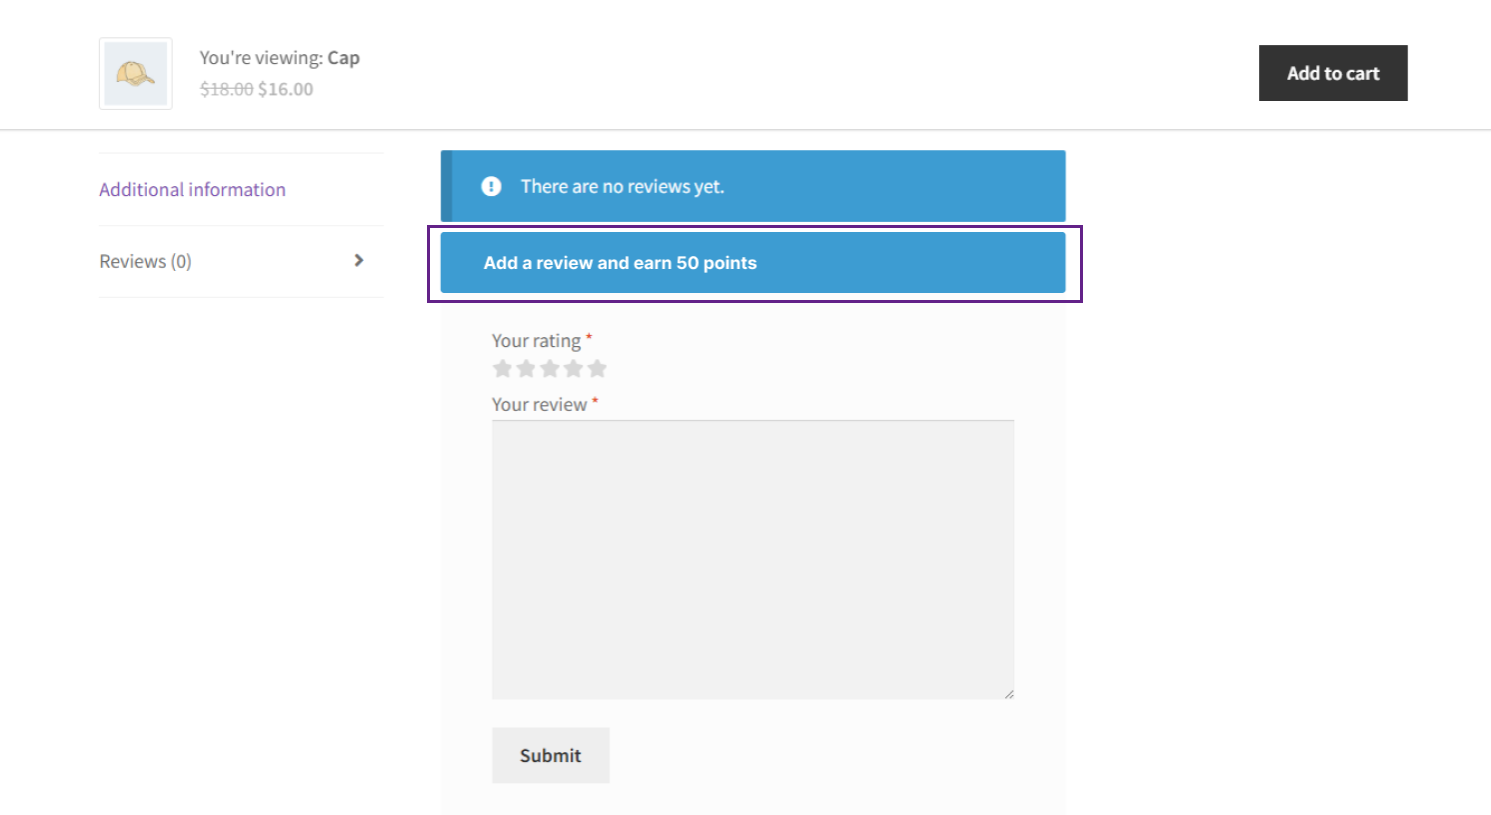
Comment/Review Points
↑ Back to top- Users earn points for posting reviews or comments. Admin can enable/disable this feature.
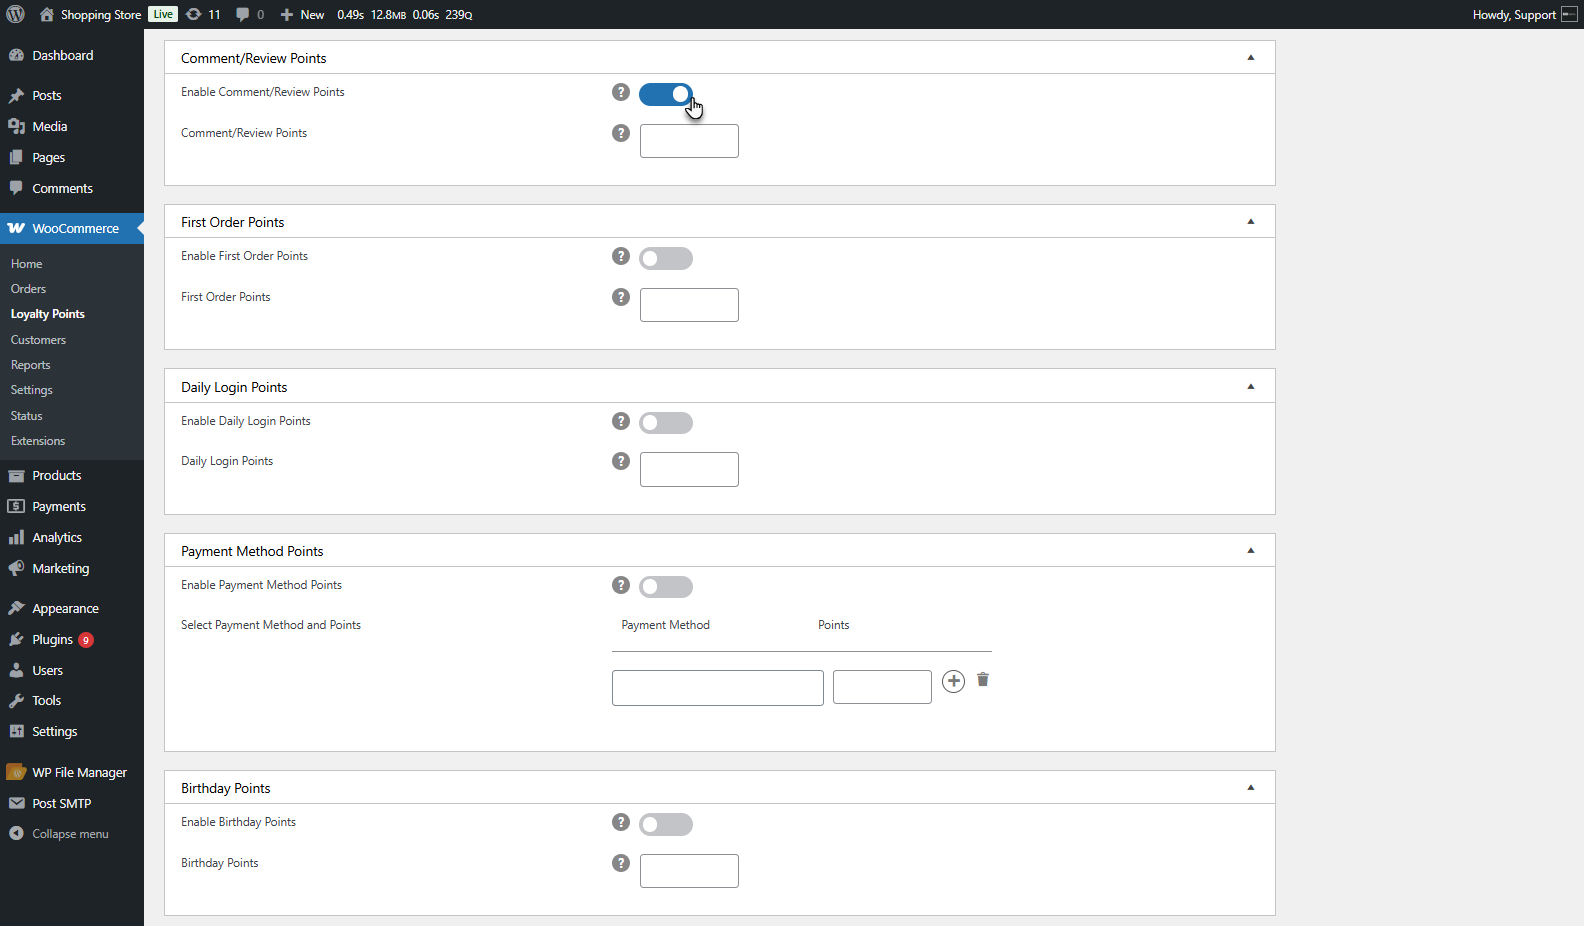
- Admin sets the number of points earned per review/comment. Points are awarded only after admin approval.
Front End Impact
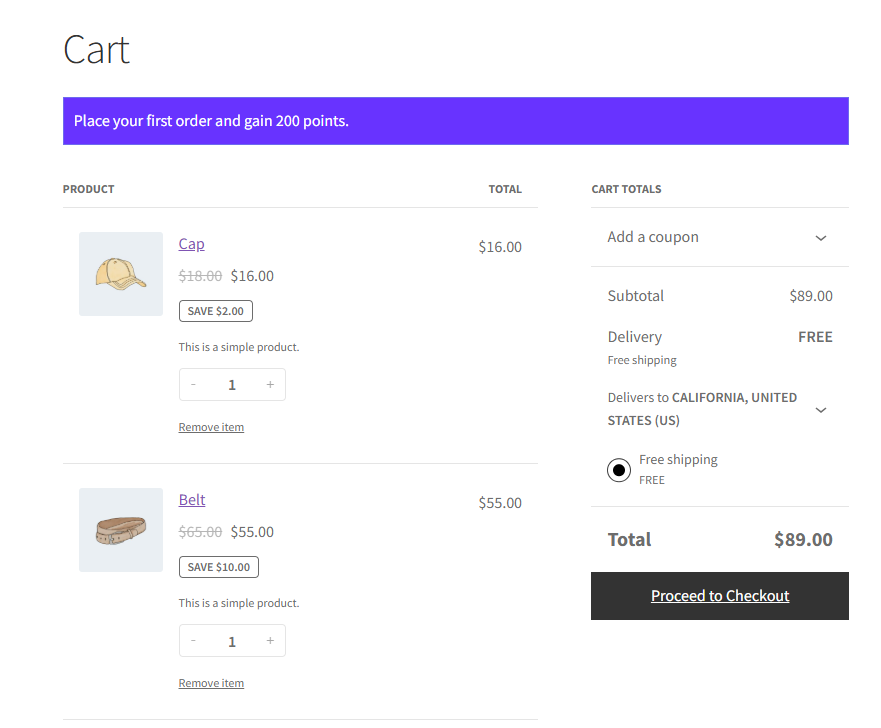
First Order Points
↑ Back to top- Users earn points on their first order after registration. Admin can enable/disable this feature.
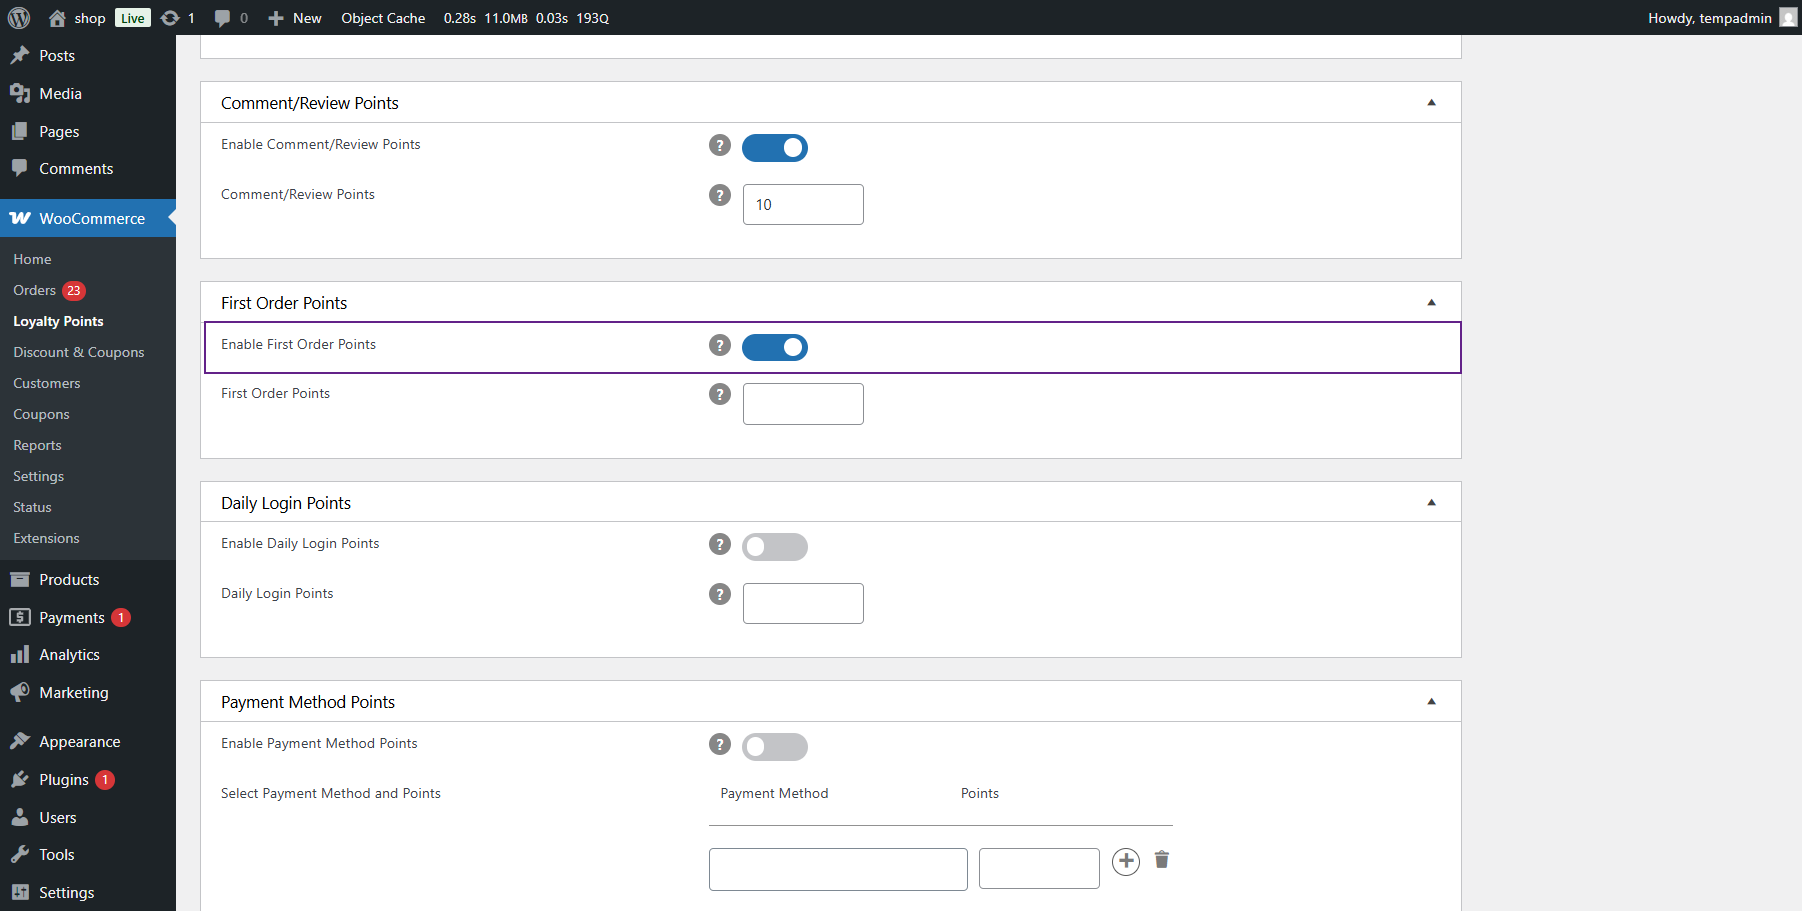
- Admin sets the number of points awarded. Points are awarded after the order status is set to Completed or any other defined status.
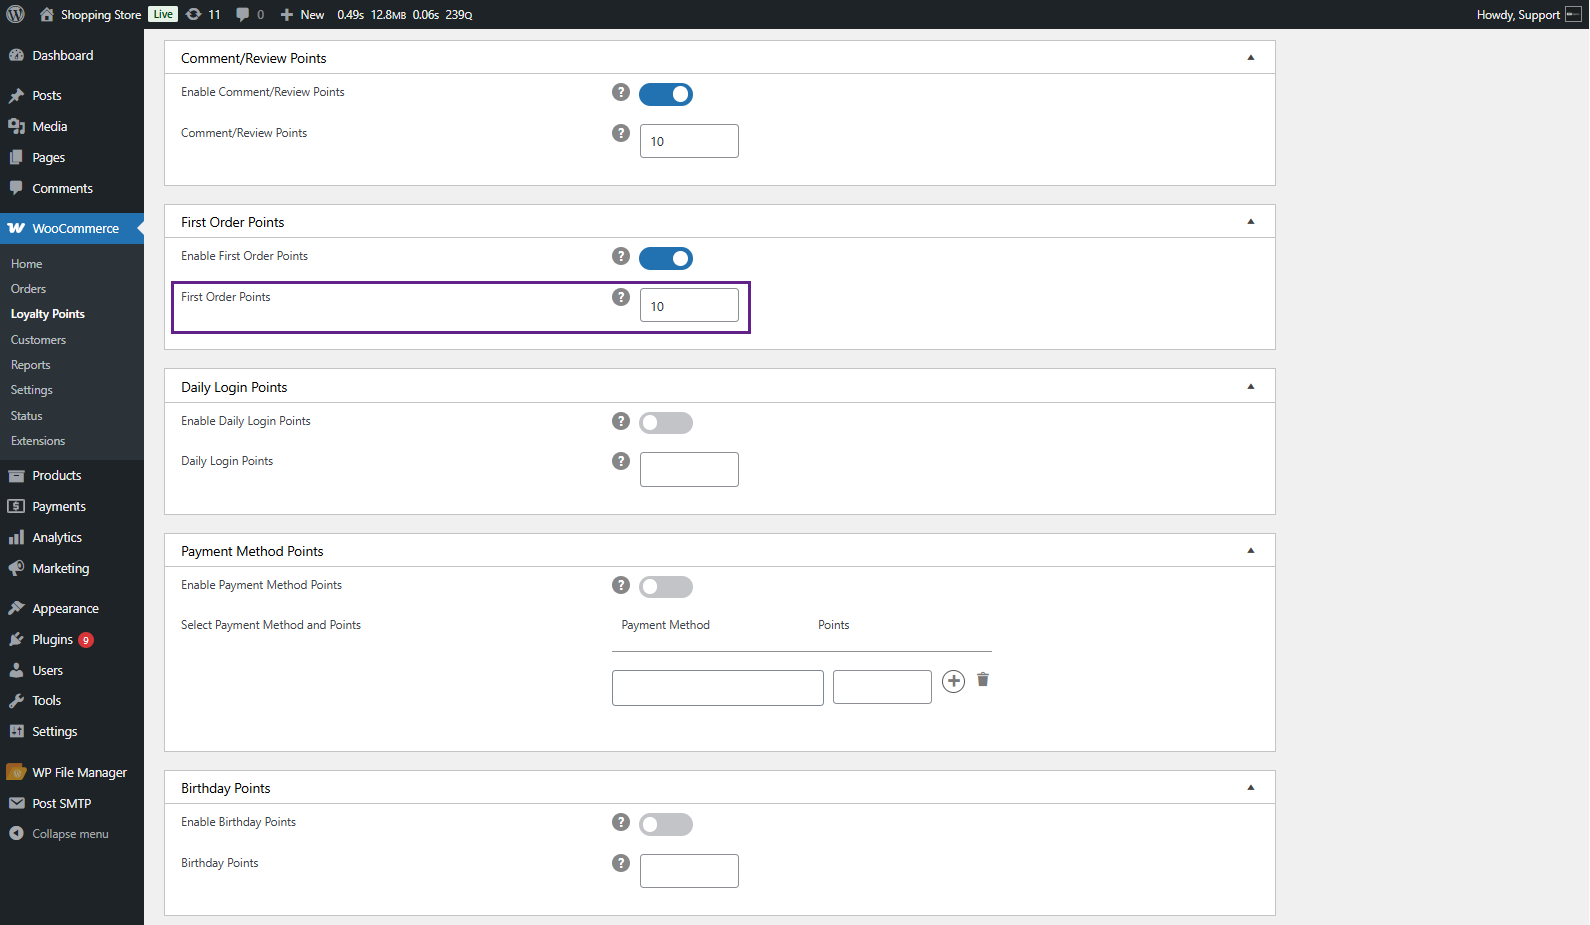
Front End Impact
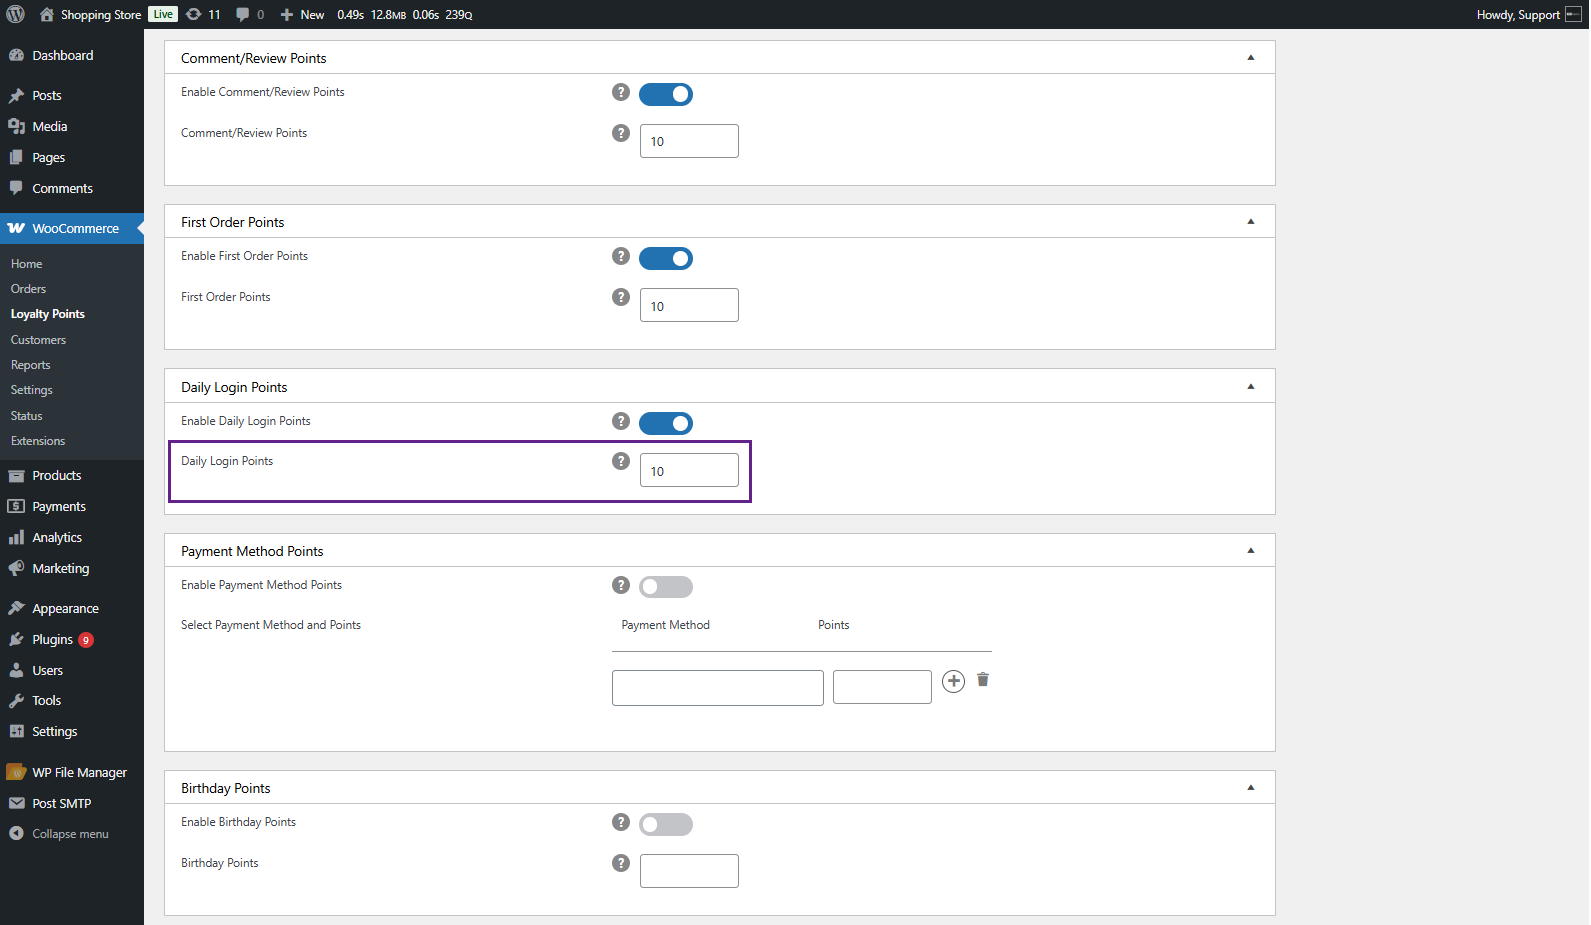
Daily Login Points
↑ Back to top- Users earn points for logging in daily. Admin can enable/disable this feature.
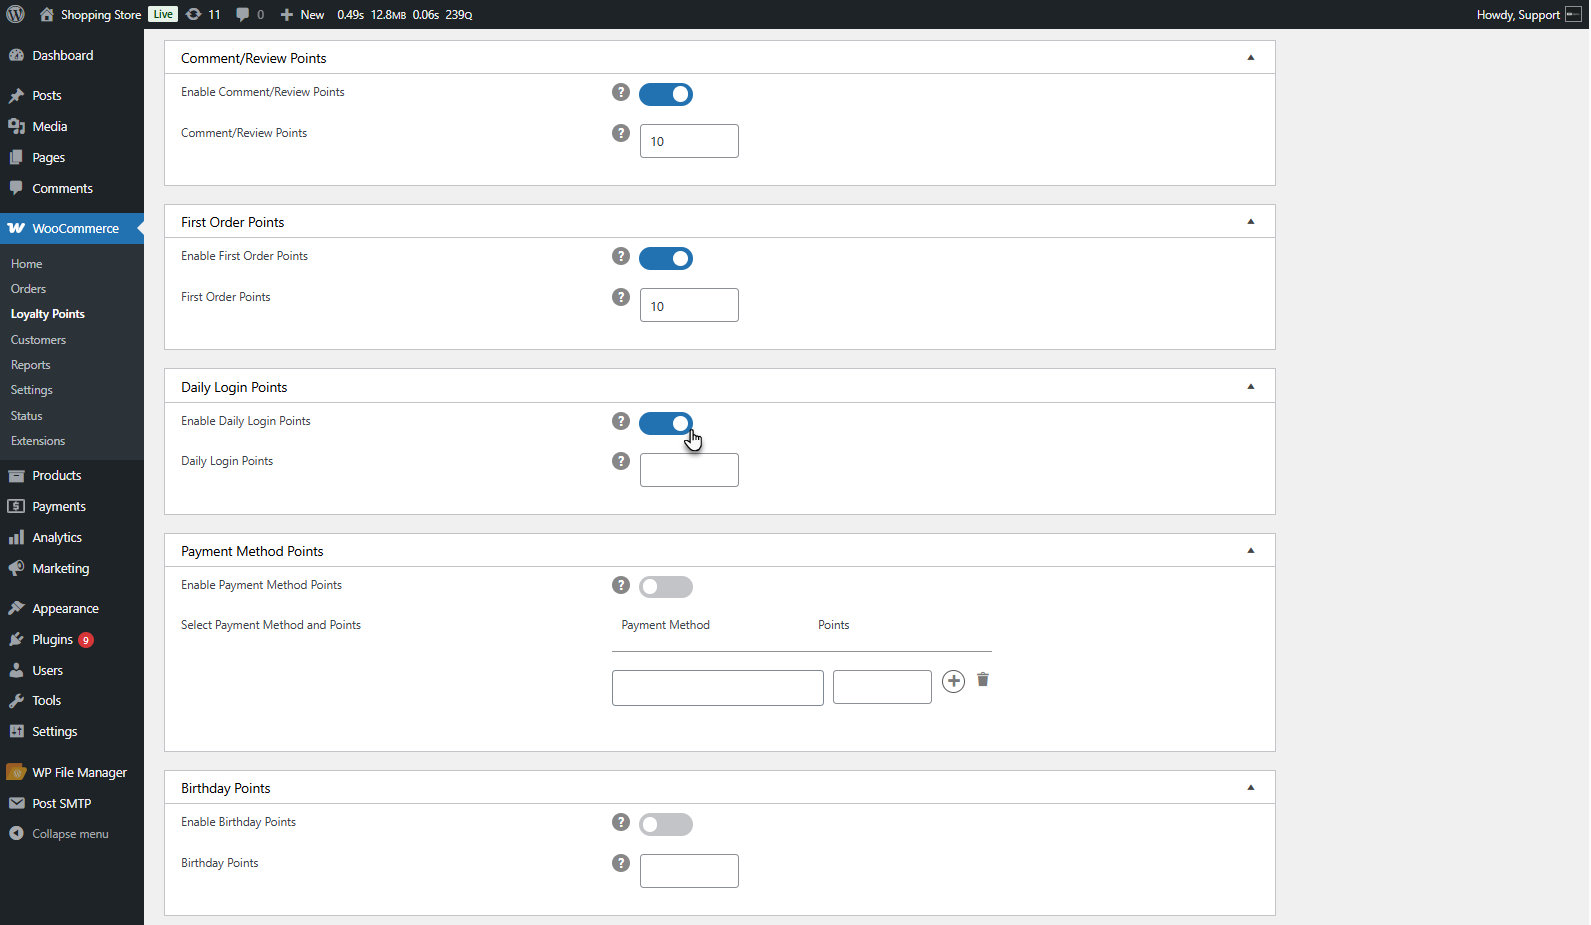
- Admin sets the number of points awarded per login.
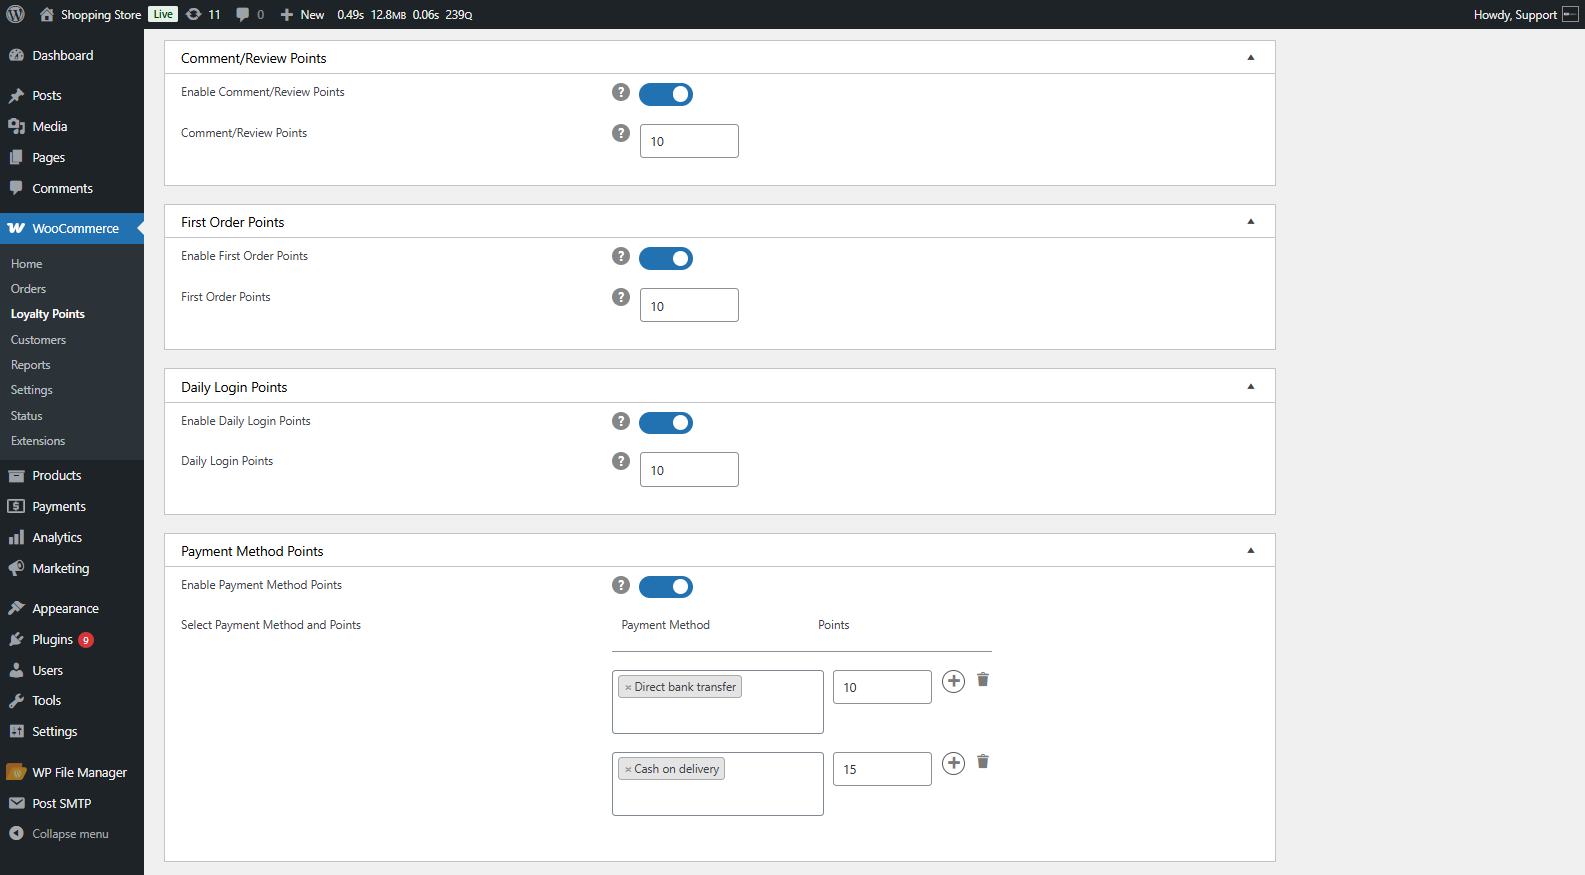
Points on Payment Method
↑ Back to top- Users earn points based on their chosen payment method. The admin can enable/disable this feature.
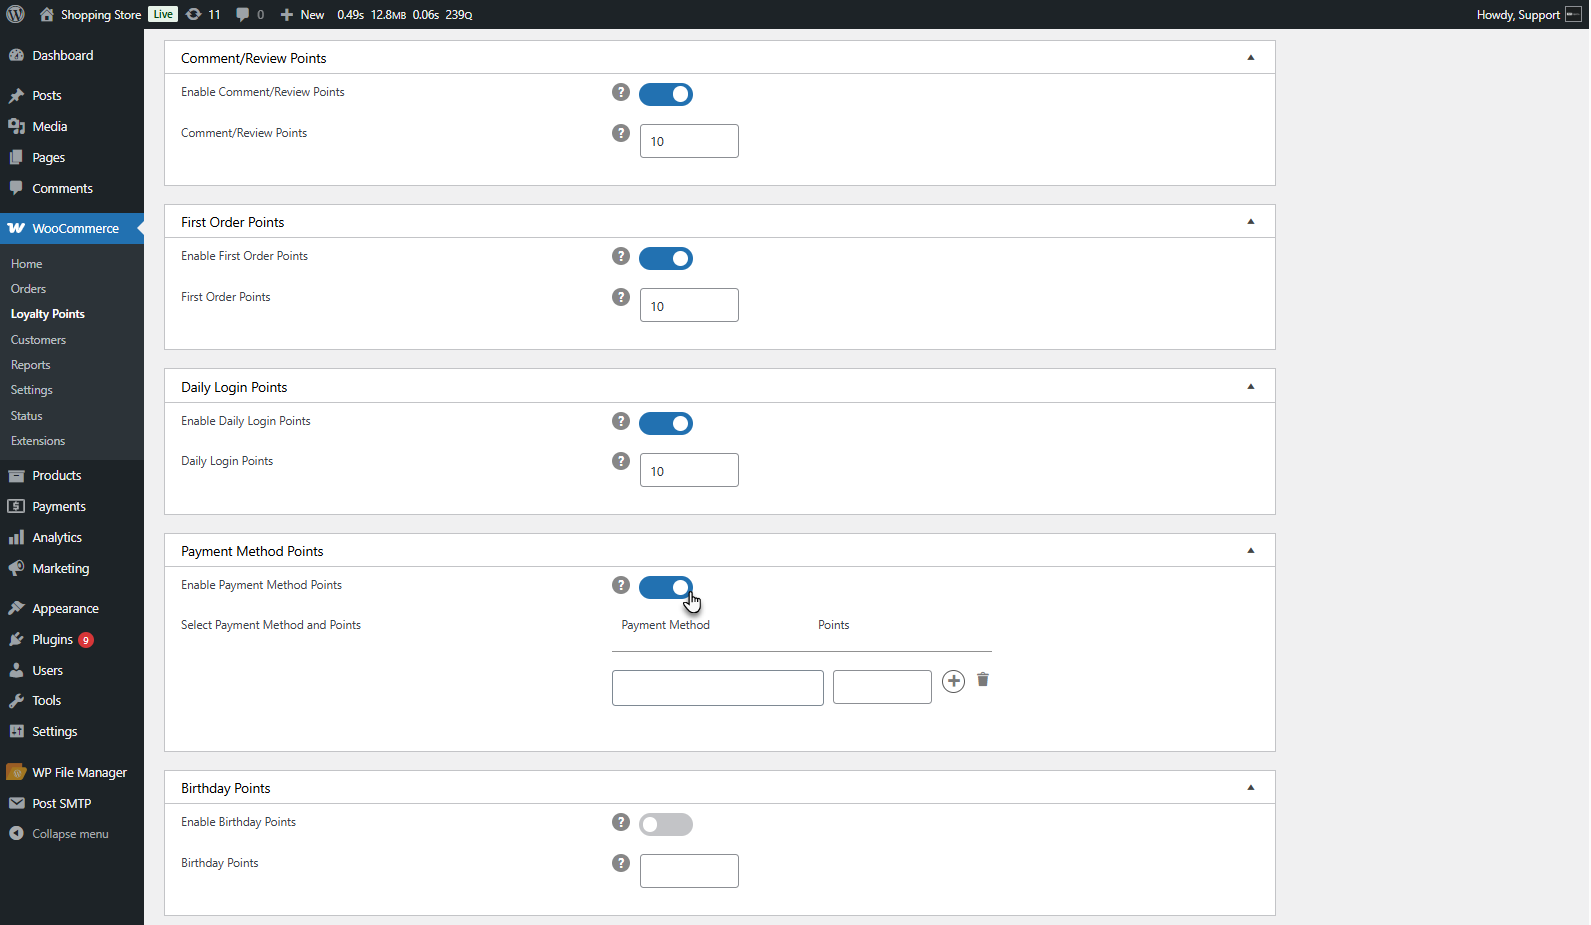
- The admin selects the payment methods from a dropdown.

- The admin sets different points for each payment method.
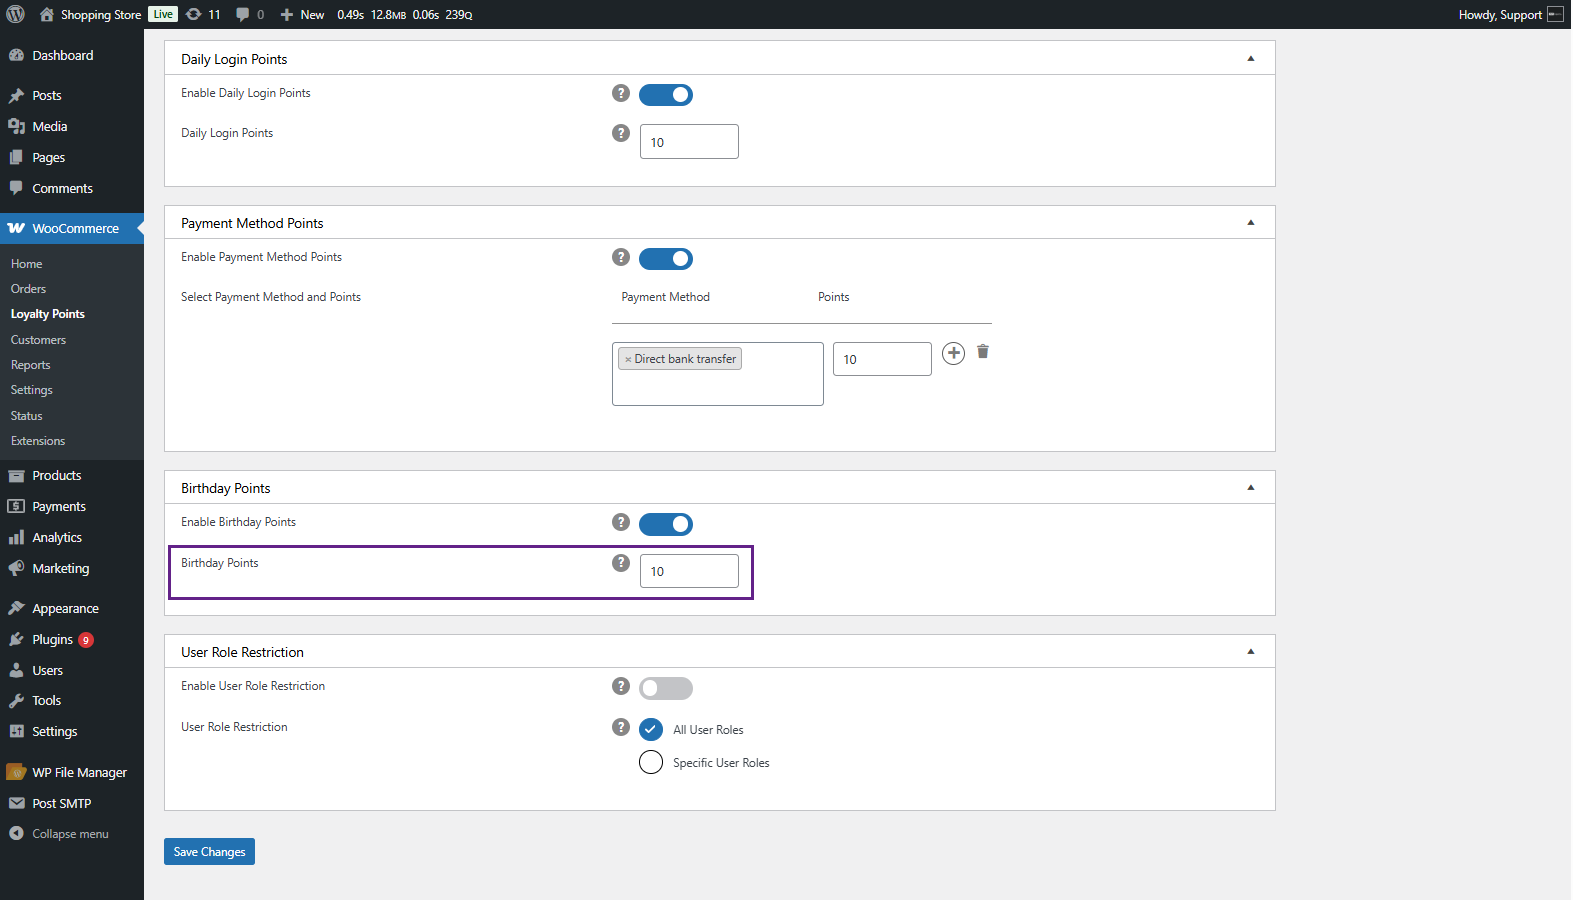
Birthday Points
↑ Back to top- Users earn points on their birthdays. The admin can enable/disable this feature.
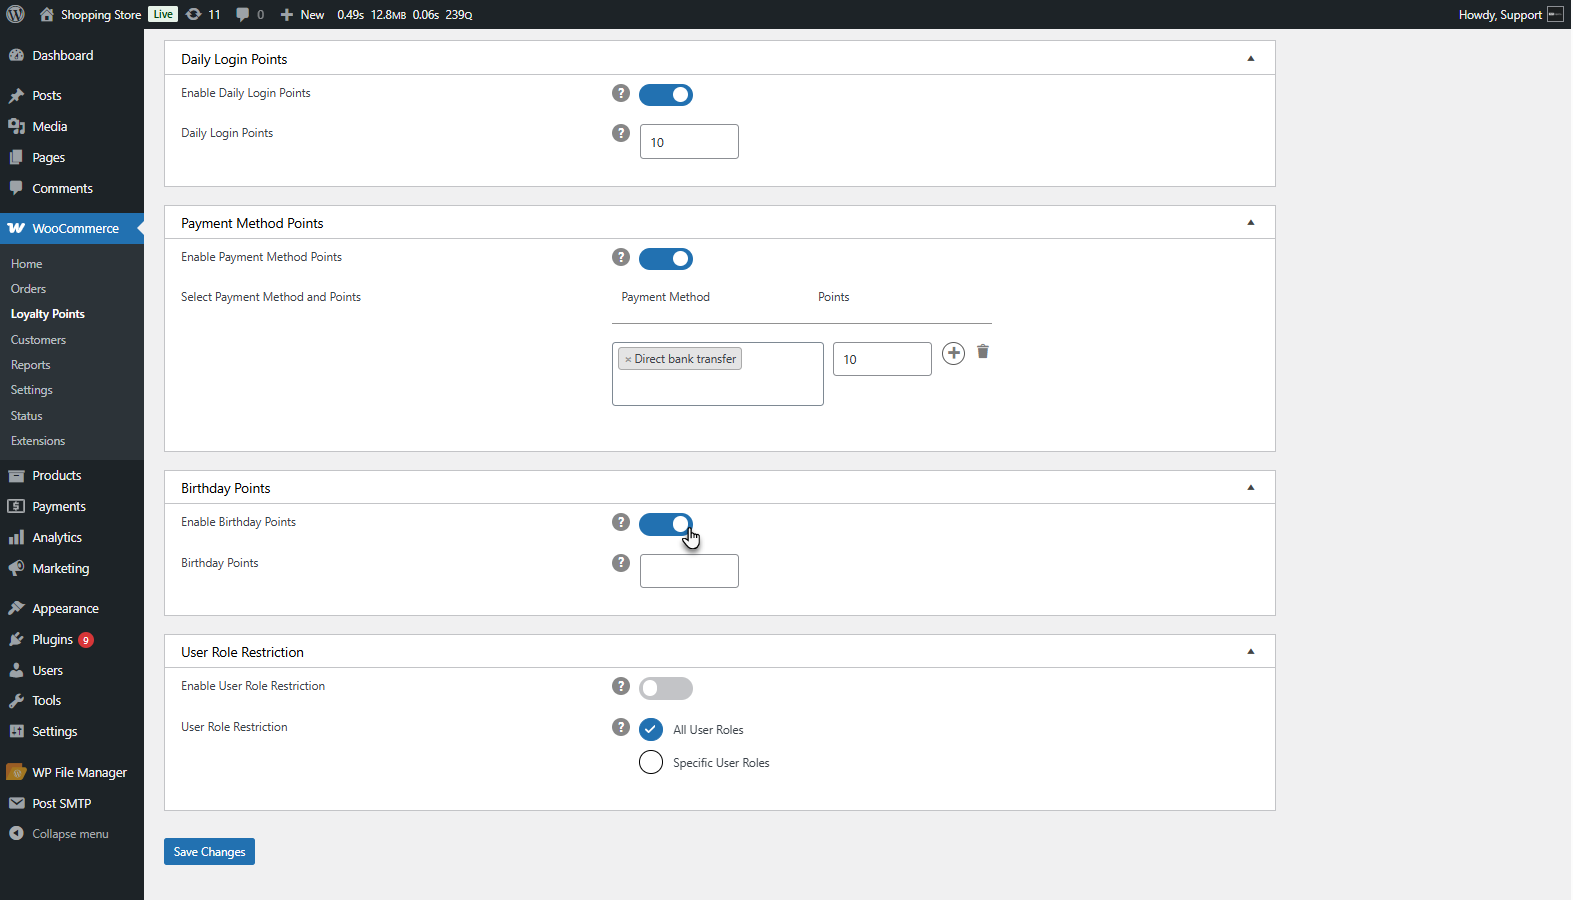
- Admin sets the number of points awarded.
Front End Impact
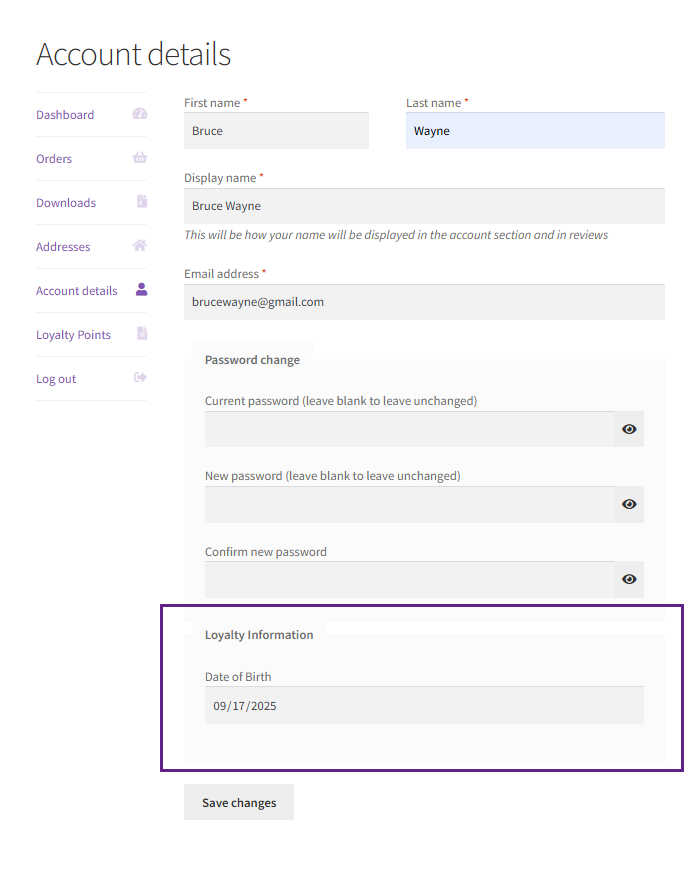
PLEASE NOTE: Users can enter their birthdate once during registration or in account details, while the admin can edit it from the backend.
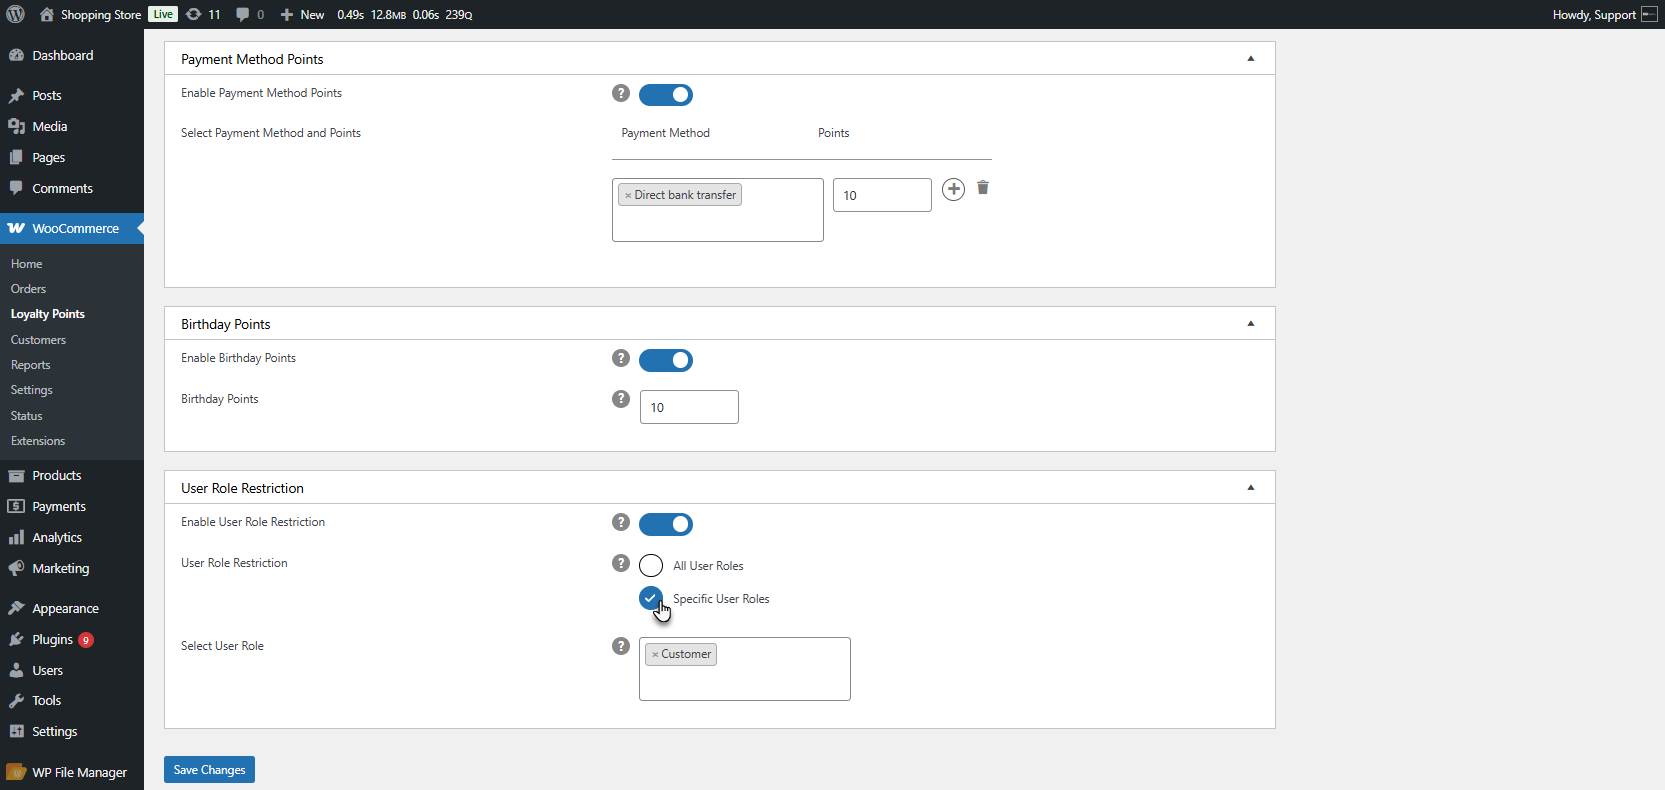
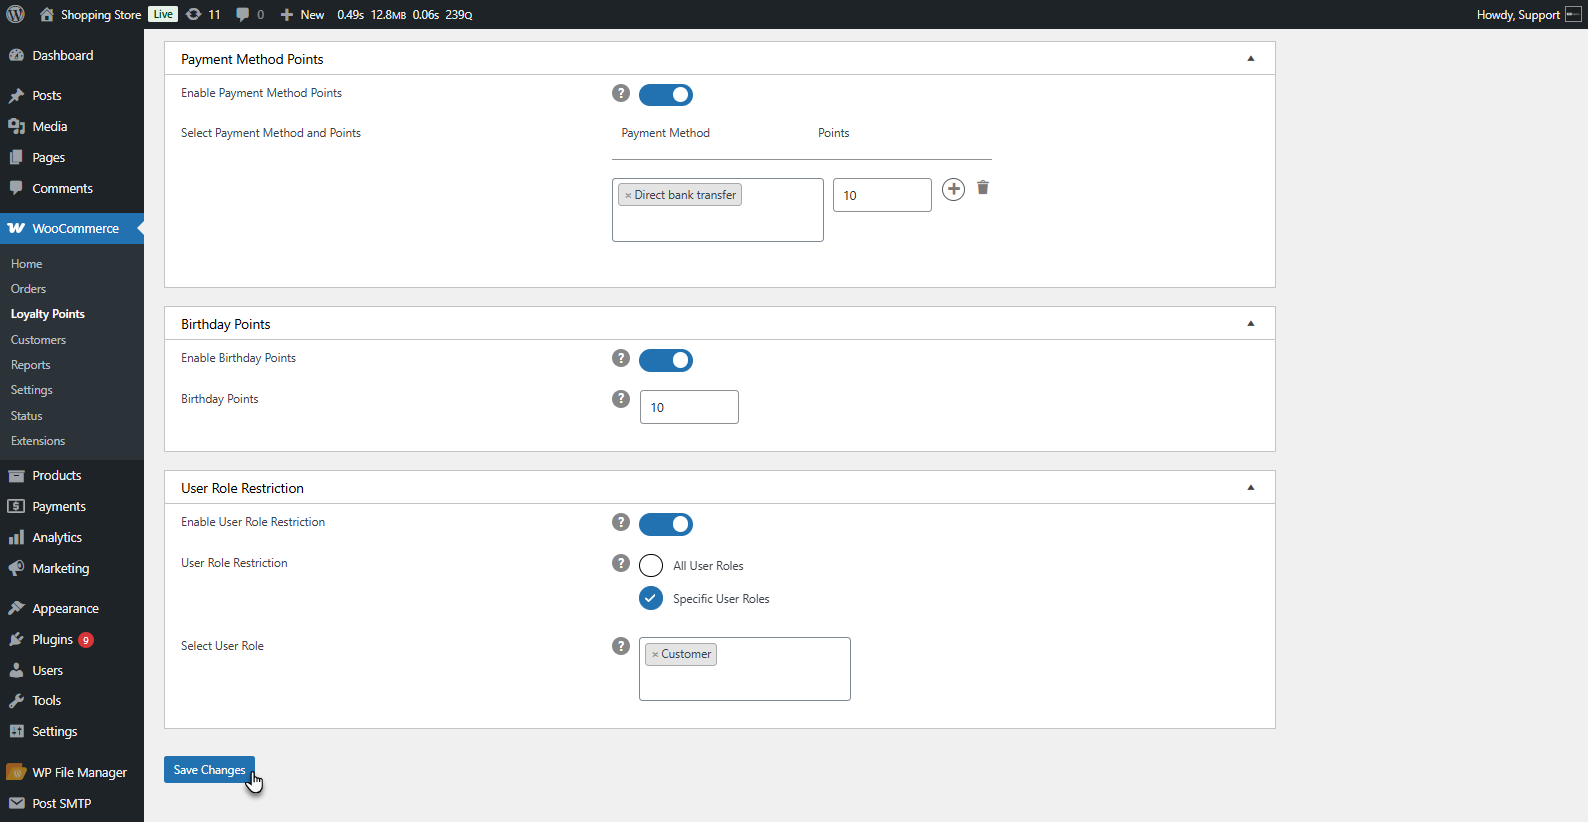
User Role Restriction
↑ Back to top- Admin can restrict points to specific user roles. The admin can enable/disable this feature.
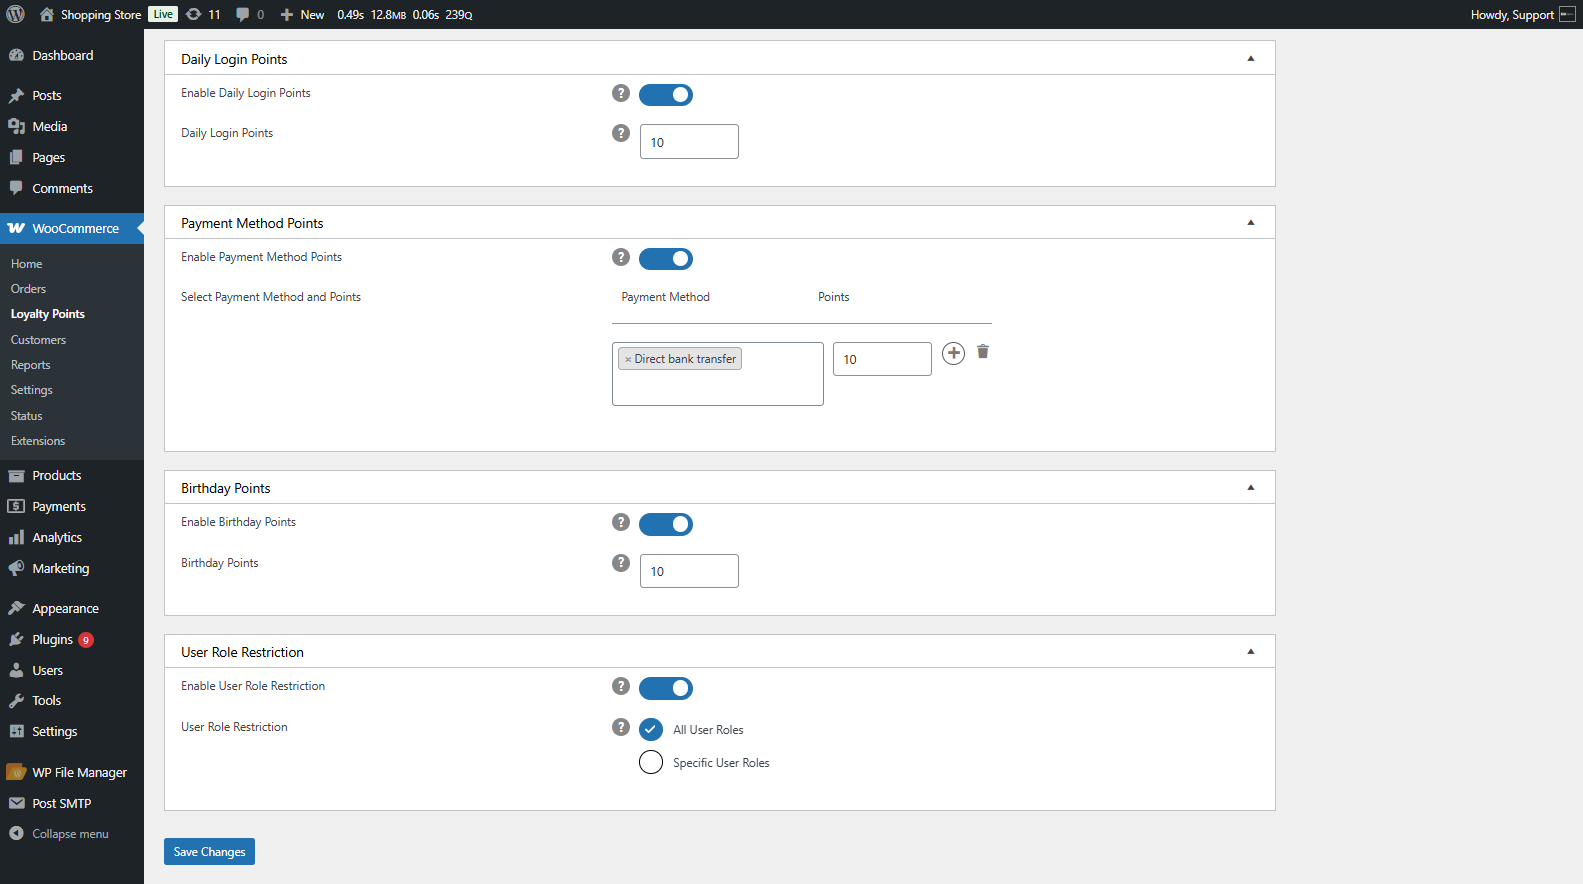
- Select All User Roles to assign points to all user roles.
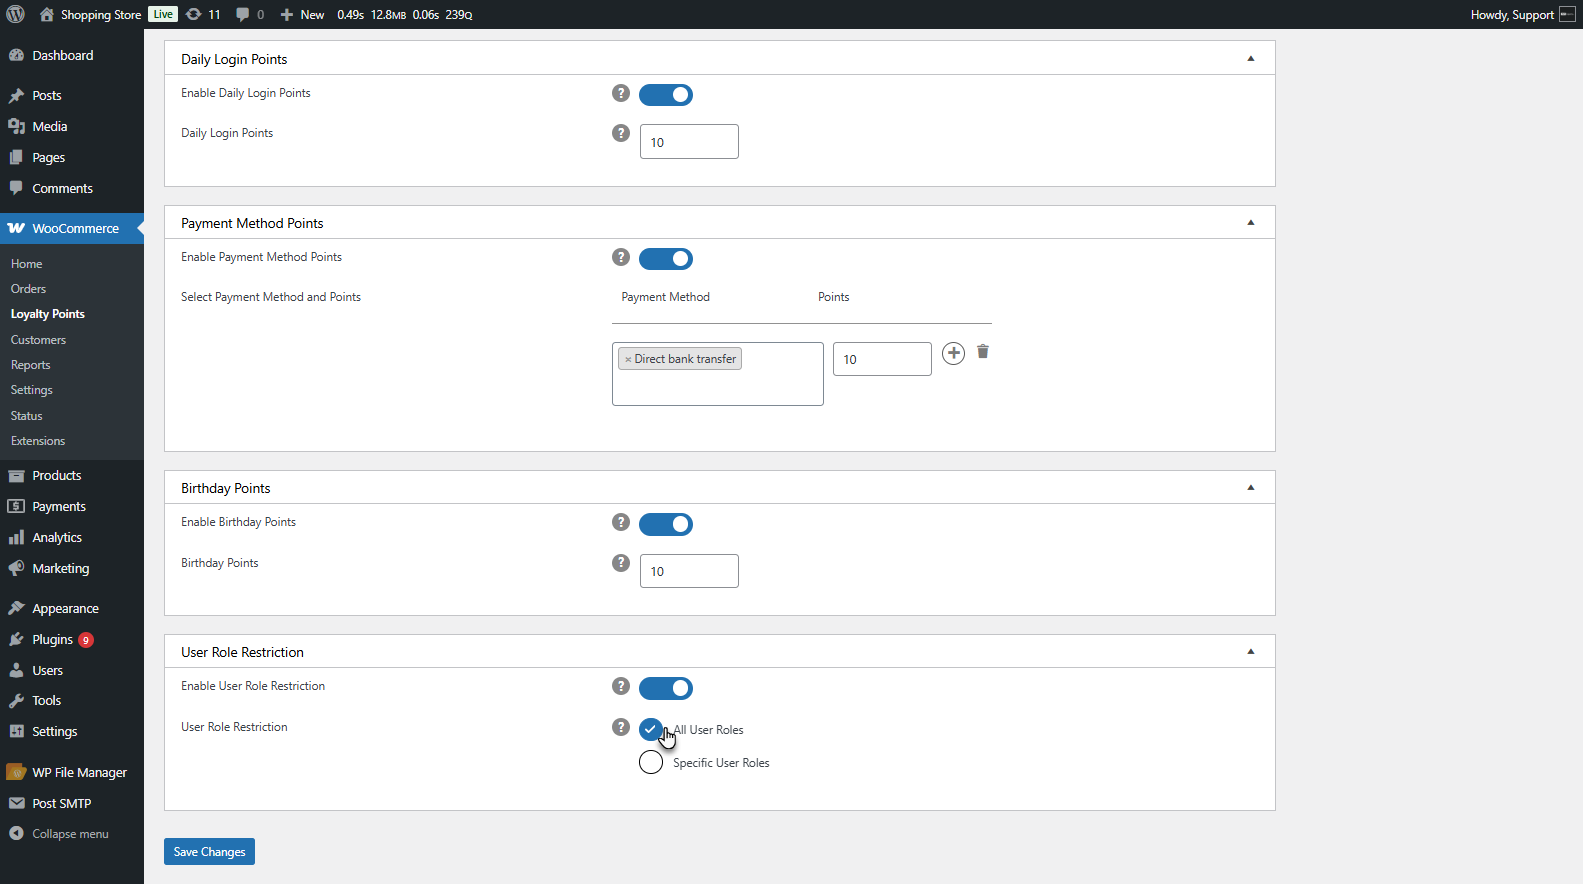
- Select Specific User Roles to limit point assignments to selected roles.
Saving Changes
↑ Back to top- Click the Save Changes button at the bottom to apply the updated settings.
Order Points
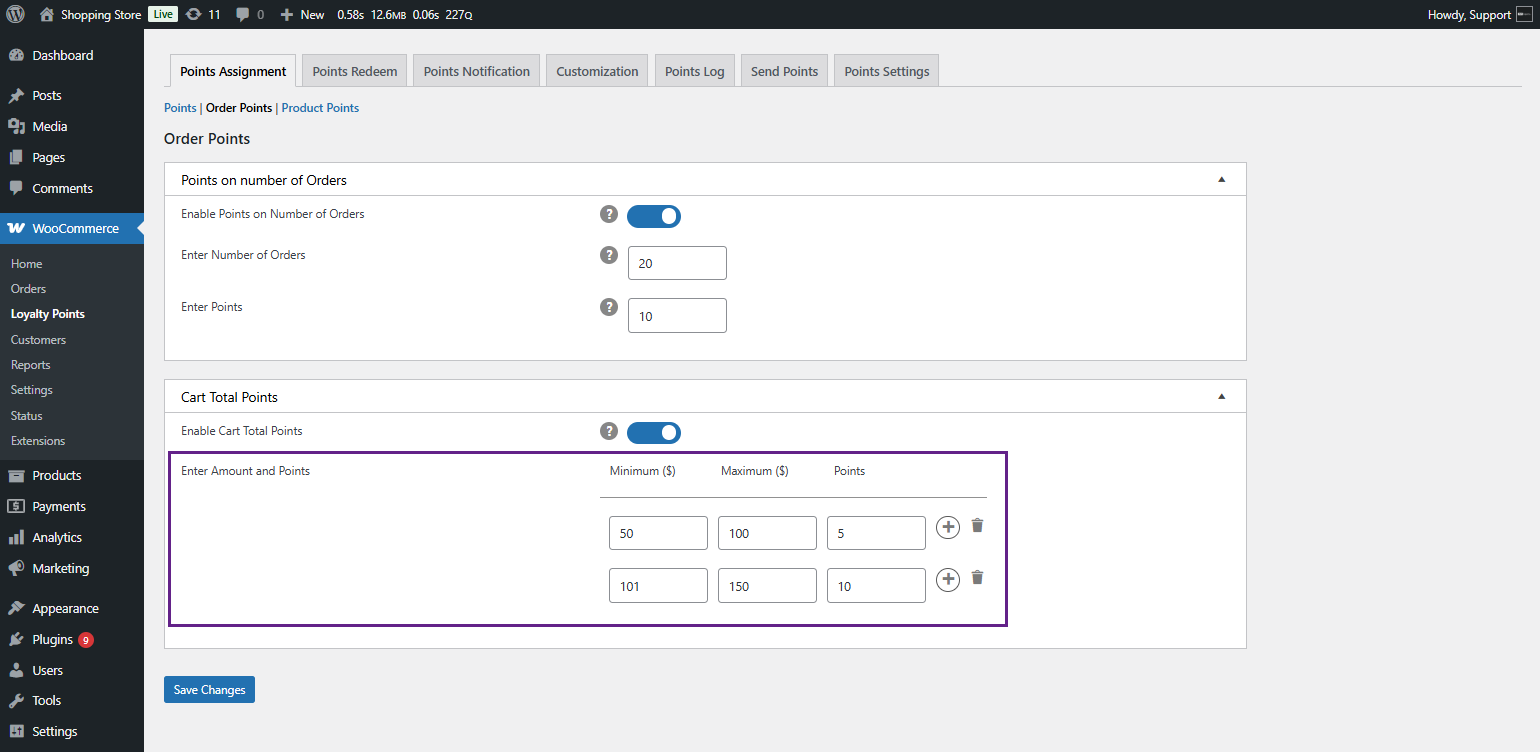
↑ Back to top- The Order Points settings allow the admin to assign points based on the number of orders placed or the cart subtotal amount.
- Navigate to WordPress Admin Dashboard > WooCommerce > Loyalty Points > Order Points.
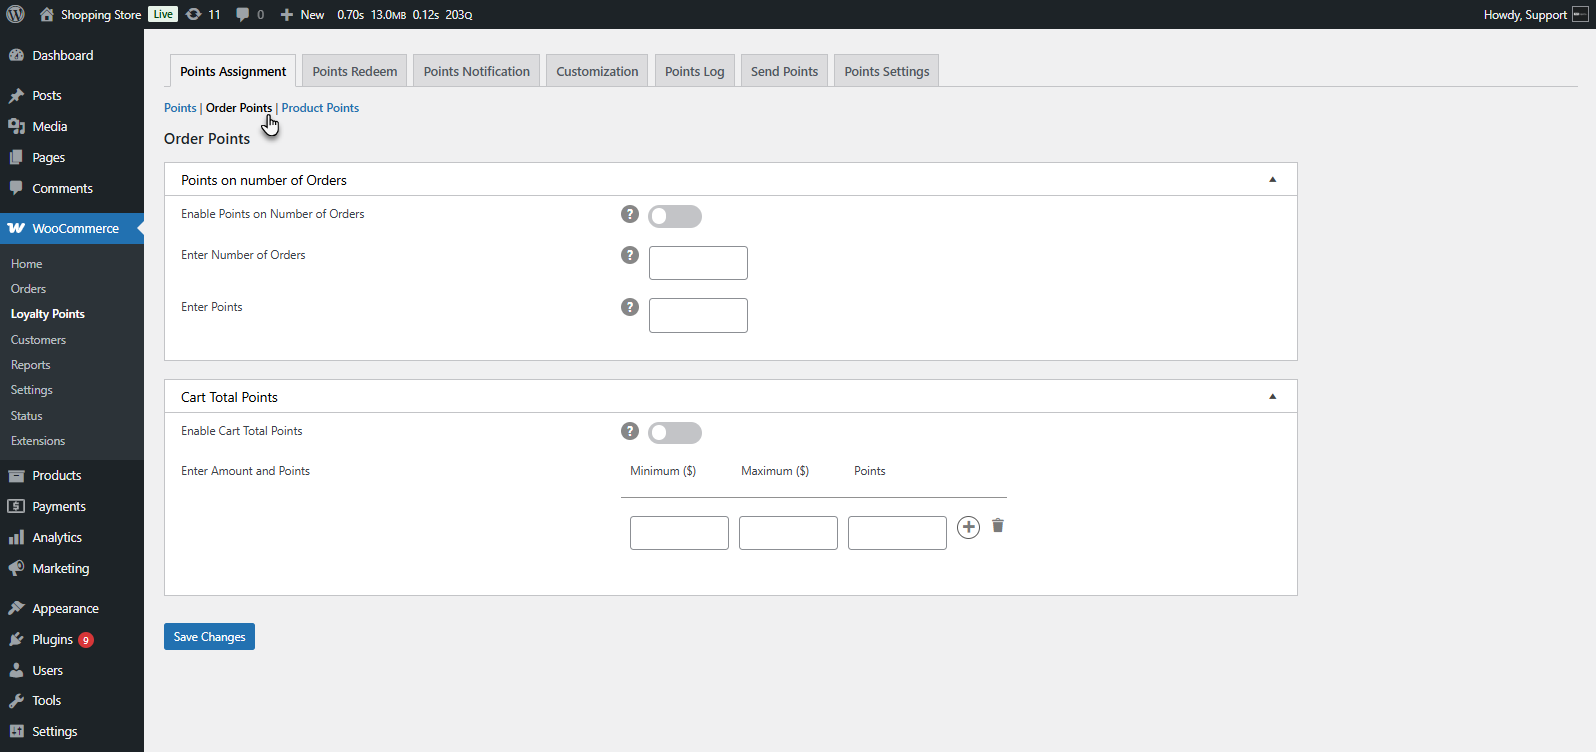
Points on Number of Orders
↑ Back to top- Users earn points after completing a specific number of orders. The admin can enable/disable this feature by using a toggle.
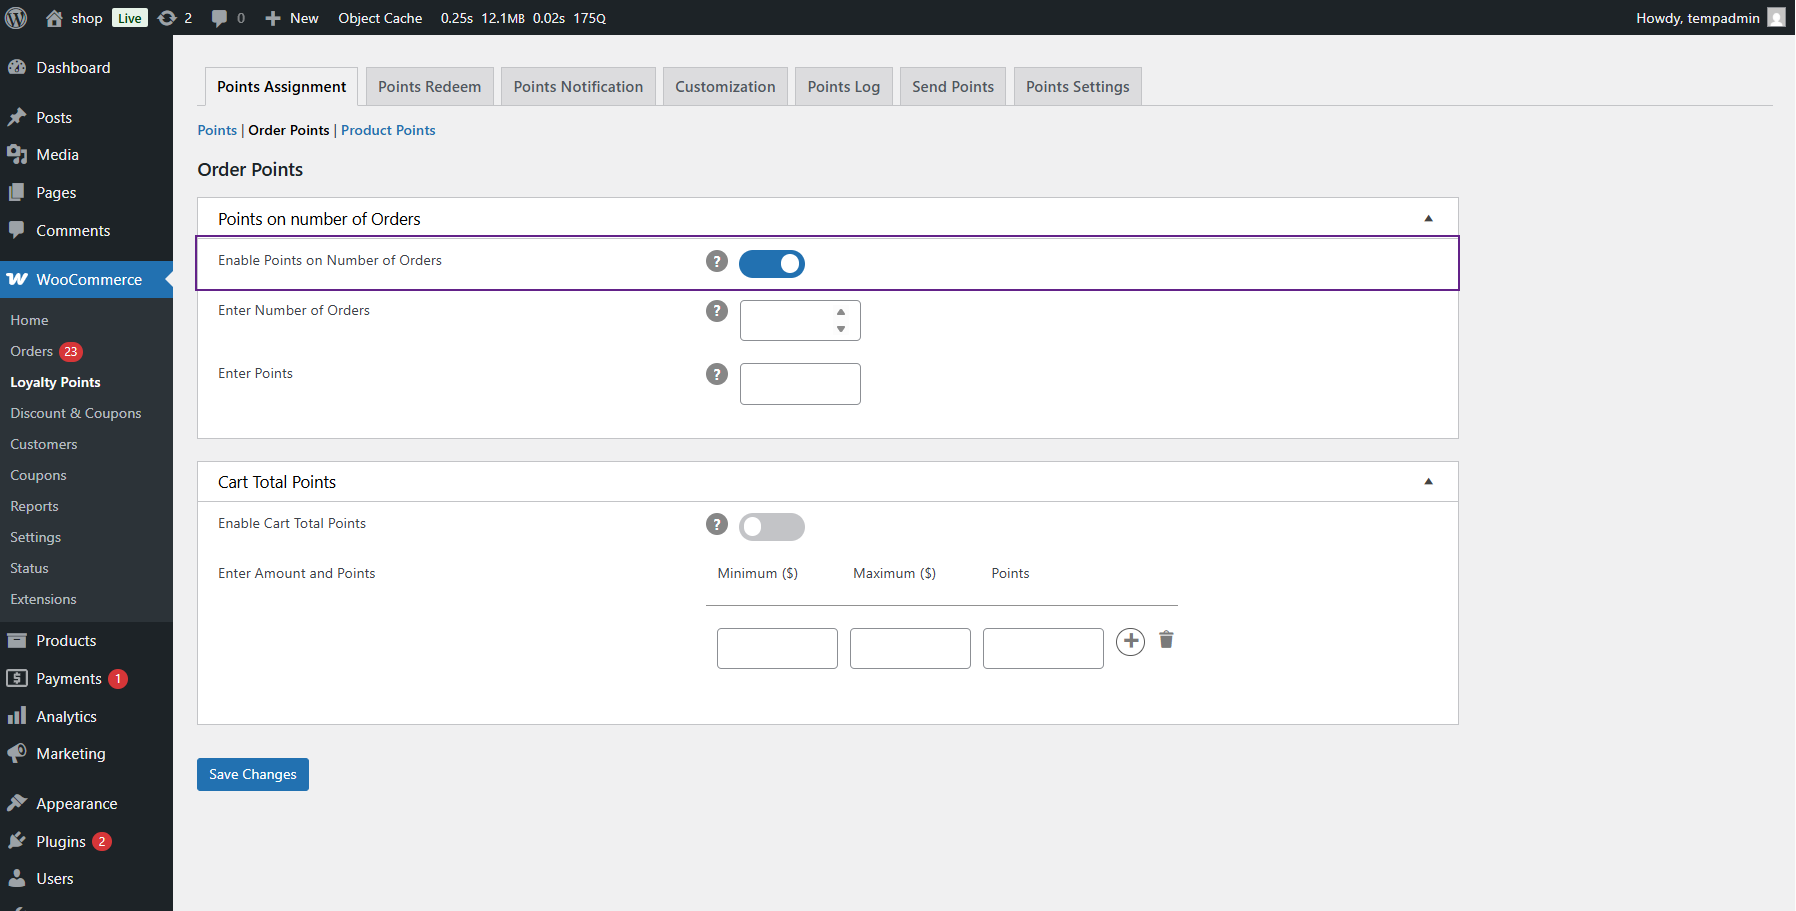
- Admin specifies:
- The number of orders required.
- The points users will receive.
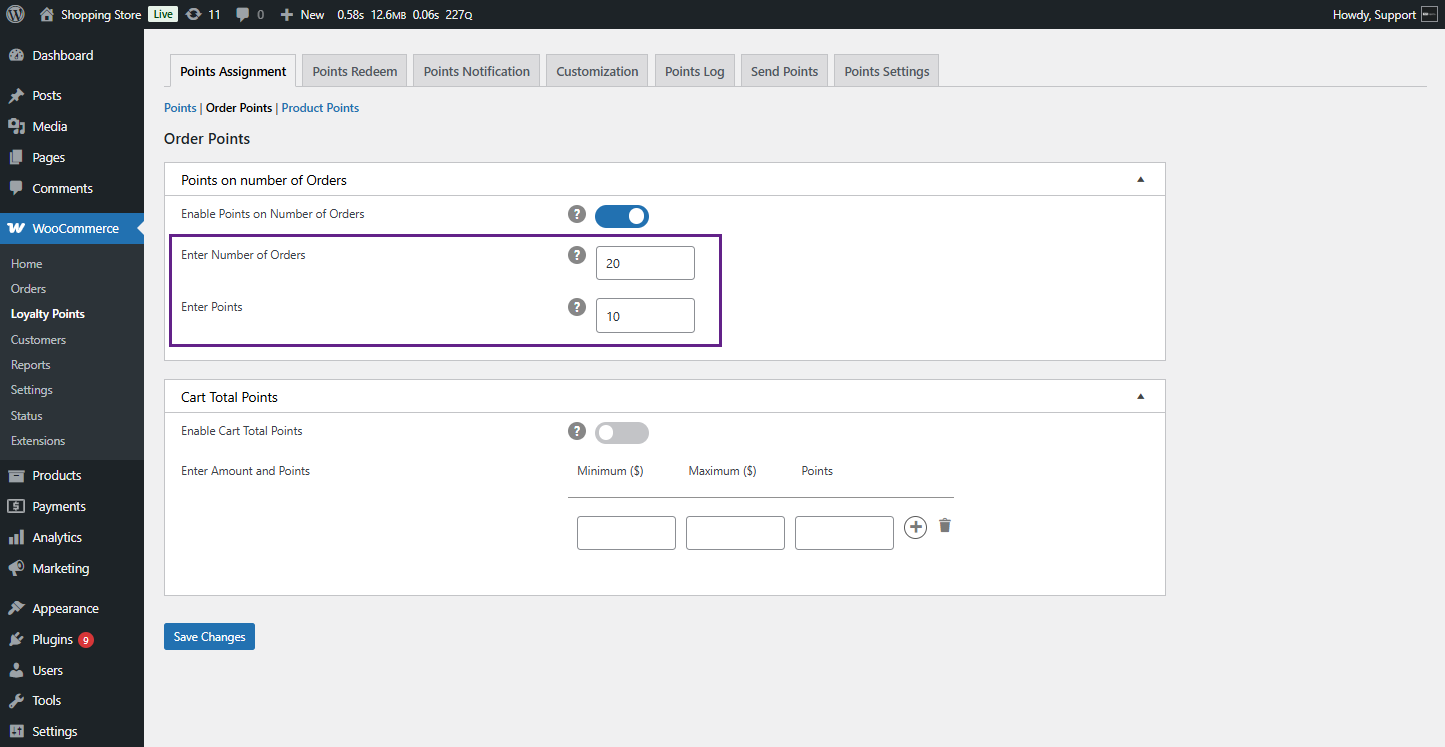
- Example: If set to 2 orders, users receive points upon completing two successful orders.
Front End Impact
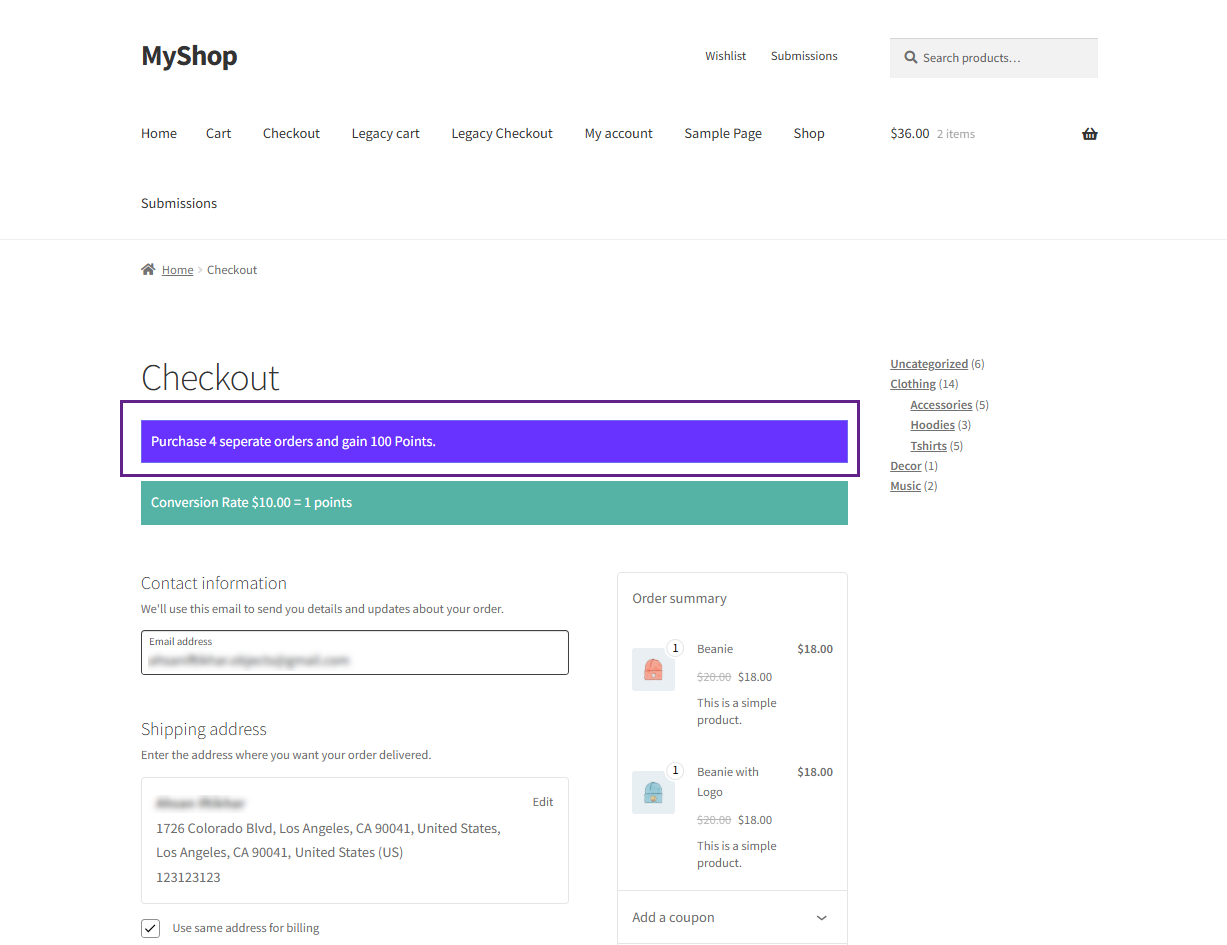
Cart Total Points (Tier-Based)
↑ Back to top- Points are assigned based on the total cart value within predefined tiers. Admin can enable/disable this feature.
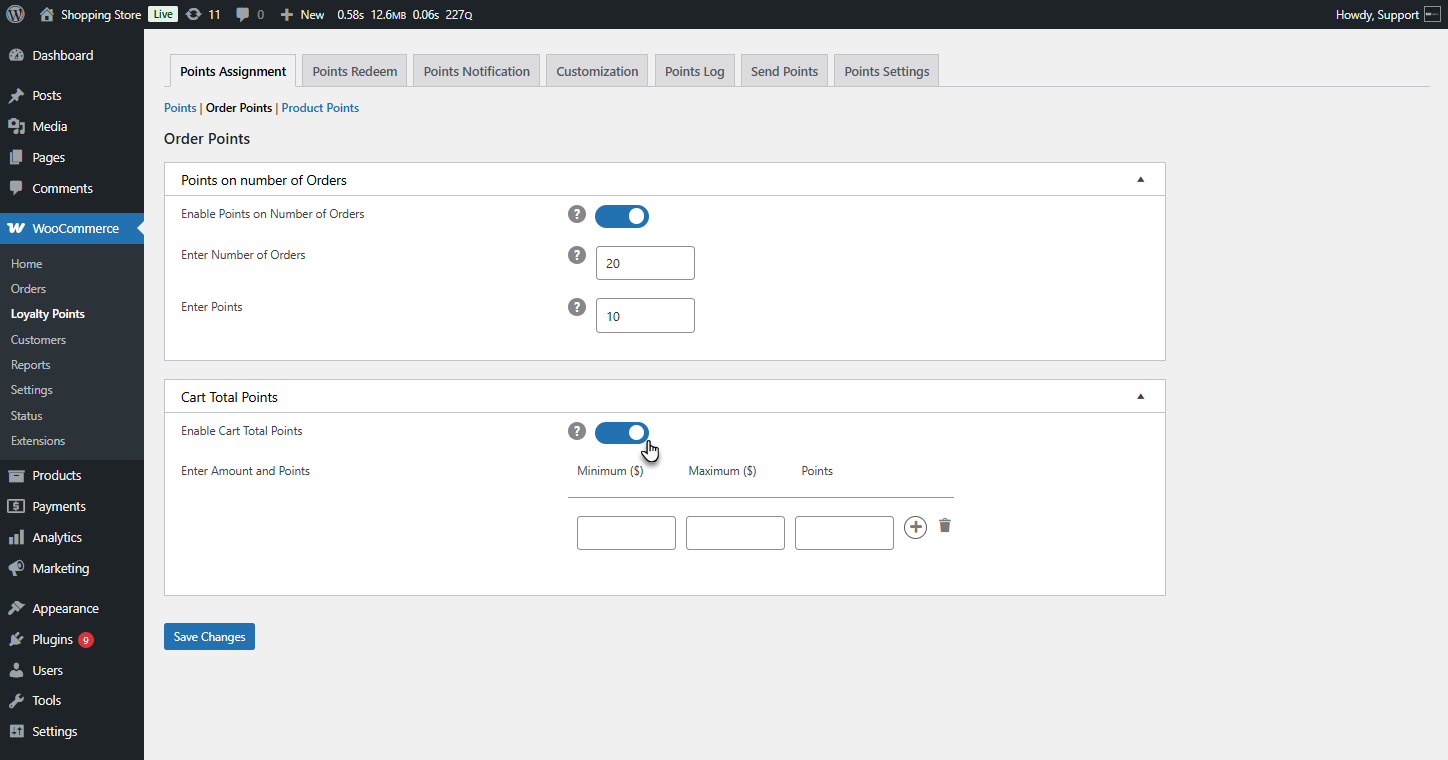
- Admin sets:
- Minimum and maximum cart amount for each tier.
- The number of points awarded per tier.
- Multiple tiers with different point values.
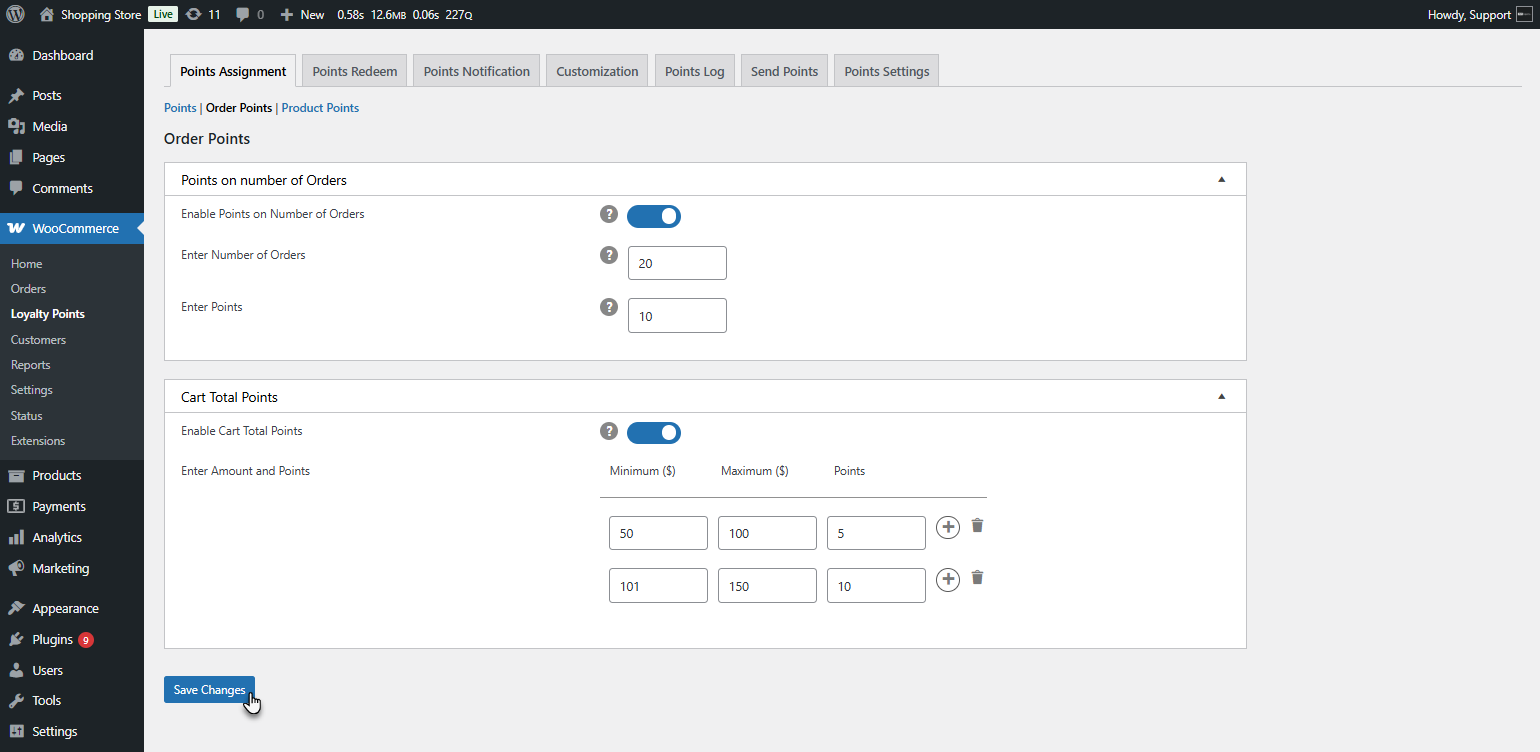
Saving Changes
- Click the Save Changes button at the bottom to apply the updated settings.
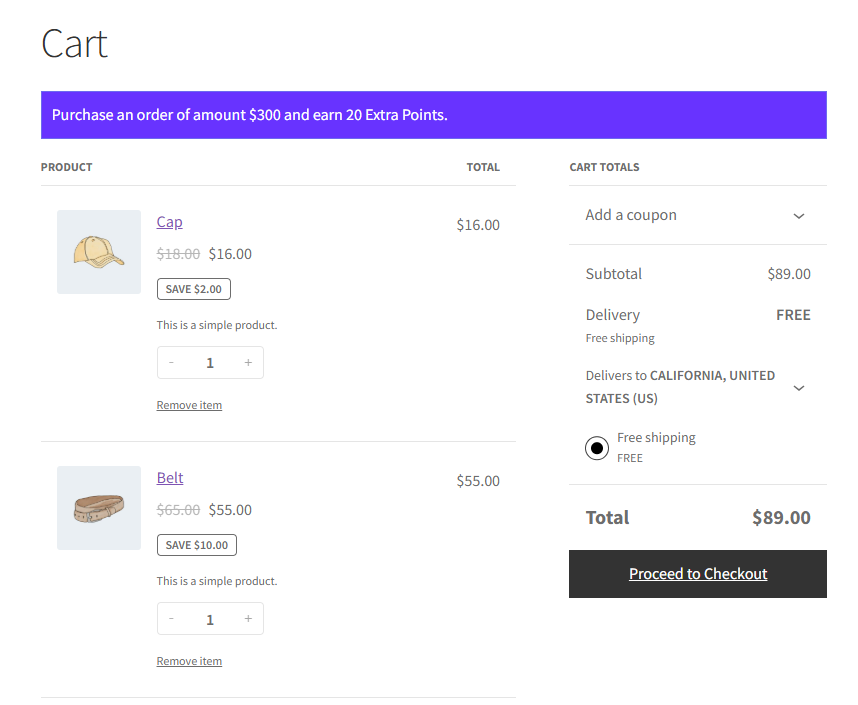
Front End Impact
Product Points
↑ Back to top- The Product Points settings allow the admin to assign points based on products or product categories. These settings enable a flexible reward system based on purchases.
- Navigate to WordPress Admin Dashboard > WooCommerce > Loyalty Points > Product Points.
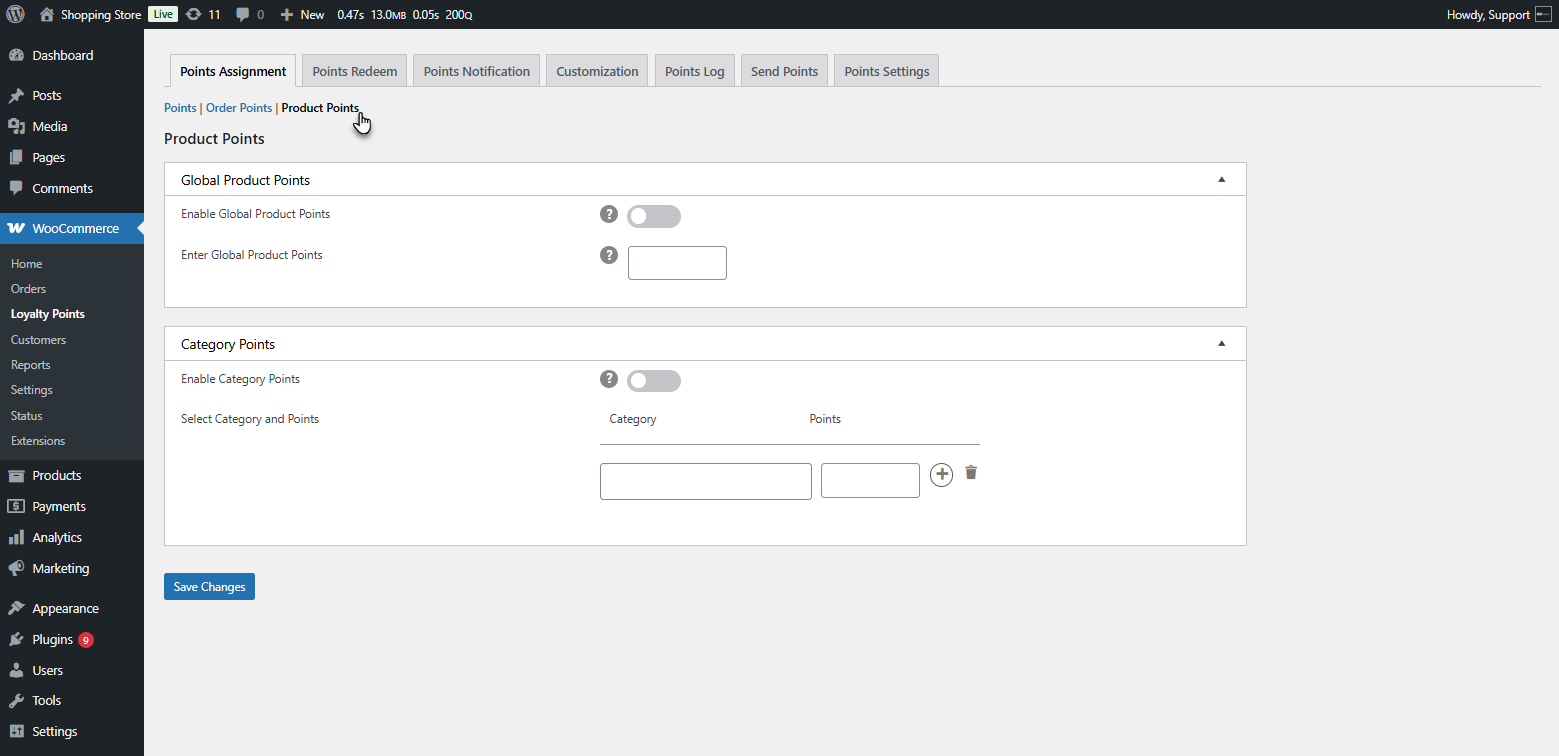
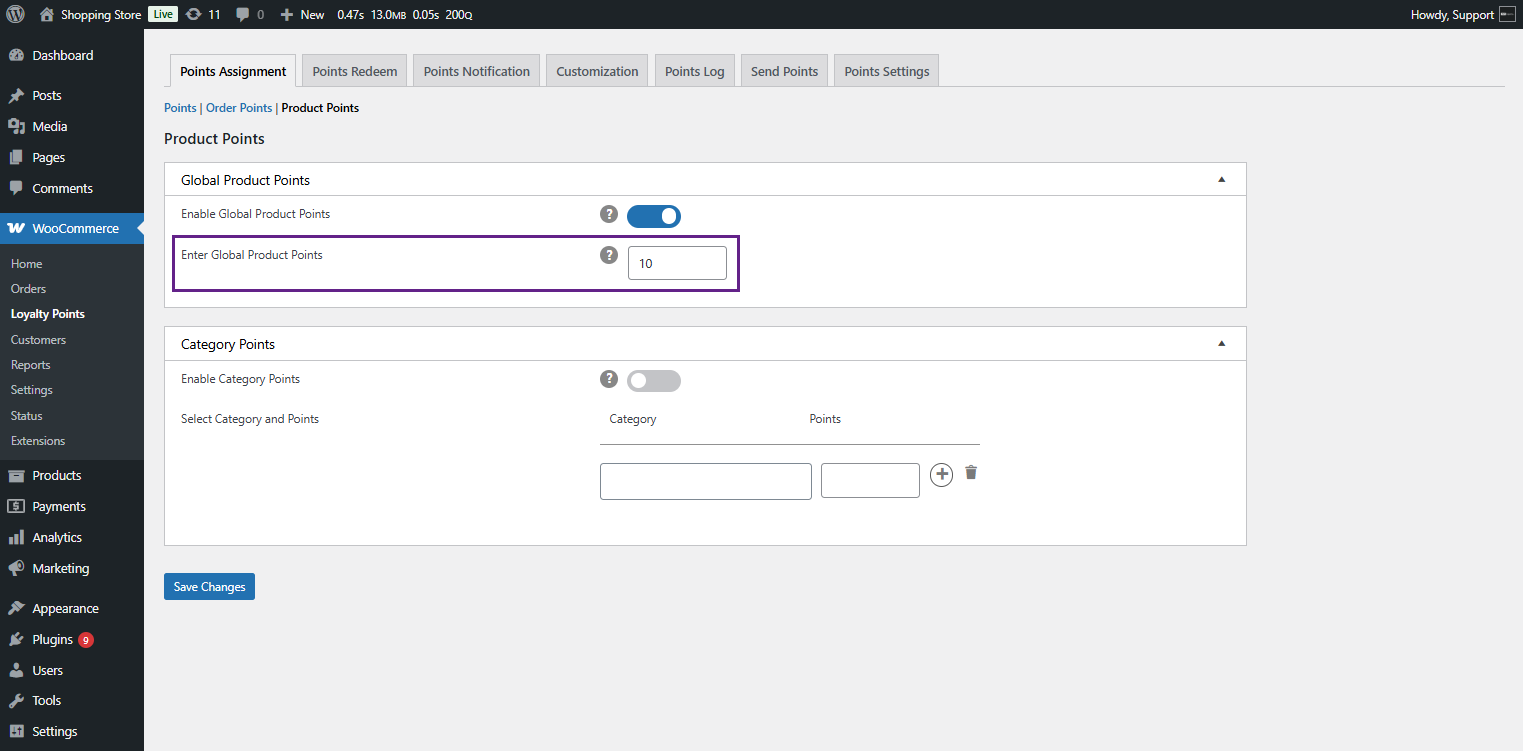
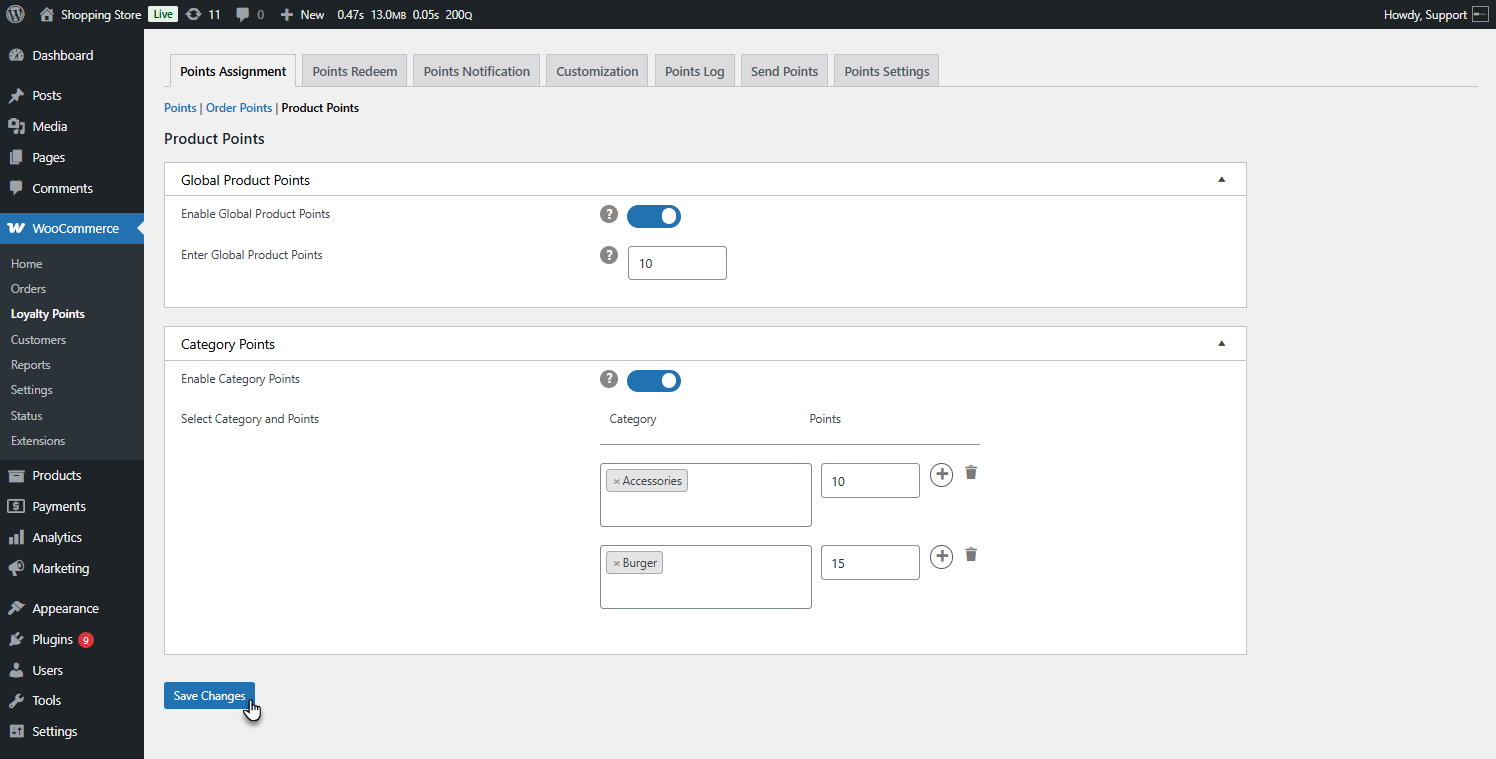
Global Product Points
↑ Back to top- Users earn points on every product purchase. Points apply to all products globally.
- Admin can enable/disable this feature using a toggle.
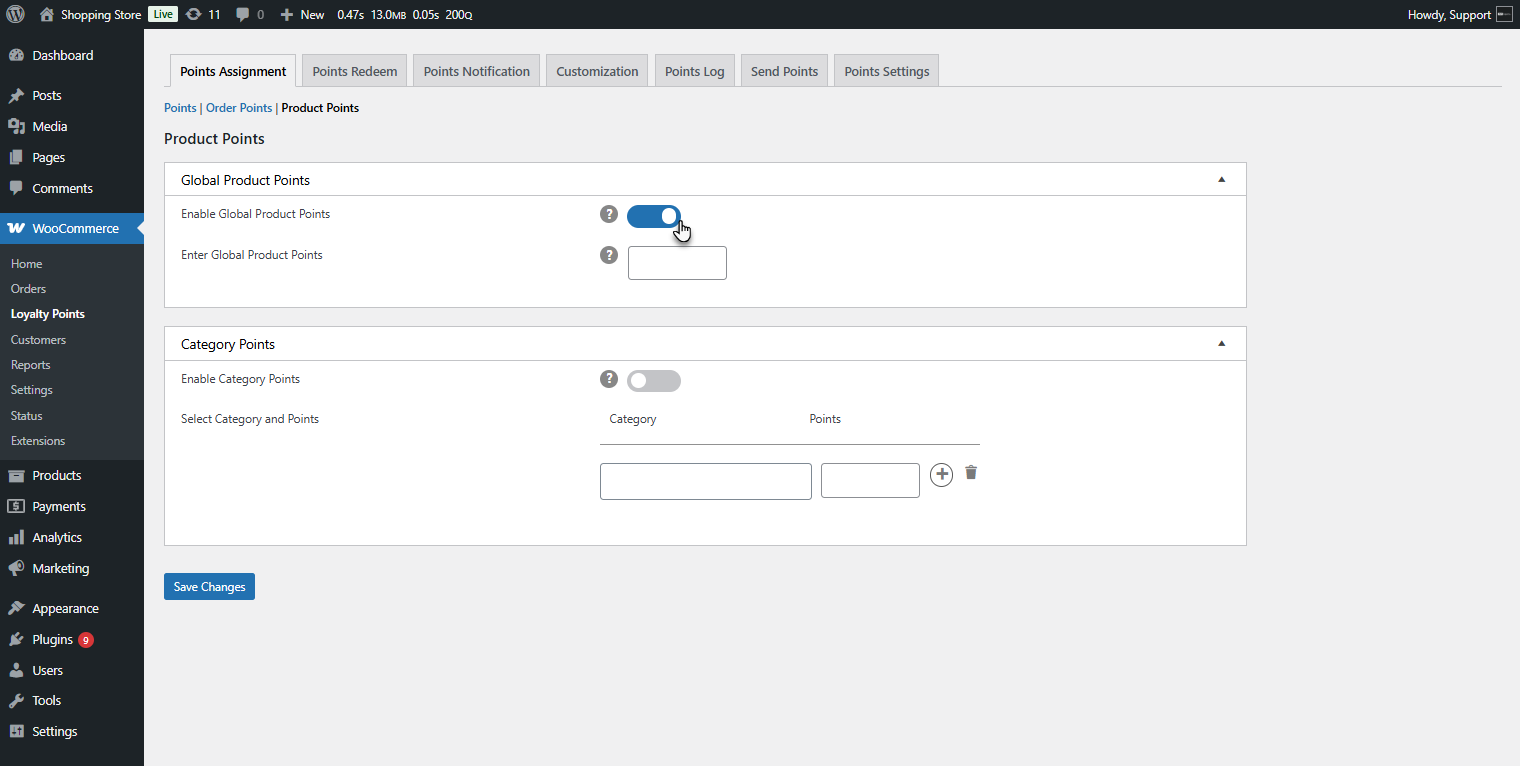
- Set the number of points users will receive.
Per Product Points
↑ Back to topYou can configure how loyalty points work for each product by editing product-level settings:
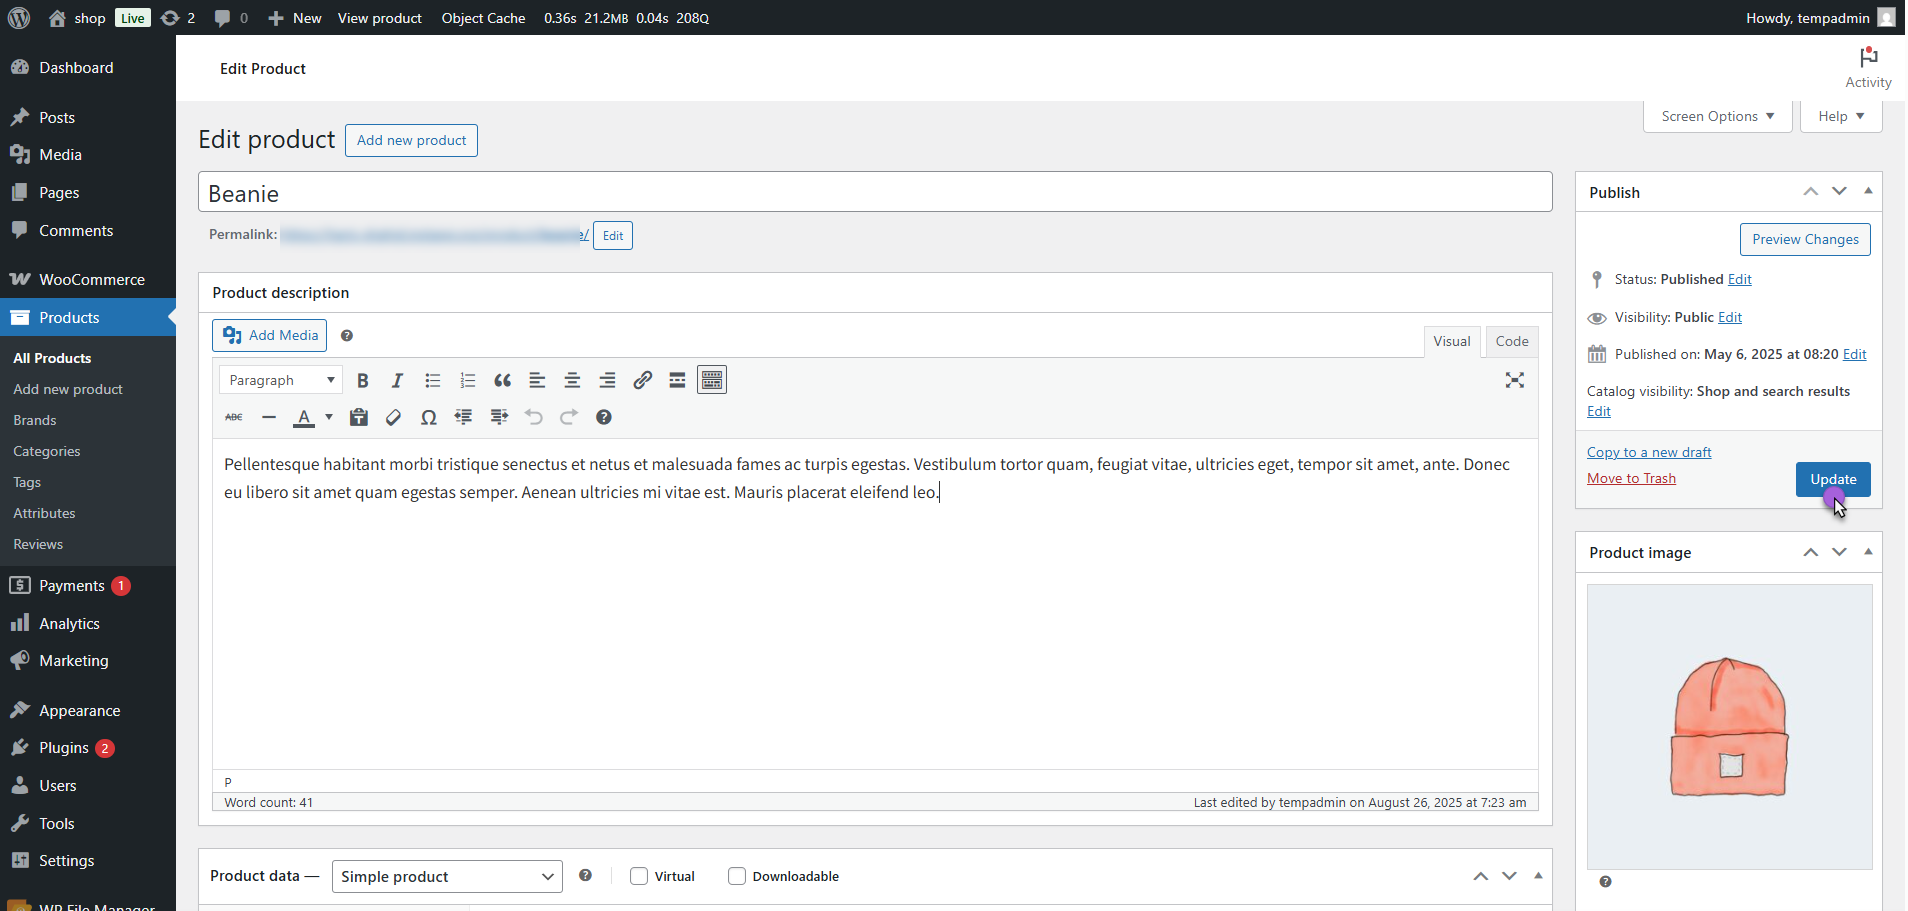
- Navigate to Products > All Products
- Edit the product where you want to assign loyalty points.
- Scroll down to the Product data section and select the Loyalty Points tab.
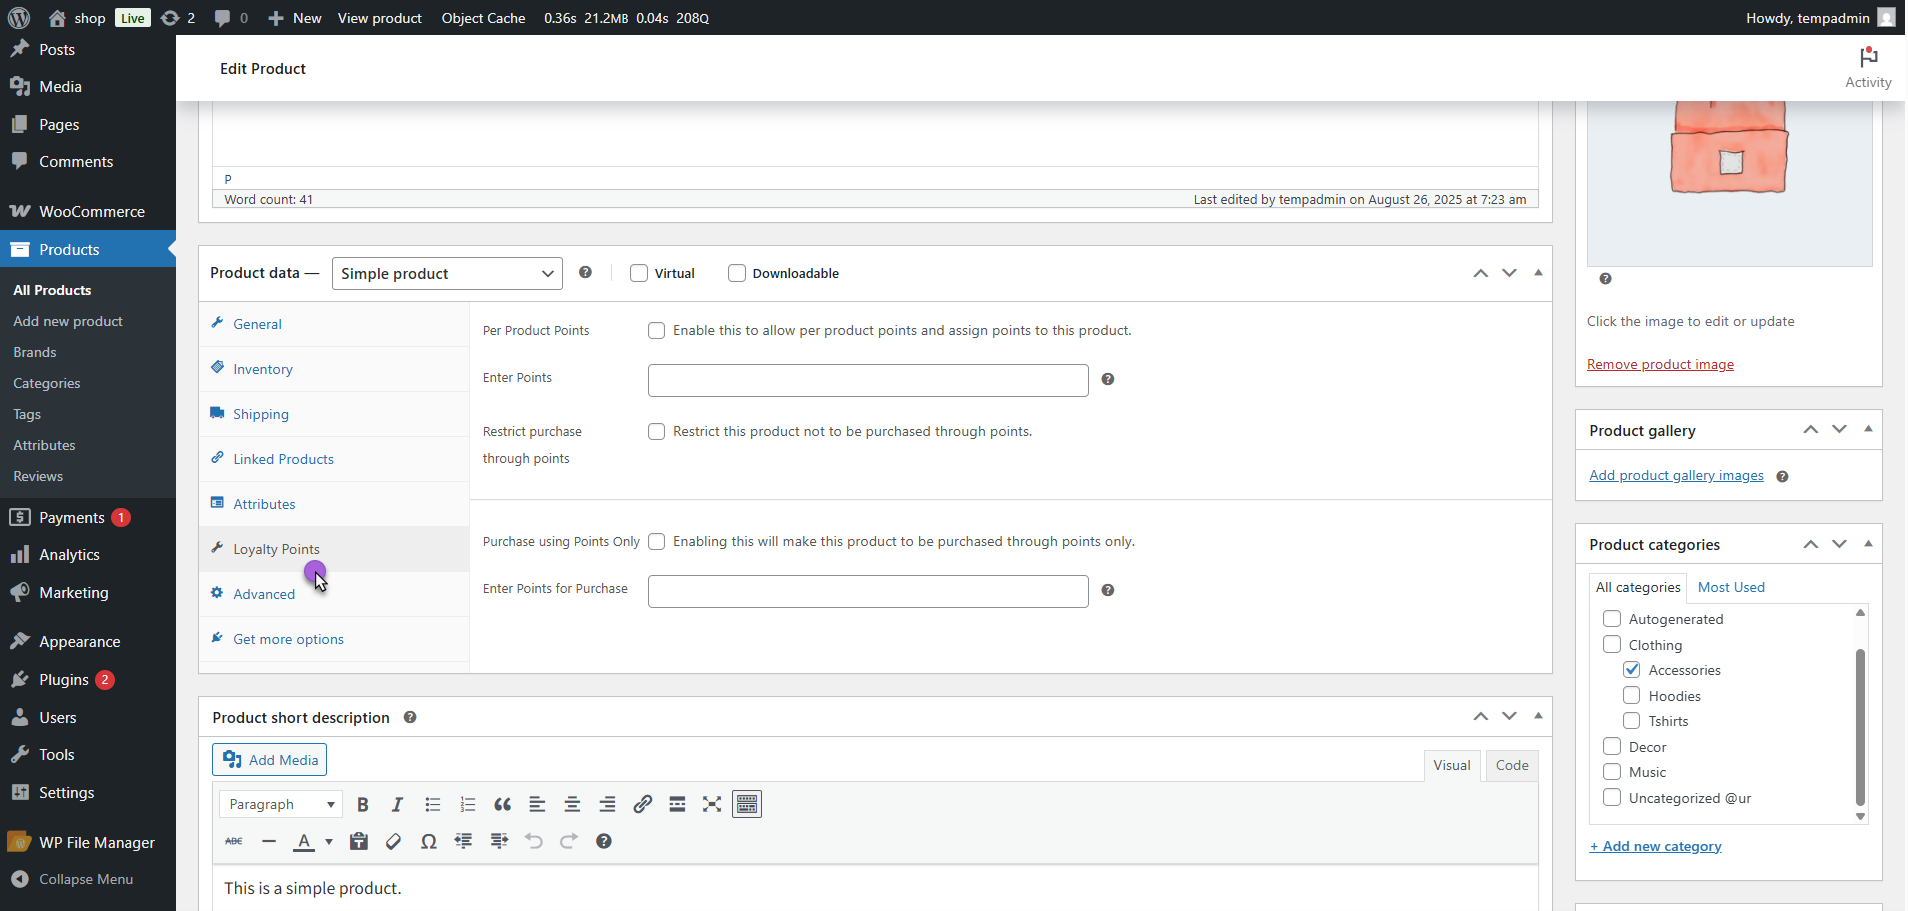
- Enable Per Product Points > Tick this checkbox to allow custom points for this product.
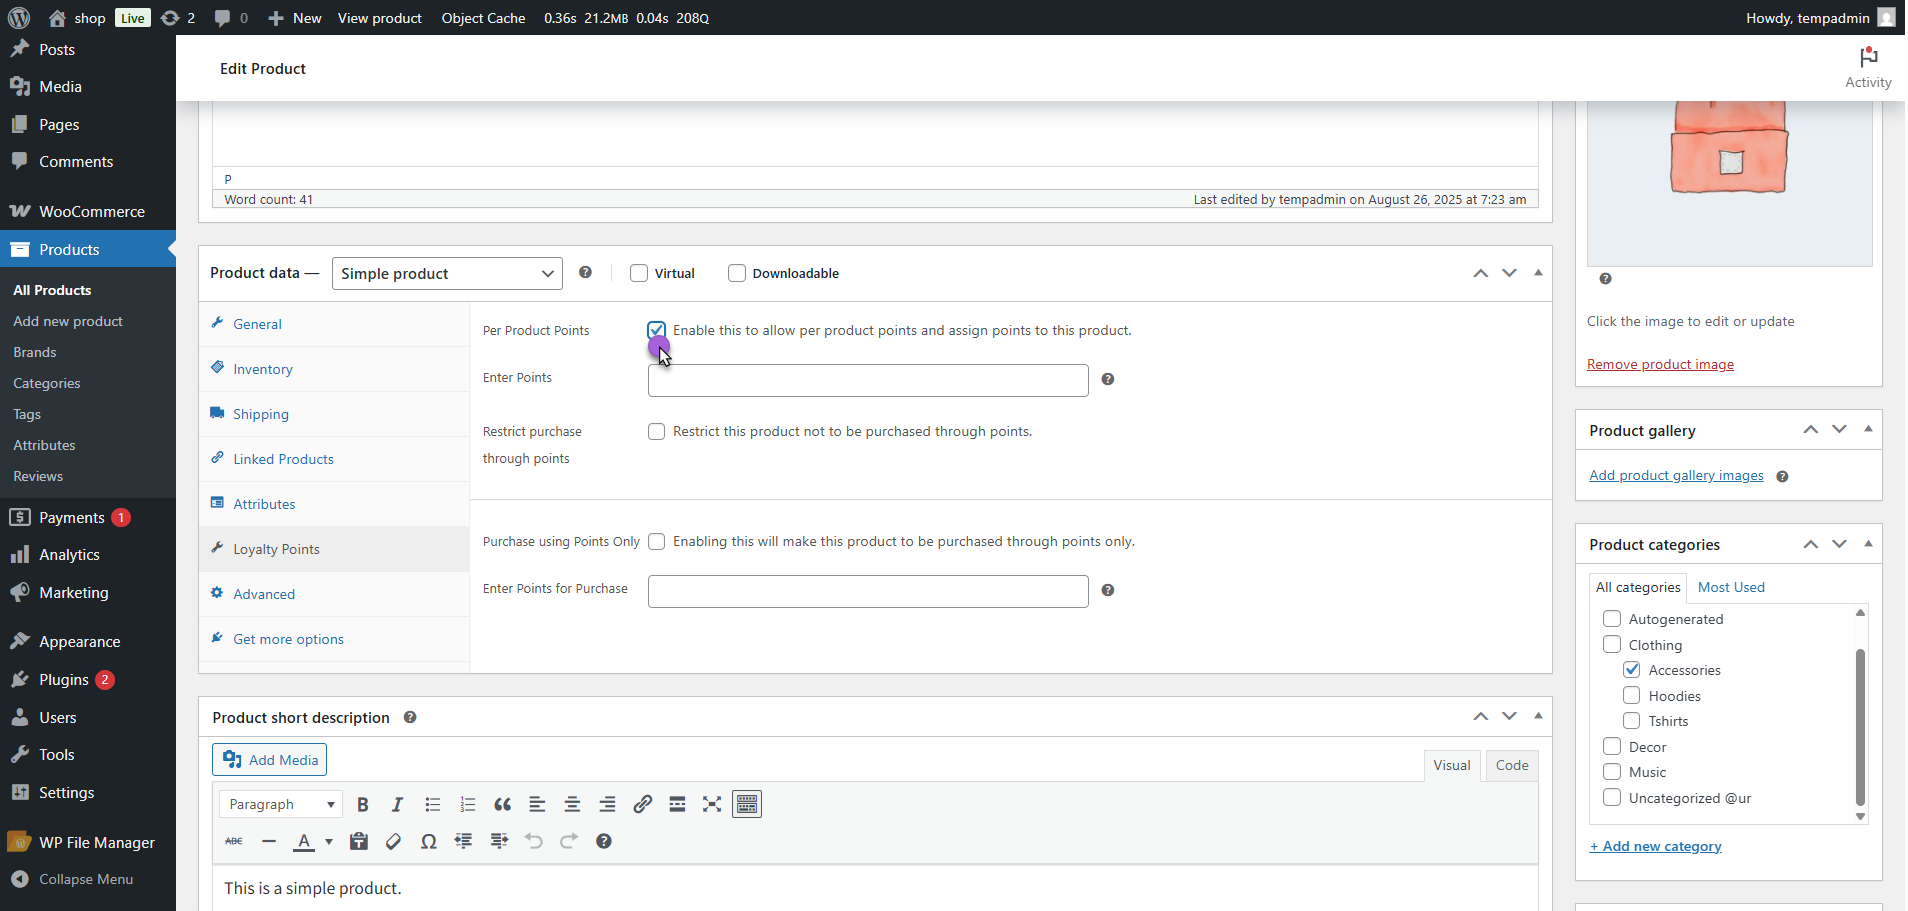
- Enter Points > Add the number of loyalty points that customers will earn when they purchase this product.
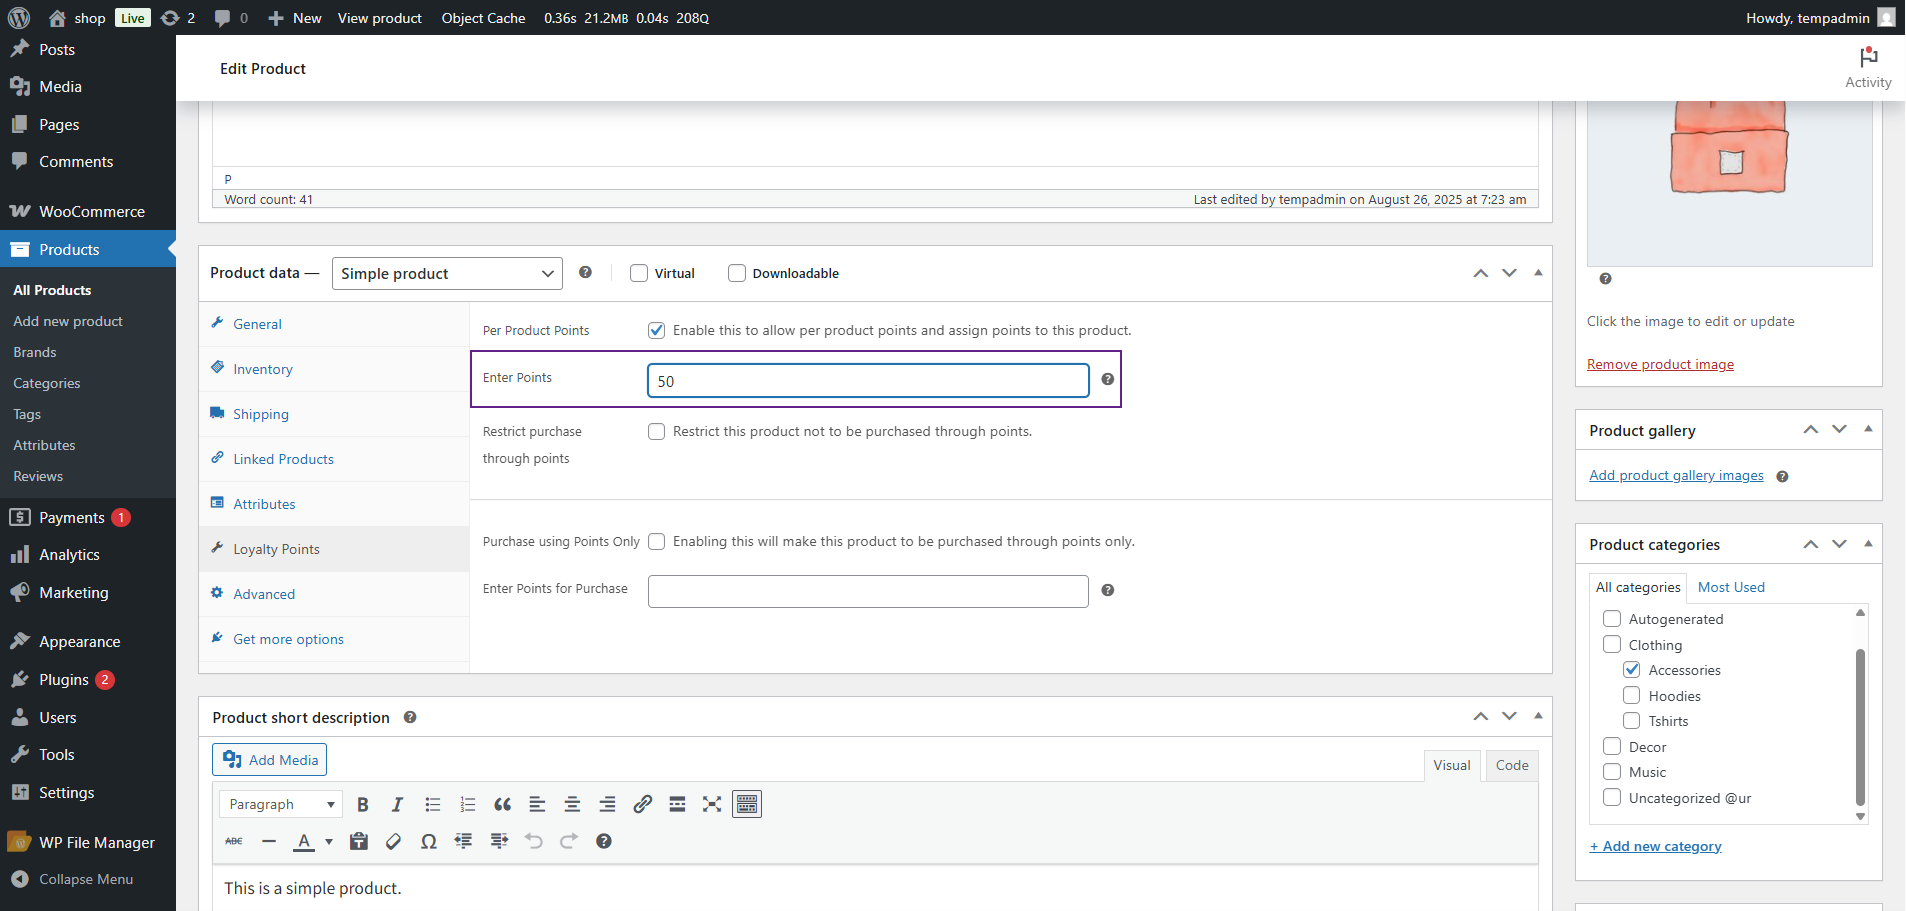
- Click Update/Publish to save changes.
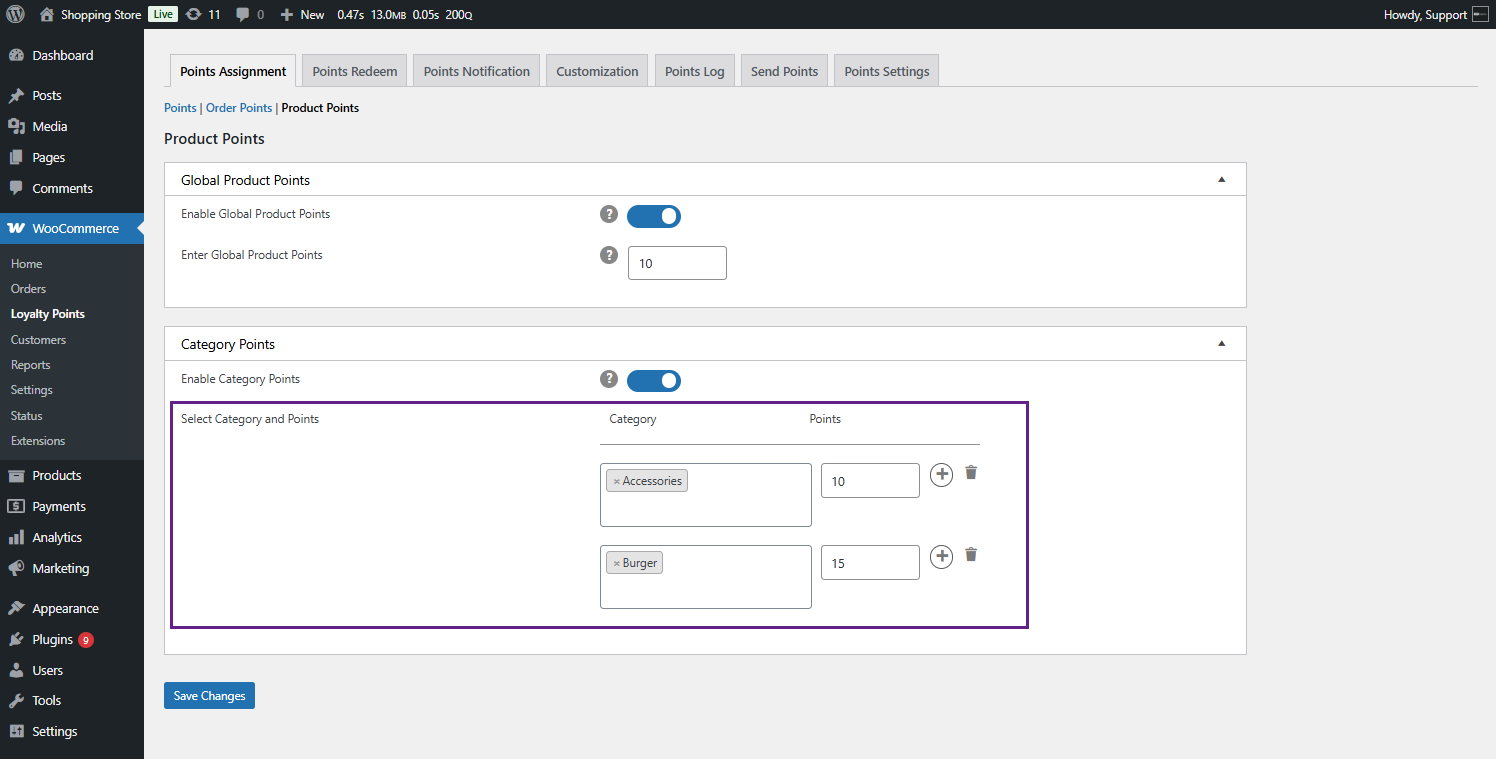
Category Points
↑ Back to top- Users earn points when purchasing from specific product categories. These points override global product points for the selected category. Admin can enable/disable category-based points.
- Assign specific points per category.
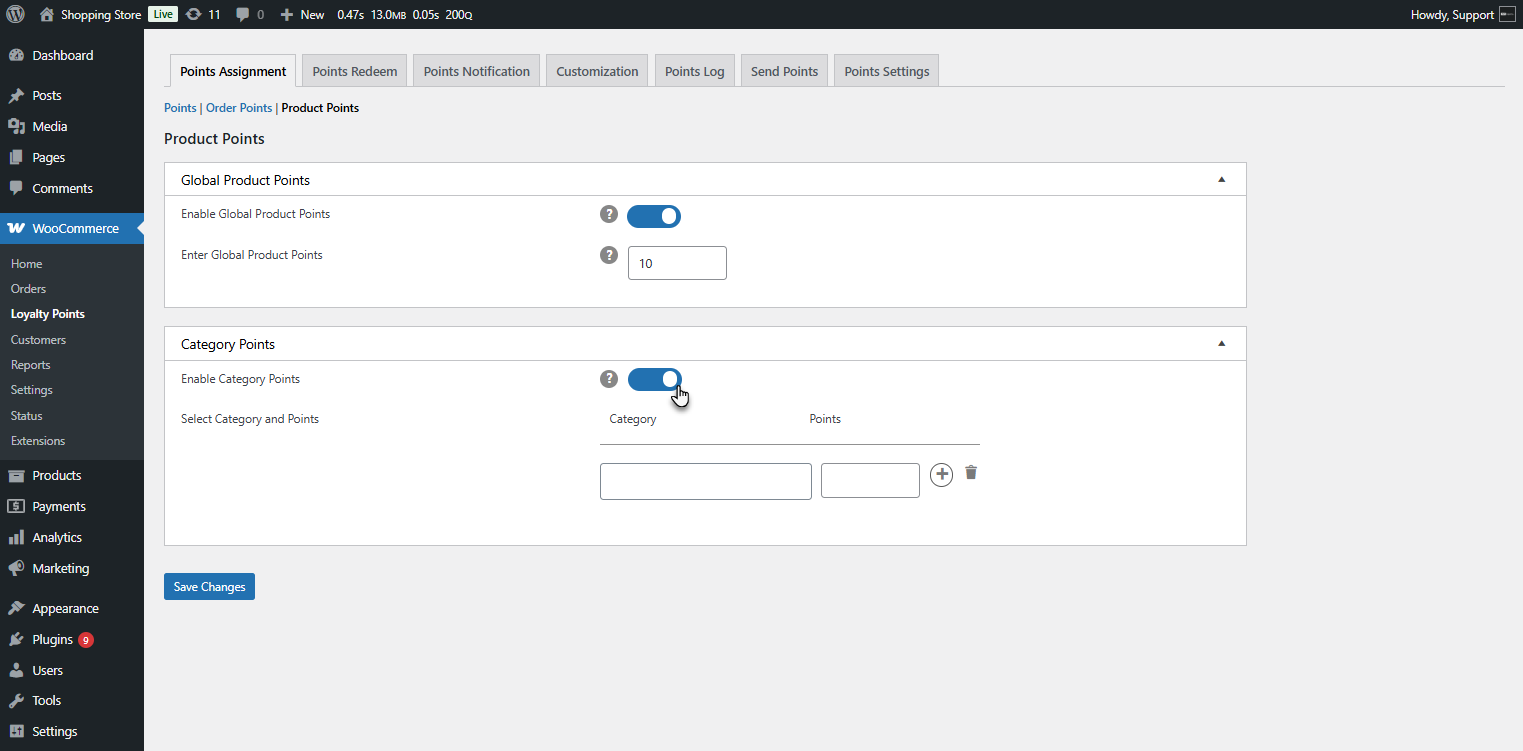
- Select the category from the dropdown and enter the point for the category.
Saving Changes
- Click the Save Changes button at the bottom to apply the updated settings.
Points Redeem
↑ Back to top- The Points Redeem tab controls how users can redeem and use their points for purchases and discounts.
- Navigate to WordPress Admin Dashboard > WooCommerce > Loyalty Points > Points Redeem.
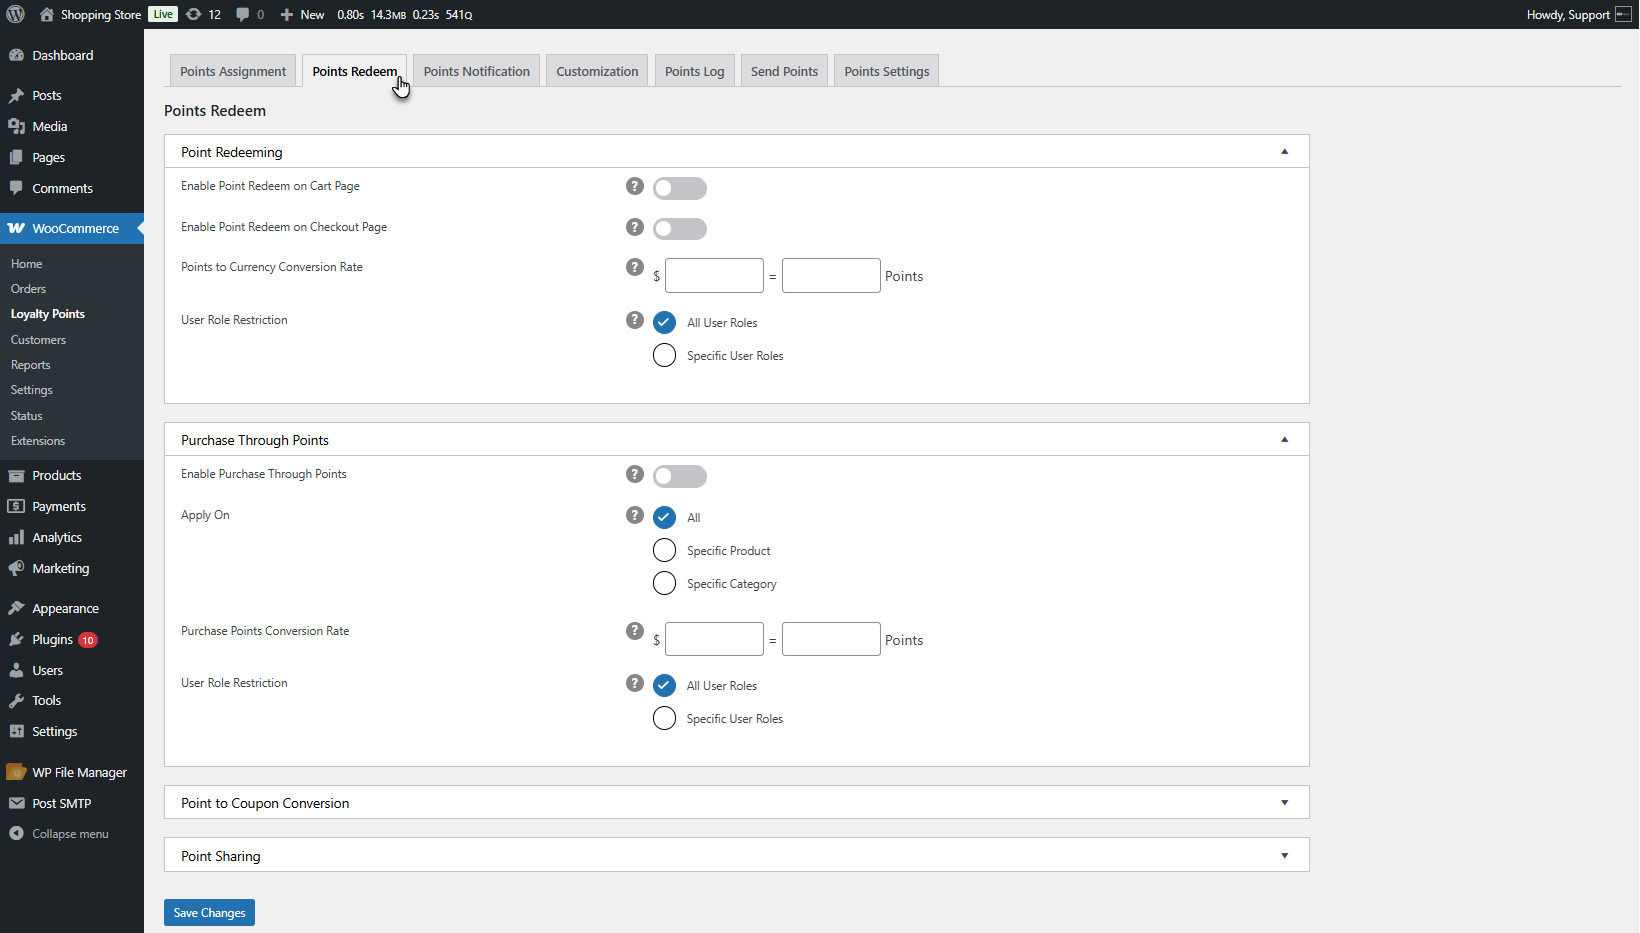
Points Redeeming
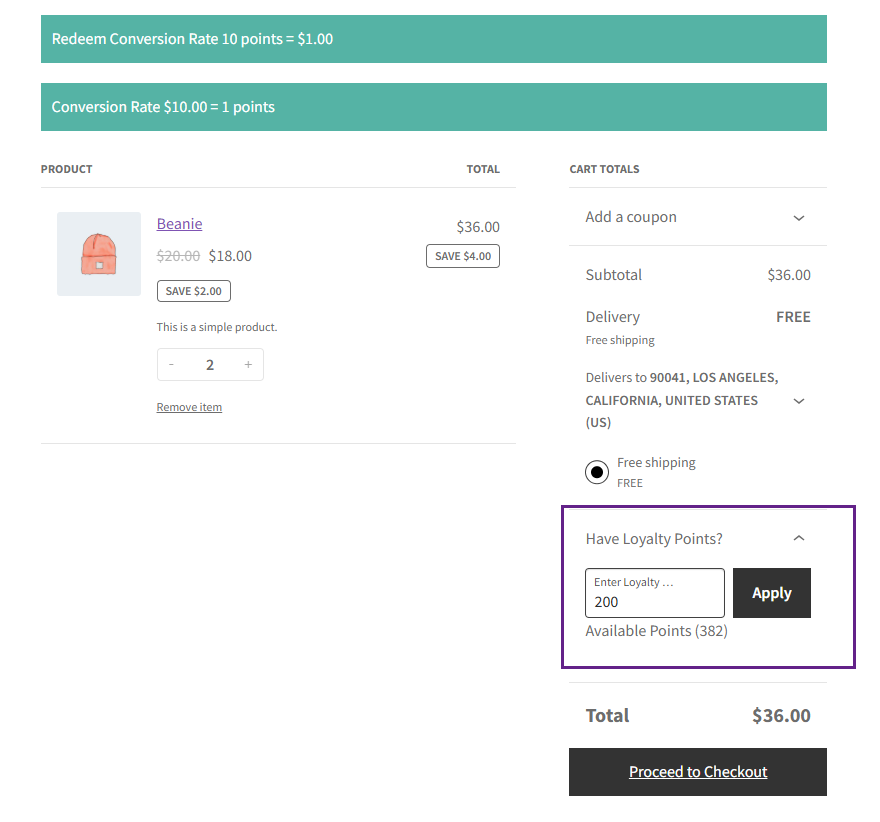
↑ Back to top- Enables users to redeem points as discounts on the cart and checkout pages.
- Admin can:
- Enable/disable point redemption on the cart and checkout pages.
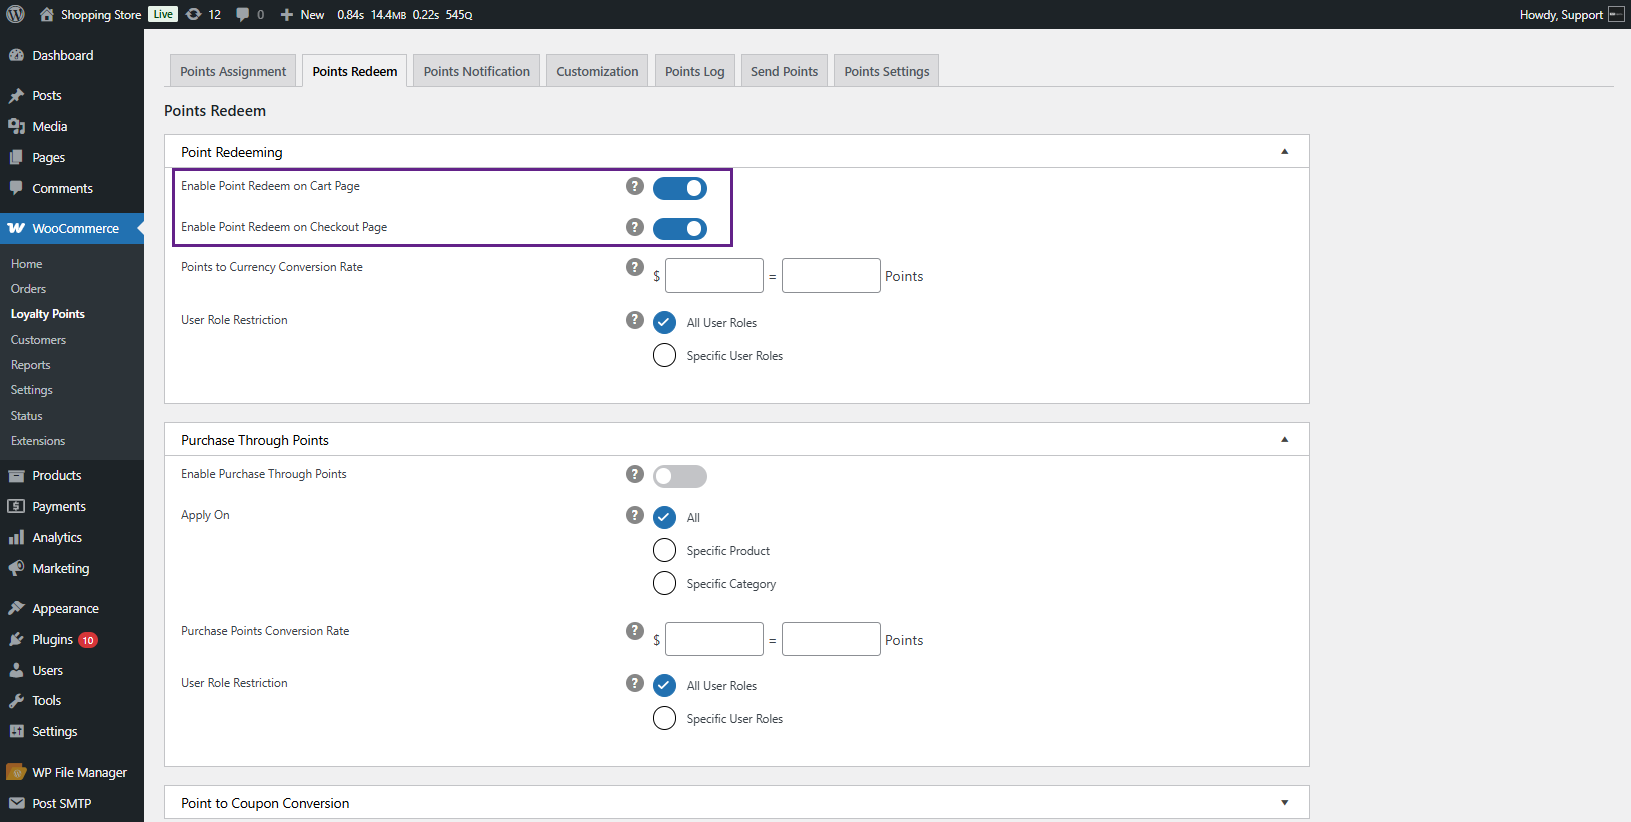
- Set a Points to Currency Conversion Rate (e.g., 10 points = $1).
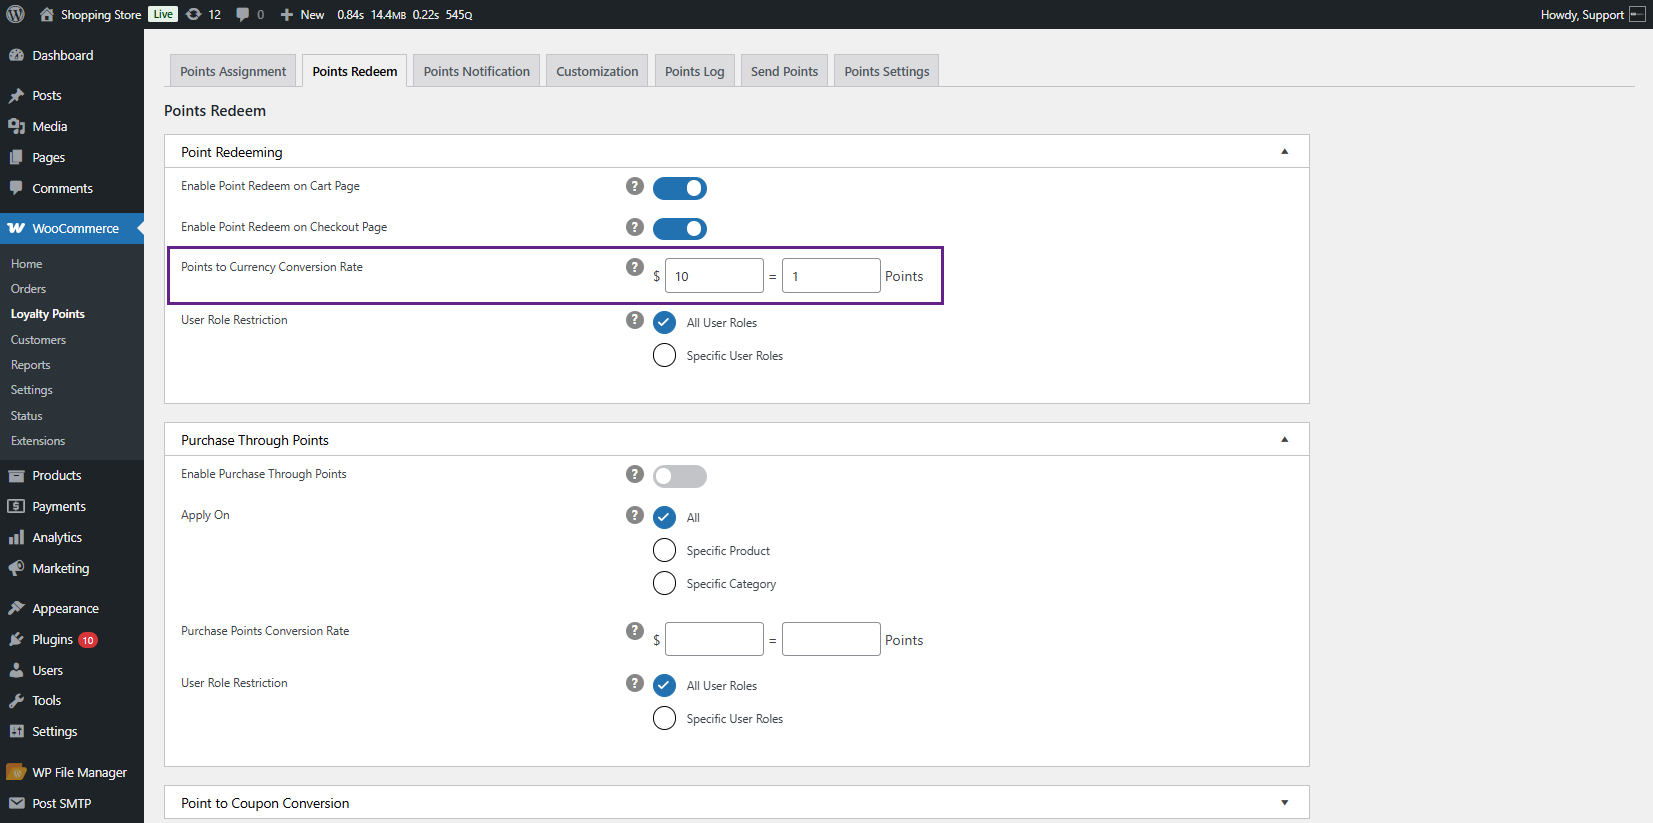
- Restrict redemption to All User Roles or Specific User Roles.
- Example: If a user redeems 300 points, and the conversion is 10 points = $1, the user will get a $30 discount.
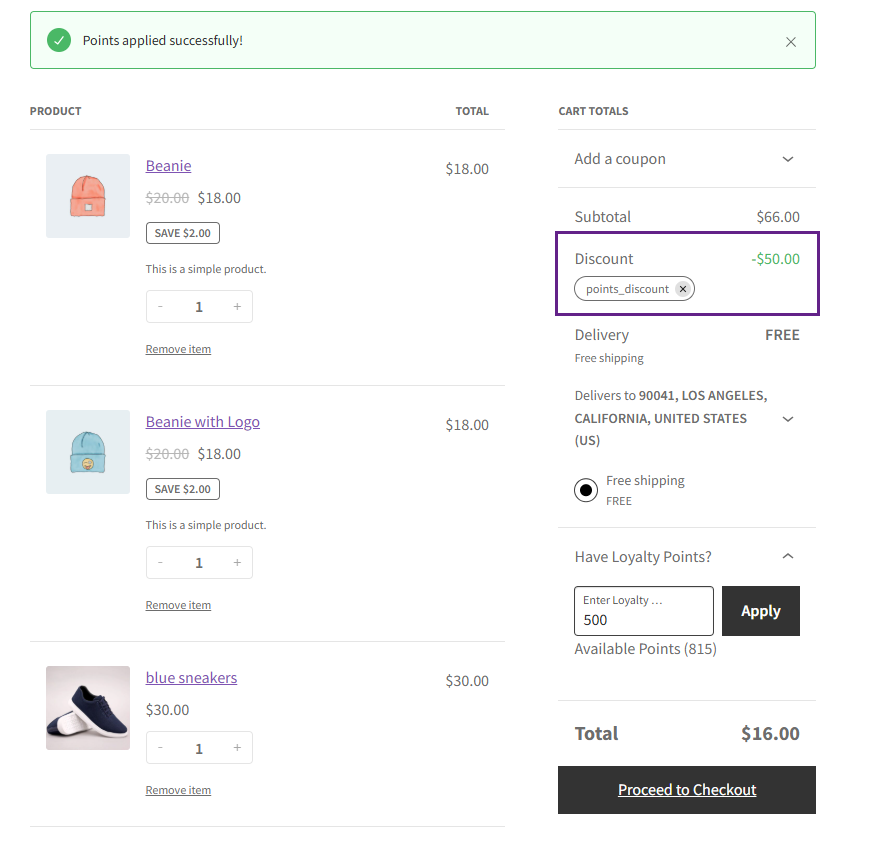
Front End Impact
How to Apply Point
Points Applied
Purchase Through Points
↑ Back to top- Allows users to purchase products using points instead of Currency.
- Admin can:
- Enable/disable this option.
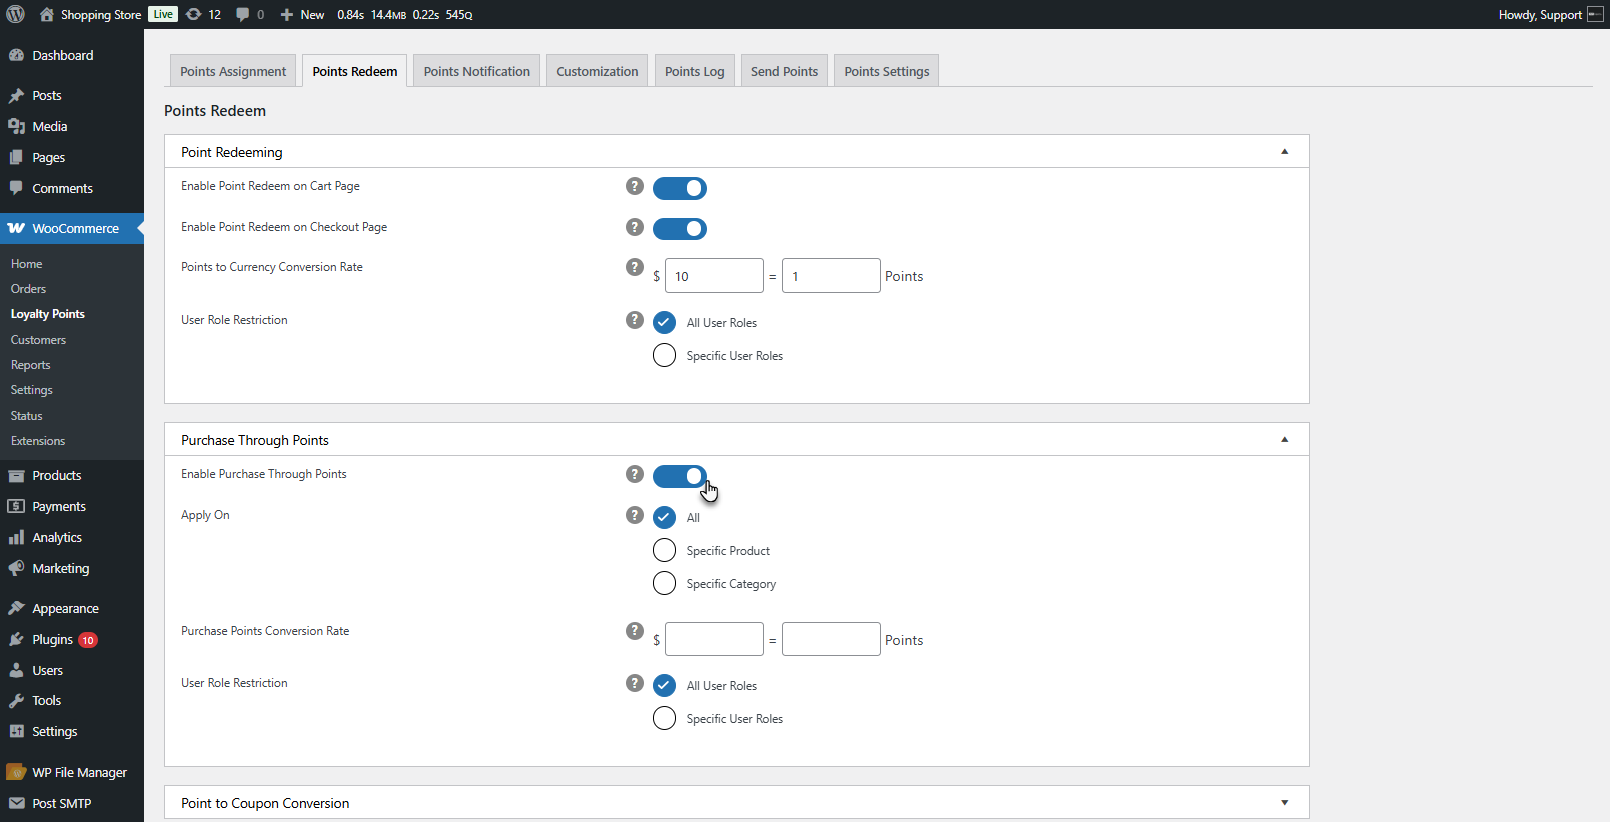
- Apply it to all products, specific products, or categories.

- Set a Currency to Points Conversion Rate.
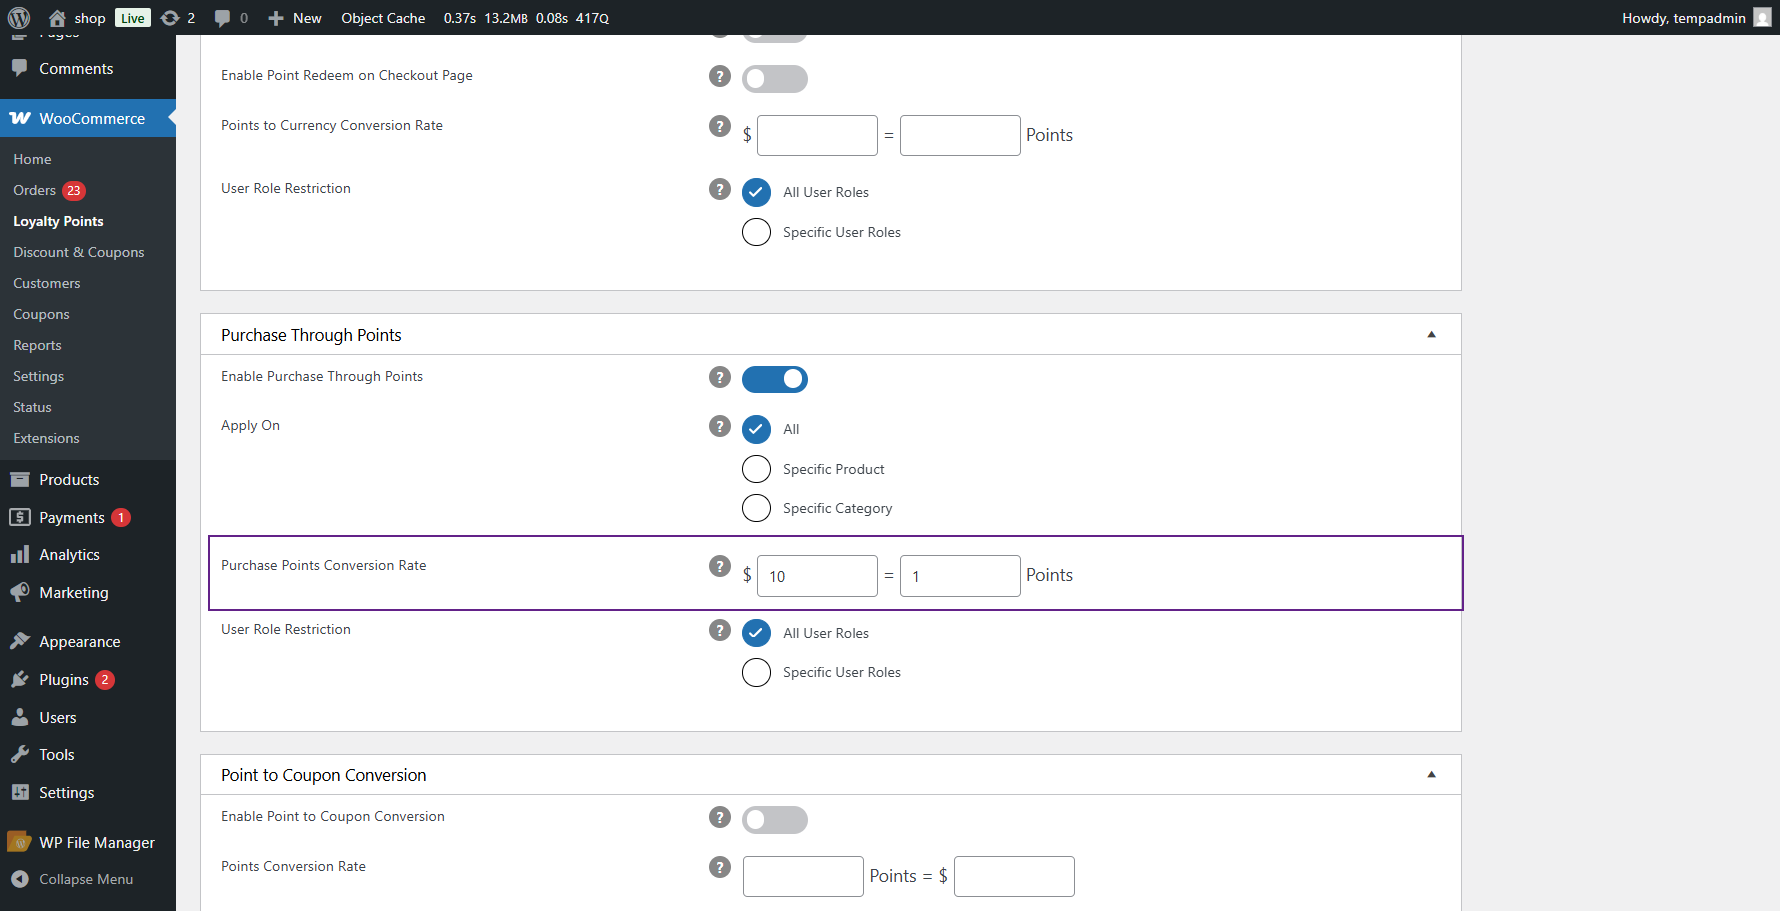
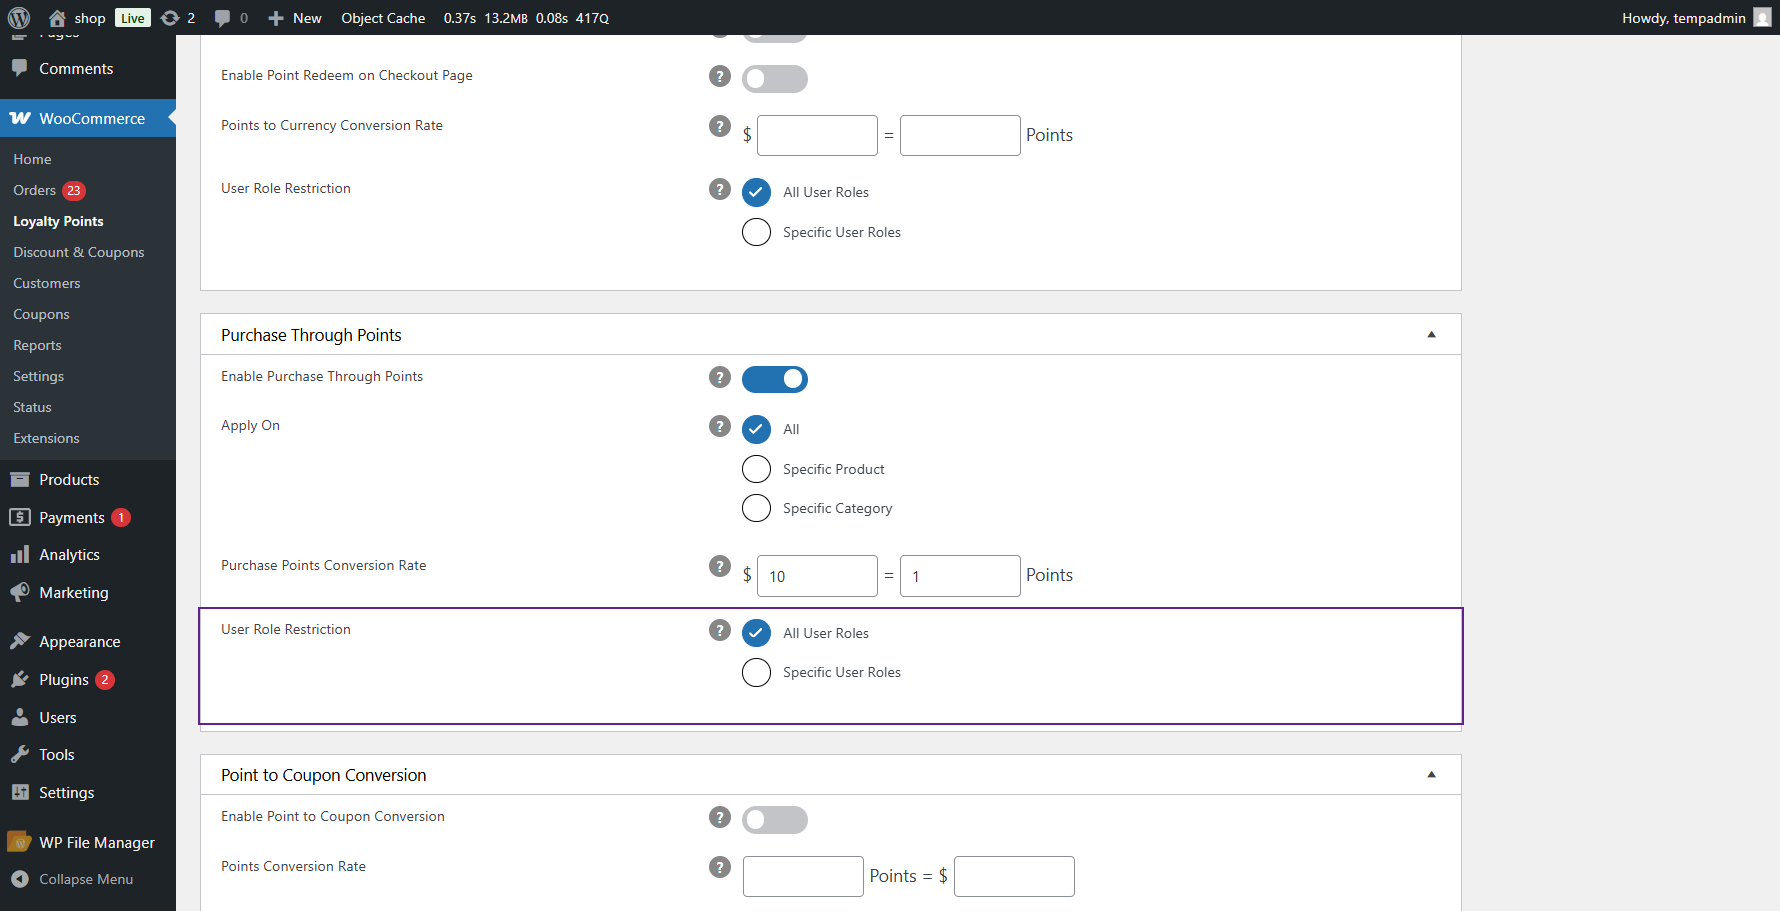
- Restrict purchase-through points access by user role.
- Example: If a product costs $50, and the conversion is 1$ = 10 points, the product can be purchased for 500 points.
Restrict Purchase Through Points
↑ Back to topTo configure Restrict Purchase Through Points for a product:
- Navigate to Products > All Products.
- Edit the product where you want to apply restrictions.
- Scroll down to the Product data section and open the Loyalty Points tab.
- Under Per Product Points, enable the option Restrict Purchase Through Points.

- Enabling this will restrict the product from being purchased using loyalty points.
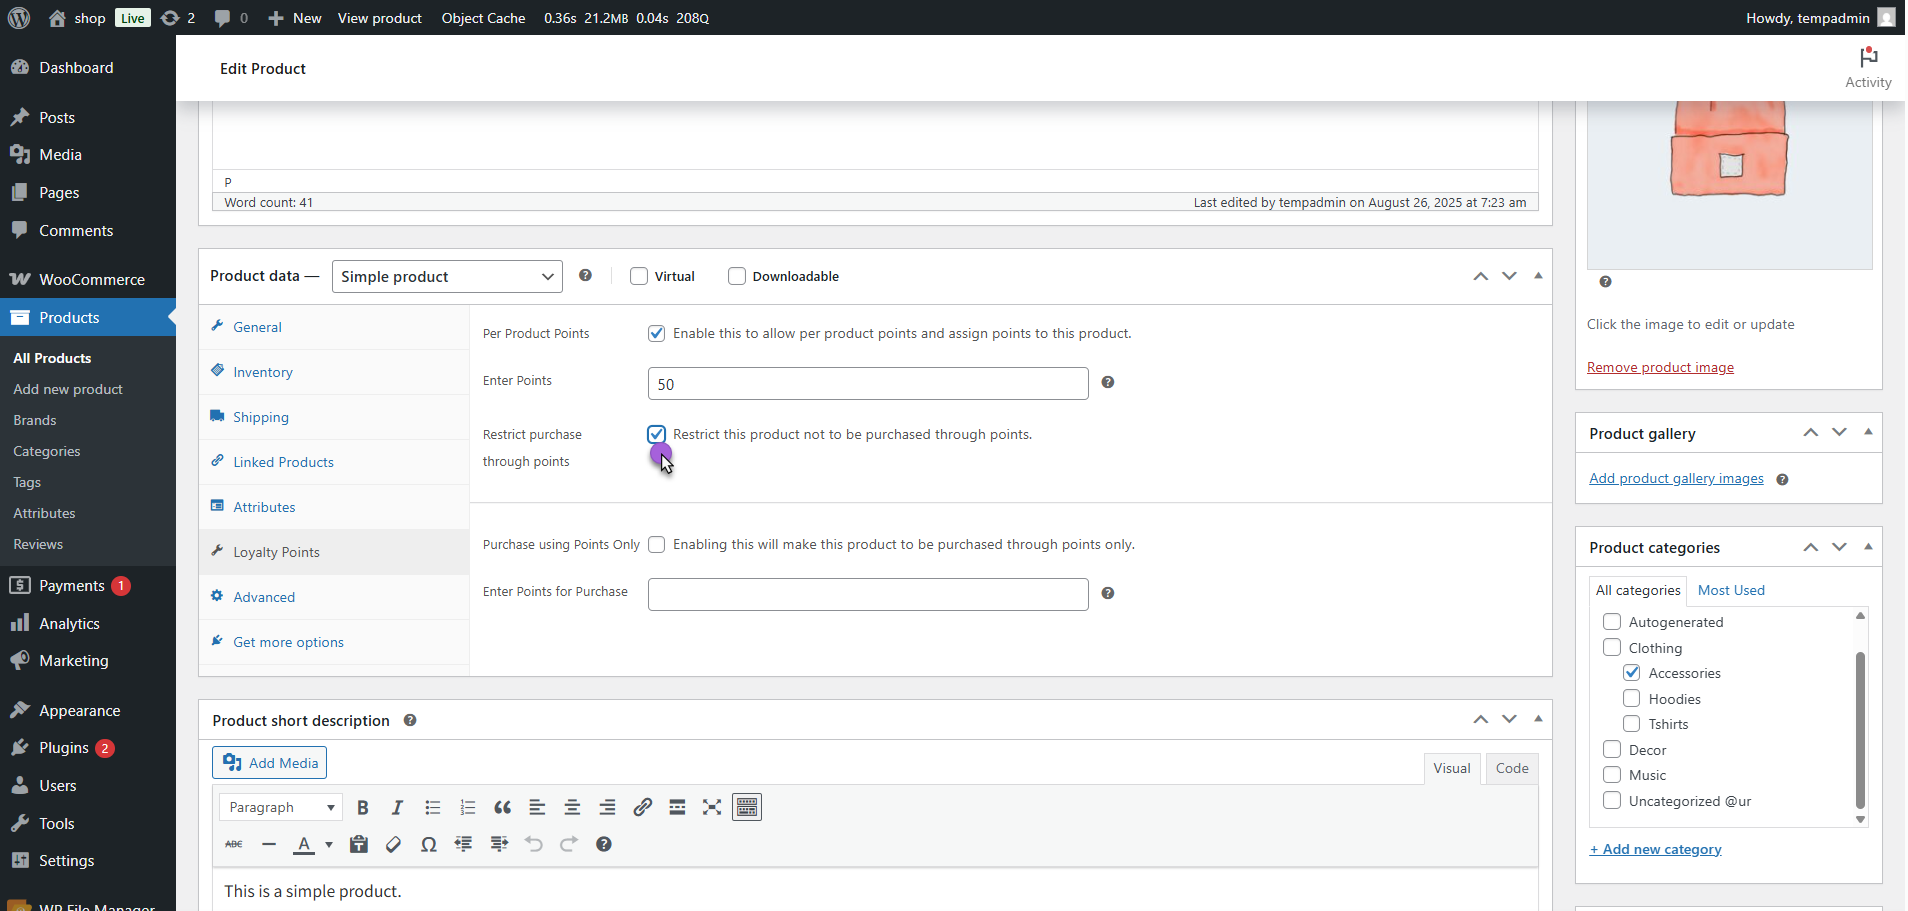
Note: Customers will only be able to buy this product with money.
- Click Update/Publish to save changes.

Purchase Using Points Only
↑ Back to topTo configure Purchase Using Points Only for a product:
- Navigate to Products > All Products.
- Edit the product where you want to allow purchase through points only.
- Scroll down to the Product data section and open the Loyalty Points tab.
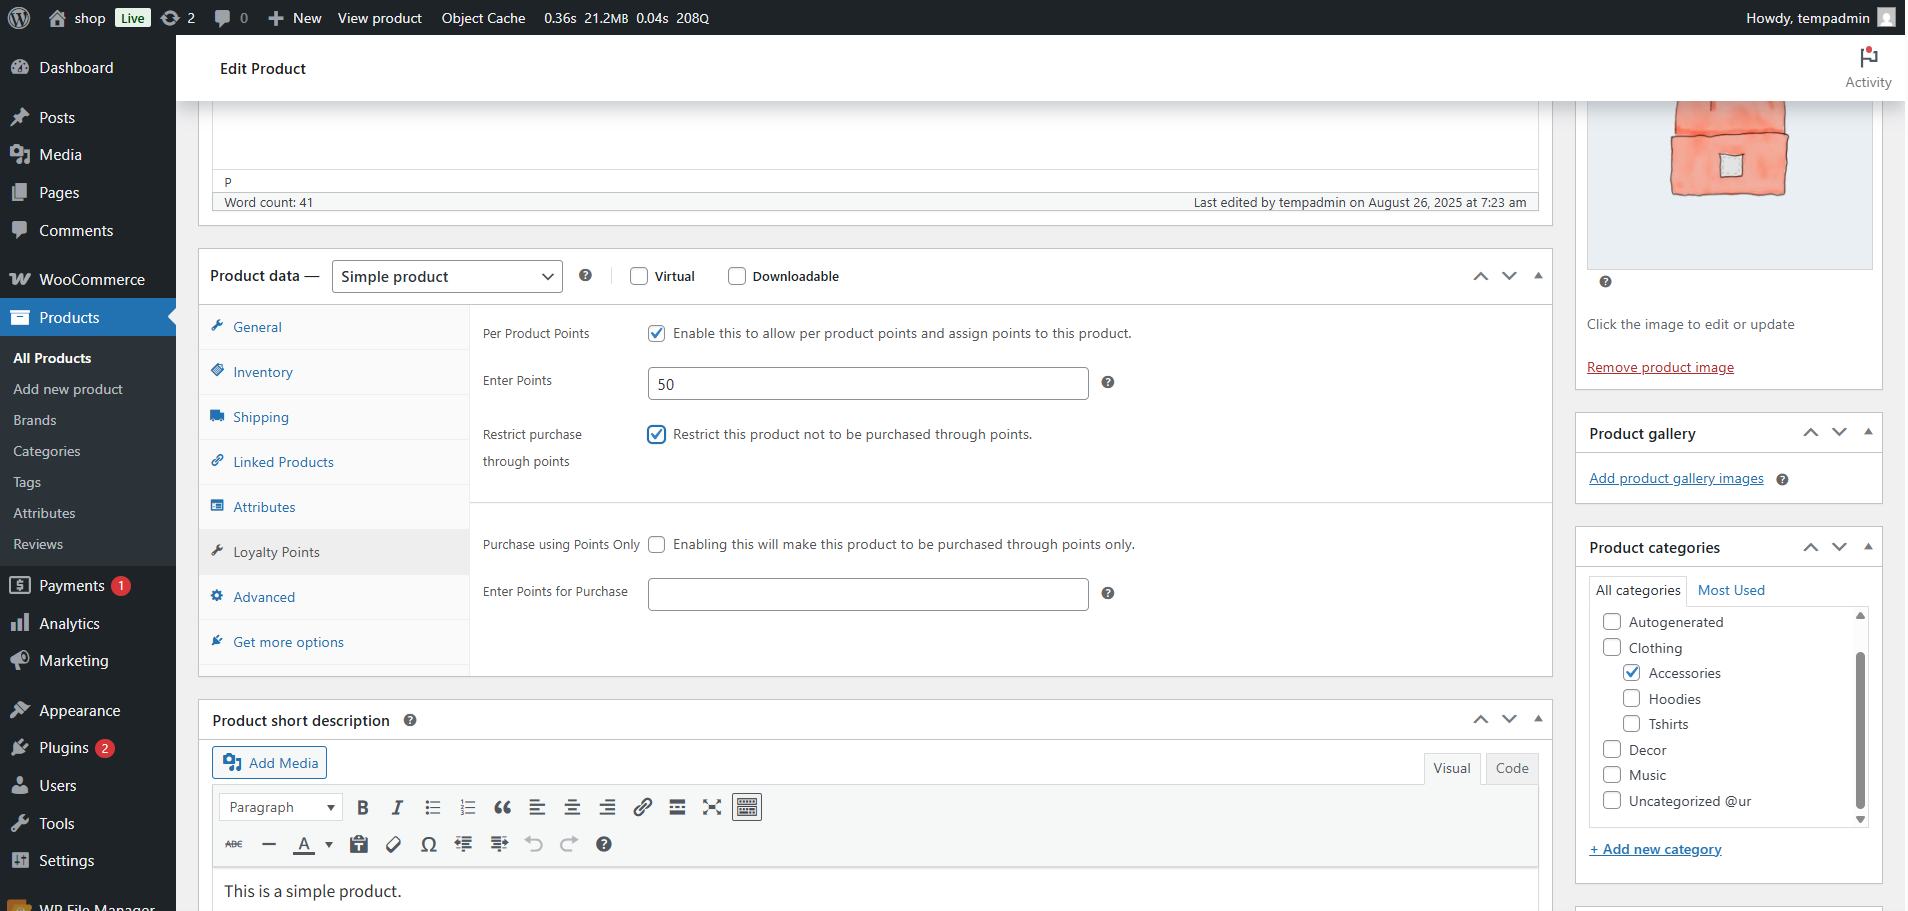
- Enable the option Purchase Using Points Only.
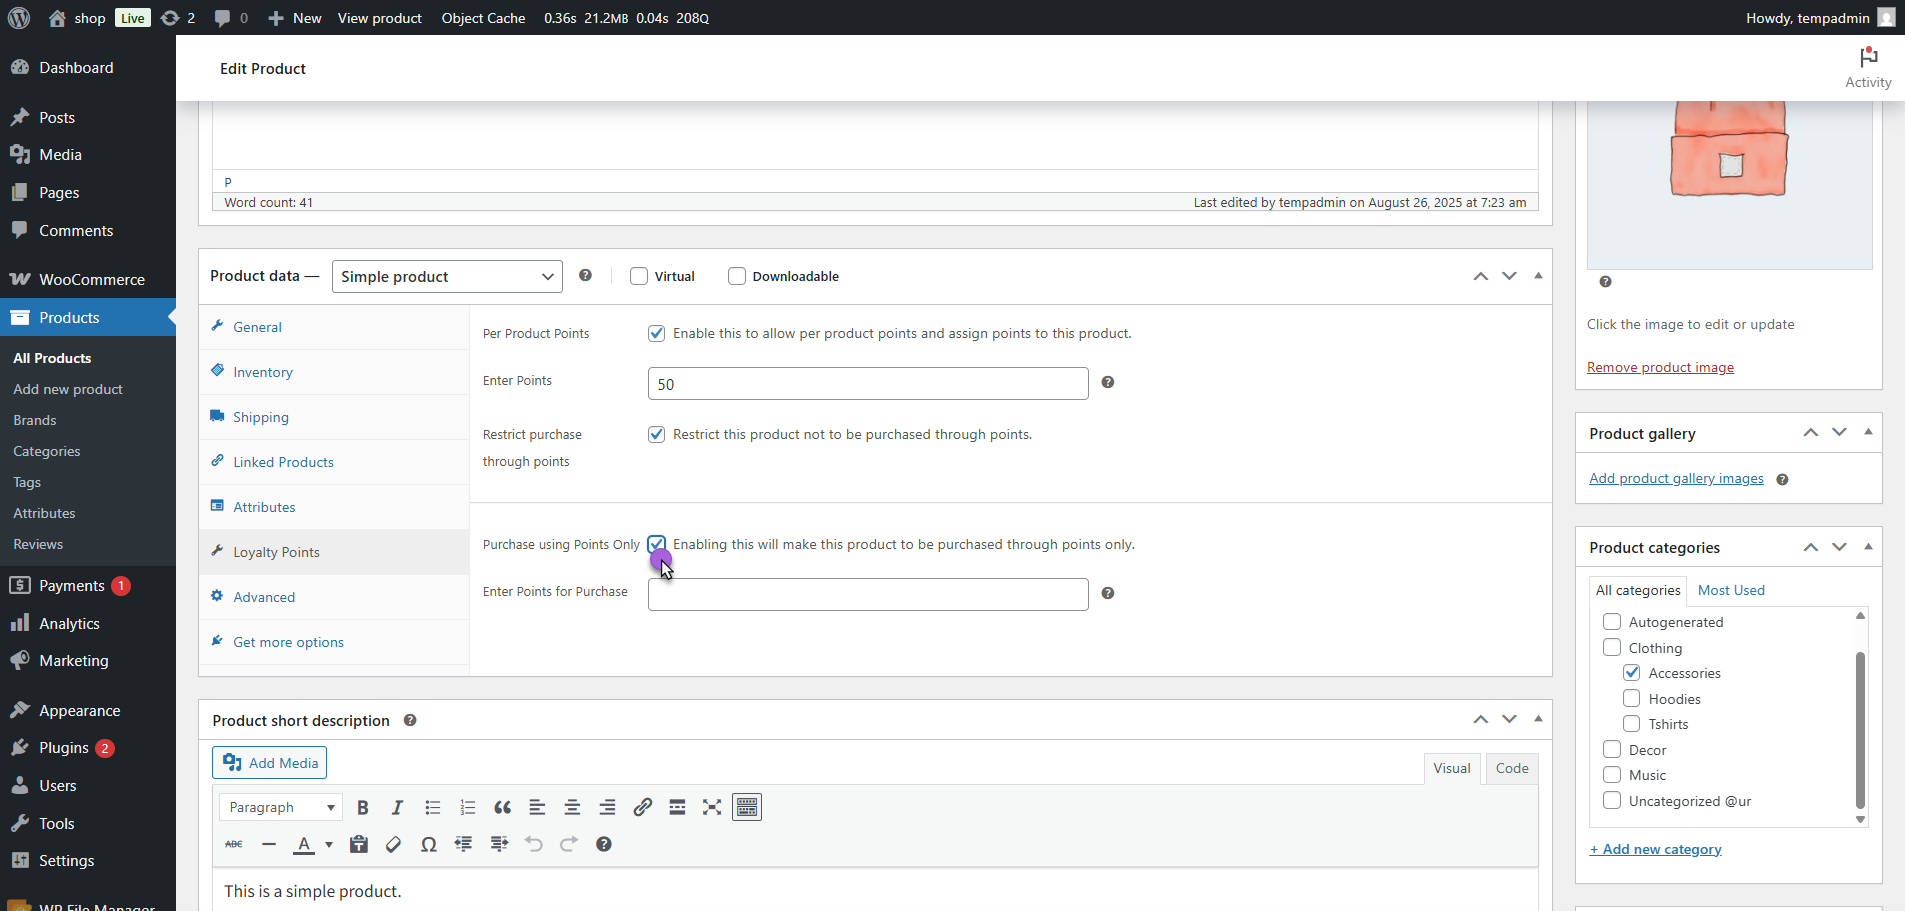
- Enabling this will make the product available for purchase only via loyalty points (customers cannot buy it with money).
- In the Enter Points for Purchase field, enter the number of points required to purchase the product.
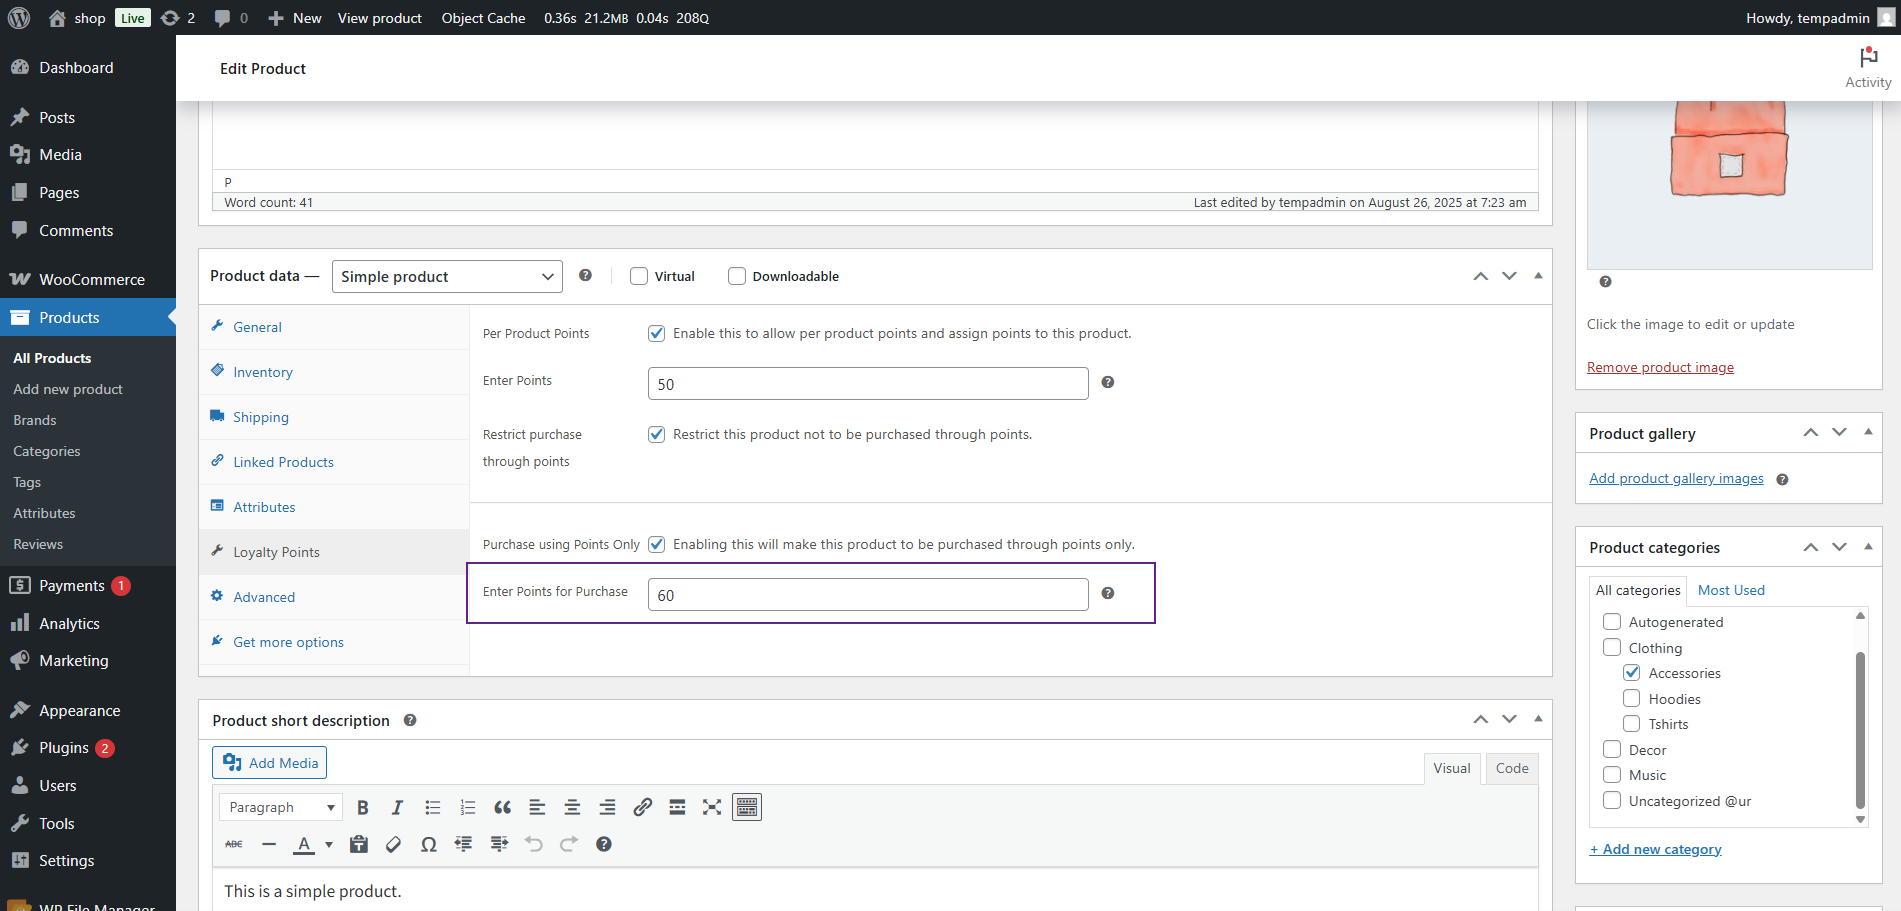
- Click Update/Publish to save changes.

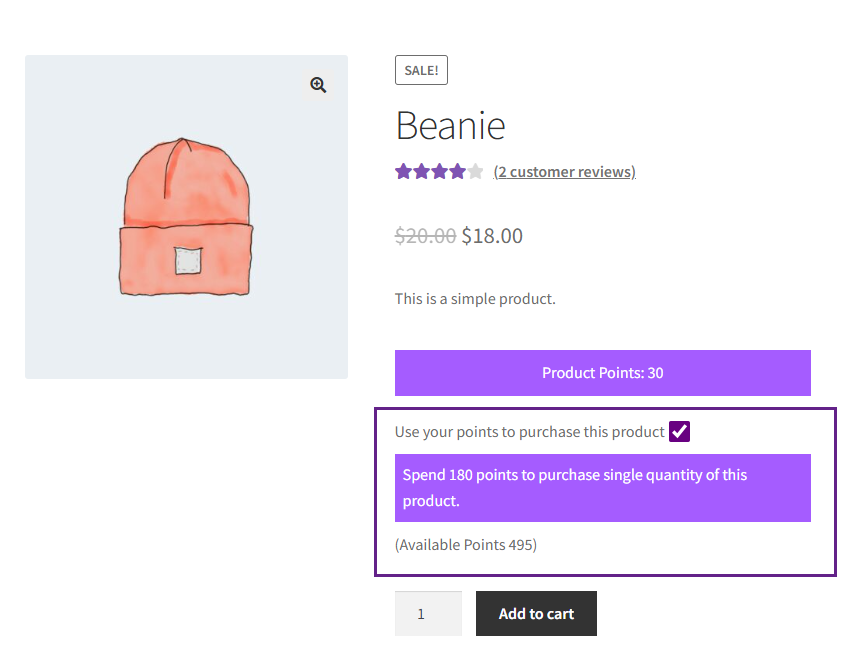
Front End Impact
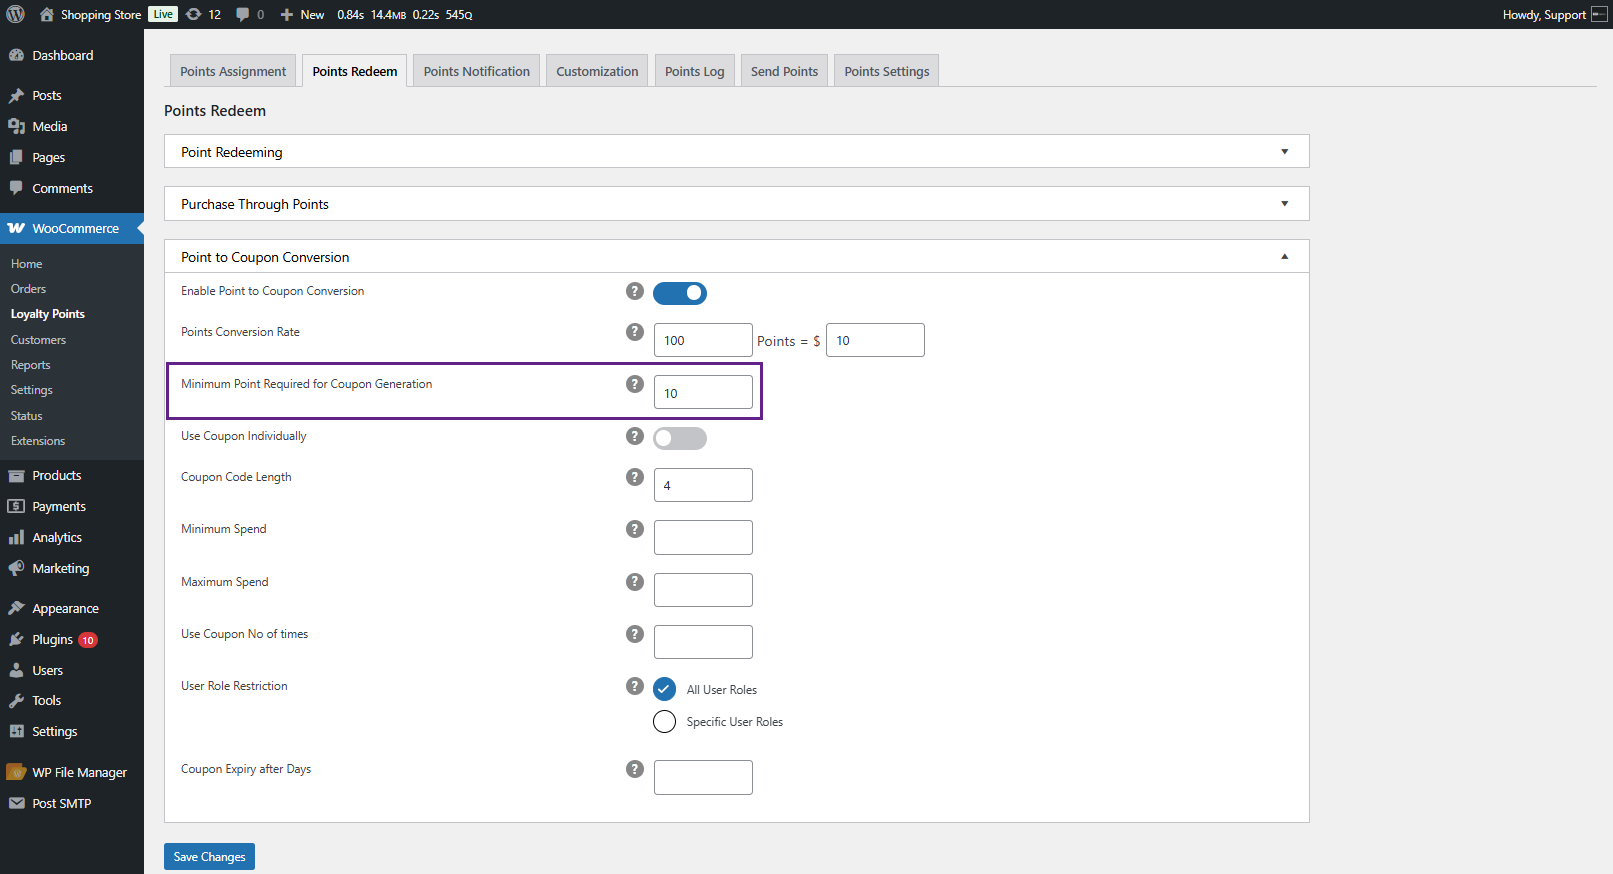
Points to Coupon Conversion
↑ Back to top- Allows users to convert their points into discount coupons.
- Admin can:
- Enable this feature from the backend.
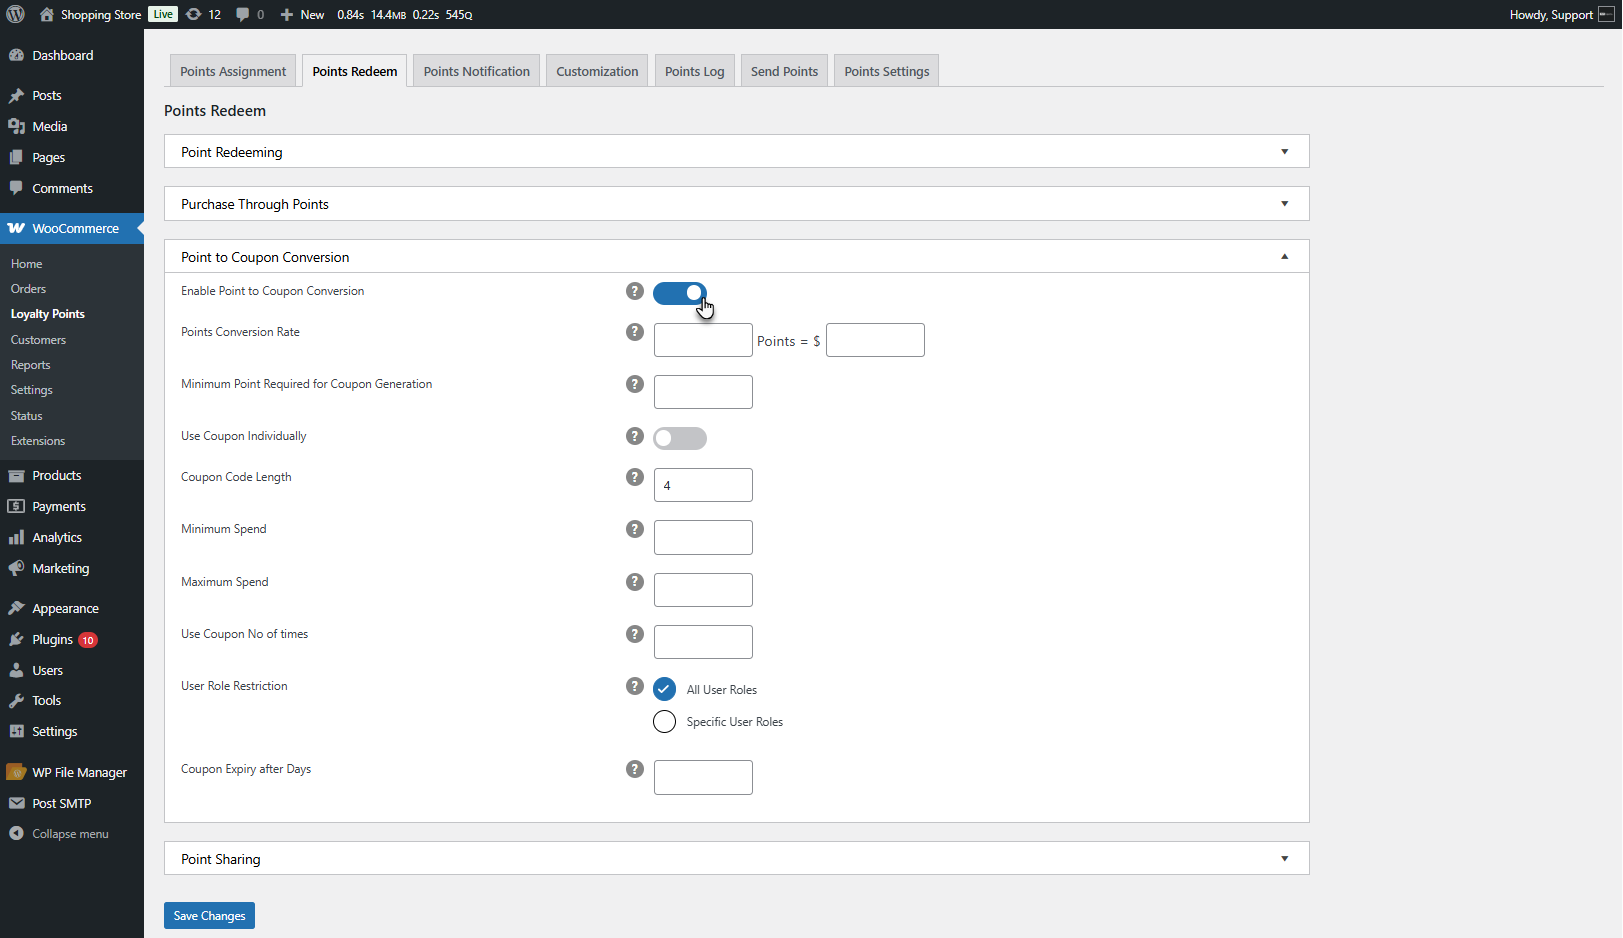
- Set a conversion rate (e.g., 100 points = $5 coupon).
- Define a minimum points requirement to generate a coupon.
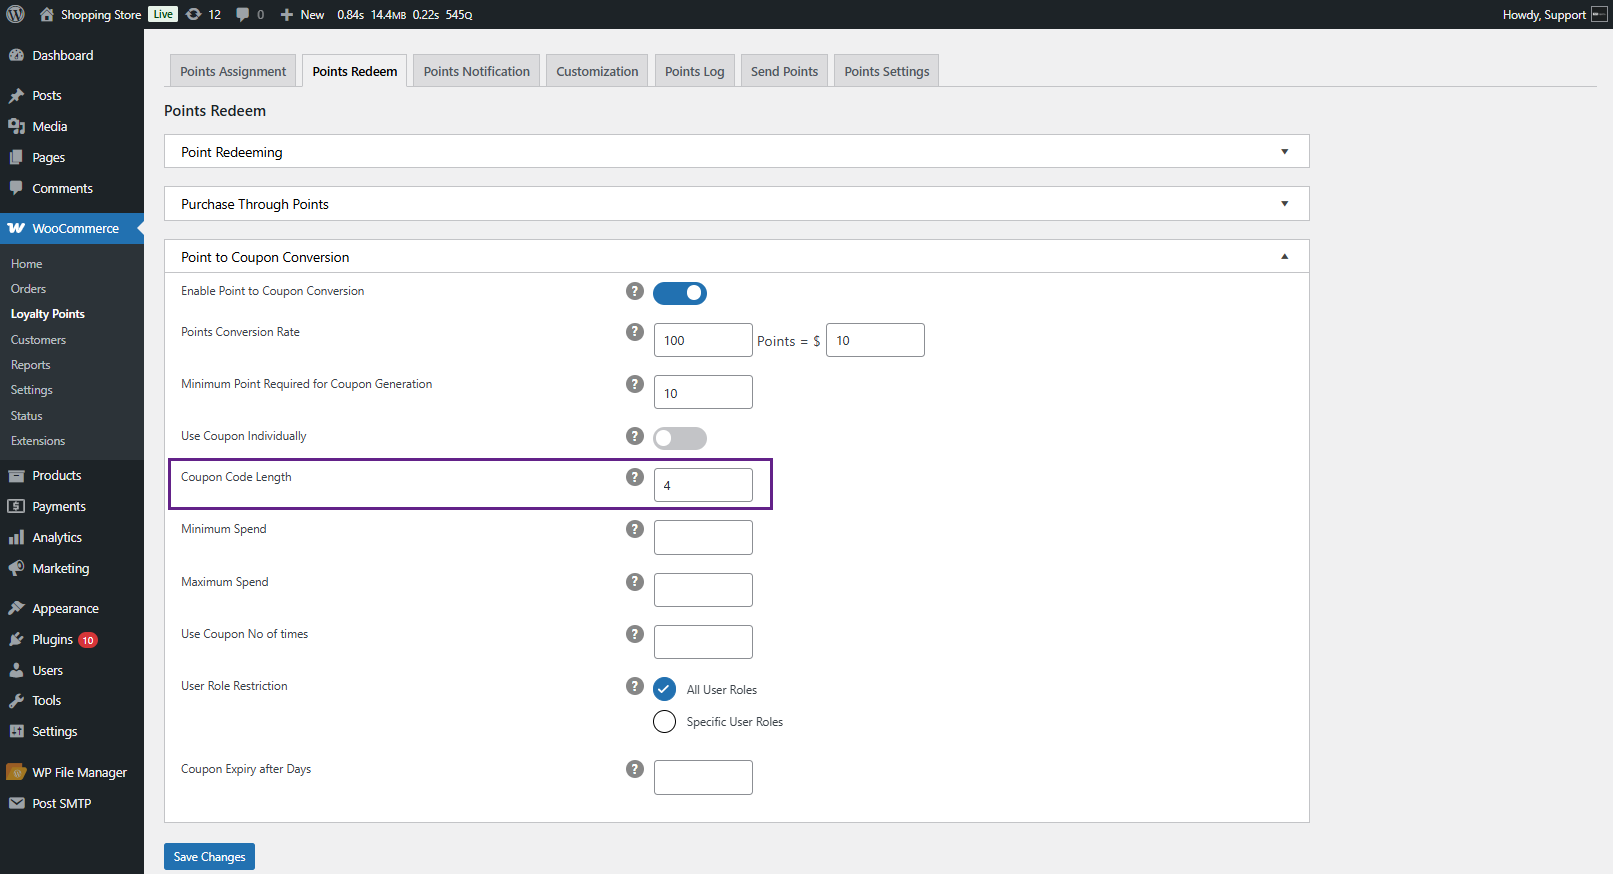
- Allow coupons to be used individually or combined with others.

- Set the Coupon Code Length.
- Set the Minimum and Maximum Spend of the Coupon.
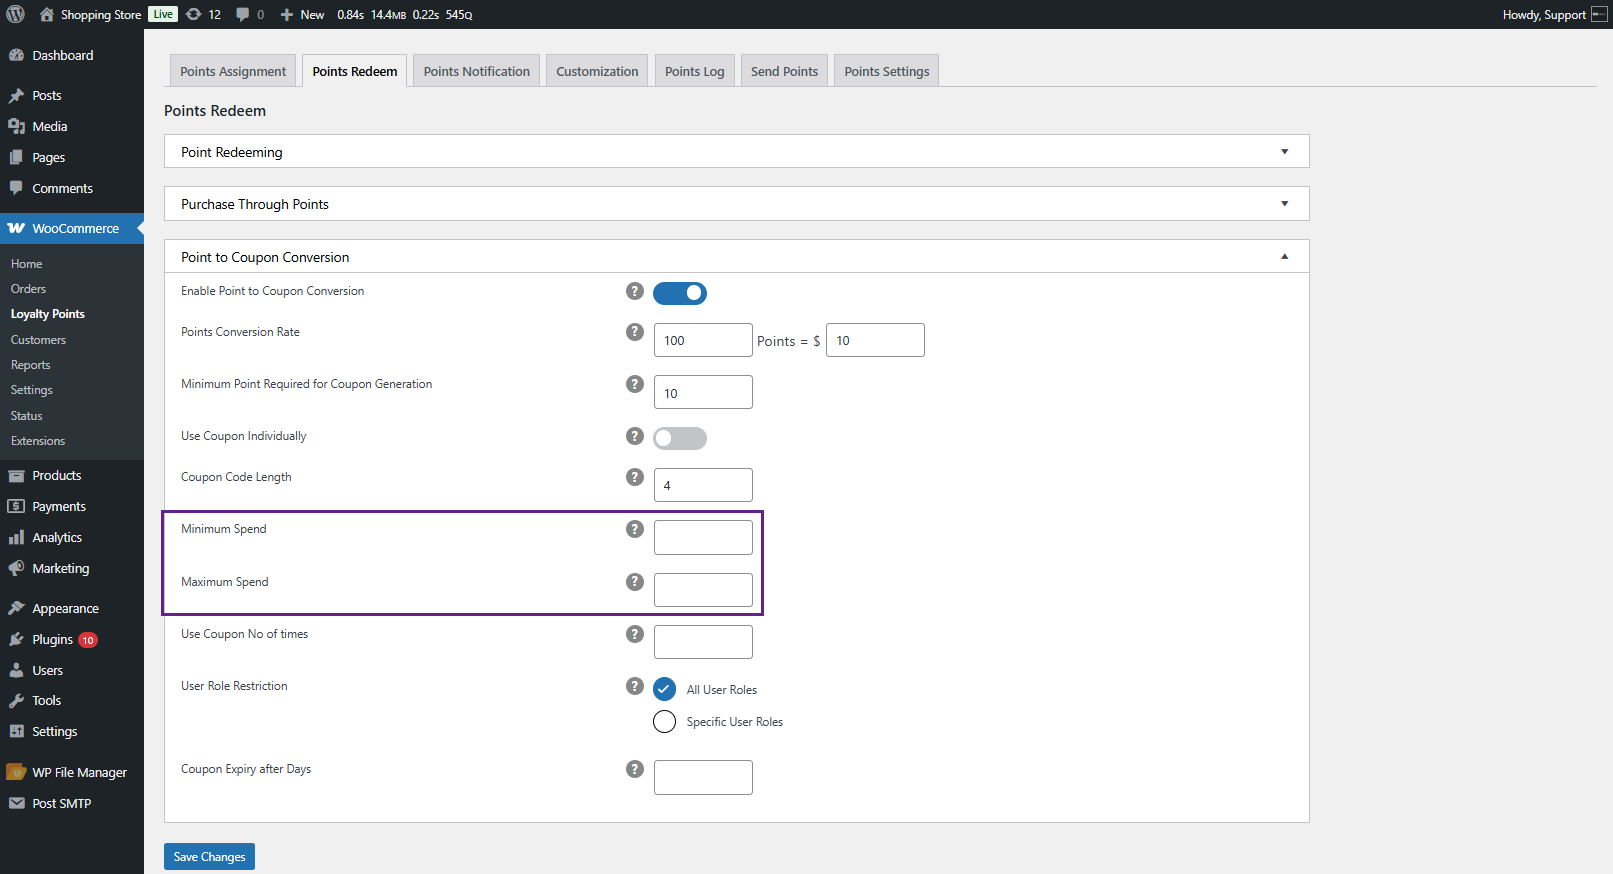
- Set the number of times a coupon can be used.
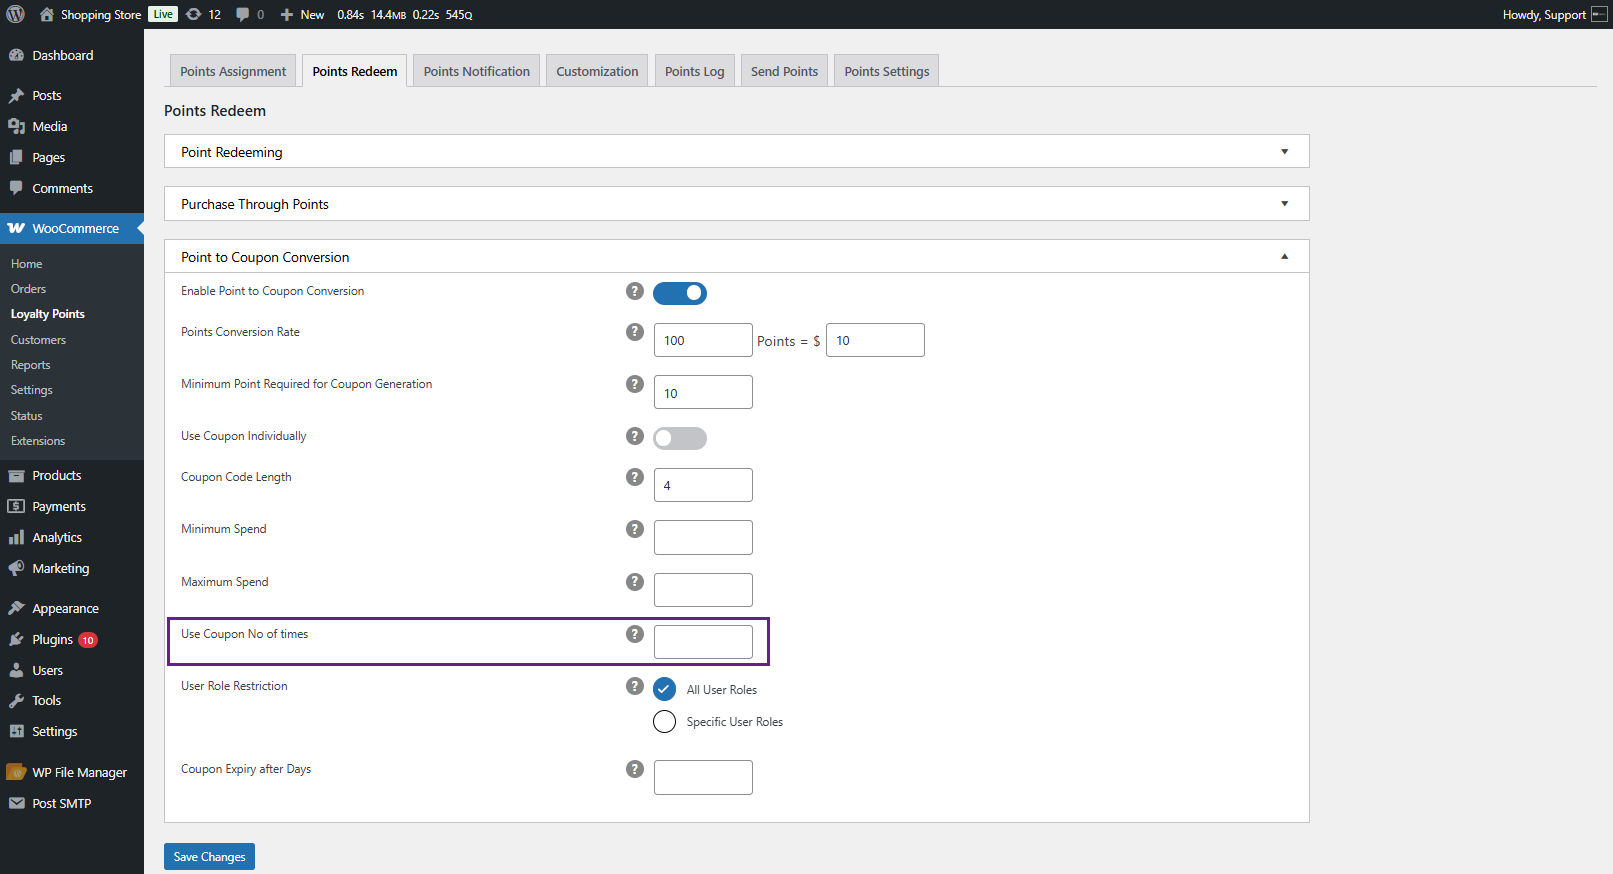
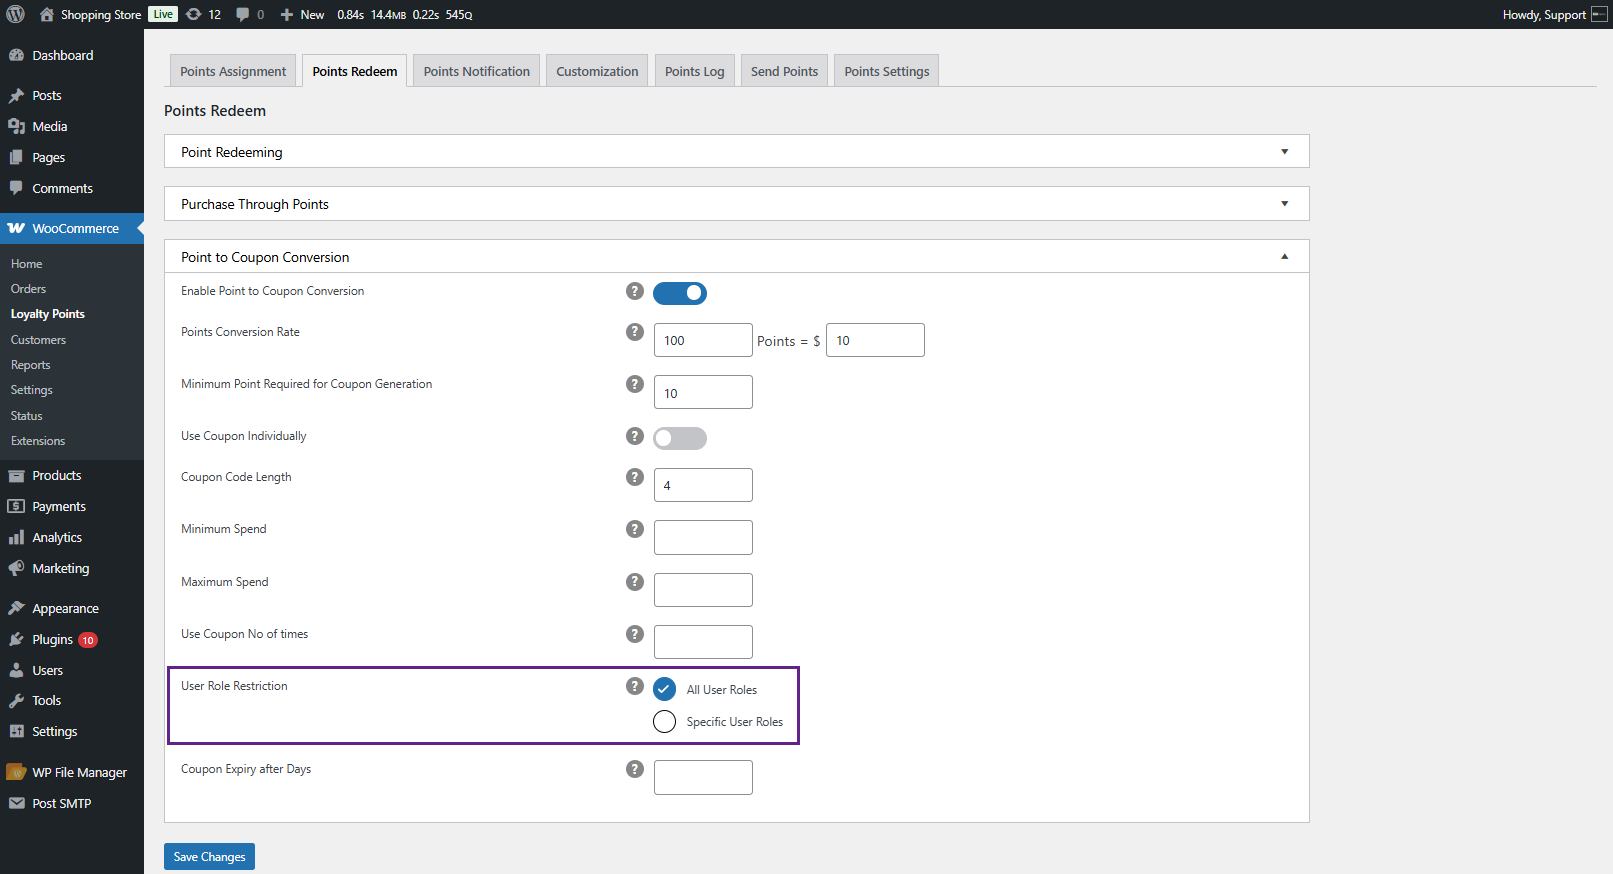
- Restrict the User role restriction.
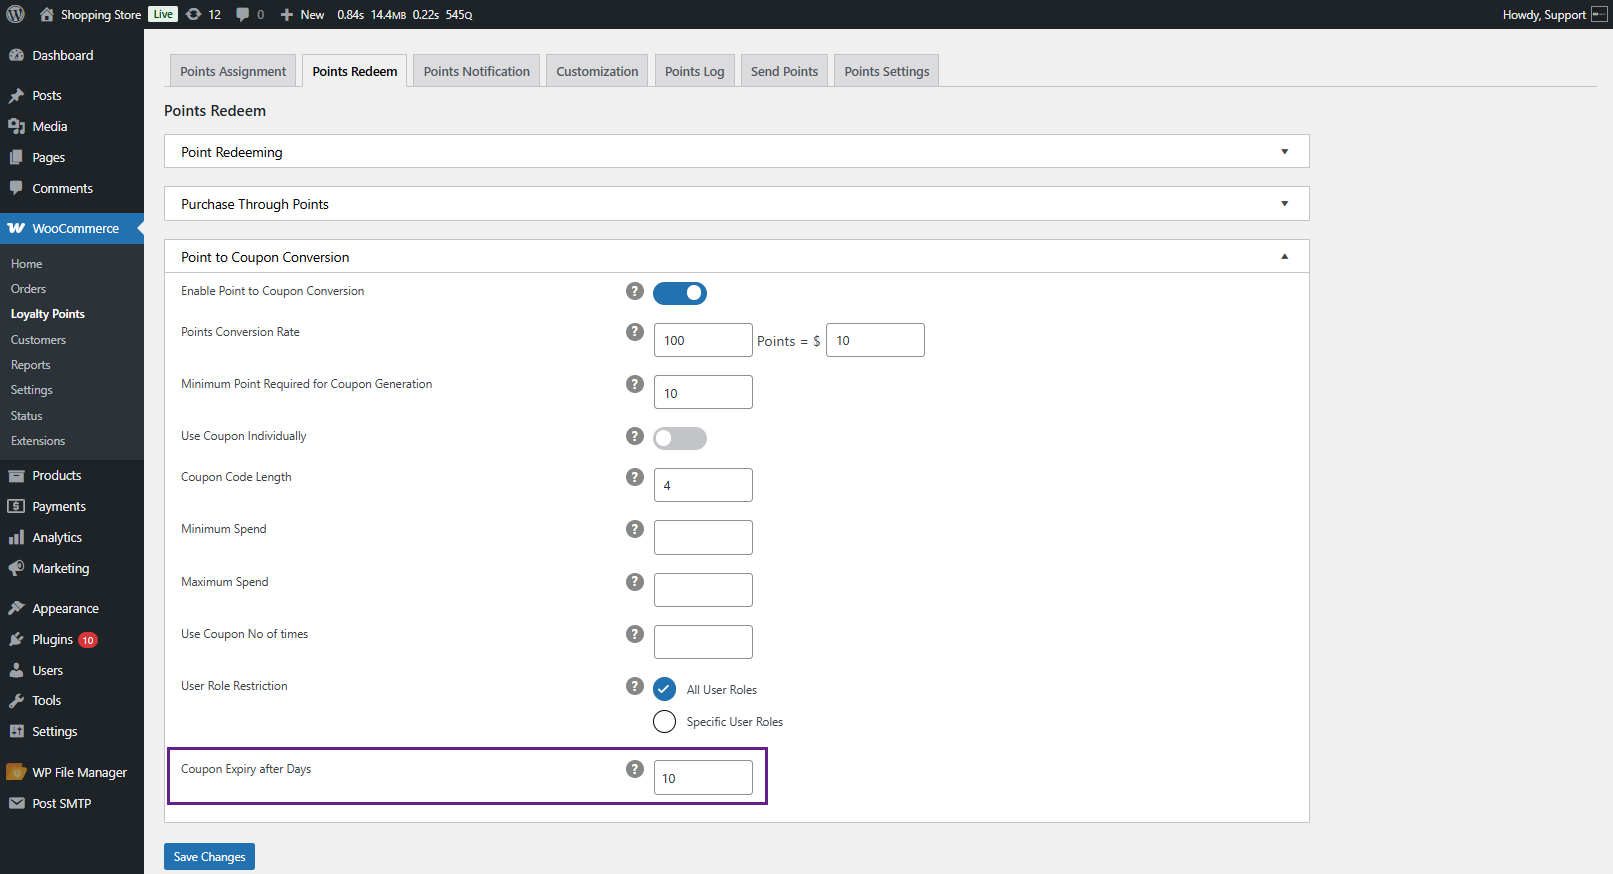
- Set the Coupon Expiry After Days.
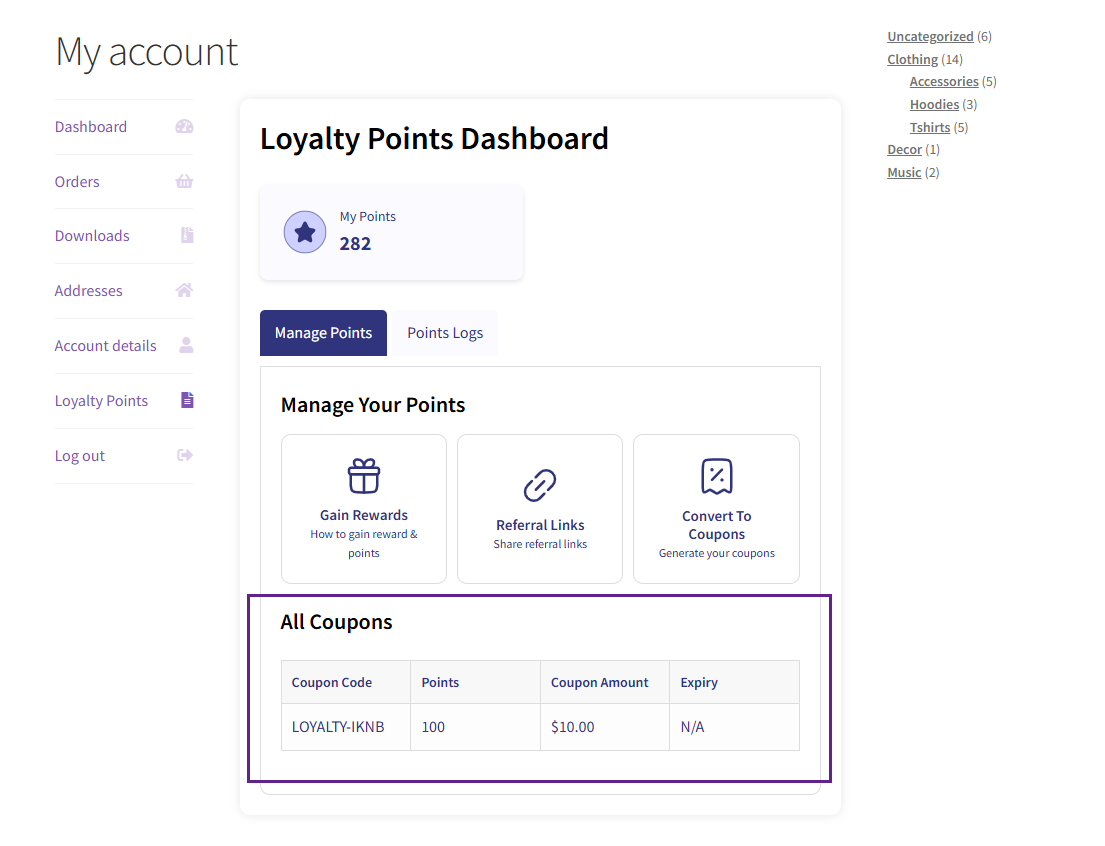
- Example: If the conversion is 100 points = $5, a user with 500 points can generate a $25 coupon.
Front End Impact
Coupon-Convert
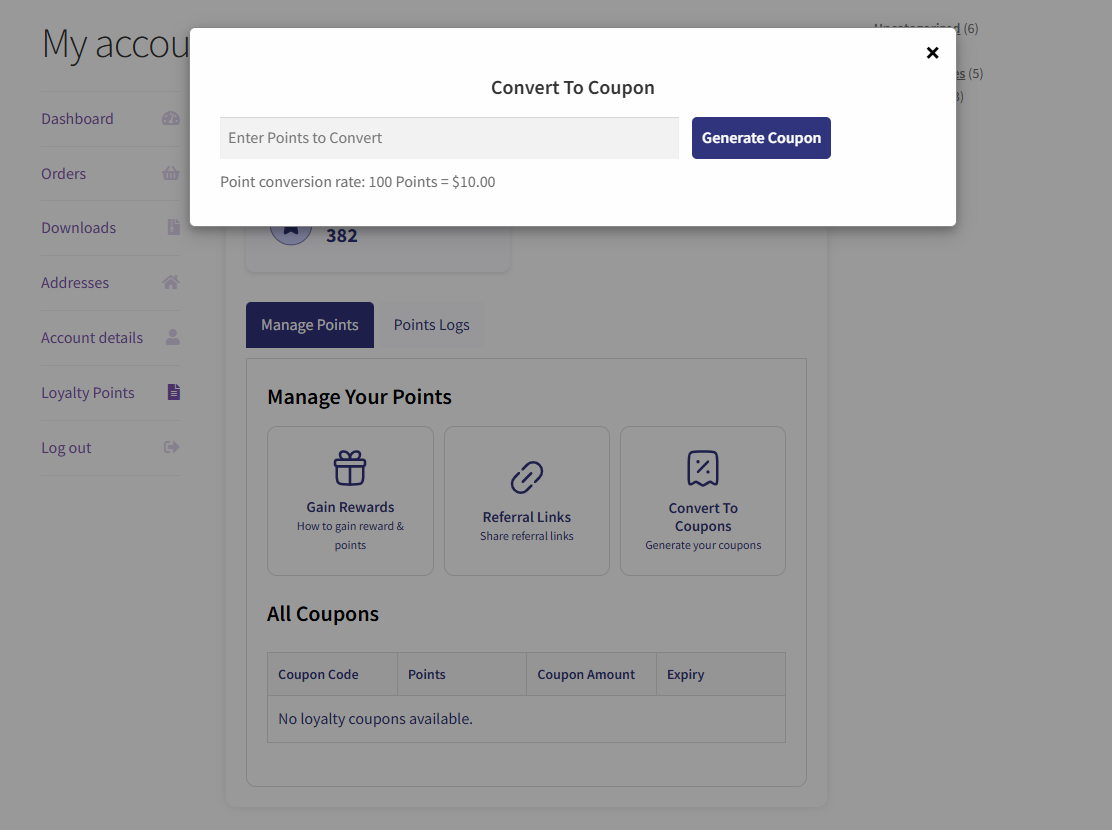
Coupon-Generated
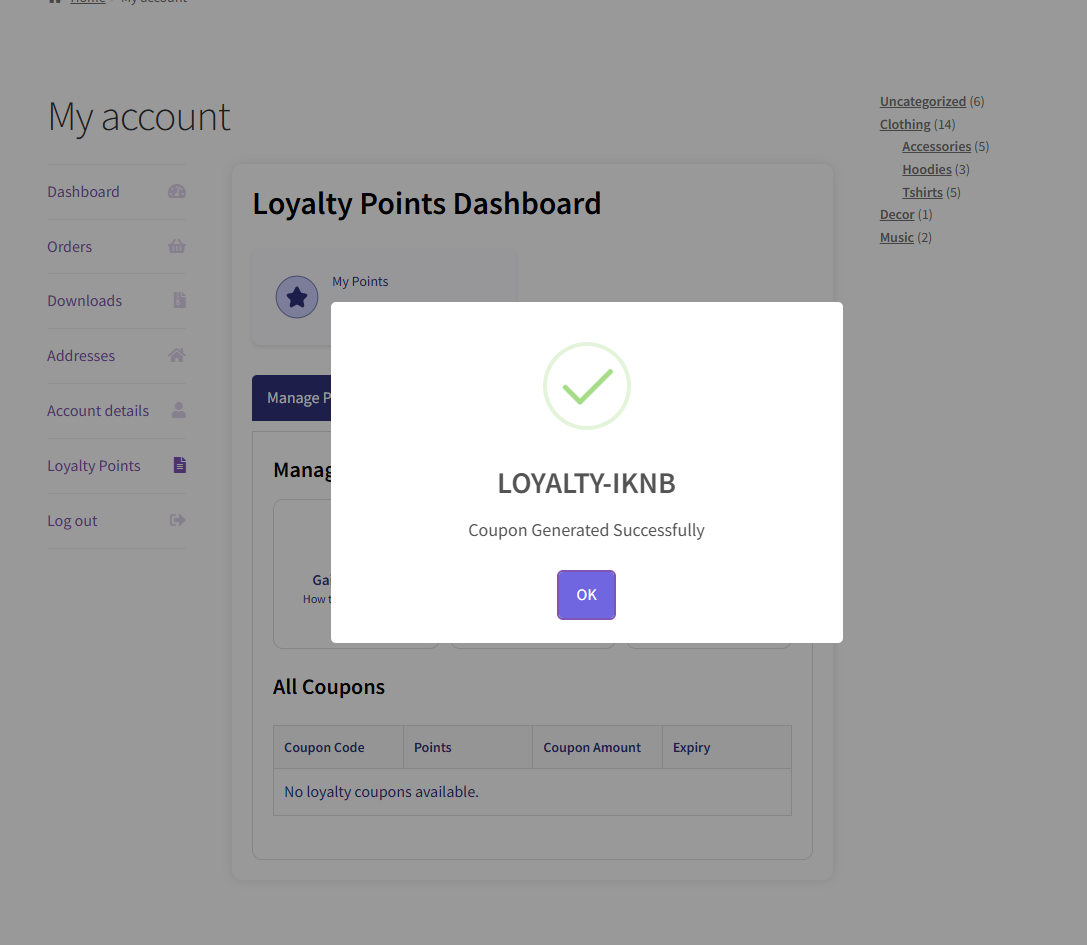
Coupon-Dashboard
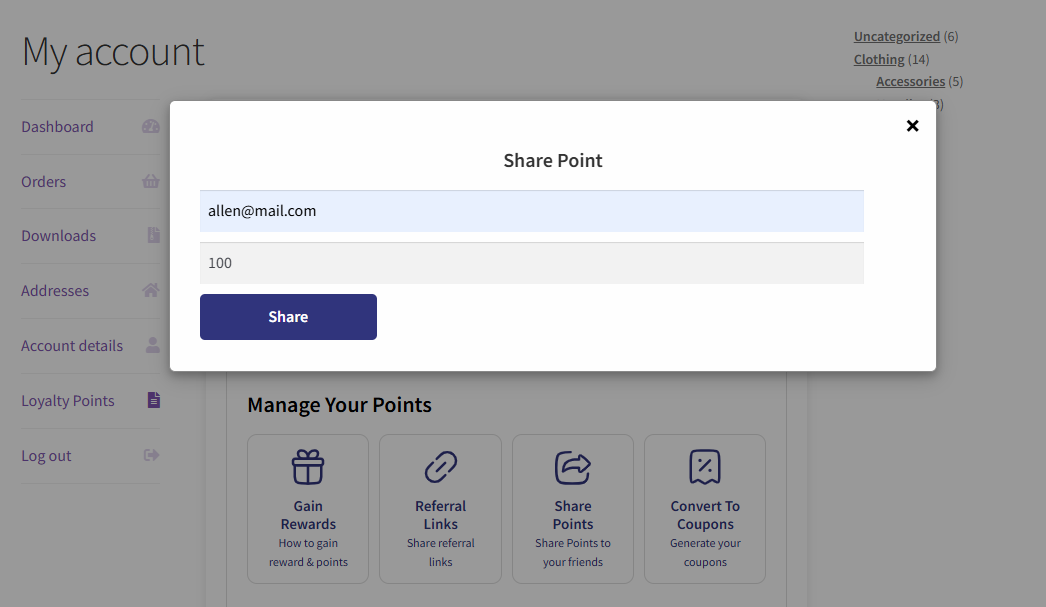
Points Sharing
↑ Back to top- Allows users to share points with other users.
- The admin can enable/disable this feature.
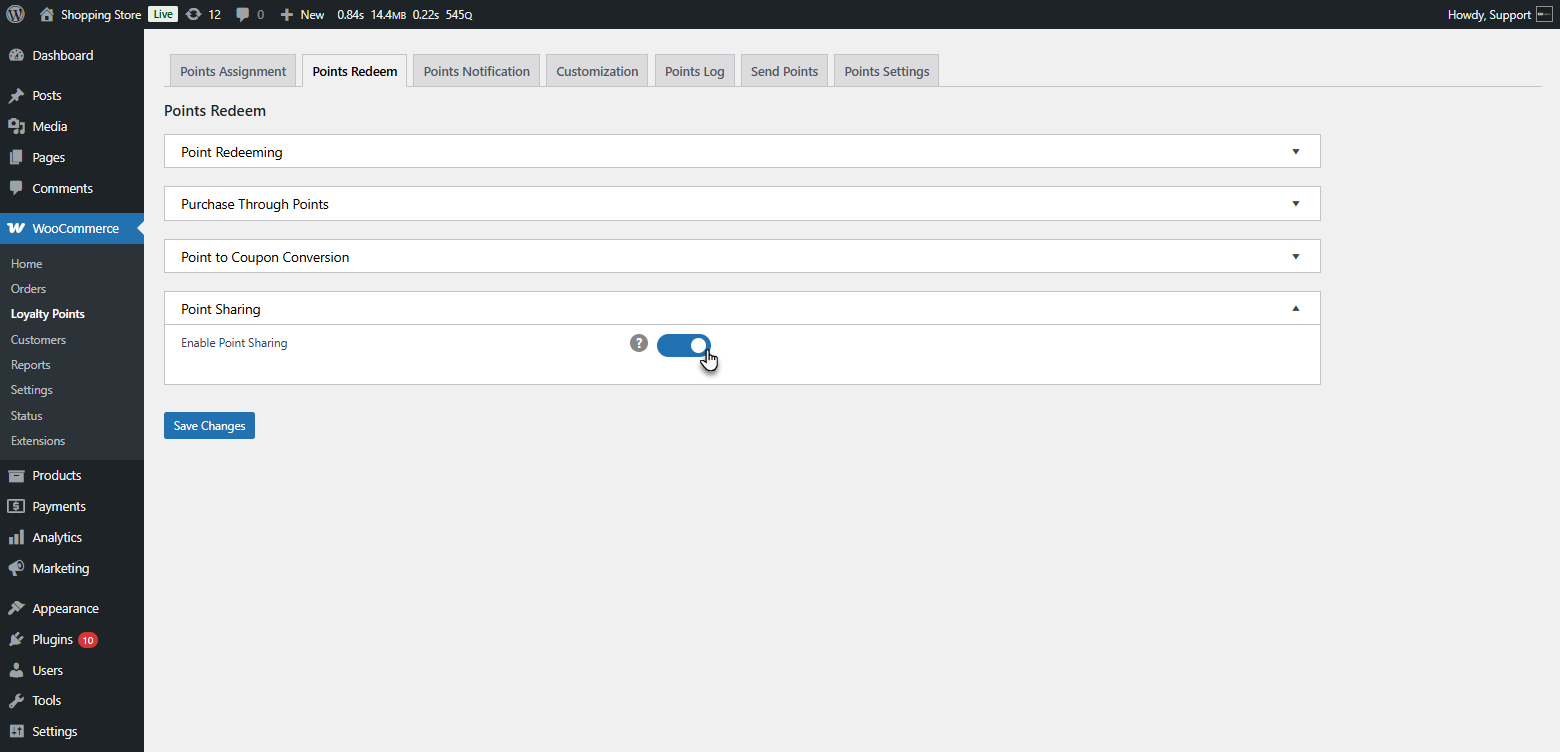
- Click the Save Changes button at the bottom to apply the updated settings.

Front End Impact
Share-Points-Dashboard
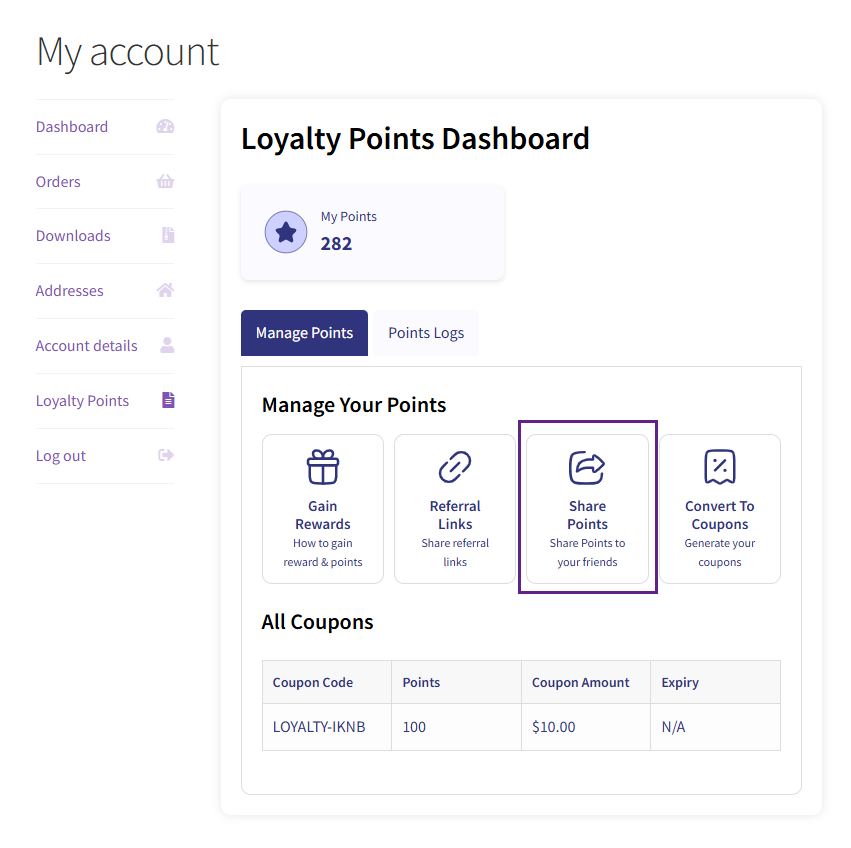
Share-Points
Points Notification
↑ Back to top- Navigate to WordPress Admin Dashboard > WooCommerce > Loyalty Points > Points Notification.
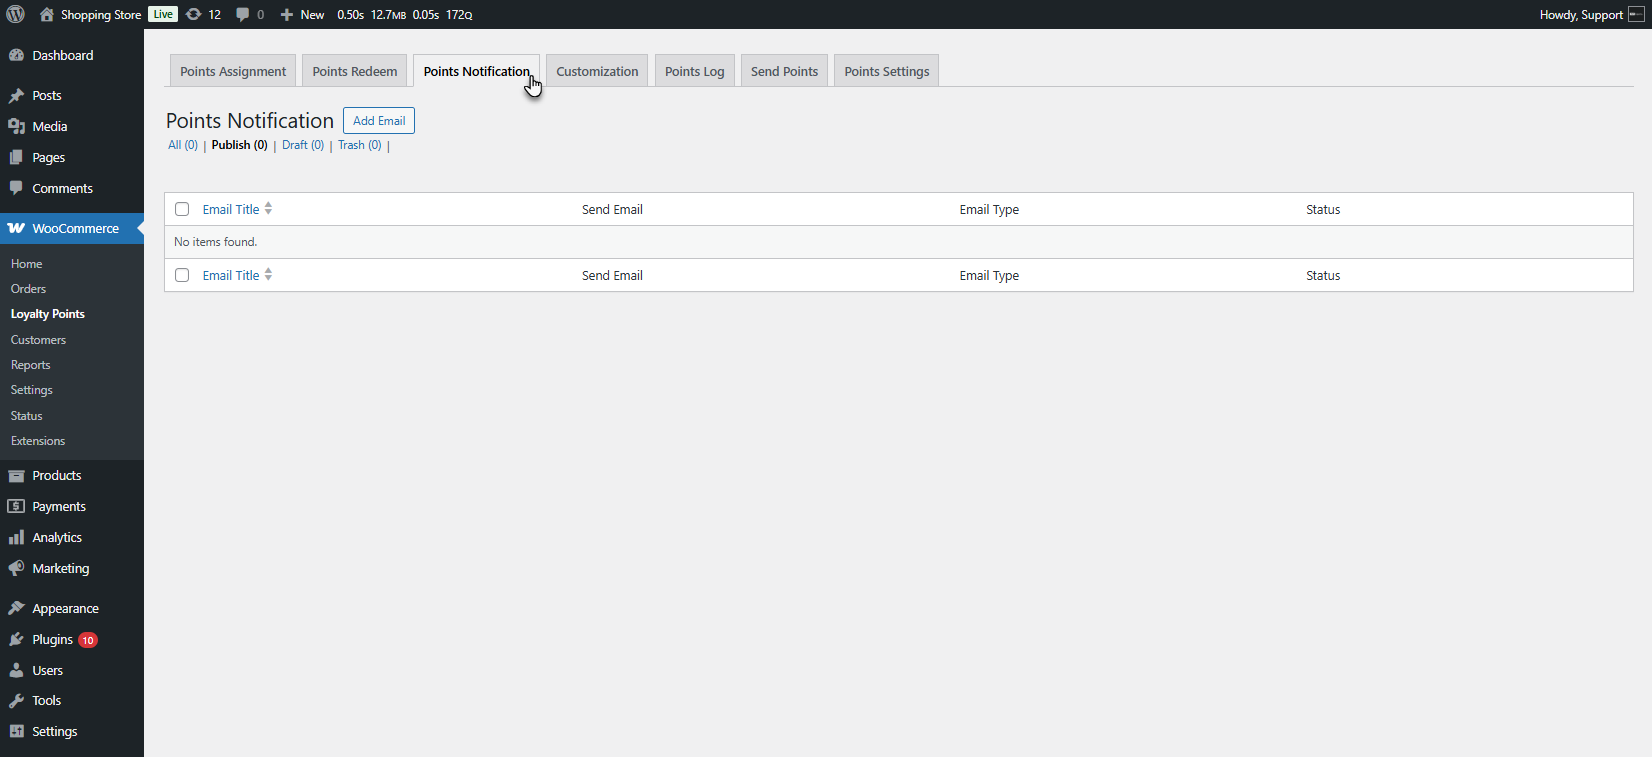
- The Points Notification List Page will appear. Click on Add Email to create a new notification.
- The Add New Email Screen will appear. Add a Title to your Email.
- Use the toggle switch to enable or disable this email notification.

- Select the Send Email trigger.
- Once a day if points have been updated: The email will be sent once daily if any changes occur in the user’s loyalty points.
- As soon as points are updated, the email is triggered and sent immediately whenever there is a change in the user’s points balance.
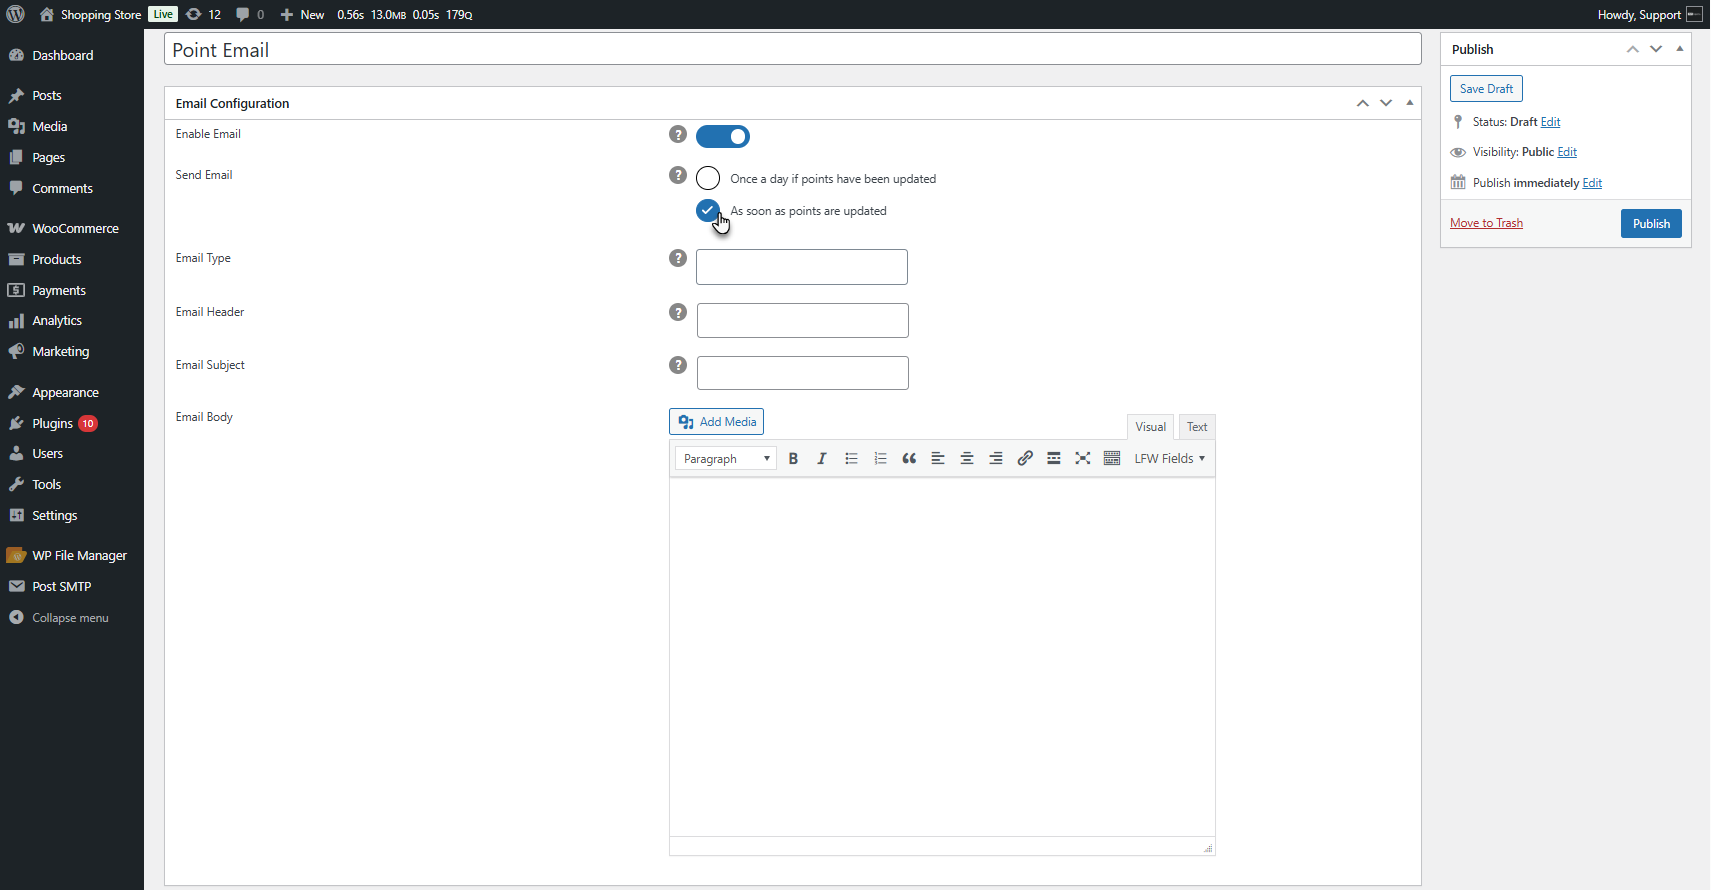
- Add text to define the type of email.
- Add the title or heading of the email is displayed at the top of the email content.
- Add the email’s subject line that appears in the recipient’s inbox.
- Add the main content of the email. The admin can use the predefined LFW tags that are provided.
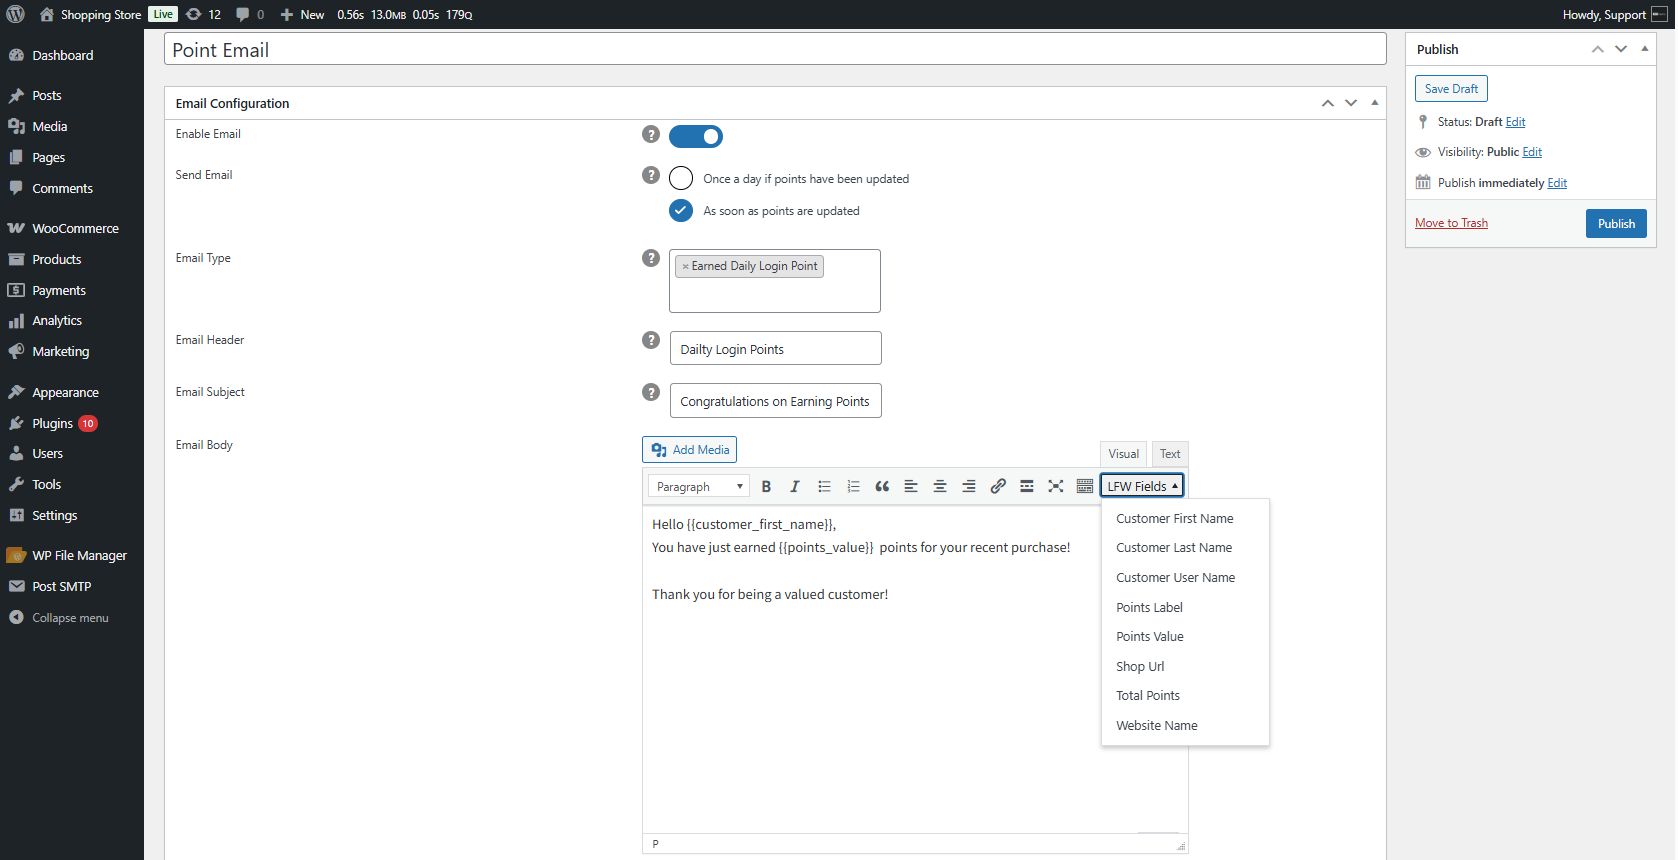
- Click on the Publish button to save the email.

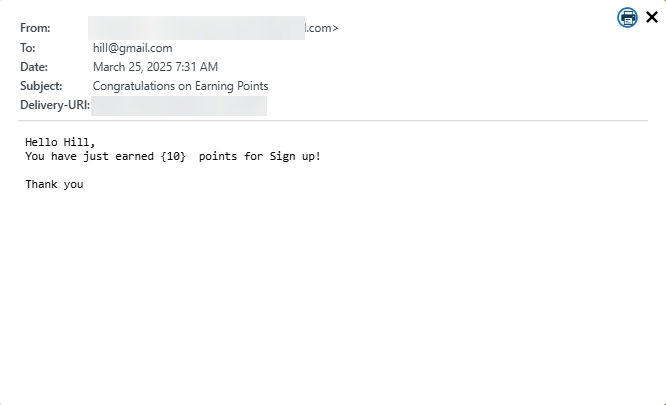
- Front End Impact
Customization
↑ Back to top- The Customization tab allows you to configure how loyalty points are displayed on various pages of your WooCommerce store, including the My Account page, Shop page, Cart page, Checkout page, and Thank You page. You can also customize various messages related to loyalty points.
- Navigate to WordPress Admin Dashboard > WooCommerce > Loyalty Points > Customization.
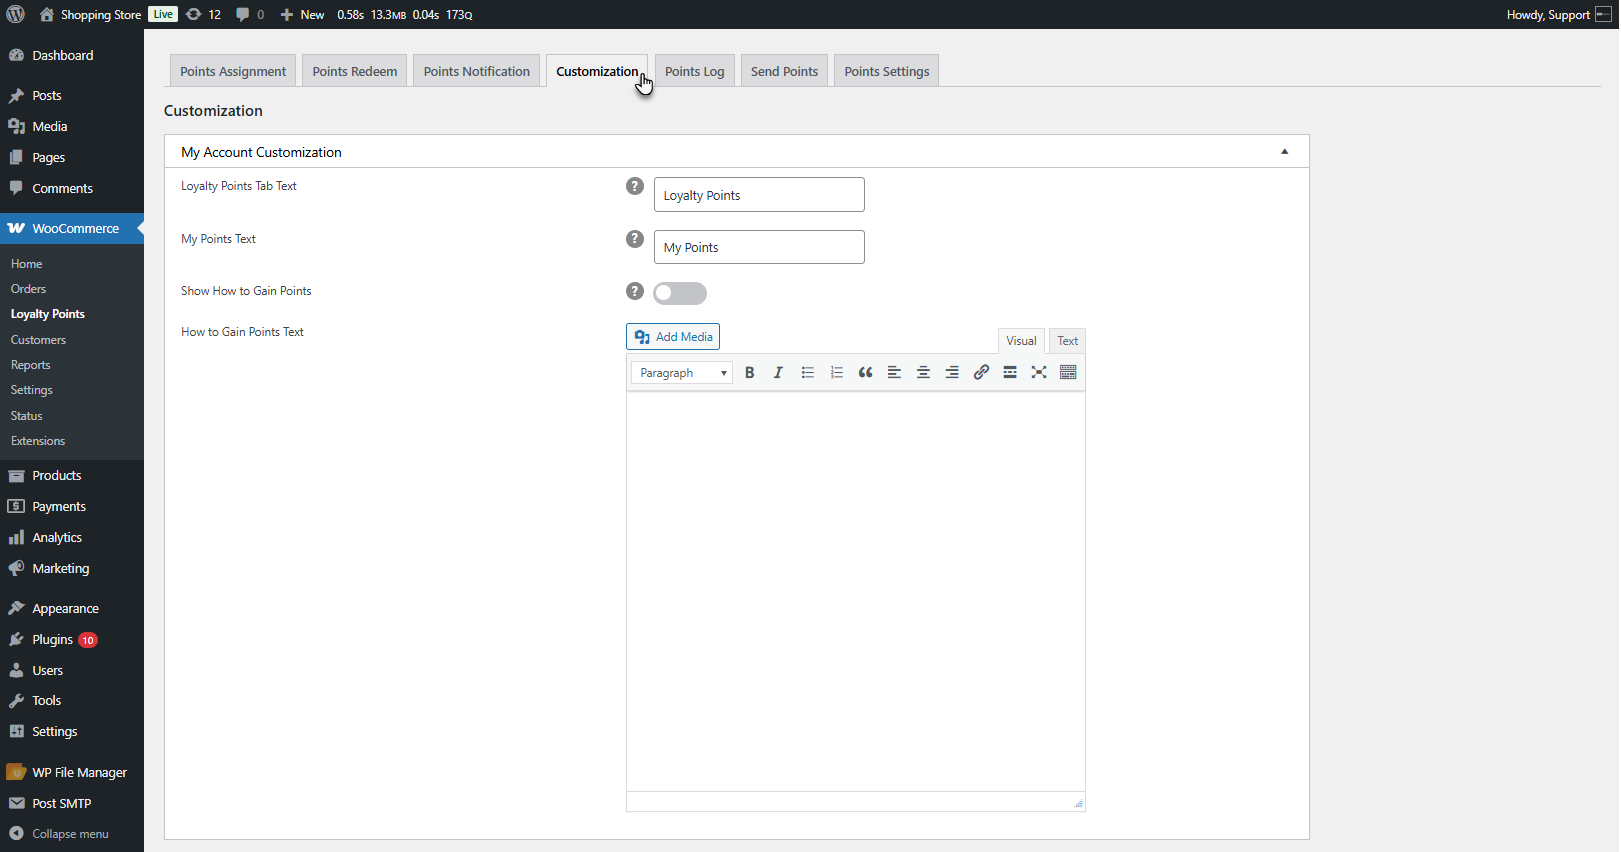
My Account Customization
↑ Back to topThis section lets you personalize how the loyalty points system appears on the My Account page.
- Loyalty Points Tab Title: The title for the loyalty points section in the user’s account. (Default: Loyalty Points)
- My Points Text: The text label for displaying the user’s total earned points. (Default: My Points)
- How to Gain Points Toggle: Enable/disable a section where users can see instructions on earning points.
- How to Gain Points Text: Add a custom message explaining how customers can earn loyalty points.

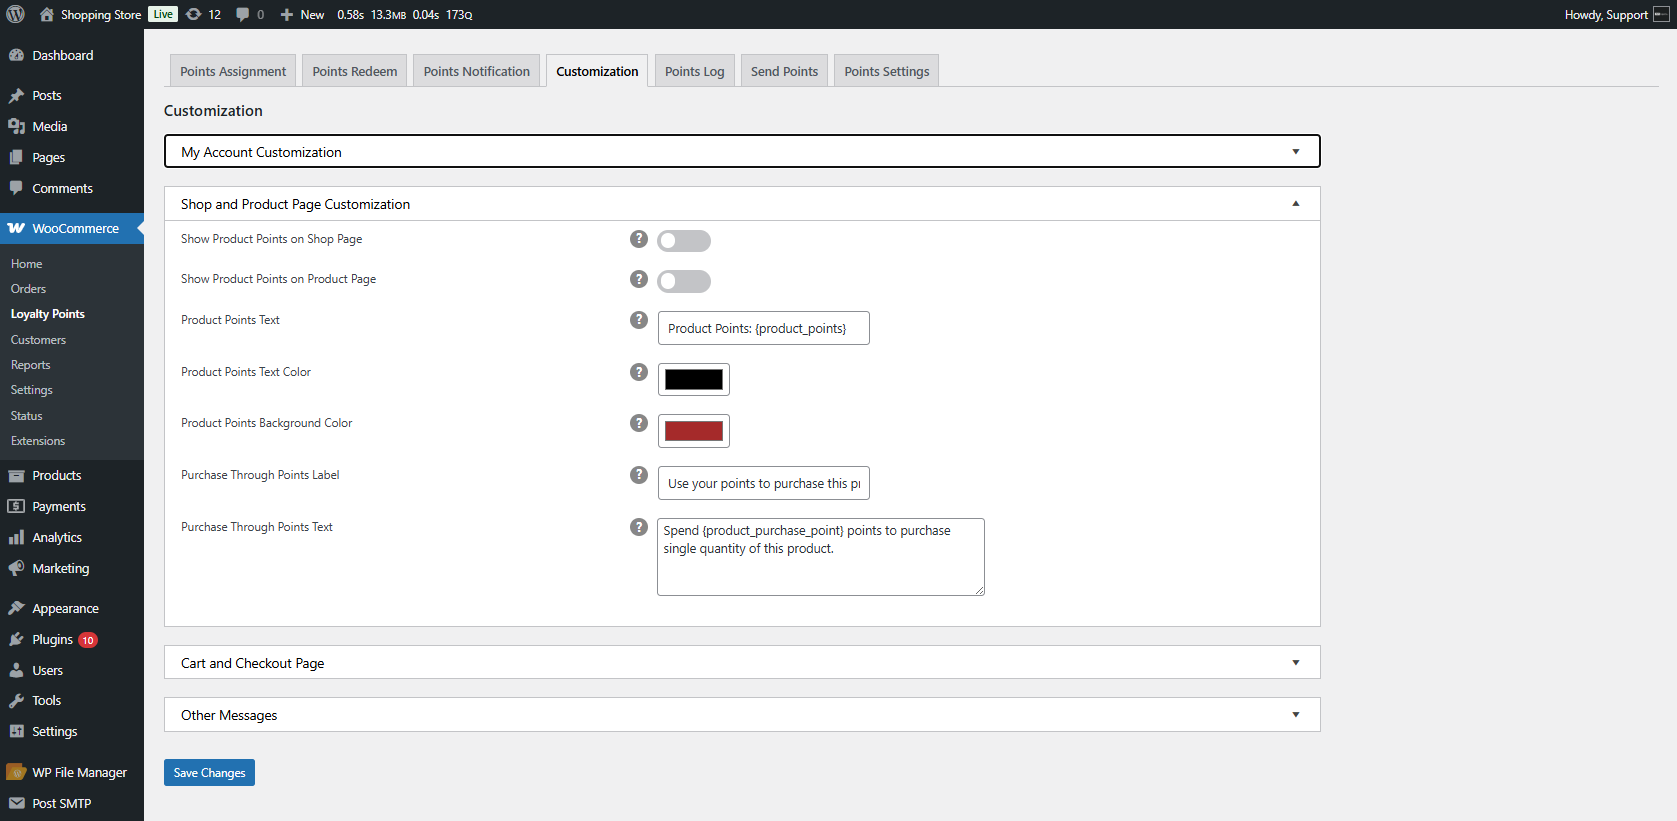
Shop and Product Page Customization
↑ Back to topThis section controls how loyalty points appear on product and shop pages.
- Show Product Points on the Shop Page: Enable/disable the display of points on the shop page.
Show Product Points on Product Page: Enable/disable the display of points on individual product pages. - Product Points Text: Customize the text displayed for the points a product offers. Example: Product Points: {product_points}
- Product Points Text Color: Choose the text color for the points display.
- Product Points Background Color: Choose a background color for the points display.
- Purchase Through Points Label: Customize the text for purchasing a product using points. (Default: Use your points to buy this product.)
- Purchase Through Points Text: Additional explanatory text for purchasing with points.
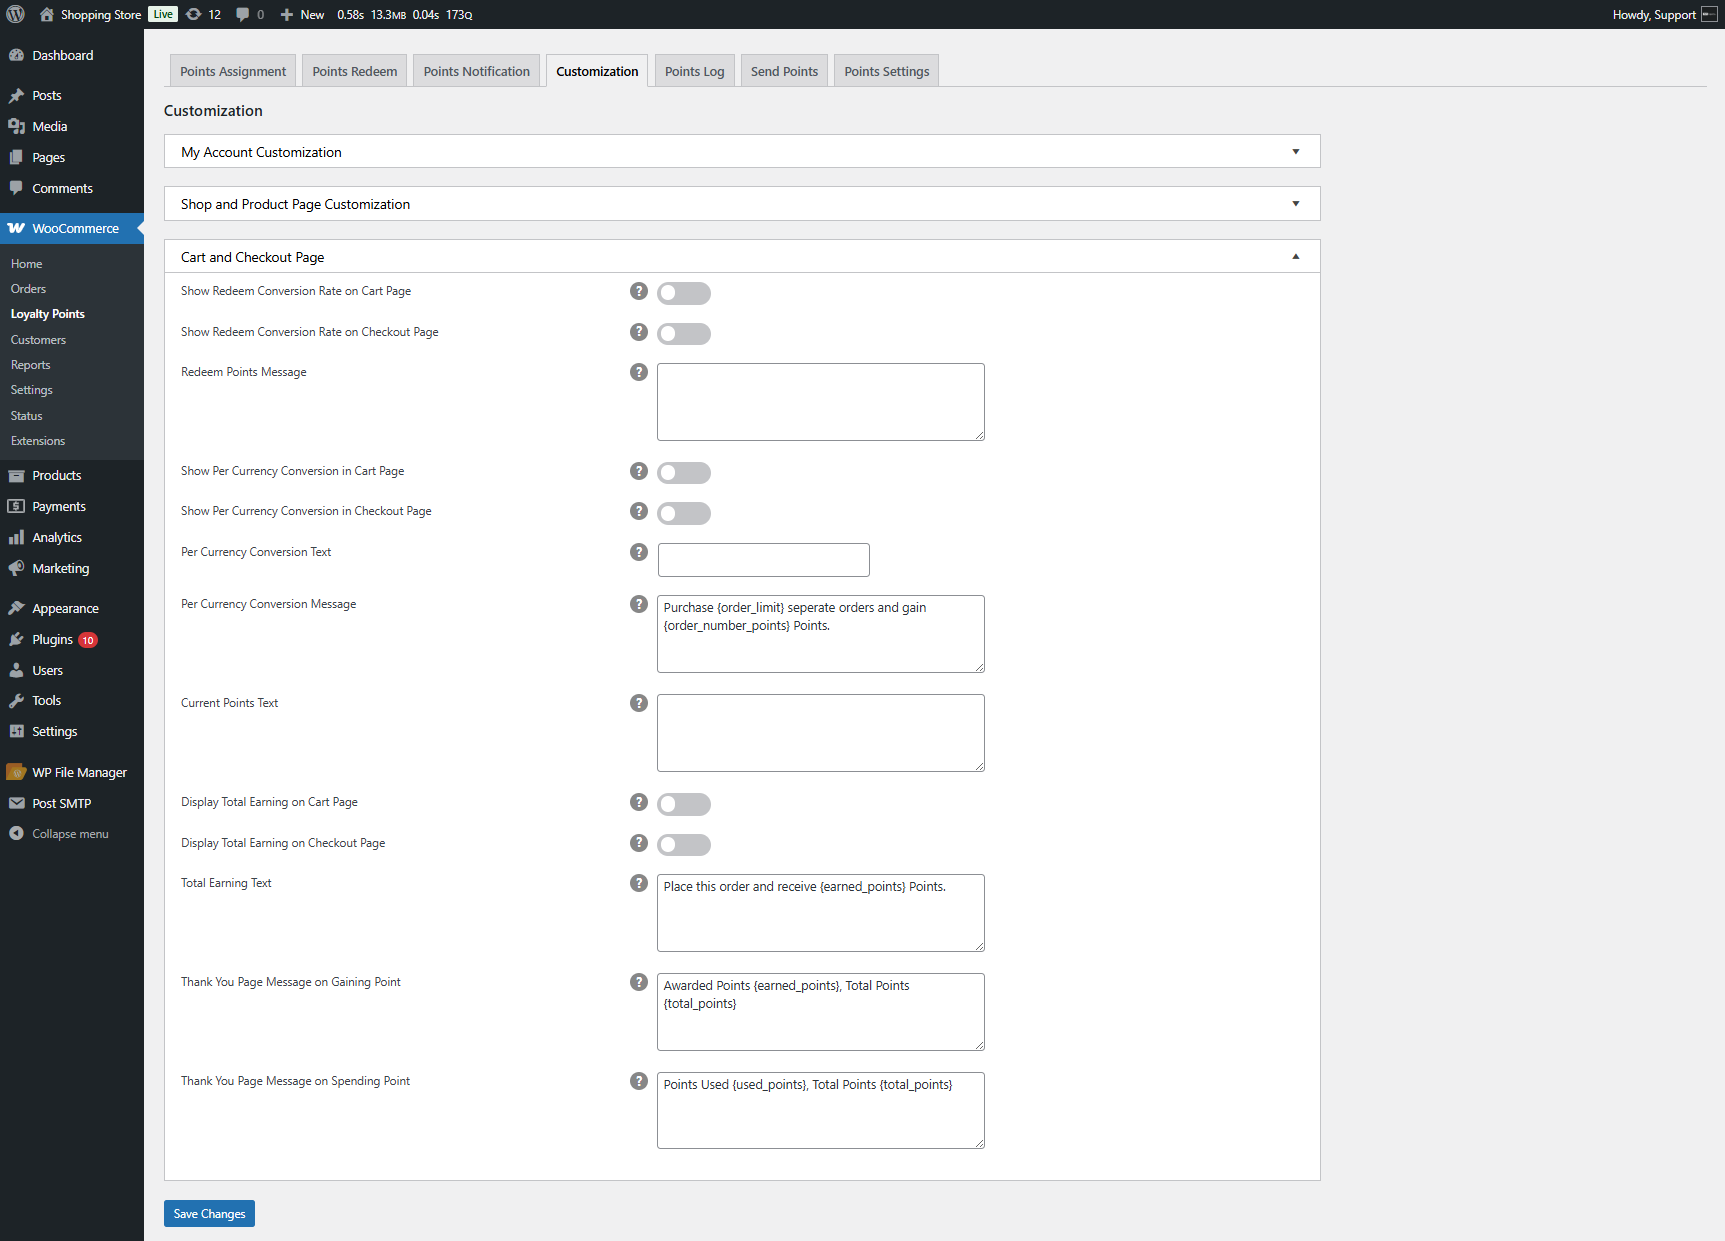
Cart and Checkout Page Customization
↑ Back to topThis section customizes the display of loyalty points during checkout.
- Show Redeem Conversion Rate on Cart Page: Enable/disable the display of the conversion rate when redeeming points on the cart page.
- Show Redeem Conversion Rate on Checkout Page: Enable/disable the display of the conversion rate on the checkout page.
- Redeem Points Message: Customize the message displayed when a user redeems points.
- Show Per Currency Conversion on Cart Page: Enable/disable a message about how points are earned per currency unit.
- Show Per Currency Conversion on Checkout Page: Enable/disable a message about how points are earned per currency unit on the checkout page.
- Per Currency Conversion Text: Customize the conversion rate text, e.g., Earn 1 point per $1 spent.
- Per Currency Conversion Message: A detailed message explaining how users can earn points by purchasing in different currencies.
- Current Points Text: Customize the text showing the customer’s current points balance.
- Display Total Earnings on Cart Page: Enable/disable the display of total points a user will earn for their cart items.
- Display Total Earning on Checkout Page: Enable/disable the display of total points a user will earn upon checkout.
Total Earning Text: Customize the message for total points earned, e.g., Place this order and receive {earned_points} points. - Thank You Page Message on Gaining Points: Customize the message displayed after purchase regarding earned points.
- Thank You Page Message on Spending Points: Customize the message displayed after a user spends points on an order.
Other Messages Customization
↑ Back to topThis section allows the customization of different messages related to earning points.
- Order Total Points Message: A message is shown when a user earns points based on the order total. (Example: Purchase an order of {order_total_min} and earn {order_total_points} points.)
- Signup Points Message: A message is displayed when users earn points for signing up. (Example: You will get {signup_points} points for a successful signup.)
- Referral Points Message: This message is displayed when a user earns points for referring someone. (Example: Refer a new user and earn {referrer_points} points.)
- Comment Review Points Message: A message is displayed when a user earns points for leaving a review. (Example: Add a review and earn {review_points} points.
- First Order Points Message: This message is displayed when users earn points for their first order. (Example: Place your first order and earn {first_order_points} points.)
- Payment Methods Points Message: A message is displayed when a user earns points for using specific payment methods. (Example: Place an order using {selected_pay_method} and earn {pay_method_points} points.)
- After configuring the settings, click the “Save Changes” button to apply your customizations.

Front End Impact
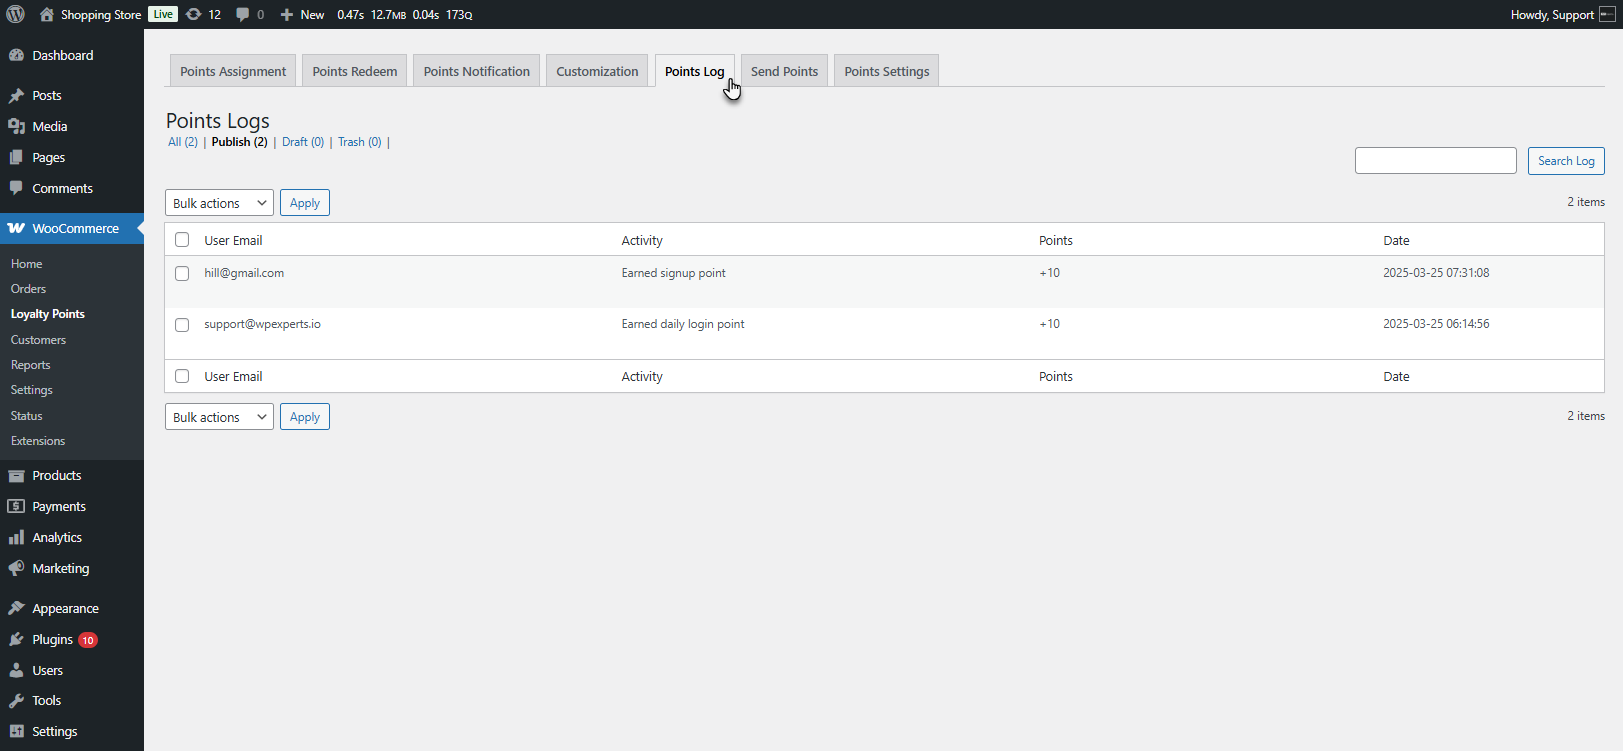
Points Log
↑ Back to top- All the activities that result in point gain, deduction, sharing, or updating will be recorded in the point logs.
- Navigate to WordPress Admin Dashboard > WooCommerce > Loyalty Points > Points Log.
Front End Impact
Send Points
↑ Back to top- The Send Points tab allows store administrators to assign loyalty points to customers manually. It also provides an option to notify users via email about the points they receive.
- Navigate to WordPress Admin Dashboard > WooCommerce > Loyalty Points > Send Points.
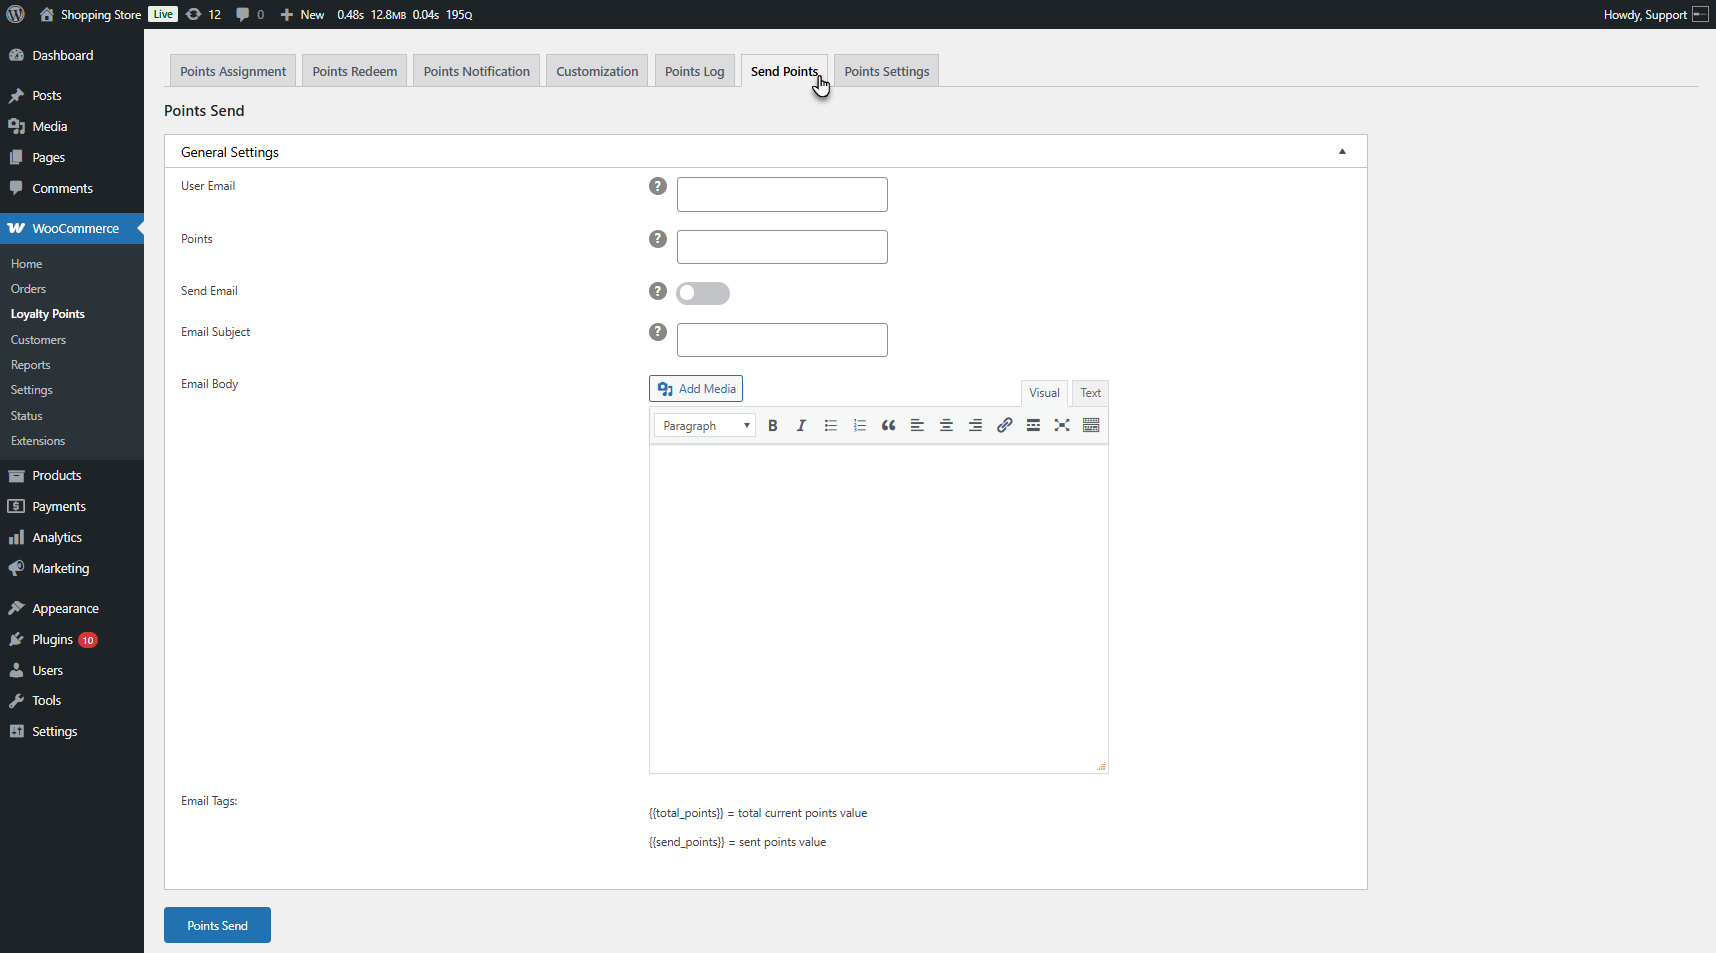
General Settings
↑ Back to topThis section allows you to manually send loyalty points to a specific user.
- User Email:
Enter the email address of the user who will receive the points.
Example: user@example.com - Points:
Enter the number of points to be awarded to the user.
Example: 50 - Send Email :
Enable this option if you want to notify the user via email about the points received. - Email Subject:
The subject line of the email notification.
Example: “You Have Received Loyalty Points!” - Email Body:
A customizable message will be sent to the user.
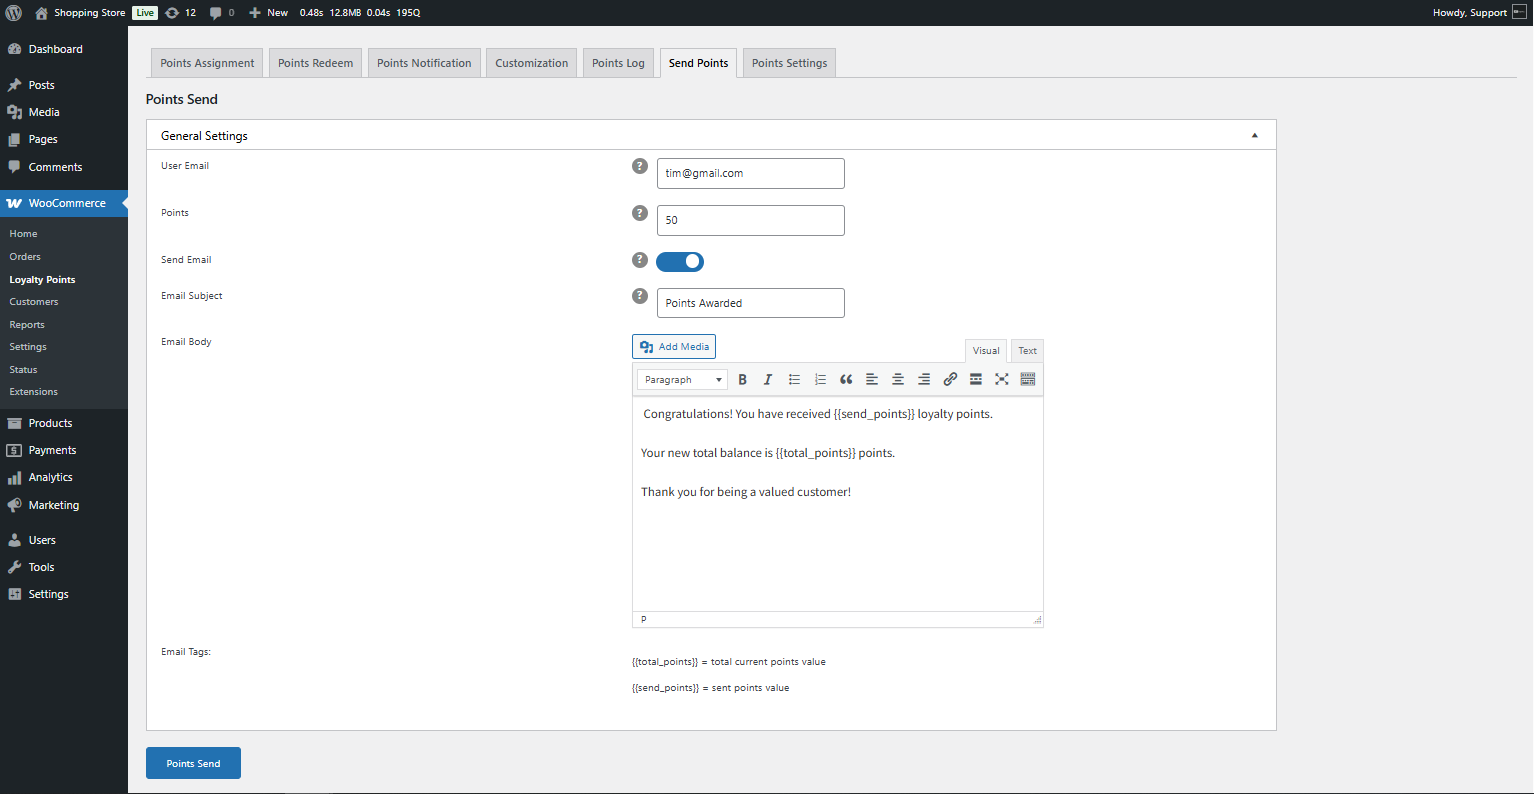
- Click on the Send Points button. The Points will be sent to the user. A pop-up will notify the admin that points have been sent to users.

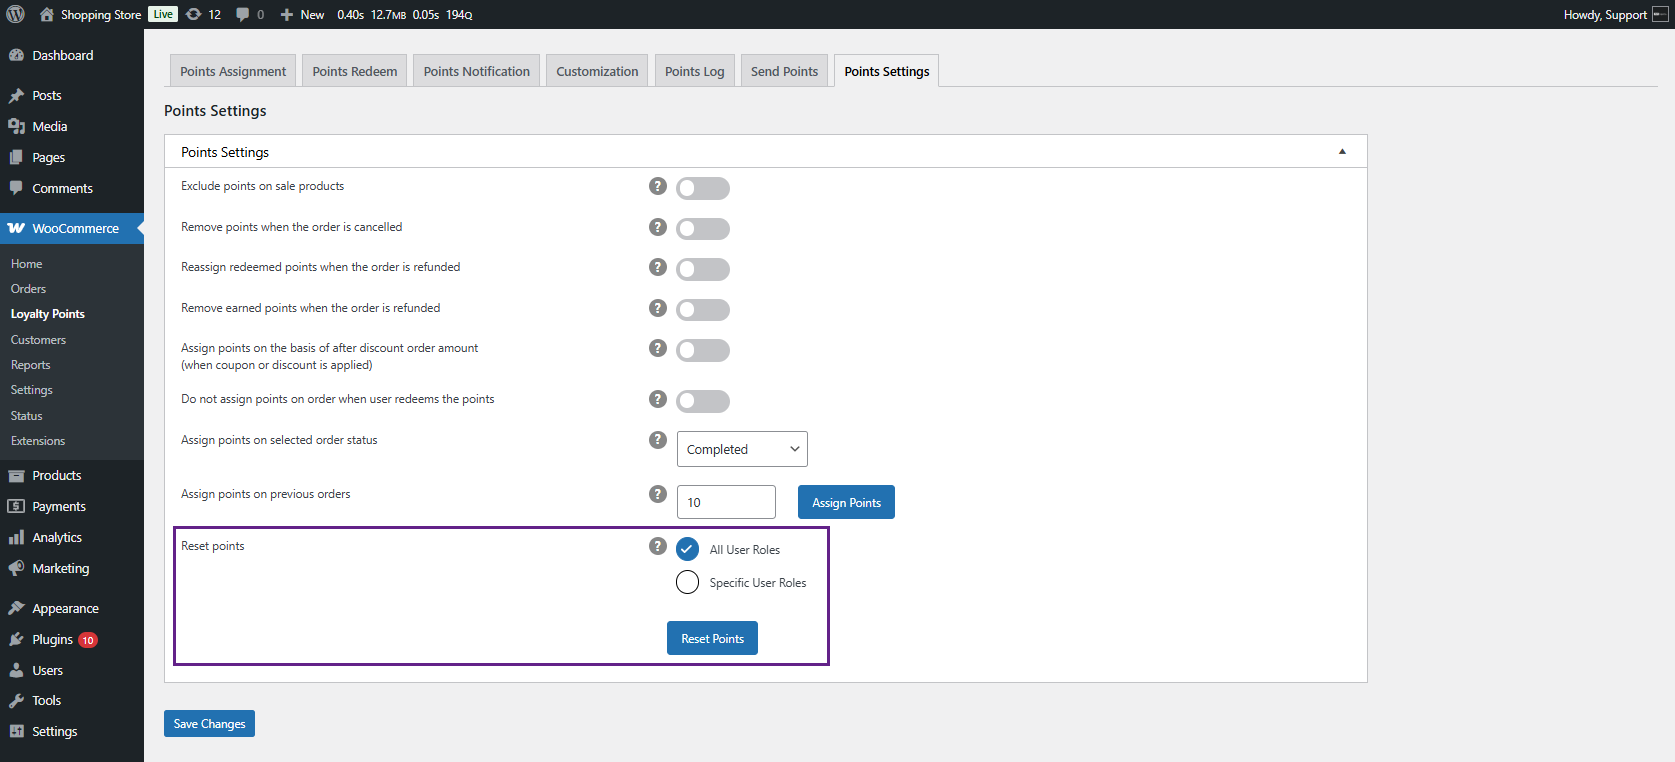
Points Settings
↑ Back to top- This section contains various settings that define how points are awarded and handled in different order scenarios.
- Navigate to WordPress Admin Dashboard > WooCommerce > Loyalty Points > Points Settings.
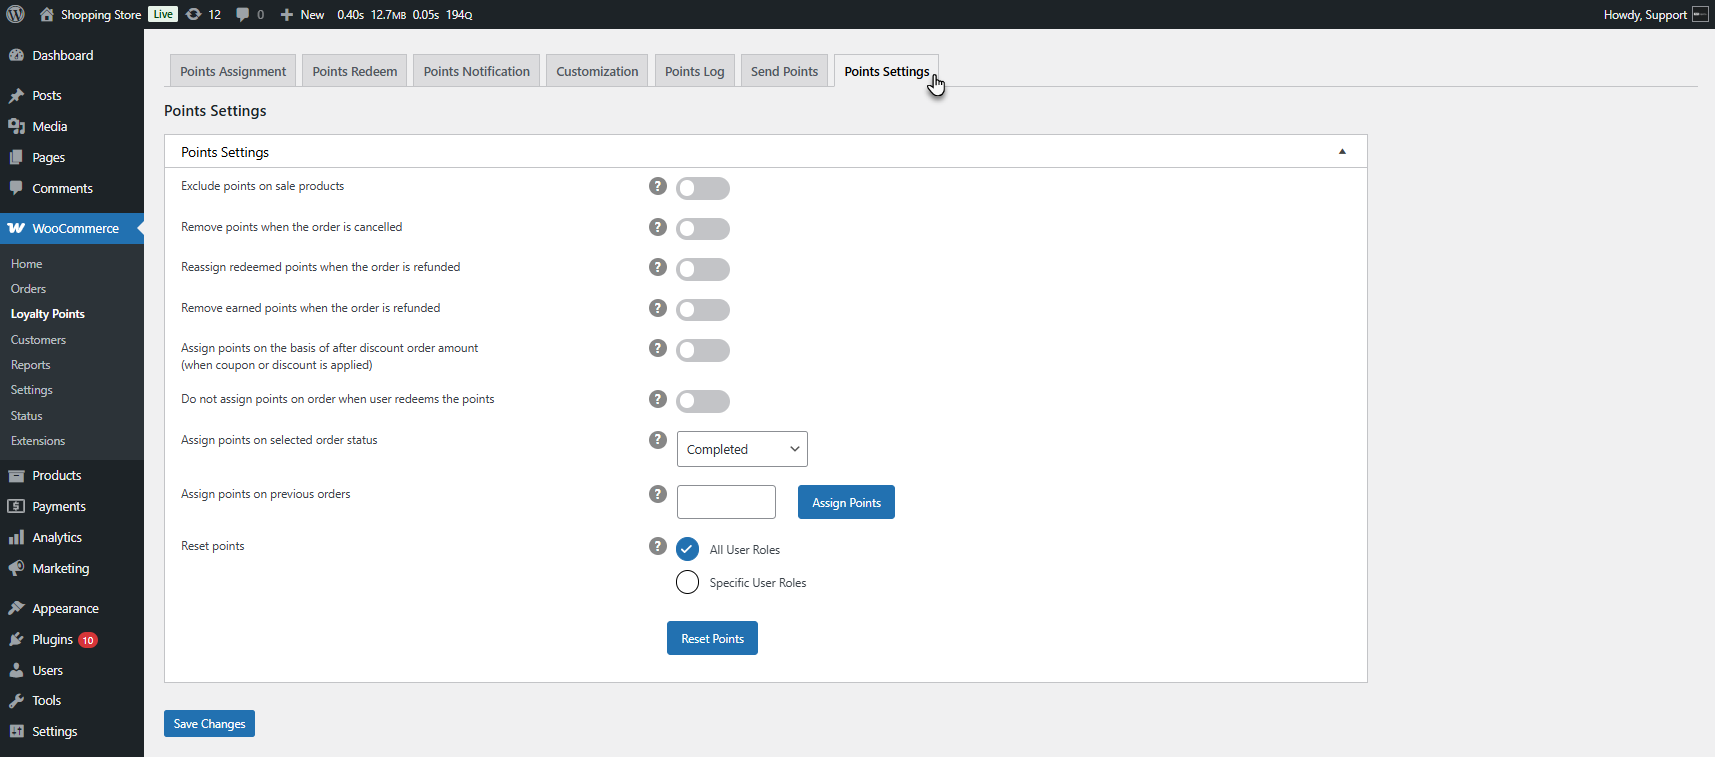
General Settings
↑ Back to topThis section contains various settings that define how points are awarded and handled in different order scenarios.
Available Options & Their Functions:
↑ Back to top- Exclude points on sale products:
- When enabled, customers will not earn points on discounted or sale items.
- Remove points when the order is canceled:
- When enabled, any points earned from a canceled order will be deducted from the user’s balance.
- Reassign redeemed points when the order is refunded:
- When enabled, points used in a refunded order will be credited back to the user.
- Remove earned points when the order is refunded:
- Any points earned from a refunded order will be removed from the user’s balance when enabled.
- Assign points based on the after-discount order amount:
- When enabled, points will be awarded based on the final order amount after applying coupons or discounts.
- Do not assign points when a user redeems points:
- Users will not earn new points on orders with redeemed points when enabled.

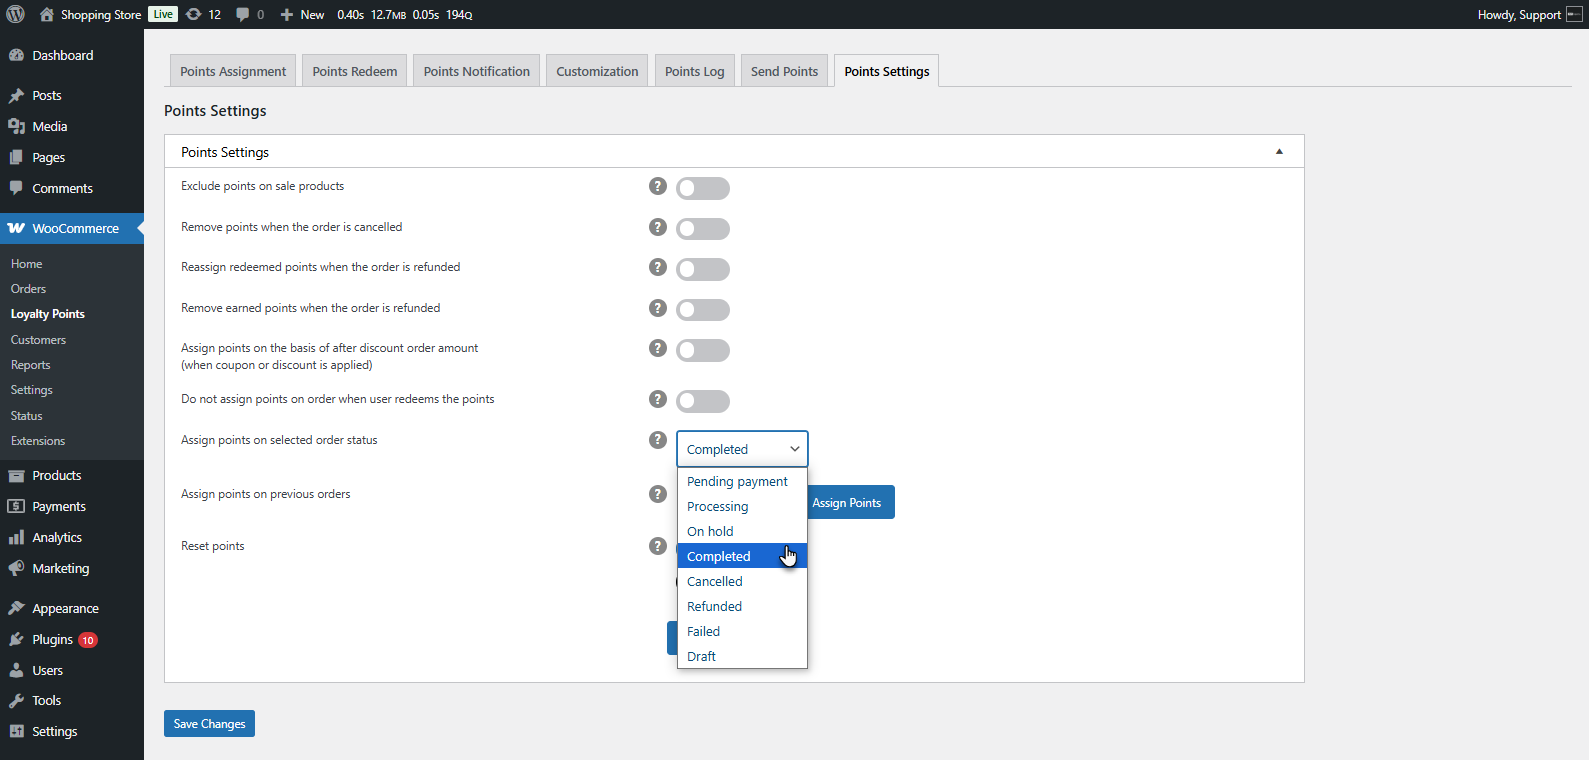
Assign Points Based on Order Status
↑ Back to top- Dropdown Selection (Default: Completed)
- You can choose in which order status the points should be awarded.
- Example: If set to “Completed,” points will only be awarded once the order is marked as completed.
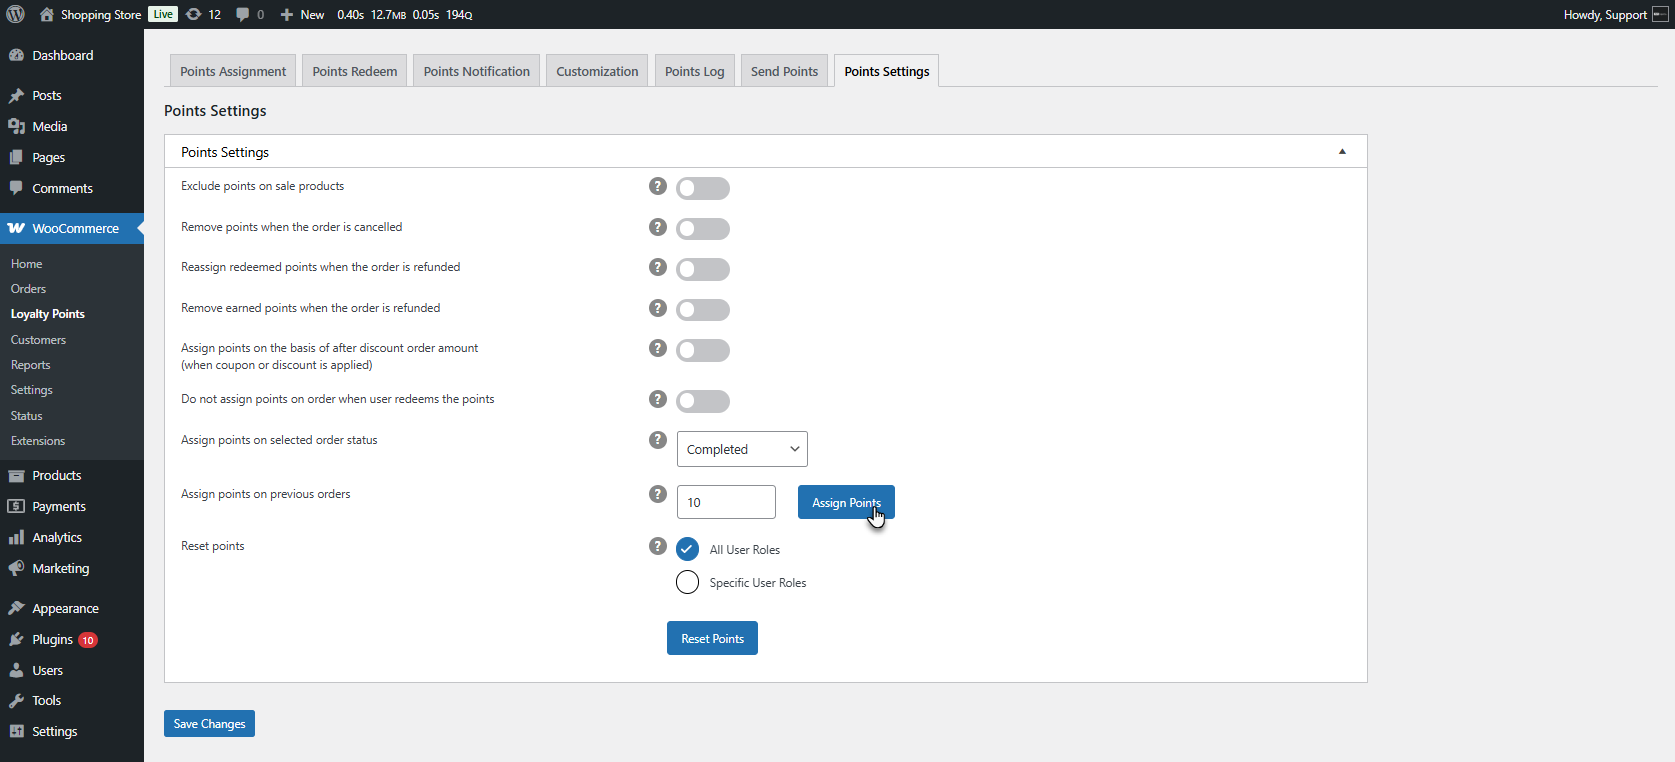
Assign Points on Previous Orders
↑ Back to top- Enter the number of points to be assigned to previous orders.
- Click Assign Points to apply points retrospectively.
Reset Points
↑ Back to top- All User Roles (Default Selected):
- Reset points of all user roles (e.g., customers, subscribers, etc.).
- Specific User Roles:
- Reset points only to selected user roles.
Front End Impact – User Side
↑ Back to top- Log in to your account.
- Go to the Loyalty Points tab on the My Account Page.
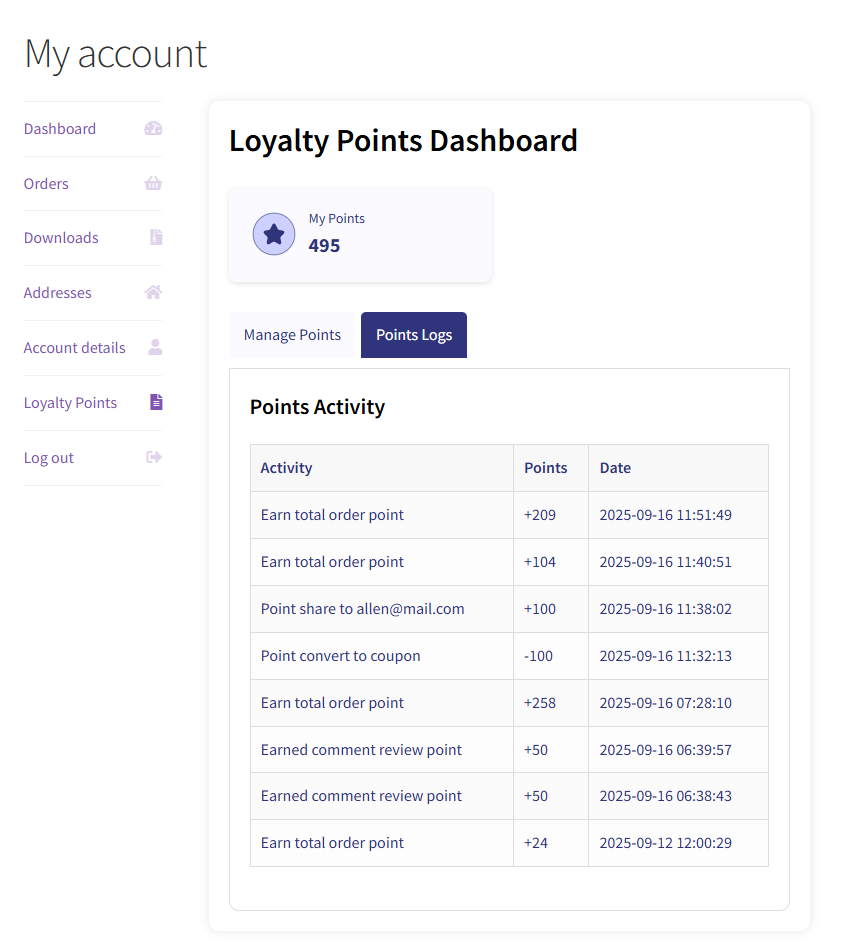
- A Loyalty Points Dashboard will appear. All the points awarded or gained will appear here. The dashboard consists of three major sections.
- My Points: Displays the total points earned (in this case, 70).
- Manage Points / Points Logs: These tabs manage and track loyalty points activity.
- All Coupons: Coupons available will be listed here.
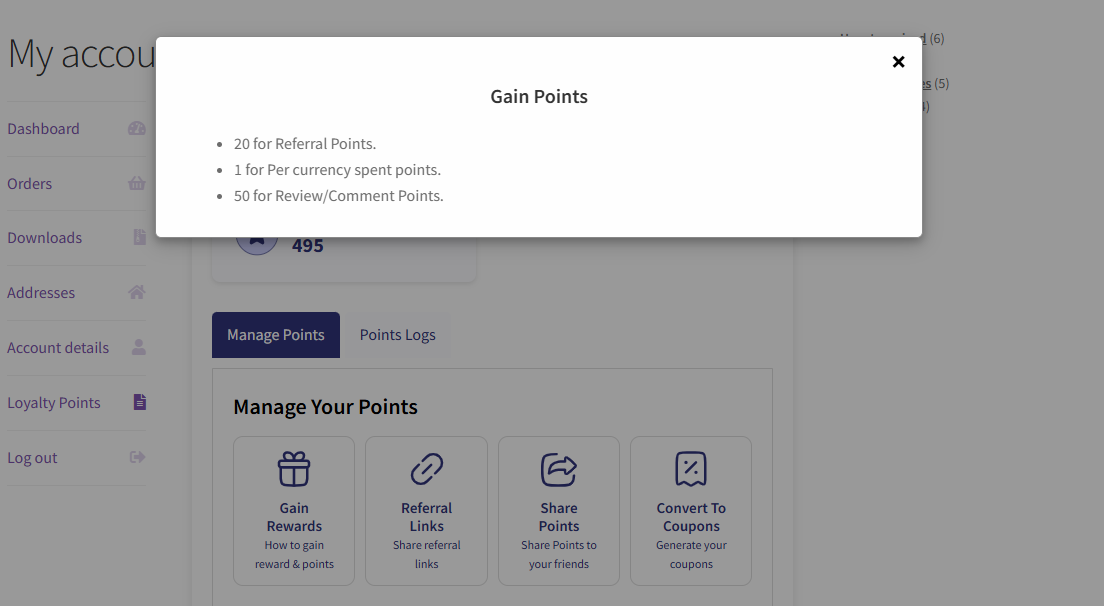
- The Manage Points section allows users to utilize their points in different ways:
- Gain Rewards: Provides details on how customers can earn points
