Documentation of Try Before you Buy for WooCommerce.
Installation
↑ Back to top- Download the .zip file from your WooCommerce account.
- Go to WordPress Admin > Plugins > Add New and upload the plugin file you have downloaded.
- Install Now and Activate.
More information at Install and Activate Plugins/Extensions.
Initial Setup:
↑ Back to topAfter activating the WooCommerce Try before you buy extension, the “Try before you buy” option will be displayed in the WooCommerce admin menu. Now you can configure the following settings:
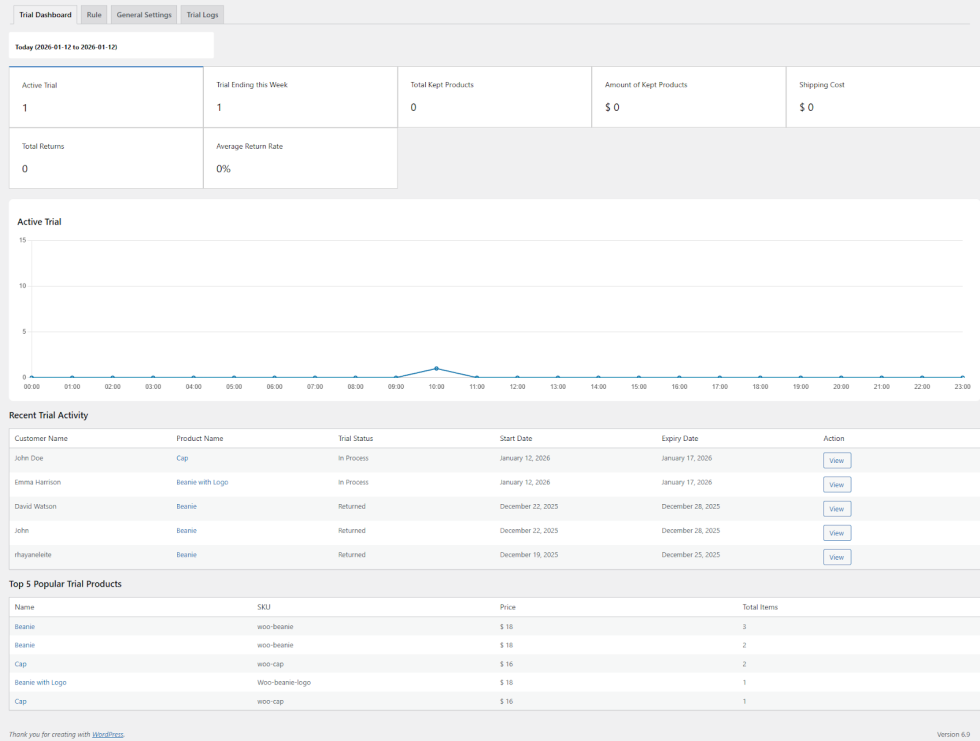
Trails Dashboard:
↑ Back to topOpen the trails dashboard, where you can monitor the:
- Activity Trails: Display the count of trail activity.
- Trail ending this week: Display the count of those trials that end this week.
- Total kept products: Show the count of total kept products.
- Amount of kept products: Display the total amount of products.
- Shipping cost: Display total shipping cost.
- Total Returns: Display the amount of total returns.
- Average Return Rate: Show the average return rate.
- Activity Trails: Display all trail activity in a graph.
How to Setup Try Before Buy Rules:
↑ Back to topClick on the Rules option to view all existing rules and create new ones.
All existing rules are displayed in a grid view, where you can easily review their details in a Grid.
Grid Details:
- Title: Show the title of the rules.
- Rule Status: Show the status of the rule.
- Trail periods (Days): Show the number of days for trial periods.
- Date: Show the date of rule creation.
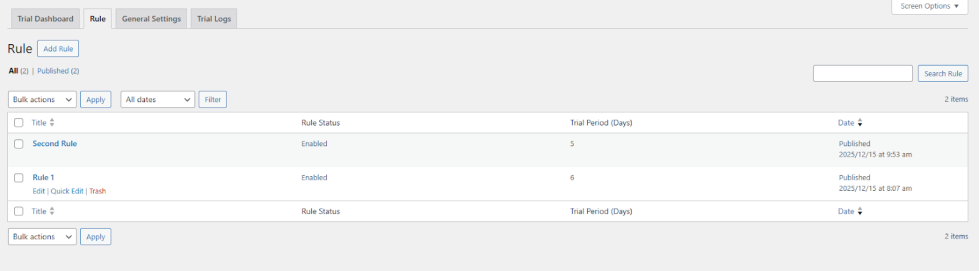
To create a new rule, you can click on the “Add New” button and add the following details:
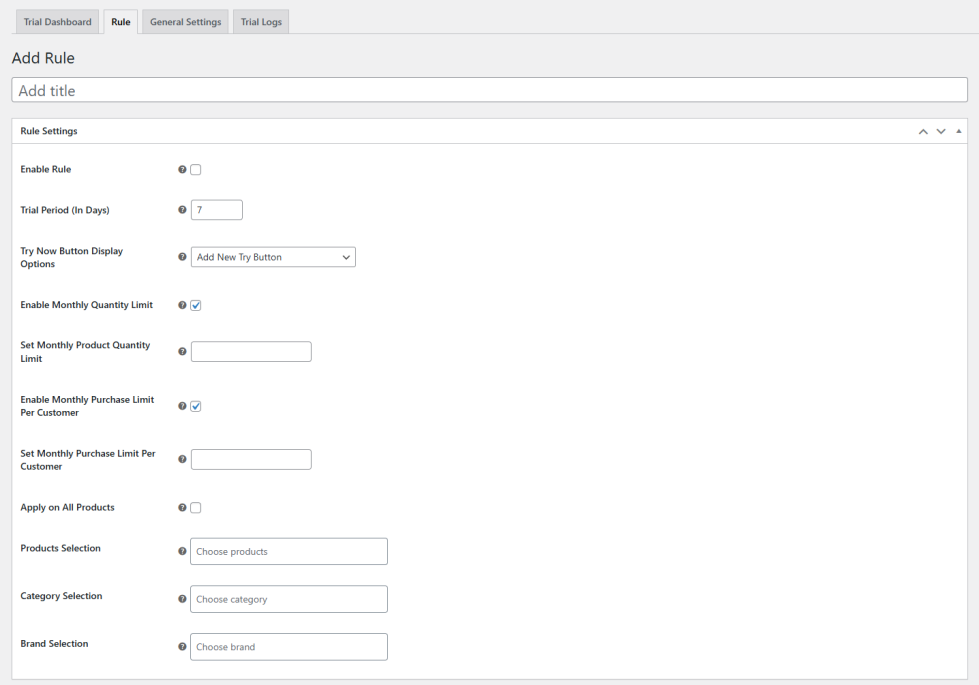
Add Rule:
Rule Title: Add hte custom title for the rule.
Rule Settings:
- Enable Rule: Easily enable or disable the rule based on your preference.
- Trial Period (In days): Add the total number
- Try now button display options: Set the option of the try now button from the dropdown.
- Enable monthly quantity Limit: Enable or disable the monthly quantity limit for trails. If enabled:
- Set the Monthly product Limit: Add the custom quantity for trial products.
- Enable Monthly Purchase limit per customer: Enable or disable the monthly purchase limit based on your preference. If enabled:
- Set the monthly purchase limit per customer: Add the custom monthly purchase limit for the customer.
- Apply to all products: Enable this option if you want to apply the rule to all products.
- Product Selection: Add the specific products where you want to apply the rule.
- Category Selection: Add the specific categories where you want to apply the rule.
- Brand Selection: Add the specific brand where you want to apply the rule.
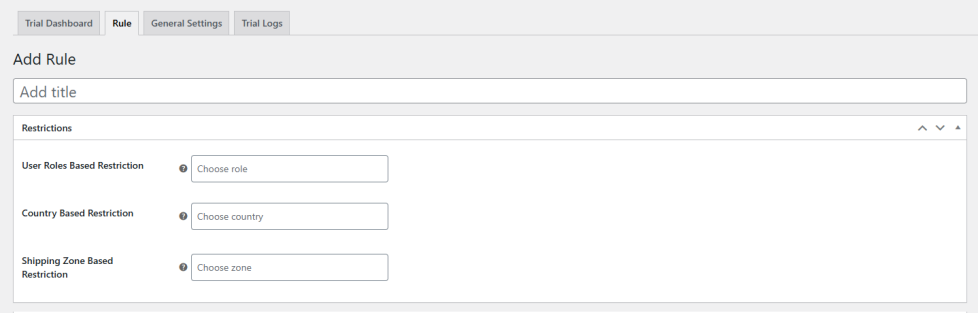
Restrictions:
- User Role based on Restriction: Choose the specific user role to apply the restriction.
- Country based Restriction: Choose the specific country or geographical location to apply the restriction.
- Shipping Zone-based Restriction: Choose the specific shipping zone to apply the restriction.
Custom Instruction:
- Custom Heading for Try Now Template: Add the custom text for the heading that is displayed at the top of Try Now Template.
- Custom Instruction for Try Now Template: Add the custom instruction that is displayed at the try now templates.

General Setting:
↑ Back to topIn a general setting, you can configure the following settings:
Trial Settings
- Trial Period Priority: Set the trial period priority, such as maximum or minimum, from a dropdown.
- Start Trials When Order Status is: Add the order status when the customer starts the trial, such as processing, pending, etc.
- Trial Fee: Add the fee that is implemented during the trial period.

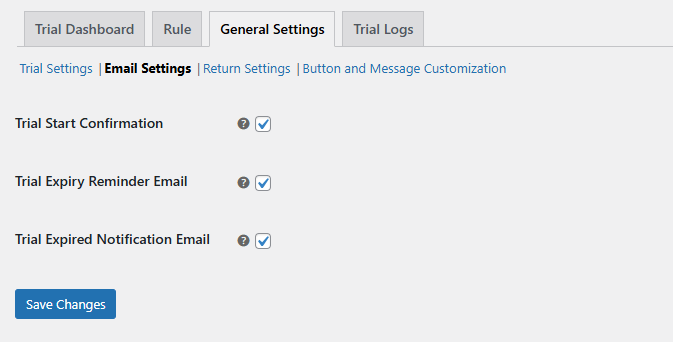
Email Settings
In the email setting you can configure the following settings:
- Trial Start Confirmation: Enable this if you want to send the email to the customer and admin when the trial period starts.
- Trial Expiry Reminder: Enable this if you want to send the reminder email for trial expiry.
- Trial Expired Notification Email: Enable this to send the trial expiry notification email.
Return Settings:
In the trials products return setting, you can:
- Enable file Uploads for Return request: Enable/Disable this option based on your requirements. If enabled:
- Allowed file types: Add the file type, such as jpg, png, or csv, that allows customers to upload for return.
- Allow custom return reason: Enable or disable this option. If enabled:
- Custom return reason: Add the custom reason for return.
- Name: Add the name of the return reason.
- Return Reason: Add the reason for return.
- Status: Add the status from the dropdown, such as active/inactive.
- Action: Edit or remove the reason as needed.
- Add New: Click Add New to create a new return reason.
- Custom return reason: Add the custom reason for return.

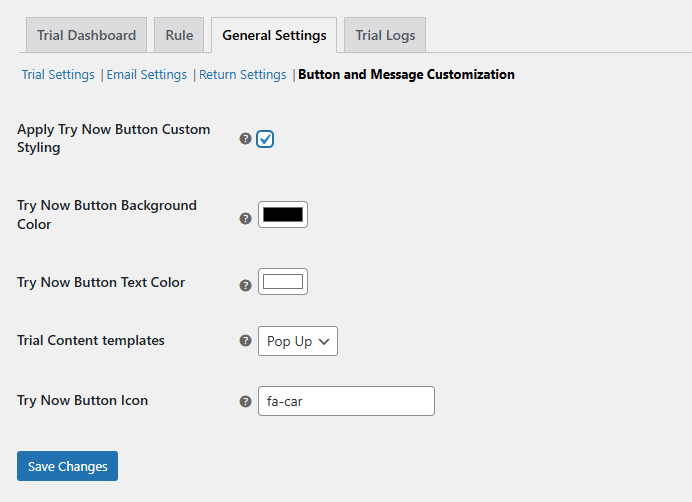
Button and Message Customization:
- Apply Try Now button custom styling: Enable/Disable this option based on your needs. If enabled:
- Try Button background color: Add a custom color for the button background.
- Try Now button text color: Add a custom color for the button text.
- Trials content templates: Select a template from the dropdown to define how the trial content should be displayed to the customer.
- Popup: Select this option to display the trial content in a pop-up window along with a “Try Now” button.
- In page: Select this option to display the trial content directly on the product page.
- Try now button icon: Add the icon for the Try Now button.
- Save Changes: Click on the save changes button to apply the updates.
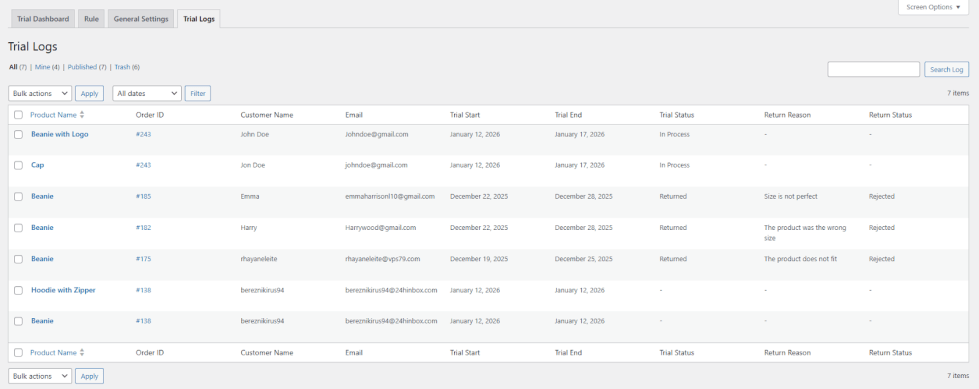
Trial Logs:
↑ Back to topMaintain the trail’s log in a grid view.
Grid Details:
- Product Name: Display the name of products.
- Order ID: Display the order ID.
- Customer Name: Display the customer name.
- Email: Display the email address.
- Trial Start: Display the trial start date.
- Trial End: Display the trial end date.
- Trail Status: Show the trail status.
- Return Reason: Show the reason of return.
- Return Status: Display the reason of status.