Availability Scheduler for WooCommerce allows store owners to schedule the product for specific date and time. They can set product availability scheduler on single product page and shop page.
After downloading the plugin from WooCommerce follow the below instructions to install & activate the plugin.
- Login to your WordPress website dashboard.
- Navigate to Plugins > Add New.
- Click the Upload Plugin button at the top of the screen.
- Upload the availability-scheduler.zip file you’ve downloaded from WooCommerce.com dashboard.
- Install and Activate the plugin.
After installing & activating the Availability Scheduler for WooCommerce extension, please find the Availability Scheduler menu in the admin menu.
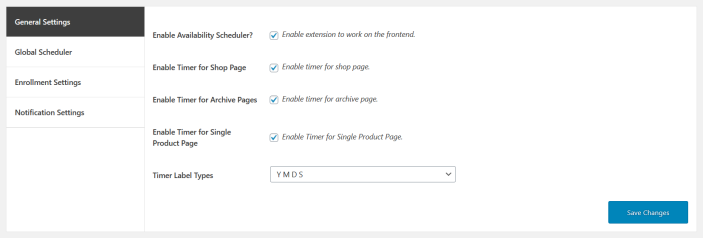
In the Availability Scheduler, general settings following settings will be available.
Enable Availability Scheduler? Allows store owners to enable/disable the extension to work on the frontend.
Enable Timer for Shop Page: The availability/unavailability scheduler helps you with a custom timer on your shop product. Whatever timing you want to set, registered customers will be notified by email.
Enable Timer for Archive Pages: It allows you to schedule custom timers for products on your archive pages to set products available or unavailable by schedule.
Enable Timer for Single Product Page: Admin can set enable/disable the Timer for a single product page.
Timer Label Types: When you allow for display countdown timer on the single product page, shop page, or archive page. You can choose the timer label as:
- Full Labels.
- D M H S (Days, minutes, hours, and seconds)

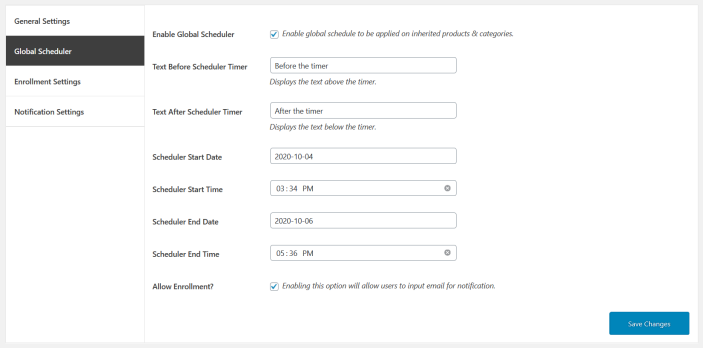
In the global settings you can see the following settings.
Enable Global Scheduler: The global scheduler works to enable or disable apply to inherited products and categories.
Text Before Scheduler Timer: It allows you to add a text which displays before/above the timer.
Text After Scheduler Timer: It allows you to add a text which displays after/below the timer.
Scheduler Start Date: Select the specific start date to display the timer.
Scheduler End Date: Select the specific date when the product will be available and the timer.
Scheduler Start Time: Select the start time for availability scheduler when your product will be available.
Scheduler End Time: Select the end time for scheduler when your product will be unavailable.
Allow Enrollment? When you enable this option will allow users to input the email for notification.


In the enrollment settings you can see the following settings.
Enrollment Success Message Text: In a success message, the admin types a success message in the text field.
Message Text For Email Duplicate: Add custom text for customers to receive a notification when they enter a duplicate email.
Notify button text: It contains a button that notifies the button text.
Allow Guest Users? Enabling this option will allow guest users to input the email for notification.

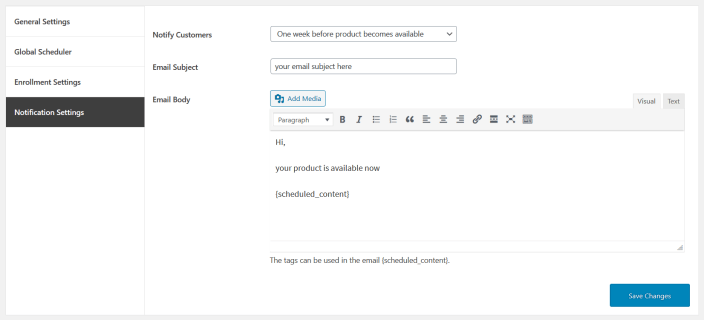
In the notification settings you can see the following settings.
Notify Customers: However, for product availability, you can send a notification to your customers in three ways:
- As soon as the product becomes available.
- One day before the product becomes available.
- One week before the product becomes available.
Product Scheduler
You can select the option from the drop-down for the product to enable the quantity settings.
Select Status Unique

When you select status as UNIQUE, then the product pricing rule set will be applied.
Select Status Disable
When you select status as DISABLE, then no pricing rules will be applied.
Rule Set For Product Category Scheduler: The rule set applies when inherited products settings.
 Global Rule Set For Product Scheduler:
 The rule set applies when inherited category settings.
Single Product page

Single product view for the scheduled product with custom text before and after the timer. You can also enroll by email to get notified when the product is available.
Shop page

Shop page product view for the scheduled product with custom text before and after the timer.


 In the enrollment settings you can see the following settings.
Enrollment Success Message Text: In a success message, the admin types a success message in the text field.
Message Text For Email Duplicate: Add custom text for customers to receive a notification when they enter a duplicate email.
Notify button text: It contains a button that notifies the button text.
Allow Guest Users? Enabling this option will allow guest users to input the email for notification.
 In the notification settings you can see the following settings.
Notify Customers: However, for product availability, you can send a notification to your customers in three ways:
 When you select status as UNIQUE, then the product pricing rule set will be applied.
Select Status Disable
When you select status as DISABLE, then no pricing rules will be applied.
Rule Set For Product Category Scheduler: The rule set applies when inherited products settings.
 Global Rule Set For Product Scheduler: The rule set applies when inherited category settings.
 Single product view for the scheduled product with custom text before and after the timer. You can also enroll by email to get notified when the product is available.
Shop page
 Shop page product view for the scheduled product with custom text before and after the timer.