Overview
↑ Back to topWooCommerce Customs Fees allows your WooCommerce store to automatically calculate and display import duties, customs fees, and taxes for international orders during checkout.
We are not tax professionals; our advice only applies to how to use our software. We recommend consulting a tax professional or accountant to ensure the correct fees are applied.
Requirements
↑ Back to top- WooCommerce version 9.0 or higher
- WordPress version 6.8 or higher
- PHP version 7.4 or higher
- MySQL version 5.6 or higher
Installation
↑ Back to topTo start using a product from WooCommerce.com, you can use the “Add to store” functionality on the order confirmation page or the My subscriptions section in your account.
- Navigate to My subscriptions.
- Find the Add to store button next to the product you’re planning to install.
- Follow the instructions on the screen, and the product will be automatically added to your store.
Alternative options and more information at:
Managing WooCommerce.com subscriptions.

Setup and Configuration
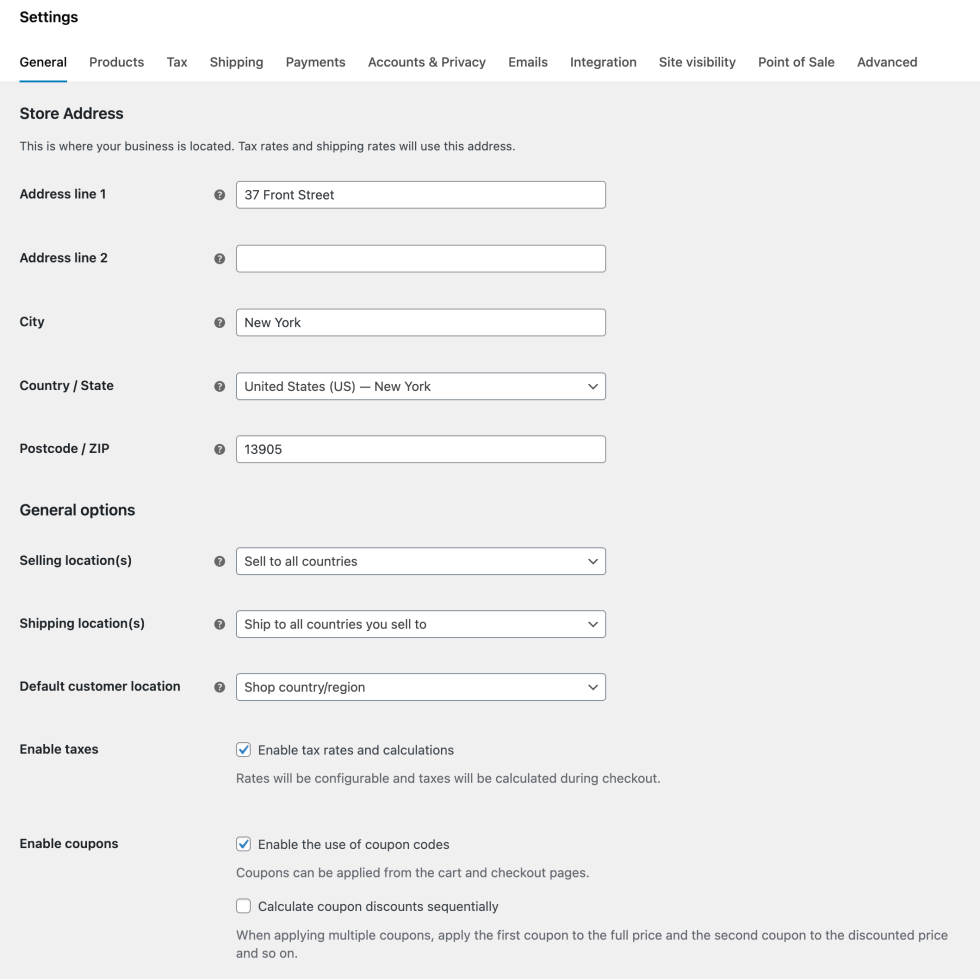
↑ Back to topEnable WooCommerce Tax: Go to WooCommerce > Settings > General and check Enable tax rates and calculations. Customs Fees will not work without tax calculations enabled.
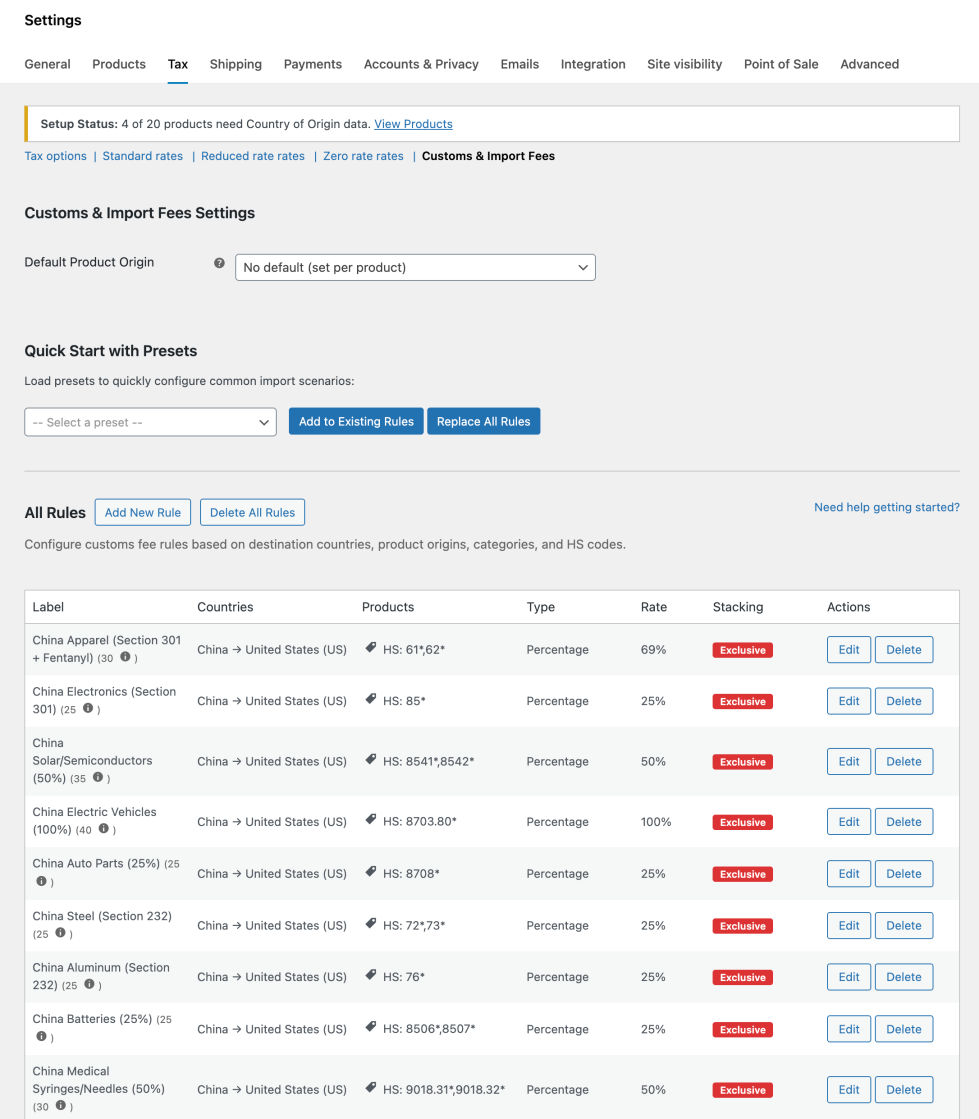
After enabling tax calculations, go to WooCommerce > Settings > Tax > Customs Fees. This is where you can configure the extension and set up the fees.
In short
↑ Back to topSet the default product origin country, this will apply to all new products unless you change it on the product. Then either manually add the fees, or use one of the presets. That’s it. Your fees will now be added. Make sure to verify this by testing it on the checkout page.
Note: Customs fees only apply to physical products. Digital/virtual products are automatically excluded from calculations.
Set the default product origin
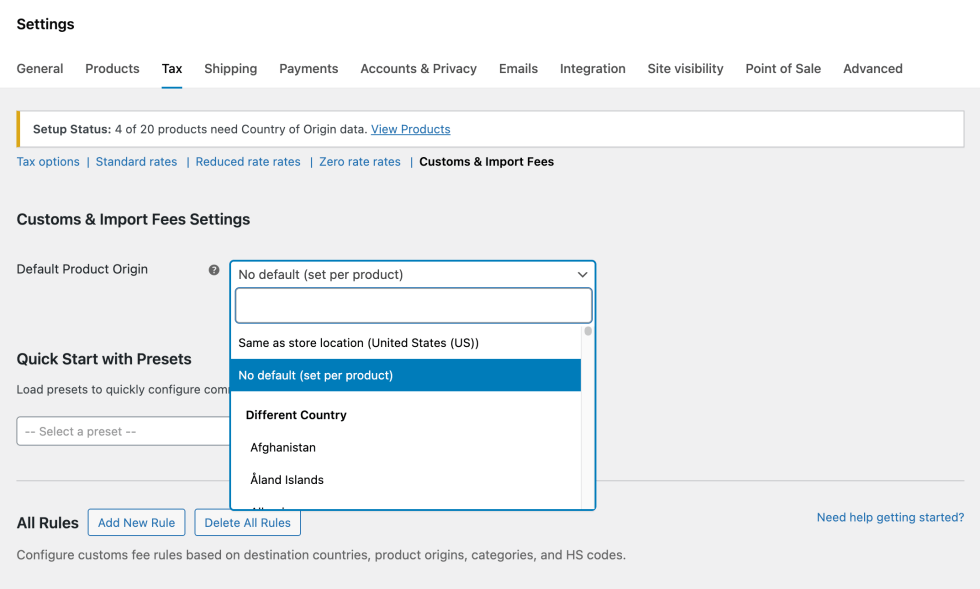
↑ Back to topAll products need to have their country of origin added for the right fees to be calculated. If no origin country is specified on the product, the “default product origin” country will be used.
Choose between:
- Same as store location (Recommended for single-location businesses)
- Automatically uses your WooCommerce store address as the origin.
- Perfect if you ship everything from one location.
- Updates automatically if you change your store address.
- No default (For multi-supplier stores)
- No automatic default, requires manual origin for each product.
- Best when products ship from various locations.
- Prevents incorrect fee calculations from assumed origins.
- Different country (For dropshipping or specific warehouses)
- Select a specific country as your default origin.
- Useful when your inventory is in a different country than your business.
- Example: Store in UK, but warehouse in Germany.
CIF Customs Valuation
↑ Back to topMany countries calculate customs duties based on CIF (Cost, Insurance, Freight) value rather than just the product value. Version 1.1.3 introduces support for CIF-based customs calculations.
What is CIF?
↑ Back to topCIF stands for Cost, Insurance, and Freight. Under CIF valuation:
- FOB (Free On Board): Customs value = Product price only (default).
- CIF (Cost, Insurance, Freight): Customs value = Product price + Shipping costs.
Enable CIF Valuation
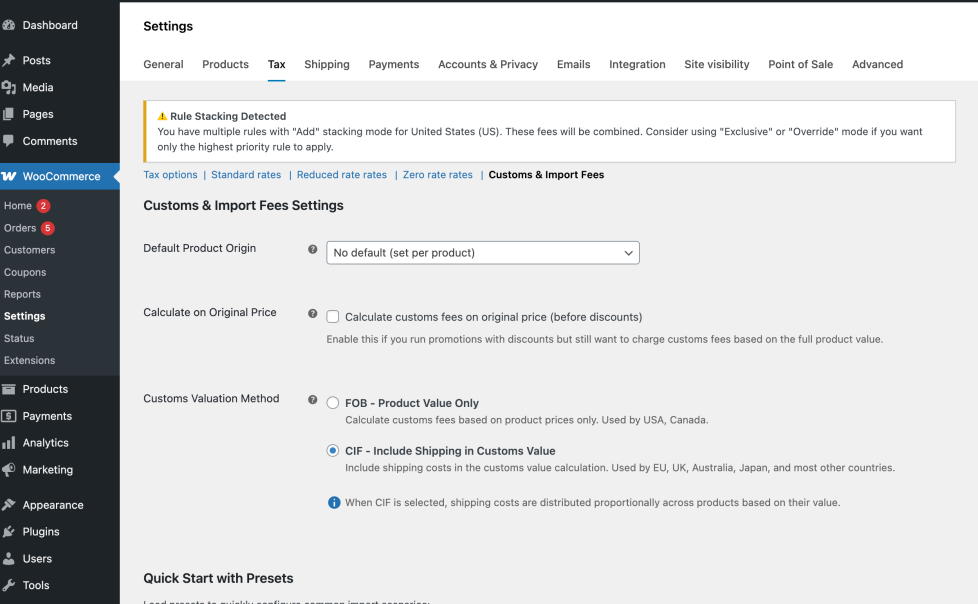
↑ Back to top- Go to WooCommerce > Settings > Tax > Customs & Import Fees.
- Find the Customs Valuation Method setting.
- Choose your valuation method:
- FOB – Product Value Only: Calculate customs fees on product prices only (default, US/Canada).
- CIF – Include Shipping in Customs Value: Include shipping costs in the customs value calculation
How CIF Calculation Works
↑ Back to topWhen CIF is enabled, shipping costs are distributed proportionally across products based on their value:
Example:
- Product A: $100 (50% of cart)
- Product B: $100 (50% of cart)
- Shipping: $20
- Customs duty rate: 25%
FOB Calculation:
Customs Value (A) = $100
Customs Value (B) = $100
Total Customs Fee = ($100 + $100) × 25% = $50.00
CIF Calculation:
Customs Value (A) = $100 + ($20 × 50%) = $110
Customs Value (B) = $100 + ($20 × 50%) = $110
Total Customs Fee = ($110 + $110) × 25% = $55.00
Important Notes
- CIF only applies to physical products that require shipping.
- Virtual/downloadable products are automatically excluded.
- The same rules and percentages apply – only the calculation base changes.
- Existing orders are not affected – CIF only applies to new orders.
- If shipping is free or $0, CIF behaves the same as FOB.
Insurance Integration for CIF
↑ Back to topFor countries that include insurance in CIF calculations (CIF = Cost + Insurance + Freight), the extension provides a filter hook for integration with third-party insurance plugins.
Using the Insurance Filter Hook
↑ Back to topIf you use a shipping insurance plugin (like Shipping Insurance Manager), you can integrate it with customs calculations:
/**
 * Integrate shipping insurance with CIF customs calculations.
 *
 * @param float  $insurance_value   Default insurance value (0).
 * @param float  $product_value     Product line total.
 * @param string $insurance_method  Current setting (percentage, flat, disabled).
 */
add_filter( 'cfwc_insurance_value', function( $insurance_value, $product_value, $method ) {
    // Example: Get insurance from another plugin
    if ( function_exists( 'get_cart_insurance_amount' ) ) {
        $total_insurance = get_cart_insurance_amount();
        $cart_subtotal   = WC()->cart->get_cart_contents_total();

        // Return proportional share for this product
        if ( $cart_subtotal > 0 ) {
            return ( $product_value / $cart_subtotal ) * $total_insurance;
        }
    }

    return $insurance_value;
}, 10, 3 );
Quick Start with Presets
↑ Back to topSome known customs fees are already added to the extension. Select the ones that apply to your store and customer base.
Note: Fees are subject to change and you are responsible for making sure that the right fees apply.
Create fee rules
↑ Back to topHow do fees calculations work?
↑ Back to topCustoms Fees calculates fees per rule at the checkout. The extension reviews all rules that apply to products in the basket based on the destination, it looks at the priority and the calculation type. It then:
- Groups all fees that come from the same rule (to bundle them under the same label at the checkout)
- Shows the total fees at the checkout
Example:
- 3x Blue T-shirt from China → USA (each gets 25% duty).
- 2x Smartwatch from China → USA (each gets 25% duty).
- Display at checkout:
- China Import Duty (25%) x 3: $45.00
- China Import Duty (25%) x 2: $50.00
- Total Customs Fees: $95.00
Note: At the moment, the detailed fee breakdown is only displayed in the legacy shortcode-based cart and checkout pages. If you’re using the block-based cart and checkout, customers will see a single combined total for all customs fees.
Add rules
↑ Back to top- Go to: All Rules > Add New Rule
- Choose a label name. This is what your customers will see at the checkout, so it’s best to be as clear as possible. For example, “Footwear from China”.
- Add a priority. A higher number means a higher priority, which means that this rule is first considered before any other rules that also match with the product
- Select the country of origin (where the product was made) and the destination country (where the product is shipped to).
- Select the rule type:
- All Products will add a fee that’s added to all products
- By Category will only add a fee to products from that category –> add the category you want it to apply to
- By HS Code will only add a fee to products with a matching code on the product. HS Codes are an internationally agreed classification system to identify product types. For example, Lithium batteries would get
8506,8507added. - By Category + HS Code will only add a fee to products matching both the category and the HS code. This is for very specific matching.
- Choose the calculation type: percentage or absolute.
- Add the rate.
- Choose the stacking mode:
- Add (default) means that these fees will be added with all other matching rules. For example: 10% + 5% = 25%.
- Override means that a rule with a higher priority will replace a lower priority. This is best used for exceptions to general rules.
- Exclusive means that the first matching rule (highest priority) will apply without any other rules further being considered.
Some examples on fee calculation based on priority and stacking mode
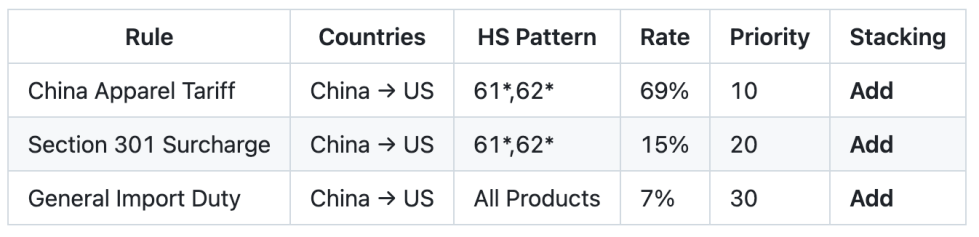
↑ Back to topExample 1: Add Mode
Calculation Process:
- Step 1: Find all matching rules
- China Apparel Tariff (HS 61* matches) – 69%
- Section 301 Surcharge (HS 61* matches) – 15%
- General Import Duty (All Products) – 7%
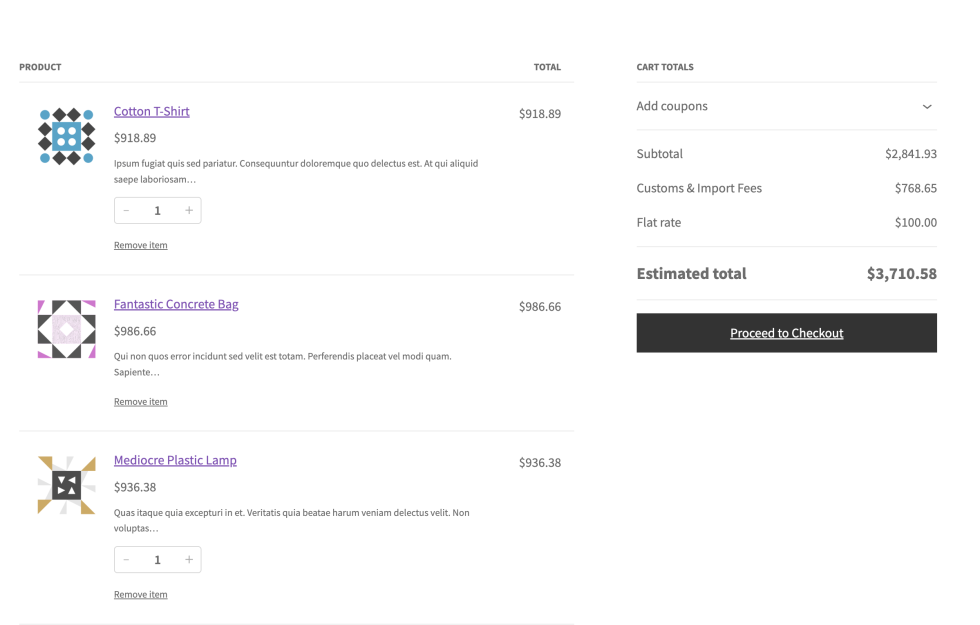
- Step 2: Each matching rule creates its own fee line item (Add mode)
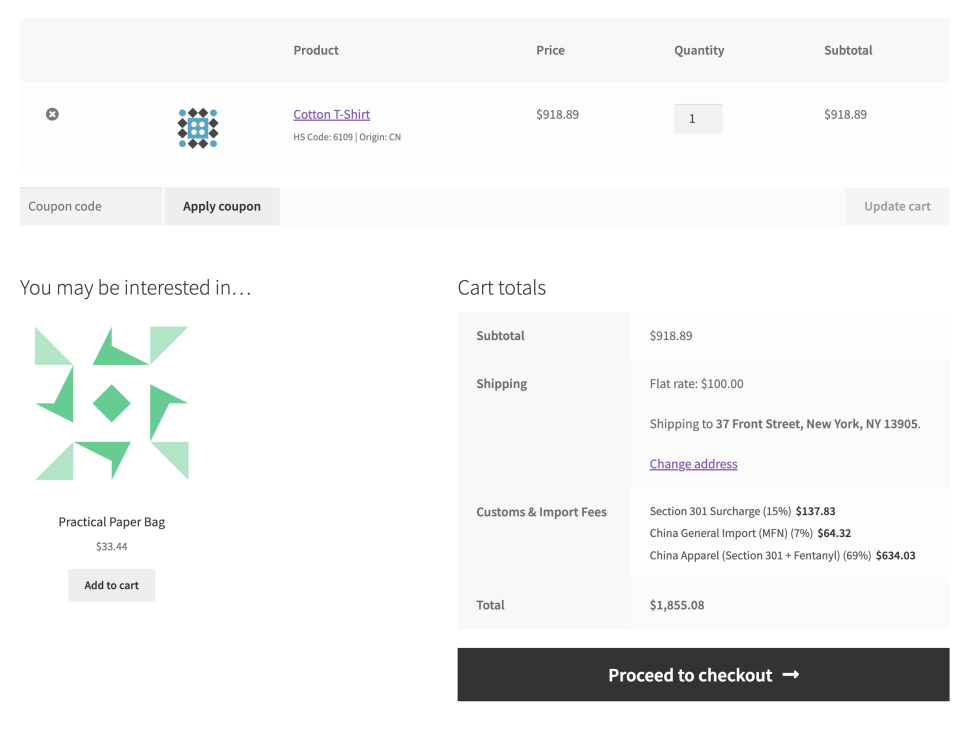
- China Apparel: $918.89 × 69% = $634.03
- Section 301 Surcharge: $918.89 × 15% = $137.83
- China General Import: $918.89 × 7% = $64.32
- Step 3: All fees are added to create total customs charges
- Total Customs & Import Fees = $918.89 + $137.83 (15%) + $64.32 (7%) + $634.03 (69%) + $100 = $1,855.08
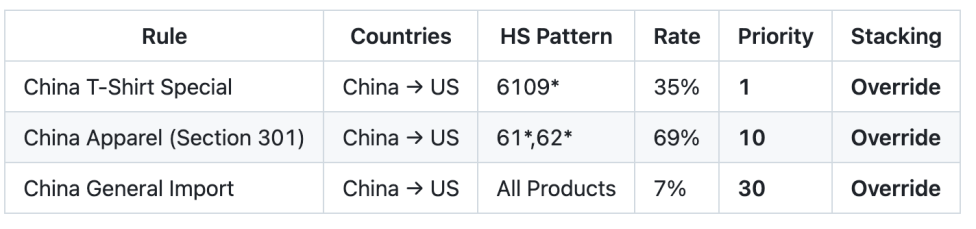
Example 2: Override Mode
Calculation Process:
- Step 1: Find all matching rules
- China T-Shirt Special (HS 6109* matches) – Priority 1
- China Apparel (HS 61* matches) – Priority 10
- China General Import (All Products) – Priority 30
- Step 2: Apply ONLY the highest priority rule (lowest number)
- Winner: China T-Shirt Special (Priority 1) – 35%
- Ignores: 69% apparel rate and 7% general rate
- Step 3: Calculate fee
- Total Customs & Import Fees = $918.89 + $321.61 (35%) + $100 = $1,340.50
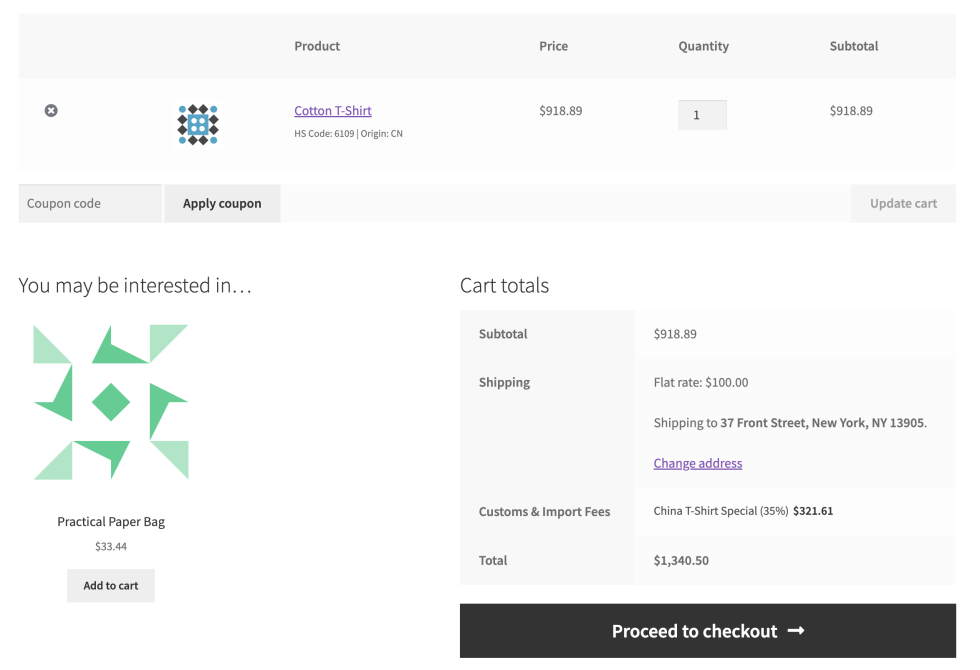
Note: Override mode is useful for special exemptions or negotiated rates.
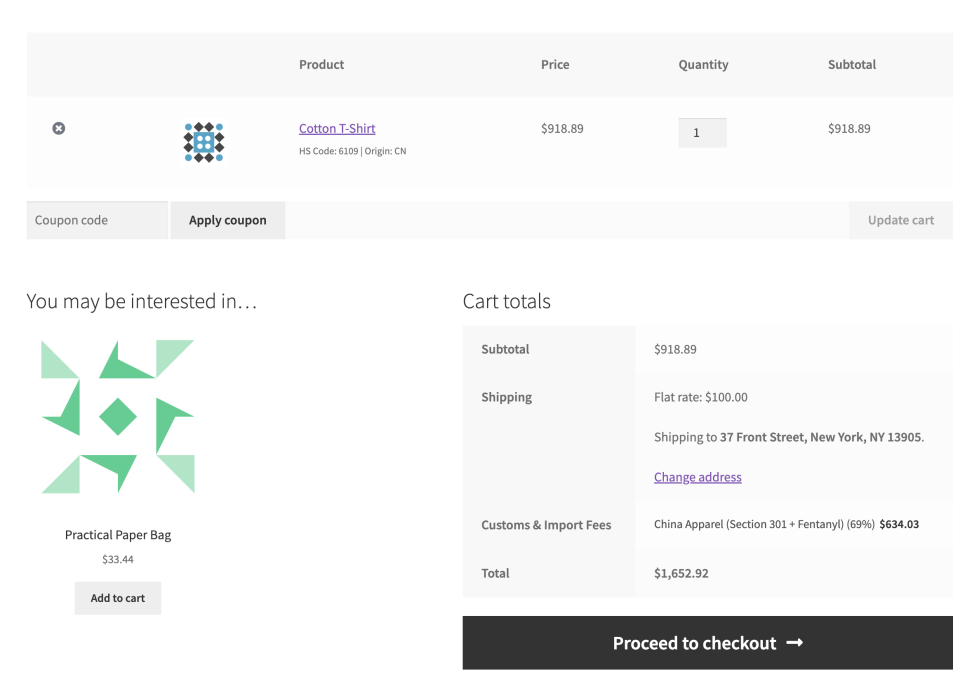
Example 3: Exclusive Mode

Calculation Process:
- Step 1: Find all matching rules
- China Apparel (HS 61,62 matches 6109) – Specific pattern
- China General Import (All Products) – General fallback
- Step 2: Sort rules by priority and specificity
- Sorts by HIGHER priority numbers first (30 > 5)
- If priorities were equal, specificity would be the tiebreaker.
- Sorted order: [China Apparel (30), China General Import (5)]
- Step 3: Apply FIRST rule from sorted list
- Winner: China Apparel (69%) – First in sorted list.
- Exclusive mode returns immediately with first rule.
- Step 4: Calculate fee
- Total Customs & Import Fees = $918.89 + $634.03 (69%) + $100 = $1,652.92
Add product-specific information
↑ Back to topIn most cases, a default origin country, combined with rules that apply on all products or on product categories will be sufficient to configure the rules. However, in some cases, you will want to add information on a product level so more exclusive rules can be applied.
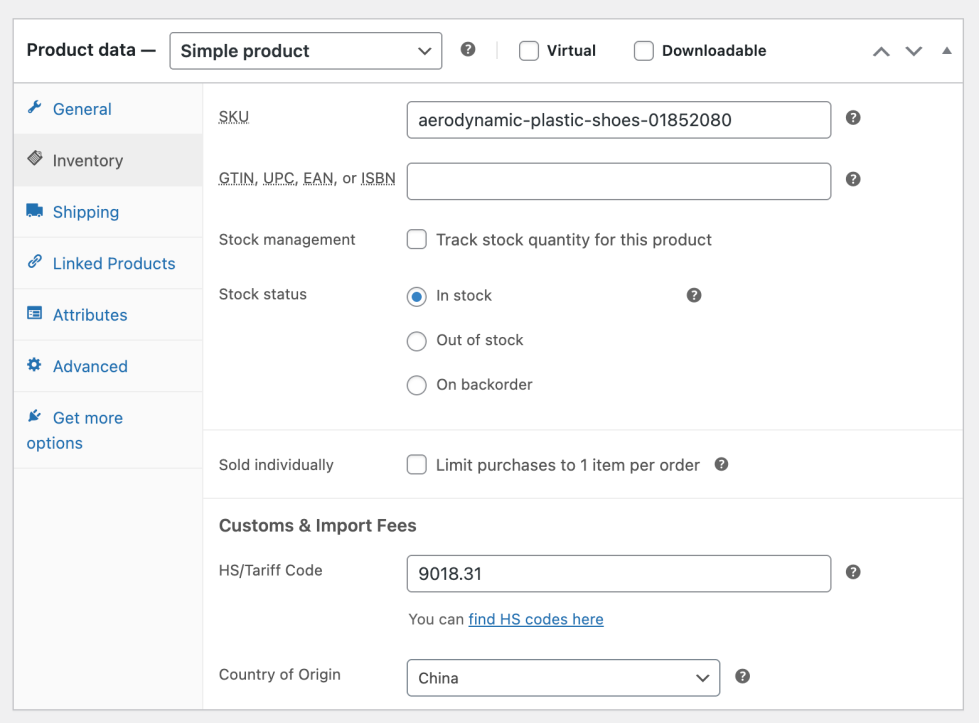
Edit a single product
↑ Back to topVia the product edit screen
- Go to Products > All Products, and edit the product
- Go to Product data > Inventory.
- There you can add the following information:
- HS/Tariff Code. Enter the 6 to 10 digit Harmonized System code.
- Country of Origin. Override the default country of origin you’ve added in the Customs Fees settings. This product-specific country will always get the priority.
- Select Update.
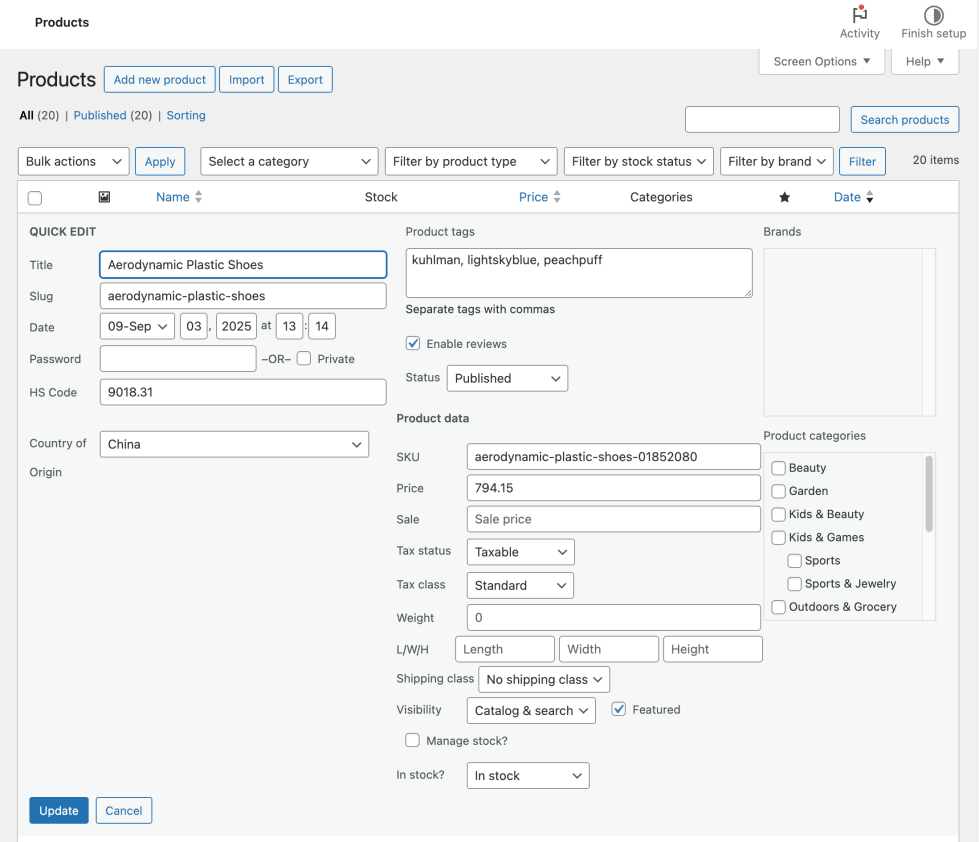
Via Quick Edit
- Go to Products > All Products.
- Hover over a product and click Quick Edit.
- Update the HS Code and/or Country of Origin.
- Select Update.
Bulk update products
↑ Back to topVia All Products
- Go to Products > All Products.
- Select multiple products with the checkboxes.
- Choose Edit from Bulk Actions dropdown.
- Add a HS Code and/or Country of Origin for all selected.
- Click Update.
Via CSV export/import
↑ Back to top- Export your products using these instructions.
- When Customs Fees is enabled, two columns will be added: HS Code and Country of Origin. You can edit them there per product. Note: Country uses a two-letter country code.
- Save your changes as CSV (UTF-8 encoding recommended).
- Import the updated products using the instructions linked to above.
A little more on HS codes
↑ Back to topHarmonized System Codes (or: HS Codes) are a way for countries to talk about exporting and importing goods in an organized — or harmonized — way. Basically, an HS code should tell the customs official instantly what type of product is in the shipment. This means that identifying what duties should apply, what measures should be taken, whether the product can legally be imported, etc. is made easy. Adding HS Codes to your international shipping will likely improve the import process resulting in a faster delivery and a more accurate customs charge.
HS Codes best practices
↑ Back to top- Use six-digit codes minimum (8507.60).
- More digits mean more precise classification.
- Refer to your country’s customs tariff schedule.
- Common HS codes:
- 6109: T-shirts and singlets.
- 8517: Smartphones.
- 9503: Toys.
- 8471: Computers.
Where to find HS codes?
↑ Back to top- International: https://www.wcotradetools.org/en/harmonized-system
- United States: https://hts.usitc.gov/
- European Union: https://ec.europa.eu/taxation_customs/dds2/taric/taric_consultation.jsp
- United Kingdom: https://www.trade-tariff.service.gov.uk/find_commodity
- Canada: https://www.cbsa-asfc.gc.ca/trade-commerce/tariff-tarif/menu-eng.html
Developer reference
↑ Back to topOverride calculations for specific conditions:
add_filter( 'cfwc_calculated_single_fee', function( $fee, $rule, $total ) {
    // Apply 50% discount for orders over USD $1000
    if ( WC()->cart->subtotal > 1000 ) {
        $fee = $fee * 0.5;
    }
    return $fee;
}, 10, 3 );
Filters
↑ Back to topFee Calculation Filters
// Modify all calculated fees before they're applied
apply_filters( 'cfwc_calculated_fees', $fees, $destination_country, $cart );

// Modify a single fee calculation
apply_filters( 'cfwc_calculated_single_fee', $fee, $rule, $total );

// Customize fee label displayed at checkout
apply_filters( 'cfwc_fee_label', $label, $rule, $country, $origin );

// Filter if fee should be taxable
apply_filters( 'cfwc_fee_taxable_default', true, $rule );

// Filter fee tax class
apply_filters( 'cfwc_fee_tax_class_default', '', $rule );
Product & Origin Filters
// Override product origin country
apply_filters( 'cfwc_product_origin', $origin, $product_id, $product );

// Modify the customs value (for CIF calculations)
apply_filters( 'cfwc_customs_value', $customs_value, $line_total, $cart_item, $method );

// Provide insurance value for CIF calculations
apply_filters( 'cfwc_insurance_value', $insurance_value, $product_value, $method );
Rules Filters
// Filter rules for a specific country
apply_filters( 'cfwc_rules_for_country', $country_rules, $country );

// Filter all available rules
apply_filters( 'cfwc_all_rules', $rules );

// Filter countries available for rules
apply_filters( 'cfwc_countries_for_rules', $countries );

// Filter preset templates
apply_filters( 'cfwc_preset_templates', $templates );
Configuration Filters
// Include shipping in cart total calculations
apply_filters( 'cfwc_include_shipping_in_calculation', true );

// Include taxes in cart total calculations
apply_filters( 'cfwc_include_taxes_in_calculation', false );

// Enable detailed calculation logging
apply_filters( 'cfwc_enable_calculation_logging', false );

// Control data removal on uninstall
apply_filters( 'cfwc_uninstall_remove_data', true );
Actions
↑ Back to top// After cache is cleared
do_action( 'cfwc_cache_cleared' );Code Examples
↑ Back to topOverride product origin for specific products:
add_filter( 'cfwc_product_origin', function( $origin, $product_id, $product ) {
    // Force all products in category 'electronics' to use 'CN' origin
    if ( has_term( 'electronics', 'product_cat', $product_id ) ) {
        return 'CN';
    }
    return $origin;
}, 10, 3 );
Country-specific CIF override:
add_filter( 'cfwc_customs_value', function( $customs_value, $line_total, $cart_item, $method ) {
    $destination = WC()->customer->get_shipping_country();

    // Force FOB for US/Canada even if CIF is enabled globally
    if ( in_array( $destination, array( 'US', 'CA' ), true ) ) {
        return $line_total; // Return product value only
    }

    return $customs_value;
}, 10, 4 );
Integrate third-party insurance for CIF:
add_filter( 'cfwc_insurance_value', function( $value, $product_value, $method ) {
    // Calculate 2% insurance for all products
    return $product_value * 0.02;
}, 10, 3 );
Hide country of origin from order emails:
// Hide Country of Origin from order emails.
add_filter( 'cfwc_show_origin_in_email', '__return_false' );
Troubleshooting
↑ Back to topMost of the errors you will see in calculations will be connected to the configuration. Testing the rules and figuring out which — potentially conflicting — rules are adding to the wrong calculation will be the first thing to do.
The extension logs can help you with detailed information on that. When WP_DEBUG is enabled, the extension logs detailed information:
- Edit
wp-config.php - Add these lines.
- Check logs at
/wp-content/debug.log
define( 'WP_DEBUG', true );
define( 'WP_DEBUG_LOG', true );
define( 'WP_DEBUG_DISPLAY', false );
Note: Unlike some WooCommerce extensions, Customs Fees logs do not appear in WooCommerce > Status > Logs. This extension uses WordPress debug logging for development diagnostics rather than WooCommerce’s logger system. To view logs, you need to access the debug.log file directly via FTP or your hosting file manager.
What gets logged:
- Any errors or configuration issues.
- Which rules matched each product.
- Fee calculation details with amounts.
- Priority and stacking decisions.
- Origin country lookups.
Common issues and solutions
↑ Back to topDo customers pay these fees at checkout?
↑ Back to topYes, customers pay these fees as part of their order total. When customs fees are calculated, they’re added to the WooCommerce cart and become part of the total payment collected at checkout. These are NOT informational-only fees.
This also means that customers will expect you to pay for these fees upfront so the shipment does not get stuck at the border.
Can I have different fees for different states or regions?
↑ Back to topCurrently, the extension only supports country-level rules. While you could theoretically use the cfwc_calculated_fee filter to check customer state via WC()->customer->get_billing_state(), this isn’t built-in functionality. State/region-specific fees would require custom development.
How accurate are the fee calculations?
↑ Back to topThey are very accurate, but only based on your rules. Keep rules updated with current customs regulations and use precise HS codes.
Can products have multiple HS codes?
↑ Back to topNo. Each product can have one HS code. For products fitting multiple categories, choose the most specific applicable code.
What happens if no rules match a product?
↑ Back to topNo customs fees are added. Products without matching rules are assumed to have no customs requirements. Create general import rules (match type: “All Products”) as fallbacks if needed.
Can I exclude certain products from all fees?
↑ Back to topYes, create a rule with:
- Priority: 1 (highest)
- Stack Mode: Exclusive
- Fee Amount: 0
- Target specific products via category or HS code.
Is it compatible with other tax plugins?
↑ Back to topYes. Customs fees are added as WooCommerce fees (not taxes) and calculate independently from tax plugins.
Does it work with multicurrency plugins?
↑ Back to topThe extension uses WooCommerce’s base currency for calculations. Compatibility depends on whether your multicurrency plugin properly converts WooCommerce fees.
Can I customize the fee display format?
↑ Back to topYes, use the cfwc_fee_label filter. Here’s the code example for the developer reference:
add_filter( 'cfwc_fee_label', function( $label, $rule, $country, $origin ) {
    // Add emoji prefix to all customs fees
    return '🌍 ' . $label;
}, 10, 4 );
Why do some products show duplicate fees?
↑ Back to topCheck for overlapping rules with “Add” stacking mode. Consider using “Override” or “Exclusive” mode.
Fees disappeared after updating WooCommerce?
↑ Back to top- Clear all caches (browser, plugin, server).
- Verify the plugin is still active.
- Check that tax calculations are still enabled.
- Confirm your rules are still present and active.
How do I completely remove all fees temporarily?
↑ Back to topYou can either deactivate the extension or delete all rules in the settings.
Note: This only affects new orders. Existing orders retain their recorded fees.
Why do some products show grouped fees (e.g., “x 3”)?
When multiple products match the same rule, fees are grouped for clarity. For example, three shirts with the same 25% duty show as “Import Duty (25%) x 3” instead of three separate lines.
Will enabling CIF affect my existing orders?
↑ Back to topNo. CIF only affects new orders placed after you enable it. Existing order data remains unchanged.
Can I use different valuation methods for different countries?
↑ Back to topCurrently, the valuation method is a global setting. However, you can use the cfwc_customs_value filter to implement country-specific logic. See the “Country-specific valuation override” code example above.
How do I add insurance to CIF calculations?
↑ Back to topUse the cfwc_insurance_value filter to integrate with your insurance solution. See the “Insurance Integration for CIF” section above.
Does the fee breakdown show shipping separately in CIF mode?
↑ Back to topNo. When CIF is enabled, the shipping cost is included in the customs value calculation, but customers see the same fee display as before. The fee label and amount reflect the total calculated duty – the breakdown of how it was calculated (product + shipping) is handled internally.
What happens if shipping is free?
↑ Back to topIf shipping costs are $0 (free shipping), CIF behaves exactly the same as FOB since there’s no shipping cost to add to the customs value.
Does CIF work with all shipping methods?
↑ Back to topYes. CIF works with any shipping method that provides a shipping total to WooCommerce, including:
- Flat rate shipping
- Table rate shipping
- Live carrier rates (UPS, FedEx, etc.)
- Free shipping (behaves same as FOB)
Questions and support
↑ Back to topSomething missing from this documentation? Still have questions and need assistance?
- If you have a question about a specific extension or theme you’d like to purchase, contact us to get answers.
- If you already purchased this product and need some assistance, get in touch with a Happiness Engineer via our support page and select this product’s name from the Product dropdown.